Samsung Electronics Co 04DELTA2 Digital Camcorder User Manual
Samsung Electronics Co Ltd Digital Camcorder Users Manual
UserManual.wiki
>
Samsung Electronics Co
>
04DELTA2 User Manual
Users Manual
Navigation menu
Upload a User Manual
Namespaces
Wiki Guide
HTML
PDF
Info
Views
User Manual
Discussion / Help
Navigation


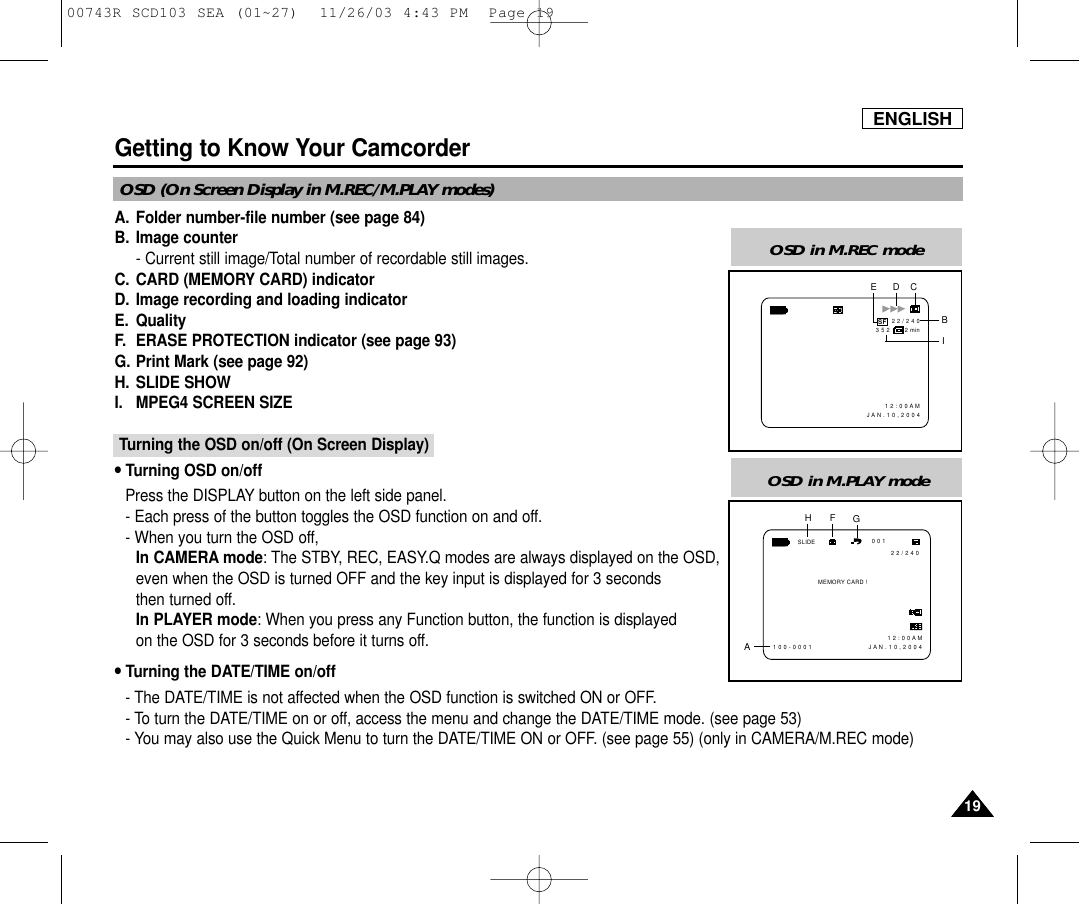
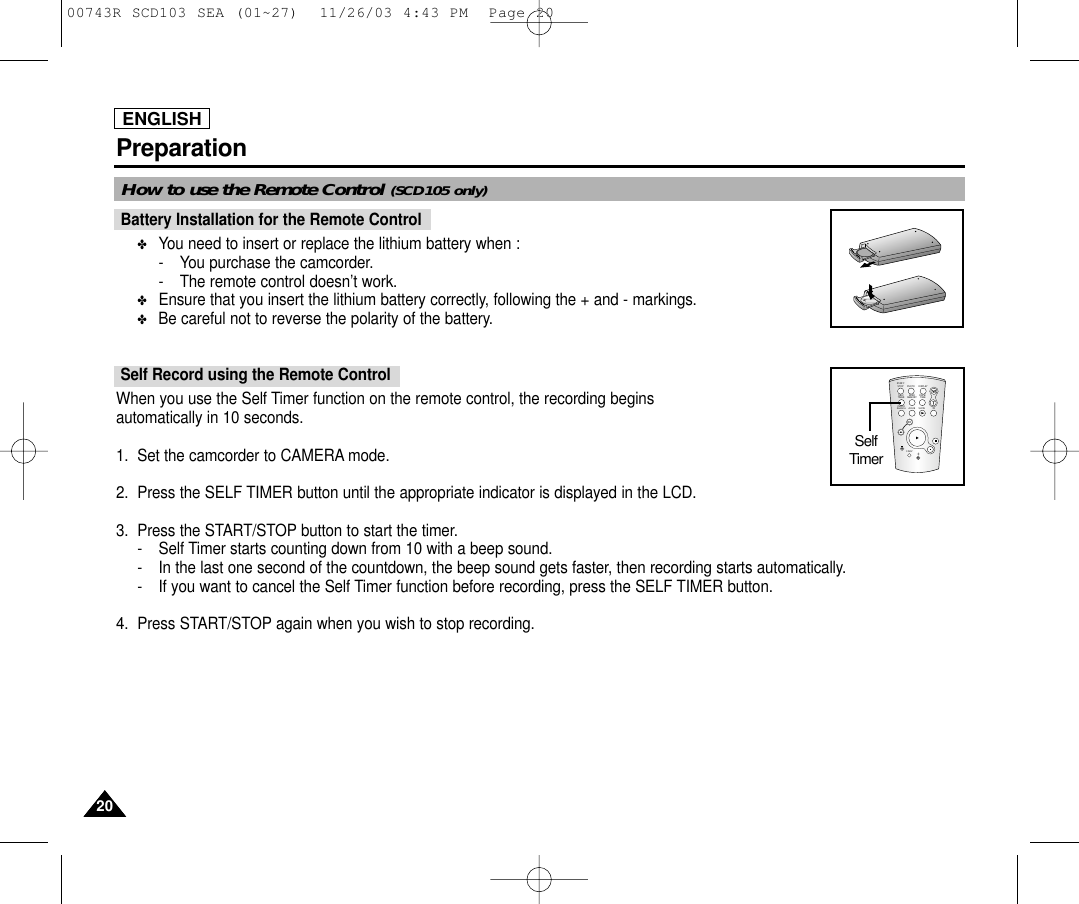
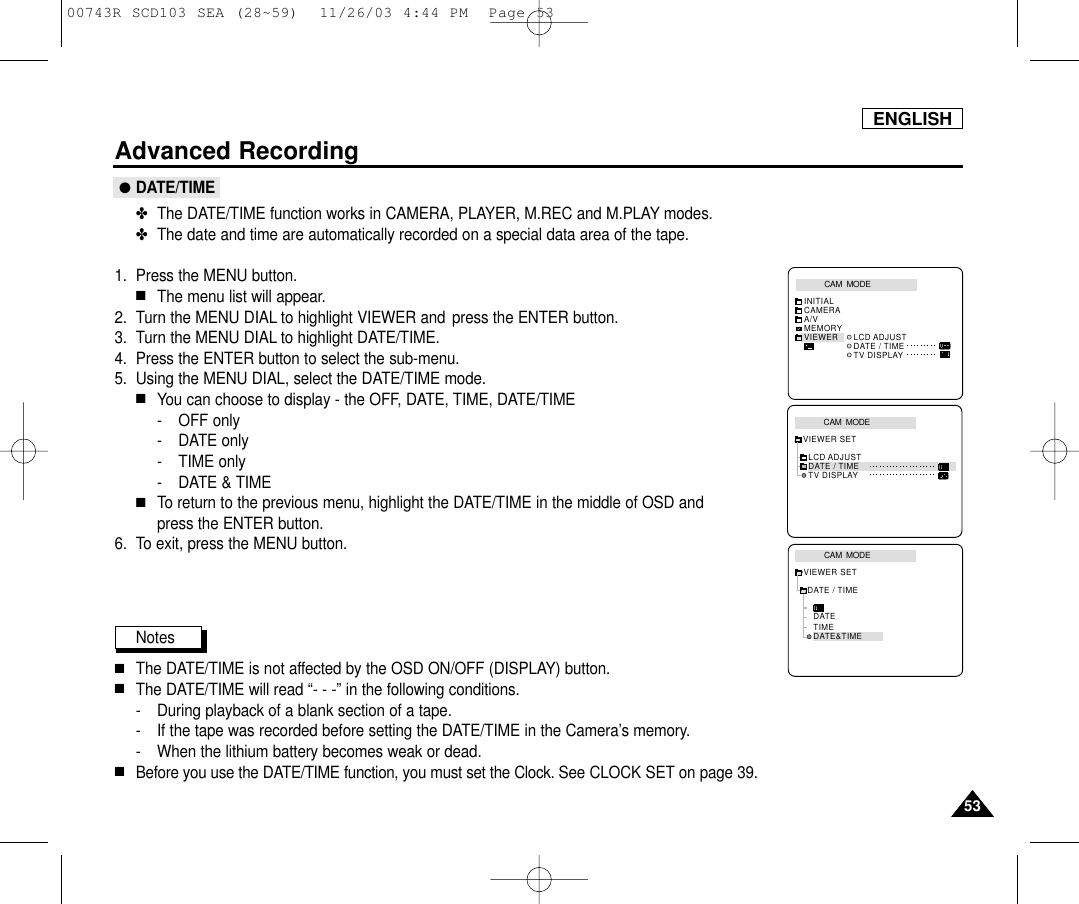
![ENGLISHGetting to Know Your Camcorder1818OSD (On Screen Display in CAMERA and PLAYER modes)1. Battery level (see page 26)2. Easy mode (see pages 59)3. DSE (Digital Special Effects) mode (see page 48)4. Program AE (see page 42)5. White Balance mode (see page 44)6. BLC (Back Light Compensation) (see page 61)7. Manual focus (see page 60) 8. Shutter speed and EXPOSURE (see page 57)9. Zoom position (see page 45)10. NITE PIX (see page 66) 11. DATE/TIME (see page 53)12. USB13. WL. REMOTE (SCD105 only)14. WIND CUT (see page 52)15. Audio recording mode (see page 51)16. Zero memory indicator (SCD105 only) (see page 74)17. Remaining Tape (measured in minutes) 18. Tape Counter19. Operating mode20. Record speed mode21. PHOTO mode22. Self recording and waiting timer (SCD105 only) (see page 20) 23. DIS (see page 47)24. Volume control (see page 35)25. Audio playback channel26. DV IN(DV data transfer mode) (see page 78)27. DEW (see page 7)28. Message Line29. PB DSE (see page 75)30. PB ZOOM/ENTER (see page 76)31. POWER NITE PIX (see page 67)32. Tele MACRO (see page 45)OSD in CAMERA modeTAPE !NIGHT CAPTUREMFMIRRORSHUTTER PZOOMEXPOSUREEASY M - 0 : 0 0 : 0 0 5 5 min1 6 bit1 2 : 0 0 A M JAN . 10 , 2 0 0 4RECEXPOSURESHUTTERBLC1236457319823 2232 21 20 191615141312111028OSD in PLAYER mode. . . CSOUND [ 2 ]MIRRORENTER : PB ZOOM1.2xM - 0 : 0 0 : 0 0 5 5 min1 6 bitVOL. [ 1 1 ]DV1 2 : 0 0 A M J A N . 1 0 , 2 0 0 425302930282721 20 192624 11181700743R SCD103 SEA (01~27) 11/26/03 4:43 PM Page 18](https://usermanual.wiki/Samsung-Electronics-Co/04DELTA2/User-Guide-384205-Page-24.png)

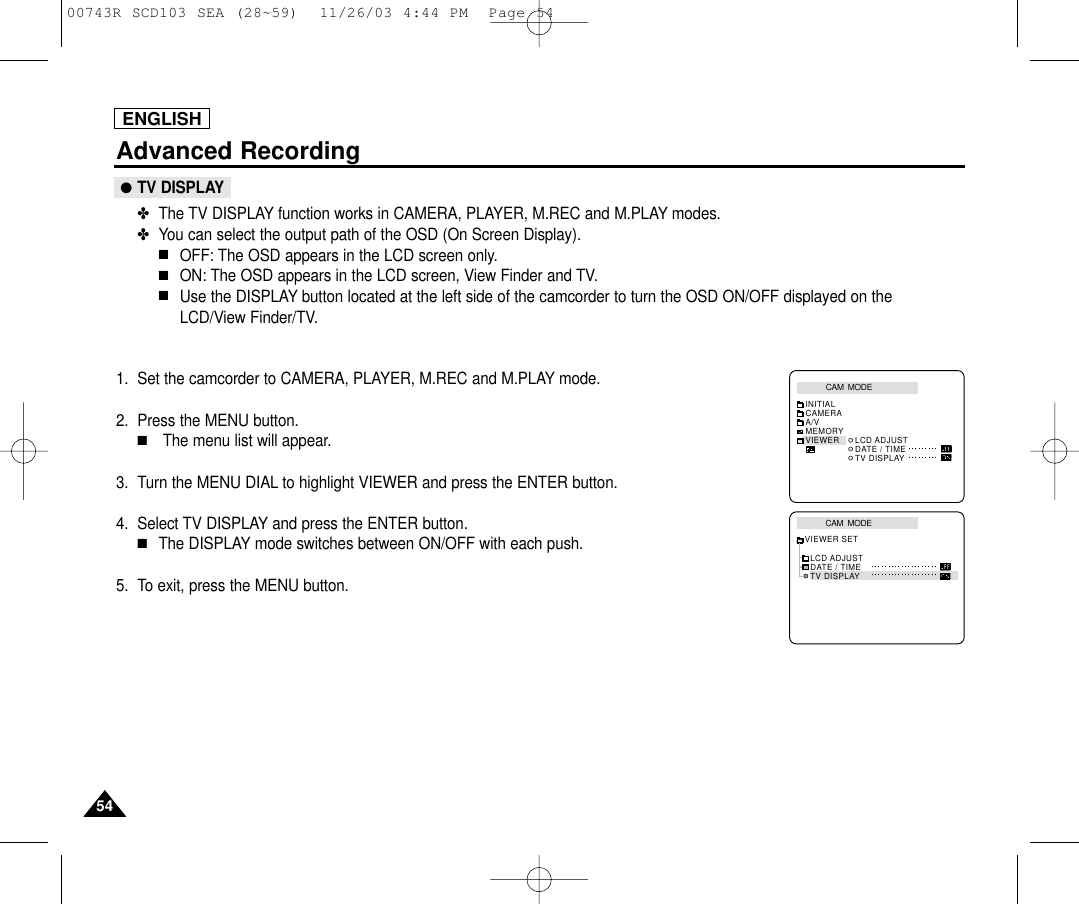
![3232ENGLISHBasic RecordingAdjusting the LCD✤Your camcorder is equipped with a 2.5 inch color Liquid Crystal Display(LCD) screen, which enables you to view what youare recording or playing back directly.✤Depending on the conditions under where you are using the camcorder (indoors or outdoors for example), you can adjust ;■BRIGHT SELECT■BRIGHT ADJUST■COLOR ADJUST1. Set the POWER switch to CAMERA position.■In the PLAYER mode, you may only setup the LCD while the tape is playing. 2. Open the LCD screen, and the LCD switches on.3. Press the MENU button.4. Turn the MENU DIAL so that VIEWER is highlighted and then press the ENTER button. 5. Turn the MENU DIAL so that LCD ADJUST is highlighted.6. Press the ENTER button to enter the sub-menu.7. Turn the MENU DIAL so that it highlights the menu item you want to adjust(BRIGHT SELECT, BRIGHT ADJUST, COLOR ADJUST).CAM MODEVIEWER SETLCD ADJUSTDATE / TIMETV DISPLAYCAM MODEINITIALLCD ADJUSTDATE/TIMETV DISPLAYCAMERAA/VMEMORYVIEWERCAM MODELCD ADJUSTVIEWER SETBRIGHT SELECT . . . . NORMALBRIGHT ADJUST . . . . . .[ 1 8 ]COLOR ADJUST . . . . . . [ 1 8 ]00743R SCD103 SEA (28~59) 11/26/03 4:43 PM Page 32](https://usermanual.wiki/Samsung-Electronics-Co/04DELTA2/User-Guide-384205-Page-38.png)
![3535ENGLISHAdjusting the LCD during PLAY✤ You can adjust the LCD during playback.✤ The adjustment method is the same procedure as used in CAMERA mode. (see page 32) The Speaker works in PLAYER mode only.■When you use the LCD screen for playback, you can hear recorded sound from the built-in Speaker.- Follow the instructions below to decrease or mute speaker volume in the PLAYER mode. - Take the following steps to lower the volume or mute the sound while playing a tape on the camcorder.1. Set the power switch to PLAYER mode.2. Press (PLAY/STILL) to play the tape.3. When you hear sounds once the tape is in play, use the MENU DIAL to adjust the volume.■A volume level display will appear on the LCD. Levels may be adjusted from anywhere between 00 to 19 and you will not hear any sound when the volume is set on 00.■If you close the LCD while playing, you will not hear sound from the speaker.Notes■When the cable is connected to the Audio/Video jack, you cannot hear sound from the speakerand cannot adjust the volume. ■You can hear sound from speaker by removing the connected cable from the Audio/Video jack.Basic RecordingControlling Sound from the Speaker 0 : 2 3 : 4 7 5 5 min1 2 : 0 0 A M J A N . 1 0 , 2 0 0 4VOL. [ 1 1 ]<3-2>VOL/MF23-100743R SCD103 SEA (28~59) 11/26/03 4:43 PM Page 35](https://usermanual.wiki/Samsung-Electronics-Co/04DELTA2/User-Guide-384205-Page-41.png)
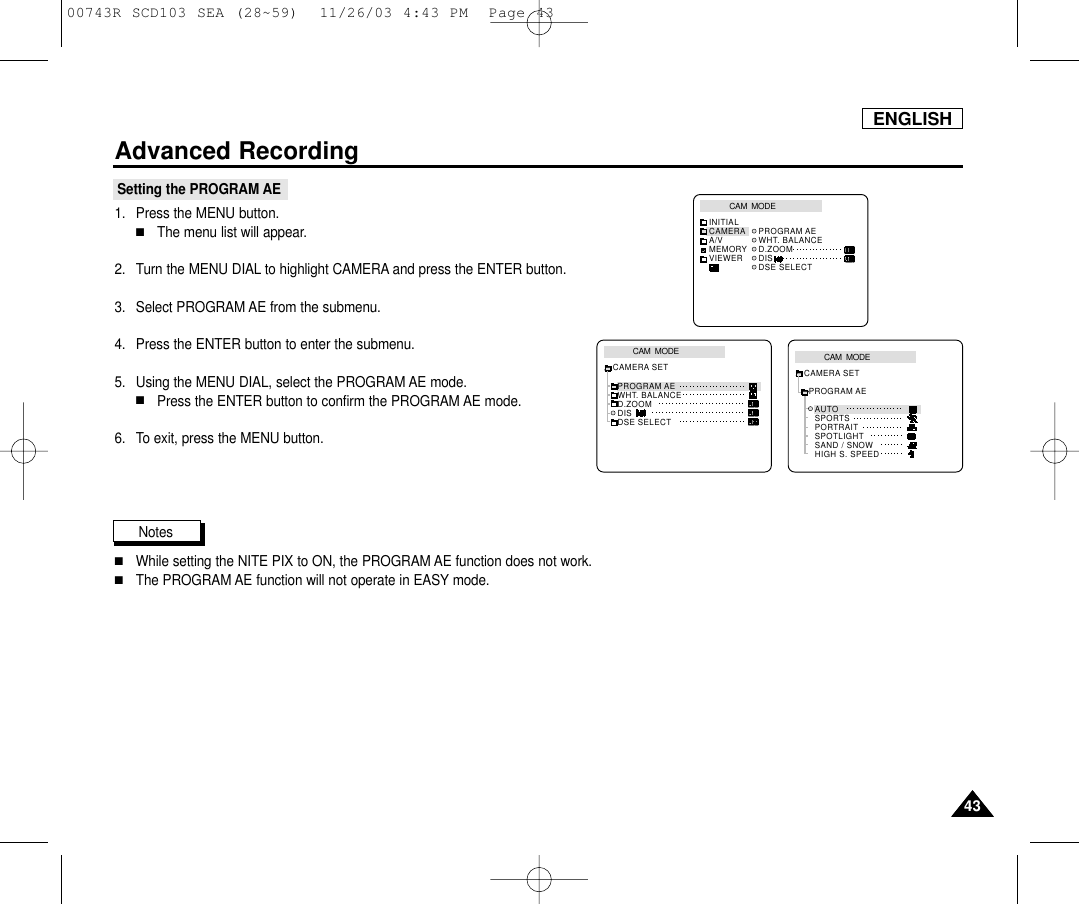
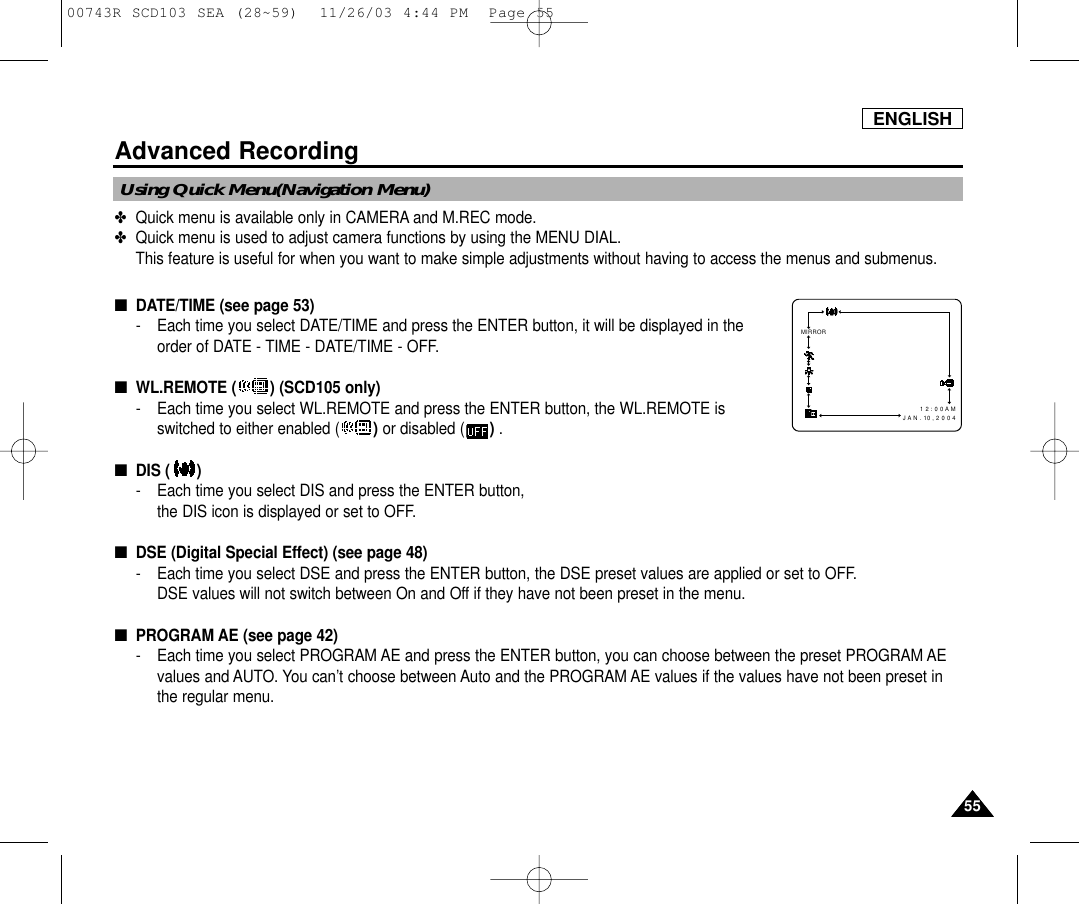
![5050ENGLISHAdvanced Recording●REC MODE✤The REC MODE function works in CAMERA mode.✤This camcorder records and plays back in SP (standard play) mode and in LP (long play) mode.■SP (standard play): This mode permits 60 minutes of recording time with a DVM60 tape.■LP (long play): This mode permits 90 minutes of recording time with a DVM60 tape.1. Set the camcorder to CAMERA mode.2. Press the MENU button.■The menu list will appear.3. Turn the MENU DIAL to highlight A/V and press the ENTER button.4. Select REC MODE from the submenu and press the ENTER button.■The REC MODE toggles between SP and LP with each press.5. To exit, press the MENU button.Notes■We recommend that you use this camcorder to play back any tapes recorded on this camcorder.Playing back a tape recorded in other equipment may produce mosaic shaped distortion.■When you record a tape in SP and LP modes, or LP mode only, the playback picture may be distorted or the time code maynot be written properly between scenes.■Record using SP mode for best picture and sound quality.CAM MODEINITIALWIND CUTPB DSEREC MODEPHOTO SEARCHCOPYAUDIO MODE 12AUDIO SELECTCAMERAA/VMEMORYVIEWERCAM MODEREC MODEPHOTO SEARCHPHOTO COPYAUDIO MODE 12SOUND[1]AUDIO SELECTWIND CUTA / V SETPB DSE00743R SCD103 SEA (28~59) 11/26/03 4:44 PM Page 50](https://usermanual.wiki/Samsung-Electronics-Co/04DELTA2/User-Guide-384205-Page-56.png)
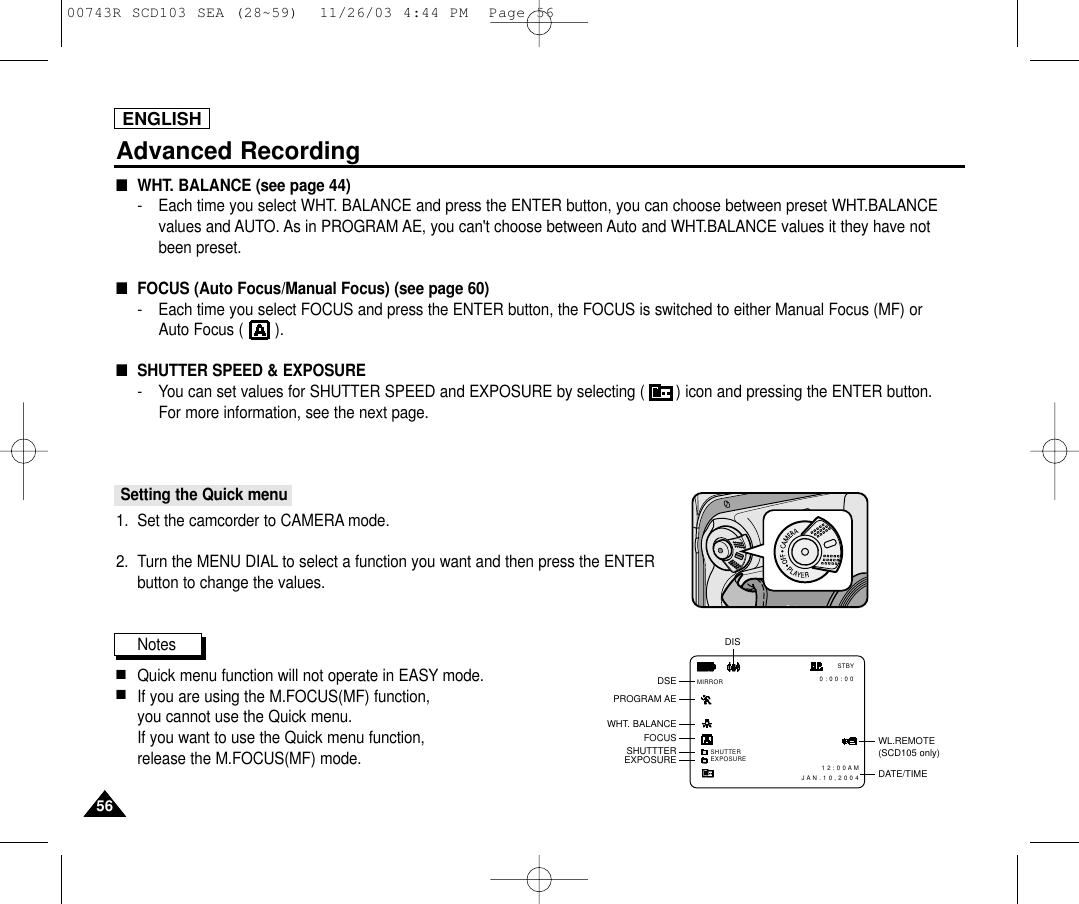
![5151ENGLISHAdvanced Recording●AUDIO MODE✤The AUDIO MODE function works in CAMERA mode.✤This camcorder records sound in two ways. (12bit, 16bit)■12bit :You can record two 12bit stereo sound tracks.The original stereo sound can be recorded onto the MAIN (SOUND1) track. Additional stereo sound can be dubbed onto the SUB (SOUND2) track.■16bit :You can record one high quality stereo sound using the 16bit recording mode. Audio dubbing is not possible when using this mode.1. Set the camcorder to CAMERA mode.2. Press the MENU button.■The menu list will appear.3. Turn the MENU DIAL to highlight A/V and press the ENTER button.4. Select the AUDIO MODE from the menu and press the ENTER button.■The AUDIO MODE toggles between 12bit-16bit with each push.5. To exit, press the MENU button.CAM MODEREC MODEPHOTO SEARCHPHOTO COPYAUDIO MODE 12SOUND[1]AUDIO SELECTWIND CUTA / V SETPB DSECAM MODEINITIALWIND CUTPB DSEREC MODEPHOTO SEARCHCOPYAUDIO MODE 12AUDIO SELECTCAMERAA/VMEMORYVIEWER00743R SCD103 SEA (28~59) 11/26/03 4:44 PM Page 51](https://usermanual.wiki/Samsung-Electronics-Co/04DELTA2/User-Guide-384205-Page-57.png)
![5252ENGLISHAdvanced Recording●WIND CUT✤The WIND CUT function works in CAMERA and PLAYER modes.✤The WIND CUT function minimizes wind noise or other noise while recording.- When the wind cut is on, some low sounds are eliminated along with the sound of the wind.1. Set the camcorder to CAMERA mode.2. Press the MENU button.■The menu list will appear.3. Turn the MENU DIAL to highlight A/V and press the ENTER button.4. Select WIND CUT from submenu.5. This feature toggles ON/OFF each time you press the ENTER button.■is shown in the display when you turn the WIND CUT on.6. To exit, press the MENU button.Notes■Make sure WIND CUT is set to off when you want the microphone to be as sensitive as possible.■Use the WIND CUT when recording in windy places such as the beach or near buildings.CAM MODEREC MODEPHOTO SEARCHPHOTO COPYAUDIO MODE 12SOUND[1]AUDIO SELECTWIND CUTA / V SETPB DSECAM MODEINITIALWIND CUTPB DSEREC MODEPHOTO SEARCHCOPYAUDIO MODE 12AUDIO SELECTCAMERAA/VMEMORYVIEWER00743R SCD103 SEA (28~59) 11/26/03 4:44 PM Page 52](https://usermanual.wiki/Samsung-Electronics-Co/04DELTA2/User-Guide-384205-Page-58.png)

![ENGLISH6464Advanced RecordingDubbed audio Playback1. Insert the dubbed tape and press MENU button.2. Turn the MENU DIAL to highlight A/V.3. Press the ENTER button to enter the sub-menu.4. Use the MENU DIAL to select AUDIO SELECT from the submenu. 5. Press the ENTER button to enter the sub-menu.6. Using the MENU DIAL, select the AUDIO playback channel. ■Press the ENTER button to confirm the audio playback channel.- SOUND1 : play the original sound.- SOUND2 : play the dubbed sound.- MIX(1+2) : play back SOUND1 and 2 equally mixed.7. To exit, press the MENU button.8. Press the (PLAY/STILL) button to playback the dubbed tape.NoteWhen you playback added sound (SOUND2 or MIX mode), you may experience loss of sound quality.PLAYER MODEA / V SETAUDIO SELECTSOUND [ 1 ]SOUND [ 2 ]MIX [ 1 + 2 ]PLAYER MODEREC MODEPHOTO SEARCHPHOTO COPYAUDIO MODE 12SOUND[1]AUDIO SELECTWIND CUTA / V SETPB DSE00743R SCD103 SEA (60~107) 11/26/03 4:44 PM Page 64](https://usermanual.wiki/Samsung-Electronics-Co/04DELTA2/User-Guide-384205-Page-70.png)
![ENGLISH6565Advanced Recording1. Set the power switch to the CAMERA mode.2. Press the PHOTO button.■The still picture is recorded for about 6~7 seconds. 3. After the PHOTO has been recorded, the camcorder returns to STBY mode.Searching for a PHOTO picture ✤The PHOTO SEARCH works in PLAYER mode only. 1. Press the MENU button. ■The MENU list will appear.2. Turn the MENU DIAL to highlight A/V.3. Press the ENTER button to enter the submenu.4. Select PHOTO SEARCH from the submenu and press the ENTER button. ■You can also press the PHOTO SEARCH button on the remote control. (SCD105 only)5. Search the PHOTO using the (FF) and (REW) buttons. ■The PHOTO search process appears on the LCD while you are searching. ■After completing the search, the camcorder displays the still image. 6. To exit, press the (STOP) button. PHOTO Image RecordingPHOTOPLAYER MODEINITIALWIND CUTPB DSEREC MODEPHOTO SEARCHCOPYAUDIO MODE 12AUDIO SELECTCAMERAA/VMEMORYVIEWERPLAYER MODEREC MODEPHOTO SEARCHPHOTO COPYAUDIO MODE 12SOUND[1]AUDIO SELECTWIND CUTA / V SETPB DSE00743R SCD103 SEA (60~107) 11/26/03 5:14 PM Page 65](https://usermanual.wiki/Samsung-Electronics-Co/04DELTA2/User-Guide-384205-Page-71.png)

![ENGLISH7575PlaybackPB DSE (Playback Digital Special Effects)✤The PB DSE function works in PLAYER mode. ✤The PB DSE function enables you to apply Digital Special Effects (DSE) to tape playback or still images.1. Set the camcorder to the PLAYER mode and then play back a tape.2. Press the MENU button and turn the MENU DIAL to highlight A/V.3. Press the ENTER button to enter the sub-menu.4. Select PB DSE from the sub-menu and press the ENTER button.5. Select PB DSE item (off, mirror, mosaic) from the sub-menu and press the ENTER button.6. To exit, press the MENU button.7. To cancel the PB DSE function, set the PB DSE to off or press the STOP button.Notes■You cannot apply the PB DSE function to the pictures which are being input from an externalsource.■Once you modify an image using the PB DSE function, it cannot be imported to your PC from the camcorder’s DV jack.PLAYER MODEINITIALWIND CUTPB DSEREC MODEPHOTO SEARCHCOPYAUDIO MODE 12AUDIO SELECTCAMERAA/VMEMORYVIEWERPLAYER MODEREC MODEPHOTO SEARCHPHOTO COPYAUDIO MODE 12SOUND[1]AUDIO SELECTWIND CUTA / V SETPB DSEPLAYER MODEA / V SETPB DSEOFFMIRRORMOSAIC00743R SCD103 SEA (60~107) 11/26/03 4:44 PM Page 75](https://usermanual.wiki/Samsung-Electronics-Co/04DELTA2/User-Guide-384205-Page-81.png)
![ENGLISH8181USB interface Using the “removable Disk” function ✤You can easily transfer data from a Memory Card to a PC without additional add-on cards via a USB connection.1.Set the mode switch to memory, set the power switch to CAMERA or PLAYER.2. Connect one end of the USB cable to the USB jack on the camcorder and the other end to the USB port on your computer.Using the “USB streaming” function✤USB streaming data type is MPEG4.✤To use the USB STREAMING, the DVC Media 5.1, DirectX 9.0a and Windows Media Player 9.0(included in the CD)programs must be installed in the PC. ✤You can CAMCORDER video from the PC using USB STREAMING.Also you can store it to a moving picture of the "asf" file format, or a still image of the "jpg" file format at PC.1. Set the mode switch to TAPE, set the power switch to CAMERA or PLAYER.2. Connect one end of the USB cable to the USB jack on the camcorder and the other end to the USB port on your computer.3. Execute the DVC Media 5.1 program.If you want the detailed description of USB streaming, refer to the DVC Media 5.1 User's Manual.Connecting to a PC1. Connect a USB cable to the USB port on the PC.2. Connect the other end of the USB cable into the proper terminal on the camcorder. (USB jack)-If a PC is connected to the camcorder with a USB cable only, the Power Switch, Zoom Switch, mode switch and NITE PIXoperate.Disconnecting the USB cable✤After completing the data transmission, you must disconnect the cable in the following way:1.Select the removable disc icon and click the right mouse button to select [Eject].2. Select [Confirm] and disconnect the USB cable when the Windows Splash screen appears.Notes ■If you disconnect the USB cable from the PC or the camcorder while transferring,the data transmission will stop and the data may be damaged. ■If you connect the USB cable to a PC via a USB HUB or simultaneously connectthe USB cable along with other USB devices, the camcorder may not work properly.- If this occurs, remove all USB devices from the PC and reconnect thecamcorder. DVUSBAUDIO/VIDEOS-VIDEOMICUSB Cable00743R SCD103 SEA (60~107) 11/26/03 4:44 PM Page 81](https://usermanual.wiki/Samsung-Electronics-Co/04DELTA2/User-Guide-384205-Page-87.png)
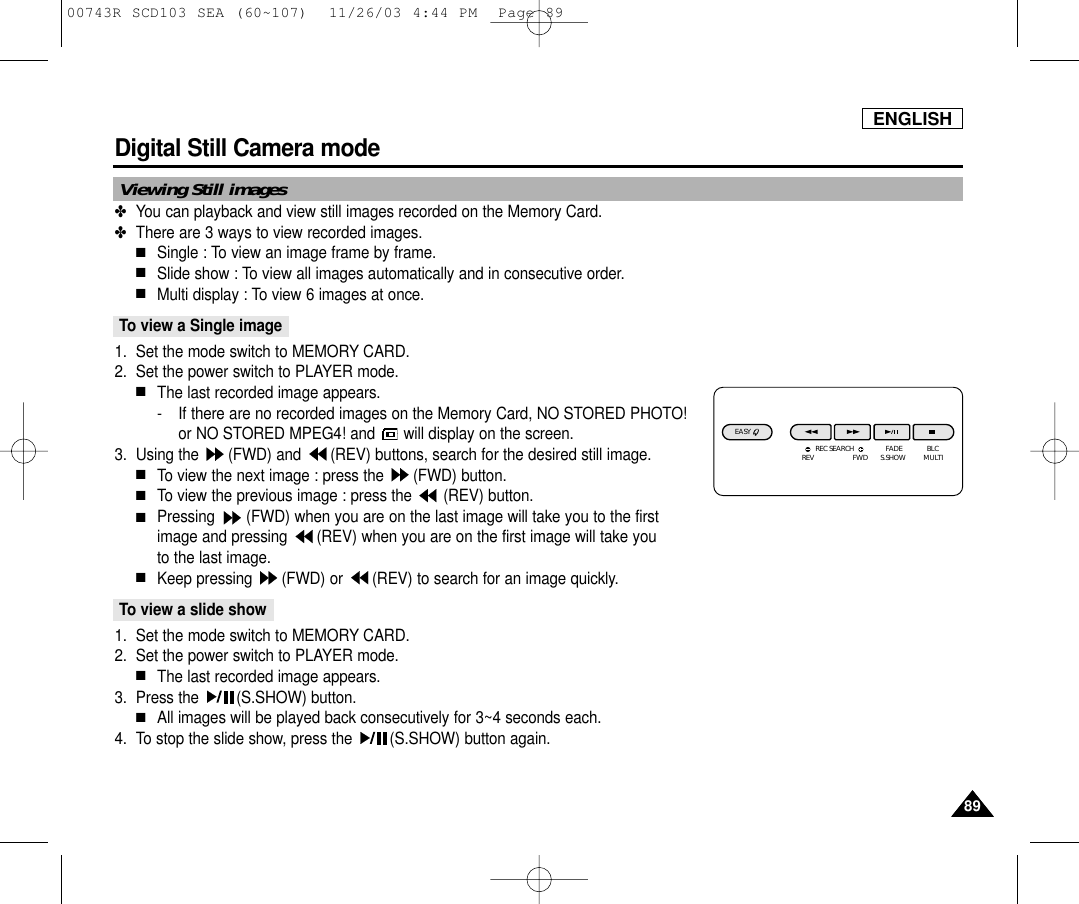
![ENGLISH9090Digital Still Camera mode To view the Multi Display1. Set the mode switch to MEMORY CARD.2. Set the power switch to PLAYER mode.■The last recorded image appears.3. To view six stored images on single screen, press the MULTI button.■A selection mark ( ) appears under the image.■Turn the MENU DIAL to select a image.4. To return to single playback mode, press the MULTI button again.Notes■To display the previous six images, press the (REV).■To display the next six images, press the (FWD).19 20 2122 23 24[24/24]100-0025EASY REC SEARCH FADE BLCREV FWD S.SHOW MULTI00743R SCD103 SEA (60~107) 11/26/03 4:44 PM Page 90](https://usermanual.wiki/Samsung-Electronics-Co/04DELTA2/User-Guide-384205-Page-96.png)
![ENGLISH9191Digital Still Camera mode ✤You can copy still images recorded with PHOTO function on a cassette into a Memory Card.✤Rewind the TAPE to the point which you wants.1. Set the power switch to the PLAYER mode.2. Press the MENU button.3. Turn the MENU DIAL to highlight A/V and press the ENTER button.■The submenu will appear.4. Turn the MENU DIAL to highlight PHOTO COPY and press the ENTER button.■All still images that recorded on a cassette will be copied into a Memory Card.5. The camcorder automatically performs the photo search to find still images and copy starts.6. Press (STOP) button to stop copying.■Copy stops when the cassette is finished or Memory Card is full.Copying still images from a cassette to Memory CardPLAYER MODEREC MODEPHOTO SEARCHPHOTO COPYAUDIO MODE 12SOUND[1]AUDIO SELECTWIND CUTA / V SETPB DSEPLAYER MODEINITIALWIND CUTPB DSEREC MODEPHOTO SEARCHCOPYAUDIO MODE 12AUDIO SELECTCAMERAA/VMEMORYVIEWER00743R SCD103 SEA (60~107) 11/26/03 4:44 PM Page 91](https://usermanual.wiki/Samsung-Electronics-Co/04DELTA2/User-Guide-384205-Page-97.png)