Samsung Electronics Co 04OMEGA2 DIGITAL CAMCORDER User Manual 00000 SCD903 USA 01 27
Samsung Electronics Co Ltd DIGITAL CAMCORDER 00000 SCD903 USA 01 27
UserManual.wiki
>
Samsung Electronics Co
>
04OMEGA2 User Manual
>
User Manual Part 2
Contents
1.
User Manual Part 1
2.
User Manual Part 2
User Manual Part 2
Navigation menu
Upload a User Manual
Namespaces
Wiki Guide
HTML
PDF
Info
Views
User Manual
Discussion / Help
Navigation
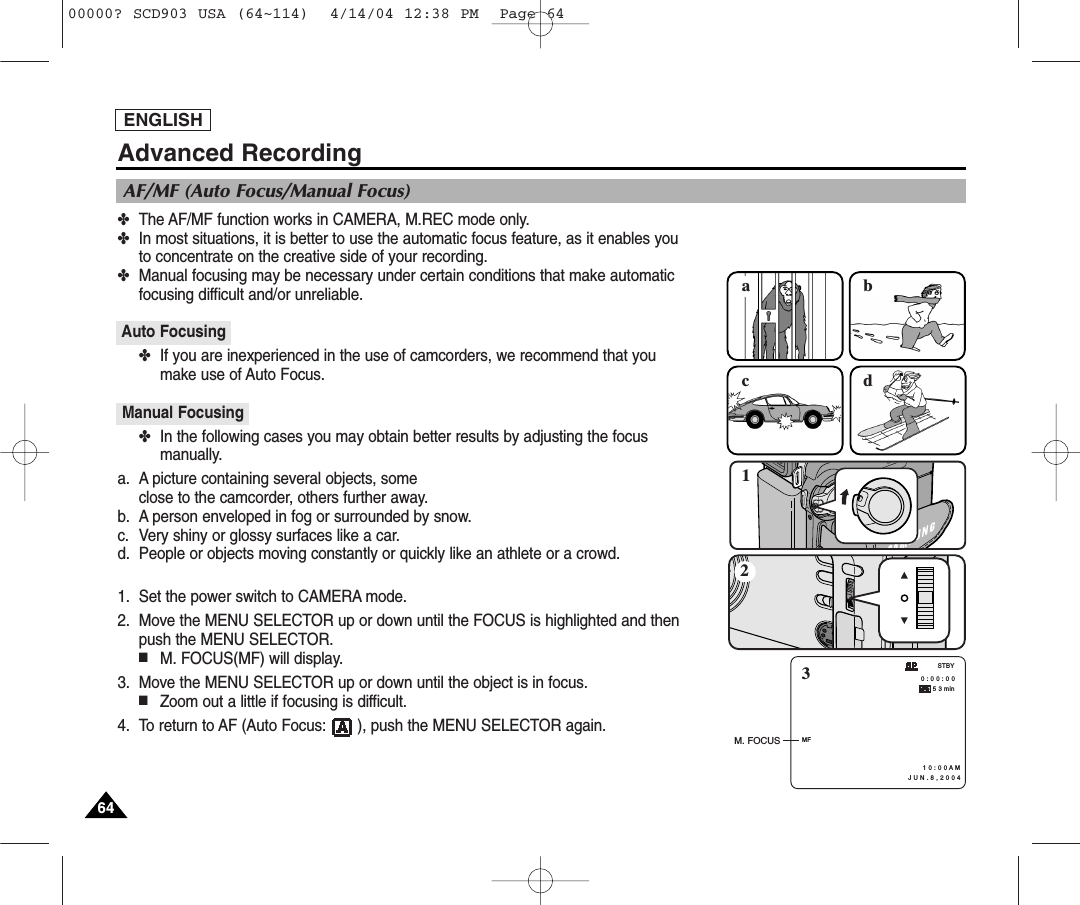
![ENGLISH6868Advanced RecordingDubbed audio Playback1. Insert the dubbed tape and press MENU button.2. Move the MENU SELECTOR to highlight A/V.3. Push the MENU SELECTOR to enter the sub-menu.4. Use the MENU SELECTOR to select AUDIO SELECT from the submenu. 5. Push the MENU SELECTOR to enter the sub-menu.6. Using the MENU SELECTOR, select the AUDIO playback channel. ■Push the MENU SELECTOR to confirm the audio playback channel.- SOUND1 : play the original sound.- SOUND2 : play the dubbed sound.- MIX(1+2) : play back SOUND1 and 2 equally mixed.7. To exit, press the MENU button.8. Press the (PLAY/STILL) button to playback the dubbed tape.Note■When you playback added sound (SOUND2 or MIX mode), you may experience loss of sound quality.PLAYER MODEA / V SETAUDIO SELECTSOUND [ 1 ]SOUND [ 2 ]MIX [ 1 + 2 ]PLAYER MODEREC MODEPHOTO SEARCHPHOTO COPYAUDIO MODE 12SOUND[1]AUDIO SELECTWIND CUTA / V SET00000? SCD903 USA (64~114) 4/14/04 12:38 PM Page 68](https://usermanual.wiki/Samsung-Electronics-Co/04OMEGA2.User-Manual-Part-2/User-Guide-418398-Page-11.png)
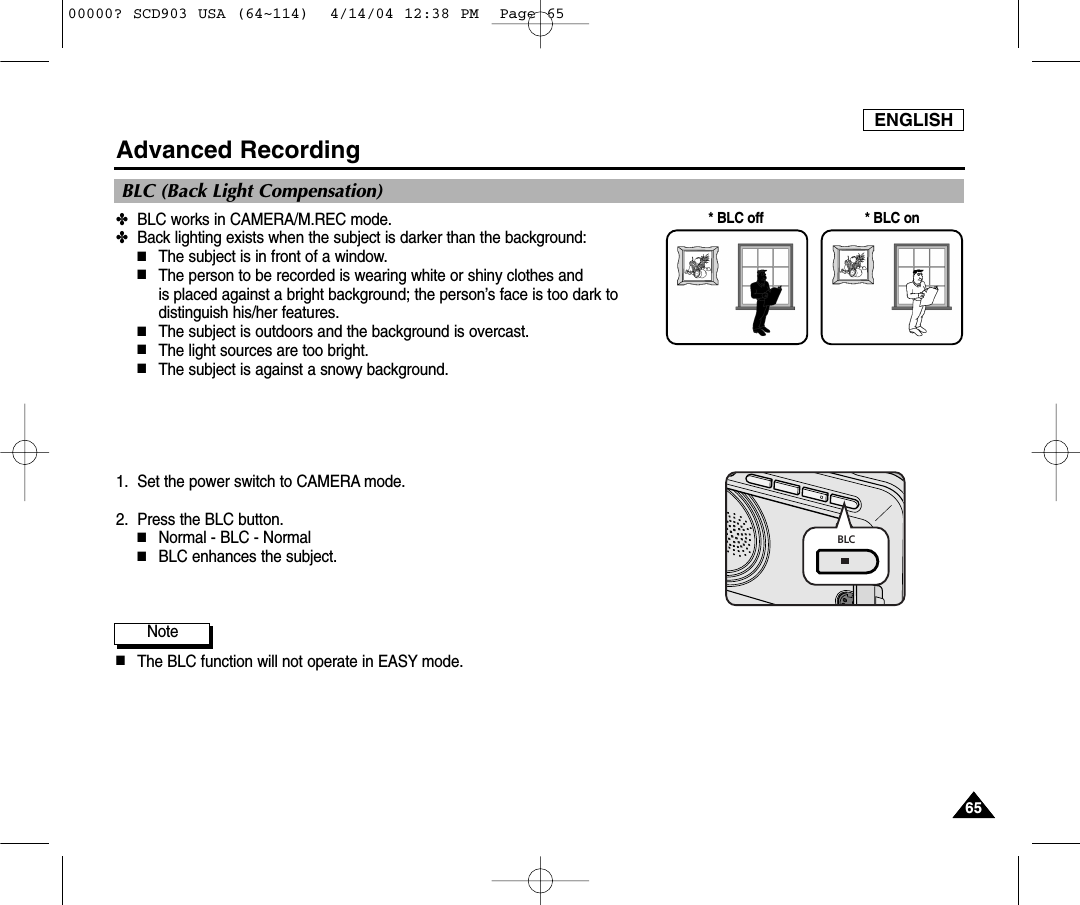
![ENGLISH6969Advanced Recording1. Press the PHOTO button lightly (about halfway down) and hold it.■The still picture appears on the LCD monitor.■If you do not wish to record, release the button.2. Press the PHOTO button fully down.■The still picture is recorded for about 6~7 seconds. 3. After the PHOTO has been recorded, the camcorder returns to STBY mode.Searching for a PHOTO picture ✤The PHOTO SEARCH works in PLAYER mode only. 1. Press the MENU button. (or press the PHOTO SEARCH button on the remote control.)■The MENU list will appear.2. Move the MENU SELECTOR to highlight A/V.3. Push the MENU SELECTOR to enter the sub-menu.4. Select PHOTO SEARCH from the sub-menu and push the MENU SELECTOR.5. Search the PHOTO using the (FF) and (REW) buttons. ■The PHOTO search process appears on the LCD while you are searching. ■After completing the search, the camcorder displays the still image. 6. To exit, press the (STOP) button. PLAYER MODEINITIALWIND CUTREC MODEPHOTO SEARCHCOPYAUDIO MODE 12AUDIO SELECTCAMERAA/VMEMORYVIEWERPLAYER MODEREC MODEPHOTO SEARCHPHOTO COPYAUDIO MODE 12SOUND[1]AUDIO SELECTWIND CUTA / V SETPHOTO Image RecordingPHOTO00000? SCD903 USA (64~114) 4/14/04 12:38 PM Page 69](https://usermanual.wiki/Samsung-Electronics-Co/04OMEGA2.User-Manual-Part-2/User-Guide-418398-Page-12.png)


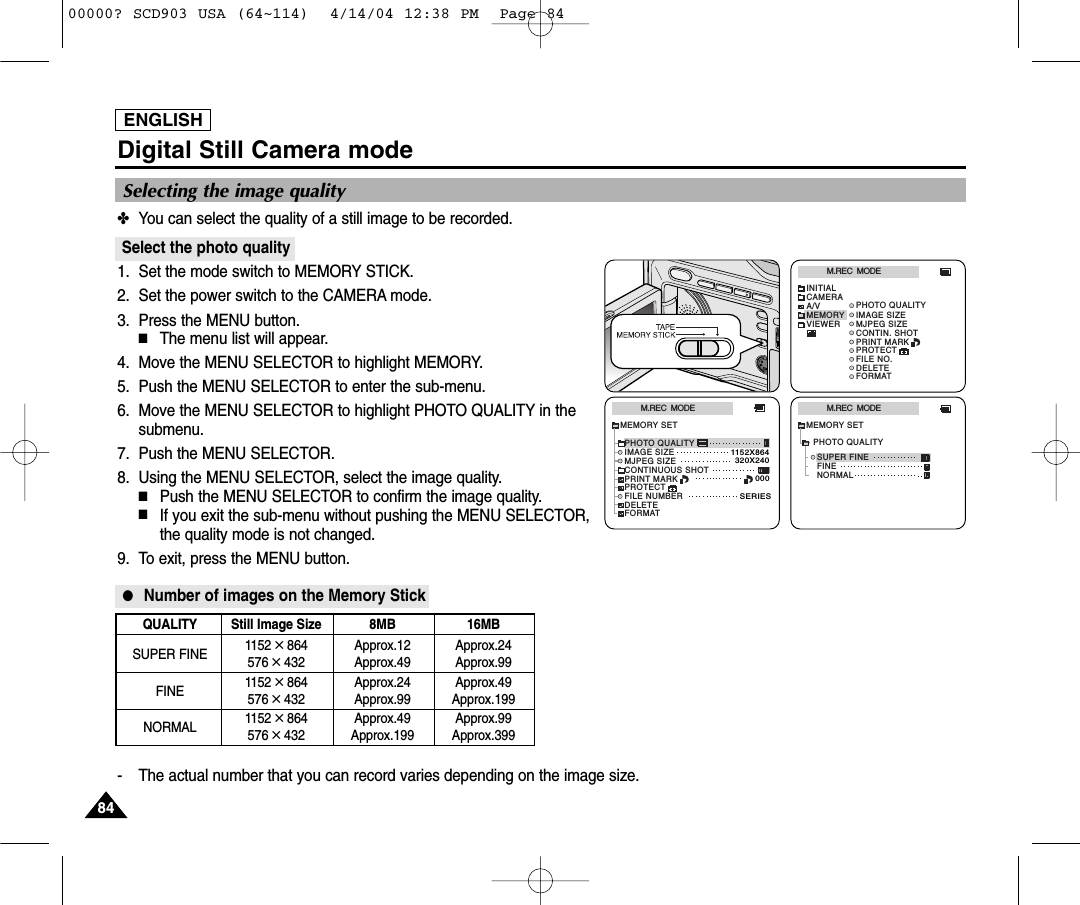
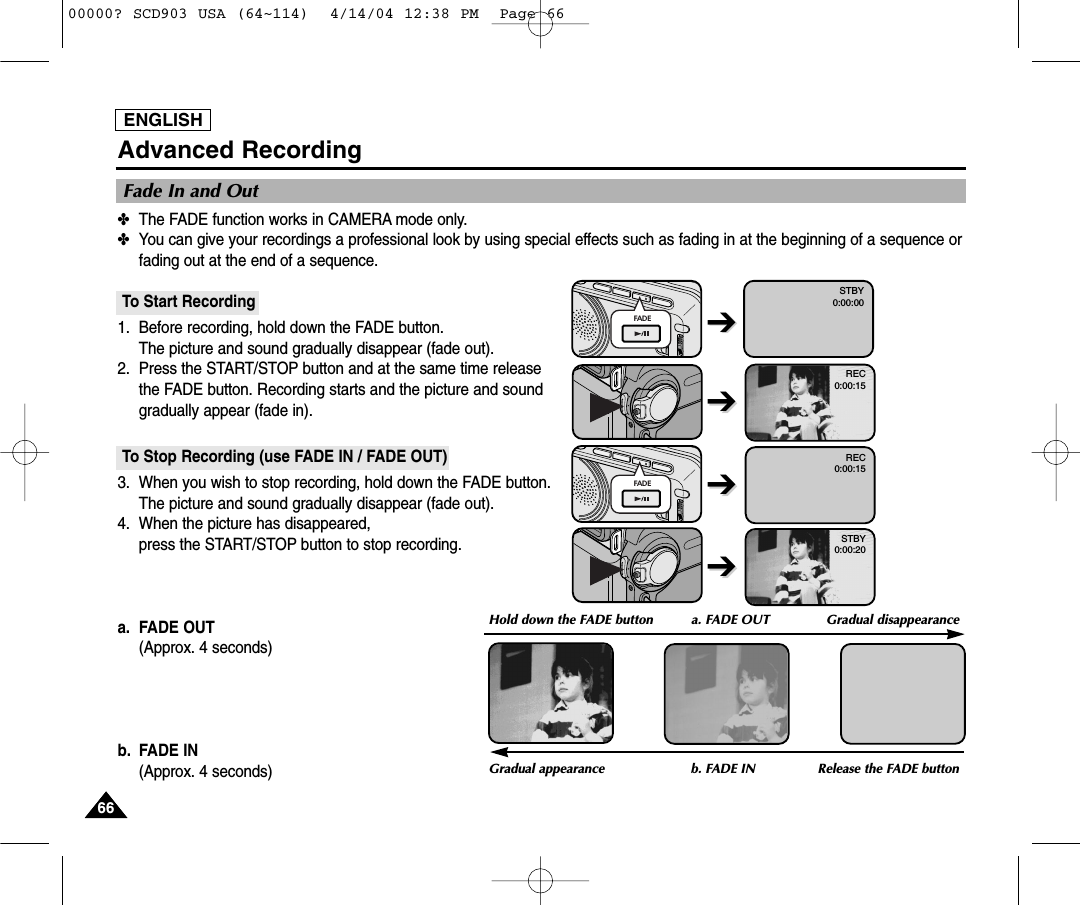
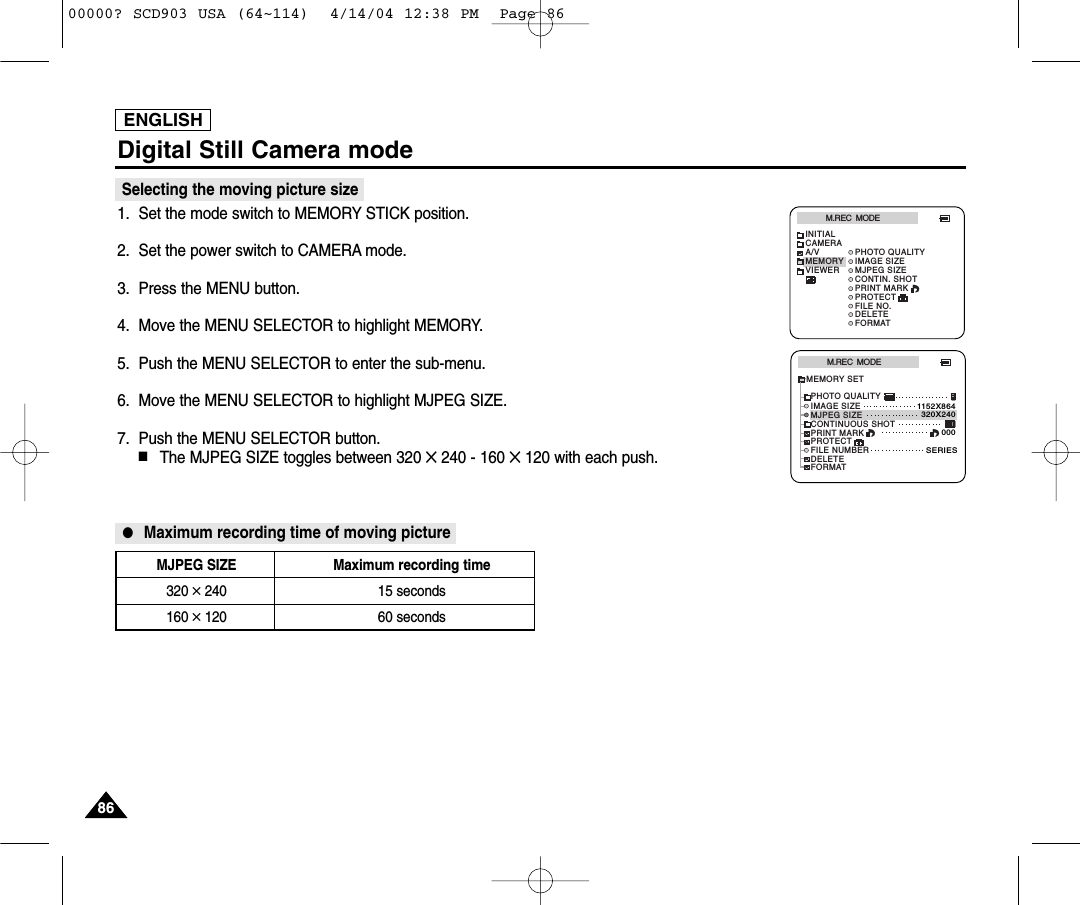
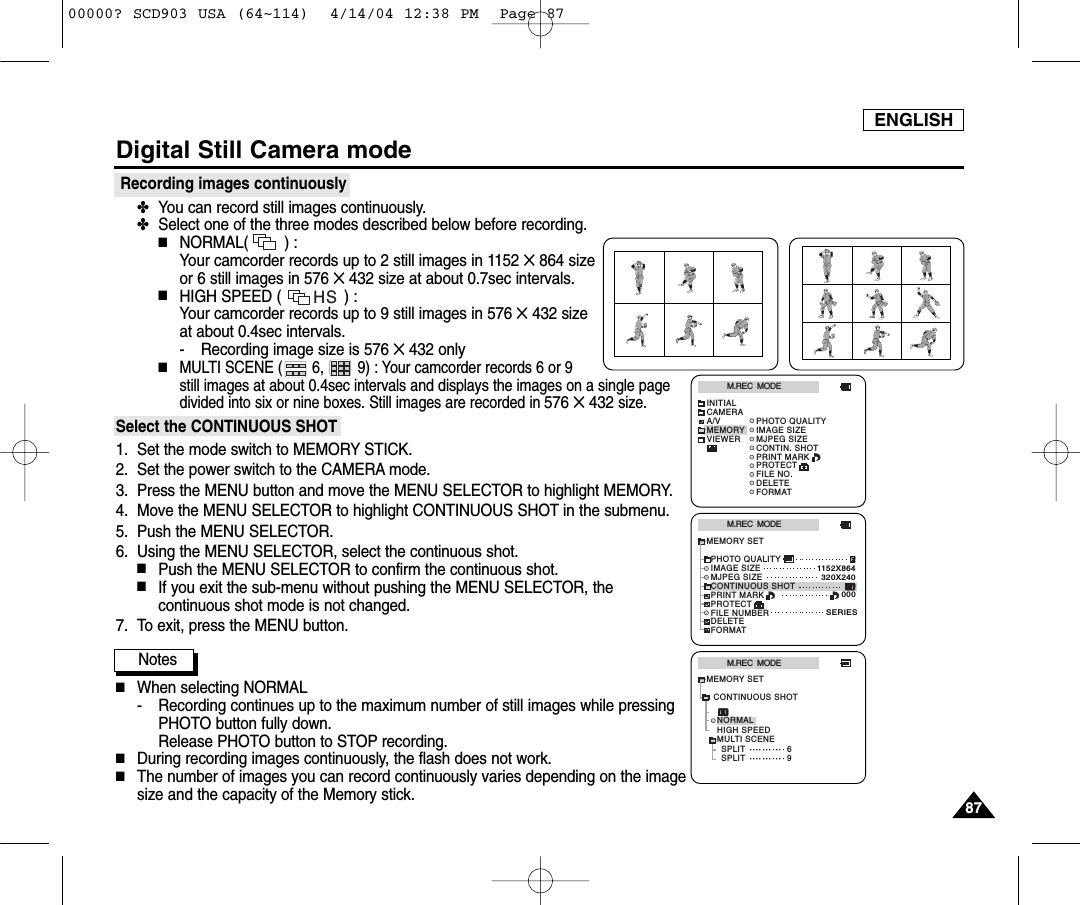
![ENGLISHDigital Still Camera mode8585Selecting the recording image size✤Select the image size of still image to be recorded.1. Set the mode switch to MEMORY STICK.2. Set the power switch to the CAMERA mode.3. Press the MENU button.■The menu list will appear4. Use the MENU SELECTOR to highlight MEMORY and push the MENU SELECTOR.5. Select IMAGE SIZE from the submenu and push the MENU SELECTOR.■The IMAGE SIZE toggles between 1152 ✕864 and 576 ✕432 with each push.6. To exit the menu, press the MENU button.Note■Still images that are recorded at an image size of 1152 ✕864 on your camcorder, may not playback properly on other digitaldevices as the device may not support recordings made with this image size.M.REC MODEINITIALPRINT MARKPROTECTPHOTO QUALITYFILE NO.DELETEFORMATIMAGE SIZEMJPEG SIZECONTIN. SHOTCAMERAA/VMEMORYVIEWERM.REC MODEMEMORY SETPRINT MARKPROTECTPHOTO QUALITYFILE NUMBERDELETEFORMATIMAGE SIZEMJPEG SIZE320X2401152X864000SERIESCONTINUOUS SHOT [ 1 0 / 1 4 ]3 2 0 0 0 min1152FImage Size00000? SCD903 USA (64~114) 4/14/04 12:38 PM Page 85](https://usermanual.wiki/Samsung-Electronics-Co/04OMEGA2.User-Manual-Part-2/User-Guide-418398-Page-28.png)

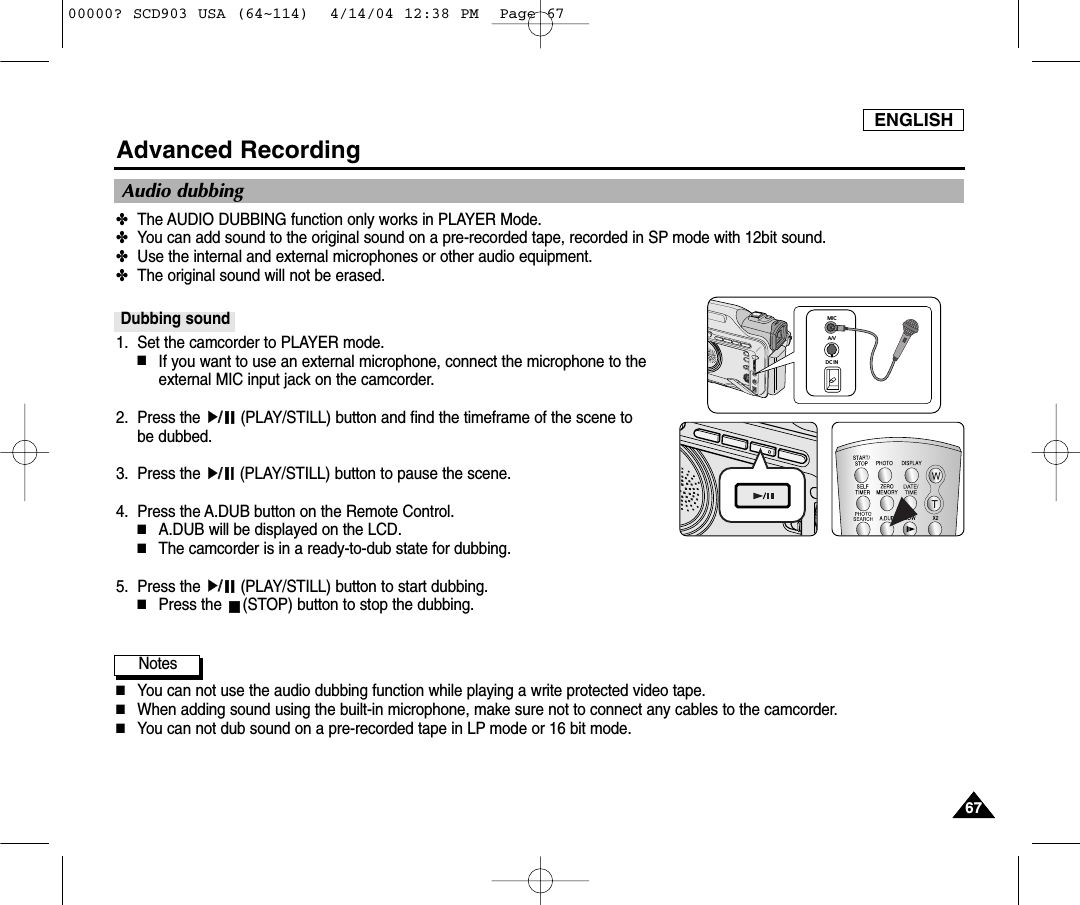
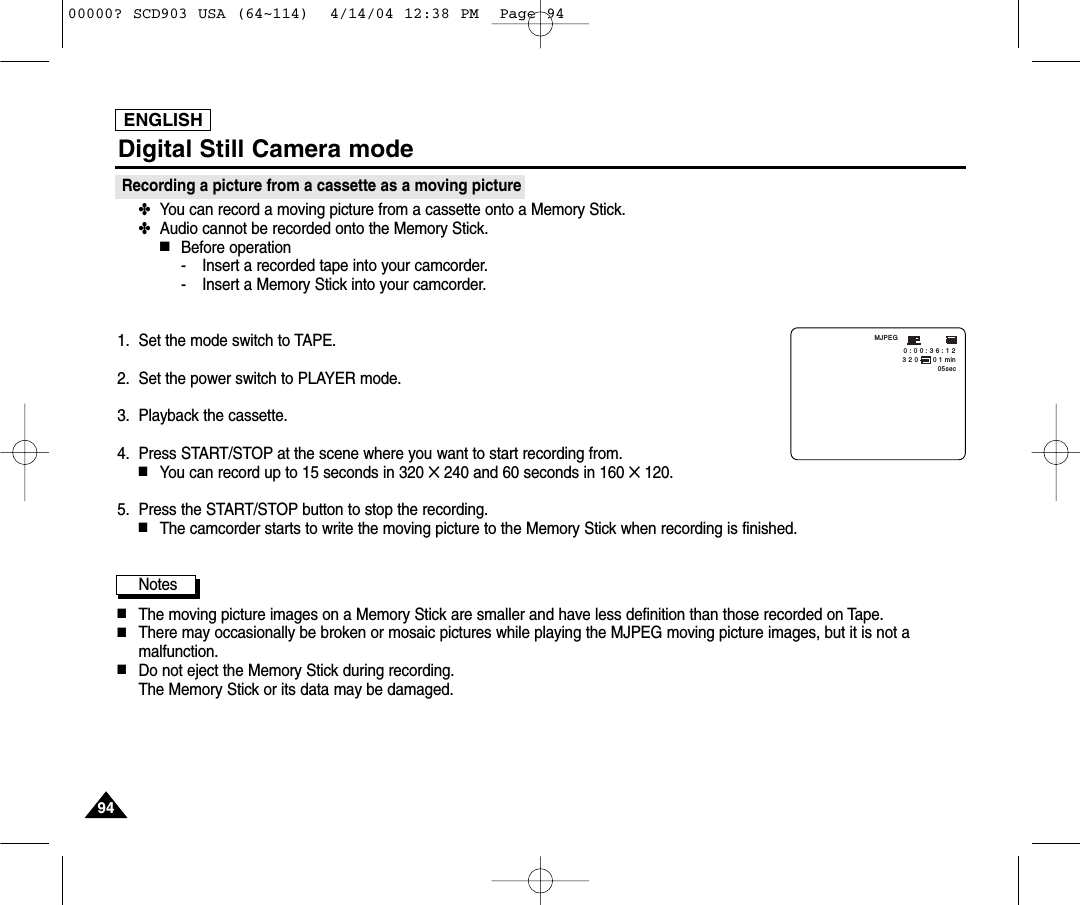
![ENGLISH8989Digital Still Camera mode✤Audio cannot be recorded with still images onto the Memory Stick.Recording images to a Memory Stick1. Set the mode switch to MEMORY STICK.2. Set the power switch to CAMERA.3. Press the PHOTO button lightly (about halfway down) and hold it.■During autofocus photo mark ( ) flashes in the display as the camcorder adjusts thefocus and is continuously displayed when the camcorder is ready to take the still image.■If you do not wish to record, release the pressure from the button.4. Press the PHOTO button fully down.■The still image is recorded to the Memory Stick.■While the camcorder is recording the still image, “” appears on the screen.Notes■The remote controller’s PHOTO button has no halfway setting.Press the button fully and the camcorder immediately takes the image.■Do not turn the power off, eject a Memory Stick or remove the battery pack during recording.The Memory Stick or its data may be damaged.■If focusing is difficult with the autofocus mode when using the PHOTO function, focus manually. [ 0 9 / 2 4 ]FRecording Still images to a Memory Stick in M.REC Mode.PHOTO00000? SCD903 USA (64~114) 4/14/04 12:38 PM Page 89](https://usermanual.wiki/Samsung-Electronics-Co/04OMEGA2.User-Manual-Part-2/User-Guide-418398-Page-32.png)
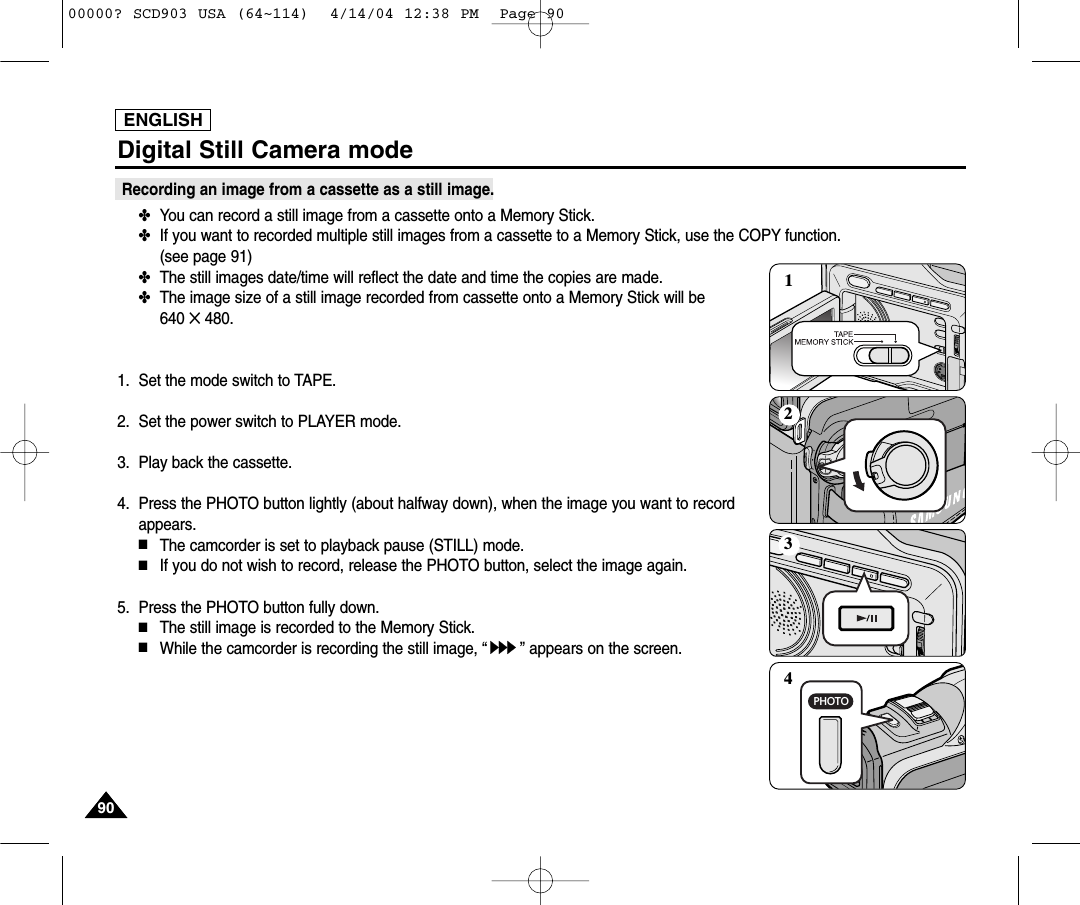
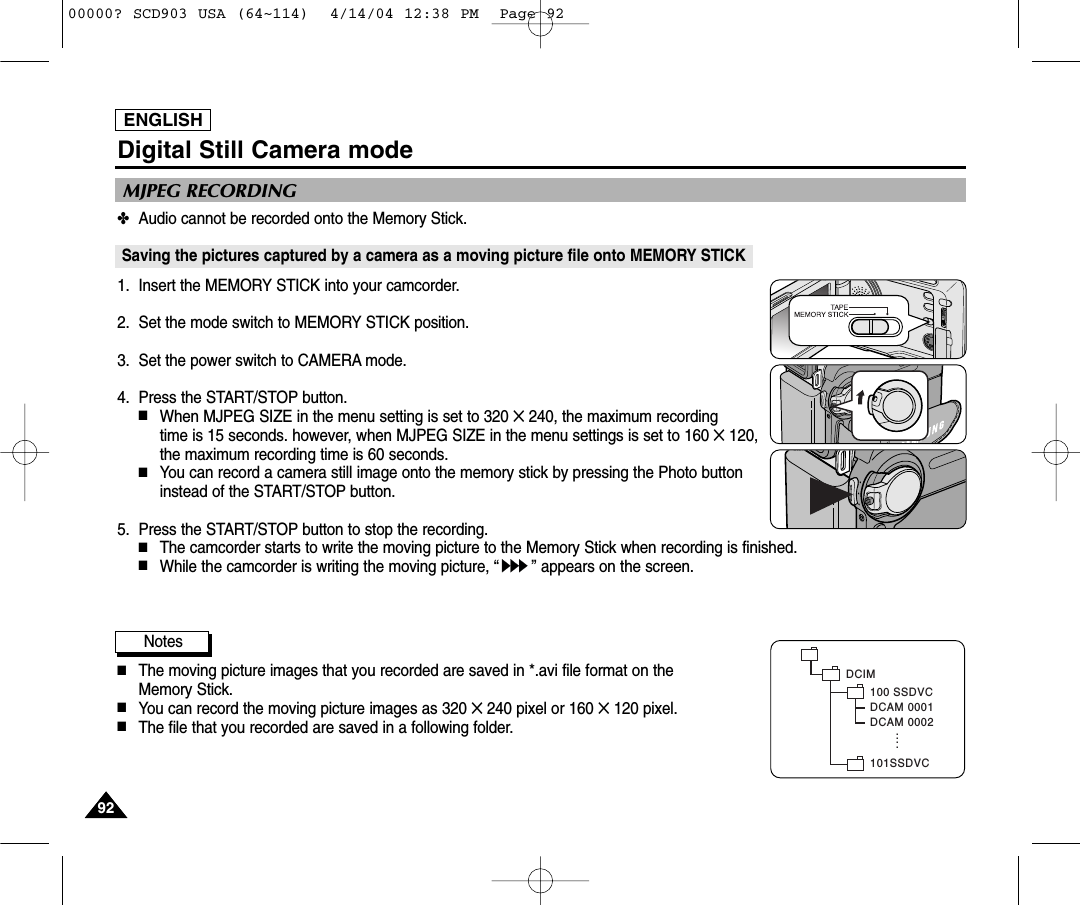
![ENGLISH9191Digital Still Camera mode✤You can copy still images recorded with PHOTO function on a cassette onto a Memory Stick.■The still images date/time will reflect the date and time the copies are made.■The image size of a still image copied from tape to Memory Stick will be 640 ✕480.■Before operation- Insert a recorded tape into your camcorder and rewind the tape.- Insert a Memory Stick into your camcorder.1. Set the mode switch to TAPE.2. Set the power switch to the PLAYER mode.3. Press the MENU button.4. Move the MENU SELECTOR to highlight A/V and push the MENU SELECTOR.■The submenu will appear.5. Move the MENU SELECTOR to highlight PHOTO COPY and push the MENU SELECTOR.■All still images that recorded on a cassette will be copied to a Memory Stick.6. The camcorder automatically performs the photo search to find still images and copying starts.7. Press (STOP) button to stop copying.■Copying stops when the cassette is finished or Memory Stick is full.PLAYER MODEREC MODEPHOTO SEARCHPHOTO COPYAUDIO MODE 12SOUND[1]AUDIO SELECTWIND CUTA / V SET[ 1 5 / 4 4 ]640PHOTO COPYNOW SEARCH ... 0 : 1 0 : 3 5 : 0 2PLAYER MODEINITIALWIND CUTREC MODEPHOTO SEARCHCOPYAUDIO MODE 12AUDIO SELECTCAMERAA/VMEMORYVIEWERCopying still images from a cassette to Memory Stick00000? SCD903 USA (64~114) 4/14/04 12:38 PM Page 91](https://usermanual.wiki/Samsung-Electronics-Co/04OMEGA2.User-Manual-Part-2/User-Guide-418398-Page-34.png)
![ENGLISH9595Digital Still Camera mode✤You can playback and view still images/moving pictures recorded on the Memory Stick.✤There are 3 ways to view recorded images.■Single images/Moving pictures■Slide show : To view all images automatically and in consecutive order.■Multi display : To view 6 images at once.✤You cannot hear the sound.To view a Single image1. Set the mode switch to MEMORY STICK.2. Set the power switch to PLAYER mode.■The last still image/moving picture recorded apears in the display.- If there are no recorded still images/moving pictures on the Memory Stick, NO STORED IMAGE! and will display on the screen.3. Using the (FWD) and (REV) buttons, search for the desired still images/movingpictures.■To view the next still image/moving picture: press the (FWD) button.■To view the previous still image/moving picture: press the (REV) button.■Pressing (FWD) when you are on the last still image/ moving picture will take you tothe first still image and pressing (REV) when you are on the first still image/movingpicture will take you to the last still image/moving picture.■Keep pressing (FWD) or (REV) to search for an still image/moving picture quickly.■Moving picture: Pressing (PLAY/STILL) plays back the moving picture and will showfirst scene as a still image when playback ends.- Pressing (PLAY/STILL) during playback will stop the moving picture and thescene is shown as a still image. Pressing (PLAY/STILL) again will restart theplayback.Notes■There could be some broken or mosaic pictures displayed while playing the MJPEG movingpictures. This is not a fault.■It is possible that moving pictures that you recorded in the Memory Stick might not playbackin other brands of camcorder.■The MJPEG file recorded by another camcorder might not playback in this camcorder.■Memory Stick with large file sizes may take additional time to replay.■You can transfer MJPEG file to PC through DVC Media 6.1 using USB port on your PC. And then, play MJPEG file with a movingpicture player program like a Microsoft Windows Media Player. (DVC Media 6.1 is included in the CD supplied)Viewing Still images/Moving picturesREC SEARCH FADE BLCREV FWDEASY MULTI DISP.1152 X 864[0 4 / 0 6]1 0 0 - 0 0 0 4ImageSize320MJPEG0 0 / 1 5 secDCAM0002.AVIPlayback time/Time of recordedpictureMJPEG SizeFile numberstill imagemoving picture00000? SCD903 USA (64~114) 4/14/04 12:38 PM Page 95](https://usermanual.wiki/Samsung-Electronics-Co/04OMEGA2.User-Manual-Part-2/User-Guide-418398-Page-38.png)
![ENGLISH9696Digital Still Camera modeTo view a slide show1. Set the mode switch to MEMORY STICK.2. Set the power switch to PLAYER mode.■The last recorded still image/moving picture appears3. Press the S.SHOW button.■All images will be played back consecutively for 3~4 seconds each.4. To stop the slide show, press the S.SHOW button again.To view the Multi Display1. Set the mode switch to MEMORY STICK.2. Set the power switch to PLAYER mode.■The last recorded still image/moving picture appears.3. To view six stored still image/moving picture on single screen, press the MULTI DISP.button.■A selection mark ( ) appears under the still image/moving picture.■Moving pictures will be displayed with the first scene as a still image, indicated by a picture mark ( ).■Move the MENU SELECTOR to select a still image/moving picture.■To display the previous six images, press the (REV).■To display the next six images, press the (FWD).4. To return to single playback mode, press the MULTI DISP. button again.■The still image/moving picture you have marked fills the whole display.19 20 2122 23 24[24/24]100-0025REC SEARCH FADE BLCREV FWDEASY MULTI DISP.MEMORY MIX / S.SHOW00000? SCD903 USA (64~114) 4/14/04 12:38 PM Page 96](https://usermanual.wiki/Samsung-Electronics-Co/04OMEGA2.User-Manual-Part-2/User-Guide-418398-Page-39.png)