Samsung Electronics Co 05TIGER DIGITAL CAMCORDER User Manual Tiger SEA 1 25
Samsung Electronics Co Ltd DIGITAL CAMCORDER Tiger SEA 1 25
UserManual.wiki
>
Samsung Electronics Co
>
05TIGER User Manual
Users Manual
Navigation menu
Upload a User Manual
Namespaces
Wiki Guide
HTML
PDF
Info
Views
User Manual
Discussion / Help
Navigation

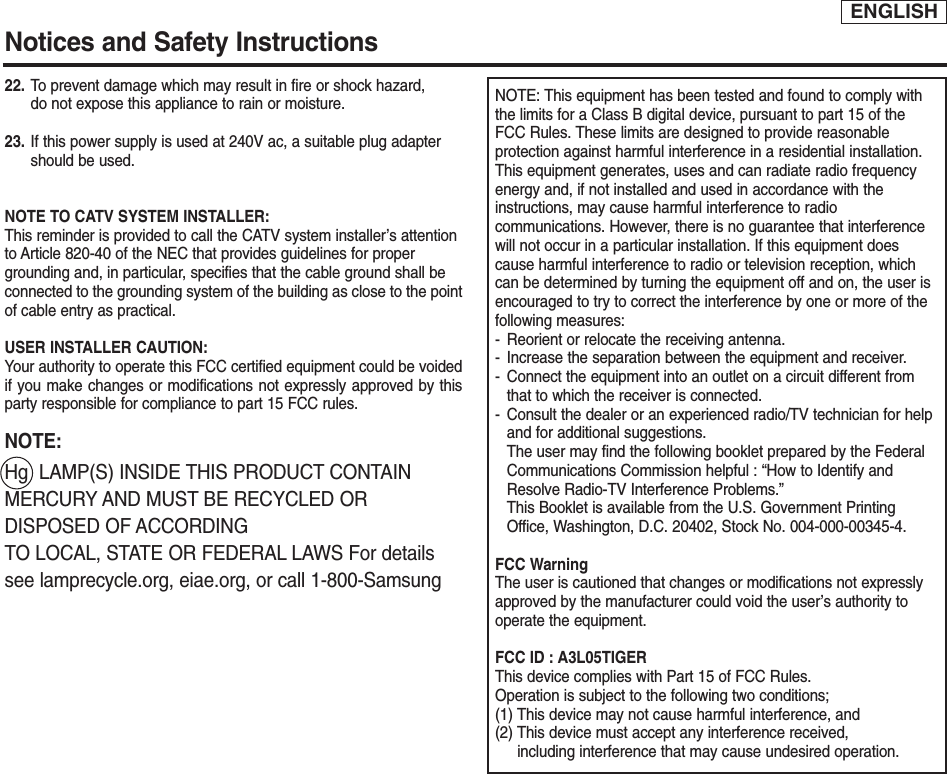
![ENGLISHSystem Menu Setting2727✤Clock setup works in Camera/Player/M.Cam/M.Player modes.✤The Date/Time is automatically recorded onto a tape.Before recording, please set the Date/Time.1. Set the Power switch to CAMERA or PLAYER.2. Set the Mode switch to TAPE or MEMORY.3. Press the MENU button.■The menu list will appear.4. Move the Menu selector to the left or right to select System, then press the Menu selector.5. Move the Menu selector to the left or right to select Clock Set, then press the Menuselector.The year will highlight first.6. Move the Menu selector to the left or right to set current Year, then press the Menu selector.The month will be highlighted.7. You can set the month, day, hour and minute following the same procedure for setting the year.8. Press the Menu selector after setting the minutes.■The message Complete! will be displayed.■To adjust the clock, select the Year, Month, Day, Hour or Min by pressing the Menu selector,then move the Menu selector to the left or right to set respective values. 9. To exit, press the MENU button.[ Notes ]■Date/Time is memorized and maintained by the built-in Lithium battery installed in the camcorder. If youdon’t use the camcorder for a long period of time, charge the Lithium battery at least once a month. To charge the built-in Lithiumbattery, supply power to the camcorder and set the Power Switch to CAMERA or PLAYER.■After the Lithium battery loses its charge (after about 3 month), the date/time appears on the screen as 12:00 AM JAN.1,2005.■You can set the year up to 2037.■If the built-in lithium battery is not charged, any input data will not be backed up.Setting the ClockMove Select ExitMENUCamera ModeBackClock SetBeep SoundUSB VersionLanguageDemonstrationJAN 1 200512 : 00 AM…†Move Select ExitMENUCamera ModeBackClock SetBeep SoundUSB VersionLanguageDemonstrationJAN 1 200512 : 00 AMComplete!58Camera Mode√SystemClock SetBeep SoundUSB VersionLanguageDemonstration√On√USB 2.0√English√OnMove Select ExitMENU4](https://usermanual.wiki/Samsung-Electronics-Co/05TIGER/User-Guide-516041-Page-11.png)
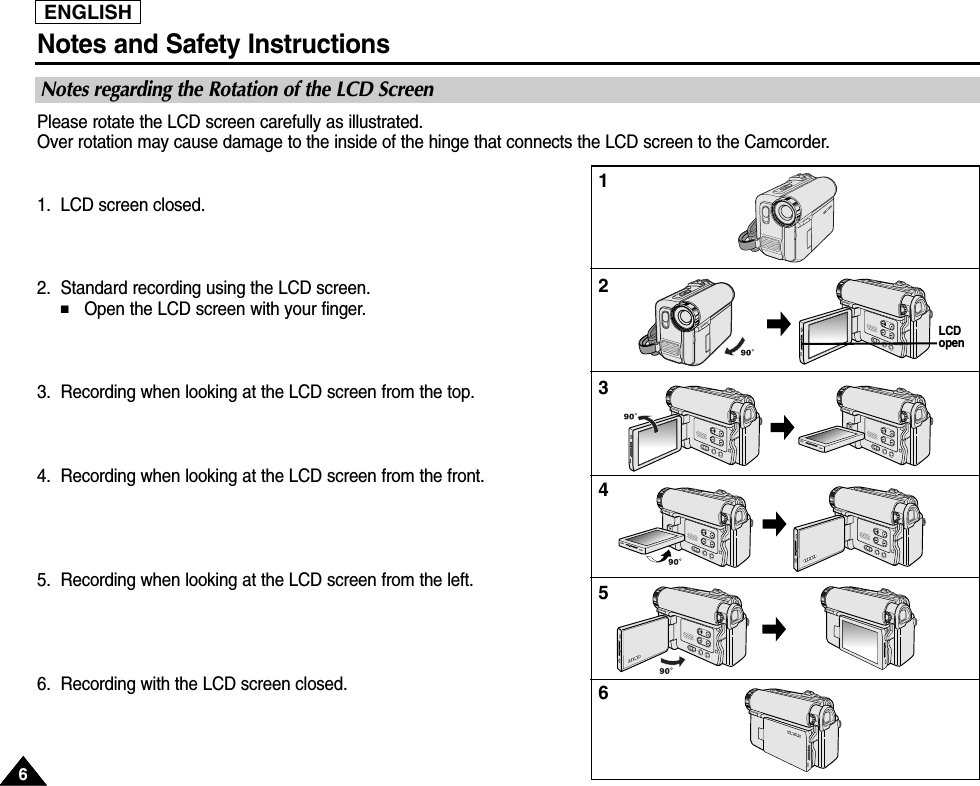
![✤The Remote function works in Camera/Player/M.Cam/M.Player modes.✤The Remote option allows you to enable or disable the remote control for use with the Camcorder.1. Set the Power switch to CAMERA or PLAYER.2. Set the Mode switch to TAPE or MEMORY.3. Press the MENU button.■The menu list will appear.4. Move the Menu selector to the left or right to select System, then press the Menu selector.5. Move the Menu selector to the left or right to select Remote, then press the Menu selector.6. Move the Menu selector to the left or right to select On or Off, then press the Menu selector.7. To exit, press the MENU button.[ Note ]If you set the Remote to Off in the menu and try to use it, the remote control icon ( ) will blink for 3 seconds on the LCD screen and then disappear.ENGLISHSystem Menu Setting2828Setting the Wireless Remote Control Acceptance (Remote) (SC-D457 only)Move Select ExitMENU61OffOn Camera ModeBackClock SetRemoteBeep SoundUSB VersionLanguageDemonstrationCamera Mode√SystemClock SetRemoteBeep SoundUSB VersionLanguageDemonstration√On√On√USB 2.0√English√OnMove Select ExitMENU4](https://usermanual.wiki/Samsung-Electronics-Co/05TIGER/User-Guide-516041-Page-12.png)
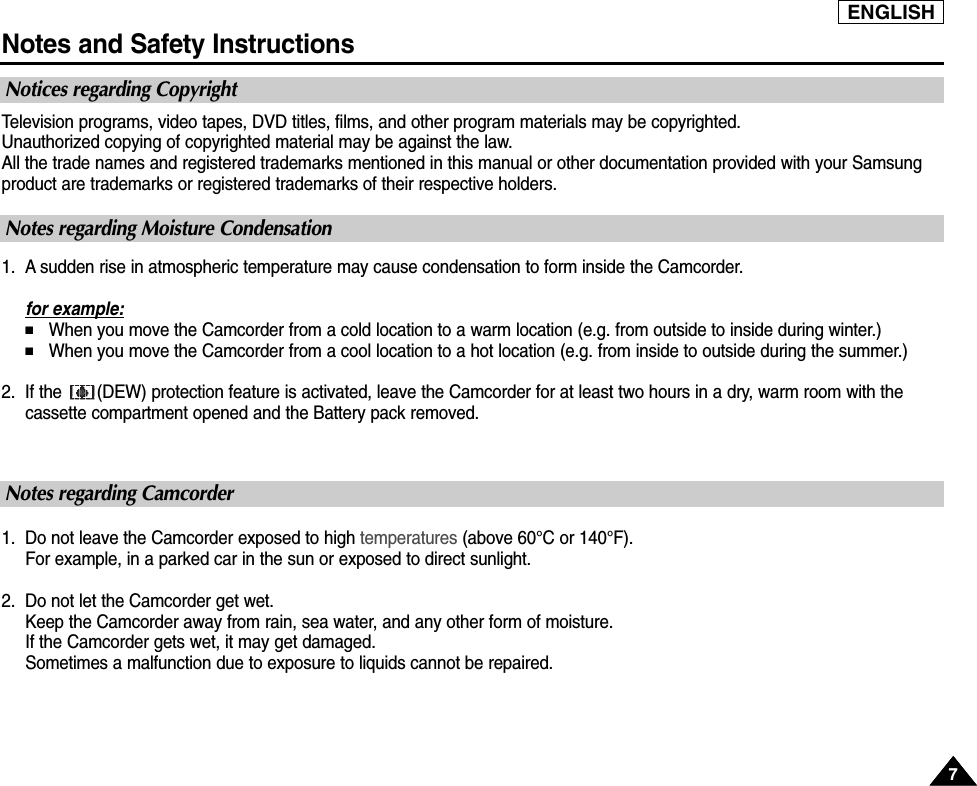
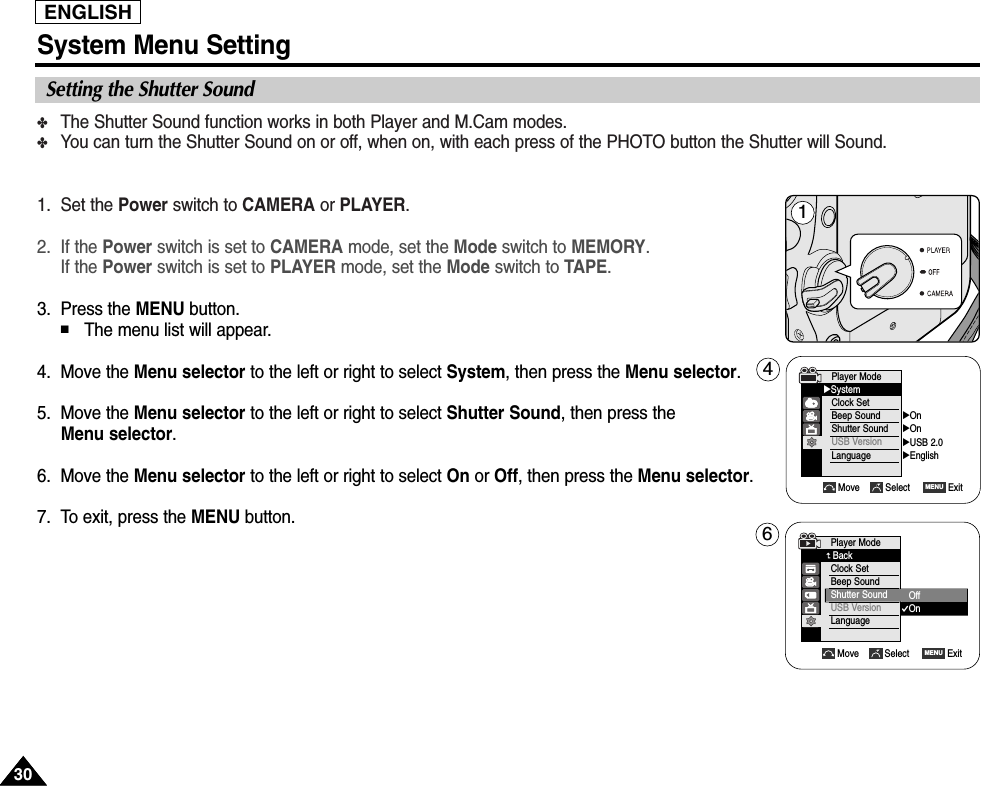
![ENGLISHSystem Menu Setting2929Setting the Beep Sound✤The Beep Sound function works in Camera/Player/M.Cam/M.Player modes.✤You can turn the Beep Sound on or off, when on, each press of a button sounds a beep.1. Set the Power switch to CAMERA or PLAYER.2. Set the Mode switch to TAPE or MEMORY.3. Press the MENU button.■The menu list will appear.4. Move the Menu selector to the left or right to select System, then press the Menu selector.5. Move the Menu selector to the left or right to select Beep Sound, then press the Menu selector. 6. Move the Menu selector to the left or right to select On or Off, then press the Menu selector.7. To exit, press the MENU button.[ Note ]When you are recording, the Beep Sound is automatically set to Off so you can’t hear it until you stopthe recording.Move Select ExitMENUCamera ModeBackClock SetBeep SoundUSB VersionLanguageDemonstrationOffOn 1Camera Mode√SystemClock SetBeep SoundUSB VersionLanguageDemonstration√On√USB 2.0√English√OnMove Select ExitMENU46](https://usermanual.wiki/Samsung-Electronics-Co/05TIGER/User-Guide-516041-Page-13.png)
![✤Before you begin: Make sure that there is no tape inserted in the Camcorder. (See page 36)✤Demonstration automatically shows you the major functions that are included with yourCamcorder so that you may use them more easily.✤The Demonstration function may only be used in the Camera mode without a tape inserted in theCamcorder. ✤The Demonstration operates repeatedly until the Demonstration mode switched off.1. Set the Power switch to CAMERA.2. Set the Mode switch to TAPE.3. Press the MENU button.■The menu list will appear.4. Move the Menu selector to the left or right to select System, then press the Menu selector.5. Move the Menu selector to the left or right to select Demonstration, then press the Menu selector. 6. Move the Menu selector to the left or right to select On, then press the MENU button.■The Demonstration will begin. 7. To quit the Demonstration, press the MENU button.[ Notes ]■The Demonstration mode is automatically activated when the Camcorder is left idle for more than 10 minutes after switching to the Camera mode (no tape is inserted in the Camcorder).■If you press other buttons (FADE, BLC, PHOTO, EASY.Q, COLOR NITE/PB ZOOM) during theDemonstration mode, the demonstration stops temporarily and resumes 10 minutes later if you do notoperate any other functions.ENGLISHSystem Menu Setting3131Viewing the DemonstrationMove Select ExitMENUCamera ModeBackClock SetBeep SoundUSB VersionLanguageDemonstration OffOn Camera Mode√SystemClock SetBeep SoundUSB VersionLanguageDemonstration√On√USB 2.0√English√OnMove Select ExitMENU146Samsung Camcorder is...Demonstration[Digital Camcorder]](https://usermanual.wiki/Samsung-Electronics-Co/05TIGER/User-Guide-516041-Page-15.png)
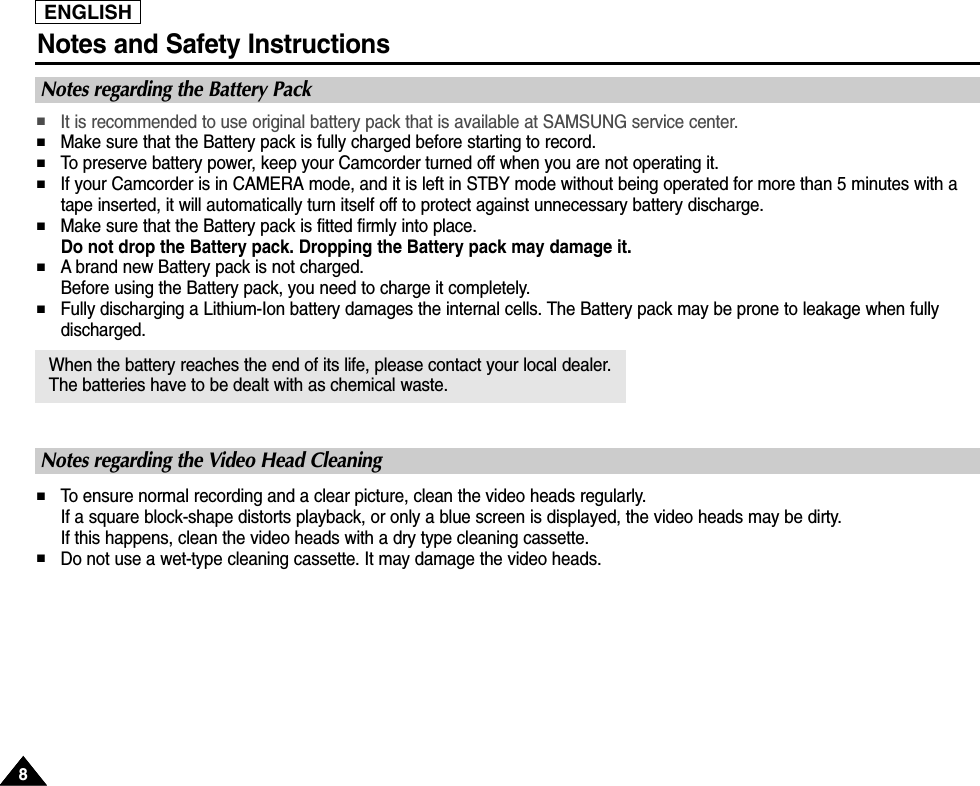
![3232ENGLISHDisplay Menu Setting✤This function works in Camera/Player/M.Cam/M.Player modes.✤Your Camcorder is equipped with a 2.5 inch color Liquid Crystal Display(LCD) screen, which enables you to view what youare recording or playing back directly.✤Depending on the conditions under which you are using the Camcorder (indoors or outdoors for example), you can adjust;-LCD Bright-LCD Color1. Set the Power switch to CAMERA or PLAYER.2. Set the Mode switch to TAPE or MEMORY.3. Press the MENU button.■The menu list will appear.4. Move the Menu selector to the left or right to select Display, then press the Menu selector.5. Move the Menu selector to the left or right to select the item you want to adjust(LCD Bright or LCD Color), then press the Menu selector.6. Move the Menu selector to the left or right to adjust the value of the selected item (LCD Bright or LCD Color), then press the Menu selector.■You can set values for LCD Bright and LCD Color between 0~35.7. To exit, press the MENU button.LCD BRIGHT & LCD COLOR functions do not affect the brightness and color of the image to be recorded.Adjusting the LCD Screen1Move Select ExitMENUCamera Mode√DisplayLCD BrightLCD ColorDate/TimeTV Display4√Off√OnMove Select ExitMENU6[18]Camera ModeBackLCD BrightLCD ColorDate/TimeTV Display](https://usermanual.wiki/Samsung-Electronics-Co/05TIGER/User-Guide-516041-Page-16.png)
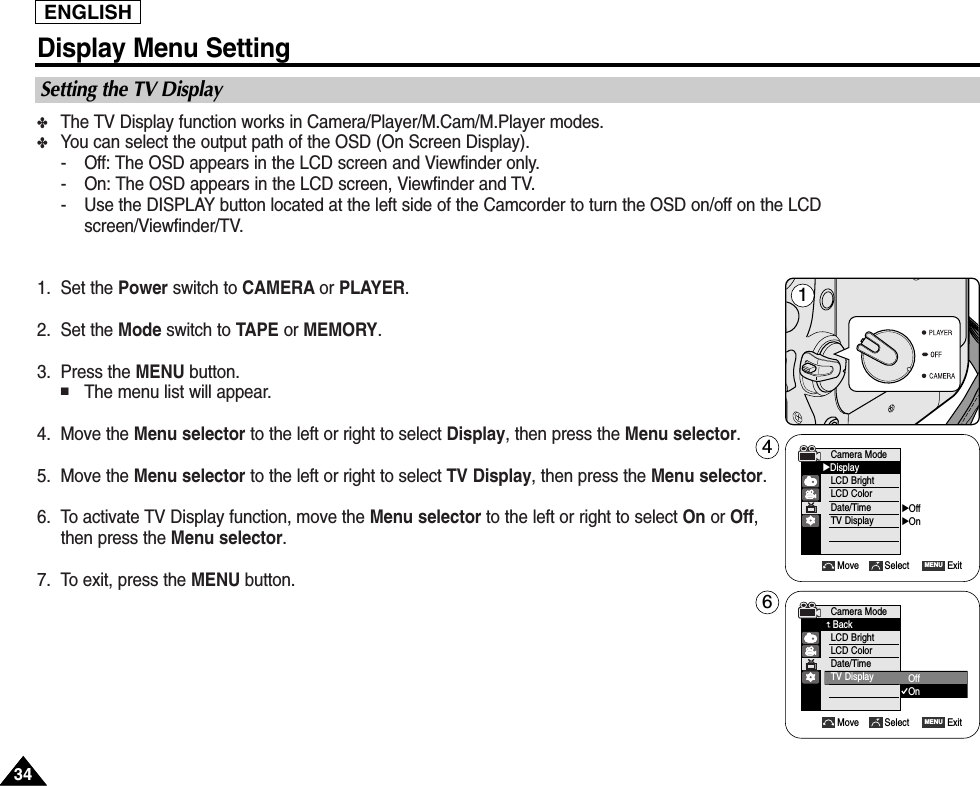
![3333ENGLISHDisplay Menu Setting✤The Date/Time function works in Camera/Player/M.Cam/M.Player modes.✤The date and time are automatically recorded on a special data area of the tape.1. Set the Power switch to CAMERA or PLAYER.2. Set the Mode switch to TAPE or MEMORY.3. Press the MENU button.■The menu list will appear.4. Move the Menu selector to the left or right to select Display, then press the Menu selector.5. Move the Menu selector to the left or right to select Date/Time, then press the Menuselector.6. Move the Menu selector to the left or right to select the display type of the Date/Time, then press the Menu selector.■Display type of the Date/Time: Off, Date, Time, Date&Time.7. To exit, press the MENU button.[ Notes ]■The Date/Time will read 12:00 AM JAN.1,2005 in the following conditions.-During playback of a blank section of a tape.-If the tape was recorded before setting the Date/Time in the Camcorder.-When the Lithium battery becomes weak or dead.■Before you use the Date/Time function, you must set the clock. See Setting the Clock on page 27.Displaying the Date/Time1Move Select ExitMENUCamera Mode√DisplayLCD BrightLCD ColorDate/TimeTV Display4Move Select ExitMENUCamera ModeBackLCD BrightLCD ColorDate/TimeTV DisplayOffDateTimeDate&Time√Off√On6](https://usermanual.wiki/Samsung-Electronics-Co/05TIGER/User-Guide-516041-Page-17.png)
![Adjusting the FocusENGLISHBasic Recording3535✤The Viewfinder will work when the LCD screen is closed.The focus adjustment knob of the Viewfinder enables individuals with vision problems to see clearer images.1. Close the LCD screen and pull out the Viewfinder.2. Use the focus adjustment knob of the Viewfinder to focus the picture.[ Notes ]■Viewing the sun or any strong light source through the Viewfinder for a prolonged period may beharmful, or cause temporary impairment.■The Viewfinder will work either in PLAYER mode with LCD screen closed or in CAMERA mode withLCD screen closed.Using the Viewfinder](https://usermanual.wiki/Samsung-Electronics-Co/05TIGER/User-Guide-516041-Page-19.png)
![3636ENGLISHBasic RecordingInserting and Ejecting a Cassette✤When inserting a tape or closing the cassette compartment, do not apply excessive force. As it may cause a malfunction. ✤Do not use any tape other than Mini DV cassettes.1. Turn on your Camcorder, then slide the TAPE EJECT switch on the upper ofthe Camcorder and open the cassette door until it clicks.■The cassette holder automatically rises and opens forward.2. Insert a tape into the cassette compartment with the tape window facingoutward and the protection tab toward the top. (Inserting a Cassette)■Remove the cassette tape, which is automatically ejected by pulling thecassette out. (Ejecting a Cassette)3. Press the PUSH label on the cassette holder and wait until it clicks and goesback into place. ■Do not apply excessive force or pressure on the cassette holder. ■Do not forcibly push the cassette holder into the Camcorder.■The cassette is automatically loaded.4. Close the cassette door.[ Note ] When you have recorded something that you wish to keep, you can protect it so that it will not be accidentallyerased.a. Protecting a tape: Push the safety tab on the cassette so that the hole is uncovered.b. Removing the tape protection: If you no longer wish to keep the recording on the cassette, push the safety tab back so that it covers the hole.How to store a tape a. Avoid places with magnets or magnetic interference.b. Avoid humidity and dust prone places. c. Keep the tape in an upright position and avoid storing it in direct sunlight.d. Avoid dropping or knocking your tapes.SAVEPUSH1 23 4aRECb](https://usermanual.wiki/Samsung-Electronics-Co/05TIGER/User-Guide-516041-Page-20.png)
![3838ENGLISHBasic Recording✤In some situations different recording techniques may be required for more dramatic results.1. General recording.2. Downward recording.Making a recording with a top view of the LCD screen.3. Upward recording.Making a recording viewing the LCD screen from below.4. Self recording.Making a recording viewing the LCD screen from the front.5. Recording with the Viewfinder.In circumstances where it is difficult to use the LCD screen, the Viewfinder can beused as a convenient alternative.[ Note ]Please rotate the LCD screen carefully as excessive rotation may cause damage to the inside of the hinge that connects the LCD screen to the Camcorder.Various Recording Techniques1 2354](https://usermanual.wiki/Samsung-Electronics-Co/05TIGER/User-Guide-516041-Page-22.png)
![ENGLISHBasic Recording3939Making your First Recording1. Connect a power source to the Camcorder. (see page 20)(A Battery pack or a AC Power adapter)Insert a cassette. (see page 36)2. Remove the Lens cover.3. Set the Power switch to CAMERA.■Open the LCD screen. ■Set the Mode switch to TAPE.Make sure that STBY is displayed. ■If the write protection tab of the cassette is open(set to save),STOP and Protection! will be displayed.Release the write protection tab to record.■Make sure the image you want to record appears on theLCD screen or Viewfinder.■Make sure the battery level indicates that there is enough remaining power for your expected recording time.4. To start recording, press the Start/Stop button.■REC ●is displayed on the LCD screen.To stop recording, press the Start/Stop button again.■STBY is displayed on the LCD screen.[ Note ]Detach the Battery pack when you are finished recording to prevent unnecessary battery power consumption.4132√√](https://usermanual.wiki/Samsung-Electronics-Co/05TIGER/User-Guide-516041-Page-23.png)
![Basic Recording✤The EASY.Q mode works only in Camera mode.✤The EASY.Q mode allows a beginner to easily make good recordings.1. Set the Power switch to CAMERA.2. Set the Mode switch to TAPE.3. By pressing the EASY.Q button, all functions on the camera will be set to off and the recordingsettings will be set to the following basic modes:■Battery level, recording mode, counter, date/time, and DIS ( ) will be displayed.■The word EASY.Q will appear on the LCD screen at the same time.However, the Date/Time will only be seen if it has been previously set. (see page 33)4. Press the Start/Stop button to start recording.Recording will begin using the basic automatic settings.5. Press the EASY.Q button again in the STBY mode and then turn the EASY.Q mode off. ■The EASY.Q function will not turn off while you are recording.■The camera will return to the settings that were set prior to activating EASY.Q mode.[ Notes ]■In EASY.Q mode, certain functions are not available, such as Menu, BLC, Manual focus.If you want to use these functions, you must first turn the EASY.Q mode off.■The EASY.Q mode settings are deleted when the Battery pack is removed from the Camcorder andmust be reset when the Battery pack is replaced. ■EASY.Q mode will not turn off during a recording.■Taking a photo image using the PHOTO button while EASY.Q is set releases DIS function. ■Digital Zoom, COLOR NITE or Digital Effect is not available in the EASY.Q mode.Using EASY.Q Mode (for Beginners)60min0:00:10SPSTBY4040ENGLISH31](https://usermanual.wiki/Samsung-Electronics-Co/05TIGER/User-Guide-516041-Page-24.png)
![ENGLISH4141Basic RecordingRecord Search (REC SEARCH)When a cassette is loaded and the Camcorder is left in the STBY mode for more than 5 minutes without being used, it will switch off automatically. To use it again, press the Start/Stop button or set the Power switch to OFF and then back to CAMERA. This auto power off feature is designed to save battery power.■You can view a recording using the REC SEARCH +, - function in STBY mode. REC SEARCH - enables you to play the recording backwards and REC SEARCH + enables you to play it forwards, for as long as you keep each button presseddown.■If you press the REC SEARCH - button in STBY mode, your Camcorder will play in reverse for 3 seconds and return to the original position automatically.[ Note ]Mosaic shaped distortion may appear on the screen while in Record Search mode.](https://usermanual.wiki/Samsung-Electronics-Co/05TIGER/User-Guide-516041-Page-25.png)
![4242ENGLISHBasic Recording✤The ZERO MEMORY function works in both Camera and Player modes.✤You can mark a point on a tape that you want to return to following playback.1. Set the Power switch to CAMERA or PLAYER.2. Set the Mode switch to TAPE.3. Press the ZERO MEMORY button on the remote control before the recording or during playbackat the point where you wish to return. ■The time code is changed to a tape counter that is set to ZERO MEMORY with the0:00:00 (ZERO MEMORY indicator).■If you want to cancel the ZERO MEMORY function, press the ZERO MEMORY button again.4. Finding the zero position.■When you have finished playback, fast forward or rewind the tape in stop mode.The tape stops automatically when it reaches the zero position.■When you have finished recording, set the Power switch to PLAYER and press the(REW) button.The tape stops automatically when it reaches the zero position.5. The tape counter with the (ZERO MEMORY indicator) disappears from the display and the tape counter is changed to thetime code.[ Notes ]■In the following situations, ZERO MEMORY mode may be canceled automatically:-At the end of the section marked with the ZERO MEMORY function.-When the tape is ejected.-When you remove the Battery pack or power supply.■The ZERO MEMORY may not function correctly where there is a break between recordings on the tape.Setting the Zero Memory (SC-D457 only)œ1](https://usermanual.wiki/Samsung-Electronics-Co/05TIGER/User-Guide-516041-Page-26.png)
![ENGLISHBasic Recording4343✤The SELF TIMER function works only in Camera mode.✤When you use the Self Timer function on the remote control, the recording begins automatically in 10 seconds.1. Set the Power switch to CAMERA.2. Set the Mode switch to TAPE.3. Press the SELF TIMER button until the appropriate indicator is displayed in the LCD screen.4. Press the Start/Stop button to start the timer.-Self Timer starts counting down from 10 with a beep sound.-In the last one second of the countdown, the beep sound gets faster, then recording startsautomatically.-If you want to cancel the Self Timer function before recording, press the SELF TIMER button.5. Press the Start/Stop button again when you wish to stop recording.[ Notes ]■Do not obstruct the remote control sensor by putting obstacles between the remote control andCamcorder.■The remote control range is 4~5m (13~17 ft).■The effective remote control angle is up to 30 degrees left /right from the center line.■Using a tripod is recommended for delayed recording.Self Record using the Remote Control (SC-D457 only)œ134œ](https://usermanual.wiki/Samsung-Electronics-Co/05TIGER/User-Guide-516041-Page-27.png)
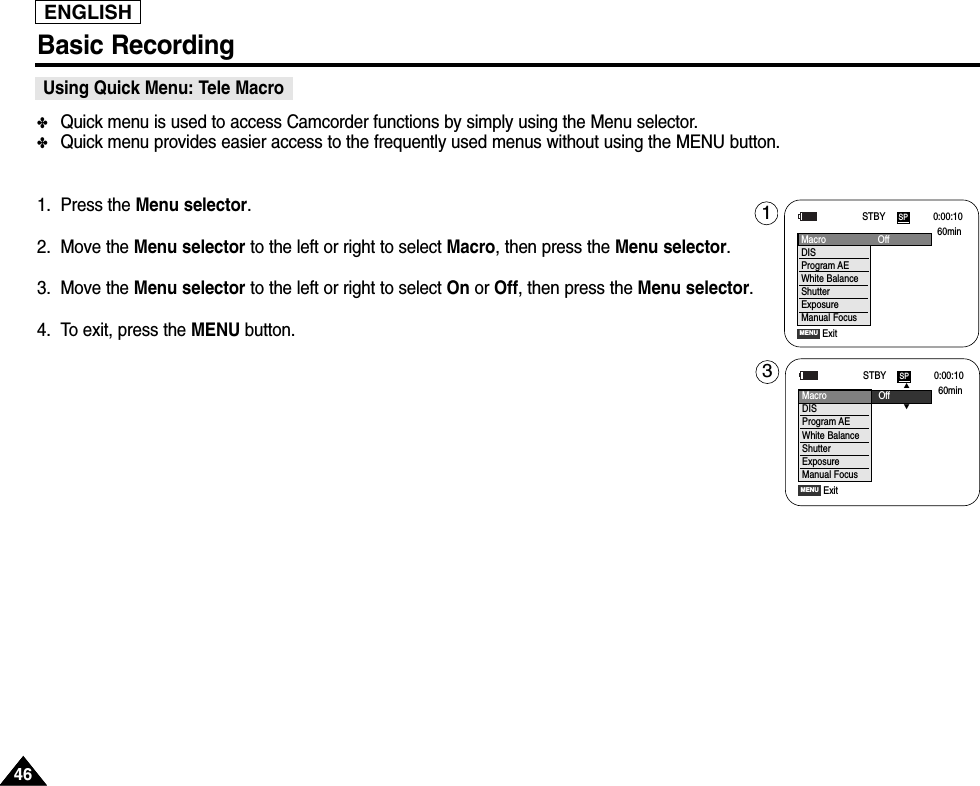
![ENGLISH4545Basic Recording✤Tele Macro Function works in both Camera and M.Cam mode.✤Effective focal distance in Tele Macro mode is 50 Cm (19.7 inches) ~ 100 Cm (39.4 inches).1. Set the Power switch to CAMERA. 2. Set the Mode switch to TAPE or MEMORY.3. Press the MENU button.■The menu list will appear.4. Move the Menu selector to the left or right to select Camera, then press the Menu selector.5. Move the Menu selector to the left or right to select Macro, then press the Menu selector.6. Move the Menu selector to the left or right to select On or Off, then press the Menu selector.7. To exit, press the MENU button.■Tele Macro Icon( ) will be displayed.[ Notes ]■When recording in Tele Macro mode, the focus speed may be slow.■When you operate the Zoom function in the Tele Macro mode,the recording subject may be out of focus.■Use a tripod to prevent hand shake in the Tele Macro mode.■Avoid shadows when recording in the Tele Macro mode.■As the distance to the subject decreases, focusing area narrows.■When you can not get proper focus, use the Zoom lever.Using the Tele MacroSP60min0:00:10STBYœMove Select ExitMENUCamera ModeBackProgram AEWhite BalanceDigital EffectMacroDISDigital ZoomOffOn √Auto√Auto√Off√Off√Off√OffMove Select ExitMENUCamera Mode√CameraProgram AEWhite BalanceDigital EffectMacroDISDigital Zoom46](https://usermanual.wiki/Samsung-Electronics-Co/05TIGER/User-Guide-516041-Page-29.png)
![ENGLISH4848Basic Recording✤BLC works in both Camera and M.Cam modes.✤Back lighting exists when the subject is darker than the background:-The subject is in front of a window.-The person to be recorded is wearing white or shiny clothes and is placedagainst a bright background; the person’s face is too dark to distinguishhis/her features.-The subject is outdoors and the background is overcast.-The light sources are too bright.-The subject is against a snowy background.1. Set the Power switch to CAMERA.2. Set the Mode switch to TAPE or MEMORY.3. Press the BLC button.■BLC icon ( ) will be displayed.4. To exit BLC mode, press the BLC button again.■Each press of the BLC button toggles: Normal ➝ BLC ➝ Normal.[ Note ]The BLC function will not operate in EASY.Q mode.Using Back Light Compensation Mode (BLC)<BLC on><BLC off>60min0:00:10SPSTBY34œ](https://usermanual.wiki/Samsung-Electronics-Co/05TIGER/User-Guide-516041-Page-32.png)
![Danger (SC-D455/D457 only)ENGLISH4949Basic Recording✤COLOR NITE function works only in Camera mode.✤Shutter speed can be controlled, allowing you to record slow moving objects.✤COLOR NITE function may produce a brighter image.✤The LED light can be used with COLOR NITE function only. (SC-D455/D457 only)✤The LED light enables you to record a subject in dark places without sacrificing color.(SC-D455/D457 only)1. Set the Power switch to CAMERA.2. Set the Mode switch to TAPE.3. Press the COLOR NITE button.4. Each time you press the COLOR NITE button, shutter speed is changed to;√Color N. 1/30, Color N. 1/15 and off. (SC-D453 only)√Color N. 1/30, Color N. 1/15, Color N. 1/15()and off. (SC-D455/D457 only) [ Notes ]■The COLOR NITE will not turn ON or OFF while you are recording.■When using COLOR NITE the image takes on a slow motion like effect.■While using the COLOR NITE function, you cannot use the following functions: Program AE, DIS,Digital Zoom, Shutter Speed, Exposure, 16:9 wide (among of the Digital Effect function).■When using the COLOR NITE function, the focus adjusts slowly and the white dots may appearon the screen, this is not a defect.■COLOR NITE is not available while DIS, Photo image recording or EASY.Q is in use.■The range of the LED light is limited (up to 6.6ft (2m)). (SC-D455/D457 only)■Digital Zoom, Photo image recording,16:9 Wide, Emboss2, Pastel2, Mirror or Mosaic is not availablein the COLOR NITE mode.■If DIS or EASY.Q is set, COLOR NITE mode will be released.■The LED light can become extremely hot.■Do not touch it while in operation or soon after turning it off, otherwise serious injury may result.■Do not place the Camcorder into the carrying case immediately after using the LED light, since it remains extremely hot forsome time.■Do not use near flammable or explosive materials.Using the Color Nite/LED Light (SC-D455/D457 only)COLORNITE/PB ZOOM60min0:00:10SPSTBYColor N.1/3013œ4œ](https://usermanual.wiki/Samsung-Electronics-Co/05TIGER/User-Guide-516041-Page-33.png)
![ENGLISH6868PlaybackPlaying back a Tape you have recorded on the LCD ScreenAdjusting the LCD Bright/Color during Playback✤The playback function works only in Player mode.✤You can monitor the playback picture on the LCD screen.1. Set the Power switch to PLAYER.2. Set the Mode switch to TAPE.3. Insert the tape you wish to view. (see page 36)4. Open the LCD screen. ■Adjust the angle of the LCD screen and set the brightness or color if necessary.5. Press the (REW) button to rewind the tape to the starting point.■To stop rewinding, press the (STOP) button.■The Camcorder stops automatically after rewinding is complete.6. Press the (PLAY/STILL) button to start playback.■You can view the picture you recorded on the LCD screen.■To stop the play operation, press the (STOP) button.✤You can adjust the LCD Bright/Color during playback.✤The adjustment method is the same procedure as used in Camera mode. (see page 32) [ Notes ]■You can also view the picture on a TV screen, after connecting the Camcorder to a TV or VCR. (see page 70~71) ■Various functions are available in Player mode. (see page 72) ■For searching and viewing still images recorded onto tape. (see page 67)135](https://usermanual.wiki/Samsung-Electronics-Co/05TIGER/User-Guide-516041-Page-34.png)
![ENGLISH7070Playback✤The playback function works only in Player mode.✤It is practical to view a tape using the LCD screen when in a car or outdoors.✤To play back a tape, the television must be NTSC compatible. (see page 113)✤We recommend that you use the AC Power adapter as the power source for the Camcorder.1. Connect the Camcorder to your TV with the Multi-AV cable.■The yellow jack: Video■The white jack: Audio(L)-mono■The red jack: Audio(R)If you connect to a monaural TV, connect the yellow jack (Video) to the video input of the TV and the white jack (Audio L) to the audio input of the TV. 2. Set the Power switch to PLAYER.3. Set the Mode switch to TAPE.4. Turn on the TV and set the TV/VIDEO selector on the TV to Video.■Refer to the TV user’s manual.5. Play the tape.[ Notes ]■You may use an S-Video cable to obtain better quality pictures if you have a S-Video connector on your TV.■Even if you use an S-Video cable, you need to connect an audio cable.■If you connect the cable to the Audio/Video jack, you will not hear sound from the Camcorder's speakers.■If only a mono audio input is available on the TV set, use the Audio cable with the white jack (Audio L).Playback on the LCD ScreenPlayback on a TV MonitorConnecting to a TV which has Audio/Video Input JacksTape PlaybackDVUSBAV/ SCamcorderAudio/Video/S-VideoVideo input-YellowAudio input(left)-WhiteS-Video inputAudio input(right)-RedTV](https://usermanual.wiki/Samsung-Electronics-Co/05TIGER/User-Guide-516041-Page-35.png)
![ENGLISH7373Playback■Press the F.ADV button on the remote control while in still mode. -Video sequence advances frame by frame each time you press the F.ADV button.-The F.ADV function works in still mode only.■To resume normal playback, press the (PLAY/STILL) button.-Forward frame advancePress the F.ADV button on the remote control in still mode.-Reverse frame advancePress the (-) button on the remote control to change the direction in F.ADV mode.Press the F.ADV button on the remote control.■Forward X2 playback-Press the X2 button on the remote control during playback.-To resume normal playback, press the (PLAY/STILL) button.■Reverse X2 playback-Press the (-) button during forward X2 playback.-To resume normal playback, press the (PLAY/STILL) button.■To playback in reverse at normal speed, press the (-) button during normal forward playback.■Press the (PLAY/STILL) or (+) button to return to normal forward playback.[ Notes ]■Mosaic shaped distortion may appear on the screen while in some of the various playback modes.Mosaic shaped distortion or noise may be experienced when you play back tapes recorded in LP which contain various playbackfunctions.■Sound will only be heard during normal SP or LP playback.Frame Advance (To play back frame by frame) (SC-D457 only)X2 Playback (Forward/Reverse) (SC-D457 only)Reverse Playback (SC-D457 only)œœ<SC-D457 only>](https://usermanual.wiki/Samsung-Electronics-Co/05TIGER/User-Guide-516041-Page-36.png)
![✤AV In/Out function works only in Player mode. ✤AV in/out setting enables you to record signal from external sources and display it on LCD screen.Also, you can direct your video or image to external devices to record or play back.1. Connect the Camcorder to your VCR or TV with the Multi-AV cable. (See pages 70~71)2. Set the Power switch to PLAYER.3. Set the Mode switch to TAPE.4. Turn on the VCR or TV.5. Insert the blank tape with protection tab closed into the Camcorder.■If you want to record from a connected VCR, insert a recorded VHS tape into the VCR.6. Press the MENU button.■The menu list will appear.7. Move the Menu selector to the left or right to select Record, then press the Menu selector.8. Move the Menu selector to the left or right to select AV In/Out, then press theMenu selector. 9. Move the Menu selector to the left or right to select AV In or S-Video In, then press the Menu selector.■ If you want to see the Camcorder picture with a TV, set AV In/Out menu to Out.10.To exit, press the MENU button.11. Press the Start/Stop button to set the Camcorder to REC PAUSE mode. PAUSE appears on the LCD screen.12.Select the TV program or playback the VHS tape.13.Press the Start/Stop button to start recording.■If you want to pause recording for a while, press the Start/Stop button again.14.To stop recording, press the (STOP) button.[ Note ]■When you record the images being played back on an analog VCR, if they are not being played backat normal speed, (for example, more than double speed or slow playback), only agray image appears on the Camcorder.ENGLISH7575PlaybackAV In/Out (SC-D457 only)√SP√12Bit√Off√OutMove Select ExitMENUPlayer Mode√RecordRec ModeAudio ModeWind CutAV In/OutMove Select ExitMENU179Player ModeBackRec ModeAudio ModeWind CutAV In/Out OutAV InS-Video In](https://usermanual.wiki/Samsung-Electronics-Co/05TIGER/User-Guide-516041-Page-37.png)