Samsung Electronics Co 2004KHAN2 Video Cassette Recorder User Manual
Samsung Electronics Co Ltd Video Cassette Recorder Users Manual
Users Manual
●
Safety Instructions
●
Features
●
Accessories
●
Connecting
●
Tape Controls
●
Timer Recording
●
Remote Control
●
Front Panel
2 3 4 5 6 7
Safety Instructions Remote Control
Front Panel
Features
Accessories
Loading the Batteries
Prevent Accidental Tape Erasure
Head Cleaning
Tape Controls
Connecting
Automatically Setting the Clock Manual Clock Set Timer Recording
Changing or Canceling a timer recording
Note to CATV system installer : This reminder is
provided to call CATV system installer's attention to
Article 820-40 of the National Electrical Code (Section
54 of Canadian Electrical Code, Part I) that provides
guidelines for proper grounding and, in particular,
specifies that the cable ground shall be connected to
the grounding system of the building as close to the
point of cable entry as practical.
Caution : FCC regulations state that any unautho-
rized changes or modifications to this equipment may
void the user's authority to operate it.
Caution : To prevent electric shock, match wide
blade of plug to wide slot, fully insert.
Attention : Pour eviter les chocs electriques, intro-
duire la lame le plus large de la fiche dans la borne
correspondante de la prise et pousser jusqu’au fond.
Important : One Federal Court has held that unau-
thorized recording of copyrighted TV programs is an
infringement of U.S. copyright laws.
Certain Canadian programs may be copyrighted and
any unauthorized recording in whole or in part may
be a violation of these rights.
To prevent damage which may result in fire or
electric shock hazard,
do not expose this appliance to rain or moisture.
Important Safety Instructions
• Hi-Fi Stereo sound (VR8460 only)
• Plug and Play
• 24Hours X 7 Days Timer Back-up
• Rewinds a T-120 in about 100 seconds
• One Touch Recording (OTR) up to four hours
• Tri-lingual on-screen programming
(English/Spanish/French)
• Auto Clock Set
Old or damaged tapes may clog heads
Use "dry" type head cleaning cassette only.
Follow cleaning tape instructions carefully.
Excessive use of tape can shorten head life.
Cleaning the VCR
Use soft, dry cloth of dusting attachment of a vacuum to
remove dust from all cabinet vent holes.
You may moisten cloth with nonabrasive, antistatic
cleaner/polisher.
Features Quality
Digital Auto Tracking
Continuously analyzes the signal and adjusts for
optimum picture quality.
Manual Tracking Control (to reduce picture noise)
Use during Playback and Slow Motion mode to
reduce picture noise
Press the CH/TRK
❷
button on the remote
control or on the VCR until the picture clears up
to return to Auto Tracking. Press the EJECT button to
eject the tape and insert a tape again. Auto Tracking
will be operate automatically.
Playback a Tape
1.
Insert a tape.
Loose or peeling labels may cause tape jam.
2.
Press the PLAY button to play tape.
If Auto play is selected and the video tape has no
safety tab, it will begin playing automatically when
you insert in the VCR.
1.
"To display a timer recording list, press the MENU
and
❿
button on the remote control."
Loose or peeling labels may cause tape jam.
2.
Press the
❿
and
,
❷
buttons to set the channel.
Press the
❿
button to move to the next setting.
3.
"Repeat step 2 to set start time, end time, date and
record speed."
Loose or peeling labels may cause tape jam.
4.
Press the MENU button to complete programming
the timer recording. Stop the VCR or turn the power
off.
To stop a timer recording , press the VCR power button.
To change the Timer Program
Repeat steps 1 to 4
To cancel
the Timer Program
Select the program you want to cancel in the timer
recording list.
Press the CLEAR button twice on the remote or the
EJECT button on the VCR to clear the Timer Program
settings.
Tracking
The Tracking adjustment removes the white lines that
sometimes appear during playback because of slight
differences in recording decks. The TRK button will
automatically align the recorded tracks with the playback
heads to solve this problem. You may also set tracking
manually.
Adjust Tracking Manually
During playback, press the CH/TRK
❷
buttons to
remove white lines from the picture.
Special Features During Play
Special Features During Play
Forward/Reverse Scene Search
1.
Press the FF or REW button during playing.
2.
After search has begun, the speed of search is changed
with the duration of press of FF or REW button as
shown below.
[SLP] : Approx 21X
approx 9X
[SP] : Approx 7X
approx 3X
3. Release button to play.
Slow Motion Picture
1.
Press the Slow + or -button while a cassette is playing.
2.
Press the Slow buttons repeatedly to vary slow motion
speed from 1/5 to 1/30 of normal playback.
3.
Press the PLAY button twice to release.
Eject a Tape
●
Press the EJECT button on remote or the EJECT
button on VCR to eject tape.
Record on a Tape
1.
Insert a tape with a record tab. Check the record speed.
2.
Select a channel to record by pressing the
CH/TRK
/
❷
or number buttons.
3.
Press the REC button on the remote control of the front
of the VCR. The REC indicator will light. To edit, press
the PAUSE button to pause and again to resume
recording.
4.
Press the STOP button to stop recording.
One Touch Recording (recording in progress)
1.
Press the REC button repeatedly to set length as
follows.
2. Record Time
Not timed
30min
1 hr
1:30
2:00
3:00
4:00
Not timed
3.
The VCR shuts off at the length set.
Separate Recording and Viewing
Select the channel with the TV's channel buttons.
Select channels on VCR (in STOP or PAUSE
mode)
Select channels on VCR.
for ANT/CABLE
VCR
TV
1.
Connect cable from Antenna /Cable to VCR's IN
FROM ANT. Jack.
2.
Connect VCR's OUT TO TV jack to TV's ANT. IN jack
with RF Cable (not supplied).
REMARK : You cannot watch the VCR through the RF
connection. The RF out sends antenna and
cable signals only.
for DSS/Cable Box
VCR
TV
1.
Connect your cable box's OUT jack to the VCR's IN
FROM ANT. Jack with an RF cable.
2.
Connect VCR's OUT TO TV jack to TV's ANT. IN jack
with RF Cable (not supplied).
1.
Press the MENU button on the remote control.
Press the
❷
and
❿
buttons to select
"Clock set/adjust"
Alcohol and various solvents could damage
your VCR.
Check to make sure the following items have been
included with your VCR.
Battery replacement caution
Do not mix old and new batteries
Do not mix alkaline with manganese batteries
Remote Control
AC59-00046G
Batteries for remote (2AA)
AC43-12002J
Owner’s Manual
AC68-02094A
Registration Card
AD68-00078A
1.5V
1.5V
Owner’s
Manual
Break off the tab
to prevent
recording
To record again
Cover the hole
with cellophane
tape.
Caution
Please make all cable or antenna connections
before plugging in to the AC outlet.
Plugging the VCR Power Cord into an AC wall
outlet starts auto channel and clock set.
Caution
Over tightening "Nut type" RF coaxial cables
may damage jack. Finger tighten only.
Don't use tool.
warning
Picture interruption may occur with some TVs.
FF and REW search speed may vary depending on
current tape position.
Notes
Watching one channel and recording another
is not possible when using Cable Box or DSS
Receiver. After 5 minutes in Pause mode,
VCR stops to protect the tape and the video
heads.
Notes
When using a cable decoder box or DSS make sure
the decoder box is on and set to the correct channel
for timer recording.
Notes
R
L
LINE
OUTLINE
IN 1
AUDIO
VIDEO
TV IN
R
L
LINE
OUTLINE
IN 1
AUDIO
VIDEO
TV IN
If Auto Clock Set was incomplete
1.
Press the MENU button on the remote control.
Select "Clock set/adjust" and "Manual".
2.
To enter current time using the
/
❷
buttons then
press the
❿
button to move to the next setting.
3.
To enter month, date and year in the same way.
4.
Press the MENU button to start the clock and exit.
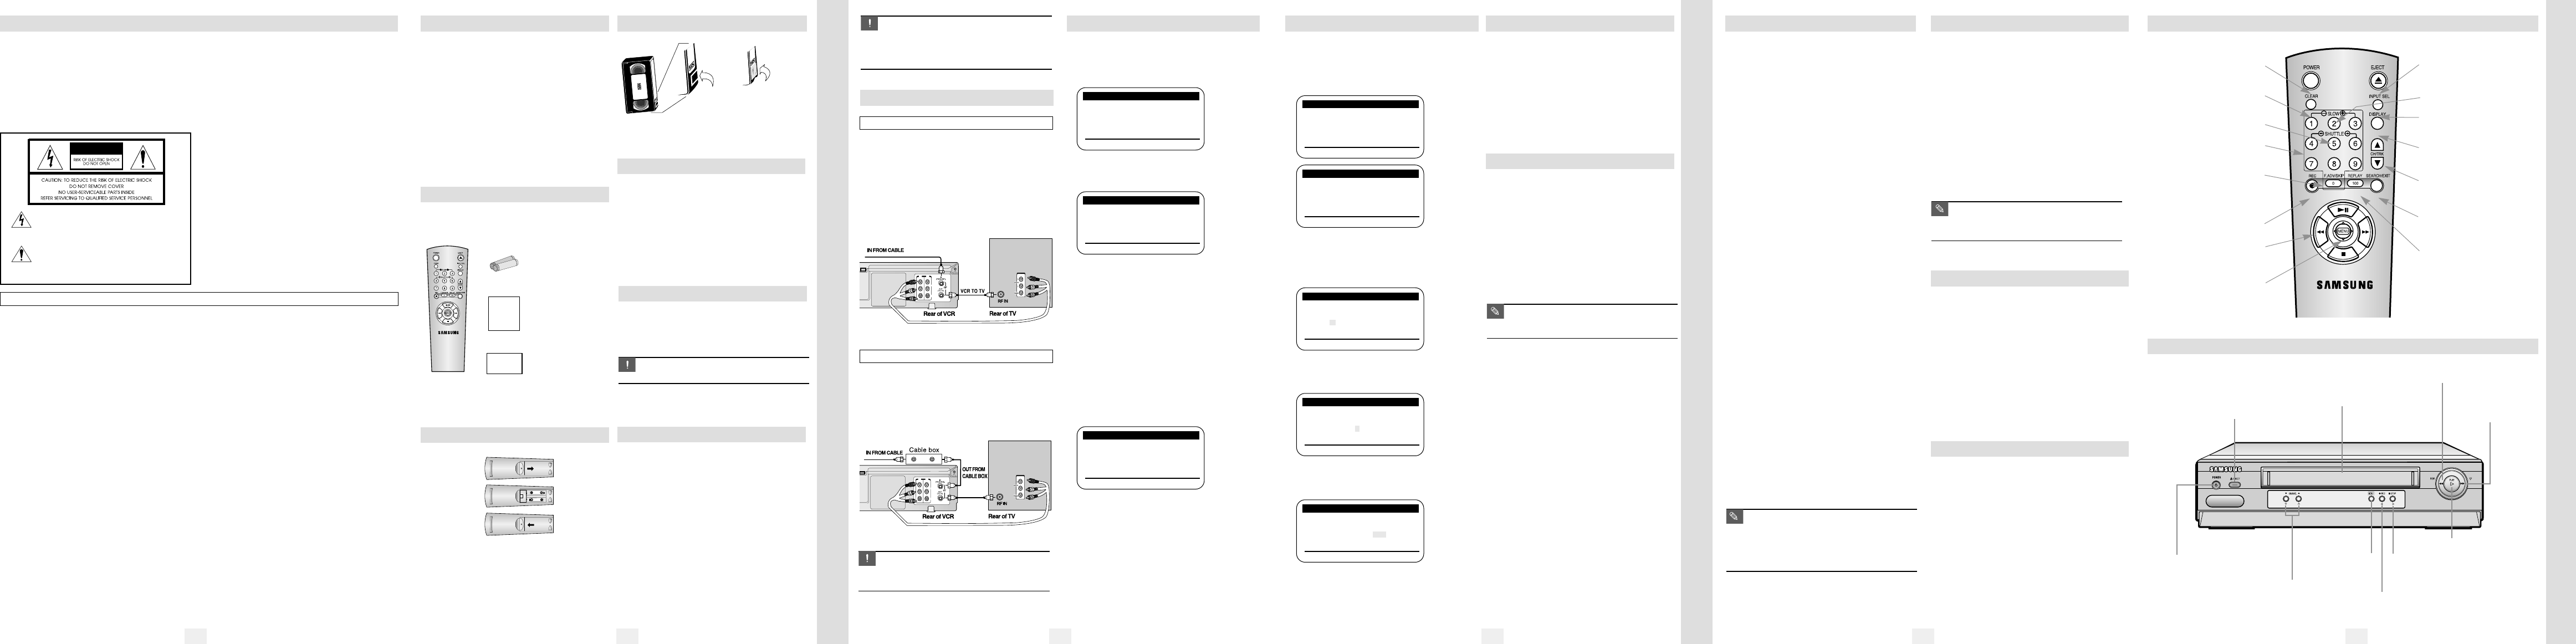
POWER
Press to turn your VCR on and off.
CLEAR
Press to set counter to zero or to clear
timer record programs.
SHUTTLE
Press to change speed during playback.
NUMBER BUTTONS
Press to select channels by assigned
numbers.
F.ADV/SKIP
In play mode, press to skip ahead 30
seconds.
In still mode, press to advance one
frame.
REC
Press to start VCR recording.
STOP, PLAY, REW, FF
Press to control cassette playback
or to move a cursor in the on screen
menu.
MENU
Press to display menu screen.
EJECT
Press to eject a tape.
SLOW
Press for slow-motion during playback.
INPUT SEL
Press to switch between line input or
antenna.
DISPLAY
Press for on-screen information displays.
CH
Press to change channels.
TRK
Press to reduce picture distortion during
playback.
SEARCH/EXIT
Press to enter the variable search mode
or to exit the on screen menu.
REPLAY
Press to repeat the last 5 seconds of tape
during playback.
100
Press to select channels higher than 100.
(followed by up to two additional number
buttons)
POWER
Press to turn the VCR on and off.
EJECT
Press to eject a tape.
EJECT button is used as the
CLEAR button on the menu screen
CASSETTE COMPARTMENT
Insert a video cassette.
REW (REWIND)
Press to rewind in stop mode or reverse search
in play mode.
F.F (FAST FORWARD)
Press to fast forward in stop mode
or forward search in play mode.
PLAY Press to play tape.
STOP Press to stop tape or press to move
a cursor to the right on the menu screen.
RECORD
Press to record or press to move a cursor to
the left on the menu screen.
MENU
Press to display or clear
the menu screen.
CHANNEL
❷
Press to change channels or press to move
a cursor up or down on the menu screen.
2.
Press the
❿
button to select AUTO.
3.
Clock data CH :
If you select AUTO, the VCR will automatically turn to a
channel providing time data.
Time zone :
If you select AUTO for your time zone, the VCR sets
the clock using the first Coordinated Universal Time
information it finds.
If time is not correct, select another time zone.
Daylight Savings Time :
If you select AUTO, the VCR sets the clock using
the DST information broadcast in the signal
(channel). If you select YES, Daylight Savings Time
is observed.
4.
Press the MENU button when you finish setting the
clock.
Timer recording
❿
Clock set/adjust
Channel setup
VCR function setup
Language/Lengua/Langue
[
❷
/
❿
] [MENU/EXIT]
MAIN MENU
Timer recording
❿
Clock set/adjust
Channel setup
VCR function setup
Language/Lengua/Langue
[
❷
/
❿
] [MENU/EXIT]
MAIN MENU
CLOCK SET/ADJUST
[
❷
/
❿
] [MENU/EXIT]
[
❷
/
➛❿
] [MENU/EXIT]
CLOCK SET/ADJUST
❿
AUTO
MANUAL
Select [
❷
] and press [
❿
]
[
❷
/
❿
] [MENU/EXIT]
CLOCK SET/ADJUST
AUTO
❿
MANUAL
Select [
❷
] and press [
❿
]
[
❷
/
➛❿
][MENU/EXIT]
CLOCK SET/ADJUST
❿
Clock data CH: [AUTO]
Time zone : [AUTO]
Do you observe [AUTO]
DST in summer?
TIME
DATE
YEAR
12:00
1/01
2004 THU
A
M
[
❷
/
➛❿
][MENU/EXIT]
CLOCK SET/ADJUST
TIME
DATE
YEAR
9:00
5/05
2004 WED
P
M
[
❷
/
➛❿
][MENU/EXIT]
CLOCK SET/ADJUST
TIME
DATE
YEAR
9:00
5/05
2004 WED
P
M
Still(Freeze) Picture
1.
Press the PLAY button during playing.
2.
Press the PLAY button to release.
Frame by Frame Picture
1.
Press the F.ADV/SKIP button repeatedly in still mode.
2.
Press the PLAY button to release.
3.
For Skip Search, press the F.ADV/SKIP button once to
skip ahead 30 seconds, twice 60 seconds and up to
four times 120 seconds in play mode.
Replay Picture
1.
Press the REPLAY button on the remote control.
2.
VCR will rewind for about 5 seconds in SP mode or
about 15 seconds in SLP mode, then play back the
section again.
This symbol is intended to alert the user to the
presence of uninsulated “dangerous voltage” within the
product’s enclosure that may be of sufficient
magnitude to constitute a risk of fire or electric shock to
persons.
This symbol is intended to alert the user to the
presence of important operating and maintenance
(servicing) instructions in the literature accompanying
CAUTION
1. Read these instructions.
2. Keep these instructions.
3. Heed all warnings.
4. Follow all instructions.
5. Do not use this apparatus near water.
6. Clean only with dry cloth.
7. Do not block any ventilation openings. Install in accordance with the manufacturer’s
instructions.
8. Do not install near any heat sources such as radiators, heat registers, stoves, or other
apparatus (including amplifiers) that produce heat.
9. Do not defeat the safety purpose of the polarized or grounding-type plug. A polarized plug has
two blades with one wider than the other. A grounding type plug has two blades and a third
grounding prong. The wide blade or the third prong are provided for your safety. If the
provided plug does not fit into your outlet, consult an electrician for replacement of the
obsolete outlet.
10. Protect the power cord from being walked on or pinched particularly at plugs, convenience
receptacles, and the point where they exit from the apparatus.
11. Only use attachments/accessories specified by the manufacturer.
12. Use only with cart, stand, tripod, bracket, or table specified by the manufacturer, or sold with
the apparatus. When a cart is used, use caution when moving the cart/apparatus combination
to avoid injury from tip-over.
13. Unplug this apparatus during lightning storms or when unused for long periods of time.
14. Refer all servicing to qualified service personnel. Servicing is required when the apparatus has
been damaged in any way, such as power-supply cord or plug is damaged, liquid has been
spilled or objects have fallen into the apparatus, the apparatus has been exposed to rain or
moisture, does not operate normally, or has been dropped.
Registration
Card
12111098
Display
Rear Panel
Specifications
●
CONEXIONES-CONFIGURACIÓN INICIAL
●
Limited Warranty
●
Display
●
Rear Panel
●
Specifications
Video
Cassette Recorder
Owner’s Manual
VR8460
VR5460
ELECTRONICS
SAMSUNG VIDEO CASSETTE RECORDER
LIMITED WARRANTY TO ORIGINAL PURCHASER
This SAMSUNG brand product, as supplied and distributed by Samsung Electronics America, Inc. (SAMSUNG) and delivered new,
in the original carton to the original consumer purchaser, is warranted by SAMSUNG against manufacturing defects in materials and
workmanship for a limited warranty period of:
Ninety (90) Days Labor and One (1) Year Parts
This limited warranty begins on the original date of purchase, and is valid only on products purchased and used in the United States.
To receive warranty service, the purchaser must contact SAMSUNG for problem determination and service procedures. Warranty
service can only be performed by a SAMSUNG authorized service center. The original dated bill of sale must be presented upon
request as proof of purchase to SAMSUNG or SAMSUNG’s authorized service center. Transportation of the product to and from the
service center is the responsibility of the purchaser.
SAMSUNG will repair or replace this product, at our option and at no charge as stipulated herein, with new or reconditioned parts or
products if found to be defective during the limited warranty period specified above. All replaced parts and products become the
property of SAMSUNG and must be returned to SAMSUNG. Replacement parts and products assume the remaining original war-
ranty, or ninety (90) days, whichever is longer.
This limited warranty covers manufacturing defects in materials and workmanship encountered in normal, noncommercial use of this
product and shall not apply to the following, including, but not limited to: damage which occurs in shipment; delivery and installation;
applications and uses for which this product was not intended; altered product or serial numbers; cosmetic damage or exterior finish;
accidents, abuse, neglect, fire, water, lightning or other acts of nature; use of products, equipment, systems, utilities, services, parts,
supplies, accessories, applications, installations, repairs, external wiring or connectors not supplied or authorized by SAMSUNG
which damage this product or result in service problems; incorrect electrical line voltage, fluctuations and surges; customer adjust-
ments and failure to follw operating instructions, cleaning, maintenance and environmental instructions that are covered and pre-
scribed in the instruction book; product removal or reinstallation; reception problems and distortion related to noise, echo, interfer-
ence or other signal transmission and delivery problems. SAMSUNG does not warrant uninterrupted or error-free operation of the
product.
THERE ARE NO EXPRESS WARRANTIES OTHER THAN THOSE LISTED AND DESCRIBED ABOVE, AND NO WARRANTIES
WHETHER EXPRESS OR IMPLIED, INCLUDING, BUT NOT LIMITED TO, ANY IMPLIED WARRANTIES OF MERCHANTABILITY
OR FITNESS FOR A PARTICULAR PURPOSE, SHALL APPLY AFTER THE EXPRESS WARRANTY PERIODS STATED ABOVE,
AND NO OTHER EXPRESS WARRANTY OR GUARANTY GIVEN BY ANY PERSON, FIRM OR CORPORATION WITH
RESPECT TO THIS PRODUCT SHALL BE BINDING TO SAMSUNG. SAMSUNG SHALL NOT BE LIABLE FOR LOSS OF REV-
ENUE OR PROFITS, FAILURE TO REALIZE SAVINGS OR OTHER BENEFITS, OR ANY OTHER SPECIAL, INCIDENTAL OR
CONSEQUENTIAL DAMAGES CAUSED BY THE USE, MISUSE OR INABILITY TO USE THIS PRODUCT, REGARDLESS OF
THE LEGAL THEORY ON WHICH THE CLAIM IS BASED, AND EVEN IF SAMSUNG HAS BEEN ADVISED OF THE POSSIBILI-
TY OF SUCH DAMAGES. NOR SHALL RECOVERY OF ANY KIND AGAINST SAMSUNG BE GREATER IN AMOUNT THAN
THE PURCHASE PRICE OF THE PRODUCT SOLD BY SAMSUNG AND CAUSING THE ALLEGED DAMAGE. WITHOUT LIMIT-
ING THE FOREGOING, PURCHASER ASSUMES ALL RISK AND LIABILITY FOR LOSS, DAMAGE OR INJURY TO PURCHAS-
ER AND PURCHASER’S PROPERTY AND TO OTHERS AND THEIR PROPERTY ARISING OUT OF THE USE, MISUSE OR
INABILITY TO USE THIS PRODUCT SOLD BY SAMSUNG NOT CAUSED DIRECTLY BY THE NEGLIGENCE OF SAMSUNG.
THIS LIMITED WARRANTY SHALL NOT EXTEND TO ANYONE OTHER THAN THE ORIGINAL PURCHASER OF THIS PROD-
UCT, IS NONTRANSFERABLE AND STATES YOUR EXCLUSIVE REMEDY.
Some states do not allow limitations on how long an implied warranty lasts, or the exclusion or limitation of incidental or consequen-
tial damages, so the above limitations or exclusions may not apply to you. This warranty gives you specific legal rights, and you may
also have other rights which vary from state to state.
To obtain warranty service, please contact SAMSUNG at:
SAMSUNG ELECTRONICS AMERICA, INC.
CONSUMER ELECTRONICS CUSTOMER SERVICE
400 Valley Road, Suite 201, Mount Arlington,NJ 07856
Tel: 973-601-6000, Fax: 973-601-6001
1-800-SAMSUNG (1-800-726-7864)
www.samsungsupport.com
Antenna input/output terminals: UHF/VHF: 75 ΩF type connector
Signal system: Standard NTSC
Recording/Playback system: Recording: VHS format(SP, SLP)
Playback: VHS format(SP, LP, SLP)*
Video cassette with mark
Record/Play Time: 6 hours with T-120 in SLP mode
Rewind Time: approximately 100 seconds
Power Source: 120V AC, 60Hz
Power Output: VR8460
VR5460
App. 12watts on, 2.0watts off
Dimensions: 360mm(W) X 84mm(H) X 240mm(D)
14.2''(W) X 3.3''(H) X 9.4''(D)
Weight: 2.7kg/6.0lbs
Your VCR can receive 68 broadcast TV channels or up to 125 unscrambled cable channels.
Check your local cable company for complete compatibility requirements.
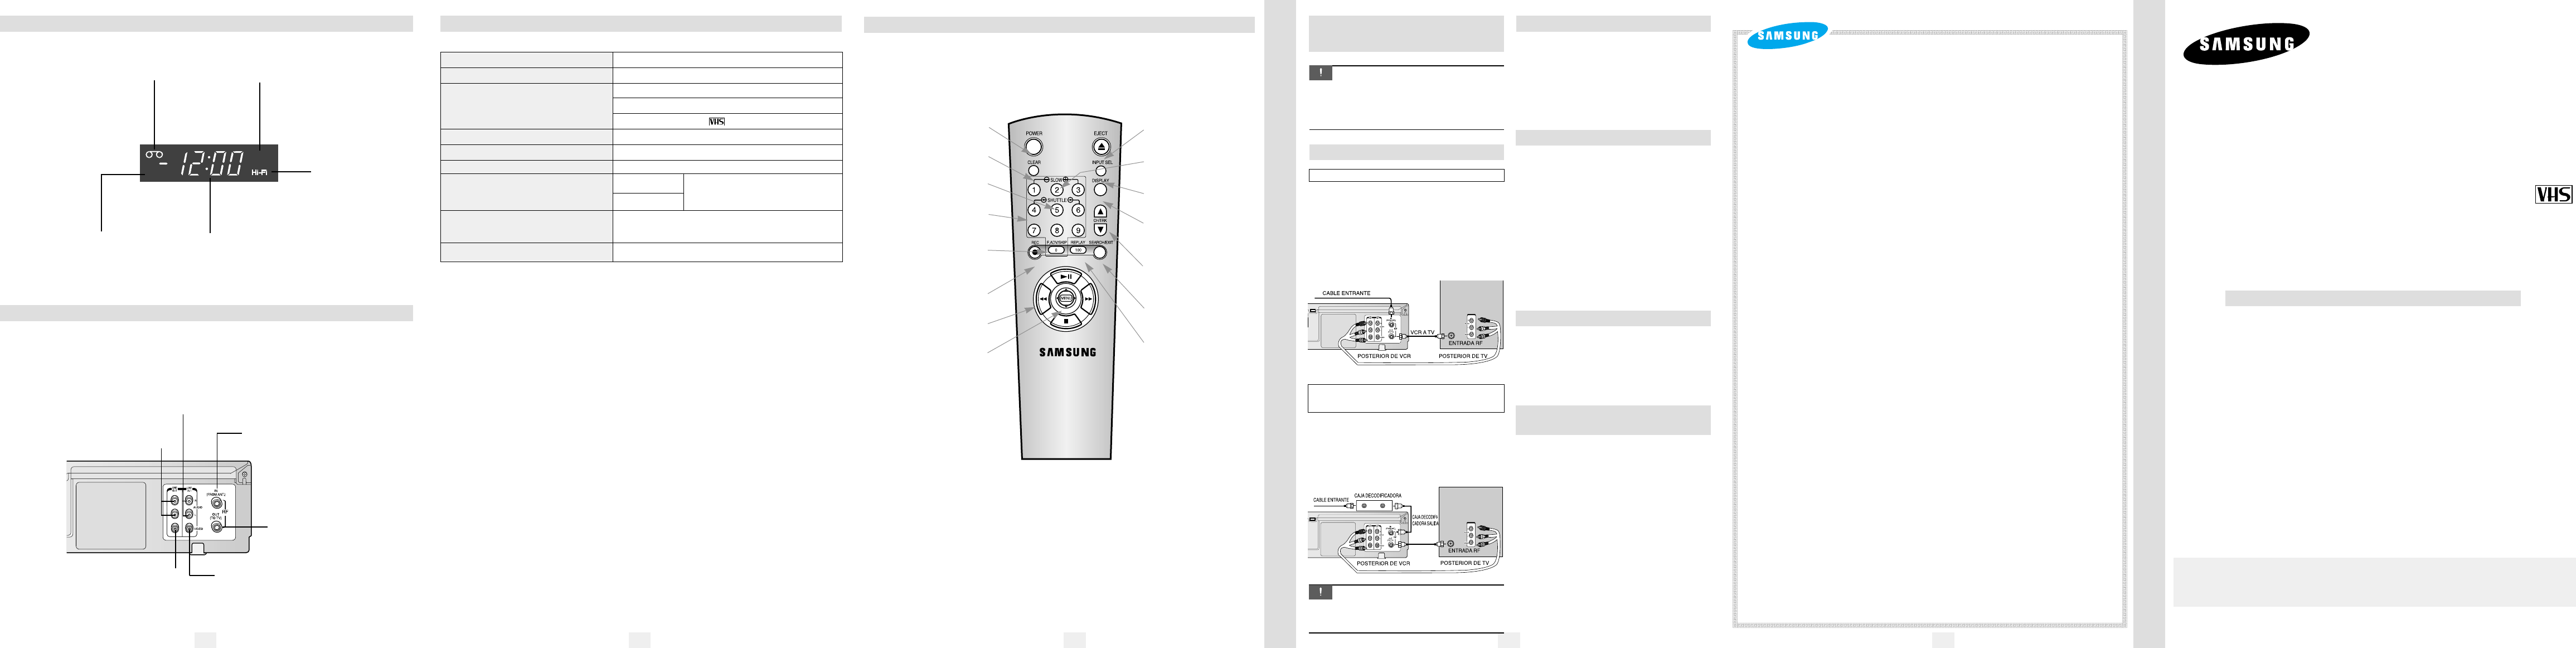
TIMER Indicator
Timer Recording is set.
VCR Indicator
Picture source is VCR.
TAPE Indicator
Lights when a tape is inserted.
Hi-Fi Indicator
Lights when the VCR
receives a Hi-Fi broadcast
(VR8460).
Number Display
Displays current channel number, clock time,
time remaining or tape counter.
VCR
TIMER
Use the jacks on the rear panel to connect the VCR to other components and signals, including: VCRs, TVs,
stereo equipment, digital video components, antenna and cable signals.
Note: VR5460 has one Audio out on the rear panel.
AUDIO OUT (L/R)
Used to output audio signals to connected
equipment.
AUDIO IN (L/R)
Used to input audio signals from connected
equipment to VCR.
IN FROM ANT
Used to input cable or antenna signals.
OUT TO TV
Used to output Cable or antenna
signals to a TV.
REMARK :
You cannot watch the VCR though
the RF connection. The RF out
sends antenna and cable signals
only.
VIDEO OUT
Used to output video signals from
VCR to connected equipment.
VIDEO IN
Used to input video signals from connected equipment
to the VCR.
Safety Instructions . . . . . . . . . . . . . . . . . . . . . . . . . . . . . . . . . . . . . . . 2
Before Using . . . . . . . . . . . . . . . . . . . . . . . . . . . . . . . . . . . . . . . . . . . 3
Connecting . . . . . . . . . . . . . . . . . . . . . . . . . . . . . . . . . . . . . . . . . . . . 4
Tape Controls . . . . . . . . . . . . . . . . . . . . . . . . . . . . . . . . . . . . . . . . . . . 5
Timer Recording . . . . . . . . . . . . . . . . . . . . . . . . . . . . . . . . . . . . . . . . . 6
Location of Control . . . . . . . . . . . . . . . . . . . . . . . . . . . . . . . . . . . . . 7, 8
Specifications . . . . . . . . . . . . . . . . . . . . . . . . . . . . . . . . . . . . . . . . . . . 9
Control remoto universal VCR, presione primero el botón . . . . . . . . . . 10
CONEXIONES-CONFIGURACIÓN INICIAL . . . . . . . . . . . . . . . . . . . . 11
Limited Warranty . . . . . . . . . . . . . . . . . . . . . . . . . . . . . . . . . . . . . . . . 12
Table of Contents
SAMSUNG ELECTRONICS AMERICA, INC.
HEADQUARTERS 105 Challenger Road, Ridgefield Park, N.J. 07660-0511 TEL: 1-800-SAMSUNG
SERVICE DIVISION 400 Valley Road, Suite 201, Mount Arlington, NJ 07856 TEL: 1-800-SAMSUNG (1-800-726-7864)
Control remoto universal VCR, presione primero el botón
CONEXIONES-CONFIGURACIÓN
INICIAL(READY TO PLAY)
POWER
Pressione para encender y apagar el
VCR.
CLEAR
Presione para reajustar el contador de
cinta.
SHUTTLE
Pressione para cambiar la velocidad
durante la reproducción.
BOTTONES DE NÚMEROS
Presione para seleccionar canales medi-
ante números asignados o para selec-
cionar opciones en pantallas.
F.ADV-SKIP
En el modo reproducir, presione para saltar
hacia adelante 30 segundos. En el modo
de cámara lenta, presione para avanzar un
cuadro.
REC
Presione para comenzar la grabación
desde el VCR.
STOP, PLAY, REW, FF
Presione para controlar la reproducción de
la cinta.
MENU
Presione para seleccionar el programa en
pantalla OSP del Menú Principal.
EJECT
Presione para expulsar la cinta.
SLOW
Usado para la reproducción en
cámara lenta.
INPUT SEL
Presione para activar y desactivar la
linea de entrada.
DISPLAY
Presione para ver información en
pantalla.
CH
Presione para cambiar canales.
TRK
Presione para ajustar el seguimiento
de la señal de video durante la
reproducción.
SEARCH-EXIT
Presione para salir de la pantalla
búsqueda OSP o para cambiar el
modo de visualización
REPLAY
Presione para la repetición de los
últimos 5 seg. durante la reproducción.
100
Presione para seleccionar canales por
encima de 100.
CONEXIONES
Para ANT/CABLE
VCR
TV
1.
Conecte el cable de la antnna al terminal IN FROM
ANT del VCR.
2.
Conecte el terminal OUT TO TV del VCR a la entrada
de la antena VHF/UHF del TV con el cable RF incluido.
OBSERVACIÓN : No puede ver el VCR mediante la
conexión RF. La salida RF sólo envía
señales de antena y de cable.
Para Sistema Digital de Satelite
(DSS)/Convertidor de cable
VCR
TV
1.
Conecte la salida de convertidor de cable al
terminal IN FROM ANT.
2.
Conecte el terminal OUT TO TV del VCR a la
entrada de la antena VHF/UHF del TV con el cable
RF incluido.
Realice la conexión de la antena o TV por cable
antes de enchufar el cable de CA.
La videograbadora iniciará automáticamente la
fijación de las canales y del reloj al enchufar el
cable de CA.
Precaución
Si aprieta demasiado los cables coaxiales
RF "tipo Nut", puede dañar el enchufe.
Apriételos sólo con los dedos, sin herramien-
tas.
Precaución
TV IN
TV IN
Reproducción de cintas de videocasete
1.
Encienda el TV e inserte un casete en el VCR.
Presione el botón de PLAY, si es necesario.
2.
Después de unos pocos segundos de seguimiento
automático, deberia escucharse el sonido.
1.
Prenda el VCR y oprima el botón de MENU para
obtener el Munú Principal. Oprima el botón de
❷
y
❿
para seleccionar el Ajuste de la hora.
2.
Oprima el botón de
/
❷
y
❿
para indicar la hora
del dia.
3.
Oprima el botón de
/
❷
y
❿
para indicar el mes,
la fecha, y dos últimos números que correspondan al
año.
4.
Oprima el botón de MENU para concluir.
1.
Oprima el botón de MENU Tras esto, oprima el botón
de
❷
y
❿
para seleccinar el Ajuste de Canales.
2.
Oprima el botón de
❷
y
❿
para comenzar la
programación automática de canales.
Oprima el botón de
❷
y
❿
para comenzar la
programación automática de canales.
Para Realizar Ajuste de la Hora
Del Menú Principal, oprima el botón de
❷
y
❿
para
seleccionar ingles, español o francés.
Para Cambiar la selección de idiomas
Para Realizar Entrada de Ajuste de
Canales
AC68-02094A(00)
2003.12.31/Version 1.0