Samsung Electronics Co BT10PS RF Digital Photo Frame User Manual IC User manual ENG
Samsung Electronics Co Ltd RF Digital Photo Frame IC User manual ENG
UserManual.wiki
>
Samsung Electronics Co
>
BT10PS User Manual
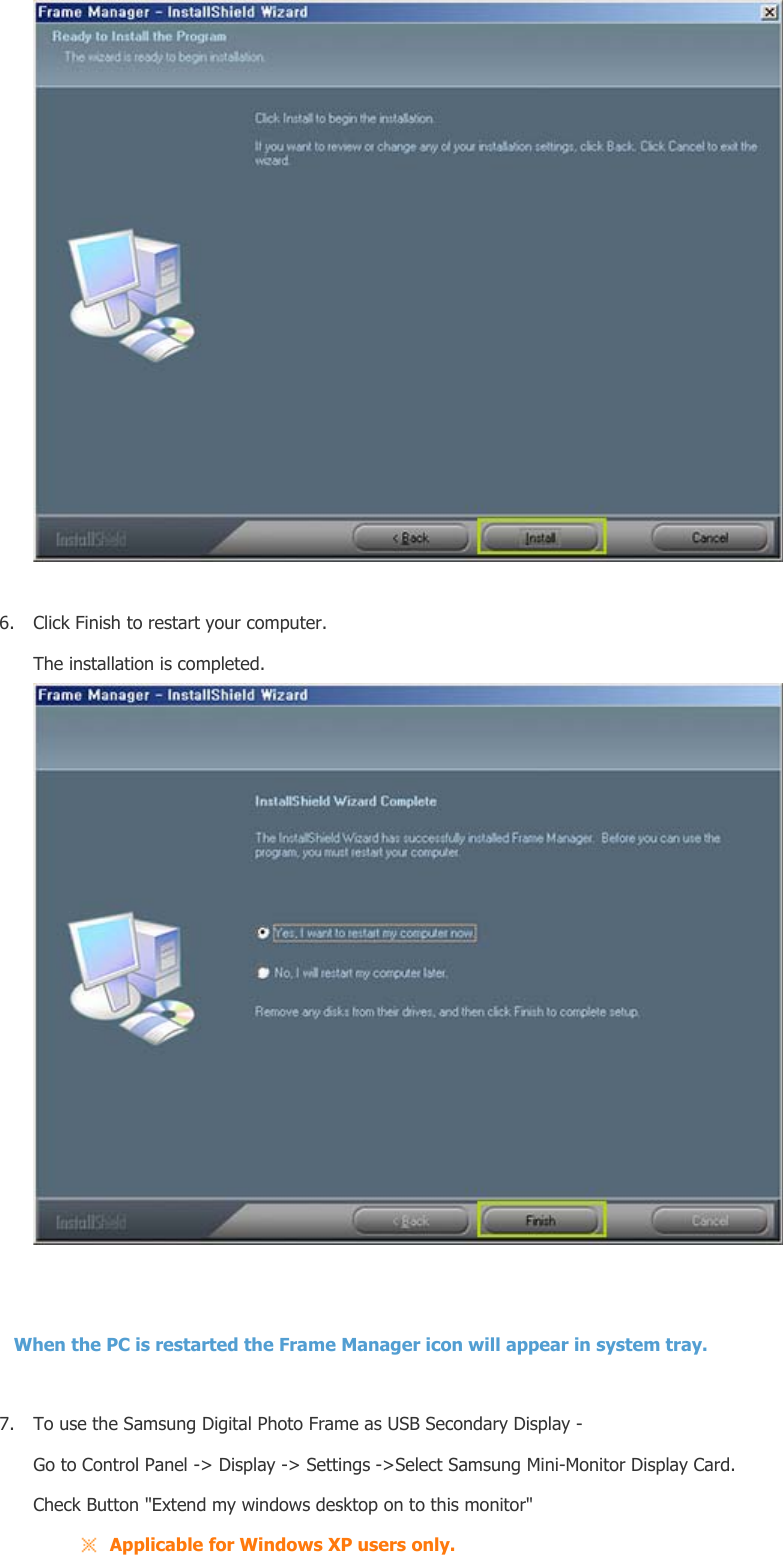
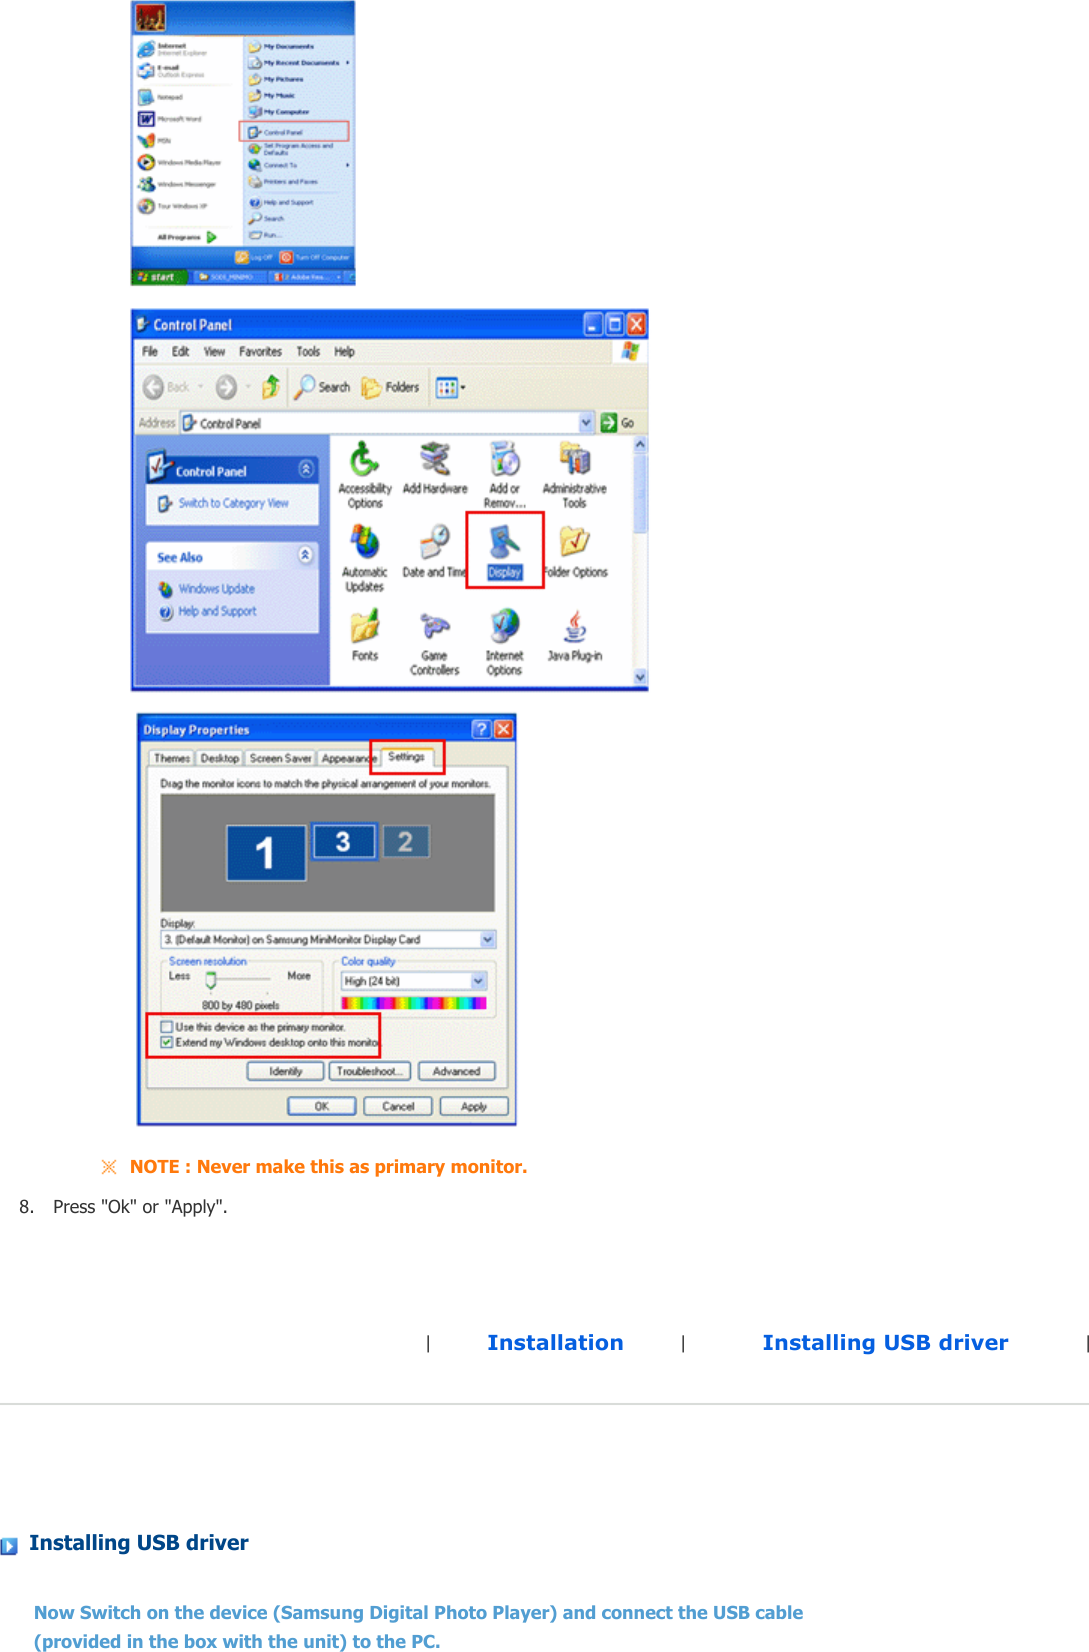
User manual
Navigation menu
Upload a User Manual
Namespaces
Wiki Guide
HTML
PDF
Info
Views
User Manual
Discussion / Help
Navigation

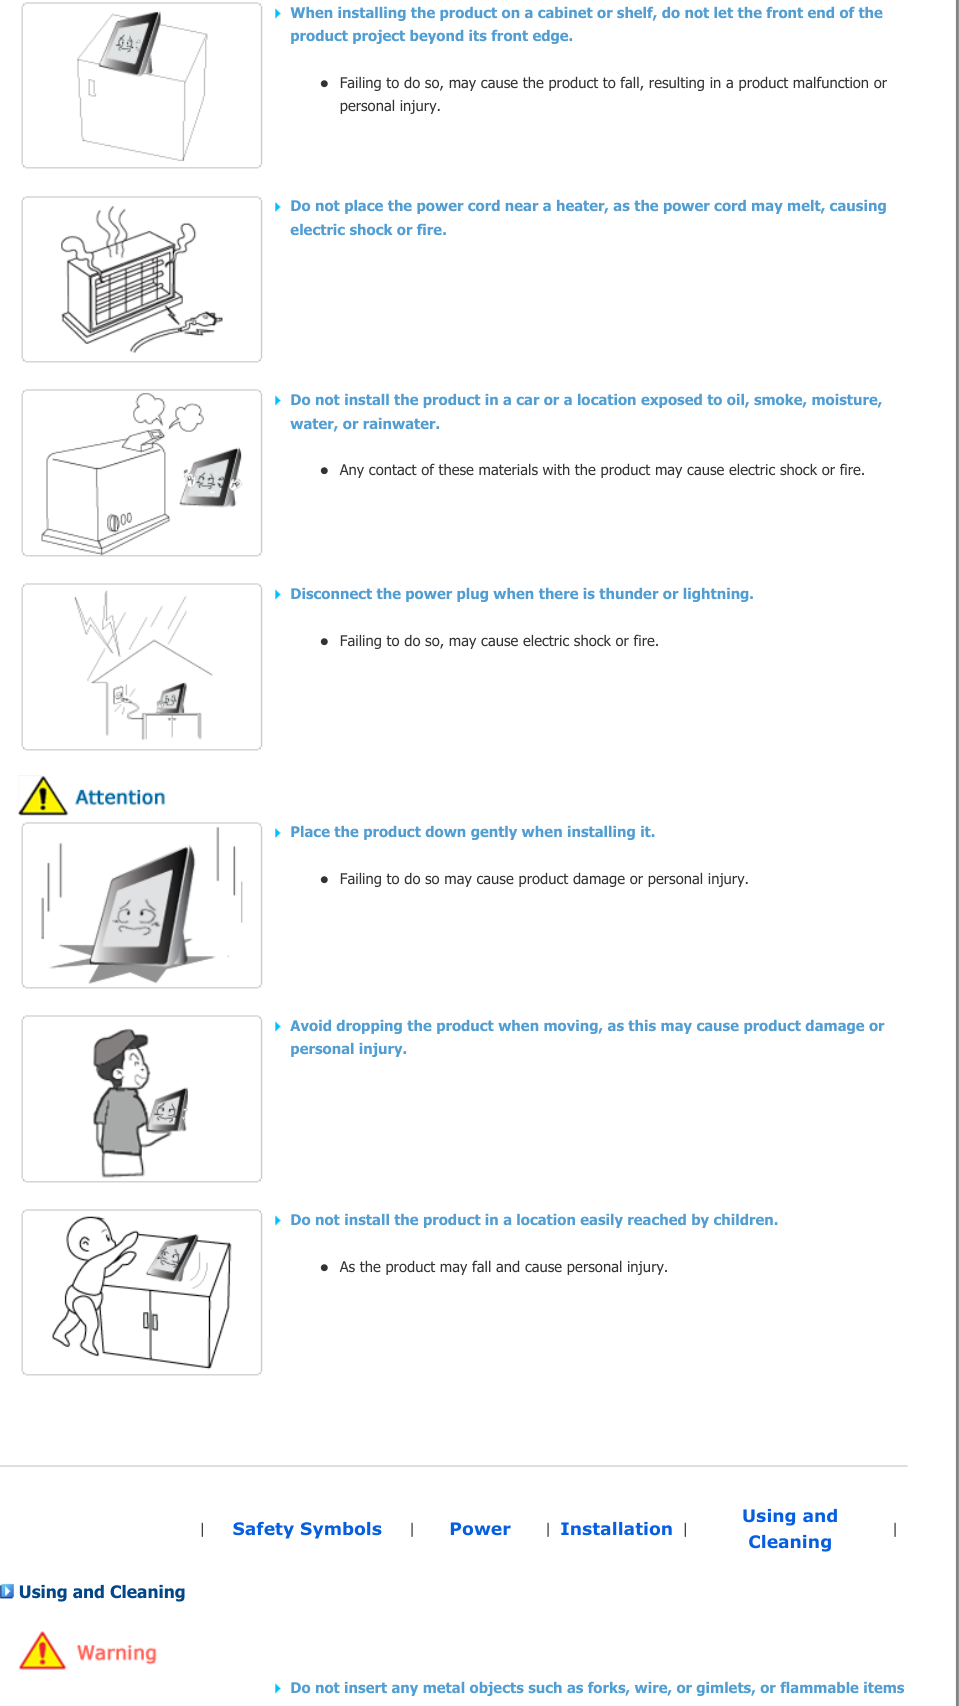

![Power cord USB cable (A-mini B type) Power Adapter|Features |Components |Front |Back |Side |FrontThe product color and shape may vary depending on the model.This product is a touch type product. If you lightly touch the button on the right of the product, the button light is turned on. When the button light is turned on, you can then operate each button's menu. [MENU] Menu Button Displays the menu window at the bottom left corner of the screen.[] Up Button Used for moving up.[ ] Left Button Used for moving left.[ ] Right Button Used for moving right.[] Down Button Used for moving down.[ ] Enter Button Used for selection.[ ] Back Button Return to the previous menu. [ ] Slideshow Button Play or pause the Slideshow. When playing a slideshow by pressing the []button, the photos in the location of the last played photo are played. If the photos in the location of the last played photo have been removed, they are automatically searched for and then played in a slideshow. |Features |Components |Front |Back |Side |BackThe product color and shape may vary depending on the model.](https://usermanual.wiki/Samsung-Electronics-Co/BT10PS/User-Guide-1057466-Page-8.png)
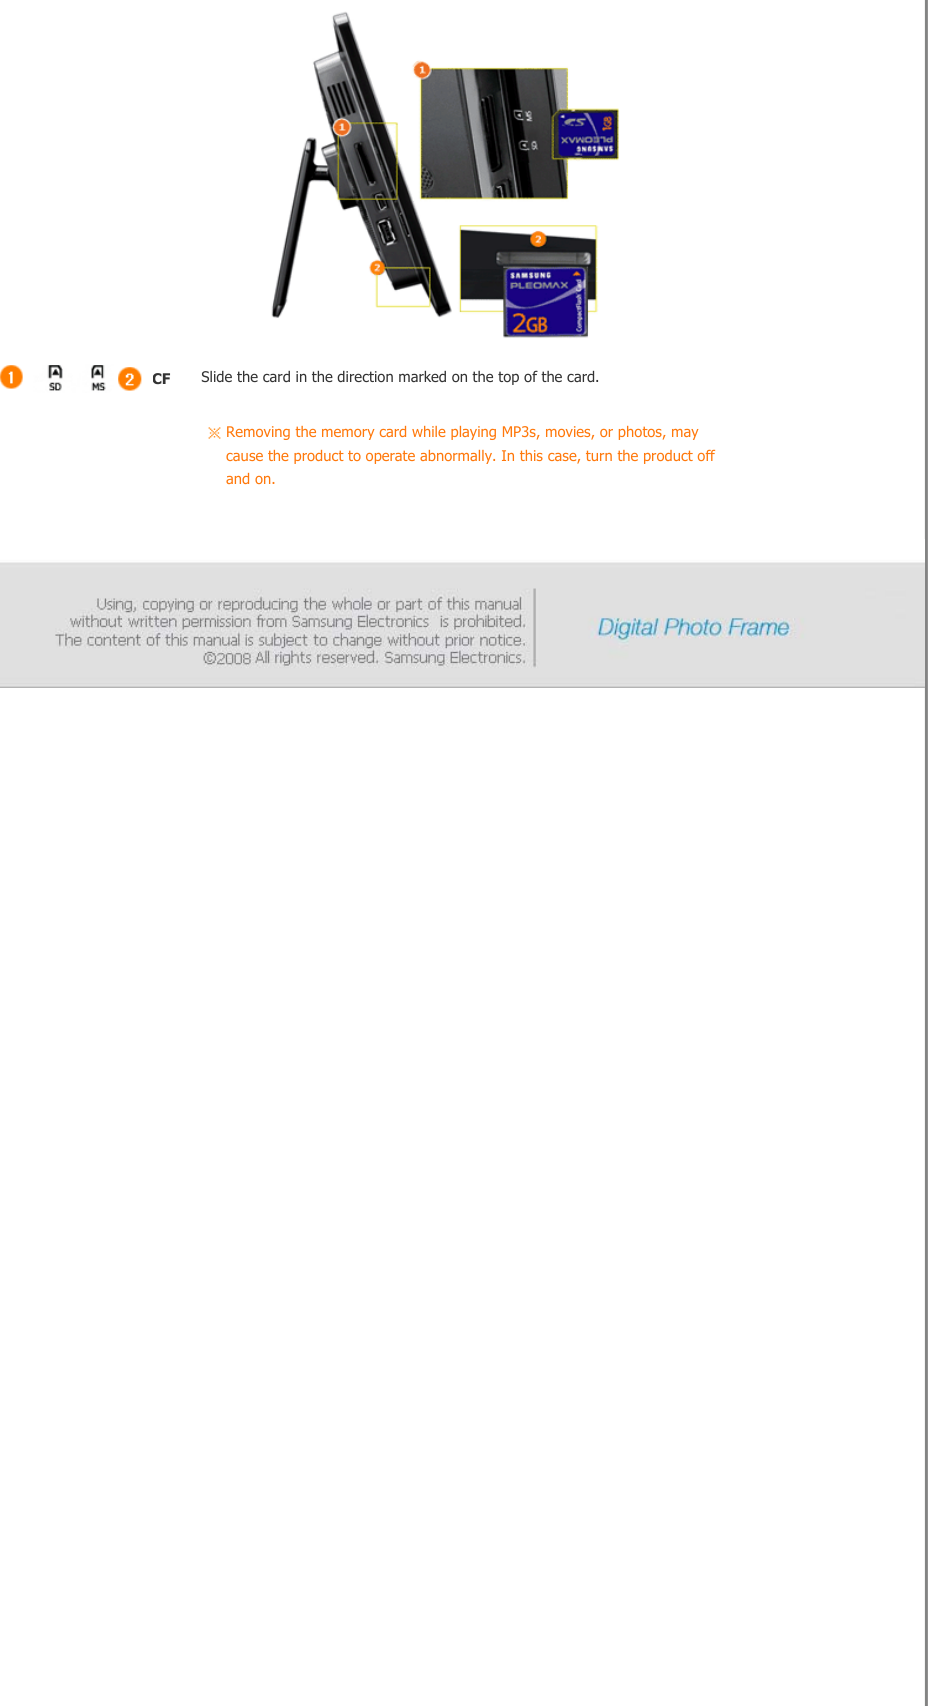
![DC –In JackConnect the power adapter to this jack. Connect the power cord to the power terminal of the power adapter. [ ] Power ButtonTurns the product on or off. Hold down the power button for about 2 seconds.StandYou can use the product in a vertical or horizontal direction by using the rotating stand.Sliding Prevention HolderSupports the product so that it stays firmly in place on slippery surfaces.Service terminalThis is a terminal for servicing the product only. Do not operate it arbitrarily. Kensington lockThe Kensington lock is a device used to physically secure the system when using it in a public place. (The locking device has to be purchased separately.) |Features |Components |Front |Back |Side |SideThe product color and shape may vary depending on the model.SpeakerYou can listen to sound without connecting an additional speaker. Headphone connection jackYou can listen to sound by connecting headphones or earphones to the product. Memory Card SlotAllows you to insert an optional memory card. (Only applicable for SD/MS/CF card) CF Connect a PC or an external device using a USB cable. Up stream terminal Connect your Digital Photo Frame to a PC's USB terminal with a USB cable.](https://usermanual.wiki/Samsung-Electronics-Co/BT10PS/User-Guide-1057466-Page-9.png)

![|Power |USB |Memory Card |Connecting the PowerConnect the adapter cable to the power terminal on the back of the product.Connect the power cord to the power adapter.Plug the power cord for the product into a nearby outlet. Press the [ ] button to turn on the power.|Power |USB |Memory Card |Connecting via USBUp Stream Used to connect your digital photo frame to a PC.](https://usermanual.wiki/Samsung-Electronics-Co/BT10PS/User-Guide-1057466-Page-11.png)
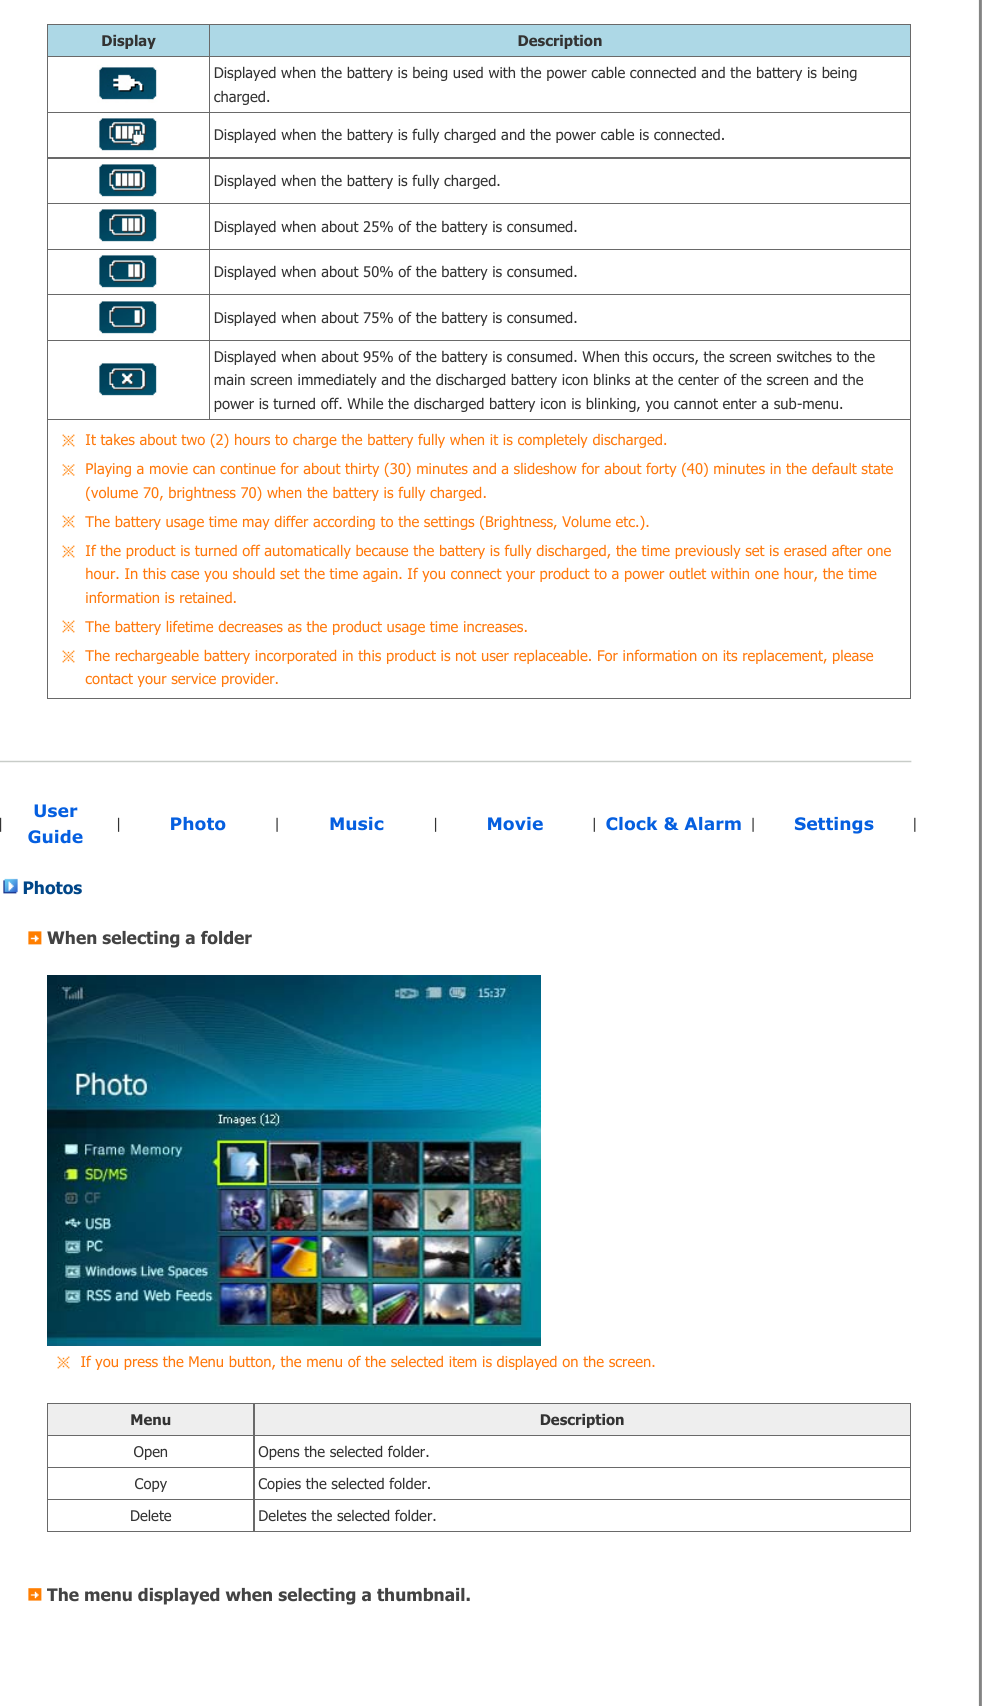
![If no button is pressed for ten (10) minutes, Slideshow or Clock mode is activated. However, if a music file is being played, Clock mode is activated and the filename of that music file is displayed. You can switch to Clock mode even when the movie is paused. In some cases, you can switch to the Movie List screen. This product is a touch type product. If you lightly touch the button on the right of the product, the button light is turned on. When the button light is turned on, you can then operate each button's menu. |UserGuide |Photo |Music |Movie |Clock & Alarm |Settings |User Guide ButtonsMenu DescriptionMENUEnters or exits a menu. Hold the MENU button down for more than five (5) seconds. All the lights of the buttons will blink twice and the button lock function will be activated. To clear the button lock function, hold the MENU button down again for more than five (5) seconds., , , Moves around the items and adjusts the value.Selects a function.Returns to the previous screen. Hold down this button for two (5) seconds to return to the Main screen.Play or pause a Slideshow. When playing a slideshow by pressing the [] button, the photos in the location of the last played photo are played. If the photos in the location of the last played photo have been removed, they are automatically searched for and then played in a slideshow. Screen Status IndicationsDisplay DescriptionThis is displayed differently according to the signal strength when connected to a network. If not connected to a network, is displayed.Displayed when a PC is connected or there is a PC which can be connected to.Displayed only when a network is connected and Internet access is available. You can only view RSS or Live Space photos if this icon is displayed.Displayed when a USB device is connected.Displayed when an SD/MS memory card is connected.Displayed when an CF memory card is connected.Battery Indicators](https://usermanual.wiki/Samsung-Electronics-Co/BT10PS/User-Guide-1057466-Page-14.png)
![If you press the Menu button, the menu of the selected item is displayed on the screen. MenuSub-MenuDescriptionStart Slideshow Play or pause a Slideshow. Copy Copies the selected file to a different storage device. At least one storage device must be connected. Copy All Files Copies all files to a different storage device. At least one storage device must be connected. Delete Deletes the selected file.Delete All Files Deletes all files.Set as Background Sets the selected image as the background of the main screen. At this time the mode for the background is automatically changed to Custom mode.When copying a photo from an external memory storage device (SD/MS, USB memory) to the Frame Memory, if [Settings]-[Options]-[Frame Memory Copy] is set to [Resized], the size (screen quality) of the photo is automatically reduced before saving it, to fit it to the screen of your digital photo frame, and the EXIF (camera related information) saved in the photo isremoved. Therefore, make sure to only use the photos saved on the Frame Memory with the digital photo frame.It may take a long time if a lot of files are copied at the same time.The menu displayed when selecting a thumbnail (PC, Live Space, RSS).If you press the Menu button, the menu of the selected item is displayed on the screen. MenuSub-MenuDescriptionStart Slideshow Play or pause a Slideshow. Copy Copies the selected file to a different storage device. At least one storage device must be connected.Copy All Files Copies all files to a different storage device. At least one storage device must be connected. Set as Background Sets the selected image as the background of the main screen. At this time the mode for the background is automatically changed to Custom mode.](https://usermanual.wiki/Samsung-Electronics-Co/BT10PS/User-Guide-1057466-Page-16.png)
![Browsing Mode All Photos, Folder, Playlist, Tags, Dates, RatingSelects the category to arrange the photos by. [Browsing Mode] is only displayed on a PC. The sub-menus of a mode are subjected to each mode.Slideshow Menu MenuSub-Menu Detailed MenuDescriptionStop Slideshow Pauses or resumes the slideshow. Slideshow Settings Slideshow Effect No Effect, Fade, Wipe, Slide, Blind, Checker, Box In/Out, Cross Comb, Silk, Circle, Wheel, Diamond, Plus, UnCover, Stairs, RandomSelects a play effect. Speed Fast, Normal, SlowSelects a play speed. Mode All photos, Photos in Folder, Shuffle all photos, Shuffle photos in Folder, Repeat one photoSelects the play mode. This cannot be used during a PC, Live Space, or RSS photo slideshow.Display Clock Off, OnSelects whether to play a slideshow and show the current time at the same time. Brightness 0~100You can adjust the brightness.Rotation You can rotate the monitor screen to 90°, 180° and 270°.Screen ratio Original Fit, Auto Fit, Fit to Width, Fit to ScreenYou can select how to adjust the size of the photos when displaying them on the screen. Original Fit - When the photo size is larger than the screen size, it is displayed to fit the screen size. Auto Fit - Photos are fit to the screen size. A horizontal or vertical part of a photo may be cut but there is no distortion. Fit to Width - Photos are fit to the screen width. A horizontal or vertical part of a photo may be cut but there is no distortion. Fit to Screen - Photos are fit to a resolution of 1024*600. (The photo image may be distorted)Delete Deletes a photo being displayed in the slideshow. This will not function during a PC, Live Space, or RSS photo slideshow.Set as Background Sets the currently selected image as the background of the main screen.Background Music On, Off, Music SettingsSelect [On] of [Background Music]. Then select [Music Settings] of [Background Music] by pressing the MENU button and select a music file stored on the Frame Memory or a connected external memory device. When the product is used for the first time, the built-in music files are used as the background music.](https://usermanual.wiki/Samsung-Electronics-Co/BT10PS/User-Guide-1057466-Page-17.png)
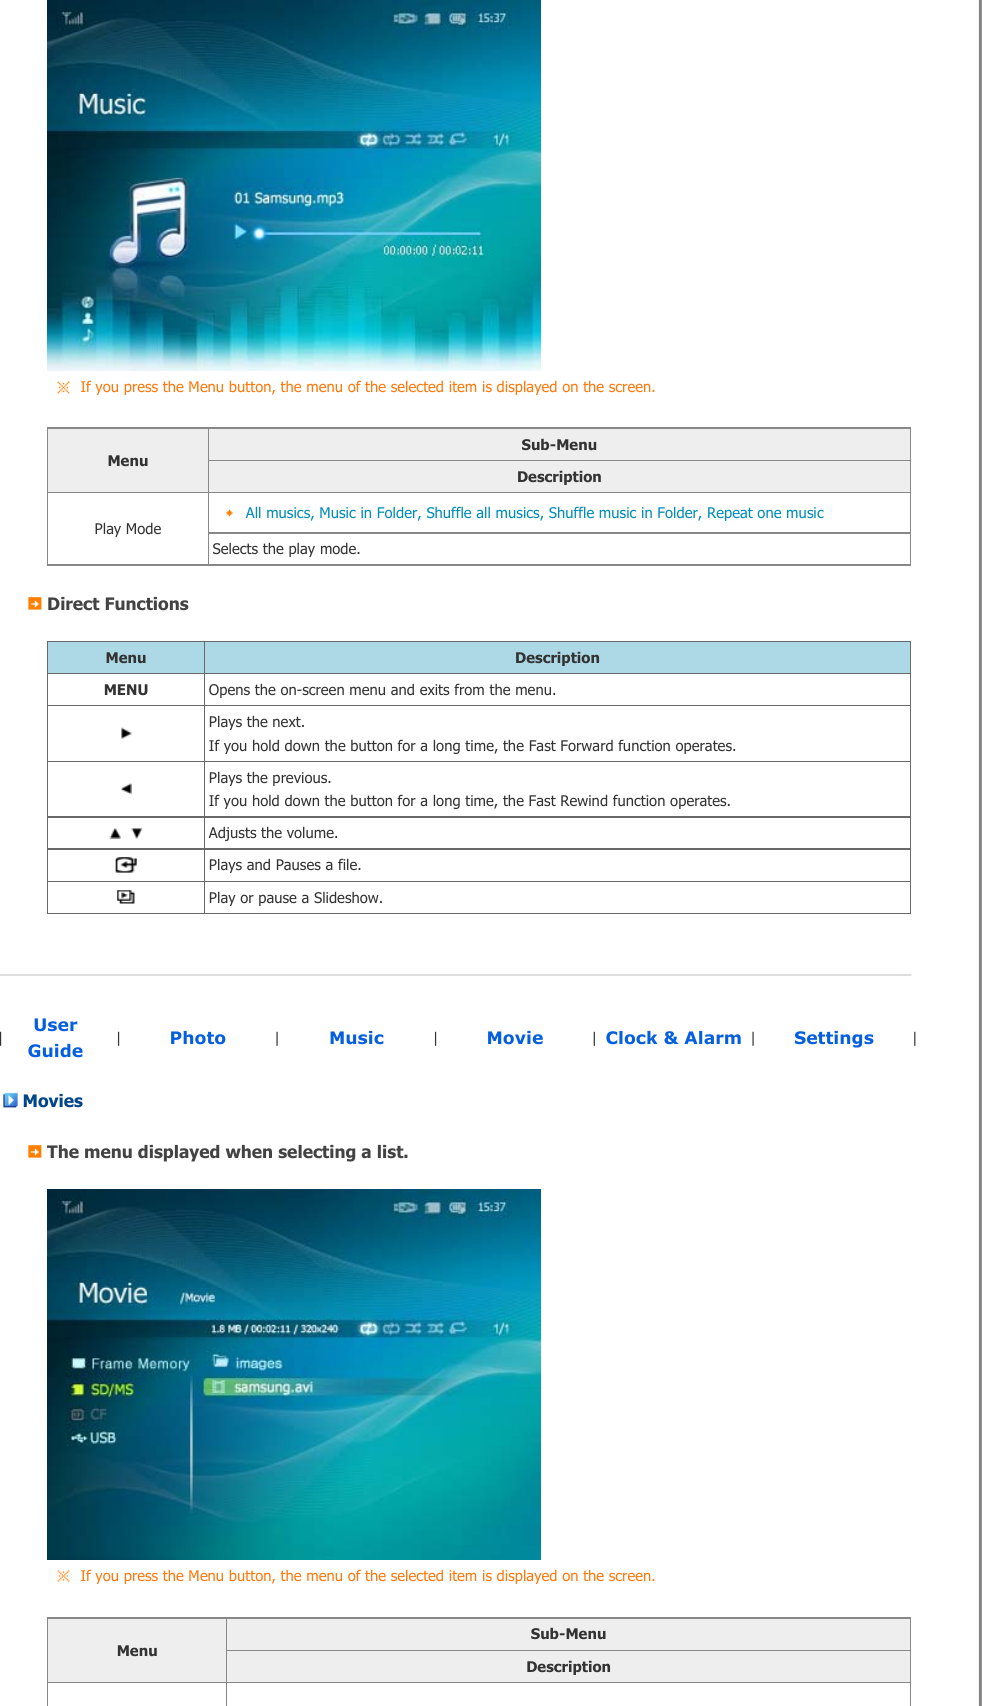
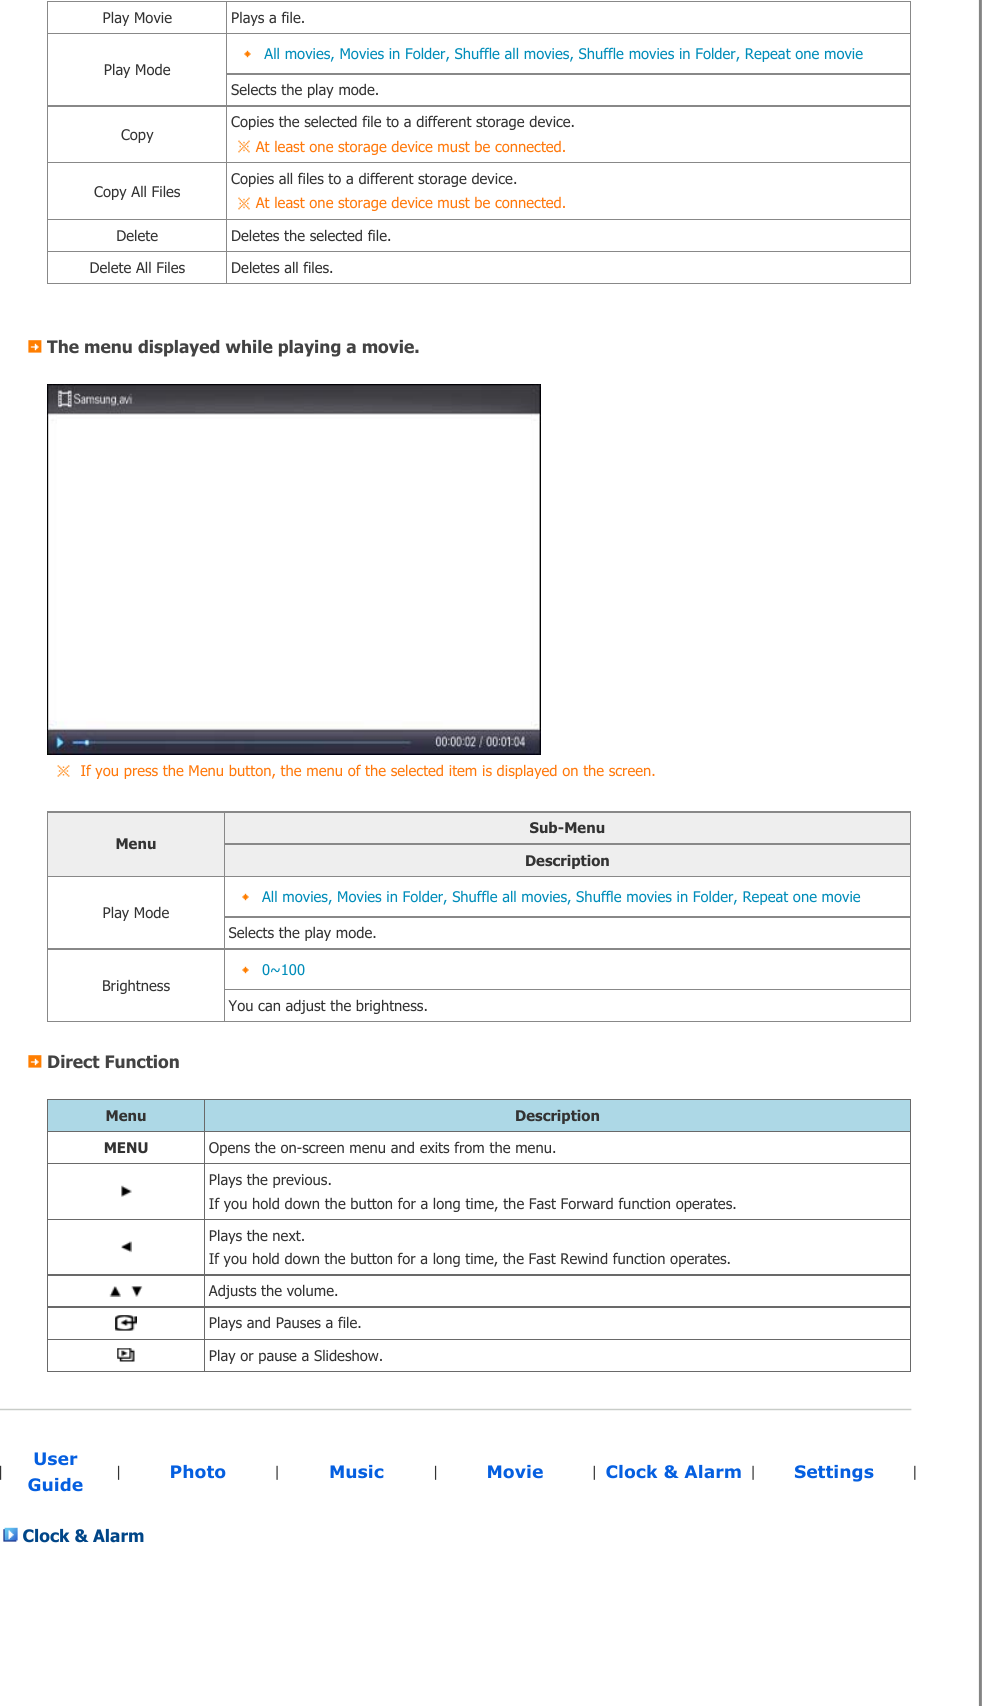
![When the next slideshow is performed using the [Slideshow] button, the last played background music file is played as the background music. (The location priority of the music files to be played for the background music is: "Location of the last played background music file ĺ [Frame Memory] ĺ [USB] ĺ [SD/MS]" . Direct FunctionsMenu DescriptionMENU Opens the on-screen menu and exits from the menu. Plays the next file.Plays the previous.Adjusts the volume.Plays and Pauses a file. Play or pause a Slideshow. |UserGuide |Photo |Music |Movie |Clock & Alarm |Settings | MusicThe menu displayed when selecting a list.If you press the Menu button, the menu of the selected item is displayed on the screen. MenuSub-MenuDescriptionPlay Music Plays a file. Play Mode All musics, Music in Folder, Shuffle all musics, Shuffle music in Folder, Repeat one musicSelects the play mode. Copy Copies the selected file to a different storage device. At least one storage device must be connected. Copy All Files Copies all files to a different storage device. At least one storage device must be connected. Delete Deletes the selected file. Delete All Files Deletes all files. The menu displayed while playing music.](https://usermanual.wiki/Samsung-Electronics-Co/BT10PS/User-Guide-1057466-Page-18.png)

![MenuSub-Menu Detailed MenuDescriptionNetworkNetwork Settings Sets the network. The network information you set is displayed at the bottom. Proxy Required Yes, NoYou can set whether to use a proxy server. Options Language English, Deutsch, Español, Français, Italiano, Nederlands, Polski, Português, ǸțșșȒȐȑ,Svenska, Türkçe, ㅔ闬譄芉,襲莇蛑,䚐ạ㛨You can select the language for the product. Brightness 0~100Adjusts the brightness of the screen. Auto Rotation Off, OnOff : If you set the frame on its edge during a SlideShow, even if the sensor detects the change, the picture does not rotate accordingly. On : If you set the frame on its edge, the sensor detects the change and rotates the picture automatically. Button Sound Off, Low, Medium, HighYou can turn the button operating sound heard when operating the product on or off. Volume 0~100Adjusts the volume. Frame Memory Copy Original Size, ResizedWhen copying a photo from an external memory storage device (SD/MS, USB memory) to the Frame Memory, if [Settings]-[Options]-[Frame Memory Copy] is set to [Resized], the size (screen quality) of the photo is automatically reduced before saving it, so that it can be fit to the screen of your digital photo frame, and the EXIF (camera related information) saved in the photo is removed. Therefore, make sure to only use the photos saved on the Frame Memory with the digital photo frame. Preferences Starting Mode Home, Last Mode, SlideshowYou can select the first screen to be displayed when the power is turned on. Screen Saver Slideshow, ClockYou can select the screensaver type. If no button is pressed for ten (10) minutes, the screensaver is activated. OSD Color Theme Violet Style, Blue Style, Green Style, Orange StyleYou can select a color theme for the menu background screen. The default color theme is Blue Style. Home Background Default, CustomYou can set the background of the main menu screen. Auto Picture On/Off Activation, Hours, Minutes, am/pm, RepeatWhen the [Off Time] is reached, other operations are stopped and the screen is turned off. When the [On Time] is reached, the screen is turned on and the previous operating status persists. If the screen is turned off as the time has reached the [Off Time], press any button except the Power button to display the screen again. If the product is being used as a Mini-Monitor or a Mass Storage device connected to your PC via a USB cable, the screen will not be turned off even if the Off Time is reached.](https://usermanual.wiki/Samsung-Electronics-Co/BT10PS/User-Guide-1057466-Page-22.png)
![Update/Reset Firmware Update You can update the product by using a USB memory stick or memory card (SD/MS). For the latest firmware file, visit www.samsung.com.Reset Settings Yes, NoInitializes the settings to the factory defaults. Product Information Model, Firmware Version, CopyrightYou can check the product information. Web Configuration Connect to the address (URL) in the [Web Configuration Address] item on the [Settings]-[Network] page of the Digital Photo Frame using Internet Explorer.If connected, the Welcome page is displayed. Enter the password in the [Web Configuration Password] item of the [Settings]-[Network] page of the Digital Photo Frame in the [Password] item on the Welcome page. Then click the [sign in] button. Upper Menu Sub MenuDescriptionWelcome PasswordEnter the password displayed in Management Password. Enables case-sensitive mode. Photo Frame Now Playing You can monitor the photos which are being displayed in the slide show at the same time. Web Photos Photo Feeds, Photos Windows Live Spaces You can add or remove a website address from which you can receive photos. Storage Photo Feeds, Photos Windows Live Spaces You can check the size of the photos in the addresses listed in Web Photos. Settings Basic, Administrator Password, Date and Time, Network Settings You can enter and change the product name, administrator password, time, and network proxy server, etc. Help Displays the help section for using Samsung Photo Frame Web Configuration.](https://usermanual.wiki/Samsung-Electronics-Co/BT10PS/User-Guide-1057466-Page-23.png)
![3. Choose your Access PointThe AP list is displayed. Select the SSID you want to connect to in the [Choose your Access Point] screen. If the SSID you want to connect to is not displayed, refresh the SSID list by pressing [Refresh] and then select the SSID.4. Choose ComputerThe PC list is displayed. If the PC you want to connect to is not in the list, refresh the PC list by pressing [Refresh] and then select the PC. 5. FinishThe selected network and PC are displayed. You can select a menu after completing the operation. Ensure that the Settings are confi gured as shown below. Otherwise, your PC may not be displayed in the list or you may not be able to connect to it.zIn Vista, select Control Panel > Network and Sharing Center > Customize. Check whether the Location type is set to Private. zSelect Digital Photo Frame from the Windows Media Player > Library > Media Sharing list. Check whether it is set to Allow. Settings for Sharing the Photos on your PC - Configuring Your Windows VistaAdding Photos to the LibraryRun Windows Media Player.Click the [Library] tab at the top.](https://usermanual.wiki/Samsung-Electronics-Co/BT10PS/User-Guide-1057466-Page-25.png)
![Click [Add To Library] in the [Library] tab. In the [Add To Library] window, select [My personal folders] under the [Select the folders to monitor] section and select the folder containing photos and click [Add]. Select the folder to share and click [OK] to add it.When you click [OK], the [Add To Library] window is closed and the [Add to Library by Searching Computer] is displayed. Wait until it finishes the operation and click [Close] when it is completed.Checking Shared PhotosIn the Windows Media Player, set the Category, which is under the [ , ] symbol at the top left, to [Picture].](https://usermanual.wiki/Samsung-Electronics-Co/BT10PS/User-Guide-1057466-Page-26.png)
![In the [Library], select Recently added, All Pictures, Keywords, Date Taken, Rating, or Folder Settings and check whether the added photos exist in the library.Sharing Settings for Accepting Connections from Your Photo FrameIn the [Library] tab, click on [Media Sharing].In the [Media Sharing] window, check the [Share my media] checkbox under [Sharing Settings].If no [Available device] is displayed in the [Media Sharing] window, proceed to steps 4. If displayed, proceed to step 5.In the [Media Sharing] window, click [Networking] and check whether the current network is set to [Private network]. If not, set it to [Private Network].](https://usermanual.wiki/Samsung-Electronics-Co/BT10PS/User-Guide-1057466-Page-27.png)
![If your network is a Private network, the [Available Device] list and the [Settings] button are displayed in the [Media Sharing] window.In the [Media Sharing] window, click [Settings]. The [Media Sharing-Default Settings] window is displayed.In the [Media Sharing-Default Settings] window, set the [Media Type] to [Picture], both [Star ratings] and [Parental ratings] to [All ratings] or a required rating under the [Default Settings] section. If you want to add a device or computer which tries to connect to the library to the list automatically, check the [Add new devices and computers automatically] checkbox.Only photos can be transmitted via PC sharing. Settings for Sharing the Photos on Your PC - Configuring Your Photo FrameChecking Network ConnectionsCheck whether the Network icon is displayed at the left top of the Main screen.](https://usermanual.wiki/Samsung-Electronics-Co/BT10PS/User-Guide-1057466-Page-28.png)
![If the Network icon is displayed, proceed to the Checking Computer Connections section described below. If it is not displayed, move to [Settings]-[Wireless Network(SSID)]. SSID : Service Set IdentifierSelect the SSID you want to connect to in the [Choose your Access Point] screen. If the SSID you want to connect to is not displayed, refresh the SSID list by pressing [Refresh] and then select the SSID. If you select this when the SSID is encrypted, a password input window is displayed. You can only be connected to the network if you enter the correct password.Checking Computer ConnectionsThe PC list is displayed. If the PC you want to connect to is not in the list, refresh the PC list by pressing [Refresh] and then select the PC.The configured network and computer are displayed. You can select a menu once the completion window is displayed. Viewing the Photos from Windows Live SpaceChecking Windows Live Space and Uploading Photos If you have no MSN account (MSN Hotmail, MSN Messenger, Passport account), please create one. Go to and login to Windows Live Space (http://spaces.live.com/) with your MSN account.If you do not have a space, create a space and enter](https://usermanual.wiki/Samsung-Electronics-Co/BT10PS/User-Guide-1057466-Page-29.png)
![it.In your space, change to edit mode. Add albums and photos by clicking on Add under the Photos category. Setting up the Web Configuration Connect to the address (URL) in the [Web Configuration Address] item on the [Settings]-[Network] page of the Digital Photo Frame using Internet Explorer. If connected, the welcome page is displayed. Enter the password in the [Remote Configuration Password] item of the [Settings]-[Network] page of the Digital Photo Frame in the [Password] item on the Welcome! page. Then click the [sign in] button. You can change the password (default: Admin) in the Settings of the Samsung Photo Frame Web Configuration. On the Samsung Photo Frame Web Configuration page, click the [Web Photos] tab and add the space address (for example, if it is 'http://test.space.live.com', you have only to type 'test'.) to the URL input box for the Photos From Windows Live Spaces list and click [Add].Checking your Space Photos on your Digital Photo Frame First check the network connections. (Refer to Viewing the Photos Shared from Vista Windows on your Digital Photo Frame - What You Should Do on Your Digital Photo Frame - Checking Network Connections.)](https://usermanual.wiki/Samsung-Electronics-Co/BT10PS/User-Guide-1057466-Page-30.png)
![In the Main screen of your Digital Photo Frame, go to [Photo]-[Windows Live Space]. A list of the spaces you have added to the Web Configuration will be displayed.Select a space. A list of albums in the selected space will be displayed. Select an album, and thumbnails for the photos in the selected album will be displayed on the right.Viewing the Photos via RSSWeb ConfigurationGo to the Web Photos page by following the description in the Settings Web Configuration section for Windows Live Space. Click [Web Photo]-[Photo Feeds] for the RSS Input window. In the RSS Input window, enter the RSS address and click [Add]. What is an RSS Address? It is the address that appears in the address box of the web page (XML) displayed when clicking the FEED icon on a RSS service site where photos are uploaded. Checking the Photos from RSS on Your Digital Photo FrameIn the Main screen of your Digital Photo Frame, go to [Photo]-[RSS and Web Feeds]. A list of feeds you have added to the Web Configuration will be displayed.Select a feed from the list. Thumbnails for the photos in the selected feed will be](https://usermanual.wiki/Samsung-Electronics-Co/BT10PS/User-Guide-1057466-Page-31.png)
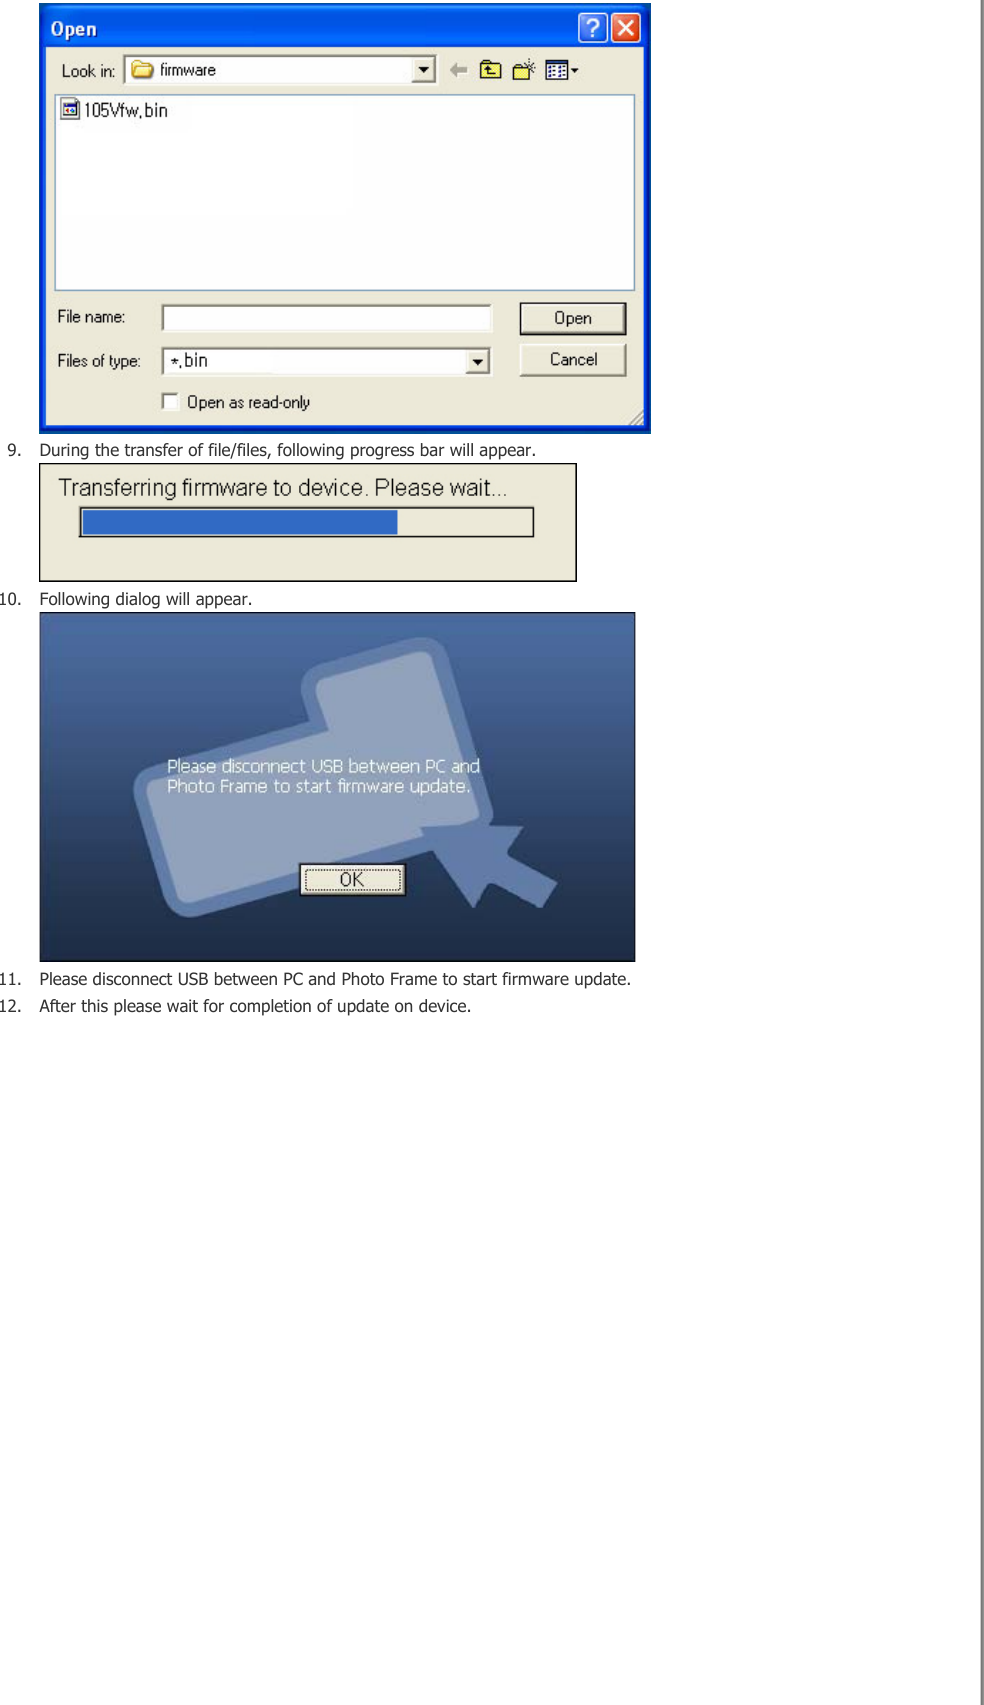
![displayed to the right.Setting up Rating and Tags (VISTA:Tags, XP:Labels) on a PCWindows VISTA Click Start - All Programs - Windows Photo Gallery to launch the Windows Photo Gallery. If you select Info at the top of the Windows Photo Gallery screen, the photo information pane appears on the right.Select a photo and change the Rating or Tags in the right information pane.Windows XP Click Start - All Programs - Microsoft Digital Image Starter Edition 2006 - Microsoft Digital Image Starter Edition 2006 Library.The Microsoft Digital Image Starter Edition 2006 Library window appears.Select a photo and configure the Rating and Labels for the selected photo at the bottom of the screen.I want to update firmware.Preparations Digital Photo Frame Firmware update file.USB memory card or external memory devices(SD/MS)Please visit www.samsung.com for the latest firmware update.Connect USB memory card to PCIf you are ready, connect the USB memory card to your PC.Copy the firmware update file you downloaded to the USB memory card.(Make sure to copy the firmware update file to the root directory.)Connect USB Memory Card to Digital Photo FrameRemove the USB memory card from your PC, and connect it to your Digital Photo Frame. If your Digital Photo Frame is off, turn it on.Updating Select [Firmware Update] on the [Settings]-[Update/Reset] page. After boot-up, turn your Digital Photo Frame off, remove the USB memory card, and turn your Digital Photo Frame on again, for maximum safety.](https://usermanual.wiki/Samsung-Electronics-Co/BT10PS/User-Guide-1057466-Page-32.png)


![|Troubleshooting |Terminology |ETC |Service Centers |Declaration of Conformity | TroubleshootingThis section lists various problems and solutions encountered by users while using the digital photo frame. When encountering a problem, first check the list below and follow the suggested action if one matches your problem. If the problem still persists, contact or visit the nearest service center.Symptoms Causes and Actions The power does not turn on. Check the connections for the adapter cable and the power terminal of the product.It takes time until an image is displayed after the power is turned on. It takes time to move to the next photo. If the resolution is high or the file size is large, the photo may be displayed slowly on the screen. I connected an external device but it is not operating. Check the cable connections connecting the product and the external device. The USB device must support Linux. Check whether your USB device supports Linux. There is still space on the Frame Memory but I cannot copy any more photos. Create a folder in the Frame Memory and copy your photos into the folder. The screen color is too dim or dark. Adjust the brightness in the Settings. No slideshow is played automatically. Set [Starting Mode] of [Settings-Preference] to [Slideshow]. When playing a movie, the screen is displayed but there is no sound. The screen is not displayed because the video codec of the file is not supported. Supported codecs are MPEG4 and WMV9.The movie is played with the sound only. A blank screen is displayed. Change the volume. Check whether the file contains sound information.Auto On and Auto Off do not operate. If Auto On and Auto Off are set to the same time, they will not operate. Check the time settings.The [Button Sound] is set to On but there is no button operating sound. The button operating sound will not be heard while a [Background Music, Music, or Movie file] is playing.My digital photo frame is not accepting a photo from the Internet. Check whether the AP connected to your digital photo frame can connect to the Internet. The maximum permitted file size of a web photo is 4.2 Mb. (The maximum permitted file size is 8.5 Mb.) Only JPEG files are available on the web or Feed (higher than 400X240 pixels).I've tried to change an image rating in Windows Media Player but it does not After changing the rating, turn Windows Media Player off and on.](https://usermanual.wiki/Samsung-Electronics-Co/BT10PS/User-Guide-1057466-Page-50.png)
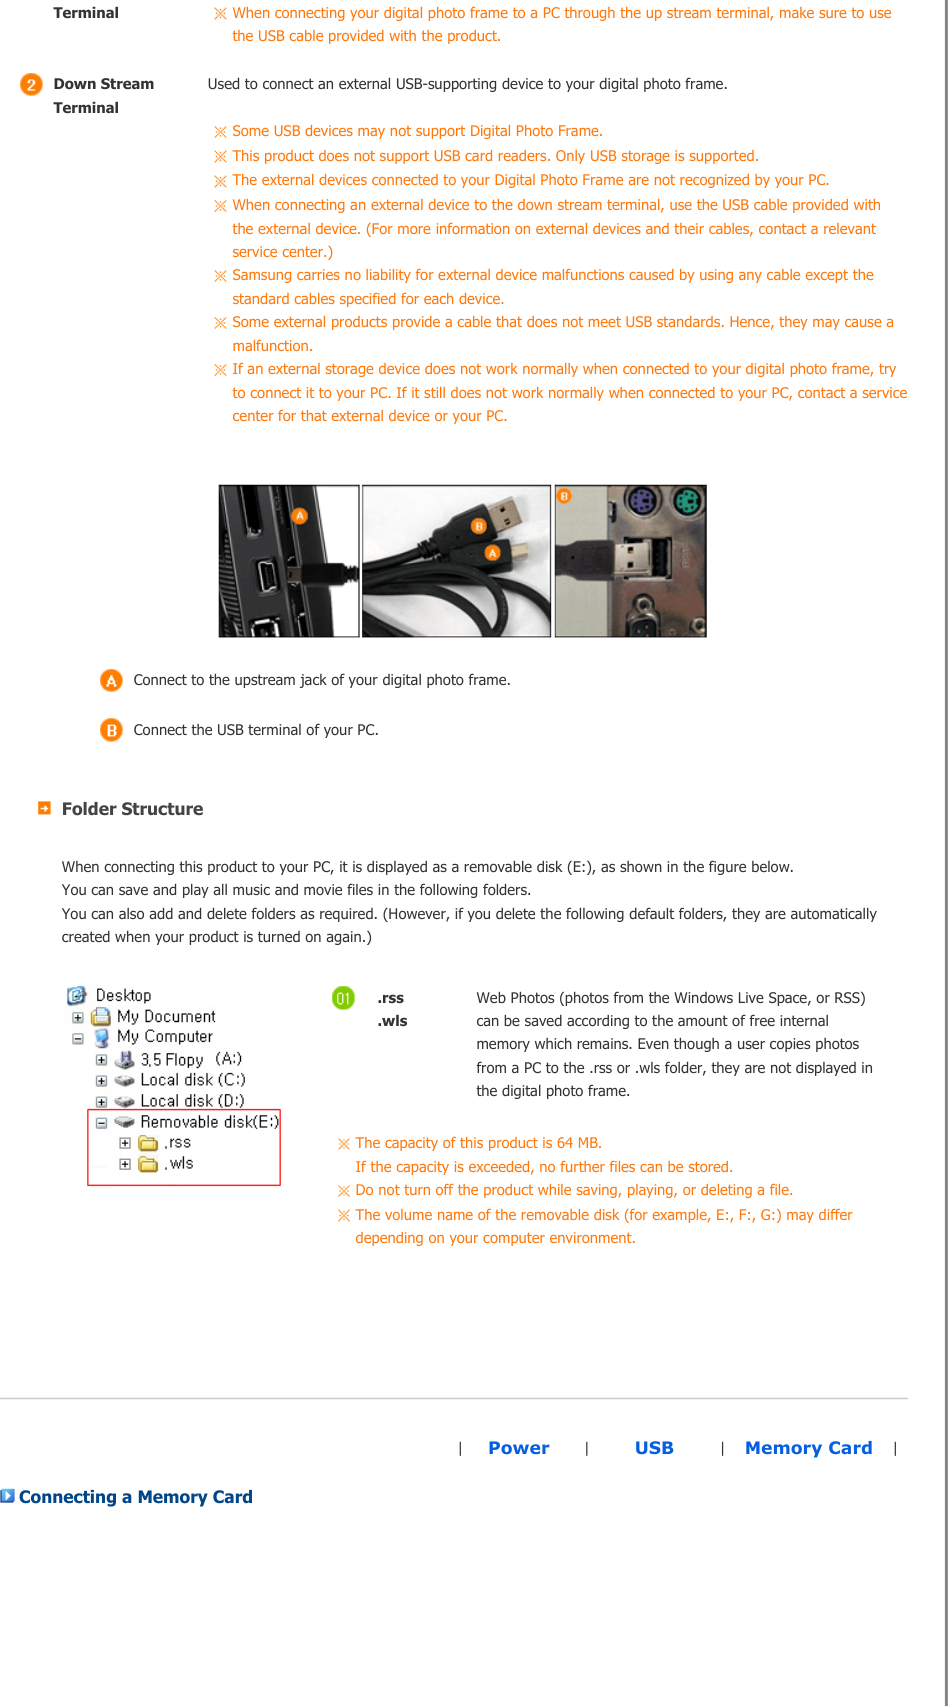
![change. I've tried to change the name of my digital photo frame but it will not change.Remove the product from Windows Media Player (Library/Media Sharing) and reboot your digital photo frame and computer.I cannot connect my digital photo frame to Windows Media Player of my PC. Check whether your PC and digital photo frame are connected to the same Access Point (AP).Vista: Check whether [Control Panel/Network and Sharing Center/Customize/Location Type/Personal] is selected.Vista/XP: Select the digital photo frame in the [Library/Media Sharing] of [Windows Media Player] and check whether it is set to [Allow].The FrameManager icon is not displayed. Check whether the FrameManager program is installed.Select Start- Programs - Samsung - FrameManager to restart FrameManager.Reboot your computer.I pressed a button, but it does not operate. Check whether the button lock function is activated.If you hold down the MENU button for more than five (5) seconds, the button lock function is activated. If you press a button it will not operate.To clear the button lock function, hold down MENU button for more than five (5) seconds again. |Troubleshooting |Terminology |ETC |Service Centers |Declaration of Conformity | Terminology Terms Description MPEG4 (Motion Picture Expert Group4) MPEG4 is a movie compression technology for video communications which enables implementing bi-directional multimedia. It was developed to make it possible to transmit movies over low speed lines on the Internet or for mobile communications. It is used widely on PCs, TVs and cell phones. A movie file formatted in the MPEG4 format is called an MPG or MPEG file.WMV9 (Window Media Video9) A video codec in the MPEG4 format developed by MicrosoftMP3 (MPEG Audio Layer-3) MP3 is a high quality audio compression technology. It provides a 50 times higher compression than CD. Because it provides high quality and a low size for its compression ratio, it is commonly used on the Internet and for FM radio transmissions, etc. An audio file formatted in the MP3 format is called an MP3 file. JPEG (Joint Photographic Coding Expert Group) JPEG is an image compression technology. It provides the smallest loss of all image compression technologies. It is used widely to transmit multimedia files on the Internet and for other uses. An image file formatted in the JPEG format is called a JPEG or JPG file. Usually, a JPEG file is created by taking a picture with a digital camera, by drawing on a computer, or by a graphic package and then by compressing the graphics image into the JPEG format. SD Card (Secure Digital Card) An SD card is a Flash memory card the size of a postage stamp. It provides high stability and high capacity. It is widely used in various digital products such as PDAs, digital cameras, MP3 players, cell phones, and notebook PCs. Its appearance is similar to that of MMC, but the number of pins and their thickness is different. It also has a password setting function for data security. USB Cable 1) A-mini B type Use the up stream terminal when connecting to a PC. This product supports USB 2.0. An A-mini B type cable which is used to connect your digital photo frame to a PC is provided with the product. The A type is the USB connector used to connect to a PC. The B type is the USB connector used to connect to an external device. You can connect your digital photo frame to a PC using an A-mini B type USB cable. USB Cable 2) Cable for Connecting Other Devices Use this type of cable when using the down stream terminal. This product supports USB 2.0. When connecting an external device to the down stream](https://usermanual.wiki/Samsung-Electronics-Co/BT10PS/User-Guide-1057466-Page-51.png)