Samsung Electronics Co CL65 Digital Camera User Manual CL65 English US Approval 090611
Samsung Electronics Co Ltd Digital Camera CL65 English US Approval 090611
UserManual.wiki
>
Samsung Electronics Co
>
CL65 User Manual
User manual
Navigation menu
Upload a User Manual
Namespaces
Wiki Guide
HTML
PDF
Info
Views
User Manual
Discussion / Help
Navigation
![6Indications used in this manualShooting mode IndicationSmart AutoSAutoaProgrampScenesDISdMovievShooting mode iconsThese icons indicate that a function is available in the corresponding modes. The s mode may not support functions for all scenes.e.g.)Available in the Program, DIS, and Movie modesIcons used in this manualIcon FunctionAdditional informationSafety warnings and precautions[ ]Camera buttons; for example: [Shutter] (represents the shutter button)( )Page number of related informationThe order of options or menus you must select to perform a step; for example: Select > (represents Select >, and then )* †AnnotationAbbreviations used in this manualAbbreviation DefinitionACBAuto Contrast BalanceAEBAuto Exposure BracketAFAuto FocusDISDigital Image StabilizationDPOFDigital Print Order FormatEVExposure ValueWBWhite Balance](https://usermanual.wiki/Samsung-Electronics-Co/CL65/User-Guide-1128407-Page-7.png)
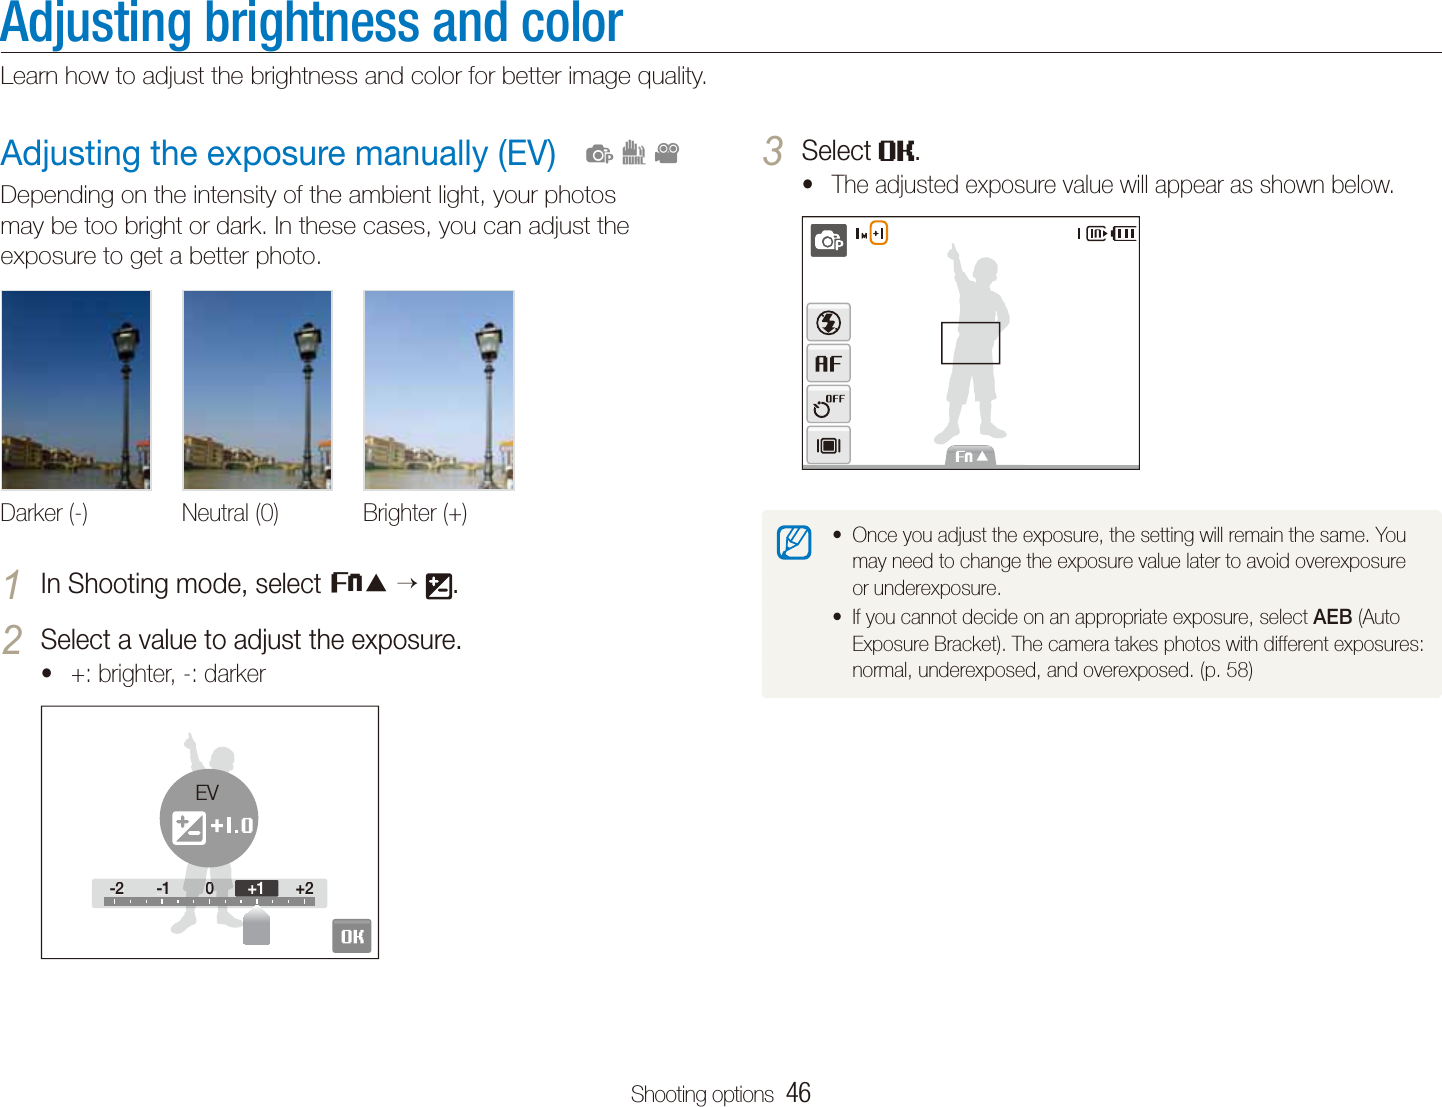
![7Expressions used in this manualPressing the shuttertHalf-press [Shutter]: press the shutter halfway downPress [t Shutter]: press the shutter all the way downHalf-press [Shutter] Press [Shutter]Subject, background, and compositionSubjectt : the main object of a scene, such as a person, animal, or still life Backgroundt : the objects around the subjectCompositiont : the combination of a subject and backgroundBackgroundSubjectCompositionExposure (Brightness)The amount of light that enters your camera determines the exposure. You can alter the exposure with shutter speed, aperture value, and ISO speed. By altering the exposure, your photos will be darker or lighter.Normal exposure Overexposure (too bright)](https://usermanual.wiki/Samsung-Electronics-Co/CL65/User-Guide-1128407-Page-8.png)
![Basic functions 16Turning your camera on or offLearn how to start your camera. Turning on your camera in Playback mode Press [Playback]. The camera turns on and accesses Playback mode immediately.Press and hold [Playback] to mute camera sounds.Rotate the lens cover to open. You can also press [POWER] with the lens cover open.](https://usermanual.wiki/Samsung-Electronics-Co/CL65/User-Guide-1128407-Page-17.png)
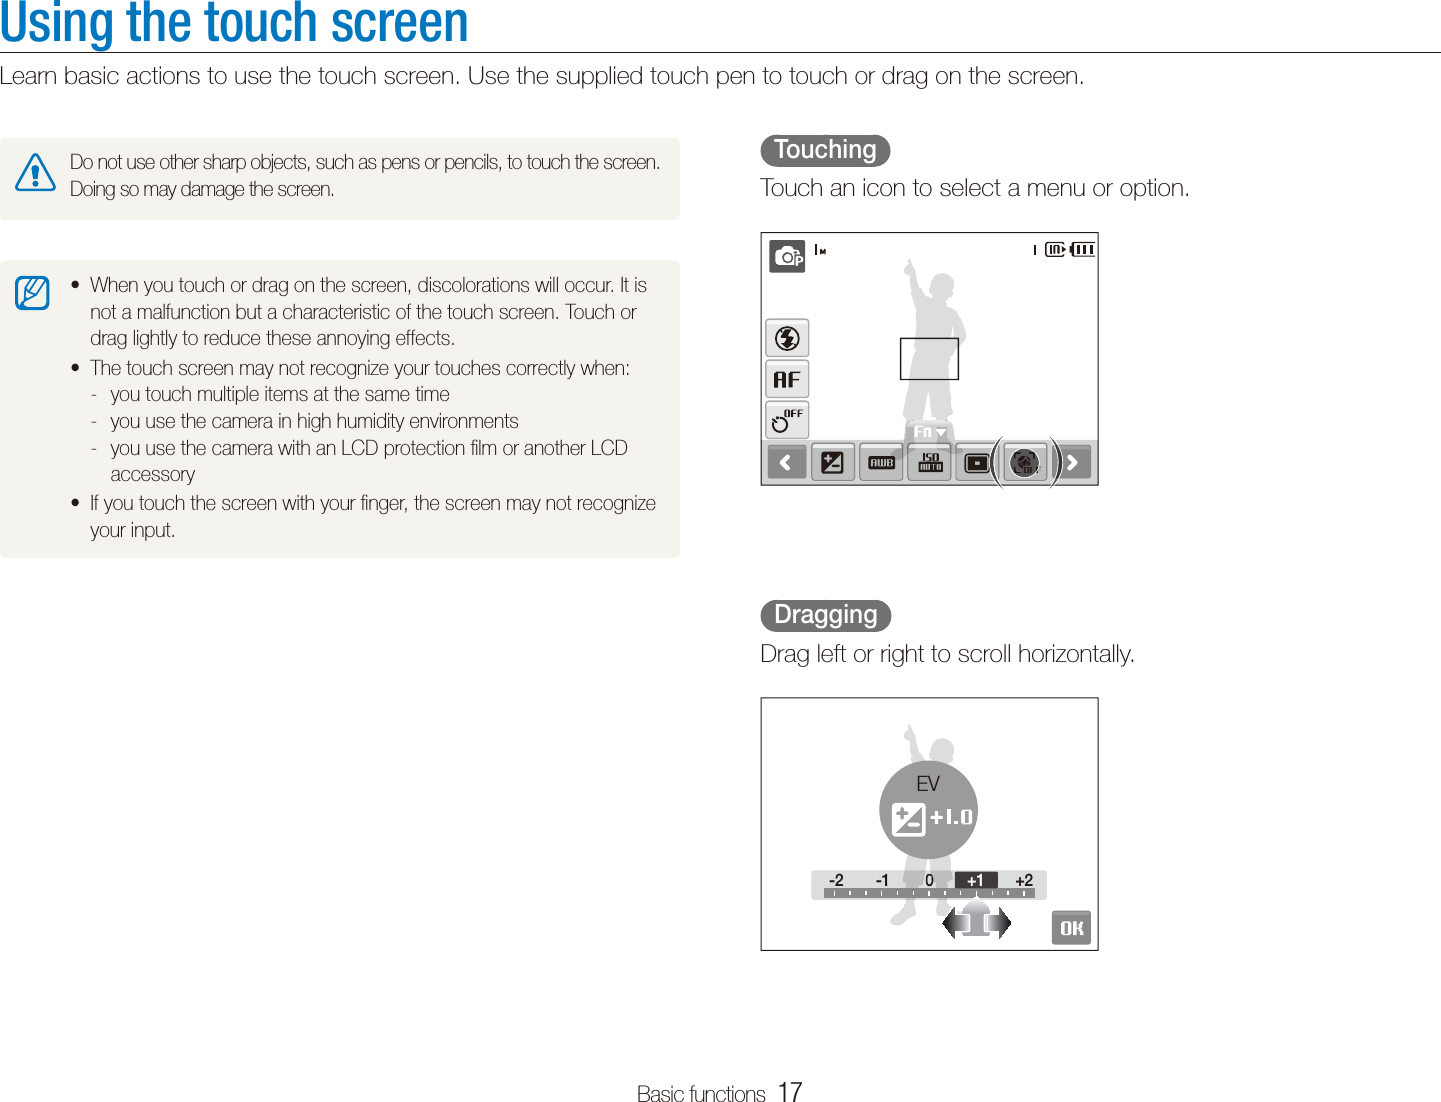

![Basic functions 19Setting the touch screenLearn how to change the basic settings for the touch screen according to your preferences.Setting the touch vibration or soundSet whether your camera vibrates or emits a specified sound when you touch on the screen.In Shooting or Playback mode, press [1 MENU].Select 2 Haptic&Sound.1/2Volume :MediumHaptic StrengthHaptic&SoundShutter SoundStart SoundOffHapticSoundAllSelect an option.3 Option DescriptionOffThe camera will neither vibrate nor sound.HapticThe camera will vibrate.SoundThe camera will sound.AllThe camera will vibrate and sound simultaneously.Press [4 MENU] to return to the previous mode.Selecting a display typeIn Shooting or Playback mode, select an option.FullOption DescriptionFull: Display the name of an option when you select an icon.Basic: Display icons without the name of an option. This option is available only in Playback mode.Hide: Hide icons on the screen if you perform no operations for 3 seconds (touch the screen to display icons again).](https://usermanual.wiki/Samsung-Electronics-Co/CL65/User-Guide-1128407-Page-20.png)
![Basic functions 20Taking photosLearn basic actions to take photos easily and quickly in the Auto mode.1 Make sure that the camera is in the a mode (Auto), the camera’s default shooting mode.If not, select the mode icon t a.AutoThis mode minimizes user settings for quick, convenient shooting.Align your subject in the frame.2 Half-press [3 Shutter] to focus.A green frame means the subject in focus.tPress [4 Shutter] to take a photo.See page 29 for tips to get clearer photos.](https://usermanual.wiki/Samsung-Electronics-Co/CL65/User-Guide-1128407-Page-21.png)
![Basic functions 21Taking photos Digital zoom If the zoom indicator is in the digital range, your camera is using the digital zoom. The picture quality may deteriorate when you use the digital zoom.Optical rangeZoom indicatorDigital rangeThe digital zoom is not available when using tS, d, s (in some scenes), and v modes and when used with Face Detection. It may take longer to save a photo when using the digital zoom.tZoomingYou can shoot close-up photos by adjusting the zoom. Your camera has a 4.6X optical zoom and 5X digital zoom. By using both, you can zoom in up to 23 times. Push [Zoom] up to zoom in on your subject. Push [Zoom] down to zoom out.Zoom inZoom outZoom ratio](https://usermanual.wiki/Samsung-Electronics-Co/CL65/User-Guide-1128407-Page-22.png)
![Basic functions 22Tips for getting a clearer photo Holding your camera correctly Make sure nothing is blocking the lens. Half-pressing the shutter button Half-press [Shutter] and adjust the focus. Focus and exposure will be adjusted automatically.The aperture value and shutter speed are automatically set.Focus framePress [t Shutter] to take the photo if displayed in green.Change the frame and half-press t[Shutter] again if displayed in red. Reducing camera shake Select the d mode to reduce camera shake digitally. (p. 36) When is displayed Camera shakeWhen shooting in the dark, avoid setting the flash option to Slow Sync or Off. The aperture remains open longer and it may be harder to hold the camera still.Use a tripod or set the flash toption to Fill in. (p. 45)Set ISO speed options. (p. 46)t](https://usermanual.wiki/Samsung-Electronics-Co/CL65/User-Guide-1128407-Page-23.png)
![Basic functions 23 Preventing your subject from being out of focus It may be difficult to get your subject in focus when: there is little contrast between the subject and background -(When your subject is wearing a color of clothing that is similar to the background)the light source behind the subject is too bright -the subject is shiny -the subject includes horizontal patterns, such as blinds -the subject is not positioned in the center of the frame -Use the focus lockHalf-press [Shutter] to focus. When the subject is in focus, you can reposition the frame to change the composition. When you are ready, press [Shutter] to take your photo.When you take photos in low lighttTurn on the flash. (p. 45)When subjects are moving fasttUse the continuous or motion capture function. (p. 58)](https://usermanual.wiki/Samsung-Electronics-Co/CL65/User-Guide-1128407-Page-24.png)
![Extended functions 25Shooting modesTake photos or record videos by selecting the best shooting mode for the conditions.Icon DescriptionAppears when taking photos of landscapes with backlighting.Appears when taking portraits with backlighting.Appears when taking portraits.Appears when taking close-up photos.Appears when taking close-up photos of text.Appears when the camera and subject are stable for a while.Appears when taking photos of actively moving subjects.Half-press [3 Shutter] to focus.Press [4 Shutter] to take the photo. If the camera does not recognize a proper scene mode, tS will not change and the default settings will be used.Even if there is a face detected, the camera may not select a portrait tmode depending on the subject's position or lighting.The camera may not select the correct scene depending on shooting tenvironments, such as camera shake, lighting and distance to the subject.Even if you use a tripod, the t mode may not be detected depending on the subject's movement.Using the Smart Auto modeIn this mode, your camera automatically chooses the appropriate camera settings based on a detected type of scene. It will be helpful if you are not familiar with the camera settings for various scenes.In Shooting mode, select 1 a S.Align your subject in the frame.2 The camera selects a scene automatically. An appropriate tmode icon will appear at the top left of the screen.Icon DescriptionAppears when taking photos of landscapes.Appears when taking photos of bright backgrounds.Appears when taking photos of landscapes at night. This is available only when the flash is off.Appears when taking portraits at night.](https://usermanual.wiki/Samsung-Electronics-Co/CL65/User-Guide-1128407-Page-26.png)
![Extended functions 26Shooting modesAlign your subject in the frame and half-press [3 Shutter] to focus.Press [4 Shutter] to take the photo.Using the Beauty Shot modeTake a photo of a person with options to hide facial imperfections.In Shooting mode, select 1 a s .2 To make the subject's skin tone appear lighter (face only), select f an option.Select a higher setting to make skin tone appear lighter.tLevel 2Using the Scene modeTake a photo with options preset for a specific scene.In Shooting mode, select 1 a s.Select a scene.2 SceneThis mode allows you to choose an appropriate scene for a variety of situations.For the Beauty Shot mode, see “Using the Beauty Shot tmode.”For the Frame Guide mode, see “Using the frame guide” on tpage 34.For the Night mode, see “Adjusting the exposure in the Night tmode” on page 35.](https://usermanual.wiki/Samsung-Electronics-Co/CL65/User-Guide-1128407-Page-27.png)
![Extended functions 27Shooting modesUsing the frame guideWhen you want another person to take a photo of you, you can compose the scene with the frame guide feature. The frame guide will help the other person take a photo of you by showing the part of the pre-composed scene.In Shooting mode, select 1 a s .Align your subject in the frame and press [2 Shutter].Transparent guides will appear on the left and right of the tframe.Cancel Frame:BackAsk another person to take a photo.3 The person must align the subject in the frame by using the tguides, and then press [Shutter] to take the photo.To cancel the guides, select 4 .To hide 3 facial imperfections, select f an option.Select a higher setting to hide a greater number of timperfections.Level 1Align your subject in the frame and half-press [4 Shutter] to focus.Press [5 Shutter] to take the photo.The focus distance will be set to Auto Macro.](https://usermanual.wiki/Samsung-Electronics-Co/CL65/User-Guide-1128407-Page-28.png)
![Extended functions 28Shooting modesAlign your subject in the frame and half-press [6 Shutter] to focus.Press [7 Shutter] to take the photo.Use a tripod to prevent your photos from blurring.Adjusting the exposure in the Night modeIn the Night mode, you can catch brief flashes of light as curved streaks by extending the exposure. Use a slow shutter speed to extend the time until the shutter closes. Increase the aperture value to prevent overexposure.In Shooting mode, select 1 a s .Select 2 f Aperture.Aperture Shutter SpeedSelect an option.3 Select 4 f Shutter Speed.Select a value to adjust the shutter speed and select 5 .](https://usermanual.wiki/Samsung-Electronics-Co/CL65/User-Guide-1128407-Page-29.png)
![Extended functions 29Shooting modesUsing the Program modeSet various options (except for shutter speed and aperture value) in the Program mode. In Shooting mode, select 1 a p.Set options. (For a list of options, refer to “Shooting 2 options.”)Align your subject in the frame and half-press [3 Shutter] to focus.Press [4 Shutter] to take the photo.Using the DIS modeReduce camera shake and prevent blurred photos with Digital Image Stabilization (DIS) functions.Before correction After correctionIn Shooting mode, select 1 a d.Align your subject in the frame and half-press [2 Shutter] to focus.Press [3 Shutter] to take the photo.The digital zoom will not work in this mode.tIf your subject is moving rapidly, the photo may be blurry. t](https://usermanual.wiki/Samsung-Electronics-Co/CL65/User-Guide-1128407-Page-30.png)
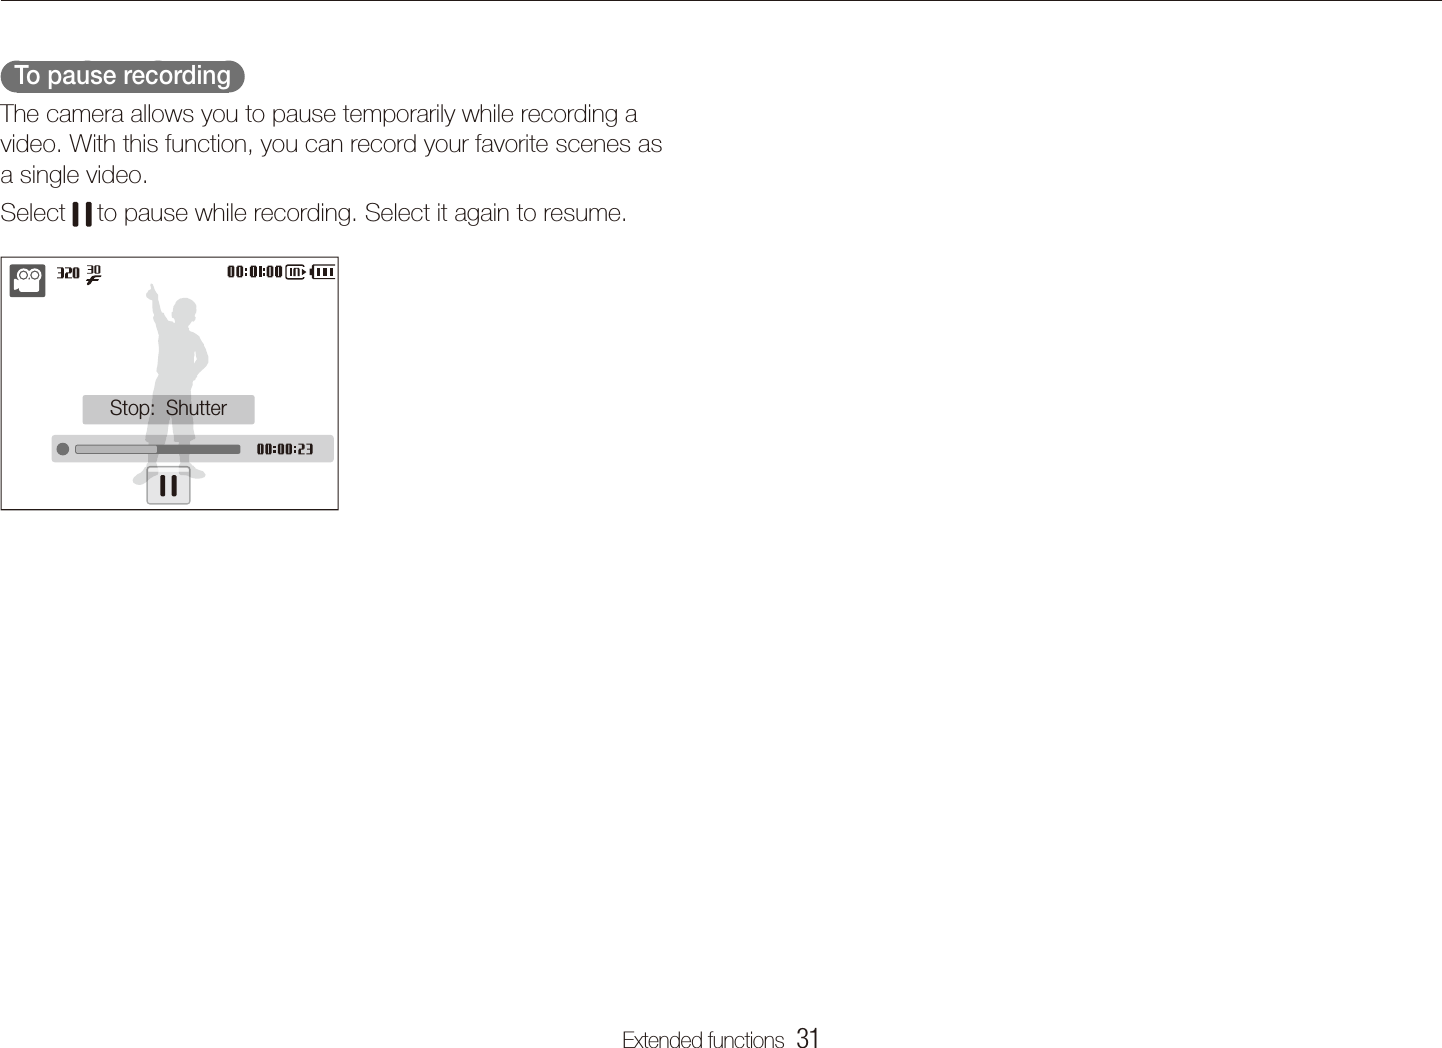
![Extended functions 30Shooting modesSelect 3 f > a sound option.Option DescriptionOff: Record a video without sound.On: Record a video with sound.Select 4 f a stabilizer option.Option DescriptionOff: Record a video with the image stabilization function turned off.On: Record a video with the image stabilization function turned on to prevent your video from blurring.Set other options as desired. (For options, refer to 5 “Shooting options.”)Press [6 Shutter] to start recording.Press [7 Shutter] again to stop recording.Recording a videoRecord videos of up to 2 hours in length. The recorded video is saved as an MPEG-4.AVI file. The zoom sound may be recorded if you use the zoom while recording a video.In Shooting mode, select 1 a v.Select 2 f a frame rate (the number of frames per second).As the number of frames increases, action appears more tnatural, but the file size is increased.30 FPS](https://usermanual.wiki/Samsung-Electronics-Co/CL65/User-Guide-1128407-Page-31.png)
![Extended functions 32Recording voice memosLearn how to record a voice memo that you can play back at any time. You can add a voice memo to a photo as a short reminder of shooting conditions. You will get the best sound quality when recording 40 cm away from the camera. apsdAdding a voice memo to a photoIn Shooting mode, select 1 f > .MemoAlign your subject in the frame and take a photo.2 You will begin recording a voice memo right after taking the tphoto.Record a short voice memo (10 seconds maximum).3 Press [t Shutter] to stop recording a voice memo.Recording a voice memoIn Shooting mode, select 1 f > .RecordPress [2 Shutter] to record.Select t to pause and to resume.The available recording time will be displayed on the top of tthe screen.You can record voice memos of up to 10 hours in length.tPress [3 Shutter] to stop.Select 4 to switch to Shooting mode.](https://usermanual.wiki/Samsung-Electronics-Co/CL65/User-Guide-1128407-Page-33.png)
![Shooting options 36Using the timerLearn how to set the timer to delay shooting. SapsdvPress [3 Shutter] to start the timer. The AF-assist light/timer lamp blinks. The camera will tautomatically take a photo at the specified time. Select the timer icon to cancel the timer.tDepending on the selected face defection option, the timer is not tavailable or some timer options are not available.In Shooting mode, select 1 .Select an option. 2 OffOption DescriptionOff: The timer is not active.10 Sec: Take a photo in 10 seconds.2 Sec: Take a photo in 2 seconds.Double: Take a photo in 10 seconds and take another in 2 seconds.Motion Timer: Detect your movement and then take a photo. (p. 44)The options may differ depending on the shooting mode.](https://usermanual.wiki/Samsung-Electronics-Co/CL65/User-Guide-1128407-Page-37.png)
![Shooting options 37Using the timerPose for your photo while the AF-assist light/timer lamp 5 is blinking.The AF-assist light/timer lamp will stop blinking just before the tcamera automatically takes a photo.The motion timer may not work when:you are more than 3 m away from the cameratyour movements are too subtletthere is too much light or backlightt Using the motion timer 1 In Shooting mode, select .Press [2 Shutter].Stand within 3 m from the camera within 6 seconds after 3 pressing [Shutter].Make a motion, such as waving your arms, to activate 4 the timer.The AF-assist light/timer lamp will start to blink rapidly when tthe camera detects you.The detection range of the motion timer](https://usermanual.wiki/Samsung-Electronics-Co/CL65/User-Guide-1128407-Page-38.png)
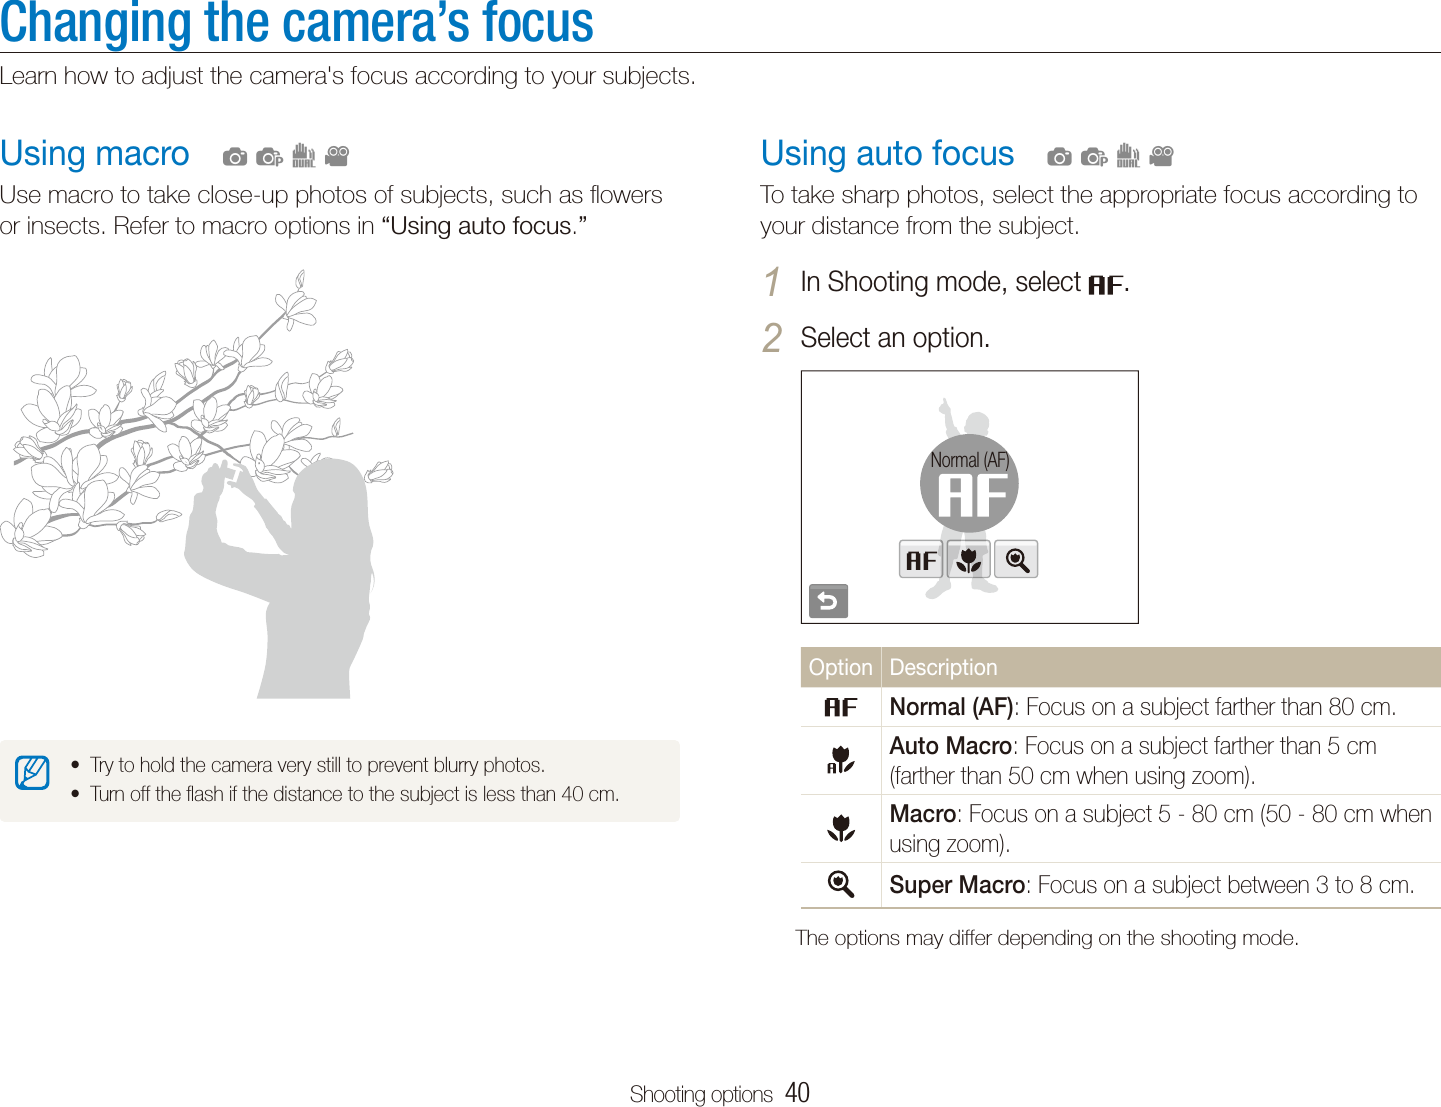
![Shooting options 41Changing the camera’s focusThe color of the focus frame indicates the tracking and focus status:White: Tracking the subjecttGreen: Auto focus when you half-press [t Shutter]If you do not touch any area on the screen, the focus frame will tappear in the center of the screen.Tracking a subject may fail when:tthe subject is too small -the subject moves -the subject is backlit or you are shooting in a dark place -colors on the subject and the background are the same -patterns on the subject and the background are the same -the camera shakes excessively - In these cases, the focus frame will appear as a white single-line frame.If the camera fails to track the subject, you must reselect the subject tto track. If the camera fails to fix the focus, the focus frame will change to a red tsingle-line frame. Using smart touch focusSmart touch AF allows you to track and auto focus on your subject, even when you are moving. Simply set the focus area to Smart Touch AF (p. 49) and touch the subject you want to track in the touch area (indicated by a frame). A focus frame will appear on the subject and will follow the subject as you move the camera. apsd](https://usermanual.wiki/Samsung-Electronics-Co/CL65/User-Guide-1128407-Page-42.png)

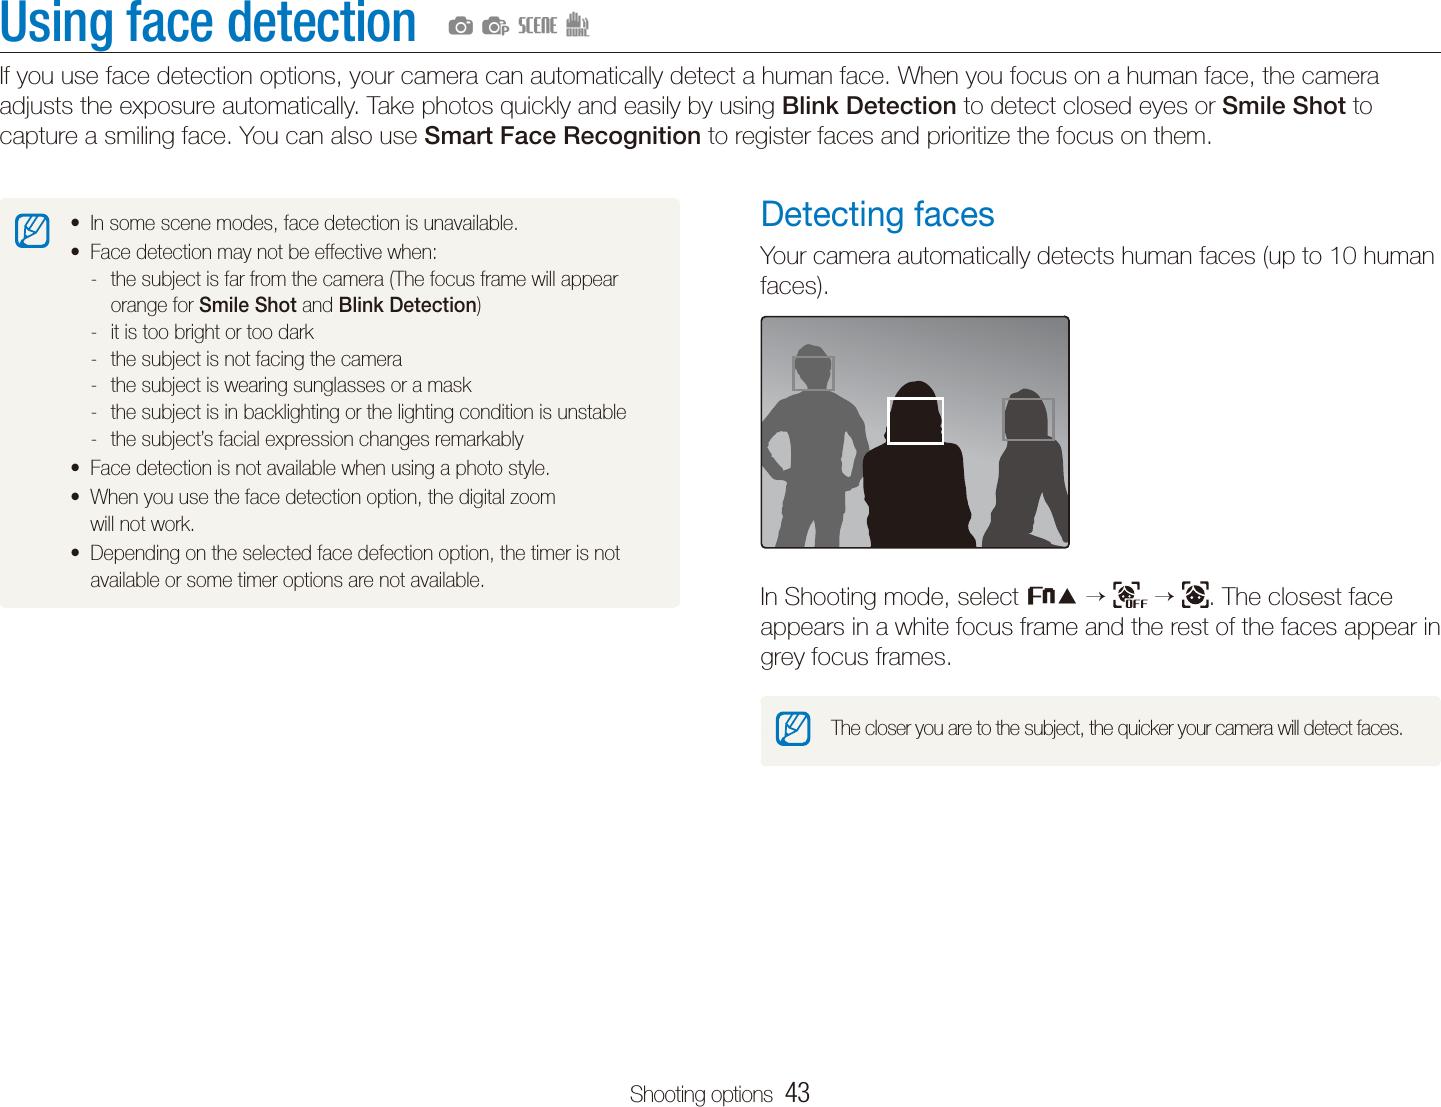
![Shooting options 44Using face detectionTaking a smile shotThe camera automatically releases the shutter when it detects a smiling face.In Shooting mode, select f . When your subject smiles broadly, your camera can detect the smile more easily.Detecting eye blinkingIf your camera detects closed eyes, it will automatically take 2 photos in succession. In Shooting mode, select f .Hold your camera still while t “Capturing” is displayed on the screen.When blink detection fails, t “Picture taken with eyes closed.” message appears. Take another photo.Taking a self portrait shotTake photos of yourself. The focus distance will be set to close-up and your camera will emit a beep.In Shooting mode, select 1 f .When your hear a quick beep, press [2 Shutter].To turn the beep on or off, select Self-Portrait in the sound settings. (p. 88)](https://usermanual.wiki/Samsung-Electronics-Co/CL65/User-Guide-1128407-Page-45.png)

![Shooting options 50Adjusting brightness and color Defining your own white balance In Shooting mode, select 1 f .Aim the lens at a piece of white paper.2 Press [3 Shutter].](https://usermanual.wiki/Samsung-Electronics-Co/CL65/User-Guide-1128407-Page-51.png)
![Shooting options 51Using burst modesIt can be difficult to take photos of fast-moving subjects or capture natural facial expressions and gestures of your subjects in photos. In these cases, select one of the burst modes. psOption DescriptionMotion Capture: t While you are pressing [Shutter], the camera takes VGA photos (6 photos per second; maximum of 30 photos).The camera automatically shows you the photos just ttaken and then saves them.AEB: Take 3 photos with different exposures: normal, tunderexposed, and overexposed.Use a tripod to prevent blurry photos.tThe options may differ depending on the shooting mode.You can use the flash and timer and ACB only when you select tSingle.When you select t Motion Capture, the resolution will be set to VGA and the ISO speed will be set to Auto.In Shooting mode, select 1 f > .Select an option.2 SingleOption DescriptionSingle: Take a single photo.Continuous: t While you are pressing [Shutter], the camera takes photos continuously.The maximum number of photos depends on the tcapacity of your memory card.](https://usermanual.wiki/Samsung-Electronics-Co/CL65/User-Guide-1128407-Page-52.png)
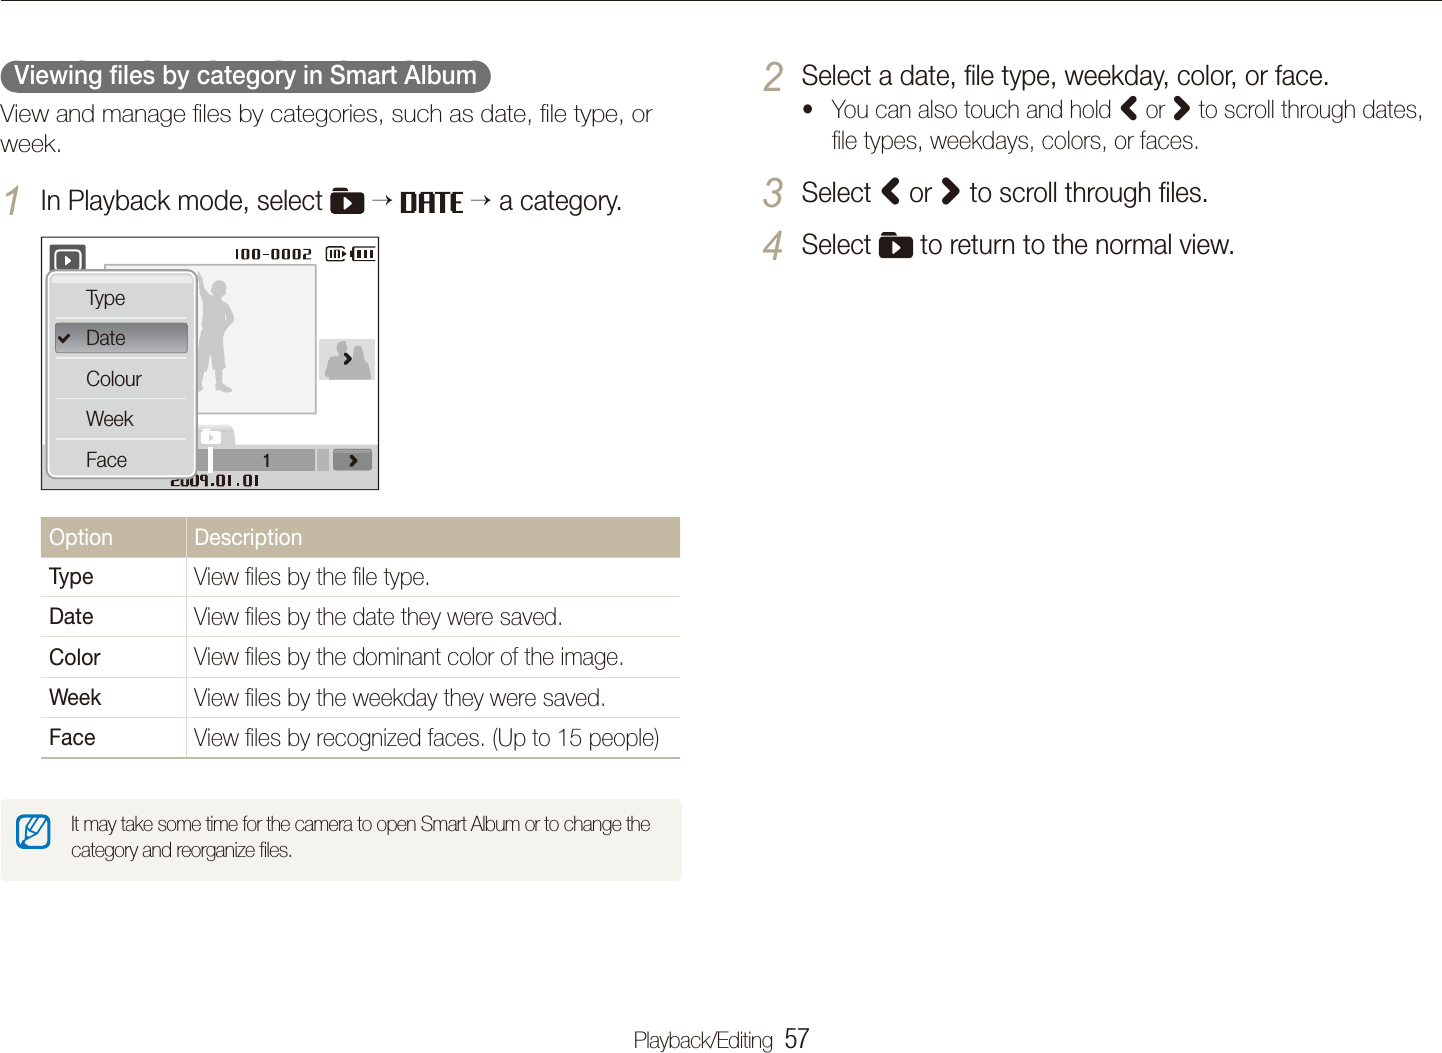
![Playback/Editing 56Playing backLearn actions to play back photos, videos, or voice memos, and managing files. Display in Playback mode Icon DescriptionPhoto includes a voice memo vVideo filePrint order has been set (DPOF)Protected filePhoto includes a registered face; Available only when you use a memory cardFolder name – File nameRegister a face (p. 63); Available only when you use a memory cardDelete files (p. 65)Play a slide show (p. 67)Edit photos (p. 70) Select a display type (p. 18)Play videos or voice memos (Video p. 68/Voice memo p. 69)Starting Playback modeView photos or play videos and voice memos stored in your camera.Press [1 Playback].The most recent file you have taken or recorded will be tdisplayed.If the camera is off, it will turn on.tDraw a horizontal bar left or right to scroll through files.2 Select t< to view the previous file. Hold to view files quickly.Select t> to view the next file. Hold to view files quickly.If you want to view files stored in the internal memory, remove your memory card.](https://usermanual.wiki/Samsung-Electronics-Co/CL65/User-Guide-1128407-Page-57.png)
![Playback/Editing 58Playing back Protecting files Protect your files from accidental deletion.To select and protect files,In Playback mode, press [1 MENU].Select 2 Protect Select.Select files you want to protect.3 Select t to select all files.Select t to cancel your selection.Select 4 . Viewing files as thumbnails Scan thumbnails of files.In Playback mode, push [Zoom] down to display 9 or 16 thumbnails (push [Zoom] up to return to the previous mode).To Do thisScroll through filesSelect < or >.View a fileSelect a thumbnail.Delete filesSelect or drag a file to . (p. 65)](https://usermanual.wiki/Samsung-Electronics-Co/CL65/User-Guide-1128407-Page-59.png)
![Playback/Editing 59Playing backTo delete all files,In Playback mode, press [1 MENU].Select 2 Delete All Yes.Alternate way to delete a fileWhile viewing a file in Playback mode, draw an X on the screen. To protect all files,In Playback mode, press [1 MENU].Select 2 Protect All Lock. Deleting files Delete single files or all files at once. You cannot delete protected files.To delete a single file,In Playback mode, select a file 1 .Select 2 Yes to delete the file.To delete multiple files,In Playback mode, select 1 Multiple Delete.Select files you want to delete. 2 Select t to select all files on the current screen.Select t to cancel your selection.Select 3 Yes.](https://usermanual.wiki/Samsung-Electronics-Co/CL65/User-Guide-1128407-Page-60.png)
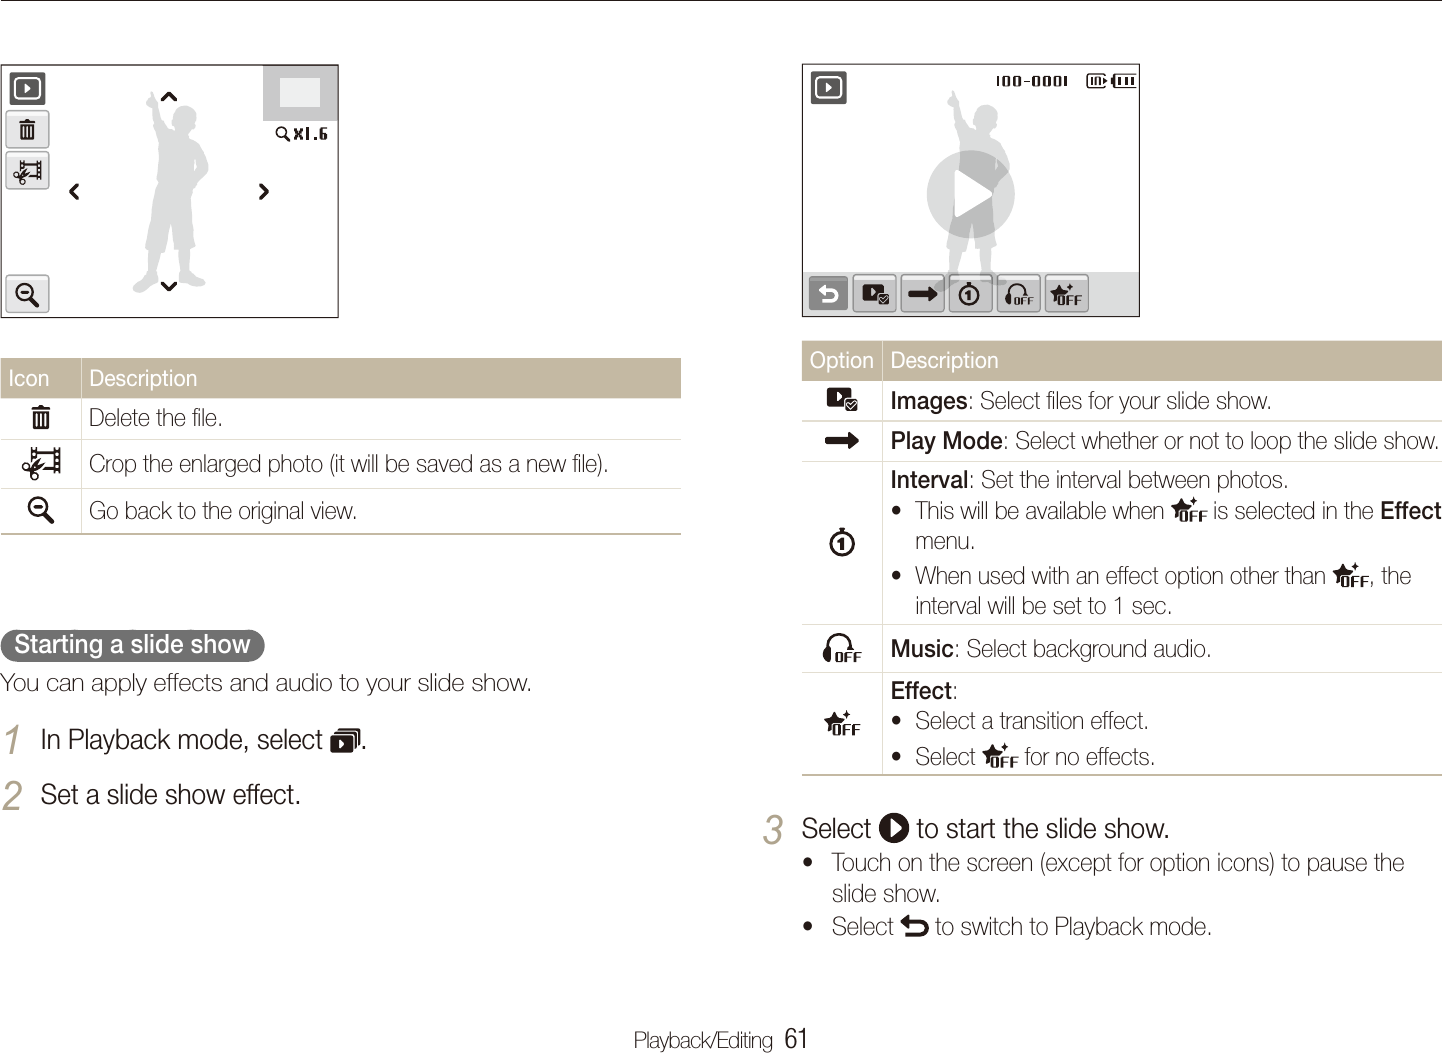
![Playback/Editing 60Playing back Copying files to the memory card You can copy files from the internal memory to a memory card.In Playback mode, press [1 MENU].Select 2 . Copy to Card.Select 3 Yes to copy files.Viewing photosView a photo by zooming in on part of a photo or view photos as a slide show. Enlarging a photo In Playback mode, push [Zoom] up to enlarge a photo (push [Zoom] down to reduce a photo).The enlarged area and zoom ratio are indicated on the top of the screen. The maximum zoom ratio may vary depending on the resolution. Select arrows to move the enlarged area. Using the recycle bin If you activate the recycle bin, files you delete will be sent to the recycle bin instead of being deleted permanently. This applies to single files or selected files only–if you choose to delete all files, those files will not be sent to the recycle bin. To activate the recycle bin,In Playback mode, press [1 MENU].Select 2 Recycle Bin On.To restore files from the recycle bin,In Playback mode, press [1 MENU].Select 2 Recycle Bin Retrieve.This function does not work for videos or voice memos.tIt may take longer to delete files when using the recycle bin function.tIf you format the internal memory, all files in the recycle folder will be tdeleted. The recycle bin will hold up to 10 MB of files. Once you exceed the t10 MB limit, the camera asks you whether to empty the recycle bin. Select Yes to empty the recycle bin or No to delete only the current file.](https://usermanual.wiki/Samsung-Electronics-Co/CL65/User-Guide-1128407-Page-61.png)
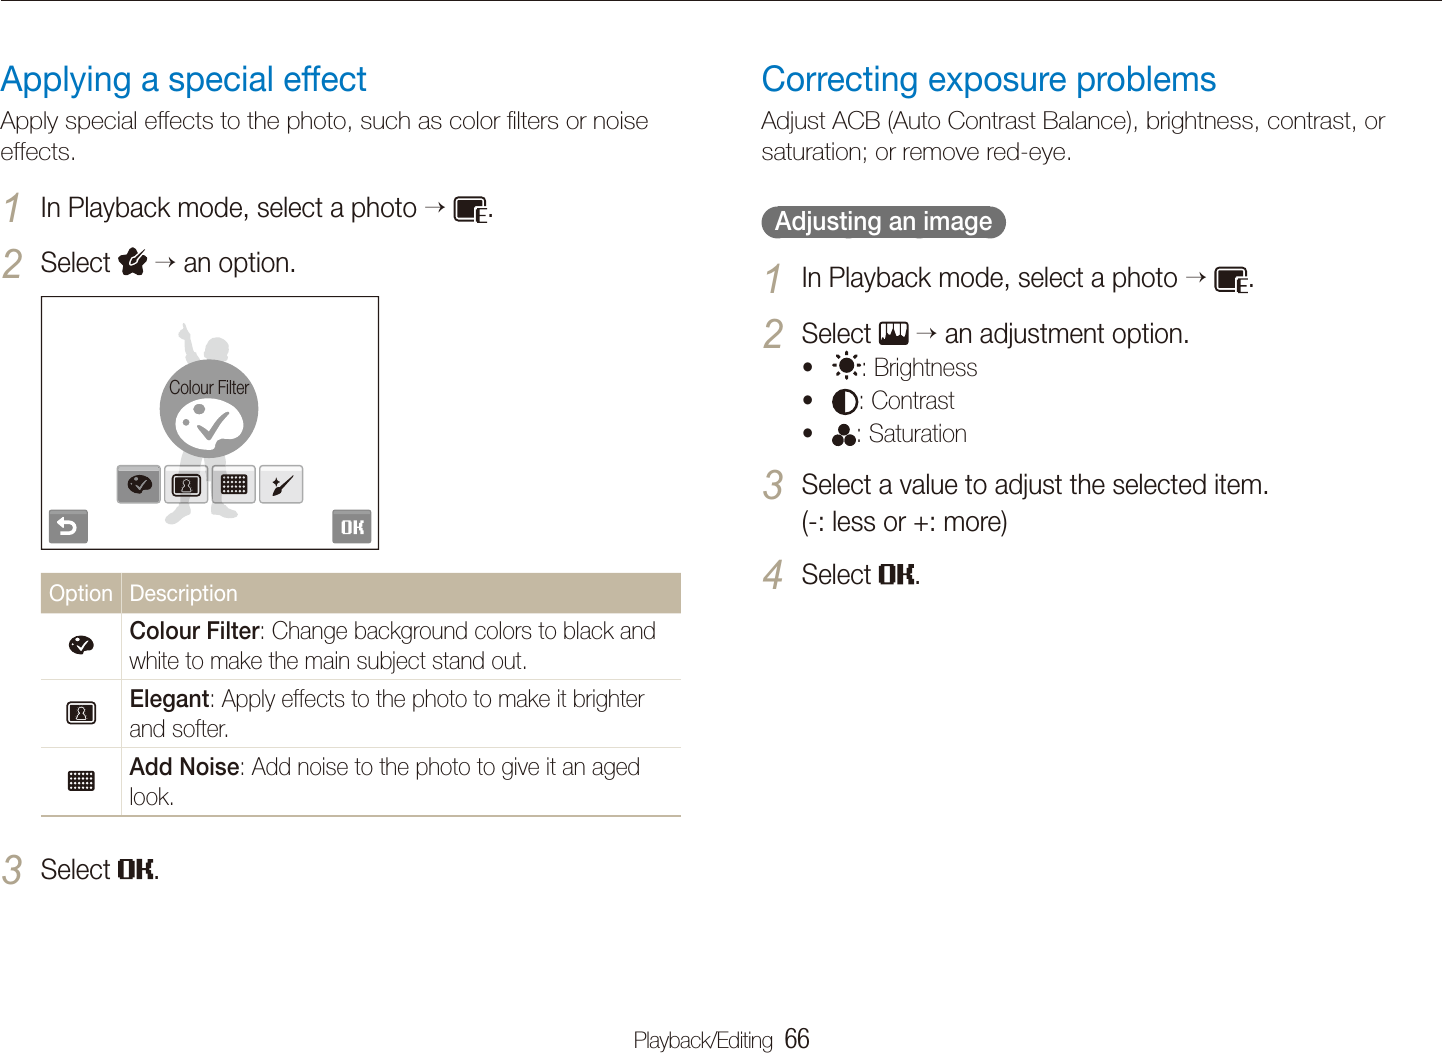
![Playback/Editing 67Editing a photoSelect photos to print.3 Select t to select all files.Select t to cancel your selection.Select 4 .Set DPOF options.5 Option DescriptionSelect whether to print the photos as thumbnails.Specify the size of the print.Select 6 , or . to set the number of copies.Select 7 .If you specify the print size, you can print photos only with DPOF 1.1-compatible printers. Adjusting ACB (Auto Contrast Balance) In Playback mode, select a photo 1 .Select 2 .Select 3 .Creating a print order (DPOF)Select photos to be printed and set options, such as number of copies or paper size. The memory card can be taken to a print shop that supports DPOF t(Digital Print Order Format) or you can print photos directly through a DPOF-compatible printer at home.Wide photos may print with the left and right edges cut off, so be taware of the dimensions of your photos.You cannot set the DPOF for the photos stored in the internal memory.tIn Playback mode, press [1 MENU].Select 2 .DPOF Select.To print all files, select t All and skip to step 5.](https://usermanual.wiki/Samsung-Electronics-Co/CL65/User-Guide-1128407-Page-68.png)
![Playback/Editing 68Viewing files on a TV (HDTV)Play back photos or videos by connecting your camera to a TV using the provided A/V cable.View photos or play videos using the touch screen on 6 your camera.Locate the option you want on the TV screen and touch twhere the option is located on the camera screen. When a pointer appears on the option on the TV screen, select on the camera screen.On some TVs, digital noise may occur or part of an image may not tappear.Images may not appear centered on the TV screen depending on tyour TV settings.You can capture photos or videos while the camera is connected tto a TV.Select a video signal output according to your country or 1 region. (p. 90)Turn off your camera and TV.2 Connect your camera to your TV using the A/V cable.3 Video AudioTurn on your TV and select the video output mode using 4 the TV remote control.Turn on your camera and press [5 Playback].](https://usermanual.wiki/Samsung-Electronics-Co/CL65/User-Guide-1128407-Page-69.png)
![Wireless network/Bluetooth 72The camera will connect to the WLAN.tIf the network has the WPS profile, select t WPS on the next screen.If the network requires a password, continue with the next tstep.Select network profiles and options.4 Option DescriptionAuthenticationSelect a network authentication.Encryption TypeSelect an encryption type.Select the password input field.5 Enter a password and select 6 O.Select 7 O.The camera will connect to the WLAN.tFor network profiles and a password, contact your network tadministrator or network service provider.When connecting to the network, you will be charged according to tyour contract with your network service provider. Connecting to a WLAN automaticallyIn Shooting mode, select [Network] 1 n.Select 2 Access Point Setting.The camera will search for and display available WLAN tconnections.Select a WLAN.3 Icon DescriptionAD-HOCSecurityWPSConnecting to a WLAN and configuring network settingsLearn to activate and connect to a wireless LAN via an access point (AP) when you are in a range of a WLAN. You can also configure network settings and learn how to enter text.Your device uses a non-harmonised frequency and is intended for use in the following countries:](https://usermanual.wiki/Samsung-Electronics-Co/CL65/User-Guide-1128407-Page-73.png)
![Wireless network/Bluetooth 73Connecting to a WLAN and configuring network settingsStoring your informationIn Shooting mode, select [Network] 1 n.Select 2 User Setting.Select the name input field and enter your name.3 For information about entering text, refer to page xx.tWhen you are finished, select 4 O.Select the email input file and enter your email address.5 When you are finished, select 6 O.Select 7 .Connecting to a WLAN manuallyIn Shooting mode, select [Network] 1 n.Select 2 Access Point Setting.The camera will search for and display available WLAN tconnections.Select a WLAN.3 Select 4 IP Setting and Manual.Select the network profiles.5 Option DescriptionIPEnter the static IP address.Subnet MaskEnter the subnet mask.GatewayEnter the gateway.Enter values and select 6 O.When you are finished, select 7 O.The camera will connect to the WLAN.tFor network profiles and a password, contact your network administrator or network service provider.](https://usermanual.wiki/Samsung-Electronics-Co/CL65/User-Guide-1128407-Page-74.png)
![Wireless network/Bluetooth 74Connecting to a WLAN and configuring network settingsSetting the file size to shareSet the file size you will share with other DNLA devices. You can select either the original size or a limit of 2MB.In Shooting mode, select [Network] 1 n.Select 2 DLNA Image Size.Select a size.3 Checking informationCheck the Mac address and serial number of your camera to register it with the Samsung website.In Shooting mode, select [Network] 1 n.Select 2 Device Information.Storing email addressesStore up to 10 email addresses in your camera. You can use them when you send your photos via email.In Shooting mode, select [Network] 1 n.Select 2 Email Address.Select 3 .Select the name input field and enter a name.4 For information about entering text, refer to page xx.tWhen you are finished, select 5 O.Select the email input file and enter an email address.6 When you are finished, select 7 O. Select 8 .](https://usermanual.wiki/Samsung-Electronics-Co/CL65/User-Guide-1128407-Page-75.png)

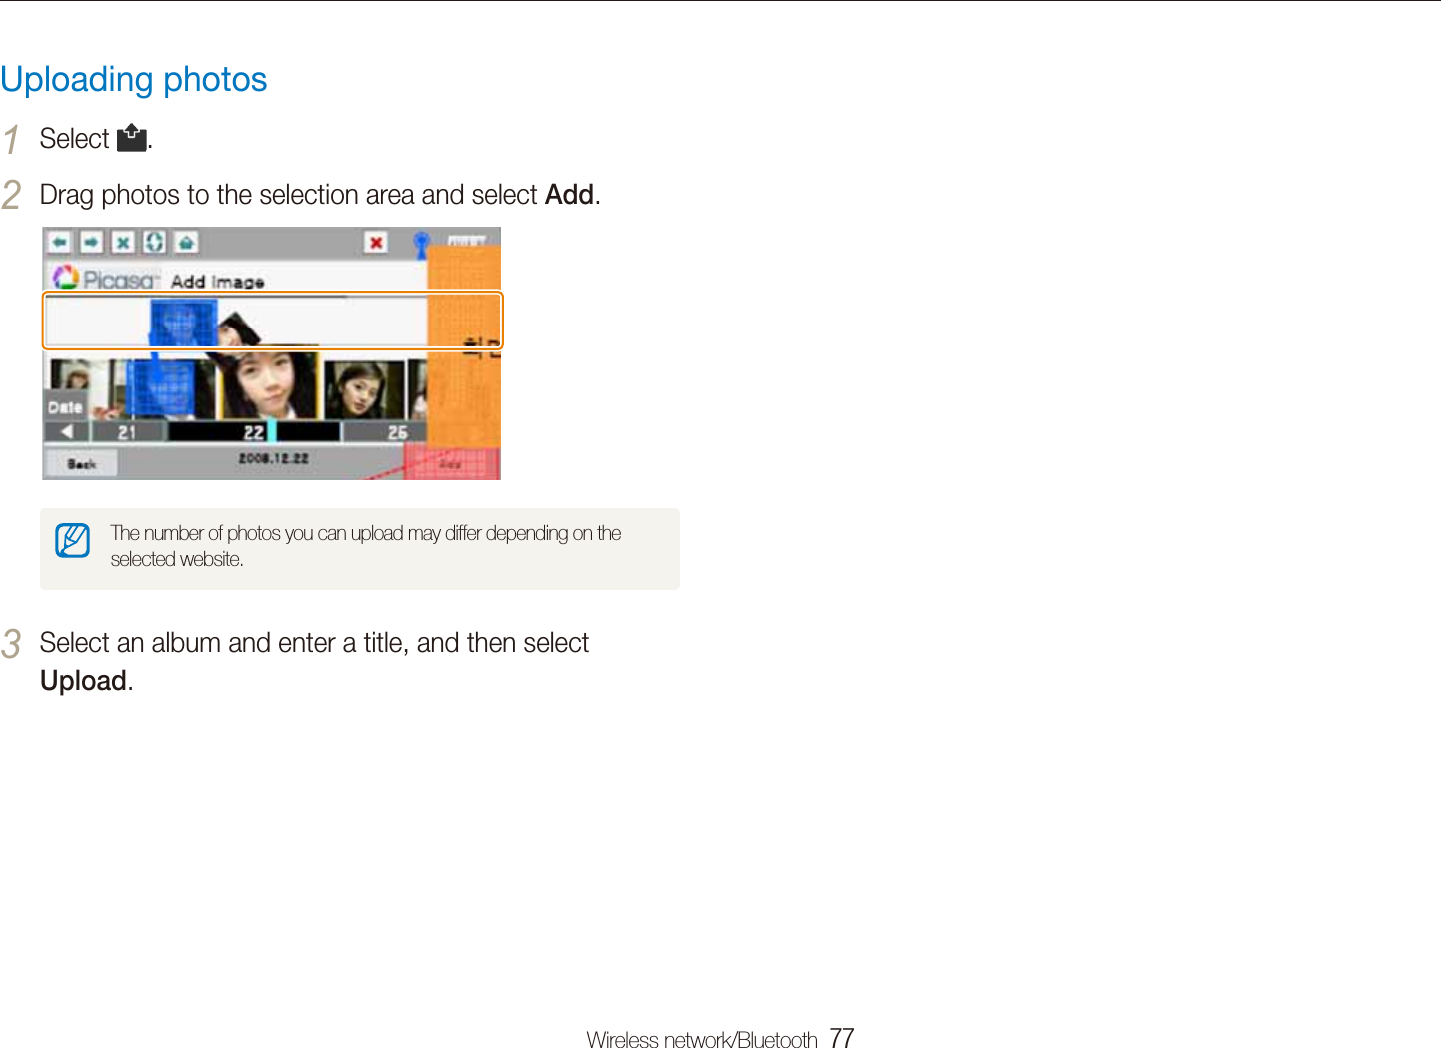
![Wireless network/Bluetooth 76Using photo or video sharing websites Icons on a website Icon DescriptionHomePrevious pageNext pageStopRefreshCloseAccessing a websiteUpload your photos to photo sharing websites, such as Zoom-in, Flickr, Picasa, and Facebook. You can also upload your videos to video sharing websites, such as YouTube.In Shooting mode, select [Network] 1 .The camera automatically connects to the last WLAN tconnection. If the camera has not connected to the WLAN, it automatically tsearches for available WLAN connections. For details, refer to page xx.Select a website.2 Enter your login ID and password, and select 3 Login.](https://usermanual.wiki/Samsung-Electronics-Co/CL65/User-Guide-1128407-Page-77.png)
![Wireless network/Bluetooth 78Sending photos via emailSelect email addresses and select 3 O.Drag photos to the selection area and select 4 Send.The photos will be sent to the selected email addresses.tIn Shooting mode, select [Network] 1 .The camera automatically connects to the last WLAN tconnection. If the camera has not connected to the WLAN, it automatically tsearches for available WLAN connections. For details, refer to page xx.Select 2 .For information about storing email addresses, refer to page txx.The email address you entered in the user setting appears. t(Refer to page xx.)If you have sent photos via email, the recent recipient taddresses appear.To enter an email address manually, select t .](https://usermanual.wiki/Samsung-Electronics-Co/CL65/User-Guide-1128407-Page-79.png)
![Wireless network/Bluetooth 79Sending photos to the DLNA devicesDLNA is an international technology standard for sharing media files between networked devices in your home. With this technology, you can view your photos on a widescreen TV or another device, and send or receive photos to or from cameras of the same model.On the TV, search for the camera and browse the shared 4 photos.Your camera’s name is what you entered in the user setting. t(Refer to page xx.)For information about searching for the camera and browsing tthe photos on the TV, refer to the TV user manual.APViewing photos on a TV screenView your photos on a TV that supports the DLNA standard.In Shooting mode, select [Network] 1 .The camera automatically connects to the last WLAN tconnection. If the camera has not connected to the WLAN, it automatically tsearches for the available WLAN connections. For details, refer to page xx.Select 2 All or Selected.If you selected 3 Selected, select the photos you want to view on the TV screen.The photos will be shared with the TV.t](https://usermanual.wiki/Samsung-Electronics-Co/CL65/User-Guide-1128407-Page-80.png)
![Wireless network/Bluetooth 80Sending photos to the DLNA devicesSending photos to another cameraSend your photos to another camera of the same model.In Shooting mode, select [Network] 1 a.Select 2 Send.The camera generates a password and displays it on the tscreen while waiting for a connection with the receiving camera.On the receiving camera, select the name of the sending 3 camera.The sending camera’s name is what you entered in the user tsetting. (Refer to page xx.)Enter the password (4 digits) on the receiving camera.4 The selection area automatically appears on the sending tcamera.Drag photos to the selection area.5 The photos will be sent to the receiving camera.tViewing photos on another deviceIn Shooting mode, select [Network] 1 .The camera automatically connects to the last WLAN tconnection. If the camera has not connected to the WLAN, it automatically tsearches for the available WLAN connections. For details, refer to page xx.Select a device that will play the photos.2 Drag a photo to the selection area.3 The photos will appear on the device’s screen.tTo view other photos, drag them to the selection area on your tcamera.](https://usermanual.wiki/Samsung-Electronics-Co/CL65/User-Guide-1128407-Page-81.png)
![Wireless network/Bluetooth 81Sending photos to the DLNA devicesReceiving photos from another cameraIn Shooting mode, select [Network] 1 a.Select 2 Receive.Select the name of the sending camera.3 Enter the sending camera’s password and select 4 O.When the sending camera transmits photos, they will appear ton the receiving camera.](https://usermanual.wiki/Samsung-Electronics-Co/CL65/User-Guide-1128407-Page-82.png)
![Wireless network/Bluetooth 82Sending photos via BluetoothBluetooth is a wireless protocol for exchanging data over short distances. With Bluetooth, you can quickly send photos to other Samsung mobile phones or PDAs.In Shooting mode, select [Network] 1 .Select 2 Yes.The camera will search for and display Bluetooth-enabled tdevices.If you have searched for the Bluetooth-enabled devices, a list tof Bluetooth-enabled devices appears. Select Research to search again.Select a Bluetooth-enabled device.3 Enter a password (4~6 digits) and select 4 O.Drag photos to the selection area.5 The photos will be sent to the selected device.tThe photo size will be resized to 640x480 (VGA).t](https://usermanual.wiki/Samsung-Electronics-Co/CL65/User-Guide-1128407-Page-83.png)
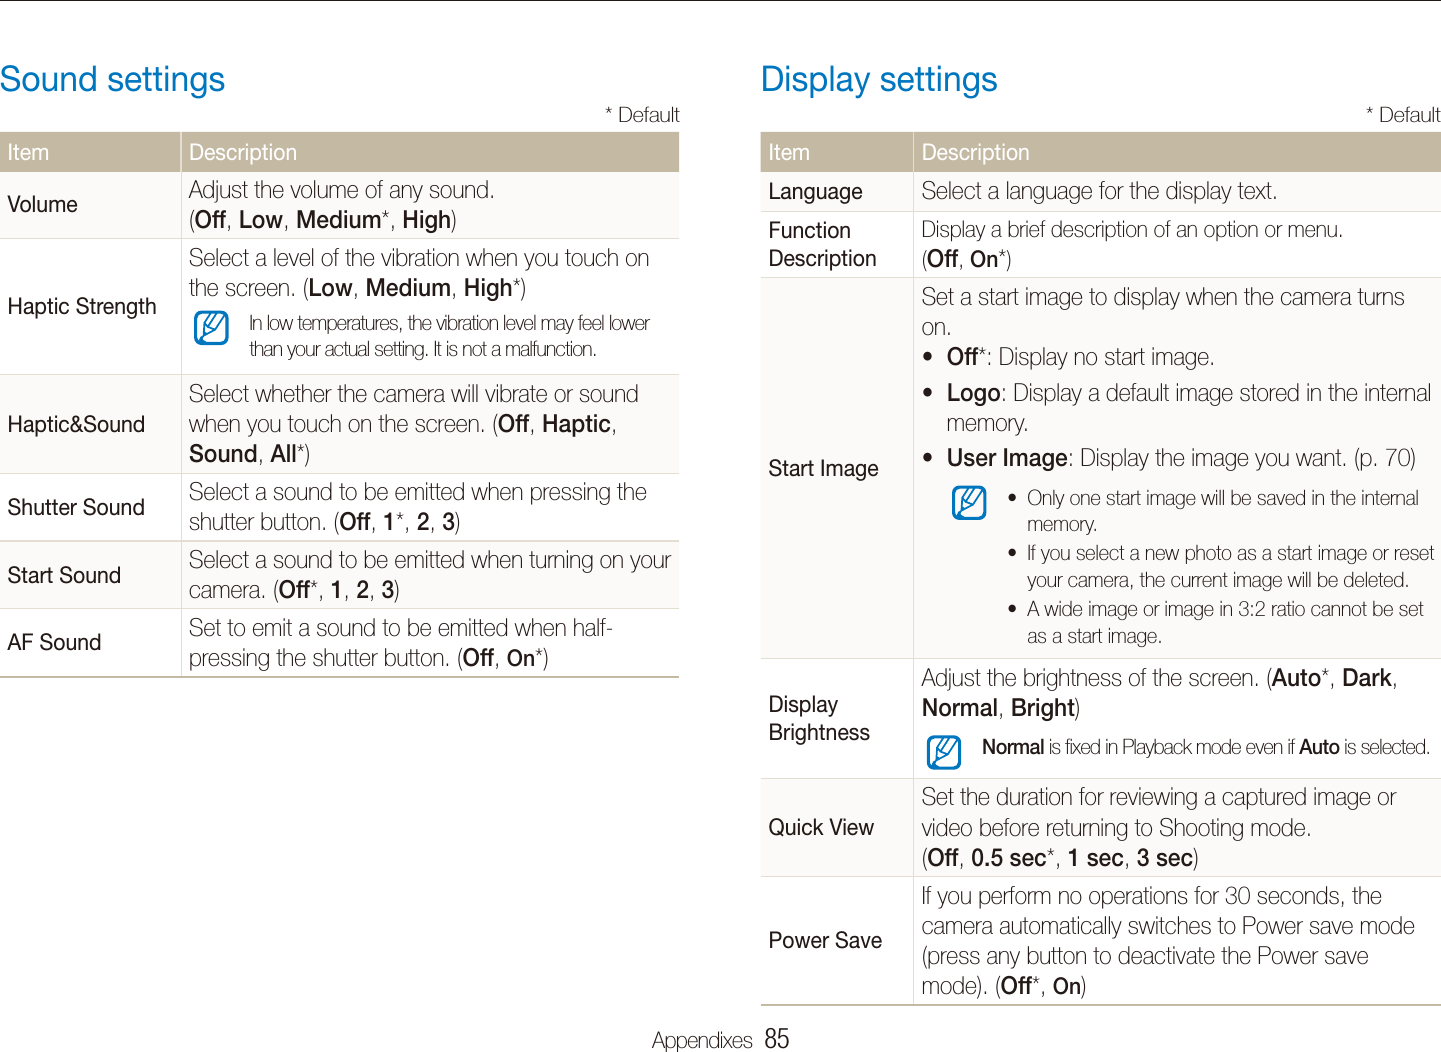
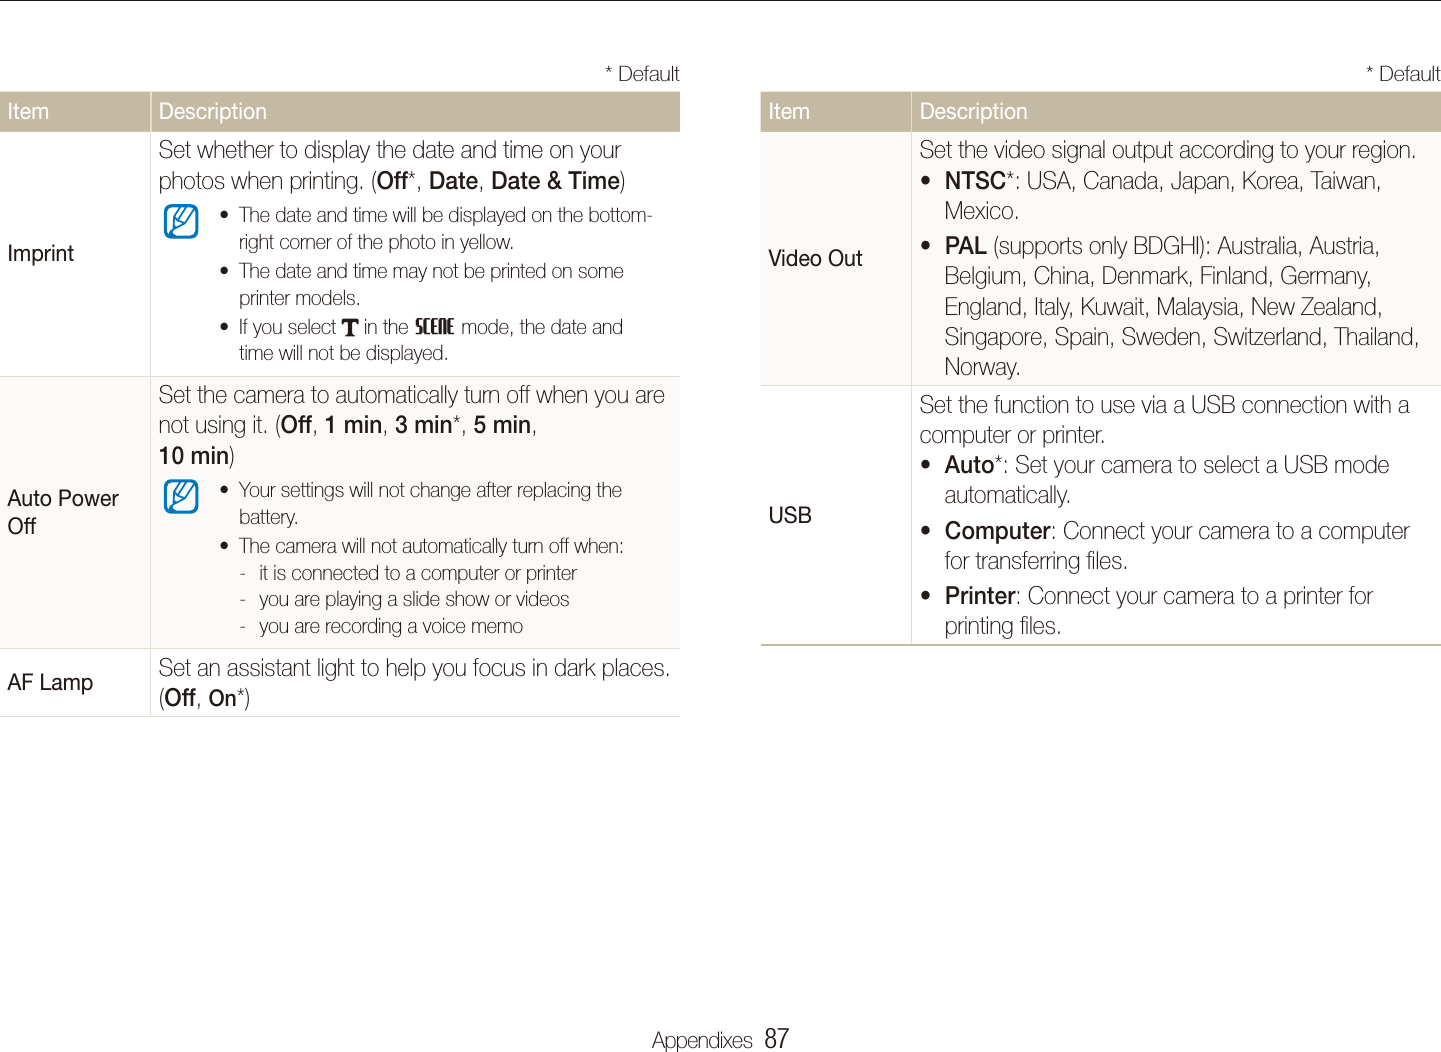
![Appendixes 84Settings menuLearn about various options to configure your camera's settings.Select an option and save your settings.3 1/2VolumeHaptic StrengthHaptic&SoundShutter SoundStart Sound :OffOffLowMediumHighSelect 4 to return to the previous screen.Accessing the settings menuIn Shooting or Playback mode, press [1 MENU].Select a menu.2 1/2VolumeHaptic StrengthHaptic&SoundShutter SoundStart Sound:Medium:High:All:1:OffIcon DescriptionSound settings: Set various camera sounds and volume. (p. 88)Display settings: Customize the display settings, such as language and brightness. (p. 88)Camera settings: Change the settings for the camera system, such as memory format, default file name, and USB mode. (p. 89)](https://usermanual.wiki/Samsung-Electronics-Co/CL65/User-Guide-1128407-Page-85.png)
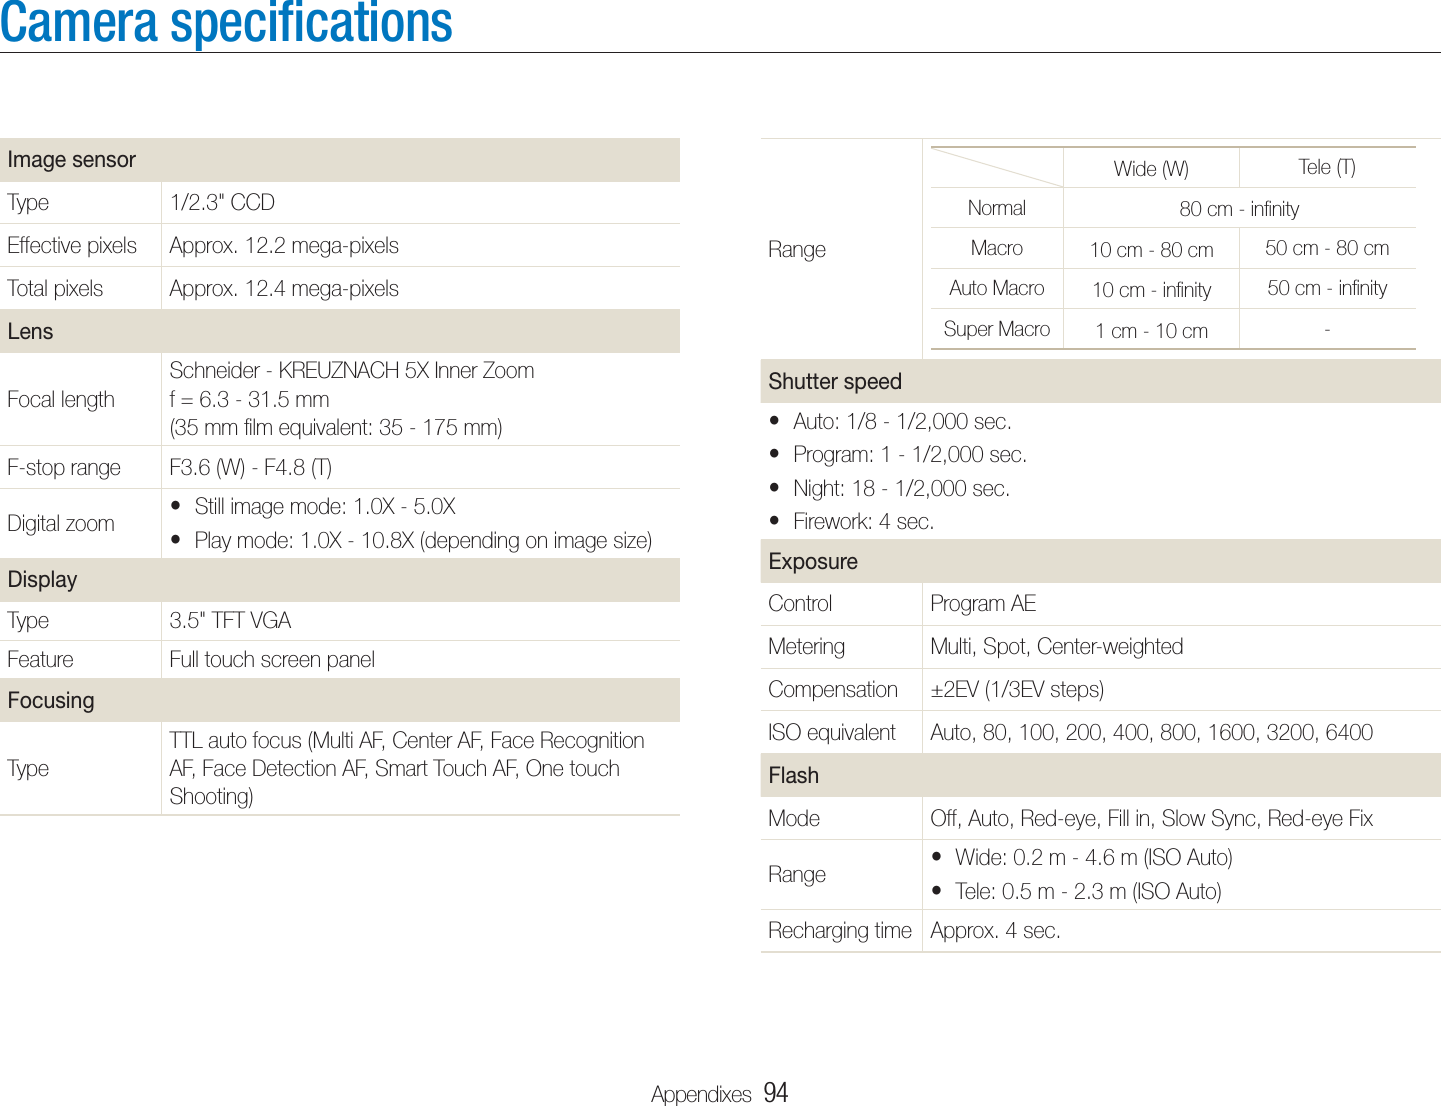
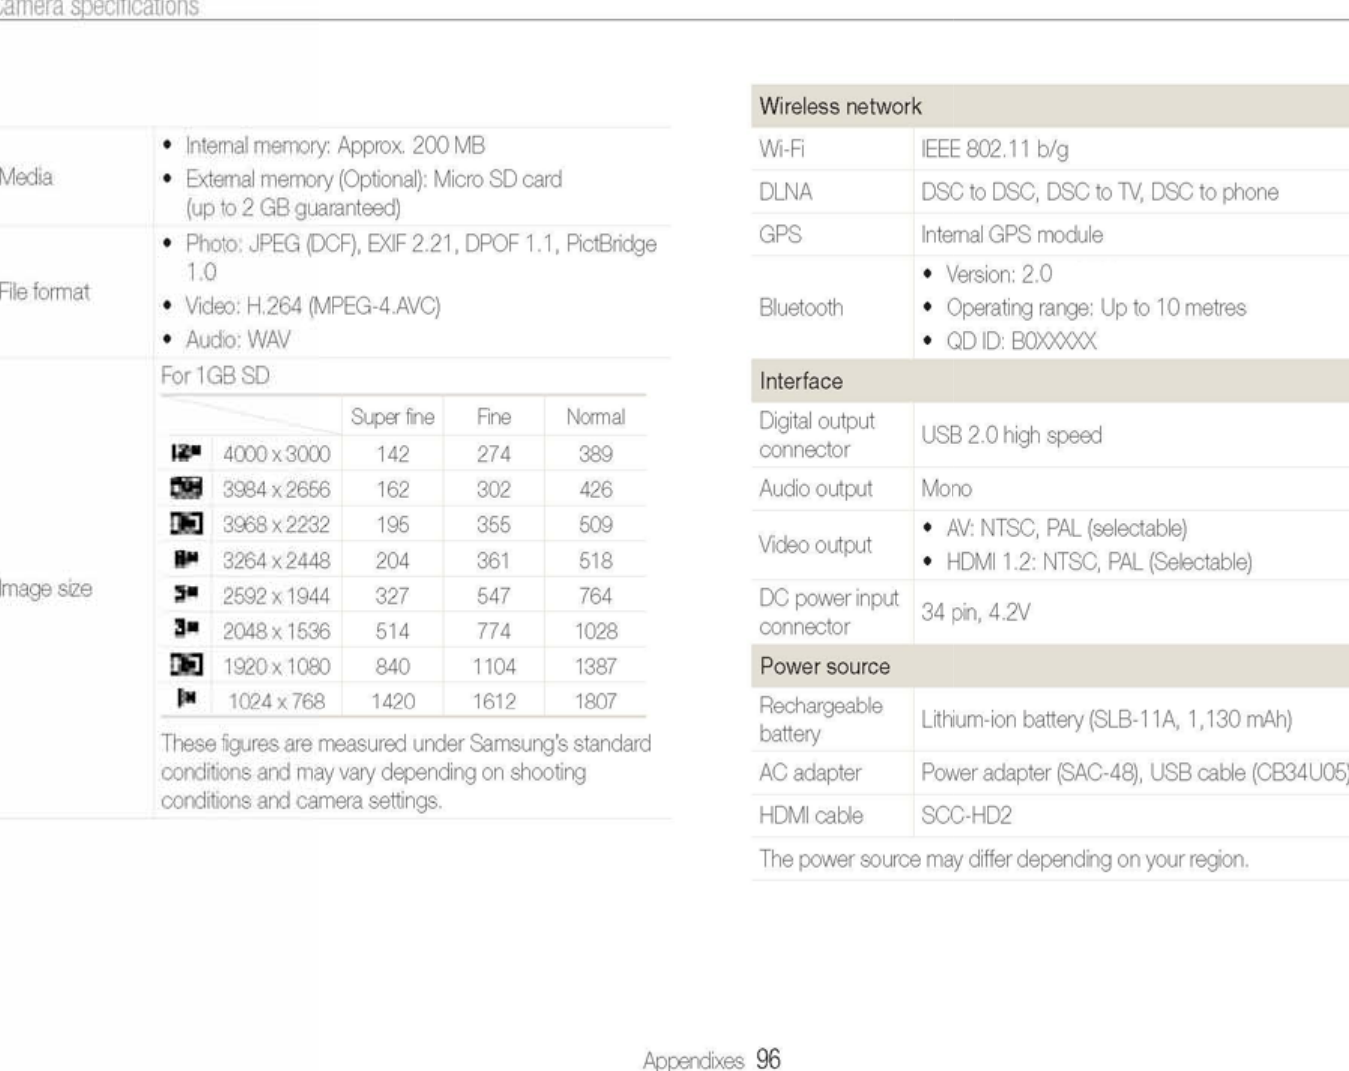
![Appendixes 95Camera specificationsVideosFormat: MPEG-4 with audio (Max recording time: 2 thours)Size: 1280 x 720 (30 FPS, 15 FPS) High Quality, t1280 x 720 (30 FPS, 15 FPS) Standard Quality, 640 x 480 (30 FPS, 15 FPS), 320 x 240 (60 FPS, 30 FPS, 15 FPS)5X Optical zoom with sound recordingtFrame rate: 60 FPS, 30 FPS, 15 FPStPhoto style selector, White balancetVideo editing (embedded): Pause during recording, tStill image capture, Time trimmingPlaybackType Single image, Thumbnails, Multi slide show, Movie clip, Smart AlbumEdit Resize, Rotate, Photo Style Selector, Image AdjustEffectPhoto Style Selector: Normal, Soft, Vivid, Forest, tRetro, Cool, Calm, Classic, Negative, Custom RGBImage Adjust: ACB, Brightness, Contrast, SaturationtFunny Face: Face Retouch, Red-eye Fix, Snow, tMosaic, HighlightVoice recordingVoice Recording (Max. 10 hours )tVoice Memo in a photo (Max. 10 sec.)tShake reduction Dual IS [Optical Image Stabilisation (OIS) + Digtal Image Stabilisation (DIS)]EffectShooting modePhoto Style Selector: Normal, Soft, Vivid, Forest, tRetro, Cool, Calm, Classic, Negative, Custom RGBImage Adjust: Sharpness, Contrast, SaturationtWhite BalanceAuto WB, Daylight, Cloudy, Fluorescent_H, Fluorescent_L, Tungsten, Custom SetShootingPhotosModes: Smart Auto (Portrait, Night Portrait, Backlight tPortrait, Backlight, Landscape, White, Motion, Tripod, Night, Macro, Macro Text, Blue Sky, Sunset Sky, Natural Portrait, Natural Green), Auto, Program, DUAL IS, Movie, Scene (Night, Portrait, Children, Landscape, Text, Close Up, Sunset, Dawn, Backlight, Firework, Beach & Snow, Frame Guide, Beauty Shot)Drive: Single, Continuous, Motion Capture, AEBtTimer: 2 sec,10 sec, Double, Motion Timert](https://usermanual.wiki/Samsung-Electronics-Co/CL65/User-Guide-1128407-Page-96.png)