Samsung Electronics Co CLP610ND Color Laser Printer User Manual CLP 6xx Series EN
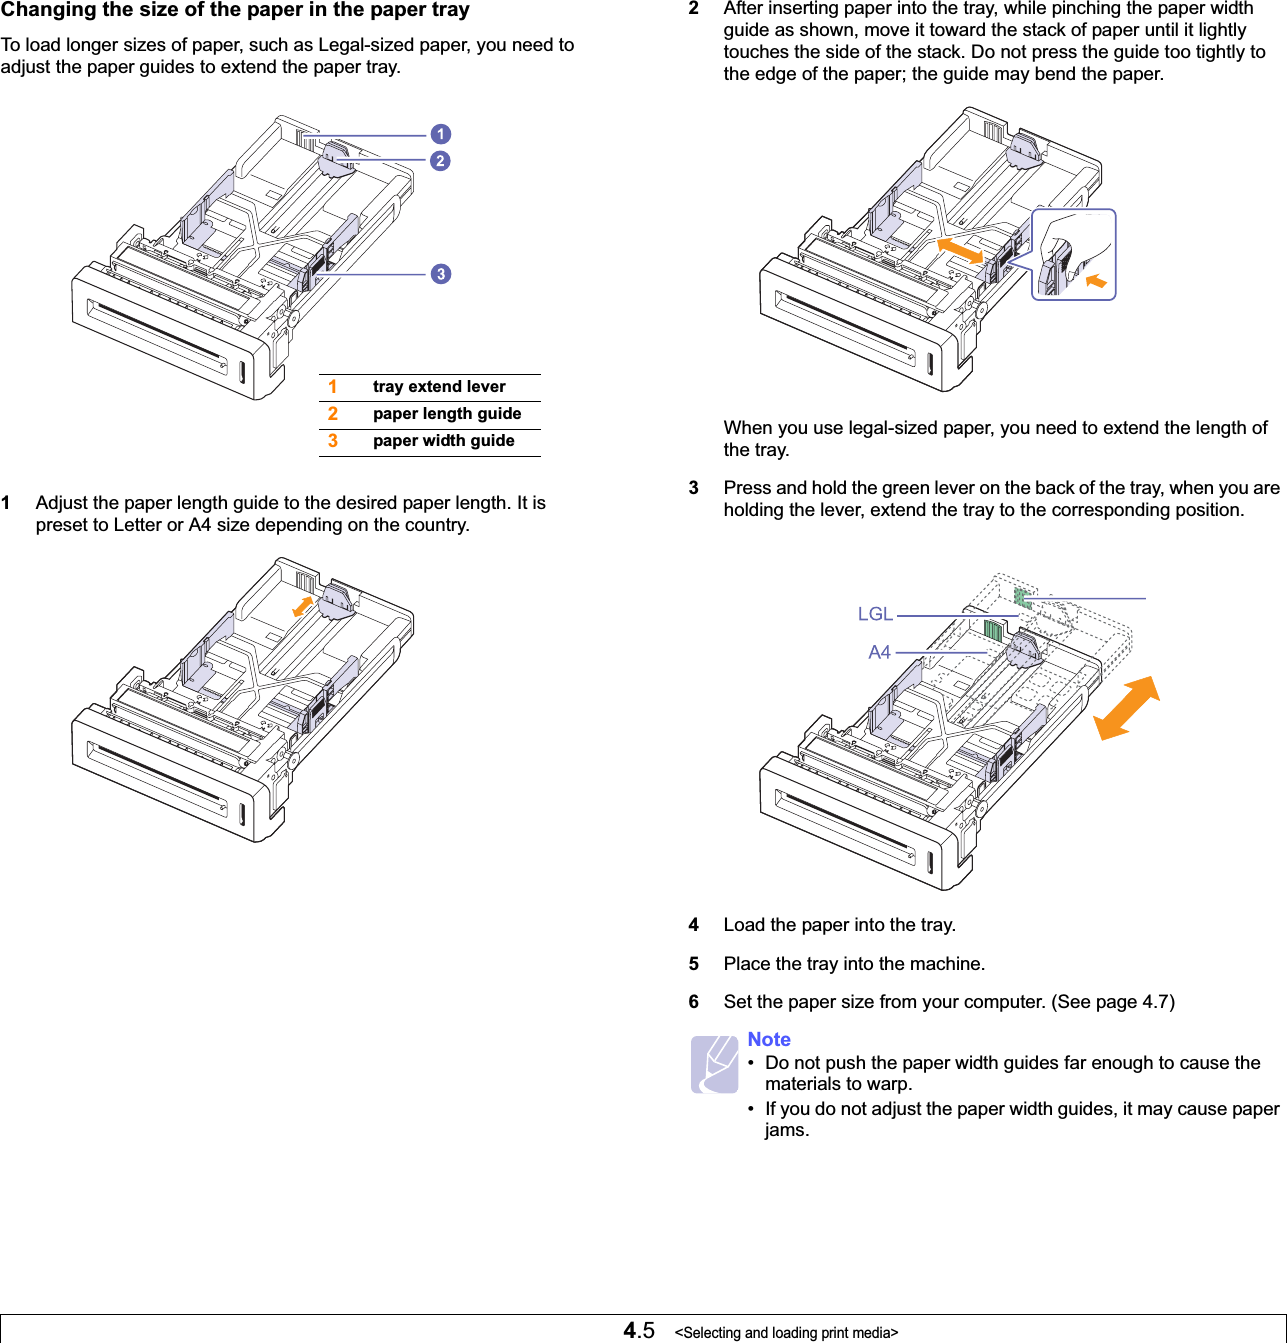
Samsung Electronics Co Ltd Color Laser Printer CLP 6xx Series EN
UserManual.wiki
>
Samsung Electronics Co
>
CLP610ND User Manual
>
Users Manual 1
Contents
1.
Users Manual 1
2.
Users Manual 2
Users Manual 1
Navigation menu
Upload a User Manual
Namespaces
Wiki Guide
HTML
PDF
Info
Views
User Manual
Discussion / Help
Navigation


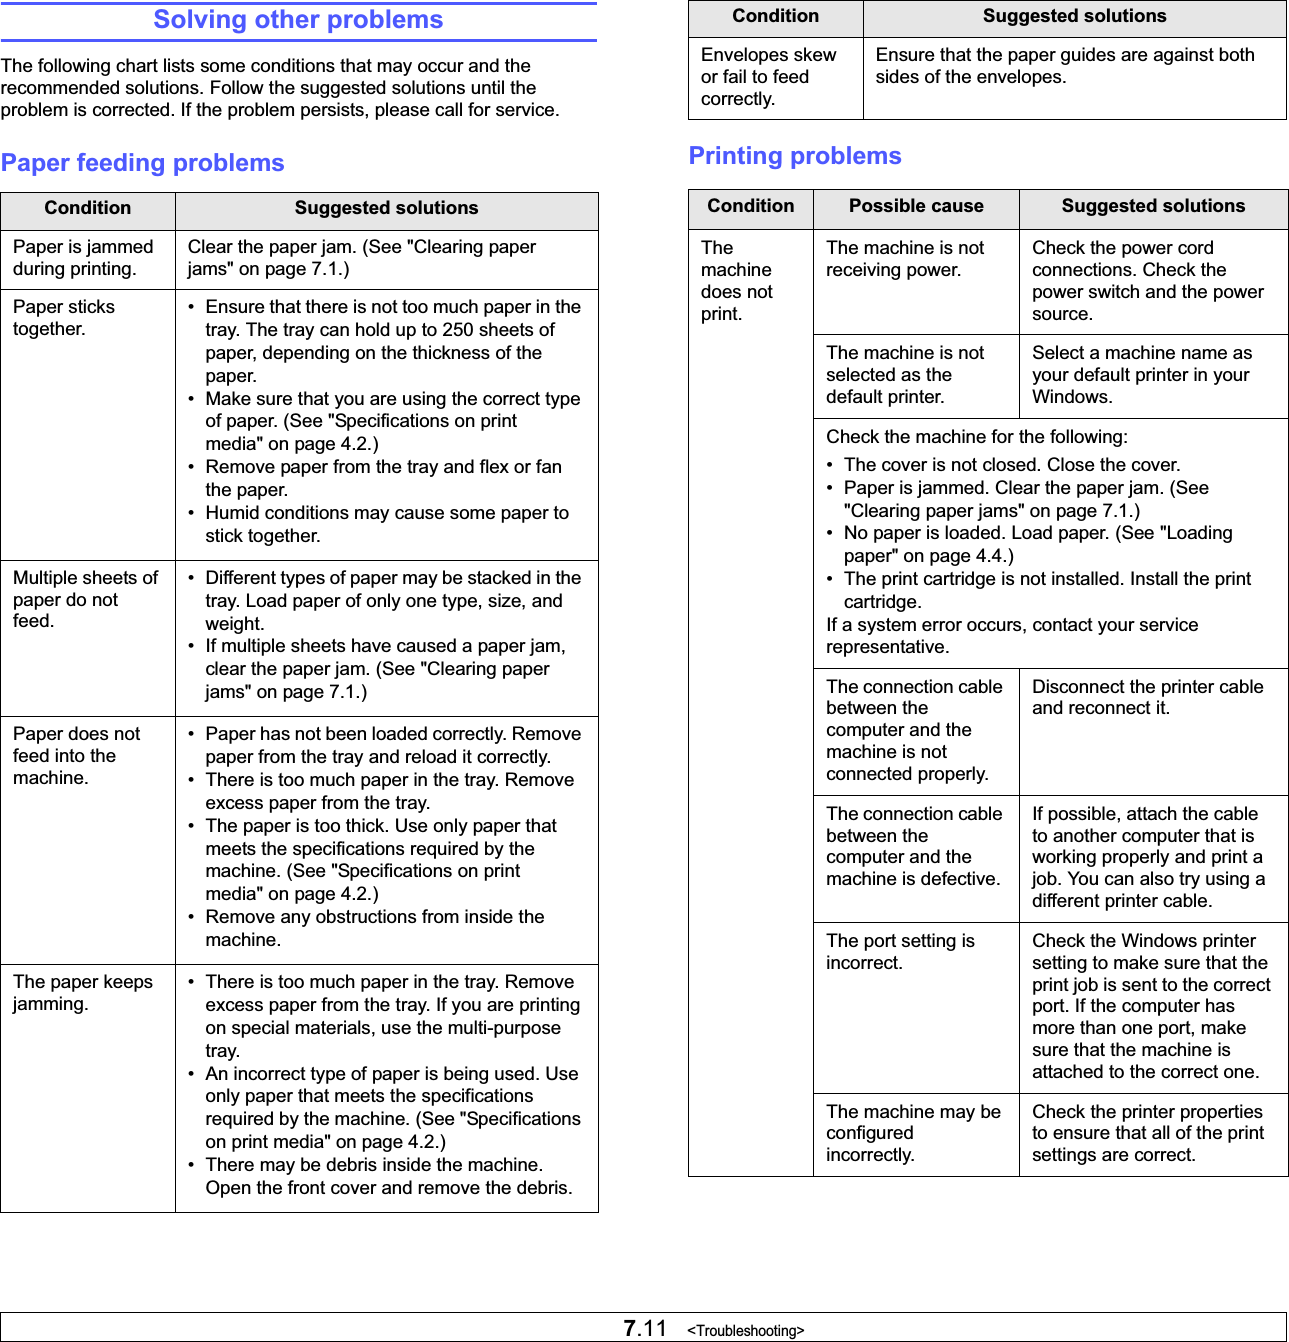
![3.3 <Getting Started>Installing the softwareYou have to install the machine software for printing. The software includes drivers, applications, and other user friendly programs. Note• The following procedure is for when you use the machine as a network machine. If you want to connect a machine with a USB cable, refer to the Software section.• The following procedure is based on the Windows XP operating system. The procedure and popup window which appears during the installation may differ depending on the operating system, the printer feature, or the interface in use.(See Software section.)1Make sure that the network setup for your machine is completed. (See "Setting up the network" on page 3.1.) All applications should be closed on your computer before beginning installation.2Insert the Printer Software CD-ROM into your CD-ROM drive.The CD-ROM should automatically run, and an installation window appears. 3Click Next.If the installation window does not appear, click Start > Run. Type X:\Setup.exe, replacing “X” with the letter which represents your drive and click OK.If you use Windows Vista, click Start > All Programs > Accessories > Run, and type X:\Setup.exe.If the AutoPlay window appears in Windows Vista, click RunSetup.exe in Install or run program field, and click Continue in the User Account Control window. • The window above may slightly differ, if you are reinstalling the driver.•View User’s Guide: Allows you to view the User’s Guide. If your computer does not have Adobe Acrobat, click on this option and it will automatically install Adobe Acrobat Reader for you, and then open the User’s Guide.4Select Typical installation for a network printer, and then click Next.5The list of machines available on the network appears. Select the printer you want to install from the list and then click Next.• If you do not see your machine on the list, click Update to refresh the list, or select Add TCP/IP Port to add your machine to the network. To add the machine to the network, enter the port name and the IP address for the machine.To verify your machine’s IP address or the MAC address, print a Network Configuration page. (See "Printing a machine configuration report" on page 6.1.)• To find a shared network printer (UNC Path), select Shared Printer [UNC] and enter the shared name manually or find a shared printer by clicking the Browse button.NoteIf you are not sure of the IP address, contact your network administrator or print network information. (See "Printing a machine configuration report" on page 6.1.)](https://usermanual.wiki/Samsung-Electronics-Co/CLP610ND.Users-Manual-1/User-Guide-816935-Page-27.png)


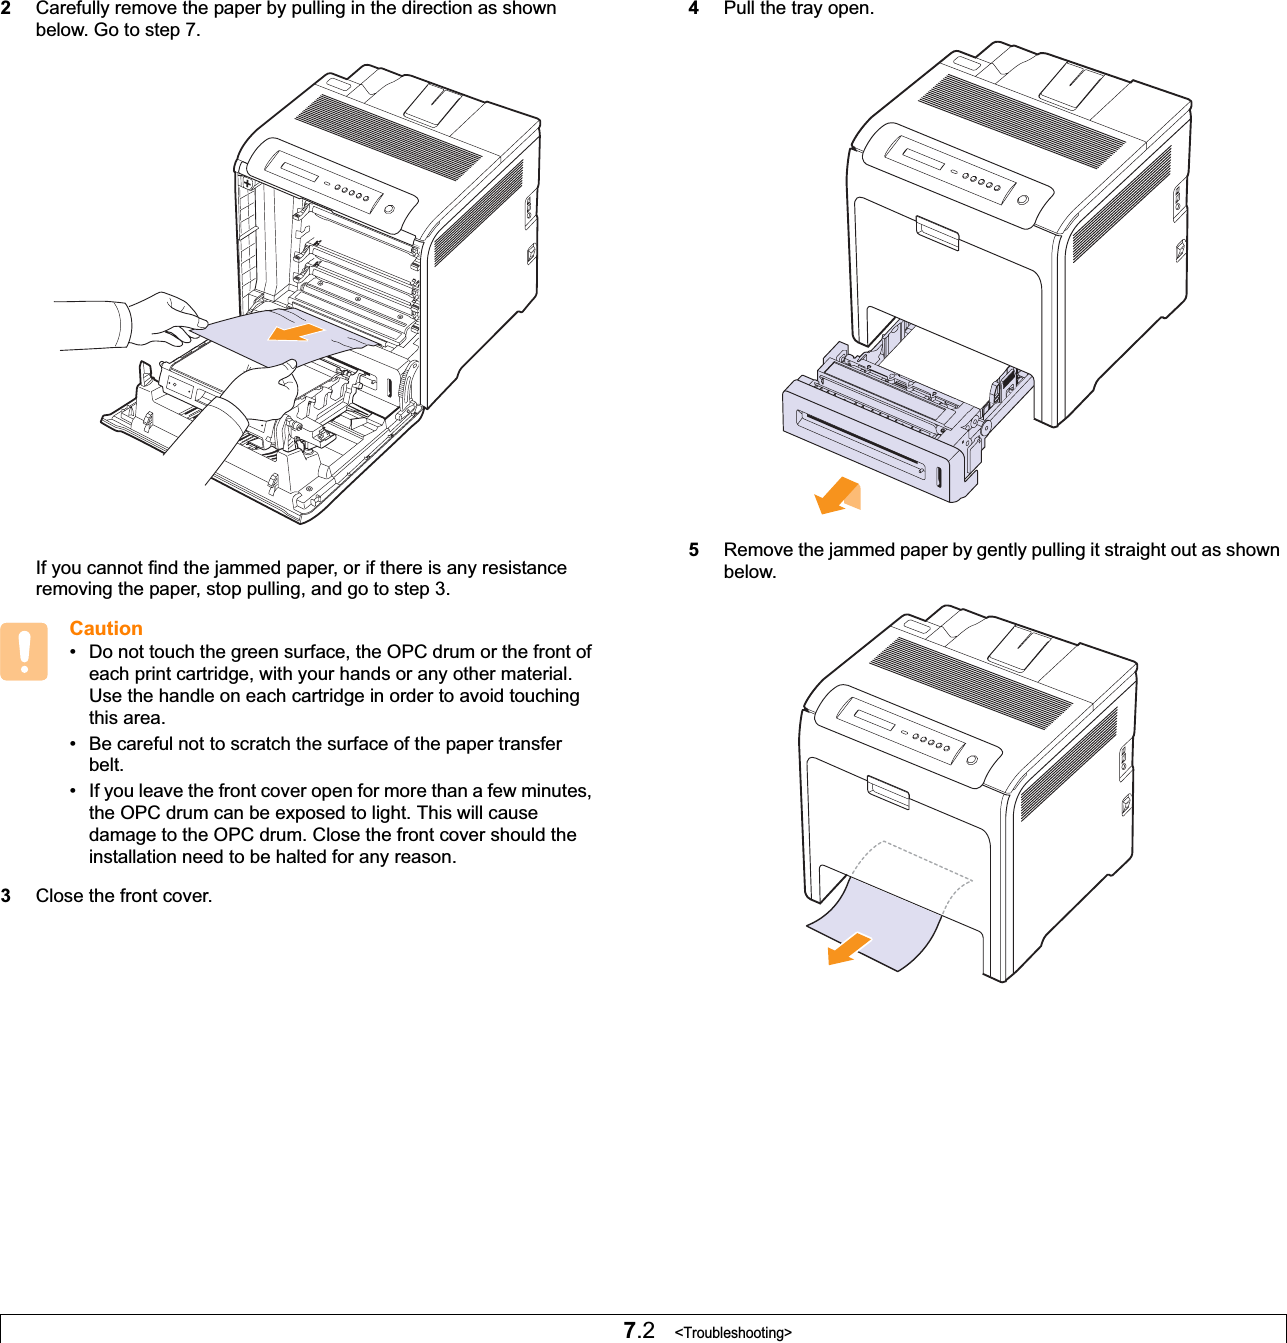
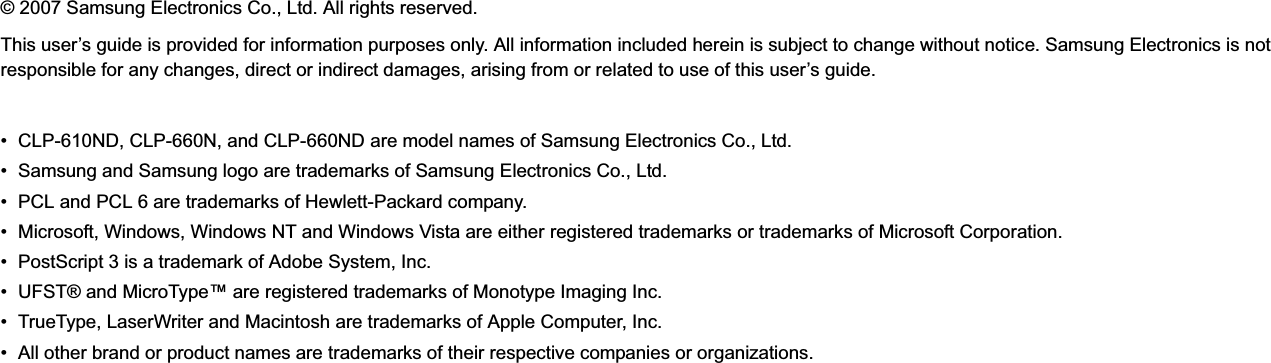
![7.7 <Troubleshooting>5Pull the jammed paper out in the direction shown. To avoid tearing the paper, pull it out gently and slowly.6Close the front cover firmly. The machine will resume printing.CautionIf the front cover is not completely closed, the machine will not operate.Understanding display messagesMessages appear on the Smart Panel program window or on the control panel display to indicate machine status or errors. Refer to the tables below to understand the messages meaning to correct the problem, if necessary. Messages and their explanations are listed in alphabetical order.NoteWhen you call for service, it is very convenient to provide the service representative with the contents of the display message. * xxx indicates the media type.* yyy indicates the tray type.Message Explanation Solution[yyy]Cassette OutThe tray cassette is not properly closed.To close the tray, lower the rear edge, align it with the slot, and slide it into the printer.[yyy]Paper EmptyThere is no paper in the tray.Load paper in the tray. (Page 4.4)ADC NotConfirm ErrorThere is a problem in the ADC (Analog to Digital Converter) of your machine.Unplug the power cord and plug it back in. If the problem persists, contact the service representatives.ADC Slope ErrorCycle PowerThe temperature slope for ADC (Analog to Digital Converter) shows the value out of the normal range.Unplug the power cord and plug it back in. If the problem persists, contact the service representatives.Adjusting...RegistrationThe machine is adjusting the color registration.Please wait a few minutes.CTD Calibration ErrorThe CTD (Color Tone r Densi ty) Calibration has an invalid value. Unplug the power cord and plug it back in. If the problem persists, contact the service representatives.Deve MotorLockedThere is a problem with the deve motor to machines which moves the toner supply device.Unplug the power cord and plug it back in. If the problem persists, contact the service representatives.](https://usermanual.wiki/Samsung-Electronics-Co/CLP610ND.Users-Manual-1/User-Guide-816935-Page-52.png)
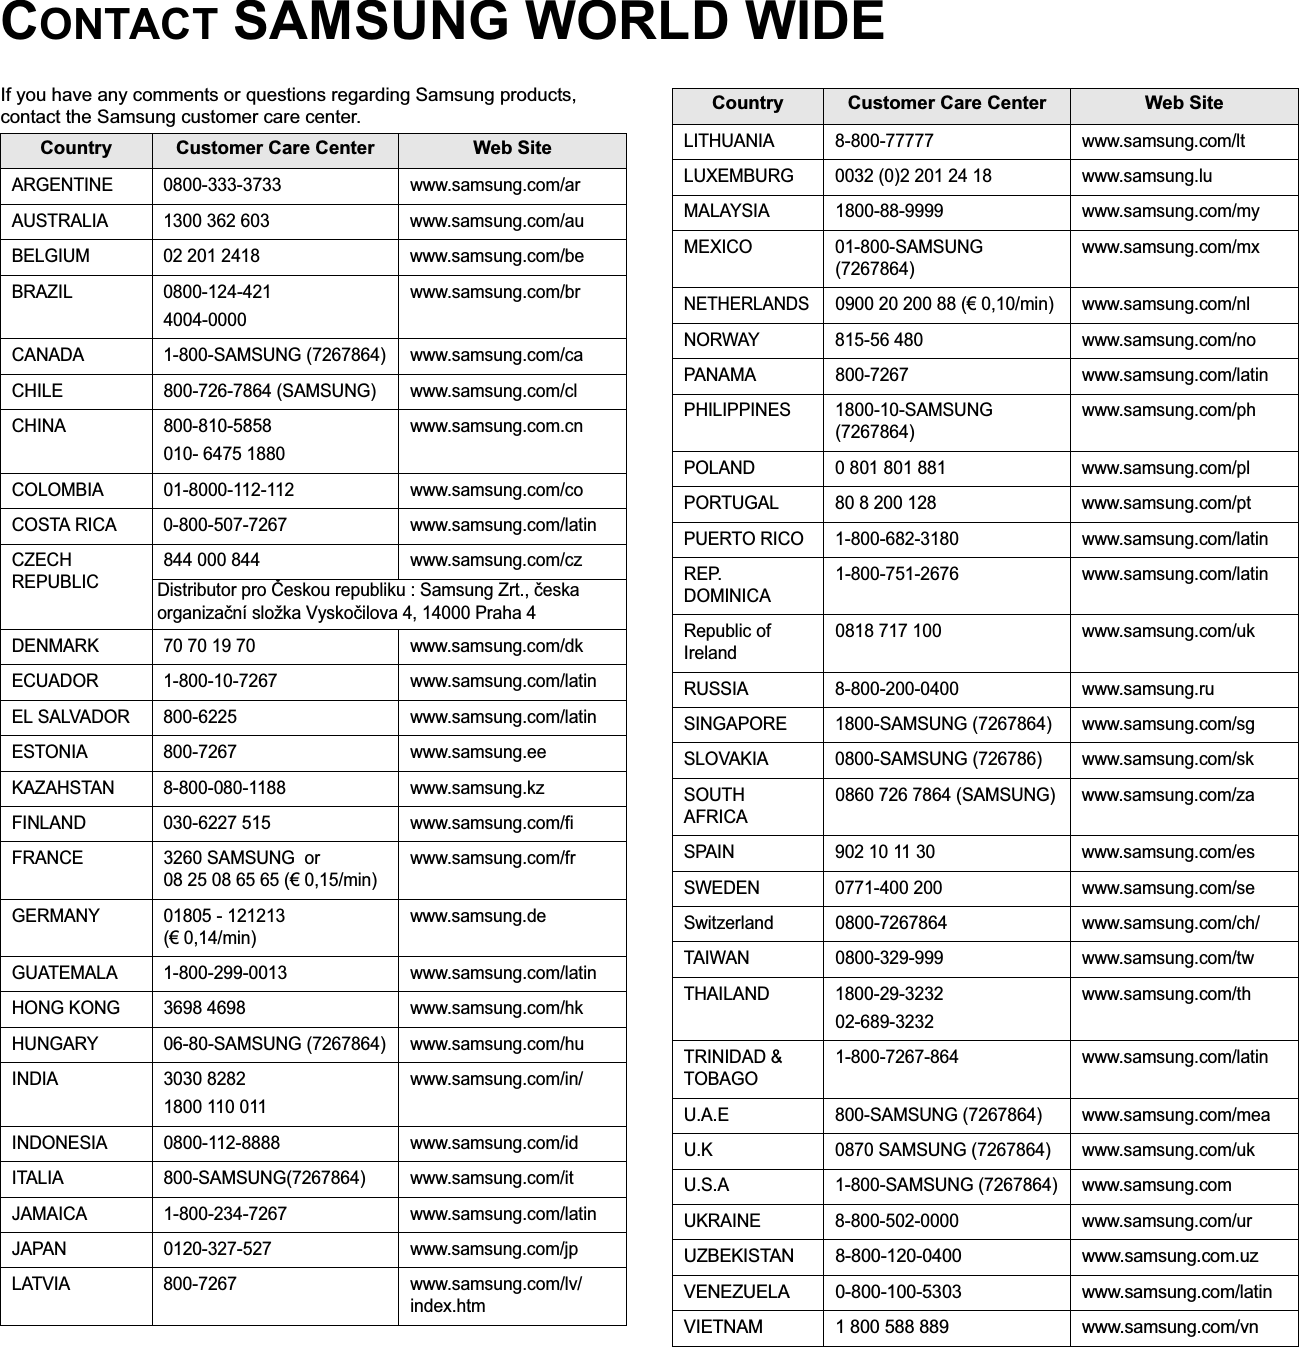
![7.8 <Troubleshooting>Door Open The front cover or the top cover is not securely latched.Close the cover until it locks into place.Duplex Jam 0Check InsidePaper has jammed during duplex printing. This is applicable only to machines with this feature. Clear the jam. (Page 7.1)Duplex Jam 1Open/Close DoorPaper has jammed during duplex printing. This is applicable only to machines with this feature. Clear the jam. (Page 7.1)Fuser Fan LockedThere is a problem with the fan for the fuser unit.Unplug the power cord and plug it back in. If the problem persists, contact the service representatives.Humidity OpenCycle PowerThe humidity exceeds the normal range.Unplug the power cord and plug it back in. If the problem persists, contact the service representatives.Humidity OutCycle PowerThe humidity has fallen under the normal range.Unplug the power cord and plug it back in. If the problem persists, contact the service representatives.Inner Temp. OpenCycle PowerThe inner temperature of the machine is above the normal range. Unplug the power cord and plug it back in. If the problem persists, contact the service representatives.Inner Temp. ShortCycle PowerThe inner temperature of the machine is below the normal range. Unplug the power cord and plug it back in. If the problem persists, contact the service representatives.Install Transfer BeltThe transfer belt is not installed.Install a Samsung-genuine transfer belt. (Page 8.1, Page 6.6)Message Explanation SolutionInstall Toner The print cartridge is installed improperly, or not installed.Reinstall the print cartridge two or three times. If the problem persists, the print cartridge is not being detected. Please contact the service representatives.IP Conflict The network IP address you have set is being used by someone else.Check the IP address and reset it if necessary. (Page 3.2)Load ManuallyPress Stop KeyThe multi-purpose tray is empty in manual feed mode.Load paper in the multi-purpose tray. (Page 4.6)Load[xxx] In [yyy]There is no corresponding paper in the corresponding tray.Load corresponding paper in the corresponding tray. (Page 4.4)Low Heat ErrorCycle PowerThe fuser unit is low-heated.Unplug the power cord and plug it back in. If the problem persists, contact the service representatives.Low Power The machine is in the previous stage of the power save mode.When data is received, it switches to on-line automatically.LSU C-Hsync Err.Cycle PowerThere is a problem in the laser beam detecting device of the LSU (Laser Scanning Unit).Unplug the power cord and plug it back in. If the problem persists, contact the service representatives.LSU C-Motor Err.Cycle PowerThere is a problem in the LSU (Laser Scanning Unit) motor.Unplug the power cord and plug it back in. If the problem persists, contact the service representatives.LSU Hsync ErrorCycle PowerThere is a problem in the laser beam detecting device of the LSU (Laser Scanning Unit).Unplug the power cord and plug it back in. If the problem persists, contact the service representatives.Message Explanation Solution](https://usermanual.wiki/Samsung-Electronics-Co/CLP610ND.Users-Manual-1/User-Guide-816935-Page-53.png)
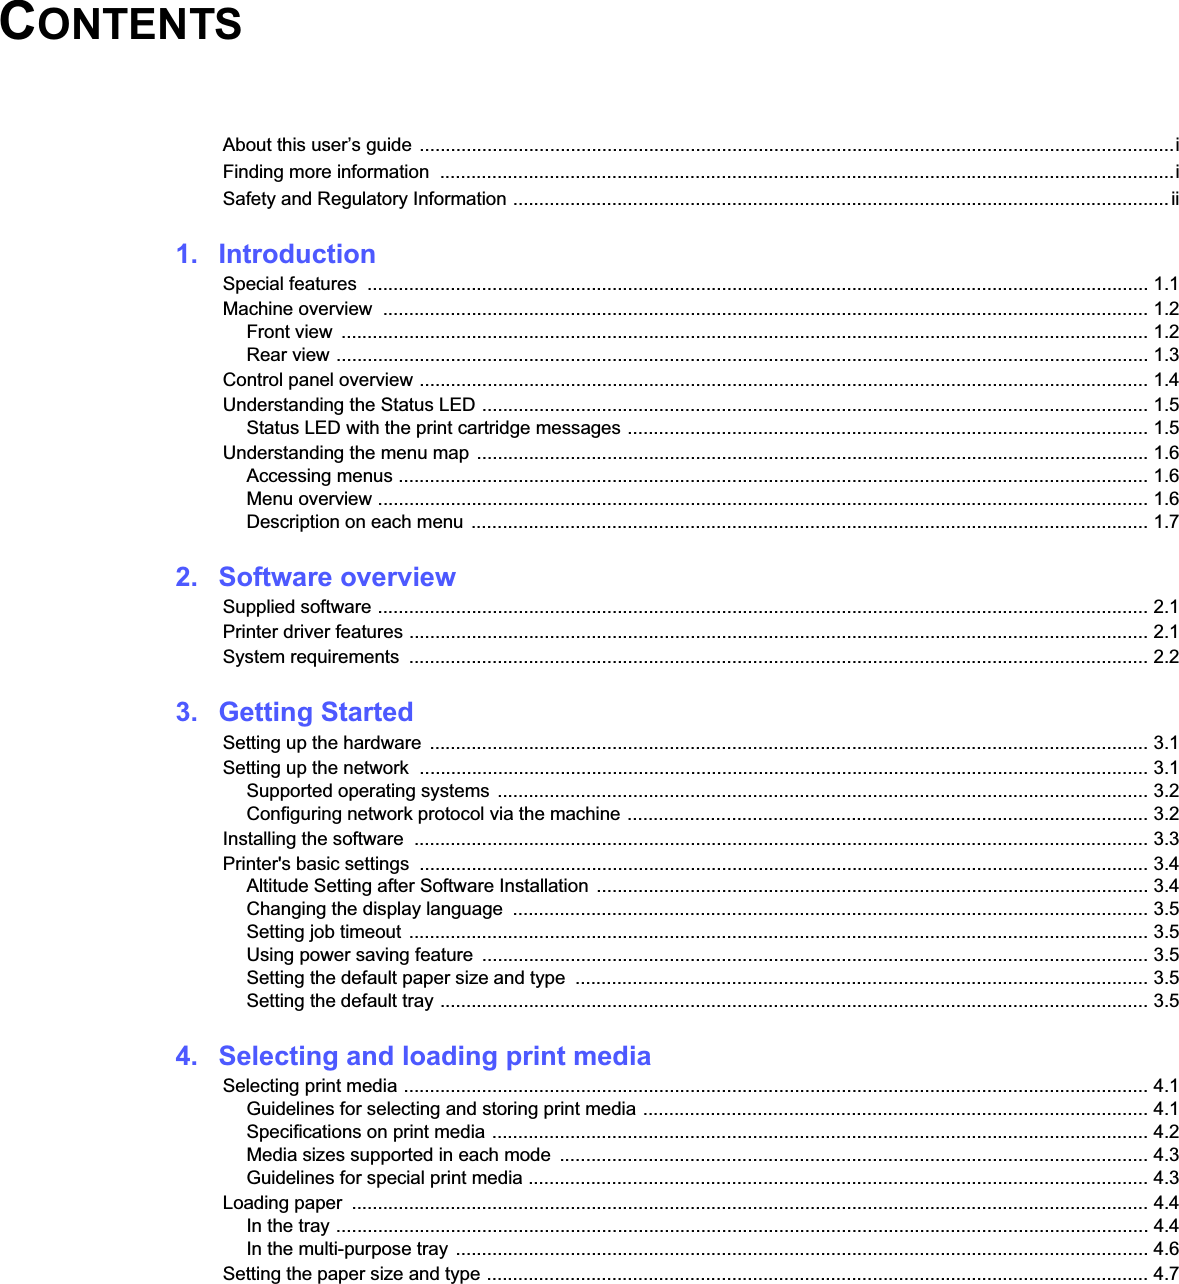
![7.10 <Troubleshooting>Replace Transfer BeltThe life of the transfer belt is expired.Replace the paper transfer belt with a new one. Please contact the service representatives.Replace Transfer Belt SoonThe life of the transfer belt will be expired soon.Replace the transfer belt with a new one. Please contact the service representatives.Replace [yyy]Pick-RollerThe life of the tray pick-roller has expired.Replace the pick up -roller with a new one. Please contact the service representatives.Self Diagnostics LSUThe LSU (Laser Scanning Unit) in your machine is checking problems detected. Please wait a few minutes.Self Diagnostics TemperatureThe engine in your machine is checking problems detected. Please wait a few minutes.Sleeping... The machine is in the power save mode.When data is received, it switches to on-line automatically.System Fan LockedThere is a problem with the main fan for the machine.Unplug the power cord and plug it back in. If the problem persists, contact the service representatives.Thermistor OpenCycle PowerThere is a problem in the temperature sensing device for the fuser unit. This device detects a value above the normal value range.Unplug the power cord and plug it back in. If the problem persists, contact the service representatives.Thermistor ShortCycle PowerThere is a problem in the temperature sensing device for the fuser unit. This device detects a value below the normal value range.Unplug the power cord and plug it back in. If the problem persists, contact the service representatives.Message Explanation SolutionToner Empty The color print cartridge which the arrow indicates has run out.Replace the corresponding print cartridge with a Samsung-genuine cartridge. (Page 6.4)Toner Low The color print cartridge which the arrow indicates is almost empty.Take out the corresponding print cartridge and thoroughly shake it. By doing this, you can temporarily reestablish printing operations. (Page 6.3)Tray 2 Paper Jam 0Paper has jammed in the optional tray.Clear the jam. (Page 7.6)Message Explanation Solution](https://usermanual.wiki/Samsung-Electronics-Co/CLP610ND.Users-Manual-1/User-Guide-816935-Page-55.png)