Samsung Electronics Co CLP670ND Color Laser Printer User Manual minus toc Dali R guide english
Samsung Electronics Co Ltd Color Laser Printer minus toc Dali R guide english
UserManual.wiki
>
Samsung Electronics Co
>
CLP670ND User Manual
>
Users Manual 2
Contents
1.
Users Manual 1
2.
Users Manual 2
Users Manual 2
Navigation menu
Upload a User Manual
Namespaces
Wiki Guide
HTML
PDF
Info
Views
User Manual
Discussion / Help
Navigation
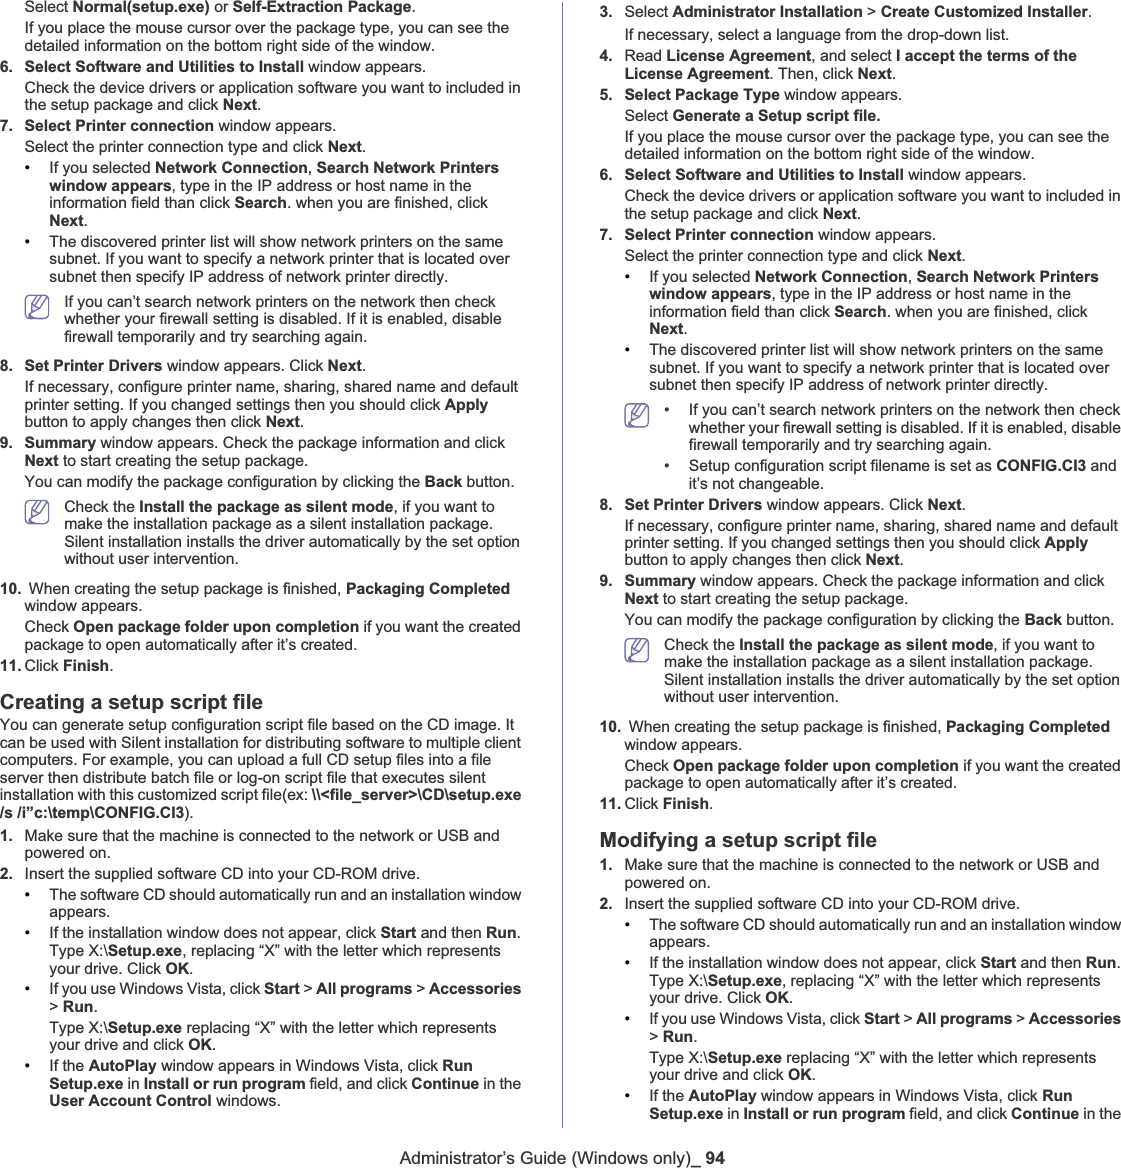
![Troubleshooting_ 703. Remove the jammed paper by pulling in the direction shown. To avoid tearing the paper, pull it out gently and slowly.4. Holding the handle on the paper transfer belt, align it with the slots on the inside of the front cover.5. Lower the paper transfer belt until it is parallel with the front cover and firmly seated.6. Close the front cover to resume printing.If the front cover is not completely closed, the machine will not operate. UNDERSTANDING DISPLAY MESSAGESMessages appear on the Smart Panel program window or on the control panel display to indicate machine status or errors. Refer to the tables below to understand the messages meaning to correct the problem, if necessary. Messages and their explanations are listed in alphabetical order.• If a message is not in the table, reboot the power and try the printing job again. If the problem persists, call for service.• When you call for service, provide the service representative with the contents of display message.• Some messages may not appear in the display depending on the options or models.• [error number] indicates the error number.• [tray type] indicates the tray number. • [media type] indicates the media type.• [media size] indicates the media size.• [color] indicates the color of toner or imaging unit.MESSAGE MEANING SUGGESTED SOLUTIONSAdjusting ColorRegistrationThe machine is adjusting the color registration.Wait a few minutes.BOOTP problemAuto IP RunThe IP address assignment is failed. This happens, when Auto IP for BOOTP is set in SyncThru™ Web Service. Change the IP address assignment method to DHCP or Static. If you do not change this option, the BOOTP server continually asks to assign the IP Address.BOOTP problemReconfigure DHCPThe IP address assignment is failed. This happens, when Auto IP for BOOTP is not set in SyncThru™ Web Service.Change the IP address assignment method to DHCP or Static. If you do not change this option, the BOOTP server continually asks to assign the IP Address.Calibratingimage density…The machine is calibrating the image density. Wait a few minutes.DHCP problem: Auto IP RunThe IP address assignment is failed. This happens, when Auto IP for DHCP is set in SyncThru Web™ Service.Change the IP address assignment method to BOOTP or Static. If you do not change this option, the DHCP server continually asks to assign the IP Address.DHCP problemReconfigure BOOTPThe IP address assignment is failed. This happens, when Auto IP for DHCP is not set in SyncThru™ Web Service.Change the IP address assignment method to BOOTP or Static. If you do not change this option, the DHCP server continually asks to assign the IP Address.](https://usermanual.wiki/Samsung-Electronics-Co/CLP670ND.Users-Manual-2/User-Guide-1156106-Page-5.png)
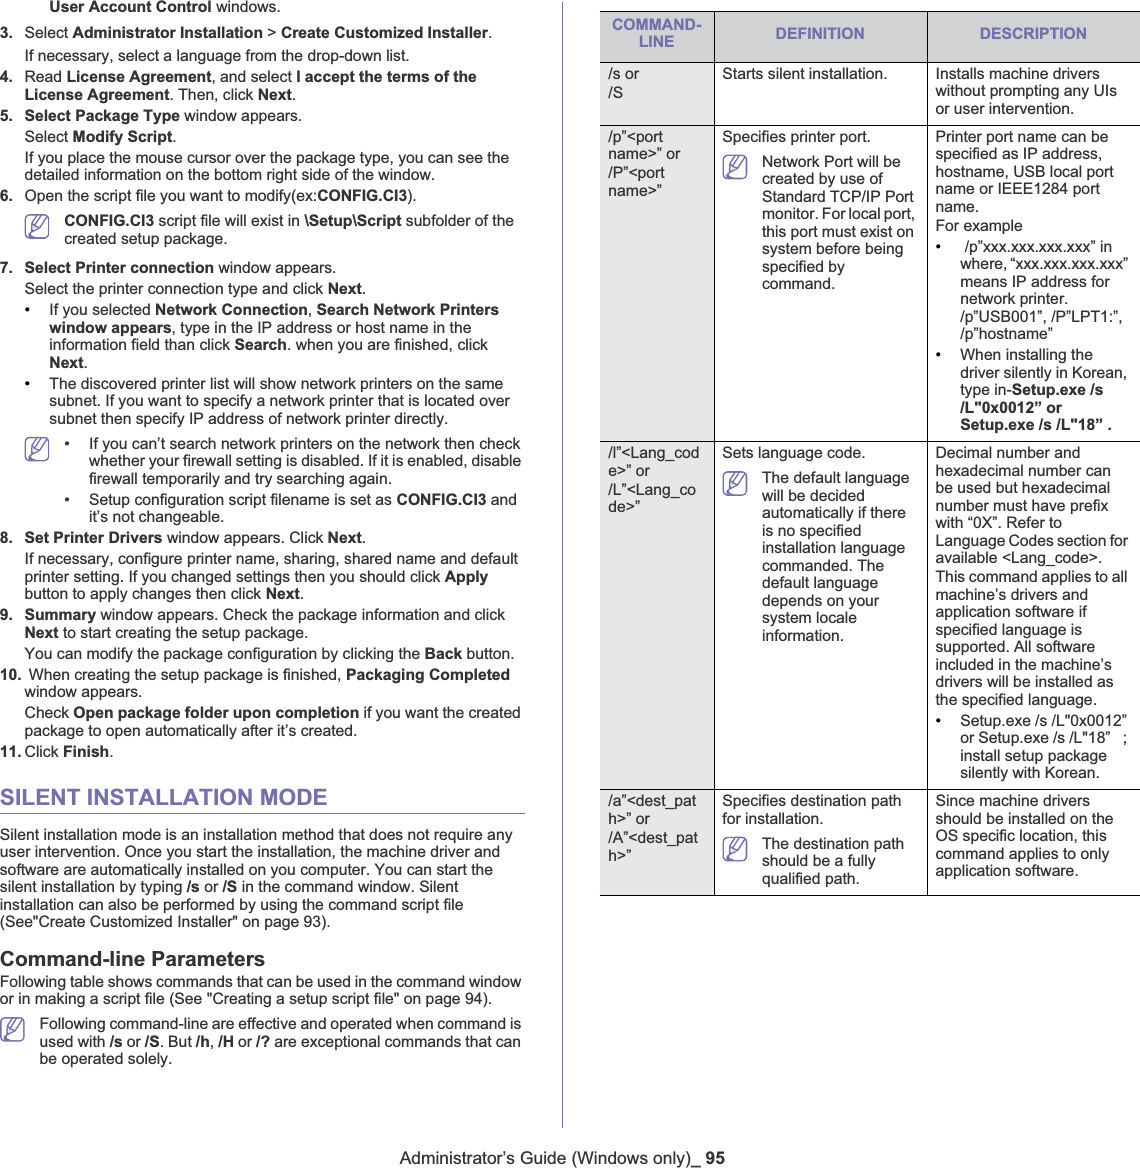
![Troubleshooting_ 71Error [error number][color] tonerThe indicated toner cartridge is installed improperly, or the connector is polluted.Reinstall the Samsung-genuine toner cartridge two or three times to confirm it is seated properly. Or clean the connector. If the problem persists, contact the service representatives.Error [error number]Turn off then on A systematic error has occurredReboot the power and try the printing job again. If the problem persists, call for service.Install TonerźThe indicated toner cartridge is installed improperly, or not installed.Reinstall the toner cartridge two or three times to confirm it is seated properly. If the problem persists, the toner cartridge is not being detected. Contact the service representatives.Load [tray number] with[media size][media type]There is no corresponding paper in the corresponding tray.Load corresponding paper in the corresponding tray. (Page 4.4)Network Problem:IP ConflictThe IP address is used elsewhere. Check the IP address or obtain a new IP address.Not Compatible[color] tonerThe indicated toner cartridge is not suitable for your machine.Install the corresponding toner cartridge with a Samsung-genuine cartridge (See "Replacing the toner cartridge" on page 82).Not CompatibleTransfer beltThe transfer belt is not suitable for your machine.Install the Samsung-genuine transfer belt. If the problem persists, contact the service representatives (See "Replacing the paper transfer belt" on page 83).Not InstalledTransfer beltThe transfer belt is not installed.Reinstall the Samsung -genuine transfer belt two or three times to confirm it is seated properly. If the problem persists, the transfer belt is not being detected. Contact the service representatives (See "Replacing the paper transfer belt" on page 83).MESSAGE MEANING SUGGESTEDSOLUTIONSNot proper roomtemp. Move setThe machine is in a room with improper room temperature. Move the machine to a room with proper room temperature (See "Environmental specifications" on page 87).Output bin FullRemove paperThe output tray is full. Or the sensor is not facing down.Remove papers from the output tray, the machine resumes printing. Or make sure the sensor is facing down. If the problem persists, call for service.Paper Emptyin [tray number] There is no paper in the indicated tray.Load paper in the tray. (See "Loading paper in the tray" on page 37).Paper Jam bottom of duplexPaper has jammed during duplex printing. This is applicable only to machines with this feature. Clear the jam (See "In the duplex unit area" on page 69).Paper Jam in exit areaSpecial print media has jammed in the paper exit area.Clear the jam (See "In exit area" on page 69).Paper Jam inside machinePaper has jammed inside the machine.Clear the jam (See "In the fuser unit area" on page 68).Paper Jamin MP TrayPaper has jammed in the multi-purpose tray.Clear the jam (See "In the multi-purpose tray" on page 68).Paper Jamin Tray1Paper has jammed in the paper feed area and inside the machine.Clear the jam (See "In tray 1" on page 67).Paper Jamin Tray2Paper has jammed in the optional tray.Clear the jam (See "In optional tray" on page 67).Prepare newTransfer beltThe life of the transfer belt will be expired soon.Replace the transfer belt with a new one. Contact the service representatives.Prepare TonerźSmall amount of toner is left in the indicated cartridge. The estimated cartridge life of toner is close.Prepare a new cartridge for a replacement. You may temporarily increase the printing quality by redistributing the toner (See "Redistributing toner" on page 65).Pulled Out[tray number] CassetteThe indicated tray cassette is not inserted, or not properly closed.To close the tray, lower the rear edge, align it with the slot, and slide it into the printer.MESSAGE MEANING SUGGESTED SOLUTIONS](https://usermanual.wiki/Samsung-Electronics-Co/CLP670ND.Users-Manual-2/User-Guide-1156106-Page-6.png)
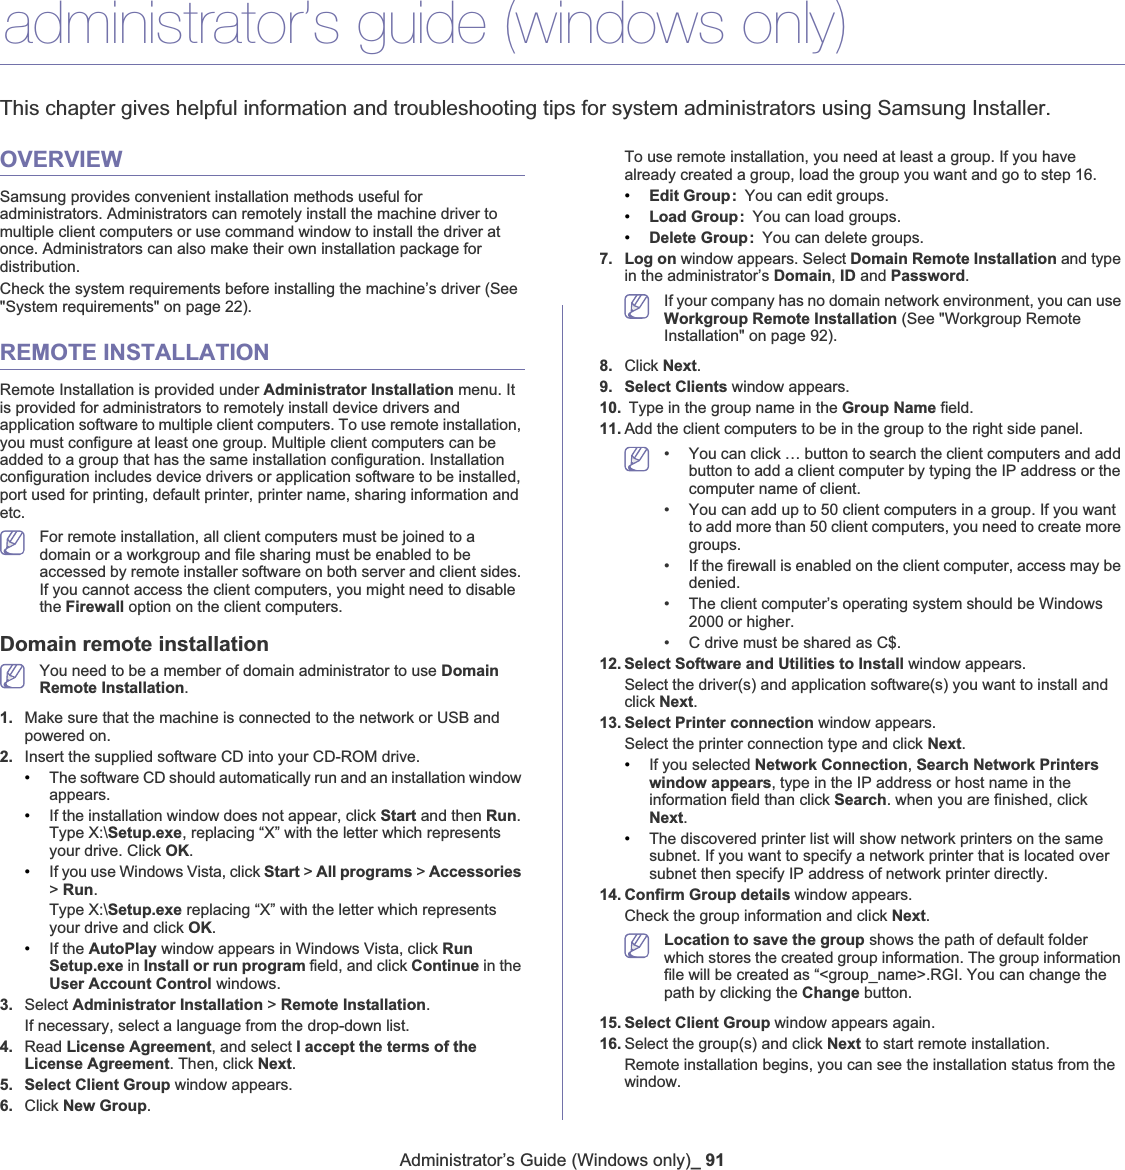
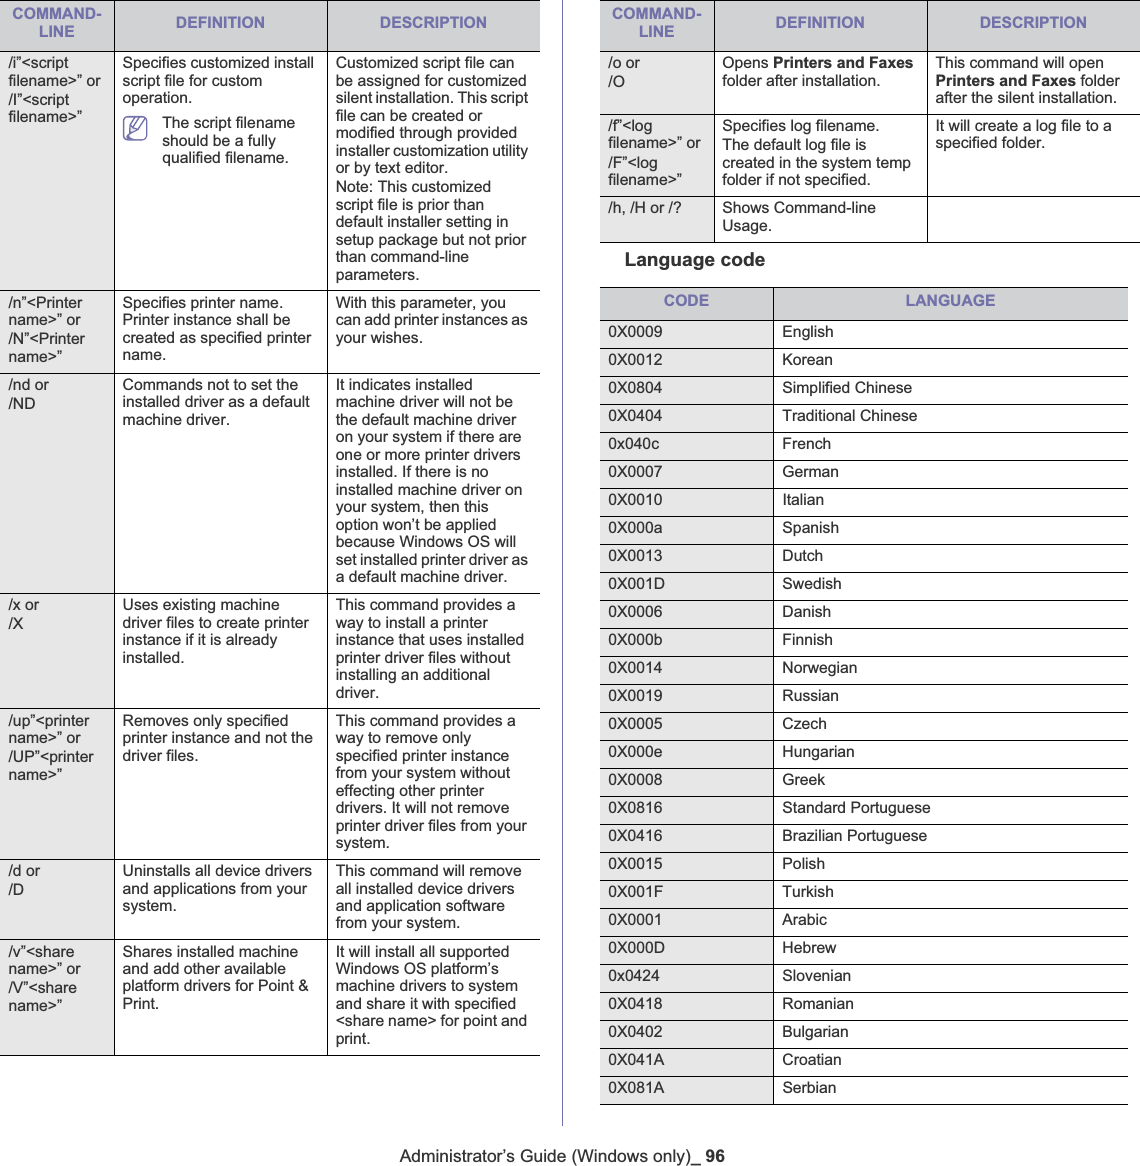
![Administrator’s Guide (Windows only)_ 9217. When installation is completed, Results of remote installation window appears. Check the result. For failed client computers, you can reinstall again by clicking the Reinstall button.For failed client computers, you can check the log file which is created in the client computers.Workgroup Remote InstallationYou can also use remote installation method with workgroups. If your company has no domain network environment, you should use Workgroup Remote Installation.If the client computer uses Windows Vista or higher, ID should be Administrator.1. Make sure that the machine is connected to the network or USB and powered on.2. Insert the supplied software CD into your CD-ROM drive.•The software CD should automatically run and an installation window appears.•If the installation window does not appear, click Start and then Run.Type X:\Setup.exe, replacing “X” with the letter which represents your drive. Click OK.•If you use Windows Vista, click Start > All programs > Accessories>Run.Type X:\Setup.exe replacing “X” with the letter which represents your drive and click OK.•If the AutoPlay window appears in Windows Vista, click RunSetup.exe in Install or run program field, and click Continue in the User Account Control windows.3. Select Administrator Installation > Remote Installation.If necessary, select a language from the drop-down list.4. Read License Agreement, and select I accept the terms of the License Agreement. Then, click Next.5. Select Client Group window appears. 6. Click New Group.To use remote installation, you need at least a group. If you have already created a group, load the group you want and go to step 16. •Edit Group: You can edit groups.•Load Group: You can load groups. •Delete Group: You can delete groups.7. Log on window appears. Select Workgroup Remote Installation and type in the Workgroup,ID and Password.• For Windows XP/2000/2003, the ID should be of a memeber of Administrators group for operating computers and for Windows Vista/2008/7, the ID should be of the default administrator account named Administrator. • You can also use Domain Remote Installation (See "Domain remote installation" on page 91).8. Click Next.9. Select Clients window appears. 10. Type in the group name in the Group Name field.11. Add the client computers to be in the group to the right side panel. • You can click … button to search the client computers and add button to add the client computer by typing the IP address or the computer name of client.• You can add up to 50 client computers in a group. If you want to add more than 50 client computers, you need to create more groups. • If the firewall is enabled on the client computer, access may be denied.• The client computer’s operating system should be Windows 2000 or higher.• If you have grouped the client computers in a workgroup and you try to connect to the client computer, a pop up window asking you to enter an Administrator's ID/password of the client computer you selected will appear if you can't access through the password you set in step 7. • C drive must be shared as C$.12. Select Software and Utilities to Install window appears.Select the driver(s) and application software(s) you want to install and click Next.13. Select Printer connection window appears. Select the printer connection type and click Next.•If you selected Network Connection,Search Network Printers window appears, type in the IP address or host name in the information field than click Search. when you are finished, click Next.•The discovered printer list will show network printers on the same subnet. If you want to specify a network printer that is located over subnet then specify IP address of network printer directly.14. Confirm Group details window appears. Check the group information and click Next.Location to save the group shows the path of default folder which stores the created group information. The group information file will be created as “<group_name>.RGI. You can change the path by clicking the Change button. 15. Select Client Group window appears again.16. Select the group(s) and click Next to start remote installation.Remote installation begins, you can see the installation status from the window. 17. When installation is completed, Results of remote installation window appears. Check the result. For failed client computers, you can reinstall again by clicking the Reinstall button.For failed client computers, you can check the log file which is created in the client computers.Error log messagesMESSAGE MEANING SUGGESTEDSOLUTIONSConnection ErrorUnable to bind the socket. [Port number:..]Restart the client computer.Unable to listen the socket. [Port number:..]Unable to connect to the client computer.Client computer’s socket is closed.](https://usermanual.wiki/Samsung-Electronics-Co/CLP670ND.Users-Manual-2/User-Guide-1156106-Page-27.png)