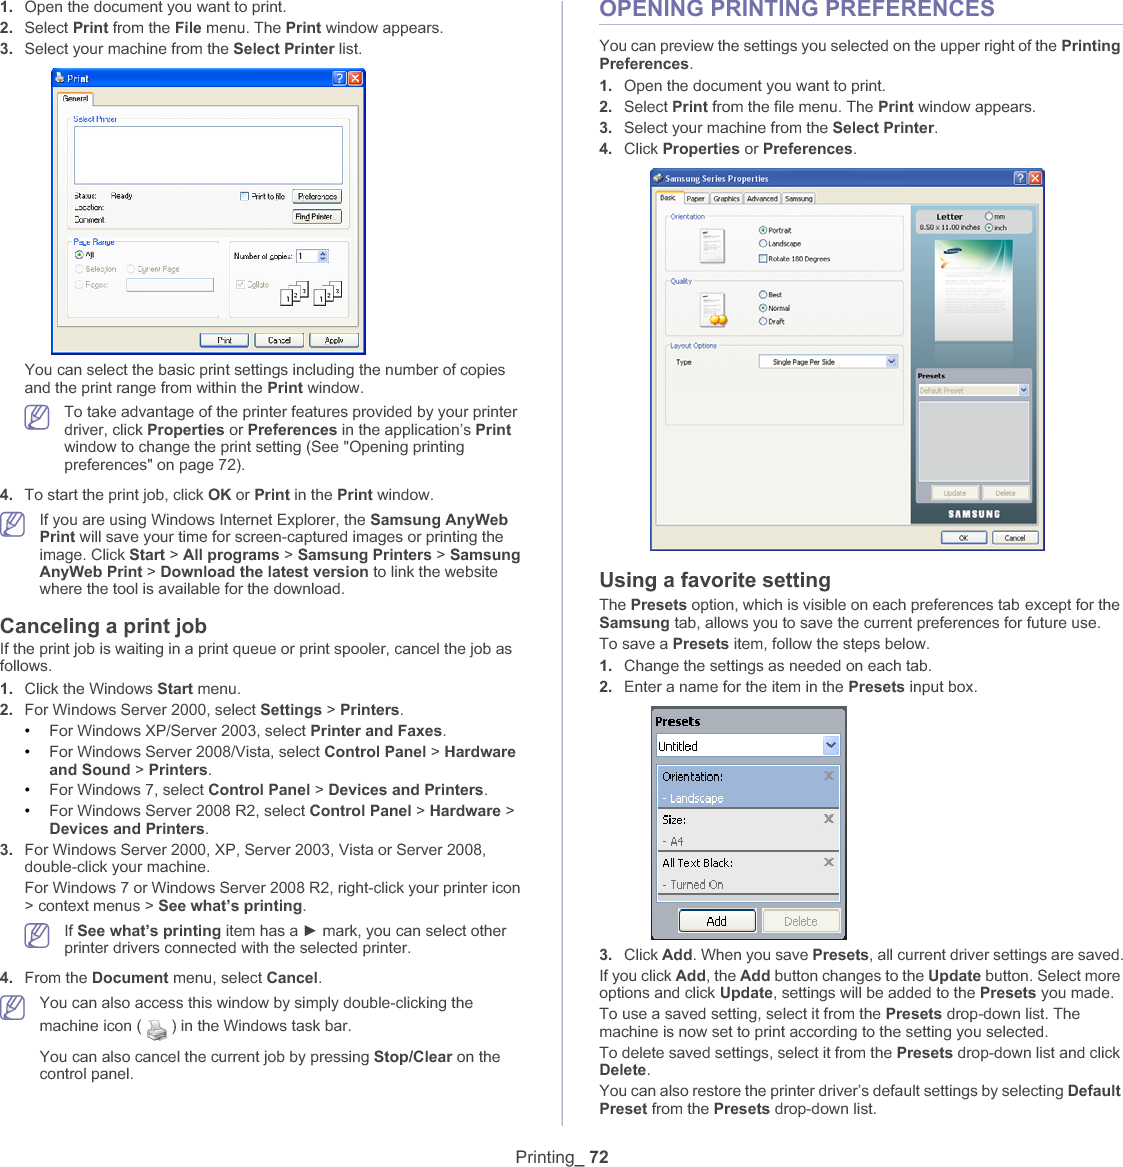
Samsung Electronics Co CLX3185 Color Laser Printer User Manual zinnia guide english
Samsung Electronics Co Ltd Color Laser Printer zinnia guide english
UserManual.wiki
>
Samsung Electronics Co
>
CLX3185 User Manual
>
Users Manual 1
Contents
1.
Users Manual 1
2.
Users Manual 2
Users Manual 1
Navigation menu
Upload a User Manual
Namespaces
Wiki Guide
HTML
PDF
Info
Views
User Manual
Discussion / Help
Navigation


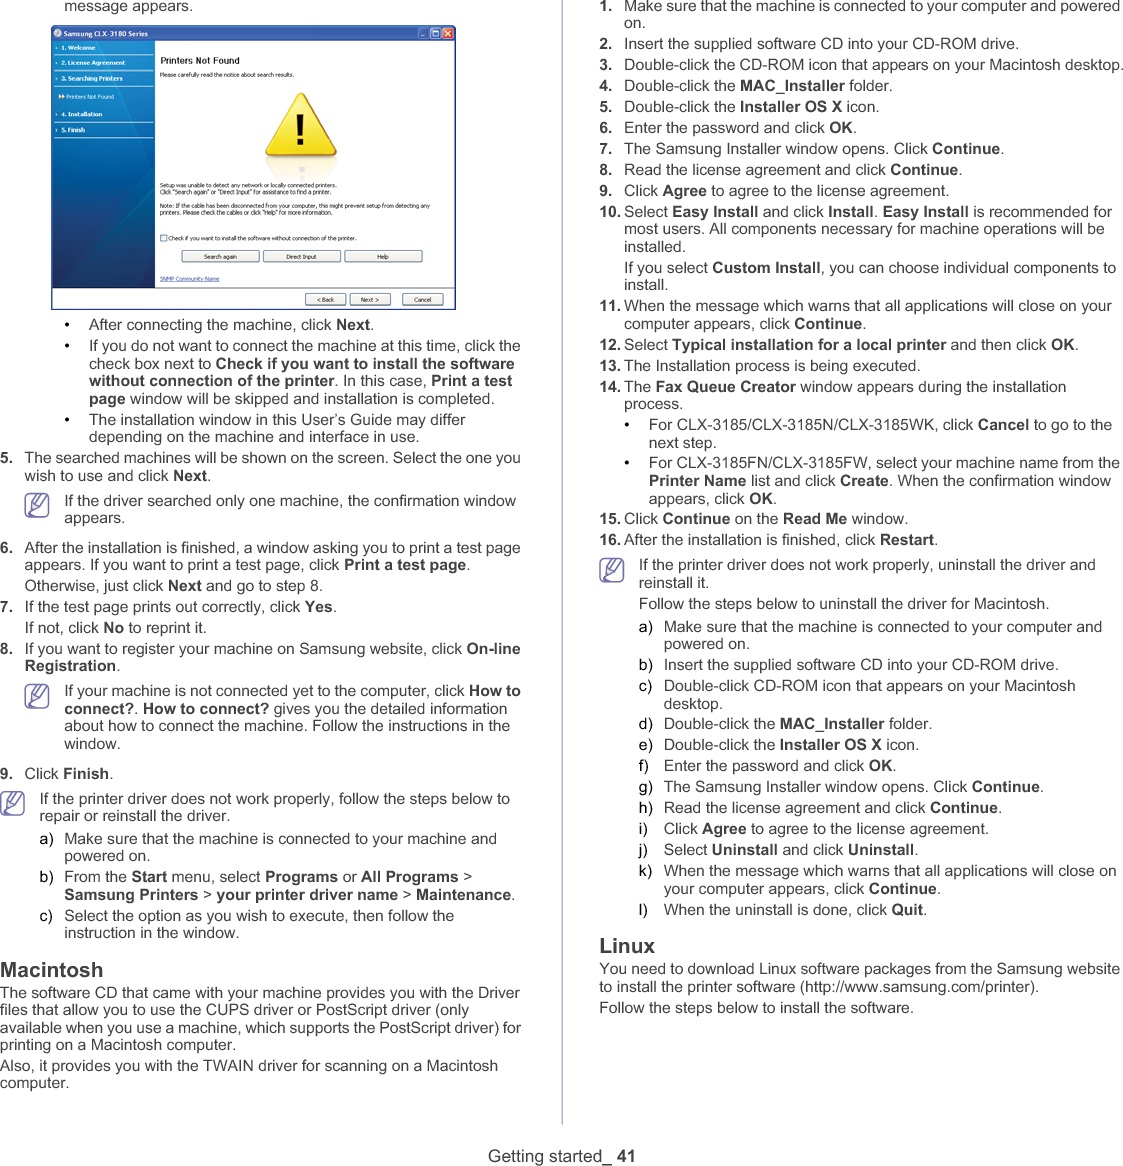
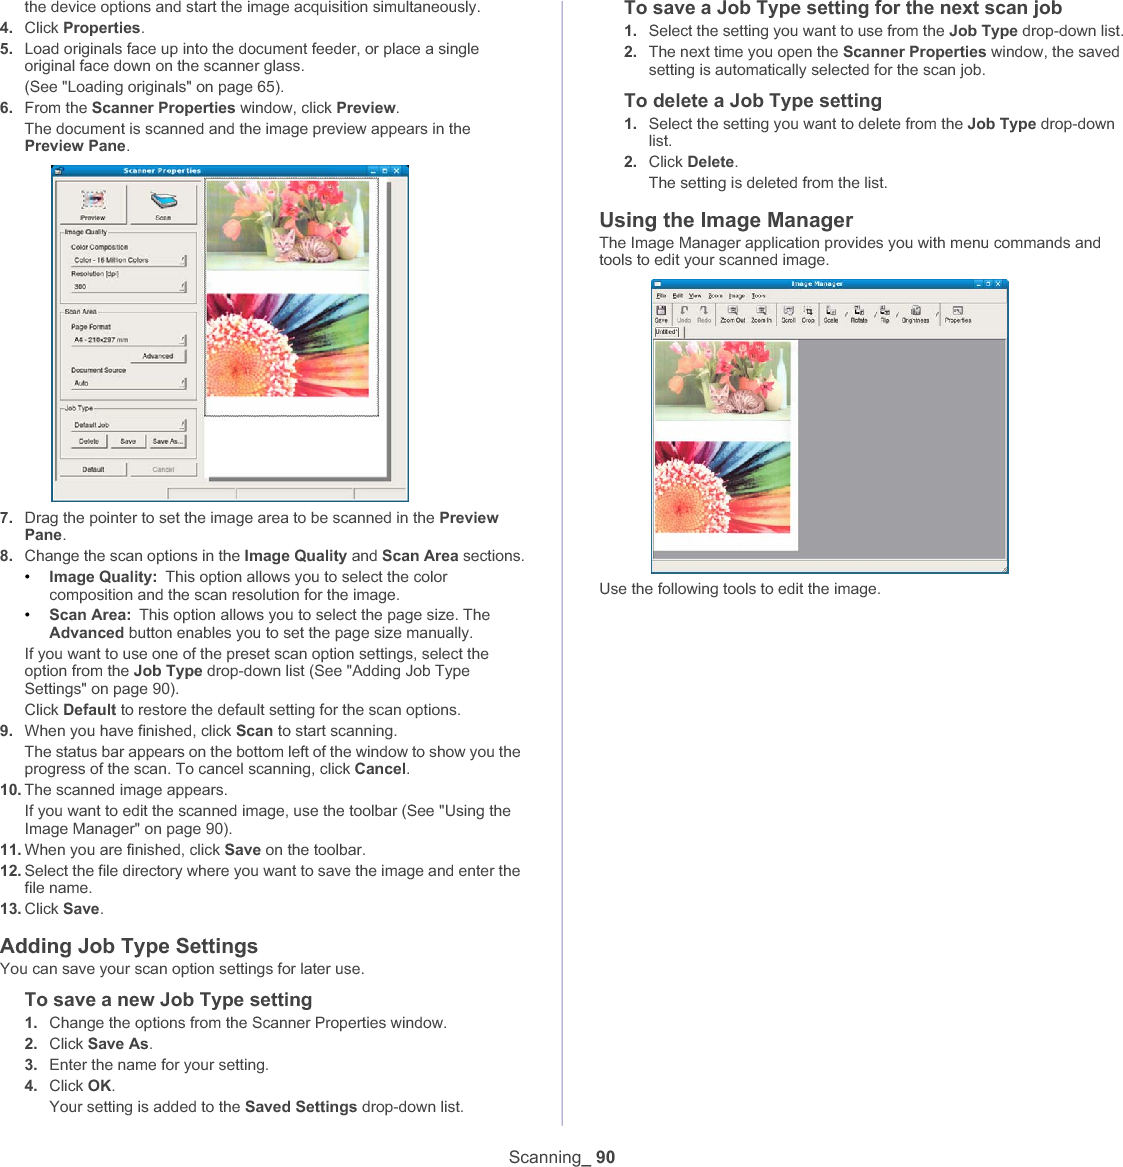
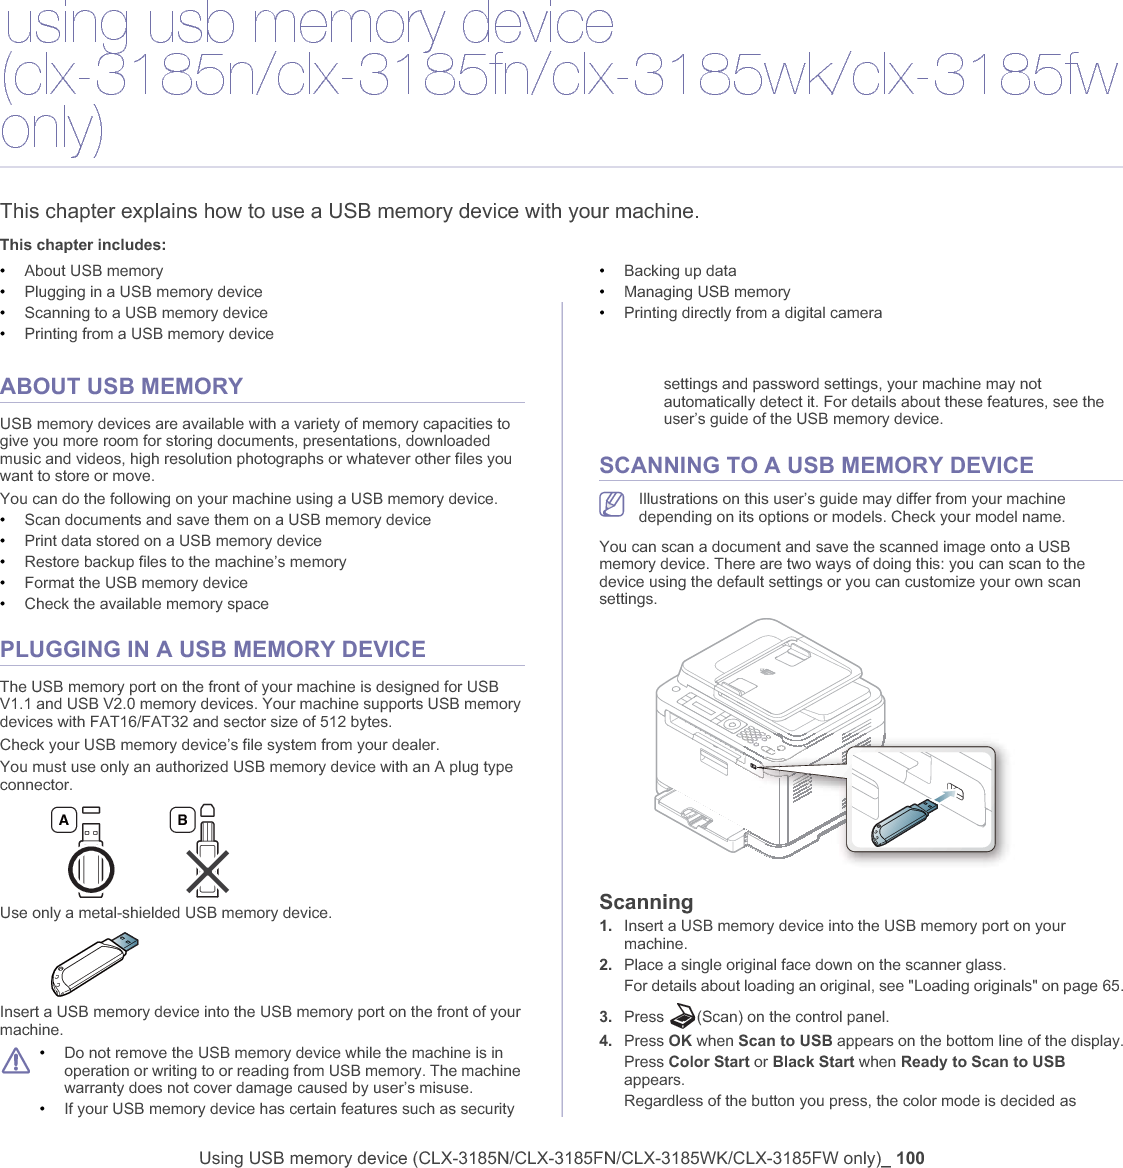
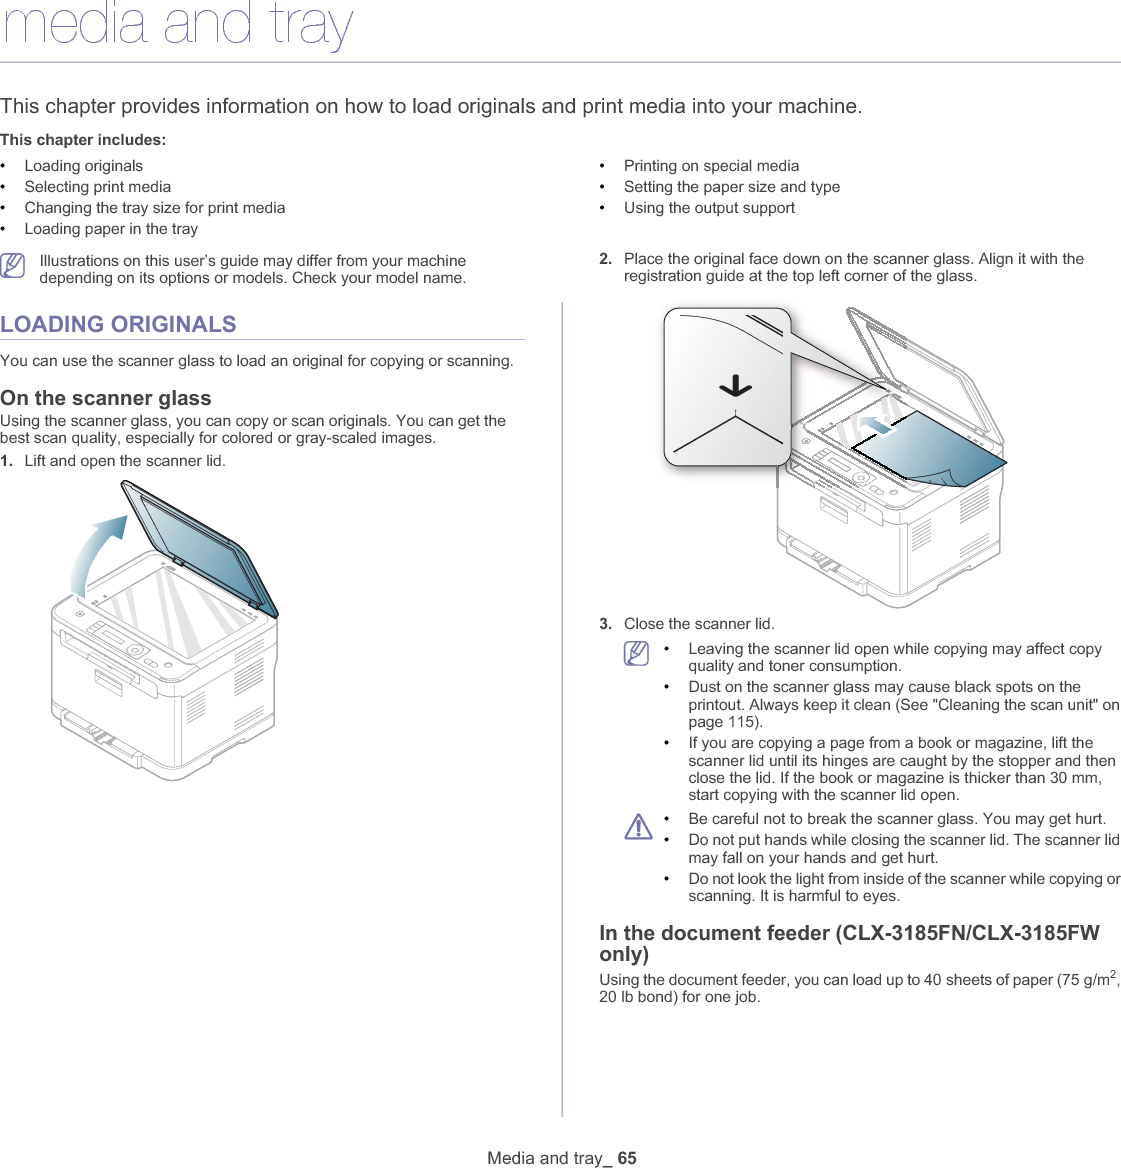
![Getting started_ 42Installing the Unified Linux Driver1. Make sure that the machine is connected to your computer and powered on.2. When the Administrator Login window appears, type in “root” in the Login field and enter the system password.You must log in as a super user (root) to install the machine software. If you are not a super user, ask your system administrator.3. From the Samsung website, download and unpack the Unified Linux Driver package to your computer.4. Click at the bottom of the desktop. When the Terminal screen appears, type in the following.[root@localhost root]#tar zxf [FilePath]/UnifiedLinuxDriver.tar.gz[root@localhost root]#cd [FilePath]/cdroot/Linux[root@localhost Linux]#./install.shIf you do not use the graphical interface and failed to install the software, you have to use the driver in the text mode. Follow the steps 3 to 4, and then follow the instructions on the terminal screen.5. When the welcome screen appears, click Next.6. When the installation is complete, click Finish.The installation program added the Unified Driver Configurator desktop icon and the Unified Driver group to the system menu for your convenience. If you have any difficulties, consult the on-screen help that is available through your system menu or from the driver package Windows applications, such as Unified Driver Configurator or Image Manager.Installing the SmartPanel1. Make sure that the machine is connected to your computer and powered on.2. When the Administrator Login window appears, type in “root” in the Login field and enter the system password.You must log in as a super user (root) to install the machine software. If you are not a super user, ask your system administrator.3. From the Samsung website, download and unpack the Smart Panel package to your computer.4. Click at the bottom of the desktop. When the Terminal screen appears, type in the following.[root@localhost root]#tar zxf [FilePath]/SmartPanel.tar.gz[root@localhost root]#cd [FilePath]/cdroot/Linux/smartpanel[root@localhost smartpanel]#./install.shIf you do not use the graphical interface and failed to install the software, you have to use the driver in the text mode. Follow the steps 3 to 4 and then follow the instructions on the terminal screen.Installing the Printer Settings Utility1. Make sure that the machine is connected to your computer and powered on.2. When the Administrator Login window appears, type in “root” in the Login field and enter the system password.You must log in as a super user (root) to install the machine software. If you are not a super user, ask your system administrator.3. From the Samsung website, download and unpack the Printer Settings Utility package to your computer.4. Click at the bottom of the desktop. When the Terminal screen appears, type in the following.[root@localhost root]#tar zxf [FilePath]/PSU.tar.gz[root@localhost root]#cd [FilePath]/cdroot/Linux/psu[root@localhost psu]#./install.shIf you do not use the graphical interface and failed to install the software, you have to use the driver in the text mode. Follow the steps 3 to 4 and then follow the instructions on the terminal screen.If the printer driver does not work properly, uninstall the driver and reinstall it. Follow the steps below to uninstall the driver for Linux.a) Make sure that the machine is connected to your computer and powered on.b) When the Administrator Login window appears, type in “root” in the Login field and enter the system password.You must log in as a super user (root) to uninstall the printer driver. If you are not a super user, ask your system administrator.c) Click the icon at the bottom of the desktop. When the Terminal screen appears, type in the following.[root@localhost root]#cd /opt/Samsung/mfp/uninstall/[root@localhost uninstall]#./uninstall.shd) Click Uninstall.e) Click Next.f) Click Finish.SHARING YOUR MACHINE LOCALLYFollow the steps below to set up computers to share your machine locally.If the host computer is directly connected to the machine with a USB cable and is also connected to the local network environment, client computers connected to the local network can use the shared machine through the host computer to print. WindowsSetting up a host computer1. Install your printer driver (See "Installing USB connected machine’s driver" on page 40).2. Click the Windows Start menu. 1Host computer A computer, which is directly connected to the machine by a USB cable.2Client computers Computers, which use the machine shared through the host computer. 21](https://usermanual.wiki/Samsung-Electronics-Co/CLX3185.Users-Manual-1/User-Guide-1230164-Page-42.png)
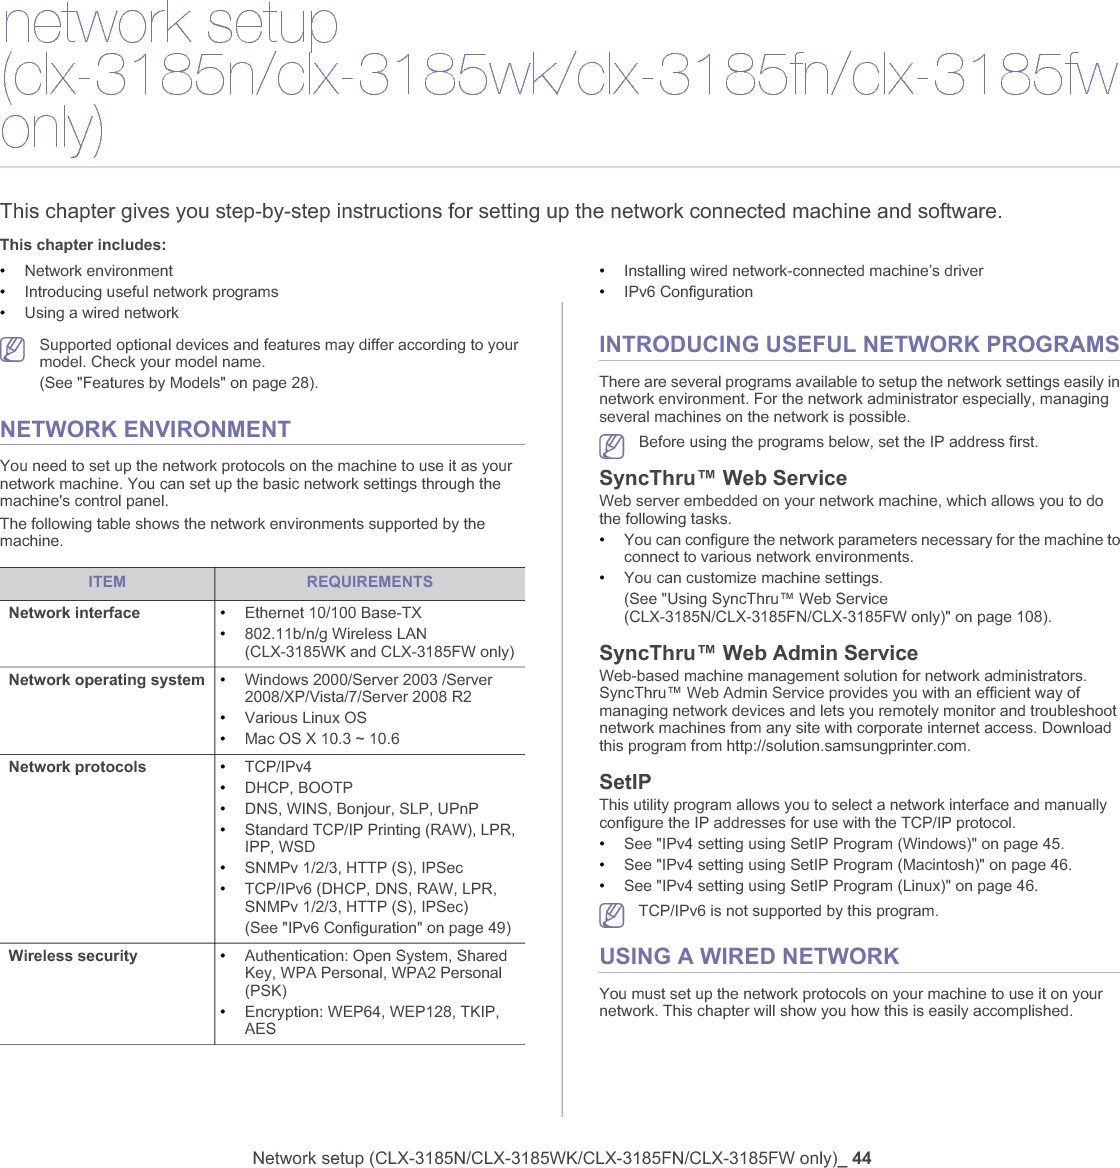
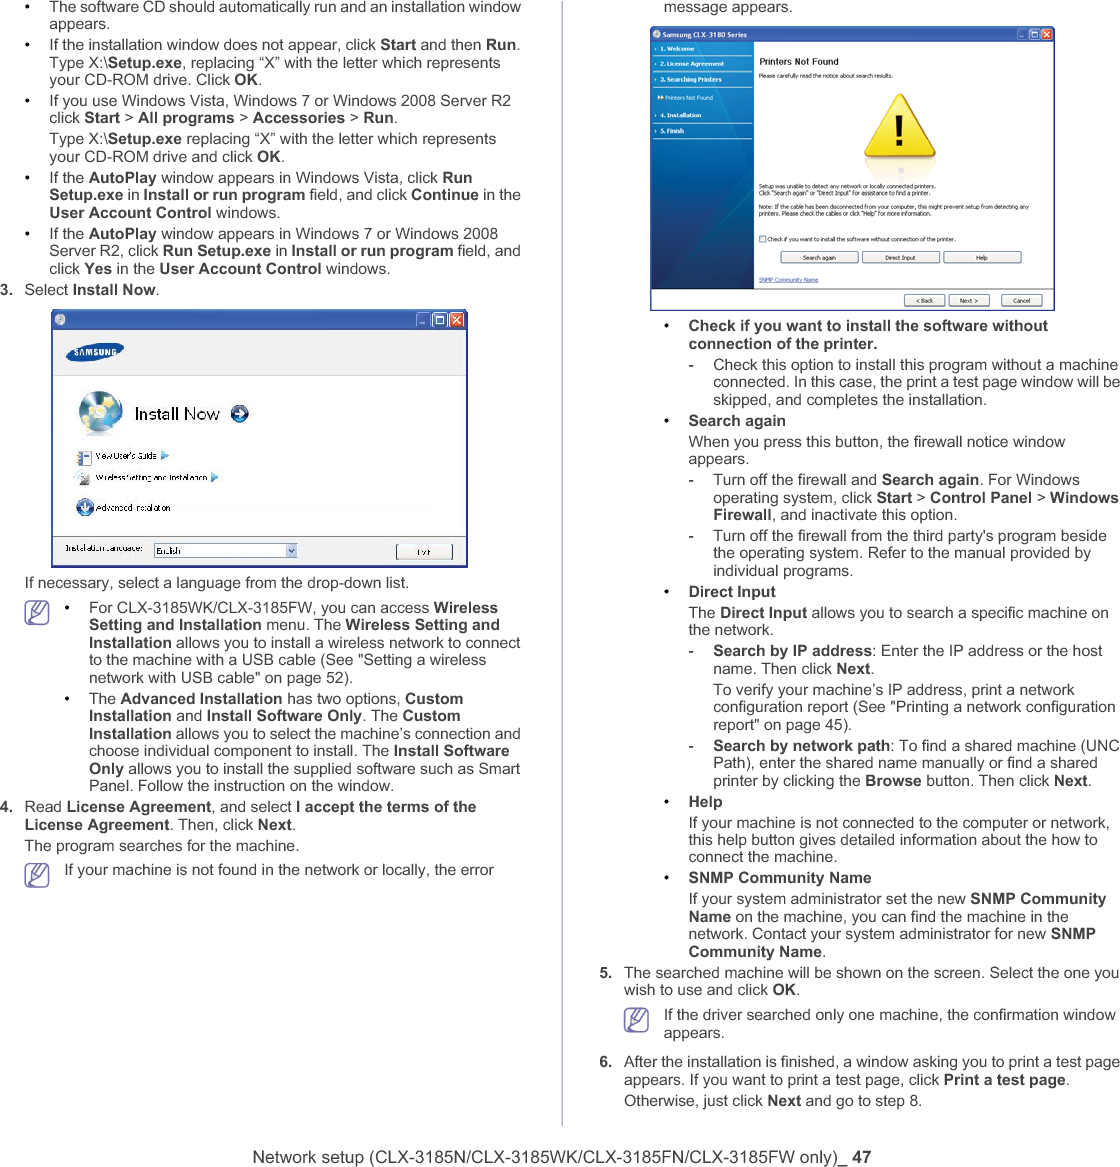
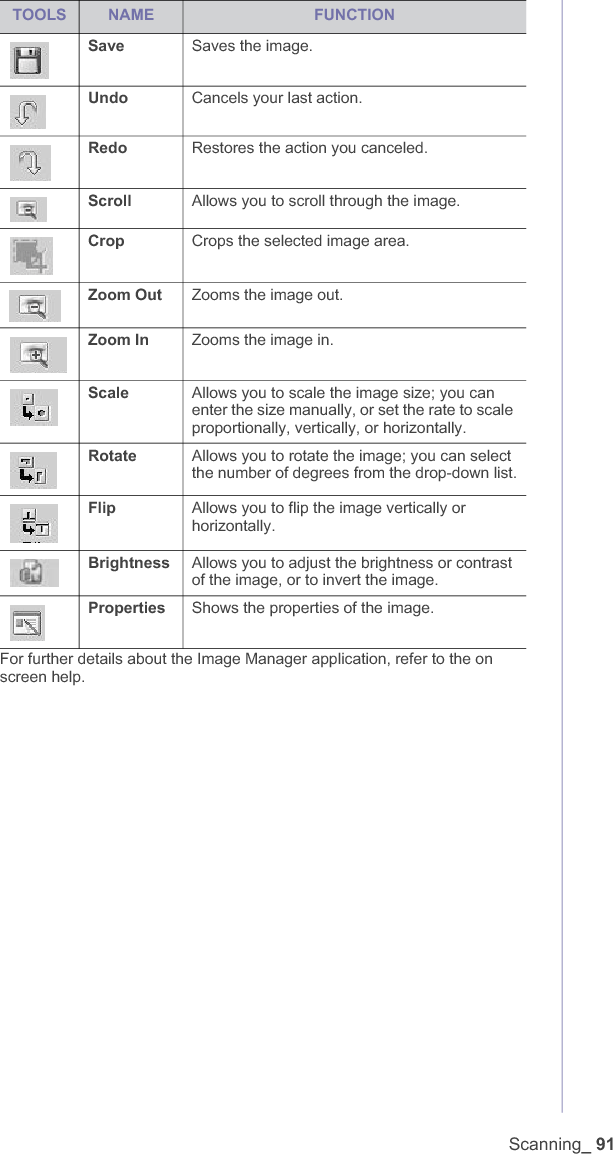
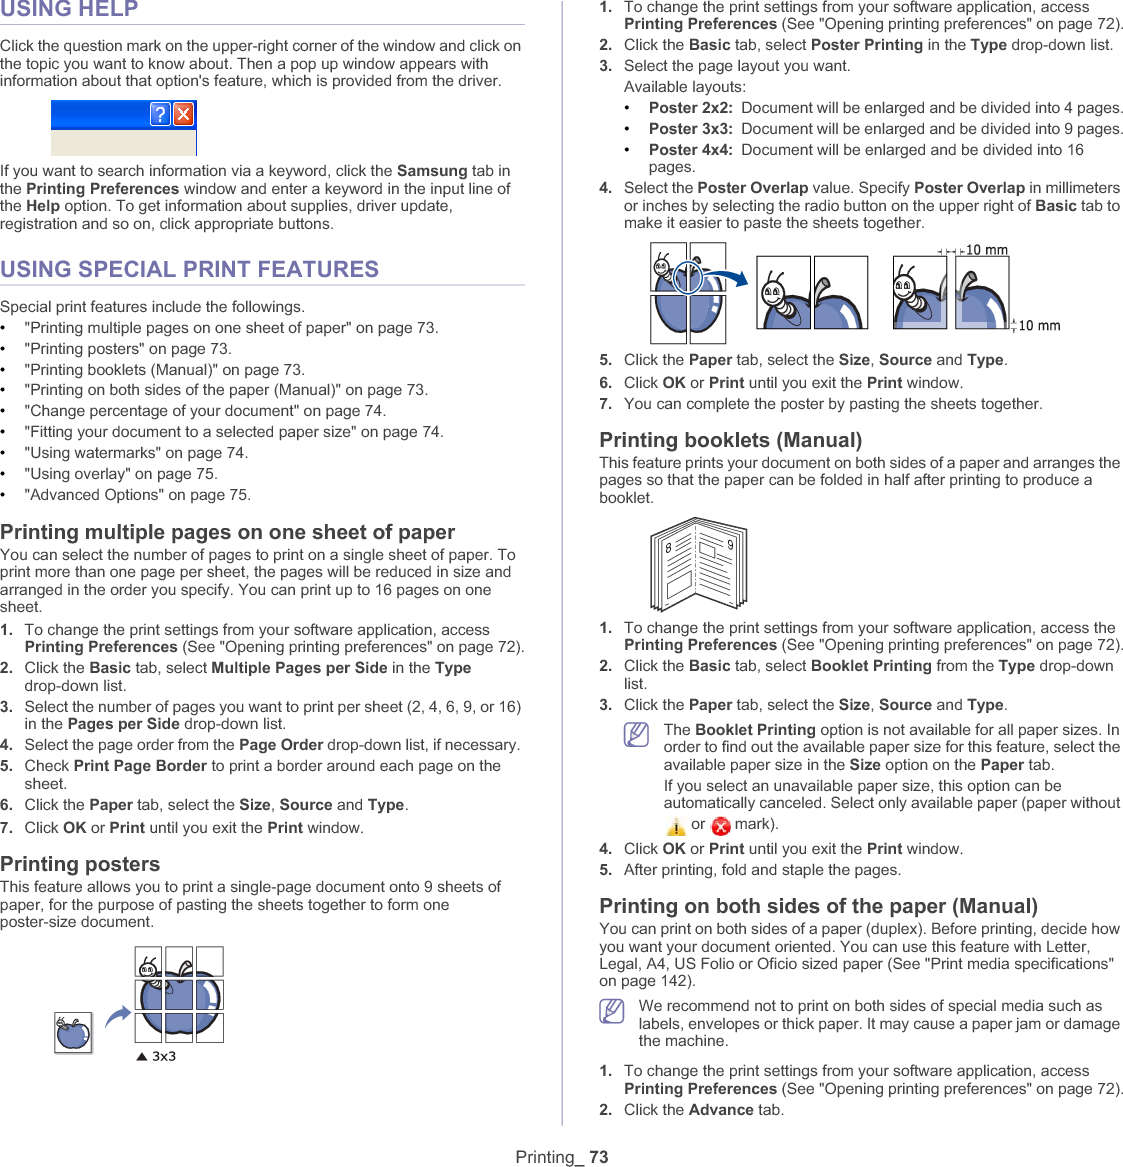
![Network setup (CLX-3185N/CLX-3185WK/CLX-3185FN/CLX-3185FW only)_ 49Add network Printer1. Double-click the Unified Driver Configurator.2. Click Add Printer…3. The Add printer wizard window opens. Click Next.4. Select Network printer and click the Search button.5. The printer’s IP address and model name appears on list field.6. Select your machine and click Next.7. Input the printer description and Next8. When the add printer is done, click Finish.IPV6 CONFIGURATIONTCP/IPv6 is supported properly only in Windows Vista or higher.If the IPv6 network seems to not be working, set all the network setting to the factory defaults and try again (See "Restoring factory default settings" on page 46).In the IPv6 network environment, follow the next procedure to use the IPv6 address.1. Connect your machine to the network with a network cable.2. Turn on the machine.3. Print a Network Configuration Report from the machine’s control panel that will check IPv6 addresses.a) Press Menu on the control panel.b) Press the left/right arrow until Network appears and press OK.c) Press the left/right arrow until Network Info. appears and press OK.d) Press the left/right arrow until Yes appears and press OK.4. Select Start > Control Panel > Printers and Faxes.5. Click Add a printer on the left pane of the Printers and Faxes windows.6. Click Add a local printer on the Add Printer windows.7. The Add Printer Wizard window appears. Follow the instruction on the window.If the machine does not work in the network environment, activate IPv6. Refer to the next section followed by.Activating IPv6The machine is provided with IPv6 feature on.1. Press Menu on the control panel.2. Press the left/right arrow until Network appears and press OK.3. Press the left/right arrow until TCP/IP (IPv6) appears and press OK.4. Press the left/right arrow until IPv6 Activate appears and press OK.5. Press the left/right arrow until On appears and press OK.6. Turn the machine off and turn it on again.7. Reinstall your printer driver.Setting IPv6 addressesMachine supports the following IPv6 addresses for network printing and managements.•Link-local Address: Self-configured local IPv6 address (Address starts with FE80).•Stateless Address: Automatically configured IPv6 address by a network router.•Stateful Address: IPv6 address configured by a DHCPv6 server.•Manual Address: Manually configured IPv6 address by a user.DHCPv6 address configuration (Stateful)If you have a DHCPv6 server on your network, you can set one of the following option for default dynamic host configuration.1. Press Menu on the control panel.2. Press the left/right arrow until Network appears and press OK.3. Press the left/right arrow until TCP/IP (IPv6) appears and press OK.4. Press the left/right arrow until DHCPv6 Config appears and press OK.5. Press the left/right arrow to access the required value.•DHCPv6 Addr.: Always use DHCPv6 regardless of router request.•DHCPv6 Off: Never use DHCPv6 regardless of router request.•Router: Use DHCPv6 only when requested by a router.6. Press OK.Manual address configuration1. Start a web browser such as Internet Explorer that supports IPv6 addressing as a URL.2. When the SyncThru™ Web Service window opens, move the mouse cursor on the Settings of the top menu bar and then click Network Settings.3. Click TCP/IPv6 on the left pane of the website.4. Select the Manual Address check box. Then, the Address/Prefixtext box is activated.5. Enter the rest of address (ex:3FFE:10:88:194::AAAA. “A” is the hexadecimal 0 through 9, A through F).6. Click the Apply button.Using SyncThru™ Web Service1. Start a web browser such as Internet Explorer that supports IPv6 addressing as a URL.2. Select one of the IPv6 addresses (Link-local Address,StatelessAddress,Stateful Address,Manual Address) from Network Configuration Report (See "Printing a network configuration report" on page 45).3. Enter the IPv6 addresses (ex: http://[FE80::215:99FF:FE66:7701]).Address must be enclosed in '[ ]' brackets.](https://usermanual.wiki/Samsung-Electronics-Co/CLX3185.Users-Manual-1/User-Guide-1230164-Page-49.png)
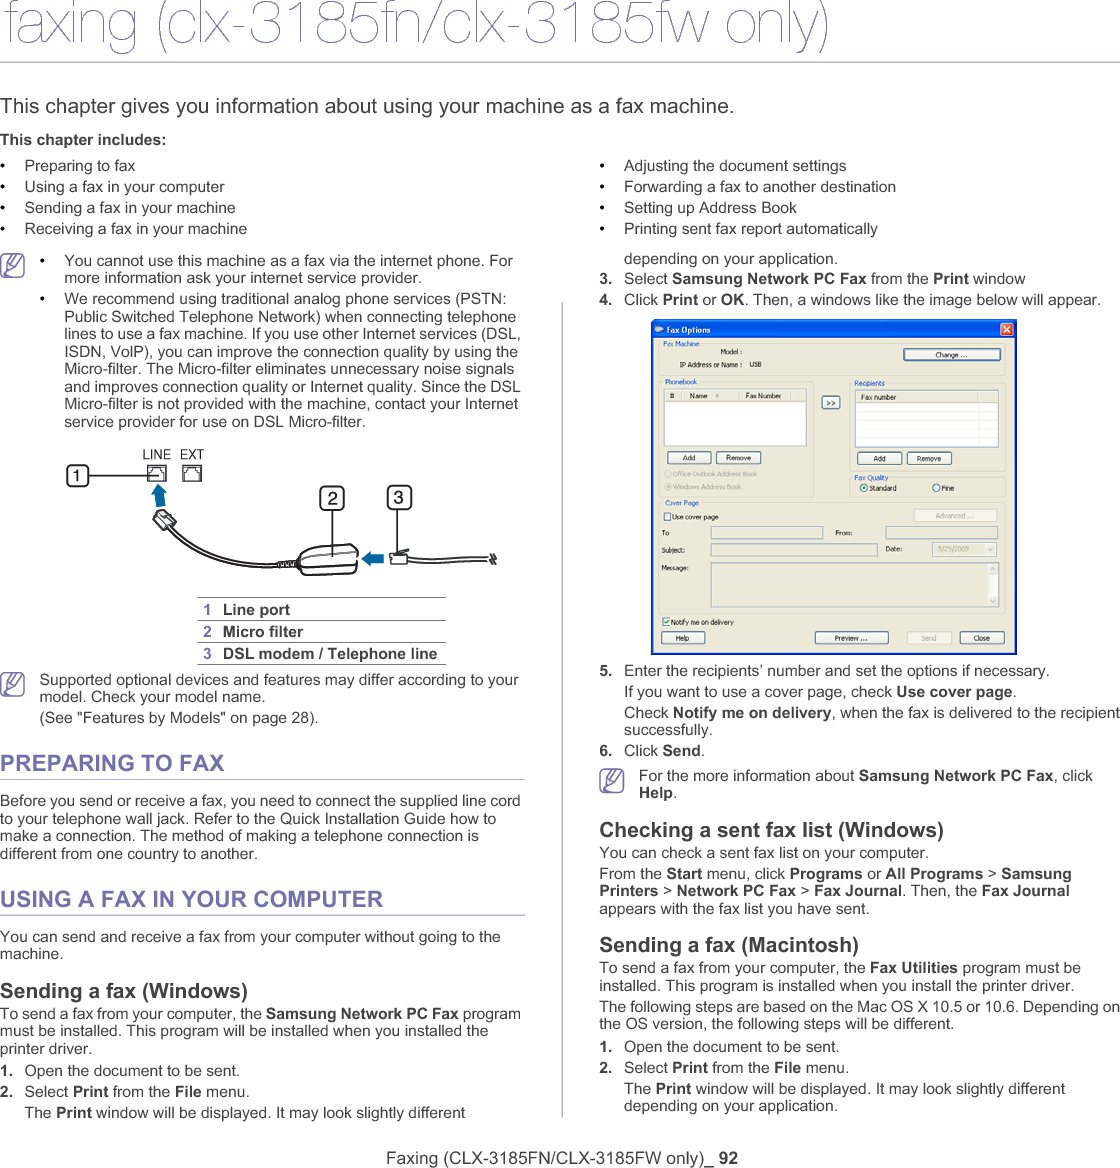
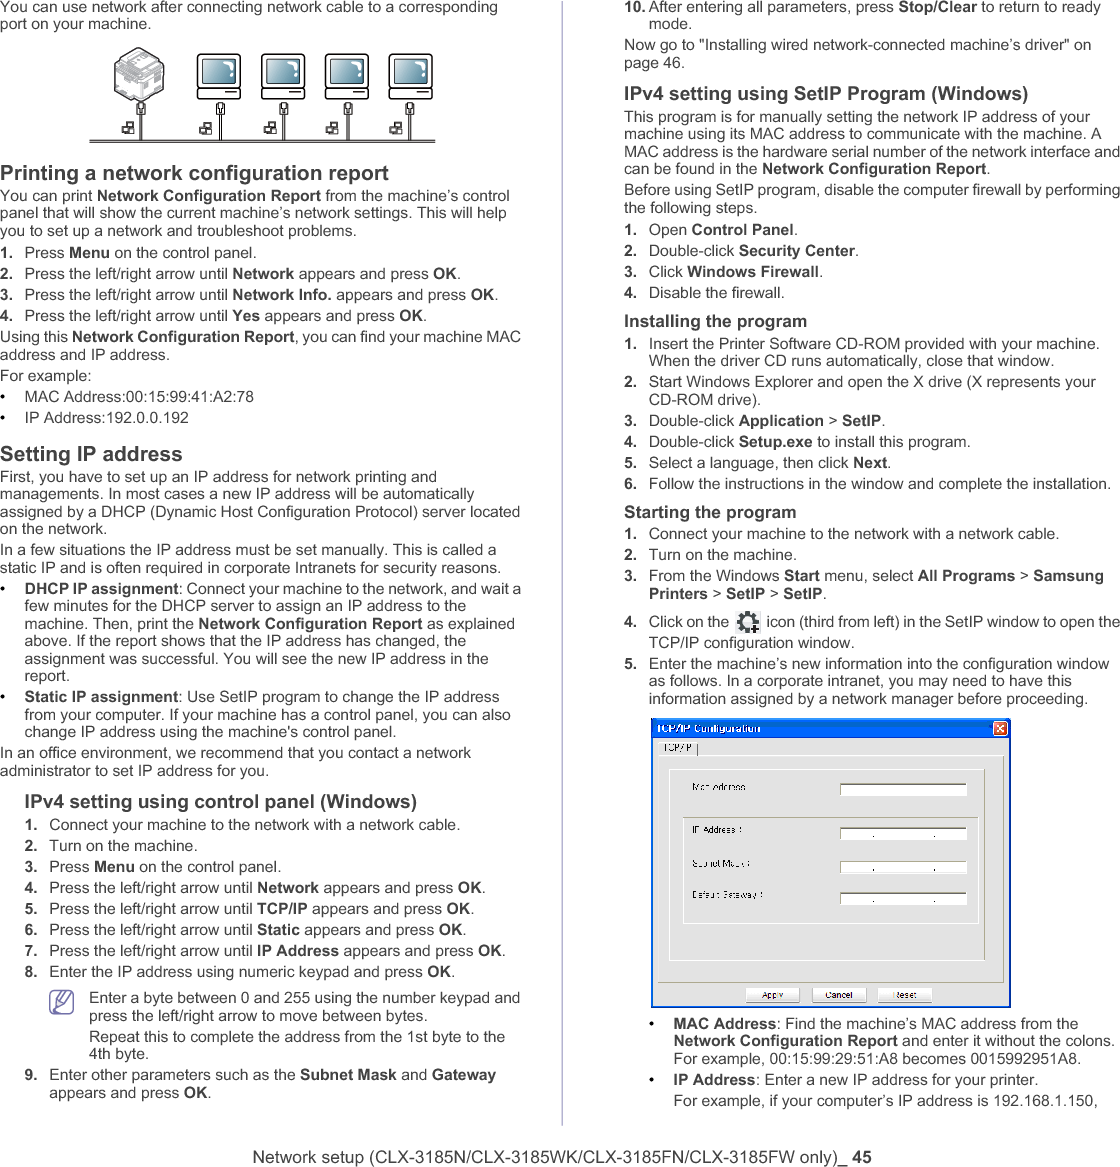
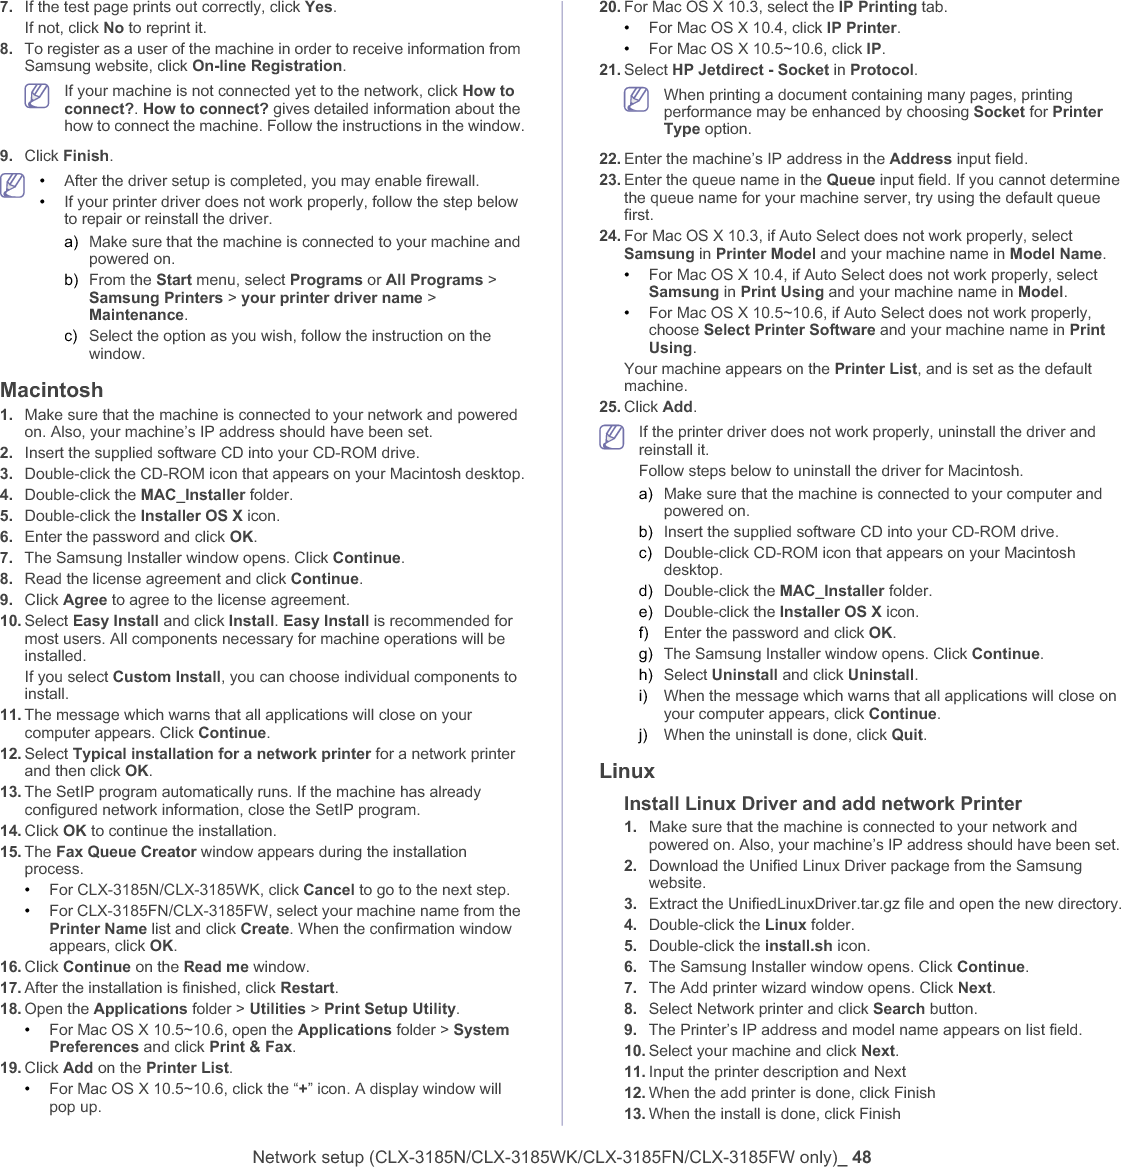
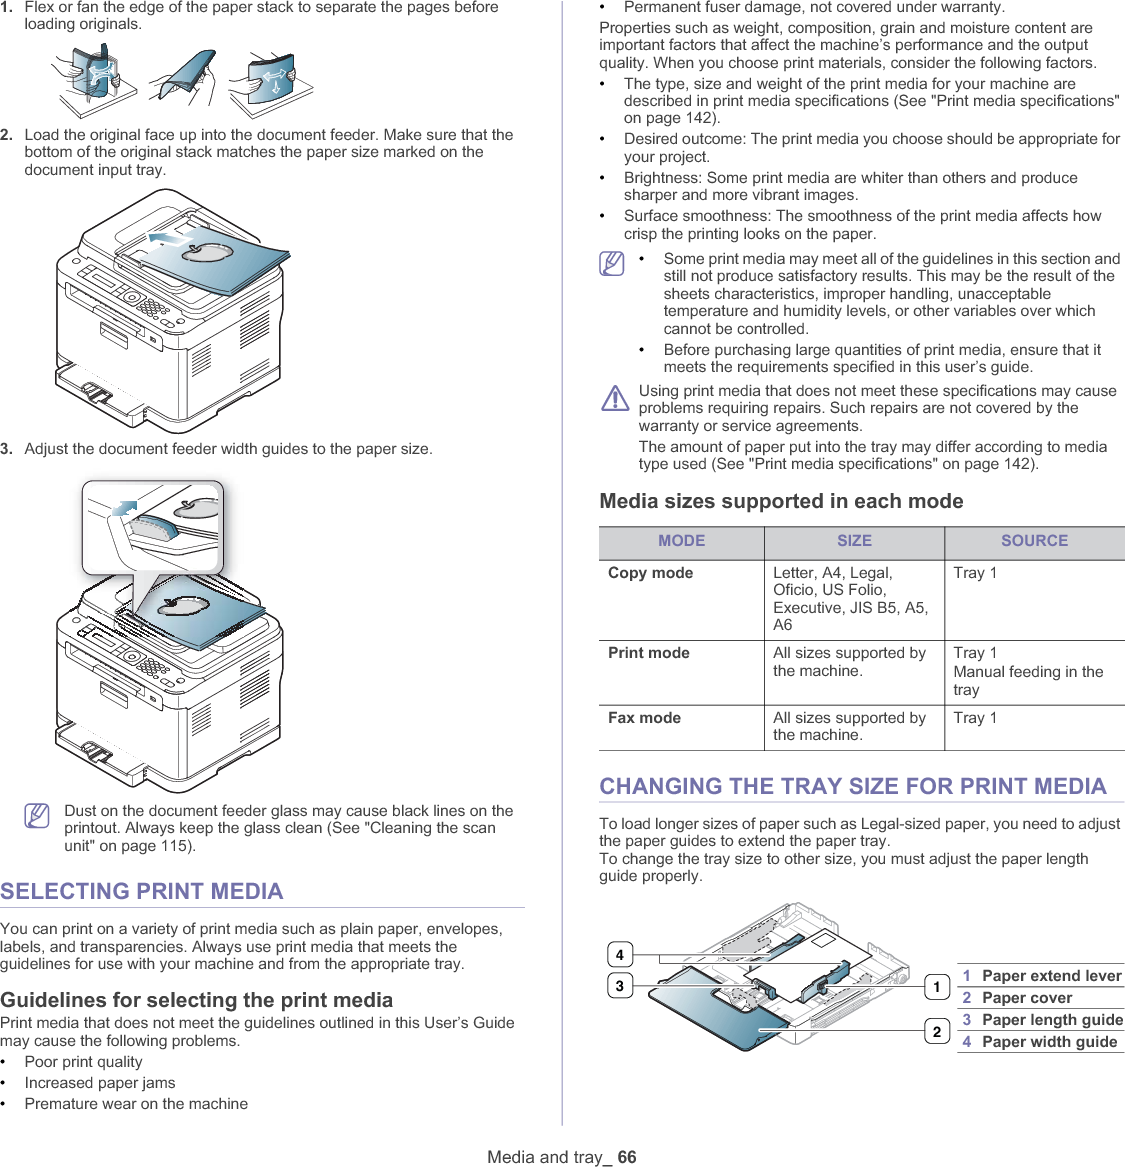
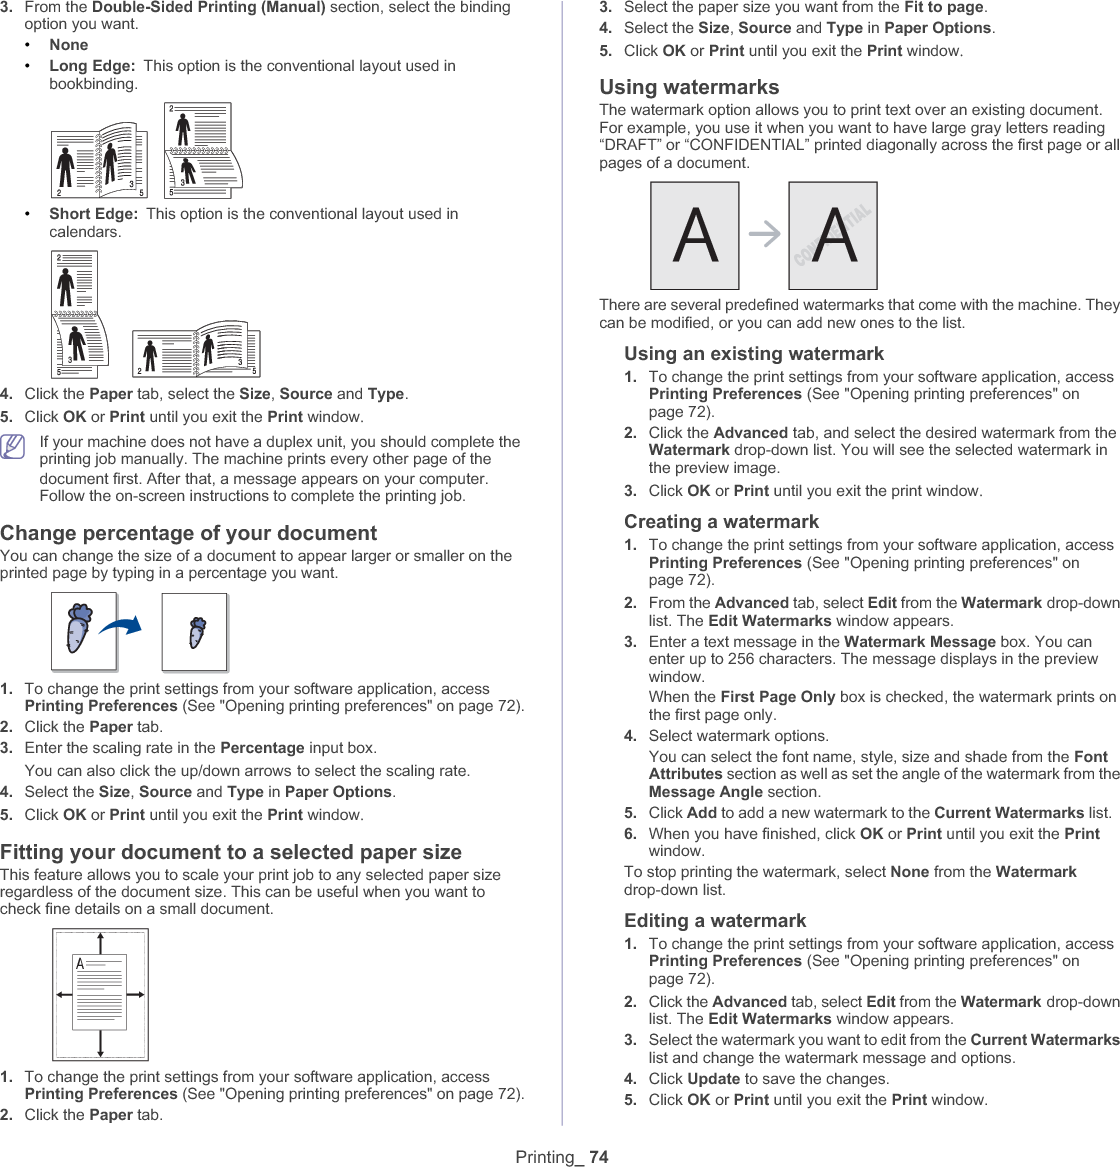
![Basic setup_ 63Correcting numbers or namesIf you make a mistake while entering a number or name, press the left/right arrow button to delete the last digit or character. Then enter the correct number or character.Inserting a pauseWith some telephone systems, you must dial an access code (9, for example) and listen for a second dial tone. In such cases, you must insert a pause in the telephone number. You can insert a pause while you are setting up speed dial numbers.To insert a pause, press Redial/Pause at the appropriate place while entering the telephone number. A - appears on the display at the corresponding location.USING THE SAVE MODESUsing the power saving featureWhen you will not be using the machine for a while, you can use this feature to save power.1. Press Menu on the control panel.2. Press the left/right arrow until System Setup appears and press OK.3. Press the left/right arrow until Machine Setup appears and press OK.4. Press the left/right arrow until Power Save appears and press OK.5. Press the left/right arrow to select the time you want.6. Press OK to save the selection.7. Press Stop/Clear to return to ready mode.SETTING THE DEFAULT PAPERThe setting options may differ according to your model. Check your model name.You can select the paper you would like to keep using for printing job.From your machine’s control panelSetting the paper size1. Press Menu on the control panel.2. Press the left/right arrow until System Setup appears and press OK.3. Press the left/right arrow until Paper Setup appears and press OK.4. Press the left/right arrow until Paper Size appears and press OK.5. Press the left/right arrow to select the paper size you want.6. Press OK to save the selection.7. Press Stop/Clear to return to ready mode.Setting the paper type1. Press Menu on the control panel.2. Press the left/right arrow until System Setup appears and press OK.3. Press the left/right arrow until Paper Setup appears and press OK.4. Press the left/right arrow until Paper Type appears and press OK.5. Press the left/right arrow to select the paper type you want.6. Press OK to save the selection.7. Press Stop/Clear to return to ready mode.From your computerWindows1. Click the Windows Start menu. 2. For Windows 2000, select Settings >Printers.•For Windows XP/Server 2003, select Printers and Faxes.•For Windows Server 2008/Vista, select Control Panel > Hardware and Sound >Printers.•For Windows 7, select Control Panel > Hardware and Sound >Devices and Printers.•For Windows Server 2008 R2, select Control Panel > Hardware >Devices and Printers.3. Right-click on your machine.4. For Windows XP/Server 2003/Server 2008/Vista, press PrintingPreferences.For Windows 7 and Windows Server 2008 R2, select the PrintingPreferences from context menu.If Printing Preferences item has a Ź mark, you can select other printer drivers connected with the selected printer.5. Click Paper tab. 6. Select options such as paper size and type.7. Press OK.If you want to use special-sized paper such as a billing paper, select Paper tab > Size >Edit... in the Printing Preferences (See "Opening printing preferences" on page 72).MacintoshMacintosh users need to change the default setting manually each time they want to print using other settings. 1. Open a Macintosh application and select the file you want to print.2. Open the File menu and click Print.3. Go to Paper Feed pane.4. Set appropriate tray from which you want to print.5. Go to Paper pane.6. Set paper type to correspond to the paper loaded in the tray from which you want to print.7. Click Print to print. Linux1. Open Terminal Program.2. When the Terminal screen appears, type in the following. [root@localhost root]# lpr <FileName>3. Select Printer and click Properties…4. Click on the Advanced tab.5. Select the tray (source) and its options, such as paper size and type.6. Press OK.8 T U V t u v 89 W X Y Z w x y z 90& + - , 0**##KEY ASSIGNED NUMBERS, LETTERS, OR CHARACTERS](https://usermanual.wiki/Samsung-Electronics-Co/CLX3185.Users-Manual-1/User-Guide-1230164-Page-63.png)
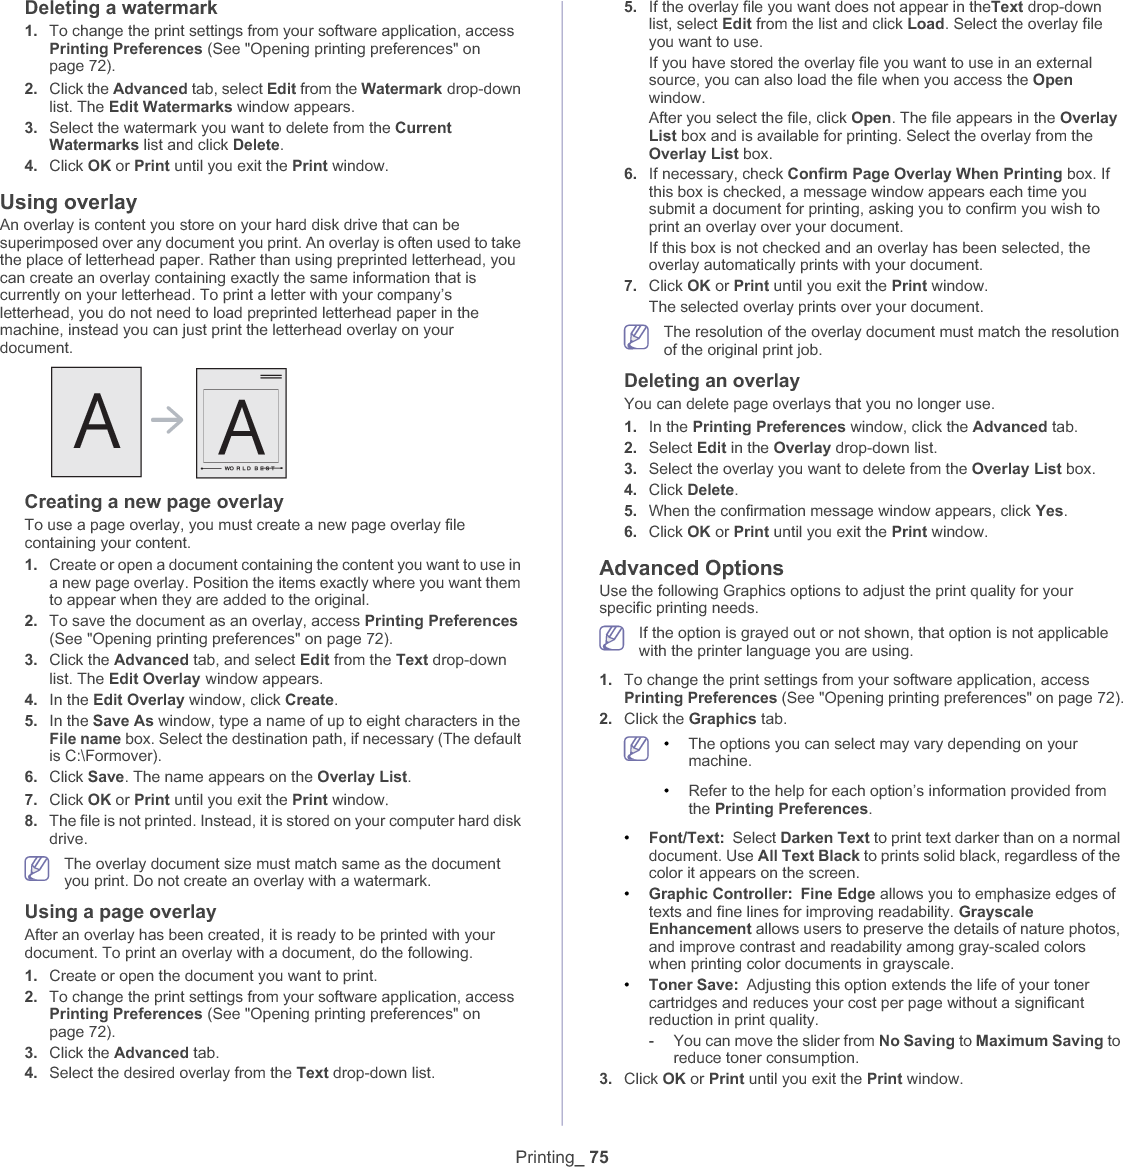

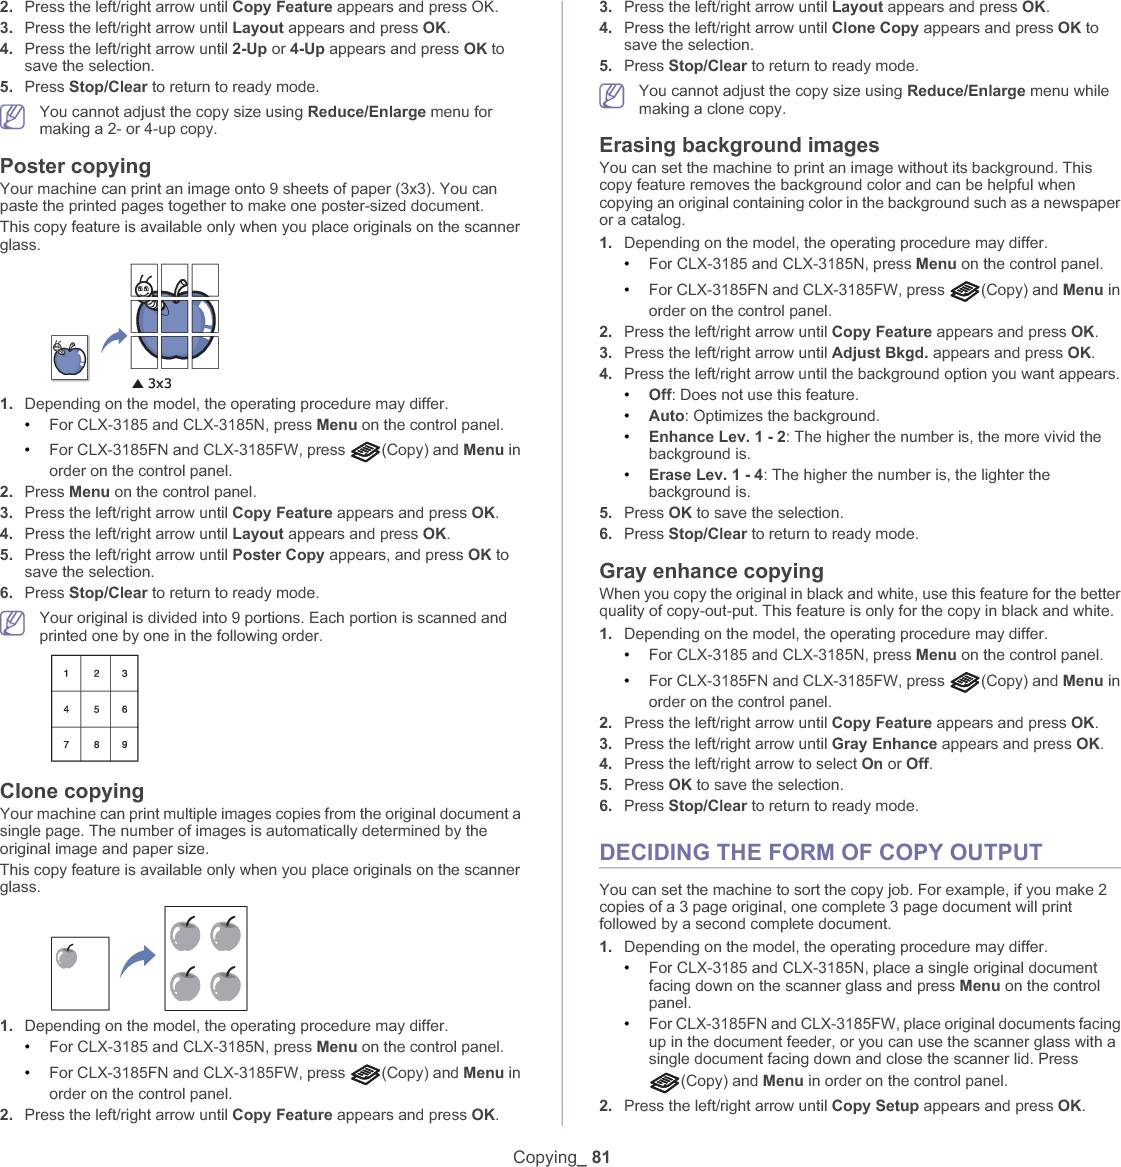
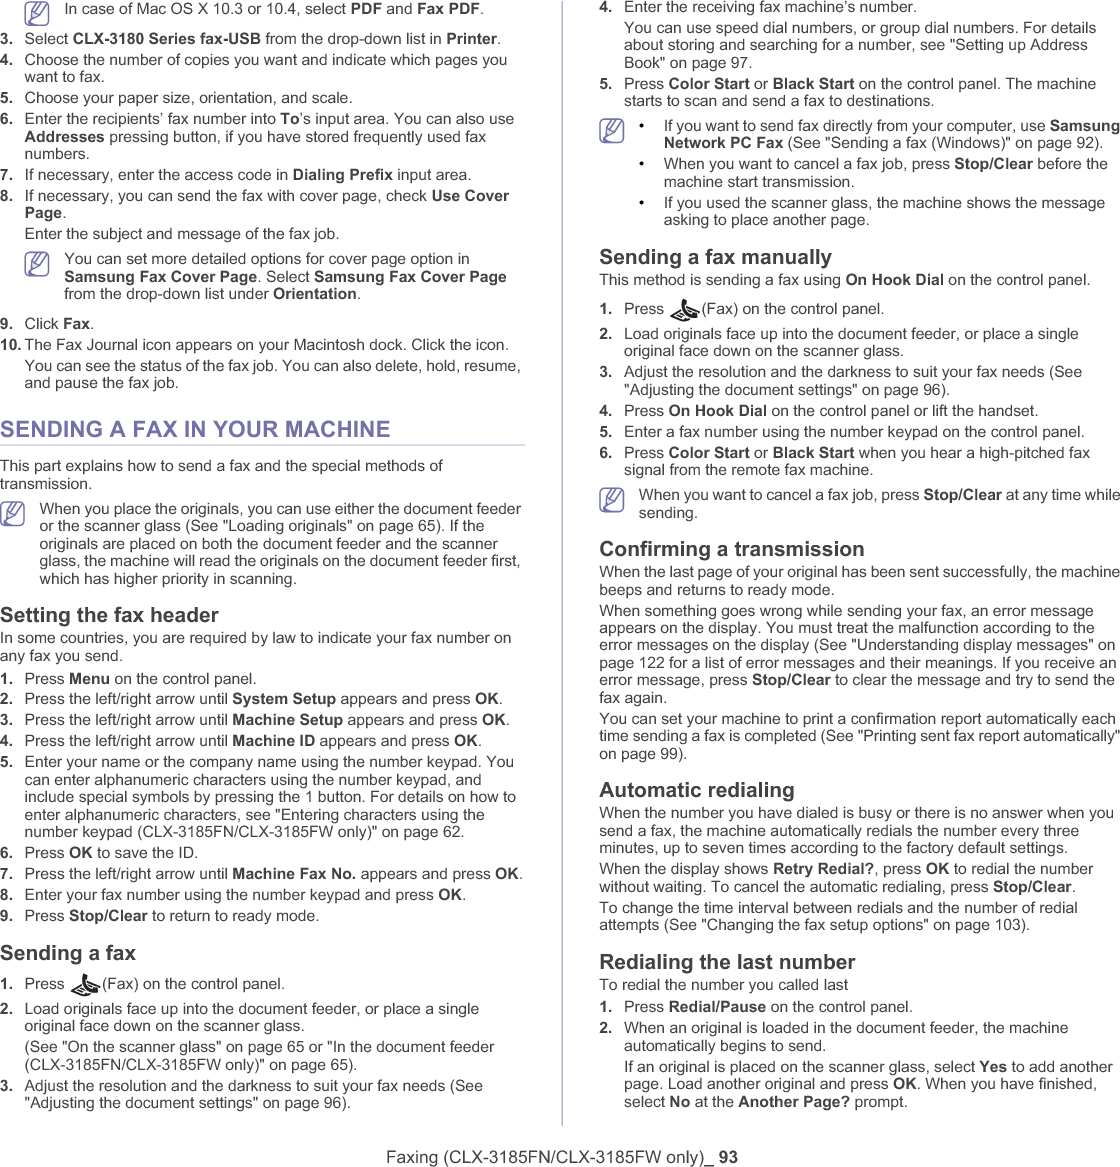
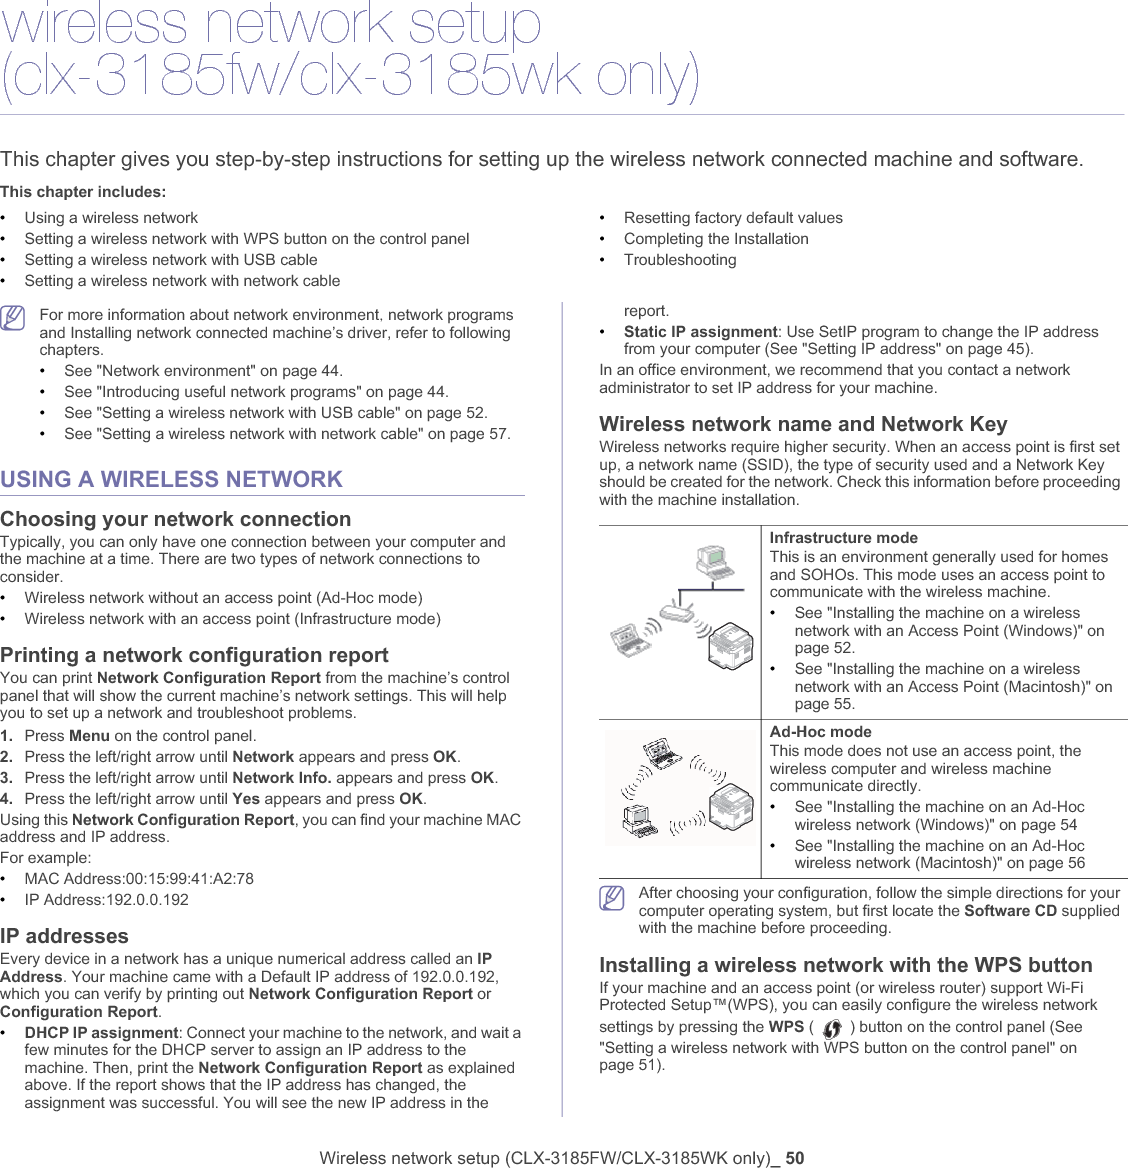
![Copying_ 802. Press the left/right arrow until Copy Feature appears and press OK.3. Press the left/right arrow until Reduce/Enlarge appears and press OK.4. Press the left/right arrow until the size setting you want appears and press OK.5. Press Stop/Clear to return to ready mode.To scale the copy by directly entering the scale rate1. Depending on the model, the operating procedure may differ.•For CLX-3185 and CLX-3185N, press Menu on the control panel.•For CLX-3185FN and CLX-3185FW, press (Copy) and Menu in order on the control panel.2. Press the left/right arrow until Copy Feature appears and press OK.3. Press the left/right arrow until Reduce/Enlarge appears and press OK.4. Press the left/right arrow until Custom appears and press OK.5. Press the left/right arrow to enter the copy size you want. Pressing and holding the button allows you to quickly scroll to the number you want. For CLX-3185FN and CLX-3185FW, you can also use the number keypad.6. Press OK to save the selection.7. Press Stop/Clear to return to ready mode.When you make a reduced copy, black lines may appear at the bottom of your copy.CHANGING THE DEFAULT COPY SETTINGSThe copy options including darkness, original type, copy size and number of copies can be set to those most frequently used. When you copy a document, the default settings are used unless they have been changed by using the corresponding buttons on the control panel.1. Depending on the model, the operating procedure may differ.•For CLX-3185 and CLX-3185N, press Menu on the control panel.•For CLX-3185FN and CLX-3185FW, press (Copy) and Menu in order on the control panel.2. Press the left/right arrow until Copy Setup appears and press OK.3. Press the left/right arrow until Change Default appears and press OK.4. Press the left/right arrow until the setup option you want appears and press OK.5. Press the left/right arrow until the setting you want appears and press OK.6. Repeat steps 4 through 5 as needed.7. Press Stop/Clear to return to ready mode.While you are setting copy options, pressing Stop/Clear cancels the changed settings and restores the defaults.ID CARD COPYINGYour machine can print 2-sided originals on one sheet of A4-, Letter-, Folio-, Oficio-, Executive-, B5-, A5- or A6-sized paper.The machine prints one side of the original on the upper half of the paper and the other side on the lower half without reducing the size of the original. This feature is helpful for copying a small-sized item such as business card.The original must be placed on the scanner glass to use this feature.1. Press ID Copy on the control panel. 2. Place the front side of an original facing down on the scanner glass where arrows indicate as shown. Then, close the scanner lid.3. Place Front Side and Press [Start] appears on the display.4. Press Color Start or Black Start.Your machine begins scanning the front side and shows Place Back Side and Press [Start].5. Turn the original over and place it on the scanner glass where arrows indicate as shown. Then, close the scanner lid.6. Press Color Start to begin color copying.Or, press Black Start to begin black and white copying.•If you do not press the Color Start or Black Start button, only the front side will be copied.•If the original is larger than the printable area, some portions may not be printed.•If you press Stop/Clear or if no buttons are pressed for approximately 30 seconds, the machine cancels the copy job and returns to ready mode. USING SPECIAL COPY FEATURESYou can use the following copy features.2-up or 4-up copying (N-up)Your machine can print 2 or 4 original images reduced to fit onto one sheet of paper.1. Depending on the model, the operating procedure may differ.•For CLX-3185 and CLX-3185N, press Menu on the control panel.•For CLX-3185FN and CLX-3185FW, press (Copy) and Menu in order on the control panel.1 21 23 4](https://usermanual.wiki/Samsung-Electronics-Co/CLX3185.Users-Manual-1/User-Guide-1230164-Page-80.png)