Samsung Electronics Co DC60CPS Laser Printer User Manual 600 EN USER
Samsung Electronics Co Ltd Laser Printer 600 EN USER
UserManual.wiki
>
Samsung Electronics Co
>
DC60CPS User Manual
>
Users Manual 1
Contents
1.
Users Manual 1
2.
Users Manual 2
Users Manual 1
Navigation menu
Upload a User Manual
Namespaces
Wiki Guide
HTML
PDF
Info
Views
User Manual
Discussion / Help
Navigation


![viiiRadio frequency wireless communication can interfere with equipment on commercial aircraft. Current aviation regulations require wireless devices to be turned off while traveling in an airplane. 802.11B (also known as wireless Ethernet) and Bluetooth communication devices are examples of devices that provide wireless communication.In environments where the risk of interference to other devices or services is harmful or perceived as harmful, the option to use a wireless device may be restricted or eliminated. Airports, Hospitals, and Oxygen or flammable gas laden atmospheres are limited examples where use of wireless devices may be restricted or eliminated. When in environments where you are uncertain of the sanction to use wireless devices, ask the applicable authority for authorization prior to use or turning on the wireless device.Every country has different restrictions on the use of wireless devices. Since your system is equipped with a wireless device, when traveling between countries with your system, check with the local Radio Approval authorities prior to any move or trip for any restrictions on the use of a wireless device in the destination country.If your system came equipped with an internal embedded wireless device, do not operate the wireless device unless all covers and shields are in place and the system is fully assembled.Wireless devices are not user serviceable. Do not modify them in any way. Modification to a wireless device will void the authorization to use it. Please contact manufacturer for service.Only use drivers approved for the country in which the device will be used. See the manufacturer System Restoration Kit, or contact manufacturer Technical Support for additional information.EU Declaration of Conformity (LVD,EMC)For the following product :Manufactured at :We hereby declare, that all major safety requirements, concerning to CE MarkingDirective[93/68/EEC] and Low Voltage Directive [73/23/EEC], ElectroMagneticCompatibility [89/336/EEC], amendments [92/31/EEC] are fulfilled, as laid out in theguideline set down by the member states of the EEC Commission.This declaration is valid for all samples that are part of this declaration, which aremanufactured according to the production charts appendix.The standards relevant for the evaluation of safety & EMC requirements are asfollows :1. Certificate of conformity / Test report issued by :2. Technical documentation kept at :which will be made available upon request.Color Laser Beam Printer(Product name)CLP-510, CLP-510N(Model Number)Samsung Electronics Co.,Ltd. #259, Gongdan-Dong, Gumi-City, Gyungbuk,KOREA. 730-030(factory name, address)LVD : EN 60950:1992+A1+A2+A3+A4+A11, EN 60825-1:1994+A1EMC : EN55022:1998incA1:2000, EN61000-3-2:2000,EN61000:3-3:1995incA1:2001EN55024:1998incA1:2001, AS/NZS3548:1995,EN61000:4-2:1995, EN61000:4-1996,EN61000:4-4:1995, EN61000:4-5:1995 EN61000:4-6:1996, EN61000:4-11:1994LVD : TUV RheinlandEMC : SAMSUNG Electronics EURO Q.A. Lab. in the U.K.Samsung Electronics Co.,Ltd.Samsung Electronics Co.,Ltd.#259,Gongdan-Dong,Gumi-CityGyungbuk, Korea 730-0302004-9-17Whan-Soon Yim / Senior Manager(place and date of issue) (name and signature of authorized person)Samsung Electronics Euro QA Lab.Blackbushe Business Park, Saxony WayYateley, Hampshire, GU46 6GG, UK2004-9-17Yong-Sang Park / Manager(place and date of issue) (name and signature of authorized person)(Manufacturer)(Representative in the EU)Temporary](https://usermanual.wiki/Samsung-Electronics-Co/DC60CPS.Users-Manual-1/User-Guide-577474-Page-9.png)


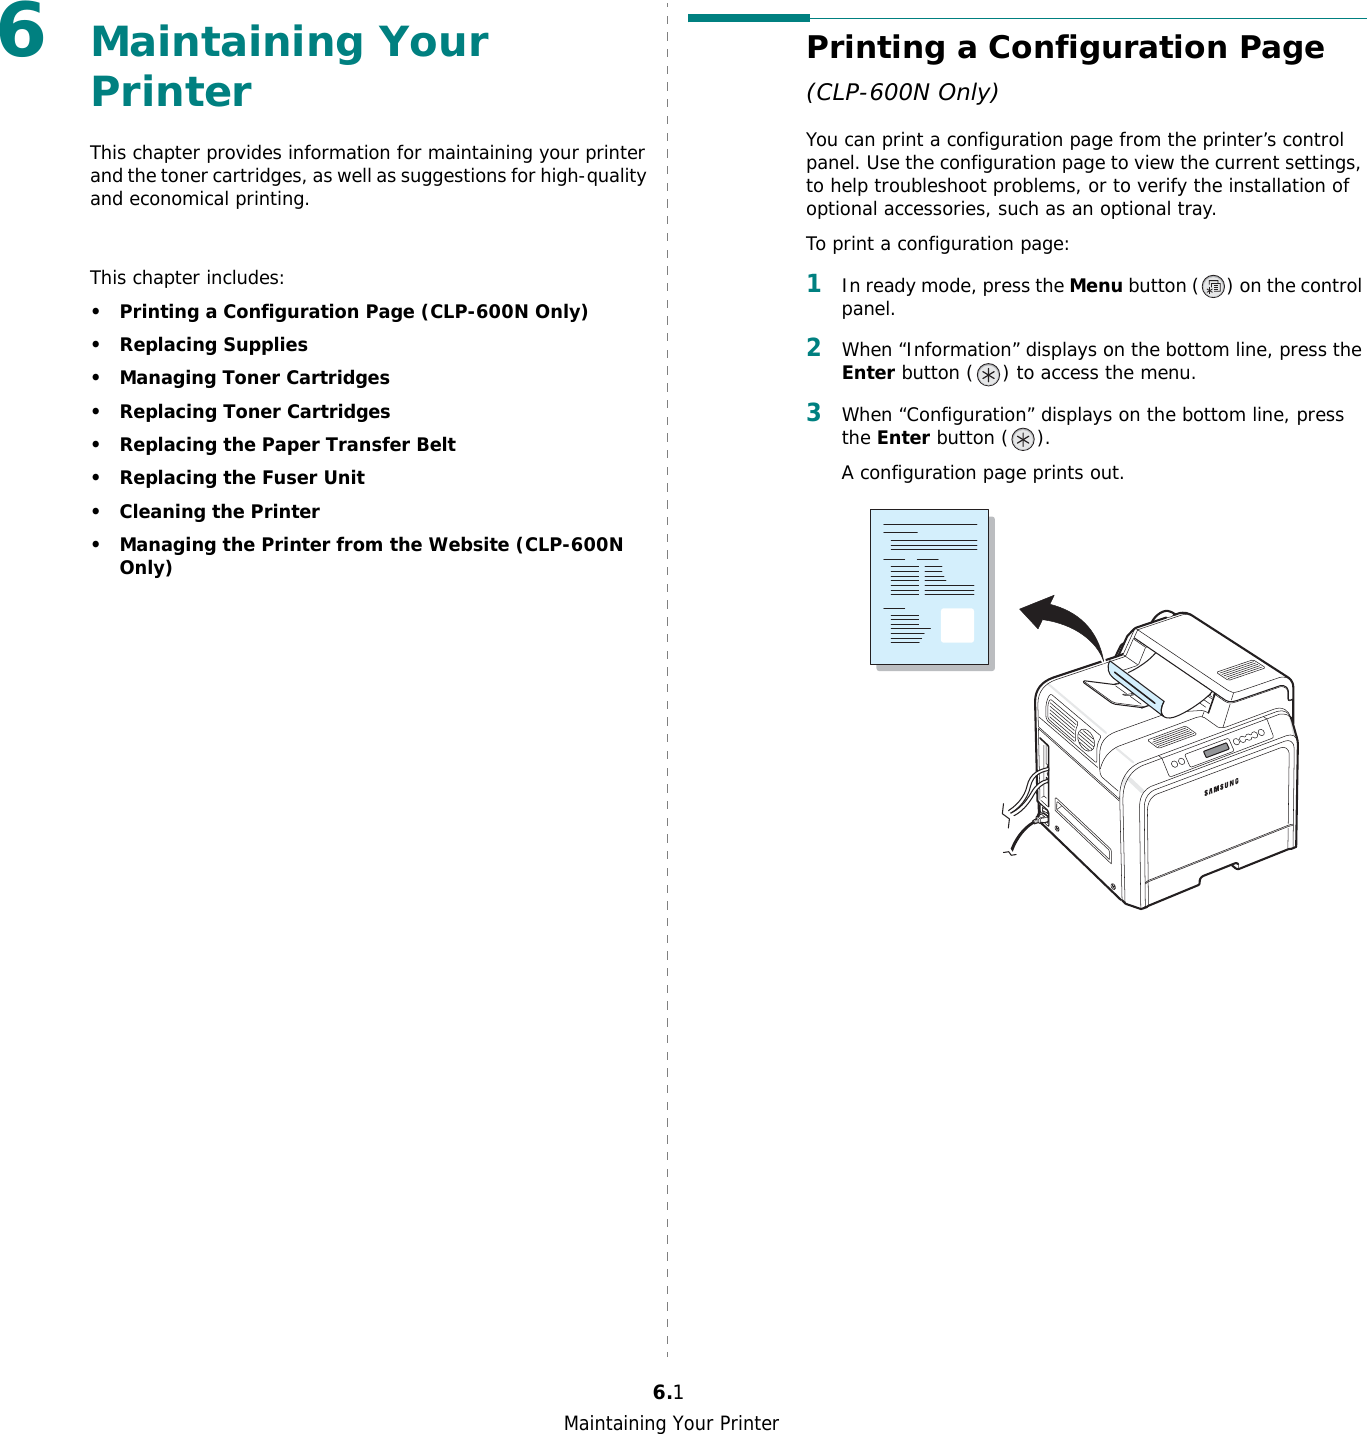
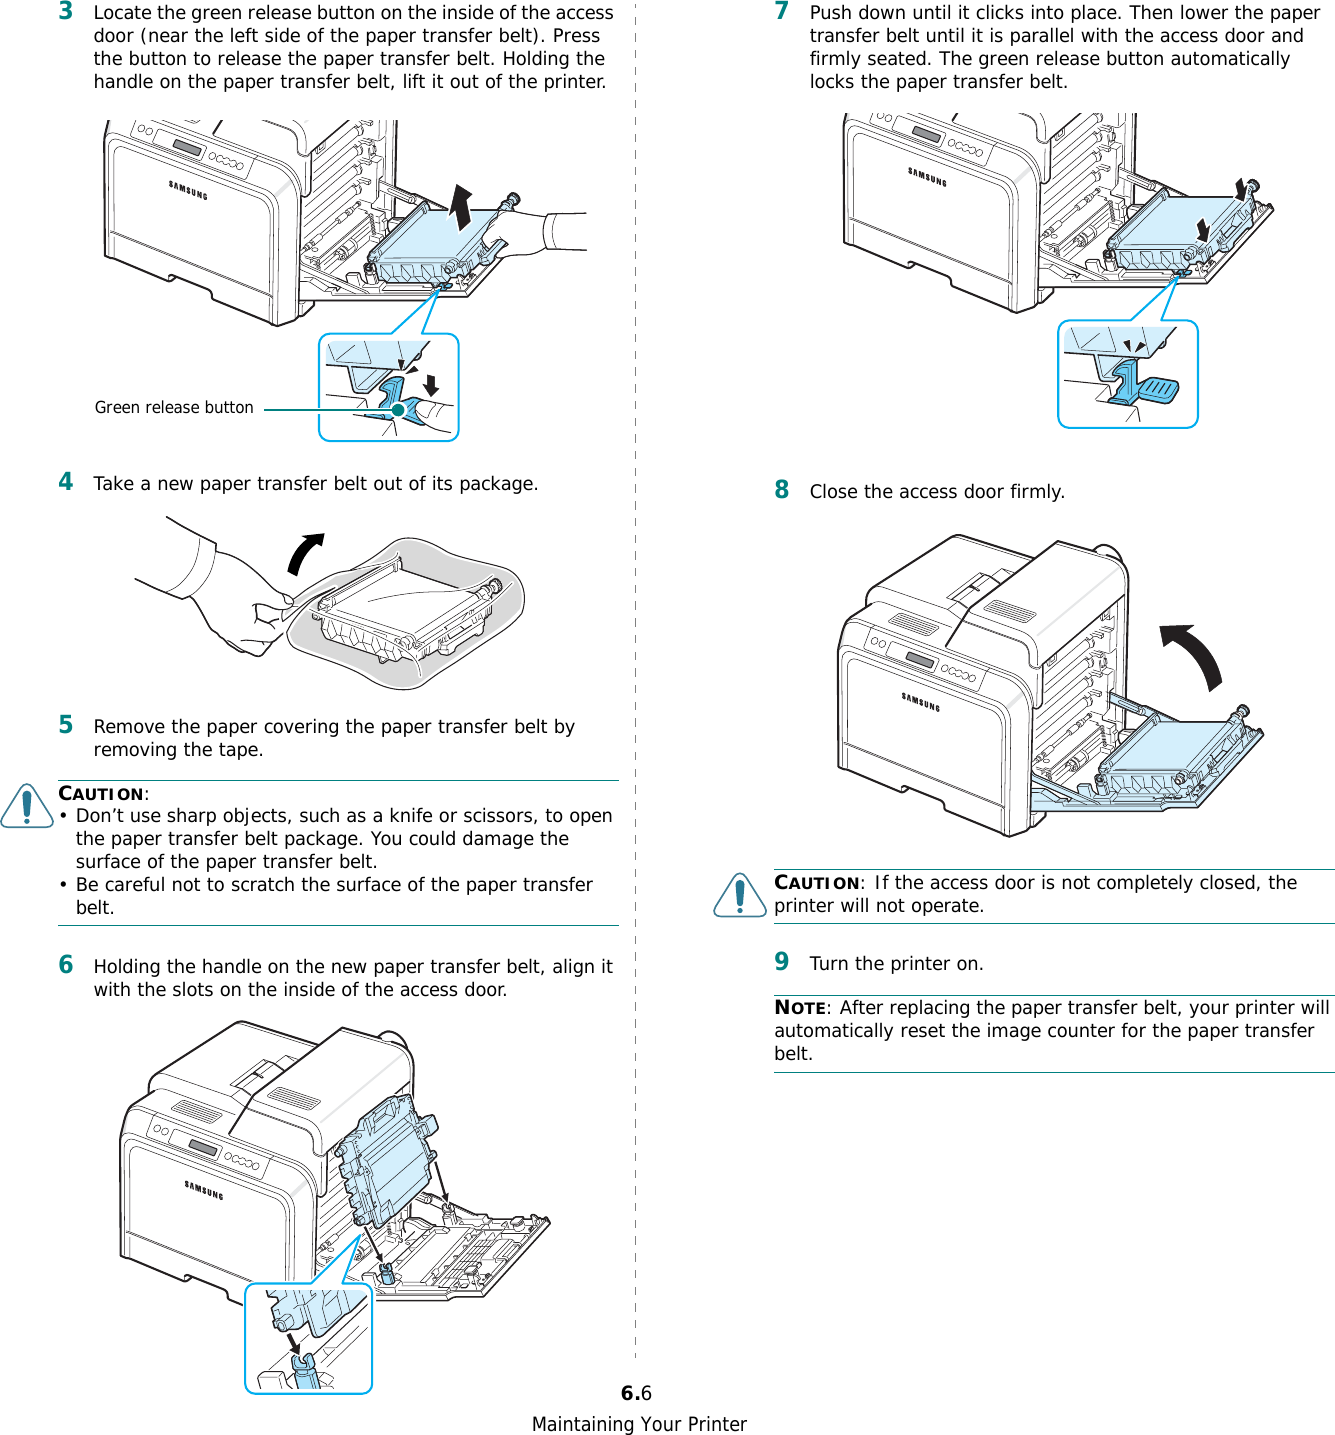
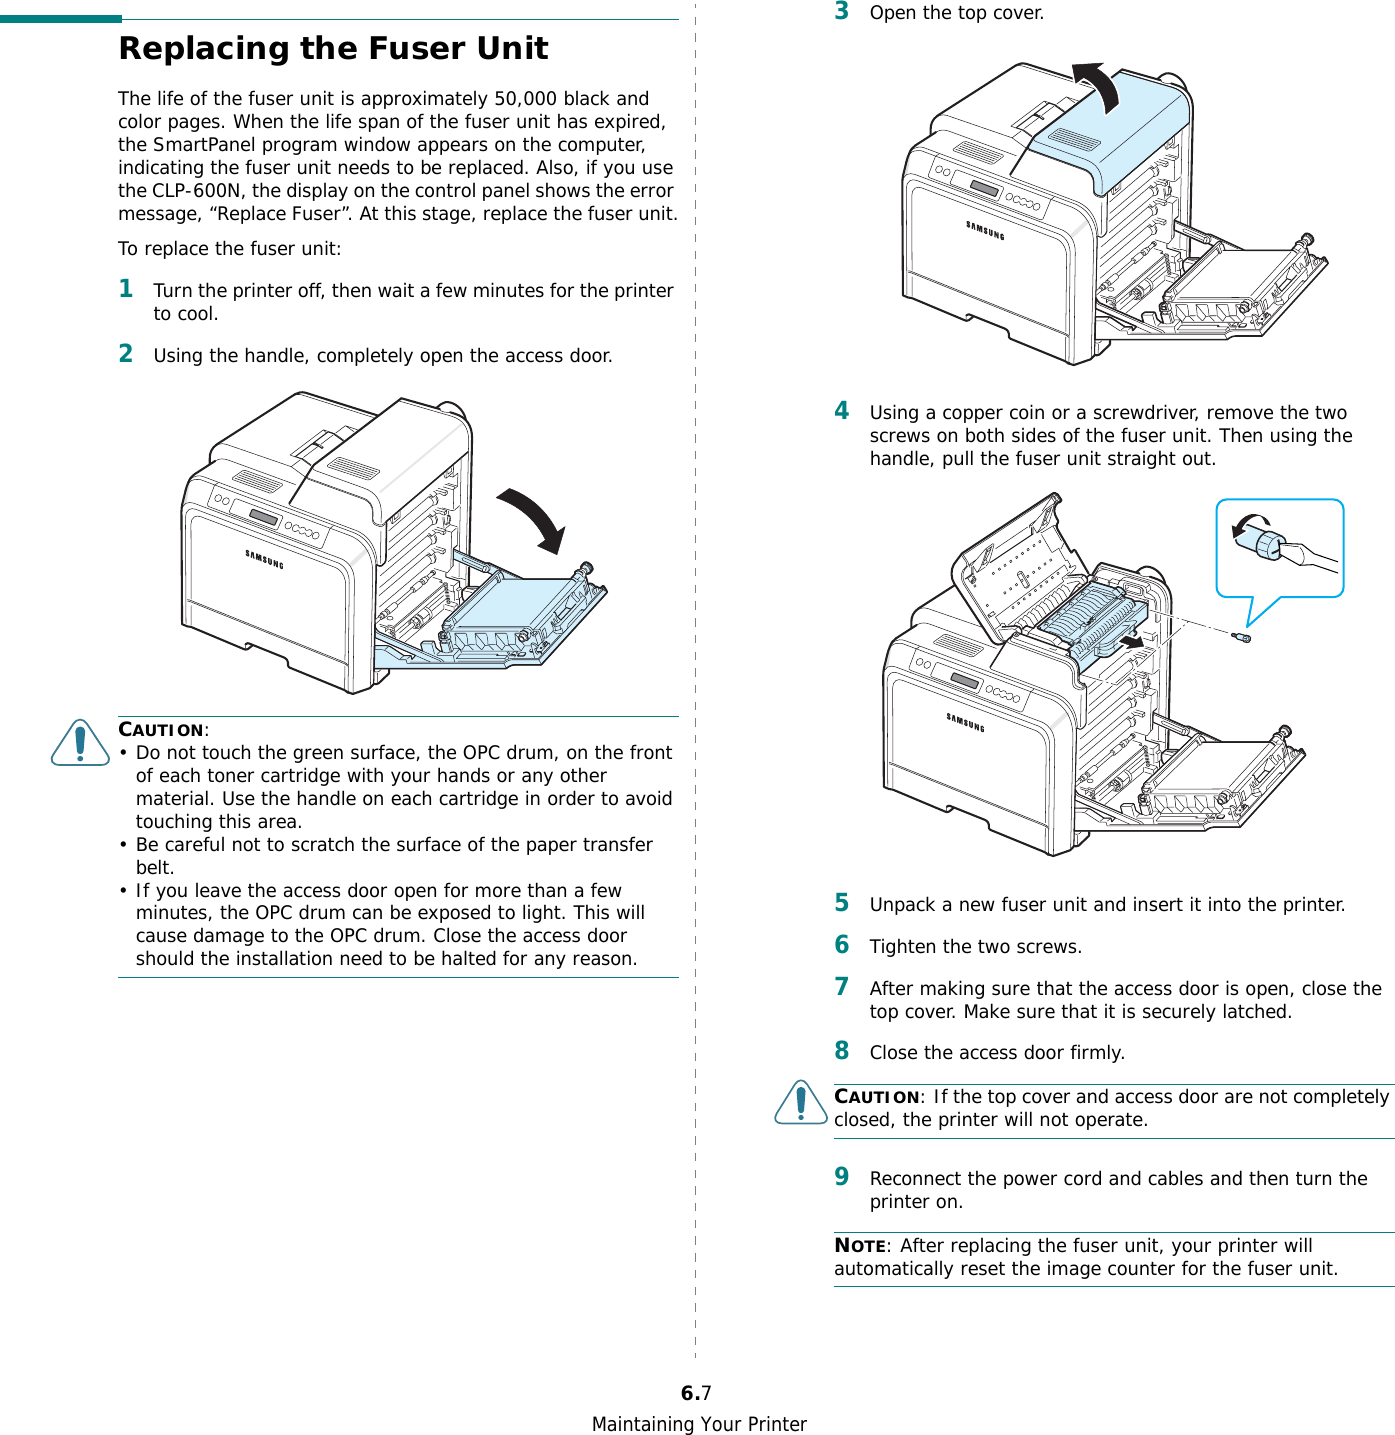
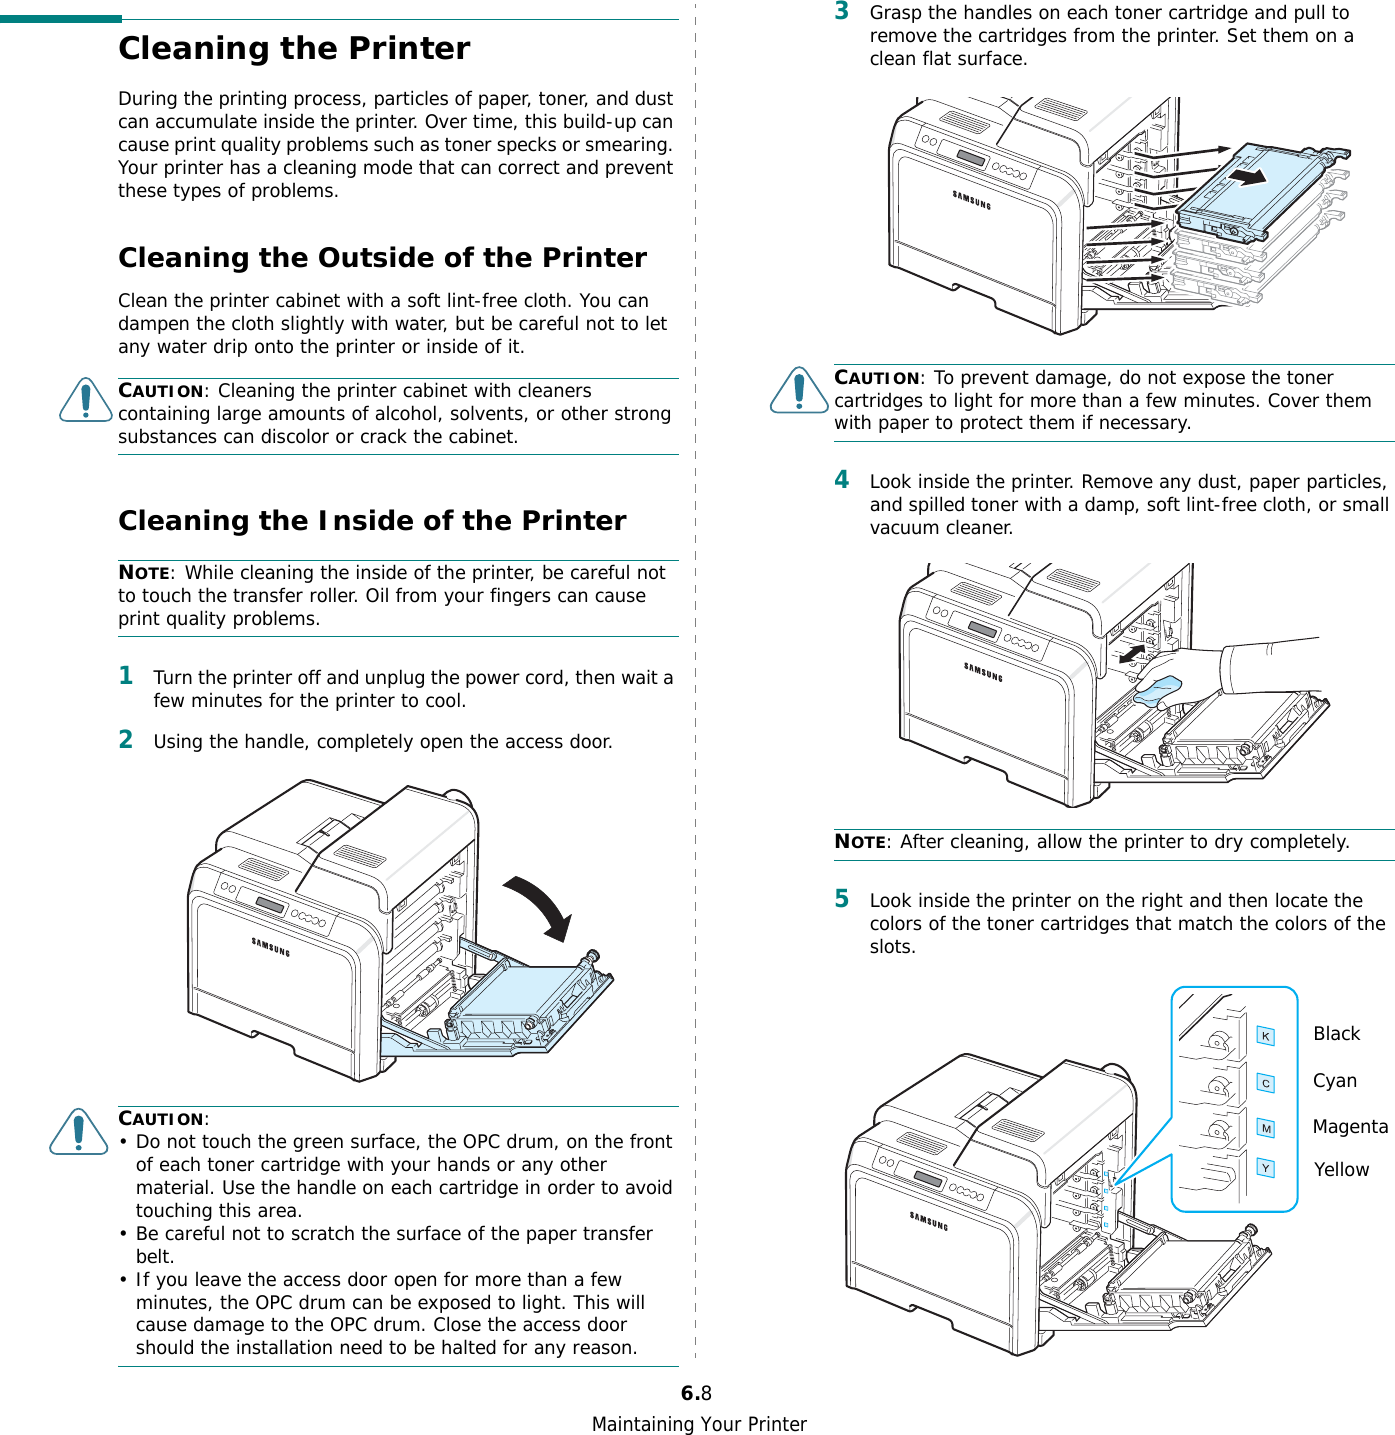
![Maintaining Your Printer6.2Replacing SuppliesFrom time to time, you need to replace the following items to maintain top performance and to avoid print quality problems and paper feed problems resulting from worn parts.The following items should be replaced after you have printed the specified number of pages or when the life span of each item has expired. The SmartPanel program window will appear on the computer, indicating which item needs to be replaced. If you use the CLP-600N, the display on the control panel will also show an error message, indicating which item needs to be replaced. See below.To purchase replacement parts, contact your Samsung dealer or the retailer where you bought your printer. We strongly recommend that items be installed by a trained service professional, except for the toner cartridges (see 6.4), the paper transfer belt (see 6.5), and the fuser unit (see 6.7).Item(s) Printer Message (CLP-600N only) Pages Printed See PageBlack toner cartridge Replace Black Toner Approx. 4,000 pages** Average A4-/letter-sized page count based on 5% coverage of individual col-ors on each page. Usage conditions and print patterns may cause results to vary.6.4Color toner cartridges Replace [Color] Toner Approx. 4,000 pages* 6.4Paper transfer belt Replace Transfer Belt Approx. 35,000 pages**** The number of pages may be affected by operating environment, media type, and media size.6.5Fuser unit Replace Fuser Approx. 50,000 pages 6.7Pick-up roller Replace MP Pick-rollerORReplace Tray 1 Pick-rollerORReplace Tray 2 Pick-rollerApprox. 50,000 pagesManaging Toner CartridgesToner Cartridge StorageTo get the maximum results from a toner cartridge, keep the following guidelines in mind:• Do not remove toner cartridges from their packages until you are ready to use them. • Do not refill toner cartridges. The printer warranty does not cover damage caused by using a refilled cartridge.• Store toner cartridges in the same environment as the printer.• To prevent damage to toner cartridges, do not expose them to light for more than a few minutes.Toner Cartridge Life ExpectancyThe life of a toner cartridge depends on the amount of toner that your print jobs require. When printing text at 5% coverage, the toner cartridges last an average of 4,000 pages for black and each color. The starter toner cartridge supplied with the printer lasts an average of 2,000 pages for black and each color.Redistributing TonerWhen a toner cartridge is low on toner, faded or light areas may appear. It is also possible that colored images may be printed with incorrect colors due to flawed mixing of toner colors when one of the colored toner cartridges is low on toner. The SmartPanel program window appears on the computer telling you which color cartridge is low on toner. Also, if you use the CLP-600N, “Ready [Color] Low Toner” may appear on the display. The printer is able to continue to print using the current toner cartridge until the SmartPanel program window appears on the computer telling you to replace the cartridge, or the control panel displays that message (CLP-600N only). You may be able to temporarily improve print quality by redistributing the toner.](https://usermanual.wiki/Samsung-Electronics-Co/DC60CPS.Users-Manual-1/User-Guide-577474-Page-35.png)
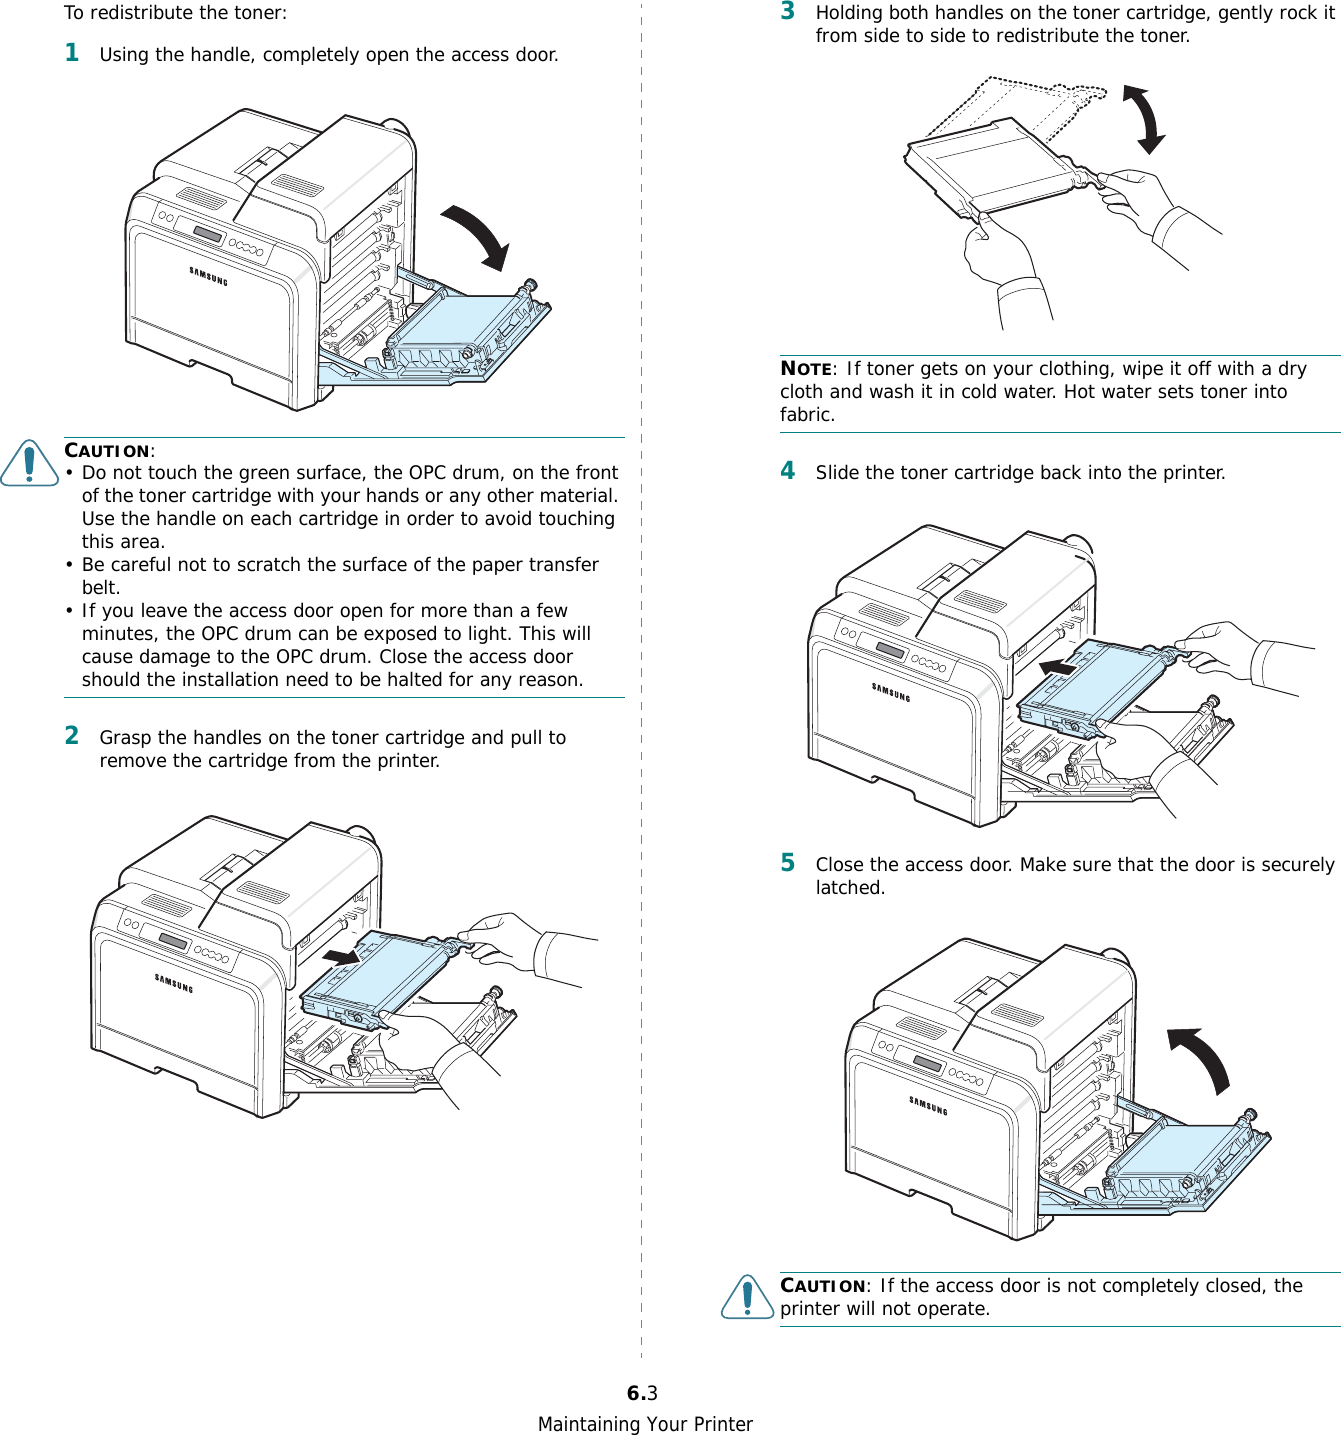
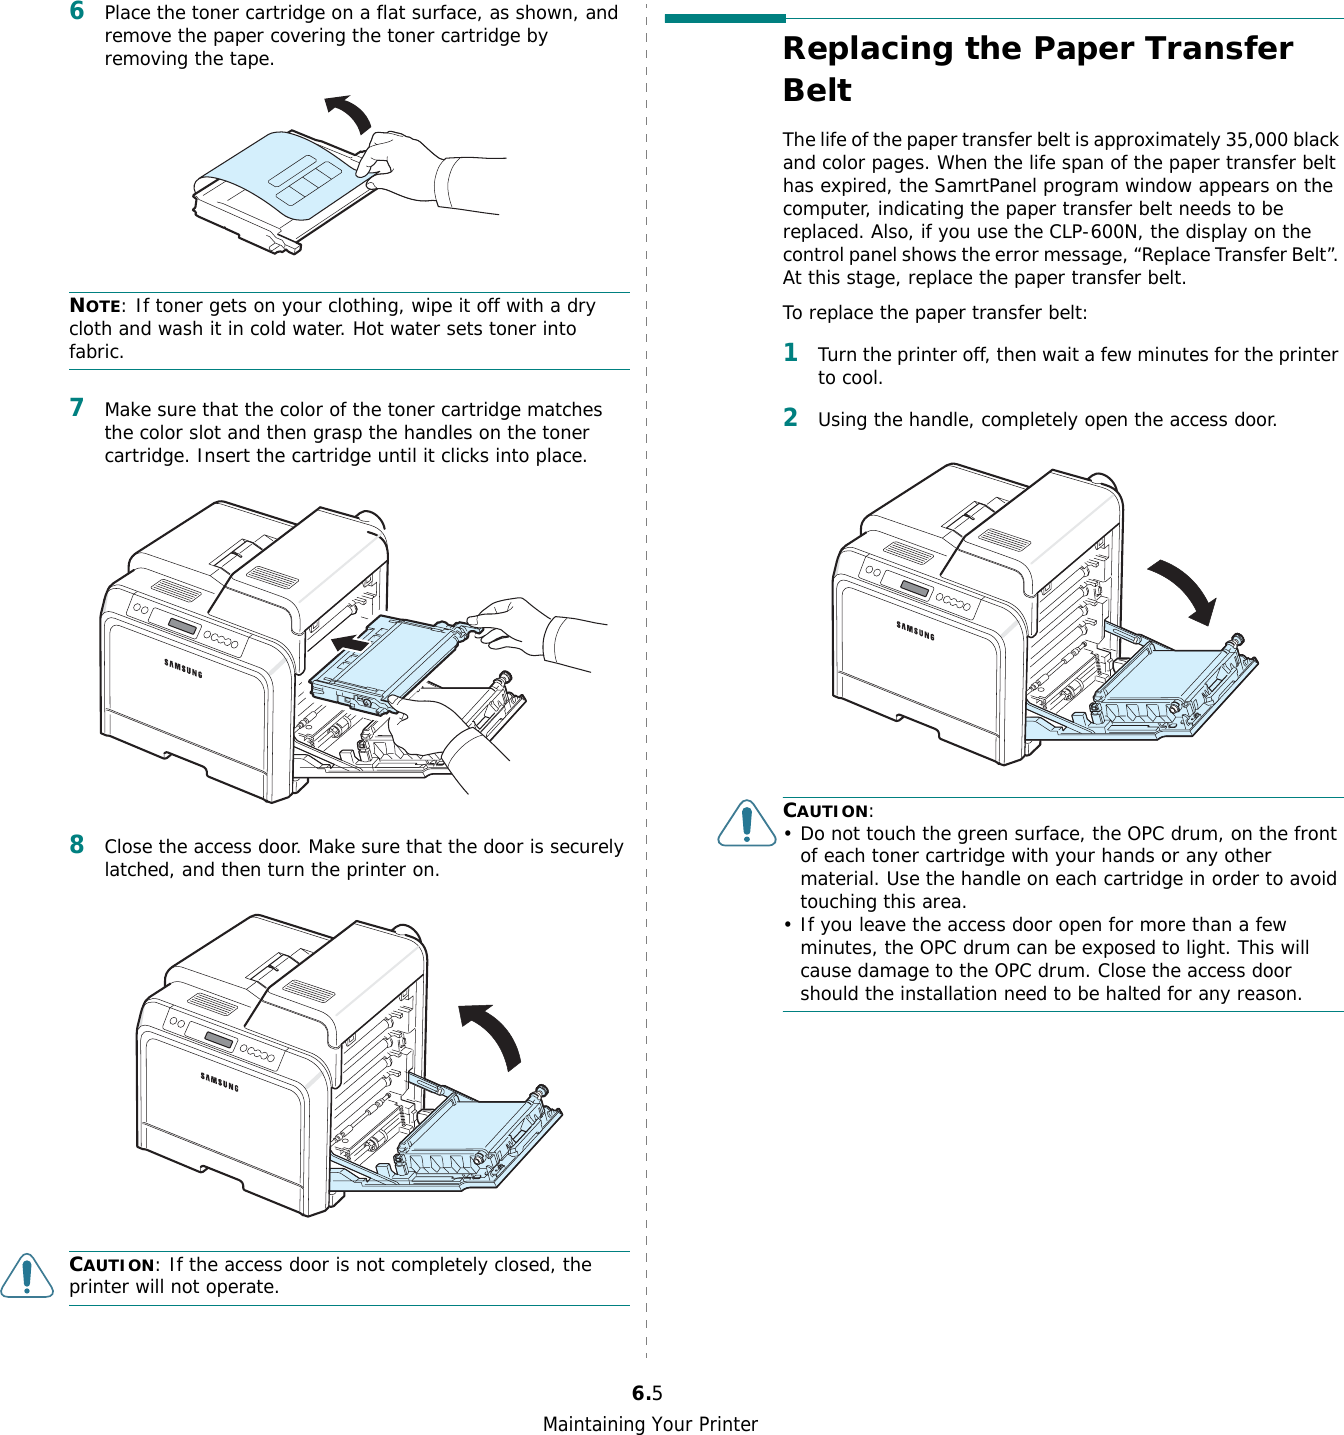
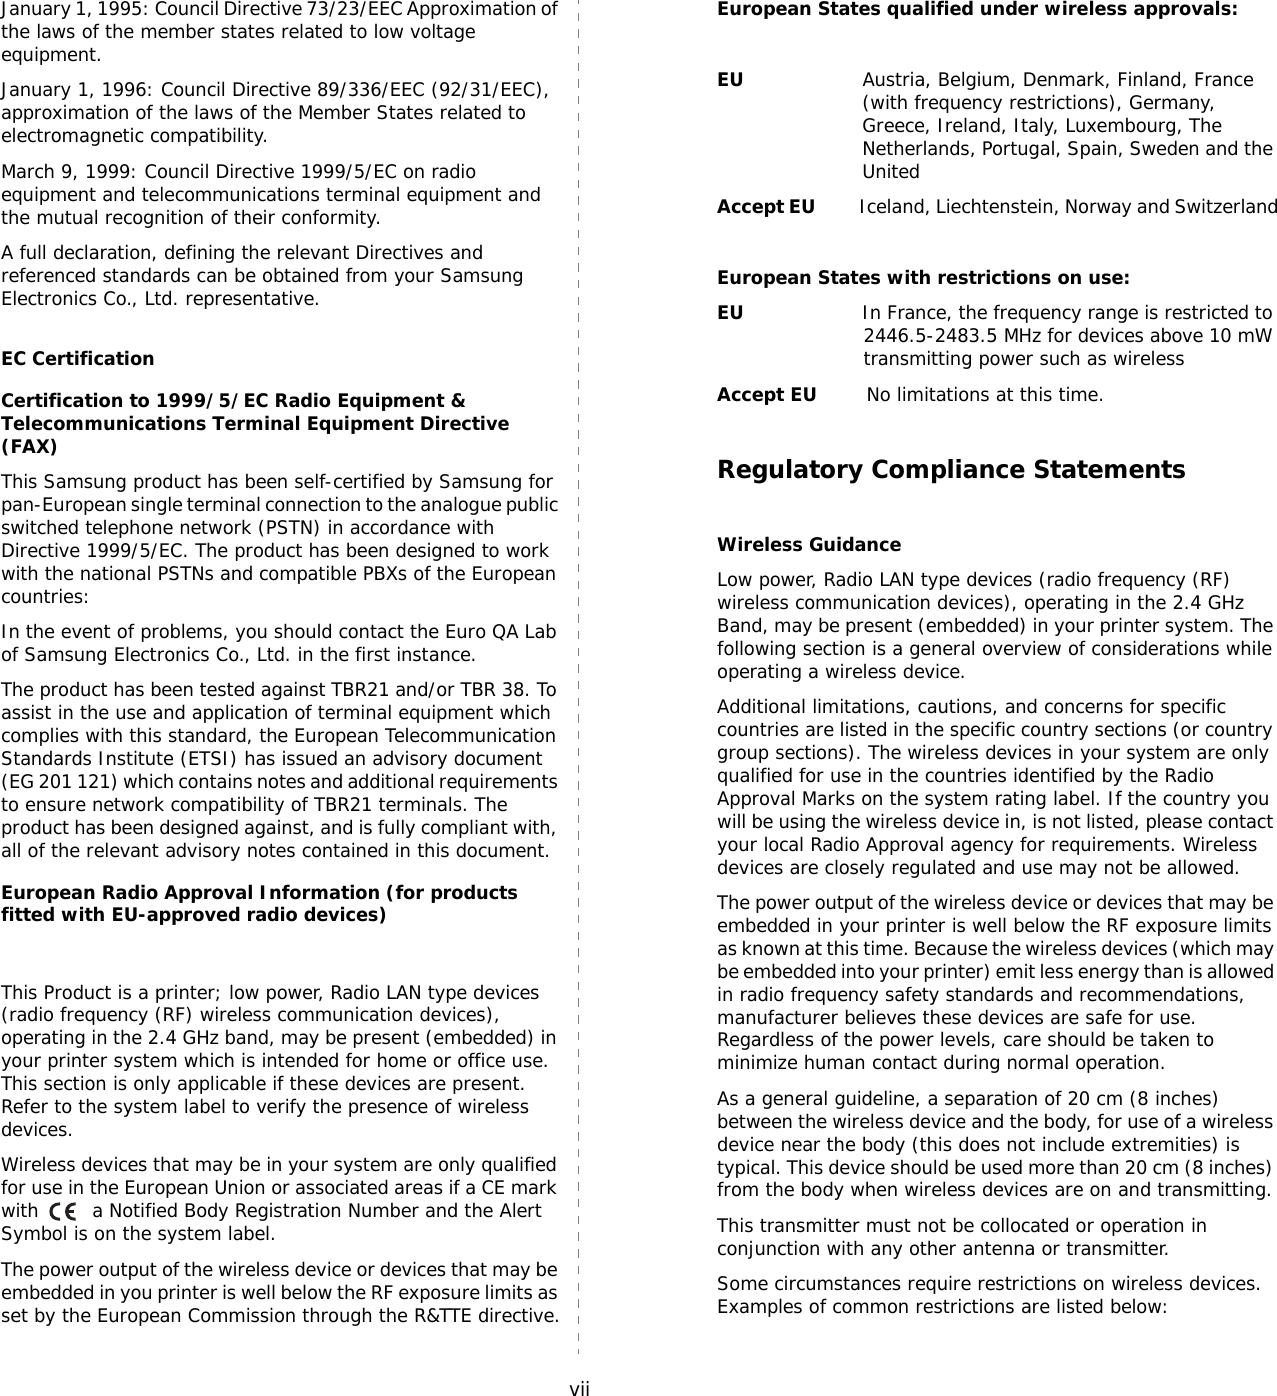
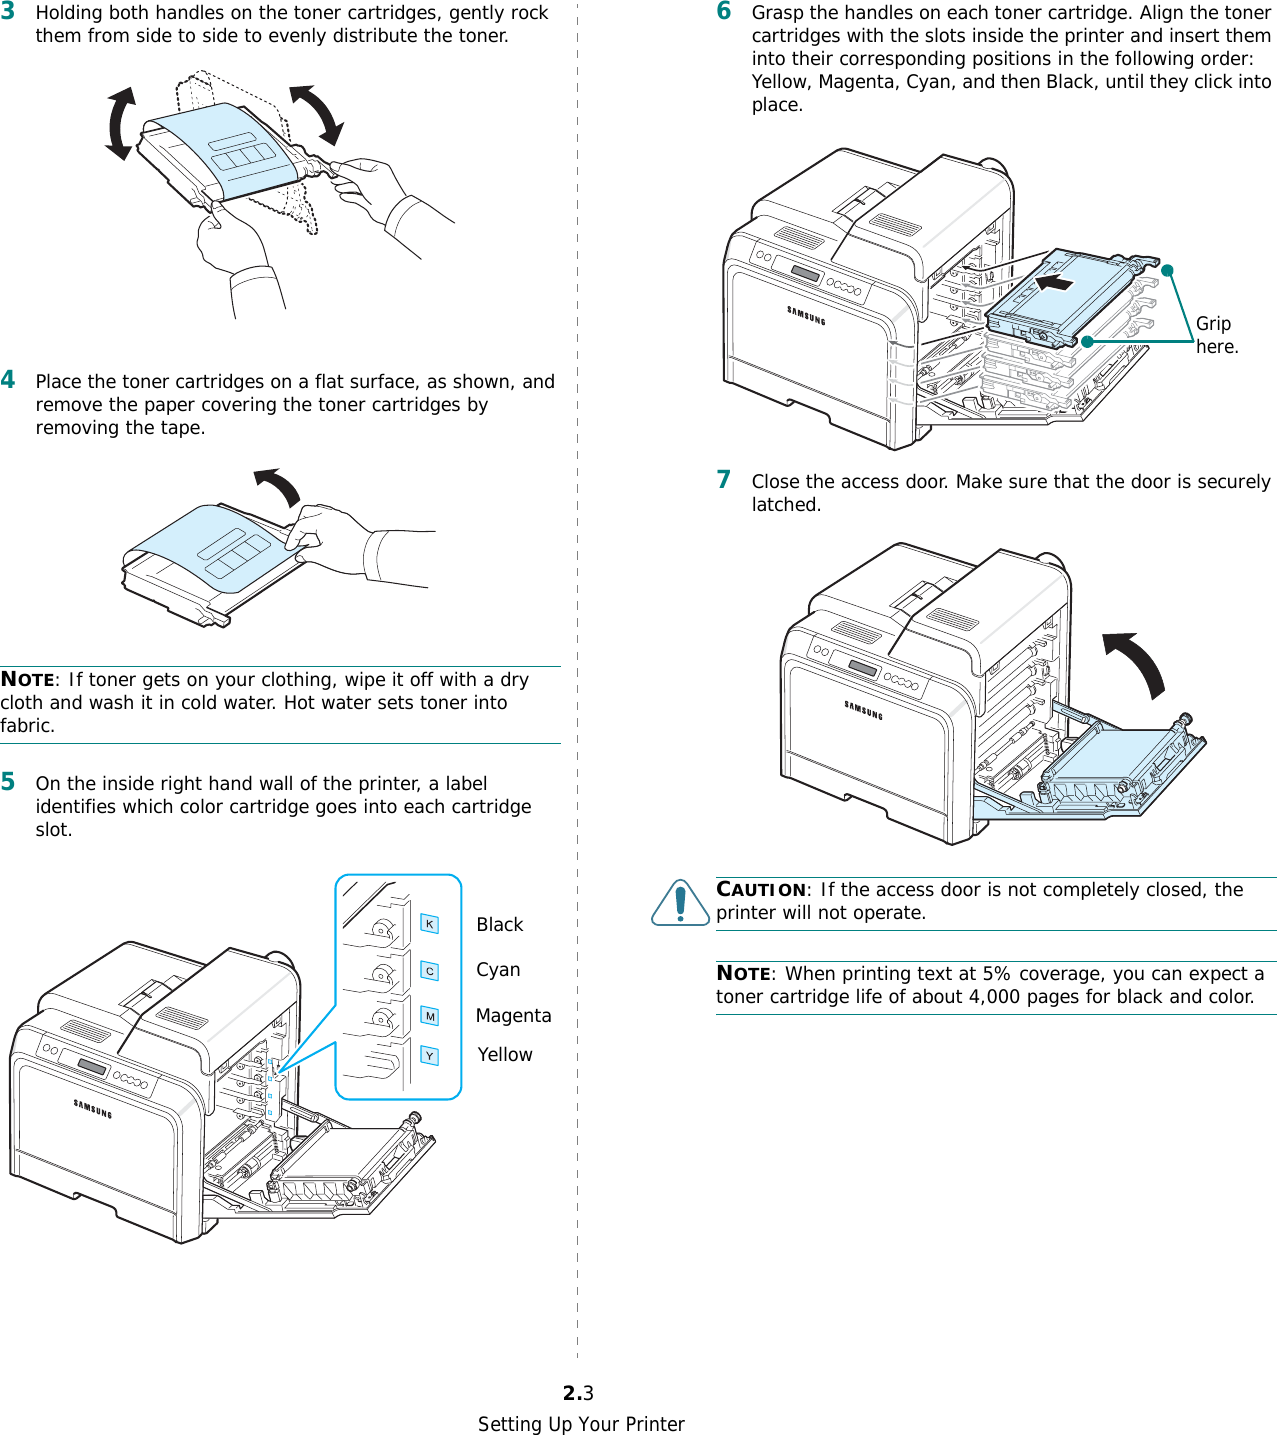
![Maintaining Your Printer6.4Replacing Toner CartridgesThe printer uses four colors and has a different toner cartridge for each one: yellow (Y), magenta (M), cyan (C), and black (K).When the Toner LEDs, ( ) on the control panel, indicating each individual toner cartridge according to its color, turn on, the printer stops printing. Also, if you use the CLP-600N, the display on the control panel shows the error message, “[Color] Toner Empty”. At this stage, replace the toner cartridge in question.To replace the toner cartridge:1Turn the printer off, then wait a few minutes for the printer to cool.2Using the handle, completely open the access door.CAUTION:• Do not touch the green surface, the OPC drum, on the front of each toner cartridge with your hands or any other material. Use the handle on each cartridge in order to avoid touching this area.• Be careful not to scratch the surface of the paper transfer belt.• If you leave the access door open for more than a few minutes, the OPC drum can be exposed to light. This will cause damage to the OPC drum. Close the access door should the installation need to be halted for any reason.3Grasp the handles on the empty toner cartridge and pull to remove the cartridge from the printer.4Take a new toner cartridge out of its package. CAUTION:• Don’t use sharp objects, such as a knife or scissors, to open the toner cartridge package. You could damage the surface of the toner cartridge.• To prevent damage, do not expose the toner cartridge to light for more than a few minutes. Cover it with a piece of paper to protect it if necessary.5Holding both handles on the toner cartridge, gently rock it from side to side to evenly distribute the toner.](https://usermanual.wiki/Samsung-Electronics-Co/DC60CPS.Users-Manual-1/User-Guide-577474-Page-37.png)