Samsung Electronics Co DVDV4800 DVD Player/ Video Cassette Recorder User Manual
Samsung Electronics Co Ltd DVD Player/ Video Cassette Recorder Users Manual
UserManual.wiki
>
Samsung Electronics Co
>
DVDV4800 User Manual
Users Manual
Navigation menu
Upload a User Manual
Namespaces
Wiki Guide
HTML
PDF
Info
Views
User Manual
Discussion / Help
Navigation
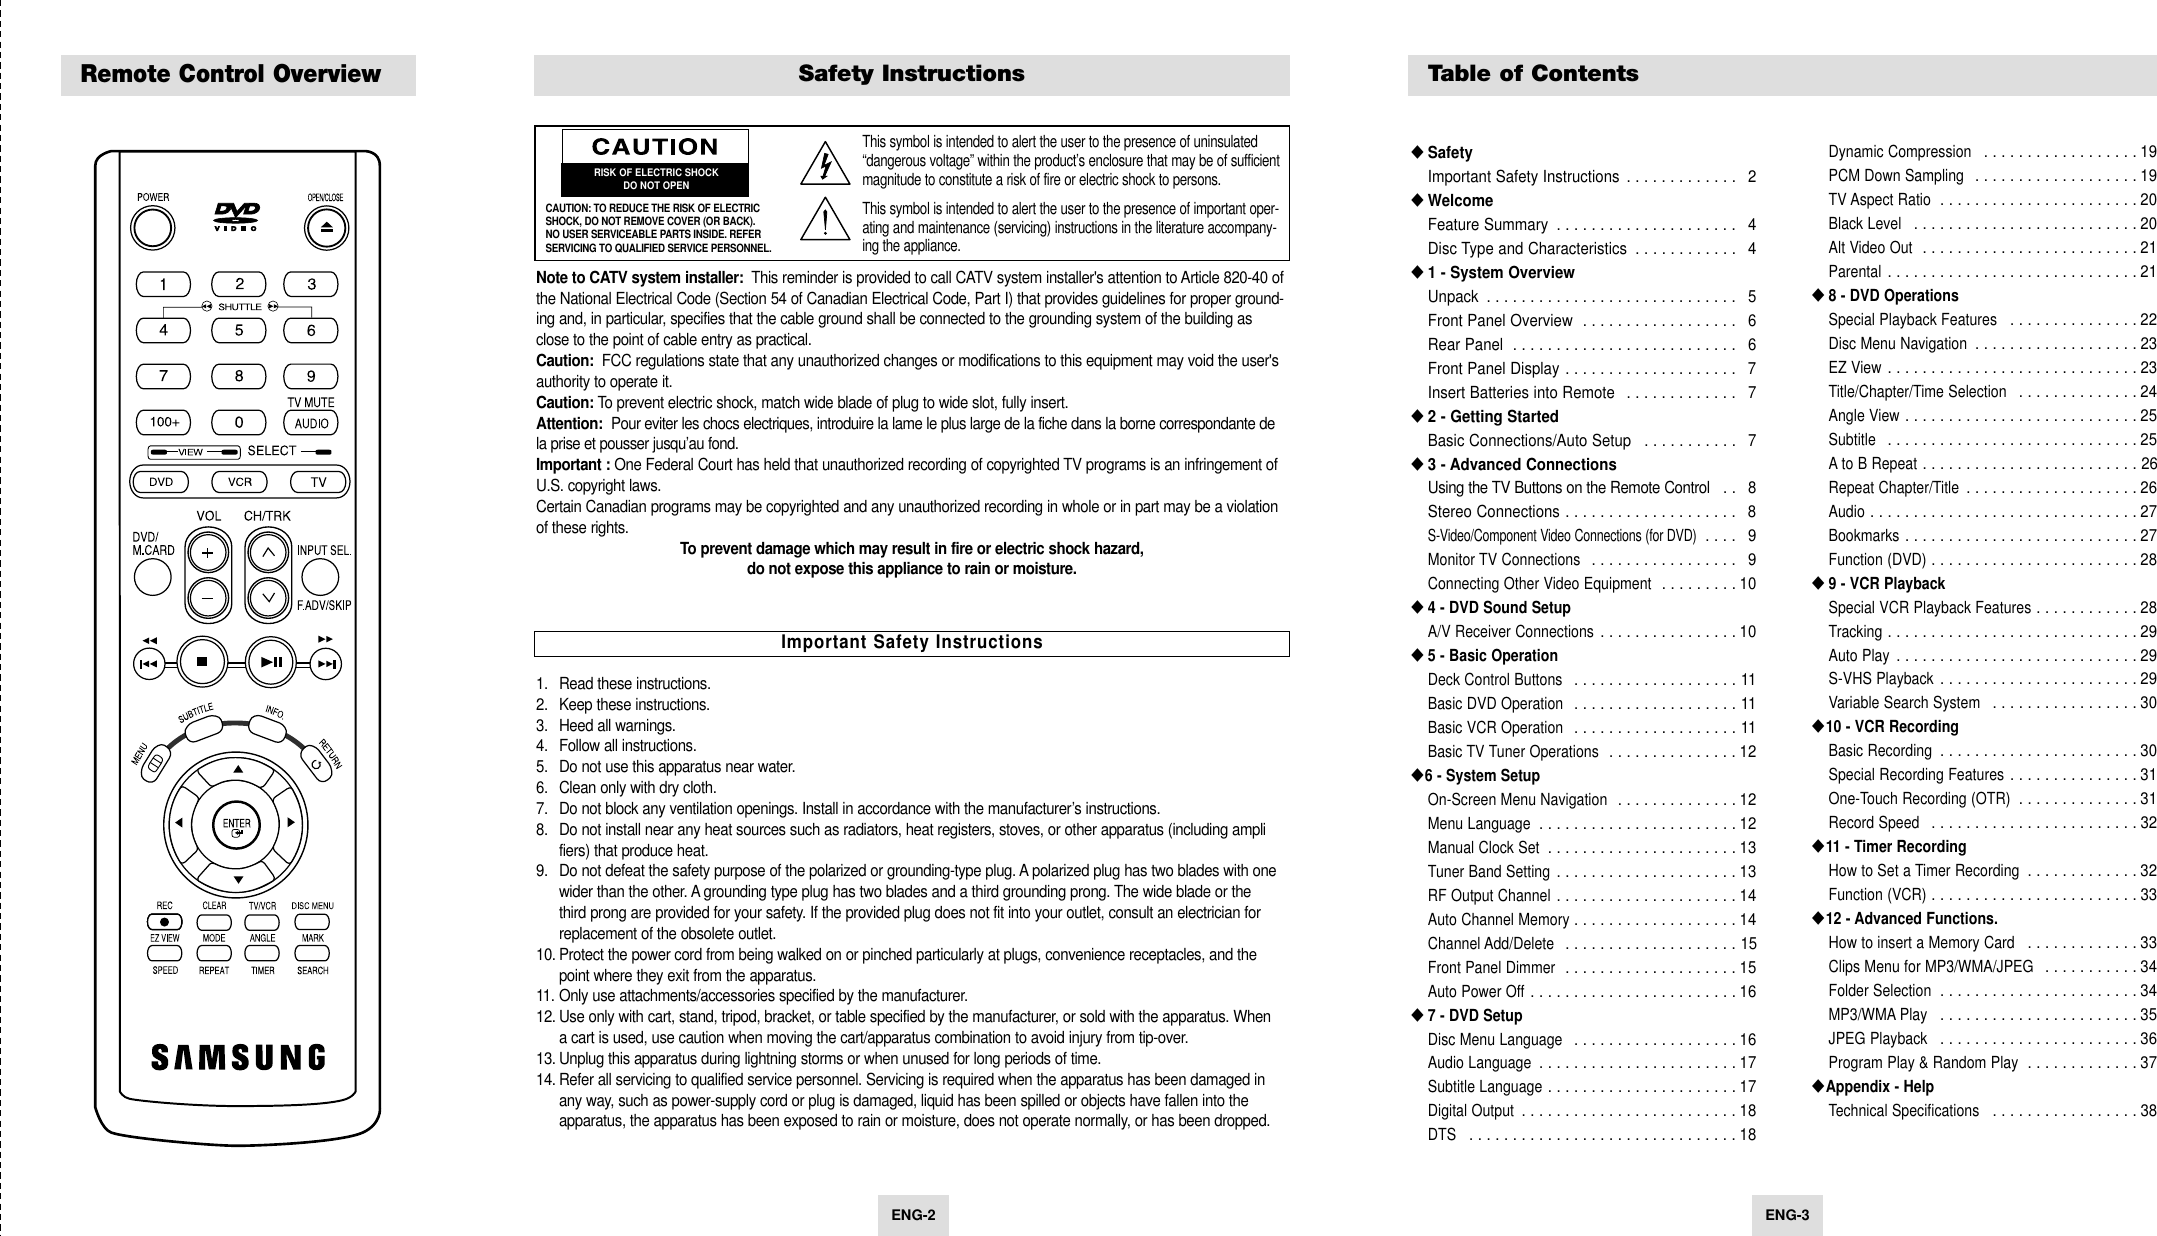

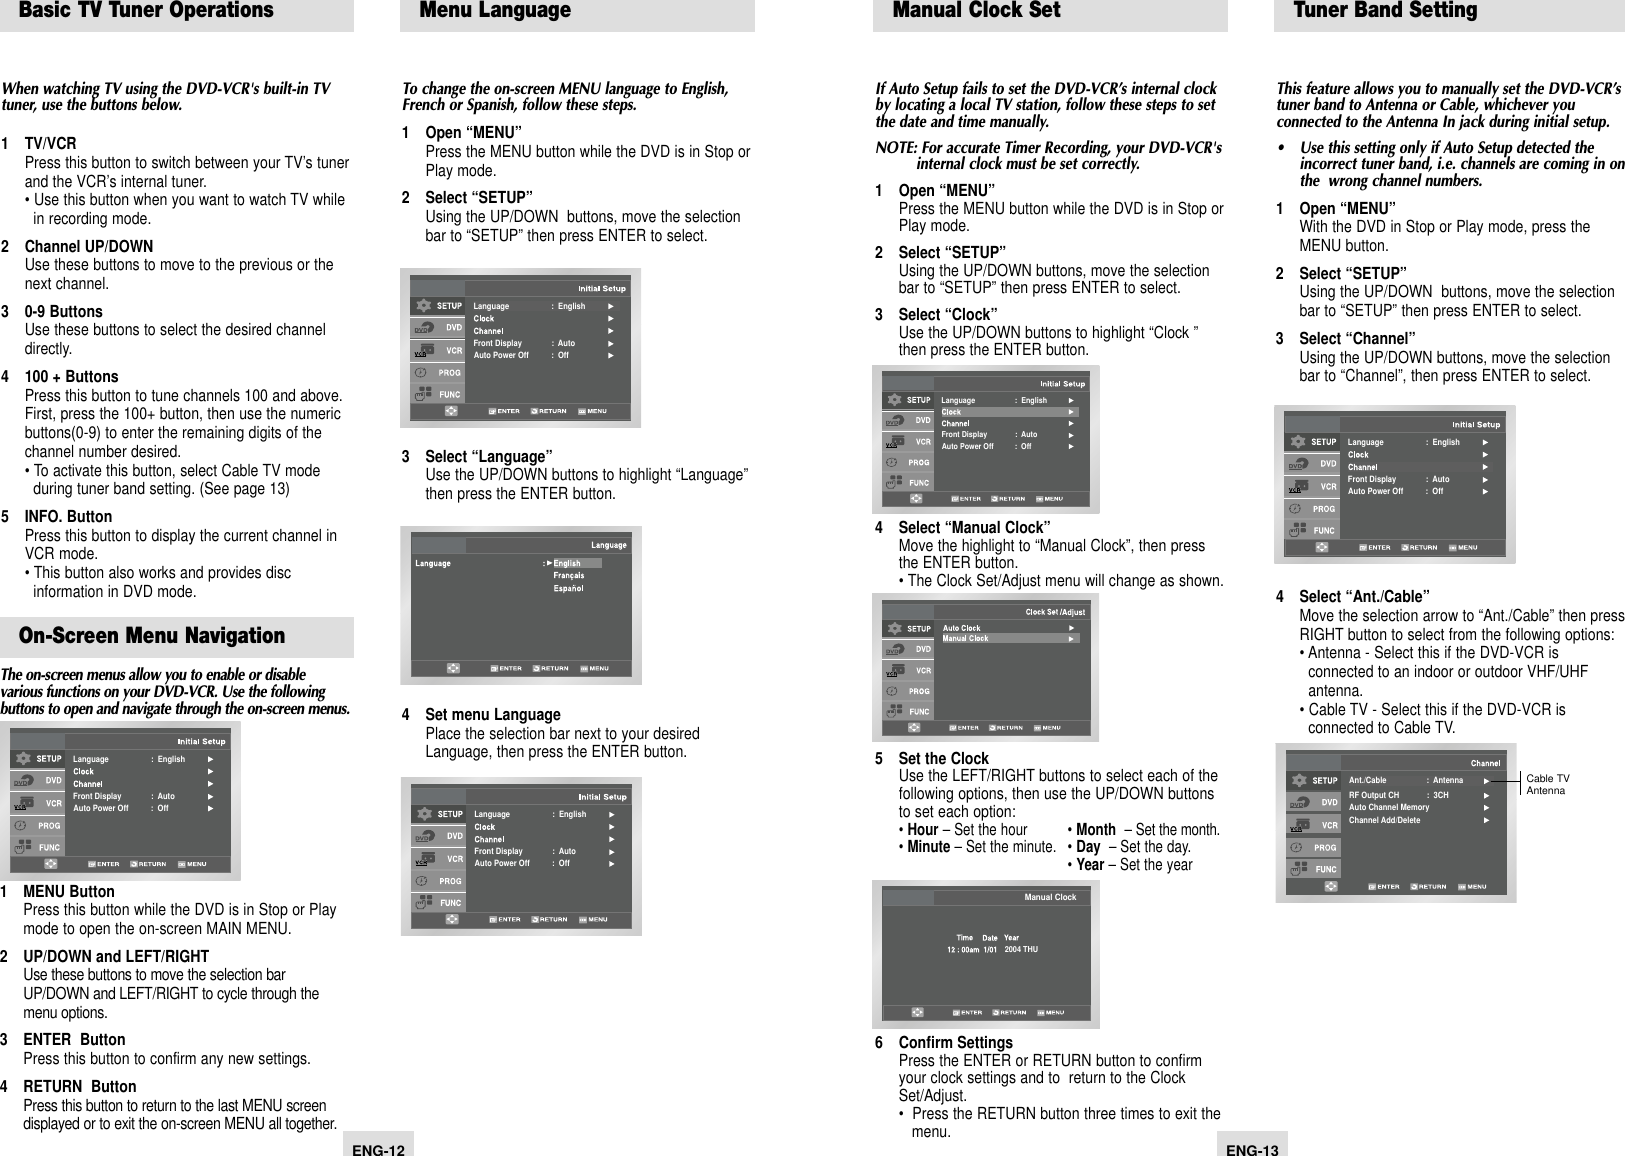
![ENG-15ENG-14Channel Add/DeleteUse this feature if Auto Channel Search missed achannel that you would like to add or delete.1 Open “MENU”With the DVD in Stop or Play mode, press the MENU button.2 Select “SETUP”Using the UP/DOWN buttons, move the selection bar to “SETUP” then press ENTER to select.3 Select “Channel”Using the UP/DOWN buttons, move the selection bar to “Channel”, then press ENTER to select.4 Select “Channel Add/Delete”Move the selection bar to “Channel Add/Delete,” then press ENTER to select.5 Select Channel to Add/DeleteUse the CH / ❷buttons to tune in the channel number you wish to add or delete.6 Select “Channel Add/Delete”Press RIGHT button to add or press left button to delete the channel from your channel list.• Repeat steps 4 and 5 to add or delete additional channels. Ant./Cable : AntennaRF Output CH : 3CHAuto Channel MemoryChannel Add/DeleteCHANNEL ADD/DELETESelect channel : [02]and press [❿] to ADDpress [➛] to DELETERETURN CH ❷Language : EnglishFront Display : AutoAuto Power Off : Off Auto Channel MemoryAuto Channel Memory will automatically seek and storeall active channels in your area.1 Open “MENU”With the DVD in Stop or Play mode, press the MENU button. 2 Select “SETUP”Using the UP/DOWN buttons, move the selection bar to “SETUP” then press ENTER to select.3 Select “Channel”Using the UP/DOWN buttons, move the selection bar to “Channel”, then press ENTER to select.4 Run “Auto channel memory”Move the selection arrow to “Auto Channel Memory,” then press ENTER to select.• The DVD-VCR will automatically search for all available channels in the selected Tuner Band. This procedure may take a few minutes to complete.• When finished, the lowest channel found will be displayed. Ant./Cable : AntennaRF Output CH : 3CHAuto Channel MemoryChannel Add/DeleteLanguage : EnglishFront Display : AutoAuto Power Off : Off RF Output ChannelUse this feature if DVD-VCR is connected to TV usingRF antenna cable.1 Open “MENU”With the DVD in Stop or Play mode, press the MENU button.2 Select “SETUP”Using the UP/DOWN buttons, move the selection bar to “Setup” then press ENTER to select.3 Select “Channel”Using the UP/DOWN buttons, move the selection bar to “Channel,” then press ENTER to select.4 Select “RF Output CH”Move the selection bar to “RF Output CH”, then press right to change.5 Change “RF Output CH”A message will appear on your TV.Then press ENTER to change.6 Change “TV Channel”A message will appear on your TV. When the message disappears, change your TV to channel 3 or 4 to match the RF output channel of the player.Language : EnglishFront Display : AutoAuto Power Off : Off Ant./Cable : AntennaRF Output CH : 3CHAuto Channel MemoryChannel Add/Delete3CH4CHFront Panel DimmerYou can set the Front Panel Display to be bright all thetime, dim all the time, dim during power off.1 Open “ MENU”With the DVD in Stop or Play mode, press the MENU button. 2 Select “SETUP”Using the UP/DOWN buttons, move the selection bar to “SETUP” then press ENTER to select.3 Set “Front Display”Move the selection bar to “Front Display,” then press RIGHT button to select from the following options:• Auto – Front Panel Display will dim automatically during power off.• Bright – Front Panel Display will be bright all the time.• Dim – Front Panel Display will be dim all the time.Language : EnglishFront Display : AutoAuto Power Off : Off AutoBrightDimFront Display : AutoAuto Power Off : Off Language : English](https://usermanual.wiki/Samsung-Electronics-Co/DVDV4800/User-Guide-423567-Page-8.png)
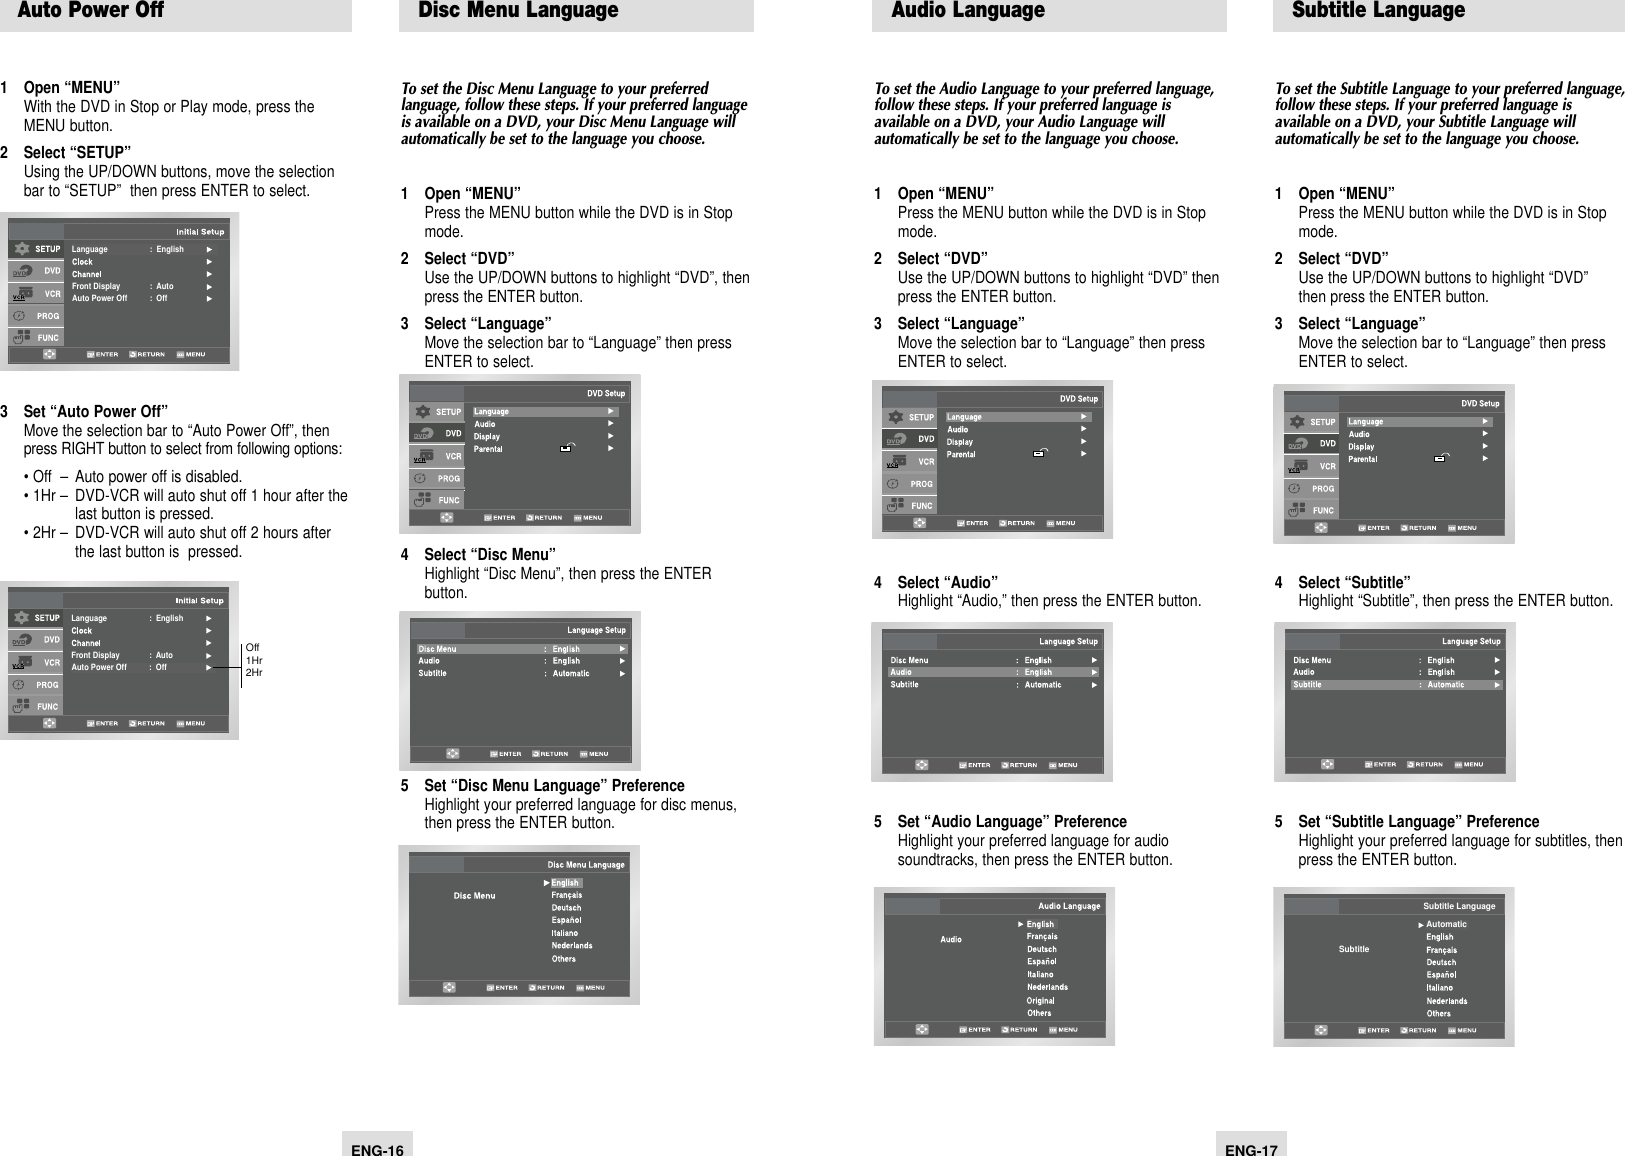

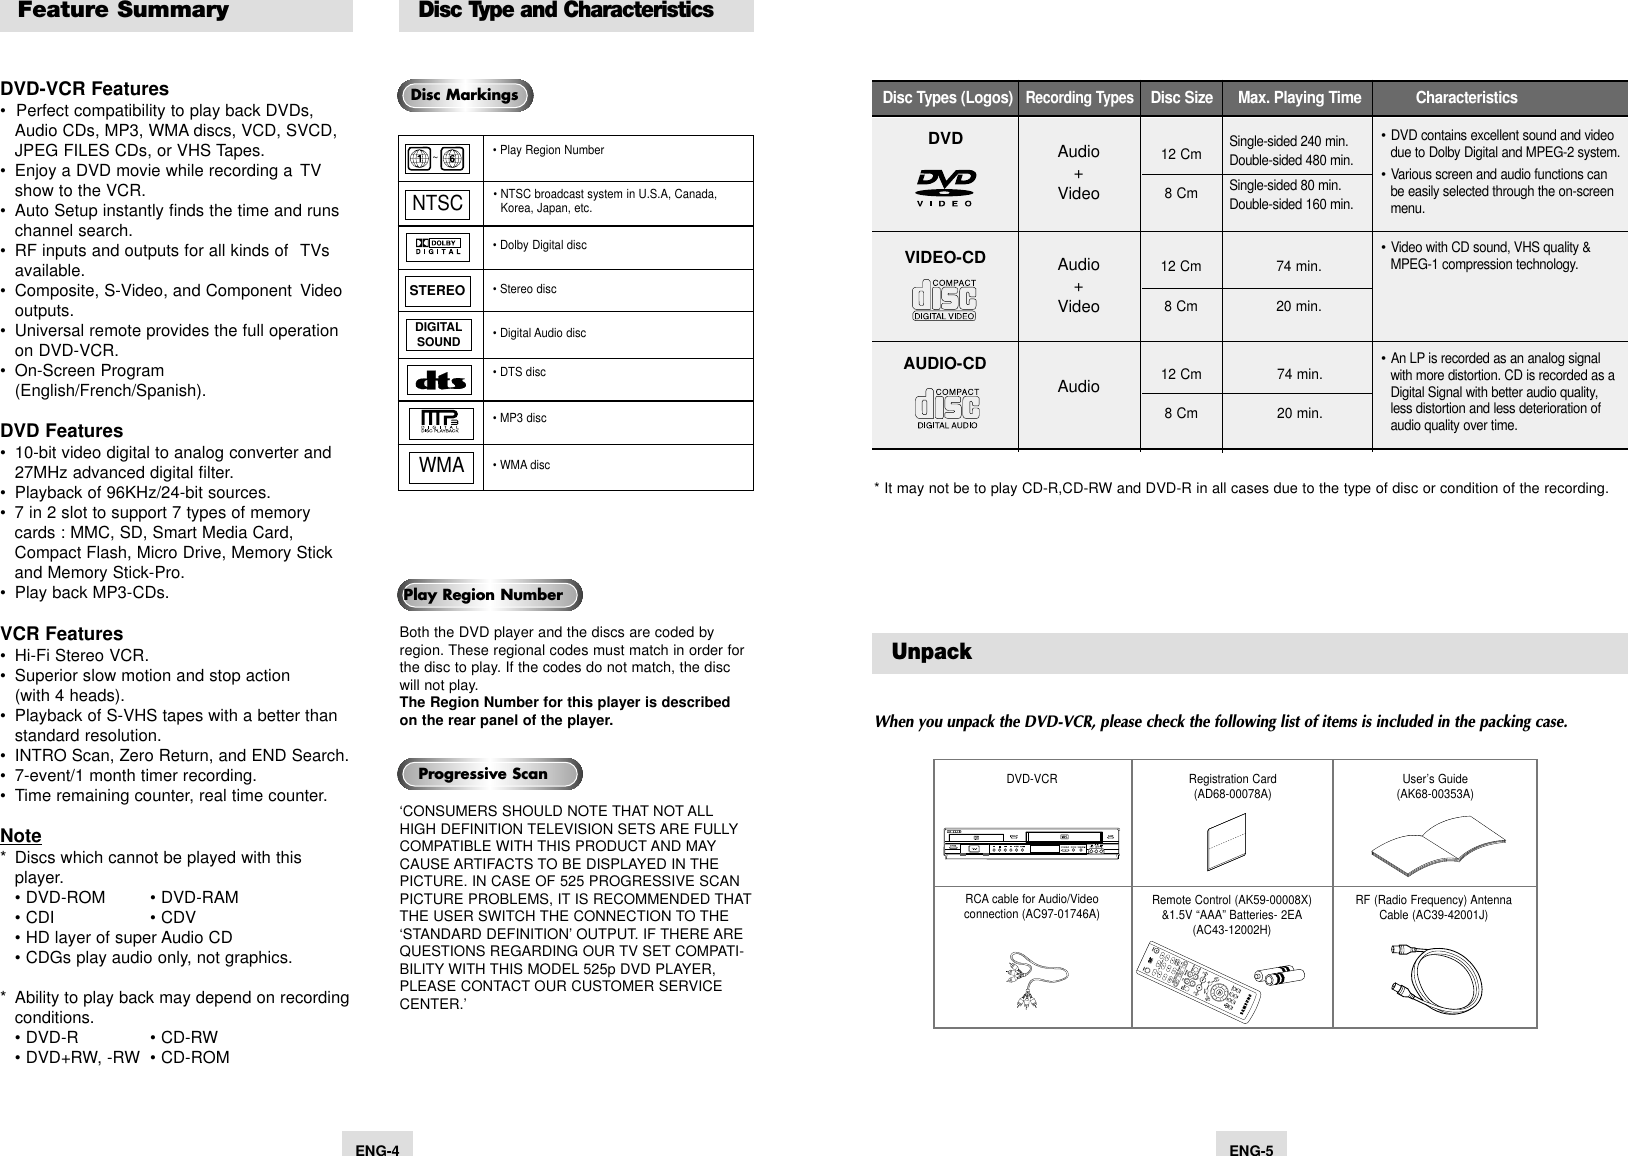
![4 Select “Auto Play”Move the selection bar to “Auto Play,” then press right button to select from the following options:• On - The VCR will automatically begin playing a video tape when it is inserted, as long as the safety tab of the cassette has been removed.• Off - Auto play is disabled.5 Select “Auto Repeat”Move the selection bar to “ Auto Repeat”. It sets theVCR to play a tape repeatedly [unless a tape control is activated (stop, fast forward or rewind)].If you want your videotapes to play automatically whenyou insert them, turn on Auto Play.NOTE: Only tapes that are missing the Record Safety Tab will play automatically when inserted.1 Open the “MENU”With the VCR in Stop or Play mode, press the MENU button.2 Select “VCR”Using the UP/DOWN buttons, move the selection bar to “VCR” then press ENTER to select.3 Select “Tape Length”Press the RIGHT button to select the Tape Length. This information is usually printed on the tape box. The menu cycles through: T-120, T-160 or T-180. Once the type of cassette is set, the VCR can display the amount of time remaining on the tape when you press the INFO. button.TrackingThe Tracking adjustment removes the white lines thatsometimes appear during playback because of slightdifferences in recording decks. The TRK button willautomatically align the recorded tracks with theplayback heads to solve this problem. You may also settracking manually.1 Adjust Tracking ManuallyDuring playback, press the CH/TRK / buttons to remove white lines from the picture.ENG-29Special VCR Playback FeaturesWhile a videotape is playing, you can enjoy a variety ofspecial playback features, including Still, FrameAdvance, Skip, Repeat, and more. Press the Play buttonagain to resume normal playback.1 PauseIn Play mode, press ❿ll(PLAY/PAUSE) to still a single frame.2 Frame Advance In the pause mode, press F.ADV/SKIP to advance to the next frame. 3 Fps/ReviewIn Play mode, press FORWARD (❿❿) orREWIND (➛➛) to Cue/Review at two speeds:• Picture Search — Press and release to advance the tape forward or backward at 5 times normal speed.• Jet Search — Press and hold to advance the tapeforward or backward at 7 times normal speed.4 SkipIn Play mode, press F.ADV/SKIP to cue ahead exactly 30 seconds. Press F.ADV/SKIP repeatedly up to 4 times to cue ahead 2 minutes.5 Repeat• In Play mode, press Repeat to review the last 5 seconds of tape (SP mode).• In Play mode, press Repeat to review the last 15 seconds of tape (SLP mode).6 ShuttleIn Play mode, Shuttle >> gradually increases the cue speed: Double Speed playback - Picture Search - Jet Search. Shuttle << gradually slows down speed: Slow mode – Still mode – Reverse Picture Search – Reverse Jet Search.Press the INFO. button to see the current status ofthe VCR deck, as well as the tape counter positionand record speed.Title MenuDisc MenuInformationZoomBookmarkRepeatEZ ViewDVD FunctionPLAY0:00:00 SPENG-28Function (DVD)Use this feature to check your DVD. 1 Open “MENU”With the DVD in Play mode, press the MENU button.2 Select “FUNCTION”Use the UP/DOWN buttons to highlight “FUNCTION” then press the ENTER button.3 Select “DVD Function”Using the UP/DOWN buttons to highlight “DVD Function” then press ENTER to select.4 Select “Title Menu”Highlight “Title Menu”, then press the ENTER button.- Disc MenuHighlight “ Disc Menu”, then press the ENTER button.- InformationHighlight “Information”, then press the ENTER button.- ZoomHighlight “Zoom”, then press the ENTER button.- BookmarkHighlight “Bookmark”, then press the ENTER button.- RepeatHighlight “Repeat”, then press the ENTER button.- EZ ViewHighlight “EZ View”, then press the ENTER button.Title MenuDisc MenuInformationZoomBookmarkRepeatEZ ViewDVD FunctionAuto PlaynT-120T-160T-180nOnOffnOffOnS-VHS PlaybackThe DVD-VCR allows you to playback high quality S-VHS tapes.1 Insert a S-VHS TapeInsert an S-VHS tape into the VCR deck.2 Start PlaybackPress ❿ll(PLAY/PAUSE) on the remote control to begin playback of the S-VHS tape.](https://usermanual.wiki/Samsung-Electronics-Co/DVDV4800/User-Guide-423567-Page-15.png)
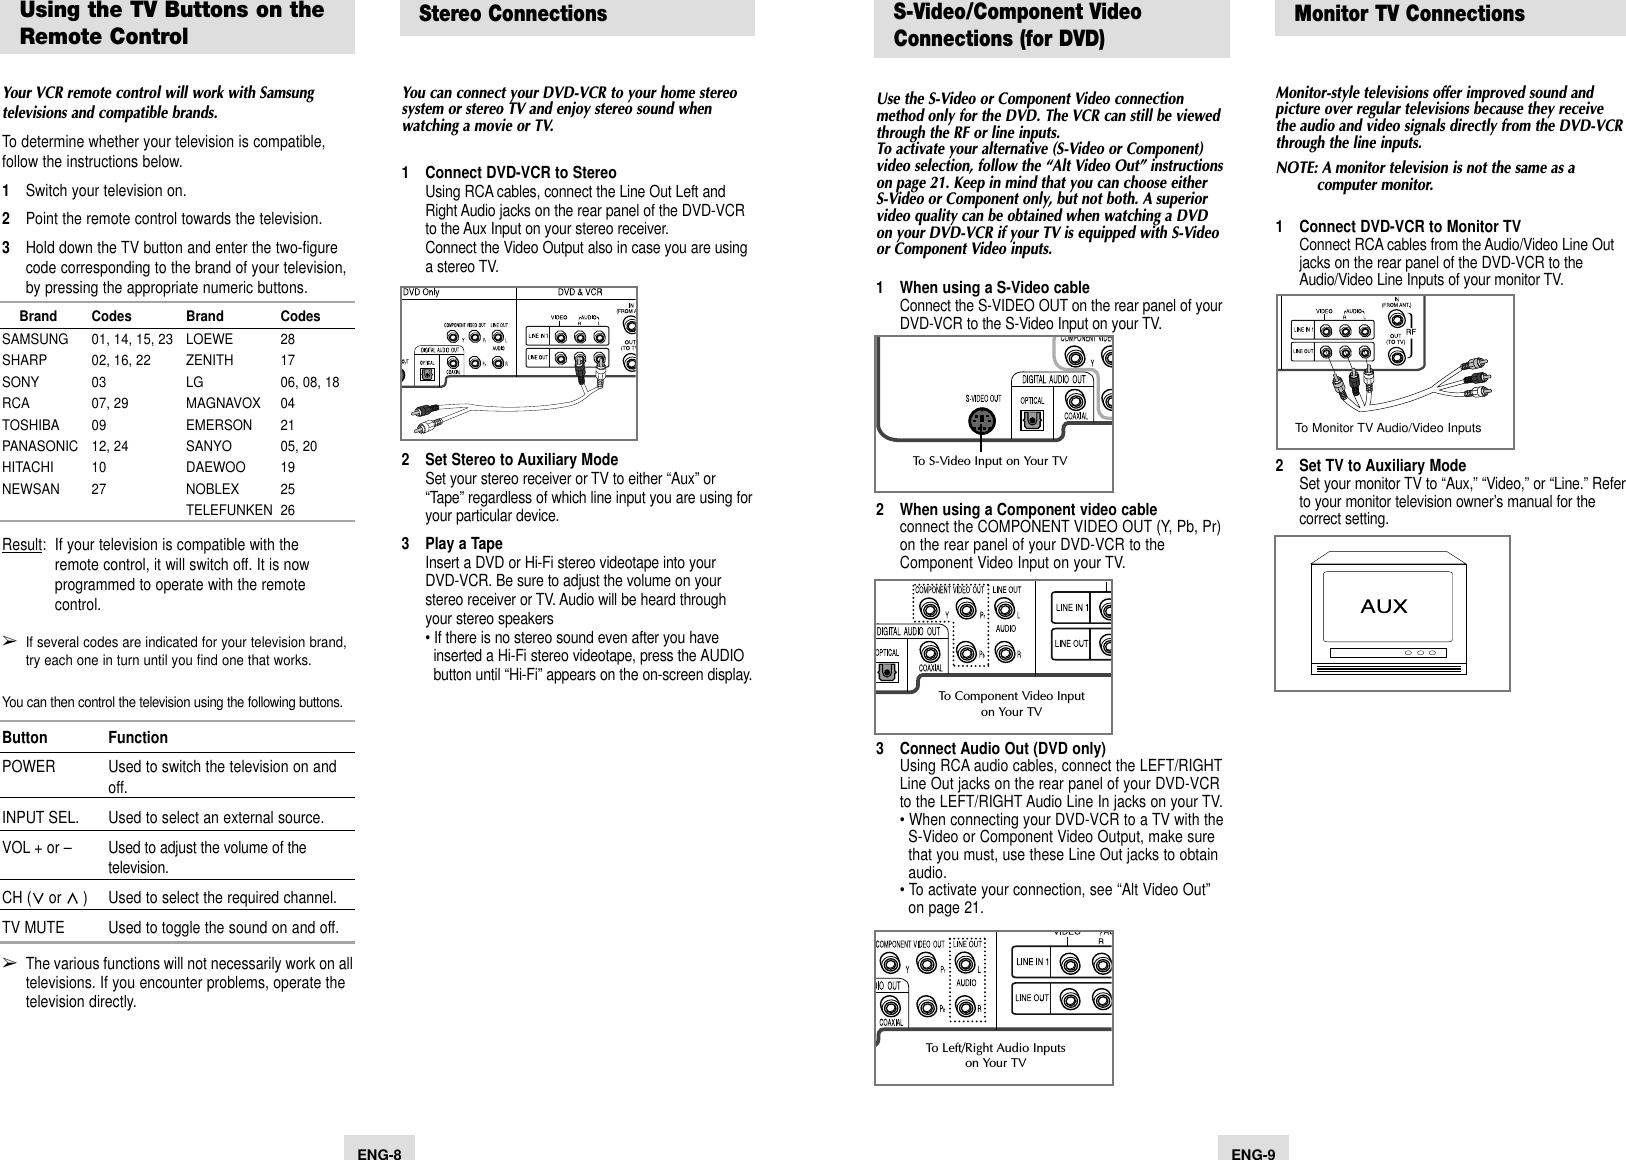
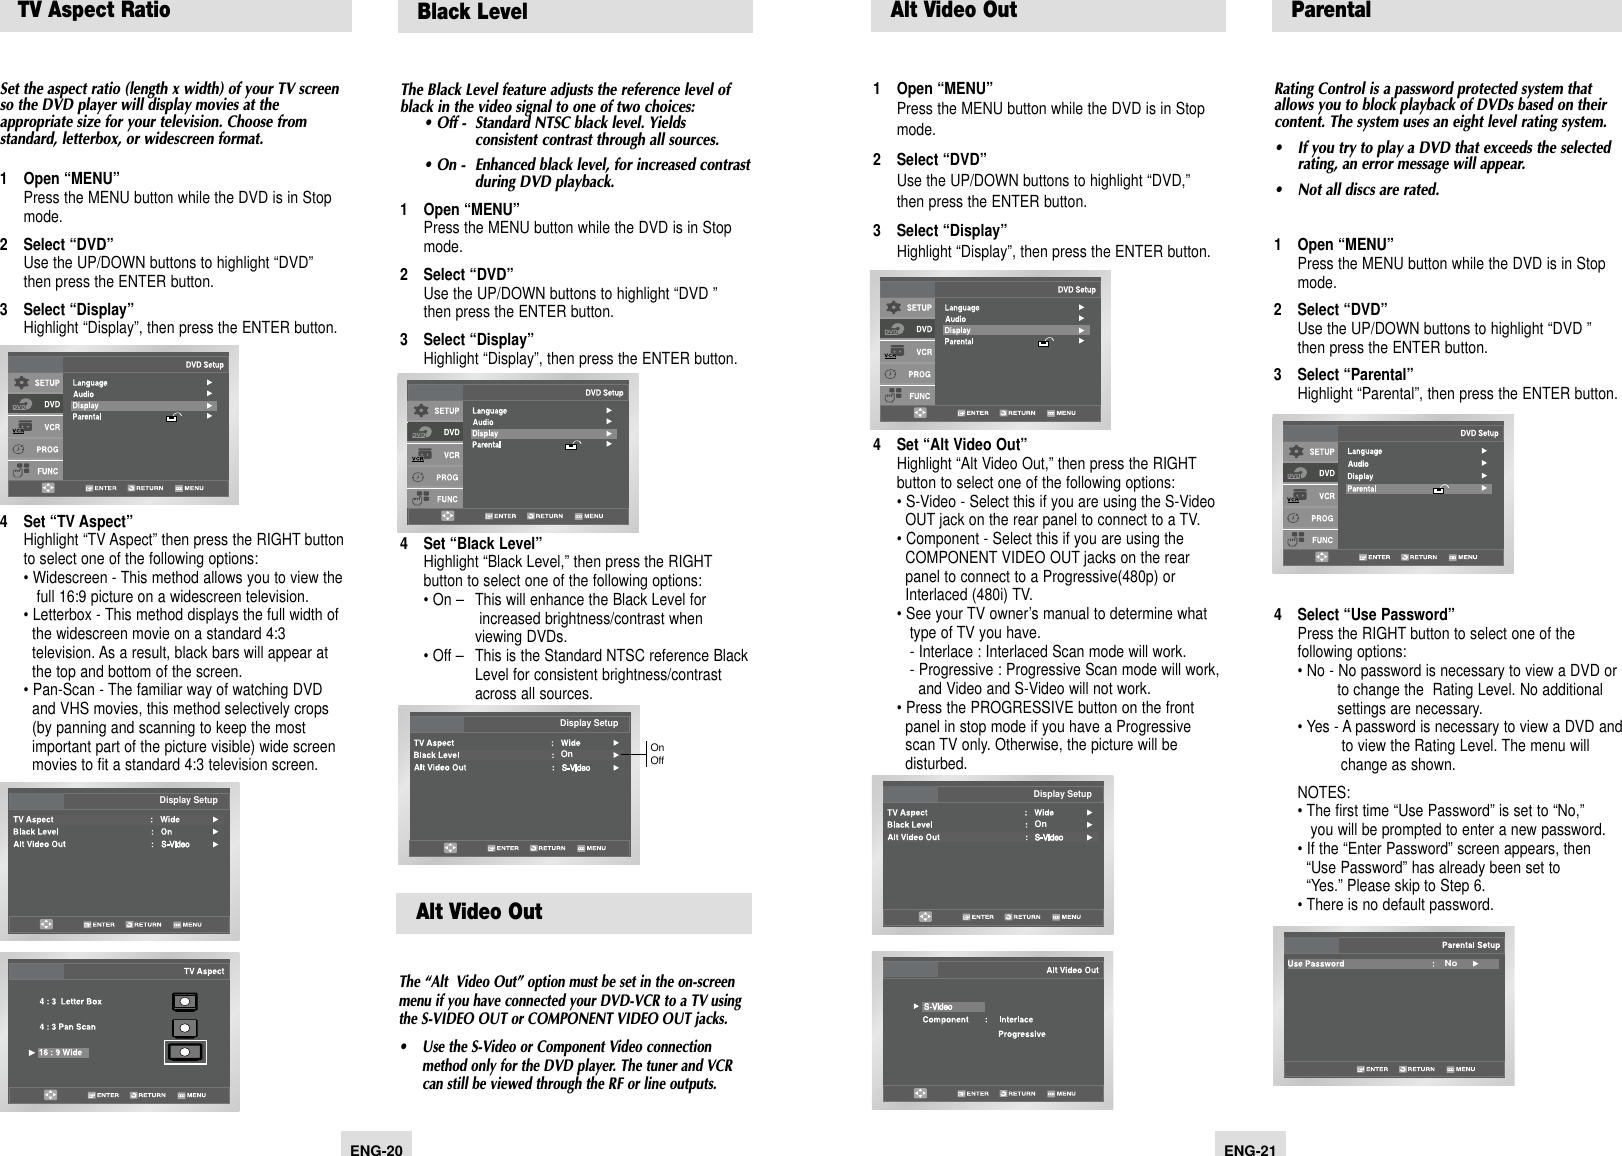
![ENG-31Special Recording FeaturesWhile a recording is in progress, you can watch adifferent channel, a DVD, or add recording time in 30-minute increments.1 To watch a different channelMake sure that you connect the DVD-VCR to the TV using an RF cable.• During recording, Press the TV/VCR button on theremote control. Press the TV button to control TVand select a different channel.2 To Watch a DVDInsert a DVD in the DVD deck and press ❿ll(PLAY/PAUSE). The output will automatically change to the DVD. 3 To Add Recording TimeSee One-Touch Recording (OTR) on the following. ForwardReverse ForwardReverse One-Touch Recording (OTR) allows you to addrecording time in 30-minute increments up to 4 hoursat the touch of a button.1 Start RecordingFollow the instructions on page 30 to begin recording.2 Activate OTRWhile in Record mode, press the (REC)button again to activate One-Touch Recording (OTR).• Record length 0:30 appears on the On-Screen Display and the DVD-VCR will record for exactly 30 minutes.3 Add Recording TimeContinue pressing (REC)to add recording time in30 minute increments up to 4 hours.• The DVD-VCR stops recording automatically when the time has elapsed. And DVD-VCR will be Automatically turned off when the OTR finished. One-Touch Recording (OTR)SP0:301:001:304:00Record length 0:30 07Record 07SPBasic RecordingYou can record a TV show in progress by inserting ablank tape and pressing the (REC) button. You caneven add time in 30-minute increments up to 4 hoursby pressing the (REC)button repeatedly; see page 31.NOTE: Be sure your videotape has a Record Safety Tab. If the tab is missing, you can cover the opening with a small piece of tape. Warning: Do not cover this opening unless you are sure you want to record over the tape. Before You Begin...• Power on the DVD-VCR• Power on the TV1 Insert TapeInsert a blank VHS tape into the VCR deck.• Make sure the tape is long enough to record the entire program.To change the Recording Speed, see page 32. 2 Select a Channel to RecordUse the 0–9 buttons or the Channel UP/DOWN arrow buttons to select the desired channel, or press the INPUT SEL. button to select Line 1 or 2 ifrecording from an external device connected to the front or rear Line inputs, respectively.3 Start RecordingPress the (REC)button on the remote control or front panel.4 Pause/Resume RecordingPress the ❿ll(PLAY/PAUSE) button.Press (REC)again to resume. 5 Stop RecordingPress the (STOP) button.For options while recording is in progress, see “Special Recording Features”.➢Recording from the DVD player to the VCR is notpossible.ENG-30Variable Search SystemWhen a program is recorded, the starting point is givenan Index mark for easy location. However, the VHSIndex Search System (VISS) cannot recognize indexmarks made by old VCRs. If the VCR has trouble findinga mark, it is probably because the cassette wasrecorded on a VCR without VISS. If you want to indextwo programs in a row, set your VCR to stop, then startrecording each program. Go to [0:00:00] stopUse this feature when you want to search for [0:00:00] counter position on a cassette. Press the CLEAR button at the point where you want to set the counter to [0:00:00]. 1. Press the SEARCH button to display the search screen.2. Use the UP/DOWN buttons to select Go to [0:00:00] and press ENTER or RIGHT button.3. The VCR will rewind or fast forward, searchingfor the [0:00:00] counter position, and thenautomatically stop at that position.End searchUse this feature when you want to search for a blank position to record a program. 1. Press the SEARCH button to display the search screen.2. Use the UP/DOWN buttons to select End Searchand press ENTER or RIGHT button.3. The VCR will fast forward, searching for a blankposition and then automatically stop at thatposition.Intro Scan(Forward/Reverse)Use this feature when you don’t know exactly where a recorded program is located on a cassette tape. 1. Press the SEARCH button to display the search screen.2. Use the UP/DOWN buttons to select Forward/Reverse Intro Scan and press ENTER or RIGHTbutton.3.When an index mark is found, DVD – VCR will playback the tape for 5 seconds, after which it will continue searching for next index mark.4. If you want to watch from a particular index,simply press ❿ll.ForwardReverse](https://usermanual.wiki/Samsung-Electronics-Co/DVDV4800/User-Guide-423567-Page-16.png)
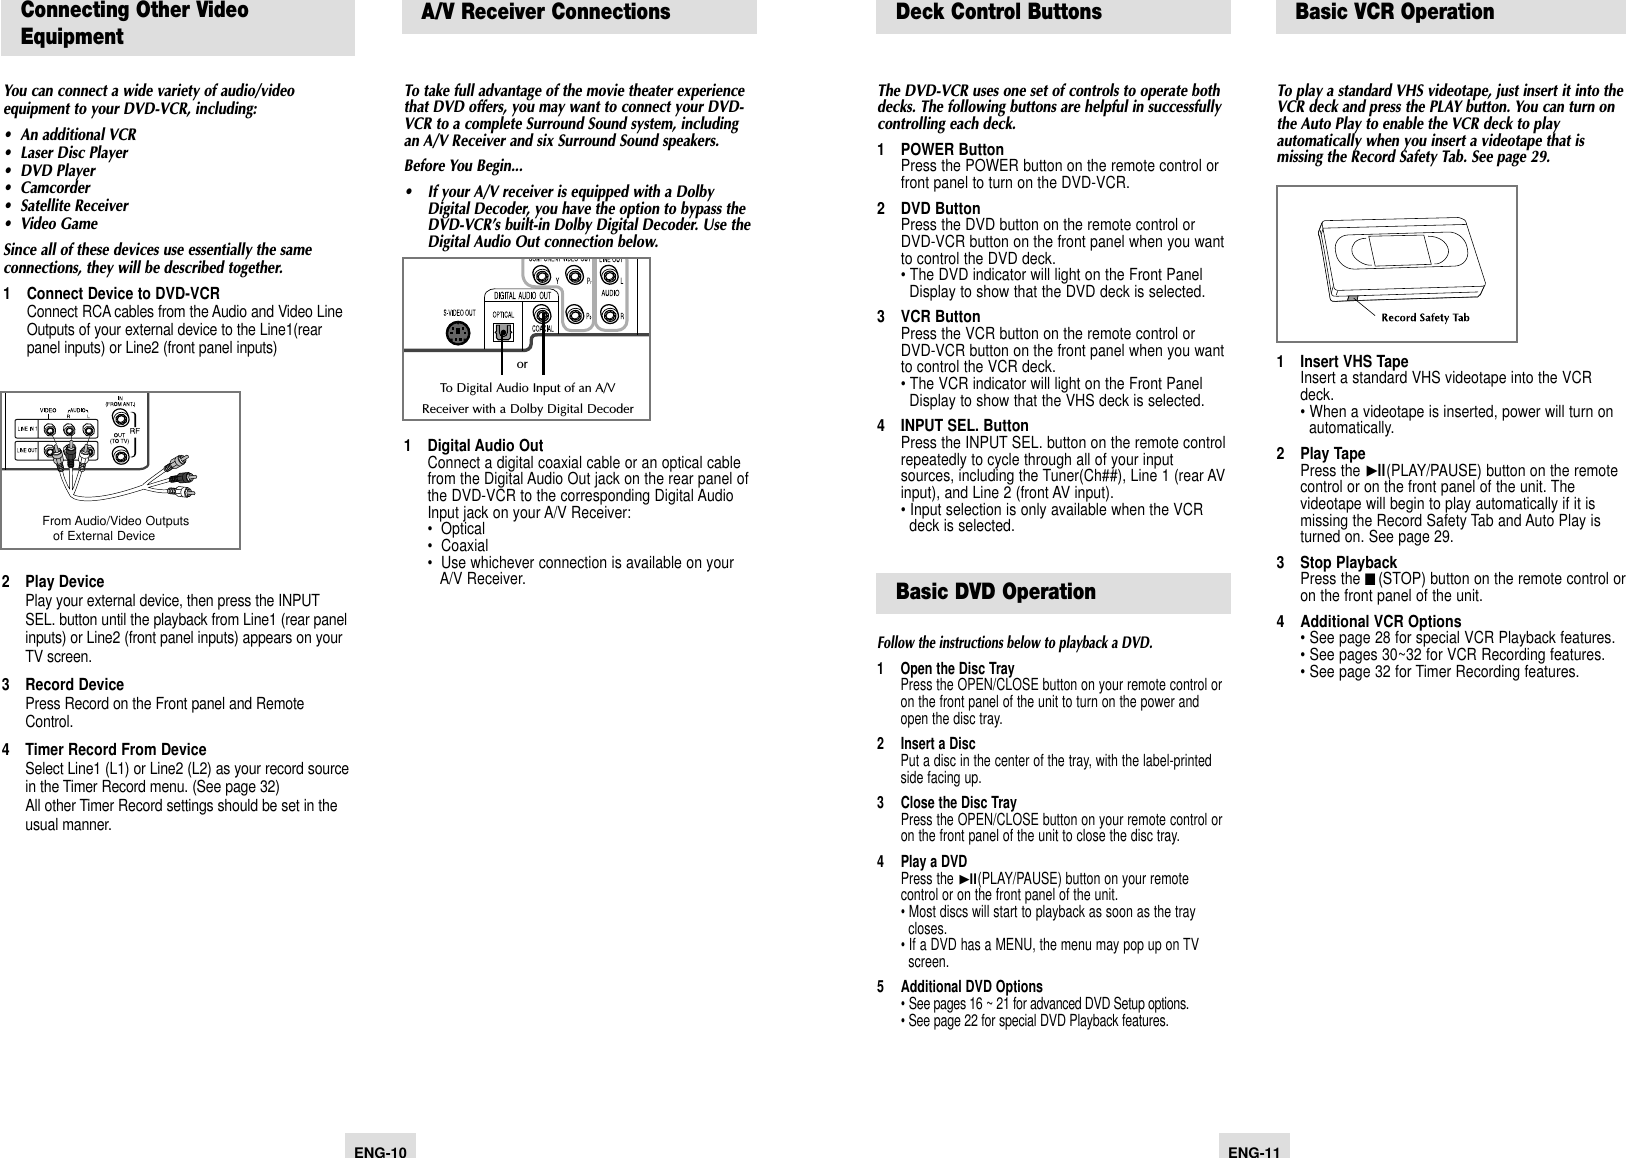
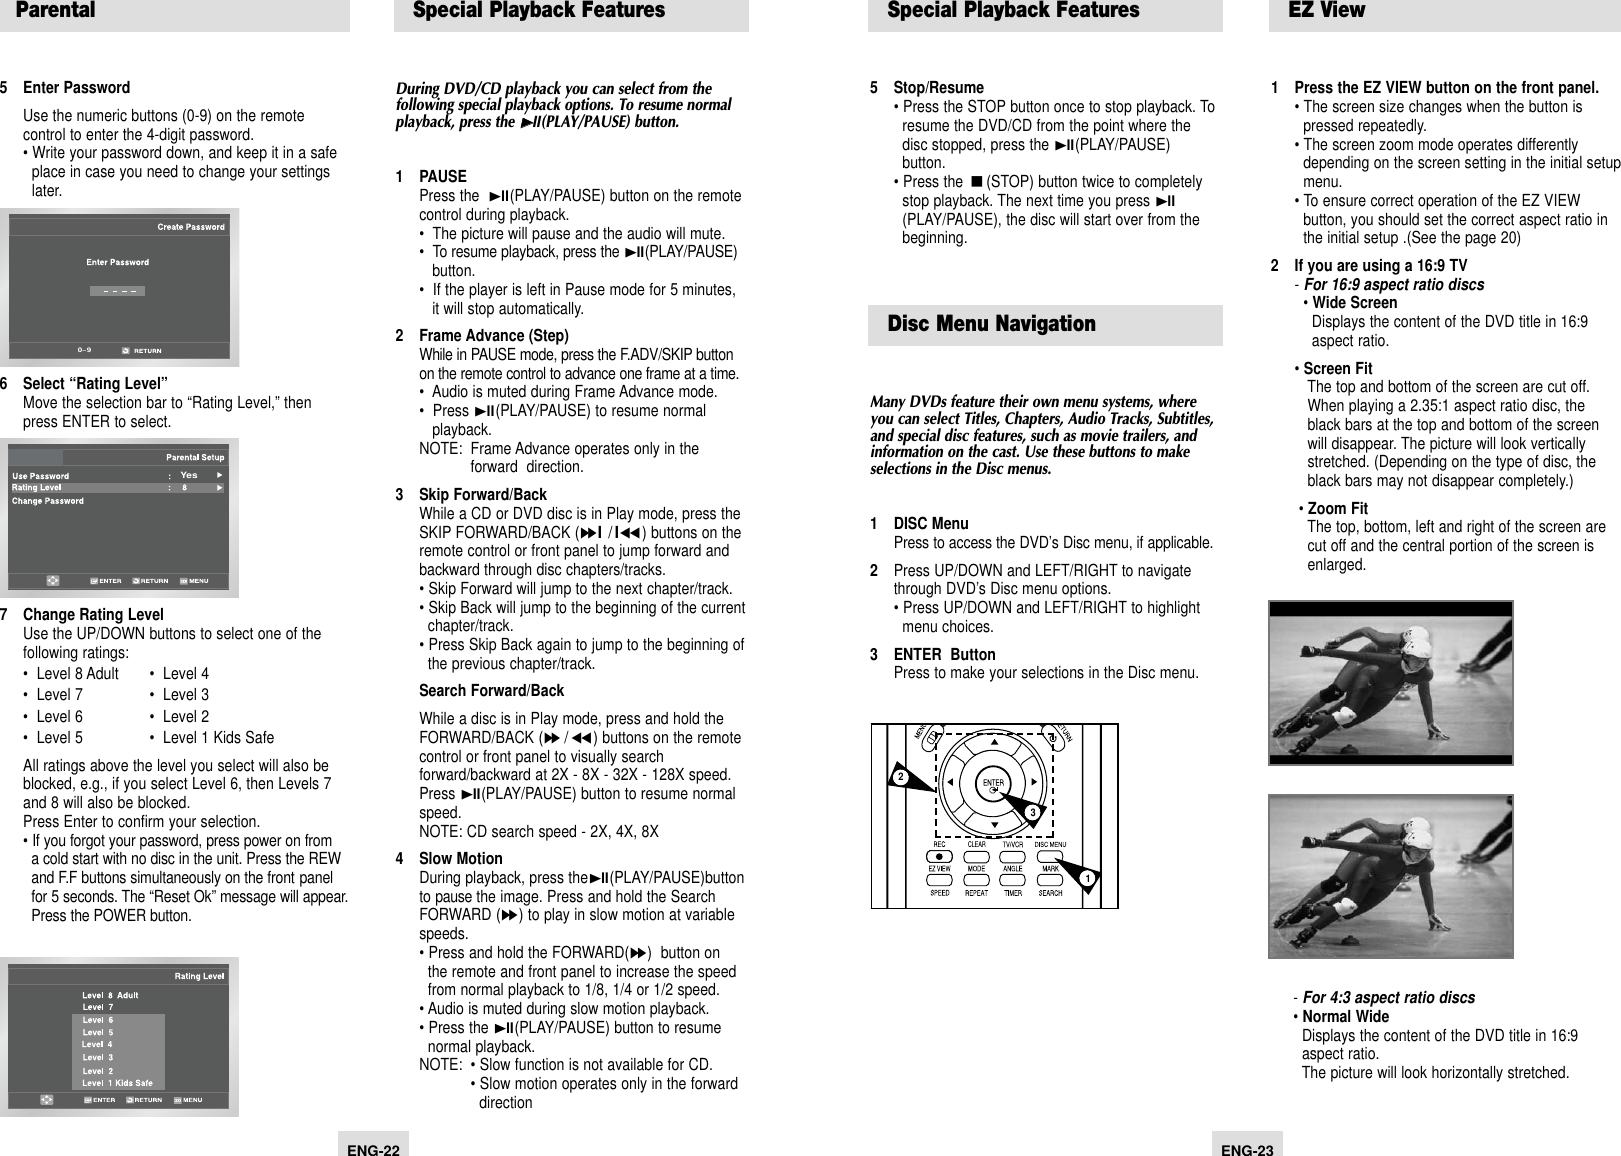
![ENG-33Function (VCR)1 Open “MENU”In the DVD in Stop or Play mode, press the MENU button.2 Select “FUNCTION”Use the UP/DOWN buttons to highlight “FUNCTION” then press the ENTER button.3 Select “VCR Function”Using the UP/DOWN buttons to highlight “VCR Function” then press ENTER to select. 4 Select “Go to [0: 00: 00]”Highlight “Go to [0: 00: 00]”, then press the ENTER button.- End SearchHighlight “End Search”, then press the ENTER button.- Forward Intro ScanHighlight “Forward Intro Scan”, then press the ENTER button.- Reverse Intro ScanHighlight “Reverse Intro Scan”, then press the ENTER button.ForwardReverse How to insert a Memory CardThis unit accepts 7 different types ofMemory CardsInsert the Memory Card correctly with the labelfacing up, otherwise it may not work.This device supports 7 types of memory cards :Memory Stick, Memory Stick Pro, SD Card, MMCand Smart Media Card through upper slot andCompact Flash, Micro Drive through below slot.In case that cards are inserted in two slots, theCompact Flash or Micro Drive in the below slot hasa priority. However if memory stick is inserted inupper slot, these may not work.NoteNote• Memory Cards over 2GB use FAT 32, which maybe not compatible with this unit.• If it is not fully inserted, the “Memory Card” will notwork.• If you remove the “Memory Card” during MemoryCard operation, the recorded data may becomecorrupted. It is better to remove it after pressingDVD/M.CARD button to return to DVD/CD Mode.MicroDriveCFMEMORY STICK MEMORY STICK PRO Smart MediaSecure DigitalMulti MediaCompact Flash Micro Drive3 Select Channel Number Use the Right and UP/DOWN buttons to set the channel. Press the RIGHT button to move to the next setting. 4 Set “Time/Date/Speed”Repeat Step 3 above to set start time, end time, date and record speed. Date can be set for one time, daily or weekly recording. See below.5 Save “Timer Recording”Press the RETURN button to finish setting the timerrecording. Stop the VCR or turn the power off. Then the VCR will automatically turn on and begin recording at the time you set. To stop the timer recording, press the POWER button or press the (STOP) button twice. Auto Speed Select If the length of the videotape is not long enough for a timer recording in the SP mode, set the recording tape speed to “AUTO”. Recording will start in the SP mode. If the length is not long enough, the tape speed will automatically change from SP mode to SLP mode.Daily/Weekly Date ProgrammingWeekly [Sun’s~Sat’s]: Use this to record TV programs on the same channel at the same time every week. Daily [MO - FR] : Use this to record TVprograms on the same channel at the same time every day Monday through Friday. If you want to setthe timer program,press the ENTER keyTimer ProgramNo Ch Start End Date Speed: :::::::::::::///////1234567ENG-32Record SpeedYou can slow down the recording speed from SP to SLPin order to fit six hours of programming on a T-120tape.1 Start RecordingFollow the Basic Recording instructions on page 30.2 Set Record SpeedPress the SPEED button on the remote control to set the Record Speed to one of the following options:• SP –Standard Play, for best quality.• SLP – Super Long Play, for maximum recording time (3 times SP).NOTE: The selected Record Speed will appear on the front panel display and on-screen display.Maximum Recording Time - SP vs. SLPTape Length SP (Standard Play) SLP (Super Long Play)T-120 2 hrs 6 hrsT-160 2hrs 40 mins 8 hrsT-180 3 hrs 9 hrs How to Set a Timer RecordingHow to Set a Timer RecordingInsert a blank videotape into the VCR deck. Be sure toleave the Record Safety Tab intact.With the Timer Recording function, you can programup to 7 events at a time to record up to a month inadvance. To Begin Setting the Timer Recording,• Turn on your DVD-VCR, and• Turn on your TV.1 Open “MENU”Press the MENU button or the TIMER button while the VCR is in Stop or Play mode.2 Select “Program”Use the UP/DOWN buttons to highlight “PROGRAM” then press the ENTER button.](https://usermanual.wiki/Samsung-Electronics-Co/DVDV4800/User-Guide-423567-Page-17.png)