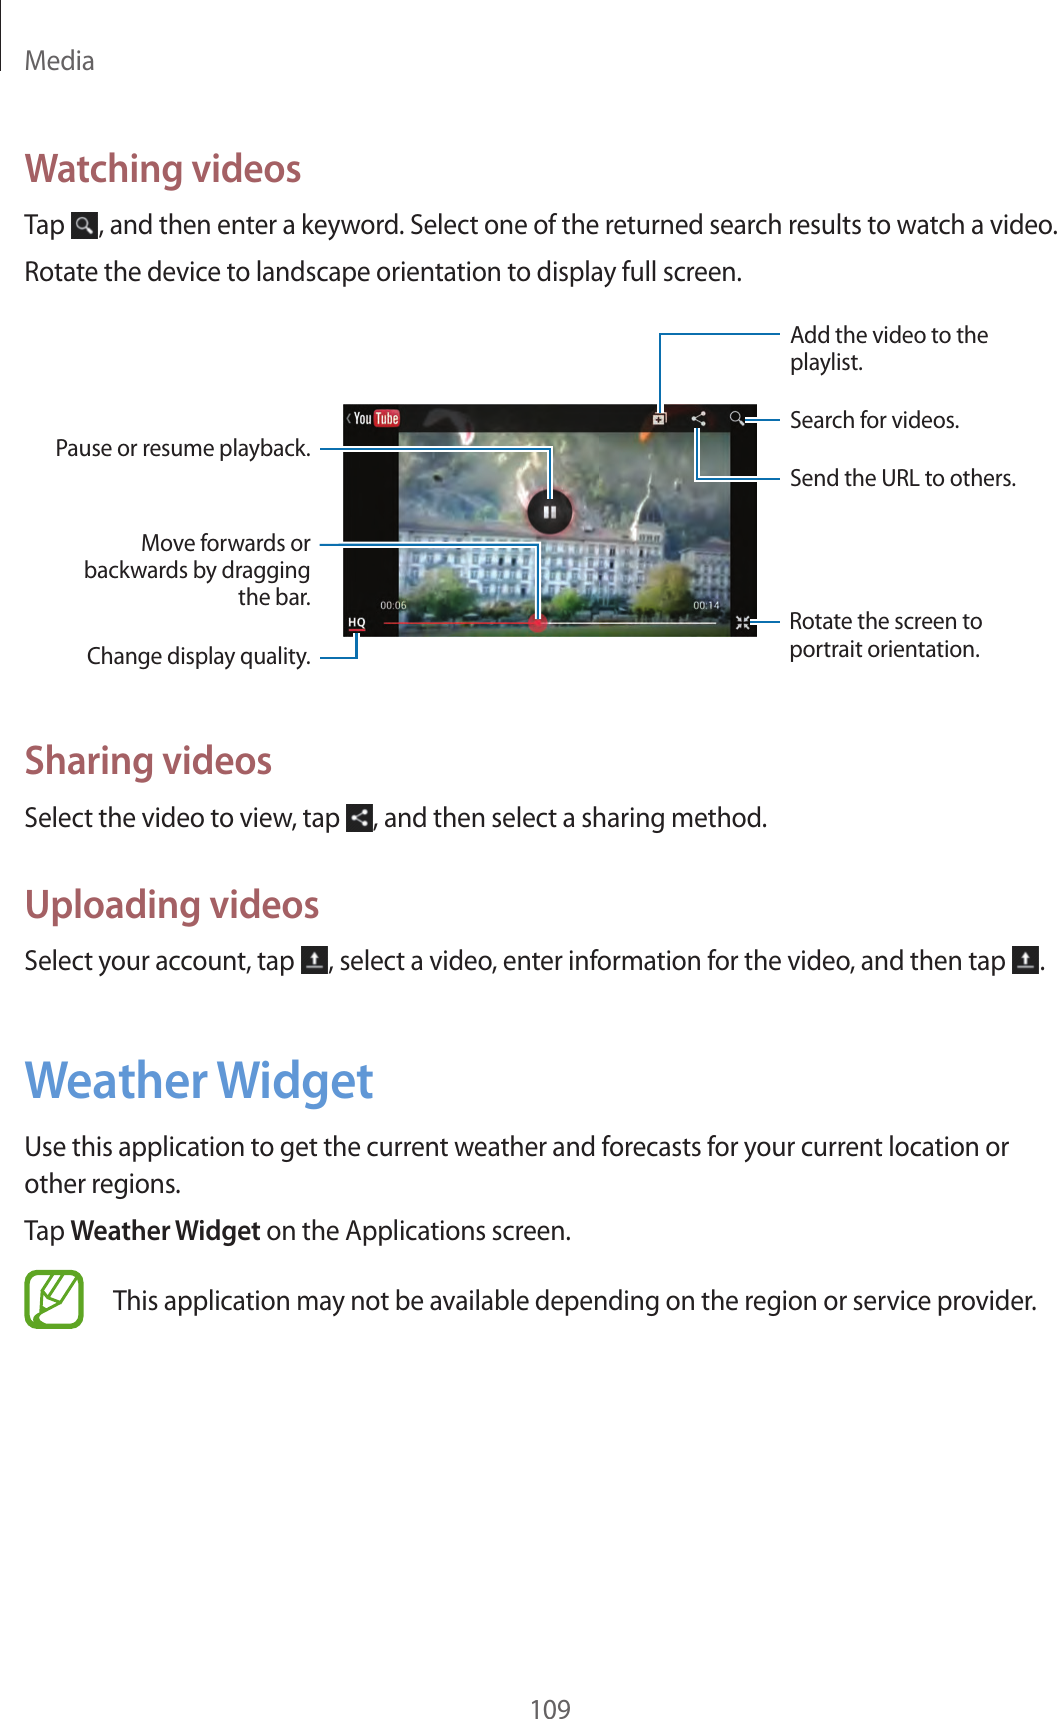
Samsung Electronics Co EKGN120A Multi-Band WCDMA/ LTE Portable Camera with WLAN and Bluetooth User Manual 2

Samsung Electronics Co Ltd Multi-Band WCDMA/ LTE Portable Camera with WLAN and Bluetooth Users Manual 2

Contents

Users Manual 2

Camera: Basic functions51Viewing photos and videosTo view taken photos or videos, tap the gallery icon. Scroll left or right to view the next or previous image. (p. 97)Taking photos or videos with voice commandsUse the voice recognition to take photos or videos with voice commands.Tap   →  .Say a shooting command, such as Smile, Cheese, or Record video.To check more voice commands for controlling the camera, tap   →  .Taking photos or videos with filter effectsUse the filter effects to take unique photos or videos.Tap   and select a filter effect. The available options vary by mode.•No effect: Do not apply an effect.•Vignette: This applies the retro-looking colours, high contrast, and strong vignette effect of Lomo cameras.•Greyscale: This makes the image black and white.•Sepia: This red-shifts the background scenery.•Vintage: This gives the image a vintage look and feel.•Turquoise: This applies a soft turquoise colour effect.•Rainbow: This applies a rainbow colour effect.
Camera: Basic functions52•Comic: This makes the image look like a comic book drawing.•Gothic noir: This makes the image look like a black and white comic strip.•FishEye: This blackens the edges of the frame and distorts objects to imitate the visual effect of a fisheye lens.Changing shooting options quicklyTap   to change shooting options quickly. The available options vary by mode.• : Configure settings for Camera.• : Activate or deactivate the flash.• : Use this to set delayed-time shots.• : Activate or deactivate the photo suggestion feature. (p. 110)• : Select a folder for saving photos or videos. To create a new folder, tap  .• : Activate or deactivate the voice recognition to take photos or videos.• : Activate or deactivate the sharing options.Reducing camera shakeUse the Optical Image Stabiliser (OIS) option to reduce or eliminate blurriness from camera shake.If the lens has an OIS switch, set the switch to ON to use the OIS function.Tap   →   → OIS (anti-shake), and select an option.Before correction After correction
Camera: Basic functions53Tips for taking clearer photosHolding the camera correctlyMake sure not to block the screen, lens, flash, or microphone.Make sure not to expose the lens to direct sunlight. This may discolour the image sensor, or cause it to malfunction.Half-pressing the Shutter buttonPress the Shutter button halfway down to adjust the focus. The camera adjusts the focus, exposure, and white balance automatically, and the focus frame turns green. The focus frame turns red if not focused.
Camera: Basic functions54Reducing camera shakeSet the Optical Image Stabiliser (OIS) option to reduce camera shake optically. (p. 52)Keeping the subject in focusFocusing on the subject may be difficult in the following conditions:•When the contrast between the subject and background is low. For example, the subject is wearing clothing that is similar in colour to the background.•The light behind the subject is too bright.•The subject is shiny or reflective.•The subject includes horizontal patterns, such as blinds.•The subject is not positioned in the centre of the frame.
Camera: Basic functions55Using the focus lockHalf-press the Shutter button to focus. When the subject is focused, you can change the composition. When you are ready, press the Shutter button to take the photo.When taking photos in low-light conditions•Turn the flash on to take photos in low-light conditions. (p. 83)•Adjust the ISO sensitivity. (p. 77)
Camera: Basic functions56When subjects are moving rapidlyUse the continuous shooting option to take photos of moving subjects. (p. 63, p. 81)To take several photos continuously, use memory cards with faster writing speeds (micro SDHC Class10 or higher).
57Camera: Shooting modesAutoUse this to take photos with scene modes selected automatically by the camera. In this mode, the camera recognises surrounding conditions and automatically adjusts factors that contribute to exposure, including the shutter speed, aperture value, metering, and white balance. As the camera controls most of the functions, some shooting options are limited. This mode is useful for capturing quick snapshots with the least amount of adjustment.Tap MODE → Auto.To display an icon for a scene mode at the top right of the preview screen when you half-press the Shutter button, tap   →   →   → Detection display → On.•The camera may detect different scenes, even the same subjects, depending on external factors, such as camera shake, lighting, and distance to the subject.•If the camera does not recognise an appropriate scene mode, it uses the default settings for this mode.•Even if it detects a face, the camera may not select a portrait mode depending on the subject’s position or lighting.•In this mode, the camera consumes more battery power due to constant changing of settings when selecting appropriate modes.
Camera: Shooting modes58ExpertUse this to take photos and videos with manual adjustment of various shooting options, including the shutter speed, aperture value, exposure value, and ISO sensitivity.Return to the previous screen.Display descriptions of modes and functions.Rotate to change the value for the shooting option.Rotate to select a shooting option.Use manual mode.Use user mode.Use program mode.Use aperture priority mode.Use shutter priority mode.Program modeIn this mode, the camera automatically adjusts the shutter speed and aperture value so that an optimal exposure value can be achieved. This mode is useful when you want to capture shots of constant exposure while being able to adjust other settings.Tap MODE → Expert → P, and set the desired shooting options.
Camera: Shooting modes59Aperture priority modeIn this mode, the camera automatically calculates shutter speed according to the aperture value you choose. You can adjust the depth of field (DOF) by changing the aperture value. This mode is useful for taking portraits and landscape shots.Tap MODE → Expert → A, and set the desired shooting options.Large depth of field Small depth of fieldIn low-light settings, you may need to increase the ISO sensitivity to prevent blurry photos.Shutter priority modeIn this mode, the camera automatically adjusts the aperture value according to the shutter speed you choose. This mode is useful for taking photos of fast-moving subjects or for creating tracer effects in a photo.Tap MODE → Expert → S, and set the desired shooting options.Slow shutter speed Fast shutter speed
Camera: Shooting modes60To compensate for the reduced amount of light allowed by fast shutter speeds, adjust the aperture and let in more light. If your photos are still too dark, increase the ISO sensitivity.Manual modeThis mode lets you adjust the shutter speed and aperture value manually. In this mode, you can fully control the exposure of your photos. This mode is useful in controlled shooting environments, such as a studio, or when it is necessary to fine-tune camera settings. This mode is also recommended for shooting night scenes or fireworks.Tap MODE → Expert → M, and set the desired shooting options.•If you set a high ISO sensitivity or open the shutter for a long time, image noise may increase.•Use a tripod and shutter release to prevent your camera from shaking.•The longer you open the shutter, the longer it takes to save a photo. Do not turn the camera off while the camera saves a photo.Using the bulb featureUse this feature to shoot night scenes or the night sky. While you are pressing the Shutter button, the shutter is left open so you can create moving light effects.In manual mode, set the shutter speed to Bulb.User modeUse this to create and save your own shooting mode by adjusting settings.Tap MODE → Expert → P / A / S / M, and set the desired shooting options. Then, tap   →  → Save as User mode to save the current settings.To access user mode, tap MODE → Expert → USER.
Camera: Shooting modes61Adjusting major shooting optionsIn expert mode, you can adjust the shutter speed, aperture value, exposure value, or ISO sensitivity with the Command dial and the i-Function button.Using the Command dialPress and hold the Command dial. Rotate it to move to a desired option and press it to select the option. Rotate it to adjust a value, and then press it to confirm the change.Using the i-Function buttonPress the i-Function button on the lens repeatedly to select an option, and then rotate the focus ring on the lens or the Command dial on the camera to adjust the value.Using the auto exposure lockWhen you cannot achieve an appropriate exposure because of a strong colour contrast, lock the exposure, and then take a photo.To lock the exposure value, adjust the photo’s exposure, and tap   to lock the exposure. Aim the lens where you desire, and then press the Shutter button.ShortcutsAdd or remove shortcuts for easy access to the camera’s various options.Tap and hold   or another shortcut icon.Tap and hold an option and drag it to the desired location.   cannot be moved.
Camera: Shooting modes62SmartUse this to take photos with predefined settings for various scenes.Smart suggestUse this to take photos with one of the smart modes that the camera automatically suggests.Tap MODE → Smart → Smart suggest.Half-press the Shutter button, select a mode from the suggested list, and then press the Shutter button to take a photo. If you do not select a mode from the suggested list, the camera will take a photo in Auto mode.Beauty faceUse this to take photos with lightened faces for gentler images.Tap MODE → Smart → Beauty face.Press the Shutter button to take a photo, and the camera automatically adjusts the photo, and then saves it.Best photoUse this to take multiple photos in a short time, and then choose the best photos among them.Tap MODE → Smart → Best photo.Press the Shutter button to take multiple photos. When Gallery opens, tap and hold thumbnails of photos to save, and then tap Save.
Camera: Shooting modes63Continuous shotUse this to take a series of photos of moving subjects.Tap MODE → Smart → Continuous shot.While holding the camera steady, press and hold the Shutter button to take several photos continuously.To take several photos continuously, use memory cards with faster writing speeds (micro SDHC Class10 or higher).Golf shotUse this to take consecutive photos of a golf-swing to analyse technique.Tap MODE → Smart → Golf shot.Press the Shutter button. When the camera detects a golf-swing, it takes multiple photos.•This feature is not available in portrait orientation.•Using a tripod is recommended.
Camera: Shooting modes64Best faceUse this to take multiple group shots at the same time and combine them to create the best possible image.Tap MODE → Smart → Best face.Press the Shutter button to take multiple photos. To get the best shot, hold the camera steady and remain still while taking photos. When Gallery opens, tap the yellow frame on each face, and choose the best individual face for the subject. After choosing a face for each individual, tap Save to merge the images into a single photo, and save it.Color bracketUse this to take three photos with different colour effects continuously.Tap MODE → Smart → Color bracket.Kids shotUse this to play a funny sound to get a baby’s attention when shooting.Tap MODE → Smart → Kids shot.Press the Shutter button. The camera emits the attention sound and takes multiple photos when it detects a smiling face.To change the attention sound, tap   →   →   → Attention sound.
Camera: Shooting modes65Vignette+Use this to highlight the centre by darkening the screen edges.Tap MODE → Smart → Vignette+.LandscapeUse this to take photos of blue skies and landscapes with richer colours.Tap MODE → Smart → Landscape.DawnUse this to take photos of the dawn sky in subtle colours.Tap MODE → Smart → Dawn.SnowUse this to take brighter photos of snow scenery.Tap MODE → Smart → Snow.
Camera: Shooting modes66MacroUse this to take photos of very close subjects.Tap MODE → Smart → Macro.Hold the camera steady to prevent blurry photos.FoodUse this to take photos of food in more colourful tones.Tap MODE → Smart → Food.Party/IndoorUse this to take crisp indoor photos.Tap MODE → Smart → Party/Indoor.
Camera: Shooting modes67Action freezeUse this to take photos of subjects moving at high speed.Tap MODE → Smart → Action freeze.Use in bright daylight is recommended.Rich toneUse this to take photos without losing details in bright and dark areas. The camera automatically takes several photos with various exposure values, and then merges them into one photo.Tap MODE → Smart → Rich tone.While holding the camera steady, press the Shutter button to take multiple photos.Without effect With effect
Camera: Shooting modes68•This feature may be affected by camera shake, lighting, movement of the subject, and shooting environment.•The flash is disabled in this feature.•When taking a photo of moving subjects, an afterimage may appear.•Using a tripod is recommended.PanoramaUse this to take wide panoramic photos.Tap MODE → Smart → Panorama.Press the Shutter button to take a photo, and then move the camera in one direction. When the blue frame aligns with the preview screen, the camera automatically takes another shot in the panoramic sequence. To stop shooting, press the Shutter button again. Photos are automatically combined into one panoramic image.
Camera: Shooting modes69•Avoid the following for best results:–Moving the camera too quickly or too slowly.–Moving the camera too little to take the next photo.–Moving the camera at irregular speeds.–Shaking the camera.–Changing the camera direction while taking a photo.–Taking photos in low-light conditions.–Taking photos of moving subjects.–Taking photos where the brightness or colour of the light changes.–Taking photos of a subject in front of unrecognisable backgrounds, such as empty skies or plain walls.•Photos are automatically saved, and shooting is stopped under following conditions:–Changing the distance from the subject while shooting.–Moving the camera too quickly.–Not moving the camera.•The camera may stop taking photos due to composition or movement within the scene.•The camera may not take the last scene entirely if you stop moving the camera at the exact position where you want the scene to end. To take the entire scene, move the camera slightly beyond the position you want the scene to end.WaterfallUse this to take photos of waterfalls.Tap MODE → Smart → Waterfall.The image may appear blurry due to the slow shutter speed when the camera takes photos. Make sure to use a tripod.
Camera: Shooting modes70Animated photoUse this to create a photo in which selected objects move by freezing or animating moving objects automatically detected by the camera.Tap MODE → Smart → Animated photo.Press the Shutter button to take a photo. Tap Animate or Freeze, and then rub the screen to animate or freeze the detected moving objects. Tap Trim to adjust the range to trim, or Direction to change the direction of the animation. Then, tap Save to save the file.Multi exposureUse this to take multiple shots and create one photo by overlapping them.Tap MODE → Smart → Multi exposure.To set the number of shots, tap   →   →   → Multi exposure.To set the camera to save all photos or only the final result, tap   →   →   → Save source.
Camera: Shooting modes71DramaUse this to take a series of photos and combine them to create an image that shows trails of the movement.Tap MODE → Smart → Drama.While holding the camera steady, press the Shutter button to take several photos continuously. Tap Save to save the file.To get the best shot, follow these tips. The camera may not take photos properly in other shooting conditions.•Hold the camera steady and remain still while taking photos.•Take photos of a subject that is moving in one direction.•Take photos with backgrounds that are free of moving objects.•Avoid taking photos of a subject and background with similar colours.•Avoid taking photos of a subject that is too close or too far away to fit within the screen or that is too long such as a bus or a train.EraserUse this to erase the movements of moving objects in the background.Tap MODE → Smart → Eraser.Press the Shutter button to take a series of photos. The camera erases traces of movement from a moving object. To restore the original photo, tap Show moving objects, tap the highlighted area, and then tap Save.
Camera: Shooting modes72•Hold the camera steady and remain still while taking photos.•Avoid taking photos of a subject and background with similar colours.•When taking photos of a subject that is moving very little or moving a great deal, the camera may not recognise all of the movements.•If there are multiple subjects moving in the background, the camera may not recognise all of the movement.Sound & shotUse this to take a photo with sound.Tap MODE → Smart → Sound & shot.The camera records a few seconds of audio before taking a photo.To record sound after taking a photo, tap   →   →   → Sound effect → Post-shot.While taking photos in this mode, sound is recorded by the internal microphone.MiniatureUse this to apply a miniature effect by making the centre clear and blurring the top and bottom of the image.Tap MODE → Smart → Miniature.
Camera: Shooting modes73Creative shotUse this to apply an appropriate filter to a scene automatically detected by the camera.Tap MODE → Smart → Creative shot.IntervalUse this to set the interval and number of shots to take over time.Tap MODE → Smart → Interval.SilhouetteUse this to take photos of dark shapes against a light background.Tap MODE → Smart → Silhouette.To maximise the silhouette effect, take photos at a location that is bright.SunsetUse this to take photos of the sunset.Tap MODE → Smart → Sunset.
Camera: Shooting modes74NightUse this to take photos in low-light conditions, without using the flash.Tap MODE → Smart → Night.While holding the camera steady, press the Shutter button to take multiple photos. Photos are automatically merged into a single photo.The image may appear blurry due to the slow shutter speed when the camera takes photos. Make sure to use a tripod.FireworksUse this to take photos of fireworks.Tap MODE → Smart → Fireworks.The image may appear blurry due to the slow shutter speed when the camera takes photos. Make sure to use a tripod.
Camera: Shooting modes75Light traceUse this to take photos of the light trailing in low-light conditions.Tap MODE → Smart → Light trace.The image may appear blurry due to the slow shutter speed when the camera takes photos. Make sure to use a tripod.My modeUse this to register your favourite shooting modes and select them conveniently. You can register up to 10 modes.Tap MODE → My mode → Add, and then select your favourite shooting modes. After completing your selection, tap Done to save it.
76Camera: Shooting options and settingsCustomising shooting optionsVarious shooting options are provided with your camera. With them, you can take more customised photos and videos.Tap   to access shooting options. Depending on the mode selected, you may tap   →  .Select an option, and then save it.•Available options may differ depending on the shooting mode, the lens you are using, and the shooting conditions.•Depending on the option selected, some settings may not be available.EV (brightness)The camera automatically sets the exposure by measuring the levels of light from the photo’s composition and the position of a subject. If the exposure set by the camera is higher or lower than you expected, you can adjust the exposure value manually.Tap   →   → EV (brightness), and select an option.Darker (-) Neutral (0) Brighter (+)
Camera: Shooting options and settings77•When taking a photo, if the appropriate exposure value cannot be decided, use the bracket set option to take multiple photos with different exposure values.•Taking photos with higher exposure values may result in blurry photos, due to slower shutter speed.ISO (sensitivity)The ISO sensitivity value represents the sensitivity of the camera to light.The higher the ISO sensitivity, the more sensitive the camera is to light. Consequently, by selecting a higher ISO sensitivity, you can take photos in dim or dark places at faster shutter speeds. However, this may increase electronic noise and result in a grainy photo.Tap   →   → ISO (sensitivity), and select an option.ExamplesISO 100 ISO 400ISO 800 ISO 3200
Camera: Shooting options and settings78•Increase the ISO sensitivity in places where flash use is prohibited. You can take a clear photo by setting a high ISO sensitivity without having to secure more light.•Use the noise reduction feature to reduce the visual noise that can appear on photos of a high ISO sensitivity. (p. 92)WB (light source)The white balance represents the light source that influences on the colour of a photo.The colour of a photo depends on the type and quality of the light source. If you want the colour of your photo to be realistic, select an appropriate lighting condition to calibrate the white balance, or adjust the colour temperature manually. You can also adjust colour for the preset light sources so that the colours of the photo match the actual scene under mixed lighting conditions.Tap   →   → WB (light source), and select an option.•Auto: Use automatic settings depending on the lighting conditions.•Daylight: Use this for sunny days. This option results in photos closest to the natural colours of the scene.•Cloudy: Use this for cloudy days or in shadows. Photos taken on cloudy days tend to be more bluish than on sunny days. This option offsets that effect.•Fluorescent_H: Use this under daylight fluorescent or 3-way fluorescent lights.•Fluorescent_L: Use this under white fluorescent lights.•Fluorescent_D: Use this under a daylight fluorescent lamp.•Tungsten: Use this under incandescent bulbs or halogen lamps. Incandescent tungsten bulbs tend to have a reddish hue. This option offsets that effect.•Flash WB: Use this when using a flash.•Custom set: Use this to set a custom white balance. Tap  , aim the lens at a piece of white surface, and then press the Shutter button.
Camera: Shooting options and settings79•K: Use this to manually adjust the colour temperature of the light source. Colour temperature is a measurement in degrees Kelvin that indicates the specific type of light source. As the colour temperature increases, the colour distribution becomes cooler. Alternatively, as the colour temperature decreases, the colour distribution becomes warmer. Tap  , and then tap +/- to adjust the colour temperature.Clear sky10,000 K8,000 K6,000 K5,000 K4,000 K3,000 K2,000 KFluorescent HCloudyDaylightFluorescent LHalogen lampTungstenCandle lightExamplesAuto WB DaylightFluorescent daylight Tungsten
Camera: Shooting options and settings80Customising preset white balance optionsAdjust the colour for the preset light sources.Tap   next to a white balance option. Tap the arrows or tap an area on the screen to adjust the value on the coordinates.•G: Green•A: Amber•M: Magenta•B: BlueMeteringThe metering mode refers to the method the camera measures the quantity of light. The camera measures the amount of light in a scene, and in many of its modes, uses the measurement to adjust various settings. For example, if a subject looks darker than its actual colour, the camera takes an overexposed photo of it. If a subject looks lighter than its actual colour, the camera takes an underexposed photo of it.Tap   →   → Metering, and select an option.•Multi: The camera calculates the amount of light in multiple areas. When light is sufficient or insufficient, the camera adjusts the exposure by averaging the overall brightness of the scene. This mode is suitable for general photos.•Spot: The camera calculates the amount of light in the centre. When you take a photo in conditions where there is a strong backlight behind a subject, the camera adjusts the exposure to shoot a subject correctly.•Centre-weighted: The camera calculates a broader area than the camera does in spot mode. It sums up the amount of light in the centre portion of the shot (60–80 %) and that of the rest of the shot (20–40 %).
Camera: Shooting options and settings81DriveUse this option to set the shooting method. Continuous or burst shots are recommended for shooting the rapid motion of fast moving subjects, such as racing cars.Tap   →   → Drive, and select an option.•Single shot: Use this to take a single photo.•Continuous normal: Use this to take five photos per second continuously while you are pressing the Shutter button.•Continuous high: Use this to take about eight photos per second continuously while you are pressing the Shutter button.•Burst (10fps) / Burst (15fps) / Burst (30fps): Use this to take 30 photos continuously when you press the Shutter button once.•AE BKT: Use the auto exposure bracketing option to take three consecutive photos with different exposure values (one a step lighter, the original, and one a step darker). Use a tripod to prevent blurry photos. You can adjust the interval range in Bracket set. (p. 91)•WB BKT: Use the white balance bracketing option to take three consecutive photos with different white balance settings (the original and two more with different white balance settings). The original photo is taken when you press the Shutter button. The other two are automatically adjusted to the white balance you have set. You can adjust the interval range in Bracket set. (p. 91)•Saving photos may take longer depending on memory card capacity and performance when taking photos continuously.•Using a tripod is recommended when taking photos continuously.
Camera: Shooting options and settings82DisplayUse this option to add or remove shooting information from the screen.Tap   →   → Display, and select an option.•Normal: The camera displays basic shooting information on the screen.•Histogram: The camera displays the histogram on the screen. A histogram is a graph that shows the brightness distribution of a photo. A histogram inclined to the left indicates a dark photo. A histogram inclined to the right indicates a bright photo. The height of the graph is related to colour information. The graph gets higher if a specific colour is more common.Insufficient exposure Balanced exposure Excessive exposure•Horizontal level: The camera displays the level gauge on the screen. The level gauge helps you align the camera with the horizontal and vertical lines on the screen.VerticalHorizontal Level  Unlevel•Distance scale: The camera displays the distance scale on the screen. The distance scale indicates the distance between a subject and the camera. This function is available only when you attach a lens that supports the distance scale function.
Camera: Shooting options and settings83Save as User modeUse this to save the current settings as your own shooting mode.Tap   →   → Save as User mode.FlashTo take a realistic photo of a subject, the amount of light should be constant. When the light source varies, you can use a flash and supply a constant amount of light.In auto mode, the flash pops up automatically when you half-press the Shutter button or tap the screen in low-light conditions.Press the Flash release button to pop the flash up, tap   →   → Flash, and then select an option.•Off: Use this to turn the flash off.•Smart flash: Use this to automatically adjust the brightness of the flash according to the amount of light in the surrounding environment.•Auto flash: Use this to automatically use the flash. The flash fires when the subject or background is dark.•Auto + Red-eye: Use this to automatically use the flash and reduce red-eyes.•Fill in: Use this to always use the flash.•Fill in + Red-eye: Use this to always use the flash and reduce red-eyes.•1st Curtain: Use this to fire the flash immediately after the shutter opens. The camera takes a photo of a subject earlier in an action sequence clearly.Ball moving direction
Camera: Shooting options and settings84•2nd Curtain: Use this to fire the flash just before the shutter closes. The camera takes a photo of a subject later in an action sequence clearly.Ball moving direction•Keep the flash retracted when not in use to avoid damage.•Forcing the flash to open may cause damage to the camera.•Use only Samsung-approved flashes. Using incompatible flashes may damage your camera.•There is an interval between two bursts of the flash. Do not move until the flash fires a second time.•If you select Off, the flash does not fire even when an external flash is attached.•If light from the flash is reflected, or if a substantial amount of dust is in the air, tiny spots may appear in the photo.•If you attach an intensity-adjustable external flash to the camera, the intensity settings of the flash will be applied.•If the subject is too close when you use the flash, some light may be blocked, resulting in a dark photo. Ensure that the subject is within the recommended range, which varies by lenses.•When a lens hood is attached, the light from the flash can be blocked by the hood. Remove the hood to use the flash.Adjusting the flash intensityWhen the flash is on, adjust the flash intensity.Tap   next to an option, and then drag the slider or tap   or   to adjust the intensity.
Camera: Shooting options and settings85AF modeUse this option to select a focus mode appropriate to the subject.If the lens has an AF/MF switch, you must set the switch to select the focus mode that you require. Set the switch to AF to select either Single AF or Continuous AF. Set the switch to MF to select Manual focus.Tap   →   → AF mode, and select an option.•Single AF: Use this to capture a still subject. When you half-press the Shutter button, the focus fixes in the focus area. The area turns green when the focus is achieved.•Continuous AF: Use this to capture fast moving subjects. When you half-press the Shutter button, the camera continues to focus. Once the focus area is fixed on the subject, the subject is always in focus even when moving.•Manual focus: Use this to manually focus on a subject by rotating the focus ring on the lens.MF Assist helps you achieve a focus easily. While you are rotating the focus ring, the focus area is magnified. (p. 89) When you use Focus Peaking, the colour you selected appears on the focused subject. (p. 89)
Camera: Shooting options and settings86AF AreaUse this option to change the positions of the focus area.Generally, cameras focus on the nearest subject. When there are a lot of subjects, however, unwanted subjects can be in focus. To prevent unwanted subjects from being in focus, change the focus area so that a desired subject is in focus. You can get a clearer and sharper photo by selecting an appropriate focus area.Tap   →   → AF Area, and select an option.•Center AF: Use this to focus on the centre of the frame.•Multi AF: Use this to focus on multiple areas. The photo is divided into two or more areas, and the camera obtains focus points of each area and displays a green rectangle in places where focus is set correctly. This option is recommended for scenery photos.•Face Detection: Use this to focus on human faces preferentially. This option is recommended for shooting a group of people.This feature may not be effective in the following conditions:•The subject is too far from the camera.•The lighting is too bright or too dark.•The subject is not facing the device.•The subject is wearing sunglasses or a mask.•The subject’s facial expression changes drastically.•The subject is backlit, or the lighting conditions are unstable.
Camera: Shooting options and settings87•Tracking AF: Use this to track and automatically focus on your subject, even when the subject is moving or when you change the shooting composition.•Tracking a subject may fail in the following conditions:–The subject is too small.–The subject moves excessively.–The subject is backlit or you are shooting in a dark place.–Colours or patterns on the subject and the background are the same.–The subject includes horizontal patterns, such as blinds.–The camera shakes excessively.•If the camera fails to track the subject, the focus area will be reset.•If the camera fails to focus, the focus frame will change to red the focus will be reset.•One touch shot: Use this to take a photo with the touch of your finger. As you touch on the subject, the camera focuses on the subject and takes a photo automatically.Photo sizeAs you increase the resolution, your photo will include more pixels, so it can be printed on larger paper or displayed on a larger screen. When you use a high resolution, the file size will also increase. Select a low resolution for photos that will be displayed in a digital picture frame or uploaded to the web.Tap   →   → Photo size, and select an option.
Camera: Shooting options and settings88QualityUse this option to select a higher photo quality for better photos. Selecting a higher photo quality also increases the file size.Tap   →   → Quality, and select an option.The camera saves photos in either the jpg or raw file format. Photos in the jpg format are stored in the memory according to the settings of the camera at the time of shooting. However, raw format files are not transformed to jpg and are saved in the memory without any changes.Raw format files have the srw file extension. To convert raw format files into other file formats or to calibrate exposures, white balance, tones, contrasts, and colours, use the Adobe Photoshop Lightroom program found on the supplied DVD-ROM. Ensure you have enough space in the memory to save photos in the raw file format.Installing Adobe Photoshop LightroomInsert the Adobe Photoshop Lightroom DVD into your computer, select a language, and then follow the on-screen instructions to complete the installation.With Adobe Photoshop Lightroom, you can convert or calibrate image files, including jpg, tiff, and raw file formats. For more information, refer to the program guide.Image AdjustUse this option to adjust the colour, saturation, sharpness, or contrast of your photos.Tap   →   → Image Adjust, and drag the slider or tap   or   for each value.
Camera: Shooting options and settings89TimerUse this option to take photos with a delay of time.Tap   →   → Timer, and select an option.Press the Shutter button to start the timer. The camera takes photos after a specified length of time. Press the Shutter button to cancel the timer.MF assistUse this option to enlarge the scene and easily adjust the focus while rotating the focus ring.Tap   →   → MF assist, and select an option.•Off: Use to turn this option off.•Enlarge x5: Use this to magnify the focus area by 5 times when you rotate the focus ring.Focus peakingUse this option to set the colour you selected appears on the focused subject to help you focus while rotating the focus ring.Tap   →   → Focus peaking, and select an option.•Level: Use this to set a sensitivity level for detecting the focused subject.•Color: Use this to set a colour to appear on the focused subject.Link AE to AF PointUse this option to measure the exposure value of the focus area. When this option is on, the camera automatically sets an optimal exposure by calculating the brightness of the focus area.Tap   →   → Link AE to AF Point, and turn this option on or off.
Camera: Shooting options and settings90Framing modeWhen you adjust the aperture value or shutter speed, the exposure value changes according to the settings, so the display may darken. When this option is on, the brightness of the display is constant regardless of the settings, so you can better frame your shot.Tap   →   → Framing mode, and turn this option on or off.OIS (anti-shake)Use the Optical Image Stabiliser (OIS) option to reduce or eliminate blurriness from camera shake.If your lens has an OIS switch, set the switch to ON to use the OIS feature.Tap   →   → OIS (anti-shake), and select an option.•Off: Use to turn this option off.•Mode1: Use this to apply the OIS feature only when you press the Shutter button in full or half.•Mode2: Use this to continuously apply the OIS feature.Without OIS correction With OIS correction
Camera: Shooting options and settings91•This feature may not function properly in the following conditions:–When you move the camera to follow a moving subject.–If the camera is shaking too much.–When the shutter speed is slow (for example, when taking photos in low-light conditions).–If the battery power is low.–When you take close-up photos.•Using this feature with a tripod may blur photos because of vibration from the OIS sensor. Deactivate this feature when using a tripod.•The display may be blurry if the camera is hit or dropped. When this happens, restart the device.Bracket setUse this option to change the settings for auto exposure bracketing and white balance bracketing.Tap   →   → Bracket set, and select an option.•AE Bracket set: Use this to adjust the exposure interval range of the three bracketed photos.•WB Bracket set: Use this to adjust the white balance interval range of the three bracketed photos.ISO customizingUse this option to change the settings for the ISO sensitivity.Tap   →   → ISO customizing, and select an option.•ISO step: Use this to set the size for the ISO sensitivity by either 1/3 or one step.•Auto ISO Range: Use this to set the maximum ISO value under which each EV step is chosen when you set the ISO sensitivity to Auto.
Camera: Shooting options and settings92DMFUse the Direct Manual Focus (DMF) option to adjust the focus manually by rotating the focus ring after achieving the focus by half-pressing the Shutter button.Tap   →   → DMF, and turn this option on or off.AF priorityUse this option to take a photo only if the focus is set correctly when you press the Shutter button.Turn this option on to always get a properly focused photo. Turn it off to take a photo regardless of focus.Tap   →   → AF priority, and turn this option on or off.When you take continuous or burst shots, the camera will take photos even if this option is turned on and the subject is not in focus. Noise reductionUse this option to reduce the visual noise in photos.Tap   →   → Noise reduction, and select an option.•High ISO NR: Use this to reduce noise that may occur when you set a high ISO sensitivity. You can adjust the noise reduction intensity by selecting one from High, Normal, and Low.•Long term NR: Use this to reduce noise when you set the camera for a long exposure.Distortions correctUse this option to correct distortion that might occur from lenses.Tap   →   → Distortions correct, and turn this option on or off.
Camera: Shooting options and settings93Color spaceUse this option to select methods for representing colours. Digital imaging devices, such as digital cameras, monitors, and printers, have their own methods for representing colours, which are called colour spaces.Tap   →   → Color space, and select an option.•S RGB: sRGB (Standard RGB) is an international specification to define the colour space created by IEC (International Electrotechnical Commission). It is widely used for creating colours on computer monitors and is also the standard colour space for Exif. sRGB is recommended for regular images and images you intend to publish on the Internet.•Adobe RGB: Adobe RGB is used for commercial printing and has a larger colour range than sRGB. Its wider range of colours helps you to easily edit photos on a computer. Note that individual programs are generally compatible with a limited number of colour spaces.The rule for creating file names varies depending on the selected colour space option.•sRGB files: YYYYMMDD_hhmmss.JPG. For example, for a photo taken on Jan. 02, 2013, at 15:30:45, the file name would be 20130102_153045.jpg. File names for continuous or burst photos would be YYYYMMDD_hhmmss_x.JPG, for the previous example, the file name would be 20130102_153045_1.JPG.•Adobe RGB files: YYYYMMDD_hhmmss_A.JPG. File names for continuous or burst photos would be YYYYMMDD_hhmmss_Ax.JPG.Dynamic rangeUse this option to correct the loss of bright detail that can occur due to shading differences in a photo.Tap   →   → Dynamic range, and select an option.•Off: Use to turn this option off.•Smart Range+: Use this to correct the loss of bright detail.•HDR: Use this to take two photos with different exposure values and combine them to create a single image.
Camera: Shooting options and settings94Over exposure guideUse this option to set the camera to indicate the overexposed area on the preview screen.Tap   →   → Over exposure guide, and turn this option on or off.Video recording optionsTap   → , and configure the settings for video recording.•Movie size: Select a resolution for videos. Use higher resolution for higher quality. Higher resolution videos take up more memory.•Quality: Set the quality level for videos. Higher quality images require more storage space.•Multi motion: Set the playing speed of videos.If you select an option other than x1, sound will not be recorded.•Voice: Set the camera to record sound with videos.•Windcut: Remove some surrounding noise in addition to wind noise.Sharing optionsShare photos as they are taken by setting sharing options. Tap   → , and select an option.•Share shot: Send a photo directly to another device via Wi-Fi Direct.•Buddy photo share: Set the camera to recognise a person’s face that you have tagged in a photo and send it to that person.•ChatON photo share: Send a photo directly to another device via ChatON.•Remote viewfinder: Set a mobile device to control the camera remotely.
Camera: Shooting options and settings95Camera settingsTap   → , and configure the settings for Camera.•AF sound: Adjust the auto focus sound.•Beep: Activate or deactivate beep sounds.•Description: Display mode descriptions.•Guidelines: Display a guide to help you compose a scene.•Display brightness: Set the brightness of the screen.•Auto screen off: Set the length of time the device waits before turning off the display’s backlight.•Review: Briefly display photos or videos taken.•Signature: Use this to add a signature on the photo.•Date/time Imprint: Use this to imprint the date and/or the time on the photos when taking them.•GPS tag: Attach a GPS location tag to the photo. Activate this feature when taking photos to create albums in Story Album or use the photo suggestion feature.•To improve GPS signals, avoid shooting in locations where the signal may be obstructed, such as between buildings or in low-lying areas, or in poor weather conditions.•Your location may appear on your photos when you upload them to the Internet. To avoid this, deactivate the GPS tag setting.
Camera: Shooting options and settings96•Voice control: Activate or deactivate the voice recognition to take photos.•Contextual filename: Set the camera to add contextual tags, such as location information, to filenames.To use this feature, you must activate the GPS tag setting.•AF lamp: Use this to activate the AF-assist light in low-light conditions.•Power-on mode: Select the default camera mode that launches when the device is turned on.•EVF dial control: Select items to control with the EVF dial.•Storage: Select the memory location for storage.•Display select: Use this to set the proximity/light sensor to automatically adjust between the screen and the viewfinder, or to always use the screen.•Sensor cleaning: Use this to remove dust from the image sensor.•Lens firmware: Update the firmware of the lens.•Reset: Reset the camera settings.
97MediaGalleryUse this application to view images and videos.Tap Gallery on the Applications screen.•Some file formats are not supported depending on the software installed on the device.•Some files may not play properly depending on the encoding method used.Viewing imagesLaunching Gallery displays available folders. When another application, such as Email, saves an image, the Download folder is automatically created to contain the image. Likewise, capturing a screenshot automatically creates the Screenshots folder. Select a folder to open it.In a folder, images are displayed by creation date. Select an image to view it in full screen.Scroll left or right to view the next or previous image.Continuous and burst photos appear as a bundle in the thumbnails view.Tap the thumbnail to view individual photos.Zooming in and outUse one of the following methods to zoom in an image:•Double-tap anywhere to zoom in.•Spread two fingers apart on any place to zoom in. Pinch to zoom out, or double-tap to return.
Media98Viewing images using the motion featureWhen an image is zoomed in, tap and hold a point on the screen, and then move the device in any direction to browse the image.On the Applications screen, tap Settings → My device → Motions and gestures → Motion, drag the Motion switch to the right, and then turn on the switch for Browse an image.To stop using the motion feature, turn off the switch for the feature.Playing videosVideo files show the   icon on the preview. Select a video to watch it and tap  .Editing imagesWhen viewing an image, tap   and use the following functions:•Edit: Launch Photo Wizard or Paper Artist to edit the image.•Details: View image details.•Slideshow: Start a slideshow with the images in the current folder.•Favourite: Add the image to favourites.•Signature: Add a signature to the image. Signatures are saved in the Mysignature folder.•Copy to clipboard: Copy to clipboard.•Rotate left: Rotate anticlockwise.•Rotate right: Rotate clockwise.•Crop: Resize the blue frame to crop and save the image in it.•Buddy photo share: Send the image to a person whose face is tagged in the image.•Print: Print the image via a USB or Wi-Fi connection. The device is only compatible with some Samsung printers.•Show on map: View the shooting location on the map. When taking a photo or video, enable geotagging to attach GPS location tag with the photo or video. If there is no GPS location tag to attach, this option does not appear.•Rename: Rename the file.
Media99•Scan for nearby devices: Search for devices that have media sharing activated.•Set as: Set the image as wallpaper or a contact image.•Settings: Change the Gallery settings.Favourite imagesWhen viewing an image, tap   → Favourite to add the image to the favourites list.Making image collagesIn a folder, tap   → Select item, select two to four images by ticking, and then tap   → Create collage. Select a style at the bottom of the screen, and then tap Save.To add images, tap   → Add picture.To delete images, tap  .To change the split type, tap  .Deleting imagesUse one of the following methods:•In a folder, tap   → Select item, select images by ticking, and then tap  .•When viewing an image, tap  .Sharing imagesUse one of the following methods:•In a folder, tap   → Select item, select images by ticking, and then tap   to send them to others.•When viewing an image, tap   to send it to others.Setting as wallpaperWhen viewing an image, tap   → Set as to set the image as wallpaper or to assign it to a contact.
Media100Tagging facesTap   → Settings, and then tick Face tag. A yellow frame appears around the recognised face on an image. Tap the face, tap Add name, and then select or add a contact.When the face tag appears on an image, tap the face tag and use available options, such as sending messages.Face recognition may fail depending on the face angle, face size, skin colour, facial expression, light conditions, or accessories the subject is wearing.Paper ArtistUse this application to make images look like illustrations with fun effects or frames.Tap Paper Artist on the Applications screen.Use artistic tools to edit an image. The edited image is saved in Gallery → Paper Pictures folder.Select an existing image.Share the image.Apply effects to the image.Open the panel to undo and redo the last action.Draw with a pen. Tap to change the pen thickness.Take a photo.Draw with a brush. Tap to change the brush thickness.Save the image.Apply frames to the image.Erase the drawings. Tap to change the eraser size.
Media101Photo WizardUse this application to embellish images by applying various effects, such as the pop art effect.Tap Photo Wizard on the Applications screen.Undo and redo the last action.Save changes.Edit the image.To select an area to edit, tap and hold the screen, and then tap Selection mode.Rotating imagesTap Rotate, select an option at the bottom of the screen, or drag the screen to rotate, and then tap  .Cropping photosTap Crop, select an option at the bottom of the screen, rotate or resize the frame by dragging the frame, and then tap  .
Media102Changing coloursTap Colour, select one of the colour effects that appear at the bottom of the screen, drag the slider to left or right if required, and then tap  .Applying filter effectsTap Effect, select one from among the filter effects that appear at the bottom of the screen, drag the slider to left or right if required, and then tap  .Adjusting a portrait photoTap Portrait, select one of the portrait effects that appear at the bottom of the screen, drag the slider to left or right if required, and then tap  .Putting stickers on imagesTap Sticker, select one of the stickers that appear at the bottom of the screen, and then tap .Drawing on imagesTap Drawing, draw on the image, and then tap  .Framing imagesTap Frame, select one of the frames that appear at the bottom of the screen, and then tap  .
Media103VideoUse this application to play video files.Tap Video on the Applications screen.•Some file formats are not supported depending on the device's software.•Some files may not play properly depending on the encoding method used.Playing videosSelect a video to play.Change screen ratio.Move forwards or backwards by dragging the bar.Scan DLNA-enabled devices.Restart the current video or skip to the previous video. Tap and hold to move backwards quickly.Skip to the next video. Tap and hold to move forwards quickly.Adjust the volume.Reduce the size of the video screen.Pause and resume playback.Deleting videosTap   → Delete, select videos by ticking, and then tap Delete.Sharing videosTap   → Share via, select videos by ticking, tap Done, and then select a sharing method.
Media104Using Popup Video playerUse this feature to use other applications without closing the video player. While watching videos, tap   to use the pop-up player.Spread two fingers apart on the screen to enlarge the player or pinch to reduce it. To move the player, drag the player to another location.Video EditorUse this application to edit videos and apply various effects.Tap Video Editor on the Applications screen.•Some video files in Gallery may not be viewable depending on video resolution and codec.•Some files may not play properly depending on the encoding method used.Creating videosTap   to create a new project, and then select a frame theme. To add media files, tap the icon corresponding to the desired media type at the bottom left pane of the screen, and then tap a file. Repeat file insertion as needed, and then tap Done to finish.To delete a frame, tap and hold the frame, and then drag it to the rubbish bin.To rearrange frames, tap and hold a frame, and then drag it to a new location.Tap   and add a transition effect between frames.To save, tap   → Save.To export the video as a file, tap   → Export.Inserting text in a videoSelect a frame to edit, enter text by using text insertion options at the right pane, and then save the video.
Media105Trimming segments of a videoSelect a frame to split, move the start bracket to the desired starting point, move the end bracket to the desired ending point, tap Done, and then save the video.Splitting videosSelect a frame to split, drag it to the split point, tap Done, and then save the video.Applying effects to a videoSelect a frame to edit, select an effect option at the left pane, and then save the video.Story AlbumUse this application to create your own digital album to keep your stories by organising the images neatly and automatically.Tap Story Album on the Applications screen.Creating story albumsTap Create album → By tag information to create a story album automatically. Select criteria, and then tap Find pictures. Enter a title for the album, select a theme, and then tap Create album.To create it manually, tap Create album → From Gallery.Creating recommended albumsWhen you take photos at one location, the device automatically sorts your photos into albums based on your specified criteria and suggests making the new albums.Tap   → Settings → Home city, and then set a method for recognising your location. Select an album type and set a minimum number of photos.
Media106When you take photos that meet the criteria you set, the device will suggest making an album.Tap Create album → From suggestions. Select an album, enter a title for the album, and then tap Save.The device will recommend making story albums when you surpass the preset number of photos in a single day.Viewing story albumsSelect a story album. The cover image appears on the first page. Scroll left or right to view images in the story album.When viewing an image, tap   and use the following functions:•Add content: Add more content to the current page.•Remove content: Delete content on the current page.•Change theme: Change the theme for the page layout.•Slideshow: Start a slideshow with the images in the current album or change the slideshow settings.•Share via: Send the album to others.•Print: Print the album via a USB or Wi-Fi connection. The device is only compatible with some Samsung printers.•Order photo book: Place an order for a printed album.•Export: Export the album to other storage locations.•Delete album: Delete the album.Editing imagesTap the image of the page in an album.To add a caption, tap  .To send the image to others, tap  .To delete the image, tap  .
Media107To apply effects to the image, tap  .To start a slideshow, tap   → Slideshow → Start slideshow.To set the image as an album cover image, tap   → Set as cover.To rotate the image anticlockwise, tap   → Rotate left.To rotate the image clockwise, tap   → Rotate right.MusicUse this application to listen to music.Tap Music on the Applications screen.•Some file formats are not supported depending on the device’s software version.•Some files may not play properly depending on the encoding method used.Playing musicSelect a music category, and then select a song to play.Tap the album image at the bottom of the screen to open the music player screen.Skip to the next song. Tap and hold to move forwards quickly.Pause and resume playback.Adjust the volume.Open the playlist.Change the repeat mode.Restart the currently-playing song or skip to the previous song. Tap and hold to move backwards quickly.Turn on shue.Hide the music player screen.Scan DLNA-enabled devices.Set the file as your favourite song.
Media108To listen to songs at equal volume levels, tap   → Settings → Smart volume.When Smart volume is activated, the volume may end up louder than the device volume level. Use caution to avoid long-term exposure to loud sounds to prevent damage to your hearing.Creating playlistsMake an own selection of songs.Tap Playlists, and then tap   → Create playlist. Enter a title and tap OK. Tap Add music, select songs to include, and then tap Done.To add the currently-playing song to a playlist, tap   → Add to playlist.Playing music by moodPlay music grouped by mood. The playlist is automatically created by the device. When a new song is added, tap Music square →   → Library update.Tap Music square and select a cell of mood. Or select multiple cells by dragging your finger.YouTubeUse this application to watch videos from the YouTube website.Tap YouTube on the Applications screen.This application may not be available depending on the region or service provider.
Media109Watching videosTap  , and then enter a keyword. Select one of the returned search results to watch a video.Rotate the device to landscape orientation to display full screen.Pause or resume playback.Move forwards or backwards by dragging the bar.Change display quality.Add the video to the playlist.Search for videos.Rotate the screen to portrait orientation.Send the URL to others.Sharing videosSelect the video to view, tap  , and then select a sharing method.Uploading videosSelect your account, tap  , select a video, enter information for the video, and then tap  .Weather WidgetUse this application to get the current weather and forecasts for your current location or other regions.Tap Weather Widget on the Applications screen.This application may not be available depending on the region or service provider.
Media110Adding locationsTo add a location, enter a place name in the search box, or tap   to find the current location.To add more locations, tap My city list → Add.Deleting locationsTap My city list, tap   → Delete, select locations by ticking, and then tap Done.To delete the current location, tap   → Settings, and then deselect Show current city.Switching between locationsScroll left or right at the left side of the screen.PhotoSuggestUse this application to view photos taken by other users of points of interest near your current location.Tap PhotoSuggest on the Applications screen.Viewing photosBased on your current location, the device suggests photos of nearby places on a map. Search for a place and tap a thumbnail photo to view it in full screen.While viewing a photo, tap   → Add to favourites/places to visit, add the photo or place to the favourites list, and turn on the notification setting. You will be notified when you visit the place in the photo.Using photos as a shooting guideYou can use the suggested photos as guides for shooting the same or similar places.While viewing a photo, tap  . The camera application launches and displays the photo. Use the shooting angle and composition in the photo as a guide for taking your own shot.

Navigation menu