Samsung Electronics Co EKGN120A Multi-Band WCDMA/ LTE Portable Camera with WLAN and Bluetooth User Manual 3
Samsung Electronics Co Ltd Multi-Band WCDMA/ LTE Portable Camera with WLAN and Bluetooth Users Manual 3
Contents
- 1. Users Manual 1
- 2. Users Manual 2
- 3. Users Manual 3
Users Manual 3
111
Communication
Contacts
Use this application to manage contacts, including phone numbers, email addresses, and
others.
Tap
Contacts
on the Applications screen.
Managing contacts
Creating a contact
Tap and enter contact information.
•
: Add an image.
•
/ : Add or delete a contact field.
Editing a contact
Select a contact to edit, and then tap .
Deleting a contact
Tap
→
Delete
.
Communication
112
Searching for contacts
Use one of the following search methods:
•
Scroll up or down the contacts list.
•
Use the index at the right side of the contacts list for quick scrolling, by dragging a finger
along it.
•
Tap the search field at the top of the contacts list and enter search criteria.
Once a contact is selected, take one of the following actions:
•
: Add to favourite contacts.
•
: Compose a message.
•
: Compose an email.
Displaying contacts
By default, the device shows all saved contacts on the device, the SIM or USIM card, or
another account.
Tap
→
Contacts to display
, and then select a location where contacts are saved.
Moving contacts
Moving contacts to Google
Tap
→
Merge accounts
→
Merge with Google
.
Contacts moved to Google Contacts appear with in the contacts list.
Moving contacts to Samsung
Tap
→
Merge accounts
→
Merge with Samsung
.
Contacts moved to Samsung Contacts appear with in the contacts list.

Communication
113
Importing and exporting contacts
Importing contacts
Tap
→
Import/Export
→
Import from SIM card
,
Import from SD card
, or
Import from
USB storage
.
Exporting contacts
Tap
→
Import/Export
→
Export to SIM card
,
Export to SD card
, or
Export to USB
storage
.
Sharing contacts
Tap
→
Import/Export
→
Share namecard via
, select contacts, tap
Done
, and then select
a sharing method.
Favourite contacts
Tap , and then take one of the following actions:
•
Search
: Search for contacts.
•
Add to favourites
: Add contacts to favourites.
•
Remove from favourites
: Remove contacts from favourites.
•
Grid view
/
List view
: View contacts in grid or list form.
Contact groups
Adding contacts to a group
Select a group, and then tap . Select contacts to add, and then tap
Done
.
Communication
114
Managing groups
Tap , and then take one of the following actions:
•
Create
: Make a new group.
•
Search
: Search for contacts.
•
Change order
: Tap and hold next to the group name, drag it up or down to another
position, and then tap
Done
.
•
Delete groups
: Select user-added groups, and then tap
Delete
. Default groups cannot be
deleted.
Sending a message or email to a group’s members
Select a group, tap
→
Send message
or
Send email
, select members, and then tap
Done
.
Business card
Create a business card and send it to others.
Tap
Set up my profile
, enter details, such as phone number, email address, and postal
address, and then tap
Save
. If user information has been saved when you set up the device,
select the business card in
ME
, and then tap to edit.
Tap
→
Share namecard via
, and then select a sharing method.
Messaging
Use this application to send text messages (SMS) or multimedia messages (MMS).
Tap
Messaging
on the Applications screen.
You may incur additional charges for sending or receiving messages while you are
outside your home service area. For details, contact your service provider.
Communication
115
Sending messages
Tap , add recipients, enter a message, and then tap .
Use the following methods to add recipients:
•
Enter a phone number.
•
Tap , select contacts, and then tap
Done
.
Use the following methods to make a multimedia message:
•
Tap and attach images, videos, contacts, memos, events, and others.
•
Tap
→
Add subject
to enter a subject.
Viewing incoming messages
Incoming messages are grouped into message threads by contact.
Select a contact to view the person’s message.
Email
Use this application to send or view email messages.
Tap
Email
on the Applications screen.
Setting up email accounts
Set up an email account when opening
Email
for the first time.
Enter the email address and password. Tap
Next
for a private email account, such as Google
Mail, or tap
Manual setup
for a company email account. After that, follow on-screen
instructions to complete the setup.
To set up another email account, tap
→
Settings
→
Add account
.
Communication
116
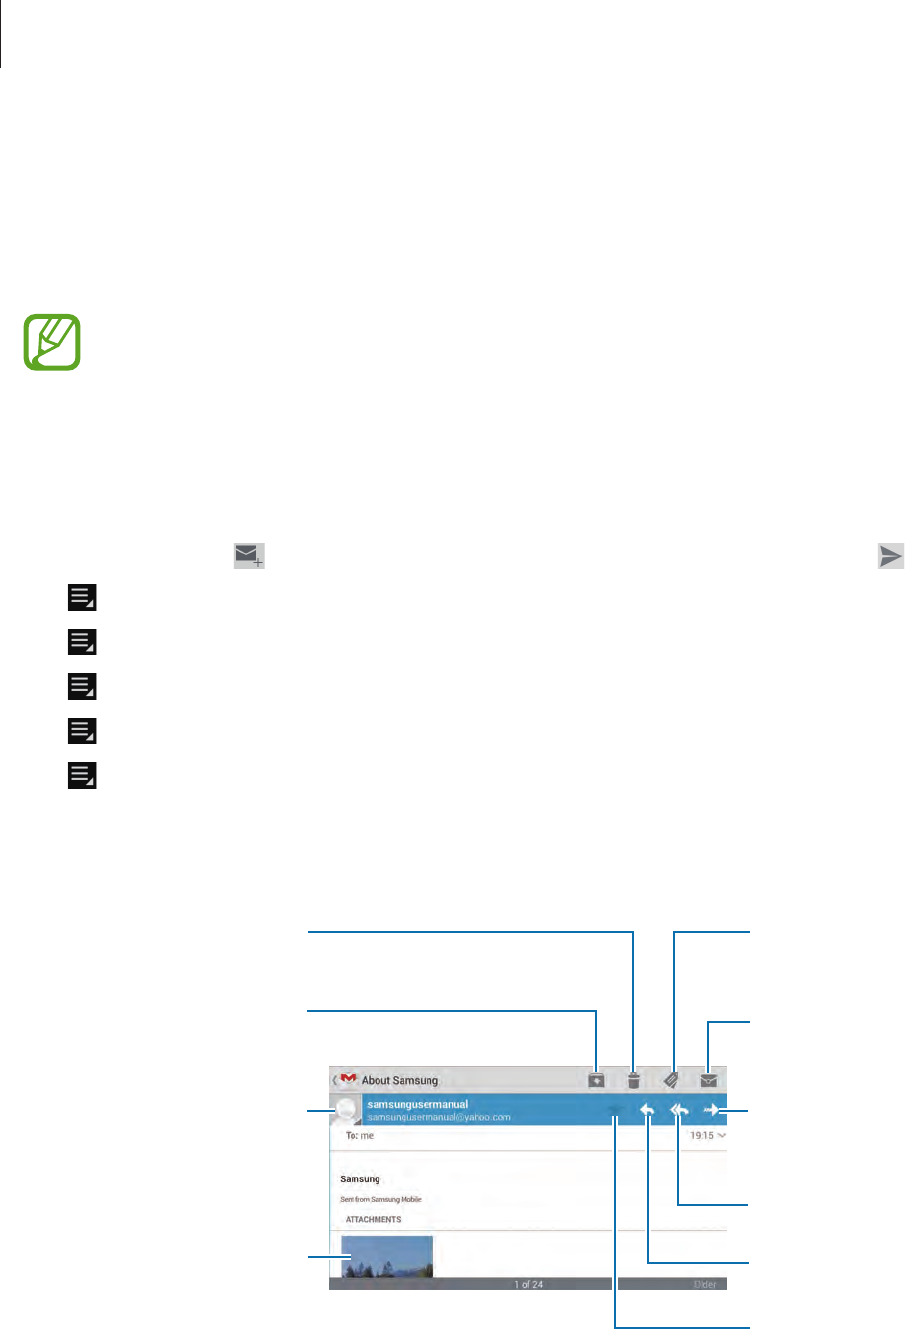
Sending messages
Tap the email account to use, and then tap at the bottom of the screen. Enter recipients,
subject, and message, and then tap .
Tap to add a recipient from the contacts list.
Tap to attach images, videos, contacts, memos, events, and others.
Tap to insert images, events, contacts, location information, and others into the message.
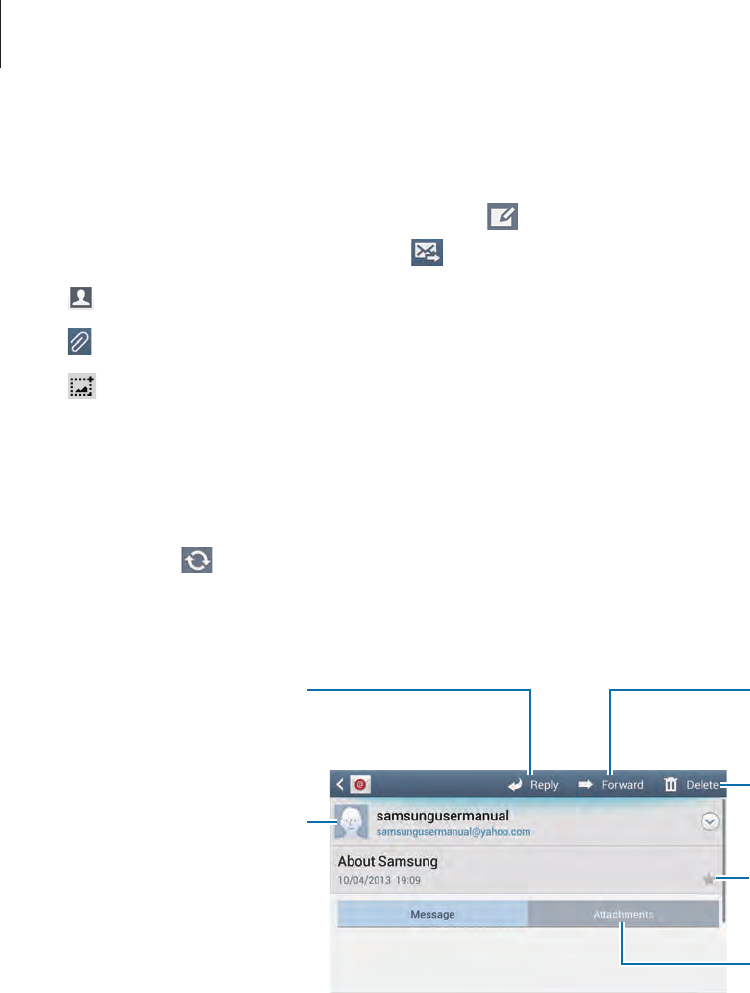
Reading messages
Select an email account to use, and new messages are retrieved. To manually retrieve new
messages, tap .
Tap a message to read.
Open attachments.
Reply to the message.
Add this email address to
the contacts list.
Delete the message.
Mark the message as a
reminder.
Forward the message.
Tap the attachment tab to open attachments, and then tap
Save
to save it.
Communication
117
Google Mail
Use this application to quickly and directly access the Google Mail service.
Tap
Google Mail
on the Applications screen.
•
This application may not be available depending on the region or service provider.
•
This application may be labelled differently depending on the region or service
provider.
Sending messages
In any mailbox, tap , enter recipients, a subject, and a message, and then tap .
Tap
→
Attach picture
to attach images.
Tap
→
Attach video
to attach videos.
Tap
→
Add Cc/Bcc
to add more recipients.
Tap
→
Save draft
to save the message for later delivery.
Tap
→
Discard
to start over.
Reading messages
Mark the message as
unread.
Add a label to this
message.
Preview attachment.
Keep this message for
long-term storage.
Mark the message as a
reminder.
Delete this message.
Reply to this message.
Add this email address to
the contacts list.
Forward this message to
others.
Reply to all recipients.
Communication
118
Labels
Google Mail does not use actual folders, but uses labels instead. When Google Mail is
launched, it displays messages labelled Inbox.
Tap to view messages in other labels.
To add a label to a message, select the message, tap , and then select the label to assign.
Talk
Use this application to chat with others via Google Talk.
Tap
Talk
on the Applications screen.
This application may not be available depending on the region or service provider.
Public profile
Tap the account ID at the top of the friends list to change the availability status, image, or
status message.
Adding friends
Tap , enter the email address of the friend to add, and then tap
DONE
.
Chatting with friends
Select a friend from the friends list, enter a message in the field at the bottom of the screen,
and then tap .
To add a friend to chat, tap
→
Add to chat
.
To end the chat, tap
→
End chat
.
Communication
119
Switching between chats
Scroll left or right.
Deleting chat history
Chats are automatically saved. To delete the chat history, tap
→
Clear chat history
.
Google+
Use this application to stay connected with people via Google’s social network service.
Tap
Google+
on the Applications screen.
This application may not be available depending on the region or service provider.
Tap
All circles
to change the category, and then scroll up or down to view posts from your
circles.
Tap to use other social network features.
Messenger
Use this application to chat with others via Google+ instant messaging service.
Tap
Messenger
on the Applications screen.
This application may not be available depending on the region or service provider.
Select a friend from the friends list, enter a message in the field at the bottom of the screen,
and then tap .

Communication
120
ChatON
Use this application to chat with any device. To use this application, you must sign in to your
Samsung account.
Tap
ChatON
on the Applications screen.
This application may not be available depending on the region or service provider.
Create a buddies list by entering phone numbers or Samsung account email addresses, or by
selecting buddies from the list of suggestions. Alternatively, tap
Contact sync
to manually
sync contacts from the device.
Tap
Chats
→
Start chat
and select a buddy to start chatting.

121
Web & network
Internet
Use this application to browse the Internet.
Tap
Internet
on the Applications screen.
Viewing webpages
Tap the address field, enter the web address, and then tap
Go
.
Tap to share, save, or print the current webpage while viewing a webpage.
To change the search engine, tap the address field, and then tap the search engine icon next
to the web address.
Opening a new page
Tap
→
New window
.
To go to another webpage, tap , scroll up or down, and tap the page to select it.
Bookmarks
To bookmark the current webpage, tap
→
Add bookmark
.
To open a bookmarked webpage, tap , and then select one.
History
Tap
→
History
to open a webpage from the list of recently-visited webpages. To clear the
history, tap
→
Clear history
.
Links
Tap and hold a link on the webpage to open it in a new page, save, or copy.
To view saved links, use
Downloads
. (p. 141)
Web & network
122
Sharing webpages
To share a webpage address with others, tap
→
Share via
.
To share a part of a webpage, tap and hold the desired text, and then tap
Share
.
Chrome
Use this application to search for information and browse webpages.
Tap
Chrome
on the Applications screen.
This application may not be available depending on the region or service provider.
Viewing webpages
Tap the address field, and then enter a web address or search criteria.
Opening a new page
Tap
→
New tab
.
To go to another webpage, tap
→
a webpage.
Searching the web by voice
Tap the address field, tap , speak a keyword, and then select one of the suggested keywords
that appear.
Syncing with other devices
Sync open tabs and bookmarks to use with Chrome on another device, when you are logged
in with the same Google account.
To view open tabs on other devices, tap
→
Other devices
. Select a webpage to open.
To view bookmarks, tap .

Web & network
123
Bluetooth
Bluetooth creates a direct wireless connection between two devices over short distances. Use
Bluetooth to exchange data or media files with other devices.
•
Samsung is not responsible for the loss, interception, or misuse of data sent or
received via the Bluetooth feature.
•
Always ensure that you share and receive data with devices that are trusted
and properly secured. If there are obstacles between the devices, the operating
distance may be reduced.
•
Some devices, especially those that are not tested or approved by the Bluetooth
SIG, may be incompatible with your device.
•
Do not use the Bluetooth feature for illegal purposes (for example, pirating copies
of files or illegally tapping communications for commercial purposes).
Samsung is not responsible for the repercussion of illegal use of the Bluetooth
feature.
To activate Bluetooth, on the Applications screen, tap
Settings
→
Connections
→
Bluetooth
, and then drag the
Bluetooth
switch to the right.
Pairing with other Bluetooth devices
On the Applications screen, tap
Settings
→
Connections
→
Bluetooth
→
Scan
, and
detected devices are listed. Select the device you want to pair with, and then accept the auto-
generated passkey on both devices to confirm.
Sending and receiving data
Many applications support data transfer via Bluetooth. An example is
Gallery
. Open
Gallery
,
select an image, tap
→
Bluetooth
, and then select one of the Bluetooth devices. After
that, accept the Bluetooth authorisation request on the other device to receive the image.
The transferred file is saved in the
Bluetooth
folder. If a contact is received, it is added to the
contacts list automatically.

Web & network
124
Screen Mirroring
Use this feature to connect your device to a large screen with an AllShare Cast dongle or
HomeSync and then share your contents. You can also use this feature with other devices that
support the Wi-Fi Miracast feature.
•
This feature may not be available depending on the region or service provider.
•
Miracast-enabled devices that do not support High-bandwidth Digital Content
Protection (HDCP) may not be compatible with this feature.
•
Some files may be buffered during playback, depending on the network
connection.
•
To save energy, deactivate this feature when not in use.
•
If you specify a Wi-Fi frequency, AllShare Cast dongles or HomeSync may not be
discovered or connected.
•
If you play videos or games on a TV, select an appropriate TV mode to get the best
experience.
On the Applications screen, tap
Settings
→
Connections
→
Screen Mirroring
, and then
drag the
Screen Mirroring
switch to the right. Select a device, open or play a file, and then
control the display with the keys on your device. To connect to a device using a PIN, tap and
hold the device name to enter the PIN.
Samsung Link
Use this application to play contents saved on various devices over the Internet. You can play
and send any file on any device to another device or web storage service.
To use this application, you must sign in to your Samsung account and register two or more
devices. The registration methods may vary depending on the device type. To get more
details, tap
→
FAQ
.
Tap
Samsung Link
on the Applications screen.
This application may not be available depending on the region or service provider.
Web & network
125
When opening this application, recent contents from all your registered devices will appear.
You can browse and play them. To start sharing files, scroll to
DEVICES & STORAGE
and select
an option.
Sending files
Send files to other devices or upload them to web storage services.
Select your device, tap , select files, and then tap
Done
.
Sharing files
Select a device or web storage, tap , select files, tap
Done
, and then select a sharing
method.
Playing files on a remote device
Select a device or web storage, tap , select a file, and then select a device.
•
Supported file formats may differ depending on connected devices as a media
player.
•
Some files may be buffered while playing depending on the network connection.
Using the Group Play feature
Share screens with multiple devices. Select a media category and tap . Select files, tap
Done
, and then tap
Group Play
. A Group Play session is created and the files are shared with
other devices in the session.
Managing contents on a web storage service
Select a web storage service, and then view and manage your files.
To download files from a web storage service, tap , select files, and then tap
Done
.
To register web storage services to the device, tap
→
Settings
→
Registered storage
→
, and then select a web storage service.

Web & network
126
Group Play
Use this application to share screens with multiple devices. Create or join a Group Play
session, and then share images, documents, or music.
Tap
Group Play
on the Applications screen.
•
This application may not be available depending on the region or service provider.
•
While using this application, you cannot use the Internet.
Creating a group for Group Play
Tap
Create group
, set a password, and then use the following features:
•
Share music
: Select music files to share. You can connect two or more devices and use
them to achieve a surround sound effect.
•
Share pictures
: Select images to share.
•
Share documents
: Select documents to share.
•
Play games
: Play online games with friends.
Tap and write a note or draw on the screen. All participants can see what you create.
Tap to view all shared images in mosaic layout.
Tap to select more images or documents.
Tap to view the group participants.
Joining Group Play
Tap
Join group
, enter the password, and then select a Group Play session to join. Select a
media category and the content that is currently being shared will appear on the device.
127
Application & media stores
Play Store
Use this application to purchase and download applications and games that are able to run
on the device.
Tap
Play Store
on the Applications screen.
This application may not be available depending on the region or service provider.
Installing applications
Browse applications by category, or tap to search with a keyword.
Select an application to view information. To download it, tap
Install
. If there is a charge for
the application, tap the price, and follow on-screen instructions to complete the purchase
process.
•
When a new version is available for any installed application, an update icon
appears at the top of the screen to alert you to the update. Open the notifications
panel and tap the icon to update the application.
•
To install applications that you downloaded from other sources, on the
Applications screen, tap
Settings
→
More
→
Security
→
Unknown sources
.
Uninstalling applications
Uninstall the applications purchased from
Play Store
.
Tap
→
My Apps
, select an application to delete in the list of installed applications, and
then tap
Uninstall
.
Application & media stores
128
Samsung Apps
Use this application to purchase and download dedicated Samsung applications. For more
information, visit
www.samsungapps.com
.
Tap
Samsung Apps
on the Applications screen.
This application may not be available depending on the region or service provider.
Installing applications
Browse applications by category.
To search for an application, tap at the top of the screen, and then enter a keyword in the
search field.
Select an application to view information. To download it, tap
Free
. If there is a charge for
the application, tap the price, and follow on-screen instructions to complete the purchase
process.
When a new version is available for any installed application, an update icon appears
at the top of the screen to alert you to the update. Open the notifications panel and
tap the icon to update the application.
Play Books
Use this application to read and download book files.
Tap
Play Books
on the Applications screen.
This application may not be available depending on the region or service provider.
Select a book file by scrolling left or right. While reading a book file, tap to access
additional options.
To purchase book files, tap
Buy
.

Application & media stores
129
Play Movies
Use this application to watch, download, and rent movies or TV shows.
Tap
Play Movies
on the Applications screen.
This application may not be available depending on the region or service provider.
Select a category at the top of the screen, and then select a movie, TV programme, or video to
play or rent.
Play Music
Use this application to listen to music from the device or stream music from the Google cloud
service.
Tap
Play Music
on the Applications screen.
This application may not be available depending on the region or service provider.
Play music by selecting a music category or share songs with others by uploading them to
the Google cloud storage.
Play Magazines
Use this application to read and download magazines.
Tap
Play Magazines
on the Applications screen.
This application may not be available depending on the region or service provider.
Select a category, and then select a magazine.
130
Utilities
S Memo
Use this application to create a memo using images and voice recordings.
Tap
S Memo
on the Applications screen.
Composing memos
Create memos with enriched content by drawing sketches with your finger or adding images
or voice memos.
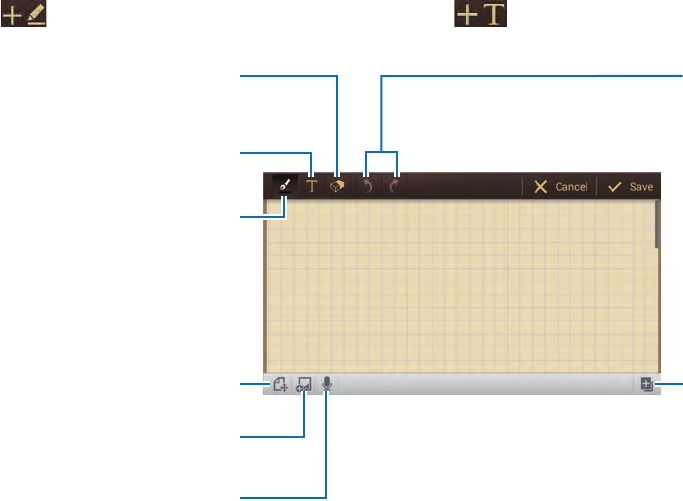
Tap to write or draw on the screen, or tap to enter text with the keyboard.
Append another page to
the current memo.
Undo and redo the last
action.
Insert a multimedia le.
Enter a memo.
Jot down or draw a memo.
Switch to view mode.
Erase the handwritten
memo.
Make a voice recording to
insert.
Utilities
131
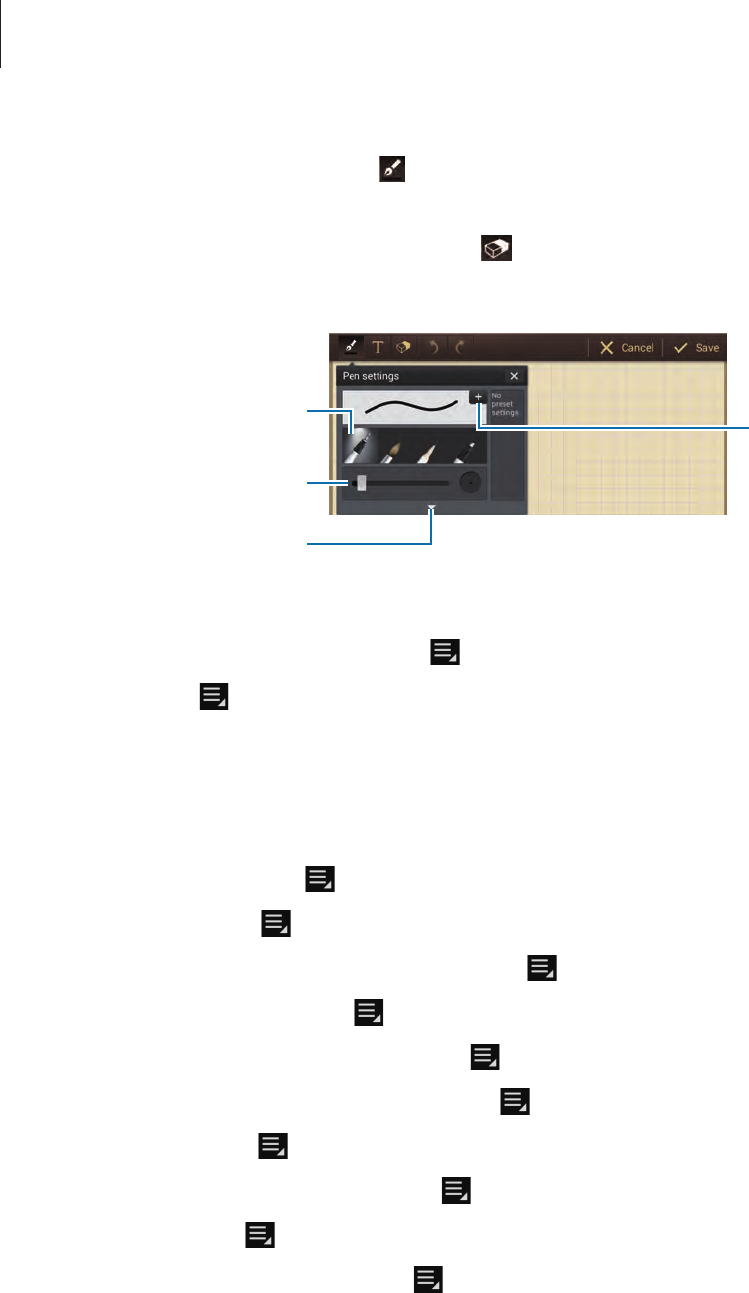
When jotting down a memo, tap once more to change the pen type, line thickness, or pen
colour.
When erasing the handwritten memo, tap once more to change the eraser size or clear the
memo.
Expand the pen settings
panel to change the pen
colour.
Change the line thickness.
Save the current setting as
a pen profile.
Change the pen type.
To change the sheet background, tap
→
Change background
.
To add tags, tap
→
Add tag
.
Browsing memos
Browse memo thumbnails by scrolling up or down.
To search for a memo, tap
→
Search
.
To delete memos, tap
→
Delete
.
To sort memos by date, title, tag, or others, tap
→
Sort by
.
To change the view mode, tap
→
List view
.
To create a memo by importing a file, tap
→
Import
.
To export memos as another file format, tap
→
Export
.
To create a folder, tap
→
Create folder
.
To move memos to another folder, tap
→
Move
.
To copy memos, tap
→
Copy
.
To change the S Memo settings, tap
→
Settings
.
Utilities
132
Viewing a memo
Tap the memo thumbnail to open it.
To delete the memo, tap
→
Delete
.
To send the memo to others, tap
→
Share via
.
To save the memo as an image file or a PDF file, tap
→
Export
.
To add the memo as your favourites list, tap
→
Add to Favourites
.
To save the memo as an event, tap
→
Create event
.
To set the memo as wallpaper or to assign it to a contact, tap
→
Set as
.
To print the memo via a USB or Wi-Fi connection, tap
→
Print
. The device is only
compatible with some Samsung printers.
To edit the memo, tap .
To play the voice recording, tap .
S Planner
Use this application to manage events and tasks.
Tap
S Planner
on the Applications screen.
Creating events or tasks
Tap , and then use one of the following methods:
•
Add event
: Enter an event with an optional repeat setting.
•
Add task
: Enter a task with an optional priority setting.
Utilities
133
To add an event or task more briefly, tap a date to select it and tap it again.
Enter a title and specify which calendar to use or sync with. Then add more details, such as
how often the event repeats, when it has an advance alert, or where it takes place.
Attach a map showing the location of the event. Enter the location in the
Location
field, tap
next to the field, and then pinpoint the precise location by tapping and holding on the
map that appears.
Attach a memo from S Memo. Tap
Memos
, and then compose a new memo or select one of
the existing memos.
Attach an image. Tap
Images
, and then take a photo or select one of the existing images.
Syncing with Google Calendar
On the Applications screen, tap
Settings
→
Accounts
→
Google
under
My accounts
→
a
Google account
→
Sync Calendar
. To manually sync for updating, on the Applications screen,
tap
S Planner
→
→
Sync
.
To display synced event or tasks, tap
→
Settings
→
Calendars
→
Display
, tick the Google
account, and then tap
Done
.

Utilities
134
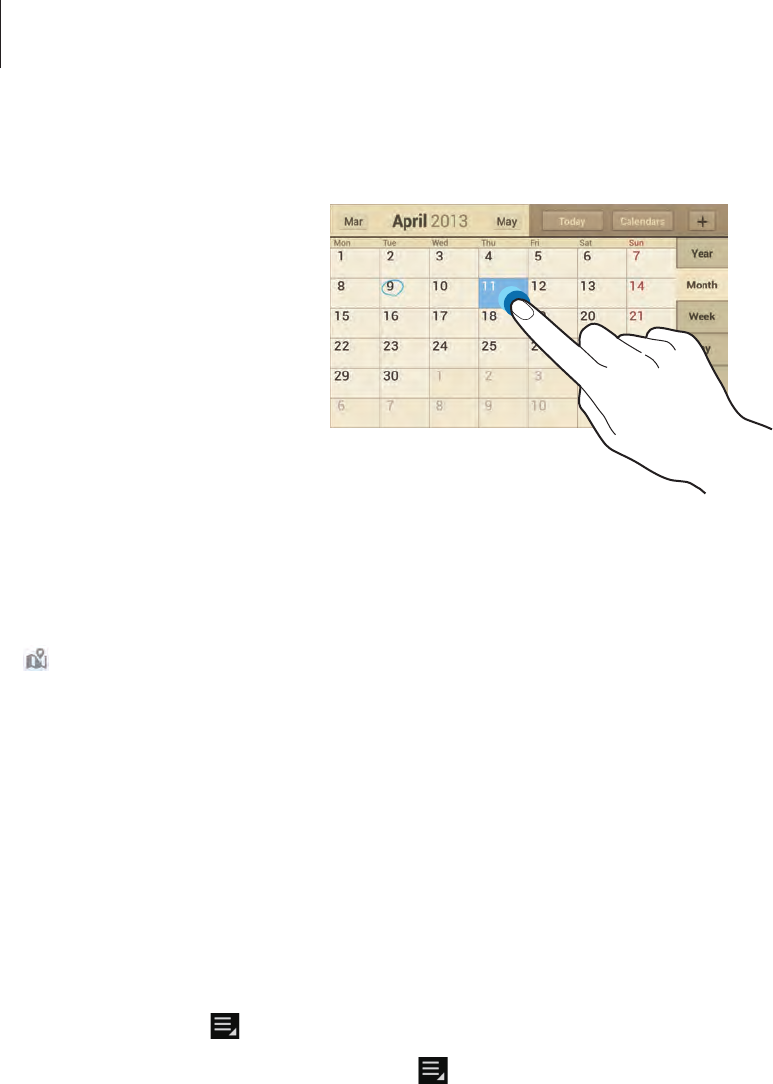
Changing calendar type
Select one from among different types of calendars including year, month, week, and others
at the right side of the screen. A pinch gesture can be used to change calendar type. For
example, pinch to change from the monthly calendar to the yearly calendar, and spread apart
to change yearly calendar back to monthly calendar.
Searching for events
Tap
→
Search
, and then enter a keyword to search for.
To view today’s events, tap
Today
at the top of the screen.
Deleting events
Select a date or event, and then tap
→
Delete
.
Sharing events
Select an event, tap
→
Share via
, and then select a sharing method.
Dropbox
Use this application to save and share files with others via the Dropbox cloud storage. When
you save files to Dropbox, your device automatically syncs with the web server and any other
computers that have Dropbox installed.
Tap
Dropbox
on the Applications screen.
This application may not be available depending on the region or service provider.
When running Dropbox for the first time, tap
Start
to activate it. Follow the on-screen
instructions to complete the setup.
Once Dropbox is activated, photos and videos taken with the device’s camera are uploaded to
Dropbox automatically. To view the uploaded photos or videos, tap . To share or delete files
or create albums, tap , and then select files.
Utilities
135
To upload files to Dropbox, tap
→
→
Upload here
→
Photos or videos
or
Other files
.
To open files in Dropbox, select a file.
While viewing images or videos, tap to add it to the favourites list. To open files in the
favourites list, tap .
Cloud
Use this feature to sync files or back up application data with your Samsung account or
Dropbox.
On the Applications screen, tap
Settings
→
Accounts
→
Cloud
.
This feature may not be available depending on the region or service provider.
Syncing with the Samsung account
Tap your Samsung account or
Sync settings
to sync files.
Backing up or restoring data
Tap
Backup
to back up or restore data with your Samsung account.
Syncing with Dropbox
Tap
Link Dropbox account
, and then enter the Dropbox account. Follow the on-screen
instructions to complete the setup.
Once you sign in, tap
Allow
and the device automatically syncs files with Dropbox whenever
you make some changes.

Utilities
136
Clock
Use this application to set alarms, check the time in any location in the world, measure the
duration of an event, set a timer, or use as the desk clock.
Tap
Clock
on the Applications screen.
Turn this alarm on or off.
Alarm
Setting alarms
Tap
Create alarm
, set a time for the alarm to go off, select days for the alarm to repeat, and
then tap
Save
.
•
Location alarm
: Set a location. The alarm goes off only when you are in the location.
•
Snooze
: Set an interval and the number of times for the alarm to repeat after the preset
time.
•
Smart alarm
: Set a time for the alarm to go off before the preset time.
Stopping alarms
Drag outside the large circle to stop an alarm. Drag outside the large circle to repeat
the alarm after a specified length of time.
Deleting alarms
Tap and hold the alarm, and then tap
Delete
.

Utilities
137
World clock
Creating clocks
Tap
Add city
, and then enter a city name or select a city from the cities list.
To apply summer time, tap and hold a clock, and then tap
DST settings
.
Deleting clocks
Tap and hold the clock, and then tap
Delete
.
Stopwatch
Tap
Start
to time an event. Tap
Lap
to record lap times.
Tap
Reset
to clear lap time records.
Timer
Set the duration, and then tap
Start
.
Drag outside the large circle when the timer goes off.
Desk clock
Tap to view in full screen.
Calculator
Use this application for simple or complex calculations.
Tap
Calculator
on the Applications screen.
Rotate the device to landscape orientation to display the scientific calculator. If
Screen
rotation
is disabled, tap
→
Scientific calculator
.
To see the calculation history, tap to hide the keypad.
To clear the history, tap
→
Clear history
.
To change the character size for the history, tap
→
Text size
.

Utilities
138
S Voice
Use this application to command the device by voice to dial a number, send a message, write
a memo, and more.
Tap
S Voice
on the Applications screen. Alternatively, tap twice.
This application may not be available depending on the region or service provider.
Here are several examples of spoken commands:
•
Open music
•
Launch calculator
•
Check schedule
Tips for better voice recognition
•
Speak clearly.
•
Speak in quiet places.
•
Do not use offensive or slang words.
•
Avoid speaking in dialectal accents.
The device may not recognise your commands or may perform unwanted commands
depending on your surroundings or how you speak.
Utilities
139
Google
Use this application to search not only the Internet, but also applications and their contents
on the device as well.
Tap
Google
on the Applications screen.
This application may not be available depending on the region or service provider.
Searching the device
Tap the search field, and then enter a keyword. Alternatively, tap , speak a keyword, and
then select one of the suggested keywords that appear.
If no results are returned from the applications, the web browser appears, displaying the
search results.
Searching with images
To search with an image, tap
→
Search with camera
. Aim the rear camera at an image,
and then tap .
Search scope
To select what applications to search, tap
→
Settings
→
Phone search
, and then tick the
items to search for.
Google Now
Launch Google search to view Google Now cards that show the current weather, public
transit info, your next appointment, and more when you are most likely to need it.
Join Google Now when opening Google search for the first time. To change Google Now
settings, tap
→
Settings
→
Google Now
.

Utilities
140
Voice Search
Use this application to search webpages by speaking.
Tap
Voice Search
on the Applications screen.
This application may not be available depending on the region or service provider.
Speak a keyword or phrase when
Speak now
appears on the screen.
My Files
Use this application to access all kinds of files stored in the device, including images, videos,
songs, and sound clips.
Tap
My Files
on the Applications screen.
Select a folder to open it. To go back to the parent folder, tap . To return to the root
directory, tap .
In a folder, tap , and then use one of the following options:
•
Select all
: Select all files to apply the same option to them at once.
•
Create folder
: Create a folder.
•
Search
: Search for files.
•
View by
: Change the view mode.
•
Sort by
: Sort files or folders.
•
Settings
: Change the file manager settings.

Utilities
141
Downloads
Use this application to see what files are downloaded through the applications.
Tap
Downloads
on the Applications screen.
This application may not be available depending on the region or service provider.
Select a file to open it with an appropriate application.
To sort the files by size, tap
Sort by size
.
To sort the files by date, tap
Sort by date
.
TripAdvisor
Use this application to get travel information such as destination, flight, or hotel. You can also
book for a room or flight and share your reviews with others.
Tap
TripAdvisor
on the Applications screen.
Sphere
Use this application to experience the world in 360-degree panoramas. You can also preview
virtual tours of hotels, restaurants, and other points of interest.
Tap
Sphere
on the Applications screen.
142
Travel & local
Maps
Use this application to pinpoint the location of the device, search for places, or get directions.
Tap
Maps
on the Applications screen.
This application may not be available depending on the region or service provider.
Searching for locations
Tap , enter an address, and then tap . Select a location to view the detailed location
information. To search for nearby locations, tap .
Once the location is found, tap and use one of the following functions:
•
Clear Map
: Clear the map.
•
Make available offline
: Save the map of a specified area to view it offline.
•
Directions
: Get directions for the location.
•
Layers
: Overlay multiple layers including satellite images, traffic information, and more.
•
Settings
: Change the map settings.
•
Help
: View information about using the map.
To view current location, tap .
Travel & local
143
Getting directions for a destination
1 Tap .
2 Tap , and then select a method to enter starting and ending locations:
•
My current location
: Use current location for starting location.
•
Contacts
: Select from the contacts list.
•
Point on map
: Pinpoint by tapping on the map.
•
My Places
: Select from the list of offline maps, starred places, recent places, and more.
3 Select a travel method, such as driving, public transit, or walking, and then tap
GET
DIRECTIONS
.
4 Select one of the routes that appear, and then tap
MAP VIEW
to view details.
Local
Use this application to search for nearby restaurants, banks, bus stops, and more.
Tap
Local
on the Applications screen.
This application may not be available depending on the region or service provider.
Select a place category, and then select a place from the list of search results.
•
Map
: Pinpoint the place on the map.
•
Directions
: Search for a route to the place.
•
Call
: Add the place’s phone number to the contacts list.
To add a place category, tap
→
Add a search
on the category list, and then enter a
keyword to search into the text field.

Travel & local
144
Navigation
Use this application to search for a route to a destination.
Tap
Navigation
on the Applications screen.
•
Navigation maps, your current location, and other navigational data may differ
from actual location information. You should always pay attention to road
conditions, traffic, and any other factors that may affect your driving. Follow all
safety warnings and regulations while driving.
•
This application may not be available depending on the region or service provider.
Specify the destination by using one of the following methods:
•
Speak the destination address.
•
Enter the destination address.
•
Select the destination address from the contacts list.
•
Select the destination from the list of starred places.
Once a route is found, follow on-screen instructions to navigate to the destination.
Earth
Use this application to explore any location in the world using the satellite map view.
Tap
Earth
on the Applications screen.
This application may not be available depending on the region or service provider.
145
Settings
About Settings
Use this application to configure the device, set application options, and add accounts.
Tap
Settings
on the Applications screen.
Connections
Wi-Fi
Activate the Wi-Fi feature to connect to a Wi-Fi network and access the Internet or other
network devices.
To use options, tap
Wi-Fi
→
.
•
Advanced
: Customise Wi-Fi settings.
•
WPS push button
: Connect to a secured Wi-Fi network with a WPS button.
•
WPS PIN entry
: Connect to a secured Wi-Fi network with a WPS PIN.
Setting Wi-Fi sleep policy
Tap
Wi-Fi
→
→
Advanced
→
Keep Wi-Fi on during sleep
.
When the screen is turned off, the device automatically turns off Wi-Fi connections.
When this happens, the device automatically accesses data networks if it is set to use
them. This may incur data transfer fees. To avoid data-usage bills, set this option to
Always
.
Setting Network notification
The device can detect open Wi-Fi networks and display an icon on the status bar to notify
when available.
Tap
Wi-Fi
→
→
Advanced
and tick
Network notification
to activate this feature.

Settings
146
Wi-Fi Direct
Wi-Fi Direct connects two devices directly via a Wi-Fi network without requiring an access
point.
Tap
Wi-Fi
→
Wi-Fi Direct
.
Bluetooth
Activate the Bluetooth feature to exchange information over short distances.
To use more options, tap .
•
Visibility timeout
: Set duration that the device is visible.
•
Received files
: View received files via the Bluetooth feature.
•
Help
: Access help information for Bluetooth.
Data usage
Keep track of your data usage amount, and customise the settings for the limitation.
•
Mobile data
: Set the device to use data connections on any mobile network.
•
Set mobile data limit
: Set a limit for the mobile data usage.
•
Data usage cycle
: Enter monthly reset date to monitor your data usage.
To use more options, tap .
•
Data roaming
: Set the device to use data connections when you are roaming.
•
Restrict background data
: Set the device to disable sync in the background while using
a mobile network.
•
Auto sync data
: Activate or deactivate auto-syncing of applications. You can select what
information to sync for each account in
Settings
→
Accounts
.
•
Show Wi-Fi usage
: Set the device to show your data usage via Wi-Fi.
•
Mobile hotspots
: Select Wi-Fi hotspots to prevent applications that are running in the
background from using them.

Settings
147
More networks
Customise settings to control networks.
Flight mode
This disables all wireless functions on your device. You can use only non-network services.
Smart network
This disables all data network functions on your device when the screen is turned off, and
disconnects applications, such as SNS applications or
Email
. When the screen is turned on, all
new notifications that were not received while the screen was off are retrieved.
You can save battery power by turning on this feature.
Mobile networks
•
Mobile data
: Use to allow packet switching data networks for network services.
•
Data roaming
: Use the device to connect to another network when you are roaming or
your home network is not available.
•
Access Point Names
: Set up access point names (APNs).
•
Network mode
: Select a network type.
•
Network operators
: Search for available networks and select a network for roaming.
Tethering and portable hotspot
•
Portable Wi-Fi hotspot
: Use the portable Wi-Fi hotspot to share the device’s mobile
network connection with computers or other devices through the Wi-Fi network.
•
USB tethering
: Use USB tethering to share the device’s mobile network connection with
a computer via USB. When connected to a computer, the device is used as a wireless
modem for the computer.
•
Bluetooth tethering
: Use the Bluetooth tethering to share the device’s mobile network
connection with computers via Bluetooth.
•
Help
: Learn more about USB, Wi-Fi, and Bluetooth tethering.

Settings
148
VPN
Set up and connect to virtual private networks (VPNs).
Nearby devices
•
File sharing
: Activate media sharing to allow other DLNA-enabled devices to access
media files on your device.
•
Shared contents
: Set the device to share your content with other devices.
•
Allowed devices list
: View the list of devices that can access your device.
•
Not-allowed devices list
: View the list of devices that are blocked from accessing your
device.
•
Download to
: Select a memory location for saving media files.
•
Upload from other devices
: Set the device to accept uploads from other devices.
Screen Mirroring
Activate the screen mirroring feature and share your display with others.
Kies via Wi-Fi
Connect the device to Samsung Kies via a Wi-Fi network.
My device
Lock screen
Change settings for the locked screen.

Settings
149
Display
Change the settings for the display.
•
Wallpaper
:
–
Home screen
: Select a background image for the Home screen.
–
Lock screen
: Select a background image for the locked screen.
–
Home and lock screens
: Select a background image for the Home screen and the
locked screen.
•
Notification panel
: Customise the items that appear on the notifications panel.
•
Screen mode
:
–
Adapt display
: Use this mode for optimising the display according to the display
settings.
–
Dynamic
: Use this mode to make the display tone more vivid.
–
Standard
: Use this mode for normal surroundings.
–
Movie
: Use this mode for dim surroundings, such as in a dark room.
•
Brightness
: Set the brightness of the display.
•
Auto-rotate screen
: Set the content to rotate automatically when the device is turned.
•
Screen timeout
: Set the length of time the device waits before turning off the display’s
backlight.
•
Daydream
: Set the device to launch a screensaver when your device is connected to a
desktop dock or charging.
•
Font style
: Change the font type for display text.
•
Font size
: Change the font size.
•
Display battery percentage
: Set the device to display the remaining battery life.
•
Edit after screen capture
: Set the device to edit the screenshot after capturing it.

Settings
150
Sound
Change settings for various sounds on the device.
•
Volume
: Adjust the volume level for music and videos, system sounds, and notifications.
•
Vibration intensity
: Adjust the force of the vibration notification.
•
Default notification sound
: Select a ringtone for events, such as incoming messages.
•
Dialling keypad tone
: Set the device to sound when tapping the buttons on the keypad.
•
Touch sounds
: Set the device to sound when selecting an application or option on the
touch screen.
•
Screen lock sound
: Set the device to sound when locking or unlocking the touch screen.
•
Vibration feedback
: Set the device to vibrate when touching keys.
•
Auto haptic
: Set the device to vibrate when playing sounds in downloaded applications.
Blocking mode
Select which notifications will be blocked and how long to block them.
Accessory
Change the accessory settings.
•
Dock sound
: Set the device to play a sound when your device is connected to or
removed from a desktop dock.
•
Audio output mode
: Set the device to use the dock speaker when your device is
connected to a desktop dock.
•
Desk home screen display
: Set the device to show the desk clock when your device is
connected to a desktop dock.
•
Audio output
: Select a sound output format to use when connecting your device to
HDMI devices. Some devices may not support the surround sound setting.
•
Audio applications
: Set the device to show which applications are available when you
connect a headset to the device.

Settings
151
Accessibility
Accessibility services are special features for those with certain physical disabilities. Access
and alert the following settings to improve accessibility to the device.
•
Auto-rotate screen
: Set the interface to rotate automatically when you rotate the device.
•
Screen timeout
: Set the length of time the device waits before turning off the display’s
backlight.
•
Speak passwords
: Set the device to read aloud passwords you enter with Talkback.
•
Show shortcut
: Add a shortcut to
Accessibility
on the quick menu that appears when
you press and hold the Power button.
•
TalkBack
: Activate Talkback, which provides voice feedback.
•
Font size
: Change the font size.
•
Magnification gestures
: Set the device to zoom in and out with finger gestures.
•
Negative colours
: Reverse the display colours to improve visibility.
•
Colour adjustment
: Adjust the colour scheme for the screen when the device determines
that you are colour blind or having difficulty reading content.
•
Accessibility shortcut
: Set the device to activate Talkback when you press and hold the
Power button, and then tap and hold the screen with two fingers.
•
Text-to-speech options
:
–
Preferred TTS engine
: Select a speech synthesis engine. To change the settings for
speech synthesis engines, tap .
–
Speech rate
: Select a speed for the text-to-speech feature.
–
Listen to an example
: Listen to the spoken text for an example.
•
Enhance web accessibility
: Set applications to install web scripts to make their web
content more accessible.
•
Sound balance
: Adjust the sound balance when using a dual headset.
•
Mono audio
: Enable mono sound when listening to audio with one earbud.
•
Turn off all sounds
: Mute all device sounds.

Settings
152
•
Assistant menu
: Set the device to show the assistive shortcut icon that helps you access
functions supported by external buttons or features on the notifications panel. You can
also edit the menu on the shortcut icon.
•
Tap and hold delay
: Set the recognition time for tapping and holding the screen.
•
Interaction control
: Set an area of the screen to be excluded from touch inputs.
Language and input
Change the settings for text input. Some options may not be available depending on the
selected language.
Language
Select a display language for all menus and applications.
Default
Select a default keyboard type for text input.
Google voice typing
To change the voice input settings, tap .
•
Choose input languages
: Select input languages for text input.
•
Block offensive words
: Set the device to prevent the device from recognising offensive
words in voice inputs.
•
Download offline speech recognition
: Download and install language data for offline
voice input.
Samsung keyboard
To change the Samsung keyboard settings, tap .
The available options may vary depending on the region or service provider.
•
Portrait keyboard types
: Change the keyboard layout.
•
Input languages
: Select languages for text input.

Settings
153
•
Predictive text
: Activate predictive text mode to predict words based on your input and
show word suggestions. You can also customise the word prediction settings.
•
Continuous input
: Set the device to enter text by sweeping on the Qwerty keyboard.
•
Keyboard swipe
: Enable or disable the keyboard sweeping feature for the text input
mode. Switch between input modes by scrolling left or right on the keyboard.
This feature may not be available depending on the region or service provider.
•
Handwriting
: Customise settings for handwriting mode, such as recognition time, pen
thickness, or pen colour.
•
Advanced
:
–
Auto capitalisation
: Set the device to automatically capitalise the first character after
a final punctuation mark, such as a full stop, question mark, or exclamation mark.
–
Auto spacing
: Set the device to automatically insert a space between words.
–
Auto-punctuate
: Set the device to insert a full stop when you double-tap the space
bar.
–
Character preview
: Set the device to display a large image of each character tapped.
–
Key-tap vibration
: Set the device to vibrate when a key is touched.
–
Key-tap sound
: Set the device to sound when a key is touched.
•
Tutorial
: Learn how to enter text with the Samsung keyboard.
•
Reset settings
: Reset Samsung keyboard settings.
Voice recogniser
Select a voice recognition engine.
Voice search
For Samsung voice recognition, use the following options:
•
Language
: Select a language for the voice recognition.
•
Use location data
: Set the device to use location information for voice search results.
•
Hide offensive words
: Hide offensive words from voice search results.
•
Help
: Access help information for
S Voice
.

Settings
154
•
About
: View version information.
•
Voice control
: Control applications by voice commands.
•
Show body of message
: Set the device to view the text of a new message received while
in driving mode.
•
Wake up command
: Set the device to start voice recognition by saying a wake up
command while using
S Voice
.
•
Wake up in lock screen
: Set the device to recognise your wake up command when the
screen is locked.
•
Set wake-up command
: Set a wake up command to launch
S Voice
or perform a
specified function.
•
Check missed events
: Set the device to check missed events when
S Voice
is launched
by pressing the headset button.
•
Home address
: Enter your home address to use location information with the voice
command feature.
•
Log in to Facebook
: Enter your Facebook account information to use Facebook with
S
Voice
.
•
Log in to Twitter
: Enter your Twitter account information to use Twitter with
S Voice
.
For Google voice recognition, use the following options:
•
Language
: Select a language for the voice recognition.
•
Speech output
: Set the device to provide voice feedback to alert you to the current
action.
•
Block offensive words
: Hide offensive words from voice search results.
•
Download offline speech recognition
: Download and install language data for offline
voice input.

Settings
155
Text-to-speech options
•
Preferred TTS engine
: Select a speech synthesis engine. To change the settings for
speech synthesis engines, tap .
•
Speech rate
: Select a speed for the text-to-speech feature.
•
Listen to an example
: Listen to the spoken text for an example.
Pointer speed
Adjust the pointer speed for the mouse or trackpad connected to your device.
Motions and gestures
Activate the motion recognition feature and change the settings that control motion
recognition on your device.
•
Motion
:
–
Zoom
: Set the device to zoom in or out while viewing images in
Gallery
, when you
tap and hold two points with your fingers and then tilt the device back and forth.
–
Move an icon
: Set the device to move an item to another page when tapping and
holding the item and then panning the device to the left or right.
–
Browse an image
: Set the device to scroll through an image by moving the device in
any direction when the image is zoomed in.
•
Palm motion
:
–
Capture screen
: Set the device to capture an image of the screen when you sweep
your hand to the left or right across the screen.
–
Mute/Pause
: Set the device to pause media playback when you touch the screen with
your palm.
•
Gyroscope calibration
: Calibrate the gyroscope so your device can correctly recognise
rotation.
•
Place the device on a stable surface during calibration. The calibration process may
fail if the device vibrates or moves.
•
Calibrate the gyroscope when you experience drifting or unintended movements
when using tilting or panning motions or motion-enabled games.

Settings
156
Voice control
Change settings to control options by voice commands.
Accounts
Add account
Add email or SNS accounts.
Cloud
Change settings for syncing data or files with your Samsung account or Dropbox cloud
storage.
Backup and reset
Change the settings for managing settings and data.
•
Back up my data
: Set the device to back up settings and application data to the Google
server.
•
Backup account
: Set up or edit your Google backup account.
•
Automatic restore
: Set the device to restore settings and application data when the
applications are reinstalled on the device.
•
Factory data reset
: Reset settings to the factory default values and delete all data.
More
Customise settings for location services, security, and other options.

Settings
157
Location services
Change settings for location information permissions.
•
Access to my location
: Set the device to allow applications to use your current location
information.
•
Use GPS satellites
: Set the device to use the GPS satellite for finding the current location.
•
My places
: Set up profiles that will be used for specific locations when you use GPS, Wi-Fi,
or Bluetooth features to find your current location.
Security
Change settings for securing the device and the SIM or USIM card.
•
Encrypt device
: Set a password to encrypt data saved on the device. You must enter the
password each time you turn on the device.
Charge the battery before enabling this setting because it may take more than an
hour to encrypt your data.
•
Encrypt external SD card
: Set the device to encrypt files on a memory card.
If you reset your device to the factory defaults with this setting enabled, the device
will not be able to read your encrypted files. Disable this setting before resetting the
device.
•
Remote controls
: Set the device to allow control of your lost or stolen device remotely
via the Internet. To use this feature, you must sign in to your Samsung account.
–
Account registration
: Add or view your Samsung account.
–
Wi-Fi & mobile network location
: Set the device to allow location data collection or
to determine the location of your lost or stolen device via Wi-Fi or mobile network.
•
SIM Change Alert
: Activate or deactivate the Find my mobile feature which helps locate
the device when lost or stolen.

Settings
158
•
Find my mobile web page
: Access the Find my mobile website
(
findmymobile.samsung.com
). You can track and control your lost or stolen device on the
Find my mobile website.
•
Set up SIM card lock
:
–
Lock SIM card
: Activate or deactivate the PIN lock feature to require the PIN before
using the device.
–
Change SIM PIN
: Change the PIN used to access SIM or USIM data.
•
Make passwords visible
: By default, the device hides passwords for security. Set the
device to display passwords as they are entered.
•
Device administrators
: View device administrators installed on the device. You can allow
device administrators to apply new policies to the device.
•
Unknown sources
: Choose to install applications from any source. If not chosen,
download applications only from
Play Store
.
•
Verify apps
: Set this to allow Google to check the application for harmful behaviour
before installing it.
•
Trusted credentials
: Use certificates and credentials to ensure secure use of various
applications.
•
Install from device storage
: Install encrypted certificates stored on the USB storage.
•
Clear credentials
: Erase the credential contents from the device and reset the password.
Application manager
View and manage the applications on your device.
Battery
View the amount of battery power consumed by your device.

Settings
159
Power
Activate power-saving mode and change the settings for power-saving mode.
•
Auto power off
: Set the length of time the device waits before turning off.
•
The device automatically turns off if the screen is not touched, or the buttons are
not pressed for a preset length of time. For extended use, select a longer time
period.
•
This feature is disabled when playing videos or listening to music.
•
You can save battery power by turning on this feature.
•
Power saving mode
:
–
CPU power saving
: Set the device to limit some system resource usage.
–
Screen power saving
: Set the device to decrease the brightness of the display.
–
Turn off haptic feedback
: Set the device to turn off the vibration when touching keys.
–
Learn about Power saving mode
: Discover how to reduce battery consumption.
•
Fast power-on
: Activating this causes the device to start quickly for the next 24 hours.
Storage
View memory information for your device and memory card, or format a memory card.
Formatting a memory card permanently deletes all data from it.
The actual available capacity of the internal memory is less than the specified
capacity because the operating system and default applications occupy part of the
memory.

Settings
160
Date and time
Access and alter the following settings to control how the device displays the time and date.
If the battery remains fully discharged or removed from the device, the time and date
is reset.
•
Automatic date and time
: Automatically update the time and date when moving across
time zones.
•
Set date
: Set the current date manually.
•
Set time
: Set the current time manually.
•
Automatic time zone
: Set the device to receive time zone information from the network
when you move across time zones.
•
Select time zone
: Set the home time zone.
•
Use 24-hour format
: Display time in 24-hour format.
•
Select date format
: Select a date format.
About device
Access device information and update device software.

161
Troubleshooting
The subject’s eyes appear red
Red eyes occur when the subject’s eyes reflect light from the camera flash.
•
Set the flash option to
Auto + Red-eye
or
Fill in + Red-eye
.
•
If the photo has already been taken, tap
Portrait
→
Red-eye fix
in
Photo Wizard
.
Photos have dust spots
If dust particles are present in the air, you may capture them in photos when you use the
flash.
•
Turn the flash off or avoid taking photos in a dusty place.
•
Adjust the ISO sensitivity. (p. 77)
Photos are blurred
Blurring can occur if you take photos in low light conditions or hold the device incorrectly.
•
Half-press the Shutter button to ensure the subject is focused.
•
Set the image stabiliser option.
•
Use a tripod to prevent your device from shaking.

Troubleshooting
162
Photos are blurred when shooting at night
As the device tries to let in more light, the shutter speed slows. This can make it difficult to
hold the device steady long enough to take a clear picture and may result in device shake.
•
Set
Night
in smart mode.
•
Turn the flash on.
•
Adjust the ISO sensitivity. (p. 77)
•
Use a tripod to prevent your device from shaking.
Subjects come out too dark because of backlighting
When the light source is behind the subject or when there is a high contrast between light
and dark areas, the subject may appear too dark.
•
Avoid shooting toward the sun.
•
Set the flash option to
Fill in
.
•
Adjust the exposure value.
•
Set the metering option to
Spot
if a subject is in the centre of the frame.
When you cannot turn on the device
•
Ensure that the battery is inserted. (p. 15)
•
Charge the battery.
When you cannot take photos or videos
•
Your storage may be full. Delete unnecessary files, or insert a new memory card.
•
Format the memory card.
•
The memory card may be defective. Purchase a new card.
•
Ensure that the device is turned on.
•
Charge the battery.
•
Ensure that the battery is inserted. (p. 15)

Troubleshooting
163
When the flash is not functional
•
Press the Flash release button to pop the flash up.
•
The flash option may be set to
Off
. (p. 83)
•
In some modes, the flash is disabled.
When the flash fires unexpectedly
The flash may fire unexpectedly due to static electricity. The device is not malfunctioning.
When the colours in the photo do not match the actual scene
Select an appropriate white balance option to suit the light source. (p. 78)
When the photo is too bright
•
Turn the flash off. (p. 83)
•
Adjust the ISO sensitivity. (p. 77)
•
Adjust the exposure value. (p. 76)
When the photo is too dark
•
Turn the flash on. (p. 83)
•
Adjust the ISO sensitivity. (p. 77)
•
Adjust the exposure value. (p. 76)

Troubleshooting
164
When you turn on your device or while you are using the device, it
prompts you to enter one of the following codes:
•
Password: When the device lock feature is enabled, you must enter the password you set
for the device.
•
PIN: When using the device for the first time or when the PIN requirement is enabled, you
must enter the PIN supplied with the SIM or USIM card. You can disable this feature by
using the Lock SIM card menu.
•
PUK: Your SIM or USIM card is blocked, usually as a result of entering your PIN incorrectly
several times. You must enter the PUK supplied by your service provider.
•
PIN2: When you access a menu requiring the PIN2, you must enter the PIN2 supplied with
the SIM or USIM card. For details, contact your service provider.
Your device displays network or service error messages
•
When you are in areas with weak signals or poor reception, you may lose reception. Move
to another area and try again.
•
You cannot access some options without a subscription. Contact your service provider for
more details.
The lens barrel does not retract even when the power is off
When you turn the power off while holding the lens barrel, the lens barrel may not be able
to retract into the body. If this happens, do not force the lens barrel into the body. Take the
device to your local Samsung Service Centre.

Troubleshooting
165
The touch screen responds slowly or improperly
If your device has a touch screen and the touch screen is not responding properly, try the
following:
•
Remove any protective covers from the touch screen. Protective covers may prevent the
device from recognising your inputs and are not recommended for touch screen devices.
•
Ensure that your hands are clean and dry when tapping the touch screen.
•
Restart your device to clear any temporary software bugs.
•
Ensure that your device software is upgraded to the latest version.
•
If the touch screen is scratched or damaged, take it to your local Samsung Service Centre.
Your device freezes or has fatal errors
If your device freezes or hangs, you may need to close programs or reset the device to regain
functionality. If your device is frozen and unresponsive, press and hold the Power button for
6-8 seconds. The device reboots automatically.
If this does not solve the problem, perform a factory data reset. On the Applications screen,
tap
Settings
→
Accounts
→
Backup and reset
→
Factory data reset
→
Reset device
→
Erase everything
.
The device beeps and the battery icon is empty
Your battery is low. Recharge or replace the battery to continue using the device.
The battery does not charge properly or the device turns off
•
The battery terminals may be dirty. Wipe both gold-coloured contacts with a clean, soft
cloth and try charging the battery again.
•
If the battery no longer charges completely, dispose of the old battery properly
and replace it with a new battery (refer to your local ordinances for proper disposal
instructions).

Troubleshooting
166
Your device is hot to the touch
When you use applications that require more power or use applications on your device for an
extended period of time, your device may feel hot to the touch. This is normal and should not
affect your device’s lifespan or performance.
Error messages appear when launching the camera
Your Samsung device must have sufficient available memory and battery power to operate
the camera application. If you receive error messages when launching the camera, try the
following:
•
Charge the battery or replace it with a battery that is fully charged.
•
Free some memory by transferring files to a computer or deleting files from your device.
•
Restart the device. If you are still having trouble with the camera application after trying
these tips, contact a Samsung Service Centre.
Error messages appear when opening music files
Some music files may not play on your Samsung device for a variety of reasons. If you receive
error messages when opening music files on your device, try the following:
•
Free some memory by transferring files to a computer or deleting files from your device.
•
Ensure that the music file is not Digital Rights Management (DRM)-protected. If the file is
DRM-protected, ensure that you have the appropriate licence or key to play the file.
•
Ensure that your device supports the file type.
Another Bluetooth device is not located
•
Ensure that the Bluetooth wireless feature is activated on your device.
•
Ensure that the Bluetooth wireless feature is activated on the device you wish to connect
to, if necessary.
•
Ensure that your device and the other Bluetooth device are within the maximum
Bluetooth range (10 m).
If the tips above do not solve the problem, contact a Samsung Service Centre.

Troubleshooting
167
A connection is not established when you connect the device to a
computer
•
Ensure that the USB cable you are using is compatible with your device.
•
Ensure that you have the proper drivers installed and updated on your computer.
•
If you are a Windows XP user, ensure that you have Windows XP Service Pack 3 or higher
installed on your computer.
•
Ensure that you have Samsung Kies 2.0 or Windows Media Player 10 or higher installed
on your computer.
A small gap appears around the outside of the device case
•
This gap is a necessary manufacturing feature and some minor rocking or vibration of
parts may occur.
•
Over time, friction between parts may cause this gap to expand slightly.
168
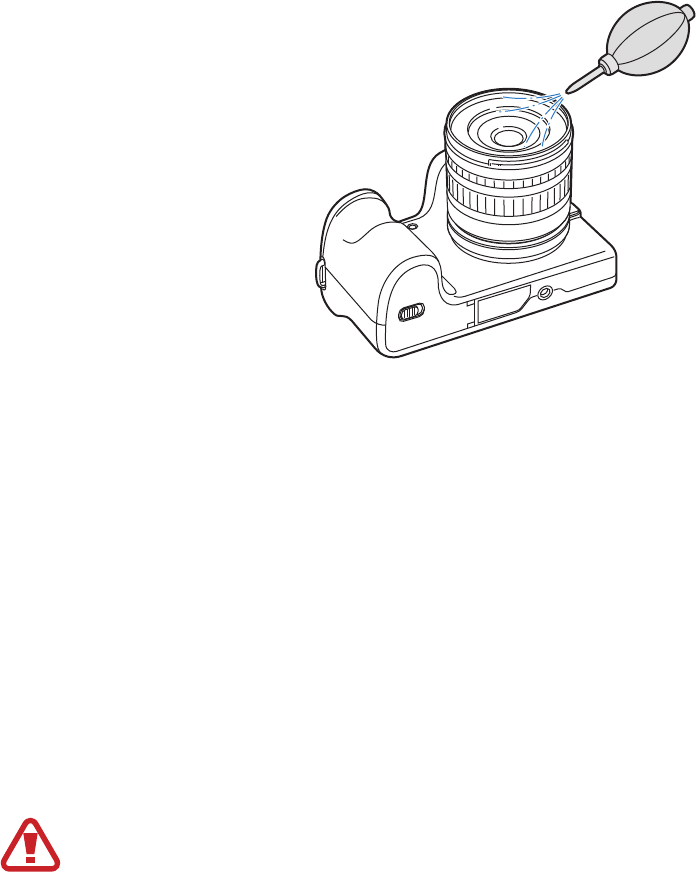
Cleaning the device
Camera lens and display
Use a blower brush to remove dust, and then wipe the lens gently with a soft cloth. If any dust
remains, apply lens cleaning liquid to a lens cleaning paper, and wipe gently.
Image sensor
Depending on different shooting conditions, dust may appear in photos because the image
sensor is exposed to the external environment. This problem is normal, and the exposure to
dust occurs in everyday use of the camera. You can remove dust from the sensor by operating
the sensor cleaning function. (p. 96) If dust remains after cleaning the sensor, contact a
service centre. Do not insert the blower into the mounting opening of the lens.
Camera body
Wipe gently with a soft, dry cloth.
Never use benzene, thinners, or alcohol to clean the device. These solutions can
damage the device or cause it to malfunction.
169
Concepts in Photography
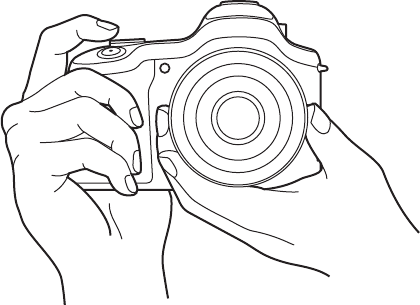
Shooting postures
A correct posture for stabilising the camera is necessary for taking a good photo. Even if you
hold a camera correctly, the wrong posture can cause the camera to shake. Stand up straight
and remain still to maintain a steady base for your camera. When shooting with a slow shutter
speed, hold your breath to minimise body movement.
Holding the camera
Hold the camera with your right hand and place you right index finger on the Shutter button.
Place your left hand under the lens for support.
Concepts in Photography
170
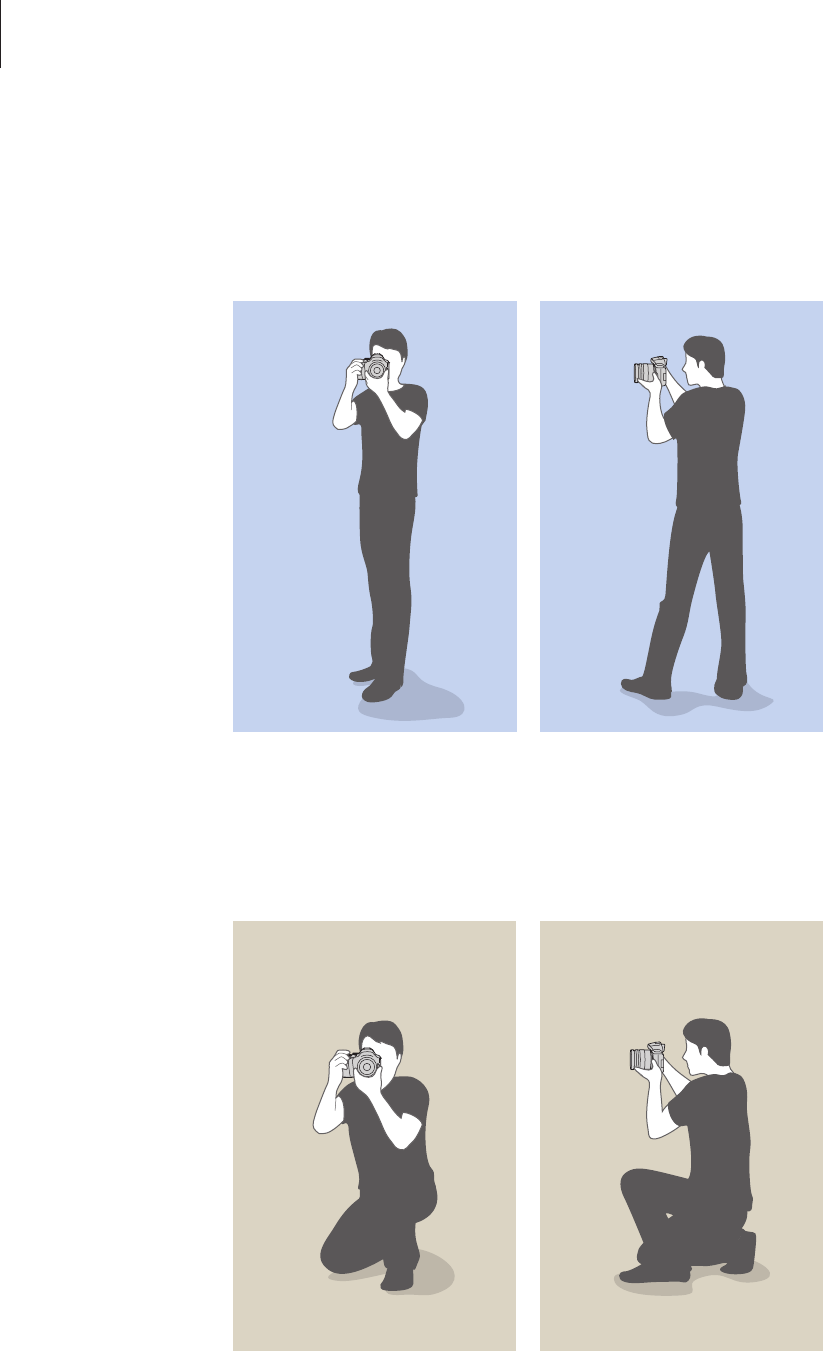
Standing photography
Compose your shot, stand up straight with your feet shoulder-length apart, and keep your
elbows pointed down.
Crouching photography
Compose your shot, crouch with one knee touching the ground, and keep a straight posture.
Concepts in Photography
171
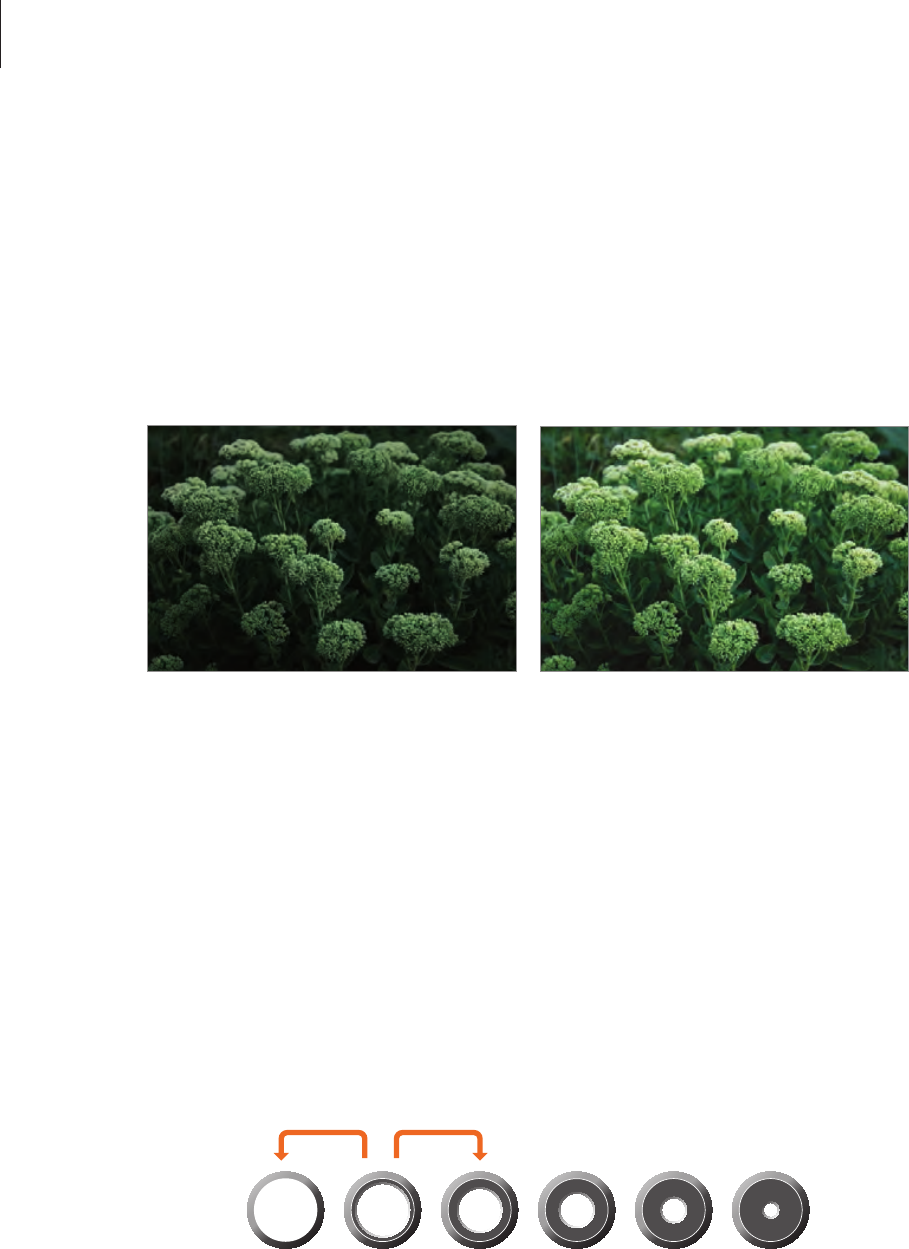
Aperture
The aperture, a hole that controls the amount of light that enters the camera, is one of the
three factors that determine the exposure. The aperture housing contains thin and metal
plates that open and close to let light through the aperture and into the camera. The size
of the aperture is closely related to the brightness of a photo: the larger the aperture, the
brighter the photo; the smaller the aperture, the darker the photo.
Darker photo
(aperture opened slightly)
Brighter photo
(aperture opened wide)
The size of the aperture is represented by a value known as an F-number. The f-number
represents the focal length divided by the diameter of the lens. For example, if a lens with a
50 mm focal length has an f-number of F2, the diameter of the aperture is 25 mm. (50 mm/25
mm=F2) The smaller the f-number, the greater the size of the aperture.
The opening in the aperture is described as the exposure value (EV). Increasing the exposure
value (+1 EV) means the amount of light doubles. Decreasing the exposure value (-1 EV)
means the amount of light halves. You can also use the exposure compensation feature to
fine-tune the amount of light by subdividing exposure values into 1/2, 1/3 EV, and so on.
+1 EV
F1.4 F2 F2.8 F4 F5.6 F8
-1 EV
Exposure value steps
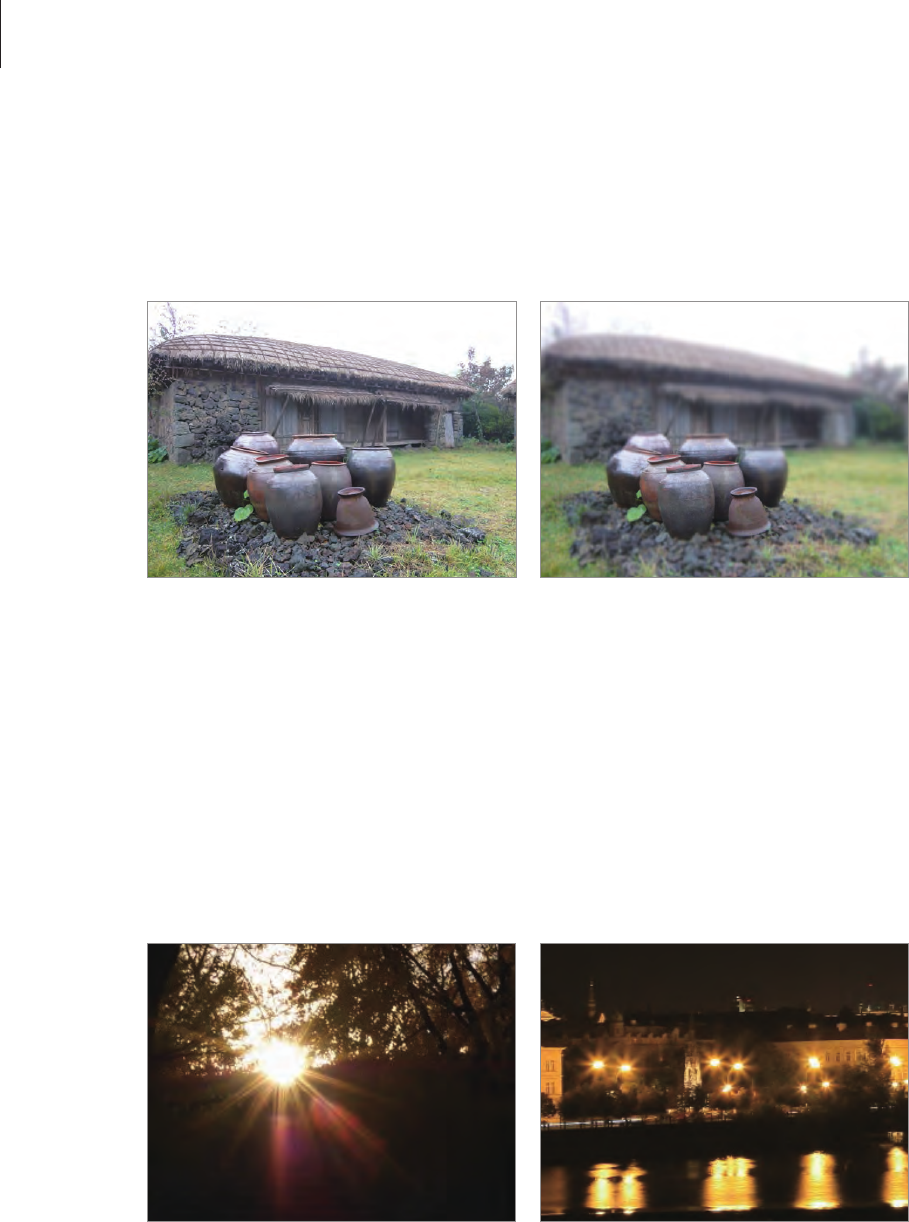
Concepts in Photography
172
Aperture value and the depth of field
You can blur or sharpen the background of a photo by controlling the aperture. It is closely
related to the depth of field (DOF), which can be expressed as small or large.
A photo with a large DOF A photo with a small DOF
The aperture housing contains several blades. These blades move together and control the
amount of light passing through the centre of the aperture. The number of blades also affects
the shape of light when shooting night scenes. If an aperture has an even number of blades,
light divides into an equal number of sections. If the number of blades is odd, the number of
sections is double the number of blades.
For example, an aperture with 8 blades divides light into 8 sections and an aperture with 7
blades into 14 sections.
7 blades 8 blades
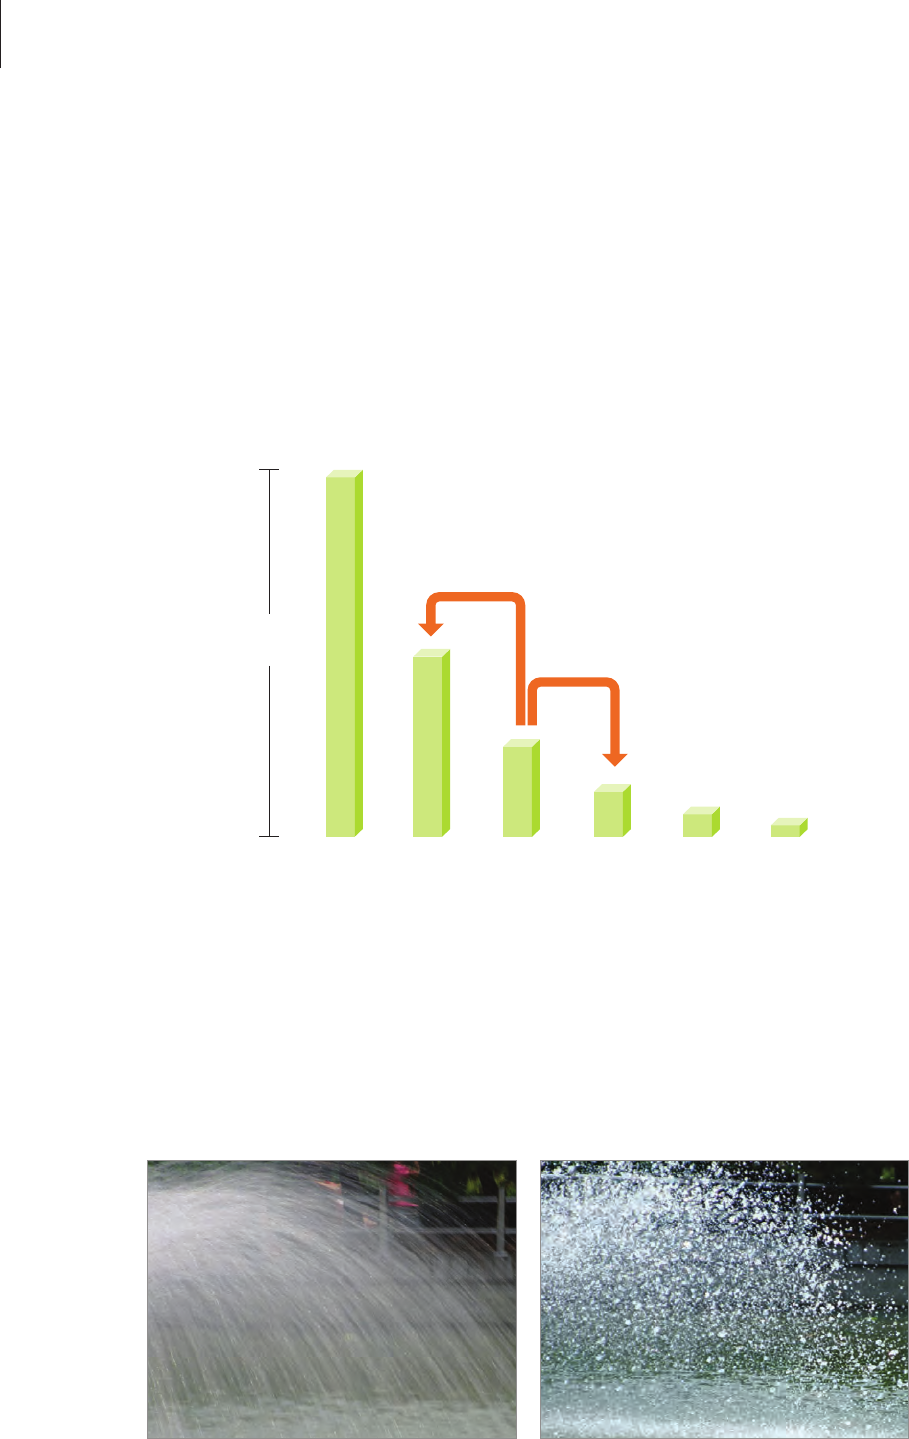
Concepts in Photography
173
Shutter speed
Shutter speed refers to the amount of time it takes to open and close the shutter, and it is an
important factor in the brightness of a photo, as it controls the amount of light which passes
through the aperture before it reaches the image sensor.
Usually, the shutter speed is manually adjustable. The measurement of the shutter speed is
the exposure value (EV), which is marked in intervals of 1 s, 1/2 s, 1/4 s, 1/8 s, 1/15 s, 1/1000 s,
1/2000 s, and so on.
+1 EV
1s 1/2 s 1/4 s 1/8 s 1/15 s 1/30 s
+1 EV
Exposure
Shutter speed
Therefore, the faster the shutter speed, the less light will be let in. Likewise, the slower the
shutter speed, the more light will be let in.
As the photos below illustrate, a slow shutter speed allows more time to let light in, so the
photo becomes brighter. On the other hand, a fast shutter speed allows less time to let light
in and the photo becomes darker and more easily freezes subjects in motion.
0.8 s 0.004 s
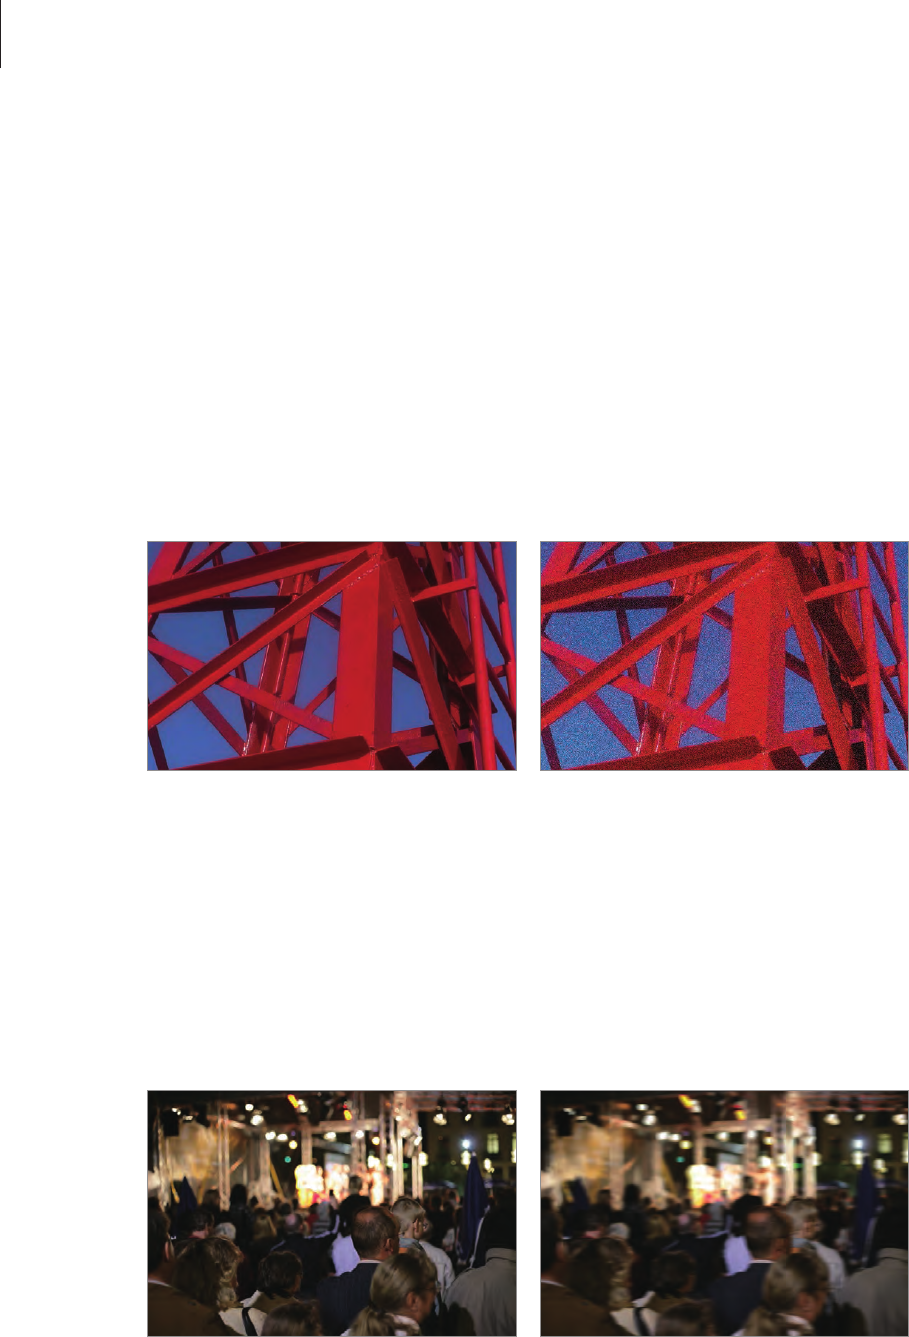
Concepts in Photography
174
ISO sensitivity
The exposure of an image is determined by the sensitivity of the camera. This sensitivity
is based on international film standards, known as ISO standards. On digital cameras, this
sensitivity rating is used to represent the sensitivity of the digital mechanism that captures
the image.
ISO sensitivity doubles as the number doubles. For example, an ISO 200 setting is capable
of taking photos at twice the speed of an ISO 100 setting. However, higher ISO settings can
result in noise. As a general rule, it is best to use a low ISO setting to prevent noise in your
photos, unless you are shooting in darkened environments or at night.
Changes in the quality and brightness according to ISO sensitivity
Because a low ISO sensitivity means the camera will be less sensitive to light, you need more
light to have an optimal exposure. When using a low ISO sensitivity, open the aperture more
or reduce the shutter speed to allow more light to enter the camera. For example, on a sunny
day when light is abundant, a low ISO sensitivity does not require a slow shutter speed.
However, in a dark place or at night, a low ISO sensitivity and a slow shutter speed will result
in a blurry photo.
A photo taken with a tripod and
high ISO sensitivity
A blurred photo with a low ISO
sensitivity
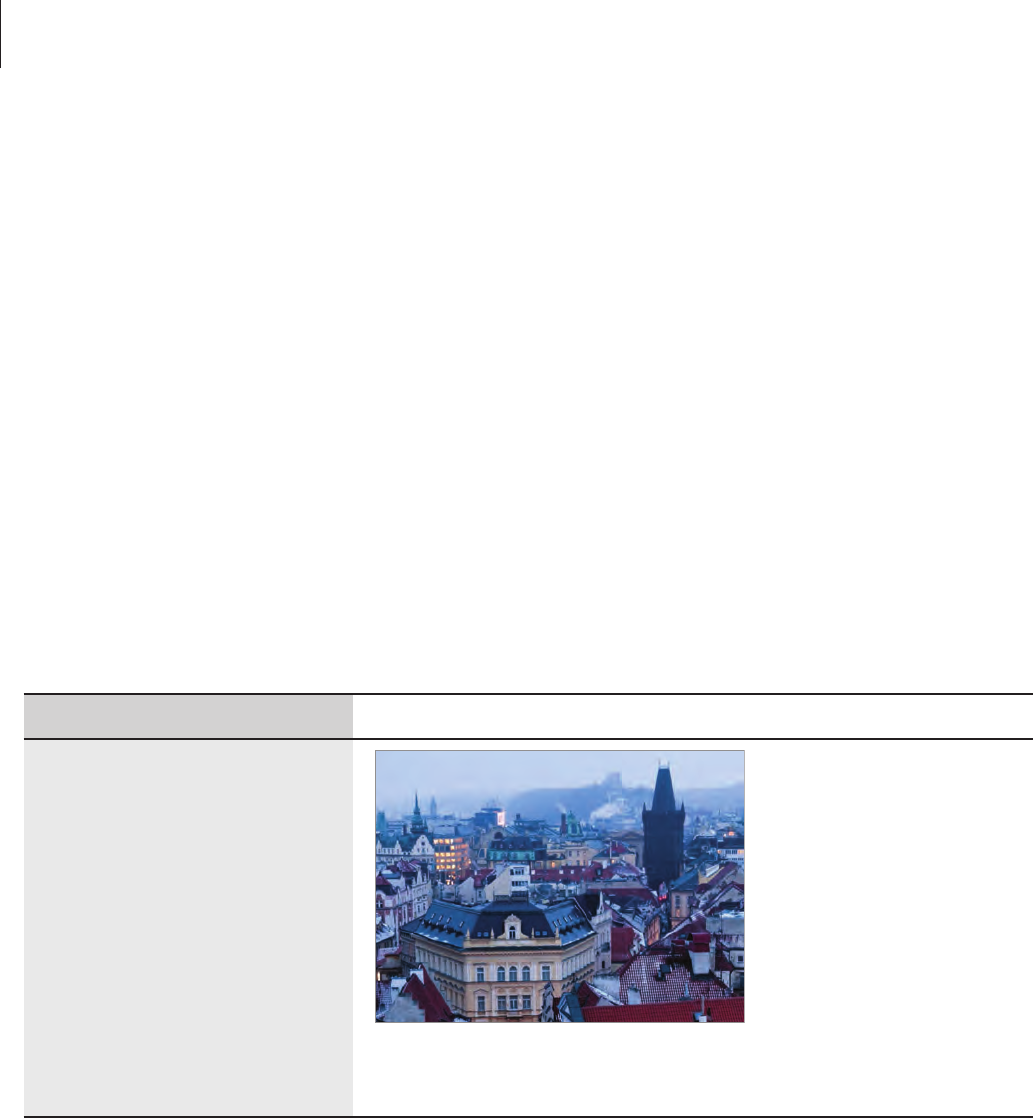
Concepts in Photography
175
How the aperture setting, shutter speed, and
ISO sensitivity control exposure
The aperture setting, shutter speed, and ISO sensitivity are closely interconnected in
photography. The aperture setting controls the opening that regulates the light that enters
the camera, while the shutter speed determines the length of time that light is allowed to
enter. ISO sensitivity determines the speed at which the film reacts to light. Together, these
three aspects are described as the triangle of exposure.
A change in shutter speed, aperture value, or ISO sensitivity can be offset by adjustments to
the others to maintain the amount of light. The results, however, change according to the
settings. For example, shutter speed is useful in expressing movement, the aperture can
control the depth of field, and the ISO sensitivity can control the graininess of a photo.
Aperture value
Setting Result
Wide aperture = more light
Narrow aperture = less light
Wide = small depth of field
Narrow = large depth of field
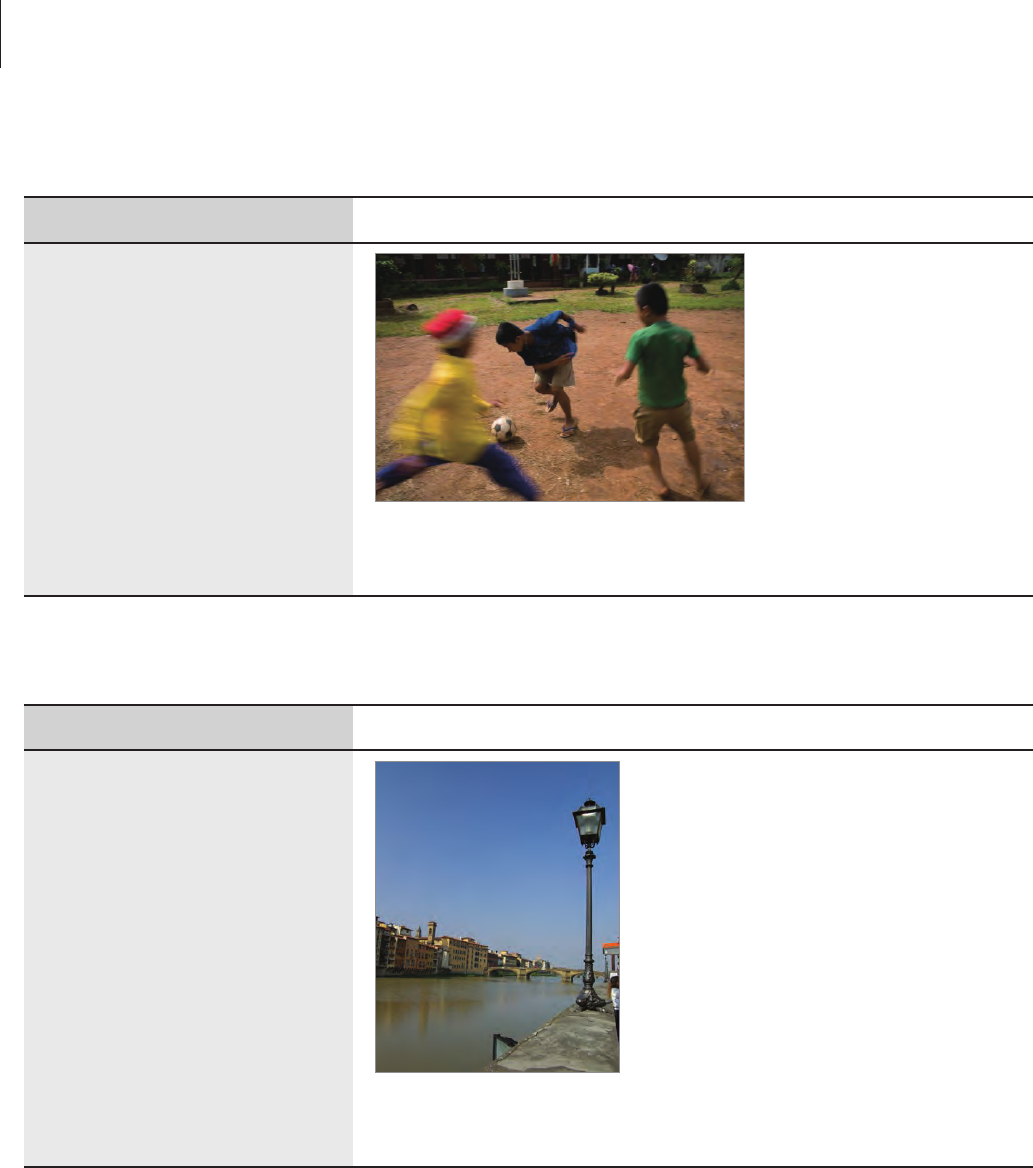
Concepts in Photography
176
Shutter speed
Setting Result
Fast speed = less light
Slow speed = more light
Fast = still
Slow = blurry
ISO sensitivity
Setting Result
High sensitivity = more
sensitive to light
Low sensitivity = less
sensitive to light
High = more grainy
Low = less grainy
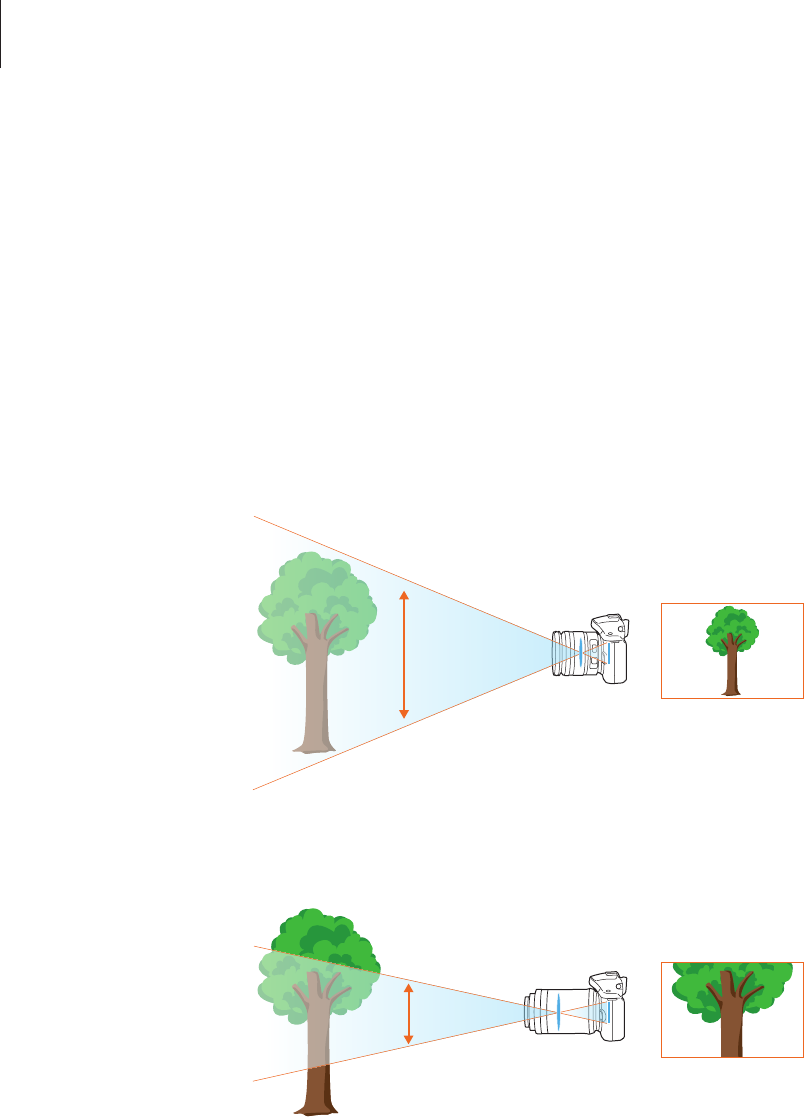
Concepts in Photography
177
Correlation between focal length, angle, and
perspective
Focal length, which is measured in millimetres, is the distance between the middle of the
lens to its focal point. It affects the angle and perspective of taken photos. A short focal
length translates into a wide angle, which allows you to take wide shots. A long focal length
translates into a narrow angle, which allows you to take telephoto shots.
Short focal length
Long focal length
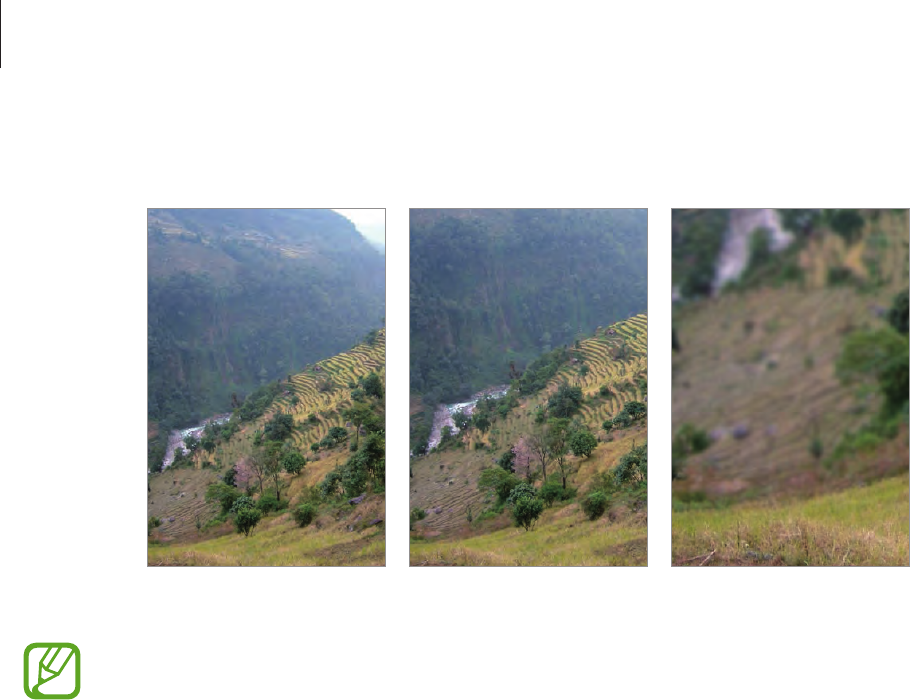
Concepts in Photography
178
Look at these photos below and compare the changes.
20 mm angle 50 mm angle 200 mm angle
Normally, a lens with a wide angle is suitable for shooting landscapes and a lens with
a narrow angle is recommended for shooting sports events or portraits.
Depth of field
Portraits or still-life photos mostly acclaimed by people are the ones on which the
background is out of focus so the subject looks pronounced. Depending on the focused
areas, a photo can be blurred or sharpened. This is called ‘a low DOF’ or ‘a high DOF’.
The depth of field is the focused area around the subject. Therefore, a small DOF signifies that
the focused area is narrow and a large DOF means the focused area is wide.

Concepts in Photography
179
A photo with a small DOF, which stresses the subject and makes the rest of it blurred, can be
obtained by using a telescope lens or selecting a low aperture value. Conversely, a photo with
a large DOF which shows all the elements on the photo sharply focused can be achieved by
using a wide angle lens or selecting a high aperture value.
Small depth of field Large depth of field
What controls out-of-focus effects?
DOF depends on aperture value
The wider the aperture is (namely the lower the aperture value), the lower the DOF becomes.
Under the condition where the other values including the shutter speed and ISO sensitivity
are equal, a low aperture value leads to a photo with a low DOF.
50 mm F5.7 50 mm F22
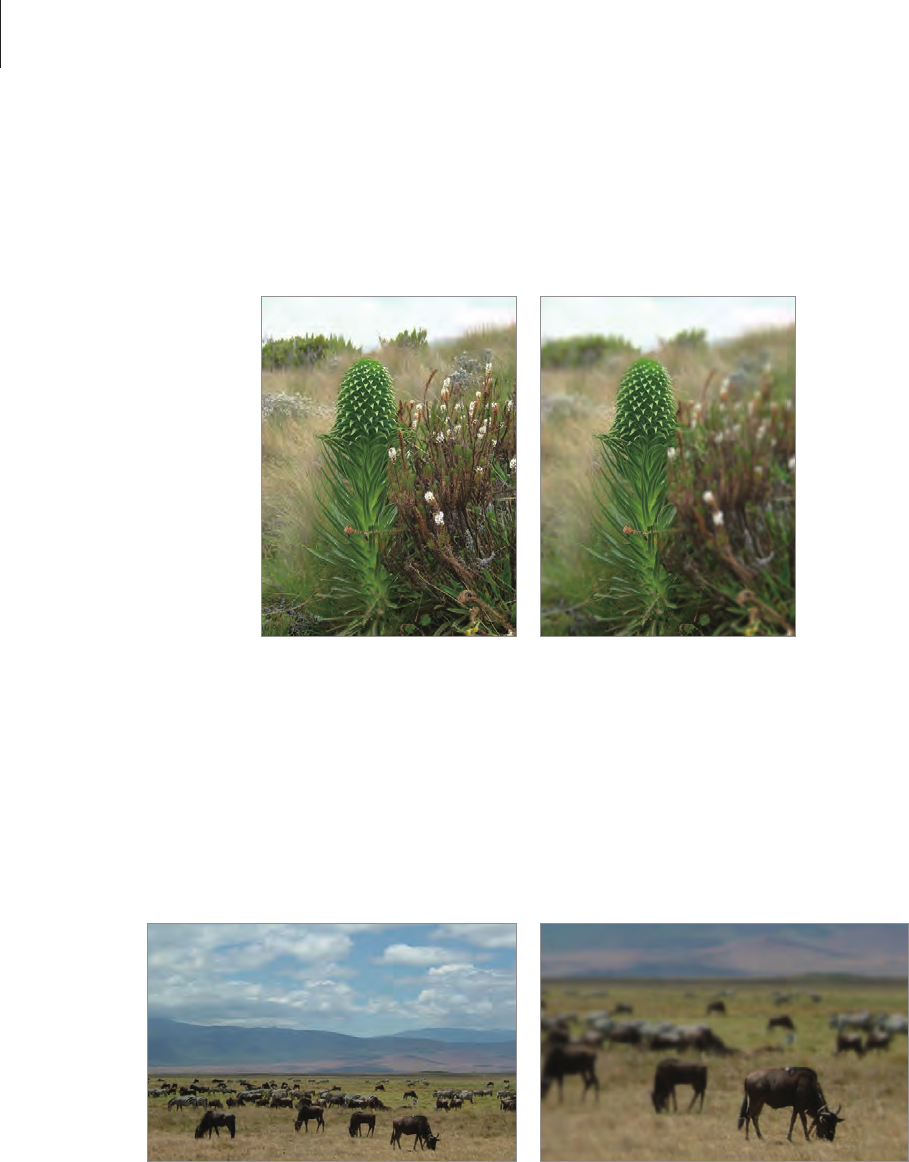
Concepts in Photography
180
DOF depends on focal length
The longer the focal length is, the lower the DOF gets. A telescope lens with a longer focal
length than a telescope lens with a short focal length is better to take a photo of a low DOF.
A photo taken with a
20 mm telescope lens
A photo taken with a
100 mm telescope lens
DOF depends on the distance between the subject and the camera
The shorter the distance between the subject and the camera is, the lower the DOF gets.
Therefore, taking a photo close to a subject can result in a photo of low DOF.
A photo taken with a 100 mm
telescope lens
A photo taken close to the
subject
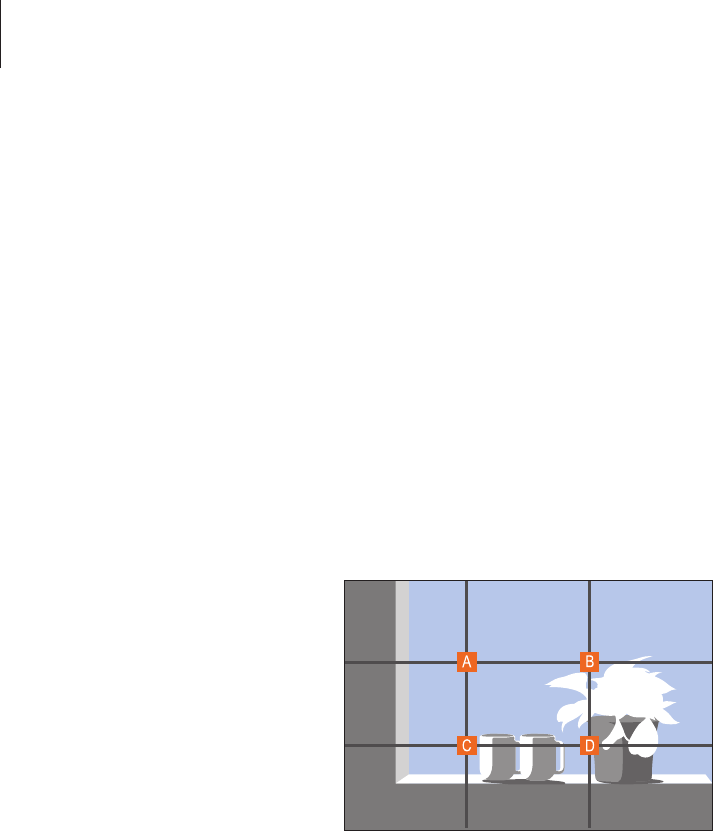
Concepts in Photography
181
Composition
It is fun to take a photo of the beauty of world with a camera. No matter how the world is
beautiful, however, a poor composition cannot capture the beauty of it.
When it comes to composition, it is very important to prioritise subjects.
Composition in photography means arranging objects in a photo. Usually, abiding by the rule
of thirds leads to a good composition.
Rule of thirds
To use the rule of thirds, divide the image into a 3x3 pattern of equal rectangles.
To compose photos that best emphasise the subject, make sure the subject is located at one
of the corners of the centre rectangle.
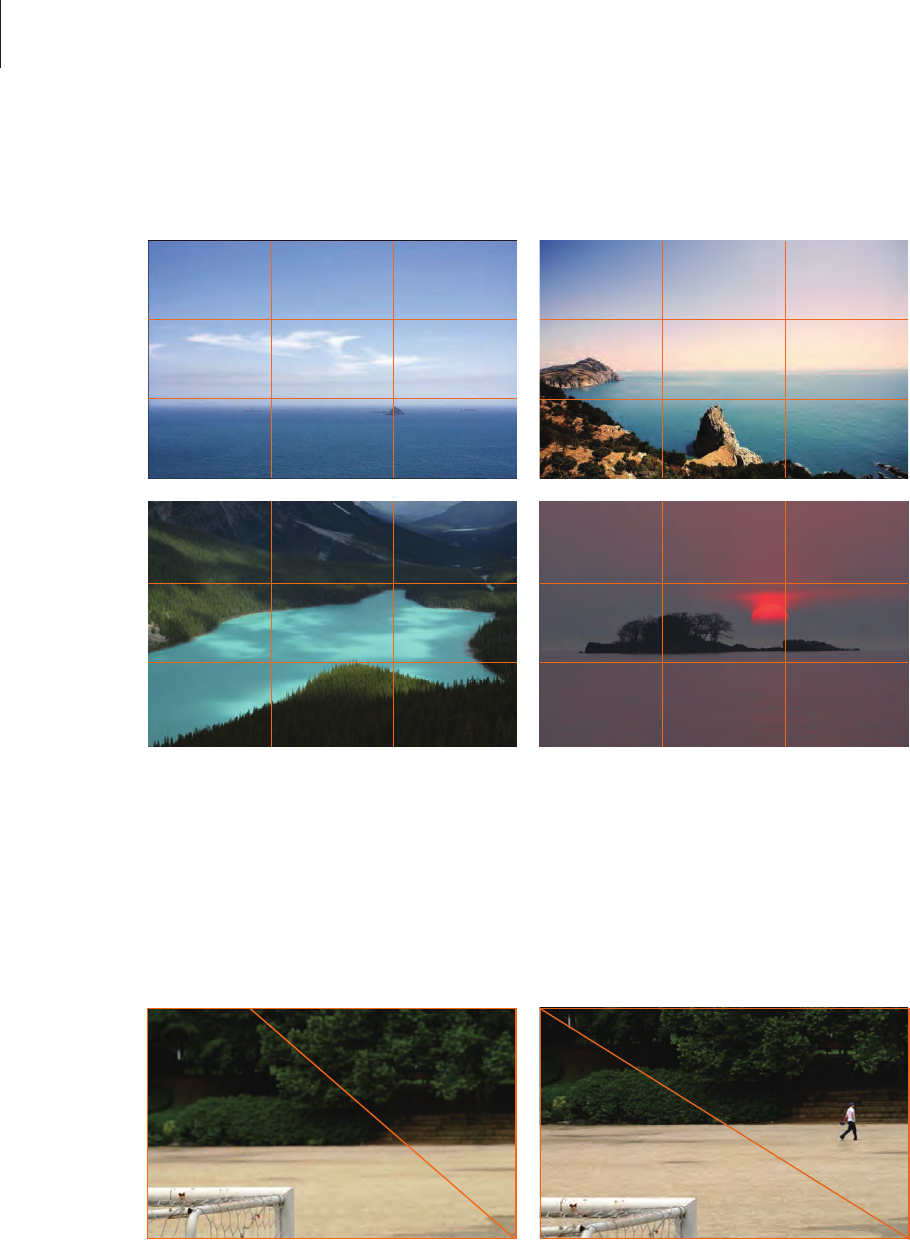
Concepts in Photography
182
Using the rule of thirds will create photos with stable and compelling compositions. Below
are a few examples.
Photos with two subjects
If your subject is in one corner of the photo, it creates an unbalanced composition. You can
stabilise the photo by capturing a second subject in the opposite corner to balance the
weight of the photo.
Unstable Stable
Subject 2
Subject 1
Subject 2
Subject 1

Concepts in Photography
183
When taking landscape photos, centring the horizon will create an unbalanced effect. Give
more weight to the photo by moving the horizon up or down.
Unstable Stable
Subject 2
Subject 1
Subject 2
Subject 1
Flash
Light is one of the most important components in photography. It’s not easy, however, to
have an enough amount of light anytime and anywhere. Making use of a flash allows you to
optimise light settings and create a variety of effects.
Flash, also known as strobe or speed light, helps to create adequate exposure in low-light
conditions. It is also useful in light-abundant situations. For example, flash can be used in
compensating the exposure of a subject’s shadow or capturing clearly both the subject and
the background in backlit conditions.
Before correction After correction

Concepts in Photography
184
Flash guide number
The model number of a flash refers to the flash’s power, and the maximum amount of light
created is represented by a value known as a guide number. The bigger the guide number,
the more light is emitted from the flash. The guide number is achieved by multiplying the
distance from the flash to the subject and the aperture value when the ISO sensitivity is set to
100.
Guide number = Flash to Subject Distance X Aperture value
Aperture value = Guide number / Flash to Subject Distance
Flash to Subject Distance = Guide number / Aperture value
Therefore, if you know the guide number of a flash, you can estimate an optimum flash to
subject distance when setting the flash manually. For example, if a flash has a guide number
of GN 20 and is 4 metres away from the subject, the optimal aperture value is F5.0.
Bounce photography
Bounce photography refers to the method of bouncing light off of the ceiling or walls so
that the light spreads evenly over the subject. Normally, photos taken with flash may appear
unnatural and cast shadows. Subjects in photos taken with bounce photography cast no
shadows and look smooth due to evenly spread light.


20
Safety information
This safety information contains content for mobile
devices. Some content may be not applicable to your
device. To prevent injury to yourself and others or damage
to your device, read the safety information about your
device before using the device.
Warning
Failure to comply with safety warnings and
regulations can cause serious injury or death
Do not use damaged power cords or plugs, or loose
electrical sockets
Unsecured connections can cause electric shock or fire.
Do not touch the power cord with wet hands or disconnect
the charger by pulling the cord
Doing so may result in electrocution.
Do not bend or damage the power cord
Doing so may cause electric shock or fire.
Do not use your device while it is charging or touch your
device with wet hands
Doing so may cause electric shock.
Do not short-circuit the charger or the device
Doing so may cause electric shock or fire, or the battery may
malfunction or explode.
Do not use your device outdoor during a thunderstorm
Doing so may result in electric shock or device malfunction.
Use manufacturer-approved batteries, chargers,
accessories, and supplies
• Using generic batteries or chargers may shorten the life of
your device or cause the device to malfunction. They may
also cause a fire or cause the battery to explode.
• Use only Samsung-approved battery and charger
specifically designed for your device. Incompatible battery
and charger can cause serious injuries or damage to your
device.
• Samsung cannot be responsible for the user’
Do not drop or cause an impact to the charger or the
device
Handle and dispose of the device and charger with care
• Never dispose of the battery or device in a fire. Never
place the battery or device on or in heating devices, such
as microwave ovens, stoves, or radiators. The device may
explode when overheated. Follow all local regulations when
disposing of used battery or device.
s safety when
using accessories or supplies that are not approved by
Samsung.
• When HDMI feature is used, it is necessary to
use an appropriate HDMI cable which is available on
the market and which contains a ferrite core.

Safety information
21
• Never crush or puncture the device.
• Avoid exposing the device to high external pressure, which
can lead to an internal short circuit and overheating.
Protect the device, battery and charger from damage
• Avoid exposing your device and battery to very cold or very
hot temperatures.
• Extreme temperatures can damage the device and reduce
the charging capacity and life of your device and battery.
• Prevent the battery from coming into contact with metal
objects, as this can create a connection between the +
and – terminals of your battery and lead to temporary or
permanent battery damage.
• Never use a damaged charger or battery.
Do not store your device near or in heaters, microwaves,
hot cooking equipment, or high pressure containers
• The battery may leak.
• Your device may overheat and cause a fire.
Do not use or store your device in areas with high
concentrations of dust or airborne materials
Dust or foreign materials can cause your device to malfunction
and may result in fire or electric shock.
Do not bite or suck the device or the battery
• Doing so may damage the device or result in an explosion
or fire.
• Children or animals can choke on small parts.
• If children use the device, make sure that they use the
device properly.
Do not insert the device or supplied accessories into the
eyes, ears, or mouth
Doing so may cause suffocation or serious injuries.
Do not handle a damaged or leaking Lithium Ion (Li-Ion)
battery
For safe disposal of your Li-Ion battery, contact your nearest
authorised service centre.
Caution
Failure to comply with safety cautions and
regulations can cause injury or property damage
Do not use your device near other electronic devices
• Most electronic devices use radio frequency signals. Your
device may interfere with other electronic devices.
• Using an LTE data connection may cause interference with
other devices, such as audio equipment and telephones.

Safety information
22
Do not use your device in a hospital, on an aircraft, or in
an automotive equipment that can be interfered with by
radio frequency
• Avoid using your device within a 15 cm range of a
pacemaker, if possible, as your device can interfere with the
pacemaker.
• To minimise possible interference with a pacemaker, use
your device only on the side of your body that is opposite
the pacemaker.
• If you use medical equipment, contact the equipment
manufacturer before using your device to determine
whether or not the equipment will be affected by radio
frequencies emitted by the device.
• On an aircraft, using electronic devices can interfere with the
aircraft’s electronic navigational instruments. Make sure the
device is turned off during takeoff and landing. After takeoff,
you can use the device in flight mode if allowed by aircraft
personnel.
• Electronic devices in your car may malfunction, due to radio
interference from your device. Contact the manufacturer for
more information.
Do not expose the device to heavy smoke or fumes
Doing so may damage the outside of the device or cause it to
malfunction.
If you use a hearing aid, contact the manufacturer for
information about radio interference
The radio frequency emitted by your device may interfere
with some hearing aids. Before using your device, contact the
manufacturer to determine whether or not your hearing aid
will be affected by radio frequencies emitted by the device.
Do not use your device near devices or apparatuses that
emit radio frequencies, such as sound systems or radio
towers
Radio frequencies may cause your device to malfunction.
Turn off the device in potentially explosive environments
• Turn off your device in potentially explosive environments
instead of removing the battery.
• Always comply with regulations, instructions and signs in
potentially explosive environments.
• Do not use your device at refuelling points (petrol stations),
near fuels or chemicals, or in blasting areas.
• Do not store or carry flammable liquids, gases, or explosive
materials in the same compartment as the device, its parts,
or accessories.
If you notice strange smells or sounds coming from
your device or the battery, or if you see smoke or liquids
leaking from the device or battery, stop using the device
immediately and take it to a Samsung Service Centre
Failure to do so may result in fire or explosion.

Safety information
23
Comply with all safety warnings and regulations
regarding mobile device usage while operating a vehicle
While driving, safely operating the vehicle is your first
responsibility. Never use your mobile device while driving, if it
is prohibited by law. For your safety and the safety of others,
use your common sense and remember the following tips:
• Get to know your device and its convenience features, such
as speed dial and redial. These features help you reduce the
time needed to place or receive calls on your mobile device.
• Position your device within easy reach. Make sure you can
access your wireless device without taking your eyes off the
road. If you receive an incoming call at an inconvenient time,
let your voicemail answer it for you.
• Suspend calls in heavy traffic or hazardous weather
conditions. Rain, sleet, snow, ice, and heavy traffic can be
hazardous.
• Do not take notes or look up phone numbers. Jotting down
a “to do” list or flipping through your address book takes
attention away from your primary responsibility of driving
safely.
• Dial sensibly and assess the traffic. Place calls when you are
not moving or before pulling into traffic. Try to plan calls
when your car will be stationary.
• Do not engage in stressful or emotional conversations that
may be distracting. Make the person you are talking to
aware that you are driving and suspend conversations that
could potentially divert your attention from the road.
Care and use your mobile device properly
Keep your device dry
• Humidity and liquids may damage the parts or electronic
circuits in your device.
• Do not turn on your device if it is wet. If your device is
already on, turn it off and remove the battery immediately
(if the device will not turn off or you cannot remove the
battery, leave it as-is). Then, dry the device with a towel and
take it to a service centre.
• Liquids will change the colour of the label that indicates
water damage inside the device. Water damage to your
device can void your manufacturer’s warranty.
Store your device only on flat surfaces
If your device falls, it may be damaged.
Do not store your device in very hot or very cold areas. It
is recommended to use your device at temperatures from
5°C to 35°C
• Do not store your device in very hot areas such as inside a
car in the summertime. Doing so may cause the screen to
malfunction, result in damage to the device, or cause the
battery to explode.
• Do not expose your device to direct sunlight for extended
periods of time (on the dashboard of a car, for example).
• Store the battery at temperatures from 0°C to 45°C.

Safety information
24
Do not store your device with metal objects, such as coins,
keys, and necklaces
• Your device may be scratched or may malfunction.
• If the battery terminals come into contact with metal
objects, this may cause a fire.
Do not store your device near magnetic fields
• Your device may malfunction or the battery may discharge
from exposure to magnetic fields.
• Magnetic stripe cards, including credit cards, phone cards,
passbooks, and boarding passes, may be damaged by
magnetic fields.
Do not use your device or applications for a while if the
device is overheated
Prolonged exposure of your skin to an overheated device may
cause low temperature burn symptoms, such as red spots and
pigmentation.
Do not use your device with the back cover removed
The battery may fall out of the device, which may result in
damage or malfunction.
If your device has a camera flash or light, do not use it
close to the eyes of people or pets
Using a flash close to the eyes may cause temporary loss of
vision or damage to the eyes.
Use caution when exposed to flashing lights
• While using your device, leave some lights on in the room
and do not hold the screen too close to your eyes.
• Seizures or blackouts can occur when you are exposed to
flashing lights while watching videos or playing Flash-based
games for extended periods. If you feel any discomfort, stop
using the device immediately.
• If anyone related to you has experienced seizures or
blackouts while using a similar device, consult a physician
before using the device.
• If you feel discomfort, such as a muscle spasm, or
disoriented, stop using the device immediately and consult
a physician.
• To prevent eye strain, take frequent breaks while using the
device.
Reduce the risk of repetitive motion injuries
When you repetitively perform actions, such as pressing keys,
drawing characters on a touch screen with your fingers, or
playing games, you may experience occasional discomfort in
your hands, neck, shoulders, or other parts of your body. When
using your device for extended periods, hold the device with a
relaxed grip, press the keys lightly, and take frequent breaks. If
you continue to have discomfort during or after such use, stop
using the device and consult a physician.

Safety information
25
Protect your hearing and ears when using a headset
• Excessive exposure to loud sounds can cause
hearing damage.
• Exposure to loud sounds while walking may
distract your attention and cause an accident.
• Always turn the volume down before plugging the
earphones into an audio source and use only the minimum
volume setting necessary to hear your conversation or
music.
• In dry environments, static electricity can build up in the
headset. Avoid using headsets in dry environments or
touch a metal object to discharge static electricity before
connecting a headset to the device.
• Do not use a headset while driving or riding. Doing so may
distract your attention and cause an accident, or may be
illegal depending on your region.
Use caution when using the device while walking or
moving
• Always be aware of your surroundings to avoid injury to
yourself or others.
• Make sure the headset cable does not become entangled in
your arms or on nearby objects.
Do not carry your device in your back pockets or around
your waist
You could be injured or damage the device if you fall.
Do not paint or put stickers on your device
• Paint and stickers can clog moving parts and prevent proper
operation.
• If you are allergic to paint or metal parts of the device, you
may experience itching, eczema, or swelling of the skin.
When this happens, stop using the device and consult your
physician.
Do not use the device if it is cracked or broken
Broken glass or acrylic could cause injury to your hands and
face. Take the device to a Samsung Service Centre to have it
repaired.
Install mobile devices and equipment with caution
• Ensure that any mobile devices or related equipment
installed in your vehicle are securely mounted.
• Avoid placing your device and accessories near or in an
airbag deployment area. Improperly installed wireless
equipment can cause serious injury when airbags inflate
rapidly.
Do not drop your device or cause impacts to your device
• Your device may be damaged or may malfunction.
• If bent or deformed, your device may be damaged or parts
may malfunction.
Ensure maximum battery and charger life
• Avoid charging your device for more than a week, as
overcharging may shorten battery life.

Safety information
26
• Over time, unused device will discharge and must be
recharged before use.
• Disconnect the charger from power sources when not in
use.
• Use the battery only for their intended purposes.
• Leaving batteries unused over time may reduce their
lifespan and performance. It may also cause the batteries to
malfunction or explode, or cause a fire.
• Follow all instructions in this manual to ensure the longest
lifespan of your device and battery. Damages or poor
performance caused by failure to follow warnings and
instructions can void your manufacturer’s warranty.
• Your device may wear out over time. Some parts and repairs
are covered by the warranty within the validity period, but
damages or deterioration caused by using unapproved
accessories are not.
Do not disassemble, modify, or repair your device
• Any changes or modifications to your device can void your
manufacturer’s warranty. If your device needs servicing, take
your device to a Samsung Service Centre.
• Do not disassemble or puncture the battery, as this can
cause explosion or fire.
• Turn off the device before removing the battery. If you
remove the battery with the device turned on, it may cause
the device to malfunction.
When cleaning your device, mind the following
• Wipe your device or charger with a towel or an eraser.
• Clean the battery terminals with a cotton ball or a towel.
• Do not use chemicals or detergents. Doing so may discolour
or corrode the outside the device or may result in electric
shock or fire.
Do not use the device for anything other than its intended
use
Your device may malfunction.
Avoid disturbing others when using the device in public
Allow only qualified personnel to service your device
Allowing unqualified personnel to service your device
may result in damage to your device and will void your
manufacturer’s warranty.
Handle SIM cards, memory cards, or cables with care
• When inserting a card or connecting a cable to your device,
make sure that the card is inserted or the cable is connected
to the proper side.
• Do not remove a card while the device is transferring or
accessing information, as this could result in loss of data
and/or damage to the card or device.
• Protect cards from strong shocks, static electricity, and
electrical noise from other devices.

Safety information
27
• Do not touch gold-coloured contacts or terminals with your
fingers or metal objects. If dirty, wipe the card with a soft
cloth.
• Inserting a card or connecting a cable by force or improperly
may result in damage to the multipurpose jack or other
parts of the device.
Ensure access to emergency services
Emergency calls from your device may not be possible in
some areas or circumstances. Before travelling in remote or
undeveloped areas, plan an alternative method of contacting
emergency services personnel.
Protect your personal data and prevent leakage or misuse
of sensitive information
• While using your device, be sure to back up important data.
Samsung is not responsible for the loss of any data.
• When disposing of your device, back up all data and then
reset your device to prevent misuse of your personal
information.
• Carefully read the permissions screen when downloading
applications. Be particularly cautious with applications that
have access to many functions or to a significant amount of
your personal information.
• Check your accounts regularly for unapproved or suspicious
use. If you find any sign of misuse of your personal
information, contact your service provider to delete or
change your account information.
• In the event your device is lost or stolen, change the
passwords on your accounts to protect your personal
information.
• Avoid using applications from unknown sources and lock
your device with a pattern, password, or PIN.
Do not distribute copyright-protected material
Do not distribute copyright-protected material without the
permission of the content owners. Doing this may violate
copyright laws. The manufacturer is not liable for any legal
issues caused by the user’s illegal use of copyrighted material.
Malware and viruses
To protect your device from malware and viruses, follow
these usage tips. Failure to do so may result in damages
or loss of data that may not be covered by the warranty
service
• Do not download unknown applications.
• Do not visit untrusted websites.

Safety information
28
• Delete suspicious messages or email from unknown
senders.
• Set a password and change it regularly.
• Deactivate wireless features, such as Bluetooth, when not
in use.
• If the device behaves abnormally, run an antivirus program
to check for infection.
• Run an antivirus program on your device before you launch
newly-downloaded applications and files.
• Install antivirus programs on your computer and run them
regularly to check for infection.
• Do not edit registry settings or modify the device’s operating
system.
Specific Absorption Rate (SAR) certification
information
THIS DEVICE MEETS INTERNATIONAL GUIDELINES FOR
EXPOSURE TO RADIO WAVES
Your mobile imaging device is a radio transmitter and receiver.
It is designed not to exceed the limits for exposure to radio
waves (radio frequency electromagnetic fields) recommended
by international guidelines. The guidelines were developed by
an independent scientific organisation (ICNIRP) and include a
substantial safety margin designed to assure the safety of all
persons, regardless of age and health.
The radio wave exposure guidelines use a unit of
measurement known as the Specific Absorption Rate, or SAR.
The SAR limit for mobile imaging devices is 1.6 W/kg. Tests for
SAR are conducted using standard operating positions with
the device transmitting at its highest certified power level in
all tested frequency bands. The highest SAR values under the
ICNIRP guidelines for this device model are:
Body-worn SAR 0.842 W/k
During use, the actual SAR values for this device are usually
well below the values stated above. This is because, for
purposes of system efficiency and to minimise interference
on the network, the operating power of your mobile imaging
device is automatically decreased when full power is not
needed for the call. The lower the power output of the device,
the lower its SAR value.
FCC Notice and Cautions
FCC Notice
This device complies with Part 15 of the FCC Rules. Operation is subject to
the following two conditions: (1) this device may not cause harmful interference, and
(2) this device must accept any interference received, including interference that may
cause undesired operation.
This equipment has been tested and found to comply with the limits for a
Class B digital device, pursuant to part 15 of the FCC Rules. These limits are
designed to provide reasonable protection against harmful interference in a
residential installation. This equipment generates, uses and can radiate radio
frequency energy and, if not installed and used in accordance with the
instructions, may cause harmful interference to radio communications.
However, there is no guarantee that interference will not occur in a particular
installation. If this equipment does cause harmful interference to radio or
television reception, which can be determined by turning the equipment off
and on, the user is encouraged to try to correct the interference by one or
more of the following measures:
-Reorient or relocate the receiving antenna.
-Increase the separation between the equipment and receiver.
-Connect the equipment into an outlet on a circuit different from that to which the
receiver is connected.
-Consult the dealer or an experienced radio/TV technician for help.
The Camera may cause TV or radio interference if used in close proximity to
receiving
equipment. The FCC can require you to stop using the Camera if such interference
cannot be eliminated.
Vehicles using liquefied petroleum gas (such as propane or butane) must comply
with the National Fire Protection Standard (NFPA-58). For a copy of this standard,
contact the National Fire Protection Association, One Battery march Park, Quincy,
MA 02269, Attn: Publication Sales Division.
Cautions
Changes or modifications made in the radio Camera, not expressly approved by
Samsung, will void the user’s authority to operate the equipment.
The use of any unauthorized accessories may be dangerous and void the Camera
warranty if said accessories cause damage or a defect to the Camera.
Although your Camera is quite sturdy, it is a complex piece of equipment and can be
broken. Avoid dropping, hitting, bending or sitting on it.
Other Important Safety Information
Only qualified personnel should service the Camera or install the Camera in
a vehicle. Faulty installation or service may be dangerous and may invalidate
any warranty applicable to the device.
Check regularly that all wireless Camera equipment in your vehicle is
mounted and operating properly.
Do not store or carry flammable liquids, gases or explosive materials in the

same compartment as the Camera, its parts or accessories.
For vehicles equipped with an air bag, remember that an air bag inflates
with great force. Do not place objects, including both installed or portable
wireless equipment in the area over the air bag or in the air bag deployment
area. If wireless equipment is improperly installed and the air bag inflates,
serious injury could result.
Switch your Camera off before boarding an aircraft. The use of wireless
Camera in aircraft is illegal and may be dangerous to the aircraft's operation.
Failure to observe these instructions may lead to the suspension or denial of
telephone services to the offender, or legal action, or both.
This device is capable of operating in Wi-Fi mode in the 2.4 and 5 GHz
bands. The FCC requires that devices operating within 5.15-5.25 GHz may
only be used indoors, not outside, in order to avoid interference
with MobileSatellite Services (MSS).
Product Performance
Getting the Most Out of Your Signal Reception
The quality of each call you make or receive depends on the signal strength in your
area. Your Camera informs you of the current signal strength by displaying a number
of bars next to the signal strength icon. The more bars displayed, the stronger the
signal.
If you're inside a building, being near a window may give you better reception.
Understanding the Power Save Feature
If your Camera is unable to find a signal after 15 minutes of searching, a Power Save
feature is automatically activated. If your Camera is active, it periodically rechecks
service availability or you can check it yourself by pressing any key.
Anytime the Power Save feature is activated, a message displays on the screen.
When a signal is found, your Camera returns to standby mode.
Maintaining Your Camera's Peak Performance
For the best care of your Camera, only authorized personnel should service your
Camera and accessories. Faulty service may void the warranty.
There are several simple guidelines to operating your Camera properly and
maintaining safe, satisfactory service.
Do not tamper or alter the Camera's antenna.
Don't use the Camera if the antenna is damaged.
Avoid exposing your Camera and accessories to rain or liquid spills. If your
Camera does get wet, immediately turn the power off and remove the battery.
If it is inoperable, call Customer Care for service.
Availability of Various Features/Ring Tones
Many services and features are network dependent and may require additional
subscription and/or usage charges. Not all features are available for purchase or use
in all areas. Downloadable Ring Tones may be available at an additional cost. Other
conditions and restrictions may apply. See your service provider for additional
information.

Health and safety information
Exposure to Radio Frequency (RF) Signals
Certification Information (SAR)
Your device is a radio transmitter and receiver. It is designed and manufactured not
to exceed the exposure limits for radio frequency (RF) energy set by the Federal
Communications Commission (FCC) of the U.S. government. These FCC exposure
limits are derived from the recommendations of two expert organizations, the
National Counsel on Radiation Protection and Measurement
(NCRP) and the Institute of Electrical and Electronics Engineers (IEEE). In both
cases, the recommendations were developed by scientific and engineering experts
drawn from industry, government, and academia after extensive reviews of the
scientific literature related to the biological effects of RF energy.
The exposure limit set by the FCC for wireless mobile device employs a unit of
measurement known as the Specific Absorption Rate (SAR). The SAR is a measure
of the rate of absorption of RF energy by the human body expressed in units of watts
per kilogram (W/kg). The FCC requires wireless devices to comply with a safety limit
of 1.6 watts per kilogram (1.6 W/ kg). The FCC exposure limit incorporates a
substantial margin of safety to give additional protection to the public and to account
for any variations in measurements.
SAR tests are conducted using standard operating positions accepted by the FCC
with the device transmitting at its highest certified power level in all tested frequency
bands. Although the SAR is determined at the highest certified power level, the
actual SAR level of the device while operating can be well below the maximum
value. This is because the device is designed to operate at multiple power levels so
as to use only the power required to reach the network. In general, the closer you
are to a wireless base station antenna, the lower the power output.
Before a new device is available for sale to the public, it must be tested and certified
to the FCC that it does not exceed the exposure limit established by the FCC. Tests
for each model device are performed in positions and locations as required by the FCC.
For normal operation as described in this manual, this device has been tested and
meets the FCC RF exposure guidelines.
Non-compliance with the above restrictions may result in violation of FCC RF
exposure guidelines.
SAR information on this and other models can be viewed on-line at
http://www.fcc.gov/oet/ea/fccid/. Please use the device FCC ID number for search,
A3LEKGN120A. Once you have the FCC ID number for a particular device, follow
the instructions on the website and it should provide values for typical or maximum
SAR for a particular device. Additional product specific SAR information can also
be obtained on the website.

Safety information
29
Business users should contact their supplier and check the
terms and conditions of the purchase contract. This product
and its electronic accessories should not be mixed with other
commercial wastes for disposal.
This EEE is compliant with RoHS.
Correct disposal of batteries in this product
(Applicable in countries with separate collection
systems)
This marking on the battery, manual or packaging
indicates that the batteries in this product should
not be disposed of with other household waste. Where
marked, the chemical symbols Hg, Cd or Pb indicate that
the battery contains mercury, cadmium or lead above the
reference levels in EC Directive 2006/66. If batteries are not
properly disposed of, these substances can cause harm to
human health or the environment.
To protect natural resources and to promote material reuse,
please separate batteries from other types of waste and
recycle them through your local, free battery return system.
Organisations such as the World Health Organisation and
the US Food and Drug Administration have suggested that
if people are concerned and want to reduce their exposure,
they could use a hands-free accessory to keep the wireless
device away from the face and body during use, or reduce the
amount of time spent using the device. For more information,
visit
www.samsung.com/sar
and search for your device with
the model number.
Correct disposal of this product
(Waste Electrical & Electronic Equipment)
(Applicable in countries with separate collection
systems)
This marking on the product, accessories or literature
indicates that the product and its electronic
accessories (e.g. charger, headset, USB cable) should not be
disposed of with other household waste.
To prevent possible harm to the environment or human health
from uncontrolled waste disposal, please separate these items
from other types of waste and recycle them responsibly to
promote the sustainable reuse of material resources.
Household users should contact either the retailer where
they purchased this product, or their local government office,
for details of where and how they can take these items for
environmentally safe recycling.

Safety information
30
BY YOU OR ANY THIRD PARTY, EVEN IF ADVISED OF THE
POSSIBILITY OF SUCH DAMAGES.”
Third party services may be terminated or interrupted at any
time, and Samsung makes no representation or warranty that
any content or service will remain available for any period of
time. Content and services are transmitted by third parties
by means of networks and transmission facilities over which
Samsung has no control. Without limiting the generality of this
disclaimer, Samsung expressly disclaims any responsibility or
liability for any interruption or suspension of any content or
service made available through this device.
Samsung is neither responsible nor liable for customer service
related to the content and services. Any question or request
for service relating to the content or services should be made
directly to the respective content and service providers.
Disclaimer
Some content and services accessible through this device
belong to third parties and are protected by copyright, patent,
trademark and/or other intellectual property laws. Such
content and services are provided solely for your personal
non-commercial use. You may not use any content or services
in a manner that has not been authorised by the content
owner or service provider. Without limiting the foregoing,
unless expressly authorised by the applicable content owner
or service provider, you may not modify, copy, republish,
upload, post, transmit, translate, sell, create derivative works,
exploit, or distribute in any manner or medium any content or
services displayed through this device.
“THIRD PARTY CONTENT AND SERVICES ARE PROVIDED “AS
IS.” SAMSUNG DOES NOT WARRANT CONTENT OR SERVICES
SO PROVIDED, EITHER EXPRESSLY OR IMPLIEDLY, FOR ANY
PURPOSE. SAMSUNG EXPRESSLY DISCLAIMS ANY IMPLIED
WARRANTIES, INCLUDING BUT NOT LIMITED TO, WARRANTIES
OF MERCHANTABILITY OR FITNESS FOR A PARTICULAR
PURPOSE. SAMSUNG DOES NOT GUARANTEE THE ACCURACY,
VALIDITY, TIMELINESS, LEGALITY, OR COMPLETENESS OF
ANY CONTENT OR SERVICE MADE AVAILABLE THROUGH
THIS DEVICE AND UNDER NO CIRCUMSTANCES, INCLUDING
NEGLIGENCE, SHALL SAMSUNG BE LIABLE, WHETHER IN
CONTRACT OR TORT, FOR ANY DIRECT, INDIRECT, INCIDENTAL,
SPECIAL OR CONSEQUENTIAL DAMAGES, ATTORNEY FEES,
EXPENSES, OR ANY OTHER DAMAGES ARISING OUT OF, OR
IN CONNECTION WITH, ANY INFORMATION CONTAINED IN,
OR AS A RESULT OF THE USE OF ANY CONTENT OR SERVICE