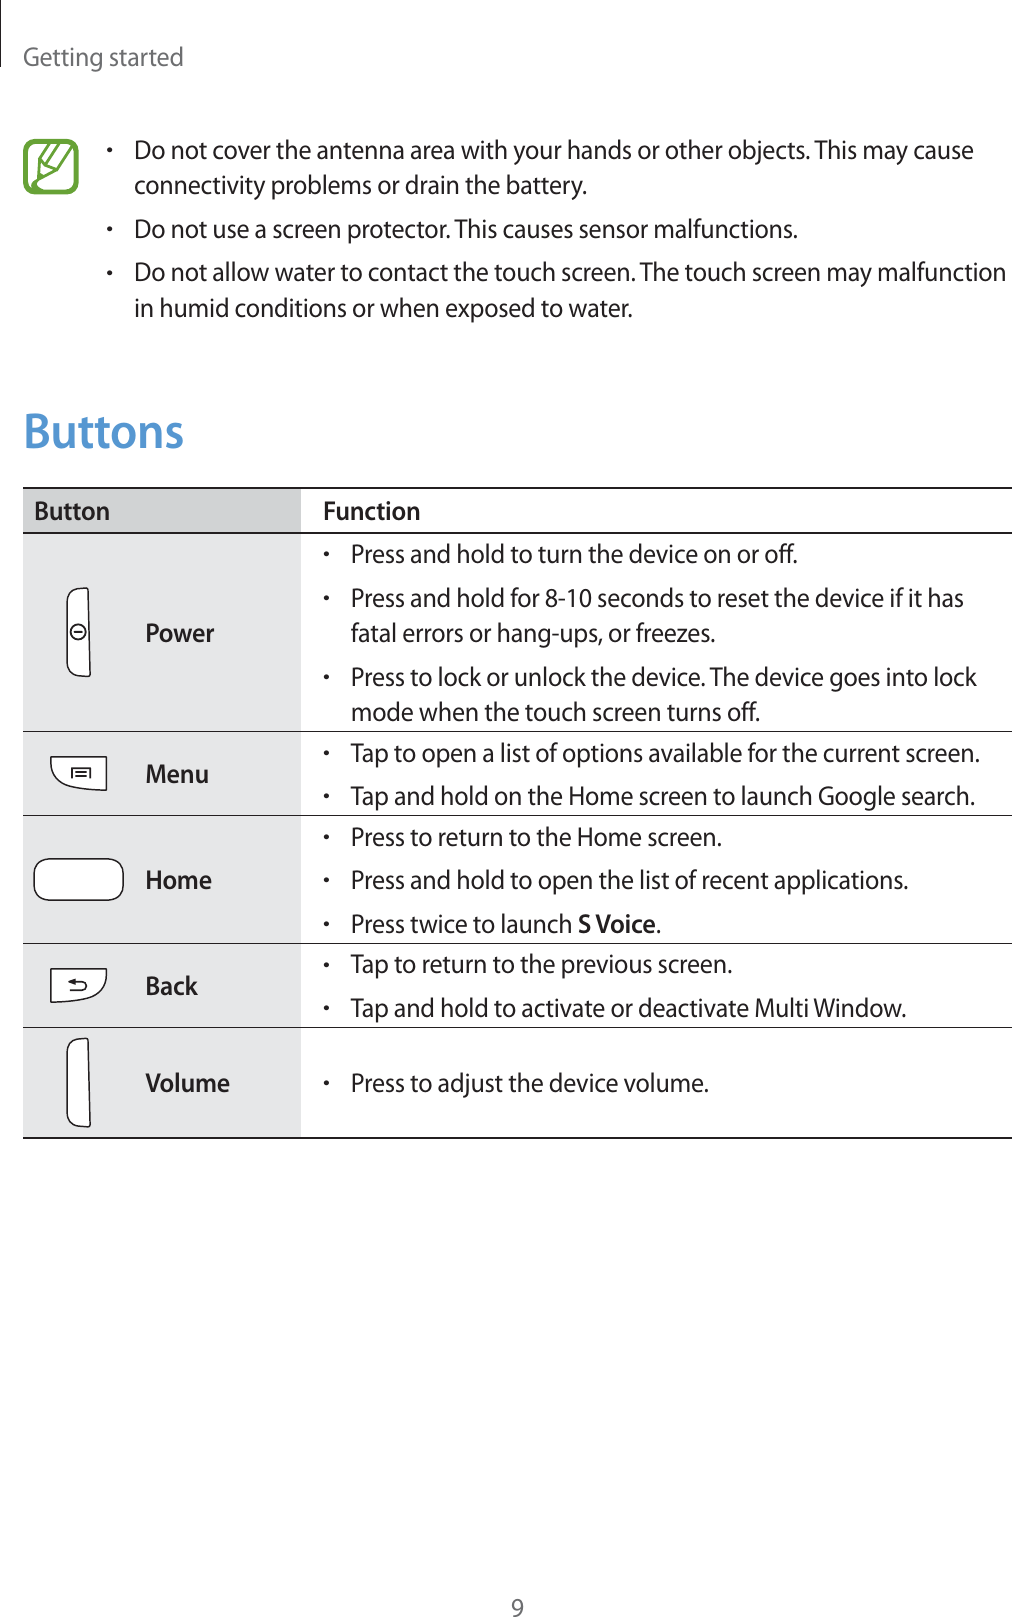
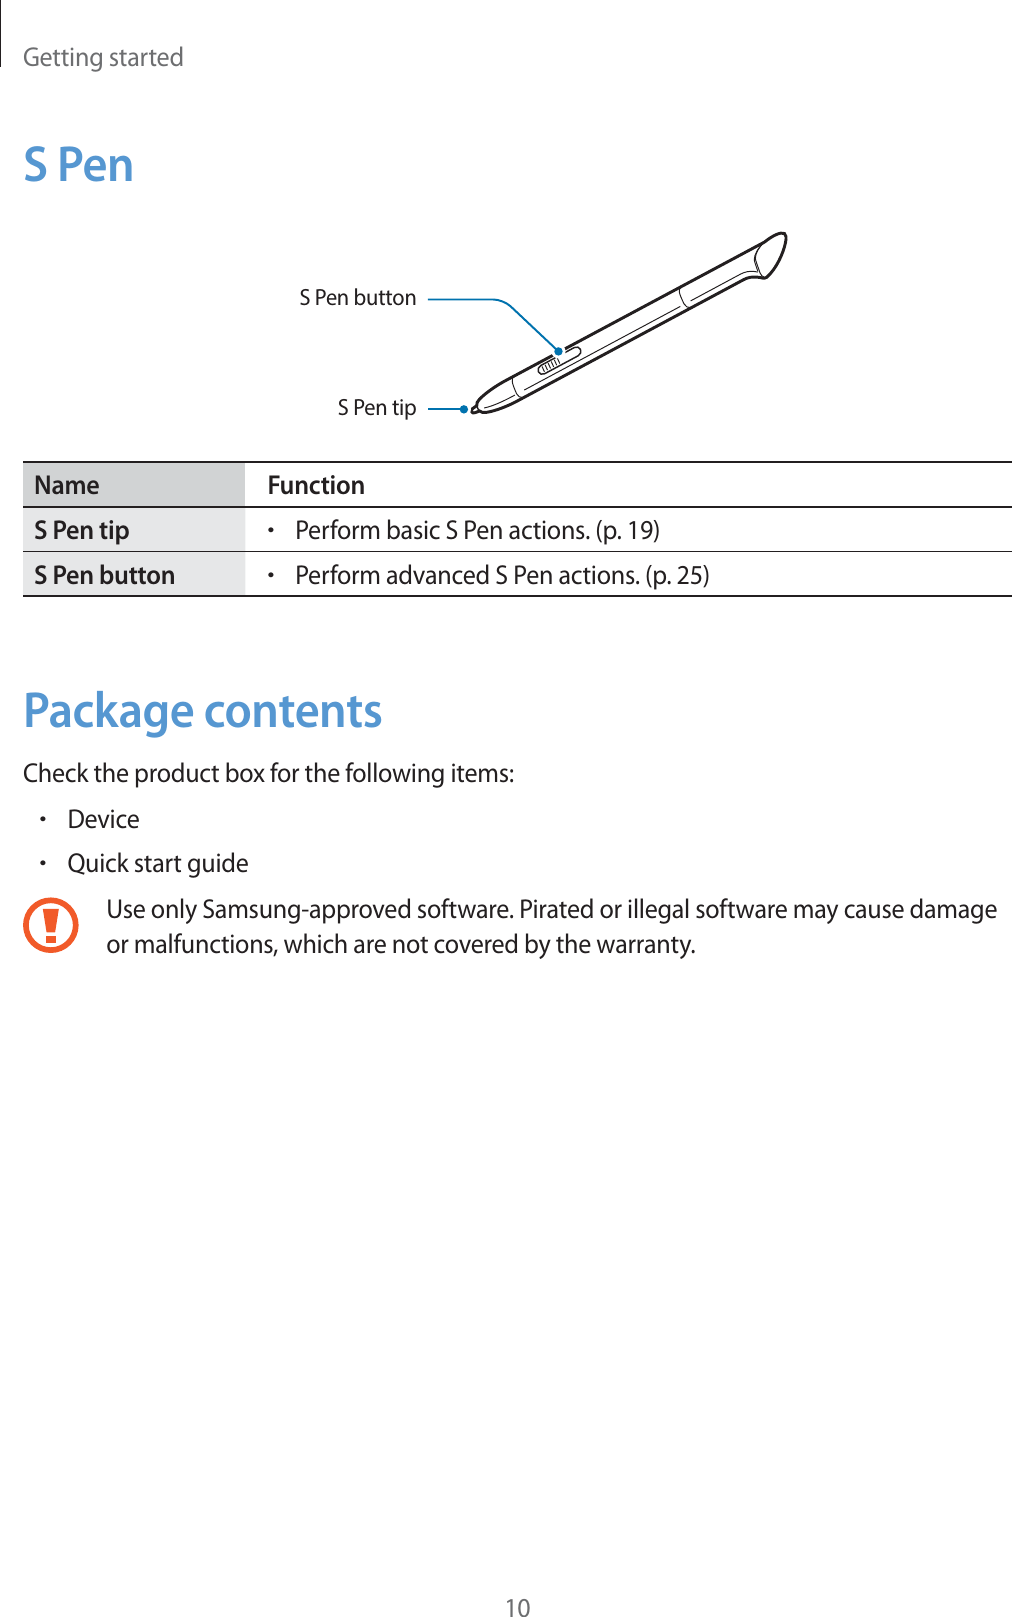
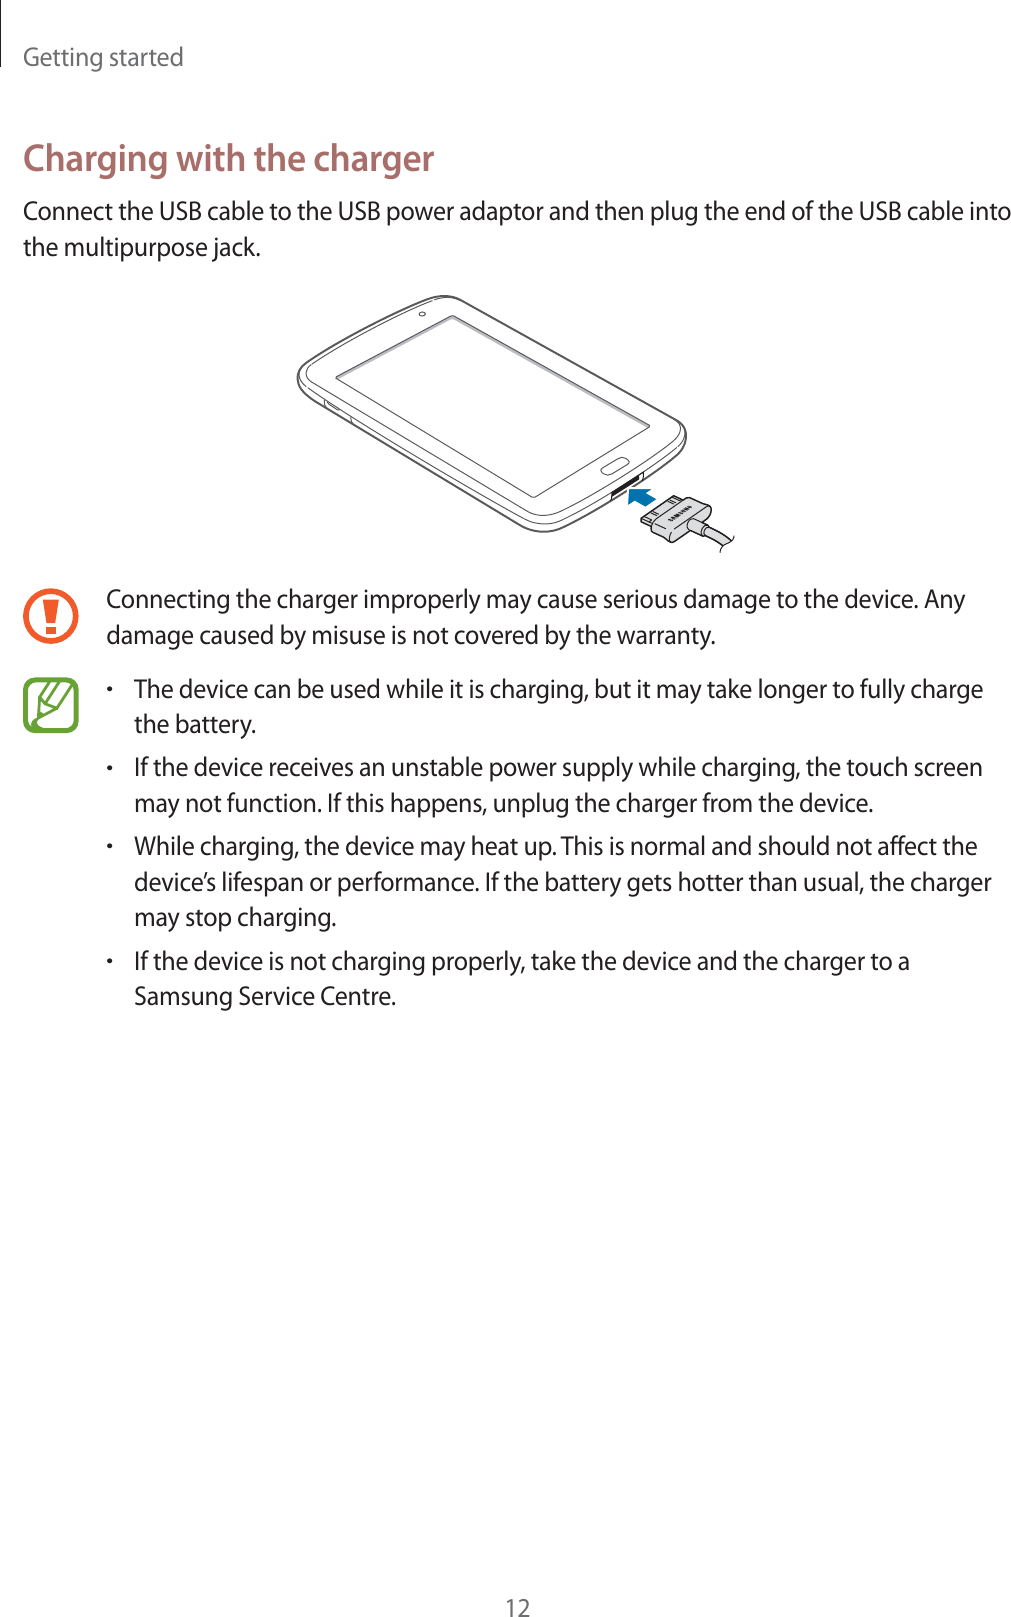
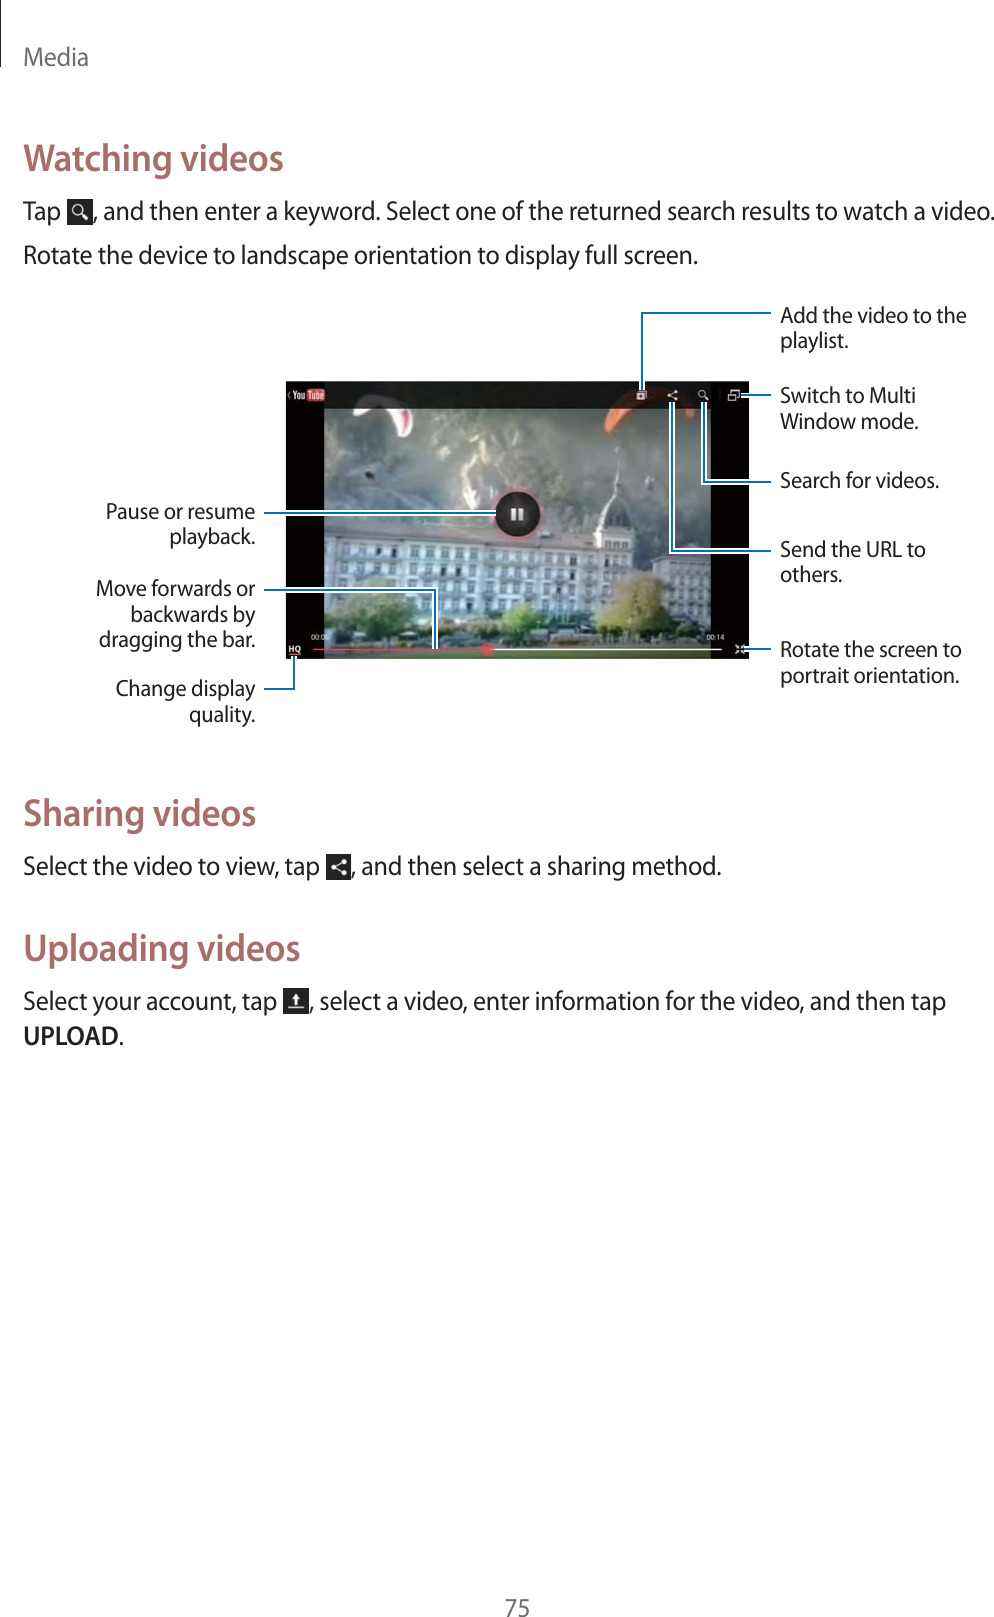
Samsung Electronics Co GTN5110 Portable Tablet Computer with WLAN and Bluetooth User Manual GT N5110 FCC 0121

Samsung Electronics Co Ltd Portable Tablet Computer with WLAN and Bluetooth GT N5110 FCC 0121

Users Manual

www.samsung.comUser ManualGT-N5110
2About this manualThis device provides high quality mobile communication and entertainment using Samsung’s high standards and technological expertise. This user manual is specially designed to detail the device’s functions and features.rPlease read this manual before using the device to ensure safe and proper use.rDescriptions are based on the device’s default settings.rImages and screenshots may differ in appearance from the actual product.rContent may differ from the final product, or from software provided by service providers or carriers, and is subject to change without prior notice. For the latest version of the manual, refer to the Samsung website, www.samsung.com.rAvailable features and additional services may vary by device, software, or service provider.rApplications and their functions may vary by country, region, or hardware specifications. Samsung is not liable for performance issues caused by applications from any provider other than Samsung.rSamsung is not liable for performance issues or incompatibilities caused by edited registry settings or modified operating system software. Attempting to customise the operating system may cause the device or applications to work improperly.rSoftware, sound sources, wallpapers, images, and other media provided with this device are licensed for limited use. Extracting and using these materials for commercial or other purposes is an infringement of copyright laws. Users are entirely responsible for illegal use of media.rYou may incur additional charges for data services, such as messaging, uploading and downloading, auto-syncing, or using location services. To avoid additional charges, select an appropriate data tariff plan. For details, contact your service provider.
About this manual3rDefault applications that come with the device are subject to updates and may no longer be supported without prior notice. If you have questions about an application provided with the device, contact a Samsung Service Centre. For user-installed applications, contact service providers.rModifying the device’s operating system or installing softwares from unofficial sources may result in device malfunctions and data corruption or loss. These actions are violations of your Samsung licence agreement and will void your warranty.Instructional iconsWarning: situations that could cause injury to yourself or othersCaution: situations that could cause damage to your device or other equipmentNote: notes, usage tips, or additional informationCopyrightCopyright © 2013 Samsung ElectronicsThis guide is protected under international copyright laws.No part of this guide may be reproduced, distributed, translated, or transmitted in any form or by any means, electronic or mechanical, including photocopying, recording, or storing in any information storage and retrieval system, without the prior written permission of Samsung Electronics.
About this manual4TrademarksrSAMSUNG and the SAMSUNG logo are registered trademarks of Samsung Electronics.rThe Android logo, Google™, Google Maps™, Google Mail™, YouTube™, Google Play™ Store, and Google Talk™ are trademarks of Google, Inc.rBluetooth® is a registered trademark of Bluetooth SIG, Inc. worldwide.rWi-Fi®, Wi-Fi Protected Setup™, Wi-Fi Direct™, Wi-Fi CERTIFIED™, and the Wi-Fi logo are registered trademarks of the Wi-Fi Alliance.rAll other trademarks and copyrights are the property of their respective owners.DivX®, DivX Certified®, and associated logos are trademarks of Rovi Corporation or its subsidiaries and are used under licence.ABOUT DIVX VIDEODivX® is a digital video format created by DivX, LLC, a subsidiary of Rovi Corporation. This is an official DivX Certified® device that plays DivX video. Visit www.divx.com for more information and software tools to convert your files into DivX videos.ABOUT DIVX VIDEO-ON-DEMANDThis DivX Certified® device must be registered in order to play purchased DivX Video-on- Demand (VOD) movies. To obtain your registration code, locate the DivX VOD section in your device setup menu. Go to vod.divx.com for more information on how to complete your registration.DivX Certified® to play DivX® video up to HD 720p, including premium content.
5Table of ContentsGetting started8 Device layout9 Buttons10 S Pen10 Package contents11  Charging the battery14  Inserting a memory card16  Turning the device on and off16  Holding the device17  Locking and unlocking the device17  Adjusting the volume17  Switching to silent modeBasics18 Indicator icons19  Using the touch screen22 Control motions24 Page Buddy24 Activating Multi Window25  Using the S Pen30  S Pen Air View30 Quick Command31 Notifications32 Home screen34 Using widgets34 Using applications35 Applications screen36 Help36 Entering text38  Connecting to a Wi-Fi network39  Setting up accounts40 Transferring files41  Securing the device43  Upgrading the deviceCommunication44 Contacts47 Email49 Google Mail50 Talk51 Google+51 Messenger52 ChatONWeb & network53 Internet54 Chrome55 Bluetooth56 AllShare Cast57 AllShare Play58 Group Play58 Smart Remote
Table of Contents695 S Voice96 Google97 Voice Search97 My Files98 DownloadsTravel & local99 Maps100 Local101 NavigationSettings102 About Settings102 Wi-Fi103 Bluetooth103 Data usage103 More settings104  Home screen mode104 Blocking mode105 Sound105 Display106 Storage107  Power saving mode107 Battery107 Application manager107 Location services108 Lock screen109 Security110  Language and input112 Cloud113  Backup and reset113 Add accountMedia60 Music Player61 Camera68 Gallery71 Paper Artist72 PS Touch73 Video Player74 YouTube76 FlipboardApplication & media stores77 Play Store78 Samsung Apps78 Game Hub79 Music Hub80 Play Books80 Play Movies80 Play Music81 Readers Hub81 Video Hub81 Learning HubUtilities82 S Note86 aNote HD87 S Planner90 Polaris Office93 Dropbox93 Alarm94 World Clock95 Calculator
Table of Contents7113 Motion113 S Pen114 Accessory114  Date and time115 Accessibility116 Developer options117 About deviceTroubleshooting
8Getting startedDevice layoutMenu buttonMultipurpose jackFront cameraVolume buttonHome buttonMicrophoneIrLEDPower buttonTouch screenBack buttonLight sensorRear cameraSpeaker SpeakerS PenMemory card slotHeadset jackGPS antenna
Getting started9rDo not cover the antenna area with your hands or other objects. This may cause connectivity problems or drain the battery.rDo not use a screen protector. This causes sensor malfunctions.rDo not allow water to contact the touch screen. The touch screen may malfunction in humid conditions or when exposed to water.ButtonsButton FunctionPowerrPress and hold to turn the device on or off.rPress and hold for 8-10 seconds to reset the device if it has fatal errors or hang-ups, or freezes.rPress to lock or unlock the device. The device goes into lock mode when the touch screen turns off.MenurTap to open a list of options available for the current screen.rTap and hold on the Home screen to launch Google search.HomerPress to return to the Home screen.rPress and hold to open the list of recent applications.rPress twice to launch S Voice.BackrTap to return to the previous screen.rTap and hold to activate or deactivate Multi Window.VolumerPress to adjust the device volume.
Getting started10S PenS Pen tipS Pen buttonName FunctionS Pen tiprPerform basic S Pen actions. (p. 19)S Pen buttonrPerform advanced S Pen actions. (p. 25)Package contentsCheck the product box for the following items:rDevicerQuick start guideUse only Samsung-approved software. Pirated or illegal software may cause damage or malfunctions, which are not covered by the warranty.
Getting started11rThe items supplied with the device and any available accessories may vary depending on the region or service provider.rThe supplied items are designed only for this device and may not be compatible with other devices.rAppearances and specifications are subject to change without prior notice.rYou can purchase additional accessories from your local Samsung retailer. Make sure they are compatible with the device before purchase.rOther accessories may not be compatible with your device.rUse only Samsung-approved accessories. Malfunctions caused by using unapproved accessories are not covered by the warranty service.rAvailability of all accessories is subject to change depending entirely on manufacturing companies. For more information about available accessories, refer to the Samsung website.Charging the batteryUse the charger to charge the battery before using it for the first time.Use only Samsung-approved chargers, batteries, and cables. Unapproved chargers or cables can cause the battery to explode or damage the device.rWhen the battery power is low, the device emits a warning tone and displays a low battery power message.rIf the battery is completely discharged, the device cannot be turned on immediately when the charger is connected. Allow a depleted battery to charge for a few minutes before turning on the device.
Getting started12Charging with the chargerConnect the USB cable to the USB power adaptor and then plug the end of the USB cable into the multipurpose jack.Connecting the charger improperly may cause serious damage to the device. Any damage caused by misuse is not covered by the warranty.rThe device can be used while it is charging, but it may take longer to fully charge the battery.rIf the device receives an unstable power supply while charging, the touch screen may not function. If this happens, unplug the charger from the device.rWhile charging, the device may heat up. This is normal and should not affect the device’s lifespan or performance. If the battery gets hotter than usual, the charger may stop charging.rIf the device is not charging properly, take the device and the charger to a Samsung Service Centre.
Getting started13After fully charging, disconnect the device from the charger. First unplug the charger from the device, and then unplug it from the electric socket.To save energy, unplug the charger when not in use. The charger does not have a power switch, so you must unplug the charger from the electric socket when not in use to avoid wasting power. The device should remain close to the electric socket while charging.Checking the battery charge statusWhen you charge the battery while the device is off, the following icons will show the current battery charge status:Charging Fully chargedReducing the battery consumptionYour device provides options that help you save battery power. By customising these options and deactivating features in the background, you can use the device longer between charges:rWhen you are not using the device, switch to sleep mode by pressing the Power button.rClose unnecessary applications with the task manager.rDeactivate the Bluetooth feature.rDeactivate the Wi-Fi feature.rDeactivate auto-syncing of applications.rDecrease the backlight time.rDecrease the brightness of the display.
Getting started14Inserting a memory cardYour device accepts memory cards with maximum capacities of 32 GB. Depending on the memory card manufacturer and type, some memory cards may not be compatible with your device.rSome memory cards may not be fully compatible with the device. Using an incompatible card may damage the device or the memory card, or corrupt the data stored in it.rUse caution to insert the memory card right-side up.rThe device supports only the FAT file system for memory cards. When inserting a card formatted in a different file system, the device asks to reformat the memory card.rFrequent writing and erasing of data shortens the lifespan of memory cards.rWhen inserting a memory card into the device, the memory card’s file directory appears in the extSdCard folder under the internal memory.1  Insert a memory card with the gold-coloured contacts facing downwards.2  Push the memory card into the slot until it locks in place.
Getting started15Removing the memory cardBefore removing the memory card, first unmount it for safe removal. On the Home screen, tap Apps ĺ Settings ĺ Storage ĺ Unmount SD card.Push the memory card until it disengages from the device, and then pull it out.Do not remove the memory card while the device is transferring or accessing information. Doing so can cause data to be lost or corrupted or damage to the memory card or device. Samsung is not responsible for losses that result from the misuse of damaged memory cards, including the loss of data.Formatting the memory cardA memory card formatted on a computer may not be compatible with the device. Format the memory card on the device.On the Home screen, tap Apps ĺ Settings ĺ Storage ĺ Format SD card ĺ Format SD card ĺ Erase everything.Before formatting the memory card, remember to make backup copies of all important data stored on the device. The manufacturer’s warranty does not cover loss of data resulting from user actions.
Getting started16Turning the device on and offWhen turning on the device for the first time, follow the on-screen instructions to set up your device.Press and hold the Power button for a few seconds to turn on the device.rFollow all posted warnings and directions from authorised personnel in areas where the use of wireless devices is restricted, such as aeroplanes and hospitals.rPress and hold the Power button and tap Flight mode to disable the wireless features.To turn off the device, press and hold the Power button, and then tap Power off.Holding the deviceDo not cover the antenna area with your hands or other objects. This may cause connectivity problems or drain the battery.
Getting started17Locking and unlocking the deviceWhen not in use, lock the device to prevent unwanted operation. Pressing the Power button turns off the screen and puts the device into lock mode. The device automatically gets locked if it is not used for a specified period.To unlock the device, press the Power button or the Home button when the touch screen is turned off, tap anywhere on the screen, and then flick your finger in any direction.Adjusting the volumePress the Volume button up or down to adjust the ringtone volume, or to adjust the sound volume when playing music or video.Switching to silent modeUse one of the following methods:rPress and hold the Volume button down until it switches to silent mode.rPress and hold the Power button, and then tap Mute.rOpen the notifications panel at the top of the screen, and then tap Sound.Set the device to alert you to various events in silent mode. Press and hold the Power button, and then tap Vibrate.
18BasicsIndicator iconsThe icons displayed at the top of the screen provide information about the status of the device. The icons listed in the table below are most common.Icon MeaningWi-Fi connectedBluetooth feature activatedGPS activatedSynced with the webConnected to computerAlarm activatedSilent mode activatedVibration mode activatedFlight mode activatedError occurred or caution requiredBattery power level
Basics19Using the touch screenUse only fingers or the S Pen to use the touch screen.rDo not allow the touch screen to come into contact with other electrical devices. Electrostatic discharges can cause the touch screen to malfunction.rDo not allow the touch screen to contact water. The touch screen may malfunction in humid conditions or when exposed to water.rTo avoid damaging the touch screen, do not tap it with anything sharp or apply excessive pressure to it with your fingertips.rLeaving the touch screen idle for extended periods may result in afterimages (screen burn-in) or ghosting. Turn off the touch screen when you do not use the device.Finger gesturesTappingTo open an application, to select a menu item, to press an on-screen button, or to enter a character using the on-screen keyboard, tap it with a finger.
Basics20DraggingTo move an icon, thumbnail, or preview to a new location, tap and hold it and drag it to the target position.Double-tappingDouble-tap on a webpage, map, or image to zoom in a part. Double-tap again to return.
Basics21FlickingFlick left or right on the Home screen or the Applications screen to see another panel. Flick up or down to scroll through a webpage or a list, such as contacts.PinchingSpread two fingers apart on a webpage, map, or image to zoom in a part. Pinch to zoom out.
Basics22Control motionsSimple motions allow easy control of the device.Before using motions, make sure the motion feature is activated. On the Home screen, tap Apps ĺ Settings ĺ Motion, and then drag the Motion switch to the right.Rotating the screenMany applications allow display in either portrait or landscape orientation. Rotating the device causes the display to automatically adjust to fit the new screen orientation.To prevent the display from rotating automatically, open the notifications panel and deselect Screen rotation.rSome applications do not allow screen rotation.rSome applications display a different screen depending on the orientation. The calculator turns into a scientific calculator when rotated to landscape.
Basics23SweepingSweep your hand across the screen to capture a screenshot. The image is saved in Gallery ĺ Screenshots. It is not possible to capture a screenshot while using some applications.CoveringCover the screen with a palm to pause media playback.
Basics24Page BuddyUse this feature to use specific applications based on your actions. Pages related to your actions appear in the following conditions:rWhen you pull out the S Pen from the slot.rWhen you connect a headset or dock to the device.Activating Multi WindowUse this feature to run two applications on the screen at the same time.rWhen launching applications that contain multimedia files, such as music or videos, sound from both files will be played.rThis feature may not be available depending on the region or service provider.To use Multi Window, on the Applications screen, tap Settings ĺ Display, and then tick Multi window.Using the Multi Window panelTo activate Multi Window panel, tap and hold  . The Multi Window panel appears at the left side of the screen. To deactivate Multi Window panel, tap and hold   again.Tap the panel handle to hide or show the panel. When a panel is open, tap and hold the handle and drag it to an edge of the screen to move the panel. When a panel is hidden, tap and hold the handle and drag it up or down or left or right to move the handle.
Basics25Launching Multi Window applicationsWhile using an application, tap   to switch to Multi Window mode or open the Multi Window panel and select an application.To move an application to another location, tap and hold the application’s title and drag it to a new location.To adjust the size of the window, drag   or   up or down.To make the application always stay on top, tap  .To maximise the window to fit the screen, tap  .To close the application, tap  .To display two different Multi Window applications in full screen, open the Multi Window panel, and then tap  .To cascade Multi Window applications, open the Multi Window panel, and then tap  .Using the S PenThe included S Pen can be used to easily select items or perform functions. Actions using the S Pen with the button pressed provide additional conveniences, such as screen capture.Pull out the S Pen from the slot to use it.
Basics26When you pull out the S Pen from the slot, the device detects it and performs the following:rTurns on the touch screen (if it is off).rOpens the S Pen page (from the Home screen).rThe tip of the S Pen is not replaceable. If the tip gets dull, purchase a new S Pen.rIf the S Pen is not working properly, take it to a Samsung Service Centre. Refer to the Samsung website for more information about the S Pen.rFor best results, keep the S Pen mostly perpendicular to the touch screen and avoid using it at sharp angles.rThe Menu button and the Back button cannot be activated by the S Pen.Opening a menuWith the S Pen button pressed, draw   to open a list of the screen’s available options.
Basics27Undoing the last actionWith the S Pen button pressed, draw   to undo the last action.Capturing screenshotsWith the S Pen button pressed, touch the screen until you hear a click. A screenshot is saved in the Gallery ĺ Screenshots folder.It is possible to draw or write on or to crop a screenshot. The edited image is saved in the Gallery ĺ IMG_edited folder.It is not possible to capture a screenshot while using some applications.
Basics28Launching S NoteWith the S Pen button pressed, double-tap the screen to launch S Note.Selecting textWith the S Pen button pressed, drag left or right on the text to select. If you drag between lines, you may select unwanted text. To select only the text you intend, drag across the middle of the text or drag the text selection icons.Samsung UserManualaaalaalaaaalalaaalaalalaalalalaaalalaaalalalaalalalalalalallaalala
Basics29Launching Quick CommandWith the S Pen button pressed, drag the S Pen up the screen to launch Quick Command.On the Quick Command screen, draw a gesture command to launch the assigned application or feature.Selecting and capturing an imageWith the S Pen button pressed, draw a line around an area to select it. The selected area is saved in the Gallery ĺ Screenshots folder. Select an application to use with the selected area from the icons that appear at the bottom of the screen.
Basics30S Pen Air ViewWhen you hold the S Pen near the screen, a pointer appears on the screen. Move the pointer to files, subjects, or options to preview the contents or view information in pop-up windows. You can scroll through panels or lists by moving the pointer to an edge (top/bottom/left/right) of the screen.Quick CommandUse this feature to send a message or search for content by drawing gesture commands on the screen. With the S Pen button pressed, drag the S Pen up on the screen to launch Quick Command.Adding gesture commandsTap   ĺ   ĺ Select an application or Select functions/settings. Select an application or a feature ĺ an option. Draw a new gesture command, and then tap Done.Using gesture commandsDraw a gesture command to launch applications or features.For more specific tasks, draw a keyword, such as a name, after a gesture command. For example, when drawing @, the Email application launches. When adding a recipient’s name after @, an email composing screen opens so that you can send an email to the recipient.
Basics31NotificationsNotification icons appear on the status bar at the top of the screen to report new messages, calendar events, device status, and more. Drag down from the status bar to open the notifications panel. Scroll the list to see additional alerts. To close the notifications panel, drag up the bar that is at the bottom of the screen.From the notifications panel, you can view your device’s current status and use the following options:rWi-Fi: Activate or deactivate the Wi-Fi feature.rGPS: Activate or deactivate the GPS feature.rReading mode: Activate or deactivate reading mode. In reading mode, the device helps protect your eyes when reading at night. To select which applications will be used for, tap Settings ĺ Reading mode.rSound: Activate or deactivate silent mode. You can vibrate or mute your device in silent mode.rScreen rotation: Allow or prevent the interface from rotating when you rotate the device.rBluetooth: Activate or deactivate the Bluetooth feature.rS Pen mode: Activate or deactivate S Pen mode.rPower saving: Activate or deactivate power-saving mode.rBlocking mode: Activate or deactivate blocking mode. In blocking mode, the device will block notifications. To select which applications will use reading mode, tap Settings ĺ Blocking mode.rSync: Activate or deactivate auto-syncing of applications.The available options may vary depending on the region or service provider.
Basics32Home screenThe Home screen is the starting point to access all of the device’s features. It displays indicator icons, widgets, shortcuts to applications, and others.The Home screen can have multiple panels. To view other panels, scroll left or right.Changing the Home screen modeThe Home screen has basic and easy modes. In easy mode, you can easily access your favourite contacts, applications, and settings by adding shortcuts to the Home screen.To switch to easy mode, on the Home screen, tap Apps ĺ Settings ĺ Home screen mode ĺ Easy mode ĺ Apply.Rearranging itemsAdding an application iconOn the Home screen, tap Apps, tap and hold an application icon, and then drag it into a panel preview.Adding an itemCustomise the Home screen by adding widgets, folders, or pages.Tap and hold the empty area on the Home screen, and then select one of the following categories:rApps and widgets: Add widgets to the Home screen.rFolder: Create a new folder.rPage: Create a new page.Moving an itemTap and hold an item and drag it to a new location. To move it to another panel, drag it to the side of the screen.
Basics33Removing an itemTap and hold an item, and drag it to the rubbish bin that appears at the top of the Home screen. When the rubbish bin turns red, release it.Rearranging panelsAdding a new panelTap   ĺ Edit page ĺ  .Moving a panelTap   ĺ Edit page, tap and hold a panel preview, and then drag it to a new location.Removing a panelTap   ĺ Edit page, tap and hold a panel preview, and then drag it to the rubbish bin at the bottom of the screen.Setting wallpaperSet an image or photo stored in the device as wallpaper for the Home screen.On the Home screen, tap   ĺ Set wallpaper ĺ Home screen, and then select one of the following:rGallery: See photos taken by the device’s camera or images downloaded from the Internet.rLive wallpapers: See animated images.rWallpapers: See wallpaper images.Then, select an image and tap Set wallpaper. Or, select an image, resize it by dragging the frame, and then tap Done.
Basics34Using widgetsWidgets are small applications that provide convenient functions and information on your Home screen. To use them, add widgets from the widgets panel to the Home screen.rSome widgets connect to web services. Using a web-based widget may result in additional charges.rThe widgets available may vary depending on the region or service provider.Adding widgets to the Home screenOn the Home screen, tap Apps ĺ Widgets. Scroll left or right on the widgets panel, and then tap and hold a widget to add it to the Home screen.Using the setting shortcut widgetOn the Home screen, tap Apps ĺ Widgets, and then tap and hold Settings Shortcut to open a list of setting options. Select a setting option to add it to the Home screen as a shortcut.Using applicationsThis device can run many different types of applications, ranging from media to Internet applications.Opening an applicationOn the Home screen or the Applications screen, select an application icon to open it.Opening from recently-used applicationsPress and hold the Home button to open the list of recently-used applications.Select an application icon to open.
Basics35Closing an applicationClose applications not in use to save battery power and maintain device performance.Press and hold the Home button, tap  , and then tap End next to an application to close it. To close all running applications, tap End all. Alternatively, press and hold the Home button, and then tap  .Applications screenThe Applications screen displays icons for all applications, including any new applications installed.On the Home screen, tap Apps to open the Applications screen.To view other panels, scroll left or right.Rearranging applicationsTap   ĺ Edit, tap and hold an application, and then drag it to a new location. To move it to another panel, drag it to the side of the screen.Organising with foldersPut related applications together in a folder for convenience.Tap   ĺ Edit, tap and hold an application, and then drag it to Create folder. Enter a folder name and then tap OK. Put applications into the new folder by dragging, and then tap Save to save the arrangement.Rearranging panelsPinch on the screen, tap and hold a panel preview, and then drag it to a new location.Installing applicationsUse application stores, such as Samsung Apps, to download and install applications.
Basics36Uninstalling applicationsTap   ĺ Uninstall, and then select an application to uninstall it.Default applications that come with the device cannot be uninstalled.Sharing applicationsShare downloaded applications with other users via email, Bluetooth, or other methods.Tap   ĺ Share app, select applications, tap Done, and then select a sharing method. The next steps vary depending on the method selected.HelpAccess help information to learn how to use the device and applications or configure important settings.Tap Help on the Applications screen. Select an item to view tips.Entering textUse the Samsung keyboard or the voice input feature to enter text.Text entry is not supported in some languages. To enter text, you must change the input language to one of the supported languages.Changing the keyboard typeTap any text field, open the notifications panel, tap Choose input method, and then select the type of keyboard to use.
Basics37Using the Samsung keyboardBreak to the next line.Delete a preceding character.Enter punctuation marks.Enter uppercase.Set options for the Samsung keyboard.Enter a space.Enter uppercase.Add an item from the clipboard.Entering uppercaseTap   before entering a character. For all caps, tap it twice.Changing language keyboardsSlide the space key left or right to change language keyboards.HandwritingTap and hold  , tap  , and then write a word with a finger or the S Pen. Suggested words appear as characters are entered. Select a suggested word.
Basics38Entering text by voiceActivate the voice input feature and then speak into the microphone. The device displays what you speak.If the device does not recognise your words correctly, tap the underlined text and select an alternative word or phrase from the dropdown list.To change the language or add languages for the voice recognition, tap the current language.When you are finished, tap Tap to pause.Copying and pastingTap and hold over text, drag   or   to select more or less text, and then tap Copy (or tap   ĺ Copy) to copy or Cut to cut. The selected text is copied to the clipboard.To paste it into a text entry field, tap and hold at the point where it should be inserted, and then tap Paste.Connecting to a Wi-Fi networkConnect the device to a Wi-Fi network to use the Internet or share media files with other devices. (p. 102)Turning Wi-Fi on and offOpen the notifications panel, and then tap Wi-Fi to turn it on or off.rYour device uses a non-harmonised frequency and is intended for use in all European countries. The WLAN can be operated in the EU without restriction indoors, but cannot be operated outdoors.rTurn off Wi-Fi to save the battery when not in use.
Basics39Joining Wi-Fi networksOn the Applications screen, tap Settings ĺ Wi-Fi, and then drag the Wi-Fi switch to the right.Select a network from the list of detected Wi-Fi networks, enter a password if necessary, and then tap Connect. Networks that require a password appear with a lock icon. After the device connects to a Wi-Fi network, the device will automatically connect to it any time it is available.Adding Wi-Fi networksIf the desired network does not appear in the networks list, tap Add Wi-Fi network at the bottom of the networks list. Enter the network name in Network SSID, select the security type and enter the password if it is not an open network, and then tap Save.Forgetting Wi-Fi networksAny network that has ever been used, including the current network, can be forgotten so the device will not automatically connect to it. Select the network in the networks list, and then tap Forget.Setting up accountsGoogle applications, such as Play Store, require a Google account, and Samsung Apps requires a Samsung account. Create Google and Samsung accounts to have the best experience with the device.Adding accountsFollow the instructions that appear when opening a Google application without signing in to set up a Google account.To sign in with or sign up for a Google account, on the Applications screen, tap Settings ĺ Add account ĺ Google. After that, tap New to sign up, or tap Existing, and then follow on-screen instructions to complete the account setup. More than one Google account can be used on the device.Set up a Samsung account as well.
Basics40Removing accountsOn the Applications screen, tap Settings, select an account name under Accounts, select the account to remove, and then tap Remove account.Transferring filesMove audio, video, image, or other types of files from the device to the computer, or vice versa.The following file formats are supported by some applications. Some file formats are not supported depending on the version of the device’s software.rMusic: mp3, m4a, mp4, 3gp, 3ga, wma, ogg, oga, aac, and flacrImage: bmp, gif, jpg, and pngrVideo: 3gp, mp4, avi, wmv, flv, and mkvrDocument: doc, docx, xls, xlsx, ppt, pptx, pdf, and txtConnecting with Samsung KiesSamsung Kies is a computer application that manages media libraries, contacts, and calendars, and syncs them with Samsung devices. Download the latest Samsung Kies from the Samsung website.1  Connect the device to the computer using the USB cable.Samsung Kies launches on the computer automatically. If Samsung Kies does not launch, double-click the Samsung Kies icon on the computer.2  Transfer files between your device and the computer.Refer to the Samsung Kies help for more information.
Basics41Connecting with Windows Media PlayerEnsure that Windows Media Player is installed on the computer.1  Connect the device to the computer using the USB cable.2  Open Windows Media Player and sync music files.Connecting as a media device1  Connect the device to the computer using the USB cable.2  Open the notifications panel, and then tap Connected as a media device ĺ Media device (MTP).Tap Camera (PTP) if your computer does not support Media Transfer Protocol (MTP) or not have any appropriate driver installed.3  Transfer files between your device and the computer.Securing the devicePrevent others from using or accessing personal data and information stored in the device by using the security features. The device requires an unlock code whenever unlocking it.Setting a face unlockOn the Applications screen, tap Settings ĺ Lock screen ĺ Screen lock ĺ Face unlock.Fit your face in the frame to be captured. Then, set a backup unlock PIN or pattern to unlock the screen in case the face unlock fails.
Basics42Setting a face and voice unlockOn the Applications screen, tap Settings ĺ Lock screen ĺ Screen lock ĺ Face and voice.Fit your face in the frame to be captured and then set a voice command. Then, set a backup unlock PIN or pattern to unlock the screen in case the face and voice unlock fails.Setting a patternOn the Applications screen, tap Settings ĺ Lock screen ĺ Screen lock ĺ Pattern.Draw a pattern by connecting four dots or more, and then draw the pattern again to verify it. Set a backup unlock PIN to unlock the screen when you forget the pattern.Setting a PINOn the Applications screen, tap Settings ĺ Lock screen ĺ Screen lock ĺ PIN.Enter at least four numbers, and then enter the password again to verify it.Setting a passwordOn the Applications screen, tap Settings ĺ Lock screen ĺ Screen lock ĺ Password.Enter at least four characters including numbers and symbols, and then enter the password again to verify it.
Basics43Unlocking the deviceTurn on the screen by pressing the Power button or the Home button, and enter the unlock code.If the unlock code is forgotten, take the device to a Samsung Service Centre to reset it.Upgrading the deviceThe device can be upgraded to the latest software.This feature may not be available depending on the region or service provider.Upgrading with Samsung KiesLaunch Samsung Kies and connect the device to the computer. Samsung Kies automatically recognises the device and shows available updates in a dialogue box, if any. Click the Update button in the dialogue box to start upgrading. Refer to the Samsung Kies help for details on how to upgrade.rDo not turn off the computer or disconnect the USB cable while the device is upgrading.rWhile upgrading the device, do not connect other media devices to the computer. Doing so may interfere with the update process.Upgrading over the airThe device can be directly upgraded to the latest software by the firmware over-the-air (FOTA) service.On the Applications screen, tap Settings ĺ About device ĺ Software update ĺ Update.
44CommunicationContactsUse this application to manage contacts, including phone numbers, email addresses, and others.Tap Contacts on the Applications screen.Managing contactsCreating a contactTap   and enter contact information.r : Add an image.r /   : Add or delete a contact field.Editing a contactSelect a contact to edit, and then tap  .Deleting a contactTap  .Searching for contactsUse one of the following search methods:rScroll up or down the contacts list.rUse the index at the left side of the contacts list for quick scrolling, by dragging a finger along it.rTap the search field at the top of the contacts list and enter search criteria.
Communication45Once a contact is selected, take one of the following actions:r : Add to favourite contacts.r : Compose an email.Importing and exporting contactsSyncing with Google ContactsTap   ĺ Merge with Google.Contacts synced with Google Contacts appear with   in the contacts list.If a contact is added or deleted on the device, it is also added to or deleted from Google Contacts, and vice versa.Syncing with Samsung ContactsTap   ĺ Merge with Samsung.Contacts synced with Samsung Contacts appear with   in the contacts list.If a contact is added or deleted on the device, it is also added to or deleted from Samsung Contacts, and vice versa.Importing contactsTap   ĺ Import/Export ĺ Import from SD card or Import from USB storage.Exporting contactsTap   ĺ Import/Export ĺ Export to SD card or Export to USB storage.Sharing contactsTap   ĺ Import/Export ĺ Share namecard via, select contacts, tap Done, and then select a sharing method.
Communication46Favourite contactsTap Contacts ĺ Favourites.Tap  , and then take one of the following actions:rSearch: Search for contacts.rAdd to Favourites: Add contacts to favourites.rRemove from Favourites: Remove contacts from favourites.rGrid view / List view: View contacts in grid or list form.Contact groupsTap Contacts ĺ Groups.Adding contacts to a groupSelect a group, and then tap   ĺ Add member. Select contacts to add, and then tap Done.Managing groupsTap  , and then take one of the following actions:rSearch: Search for contacts.rDelete groups: Select user-added groups, and then tap Delete. Default groups cannot be deleted.rEdit: Change the group settings.rAdd member: Add members to the group.rRemove member: Remove members from the group.rSend email: Send an email to a group’s members.rChange order: Tap and hold   next to the group name, drag it up or down to another position, and then tap Done.Sending an email to a group’s membersSelect a group, tap   ĺ Send email, select members, and then tap Done.
Communication47Business cardCreate a business card and send it to others.Tap Set up my profile, enter details, such as phone number, email address, and postal address, and then tap Save. If user information has been saved when you set up the device, select the business card in ME, and then tap   to edit.Tap   ĺ Share namecard via, and then select a sharing method.EmailUse this application to send or view email messages.Tap Email on the Applications screen.Setting up email accountsSet up an email account when opening Email for the first time.Enter the email address and password. Tap Next for a private email account, such as Google Mail, or tap Manual setup for a company email account. After that, follow on-screen instructions to complete the setup.To set up another email account, tap   ĺ Settings ĺ Add account.Sending messagesTap the email account to use, and then tap   at the top of the screen. Enter recipients, subject, and message, and then tap Send.Tap   to add a recipient from the contacts list.Tap +Cc/Bcc to add more recipients.Tap   to attach images, videos, contacts, notes, events, and others.Tap   to insert images, events, contacts, and location information into the message.
Communication48Sending scheduled messagesWhile composing a message, tap  . Set a time and date, and then tap Done. The device will send the message at the specified time and date.rIf the device is turned off at the scheduled time, is not connected to the network, or the network is unstable, the message will not be sent.rThis feature is based on the time and date set on the device. The time and date may be incorrect if you move across time zones and the network does not update the information.Reading messagesSelect an email account to use, and new messages are retrieved. To manually retrieve new messages, tap  .Tap a message to read.Open attachments.Reply to the message.Add this email address to the contacts list.Delete the message.Mark the message as a reminder.Forward the message.Compose a message.Switch to Multi Window mode.Go to the previous or next message.Tap the attachment tab to open attachments, and then tap   next to an attachment to save it.
Communication49Google MailUse this application to quickly and directly access the Google Mail service.Tap Google Mail on the Applications screen.rThis application may not be available depending on the region or service provider.rThis application may be labelled differently depending on the region or service provider.Sending messagesIn any mailbox, tap  , enter recipients, a subject, and a message, and then tap SEND.Tap +CC/BCC to add more recipients.Tap   to attach images.Tap   ĺ Save draft to save the message for later delivery.Tap   ĺ Attach video to attach videos.Tap   ĺ Discard to start over.Reading messagesMark the message as unread.Add a label to this message.Preview attachment.Keep this message for long-term storage.Mark the message as a reminder.Delete this message.Reply to this message.Reply to all recipients.Add this email address to the contacts list.Forward this message to others.Switch to Multi Window mode.
Communication50LabelsGoogle Mail does not use actual folders, but uses labels instead. When Google Mail is launched, it displays messages labelled Inbox.Tap   to view messages in other labels.To add a label to a message, select the message, tap  , and then select the label to assign.TalkUse this application to chat with others via Google Talk.Tap Talk on the Applications screen.This application may not be available depending on the region or service provider.Public profileTap the account ID at the top of the friends list to change the availability status, image, or status message.Adding friendsTap  , enter the email address of the friend to add, and then tap DONE.Chatting with friendsSelect a friend from the friends list, enter a message in the field at the bottom of the screen, and then tap  .To add a friend to chat, tap   ĺ Add to chat.To end the chat, tap   ĺ End chat.
Communication51Switching between chatsScroll left or right.Deleting chat historyChats are automatically saved. To delete chat history, tap   ĺ Clear chat history.Google+Use this application to stay connected with people via Google’s social network service.Tap Google+ on the Applications screen.This application may not be available depending on the region or service provider.Tap All circles to change the category, and then scroll up or down to view posts from your circles.Tap   to use other social network features.MessengerUse this application to chat with others via Google+ instant messaging service.Tap Messenger on the Applications screen.This application may not be available depending on the region or service provider.Select a friend from the friends list, enter a message in the field at the bottom of the screen, and then tap  .
Communication52ChatONUse this application to chat with any device that has a mobile phone number.Tap ChatON on the Applications screen.This application may not be available depending on the region or service provider.Create the buddies list by entering phone numbers or email addresses of Samsung accounts, or selecting buddies from the list of suggestions.Select a buddy to start chatting.To sync contacts on the device with ChatON, tap Settings ĺ Sync Contacts.
53Web & networkInternetUse this application to browse the Internet.Tap Internet on the Applications screen.Viewing webpagesTap the address field, enter the web address, and then tap Go.Opening a new pageTap  .To go to another webpage, scroll left or right on the title field, and tap the page to select it.Searching the web by voiceTap the address field, tap  , speak a keyword, and then select one of the suggested keywords that appear.This feature may not be available depending on the region or service provider.BookmarksTo bookmark the current webpage, tap  .To open a bookmarked webpage, tap  , and then select one.
Web & network54HistoryTap   ĺ History to open a webpage from the list of recently-visited webpages. To clear the history, tap   ĺ Clear history.Tap   ĺ History ĺ Most visited to open a webpage from the list of most visited webpages.LinksTap and hold a link on the webpage to open it in a new page, save, or copy.To view saved webpages, tap   ĺ Downloads.Sharing webpagesTo share a webpage address with others, tap   ĺ Share page.To share a part of a webpage, tap and hold the desired text, and then tap  .ChromeUse Chrome to search for information and browse webpages.Tap Chrome on the Applications screen.This application may not be available depending on the region or service provider.Viewing webpagesTap the address field, and then enter a web address or search criteria.Opening a new pageTap   ĺ New tab.To go to another webpage, scroll left or right on the title field, and tap the page to select it.
Web & network55Searching the web by voiceTap the address field, tap  , speak a keyword, and then select one of the suggested keywords that appear.Syncing with other devicesSync open tabs and bookmarks to use with Chrome on another device, when you are logged in with the same Google account.To view open tabs on other devices, tap   ĺ Other devices. Select a webpage to open.To view bookmarks, tap  .BluetoothBluetooth creates a direct wireless connection between two devices over short distances. Use Bluetooth to exchange data or media files with other devices.rSamsung is not responsible for the loss, interception, or misuse of data sent or received via the Bluetooth feature.rAlways ensure that you share and receive data with devices that are trusted and properly secured. If there are obstacles between the devices, the operating distance may be reduced.rSome devices, especially those that are not tested or approved by the Bluetooth SIG, may be incompatible with your device.rDo not use the Bluetooth feature for illegal purposes (for example, pirating copies of files or illegally tapping communications for commercial purposes).Samsung is not responsible for the repercussion of illegal use of the Bluetooth feature.To activate Bluetooth, on the Applications screen, tap Settings ĺ Bluetooth, and then drag the Bluetooth switch to the right.
Web & network56Pairing with other Bluetooth devicesOn the Applications screen, tap Settings ĺ Bluetooth ĺ Scan, and detected devices are listed. Select the device you want to pair with, and then accept the auto-generated passkey on both devices to confirm.Sending and receiving dataMany applications support data transfer via Bluetooth. An example is Gallery. Open Gallery, select an image, tap   ĺ Bluetooth, and then select one of the paired Bluetooth devices. After that, accept the Bluetooth authorisation request on the other device to receive the image. The transferred file is saved in the Bluetooth folder. If a contact is received, it is added to the contacts list automatically.AllShare CastUse this feature to connect your device to a large screen with an AllShare Cast dongle, and then share your contents.rThis feature may not be available depending on the region or service provider.rSome files may be buffered during playback, depending on the network connection.rTo save energy, deactivate the AllShare Cast feature when not in use.rIf you specify a Wi-Fi frequency band, AllShare Cast dongles may not be discovered or connected.rIf you play videos or games on a TV, select an appropriate TV mode to get the best experience from AllShare Cast.On the Applications screen, tap Settings ĺ More settings ĺ AllShare Cast, and then drag the AllShare Cast switch to the right. Select a device, open or play a file, and then control the display with the keys on your device.
Web & network57AllShare PlayUse this application to play contents saved on various devices over the Internet. You can play and send any file on any device to another device or web storage server.To use this application, you must sign in to your Samsung account and register two or more devices as file servers. The registration methods may vary depending on the device type. To get more details, tap   ĺ FAQ.Tap AllShare Play on the Applications screen.This application may not be available depending on the region or service provider.Sending filesSelect a device or web storage, select a file, and then tap  .Sharing filesSelect a device or web storage, select a file, tap  , and then use the following options:rGroup Play: Share screens with multiple other devices that are connected to the same Wi-Fi network.rSend to Nearby Users: Share files with nearby devices that have AllShare Play activated.rFacebook / Twitter / Flickr / Picasa: Upload files to a social network site.Playing files on a remote deviceSelect a device or web storage, select a file, tap  , and then select a device.rSupported file formats may differ depending on connected devices as a media player.rSome files may be buffered while playing depending on the network connection.
Web & network58Managing contents on a web storage serverSelect a web storage server, and then view and manage your files.Group PlayUse this application to share images, documents, and music with other devices that are connected to the same Wi-Fi network.Tap Group Play on the Applications screen.This application may not be available depending on the region or service provider.Sharing files1  Tap Start ĺ Share picture, Share document, or Share music, select the files to share, and then tap Done.2  Enter a PIN code and tap Done.Joining another Group PlayTap Join ĺ another device, enter the PIN code, and then tap Done.Smart RemoteUse this application to use the device as a remote control for a TV.Tap Smart Remote on the Applications screen.You must first connect the device to a Wi-Fi AP and ensure that the device’s infrared port is facing the TV.
Web & network59Setting the device as a remote control for a TVSelect a region next to Set Up Smart Remote Now, tap Choose Brand, and then tap the brand of the TV. Tap Test Power On/Off ĺ Yes ĺ Done.To connect additional devices, tap Add New Device.When you are finished, you can control the TV remotely with the device.Customising remote control settingsTap   and use the following options:rTelevision: Change command codes if you have problems with a particular control.rAdd New Device: Add connections for peripheral devices connected to the TV.rReset Peel: Reset the connection settings.rSend Feedback: Report your opinions for application development.
60MediaMusic PlayerUse this application to listen to music.Tap Music Player on the Applications screen.rSome file formats are not supported depending on the device’s software version.rSome files may not play properly depending on the encoding used.Playing musicSelect a music category, and then select a song to play.Tap the album image to open the music player screen.Skip to the next song. Tap and hold to move forwards quickly.Pause and resume playback.Switch to Multi Window mode.Select a sound effect.Open the playlist.View file details.Change the repeat mode.Restart the currently-playing song or skip to the previous song. Tap and hold to move backwards quickly.Turn on shue.Set the le as your favourite track.Mute the sound.Adjust the volume.
Media61Creating playlistsMake an own selection of songs.Tap   ĺ New playlist. Enter a title and tap OK. Select songs to include, and then tap Done.To add the currently-playing song to a playlist, tap   ĺ Add to playlist.Playing music by moodPlay music grouped by mood. The playlist is automatically created by the device. When a new song is added, tap Music square ĺ  .Tap Music square and select a cell of mood. Or select multiple cells by dragging your finger.CameraUse this application to take photos or videos.Use Gallery to view photos and videos taken with the device’s camera. (p. 68)Tap Camera on the Applications screen.The camera automatically shuts off when unused.Camera etiquetterDo not take photos or videos of other people without their permission.rDo not take photos or videos where legally prohibited.rDo not take photos or videos in places where you may violate other people’s privacy.
Media62Taking photosTaking a photoTap the image on the preview screen where the camera should focus. When the subject is in focus, the focus frame turns green. Tap   to take the photo.Indicates which storage is in use.Switch between still and video mode.Open the image viewer to display photos.Switch between the front and rear camera.Change the shooting mode.Use this for delayed-time shots.Determine how much light the camera’s sensor receives.Change the camera settings.Select among various eects that are available.Scene modePredefined settings make point-and-shoot photos easier to take.Tap   ĺ Scene mode.rPortrait: Use this setting for a human subject.rLandscape: Use this setting to take photos of blue skies and landscapes with richer colours.rSports: Use this setting for fast-moving subjects.rParty/Indoor: Use this setting for well-lit indoor scenes.rBeach/Snow: Use this setting for well-lit or sunny outdoor scenes.
Media63rSunset: Use this setting for richer colours and sharper contrasts.rDawn: Use this setting for very subtle colours.rAutumn colour: Use this setting for red-shifted background scenery.rText: Use this setting for books or posters.rCandlelight: Use this setting for images of bright light against a dark background.rBacklight: Use this setting for subjects with bright lights behind them.rNight: Use this setting for images taken in darker conditions.Shooting modeSeveral photo effects are available.Tap   ĺ Shooting mode.rSingle shot: Take a single photo.rPanorama: Take a photo composed of many photos strung together.rShare shot: Send a photo directly to another device via Wi-Fi Direct.rBuddy photo share: Set the device to recognise a person’s face that you have tagged in a photo and send it to that person. Face recognition may fail depending on the face angle, face size, skin colour, facial expression, light conditions, or accessories the subject is wearing.rSmile shot: Take a photo when a subject smiles.rCartoon: Take a photo that looks like a drawing.Panoramic photosA panoramic photo is a wide landscape image consisting of multiple shots.Tap   ĺ Shooting mode ĺ Panorama.Tap   and move the camera in any direction. When two panorama guide frames are aligned, the camera automatically takes another shot in a panoramic sequence. To stop shooting, tap   again.
Media64Taking videosTaking a videoSlide the still-video switch to the video icon, and then tap   to take a video. To stop recording, tap  .The zoom function may not be available when recording at the highest resolution.Recording modeSwitch between the front and rear camera.Change recording mode.Use this for delayed-time shots.Select among various eects that are available.Determine how much light the camera’s sensor receives.Change the camera settings.Indicates which storage is in use.Switch between still and video mode.Open the video player to play videos.
Media65Tap   to change recording mode.rNormal: Use this mode for normal quality.rLimit for Email: Use this mode to lower quality for sending via email.Zooming in and outUse one of the following methods:rUse the Volume button to zoom in or out.rSpread two fingers apart on the screen to zoom in, and pinch to zoom out.rThe zoom function may not be available when shooting at the highest resolution.rThe zoom in/out effect is available when using the zoom feature while shooting video.
Media66Configuring settings for CameraTap   to configure settings for Camera. Not all of the following options are available in both still camera and video camera modes. The available options vary depending on the mode used.rEdit shortcuts: Reorganise shortcuts to frequently-used options.rUse the volume key as: Set to use the Volume button to control the shutter or zoom function.rGPS tag: Attach a GPS location tag to the photo.rTo improve GPS signals, avoid shooting in locations where the signal may be obstructed, such as between buildings or in low-lying areas, or in poor weather conditions.rYour location may appear on your photos when you upload them to the Internet. To avoid this, deactivate the GPS tag setting.rSelf portrait: Take a photo of yourself.rSelf recording: Take a video of yourself.rShooting mode: Change the shooting mode.rRecording mode: Change recording mode.rEffects: Select among various photo effects that are available.rScene mode: Change the scene mode.rExposure value: Change the exposure value. This determines how much light the camera’s sensor receives. For low-light situations, use a higher exposure.rFocus mode: Select a focus mode. Auto focus is camera-controlled. Macro is for very close objects.rTimer: Use this for delayed-time shots.rResolution: Select a resolution. Use higher resolution for higher quality. But it takes up more memory.
Media67rWhite balance: Select an appropriate white balance, so images have a true-to-life colour range. The settings are designed for specific lighting situations. These settings are similar to the heat range for white-balance exposure in professional cameras.rISO: Select an ISO value. This controls camera light sensitivity. It is measured in film-camera equivalents. Low values are for stationary or brightly-lit objects. Higher values are for fast-moving or poorly-lit objects.rMetering: Select a metering method. This determines how light values are calculated. Centre-weighted measures background light in the centre of the scene. Spot measures the light value at a specific location. Matrix averages the entire scene.rOutdoor visibility: Use this for bright, outdoor conditions.rGuidelines: Display viewfinder guides to help composition when selecting subjects.rContextual filename: Set the camera to display contextual tags.rTake photos using voice: Set the camera to take photos with voice commands.rSave as flipped: Invert the image to create a mirror-image of the original scene.rImage quality: Set the quality level for photos. Higher quality images require more storage space.rVideo quality: Set the quality level for videos.rStorage: Select the memory location for storage.rReset: Reset the camera settings.ShortcutsReorganise shortcuts for easy access to the camera’s various options.Tap   ĺ Edit shortcuts.Tap and hold an option and drag it to a slot at the left of the screen. The other icons can be moved within the list by tapping and dragging them.
Media68GalleryUse this application to view images and videos.Tap Gallery on the Applications screen.rSome file formats are not supported depending on the software installed on the device.rSome files may not play properly depending on how they are encoded.Viewing imagesLaunching Gallery displays available folders. When another application, such as Email, saves an image, the download folder is automatically created to contain the image. Likewise, capturing a screenshot automatically creates the Screenshots folder. Select a folder to open it.In a folder, images are displayed by creation date. Select an image to view it in full screen.Scroll left or right to view the next or previous image.Zooming in and outUse one of the following methods to zoom in an image:rDouble-tap anywhere to zoom in.rSpread two fingers apart on any place to zoom in. Pinch to zoom out, or double-tap to return.Playing videosVideo files show the   icon on the preview. Select a video to watch it and tap  .
Media69Editing imagesWhen viewing an image, tap   and use the following functions:rFace tag: Register the faces in the image as face tags.rTag buddy: Set the camera to display contextual tags.rAdd weather tag: Add a weather tag.rPhoto frame: Use this to write a note below the image. The edited image is saved in the Photo frame folder.rPhoto note: Use this to write a note on the back of the image. Tap   to edit the note.rCopy to clipboard: Copy to clipboard.rRotate left: Rotate anticlockwise.rRotate right: Rotate clockwise.rCrop: Resize the blue frame to crop and save the image in it.rEdit: Launch Paper Artist or Photo Editor to edit the image.rSet as: Set the image as a wallpaper or a contact image.rBuddy photo share: Send the image to a person whose face is tagged in the image.rPrint: Print via a USB or Wi-Fi connection. The device is only compatible with some Samsung printers.rRename: Rename the file.rScan for nearby devices: Search for devices that have media sharing activated.rDetails: View image details.Favourite imagesWhen viewing an image, tap   to add the image to the favourites list.
Media70Deleting imagesUse one of the following methods:rIn a folder, tap   ĺ Select item, select images by ticking, and then tap  .rWhen viewing an image, tap  .Sharing imagesUse one of the following methods:rIn a folder, tap   ĺ Select item, select images by ticking, and then tap   to send them to others.rWhen viewing an image, tap   to send it to others or share it via social network services.Setting as wallpaperWhen viewing an image, tap   ĺ Set as to set the image as wallpaper or to assign it to a contact.Tagging facesWhen viewing an image, tap   ĺ Face tag ĺ On. A yellow frame appears around the recognised face. Tap the face, tap Add name, and then select or add a contact.When the face tag appears on an image, tap the face tag and use available options, such as sending messages.Face recognition may fail depending on the face angle, face size, skin colour, facial expression, light conditions, or accessories the subject is wearing.
Media71Using Tag BuddyWhen viewing an image, tap   ĺ Tag buddy to display a contextual tag (weather, location, date, and person’s name) when opening an image.Paper ArtistUse this application to make images look like illustrations with fun effects or frames.Tap Paper Artist on the Applications screen.Use artistic tools to edit an image. The edited image is saved in the Gallery ĺ Paper Pictures folder.Select an existing image. Share the image.Apply effects to the image.Draw with a pen. Double-tap to change the pen thickness.Take a photo.Draw with a brush. Double-tap to change the brush thickness.Save the image.Apply frames to the image.Erase the drawings. Double-tap to change the eraser size.
Media72PS TouchUse this application to embellish photos with the core features of Adobe Photoshop, such as layers, selection tools, adjustments, filters, and more.Tap PS Touch on the Applications screen.To open a project, select one of the following:r : Add a blank layer.r : Select from the images folder or take a photo to edit.Hide the menu bar.Move or resize the image.Add a new layer.Add an image as a new layer.Change the selection mode or use tools.Smooth the edge of the selection.Undo and redo the last action.Edit the selection.Make a selection to edit.Move to the previous screen.Add or subtract the selection.Adjust the edge angle of the selection.Apply colour effects.Apply filter effects.Modify the image by cropping, resizing, or using other options.Configure or merge the layers.LayersTo finish, tap   ĺ Save.To sync with the Adobe Create Cloud service, tap  .
Media73Video PlayerUse this application to play video files.Tap Video Player on the Applications screen.rAvoid locking the device’s screen while playing a DivX Video-On-Demand. Each time you lock the screen while playing a DivX Video-On-Demand, one of your available rental counts is lost.rSome file formats are not supported depending on the device's software.rSome files may not play properly depending on how they are encoded.Playing videosSelect a video to play.Change screen ratio.Move forwards or backwards by dragging the bar.Adjust the volume.Mute the sound.Restart the current video or skip to the previous video. Tap and hold to move backwards quickly.Skip to the next video. Tap and hold to move forwards quickly.Switch to Multi Window mode.Reduce the size of the video screen.Select a sound effect.Insert a bookmark.Pause and resume playback.
Media74Deleting videosTap   ĺ Delete, select videos by ticking, and then tap Delete.Sharing videosTap   ĺ Share via, select a sharing method, select videos by ticking, and then tap Share.Using Popup Video playerUse this feature to use other applications without closing the video player. While watching videos, tap   to use the pop-up player.Spread two fingers apart on the screen to enlarge the player or pinch to reduce it. To move the player, drag the player to another location.YouTubeUse this application to watch videos from the YouTube website.Tap YouTube on the Applications screen.This application may not be available depending on the region or service provider.
Media75Watching videosTap  , and then enter a keyword. Select one of the returned search results to watch a video.Rotate the device to landscape orientation to display full screen.Pause or resume playback.Move forwards or backwards by dragging the bar.Change display quality.Add the video to the playlist.Switch to Multi Window mode.Rotate the screen to portrait orientation.Send the URL to others.Search for videos.Sharing videosSelect the video to view, tap  , and then select a sharing method.Uploading videosSelect your account, tap  , select a video, enter information for the video, and then tap UPLOAD.
Media76FlipboardUse this application to access your personalised magazines.Tap Flipboard on the Applications screen.This application may not be available depending on the region or service provider.To start your Flipboard, flick left on the greeting page, tap Get Started, select news topics, and then tap Build Your Flipboard.Select a cover story or a topic, flick through the Flipboard pages, and then select an article to read.While reading an article, use the following icons:r : Go to the previous page.r : View others’ comments about the article.r : Share the article with others.`
77Application & media storesPlay StoreUse this application to purchase and download applications and games that are able to run on the device.Tap Play Store on the Applications screen.This application may not be available depending on the region or service provider.Installing applicationsBrowse applications by category, or tap   to search with a keyword.Select an application to view information. To download it, tap Install. If there is a charge for the application, tap the price, and follow on-screen instructions to complete the purchase process.rWhen a new version is available for any installed application, an update icon appears at the top of the screen to alert you to the update. Open the notifications panel and tap the icon to update the application.rTo install applications that you downloaded from other sources, on the Applications screen, tap Settings ĺ Security ĺ Unknown sources.Uninstalling applicationsUninstall the applications purchased from Play Store.Tap  , select an application to delete in the list of installed applications, and then tap Uninstall.
Application & media stores78Samsung AppsUse this application to purchase and download dedicated Samsung applications. For more information, visit www.samsungapps.com.Tap Samsung Apps on the Applications screen.This application may not be available depending on the region or service provider.If a Samsung account is not registered, follow the on-screen instructions to create a Samsung account. To complete the subscription process, read the terms and conditions, and then tap Accept to agree to them.Installing applicationsBrowse applications by category. Tap   to select a category.To search for an application, tap   at the top of the screen, and then enter a keyword in the search field.Select an application to view information. To download it, tap Get.When a new version is available for any installed application, an update icon appears at the top of the screen to alert you to the update. Open the notifications panel and tap the icon to update the application.Game HubUse this application to access games.Tap Game Hub on the Applications screen.This application may not be available depending on the region or service provider.Scroll left or right and select a game to download from Samsung Apps.
Application & media stores79Music HubUse this application to listen to songs on the device or the web server provided by Music Hub, and purchase songs.If you subscribe to the Music Hub premium service, you can enjoy customisable services, such as recommended songs or artists, unlimited song streaming, and personal radio stations. To get more details, tap   ĺ Help or visit the Music Hub website.Tap Music Hub on the Applications screen.This application or some features of this application may not be available depending on the region or service provider.Syncing songs with the Music Hub libraryTap MY MUSIC ĺ   ĺ Refresh. The Music Hub library is updated with the songs on the device.If a song on your Music Hub library is not in the database, Music Hub will automatically upload the song to the database.Playing musicTap MY MUSIC, select a music category, and then select a song to play.To search for and listen to similar songs, tap   ĺ Find similar music.Purchasing songsTap STORE, and then select a genre ĺ a category. Tap   ĺ Buy song, and then follow the on-screen instructions to complete the purchase process.
Application & media stores80Play BooksUse this application to read and download book files.Tap Play Books on the Applications screen.This application may not be available depending on the region or service provider.Select a book file by scrolling left or right. While reading a book file, tap   to access additional options.To purchase book files, tap  .Play MoviesUse this application to watch, download, and rent movies or TV shows.Tap Play Movies on the Applications screen.This application may not be available depending on the region or service provider.Select a category at the top of the screen, and then select a movie, TV programme, or video to play or rent.Play MusicUse this application to stream music from the Google cloud service.Tap Play Music on the Applications screen.This application may not be available depending on the region or service provider.Play music by selecting a music category or share songs with others by uploading them to the Google cloud storage.
Application & media stores81Readers HubUse this application to download and read book files.Tap Readers Hub on the Applications screen.This application may not be available depending on the region or service provider.Select a book to read. To download book files, go to the Readers Hub Store.Video HubUse this application to access and purchase videos.Tap Video Hub on the Applications screen.This application may not be available depending on the region or service provider.Select a category, and then select a video.Learning HubUse this application to access learning material.Tap Learning Hub on the Applications screen.This application may not be available depending on the region or service provider.Select a category, and then select a video lecture or book.
82UtilitiesS NoteUse this application to create a note using images and voice recordings.Tap S Note on the Applications screen.The S Pen can be used to open S Note. Double-tap the screen with the S Pen button pressed.Selecting note templatesTap   and select one of the following templates:rNote / Idea note / Memo: Create a simple note from an empty page.rMeeting note: Create a record of meetings, conferences, or lectures.rMagazine: Create a multimedia note by inserting multimedia files.rDiary: Create a photo diary.rRecipe: Create your own recipe.rTravel: Create a travel essay.rLandscape note: Create a note in landscape orientation.rBirthday: Create a birthday card.
Utilities83Composing notesAppend another page to the current note.Undo and redo the last action.Insert a multimedia le.Hide the toolbar.Switch to Multi Window mode.Compose a new note.Save the note.Erase the note.Draw only with the S Pen.Use productivity tools.Search for information about the handwritten keyword on a preset webpage.Record your actions while drawing a note.Enter a note.Jot down or draw a note.Switch to view mode.When erasing the note, tap   to change the eraser type, tap   to change the eraser size, or tap Clear all to clear the note.
Utilities84Change the pen type.Change the thickness.Change the pen colour.Open the preset pen proles.Save the current setting as a pen prole.To change the sheet background, tap   ĺ Change background.To add tags, tap   ĺ Add tag.Inserting multimedia files or a voice recordingTap   to insert multimedia files. Tap Record voice to insert a voice recording.Using productivity toolsTap   and select one of the following tools:r : Convert a shape you have drawn.r : Convert a handwritten formula to a well-organised formula. Tap Search to get detailed information about the formula.r : Convert a handwritten note.
Utilities85Browsing notesBrowse note thumbnails by scrolling up or down.To sync notes with the Samsung account, tap   ĺ Refresh.To sort notes by date, title, or others, tap   ĺ Sort by.To change the view mode, tap   ĺ List view.To create a note by importing a PDF, image file, or note, tap   ĺ Import.To export notes as another file format, tap   ĺ Export.To create a folder, tap   ĺ Create a folder.To change the order of notes, tap   ĺ Change order.To copy notes, tap   ĺ Copy.To move notes to another folder, tap   ĺ Move.To change the S Note settings, tap   ĺ Settings.To access help information for S Note, tap   ĺ Help.Viewing a noteTap the note thumbnail to open it.To move to other pages of the note, tap   or  .To create a note, tap   ĺ Create note.To send the note to others, tap   ĺ Share via.To save the note as an image file or a PDF file, tap   ĺ Export.To add or delete the note, tap   ĺ Edit pages.To delete the note, tap   ĺ Delete.To add tags, tap   ĺ Add tag.To save the note as an event, tap   ĺ Create event.To add a shortcut to the note on the Home screen, tap   ĺ Set as shortcut.To print the note via a USB or Wi-Fi connection, tap   ĺ Print. The device is only compatible with some Samsung printers.To set the note as wallpaper or to assign it to a contact, tap   ĺ Set as.
Utilities86aNote HDUse this application to create a note.Tap aNote HD on the Applications screen.Composing notesTap   to compose a note.To add a quick memo, tap  .Insert a tick box.Insert an image, location, or handwritten memo.Set a priority.Move to the previous screen.Undo and redo the last action.Select a folder to save.Move the cursor to the next tab stop.Insert a bullet.Insert a hyphen.Move the cursor.Add a tag to the memo.Browsing notesSelect a folder and browse notes by scrolling up or down the notes list.To view notes in calendar mode, tap  .To search for a note, tap  .To delete or move a note, tap  .To change the view mode of the notes list, tap  .To sort notes by date, title, or priority, tap  .To delete or move a folder, tap  .
Utilities87Viewing a noteTap the note to open it.To move to other notes, tap   or  .To change note settings, tap  .To insert an image, location, or handwritten memo, tap  .To delete the note, tap  .To lock the note so that others cannot edit it, tap  .S PlannerUse this application to manage events and tasks.Tap S Planner on the Applications screen.Creating events or tasksTap  , and then use one of the following methods:rAdd event: Enter an event with an optional repeat setting.rAdd task: Enter a task with an optional priority setting.rAdd memo: Create a handwritten memo to attach to the date.To add an event or task more briefly, tap a date to select it and tap it again.
Utilities88Enter a title and specify which calendar to use or sync with. Then tap Edit event details or Edit task details to add more details, such as how often the event repeats, when it has an advance alert, or where it takes place.Attach a map showing the location of the event. Enter the location in the Location field, tap  next to the field, and then pinpoint the precise location by tapping and holding on the map that appears.Attach a note from S Note. Tap Notes, and then compose a new note or select one of the existing notes.Attach an image. Tap Images, and then take a photo or select one of the existing images.Attaching memos to a dateTap and hold a date to select it and tap Add memo. The memo pad appears.
Utilities89Syncing with Google CalendarOn the Applications screen, tap Settings ĺ Google under Accounts ĺ a Google account ĺ Sync Calendar ĺ Sync now. To manually sync for updating, on the Applications screen, tap S Planner ĺ   ĺ Sync.To display synced event or task, tap   ĺ Settings ĺ View settings ĺ Calendars ĺ Display, select the Google account, and then tap OK.Changing calendar typeTap the top left of the screen, and then select one from among different types of calendars including month, week, and others. A pinch gesture can be used to change calendar type. For example, pinch to change from the monthly calendar to the yearly calendar, and spread apart to change yearly calendar back to monthly calendar.Searching for eventsTap  , and then enter a keyword to search for.To view today’s events, tap Today at the top of the screen.Deleting eventsSelect a date, and then tap   ĺ Delete.Sharing eventsSelect an event, tap   ĺ Share via, and then select a sharing method.
Utilities90Polaris OfficeUse this application to edit documents in various formats, including spreadsheets and presentations.Tap Polaris Office on the Applications screen.Some functions may not be available, depending on the file type.Create a document.View favourite documents.Scroll up or down to view recent documents.View and manage documents online.Browse folders.Browse by document formats.Switch to Multi Window mode.Creating documentsTap  , and then select a document type.Use the editing toolbar at the top of the screen to edit the document.To finish, tap   ĺ Save, enter a filename, select a folder to save to, and then tap Save.
Utilities91Reading documentsTap a file in Recent documents. Or tap Browser, Clouds, Form type, or Favourites, and then select a file to open.To start a slideshow, tap   ĺ Slide Show.To search for a text string in the document, tap  .Tap  , and then use one of the following functions:WordrSave as: Save the document with a different name.rPDF export: Save the document as a PDF file.rFind & Replace: Search for or replace text.rPage layout: Change the layout of pages.rFull width view: View the document contents only, without margins.rZoom: Change the view size.rReflow text: Rearrange the text to fit the screen.rView Comment: View comments in the document.rTTS: Read the document via the text-to-speech feature.rPrint: Print the document via a USB or Wi-Fi connection. The device is only compatible with some Samsung printers.PowerPointrSlide Show: Start a slideshow.rSave as: Save the document with a different name.rPDF export: Save the document as a PDF file.rFind & Replace: Search for or replace text.rSingle slide view: View slides one by one.rZoom: Change the view size.rPrint: Print the document via a USB or Wi-Fi connection. The device is only compatible with some Samsung printers.
Utilities92ExcelrSave as: Save the document with a different name.rFind & Replace: Search for or replace text.rProtect worksheet: Lock the sheet so that others cannot edit it.rFreeze frame: Keep the selected row in place.rRecalculation: Recalculate the functions on the sheet.rSort: Sort cells by specific criteria.rFilter: View cells filtered by specific criteria.rZoom: Change the view size.rPrint: Print the document via a USB or Wi-Fi connection. The device is only compatible with some Samsung printers.Tex trSave as: Save the document with a different name.rTTS: Read the document via the text-to-speech feature.rPrint: Print the document via a USB or Wi-Fi connection. The device is only compatible with some Samsung printers.
Utilities93DropboxUse this application to save and share files with others via the Dropbox cloud storage. When you save files to Dropbox, your device automatically syncs with the web server and any other computers that have Dropbox installed.Tap Dropbox on the Applications screen.This application may not be available depending on the region or service provider.When running Dropbox for the first time, tap Start to activate it. Follow the on-screen instructions to complete the setup.To upload files to Dropbox, tap   ĺ   ĺ Upload here ĺ Photos or videos or Other files.To open a file in Dropbox, tap  , and then select a file. While viewing the file, tap   to add it to the favourites list.To open favourite files, tap  .AlarmUse this application to set wake-up calls and alarms for important events.Tap Alarms on the Applications screen.Turn this alarm on or off.
Utilities94Setting alarmsTap   set a time for the alarm to go off, select days for the alarm to repeat, and then tap Save.rSnooze: Set an interval and the number of times for the alarm to repeat after the preset time.rSmart alarm: Set a time for the alarm to go off before the preset time.Stopping alarmsDrag   outside the large circle to stop an alarm. Drag   outside the large circle to repeat the alarm after a specified length of time.Deleting alarmsTap and hold the alarm, and then tap Delete.World ClockUse this application to check the time in any location in the world.Tap World Clock on the Applications screen.Creating clocksTap  , enter a city name or select a city from the globe, and then tap  .To apply summer time, tap and hold a clock, and then tap DST settings.Deleting clocksTap  , select clocks, and then tap Delete.
Utilities95CalculatorUse this application for simple or complex calculations.Tap Calculator on the Applications screen.Rotate the device to landscape orientation to display the scientific calculator. If Screen rotation is disabled, tap   ĺ Scientific calculator.To see calculation history, tap   to hide the keypad.To clear history, tap   ĺ Clear history.To change the character size for history, tap   ĺ Text size.S VoiceUse this application to command the device by voice to send a message, write a memo, and more.Tap S Voice on the Applications screen.This application may not be available depending on the region or service provider.Here are several examples of spoken commands:rOpen musicrLaunch calculatorrCheck scheduleTips for better voice recognitionrSpeak clearly.rSpeak in quiet places.rDo not use offensive or slang words.rAvoid speaking in dialectal accents.The device may not recognise your commands or may perform unwanted commands depending on your surroundings or how you speak.
Utilities96GoogleUse this application to search not only the Internet, but also applications and their contents on the device as well.Tap Google on the Applications screen.Searching the deviceTap the search field, and then enter a keyword. Alternatively, tap  , speak a keyword, and then select one of the suggested keywords that appear.If no results are returned from the applications, the web browser appears, displaying the search results.Search scopeTo select what applications to search, tap   ĺ Settings ĺ Tablet search, and then tick the items to search for.Google NowLaunch Google search to view Google Now cards that show the current weather, public transit info, your next appointment, and more when you are most likely to need it.Join Google Now when opening Google search for the first time. To change Google Now settings, tap   ĺ Settings ĺ Google Now.This feature may not be available depending on the region or service provider.
Utilities97Voice SearchUse this application to search webpages by speaking.Tap Voice Search on the Applications screen.This application may not be available depending on the region or service provider.Speak a keyword or phrase when Speak now appears on the screen. Select one of the suggested keywords that appear.My FilesUse this application to access all kinds of files stored in the device, including images, videos, songs, and sound clips.Tap My Files on the Applications screen.Select a folder to open it. To go back to the parent folder, tap  . To return to the root directory, tap  .In a folder, use one of the following functions:r : Search for files.r : Change the view mode.r : Create a folder.rTime: Sort files or folders.Select a file or folder by ticking, and then use one of the following functions:r : Copy files or folders to another folder.r : Move files or folders to another folder.r : Delete files or folders.r : Send files to others.r ĺ Rename: Rename a file or folder.r ĺ Details: View file or folder details.
Utilities98DownloadsUse this application to see what files are downloaded through the applications.Tap Downloads on the Applications screen.This application may not be available depending on the region or service provider.To see the files downloaded from the Internet, tap Internet downloads, otherwise, tap Other downloads to see the files downloaded from other applications, such as Email.Select a file to open it with an appropriate application.
99Travel & localMapsUse this application to pinpoint the location of the device, search for places, or get directions.Tap Maps on the Applications screen.This application may not be available depending on the region or service provider.Searching for locationsTap Search Maps, enter an address, and then tap  . Select a location to view the detailed location information. To search for nearby locations, tap   ĺ Local.Once the location is found, tap   and use one of the following functions:rClear Map: Clear the map.rMake available offline: Save the map of a specified area to view it offline.rLocal: Search for nearby locations.rLayers: Overlay multiple layers including satellite images, traffic information, and more.rLatitude: Share location information with friends.rMy Places: View search history.rSettings: Change the map settings.rHelp: View information about using the map.To view current location, tap  .To zoom in or out the map, spread two fingers apart on the screen to zoom in, and pinch to zoom out.
Travel & local100Getting directions for a destination1  Tap  .2  Tap  , and then select a method to enter starting and ending locations:rMy current location: Use current location for starting location.rContacts: Select from the contacts list.rPoint on map: Pinpoint by tapping on the map.rMy Places: Select from the list of favourite places.3  Select a travel method, such as driving, public transit, or walking, and then tap Go.4  Select one of the routes that appear.LocalUse this application to search for nearby restaurants, banks, bus stops, and more.Tap Local on the Applications screen.This application may not be available depending on the region or service provider.Select a place category, and then select a place from the list of search results.rMap: Pinpoint the place on the map.rDirections: Search for a route to the place.To add a place category, tap   ĺ Add a search on the category list, enter a keyword to search into the text field.
Travel & local101NavigationUse this application to search for a route to a destination.Tap Navigation on the Applications screen.rNavigation maps, your current location, and other navigational data may differ from actual location information. You should always pay attention to road conditions, traffic, and any other factors that may affect your driving. Follow all safety warnings and regulations while driving.rThis application may not be available depending on the region or service provider.Specify the destination by using one of the following methods:rSpeak the destination address.rEnter the destination address.rSelect the destination address from the contacts list.rSelect the destination from the list of starred places.Once a route is found, follow on-screen instructions to navigate to the destination.
102SettingsAbout SettingsUse this application to configure the device, set application options, and add accounts.Tap Settings on the Applications screen.Wi-FiActivate the Wi-Fi feature to connect to a Wi-Fi network and access the Internet or other network devices.To use options, tap  .rAdvanced: Customise Wi-Fi settings.rWPS push button: Connect to a secured Wi-Fi network with a WPS button.rWPS PIN entry: Connect to a secured Wi-Fi network with a WPS PIN.Setting Wi-Fi sleep policyOn the Settings screen, tap Wi-Fi ĺ   ĺ Advanced ĺ Keep Wi-Fi on during sleep.When entering power-saving mode, the device automatically turns off Wi-Fi connections. When this happens, the device automatically accesses data networks if it is set to use them. This may incur data transfer fees. To avoid data-usage bills, set this option to Always.Setting Network notificationThe device can detect open Wi-Fi networks and display an icon on the status bar to notify when available.On the Settings screen, tap Wi-Fi ĺ   ĺ Advanced and tick Network notification to activate this feature.
Settings103Wi-Fi DirectWi-Fi Direct connects two devices directly via a Wi-Fi network without requiring an access point.On the Settings screen, tap Wi-Fi ĺ Wi-Fi Direct.BluetoothActivate the Bluetooth feature to exchange information over short distances.Data usageKeep track of your data usage amount.More settingsCustomise settings to control connections with other devices or networks.Flight modeThis disables all wireless functions on your device. You can use only non-network services.VPNSet up and connect to virtual private networks (VPNs).
Settings104Nearby devicesrFile sharing: Activate media sharing to allow other DLNA-enabled devices to access media files on your device.rShared contents: Set to share your content with other devices.rDevice name: Enter a media server name for your device.rAllowed devices list: View the list of devices that can access your device.rNot-allowed devices list: View the list of devices that are blocked from accessing your device.rDownload to: Select a memory location for saving media files.rUpload from other devices: Set to accept uploads from other devices.AllShare CastActivate the AllShare Cast feature and share your display with others.Kies via Wi-FiConnect the device to Samsung Kies via a Wi-Fi network.Home screen modeSelect a Home screen mode (basic or easy).Blocking modeSelect which notifications will be blocked and how long to block them.
Settings105SoundChange settings for various sounds on the device.rVolume: Adjust the volume level for music and videos, system sounds, and notifications.rVibration intensity: Adjust the force of the vibration notification.rDefault notifications: Select a ringtone for events, such as incoming messages and alarms.rTouch sounds: Set the device to sound when selecting an application or option on the touch screen.rScreen lock sound: Set the device to sound when locking or unlocking the touch screen.rHaptic feedback: Set the device to vibrate when touching keys.DisplayChange the settings for the display.rWallpaper:–Home screen: Select a background image for the Home screen.–Lock screen: Select a background image for the locked screen.–Home and lock screens: Select a background image for the Home screen and the locked screen.rNotification panel: Customise the items that appear on the notifications panel.rMulti window: Set to use Multi Window.rPage buddy: Set the device to open contextual pages based on your actions.
Settings106rScreen mode: Select a display mode.–Dynamic: Use this mode to make the display tone more vivid.–Standard: Use this mode for normal surroundings.–Movie: Use this mode for dim surroundings, such as in a dark room.rReading mode: Select which applications will use reading mode. In reading mode, the device helps protect your eyes when reading at night.rBrightness: Set the brightness of the display.rScreen timeout: Set the length of time the device waits before turning off the display’s backlight.rSmart rotation: Set the interface not to rotate according to the orientation of your face.rSmart stay: Set to prevent the display backlight from turning off while you are looking at the display.rFont style: Change the font type for display text.rFont size: Change the font size.rTouch key light duration: Set the duration for the touch button backlight.rDisplay battery percentage: Set to view the remaining battery life.StorageView memory information for your device and memory card, or format a memory card.Formatting a memory card permanently deletes all data from it.The actual available capacity of the internal memory is less than the specified capacity because the operating system and default applications occupy part of the memory.
Settings107Power saving modeActivate power-saving mode and change the settings for power-saving mode.rCPU power saving: Set the device to limit some system resource usage.rScreen power saving: Set the device to decrease the brightness of the display.rTurn off haptic feedback: Set the device to turn off the vibration when touching keys.rLearn about Power saving mode: Discover how to reduce battery consumption.BatteryView the amount of battery power consumed by your device.Application managerView and manage the applications on your device.Location servicesChange settings for GPS functionality.rUse wireless networks: Set to use Wi-Fi for finding the current location.rUse GPS satellites: Set to use the GPS satellite for finding the current location.rLocation and Google search: Set to use your current location for Google search and other Google services.
Settings108Lock screenChange settings for securing the device.rScreen lock: Activate the screen lock feature.rLock screen options: Change the settings for the locked screen. These settings are applied only when you set the swipe lock option.–Shortcuts: Set to show and edit application shortcuts on the locked screen.This feature may not be available depending on the region or service provider.–Information ticker: Set to show news or stock information on the locked screen.This feature may not be available depending on the region or service provider.–Clock: Set to show the clock on the locked screen.–Weather: Set to show the weather information on the locked screen and change the settings for the weather display.–Ripple effect: Set to show the ripple effect on the locked screen.–Ink effect: Change the colour for the ink effect. The ink effect is available only with the S Pen.–Help text: Set to show the help text on the locked screen.–Wake up in lock screen: Set the device to recognise your wake up command when the screen is locked.–Set wake-up command: Set a wake up command to launch S Voice or perform a specified function.rPopup Note on lock screen: Set to launch S Note when you double-tap the locked screen with the S Pen button pressed.rOwner information: Enter your information that is shown on the locked screen.
Settings109SecurityChange settings for securing the device.rEncrypt device: Set a password to encrypt data saved on the device. You must enter the password each time you turn on the device.Charge the battery before enabling this setting because it may take more than an hour to encrypt your data.rEncrypt external SD card:–Encrypt: Set to encrypt files when you save them to a memory card.–Full encryption: Set to encrypt all files on a memory card.–Exclude multimedia files: Set to encrypt all files on a memory card, except for media files.If you reset your device to the factory defaults with this setting enabled, the device will not be able to read your encrypted files. Disable this setting before resetting the device.rRemote controls: Set to allow control of your lost or stolen device remotely via the Internet. To use this feature, you must sign in to your Samsung account.–Account registration: Add or view your Samsung account.–Use wireless networks: Set to allow location data collection and to determine the location of your lost or stolen device via Wi-Fi.rFind my mobile web page: Access the SamsungDive website (www.samsungdive.com). You can track and control your lost or stolen device on the SamsungDive website.rMake passwords visible: By default, the device hides passwords for security. Set the device to display passwords as they are entered.
Settings110rDevice administrators: View device administrators installed on the device. You can allow device administrators to apply new policies to the device.rUnknown sources: Choose to install applications from any source. If not chosen, download applications only from Play Store.rTrusted credentials: Use certificates and credentials to ensure secure use of various applications.rInstall from device storage: Install encrypted certificates stored on the USB storage.rClear credentials: Erase the credential contents from the device and reset the password.Language and inputChange the settings for text input. Some options may not be available depending on the selected language.LanguageSelect a display language for all menus and applications.DefaultSelect a default keyboard type for text input.Google voice typingTo change the voice input settings, tap  .rChoose input languages: Select input languages for text input.rBlock offensive words: Set to prevent the device from recognising offensive words in voice inputs.rDownload offline speech recognition: Download and install language data for offline voice input.
Settings111Samsung keyboardTo change the Samsung keyboard settings, tap  .The available options may vary depending on the region or service provider.rInput languages: Select languages for text input.rPredictive text: Activate predictive text mode to predict words based on your input and show word suggestions. You can also customise the word prediction settings.rContinuous input: Set to enter text by sweeping on the keyboard.rCursor control: Enable or disable the smart keyboard navigation feature to move the cursor by scrolling the keyboard.rPen detection: Set the device to open the handwriting panel when the field is tapped with the S Pen.rHandwriting: Customise settings for handwriting mode, such as recognition time, pen thickness, or pen colour.rAdvanced:–Auto capitalisation: Set the device to automatically capitalise the first character after a final punctuation mark, such as a full stop, question mark, or exclamation mark.–Aut spacing: Set the device to automatically insert a space between words.–Auto-punctuate: Set the device to insert a full stop when you double-tap the space bar.–Character preview: Set the device to display a large image of each character tapped.–Key-tap vibration: Set the device to vibrate when a key is touched.–Key-tap sound: Set the device to sound when a key is touched.rTutorial: Learn how to enter text with the Samsung keyboard.rReset settings: Reset Samsung keyboard settings.
Settings112Voice recogniserSelect a voice recognition engine.Voice searchrLanguage: Select a language for the voice recognition.rSpeech output: Set the device to provide voice feedback to alert you to the current action.rBlock offensive words: Hide offensive words from voice search results.rDownload offline speech recognition: Download and install language data for offline voice input.Text-to-speech outputrPreferred TTS engine: Select a speech synthesis engine. To change the settings for speech synthesis engines, tap  .rSpeech rate: Select a speed for the text-to-speech feature.rListen to an example: Listen to the spoken text for an example.rDriving mode: Activate driving mode to set the device to read contents aloud and specify applications to use in driving mode.Pointer speedAdjust the pointer speed for the mouse or trackpad connected to your device.CloudChange settings for syncing data or files with your Samsung account or Dropbox cloud storage.
Settings113Backup and resetChange the settings for managing settings and data.rBack up my data: Set to back up settings and application data to the Google server.rBackup account: Set up or edit your Google backup account.rAutomatic restore: Set to restore settings and application data when the applications are reinstalled on the device.rFactory data reset: Reset settings to the factory default values and delete all data.Add accountAdd email or SNS accounts.MotionActivate motion recognition feature and change the settings that control motion recognition on your device.rPalm swipe to capture: Set to capture an image of the screen when you sweep your hand to the left or right across the screen.rPalm touch to mute/pause: Set to pause media playback when you touch the screen with your palm.rLearn about hand motions: View the tutorial for controlling hand motions.S PenChange the settings for using the S Pen.rPen attach/detach sound: Set the device to emit a sound when the S Pen is inserted or pulled out from the slot.rS Pen mode: Set the screen to recognise only the S Pen.rOpen Popup Note: Set to launch a quick note when the S Pen is pulled out from the slot.
Settings114rBattery saving: Set the screen not to respond when inserting or removing the S Pen.rAir view: Set to show the S Pen pointer when the S Pen is hovering over the screen.rSound and haptic feedback: Set the device to sound and vibrate when hovering over files, subjects, or options.rQuick Command settings: Configure the settings for Quick Command.rS Pen help: Access help information for using the S Pen.AccessoryChange the accessory settings.rDock sound: Set the device to play a sound when your device is connected to or removed from a desktop dock.rAudio output: Select a sound output format to use when connecting your device to HDMI devices. Some devices may not support the surround sound setting.Date and timeAccess and alter the following settings to control how the device displays the time and date.If the battery remains fully discharged or removed from the device, the time and date is reset.rSet date: Set the current date manually.rSet time: Set the current time manually.rSelect time zone: Set the home time zone.rUse 24-hour format: Display time in 24-hour format.rSelect date format: Select a date format.
Settings115AccessibilityAccessibility services are special features for those with certain physical disabilities. Access and alert the following settings to improve accessibility to the device.rAuto-rotate screen: Set the interface to rotate automatically when you rotate the device.rScreen timeout: Set the length of time the device waits before turning off the display’s backlight.rSpeak passwords: Set the device to read aloud passwords you enter with Talkback.rAccessibility shortcut: Add a shortcut to Accessibility on the quick menu that appears when you press and hold the Power button.rTalkBack: Activate Talkback, which provides voice feedback.rFont size: Change the font size.rNegative colours: Reverse the display colours to improve visibility.rText-to-speech output:–Preferred TTS engine: Select a speech synthesis engine. To change the settings for speech synthesis engines, tap  .–Speech rate: Select a speed for the text-to-speech feature.–Listen to an example: Listen to the spoken text for an example.–Driving mode: Activate driving mode to set the device to read contents aloud and specify applications to use in driving mode.rEnhance web accessibility: Set applications to install web scripts to make their web content more accessible.rSound balance: Adjust the sound balance when using a dual headset.rMono audio: Enable mono sound when listening to audio with one earbud.rTurn off all sounds: Mute all device sounds.rTap and hold delay: Set the recognition time for tapping and holding the screen.
Settings116Developer optionsChange the settings for application development.rDesktop backup password: Set a password to secure your backup data.rStay awake: Set the screen to remain on while you are charging the battery.rProtect SD card: Set to request a confirmation when reading data from a memory card.rUSB debugging: Activate USB debugging mode to connect your device to a computer with a USB cable.rAllow mock locations: Allow mock locations and service information to be sent to a Location Manager service for testing.rSelect debug app: Select applications to debug and prevent errors when you pause debugging.rWait for debugger: Set to prevent the selected application from loading until the debugger is ready.rShow touches: Set to show the pointer when you touch the screen.rShow pointer location: Set to show the coordinates and traces of the pointer when you touch the screen.rShow layout boundaries: Set to show boundaries.rShow GPU view updates: Set to flash areas of the screen when they are updated with the GPU.rShow screen updates: Set to flash areas of the screen when they are updated.rWindow animation scale: Select a speed for opening and closing pop-up windows.rTransition animation scale: Select a speed for switching between screens.rAnimator duration scale: Select how long pop-up windows will be shown.rDisable hardware overlays: Set to hide hardware overlays.
Settings117rForce GPU rendering: Set to use 2D hardware acceleration to improve graphic performance.rStrict mode: Set the device to flash the screen when applications perform long operations.rShow CPU usage: Set to list all active processes.rProfile GPU rendering: Set to check the time of GPU rendering time.rEnable traces: Set to capture traces of application and system performance.rDo not keep activities: Set to end a running application when you launch a new application.rLimit background processes: Set to limit the number of processes that can run in the background.rShow all ANRs: Set the device to alert you to unresponsive applications that are running in the background.About deviceAccess device information and update device software.
118TroubleshootingWhen you turn on your device or while you are using the device, it prompts you to enter one of the following codes:rPassword: When the device lock feature is enabled, you must enter the password you set for the device.Your device displays network or service error messagesrWhen you are in areas with weak signals or poor reception, you may lose reception. Move to another area and try again.rYou cannot access some options without a subscription. Contact your service provider for more details.The touch screen responds slowly or improperlyIf your device has a touch screen and the touch screen is not responding properly, try the following:rRemove any protective covers from the touch screen. Protective covers may prevent the device from recognising your inputs and are not recommended for touch screen devices.rEnsure that your hands are clean and dry when tapping the touch screen.rRestart your device to clear any temporary software bugs.rEnsure that your device software is upgraded to the latest version.rIf the touch screen is scratched or damaged, take it to your local Samsung Service Centre.Your device freezes or has fatal errorsIf your device freezes or hangs, you may need to close programs or reset the device to regain functionality. If your device is frozen and unresponsive, press and hold the Power button for 8-10 seconds. The device reboots automatically.If this does not solve the problem, perform a factory data reset. On the Applications screen, tap Settings ĺ Backup and reset ĺ Factory data reset ĺ Reset device ĺ Erase everything.
Troubleshooting119The device beeps and the battery icon is emptyYour battery is low. Recharge or replace the battery to continue using the device.The battery does not charge properly or the device turns offThe battery in the device is not user replaceable. If you have problems with the battery or need it replaced, take the device to a Samsung Service Centre.Your device is hot to the touchWhen you use applications that require more power or use applications on your device for an extended period of time, your device may feel hot to the touch. This is normal and should not affect your device’s lifespan or performance.Error messages appear when launching the cameraYour Samsung device must have sufficient available memory and battery power to operate the camera application. If you receive error messages when launching the camera, try the following:rCharge the battery or replace it with a battery that is fully charged.rFree some memory by transferring files to a computer or deleting files from your device.rRestart the device. If you are still having trouble with the camera application after trying these tips, contact a Samsung Service Centre.Error messages appear when opening music filesSome music files may not play on your Samsung device for a variety of reasons. If you receive error messages when opening music files on your device, try the following:rFree some memory by transferring files to a computer or deleting files from your device.rEnsure that the music file is not Digital Rights Management (DRM)-protected. If the file is DRM-protected, ensure that you have the appropriate licence or key to play the file.rEnsure that your device supports the file type.
Troubleshooting120Another Bluetooth device is not locatedrEnsure that the Bluetooth wireless feature is activated on your device.rEnsure that the Bluetooth wireless feature is activated on the device you wish to connect to, if necessary.rEnsure that your device and the other Bluetooth device are within the maximum Bluetooth range (10 m).If the tips above do not solve the problem, contact a Samsung Service Centre.A connection is not established when you connect the device to a computerrEnsure that the USB cable you are using is compatible with your device.rEnsure that you have the proper drivers installed and updated on your computer.rIf you are a Windows XP user, ensure that you have Windows XP Service Pack 3 or higher installed on your computer.rEnsure that you have Samsung Kies 2.0 or Windows Media Player 10 or higher installed on your computer.A small gap appears around the outside of the device caserThis gap is a necessary manufacturing feature and some minor rocking or vibration of parts may occur.rOver time, friction between parts may cause this gap to expand slightly.
English (EU). 01/2013. Rev. 1.0Some content may differ from your device depending on the region or service provider.www.samsung.com
48Exposure to Radio Frequency (RF) SignalsYour wireless device is a radio transmitter and receiver. It is designed and manufactured not to exceed the exposure limits for radio frequency (RF) energy set by the Federal Communications Commission (FCC) of the U.S. government. These FCC exposure limits are derived from the recommendations of two expert organizations, the National  Counsel  on Radiation Protection and Measurement (NCRP)  and the Institute of Electrical and Electronics Engineers (IEEE). In both cases, the engineering experts drawn from industry, government, The exposure limit set by the FCC for wireless mobiledevices employs a unit of measurement known as the the rate of absorption of RF energy by the human body expressed in units of watts per kilogram ( W/kg). The FCC requires wireless devices to comply with a safety limit of 1.6 watts per kilogram (1.6 W/kg). The FCC exposure limit incorporates a substantial margin of safety to give additional protection to the public and to account for any variations in measurements.SAR tests are conducted using recommended operating positions accepted by the FCC with the EFWJDF  tested frequency bands. Although the SAR is determined of the EFWJDF whiMe operatingcan be weMl  belowthe  maximum value. This is because the EFWJDF is designed  to operate at multiple power levels so as to use only the power required to reach the network. In general, the closer you are to a wireless base station antenna, the lower the power output.Before a new model device is available for sale to the it does not exceed the exposure limit established by the FCC. Tests for each model are perGormedin positions and locations (e.g.  near the body) as requiredby the FCC. Health and safety informationFor typical operations, this model hasbeen tested and meets the FCC exposure guidelines. SAR information on this and other modelT can be viewed on-line at http://www.fcc.gov/oet/ea/fccid/.  This site uses the FCC ID number A3L(5/1You can check the  FCC ID on the rear case.Once you have the FCC ID number for a particular EFWJDF,follow the instructions on the website and it should  provide values for typical  or maximum SAR fora particular EFWJDFSAR information can also be obtained at www.fcc.gov/cgb/sar.Operating EnvironmentRemember to follow any special regulations in force in any area and always switch your EFWJDFforbidden to use it, or when it may cause interference or danger. When connecting the EFWJDF or anyaDcessorZ to another device, read its user’s guide for detailed safety instructions. Do not connect incompatible products.
FCC Notice and Cautions  FCC Notice  This device complies with Part 15 of the FCC Rules. Operation is subject to the following two conditions:  (1) this device may not cause harmful interference, and (2)  this device must accept any interference received, including interference that may cause undesired operation.  This equipment has been tested and found to comply with the limits for a Class B digital device, pursuant to part 15 of the FCC Rules. These limits are designed to provide reasonable protection against harmful interference in a residential installation. This equipment generates, uses and can radiate radio frequency energy and, if not installed and used in accordance with the instructions, may cause harmful interference to radio communications. However, there is no guarantee that interference will not occur in a particular installation. If this equipment does cause harmful interference to radio or television reception, which can be determined by turning the equipment off and on, the user is encouraged to try to correct the interference by one or more of the following measures:  -  Reorient or relocate the receiving antenna.  -Increase the separation between the equipment and receiver. -  Connect the equipment into an outlet on a circuit from that to which the receiver is connected. -  Consult the dealer or an experienced radio/TV technician for help.  The  may cause TV or radio interference if used in close proximity to receiving equipment. The FCC can require you to stop using the  if such interference cannot be eliminated. Vehicles using petroleum gas (such as propane or butane) must comply with the National Fire Protection Standard (NFPA-58). For a copy of this standard, contact the National Fire Protection Association, One Battery march Park, Quincy, MA 02269, Attn: Publication Sales Division. !"#"
$%&''/n*$%&''/n+'+3+&+7;!<=<>?  @E*E"G$%&''/n=+'+3+&+7;!>!E@E*E#@E*E<

Navigation menu