Samsung Electronics Co GTP1000L Cellular/PCS GSM/EDGE/WCDMA Mini-Tablet with WLAN and Bluetooth User Manual Modified M180S Manual 09 28 Steve
Samsung Electronics Co Ltd Cellular/PCS GSM/EDGE/WCDMA Mini-Tablet with WLAN and Bluetooth Modified M180S Manual 09 28 Steve
Users Manual
![Using this guide4Instructional iconsBefore you start, familiarise yourself with the icons you will see in this guide: Warning—situations that could cause injury to yourself or othersCaution—situations that could cause damage to your device or other equipmentNote—notes, usage tips, or additional information ►Refer to—pages with related information; for example: ► p.12 (represents “see page 12”)→Followed by—the order of options or menus you must select to perform a step; for example: In Menu mode, select Settings → Wireless and network (represents Settings,followed by Wireless and network)[]Square brackets—device keys; for example: [ ] (represents the Power key)](https://usermanual.wiki/Samsung-Electronics-Co/GTP1000L/User-Guide-1368682-Page-3.png)

![Getting started18Getting startedTurn your device on and oTo turn on your device, Press and hold [1 ]. If you turn on your device for the rst time, follow the on-screen instructions to set up your 2 device.To turn o your device, press and hold [ ] and then select Power o →Yes.](https://usermanual.wiki/Samsung-Electronics-Co/GTP1000L/User-Guide-1368682-Page-17.png)
![Getting started 19Switch to Flight mode ›In Flight mode, you can disable all wireless connections and use non-network services in areas where wireless devices are prohibited, such as aeroplanes and hospitals.To activate Flight mode, go to Settings→Wireless and network→Flight mode. You can also press and hold [ ] and then select Flight mode.To deactivate Flight mode and use wireless connections, go to Settings→Wireless and networkand clear the check box next to Flight mode.Switch to the silent mode ›In Idle mode, press and hold [• ] and then select Silent mode.Open the shortcuts panel from the top of the screen and select • Silent.](https://usermanual.wiki/Samsung-Electronics-Co/GTP1000L/User-Guide-1368682-Page-18.png)
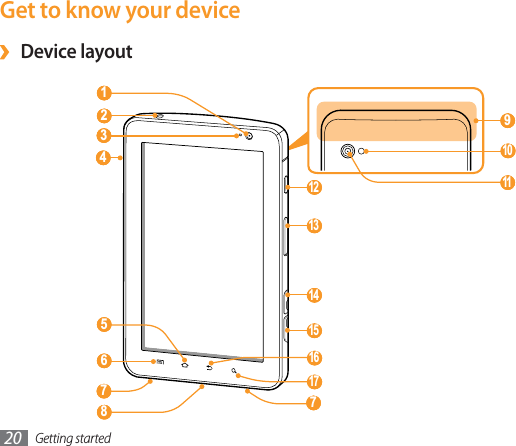

![Getting started24Rotate the touch screen ›Your device has a built-in motion sensor that detects its orientation. If you rotate the device, the interface will automatically rotate according to the orientation. To set the interface to keep the orientation, open the shortcuts panel from the top of the screen and select Orientation lock.Lock or unlock the touch screen ›When you do not use the device for a specied period, your device turns o the touch screen and automatically locks the touch screen to prevent any unwanted device operations. To manually lock the touch screen, press [ ]. To unlock, turn on the screen by pressing [ ], and drag right until Unlock appears. If you set a screen lock, you need to enter your PIN or password, or draw a pattern. Get to know the home screenWhen the device is in Idle mode, you will see the home screen. From the home screen, you can view your device’s status and access Menu mode. Scroll left or right to a panel of the home screen.Add items to the home screen ›In Idle mode, press [1 ]→Add.Select the item category (widget, shortcut, folder, or wallpaper) and select an item.2](https://usermanual.wiki/Samsung-Electronics-Co/GTP1000L/User-Guide-1368682-Page-23.png)
![Getting started26Access applicationsIn Idle mode, select 1 Applications to access Menu mode.Scroll left or right to another menu screen.2 Select an application.3 Press [4 ] to return to the previous screen; Press [ ] to return to the home screen.Organise applications ›You can reorganise the applications in the application list by changing their order.In Menu mode, press [1 ]→Edit.Tap and hold an application.2 Drag the application icon to the location you want.3 Press [4 ]→Save.Access recent applications ›Press and hold [1 ] to open the list of applications you have accessed recently.Select an application.2](https://usermanual.wiki/Samsung-Electronics-Co/GTP1000L/User-Guide-1368682-Page-25.png)
![Getting started28Select a wallpaper for the home and menu screens ›In Idle mode, press [1 ]→ Wallpaper.Select an image folder 2 → an image.Select 3 Save or Set wallpaper.Samsung is not responsible for any use of default images or wallpapers provided on your device.Adjust the brightness of the display ›In Menu mode, select 1 Settings→Display settings→Brightness.Clear the check box next to 2 Automatic brightness.Drag the slider3 to adjust the level of brightness.Select 4 OK.The brightness level of the display will aect how quickly the device consumes battery power.](https://usermanual.wiki/Samsung-Electronics-Co/GTP1000L/User-Guide-1368682-Page-27.png)

![Connecting to the intenet 35Browse web pagesIn Menu mode, select 1 Browser to launch your homepage. To access a specic web page, select the URL input eld, enter the web address (URL) of the web page, and select .Navigate web pages with the following keys:2 To move backward or forward to web pages in history, select • or . You can also tap and hold to view the recent internet history.To open a list of saved bookmarks, frequently visited pages, and recent internet history, • select .To reload the current web page, select • .To open a web page in a new window or switch between the currently open windows, • select . To add a new window, select and access another web page on the new window.Bookmark your favourite web pagesIn Menu mode, select 1 Browser.Press [2 ]→ Add bookmark.Enter a page title and a web address (URL).3 To bookmark the web page you were viewing, skip to step 5.](https://usermanual.wiki/Samsung-Electronics-Co/GTP1000L/User-Guide-1368682-Page-34.png)
![Connecting to a PC 39Connecting to a PCLearn to connect your device to a PC to use with Samsung Kies or Windows Media Player, or use the device as a mass storage device. For more information, see the "PC connections" section of the user manual.Connect with Samsung KiesEnsure that Samsung Kies is installed on your PC. You can download the program from the Samsung website (www.samsungmobile.com).In Menu mode, select 1 Settings→Wireless and network→USB settings→Samsung Kies.Press [2 ] to return to Idle mode.Using the PC data cable, connect the multifunction jack on your device to a PC.3 Run Samsung Kies and use wireless connections or copy data and les.4 Refer to the Samsung Kies help for more information.](https://usermanual.wiki/Samsung-Electronics-Co/GTP1000L/User-Guide-1368682-Page-38.png)
![Connecting to a PC40Synchronise with Windows Media PlayerEnsure that Windows Media Player is installed on your PC.In Menu mode, select 1 Settings→Wireless and network→USB settings→Media player.Press [2 ] to return to Idle mode.Using the PC data cable, connect the multifunction jack on your device to a PC with Windows 3 Media Player installed.When connected, a pop-up window will appear on the PC.Open Windows Media Player to synchronise music les.4 Edit or enter your device’s name in the pop-up window (if necessary).5 Select and drag the music les you want to the sync list.6 Start synchronisation.7 Connect as a mass storage deviceYou can connect your device to a PC as a removable disk and access the le directory. If you insert a memory card in the device, you can also access the le directory of the memory card by using the device as a memory card reader.](https://usermanual.wiki/Samsung-Electronics-Co/GTP1000L/User-Guide-1368682-Page-39.png)
![Connecting to a PC 41If you want to transfer les from or to a memory card, insert a memory card into the device.1 In Menu mode, select 2 Settings→Wireless and network→USB settings→Mass storage.Press [3 ] to return to Idle mode.Using the PC data cable, connect the multifunction jack on your device to a PC.4 When connected, select 5 Mount.Open the folder to view les on the PC.6 Copy les from the PC to your device or memory card.7 When you are nished, select 8 Turn O.To disconnect the device to the PC, click the USB device icon on the Windows task bar and click the option to safely remove the mass storage device. Then remove the PC data cable from the PC. Otherwise, you may lose data stored on the memory card or damage the memory card.](https://usermanual.wiki/Samsung-Electronics-Co/GTP1000L/User-Guide-1368682-Page-40.png)