Samsung Electronics Co GTP6810 Tablet PC with WLAN and Bluetooth User Manual 09 FCC Draft4 P7100
Samsung Electronics Co Ltd Tablet PC with WLAN and Bluetooth 09 FCC Draft4 P7100
UserManual.wiki
>
Samsung Electronics Co
>
GTP6810 User Manual
Users Manual
Navigation menu
Upload a User Manual
Namespaces
Wiki Guide
HTML
PDF
Info
Views
User Manual
Discussion / Help
Navigation
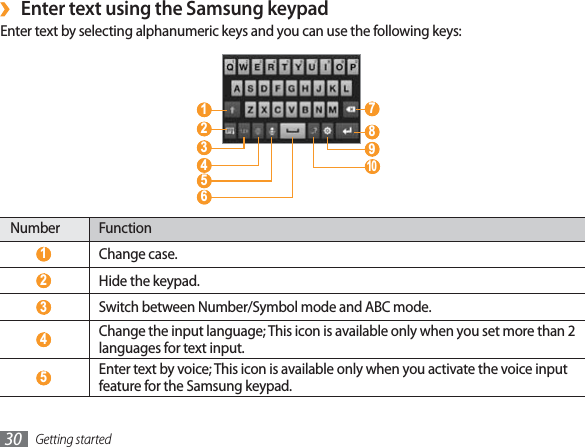
![Using this guide4Instructional iconsBefore you start, familiarise yourself with the icons you will see in this guide: Warning—situations that could cause injury to yourself or othersCaution—situations that could cause damage to your device or other equipmentNote—notes, usage tips, or additional information ŹRefer to—pages with related information; for example: Ź p.12 (represents “see page 12”)ĺFollowed by—the order of options or menus you must select to perform a step; for example: In Menu mode, select Settings ĺWireless and network (represents Settings,followed by Wireless and network)[]Square brackets—device keys; for example: [ ] (represents the Power key)](https://usermanual.wiki/Samsung-Electronics-Co/GTP6810/User-Guide-1549203-Page-3.png)

![Getting started 15Getting startedTurn your device on and oTo turn on your device, Press and hold [1]. If you turn on your device for the rst time, follow the on-screen instructions to set up your 2device.To turn o your device, press and hold [ ] and then select Power o ĺYes .](https://usermanual.wiki/Samsung-Electronics-Co/GTP6810/User-Guide-1549203-Page-14.png)
![Getting started16Switch to Flight mode›In Flight mode, you can disable all wireless connections and use non-network services in areas where wireless devices are prohibited, such as aeroplanes and hospitals.To activate Flight mode, go to SettingsĺWireless and networkĺFlight mode. You can also press and hold [ ] and then select Flight mode.To deactivate Flight mode and use wireless connections, go to SettingsĺWireless and networkand clear the check box next to Flight mode.Switch to the silent mode›In Idle mode, press and hold [ ] and then select Silent mode.Open the shortcuts panel from the top of the screen and select Silent.](https://usermanual.wiki/Samsung-Electronics-Co/GTP6810/User-Guide-1549203-Page-15.png)
![Getting started 21Rotate the touch screen›Your device has a built-in motion sensor that detects its orientation. If you rotate the device, the interface will automatically rotate according to the orientation. To set the interface to keep the orientation, open the shortcuts panel from the top of the screen and select Orientation lock.Lock or unlock the touch screen›When you do not use the device for a specied period, your device turns o the touch screen and automatically locks the touch screen to prevent any unwanted device operations. To manually lock the touch screen, press [ ]. To unlock, turn on the screen by pressing [ ], and drag right until Unlock appears. If you set a screen lock, you need to enter your PIN or password, or draw a pattern. Get to know the home screenWhen the device is in Idle mode, you will see the home screen. From the home screen, you can view your device’s status and access Menu mode. Scroll left or right to a panel of the home screen.Add items to the home screen›In Idle mode, press [1]ĺAdd.Select the item category (widget, shortcut, folder, or wallpaper) and select an item.2](https://usermanual.wiki/Samsung-Electronics-Co/GTP6810/User-Guide-1549203-Page-20.png)
![Getting started 23Access applicationsIn Idle mode, select 1Applications to access Menu mode.Scroll left or right to another menu screen.2Select an application.3Press [4] to return to the previous screen; Press [ ] to return to the home screen.Organise applications›You can reorganise the applications in the application list by changing their order.In Menu mode, press [1]ĺEdit.Tap and hold an application.2Drag the application icon to the location you want.3Press [4]ĺSave.Access recent applications›Press and hold [1] to open the list of applications you have accessed recently.Select an application.2](https://usermanual.wiki/Samsung-Electronics-Co/GTP6810/User-Guide-1549203-Page-22.png)
![Getting started 25Select a wallpaper for the home and menu screens›In Idle mode, press [1]ĺWallpaper.Select an image folder 2ĺ an image.Select 3Save or Set wallpaper.Samsung is not responsible for any use of default images or wallpapers provided on your device.Adjust the brightness of the display›In Menu mode, select 1SettingsĺDisplay settingsĺBrightness.Clear the check box next to 2Automatic brightness.Drag the slider3to adjust the level of brightness.Select 4OK.The brightness level of the display will aect how quickly the device consumes battery power.](https://usermanual.wiki/Samsung-Electronics-Co/GTP6810/User-Guide-1549203-Page-24.png)
![Connecting to the internet32Browse web pagesIn Menu mode, select 1Browser to launch your homepage. To access a specic web page, select the URL input eld, enter the web address (URL) of the web page, and select .Navigate web pages with the following keys:2To move backward or forward to web pages in history, select or . You can also tap and hold to view the recent internet history.To open a list of saved bookmarks, frequently visited pages, and recent internet history, select .To reload the current web page, select .To open a new window or switch between the currently open windows, select . To add a new window, select and access another web page on the new window.Bookmark your favourite web pagesIn Menu mode, select 1Browser.Press [2]ĺAdd bookmark.Enter a page title and a web address (URL).3To bookmark the web page you were viewing, skip to step 5.](https://usermanual.wiki/Samsung-Electronics-Co/GTP6810/User-Guide-1549203-Page-31.png)
![Connecting to a PC36Connecting to a PCLearn to connect your device to a PC to use with Samsung Kies or Windows Media Player, or use the device as a mass storage device. For more information, see the "PC connections" section of the user manual.Connect with Samsung KiesEnsure that Samsung Kies is installed on your PC. You can download the program from the Samsung website (www.samsungmobile.com).In Menu mode, select 1SettingsĺWireless and networkĺUSB settingsĺSamsung Kies.Press [2] to return to Idle mode.Using the PC data cable, connect the multifunction jack on your device to a PC.3Run Samsung Kies and use wireless connections or copy data and les.4Refer to the Samsung Kies help for more information.](https://usermanual.wiki/Samsung-Electronics-Co/GTP6810/User-Guide-1549203-Page-35.png)
![Connecting to a PC 37Synchronise with Windows Media PlayerEnsure that Windows Media Player is installed on your PC.In Menu mode, select 1SettingsĺWireless and networkĺUSB settingsĺMedia player.Press [2] to return to Idle mode.Using the PC data cable, connect the multifunction jack on your device to a PC with Windows 3Media Player installed.When connected, a pop-up window will appear on the PC.Open Windows Media Player to synchronise music les.4Edit or enter your device’s name in the pop-up window (if necessary).5Select and drag the music les you want to the sync list.6Start synchronisation.7Connect as a mass storage deviceYou can connect your device to a PC as a removable disk and access the le directory. If you insert a memory card in the device, you can also access the le directory of the memory card by using the device as a memory card reader.](https://usermanual.wiki/Samsung-Electronics-Co/GTP6810/User-Guide-1549203-Page-36.png)
![Connecting to a PC38If you want to transfer les from or to a memory card, insert a memory card into the device.1In Menu mode, select 2SettingsĺWireless and networkĺUSB settingsĺMass storage.Press [3] to return to Idle mode.Using the PC data cable, connect the multifunction jack on your device to a PC.4When connected, select 5Mount.Open the folder to view les on the PC.6Copy les from the PC to your device or memory card.7When you are nished, select 8Turn O.To disconnect the device to the PC, click the USB device icon on the Windows task bar and click the option to safely remove the mass storage device. Then remove the PC data cable from the PC. Otherwise, you may lose data stored on the memory card or damage the memory card.](https://usermanual.wiki/Samsung-Electronics-Co/GTP6810/User-Guide-1549203-Page-37.png)

![Communication 52Send an email message ›In Menu mode, select 1 Google Mail.Press [2 ] → Compose.Enter a name or address in the recipient eld.3 Enter a subject and message.4 To attach an image le, press [5 ] → Attach → a le.Press [6 ] → Send to send the message.View an email message ›In Menu mode, select 1 Google Mail.Select an email message.2 From the message view, use the following options:To reply to the message, select • .To reply to the message including all recipients, select • →Reply all.To forward the message to other people, select • →Forward.To add a star to the message, select • .To view an attachment, select • Preview. To save it to your device, select Download. To archive the message, select • Archive.To delete the message, select • Delete.To move to the previous or next message, select • or .CommunicationQik VideoYou can make live video calls and share your videos with others online or by video mail. You can also save videos to show them to your friends and family later.You cannot make a call when a Bluetooth headset is connected.In Menu mode, select 1 Qik Video → Log in.Enter your user name and password and select 2 Log in.Make a video call or share your videos.3 Google MailYou can retrieve new email messages from Google Mail™ to your Inbox. When you access this application, the Inbox screen appears. The total number of unread messages displays in the title bar and unread messages display in bold. If you have labelled a message, its label appears in a coloured rectangle on the message.This feature may be unavailable depending on your region or •service provider.This Google Mail menu may be labelled dierently depending on •your service provider.](https://usermanual.wiki/Samsung-Electronics-Co/GTP6810/User-Guide-1549203-Page-51.png)
![Communication53EmailLearn to send or view email messages via your personal or company email account.Set up an email account ›1 In Menu mode, select Email.Enter your email address and password.2 Select 3 Next (for general email accounts) or Manual setup (for other company email accounts).Follow the on-screen instructions.4 To add more email accounts, press [5 ] → Account manager → Add account and repeat steps 2-4 above.When you are nished setting up the email account, the email messages are downloaded to your device. If you have created more than two accounts, you can switch between email accounts; Select an account name at the top left of the screen and select one you want to retrieve messages from.Organise email by labels ›You can organise your email by labelling your messages or adding stars to mark important messages. You can sort messages by label lter.Add a label to a messageFrom the Inbox screen, tap and hold a message.1 Select 2 Change labels.Select a label to add and select 3 OK.Add a star to a messageFrom the Inbox screen, tap and hold a message.1 Select 2 Add star. The star icon next to the message is activated.Filter messagesFrom the Inbox screen, press [1 ] → Go to labels.Select the label of the messages you want to view.2](https://usermanual.wiki/Samsung-Electronics-Co/GTP6810/User-Guide-1549203-Page-52.png)
![Communication 54Select 2 to update the message list.Select an email message.3 From the message view, use the following options:To move to the previous or next message, select • or .To move the message to another folder, select • .To delete the message, select • .To reply to the message, select • → Reply.To forward the message to other people, select • → Forward.To create a new message, select • .To view an attachment, tap the attachment area. To save it to your device, •select .To print the message via a connected printer, press [• ] → Print. Your device is compatible only with Samsung printers.TalkLearn to chat with friends and family via Google Talk™. By using application as Google Talk, it is possible to make voice call in a held-to-head and video call through speaker.Add friends to your friend list ›In Menu mode, select 1 Talk.The friend list shows all of your Google Talk contacts at a glance.Send an email message ›In Menu mode, select 1 Email →an email account.Select 2 .Add recipients of your message.3 Enter email addresses manually, separating them with a semicolon •or a comma.Select email addresses from the lists by selecting • .Select the Cc/Bcc eld and add more recipients.4 Select the subject eld and enter a subject.5 Select the text input eld and enter your email text.6 Select7 Attach and attach a le.You can attach media les, contacts, or location information.Select 8 Send to send the message.If you are oine or outside your service area, the message will be held in the outbox until you are online and in your service area.View an email message ›When you open an email account, you can view previously retrieved emails oine or connect to the email server to view new messages. After retrieving email messages, you can view them oine.In Menu mode, select 1 Email → an email account.](https://usermanual.wiki/Samsung-Electronics-Co/GTP6810/User-Guide-1549203-Page-53.png)
![Communication55Press [2 ] → Add friend.Enter an email address of the friend and select 3 Send invitation.When your friend accepts the invitation, the friend is added to your friend list.Start a chat ›In Menu mode, select 1 Talk.Select a friend from the friend list. The chat screen opens.2 Enter your message and select 3 Send.To insert emoticons, press [ ] → More → Insert smiley.To switch between active chats, press [4 ] → Switch chats.To end the chat, press [5 ] → End chat.Social HubLearn to access Social Hub™, the integrated communication application for email, instant messages, contacts or calendar information. Visit socialhub.samsungmobile.com for more details.In Menu mode, select 1 Social Hub.Check and use contents delivered from Social Hub.2](https://usermanual.wiki/Samsung-Electronics-Co/GTP6810/User-Guide-1549203-Page-54.png)