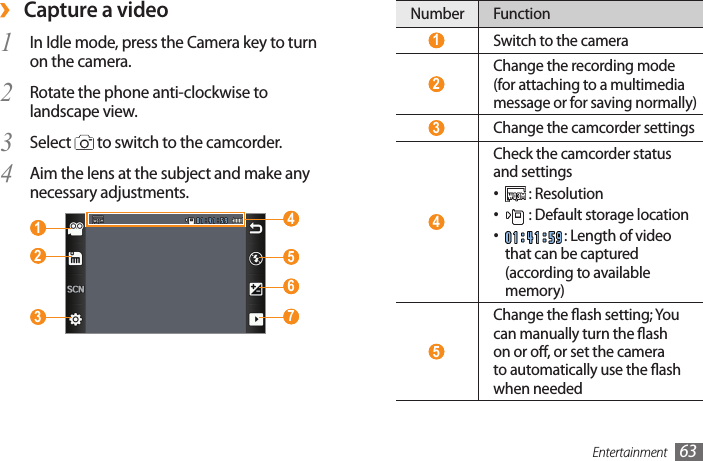
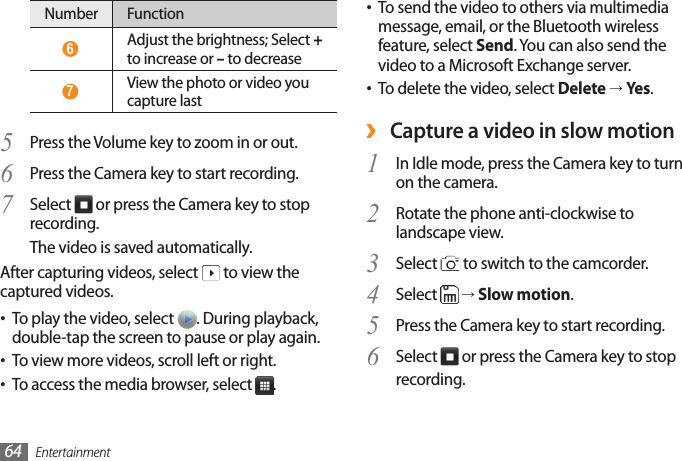
Samsung Electronics Co GTS3370D Cellular/PCS GSM/EDGE Phone with Bluetooth User Manual GT S3370 UM Eng indb
Samsung Electronics Co Ltd Cellular/PCS GSM/EDGE Phone with Bluetooth GT S3370 UM Eng indb
UserManual.wiki
>
Samsung Electronics Co
>
GTS3370D User Manual
Users Manual
Navigation menu
Upload a User Manual
Namespaces
Wiki Guide
HTML
PDF
Info
Views
User Manual
Discussion / Help
Navigation

![Using this manual 3Copyright informationRights to all technologies and products that comprise this phone are the property of their respective owners:Bluetooth® is a registered trademark of the •Bluetooth SIG, Inc. worldwide. Bluetooth QD ID: B015189Java™ is a trademark of Sun Microsystems, Inc.•Windows Media Player® is a registered •trademark of Microsoft Corporation.• and are trademarks of SRS Labs, Inc. CS Headphone and WOW HD technologies are incorporated under licence from SRS Labs, Inc.DivX® is a registered trademark of DivX, Inc. and •is used under licence.→Followed by—the order of options or menus you must select to perform a step; for example: In Idle mode, select Messages → Create message (represents Messages, followed by Create message)[ ] Square brackets—phone keys; for example: [ ] (represents the Power/End key)](https://usermanual.wiki/Samsung-Electronics-Co/GTS3370D/User-Guide-1247180-Page-4.png)
![Using this manual4ABOUT DIVX VIDEODivX® is a digital video format created by DivX, Inc. This is an ocial DivX Certied device that plays DivX video. Plays DivX® video up to 320x240.ABOUT DIVX VIDEO-ON-DEMANDThis DivX® Certied device must be registered with DivX in order to play DivX Video-on-Demand (VOD) content. First generate the DivX VOD registration code for your device and submit it during the registration process. [Important: DivX VOD content is protected by a DivX DRM (Digital Rights Management) system that restricts playback to registered DivX Certied devices. If you try to play DivX VOD content not authorised for your device, the message “Authorization Error” will be displayed and your content will not play.] Learn more at http://vod.divx.com.](https://usermanual.wiki/Samsung-Electronics-Co/GTS3370D/User-Guide-1247180-Page-5.png)
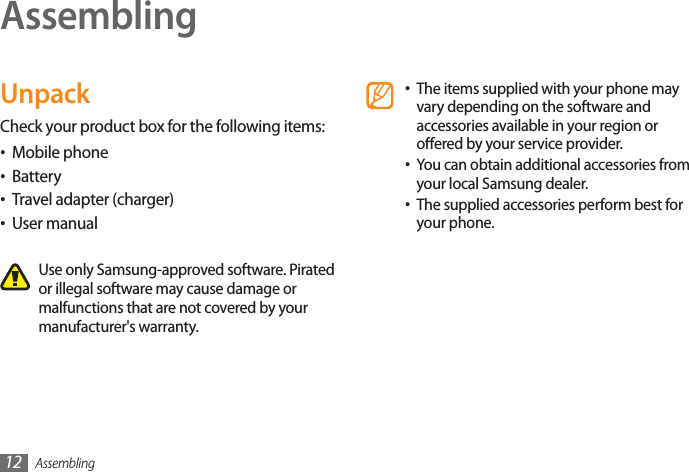
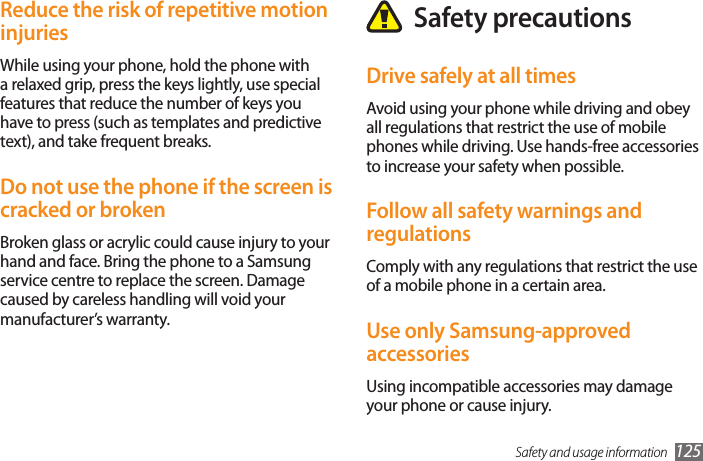
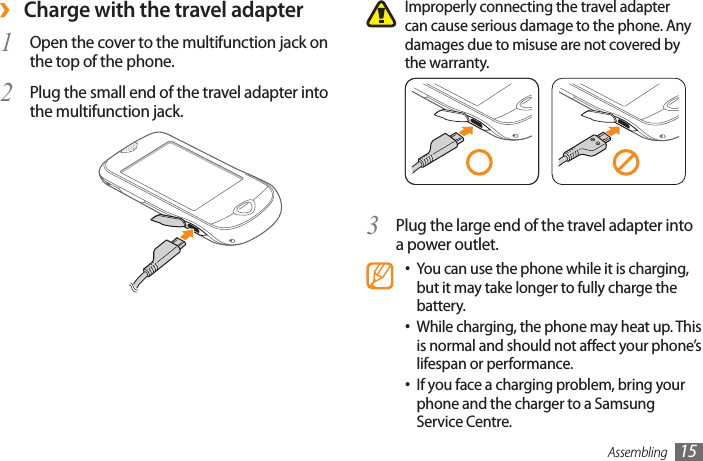
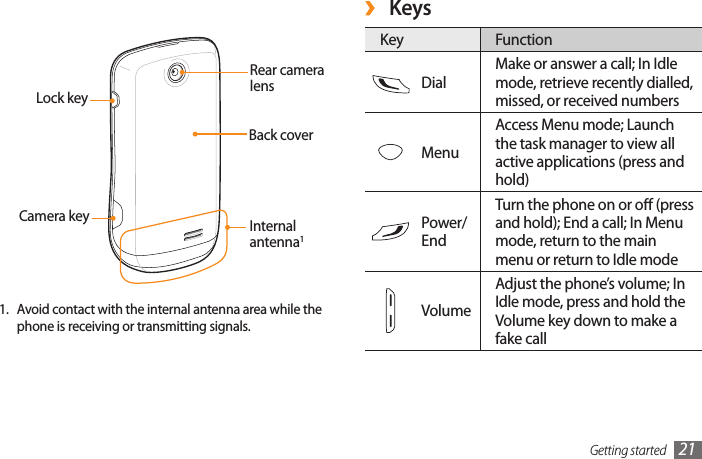
![Assembling 13Be careful not to damage your ngernails when you remove the back cover.Insert the SIM or USIM card.3 Place the SIM or USIM card into the phone •with the gold-coloured contacts facing down.If you do not insert a SIM or USIM card, you •can only use your phone’s non-network services and some menus.Install the SIM or USIM card and batteryWhen you subscribe to a cellular service, you will receive a Subscriber Identity Module (SIM) card, with subscription details, such as your personal identication number (PIN) and optional services. To use UMTS or HSDPA services, you can purchase a Universal Subscriber Identity Module (USIM) card.To install the SIM or USIM card and battery,If the phone is on, press and hold [1 ] to turn it o.Remove the back cover.2](https://usermanual.wiki/Samsung-Electronics-Co/GTS3370D/User-Guide-1247180-Page-14.png)

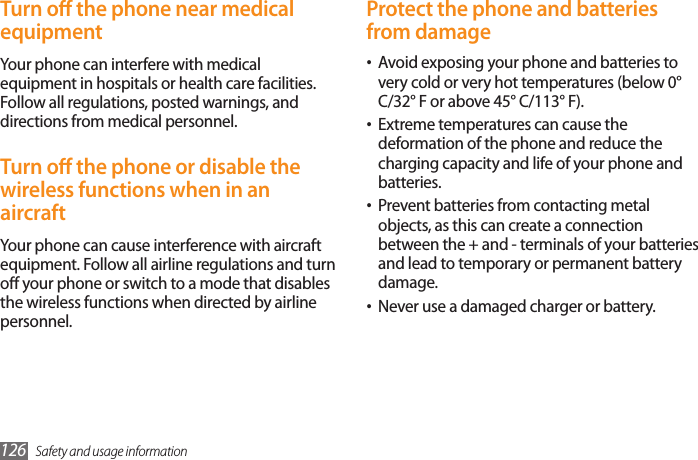
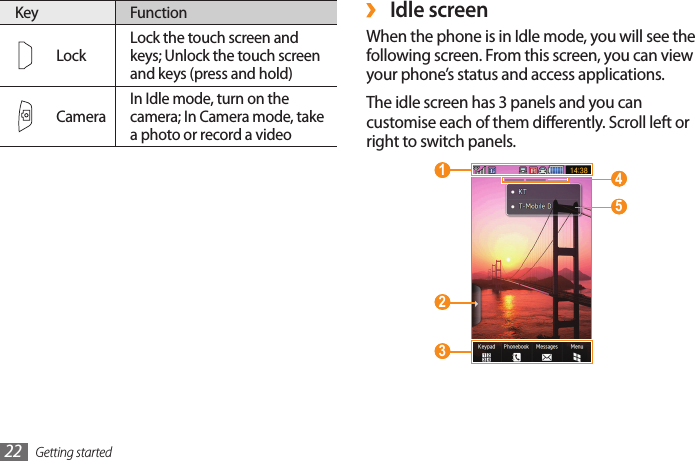
![Getting started20Getting startedTurn your phone on and oTo turn on your phone,Press and hold [1 ].Enter your PIN and select 2 Conrm (if necessary).To turn o your phone, repeat step 1 above.Follow all posted warnings and directions •from ocial personnel when in areas where the use of wireless devices is restricted, such as aeroplanes and hospitals.To use your phone's non-network services •only, switch to the oine prole. ► p. 32Get to know your phone ›Phone layoutFront camera lens (for video calls)EarpieceTouch screenPower/End keyMenu keyVolume keyDial keyMultifunction jack](https://usermanual.wiki/Samsung-Electronics-Co/GTS3370D/User-Guide-1247180-Page-21.png)
![Getting started26 ›Organise applications in Menu modeYou can reorganise the applications in Menu mode by changing their order or grouping them into categories to suit your preferences and needs.In Idle mode, select 1 Menu or press the Menu key to access Menu mode. Select 2 at the top right of the screen. Drag an application icon to the location you 3 want.You can move an application icon to another main menu screen.If you rotate the phone anti-clockwise to landscape view, the phone shows all main menus at once.Access menusTo access your phone’s menus,In Idle mode, select 1 Menu or press the Menu key to access Menu mode. Scroll left or right to a main menu screen.2 Select a menu or application.3 Select 4 to move up one level; Press [] to close the menu or application and return to Idle mode.Your phone has a built-in motion sensor that detects its orientation. If you rotate the phone while using some features, such as the music player, video player, media browser, or web browser, the interface will automatically switch to landscape view.](https://usermanual.wiki/Samsung-Electronics-Co/GTS3370D/User-Guide-1247180-Page-27.png)


![Communication40CommunicationCallingLearn to use calling functions, such as making and answering calls, using options available during a call, or customising and using call-related features. ›Make and answer a callMake a call 1 In Idle mode, select Keypad and enter an area code and a phone number.Press [2 ] to dial the number. For a video call, select → Video call.During a call, your phone automatically locks the touch screen to prevent accidental inputs. To unlock, press the Lock key.To end the call, press [3 ].Use the phonebook to save numbers you •dial frequently. ► p. 79To quickly access the call log to redial the •numbers you dialled recently, press [ ].Answer a call1 When a call comes in, press [ ].When the phone is ringing, press the Volume key to adjust the volume, or press and hold the Volume key down to mute the ringtone.For a video call, press [2 ] and select Show me to allow the caller to see you.The front camera lens is activated to show your image.To end the call, press [3 ].](https://usermanual.wiki/Samsung-Electronics-Co/GTS3370D/User-Guide-1247180-Page-41.png)
![Communication 41To redial the last call, press the headset button, •and then press and hold.To answer a call, press the headset button.•To end a call, press the headset button.• ›Use options during a voice callYou can use the following options while a voice call is in progress:To adjust the voice volume, press the Volume •key up or down.To activate the speakerphone feature, select •Speaker → Yes .You can activate the speakerphone feature •with motion. In Menu mode, select Settings → Motion settings → Speaker call → On → Save. Then, during a call, place your phone on a table or a at surface. In noisy environments, you may have •diculty hearing some calls while using the speakerphone feature. For better audio performance, use the normal phone mode.Reject a callWhen a call comes in, press [ ]. The caller will hear a busy tone.You can set up a list of numbers to reject incoming calls automatically. ► p. 44Call an international numberIn Idle mode, select 1 Keypad and tap and hold 0 to insert the + character.Enter the complete number you want to 2 dial (country code, area code, and phone number), and then press [ ] to dial the number. ›Use the headsetBy plugging the supplied headset into the multifunction jack, you can make and answer calls:](https://usermanual.wiki/Samsung-Electronics-Co/GTS3370D/User-Guide-1247180-Page-42.png)
![Communication42To make a multiparty call (conference call), •make or answer a second call and select Join when connected to the second party. Repeat to add more parties. You must subscribe to the multiparty call service to use this feature.To remove noise from your background so •that the other party can hear you more clearly, select More → Voice clarity on/o.To connect the current party to the party •placed on hold, select More → Transfer. You will be disconnected. ›Use options during a video callYou can use the following options while a video call is in progress:To switch between the front and rear camera •lens, select More → Switch camera.To zoom in or out, select • Zoom. The zoom feature is available only when you are using the rear camera.To turn o the microphone so that the other •party cannot hear you, select Mute. To switch the current call to a video call, select •Video call.To listen and talk to the other party via the •headset, select Headset.To place a call on hold, select • Hold. To retrieve a held call, select Retrieve.To dial a second call, place the rst call on •hold and then dial a new number. You must subscribe to the call waiting service to use this feature.To answer a second call, press [• ] when a call waiting tone sounds. The rst call is automatically placed on hold. You must subscribe to the call waiting service to use this feature.To switch between the two calls, select • Swap.To end the call on hold, select • On hold → .](https://usermanual.wiki/Samsung-Electronics-Co/GTS3370D/User-Guide-1247180-Page-43.png)


![Connectivity96 ›Connect as a mass storage deviceYou can connect your phone to a PC as a removable disk and access the le directory. If you insert a memory card in the phone, you can also access the le directory of the memory card by using the phone as a memory card reader.If you want to transfer les from or to a 1 memory card, insert a memory card into the phone.In Menu mode, select 2 Settings → Phone settings → PC connections → Mass storage → Save.Press [3 ] to return to Idle mode.Using an optional PC data cable, connect the 4 multifunction jack on your phone to a PC.When connected, a pop-up window will appear on the PC. ›Connect with Samsung PC StudioEnsure that Samsung PC Studio is installed on your PC. You can download the program from the Samsung website (www.samsungmobile.com).In Menu mode, select 1 Settings → Phone settings → PC connections → Samsung PC studio or Mass storage → Save.Press [2 ] to return to Idle mode.Using an optional PC data cable, connect the 3 multifunction jack on your phone to a PC.Run Samsung PC Studio and use wireless 4 connections or copy data and les.Refer to the Samsung PC Studio help for more information.](https://usermanual.wiki/Samsung-Electronics-Co/GTS3370D/User-Guide-1247180-Page-97.png)
![Connectivity 97Using an optional PC data cable, connect the 3 multifunction jack on your phone to a PC with Windows Media Player installed.When connected, a pop-up window will appear on the PC.Open Windows Media Player to synchronise 4 music les.Edit or enter your phone’s name in the pop-5 up window (if necessary).Select and drag the music les you want to 6 the sync list.Start synchronisation.7 Open the folder to view les.5 Copy les from the PC to the memory card.6 To disconnect the phone to the PC, click the USB device icon on the Windows task bar and click the option to safely remove the mass storage device. Then remove the PC data cable from the PC. Otherwise, you may lose data stored on the memory card or damage the memory card. ›Synchronise with Windows Media PlayerEnsure that Windows Media Player is installed on your PC. In Menu mode, select 1 Settings → Phone settings → PC connections → Media player → Save.Press [2 ] to return to Idle mode.](https://usermanual.wiki/Samsung-Electronics-Co/GTS3370D/User-Guide-1247180-Page-98.png)

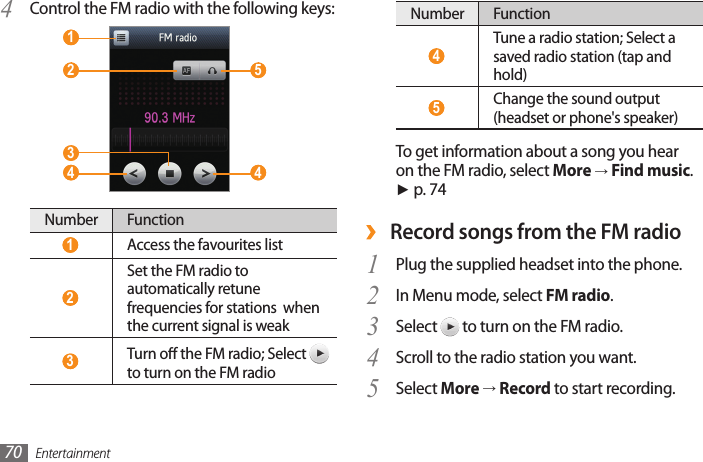
![Tools104TimerLearn to use a count-down timer that can run in the background.In Menu mode, select 1 Timer.Set the length of time to count down.2 Select 3 Start to begin the countdown.You can now use other functions with the timer counting down in the background. Press the Menu key or [ ] and access another application.When the timer expires, drag the slider to 4 Stop to stop the alert. ›Set a sound clip as your ringtoneYou can set any music or sound clips in the sound folder as ringtones for incoming calls.In Menu mode, select 1 My les →Sounds→a sound clip.During playback, select 2 Set as→Ringtone or select More→Set as→Ringtone.StopwatchLearn to record the time of an event as you would with a traditional stopwatch and lap timer.In Menu mode, select 1 Stopwatch.Select 2 Start to begin the stopwatch.Select 3 Lap to record lap times. When you are nished, select 4 Stop.Select 5 Reset to clear recorded times.](https://usermanual.wiki/Samsung-Electronics-Co/GTS3370D/User-Guide-1247180-Page-105.png)

![Settings110Use call fail options - : Select a retry option to use when a video call fails to connect.Call diverting - : Divert incoming calls to another number.Call barring - : Block calls from specied numbers.Auto redial - : Set whether or not to redial when a video call fails to connect or is interrupted.Fake call• : Customise the settings for fake calls. ► p. 45 ›MessagesCustomise the settings for messaging features.Text messages• :Network section - : Select network bearer type for sending text messages.Character support - : Select a character encoding type. Using Unicode encoding will reduce the maximum number of characters in a message to about half.Reply path - : Allow recipients to reply to you through your text message server.Answering mode - : Set how to answer calls— either by pressing [ ] or by pressing any key—or set the phone to answer automatically after a specied period.Call status tones - : Activate or deactivate connection, minute minder, or call disconnect tones.Alert on call - : Activate or deactivate an alert for incoming calls.Voice calls• : Call diverting - : Divert incoming calls to another number.Call barring - : Block incoming or outgoing calls.Call waiting - : Specify options for handling an incoming call when you are already on a call.Auto redial - : Specify options for automatically redialling a call that was not connected.Video call• : Select my image - : Select an image to be shown to the other party.Show my image - : Set whether to show your image to the other party.](https://usermanual.wiki/Samsung-Electronics-Co/GTS3370D/User-Guide-1247180-Page-111.png)