Samsung Electronics Co GTS5660V Cellular/PCS GSM Phone with WLAN and Bluetooth User Manual
Samsung Electronics Co Ltd Cellular/PCS GSM Phone with WLAN and Bluetooth Users Manual
UserManual.wiki
>
Samsung Electronics Co
>
GTS5660V User Manual
Users Manual
Navigation menu
Upload a User Manual
Namespaces
Wiki Guide
HTML
PDF
Info
Views
User Manual
Discussion / Help
Navigation

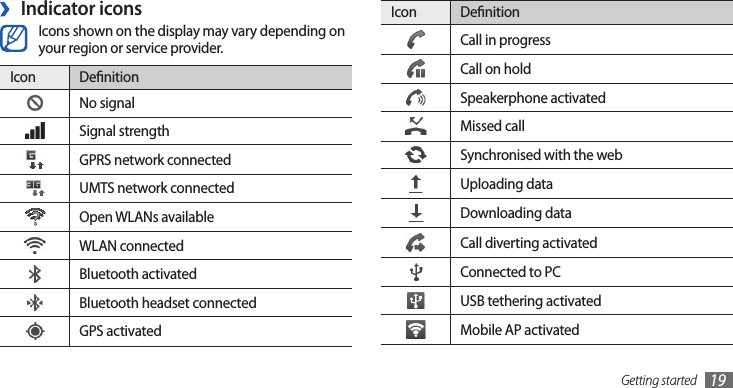
![Using this manual 3Note—notes, usage tips, or additional information ►Refer to—pages with related information; for example: ► p.12 (represents “see page 12”)→Followed by—the order of options or menus you must select to perform a step; for example: In Idle mode, open the application list and select Settings →About phone (represents Settings, followed by About phone)[ ] Square brackets—device keys; for example: [] (represents the Power/Lock key)Sound sources, wallpapers, and images provided in this •device are licenced for limited use between Samsung and their respective owners. Extracting and using these materials for commercial or other purposes is an infringement of copyright laws. Samsung is not liable for such copyright infringement by the user.Please keep this manual for future reference.•Instructional iconsBefore you start, familiarise yourself with the icons you will see in this manual: Warning—situations that could cause injury to yourself or othersCaution—situations that could cause damage to your device or other equipment](https://usermanual.wiki/Samsung-Electronics-Co/GTS5660V/User-Guide-1502213-Page-4.png)
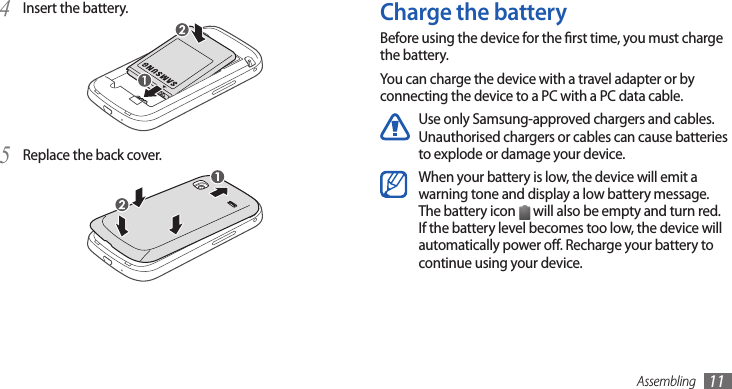
![Assembling10Insert the SIM or USIM card with the gold-coloured 3 contacts facing down.If you do not insert a SIM or USIM card, you can only use your device’s non-network services and some menus.To install the SIM or USIM card and battery,If the device is on, press and hold [1 ] and select Power o → OK to turn it o.Remove the back cover.2 Be careful not to damage your ngernails when you remove the back cover.](https://usermanual.wiki/Samsung-Electronics-Co/GTS5660V/User-Guide-1502213-Page-11.png)
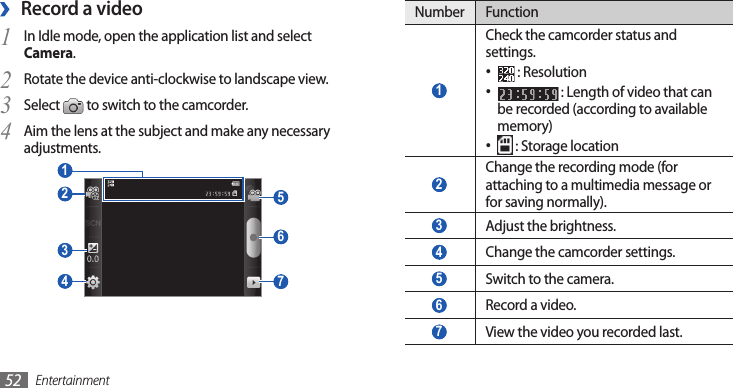
![Getting started 17Getting startedTurn your device on and oTo turn on your device,Press and hold [1 ].If you turn on your device for the rst time, follow the 2 on-screen instructions to set up your device.To turn o your device, press and hold [ ] and select Power o → OK.Follow all posted warnings and directions from •ocial personnel when in areas where the use of wireless devices is restricted, such as aeroplanes and hospitals.To use your device's non-network services only, •switch to Flight mode. Press and hold [ ] and select Flight mode.Get to know your deviceDevice layout ›Proximity sensorHome keyVolume keyMenu keyMouthpieceTouch screenBack keyEarpieceMultifunction jack](https://usermanual.wiki/Samsung-Electronics-Co/GTS5660V/User-Guide-1502213-Page-18.png)
![Getting started 21Control your touch screen with the following actions:Tap: Touch once with your nger to select or launch a •menu, option, or application.Tap and hold: Tap an item and hold it for more than 2 •seconds to open a pop-up option list.Drag: Tap and drag your nger up, down, left, or right to •move to items on lists.Drag and drop: Tap and hold your nger on an item, and •then drag your nger to move the item.Double-tap: Tap twice quickly with your nger to zoom •in or out while viewing photos or web pages.Your device turns o the touch screen when you •do not use the device for a specied period. To turn on the screen, press [ ] or the Home key.You can adjust the backlight time. In Idle mode, •open the application list and select Settings → Display → Screen timeout.To avoid scratching the touch screen, do not use •sharp tools.Do not allow the touch screen to come into •contact with other electrical devices. Electrostatic discharges can cause the touch screen to malfunction.Do not allow the touch screen to come into •contact with water. The touch screen may malfunction in humid conditions or when exposed to water. For optimal use of the touch screen, remove the •screen protection lm before using your device.Your touch screen has a layer that detects small •electrical charges emitted by the human body. For best performance, tap the touch screen with your ngertip. The touch screen will not react to touches of sharp tools, such as a stylus or pen.](https://usermanual.wiki/Samsung-Electronics-Co/GTS5660V/User-Guide-1502213-Page-22.png)
![Getting started22 ›Add items to the idle screenYou can customise the idle screen by adding shortcuts to applications or items in applications, widgets, or folders. To add items to the idle screen,Press [1 ] → Add or tap and hold the empty area on the idle screen.Select the item category 2 → an item:Widgets• : Add widgets. Widgets are small applications that provide convenient functions and information on your idle screen.Shortcuts• : Add shortcuts to items, such as applications, bookmarks, and contacts.Folders• : Create a new folder or add folders for your contacts.Wallpapers• : Set a background image.Lock or unlock the touch screen and keysYou can lock the touch screen and keys to prevent any unwanted device operations. To lock, press [ ]. To unlock, turn on the screen and drag right until it reaches the dot.Get to know the idle screenWhen the device is in Idle mode, you will see the idle screen. From the idle screen, you can view your device’s status and access applications.The idle screen has multiple panels. Scroll left or right to a panel of the idle screen.](https://usermanual.wiki/Samsung-Electronics-Co/GTS5660V/User-Guide-1502213-Page-23.png)
![Getting started24Access applicationsTo access your device’s applications,In Idle mode, select 1 to access the application list.Scroll left or right to another application screen.2 You can also select a dot on the top of the screen to move to the corresponding main menu screen directly.Select an application.3 When you use applications provided by Google, •you must have a Google account. If you do not have a Google account, sign up for a Google account.You can add a shortcut to an application by •tapping and holding the application icon from the application list. You can move the icon to the location you want on the idle screen. ›Add or remove panels to the idle screenYou can add or remove panels of the idle screen to organise widgets according to your preferences and needs.In Idle mode, press [1 ] → Edit.You can also place your two ngers on the screen and pinch to switch to Edit mode. Add or remove panels by using the following features:2 To remove a panel, tap and hold the thumbnail of a •panel and drag it to the trash bin at the bottom of the screen.To add a new panel, select • .To change the order of the panels, tap and hold the •thumbnail of a panel and drag it to the location you want.When you are nished, press [3 ].](https://usermanual.wiki/Samsung-Electronics-Co/GTS5660V/User-Guide-1502213-Page-25.png)
![Getting started 25Drag the application icon to the location you want.3 You can move an application icon to another main menu screen.Press [4 ] → Save.To change the order of the main menu screens,In the application list, place your two ngers on the 1 screen and pinch.Tap and hold the thumbnail of a screen and drag it to 2 the location you want.Access recent applications ›Press and hold the Home key to open the list of 1 applications you have accessed recently.Select an application to access.2 Press [4 ] to return to the previous screen; Press the Home key to return to the idle screen.Your device has a built-in motion sensor that detects its orientation. If you rotate the device while using some features, the interface will automatically switch to landscape view. To set the interface to keep the orientation when you rotate the device, select Settings → Display → Auto-rotate screen.Organise applications ›You can reorganise the applications in the application list by changing their order or grouping them into categories to suit your preferences and needs.In the application list, press [1 ] → Edit. Tap and hold an application.2](https://usermanual.wiki/Samsung-Electronics-Co/GTS5660V/User-Guide-1502213-Page-26.png)
![Getting started 27Activate animation for switching ›windowsIn Idle mode, open the application list and select Settings → Display → Animation → Some animations or All animations.Select a wallpaper for the idle screen ›In Idle mode, press [1 ] →Wallpaper → an option.Select an image.2 Select 3 Save or Set wallpaper.Samsung is not responsible for any use of default images or wallpapers provided on your device.Switch to Silent mode ›To mute or unmute your device, do one of the following:In Idle mode, open the application list and select • → Keypad and tap and hold .Open the shortcuts panel from the top of the screen and •select Sound.Press and hold [• ] and select Silent mode.You can set the device to alert you to various events in Silent mode. In Idle mode, open the application list and select Settings → Sound → Vibrate → Always or Only in Silent mode. When you switch to Silent mode, will appear in place of .Change your ringtone ›In Idle mode, open the application list and select 1 Settings → Sound → Phone ringtone.Select a ringtone from the list and select 2 OK.](https://usermanual.wiki/Samsung-Electronics-Co/GTS5660V/User-Guide-1502213-Page-28.png)
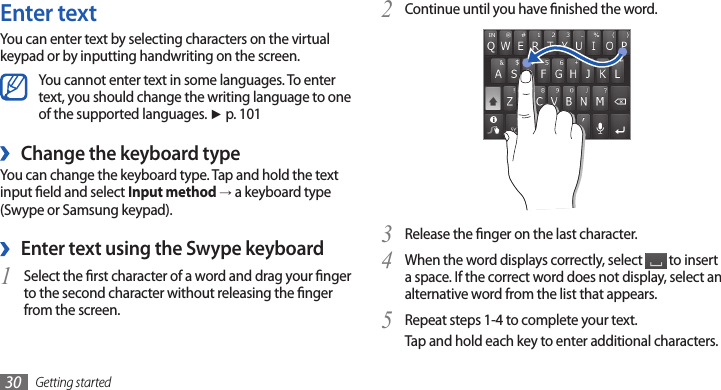
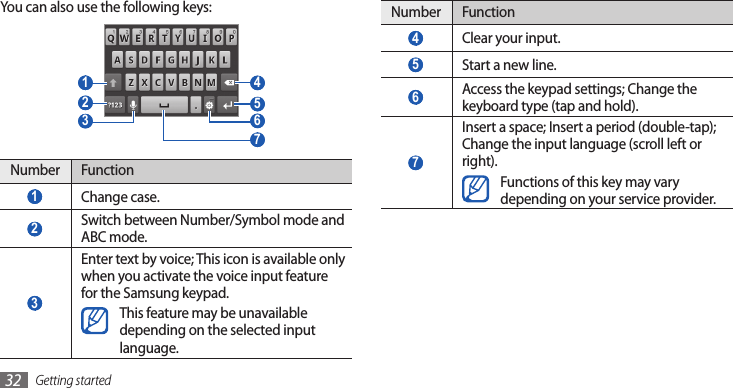
![Getting started 31Number Function 6 Enter text by voice.This feature may be unavailable depending on the selected input language.To hide the Swype keyboard, press [• ].To view help information for using the Swype •keyboard, tap and hold .Enter text using the Samsung keypad ›Select 1 → Portrait keypad types and select a text input method.You can select one of key input methods (QWERTY or traditional keypad) or handwriting input methods.Enter text by selecting alphanumeric keys or writing 2 on the screen.You can also use the following keys: 2 1 4 5 6 3 Number Function 1 Change case. 2 Switch between Symbol mode and ABC/Number mode. 3 Insert a space. 4 Delete characters. 5 Start a new line.](https://usermanual.wiki/Samsung-Electronics-Co/GTS5660V/User-Guide-1502213-Page-32.png)
![Getting started 35Select an account.3 Select the applications you want to synchronise.4 To exclude applications from automatic synchronisation, clear the check boxes next to the applications you want.Synchronise data manually ›In Idle mode, open the application list and select 1 Settings → Accounts and sync.Select an account.2 Press [3 ] → Sync now. Your device will start synchronising the data you set for synchronisation.Set up a server account ›In Idle mode, open the application list and select 1 Settings → Accounts and sync.Select 2 Add account → an account type.Follow the on-screen instructions to complete the 3 account setup.For online community services, such as Facebook or MySpace, enter your user name and password and select Log in.Activate automatic sync ›In Idle mode, open the application list and select 1 Settings → Accounts and sync.Select 2 Auto-sync.](https://usermanual.wiki/Samsung-Electronics-Co/GTS5660V/User-Guide-1502213-Page-36.png)

![Communication 39Set call waitingCall waiting is a network feature to alert you of an incoming call while you are on a previous call. In Idle mode, open the application list and select Settings → Call settings → Additional settings → Call waiting. Your setting will be sent to the network.View call logs ›You can view logs of your calls ltered by their types. In Idle mode, open the application list and select 1 → Logs.Press [2 ] → View by → an option to sort the call logs.From the call logs, you can make a call or send a message directly to a contact by icking the contact to the left or right.Enter the PIN2 supplied with your SIM or USIM card 2 and select OK.Select 3 FDN list and add contacts to be used in FDN mode.Set call forwardingCall diverting is a network feature to send incoming calls to another number that you specify. You can set this feature separately for several conditions when you are not able to answer calls, such as when you are already on the phone or when you are outside of the service area.In Idle mode, open the application list and select 1 Settings → Call settings → Call forwarding.Select a condition.2 Enter a number to which calls will be forwarded and 3 select Enable.Your setting will be sent to the network.](https://usermanual.wiki/Samsung-Electronics-Co/GTS5660V/User-Guide-1502213-Page-40.png)
![Communication40Select 2 Contacts.You can enter a number manually or select one from the logs or contact groups by selecting another option.Select contacts and select 3 Add.Select 4 Tap to compose and enter your message text.To insert emoticons, press [ ] → Insert smiley.Select 5 Send to send the message.Send a multimedia message ›1 In Idle mode, open the application list and select → New message.Select 2 Contacts.You can enter a number manually or select one from the logs or contact groups by selecting another option.When you enter an email address, the device will convert the message to a multimedia message.Select a log to view its details.3 From the detail view, you can dial the number, send a message to the number or add the number to the phonebook.MessagingLearn to create and send text (SMS) or multimedia (MMS) messages, and view or manage messages you have sent or received.You may incur additional charges for sending or receiving messages while outside your home service area. For details, contact your service provider.Send a text message ›1 In Idle mode, open the application list and select → New message.](https://usermanual.wiki/Samsung-Electronics-Co/GTS5660V/User-Guide-1502213-Page-41.png)
![Communication 41Select a contact.2 For a multimedia message, select a message to view 3 the details.Listen to voice mail messages ›If you have set missed calls to be diverted to the voice mail server, callers may leave voice messages when you do not answer incoming calls. To access your voice mail inbox and listen to voice mail messages,In Idle mode, open the application list and select 1 → Keypad and then tap and hold 1. Follow the instructions from the voice mail server.2 You must save the voice mail server number before accessing the server. Your service provider can give you the number.Select contacts and select 3 Add.Select 4 Tap to compose and enter your message text.To insert emoticons, press [ ] → Insert smiley.Select 5 → an option and add an item.You can select a le from the le list or create a new photo, video, or sound.Press [6 ] → Add subject and add a subject for the message.Select 7 Send to send the message.View a text or multimedia message ›1 In Idle mode, open the application list and select .Your messages are grouped into message threads by contact, like a messenger.](https://usermanual.wiki/Samsung-Electronics-Co/GTS5660V/User-Guide-1502213-Page-42.png)
![Communication42Enter a name or address in the recipient eld.4 Enter a subject and message.5 To attach an image le, press [6 ] → Attach → a le.Select 7 to send the message.View email messages ›In Idle mode, open the application list and select 1 Google Mail.Select an email message.2 From the message view, use the following options:To reply to the message, select • .To reply to the message including all recipients, select • →Reply all.To forward the message to other people, select • →Forward.Google MailYou can retrieve new email messages from Google Mail™ to your Inbox. When you access this application, the Inbox screen appears. The total number of unread messages displays in the title bar and unread messages display in bold.This feature may be unavailable depending on •your region or service provider.This Google Mail menu may be labelled dierently •depending on your service provider.Send an email message ›In Idle mode, open the application list and select 1 Google Mail.If you are launching this application for the rst time, 2 select OK.Press [3 ] → Compose.](https://usermanual.wiki/Samsung-Electronics-Co/GTS5660V/User-Guide-1502213-Page-43.png)
![Communication 43Add a star to a messageFrom the Inbox screen, tap and hold a message.1 Select 2 Add star. The star icon next to the message is activated.Filter messagesFrom the Inbox screen, press [1 ] → Go to labels.Select the label of the messages you want to view.2 EmailLearn to send or view email messages via your personal or company email account.Set up an email account ›1 In Idle mode, open the application list and select Email.Enter your email address and password.2 To add a star to the message, select • .To view an attachment, select • Preview. To save it to your memory card, select Download.To archive the message, select • Archive.To delete the message, select • Delete.To move to the previous or next message, select • or .Organise email by labels ›You can organise your email by labelling your messages or adding stars to mark important messages. You can sort messages by label lter.Add a label to a messageFrom the Inbox screen, tap and hold a message.1 Select 2 Change labels.Select a label to add and select 3 OK.](https://usermanual.wiki/Samsung-Electronics-Co/GTS5660V/User-Guide-1502213-Page-44.png)
![Communication44Select contacts and select 4 Add.Select the Cc/Bcc eld and add more recipients.5 Select the subject eld and enter a subject.6 Select the text input eld and enter your email text.7 Select8 Attach and attach a le.You can select a le from the le list or create a new photo, video, or sound.Select 9 Send to send the message.If you are oine or outside your service area, the message will be held in the message thread list until you are online and in your service area.View an email message ›When you open an email account, you can view previously retrieved emails oine or connect to the email server to view new messages. After retrieving email messages, you can view them oine.Select 3 Next (for general email accounts) or Manual setup (for other company email accounts).Follow the on-screen instructions.4 When you are nished setting up the email account, the email messages are downloaded to your device. If you have created more than two accounts, you can switch between email accounts; Press [ ] → Accounts and select one you want to retrieve messages from.Send an email message ›1 In Idle mode, open the application list and select Email → an email account.Press [2 ] → Compose.Select 3 Contacts.You can enter an email address manually or select one from the logs or contact groups by selecting another option.](https://usermanual.wiki/Samsung-Electronics-Co/GTS5660V/User-Guide-1502213-Page-45.png)
![Communication 45TalkLearn to chat with friends and family via Google Talk™.This feature may be unavailable depending on your region or service provider.Add friends to your friend list ›In Idle mode, open the application list and select 1 Talk.The friend list shows all of your Google Talk contacts at a glance.Press [2 ] → Add friend.Enter an email address of the friend and select 3 Send invitation.When your friend accepts the invitation, the friend is added to your friend list.In Idle mode, open the application list and select 1 Email → an email account.Press [2 ] → Refresh to update the message list.Select an email message.3 From the message view, use the following options:To reply to the message, press [• ] → Reply.To forward the message to other people, press [• ] → Forward.To delete the message, press [• ] → Delete.To move the message to another folder, press [• ] →Move to folder.To load images from the message, press [• ] →Show pictures.To view an attachment, select the attachment item. To •save it to your memory card, select .](https://usermanual.wiki/Samsung-Electronics-Co/GTS5660V/User-Guide-1502213-Page-46.png)
![Communication46Social HubLearn to access Social Hub™, the integrated communication application for Social Network Service (SNS), email, messages, instant messages (IM), contacts or calendar information. Visit socialhub.samsungapps.com for more details.In Idle mode, open the application list and select 1 Social Hub.Check and use contents delivered from Social Hub.2 Start a chat ›In Idle mode, open the application list and select 1 Talk.Select a friend from the friend list. The chat screen 2 opens.Enter your message and select 3 Send.To insert emoticons, press [ ] → More → Insert smiley.To switch between active chats, press [4 ] → Switch chats.To end the chat, press [5 ] → End chat.](https://usermanual.wiki/Samsung-Electronics-Co/GTS5660V/User-Guide-1502213-Page-47.png)

![Entertainment 55Play a video ›1 In Idle mode, open the application list and select Gallery.Select a video (with the 2 icon) to play.Rotate the device anti-clockwise to landscape view.3 Control playback with the virtual keys. 4 Share images or videos ›In Idle mode, open the application list and select 1 Gallery.Select a folder.2 Press [3 ] and select image or video les.Select 4 Share → a sharing option.View a photo ›1 In Idle mode, open the application list and select Gallery.Select a folder.2 To change the view mode, select 3 or at the top right of the screen.Select a photo (with no icon) to view.4 While viewing a photo, use the following options:To view more photos, scroll left or right. •To zoom in or out, select • or . You can also tap the screen with two ngers and spread them apart (move your ngers closer together to zoom out).To start a slideshow in the selected folder, select •Slideshow. Tap the screen to stop the slideshow.To use additional features using the photo, such as •sharing, deleting, and editing options, select Menu.](https://usermanual.wiki/Samsung-Electronics-Co/GTS5660V/User-Guide-1502213-Page-56.png)
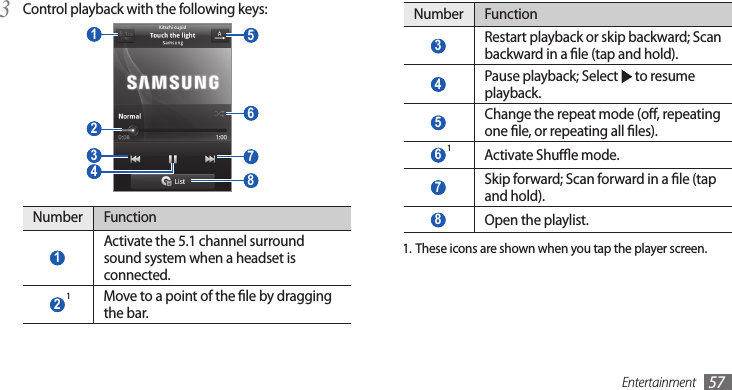
![Entertainment58Press [3 ] → Add to playlist → New.Enter a title for your new playlist and select 4 Save.To add more music les to the playlist, play a le and 5 press [ ] → Add to playlist → the new playlist.Use the party shue feature ›When you turn on the party shue feature, your device selects and plays music les randomly.In Idle mode, open the application list and select 1 Music.Press [2 ] → Party shue.To turn o the party shue feature, press [3 ] → Party shue o.You can control playback with a headset: Press the •headset button to play or pause playback. You can also press and hold the headset button to launch the music player.SRS CS Headphone• ™ delivers a 5.1 surround sound experience over standard headphones or earbuds when listening to multichannel content, such as DVD movies.WOW HD• ™ signicantly improves the playback quality of audio, delivering a dynamic 3D entertainment experience with deep, rich bass and high frequency clarity for crisp detail.Create a playlist ›In Idle mode, open the application list and select 1 Music.Select a category 2 → a music le.](https://usermanual.wiki/Samsung-Electronics-Co/GTS5660V/User-Guide-1502213-Page-59.png)
![Entertainment 59FM radioLearn to listen to music and news on the FM radio. To listen to the FM radio, you must connect a headset, which serves as the radio antenna.Listen to the FM radio ›Plug a headset into the device.1 In Idle mode, open the application list and select 2 FM radio.The FM radio scans and saves available stations automatically.The rst time you turn on the FM radio, it will start automatic tuning.Customise music player settings ›In Idle mode, open the application list and select 1 Music.Select a category 2 → a music le.Press [3 ] → Settings.Adjust the following settings to customise your music 4 player:Option Function5.1 channelSet whether or not to activate the virtual 5.1 channel surround sound system when a headset is connected.Equaliser Select a default equaliser type.](https://usermanual.wiki/Samsung-Electronics-Co/GTS5660V/User-Guide-1502213-Page-60.png)
![Entertainment60Number Function 5 Adjust the volume.Save a radio station automatically ›Plug a headset into the device.1 In Idle mode, open the application list and select 2 FM radio.Press [3 ] → Scan → a scanning option.The FM radio scans and saves available stations automatically.Add a radio station to the favourites list ›Plug a headset into the device.1 In Idle mode, open the application list and select 2 FM radio.Control the FM radio with the following keys:3 5 3 2 1 3 4 Number Function 1 Turn the FM radio o or on. 2 Fine-tune the frequency. 3 Search for an available radio station. 4 Add the current radio station to the favourites list.](https://usermanual.wiki/Samsung-Electronics-Co/GTS5660V/User-Guide-1502213-Page-61.png)
![Entertainment 61Scroll to the radio station you want.3 Select 4 to add to the favourites list.You can add a name for a radio station or remove a radio station; Tap and hold a radio station on the favourites list and select Remove or Rename.Customise FM radio settings ›In Idle mode, open the application list and select 1 FM radio.Press [2 ] → Settings.Adjust the following settings to customise your FM 3 radio:Option FunctionRegion Select your region.Option FunctionBackground playingSet whether or not to run the FM radio in the background while using other applications. If this feature is on, you can control the FM radio from the shortcuts panel.Show station IDSet whether or not to show the station ID on the FM radio screen; Station IDs are available only from radio stations that provide this information.Alternative frequencySet whether or not the FM radio attempts to retune a radio station when the current signal is weak.FM auto oSet the FM radio to automatically turn o after a specied length of time.](https://usermanual.wiki/Samsung-Electronics-Co/GTS5660V/User-Guide-1502213-Page-62.png)
![Personal information 63Select a location number 3 → a contact.You can quickly dial this number by touching and holding the location number from the dialling screen.Create your namecard ›In Idle mode, open the application list and select 1 .Press [2 ] → My prole.Enter your own personal details.3 Select 4 Save.You can send your namecard by attaching it to a message or email or transferring it via the Bluetooth wireless feature.Find a contact ›1 In Idle mode, open the application list and select .Scroll up or down on the contact list.2 Select a contact’s name.3 Once you nd a contact, you can:call the contact by selecting a phone number.•send a message by selecting• Message.send an email message by selecting an email address.•edit the contact information by pressing [• ] → Edit.Set a speed dial number ›In Idle mode, open the application list and select 1 .Press [2 ] → More → Speed dial.](https://usermanual.wiki/Samsung-Electronics-Co/GTS5660V/User-Guide-1502213-Page-64.png)
![Personal information64Enter a name and select a ringtone for the group.3 Select 4 Save.Copy contacts ›To copy contacts from the SIM or USIM card to your device,In Idle mode, open the application list and select 1 .Press [2 ] → Import/Export → Import from SIM card.Select contacts to copy and select 3 Import.To copy contacts from your device to the SIM or USIM card,In Idle mode, open the application list and select 1 .Press [2 ] → Import/Export → Export to SIM card.Select contacts to copy and select 3 Export→ Yes.Retrieve contacts from your community ›accountsYou can view the list of community website accounts and select an account to add a contact from the website to your phone contacts.In Idle mode, open the application list and select 1 .Press [2 ] → Get friends.Select an account.3 Create a group of contacts ›By creating groups of contacts, you can manage multiple contacts and send messages or email to an entire group. Start by creating a group.In Idle mode, open the application list and select 1 → Groups.Press [2 ] → Create.](https://usermanual.wiki/Samsung-Electronics-Co/GTS5660V/User-Guide-1502213-Page-65.png)
![Personal information 65To export contacts from your device to a memory card,In Idle mode, open the application list and select 1 .Press [2 ] → Import/Export → Export to SD card.Select 3 Yes to conrm.View the communication log ›You can view the communication log of calls, messages, email or SNS threads.In Idle mode, open the application list and select 1 → History.Select an item you want to view.2 Import or export contacts ›To import contact les (in vcf format) from a memory card to your device,In Idle mode, open the application list and select 1 .Press [2 ] → Import/Export → Import from SD card.Select a memory location.3 If you have more than one account, select an account to which you want to add the contact.Select an option for importing a single contact le, 4 multiple contact les, or all contact les, and select OK.Select contact les to import and select 5 OK.](https://usermanual.wiki/Samsung-Electronics-Co/GTS5660V/User-Guide-1502213-Page-66.png)
![Personal information66Enter the details of the event as required.3 Select 4 Done.View events ›To change the calendar view,In Idle mode, open the application list and select 1 Calendar.Press [2 ] and select Day, Week, or Month.To view events of a specic date,In Idle mode, open the application list and select 1 Calendar.Select a date on the calendar. In month view, days with 2 scheduled events are indicated by a blue bar.To select today's date, press [ ] → Today.Select an event to view its details.3 View social network activities ›You can view the recent activities of contacts in social network services, such as Facebook, MySpace, and Twitter.In Idle mode, open the application list and select 1 → Activities.Select an item you want to view.2 CalendarLearn to create and manage daily, weekly or monthly events, and set alarms to remind yourself of important events.Create an event ›In Idle mode, open the application list and select 1 Calendar.Press [2 ] → More → Create.](https://usermanual.wiki/Samsung-Electronics-Co/GTS5660V/User-Guide-1502213-Page-67.png)
![Personal information 67Select 2 Create memo or press [ ] → Create.Enter your memo text.3 Press [4 ] to hide the keypad.Select a colour to change a background colour.5 Select 6 Save.View memos ›In Idle mode, open the application list and select 1 Memo.Select a memo to view its details.2 To edit the memo, select • .To delete the memo, select • →OK.You can send the memo to others by tapping and holding the memo and selecting Send via → an option.Stop an event alarm ›If you set an alarm for a calendar event, the event alarm icon will appear at the specied time. Open the shortcuts panel from the top of the screen.1 Select a reminder to view more details about the 2 event.To snooze or dismiss the reminder, select 3 Snooze all or Dismiss all.MemoLearn to record important information to save and view at a later date.Create a memo ›In Idle mode, open the application list and select 1 Memo.](https://usermanual.wiki/Samsung-Electronics-Co/GTS5660V/User-Guide-1502213-Page-68.png)
![Personal information68Play a voice memo ›In Idle mode, open the application list and select 1 Voice recorder.Select 2 List.Select a voice memo to play.3 You can send the voice memo to others by pressing [] → Share →an option. Voice recorderLearn to operate your device's voice recorder.To use the voice recorder, you must rst insert a memory card.Record a voice memo ›In Idle mode, open the application list and select 1 Voice recorder.Select 2 Record to start recording.Speak into the microphone.3 When you are nished recording a memo, select 4 Stop.Your memo is saved automatically.To record more voice memos, select 5 Record from the bottom of the screen.](https://usermanual.wiki/Samsung-Electronics-Co/GTS5660V/User-Guide-1502213-Page-69.png)
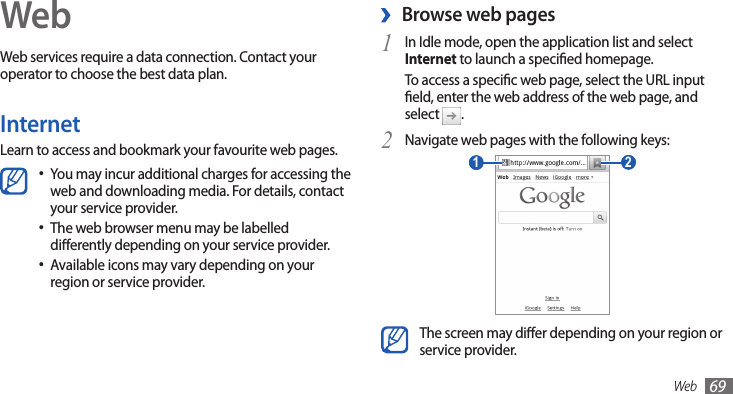
![Web70To reload the current web page, press [• ] → Refresh.To go to the next page in history, press [• ] → Forward.To bookmark the current web page, press [• ] → Add bookmark.To add a shortcut to the current web page to the idle •screen, press [ ] →More→Add shortcut to Home.To search for text on the web page, press [• ] → More → Find on page.To view web page details, press [• ] → More → Page info.To send the web address of the web page to others, •press [ ] → More → Share page.To view the download history, press [• ] → More → Downloads.To customise browser settings, press [• ] → More → Settings.Number Function 1 Enter the web address of a web page to access. 2 Open a list of saved bookmarks, frequently visited pages and recent internet history.While browsing the web page, use the following options:To zoom in or out, double-tap the screen. You can also •use the two nger zoom; Place your two ngers on the screen and slowly pinch or spread apart.To open a new window, press [• ] → New window. To view the currently active windows, press [• ] → Windows. You can open multiple pages and switch back and forth between them.](https://usermanual.wiki/Samsung-Electronics-Co/GTS5660V/User-Guide-1502213-Page-71.png)
![Web 71Select 2 →Bookmarks.Select 3 Add or press [ ] → Bookmark last-viewed page.Enter a page title and a web address.4 Select 5 OK.From the bookmark list, tap and hold a bookmark and use the following options:To open the web page in the current window, select •Open.To open the web page in a new window, select • Open in new window.To edit the bookmark details, select • Edit bookmark.To add the bookmark shortcut to the idle screen, select •Add shortcut to Home.To send the web address of the web page to others, •select Share link.Search for information by voice ›This feature may be unavailable depending on your region or service provider.In Idle mode, open the application list and select 1 Internet.Select the address eld.2 Select 3 and say a keyword into your device’s microphone. The device searches for information and web pages related with the keyword.Bookmark your favourite web pages ›If you know the web address of a web page, you can manually add a bookmark. To add a bookmark,In Idle mode, open the application list and select 1 Internet.](https://usermanual.wiki/Samsung-Electronics-Co/GTS5660V/User-Guide-1502213-Page-72.png)
![Web 73Search for a specic location ›In Idle mode, open the application list and select 1 Maps.If you are launching this application for the rst time, 2 select OK to conrm.The map will display your current location.Press [3 ] → Search or select .Enter a keyword for the location and select 4 .To search for a location by voice, select • .To view a list of all results for your search, select • .To zoom in or out, select • or .To search for a place around you, select • .To add layers to the map, select • .To view your current location, select • .To add a star to the location, select the balloon of the location name → .Activate location services to use with ›Google MapsYou must activate location services to nd your location and search the map.In Idle mode, open the application list and select 1 Settings → Location and security.Adjust the following settings to activate location 2 services:Option FunctionUse wireless networksSet to use WLAN and/or mobile networks for nding your location.Use GPS satellitesSet to use the GPS satellite for nding your location.](https://usermanual.wiki/Samsung-Electronics-Co/GTS5660V/User-Guide-1502213-Page-74.png)
![Web74Share your location via Google Latitude ›Learn to share your location with your friends and view friends’ locations via Google Latitude™.In Idle mode, open the application list and select 1 Latitude.The device automatically joins Latitude. Press [2 ] → Add friends → Select from Contacts or Add via email address.Select a friend you want to add, or enter an email 3 address and select Add friends.Select 4 Yes.When your friend accepts your invitation, you can share locations.Press [5 ] → See map.Your friends' locations are marked with their photos on the map.Get directions to a specic destination ›In Idle mode, open the application list and select 1 Maps.Press [2 ] → Directions.Enter the addresses of the starting location and the 3 ending location.To enter an address from your contact list or point the location on the map, select → Contacts or Point on map.Select a travel method (car, bus, or walk) and select 4 Go.Select a travel route to view details of your trip (if 5 necessary).Select 6 .The route is indicated on the map. To view only the single part of the route, select or . When you are nished, press [7 ] → Clear Map.](https://usermanual.wiki/Samsung-Electronics-Co/GTS5660V/User-Guide-1502213-Page-75.png)
![Web76Enter a letter or a word of the data to search for.2 To search for data by voice, select and say a keyword into your device’s microphone.Select the item's name you want to access.3 YouTubeLearn to view and upload videos via YouTube.This feature may be unavailable depending on your region or service provider.Watch videos ›In Idle mode, open the application list and select 1 YouTube.If you are launching this application for the rst time, 2 select Accept to conrm.Select a video from the list.3 Contacts• : Select your destination from addresses of your contacts.Starred Places• : Select your destination from the list of your starred places.Select 4 Install to use voice-guided navigation (if necessary).Follow the route indicated on the map and the voice 5 guide. To view directions in text form, select .To end the navigation, press [6 ] → Exit Navigation.Google SearchYou can search for applications in your device and specic data on the web.In Idle mode, open the application list and select 1 Google Search.](https://usermanual.wiki/Samsung-Electronics-Co/GTS5660V/User-Guide-1502213-Page-77.png)
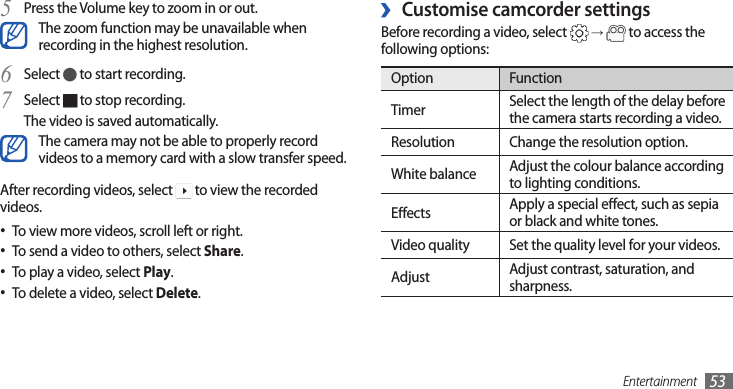
![Web 77Rotate the device anti-clockwise to landscape view.4 Control playback with the following keys:5 1 2 Number Function 1 Move to a point of the le by dragging the bar. 2 Change the quality of the display.Upload videos ›In Idle mode, open the application list and select 1 YouTube.Press [2 ] → Upload and select a video. Skip to 8.If you want to upload new videos, select to turn on the camera.Rotate the device anti-clockwise to landscape view.3 Aim the lens at the subject and make any adjustments.4 Select 5 to start recording.Select 6 to stop recording. Select 7 Save to upload the video that you have recorded.Enter your user name and password and select 8 Sign in.Enter details of the upload and select 9 Upload.](https://usermanual.wiki/Samsung-Electronics-Co/GTS5660V/User-Guide-1502213-Page-78.png)
![Web78News & WeatherLearn to view the weather information and read top news and other news articles.View the weather information ›In Idle mode, open the application list and select 1 News & Weather.Select 2 Weather at the top of the screen.Your device searches for your current location and displays the weather information.You can change the location to view the weather information in another region. Press [ ] → Settings → Weather settings and clear the check box next to Use My Location. Then select a location in Set location.Read news articles ›In Idle mode, open the application list and select 1 News & Weather.Select a news topic at the top of the screen.2 Select an article to open.3 To add news topics, press [ ] → Settings → News settings → Select news topics.](https://usermanual.wiki/Samsung-Electronics-Co/GTS5660V/User-Guide-1502213-Page-79.png)
![Connectivity 81Send data using the Bluetooth wireless ›featureSelect a le or item, such as a contact, memo, or media 1 le, from an appropriate application or My les.Press [2 ] →Share or Send via → Bluetooth.Search for and pair with a Bluetooth-enabled device.3 ›Receive data using the Bluetooth wireless featureIn Idle mode, open the application list and select 1 Settings → Wireless and networks → Bluetooth settings → Discoverable.Your device is visible to other Bluetooth devices for 120 seconds.Find and pair with other Bluetooth- ›enabled devicesIn Idle mode, open the application list and select 1 Settings → Wireless and networks → Bluetooth settings → Scan devices.Select a device.2 Enter a PIN for the Bluetooth wireless feature or the 3 other device’s Bluetooth PIN, if it has one, and select OK. Alternatively, select Accept to match the PIN between your device and the device.When the owner of the other device enters the same PIN or accepts the connection, pairing is complete. If the pairing is successful, the device will automatically search for available services.Some devices, especially headsets or hands-free car kits, may have a xed Bluetooth PIN, such as 0000. If the other device has a PIN, you must enter it.](https://usermanual.wiki/Samsung-Electronics-Co/GTS5660V/User-Guide-1502213-Page-82.png)
![Connectivity88Option FunctionEnable L2TP secretSet to use the L2TP secret password.Set L2TP secret Enter the L2TP secret password.Set user certicateSelect a user certicate that the VPN server uses to identify you. You can import certicates from the VPN server or download from the web.Set CA certicateSelect a certicate authority (CA) certicate that the VPN server uses to identify you. You can import certicates from the VPN server or download from the web.DNS search domainsEnter the domain name server (DNS) address.When you are nished, press [4 ] → Save.Set up VPN connections ›In Idle mode, open the application list and select 1 Settings → Wireless and networks → VPN settings → Add VPN.Select a VPN type.2 Customise the connection information.3 Available options may vary depending on the VPN type.Option FunctionVPN name Enter a name of the VPN server.Set VPN server Enter the IP address of the VPN server.Enable Encryption Set to encrypt the VPN server.Set IPsec pre-shared key Enter a pre-shared key.](https://usermanual.wiki/Samsung-Electronics-Co/GTS5660V/User-Guide-1502213-Page-89.png)
![Tools90ToolsClockLearn to use the clock display on the Idle screen, and set and control alarms for important events.Use the clock display ›In Idle mode, open the application list and select 1 Clock.While using the clock display, use the following 2 features:To create or delete an alarm, select • .To play a slideshow with photos in Gallery, select • .To launch the music player, select • .To return to the idle screen, select • .Set a new alarm ›In Idle mode, open the application list and select 1 Clock.Press [2 ] → Add alarm.Set alarm details.3 When you are nished, select 4 Done.The snooze feature sets the device to repeat the alarm after a specic length of time. To set the length of time for the snooze feature, press [ ] → Settings → Snooze duration.Stop an alarm ›When the alarm sounds,Select • Dismiss to stop the alarm.Select • Snooze to repeat the alarm after a specied length of time.](https://usermanual.wiki/Samsung-Electronics-Co/GTS5660V/User-Guide-1502213-Page-91.png)
![Tools 91Select a download folder.2 To open a downloaded le, select the log.3 To delete a log, select the check box and then select Delete.My lesLearn to quickly and easily access all of your images, videos, music, sound clips, and other types of les stored on your memory card. In Idle mode, open the application list and select 1 My les. Select a folder.2 To move up one level in the le directory, select • Up.To return to the Home directory, select • Home.Select a le to open.3 CalculatorLearn to perform mathematical calculations directly on your device like a typical hand-held or desktop calculator.In Idle mode, open the application list and select 1 Calculator.Use the keys that correspond to the calculator display 2 to perform basic mathematical operations.Press [3 ] →Advanced panel to use scientic calculator.DownloadsLearn to manage logs of les you have downloaded from the web and email.In Idle mode, open the application list and select 1 Downloads.](https://usermanual.wiki/Samsung-Electronics-Co/GTS5660V/User-Guide-1502213-Page-92.png)
![Tools92Task managerWith the task manager, you can view currently running applications, package size of applications, and memory information, and monitor the RAM memory.In Idle mode, open the application list and select 1 Task manager.Use the following options:2 Active applications• : View the list of all the applications currently running on your device.Package• : View the package size of applications installed on your device.RAM• : Check and manage the RAM memory for your device.Summary• : View the used and available memory on your device and memory card.Help• : View help information about extending battery life.In a folder, press [ ] to use the following options:To send a le to others via multimedia message, email or •the Bluetooth wireless feature, select Share.To create a new folder, select • Create folder.To delete les or folders, select • Delete.To change the view mode, select • View by.To sort les or folders, select • List by.To use additional features using a le, such as moving, •copying or renaming option, select More.SIM ToolkitUse a variety of additional services oered by your service provider. Depending on your SIM or USIM card, this menu may be available but labelled dierently.In Idle mode, open the application list and select SIM Toolkit.](https://usermanual.wiki/Samsung-Electronics-Co/GTS5660V/User-Guide-1502213-Page-93.png)
![Tools 93Enter a name for the document and select 6 OK.Enter contents in the document by using the tools at 7 the bottom of the screen.When you are nished editing, select 8 on the toolbar or press [ ] → File → Save.View and edit a document on your ›deviceIn Idle mode, open the application list and select 1 ThinkFree Oce.Select 2 My Docs → a document.Select a text encoding type (if necessary).3 View and edit the document as desired.4 To zoom in or out, use the two nger zoom; Place •your two ngers on the screen and slowly pinch or spread apart.ThinkFree OceLearn to create and view document les on your device. If you have an account with the ThinkFree web service, you can manage documents online. This application supports the following le formats: doc, docx, rtf, txt, xls, xlsx, csv, ppt, pps, pot, pptx, ppsx, potx, pdf.Create a new document ›In Idle mode, open the application list and select 1 ThinkFree Oce.Select 2 Accept to conrm, if you are launching this application for the rst time.Select 3 Activate now → Close to activate ThinkFree Oce.Select 4 My Docs.Press [5 ] → New → a document type.](https://usermanual.wiki/Samsung-Electronics-Co/GTS5660V/User-Guide-1502213-Page-94.png)
![Tools94Voice SearchLearn to use the voice command feature to dial a number, send a message, or search for locations and information by voice.This feature may be unavailable depending on your region or service provider.In Idle mode, open the application list and select 1 Voice Search.If you are launching this application for the rst 2 time, select Agree to use location information for your search, and then set whether or not to activate personalised recognition.Select 3 Speak now → OK (if necessary).Say a command into the microphone.4 To watch the video tutorial, select Watch a video from the help screen.To open the toolbar to edit the document (word, •text, or excel le), press [ ] → Edit.To search for text in the document, press [• ] → Find.When you are nished editing, save the document.5 Manage documents online ›In Idle mode, open the application list and select 1 ThinkFree Oce.Select 2 Online.Enter your user name and password to access your 3 account, and then select Sign in.View and manage your documents on the server as 4 desired.](https://usermanual.wiki/Samsung-Electronics-Co/GTS5660V/User-Guide-1502213-Page-95.png)
![Settings 103Default engine• : Set the speech synthesis engine to be used for spoken text.Install voice data• : Download and install voice data for the text-to-speech feature.Speech rate• : Select a speed for the text-to-speech feature.Language• : Select a language for the text-to-speech feature.Engines• : View the text-to-speech engines downloaded from Android Market.AccessibilityChange the settings for accessibility features.Accessibility• : Activate an accessibility application you have downloaded, such as Talkback or Kickback, which provide voice, melody, or vibration feedback.The power key ends calls• : Set the device to end a call when you press [ ].Voice input and outputChange the settings for the voice recogniser and the text-to-speech feature.Voice recognition settings ›Language• : Select a language for the Google voice recognition.SafeSearch• : Set the device to lter explicit text and/or images from voice search results.Block oensive words• : Hide oensive words your device recognised from voice search results.Text-to-speech settings ›Listen to an example• : Listen to the spoken text for an example. Install voice data for using the text-to-speech feature.Always use my settings• : Set the device to use the settings you specify in applications rather than the default settings.](https://usermanual.wiki/Samsung-Electronics-Co/GTS5660V/User-Guide-1502213-Page-104.png)