Samsung Electronics Co HLP5063W DLP Projection TV User Manual BP68 00283A 00 cover
Samsung Electronics Co Ltd DLP Projection TV BP68 00283A 00 cover
UserManual.wiki
>
Samsung Electronics Co
>
HLP5063W User Manual
>
Users Manual 2
Contents
1.
Users Manual 1
2.
Users Manual 2
3.
Users Manual 3
Users Manual 2
Navigation menu
Upload a User Manual
Namespaces
Wiki Guide
HTML
PDF
Info
Views
User Manual
Discussion / Help
Navigation


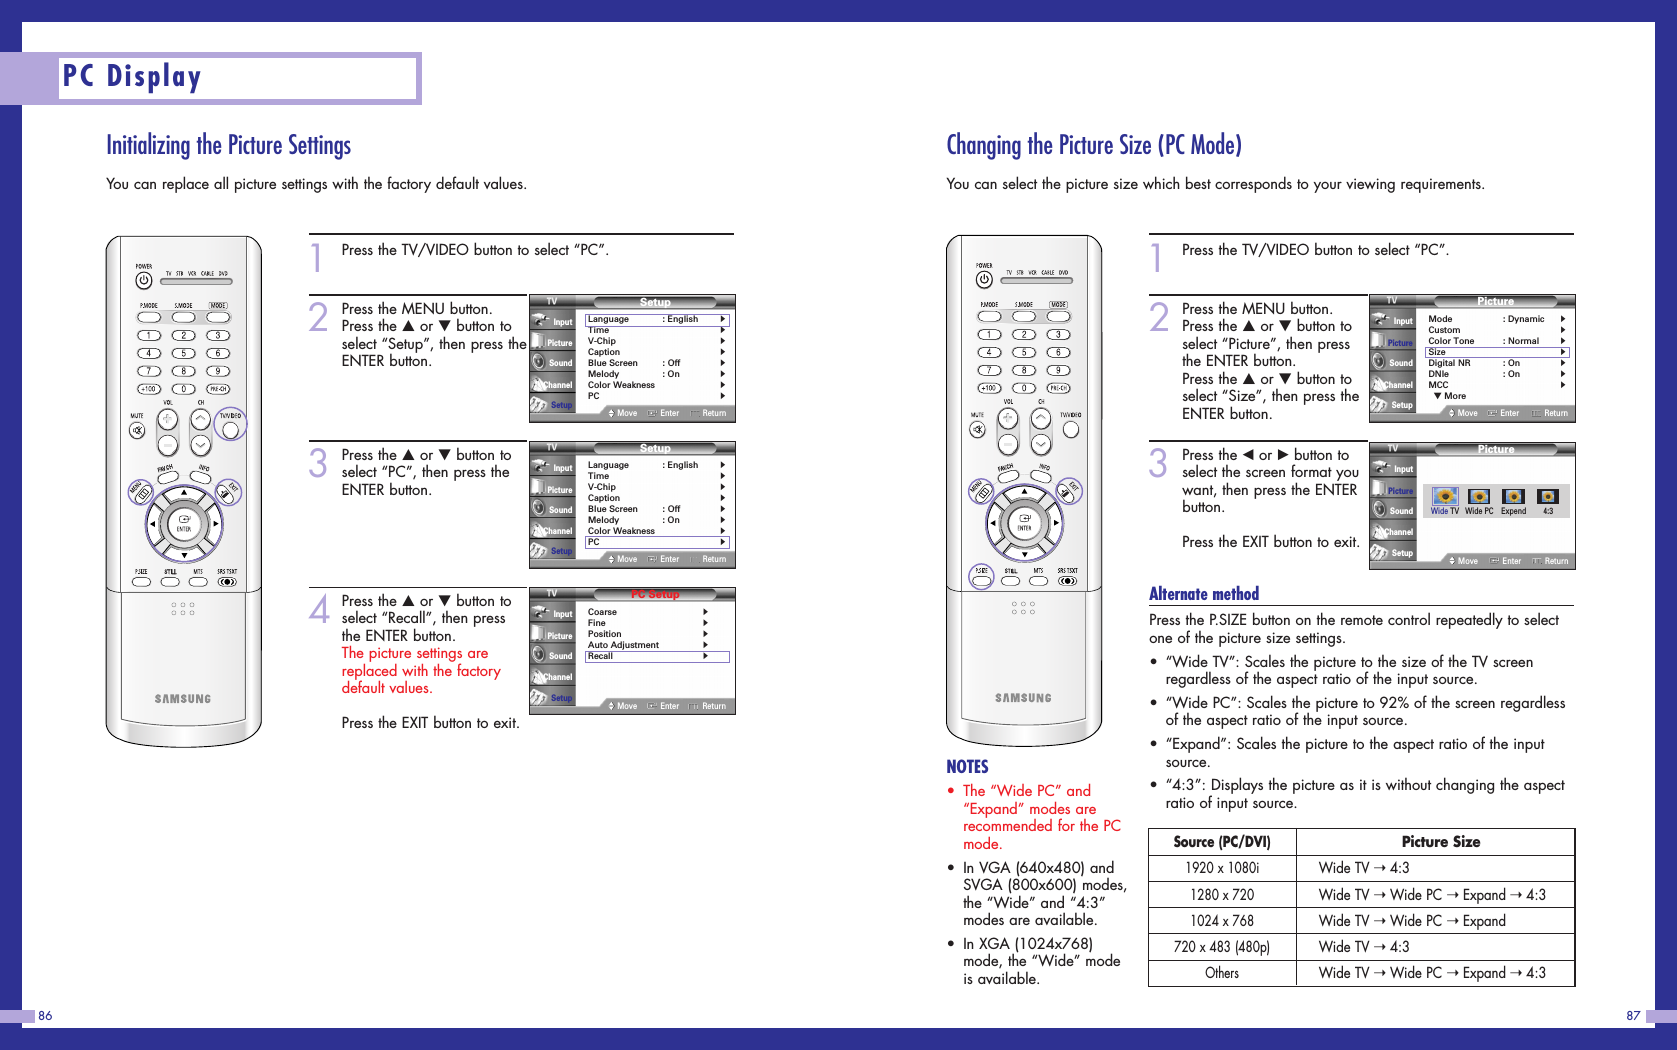
![Adjusting the Picture QualityThe purpose of picture quality adjustment is to remove or reduce picture noise. If the noise is notremoved by fine tuning alone, then do the frequency adjustments to the utmost and fine tuneagain. After the noise has been reduced, re-adjust the picture so that it is aligned on the center ofscreen.83PC Display82NOTE•Both screen position and size will vary, depending on the type of PC monitor and its resolution.The table above shows all of the display modes that are supported:* The interlace mode is not supported.* The TV will operate abnormally if a non-standard video format is selected.NOTES•When this TV is used as a PC display, 32-bit color is supported (over 16 million colors).•Your PC display screen might appear different, depending on the manufacturer (and dependingon your particular version of Windows). Check your PC instruction book for information aboutconnecting your PC to a TV display-monitor.•Same modes as PC are supported for the signal input to the DVI jack. Only a separate sync signal is supported. Resolution640 x 350720 x 400640 x 480800 x 600832 x 6241024 x 7681920 x 1080i1280 x 720p720 x 483pHorizontal Frequency [KHz]31.4731.4737.9331.4735.0037.8637.5043.2735.1637.8848.0846.8753.6749.7348.3656.4060.0233.7545.0031.47Vertical Frequency [Hz]70.0070.0085.0060.0066.7072.8075.0085.0056.3060.3072.2075.0085.1074.6060.0070.1075.00606060Pixel Clock [MHz]25.17528.32235.525.17530.2431.5031.5036.0036.0040.0050.0049.5056.2557.28465.0075.0078.7574.2574.2527Sync Polarity (H/V)+/--/--/+-/+-/--/--/--/--+/-+/+-+/++/++/+-/+-/--/-+/-XXXModeVGASVGAXGADTVDisplay Modes1Press the TV/VIDEO button to select “PC”.2Press the MENU button.Press the …or †button toselect “Setup”, then press theENTER button.3Press the …or †button toselect “PC”, then press theENTER button.4Press the …or †button toselect “Coarse” or “Fine”,then press the ENTER button.5Pressing the œor √buttonto remove the picture noise.Press the EXIT button to exit.NOTE•This feature may change the width of the image. If necessary,adjust the position to center.SetupLanguage : English√Time√V-Chip√Caption√Blue Screen : Off√Melody : On√Color Weakness√PC√Move Enter ReturnInputPictureSoundChannelSetupSetupLanguage : English√Time√V-Chip√Caption√Blue Screen : Off√Melody : On√Color Weakness√PC√Move Enter ReturnInputPictureSoundChannelSetup▲Coarse▼1344PC SetupCoarse√Fine√Position√Auto Adjustment√Recall√Move Enter ReturnInputPictureSoundChannelSetup▲Fine▼115](https://usermanual.wiki/Samsung-Electronics-Co/HLP5063W.Users-Manual-2/User-Guide-403895-Page-20.png)