Samsung Electronics Co HR44 Set-Top Box with WLAN User Manual
Samsung Electronics Co Ltd Set-Top Box with WLAN Users Manual
UserManual.wiki
>
Samsung Electronics Co
>
HR44 User Manual
Users Manual
Navigation menu
Upload a User Manual
Namespaces
Wiki Guide
HTML
PDF
Info
Views
User Manual
Discussion / Help
Navigation


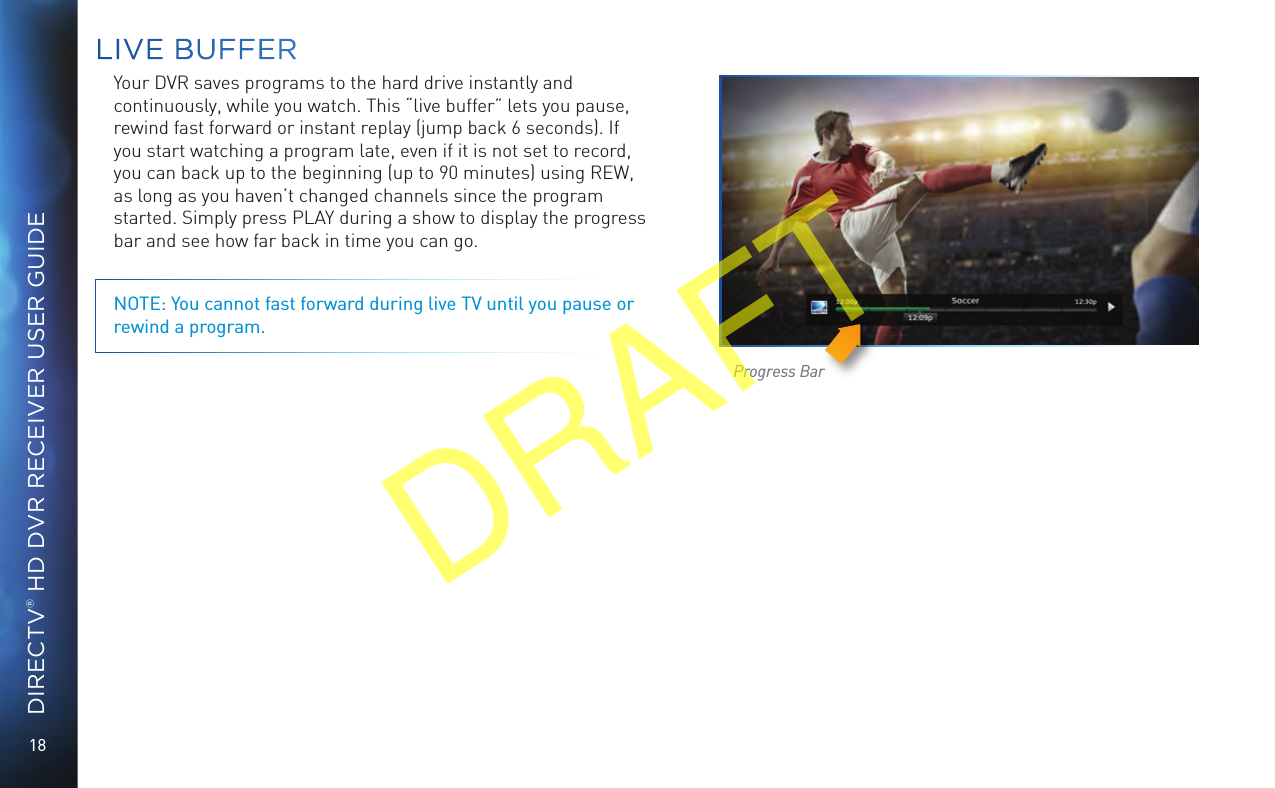

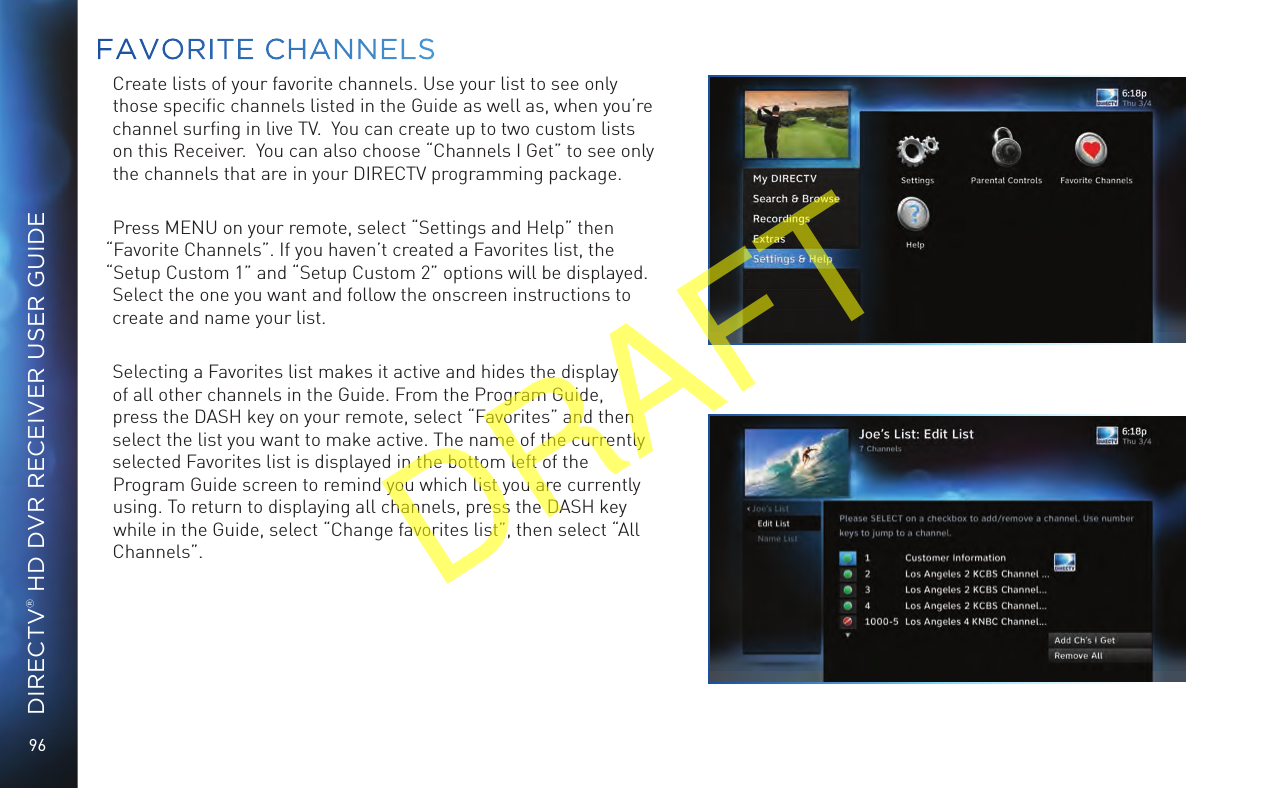
![24DIRECTV® HD DVR RECEIVER USER GUIDEPROGRAM GUIDEGUIDE OPTIONSFrom the Program Guide, press the DASH key [—] on the Genie Remote or press the button on the older DIRECTV White remote to display “Guide Options”.Sort Programs by Category: Select “Sort programs by category”, then select a category to see a list of shows in chronological order that match your sort criterion. Jump to a Date & Time: Select “Jump to a date & time” to quickly go to a future date and time in the Guide.Change Favorites List: By default, your Program Guide displays all channels offered by DIRECTV, some of which may not be in your programming package. “Change favorites list” allows you to toggle the channels displayed in your Guide among the following: “All Channels”, “Channels I Get” (channels you subscribe to) or a custom list of channels you have defined. The “Edit Settings” option allows you to modify the channels in your custom list. See Chapter 6, “Settings & Help: Favorite Channels” for details.Pay Per View: Select “Pay Per View” then select a program type. The Receiver will search for featured movies, sports or events that are available for “rent” from DIRECTV ’s vast Pay Per View offerings. DRAFT](https://usermanual.wiki/Samsung-Electronics-Co/HR44/User-Guide-1991125-Page-24.png)


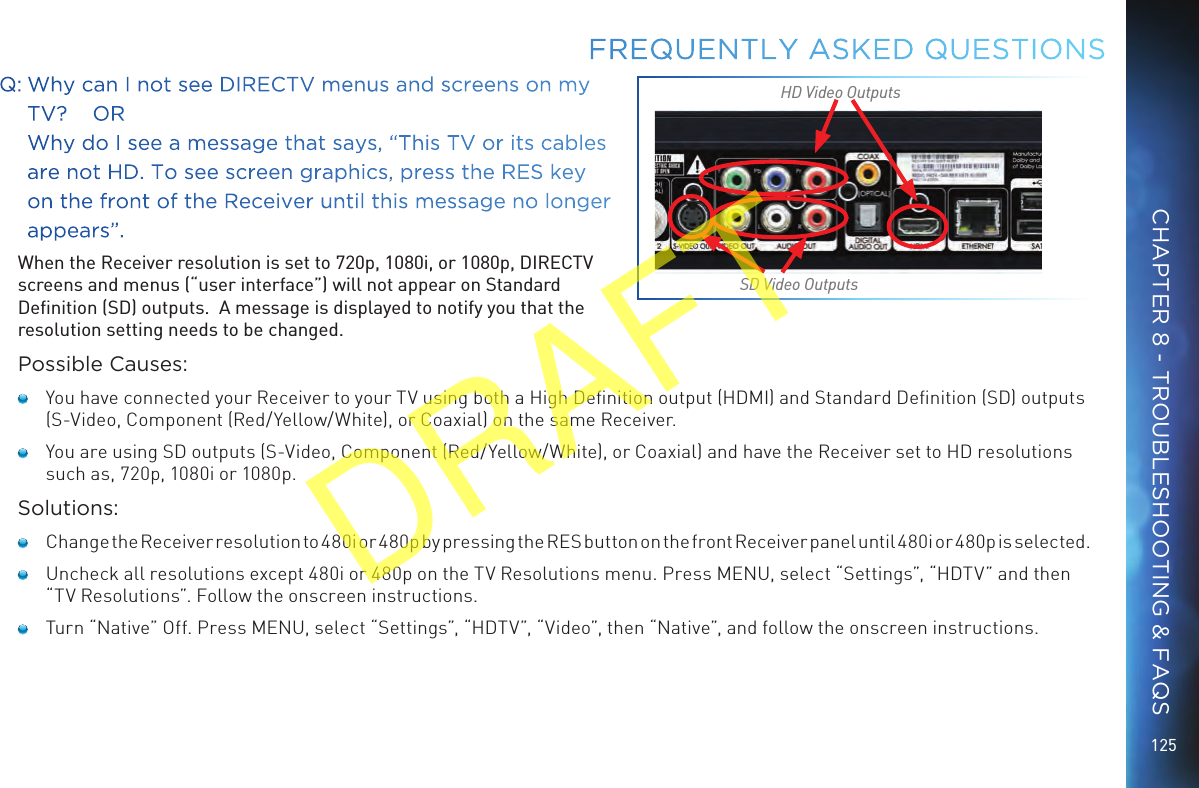
![118DIRECTV® HD DVR RECEIVER USER GUIDEQ: What to do about partial programming loss; channels missing from Guide; channel is in the Guide but I can’t tune to it?Your Program Guide is missing channels, or you are unable to use the Guide to tune to a channel.Possible Causes: The channels might be excluded from the Favorites list currently in use. Your satellite dish may be incorrectly configured. Your Receiver information may need to be refreshed.Solution: To change your Favorites List, press GUIDE on the remote, then press the DASH [—] button and select “Change Favorites List”, then “All Channels”. Enter the channel number using the number pad on the remote control. Check the dish type set in your Receiver’s preferences: Press MENU, select “Settings & Help”, “Settings”, “Info & Test”, then “More System Info”. Check the Satellite Dish Type shown on the System Setup screen to see if it is correct. If not, select “Satellite” from the left menu, then select “Repeat Satellite Setup”. Follow the steps. From the Satellite Dish Type screen, make sure the proper dish type is selected. To refresh your Receiver information, go to directv.com/reauthorize. You will need to be logged into your account on directv.com to begin this process.FREQUENTLY ASKED QUESTIONSDRAFT](https://usermanual.wiki/Samsung-Electronics-Co/HR44/User-Guide-1991125-Page-118.png)


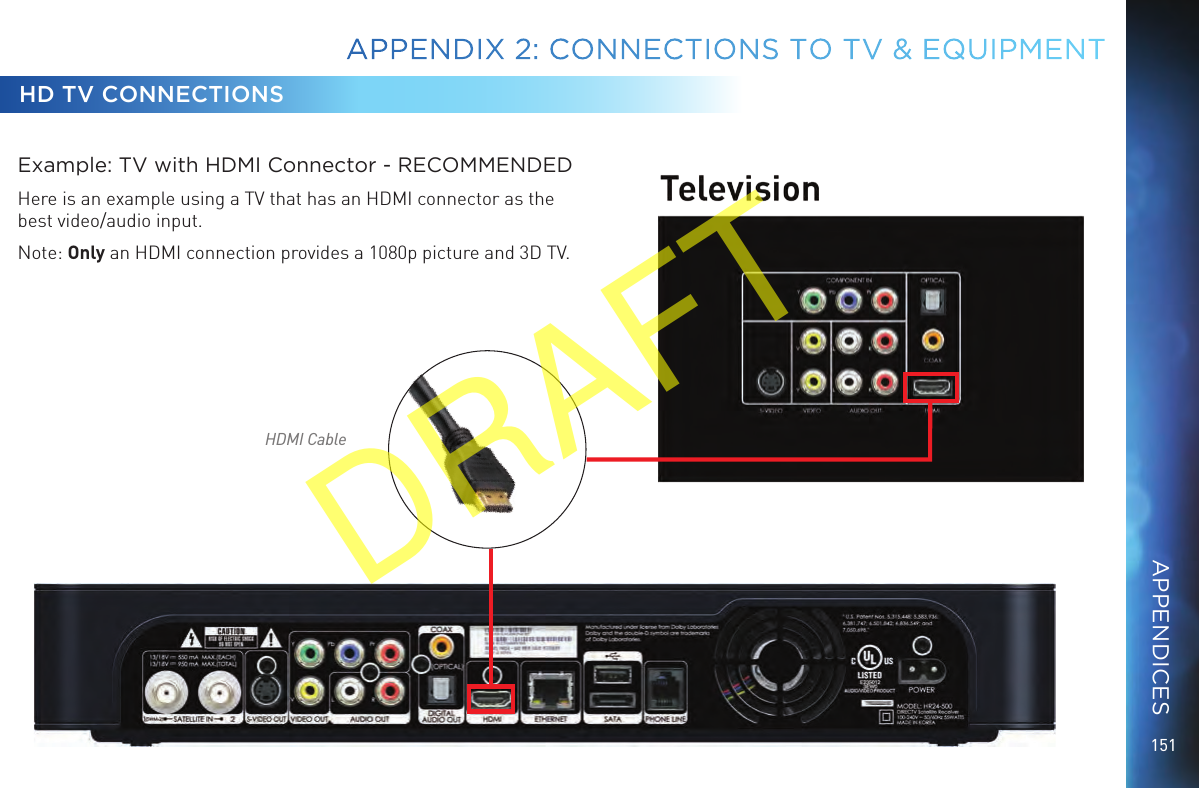
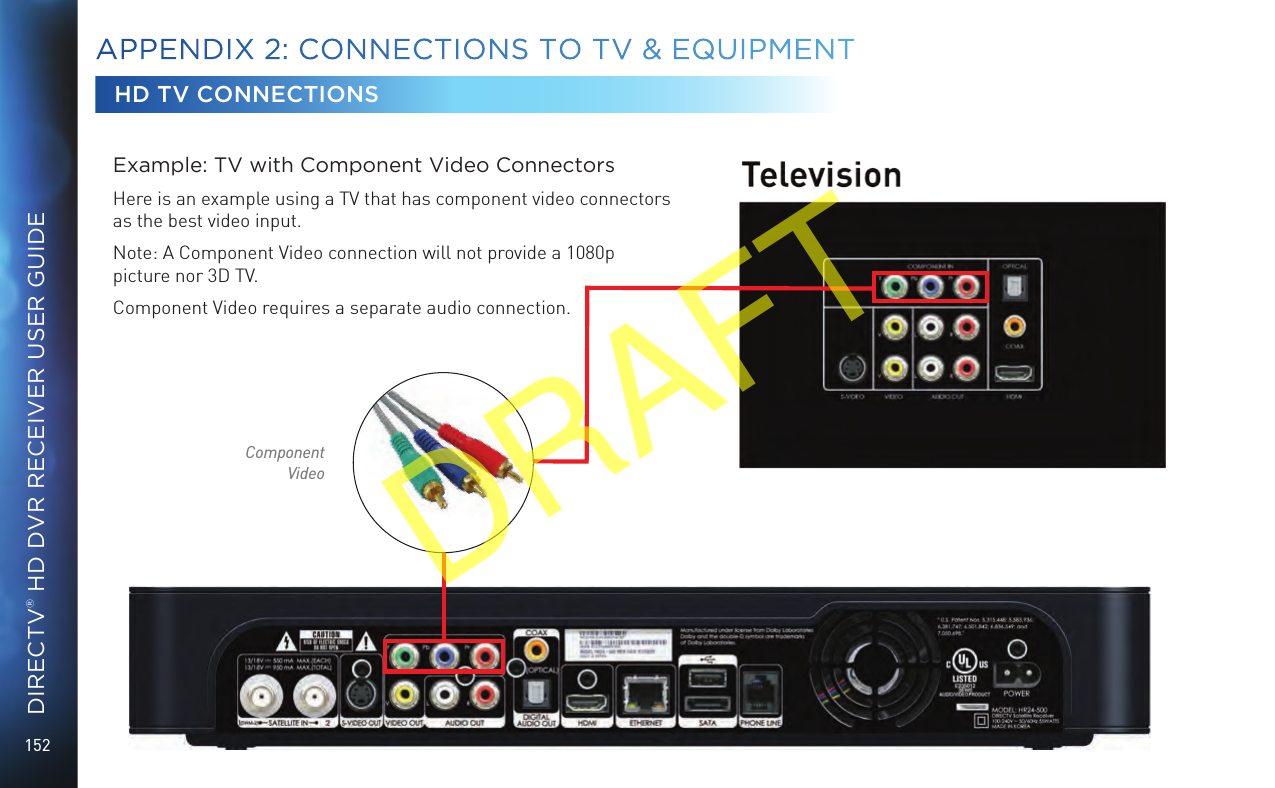
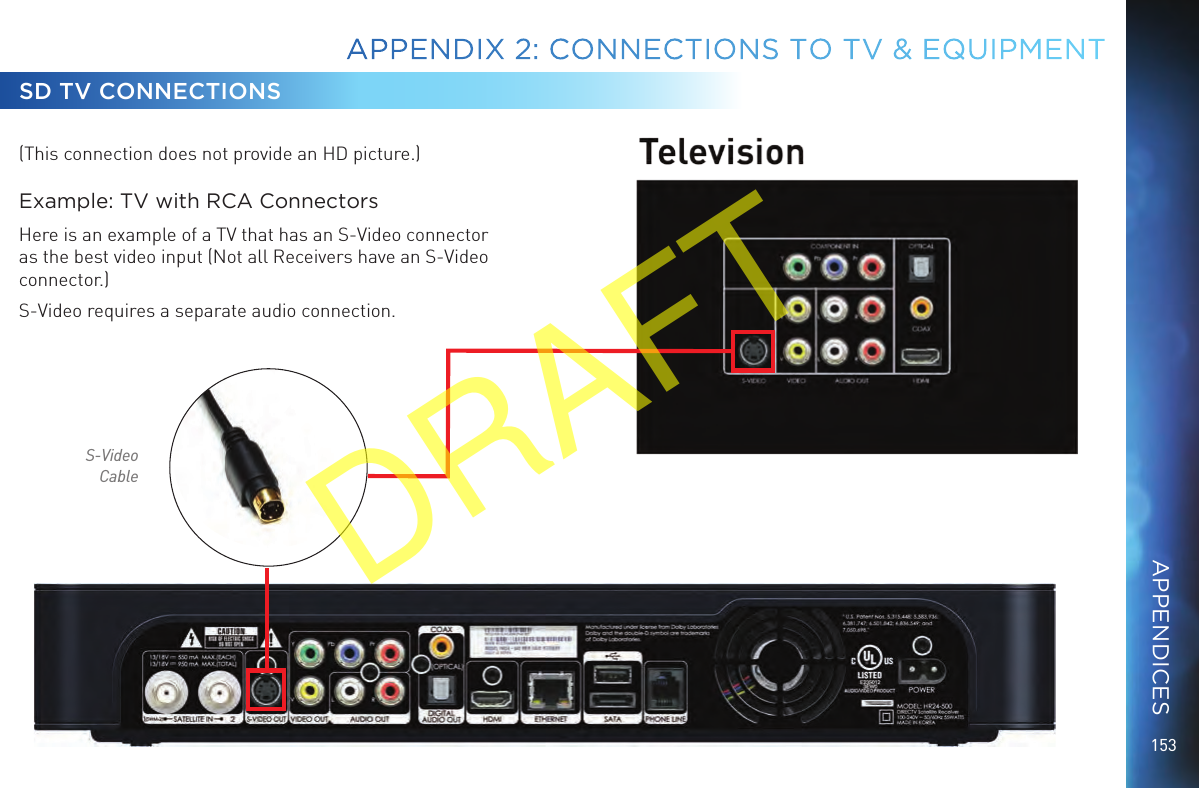
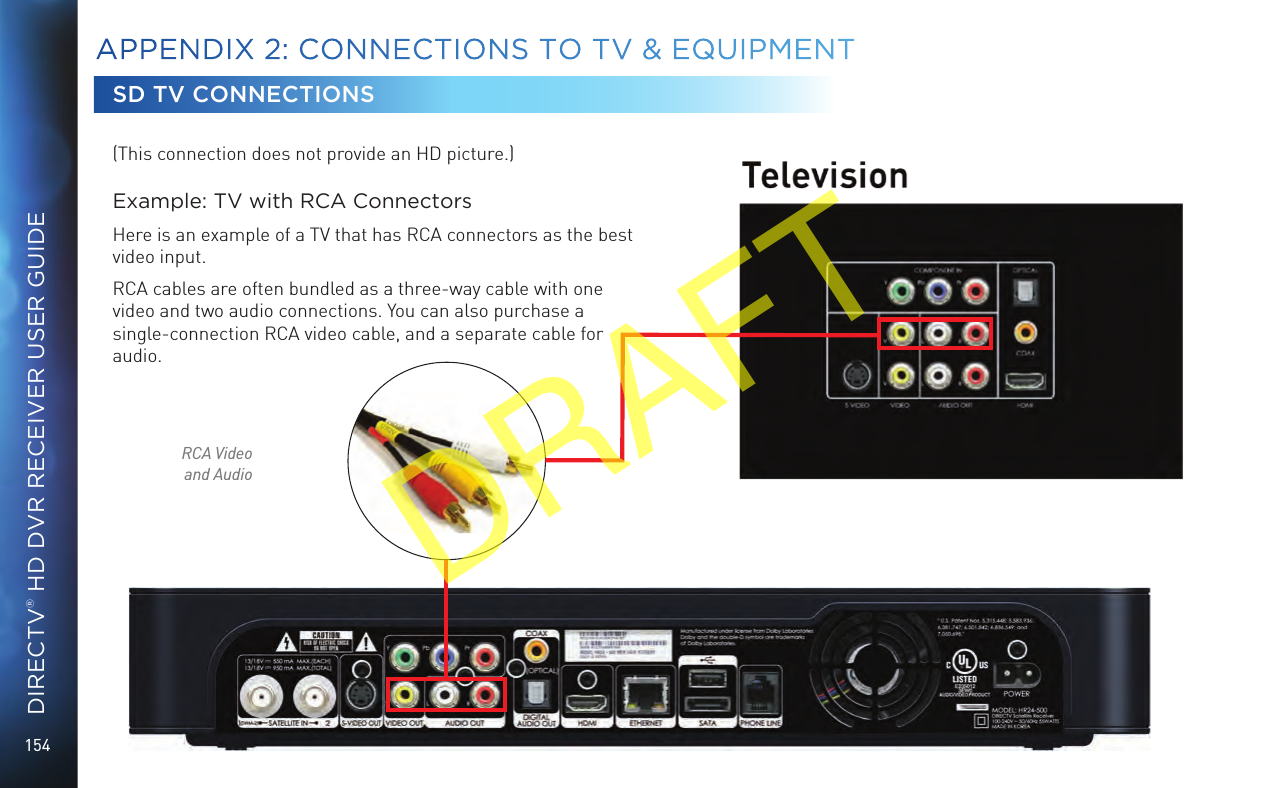
![149The table below shows the benefits and disadvantages of each type of available video connector: HDMI Component S-Video RCAHigh Def (HD) 4 4 6 6HD 1080p 46663D 4666Built-in Audio 4666Standard Def 4444HD Video Connections HDMI [High-Definition Multimedia Interface] provides the best digital video and digital audio in one connector. HDMI is the only recommended cable, and is required for the highest quality 1080p signal and 3D TV. Component Video Output (YPbPr) provides high-quality HD video, but does not provide audio. You will need to connect audio separately using the digital audio or RCA audio connectors. Newer Receivers have an “A/V Out” connector that provides Component Video and RCA audio output in a single, custom cable. Component cables do not provide 1080p or 3D TV.SD Video ConnectionsThese cables are provided for convenience only, and do not present an HD picture. They are useful if you have to connect your DIRECTV® HD DVR to an older CRT TV, a VCR, or other non-HD device. S-Video provides good video, but does not provide audio. You will need to connect audio separately using the digital audio or RCA audio connectors. (Not all Receivers have S-Video outputs.) RCA output (composite video) provides good video and usually comes bundled with three cables for one video and two audio channels. APPENDIX 2: CONNECTIONS TO TV & EQUIPMENTAPPENDICESDRAFT](https://usermanual.wiki/Samsung-Electronics-Co/HR44/User-Guide-1991125-Page-149.png)
![150DIRECTV® HD DVR RECEIVER USER GUIDEAudio Connections HDMI [High-Definition Multimedia Interface] provides the best digital video and audio in one connector. Digital Audio Optical provides excellent quality digital audio and is often used on newer surround sound and DVD equipment. Digital Audio Coax provides high quality digital audio and is also found on newer surround sound and DVD equipment. RCA outputs provide good audio quality and are found on older auxiliary equipment.There are so many makes and models of TVs and auxiliary equipment, it is impossible to fully describe all of the possible connections between them and your Receiver. Refer to the manuals for that equipment to see the connection options specific to each make and model. The following images show examples of how your Receiver may be connected using the supported video and audio connections for the TV, the surround sound, and the DVD player/burner or VCR. Several models of DIRECTV Receivers are shown, giving you a variety of connection options to your TV and other equipment.APPENDIX 2: CONNECTIONS TO TV & EQUIPMENTDRAFT](https://usermanual.wiki/Samsung-Electronics-Co/HR44/User-Guide-1991125-Page-150.png)