Samsung Electronics Co KHANVFD Video Cassette Recorder User Manual SLV N900
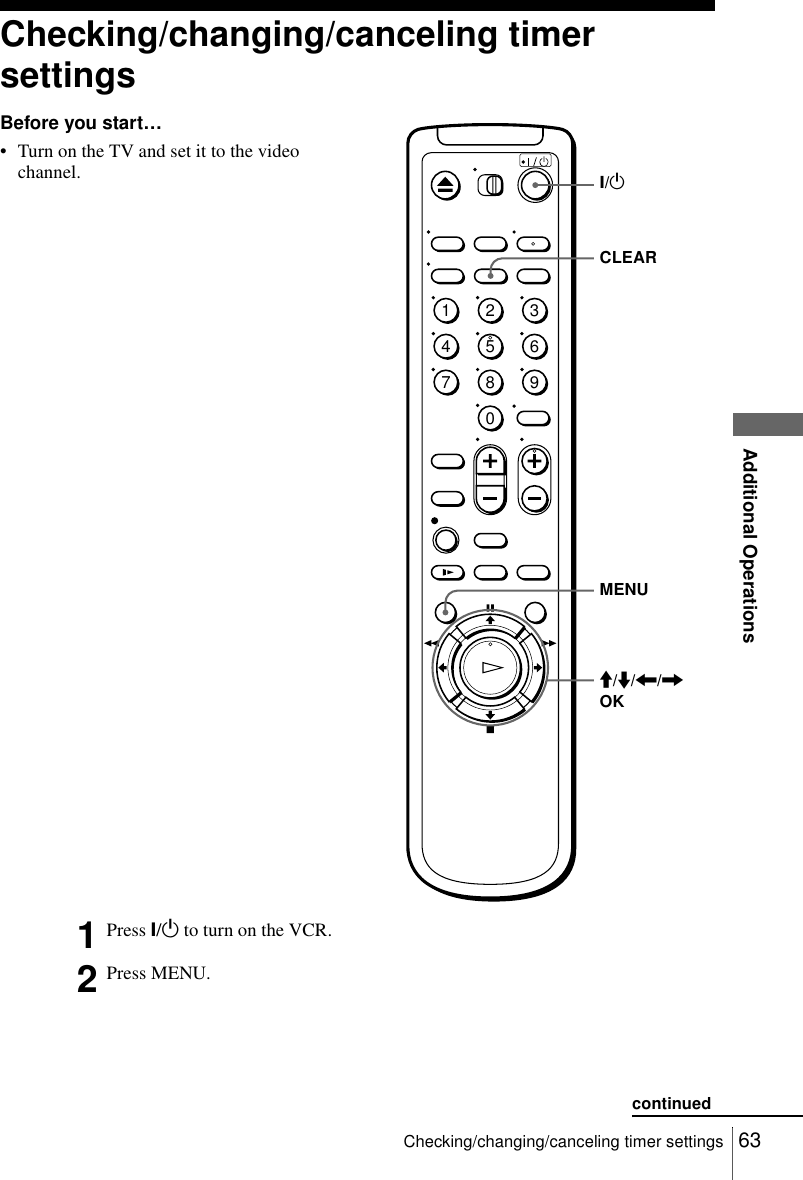
Samsung Electronics Co Ltd Video Cassette Recorder SLV N900
UserManual.wiki
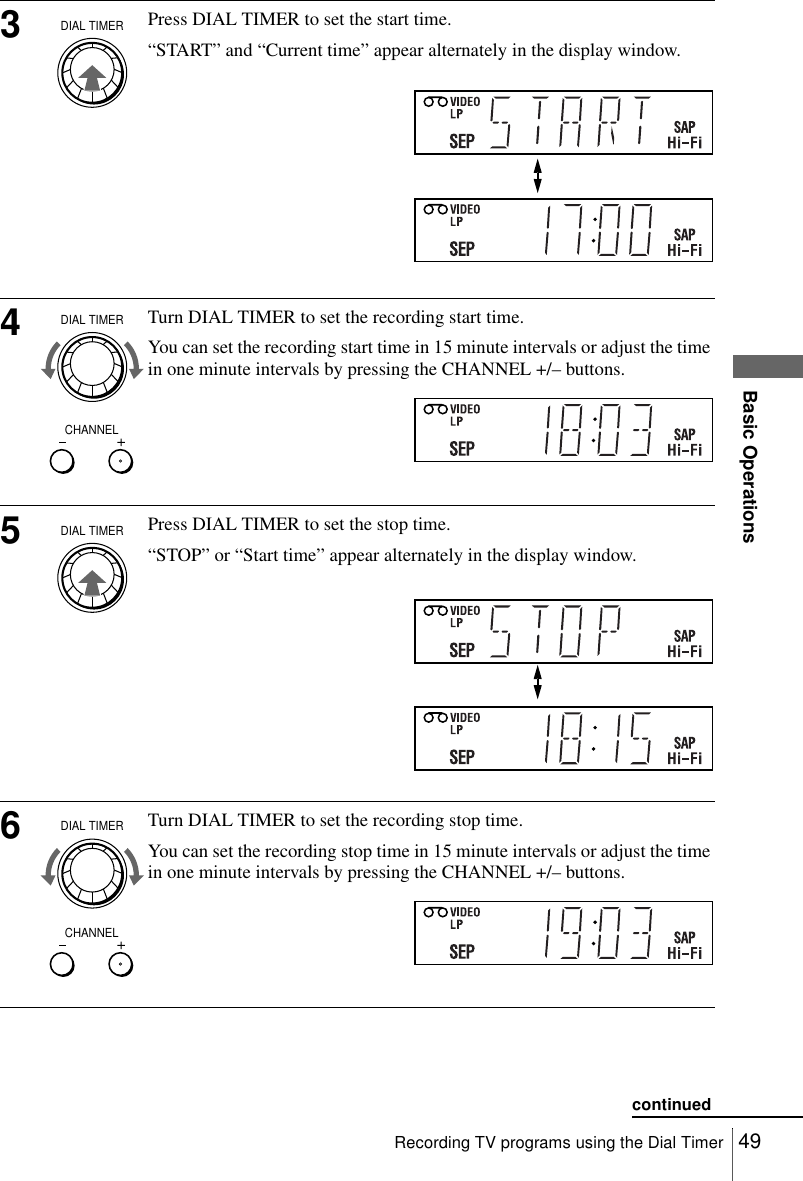
>
Samsung Electronics Co
>
KHANVFD User Manual
Users Manual
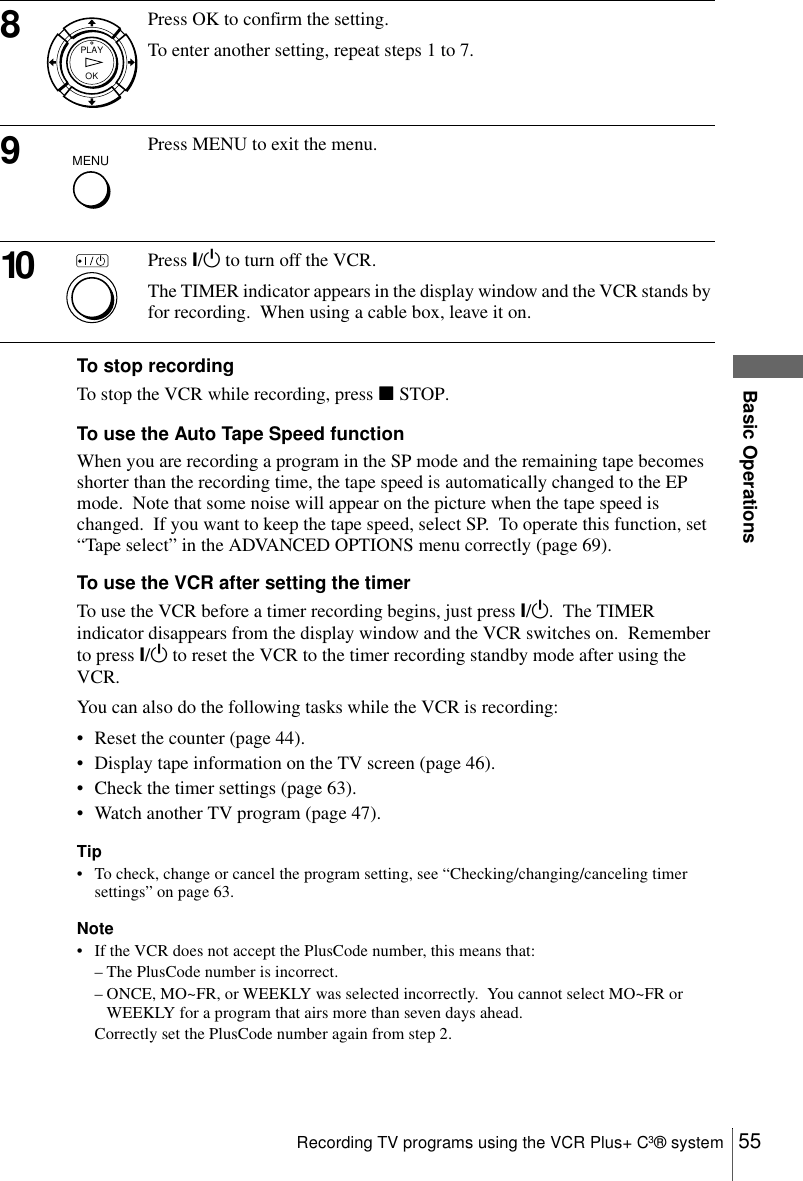
Navigation menu
Upload a User Manual
Namespaces
Wiki Guide
HTML
PDF
Info
Views
User Manual
Discussion / Help
Navigation
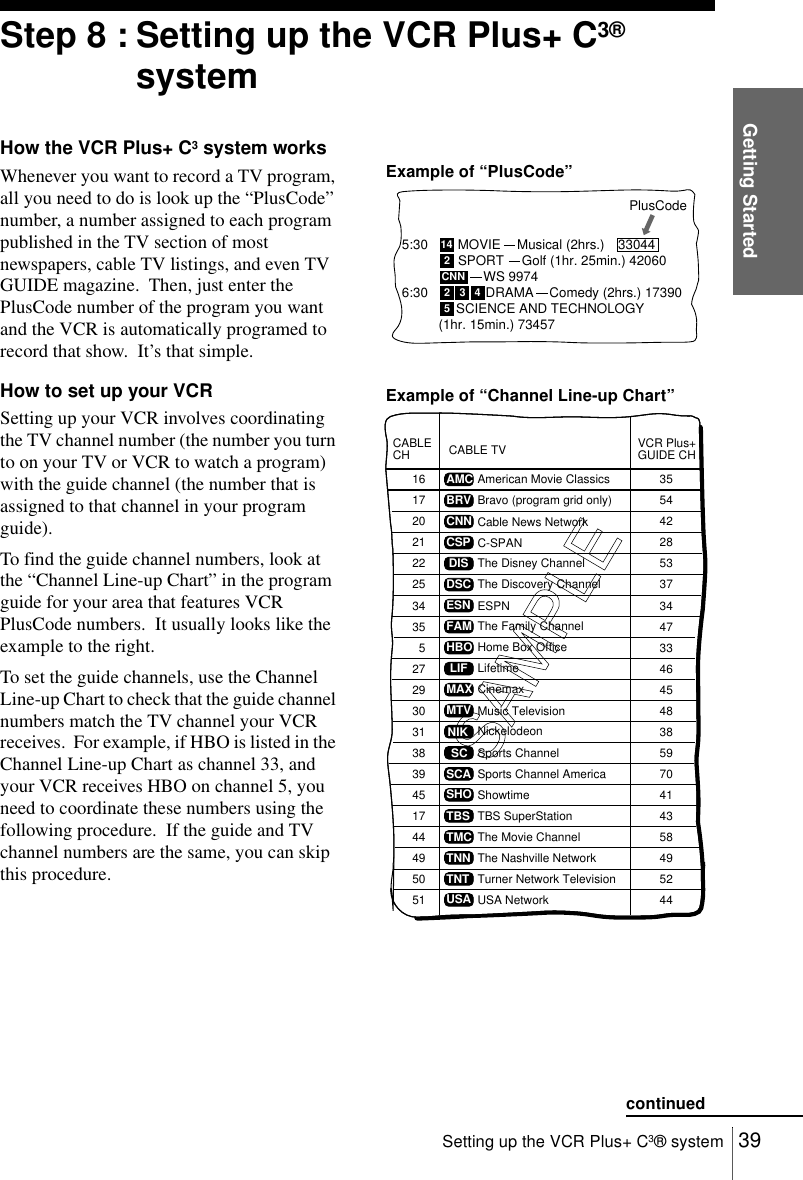
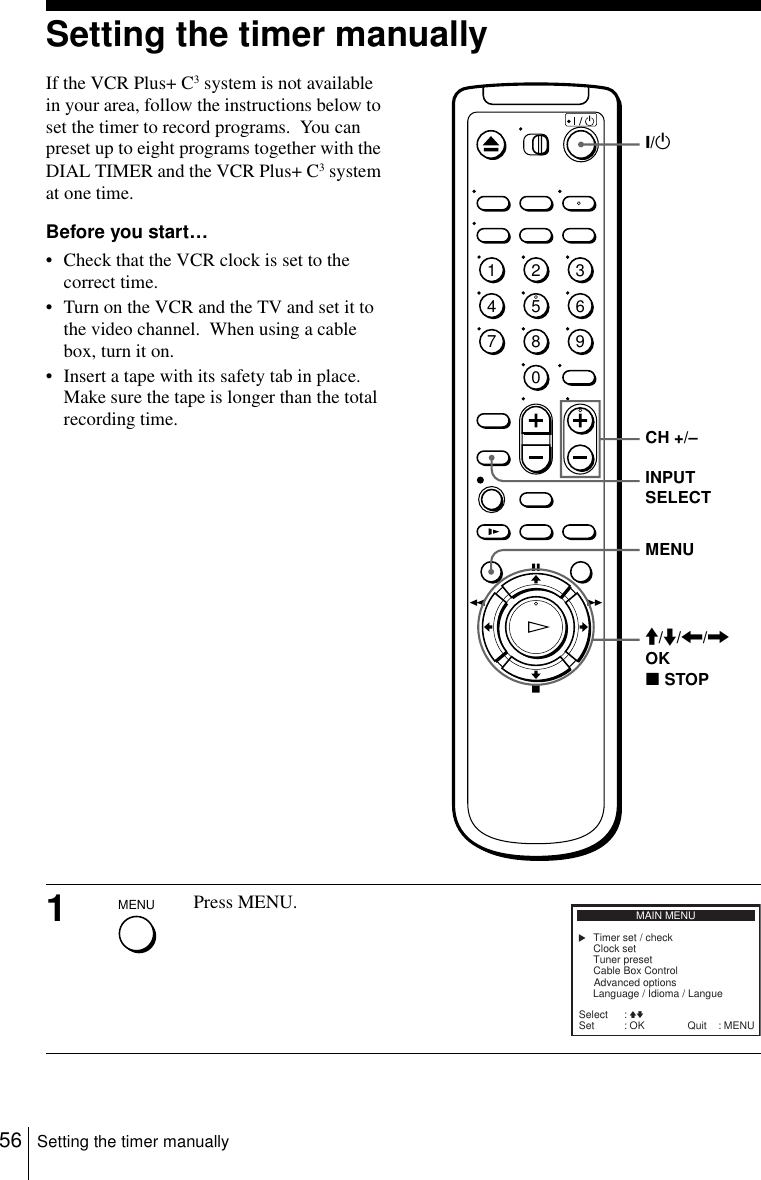
![Getting Started25Setting the clock3Press M/m to select AUTO, then press OK.4Press M/m to select the item you want. Then press </, to make the setting and press OK.• For “Clock set CH”Leave the setting to AUTO to have the VCR automatically search for a channel that carries a time signal. Press </, to select a channel that carries a time signal. Use this option if you know of a channel that carries a time signal. Most PBS member stations broadcast a time signal. For the fastest response, select your local PBS station.• For “Time zone”Select the time zone of your area, or select AUTO to have the VCR automatically set your time zone.The options are:AUTO y Atl. (Atlantic) y East (Eastern) y Cen. (Central) y Mtn. (Mountain) y Pac. (Pacific) y Alas (Alaska) y Haw. (Hawaii) y AUTO• For “Daylight Saving”Select YES or NO (standard time), or AUTO to have the VCR automatically set the daylight saving time.5Press MENU to exit the menu.6To activate the Auto Clock Set function, turn off the VCR.OKPLAYSelect :End :CLOCK SETOKVv Set : BbTime zone:Clock set CH:Daylight Saving: AUTOAUTO[[]AUTO[]]: MENUQuitOKPLAYSelect ::CLOCK SETOKVv Set : BbTime zone:Clock set CH:Daylight Saving:123[]: MENUQuitEndAUTO[]AUTO[]Select :End :CLOCK SETOKVv Set : BbTime zone:Clock set CH:Daylight Saving: Pac.AUTO[[]]AUTO[]: MENUQuitSelect ::CLOCK SETOKVv Set : BbTime zone:Clock set CH:Daylight Saving:AUTO[]: MENUQuitEndAUTO[]NO[]MENUcontinued](https://usermanual.wiki/Samsung-Electronics-Co/KHANVFD/User-Guide-289514-Page-25.png)

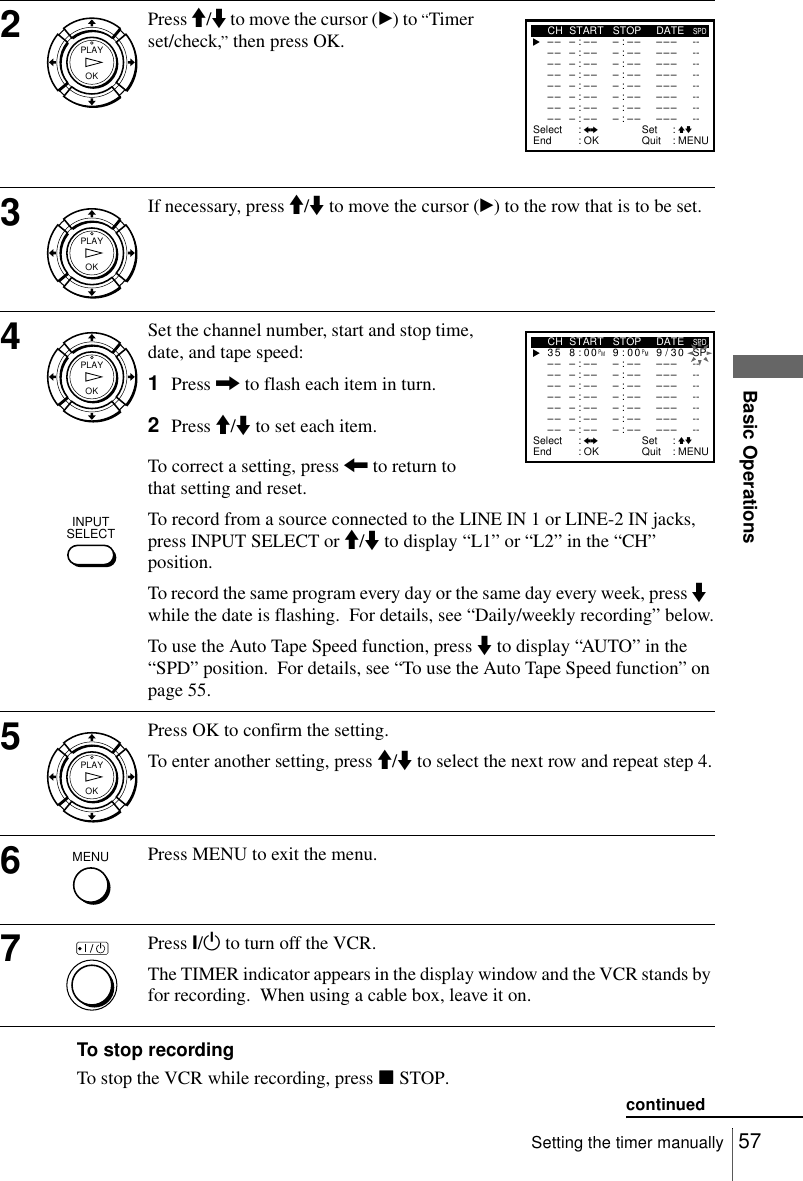
![Getting Started29Presetting channelsStep 6 : Presetting channels(Skip this section if you are using a cable box or digital satellite receiver control.)This VCR is capable of receiving VHF channels 2 to 13, UHF channels 14 to 69 and unscrambled CATV channels 1 to 125. First, we recommend that you preset the receivable channels in your area using automatic presetting methods. Then, if there are any unwanted channels, disable them manually. If you have already decided which channels you wish to preset, set them directly using manual presetting methods (page 31).Presetting all receivable channels automaticallyBefore you start…• Turn on the VCR and the TV.• Set the “VCR Output CH” to “3CH” or “4CH” in ADVANCED OPTIONS menu (page 69). If both are used, set the “VCR Output CH” to either channel. If your TV is connected to the VCR using A/V connections, set the TV to video input.• Press TV/VIDEO to display the VIDEO indicator in the VCR’s display window.1Press MENU.2Press M/m to move the cursor (B) to “Tuner preset,” then press OK.MENUM/m/</,OKMENUSelect :Set :MAIN MENUOKVvClock setTimer set / checkTuner presetAdvanced optionsLanguage / Idioma / Langue: MENUQuitCable Box ControlOKPLAYTUNER PRESETAuto presetAnt / Cable:Channel add / eraseGuide channel setupSelect :End :OKVv Set : Bb: MENUQuitCABLE[]continued](https://usermanual.wiki/Samsung-Electronics-Co/KHANVFD/User-Guide-289514-Page-29.png)
![30 Presetting channels3Press M/m to move the cursor (B) to “Ant/Cable.”4• To preset cable TV channels:Press </, to select CABLE.• To preset VHF and UHF channels:Press </, to select ANTENNA.5Press M/m to move the cursor (B) to “Auto preset,” then press OK.All receivable channels are preset in numerical sequence. When no more receivable channels can be found, presetting stops and the picture from the lowest numbered channel is displayed on the TV screen.OKPLAYOKPLAYOKPLAYTUNER PRESETAuto presetAnt / Cable: CABLE[]Channel add / eraseGuide channel setupSelect :End :OKVv Set : Bb: MENUQuitTUNER PRESETAuto presetAnt / Cable: ANTENNA[]Channel add / eraseGuide channel setupSelect :End :OKVv Set : Bb: MENUQuitOKPLAY• • • • • please wait • • • • •02CHAuto preset](https://usermanual.wiki/Samsung-Electronics-Co/KHANVFD/User-Guide-289514-Page-30.png)
![Getting Started31Presetting channelsPresetting/disabling channels manuallyBefore you start…• Turn on the VCR and the TV.• Set the “VCR Output CH” to “3CH” or “4CH” in ADVANCED OPTIONS menu (page 69). If both are used, set the “VCR Output CH” to either channel. If your TV is connected to the VCR using A/V connections, set the TV to video input.• Press TV/VIDEO to display the VIDEO indicator in the VCR’s display window.1Press MENU.2Press M/m to move the cursor (B) to “Tuner preset,” then press OK.1234567890MENUCH +/–Number buttonsM/m/</,OKENTERMENUSelect :Set :MAIN MENUOKVvClock setTimer set / checkTuner presetAdvanced optionsLanguage / Idioma / Langue: MENUQuitCable Box ControlOKPLAYTUNER PRESETAuto presetAnt / Cable:Channel add / eraseGuide channel setupSelect :End :OKVv Set : Bb: MENUQuitCABLE[]continued](https://usermanual.wiki/Samsung-Electronics-Co/KHANVFD/User-Guide-289514-Page-31.png)
![32 Presetting channels3Press M/m to move the cursor (B) to “Channel add/erase,” then press OK.4• To preset a channel:1Press the number buttons to enter the channel number, then press ENTER.2Press ,, then press OK or MENU.• To disable a channel:1Press CH +/– to select the channel number.2Press <, then press OK or MENU.OKPLAYOKPLAY1234567890MENUOKPLAY• CHMENU:EndCHANNEL ADD / ERASEOKSelect channel:and press to ADD[]bpress to ERASE[]B[]1: MENUQuitChannel to be preset:EndCHANNEL ADD / ERASEOKSelect channel:and press to ADD[]bpress to ERASE[]B5: MENUQuit[]Channel to be disabled](https://usermanual.wiki/Samsung-Electronics-Co/KHANVFD/User-Guide-289514-Page-32.png)
![34 Setting up the cable box control2Press M/m to move the cursor (B) to “Cable Box Control,” then press OK.3Press M/m to move the cursor (B) to “Cable Box Use.”4Press </, to select ON, then press OK.5Press M/m to move the cursor (B) to “Box Code No.,” then press OK.When Box Code No. is “---,” skip this step.6Press the number buttons to enter the cable box or digital satellite receiver code number, then press OK.Find your cable box or digital satellite receiver code number from the following chart.7Press M/m to move the cursor (B) to “Box Output CH.” OKPLAYCABLE BOX CONTROLBox Code No.Cable Box UseBox Output CHSelect ::OKVv Set : Bb: MENUQuitEndOF F[][]CH3[]–––OKPLAYOKPLAYCABLE BOX CONTROLBox Code No.Cable Box UseBox Output CHSelect ::OKVv Set : Bb: MENUQuitEndON[][]CH3[]790OKPLAYCABLE BOX CONTROLBox Code No.Cable Box UseBox Output CHSelect ::OKVv Set : Bb: MENUQuitEndON[][]CH3[]7901234567890OKPLAYCABLE BOX CONTROLBox Code No.Cable Box UseBox Output CHSelect ::OKVv Set : Bb: MENUQuitEndON[][]CH3[]210OKPLAYCABLE BOX CONTROLBox Code No.Cable Box UseBox Output CHSelect ::OKVv Set : Bb: MENUQuitEndON[][]CH3[]210](https://usermanual.wiki/Samsung-Electronics-Co/KHANVFD/User-Guide-289514-Page-34.png)
![40 Setting up the VCR Plus+ C3® system1Press MENU.2Press M/m to move the cursor (B) to “Tuner preset,” then press OK.1234567890MENUM/m/</,OKMENUSelect :Set :MAIN MENUOKVvClock setTimer set / checkTuner presetAdvanced optionsLanguage / Idioma / Langue: MENUQuitCable Box ControlOKPLAYTUNER PRESETAuto presetAnt / Cable:Channel add / eraseSelect :End :OKVv Set : Bb: MENUQuit]Guide channel setupCABLE[](https://usermanual.wiki/Samsung-Electronics-Co/KHANVFD/User-Guide-289514-Page-40.png)
![Getting Started41Setting up the VCR Plus+ C3® system3Press M/m to move the cursor (B) to “Guide channel setup,” then press OK.4The upper row shows VCR Plus+ C3 guide channels and the lower row shows TV channels or cable box out put channels. Press </, to select the channel number that does not match the guide channel.5• If you made Hookup 1 or 2: Enter the actual number on your TV (and VCR), then press M/m.• If you made Hookup 3: Enter the cable box output channel (usually 2, 3, or 4), then press M/m.6Repeat steps 4 and 5 for each channel number that does not match.7Press OK to confirm the setting.8Press MENU to exit the menu.OKPLAYGUIDE CHANNEL SETUPSelect :End :OK VvSet :Bb : MENUQuitEnter actual receiving channelv[GUIDE CH][TV CH]OKPLAYOKPLAYOKPLAYMENU](https://usermanual.wiki/Samsung-Electronics-Co/KHANVFD/User-Guide-289514-Page-41.png)
![53Recording TV programs using the VCR Plus+ C3® systemBasic OperationsRecording TV programs using the VCR Plus+ C3® systemJust enter the PlusCode number listed in the TV program guide. The date, time and channel number of that program are set automatically. You can preset up to eight programs together with the DIAL TIMER and manual timer settings at one time.Before you start…• Check that the VCR clock is set to the correct time.• Turn on the VCR and the TV and set it to the video channel. When using a cable box, turn it on.• Insert a tape with its safety tab in place. Make sure the tape is longer than the total recording time.1Press the VCR Plus+ button.1234567890VCR Plus+ M/m/</,OKxSTOPNumber buttons?/1MENUVCR Plus+Select :End :VCR Plus+OKVvwith [0~9]Enter codeModeSpeed: MENUQuit[ONCE][AUTO]Vcontinued](https://usermanual.wiki/Samsung-Electronics-Co/KHANVFD/User-Guide-289514-Page-53.png)
![54 Recording TV programs using the VCR Plus+ C3® system2Press M/m to move the cursor (B) to “Enter code.”3Press the number buttons to enter the PlusCode number.If you make a mistake, press < and re-enter the correct number.4Press M/m to move the cursor (B) to “Mode.”5Press </, to select ONCE, MO~FR, or WEEKLY:6Press M/m to move the cursor (B) to “Speed.”7Press </, to select the tape speed, AUTO, SP, or EP.OKPLAY1234567890OKPLAYSelect :End :VCR Plus+OKVvwith [0~9]Enter codeModeSpeed: MENUQuit[ONCE][AUTO]VOKPLAYOKPLAYSelect :End :VCR Plus+OKVv :Bbwith [0~9]Enter codeModeSpeed: MENUQuit[ONCE][AUTO]SetTo record SelectOnly once ONCEEveryday Monday to Friday MO~FROnce a week WEEKLYOKPLAYOKPLAYSelect :End :VCR Plus+OKVvwith [0~9]Enter codeModeSpeed: MENUQuit[ONCE][AUTO]:BbSet](https://usermanual.wiki/Samsung-Electronics-Co/KHANVFD/User-Guide-289514-Page-54.png)


![66 Searching using various functionsSearching using various functionsTo search using the index function (Scan and Play)The VCR automatically marks the tape with an index signal at the point where each recording begins. Use these signals as references to find a specific recording.The VCR automatically marks the tape with an index signal at the point where each recording begins. You can easily find a specific point using various search functions. 1Insert an indexed tape into the VCR.2Press SEARCH.3Press , to scan ahead, or < to scan backwards.The VCR searches and then plays back for about five seconds.4Press HPLAY to view that program.If you do not press HPLAY, the VCR automatically searches for the next index mark, or until it reaches the end of the tape.SEARCHM/m/</,HPLAY::00130SPScan and play:Press [ orB][b]Go to []000:00::Press [ V]End search: Press [ v]::00130SPScan and play](https://usermanual.wiki/Samsung-Electronics-Co/KHANVFD/User-Guide-289514-Page-66.png)
![67Searching using various functionsAdditional OperationsTo search for the counter 0:00:00 pointTo mark a point on the tape that you want to find later, reset the tape counter to “0:00:00.”The VCR automatically fast-forwards or rewinds to the 0:00:00 point on the tape counter.To search for a blank portion of the tapeThe VCR automatically searches for the beginning of a blank portion. You can easily find a point you can start recording from.Note• Once in recording mode, if the VCR is put in pause and then released to start the recording, no index mark will be inserted. An index mark will be inserted if the channel is changed while VCR is put in pause.1Press SEARCH.2Press M.The VCR starts searching and automatically stops at the 0:00:00 point.1Press SEARCH.2Press m.The VCR starts searching and automatically stops at the beginning of a blank space. If no blank space is found, the VCR reaches the end and the tape will stop.::00130SPGo to []000:00:::00130SPEnd search](https://usermanual.wiki/Samsung-Electronics-Co/KHANVFD/User-Guide-289514-Page-67.png)

![69Changing menu optionsAdditional OperationsChanging menu optionsMenu choicesInitial settings are indicated in bold print.1Press MENU.2Press M/m to move the cursor (B) to “Advanced options,” then press OK.3Press M/m to move the cursor (B) to the option to change.4Press </, to change the setting, then press OK.5Press MENU to exit the menu.Menu option Set this option toTape select • T-120 when using a T-120 or shorter length tape.• T-160 when using a T-160 length tape.• T-180 when using a T-180 or longer length tape.For details, see page 46.Auto play • ON to start playback automatically, when you insert a tape with its safety tab removed.• OFF to turn off Auto play. You need to press HPLAY to start playback, even if you insert a tape with its safety tab removed.Auto repeat • ON to play back a tape repeatedly. The VCR rewinds a tape to the beginning and restarts playback automatically.•OFF to turn off Auto repeat.Auto power off • 1Hr to turn off the VCR automatically one hour after the last operation.• 2Hr to turn off the VCR automatically two hours after the last operation.•OFF to set no specific time to turn off.Power save • ON to turn off the indicators in the display window during standby mode to reduce the VCR’s power consumption to a minimum.•OFF to turn on the indicators in the display window while the VCR is standing by.VCR Output CH • 3CH when using channel 3 to receive the VCR signal.• 4CH when using channel 4 to receive the VCR signal.For details, see page 70.Select :End :ADVANCED OPTIONSOKVv Set : BbAuto play:Tape select:Auto repeat: ONT120OFF[[[]]]Auto power off: OFF[]OFF[]3CH[]: MENUQuitPower save:VCR Output CH:continued](https://usermanual.wiki/Samsung-Electronics-Co/KHANVFD/User-Guide-289514-Page-69.png)