Samsung Electronics Co LABGEOPA20 Immunology Analyser User Manual
Samsung Electronics Co Ltd Immunology Analyser
Users Manual
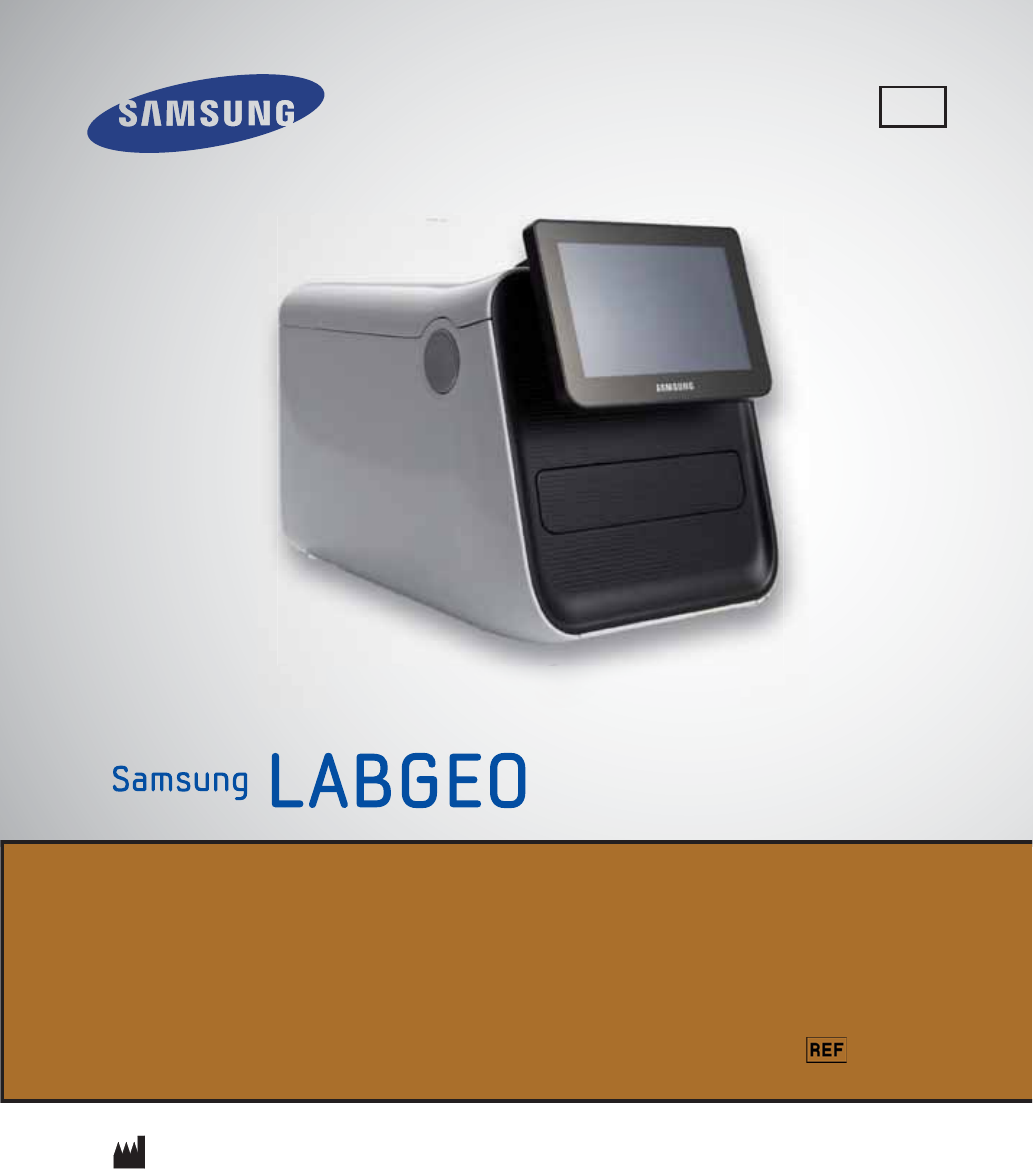
For proper use of the analyzer, please refer to the product manual.
PA20
User Manual
Version 1.0
IVD
SAMSUNG ELECTRONICS CO., LTD.
129, Samsung-ro, Yeongtong-gu, Suwon-si, Gyeonggi-do, Korea
Distribution in USA : Nexus Dx, Inc., A Subsidiary of Samsung Electronics Co., Ltd., 6759 Mesa Ridge Road,
San Diego, CA 92121 USA / Tel : 858-410-4600, Fax : 858-410-4700, www.nexus-dx.com
BCA-PA20

2
Copyright
© Copyright Reserved 2012 Samsung Electronics Co., Ltd
The hardware/software mentioned in this user manual is protected by copyright law.
Except for a copy of the User Manual for normal use, making a partial or whole copy of it
without written permission by Samsung Electronics is strictly prohibited by copyright law.
The content and specications of this user manual are subject to change without prior
notice.
Correct Disposal of This Product
(Waste Electrical & Electronic Equipment)
(Applicable in countries with separate collection systems)
This marking on the product, accessories or literature indicates that the product and its
electronic accessories (e.g. charger, headset, USB cable) should not be disposed of with
other household waste at the end of their working life. To prevent possible harm to the
environment or human health from uncontrolled waste disposal, please separate these
items from other types of waste and recycle them responsibly to promote the sustainable
reuse of material resources. Household users should contact either the retailer where they
purchased this product, or their local government oce, for details of where and how they
can take these items for environmentally safe recycling. Business users should contact their
supplier and check the terms and conditions of the purchase contract. This product and its
electronic accessories should not be mixed with other commercial wastes for disposal.

3
1. Safety Warnings and Caution ........................7
User’s Manual and Labeled Symbols ................................. 9
Cautions for system installation ....................................... 11
Cautions for system move ................................................. 12
Cautions before use ............................................................ 12
Cautions during use ............................................................ 13
Precautions Before Testing ................................................ 14
Preparing to Test Samples .........................................................................14
Cautions for storage and maintenance after use .......... 15
2. Introduction .................................................17
Intended Use ........................................................................ 18
Introduction ......................................................................... 19
Operating Principle ............................................................. 20
What’s in the box ................................................................. 20
Box contents...................................................................................................20
Sold separately ..............................................................................................21
Introduction of features ..................................................... 22
Front (Right) ...................................................................................................22
Front (Left) ......................................................................................................23
Back ...................................................................................................................24
3. Installation ....................................................25
Installation ............................................................................ 26
Replacing printer paper ..................................................... 27
Table of Contents

4
Samsung LABGEO PA20 Table of Contents
Disc ......................................................................................... 29
Handling and Storage of the Disc .................................... 30
Adding the sample to the Disc .......................................... 31
4. Analyzing ......................................................35
Analyzing .............................................................................. 36
Turning power on .........................................................................................36
Preparing analysis ........................................................................................40
Canceling analysis in progress ................................................................43
Analysis completed ....................................................................................45
Viewing analysis results .............................................................................47
Viewing results ..................................................................... 48
Viewing results of patient’s analysis ......................................................50
Viewing QC results .......................................................................................52
Searching results ..........................................................................................54
Printing results ..............................................................................................56
Transferring results ......................................................................................61
Deleting results .............................................................................................63
Quality control ..................................................................... 65
Starting quality control ..............................................................................65
Analyzer settings (General User Settings) ...................... 69
Display settings ................................................................... 71
Calibration (touch screen calibration) ..................................................72
LCD Brightness .............................................................................................73
Screensaver settings....................................................................................74
LCD O settings ...........................................................................................75
Volume settings .................................................................. 76
Analysis settings ................................................................. 77
Unit settings ...................................................................................................78
Change order .................................................................................................80
Reference range settings ..........................................................................82

5
Samsung LABGEO PA20 Table of Contents
QC material ........................................................................... 84
Registering QC Material .............................................................................84
Changing QC material ...............................................................................89
Deleting QC material ..................................................................................91
Print settings ........................................................................ 93
Barcode settings .................................................................95
Language settings .............................................................. 97
Self-test ................................................................................. 99
Analyzer settings (Administrator Settings) ..................103
Lock settings ......................................................................105
Setting security levels for each function ........................................... 105
Locking quality control ..........................................................................107
Changing password ................................................................................. 109
Network settings ...............................................................112
Connecting to a network ........................................................................ 112
Setting network connections ..............................................................114
Setting EMR/LIS .......................................................................................... 116
Lock settings.......................................................................117
Changing Date&time format ..........................................119
System settings .................................................................121
System Reset .............................................................................................. 123
USB Backup ................................................................................................. 127
System updates ......................................................................................... 129
Turning o power ..............................................................131
5. Using the LABGEO Data Manager .............133
Introduction to the LABGEO Data Manager .................134
Installation of the LABGEO Data Manager ...................135

6
Samsung LABGEO PA20 Table of Contents
Running the LABGEO Data Manager .............................139
Home screen .......................................................................140
Registering a blood analyzer device ..................................................141
Viewing analysis results ...................................................147
Editing analysis results .....................................................148
Selecting and editing multiple analysis results .............................. 150
Printing analysis results ...................................................151
Removing the LABGEO Data Manager ..........................153
6. Maintenance ...............................................155
Maintenance .......................................................................156
Maintenance ...............................................................................................156
Cleaning the exterior ...............................................................................156
Cleaning the Disc Tray .............................................................................157
Transportation and Storage...................................................................157
7. Troubleshooting .........................................159
Troubleshooting ................................................................160
Check before requesting repair ............................................................ 160
Restoring factory settings ......................................................................160
Error List ..............................................................................161
8. Other Information ......................................165
Quaility control policy ......................................................166
Westgard multi-rule technique ............................................................ 166
System information ...........................................................167
Other information .............................................................168
Product Service ..................................................................169
Index ....................................................................................170

Safety Warnings and Caution
1
User’s Manual and Labeled Symbols ................................................. 9
Cautions for system installation ....................................................... 11
Cautions for system move ................................................................. 12
Cautions before use ............................................................................ 12
Cautions during use ............................................................................ 13
Precautions Before Testing ................................................................ 14
Preparing to Test Samples ............................................................................................. 14
Cautions for storage and maintenance after use .......................... 15

8
Safety Warnings and Caution
Please follow the safety warnings and cautions in this manual for safe and appropriate use
of the product.
Repairs and maintenance work not explained in this User Manual are to be performed by a
designated Samsung service provider. Any attempt to repair the product by the user may
result in injury. Do not use the product in an area with combustible gas or high levels of
contamination for an extended period of time.
Malfunctions and damage caused by any other use than specied in the User Manual is
excluded from the manufacturer’s warranty.
If the equipment is used in a manner not specied by the manufacturer, the protection
provided by the equipment may be impaired.
9
Samsung LABGEO PA20 Safety Warnings and Caution
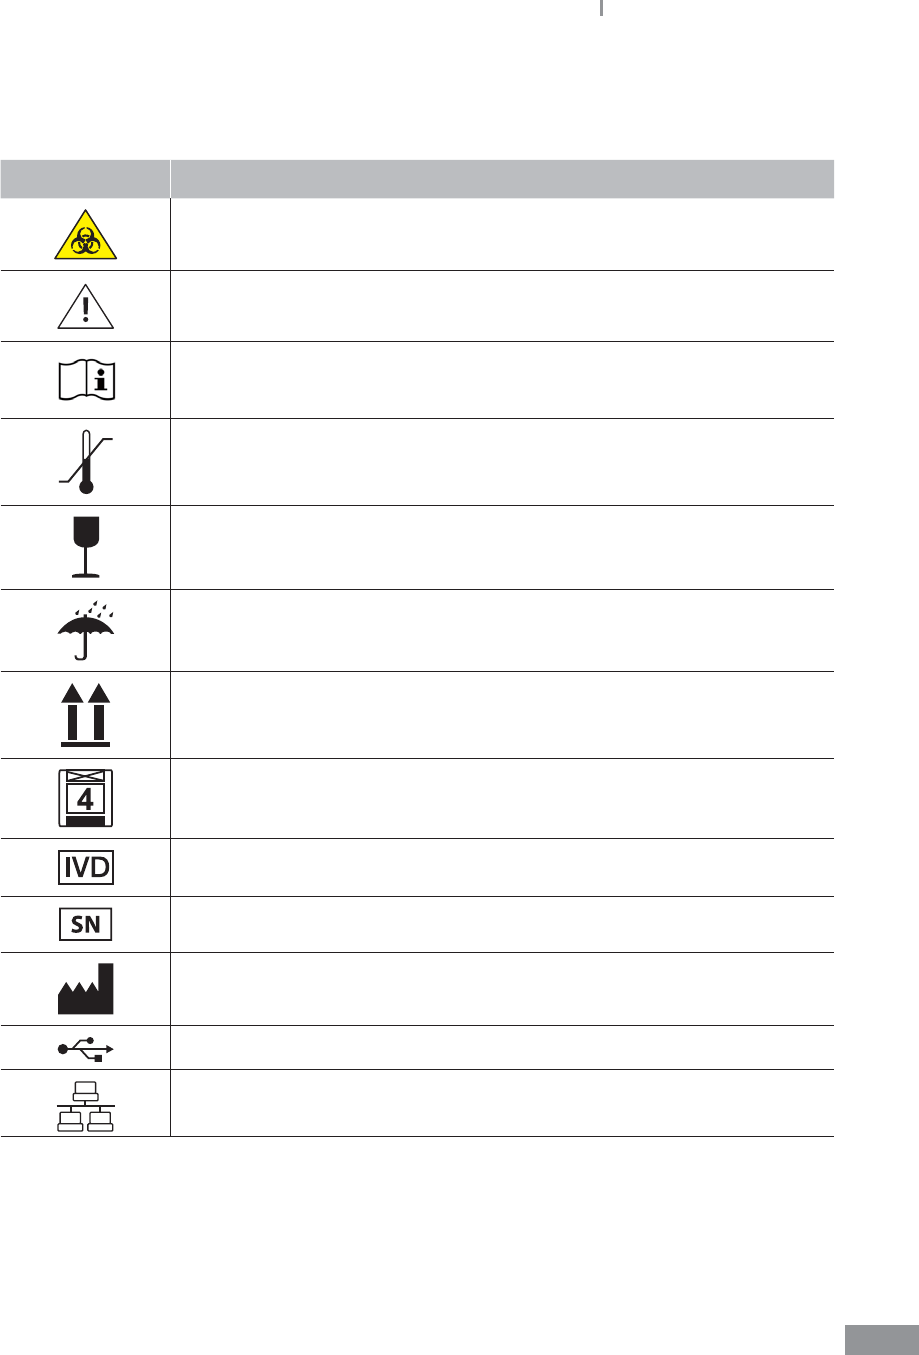
ŶUser’s Manual and Labeled Symbols
Symbol Explanation
Biohazard. A sample as well as a used cartridge containing a sample are
potentially hazardous. Handle with care.
Caution. In order to safely and properly use this product, safety
precautions and cautions in this manual must be followed.
Consult instruction for use.
Temperature limitation/ Allowed Temperature Range Shows temperature
limit for storage or transport
Fragile/Fragile contents; handle with care
Keep dry/Package should avoid wetting
This way up
Loading Unit/Avoid loading more than the marked number of units
In Vitro diagnostic device
Serial number
Manufacturer
USB port
Ethernet port
10
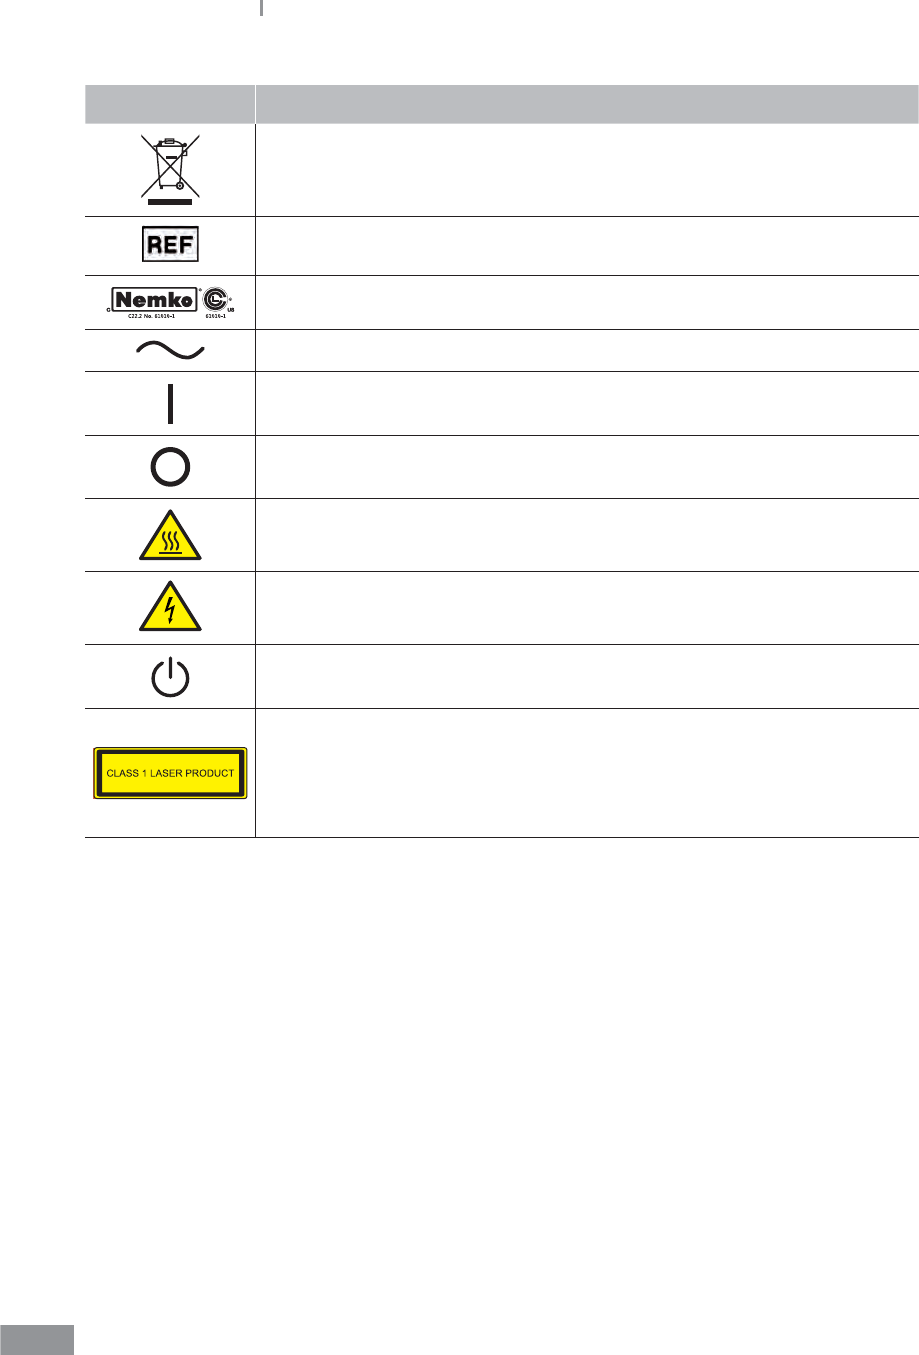
Samsung LABGEO PA20 Safety Warnings and Caution
Symbol Explanation
‘New’ waste The bar can be replaced by the date of manufacture
Catalog number
North American Safety Certication Mark
Alternating current
Power On
Power O
Hot Surface
Risk of electronic shock
Stand-by switch
LASER CLASSIFICATION
This Clinical Chemistry and Immunology Analyzer is conrmed as the
class 1 laser product in IEC60825-1:2007
- Wavelength: 808 nm
- Maximum output of laser radiation: Max. 1.5 W

11
Samsung LABGEO PA20 Safety Warnings and Caution
ŶCautions for system installation
ŶKeep the analyzer at least 6 inches (15cm) away from any wall to provide
adequate ventilation and prevent overheating.
ŶBe careful not to expose the analyzer to sources of vibration such as placing
it near a centrifuge.
ŶDo not use the analyzer where liquids or chemicals are used or where gas
may be produced. Insure that no liquids are spilled into the Unit if there
is any spillage disconnect mains immediately and return to product for
serving.
ŶThe analyzer must be used at an operating temperature of 10 - 32 °C
(50- 89 °F). The analyzer might be aected by:
t Condensing humidity and water
t Heat and extreme temperature variations
t Electromagnetic radiation
t Movement of the analyzer during sample processing
ŶOnly use the cable provided with the analyzer.
ŶTo avoid risk of re or electric shock, do not use a damaged power cable.
ŶAlways use the correct voltage supply. Incorrect voltage can cause damage
to the analyzer or result in re. Be sure that the electrical outlet is properly
grounded.
ŶDo not attempt to disassemble, repair or modify the analyzer as damage
could occur. Opening the unit will void the warranty. Contact Samsung
Technical Support.
ŶDo not place any objects on the analyzer.
ŶDo not cover the rear ventilation panel. This may damage the internal parts,
resulting in a re or electric shock.
ŶDo not introduce foreign substances into the servicing hole.
ŶTurn on the power switch at the rear of the Analyzer. (Grounding Proper
grounding is required when installing the system. Check the wall outlet
ground (Earth) for proper grounding to the facilities electrical ground. If you
are unsure of the outlet grounding, contact your facilities engineer to verify
the proper outlet ground). Next, turn the power switch on the front of the
Analyzer on and check that the program starts normally.
ŶDo not touch the power plug with wet hands. This may result in an electric
shock.

12
Samsung LABGEO PA20 Safety Warnings and Caution
ŶCautions for system move
ŶDropping the product while moving or carrying may cause damage to the
product.
ŶBe careful of impact when moving the product at all times.
ŶWhen moving the product by car, please use the original packaging
material.
When moving the analyzer, rst turn o the power and disconnect the power cable from
the product.
ŶCautions before use
ŶWhen the blood is not used immediately, be sure to store it appropriately to
prevent it from contamination.
ŶCheck for dust or other impurities on a regular basis.
ŶAlways install the product in a well-ventilated, clean, and dry area.
ŶKeep the product away from heat-emitting products (such as heaters). It
may cause deformation of the product, re, or adversely inuence analysis
results.

13
Samsung LABGEO PA20 Safety Warnings and Caution
ŶCautions during use
ŶThis system is for professional use only. The user must be a physician, clinical
laboratory personnel, or healthcare professionals.
ŶAvoid external shock or vibration during analysis.
ŶDo not use expired discs.
ŶDo not open the tray while the disc is being analyzed. During the analysis,
LED lamp or laser radiation may cause hazard due to improper operation.
ŶThe Analyzer contains UV/Visible LED Light source and laser. The users are
not exposed to Optical radiation in normal conditions. Because it is blocked
with analyzer cover cabinet. Do not open the tray during analysis. Do not
look into the analyzer during analysis. Your vision will be damaged due to
UV-lamp.
ŶPowder-free gloves must be worn when operating the product.
ŶDo not move the analyzer during operation.
ŶWhen inserting a disc into the tray, check the orientation of the disc. It must
be inserted with the label side up. Consult test Instructions for Use.
ŶAlways use designated power cable. Do not unplug the device in the middle
of an analysis.
ŶIf the product produces smoke or strange odors, discontinue use, unplug
the power cord from the outlet, and contact your local distributor for service
information.
ŶIf operation has been aborted due to abnormal circumstances such as a
power outage during operation, discard the disc and start over with a new
disc.
ŶDo not turn o the power during analysis. Press Cancel to abort a test if
needed. Discard the disc and start over with a new disc.
ŶBe careful not to damage the barcode on the disc. If the barcode is
damaged, the test will not perform accurately.
ŶDo not use the analyzer where liquids or chemicals are used or where gas
may be produced.
ŶDo not allow liquid to spill into the analyzer. If there is any spillage,
disconnect power immediately and contact your local distributor.
ŶIf you wish to stop the analysis in progress without turning the analyzer o ,
press the Cancel button and stop the analysis. After stopping an analysis in
progress, throw away the cartridge and replace it with a new one.
ŶThe operating temperature of the analyzer is 10 - 32 °C (50 - 89 °F); the
analyzer automatically maintains an internal temperature of 37°C. (The
device shuts o automatically if it exceeds normal operating temperature.)

14
Samsung LABGEO PA20 Safety Warnings and Caution
ŶPrecautions Before Testing
Preparing to Test Samples
1 Prepare a disc, sample, and injecting tool (pipette) to be used for the test.
2 Consult Test Instructions for Use.
3 Use a pipette to inject the sample into the disc as described in the Test Instructions for
Use.
Inlet
4 Inject into the inlet shown in the gure above as described in the Test Instructions for
Use.
Refer to the Test Instructions for Use for the correct sample volume to be injected
into the disc.

15
Samsung LABGEO PA20 Safety Warnings and Caution
ŶCautions for storage and maintenance after use
ŶDo not store the product in humid areas or areas inuenced by
temperature, humidity or wind.
ŶStore the device on a at surface and keep it away from vibration or impact.
ŶDo not store the product with chemicals or gas.
ŶOperating conditions and temperature: 10 - 32 °C (50 - 89 °F),
Humidity: 0% - 80%
ŶStorage conditions and temperature: -10°C - +40°C , Humidity: 0% - 80%
ŶIf there is blood residue from a specimen or any contaminants in the disc
tray and the interior or exterior of the analyzer, remove the contaminant
using a soft cloth while wearing gloves.
Wet the cloth using 30% isopropyl alcohol when removing contaminants.
Do not use highly corrosive agents such as benzene or acetone.
These agents may damage the analyzer.
ŶWhen moving or transporting the product, follow the conditions for using
and storing the product specied in this manual. Follow all cautions when
moving the product.
ŶA specimen may be contaminated with pathogens or viruses that cause
infectious illnesses such as Hepatitis B. All specimens must be considered
and handled as potential contaminants.
ŶUsed discs must be processed using Medical Waste Treatment Laws after
use.
Samsung LABGEO PA20

Introduction
2
Intended Use ........................................................................................ 18
Introduction ......................................................................................... 19
Operating Principle ............................................................................. 20
What’s in the box ................................................................................. 20
Box contents ...................................................................................................................... 20
Sold separately .................................................................................................................. 21
Introduction of features ..................................................................... 22
Front (Right) ....................................................................................................................... 22
Front (Left) .......................................................................................................................... 23
Back ....................................................................................................................................... 24

18
Introduction
ŶIntended Use
The Samsung LABGEOPA20 provides quantitative in-vitro measurements of clinical chemistry
analytes and immunological reactions in lithium-heparinized whole blood, plasma, or
serum in a clinical or point-of-care setting. It is designed to use a disposable reagent disc
which contains reagents and buers for a complete test. The Analyzer unit contains the
Laser which is for controlling microuidics. UV LED is light source is for detection chemical
reaction.
For use in moderate complexity labs with whole blood, plasma or serum.
If the Samsung LABGEOPA20 is used in any way other than described in this
manual, the analyzer may not operate as intended, may produce inaccurate or
no results, and may pose a safety harzard.
Use only Samsung LABGEOPA20 reagent disc with the Samsung LABGEOPA20.

19
Samsung LABGEO PA20 Introduction
ŶIntroduction
The Samsung LABGEOPA20 is a fully integrated photometric device that can perform both
clinical chemistry analyses and immunoassays simultaneously. Innovative laser-actuated
microvalves together with the centrifugal microuidics makes the total process of plasma
separation, metering, mixing, incubation, washing, and detection fully automatic.
A lithium-heparinized whole blood, plasma, or serum sample of 450uL is applied directly
to a disposable reagent disc and the disc is inserted into the analyzer by an operator. Each
reagent disc is self-contained clear plastic with diameter of 12 cm and thickness of 0.8 cm,
which consists of dierent kinds of reagents and buers.
The entire process is activated once the operator touches the “Run” button on the display.
The ‘self-test’ function is initiated, whereby the main power, main motor, laser motor,
temperature IC, photometer, laser, heater and barcode reader are checked. The ‘self-test’
function is conducted automatically before each test or control run. This built-in self
testing function minimizes maintenance costs. After inserting a reagent disc into a tray,
the analyzer automatically detects the disc type and identies the clinical chemistry and
immunoassay tests before performing the assays. The analysis is completed in about 12 to
25 minutes depending on the disc type.
The results are displayed on the LCD screen along with the reference ranges, can be printed
out by an internal thermal printer, and can be transferred to a laboratory information
system and electronic medical record systems (LIS/EMR) via an Ethernet and wireless LAN
ports. Data storage is up to 5,000 patient results and 3,000 control results in the instrument.
The system provides user-friendly and easy interface for analysis that minimizes user
manipulation. Handy compact design (246(W) x 375(D) x 289(H) mm3) allows maximized
space utilization and the light weight (~ 9.2 kg) provides portability.
Compared to conventional blood analyses done in clinical laboratories, the analyzer system
is suitable for point-of-care applications because it requires a smaller amount of blood
takes less time, and does not require specially trained operators, or expensive instruments
to run biochemical assays and immunoassays separately.
20
Samsung LABGEO PA20 Introduction
ŶOperating Principle
The analyzer is equipped with two optical detection modules. One is a photometer and
the other is a uorometer. The photometer can measure absorbance at 10 dierent
wavelengths (340, 405, 450, 500, 550, 570, 600, 630, 660, and 700 nm) to accommodate
various chemical and immunological reaction protocols. The measured absorbance is
converted into the concentration of the analytes.
For endpoint reactions, the nal absorbance is used for the calculation of the concentration
of the analyte.For kinetic reactions, the absorbance change during a predetermined time is
utilized for the calculation of the concentration instead of the nal absorbance.
The uorometer utilizes a time-resolved uorescence method to support high-sensitivity
immunoassay based on europium nanoparticle lables. A 365 nm LED is used as an
excitation light source and a red-sensitive photomultiplier tube is used as a photodetector.
The measured uorescence intensity is converted into the concentration of the anlayte.
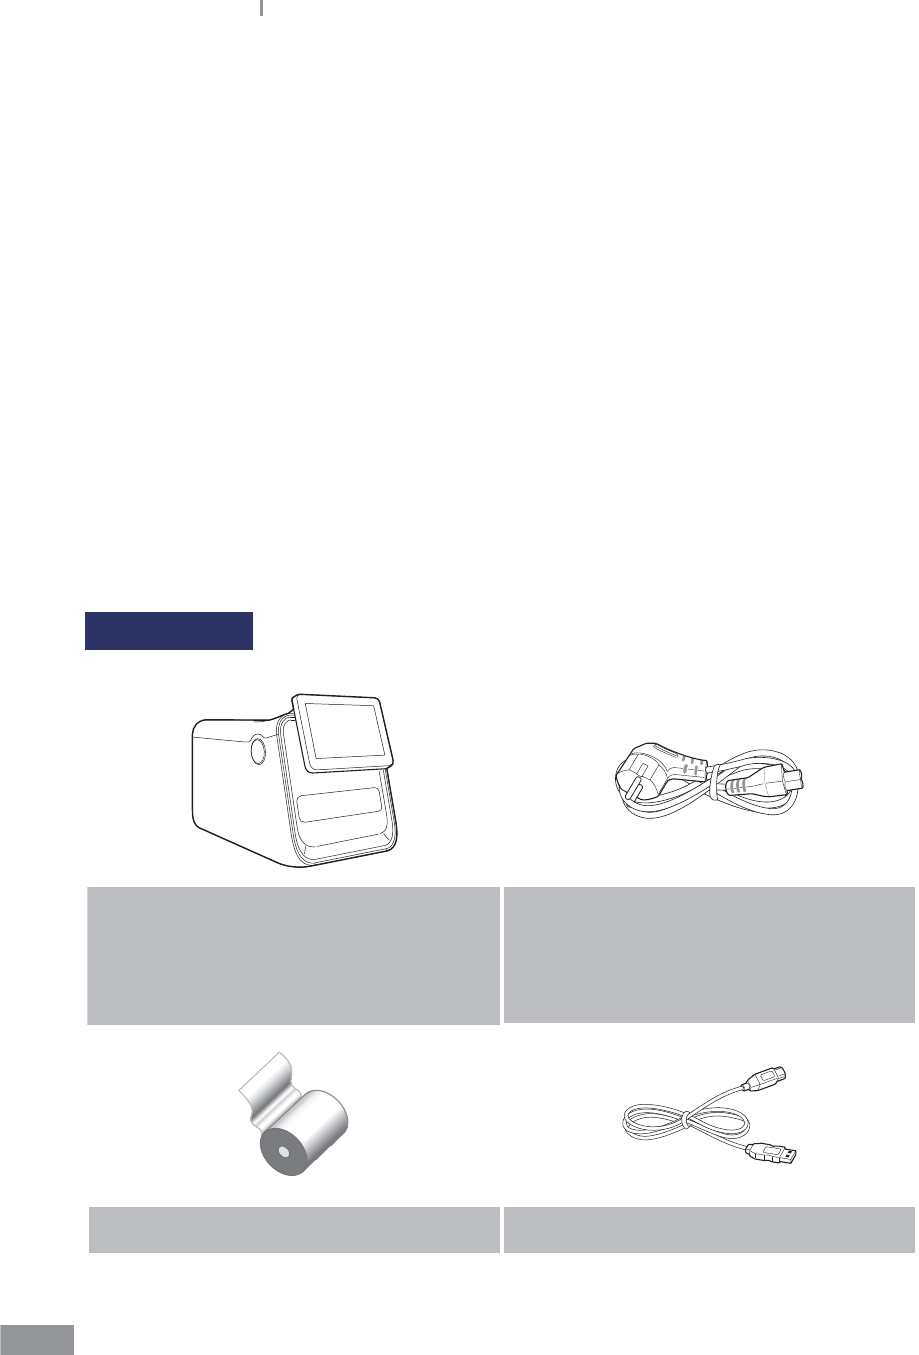
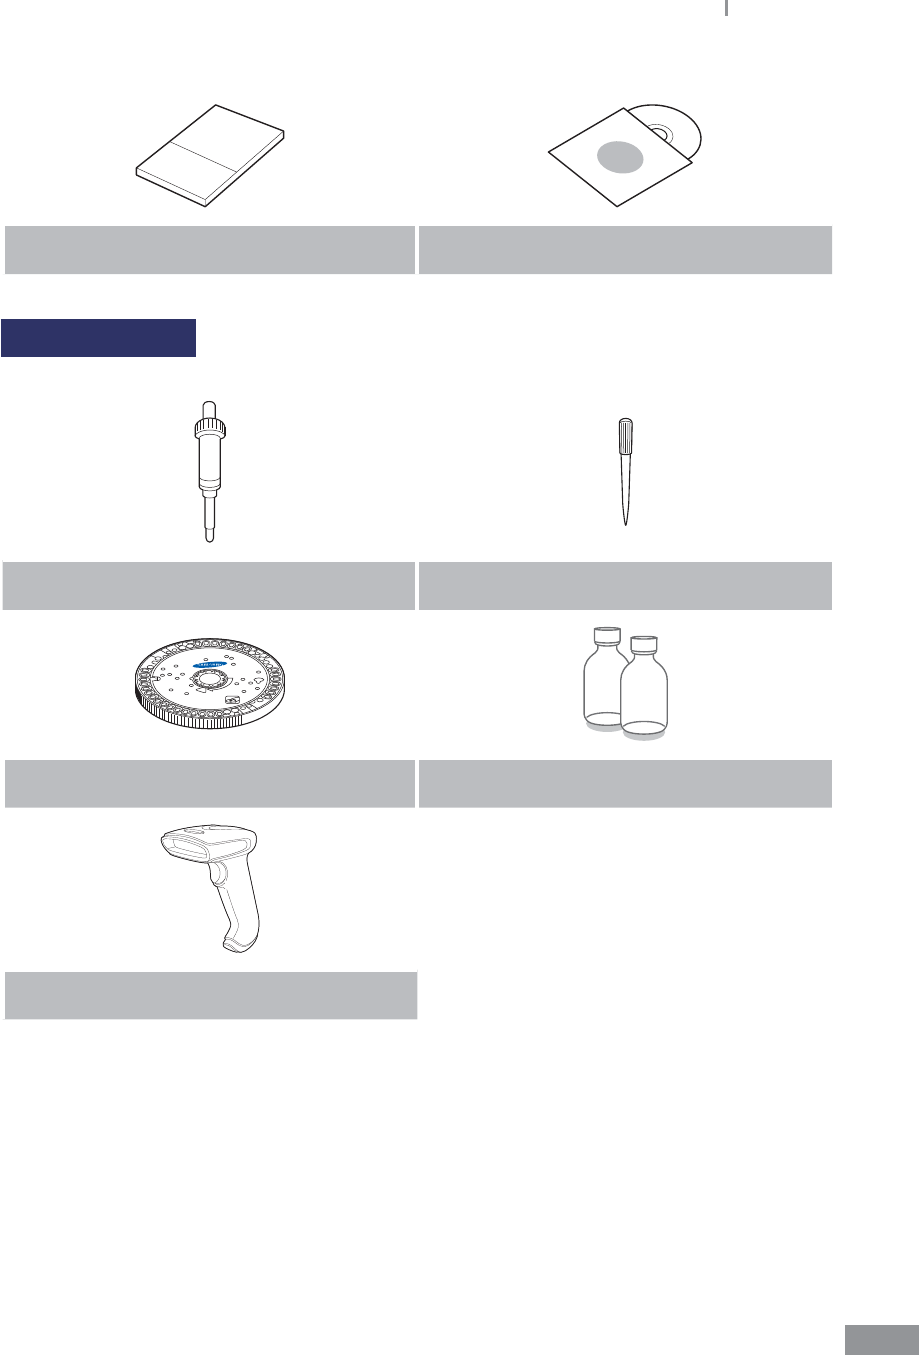
ŶWhat’s in the box
Box contents
Analyzer Samsung
LABGEO PA20
BCA-PA20
Power Cable
A 1.8m long cable used to supply power to
the system. The eective voltage range is
between 100-240 VAC
(50-60Hz).
Printer paper USB Cable
21
Samsung LABGEO PA20 Introduction
User Manual Software installation CD
Sold separately
Pipette tips
Disc Control Serum
Barcode scanner (optional)
t Please check the above contents of the box after purchase.
t If any of the contents are missing or damaged. Do not use the product and contact your
retailer for a replacement.
22
Samsung LABGEO PA20 Introduction
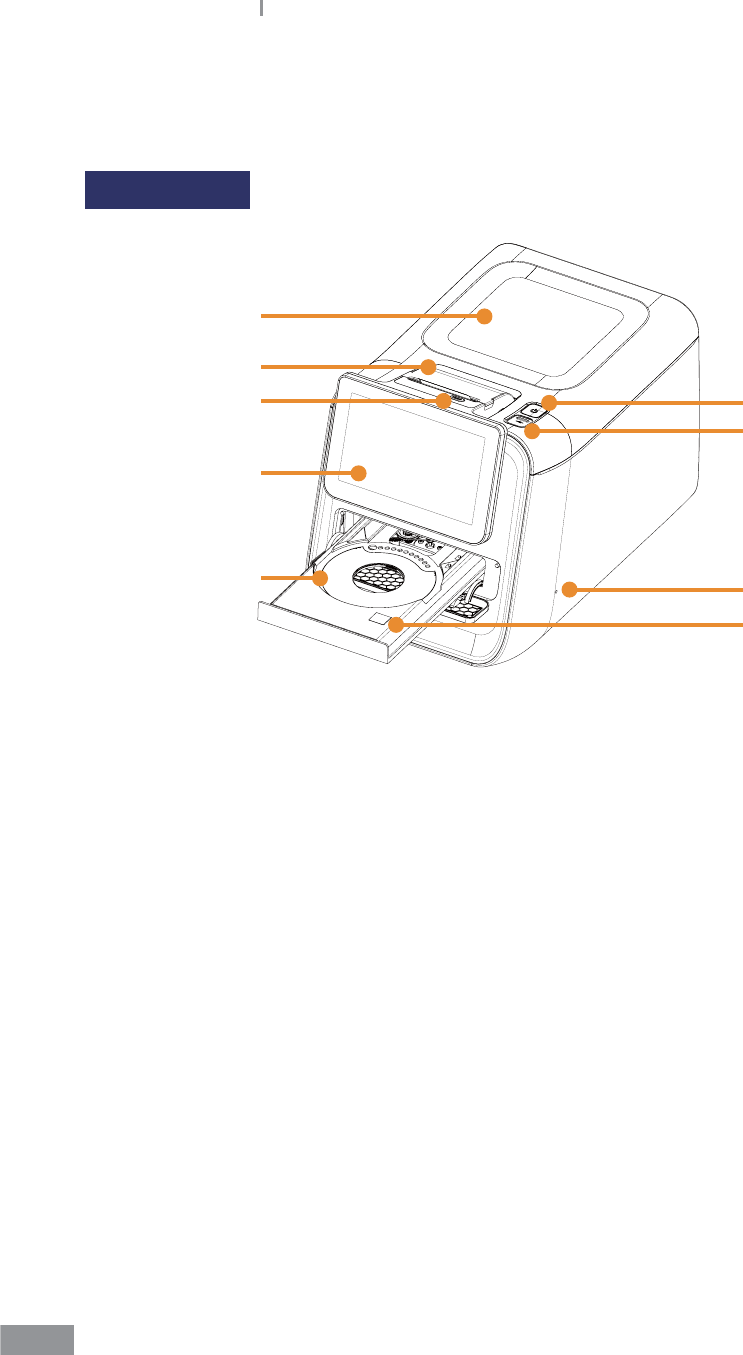
ŶIntroduction of features
Front (Right)
6
2
4
5
1
7
8
9
3
1. Main Unit
2. Printer
3. Printer feed button
4. 7-inch Color TFT LCD Monitor
5. Tray
6. Power Button: Used to turn the analyzer on or o
7. USB Port: Used to update the software and to back up the analysis results in the USB
memory
8. Servicing Hole: For qualied Samsung Technical Support personnel only
9. HOT SURFACE label
23
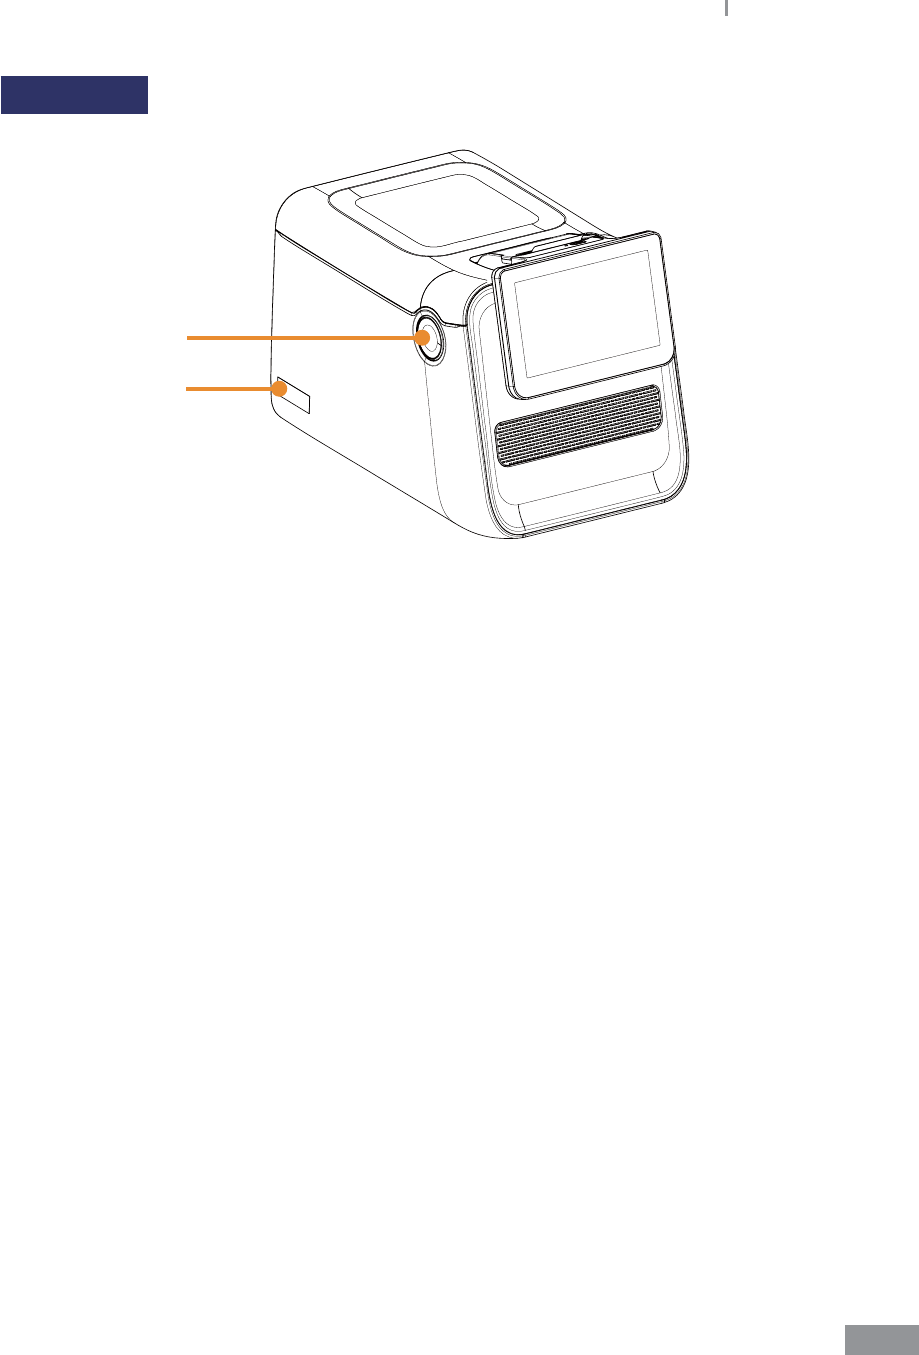
Samsung LABGEO PA20 Introduction
Front (Left)
2
1
1. Class 1 laser product label
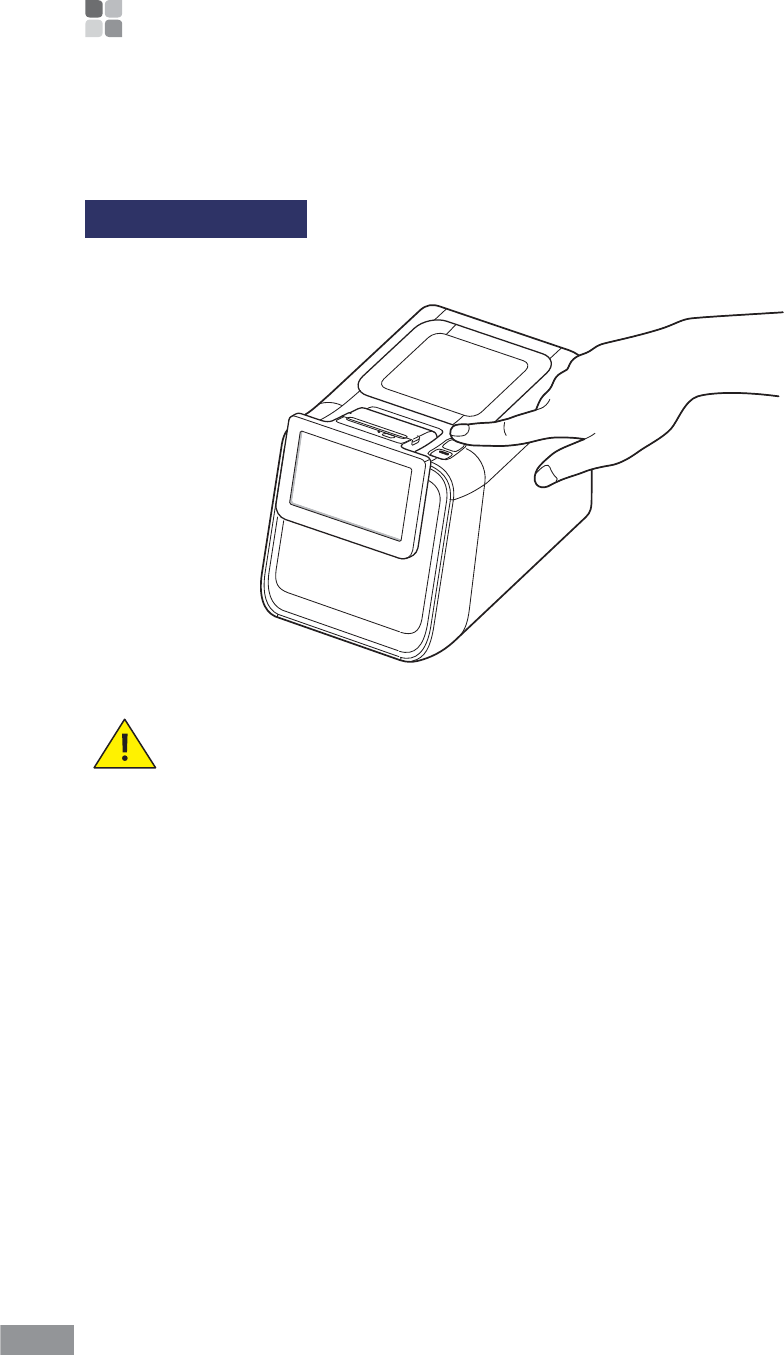
2. Monitor tilting button
24
Samsung LABGEO PA20
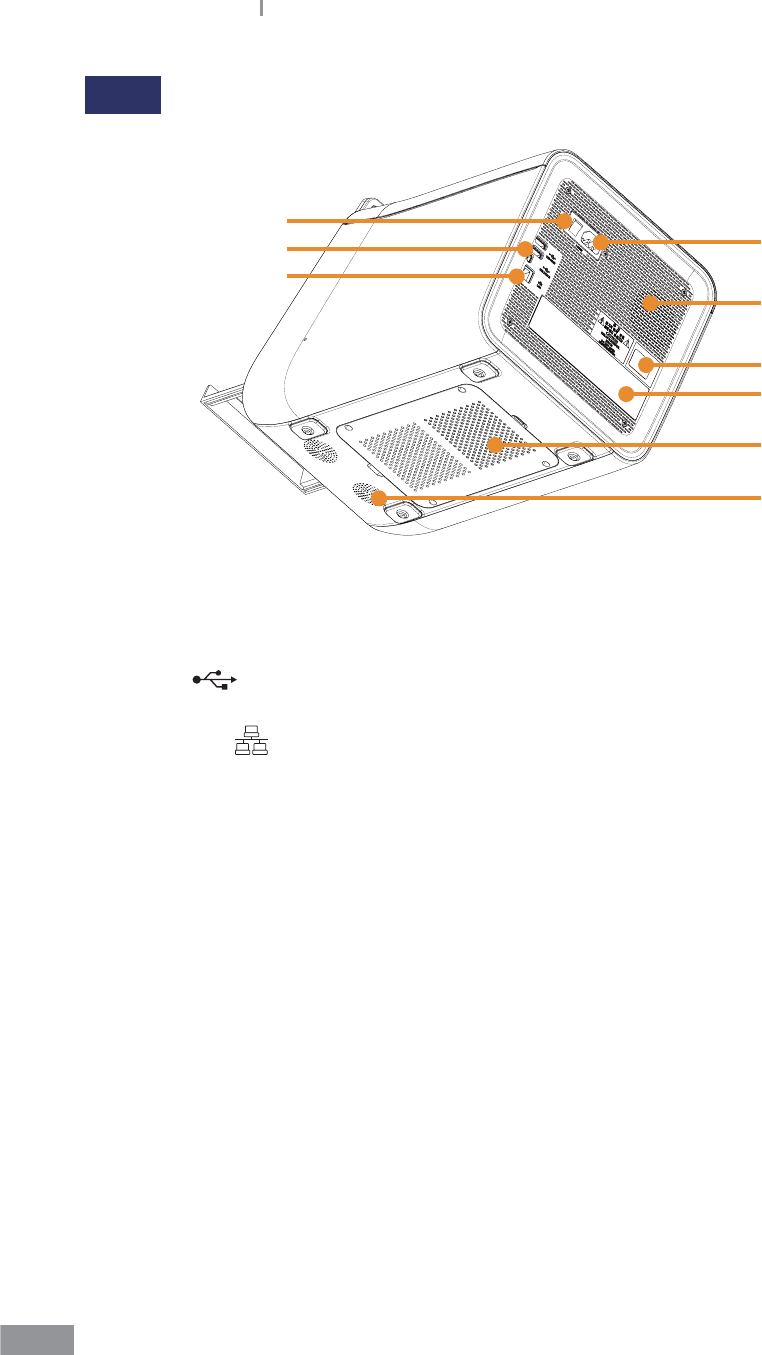
Back
5
2
3
4
1
6
7
8
9
1. Power Switch: Used to turn the power to the analyzer on or o, turning o this switch
completely cuts the power o.
2. Power Input: Connect the Power Cable here
3. USB Port : Used to update the software and to back up. The smaller port is provided
for connecting to a computer
4. Ethernet Port : Used to connect to LAN or the Internet
5. Cooling Fan
6. Biological Hazard Warning
7. Displays basic information of the analyzer including product name, manufacturer,
manufactured date and serial number
8. Motor Cover: To be removed for maintenance and only by authorized Samsung
Technical Support personnel
9. Speaker

Installation
3
Installation ............................................................................................ 26
Replacing printer paper ..................................................................... 27
Disc ......................................................................................................... 29
Handling and Storage of the Disc .................................................... 30
Adding the sample to the Disc .......................................................... 31

26
Installation
ŶInstallation
1 Carefully remove the analyzer from the packaging, and check for any damage that
may have occurred during transport. If it is damaged, contact your courier or retailer
immediately. Check and make sure that the contents of the box match the contents
described in the User Manual. Contact your retailer if any component is missing.
2 Place the analyzer on a level surface near an appropriate AC electrical outlet.
3 Connect the power cable to the power input on the rear panel of the analyzer.
4 Plug the power cable into the AC power outlet. The analyzer uses a switching-mode
power supply (100-240 V).
5 LAN and USB cables are used for PC software (LABGEO Data Manager) connections.
27
Samsung LABGEO PA20 Installation
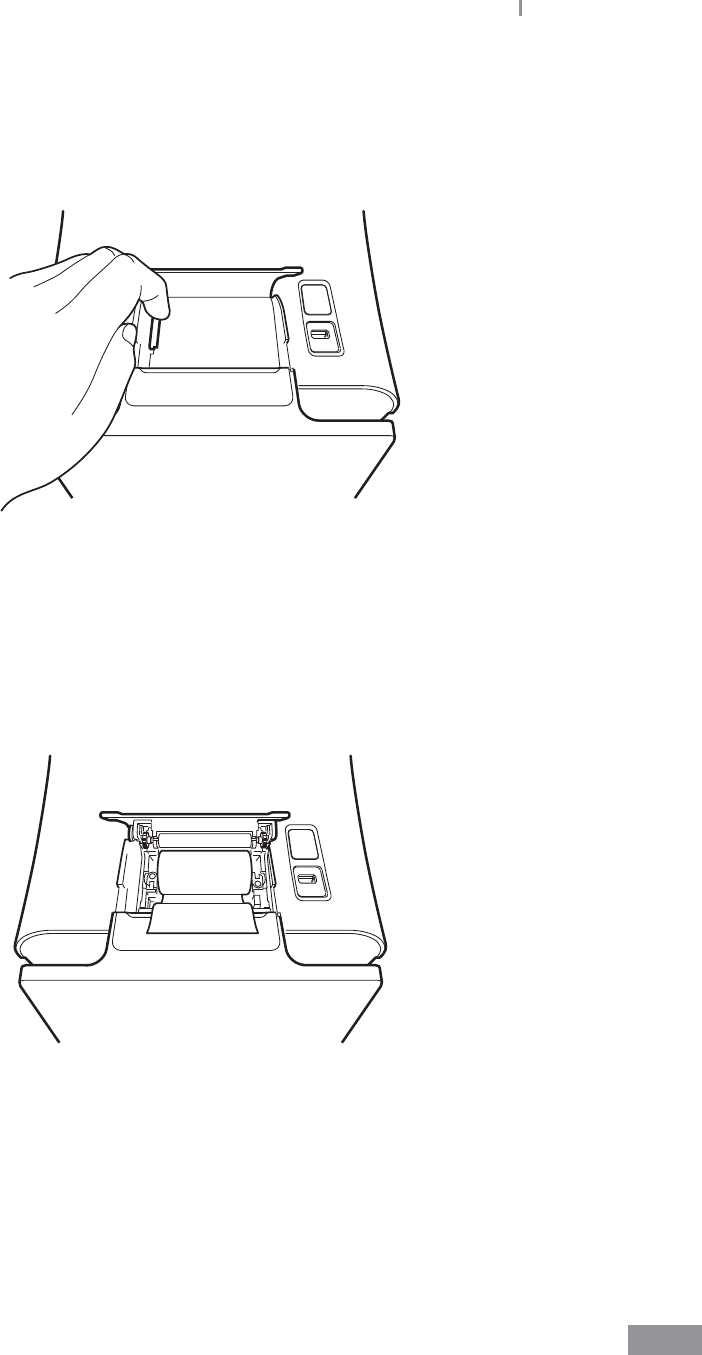
ŶReplacing printer paper
1 Open the paper lid (pull the lid upward by the handle).
2 Remove the used roll.
3 Unwind a new paper roll so that the leading edge comes out from the bottom, facing
the user.
4 Gently insert a new roll into the receptacle, and conrm that the paper comes out
through the front of the printer while holding the leading edge.

28
Samsung LABGEO PA20 Installation
5 Close the lid and conrm that the paper is positioned between the lid and the front of
the printer.
29
Samsung LABGEO PA20 Installation
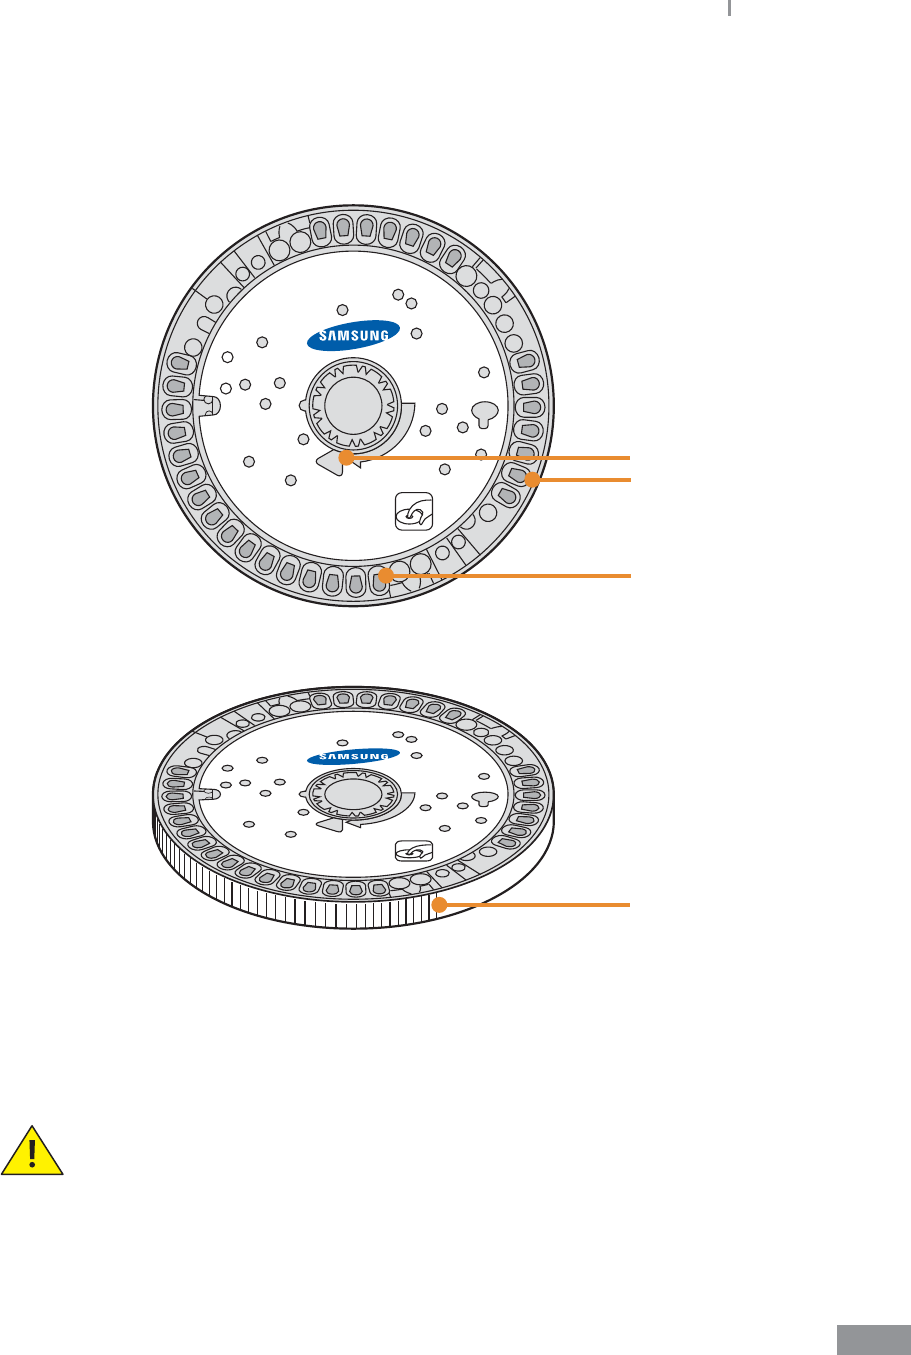
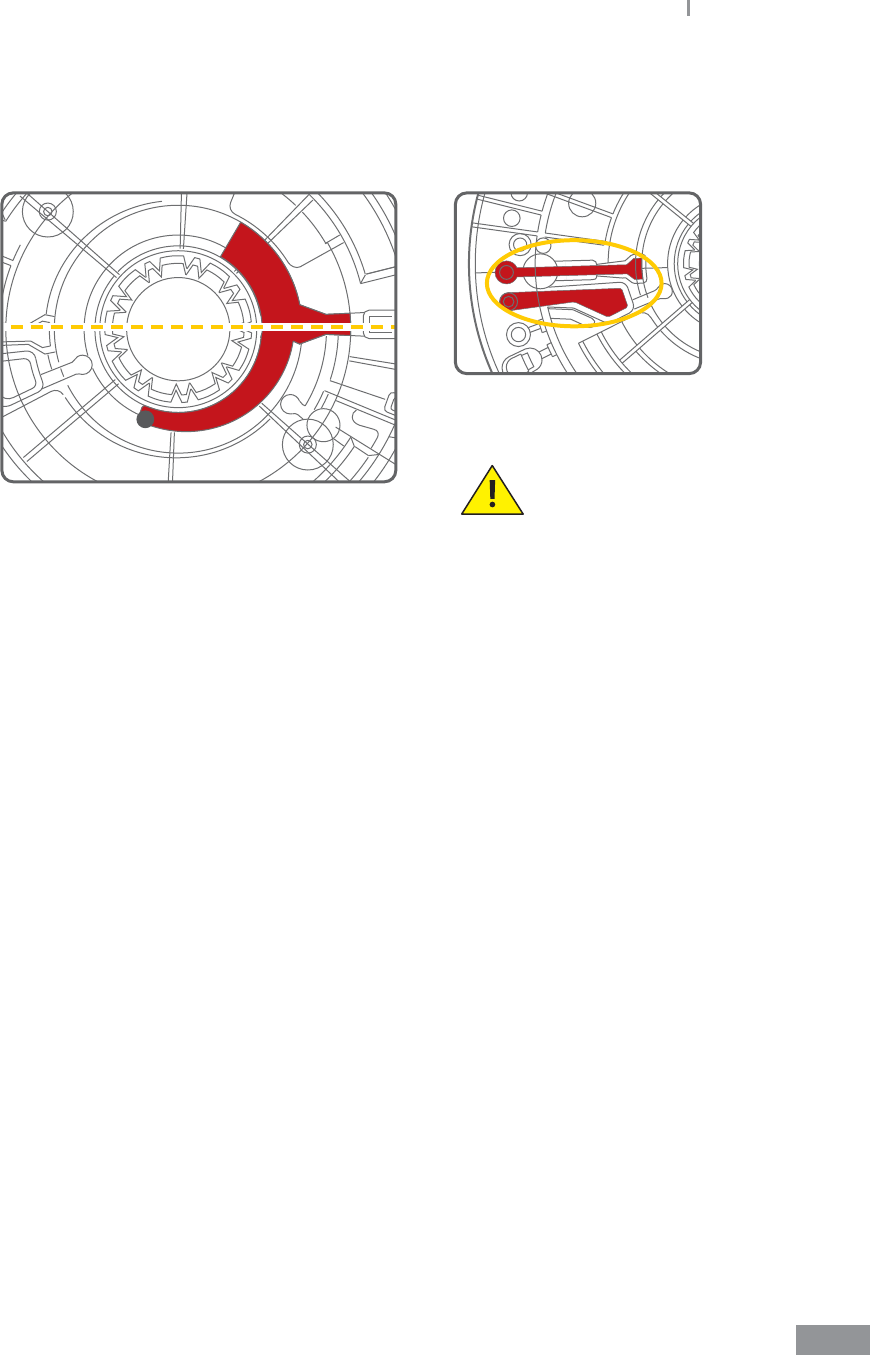
ŶDisc
The actual disc may dier from the images shown below.
1
2
4
3
1. Sample injection Hole
2. Reagent
3. Disc Barcode
4. Detection area (gray-colored zone)
Care must be taken to keep the detection area clear of ngerprints or other
foreign substances.
Contamination of the detection area may aect the analysis results.

30
Samsung LABGEO PA20 Installation
ŶHandling and Storage of the Disc
Handle the discs carefully to avoid damaging them.
The disc is a high-technology integrated product but is vulnerable to impacts.
Be careful not to bump the disc when transporting, handling or loading it.
Do not use the disc if it has been dropped.
t Always use powder-free gloves when handling the product.
t Store the disc LEVEL between 2 - 8 °C (36 - 46 °F).
t Use by the expiry date marked on the disc pouch or the package label. The analyzer
detects and rejects a disc that has expired.
t Bring the disc in its unopened pouch to room temperature (18 - 25 °C or 64 - 77 °F) for at
least 10 minutes before using it on the analyzer.
t The disc can be left at room temperate (18 - 25 °C or 64 - 77 °F) for a total of up to 12
hours if the pouch remains sealed. Do not use the disc if left at room temperature more
than 12 hours.
t Do not expose the open disc to direct sunlight.
t Do not expose the disc to temperatures over 32 °C (89 °F).
t Do not use a disc if the pouch is cut or torn as the reagents inside may be damaged by
moisture.
t Tear open the pouch at the notch located at the top edge. Once the pouch is opened,
the disc must be used within approximately 10 minutes or discarded. It cannot be put
back in the refrigerator for use at a later time.
t Be careful not to leave ngerprints or other contaminants in the detection areas of the
disc.
t Keep the disc level at all times!
BIOHAZARD! Operator health and safety regulations require that Universal
Precautions are to be observed whenever handling human blood samples
or working with the Samsung LABGEOPA20. For additional information refer to
OSHA 29 CFR Part 1910, Standard number 1910.1030 (Toxic and Hazardous
Substances: Bloodborne Pathogens”). This can be found on the internet at
http://www.osha.gov and going to “1910.1030.” Used discs contain human
blood. Care must be taken in handling used discs as the blood may have been
infected by microbes that may cause infectious diseases such as hepatitis
B. The disc, once used, should be disposed of according to medical waste
disposal rules.
For additional guidelines on handling and disposing of hazardous medical
wastes, refer to “Clinical Laboratory Waste Management, Approved
Guideline—Second Edition (GPS-A2) issued by the Clinical and Laboratory
Standards Institute (previously known as NCCLS).
This can be found at http://clsi.org.
31
Samsung LABGEO PA20 Installation
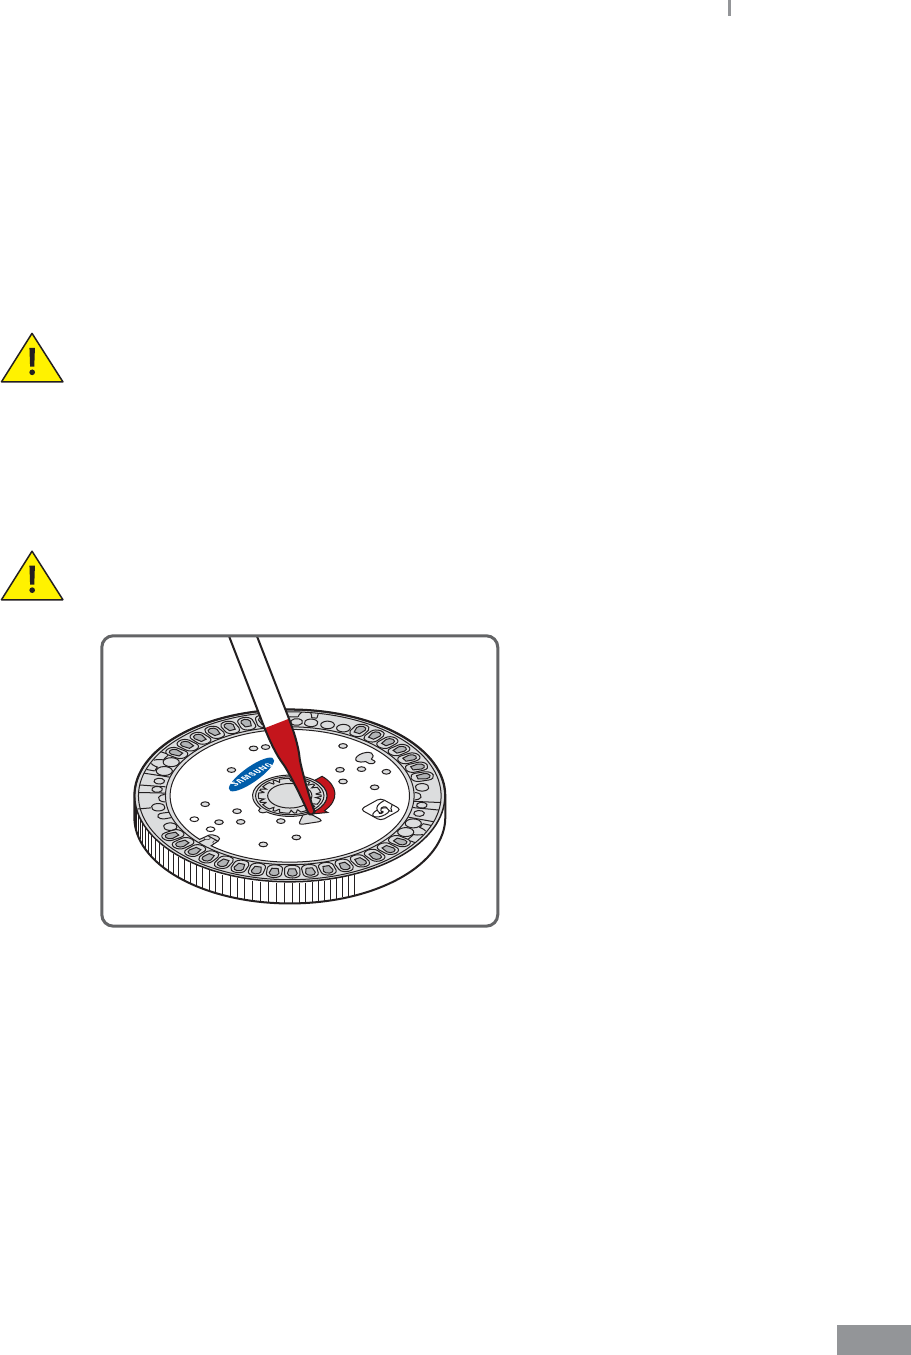
ŶAdding the sample to the Disc
It is advisable to power up the instrument prior to loading the sample on the disc.
See page xx.
ŶBring the refrigerated, unopened disc to room temperature for at least 10 minutes
before opening it. Once opened, the disc must be used within 10 minutes. Load the
disc on the Analyzer within 10 minutes after injecting the sample.
Discs are fragile — always handle with care. Do not tap discs on the
workbench. Do not use a disc that has been dropped. Inspect every disc for
damage before use. Never use a damaged disc.
ŶUse a pipette to inject 450 µL into the sample injection hole. The disc requires a
minimum of 450 µL, maximum of 750 µL. Slowly inject the blood sample into the disc
through the sample injection hole.
Be careful not to pipette with excessive force or pull back on the plunger when
removing the pipette from the hole. Be careful not to inject a bubble into the
sample injection hole.
32
Samsung LABGEO PA20 Installation
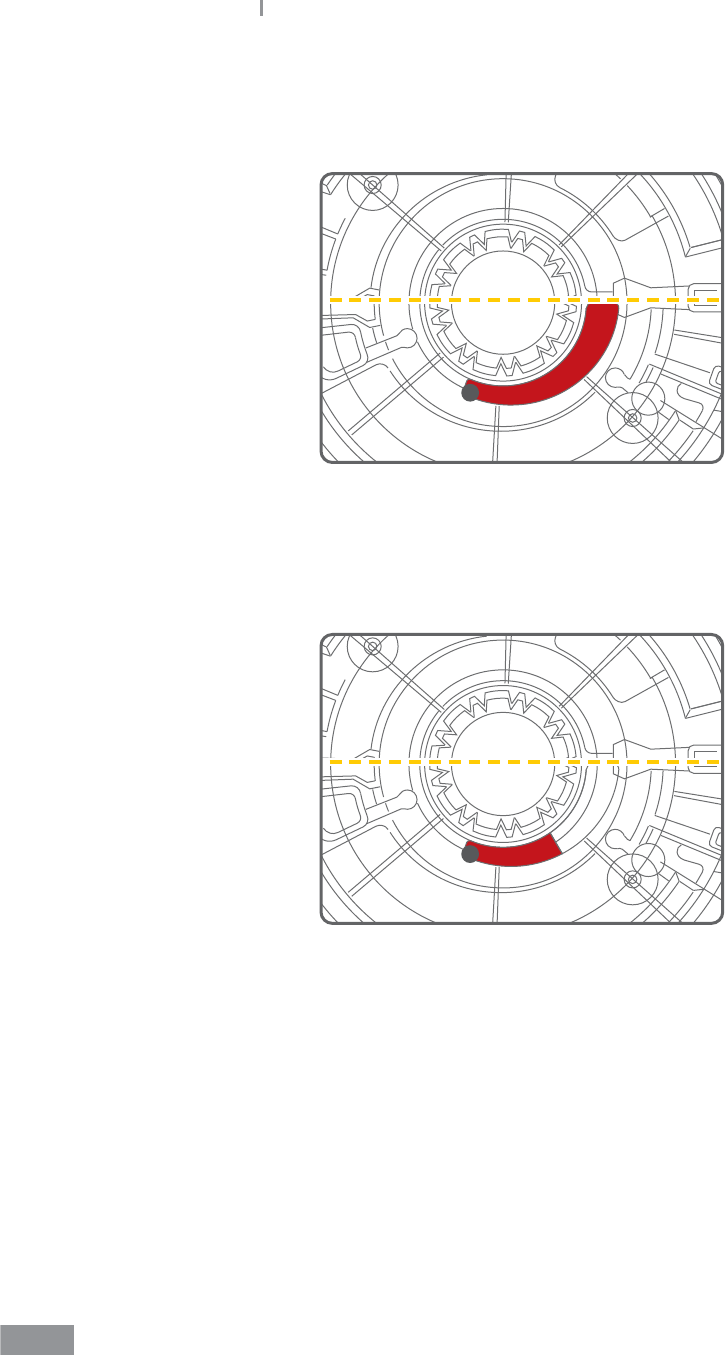
ŶSAMPLE INJECTION
t Correct injection volume
t Insucient sample volume
Analyzer will show message that insucient sample has been injected. Carefully
pipette an additional 100 µL ~ 250 µL into the sample injection hole. Tap Retry on
analyzer.
33
Samsung LABGEO PA20 Installation
t Excessive sample injection
During analysis, any surplus sample will move into the overow chamber as shown
below:
(surplus sample ĺ overow
sample chamber)
Injecting more than
750 L may cause
sample chamber to
overow.
ŶDo not use expired discs.
ŶBe careful to insert the disc into the analyzer properly. When inserting the disc the
blood sample hole should be facing up.
Samsung LABGEO PA20

Analyzing
4
Analyzing .................................... 36
Turning power on ................................. 36
Preparing analysis ................................. 40
Canceling analysis in progress ........ 43
Analysis completed ............................. 45
Viewing analysis results ...................... 47
Viewing results ........................... 48
Viewing results of patient’s
analysis ..................................................... 50
Viewing QC results ............................... 52
Searching results ................................... 54
Printing results ....................................... 56
Transferring results ............................... 61
Deleting results ..................................... 63
Quality control ........................... 65
Starting quality control ....................... 65
Analyzer settings
(General User Settings) ............. 69
Display settings ......................... 71
Calibration
(touch screen calibration) .................. 72
LCD Brightness ...................................... 73
Screensaver settings ............................ 74
LCD O settings .................................... 75
Volume settings ........................ 76
Analysis settings .......................77
Unit settings ........................................... 78
Change order ......................................... 80
Reference range settings .................. 82
QC material ................................. 84
Registering QC Material ...................... 84
Changing QC material ........................ 89
Deleting QC material .......................... 91
Print settings .............................. 93
Barcode settings .......................95
Language settings .................... 97
Self-test ....................................... 99
Analyzer settings
(Administrator Settings) .........103
Lock settings ............................105
Setting security levels for each
function .................................................. 105
Locking quality control ....................107
Changing password ..........................109
Network settings .....................112
Connecting to a network .................112
Setting network connections ........114
Setting EMR/LIS ...................................116
Lock settings.............................117
Changing Date&time
format .......................................119
System settings .......................121
System Reset .......................................123
USB Backup ..........................................127
System updates ..................................129
Turning o power ....................131
36
Analyzing
ŶAnalyzing
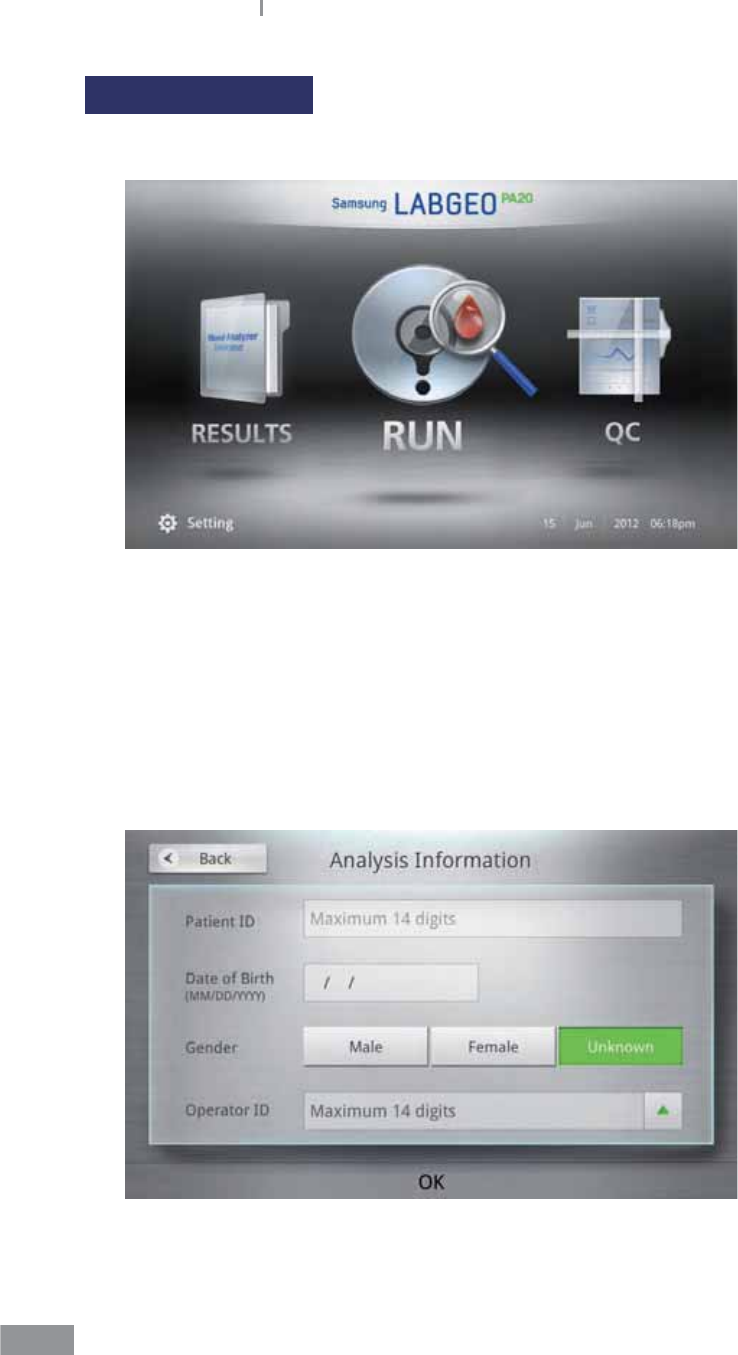
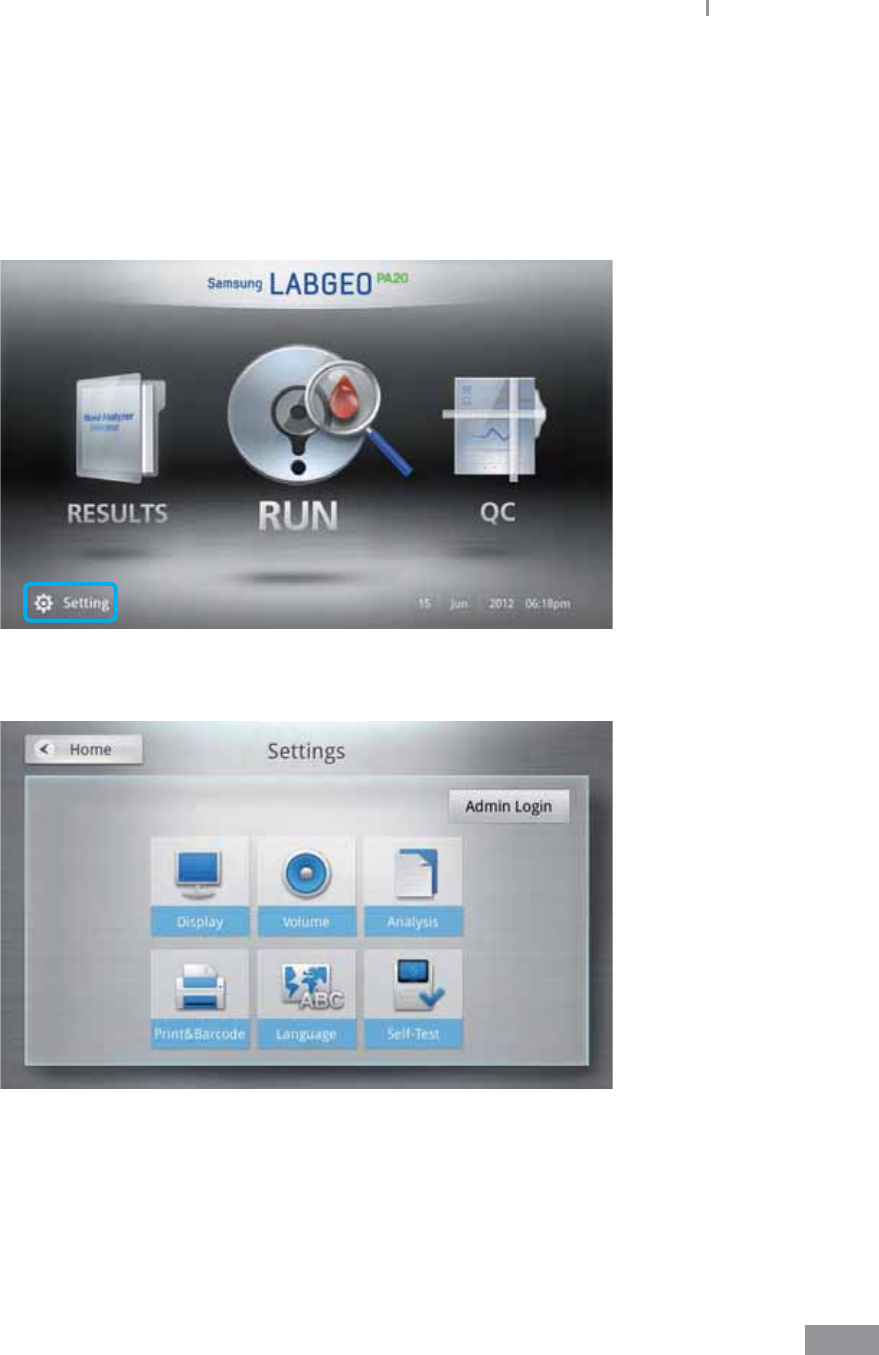
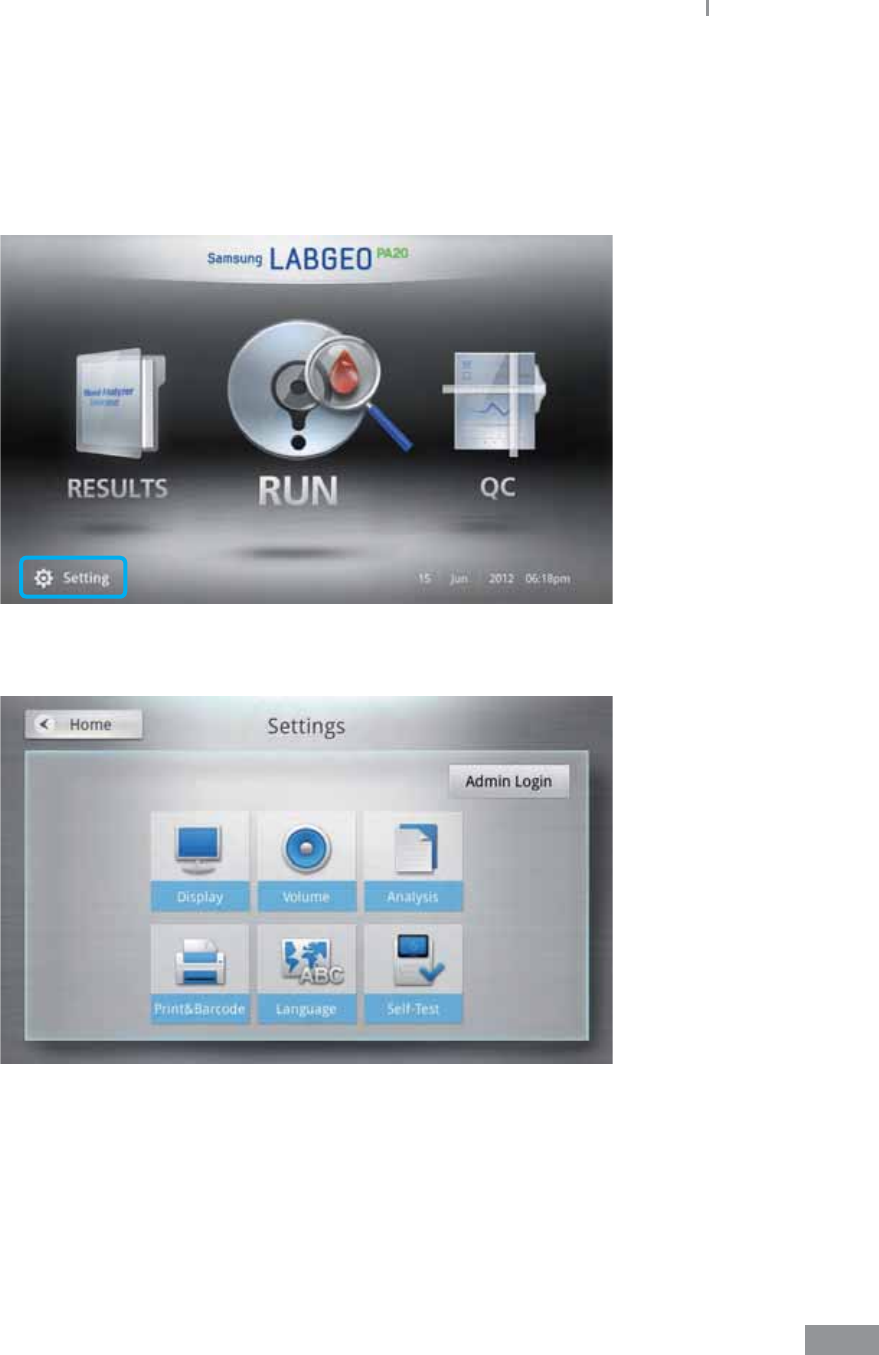
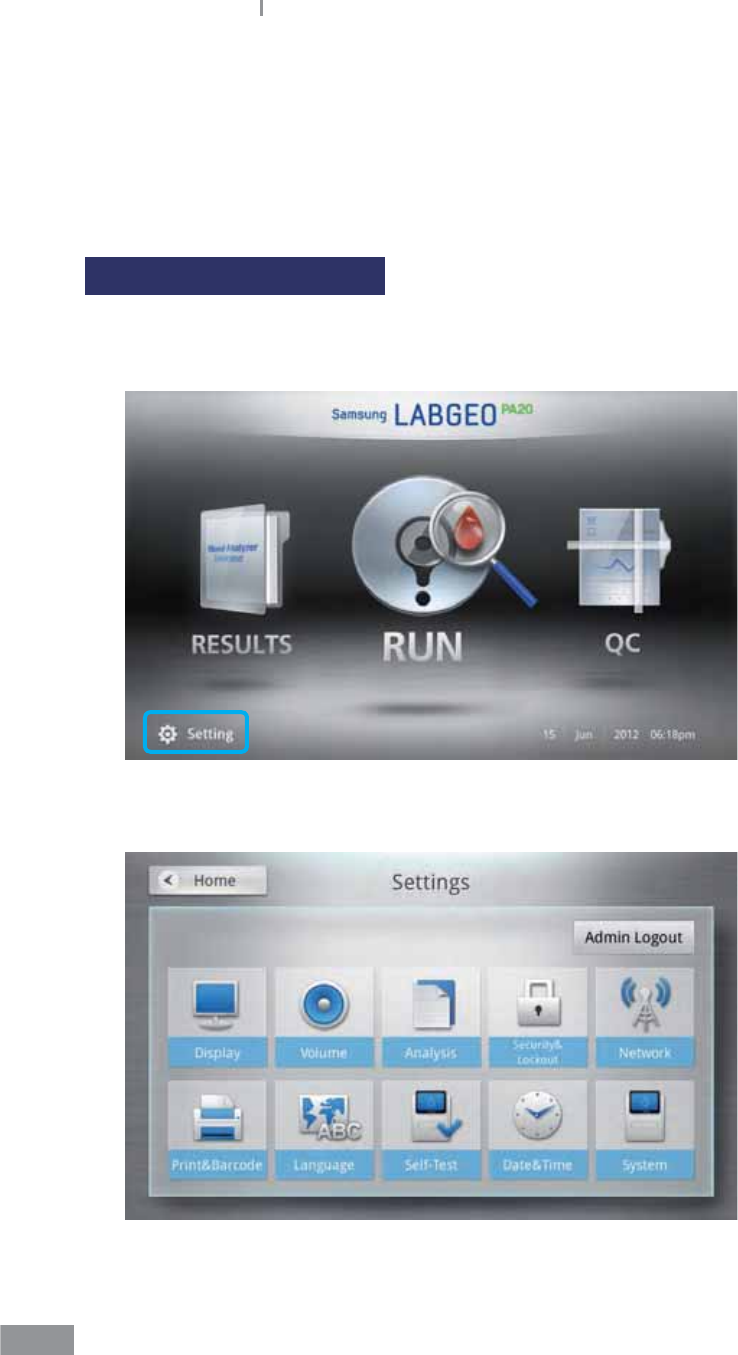
Turning power on
1 Before beginning analysis, turn the device’s power on.
Turn the analyzer’s power on. (Set the power switch in the back to ON, and
press the POWER button on the front of the device.)
Once the analyzer is turned on, it requires about 2~5minutes to preheat.
If the power doesn’t turn on, refer to page 159 “7. Troubleshooting”.
37
Samsung LABGEO PA20 Analyzing
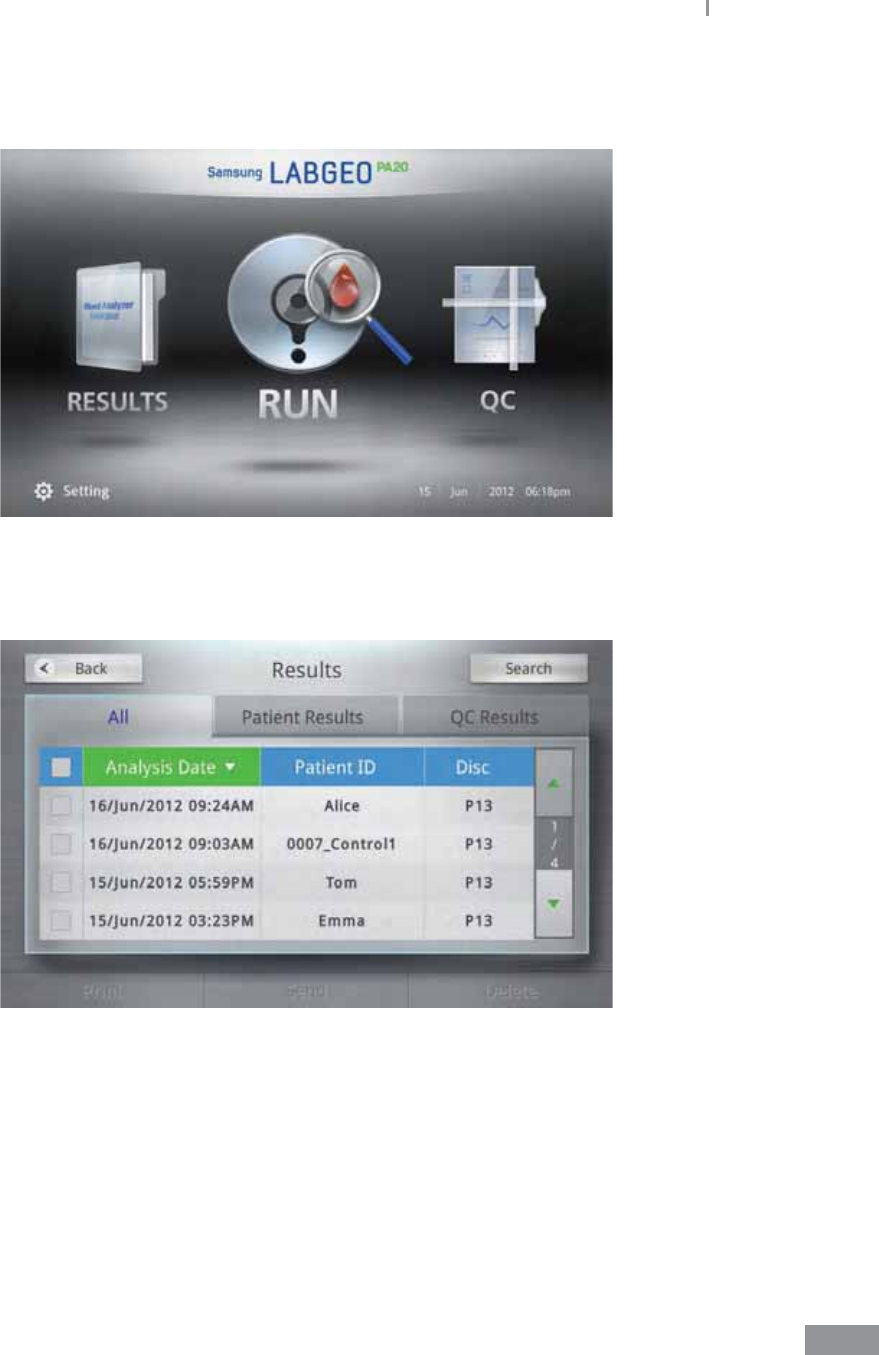
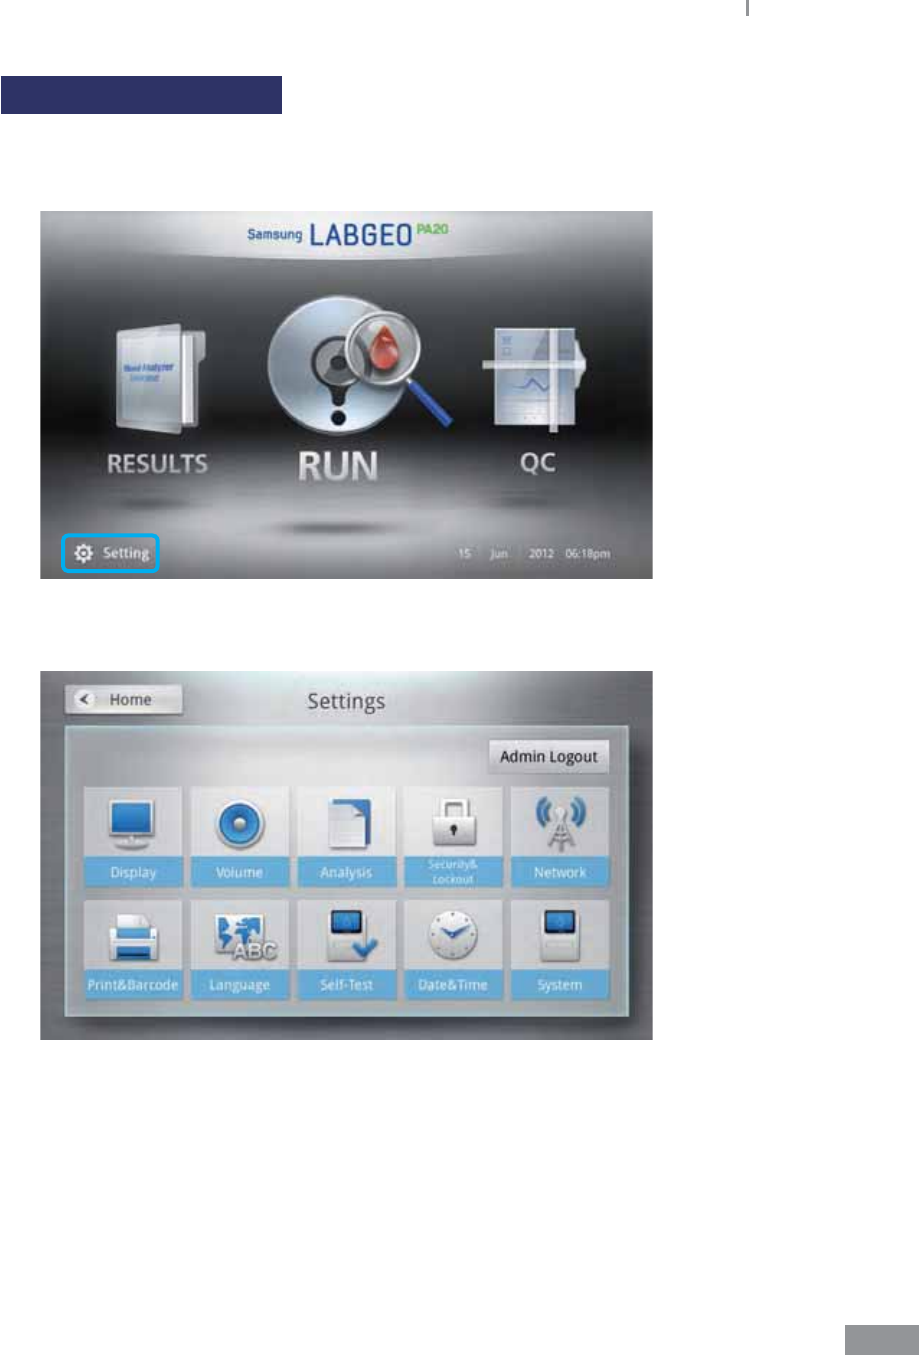
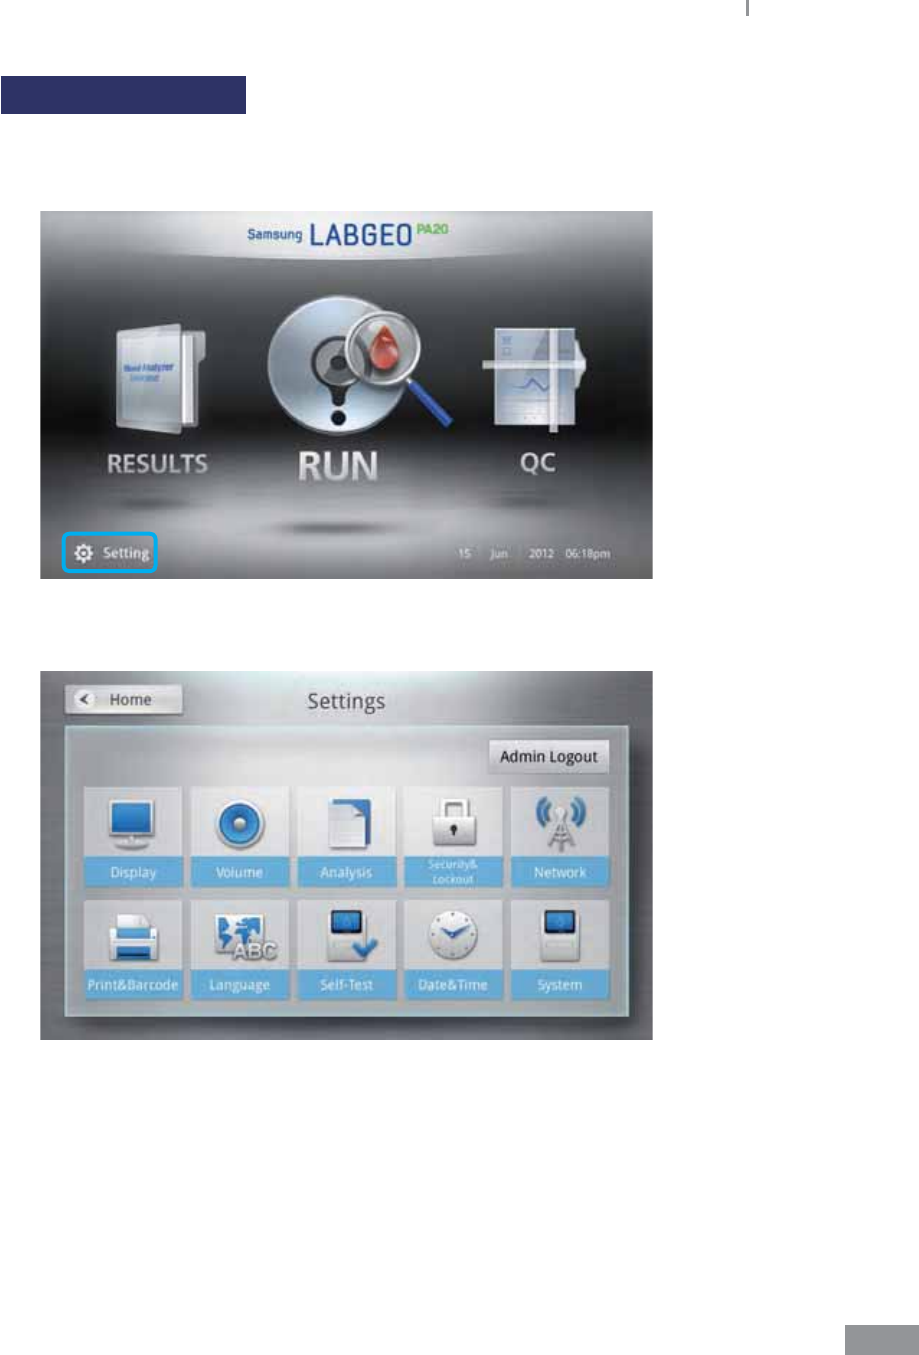
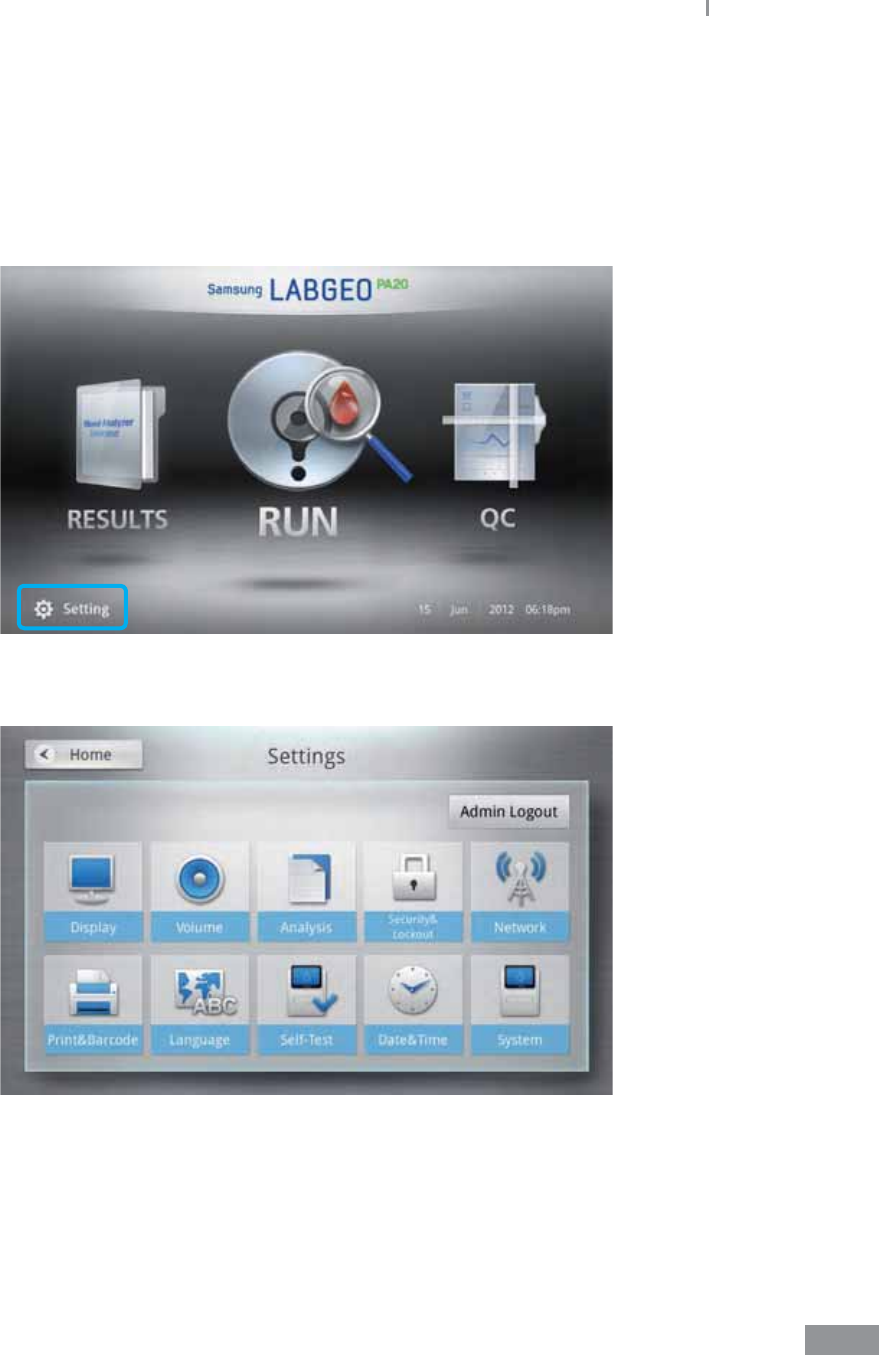
2 Once the analyzer is turned on, it performs a hardware check, and the home screen,
shown below, is displayed.
1. Results: Select Results menu to view the results of a completed analysis. Please
refer to ‘4. Analyzing - Viewing results (page 48)’ for more details.

38
Samsung LABGEO PA20 Analyzing
2. Analysis Information: Select Run menu to enter analysis information and perform
blood analysis.
3. QC Run: This is the start menu of QC Run.
39
Samsung LABGEO PA20 Analyzing
4. Settings: Select Settings menu to adjust display, volume, analysis, language,
peripherals and self-testing options. When logging in as an administrator, you can
view the status of locking, network, time, and system settings.
40
Samsung LABGEO PA20 Analyzing
Preparing analysis
1 Press the Run button.
ŶUp to 5,000 analysis results can be stored on the analyzer. The device shows a backup
warning when the available space is less than 100 records. Please refer to ‘4. Analyzing
- USB Backup (page 127)’ for instructions on backing up analysis results.
2 Screen for entering Analysis Information is displayed on the LCD. Enter patient
information and press the OK button.
t To display the keypad, tap on an empty eld.
t You may enter the Patient ID by scanning a barcode with the barcode scanner.
41
Samsung LABGEO PA20 Analyzing
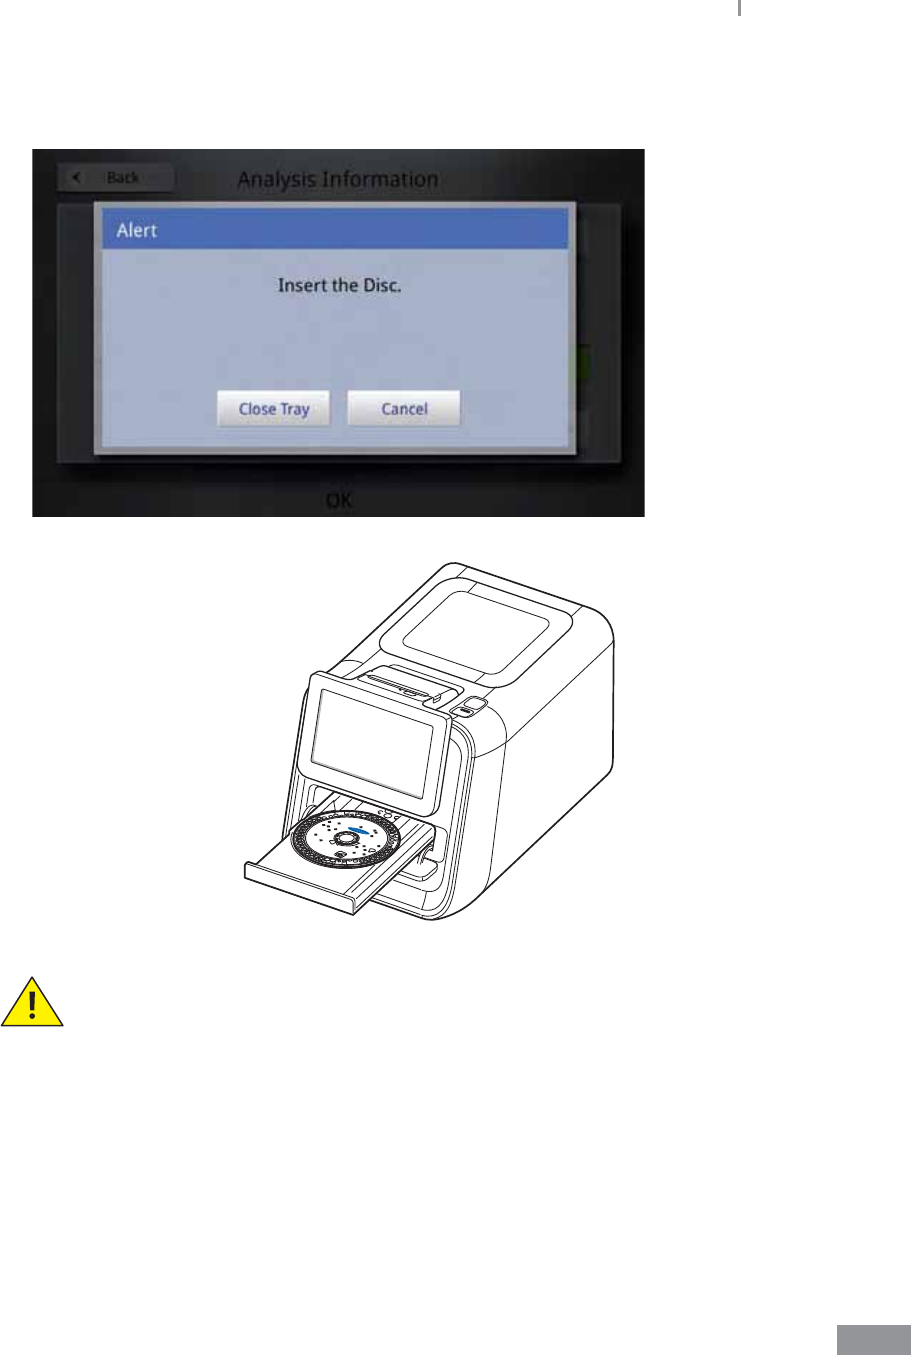
3 Insert a disc loaded with a sample into the tray when it opens, and press the Run
button.
The disc tray closes automatically if the Run button is not tapped within
30seconds after inserting the disc.
42
Samsung LABGEO PA20 Analyzing
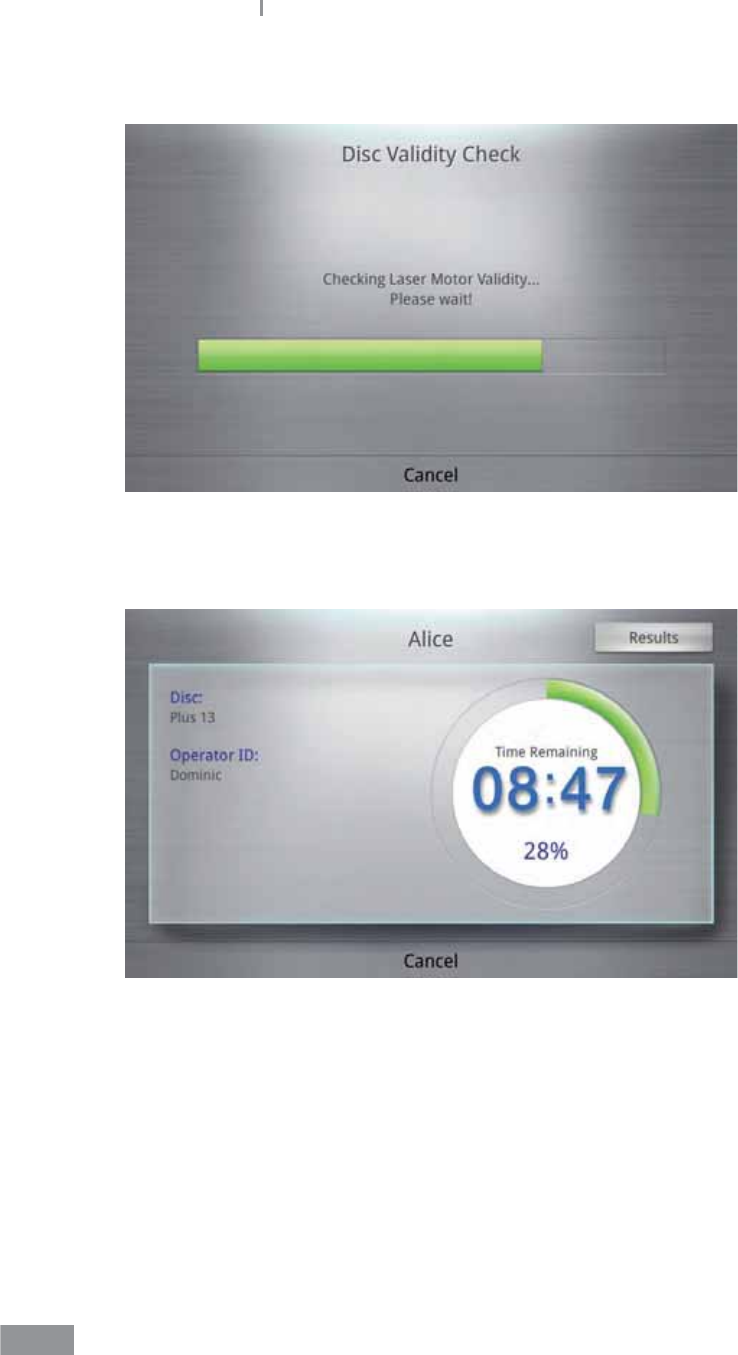
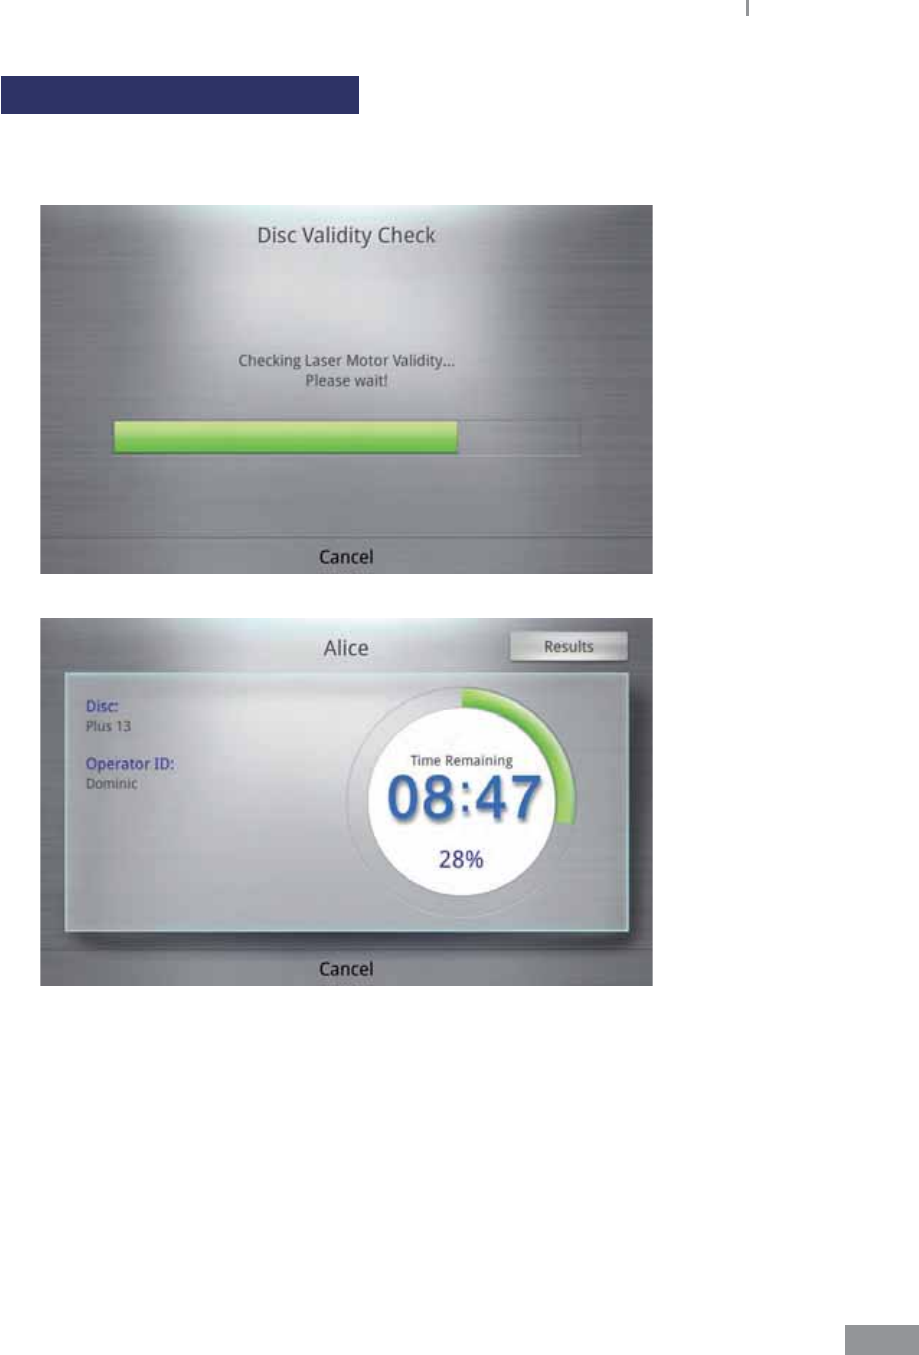
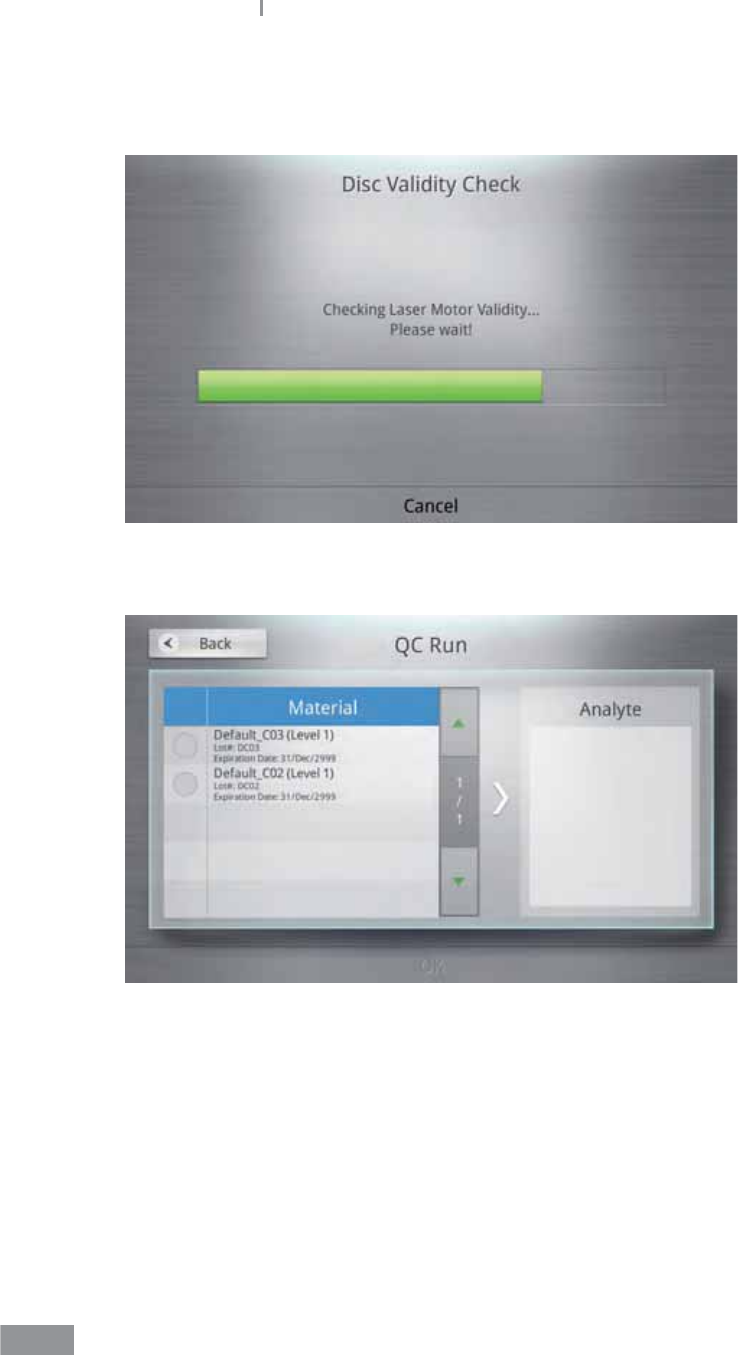
4 As the tray closes, the analyzer performs a disc validity check.
5 After completing the validity check, the test starts while the remaining time and
progress is displayed on the screen.
43
Samsung LABGEO PA20 Analyzing
Canceling analysis in progress
1 To cancel a test for Disc Validity Check or during the blood analysis stage, press the
Cancel button.
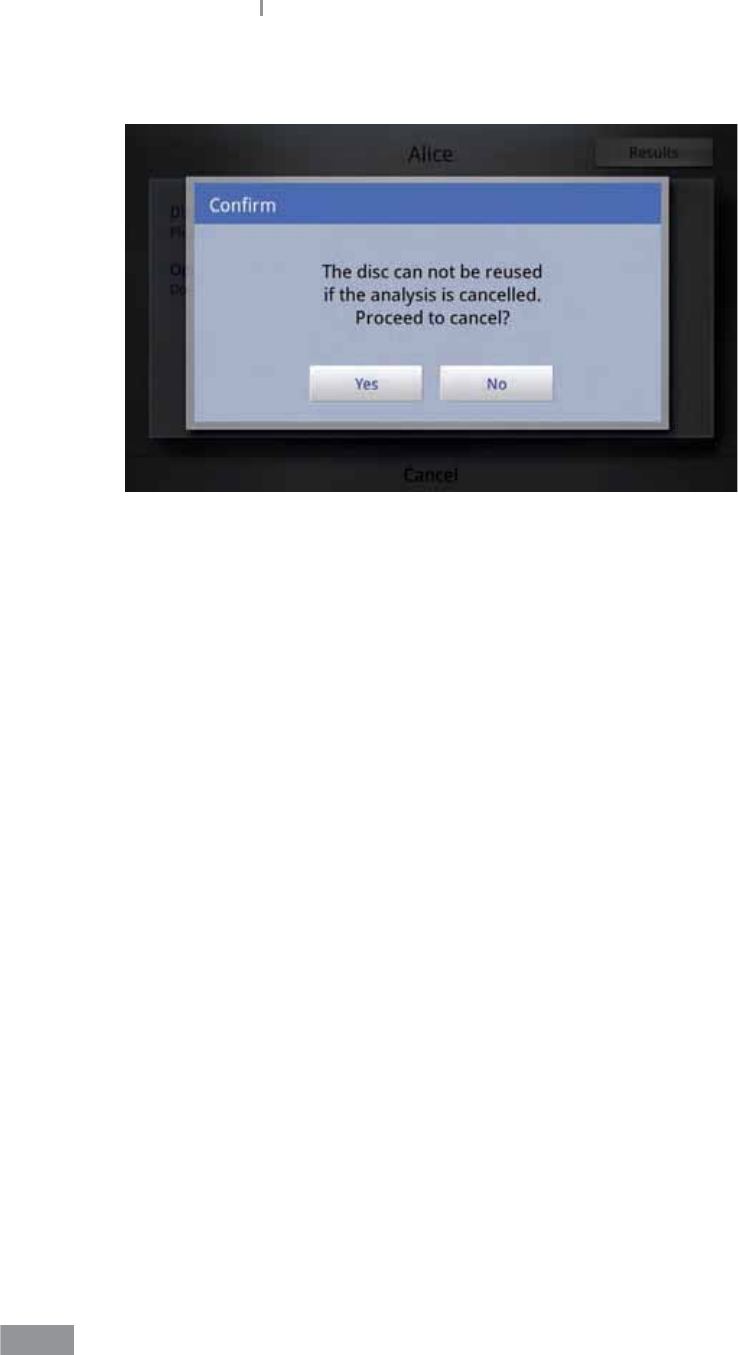
44
Samsung LABGEO PA20 Analyzing
2 Press the Yes button to cancel, and the No button to resume the analysis.
ŶWhen an analysis in progress is canceled, the disc cannot be used again.
45
Samsung LABGEO PA20 Analyzing
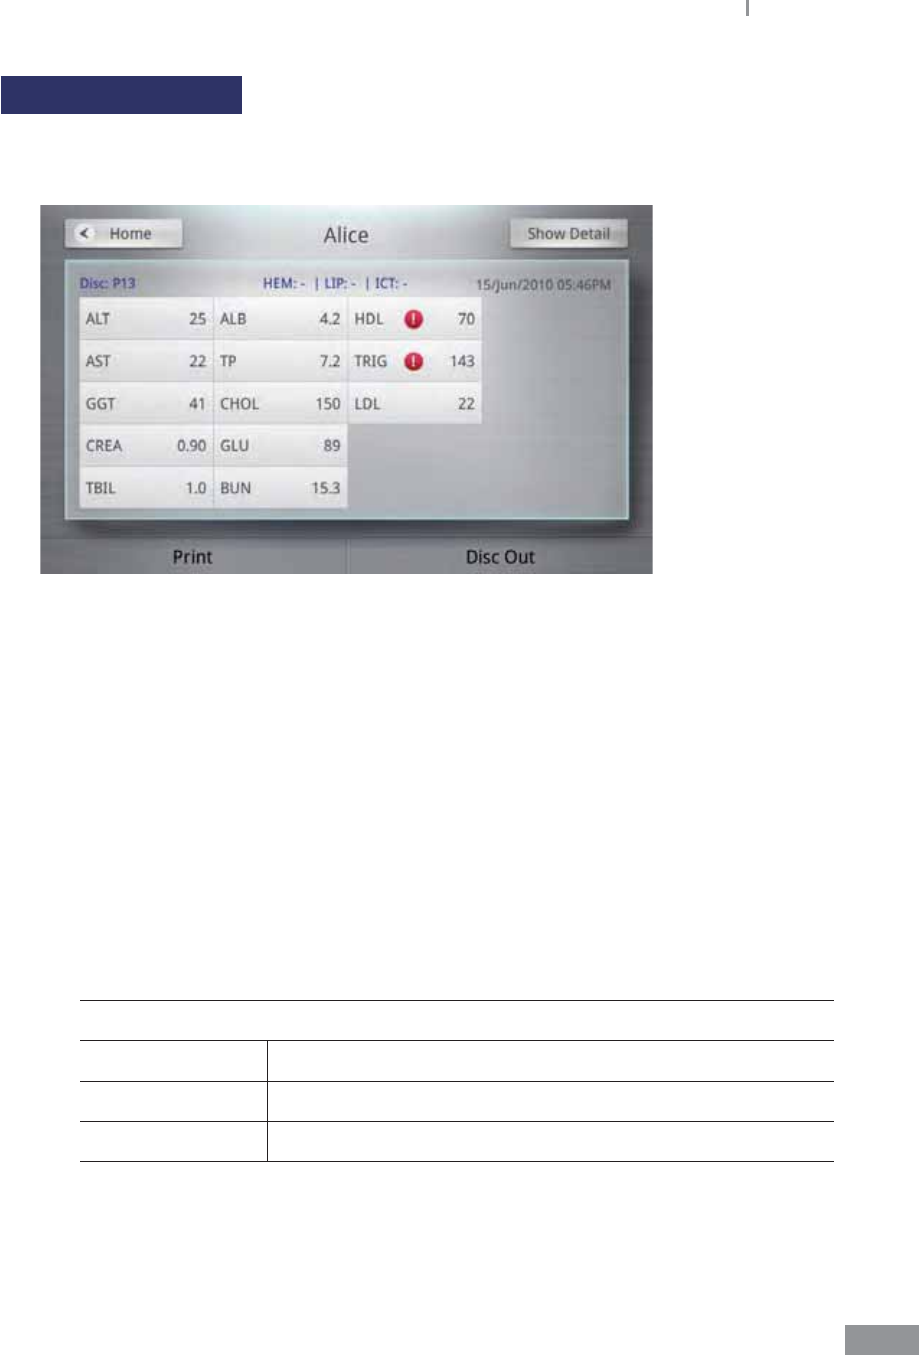
Analysis completed
1 When the analysis is completed, an audio notication plays and the analysis results are
displayed on the LCD.
t Analytes and analysis results are displayed.
t If auto-print is turned on, the device automatically prints the analysis results upon
completion.
9For instructions on adjusting auto-print settings, please refer to
“Settings–Peripherals” (page 93).
t If the device is connected to a PC, the analysis results are automatically transmitted
to the PC application(LABGEO DATA MANAGER) upon completion.
9For more details on the PC software (LABGEO Data Manager), please refer to
page 133.
t If the EMR/LIS settings are correctly set, the analysis results are automatically
transmitted to the EMR/LIS server program.
9Please refer to page 116 for instructions on setting the EMR/LIS.
Glossary
HEM (Hemolysis) Specimen’s level of hematolysis
LIP (Lipemia) Specimen’s level of lipemia
ICT (Icterus) Specimen’s level of icterus
46
Samsung LABGEO PA20 Analyzing
The following symbols are displayed when the results are not within normal values.
When results exceed the reference range
When results exceed the analyzer’s detection range
When QC fails
Tip The audio notication for completion of the test can be adjusted. To adjust the
volume, please refer to Settings – Volume (page 76).
2 Press the button to remove disc from the open tray.
47
Samsung LABGEO PA20 Analyzing
Viewing analysis results
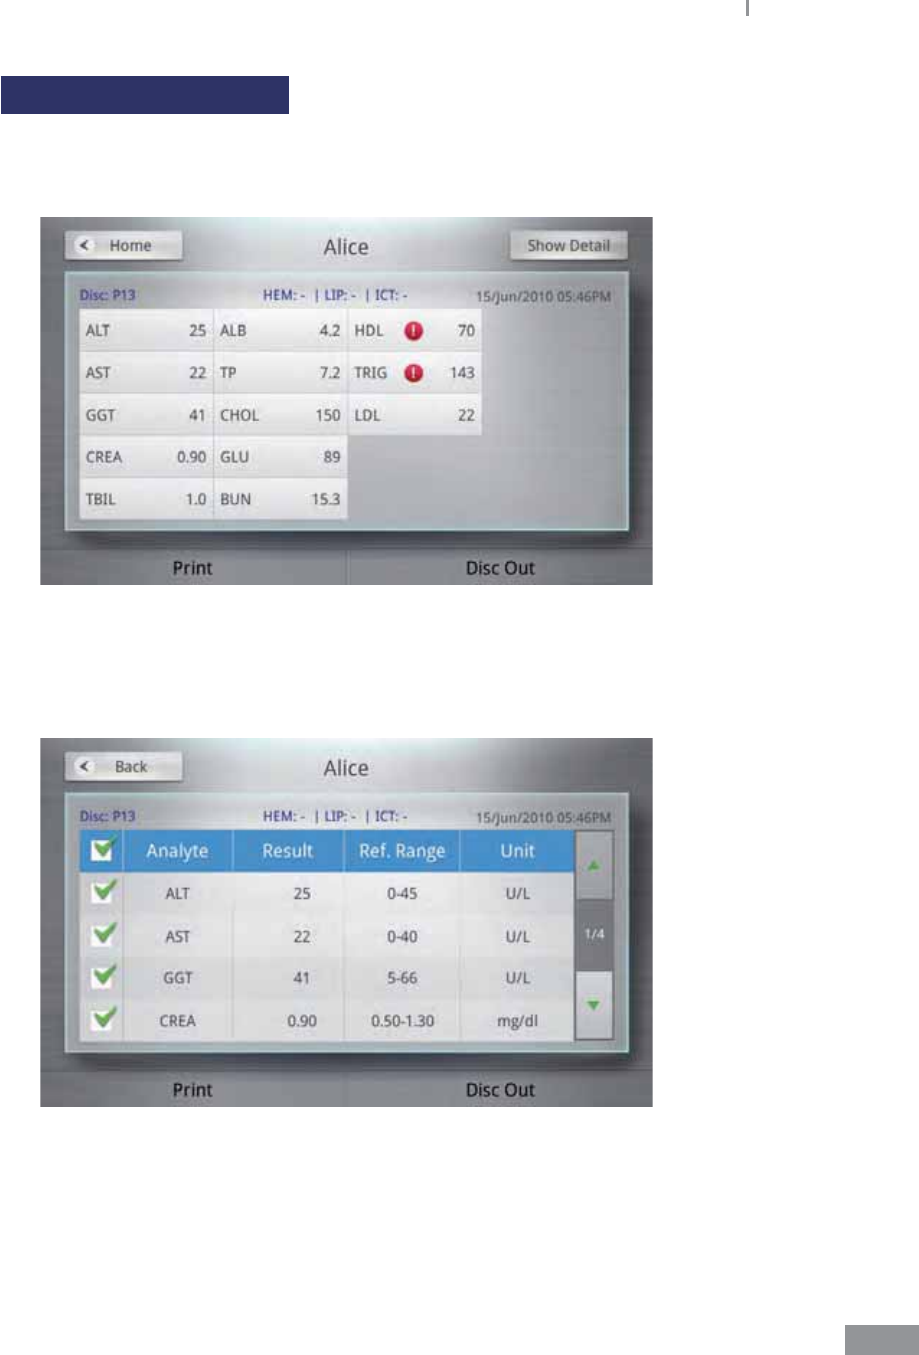
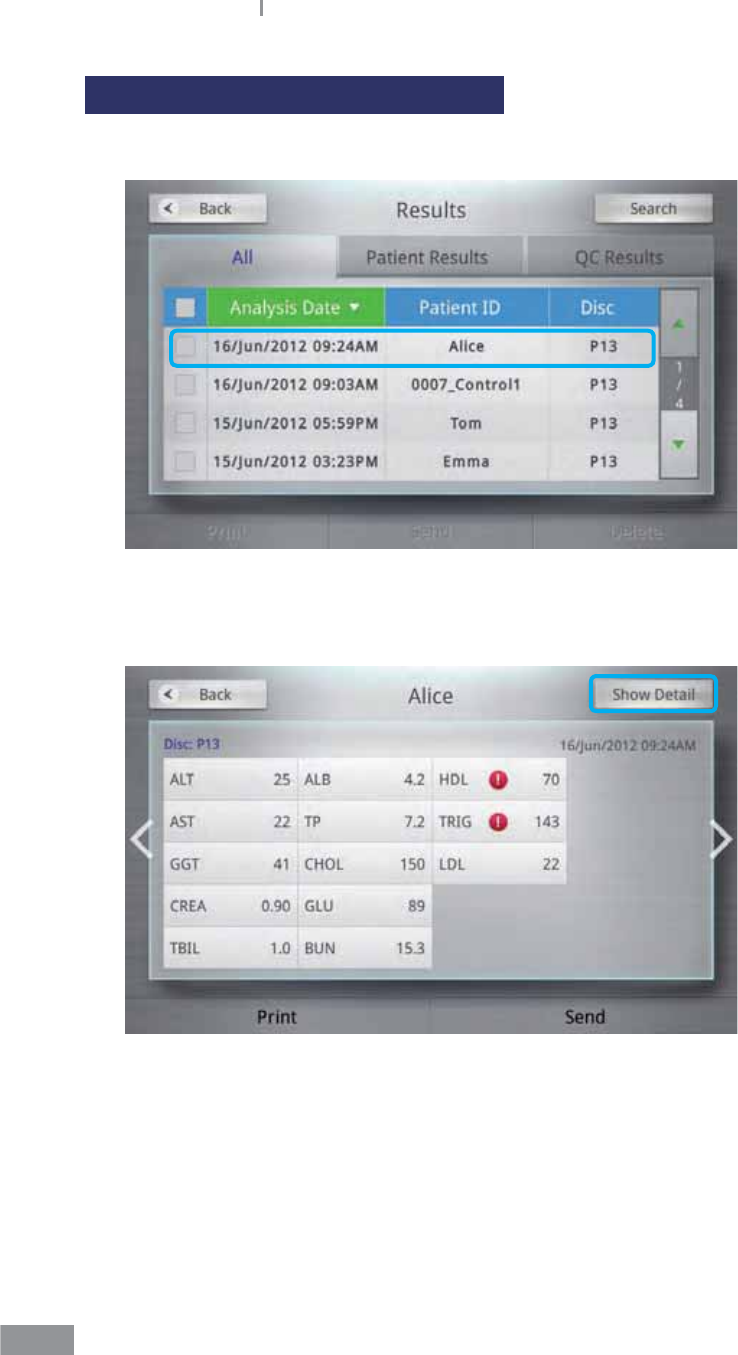
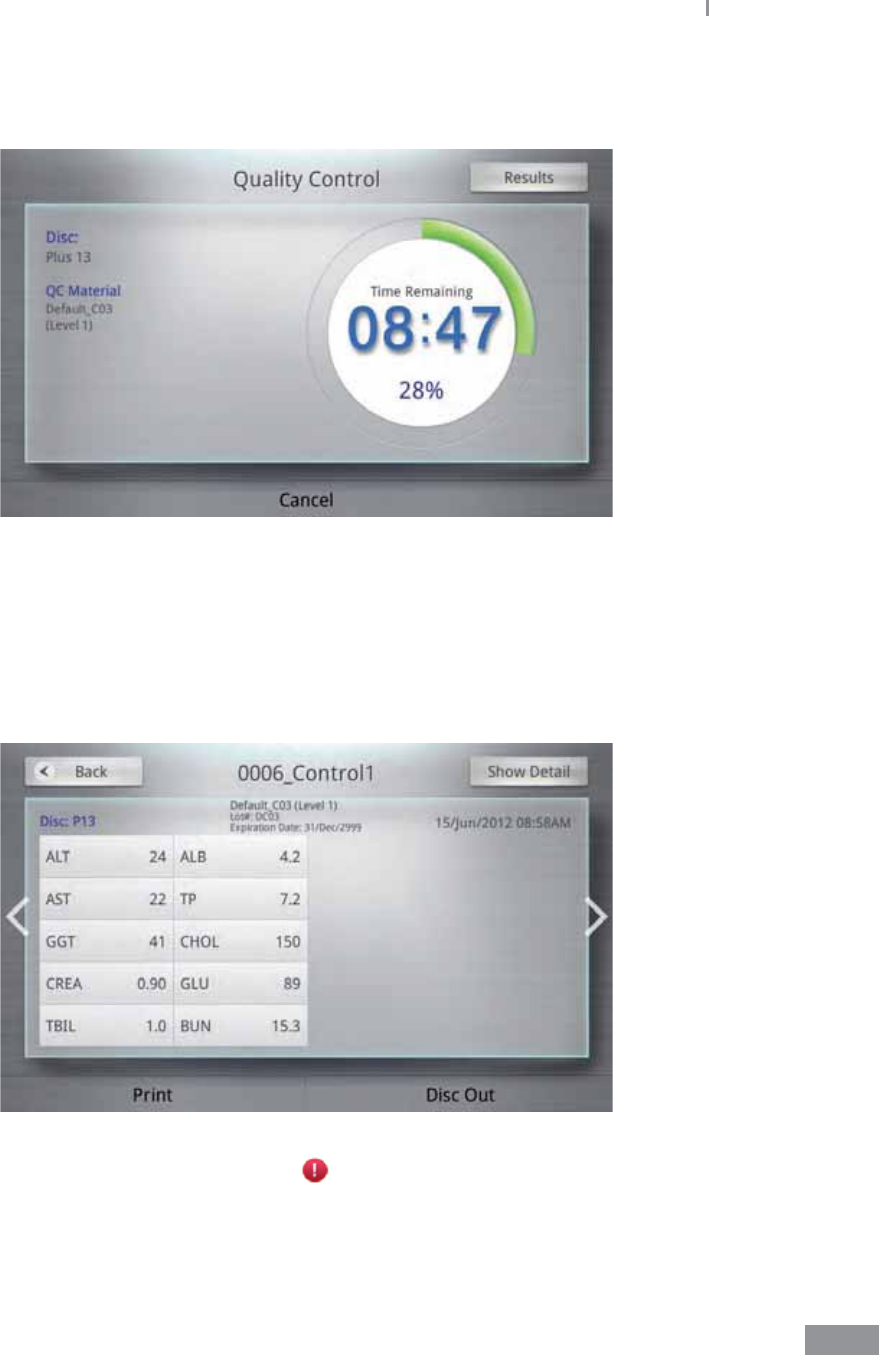
1 Once the analysis is completed, the results are displayed on the LCD.
t Analysis results can also be viewed by selecting Results on the home menu.
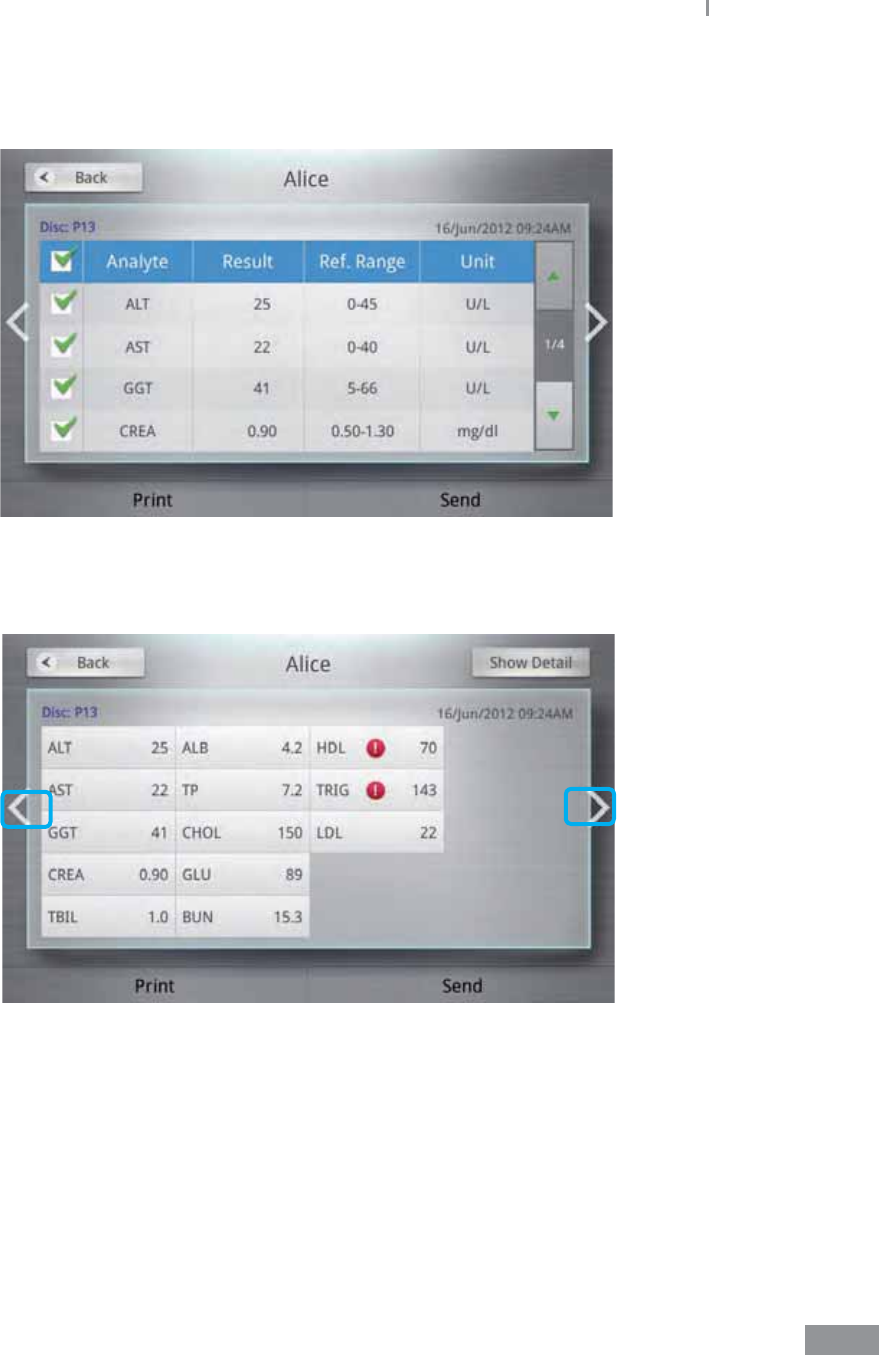
2 To view detailed results of each analyte, press the Show detail button on the upper
right corner.
t Press the Up/Down button to select an analyte from the list.
48
Samsung LABGEO PA20 Analyzing
ŶViewing results
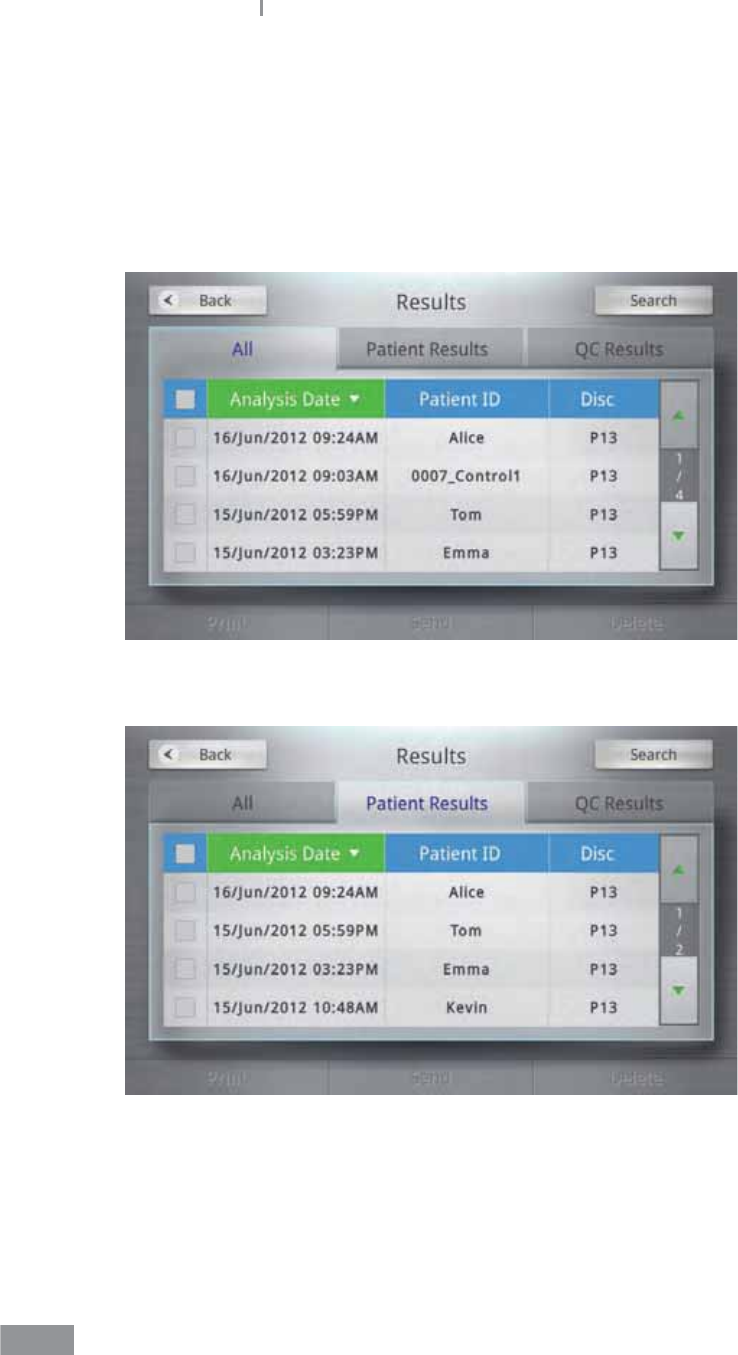
Press the Result button on the home screen to display the Results.
Results are grouped by All, Patient and Material QC.
ŶAll
ŶPatient
49
Samsung LABGEO PA20 Analyzing
ŶQuality Control
50
Samsung LABGEO PA20 Analyzing
Viewing results of patient’s analysis
1 Press the Patient Results button to enter the Simple View screen.
2 To view detailed results of each analyte, press the Show Detail button in the upper-
right corner.
51
Samsung LABGEO PA20 Analyzing
3 When you select the patient ID, you can view the patient’s date of birth, gender and
operator ID.
4 To switch to the previous or next result screen, press the arrow buttons on the left and
right side of the screen.
52
Samsung LABGEO PA20 Analyzing
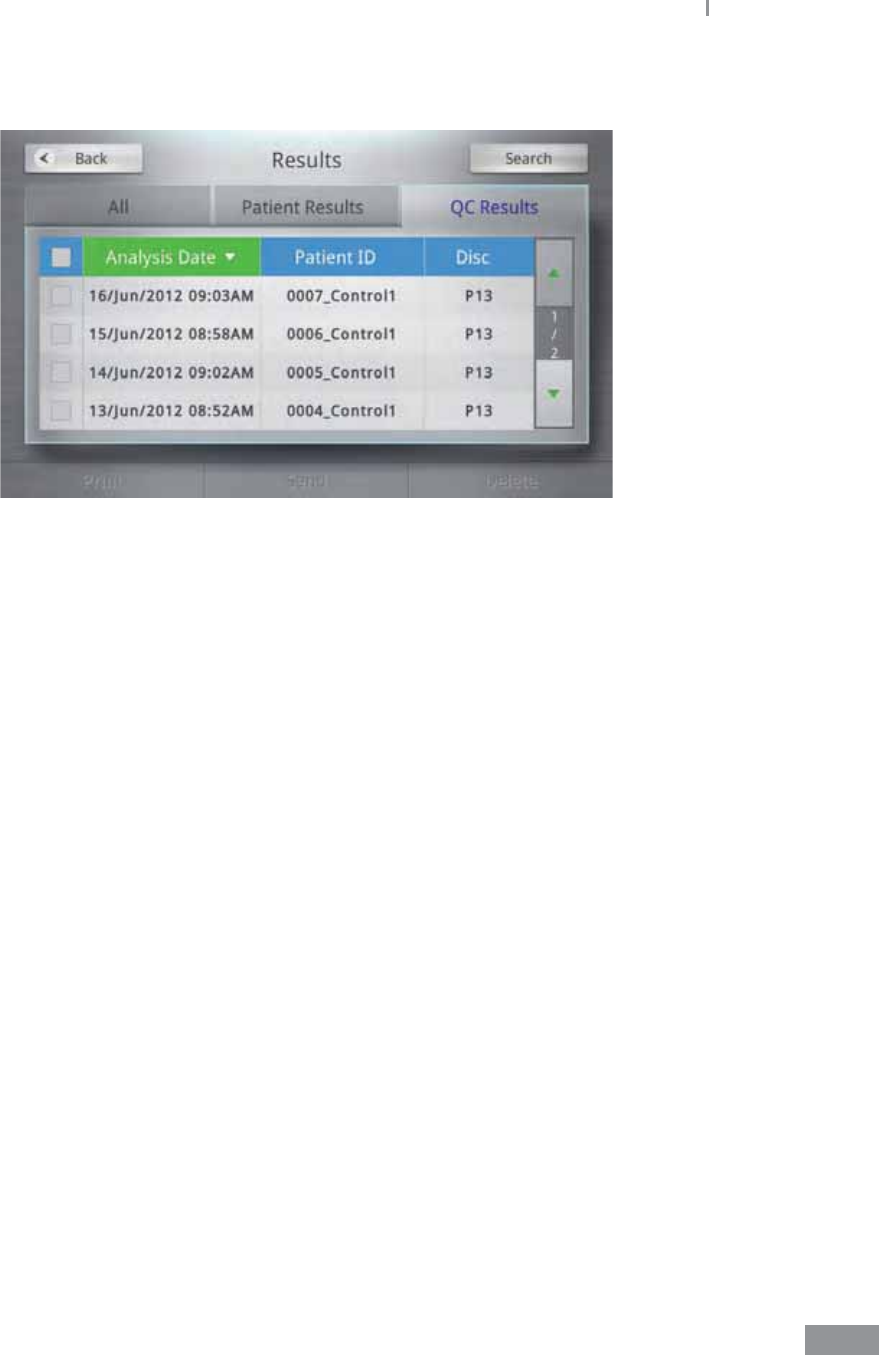
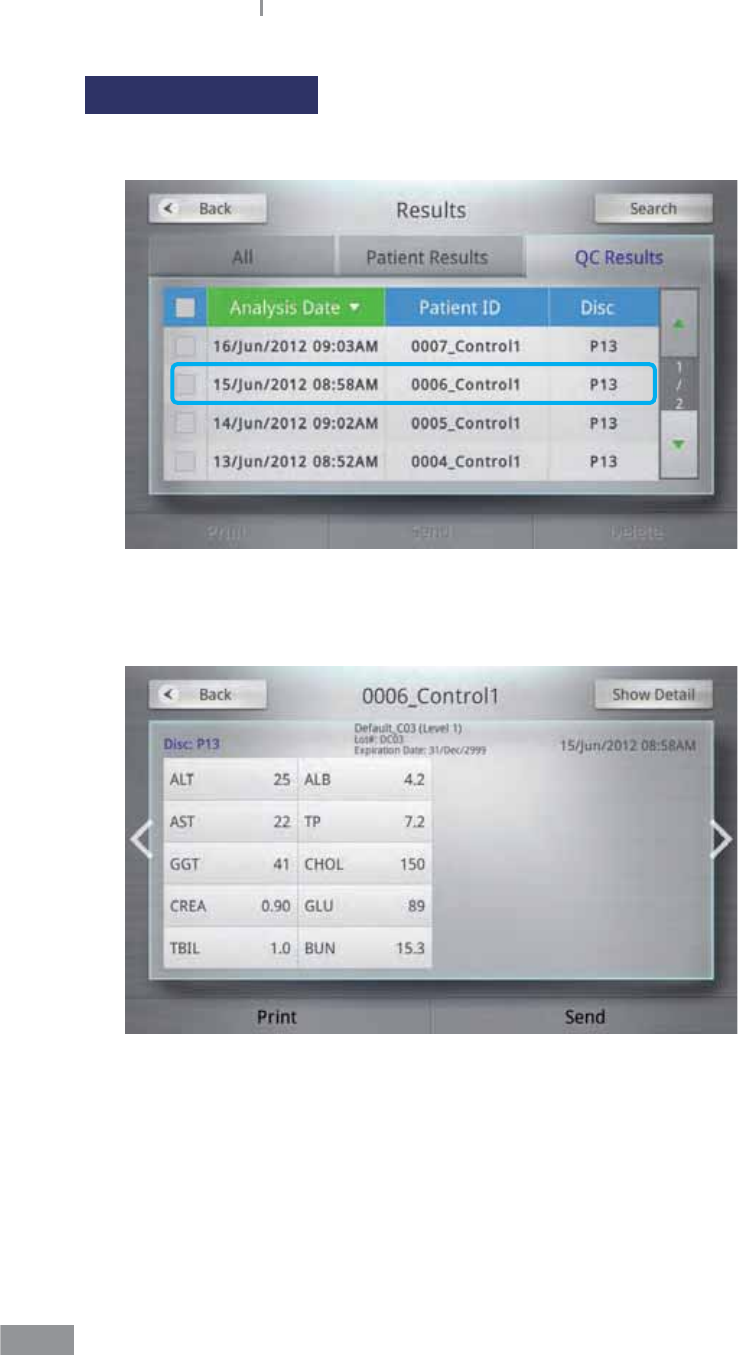
Viewing QC results
1 Press the QC Results button to switch to the simple view screen.
2 To view detailed results of each analyte, press the Show Detail button on the upper
right corner.
53
Samsung LABGEO PA20 Analyzing
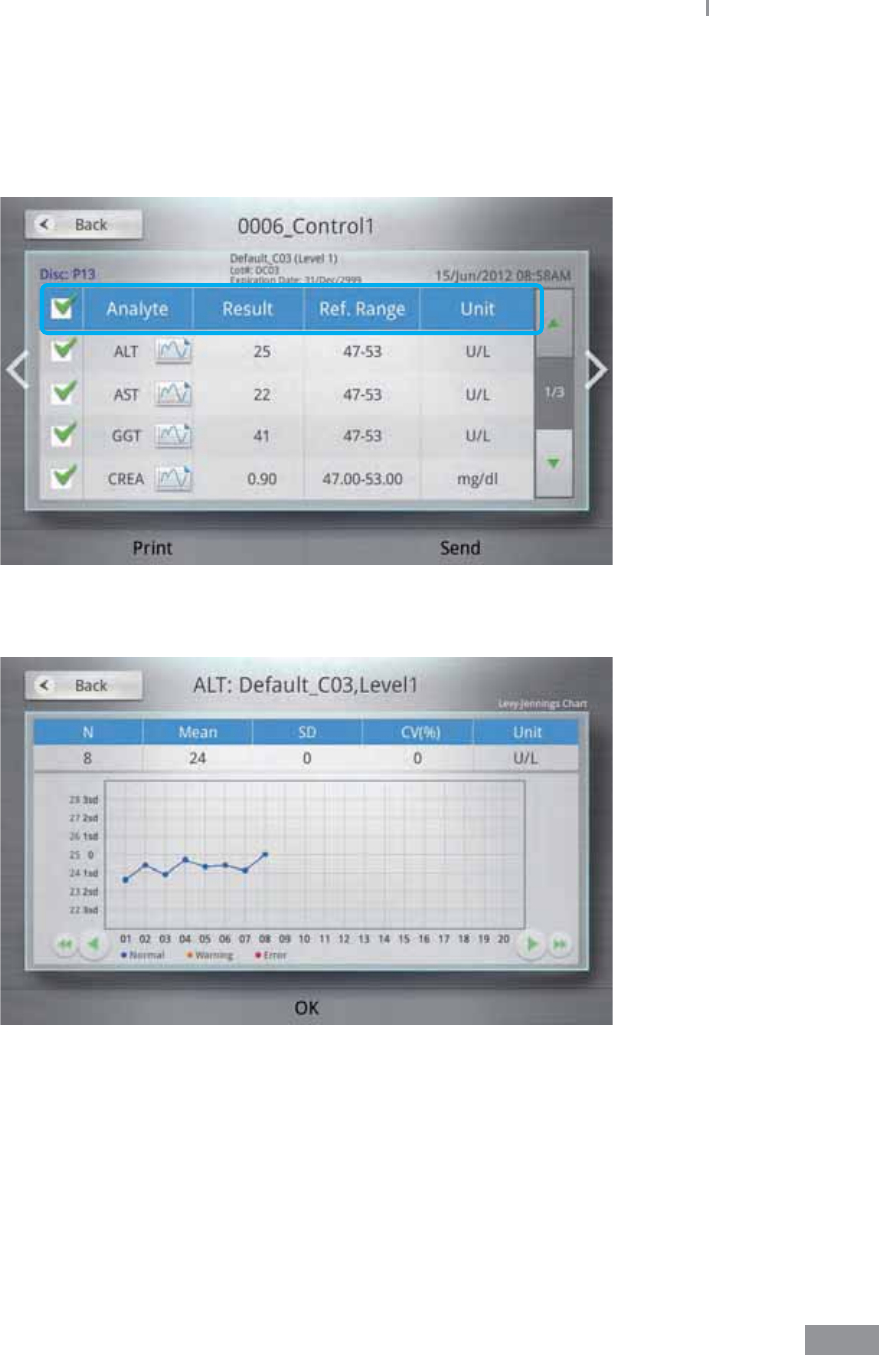
3 To switch between the simple view and show detail screens, press the arrow buttons
on the left and right side of the screen.
4 Press each analyte to enter the QC chart screen.
5 QC chart screen displays the QC results of each analyte in a graph.
54
Samsung LABGEO PA20 Analyzing
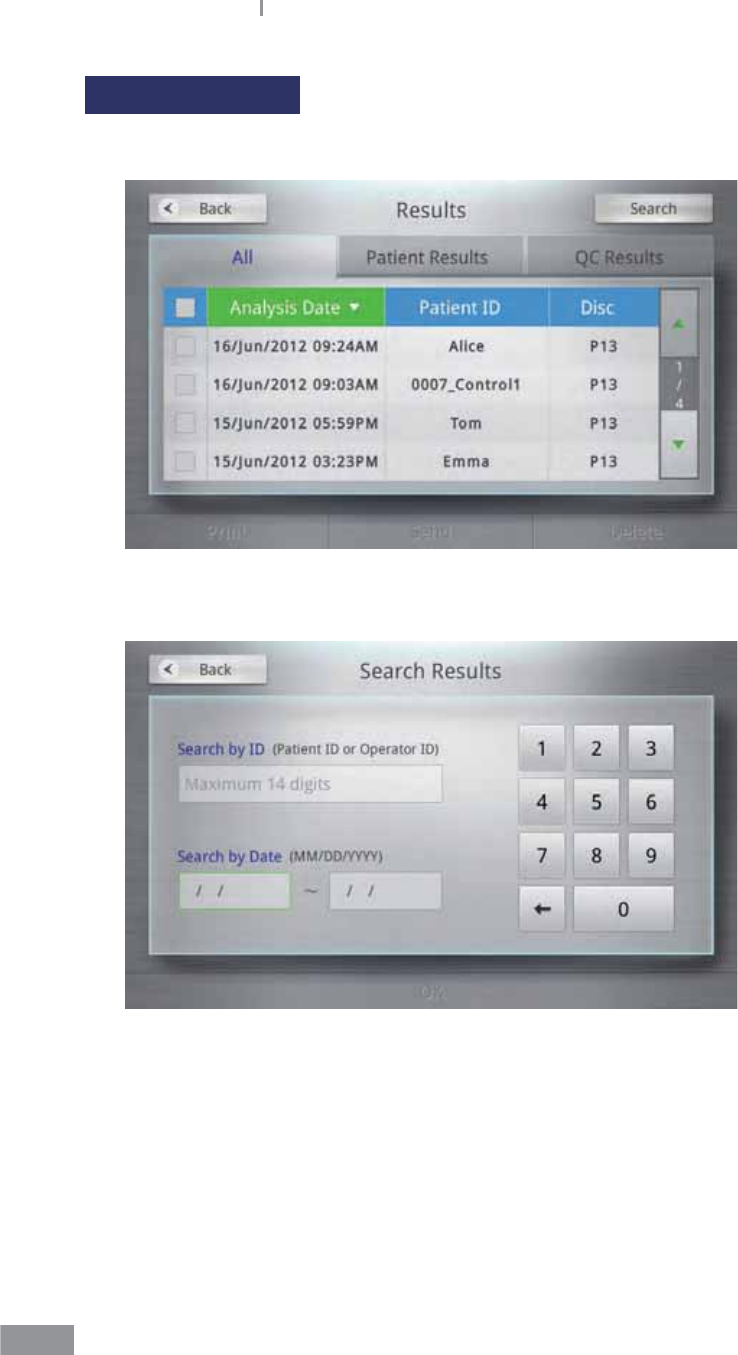
Searching results
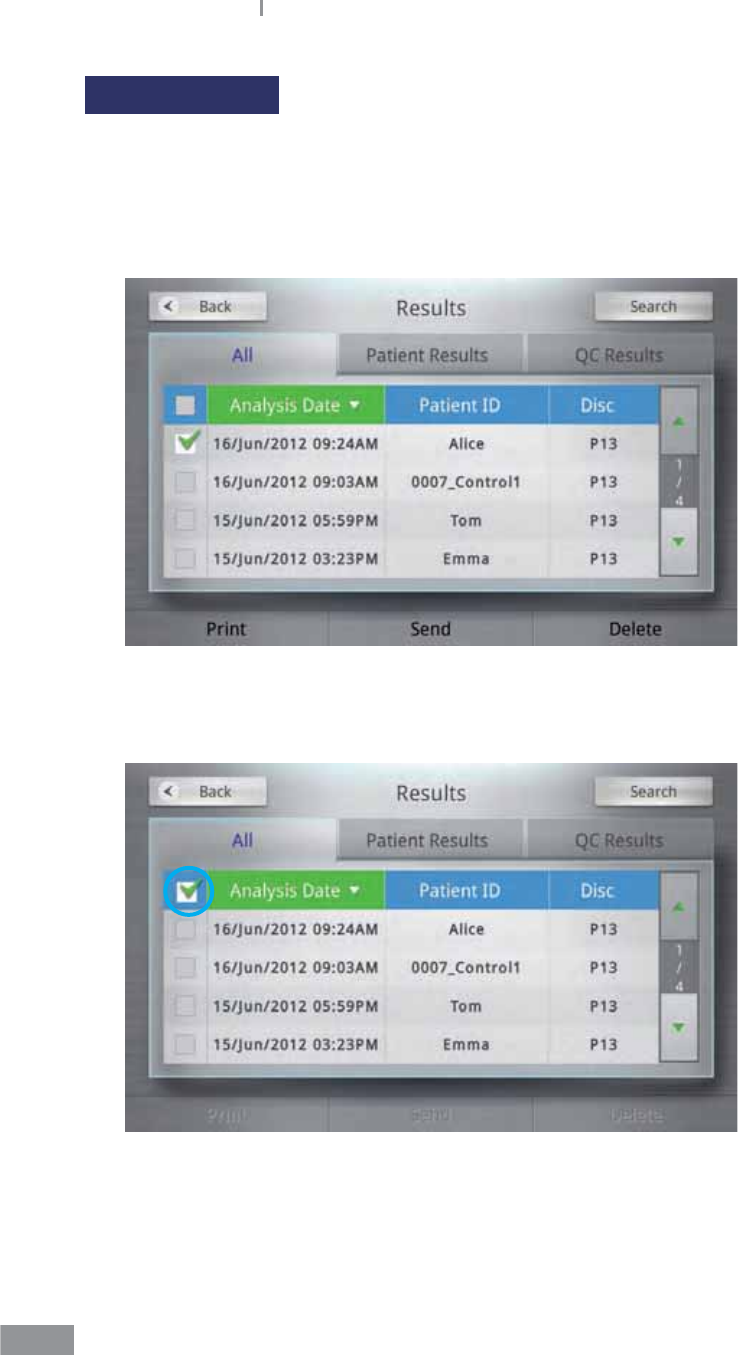
1 Press the Results button on the home screen to display the Results screen.
2 Press the Search button in the upper-right corner to enter the Search Results screen.
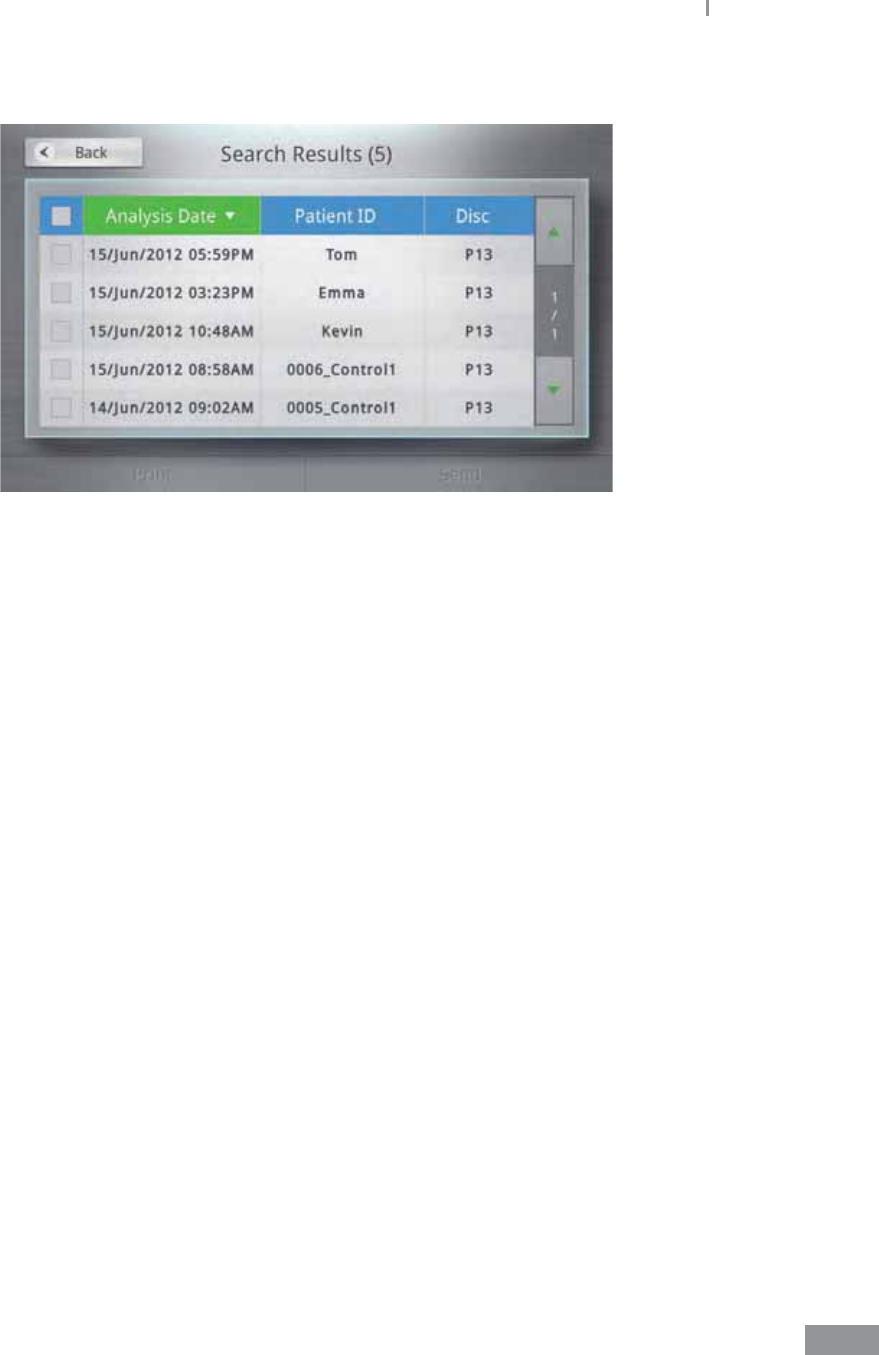
55
Samsung LABGEO PA20 Analyzing
3 Enter an ID or date and press the OK button to see matching results.
4 To print the results, select the results you wish to print and press the Print button.
To transfer the results to a PC software (LABGEO Data Manager) or EMR/LIS, select the
results you wish to transfer and select the Send button.
56
Samsung LABGEO PA20 Analyzing
Printing results
Printing analysis results, including patient ID in certain languages, requires the analyzer’s
language setting to be set in that language to print correctly.
Printing multiple analysis results
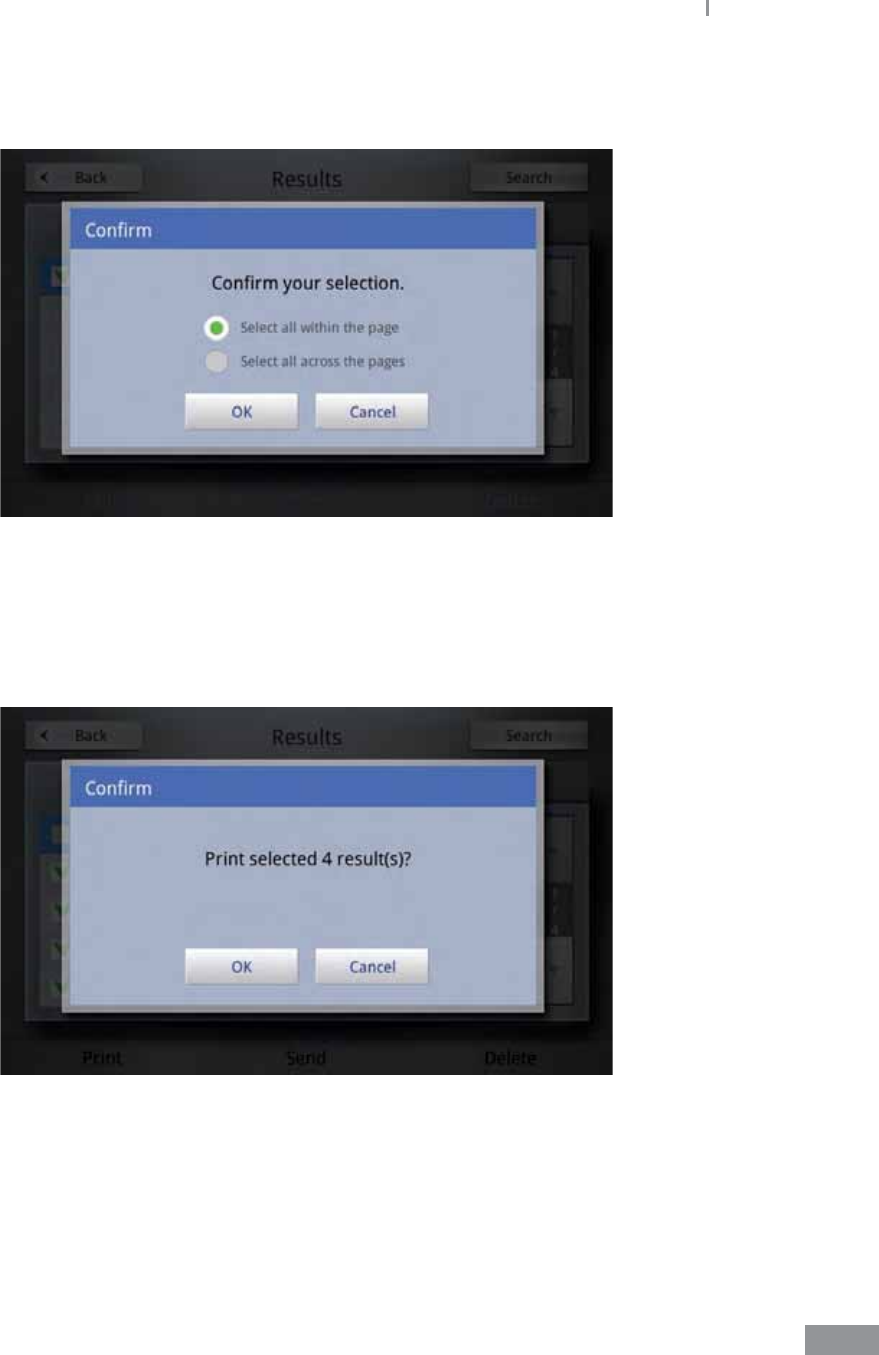
1 From the results screen, check the boxes next to the results you wish to print.
2 To print all the analysis results on the page or all the analysis results stored, check the
box in the upper-left corner of the chart.
57
Samsung LABGEO PA20 Analyzing
3 Select either print range option: Select all within the page or Select all across the
pages.
4 When you press the Print button, a pop-up window is displayed. Press the OK button
to begin printing.
t Press the Cancel button to cancel printing.
t Only results requested with the check box will be printed.

58
Samsung LABGEO PA20 Analyzing
5 Once the data is transferred, the printer prints the results.
Printing analysis results by analytes
Specic analytes of analysis results can be selectively printed.
1 On the Results screen, press Patient Results to enter the simple view screen.
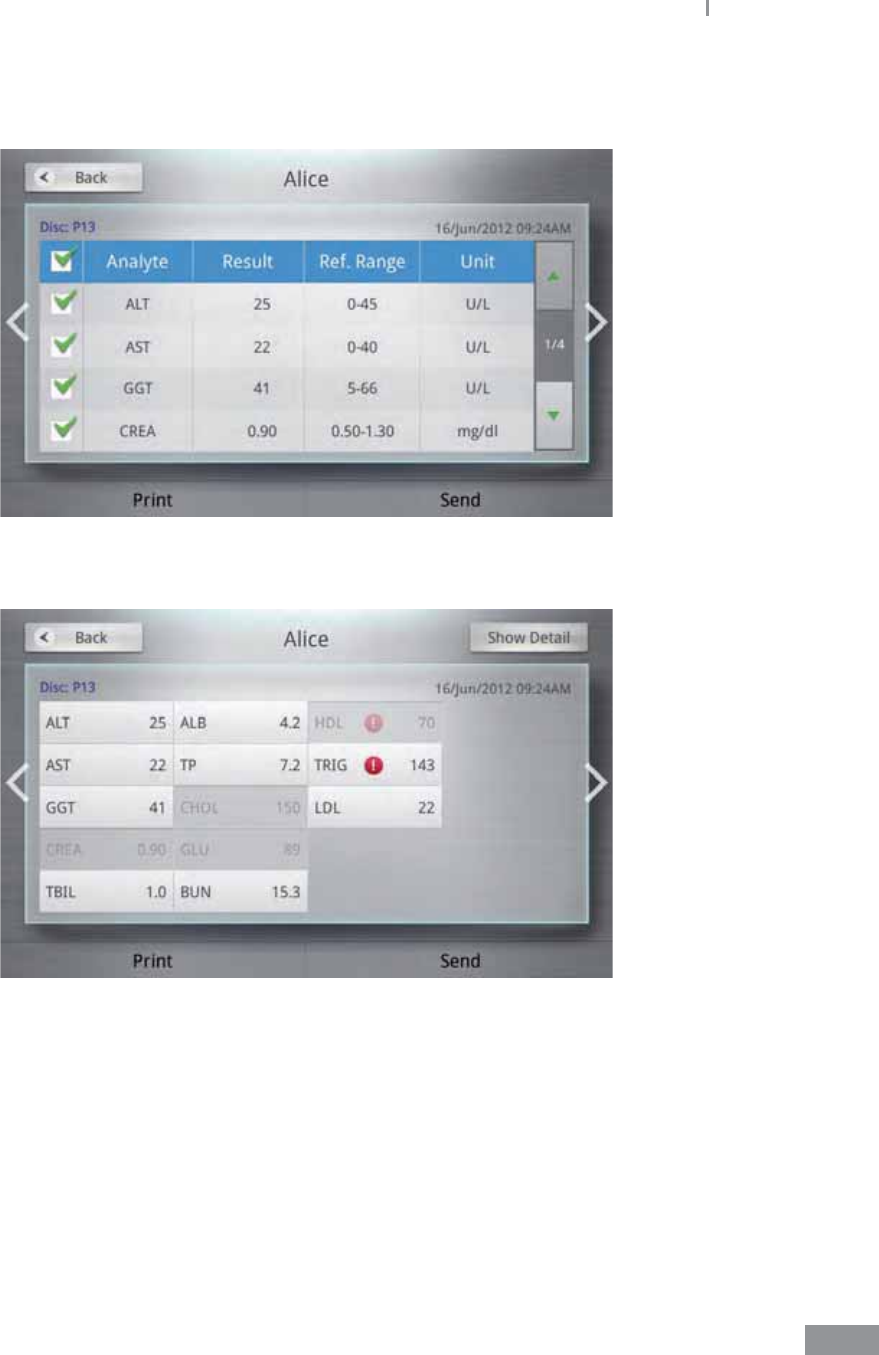
59
Samsung LABGEO PA20 Analyzing
2 In the Show detail screen, results for each analyte can be selectively printed by
checking the boxes.
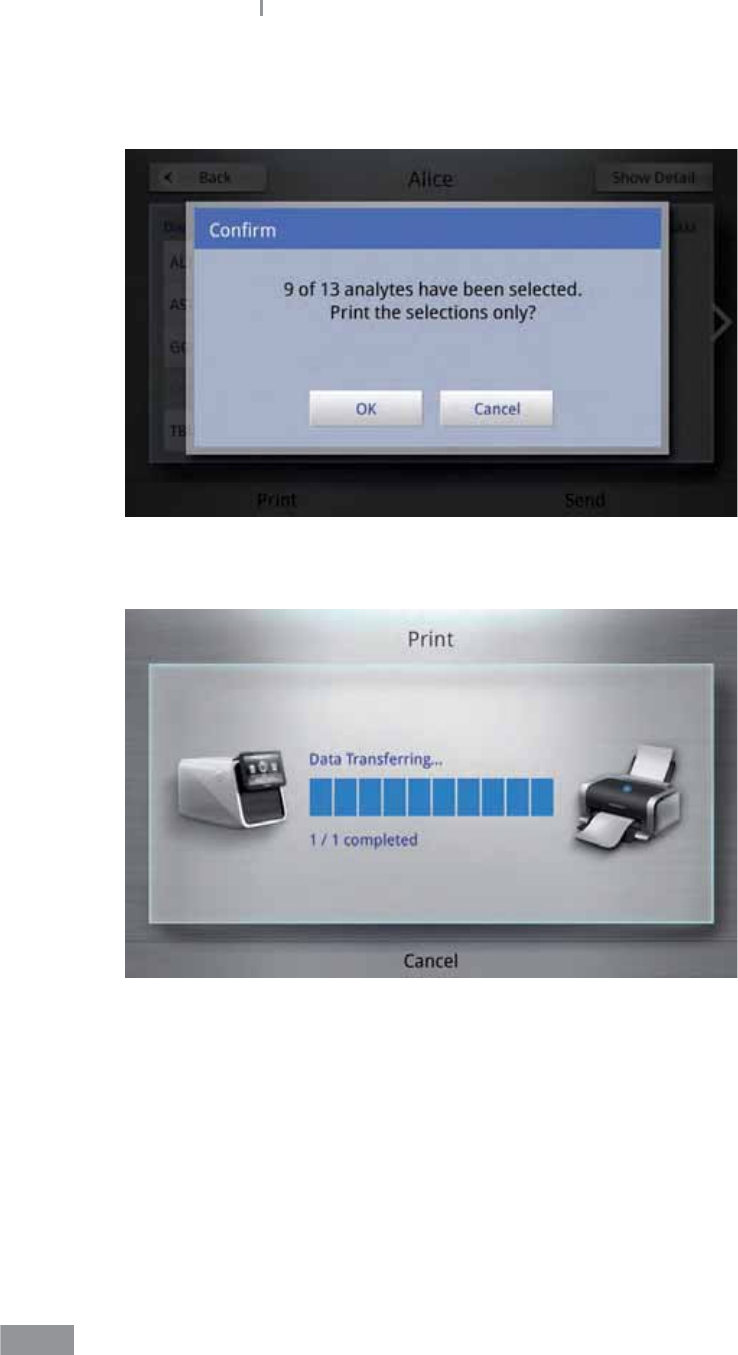
3 Uncheck the Analyte you wish to exclude, and press the Print button.
60
Samsung LABGEO PA20 Analyzing
4 A print conrmation pop-up window appears on the display. Press the OK button to
begin printing.
5 While the data is printing, the transfer status is shown.
ŶThe analysis results view is displayed again after printing.
61
Samsung LABGEO PA20 Analyzing
Transferring results
Results can be sent to PC application(LABGEO DATA MANAGER) and EMR/LIS.
1 Select the results you wish to transfer from the Results screen. Check the boxes next to
the results you wish to transfer.
t The device must be connected to a PC to transfer results. Please refer to page 133 for
instructions on using the PC application.
t Please refer to page 116 for instructions on setting the EMR/LIS.
62
Samsung LABGEO PA20 Analyzing
2 Press the Send button and select the transferring method.
t If you select EMR/LIS, only results requested through EMR will be transferred.
t To cancel the transfer, press the Cancel button.
3 If you select PC and the device is connected to a PC, the transfer will begin. If you select
EMR/LIS and the device is connected to EMR, the transfer will begin.
To cancel the transfer, press the Cancel button.
63
Samsung LABGEO PA20 Analyzing
Deleting results
1 From the results screen, check the boxes next to the results you wish to delete and
press the Delete button.
2 Press OK to begin deleting.

64
Samsung LABGEO PA20 Analyzing
3 Press Cancel to cancel deleting.
Deleted results cannot be restored before you press the Cancel button.
65
Samsung LABGEO PA20 Analyzing
ŶQuality control
The QC menu is for checking whether the QC results are within a valid range. QC is
performed according to the regulations of each analysis lab. QC materials can be registered
in the Settings menu. Please refer to page 84 for instructions on registering QC materials.
Starting quality control
1 Press the QC button on the home screen.
66
Samsung LABGEO PA20 Analyzing
2 When the pop-up window requests that you insert a disc, insert a disc into the tray.
To cancel QC, press the Cancel button.
3 Select the QC material and press the OK button to begin QC.
67
Samsung LABGEO PA20 Analyzing
4 To cancel analysis, press the Cancel button. Once canceled, the disc cannot be used
again.
5 Once QC completes, the result screen shown on the right is displayed.
t If the device is connected to the LABGEO Data Manager, the analysis results are
transferred automatically.
t If auto-print is turned on, the analysis results are printed automatically.
t To print the results, press the Print button.
If the results are outside of QC range, is displayed.
68
Samsung LABGEO PA20 Analyzing
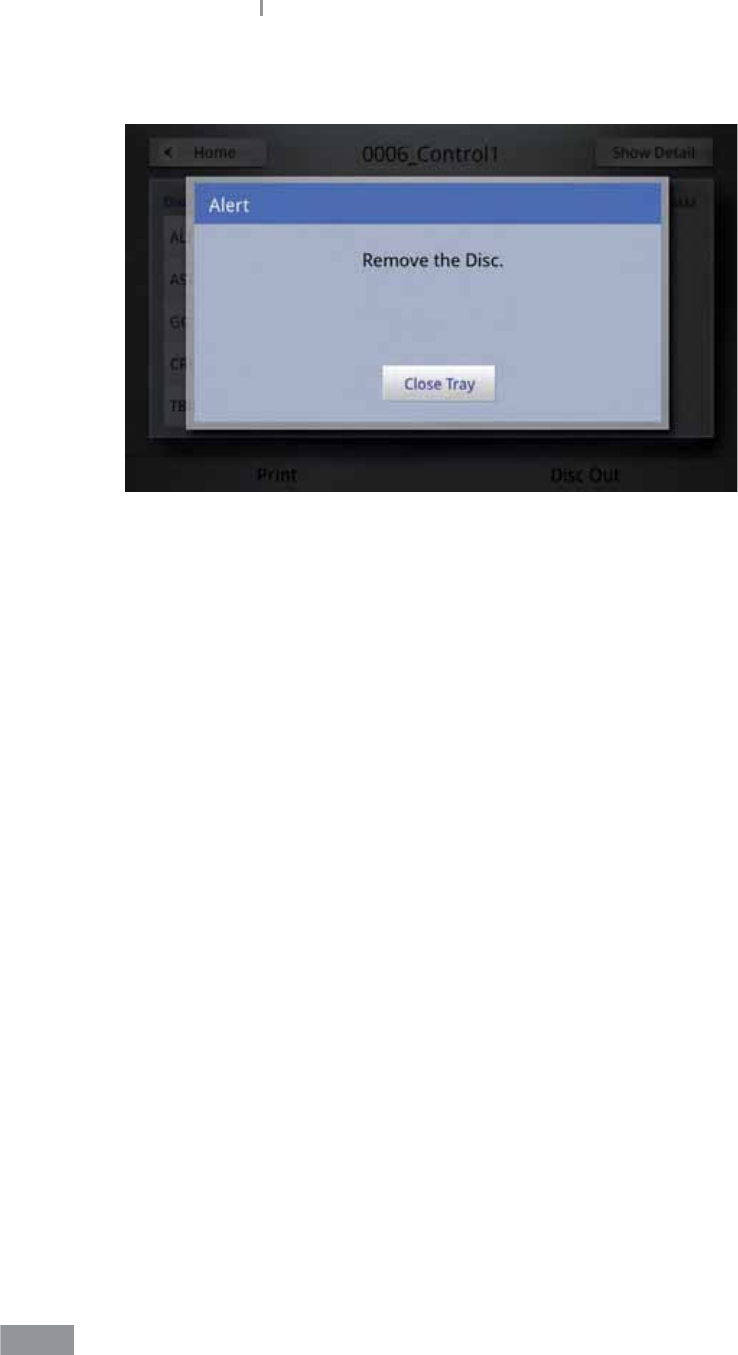
6 Press the Disc Out button and remove the disc.

69
Samsung LABGEO PA20 Analyzing
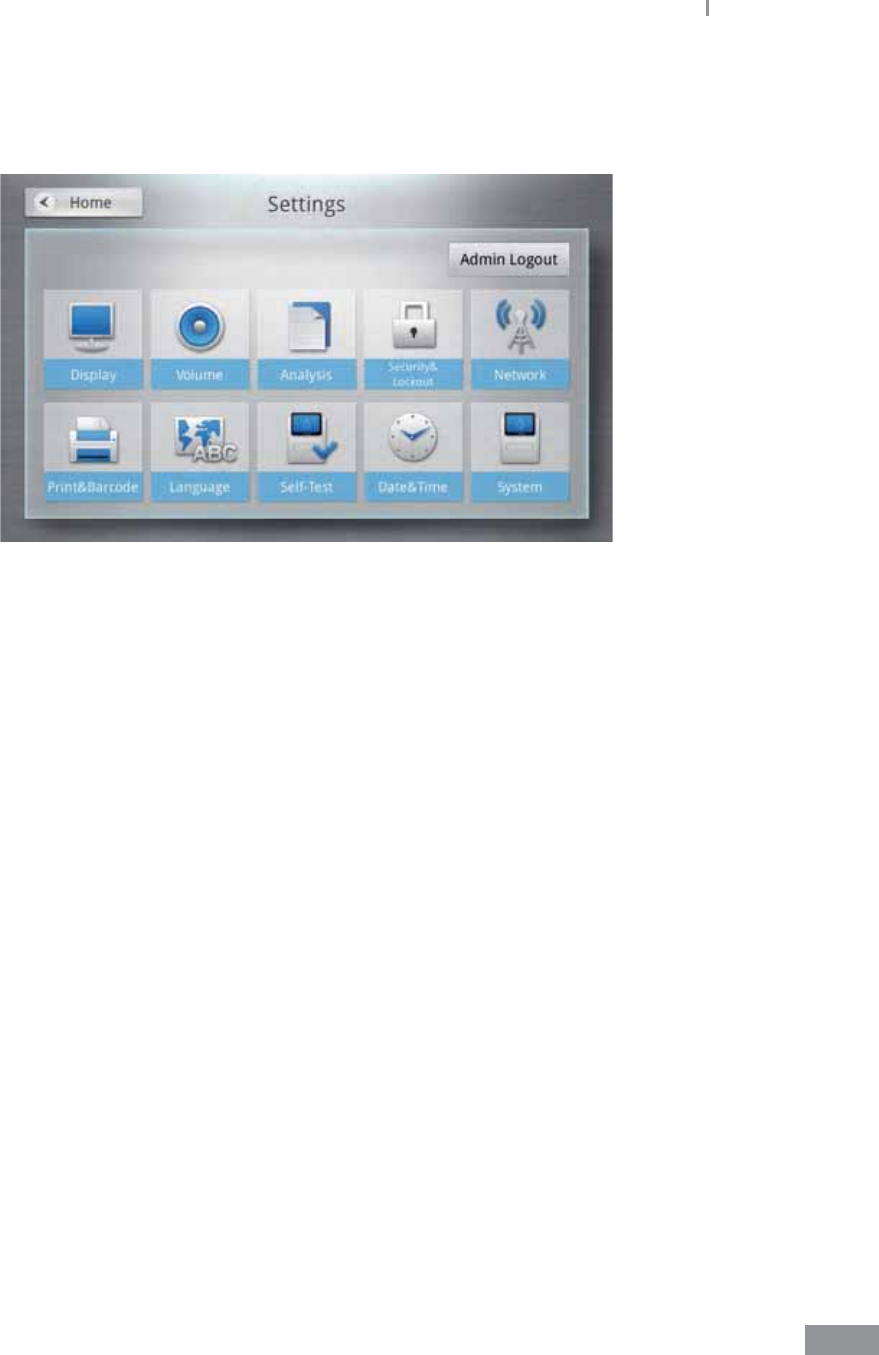
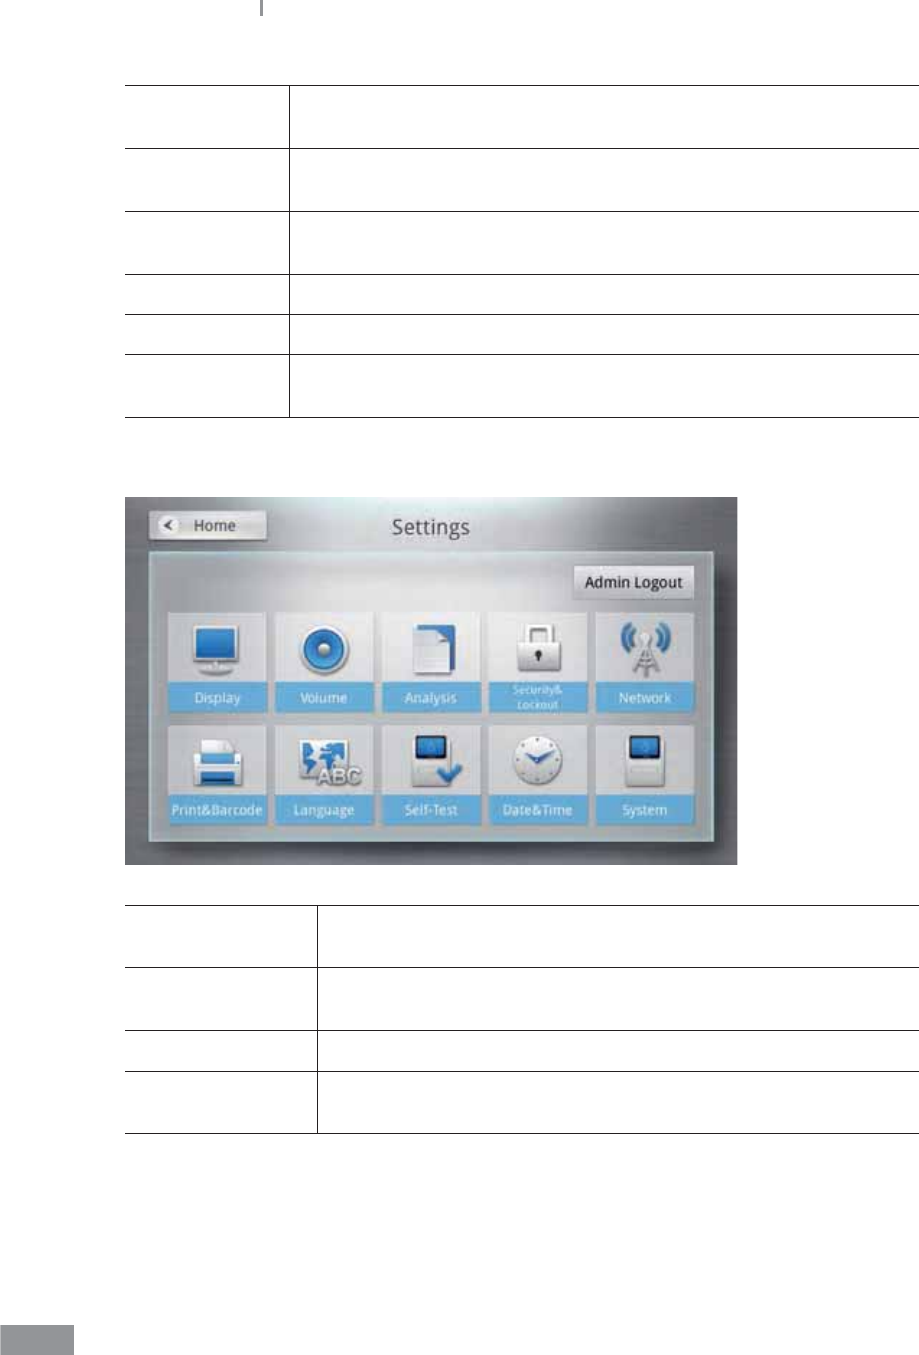
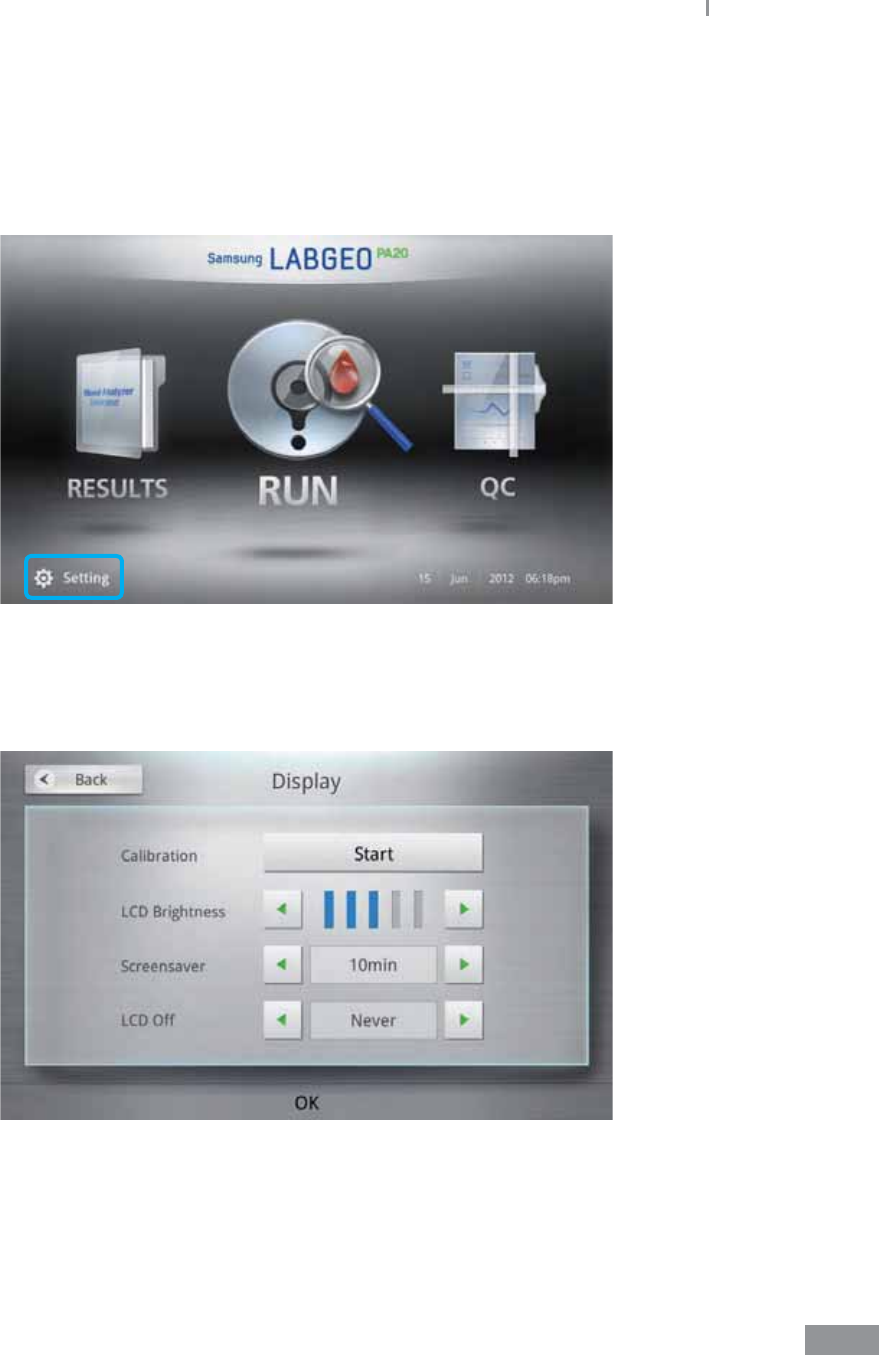
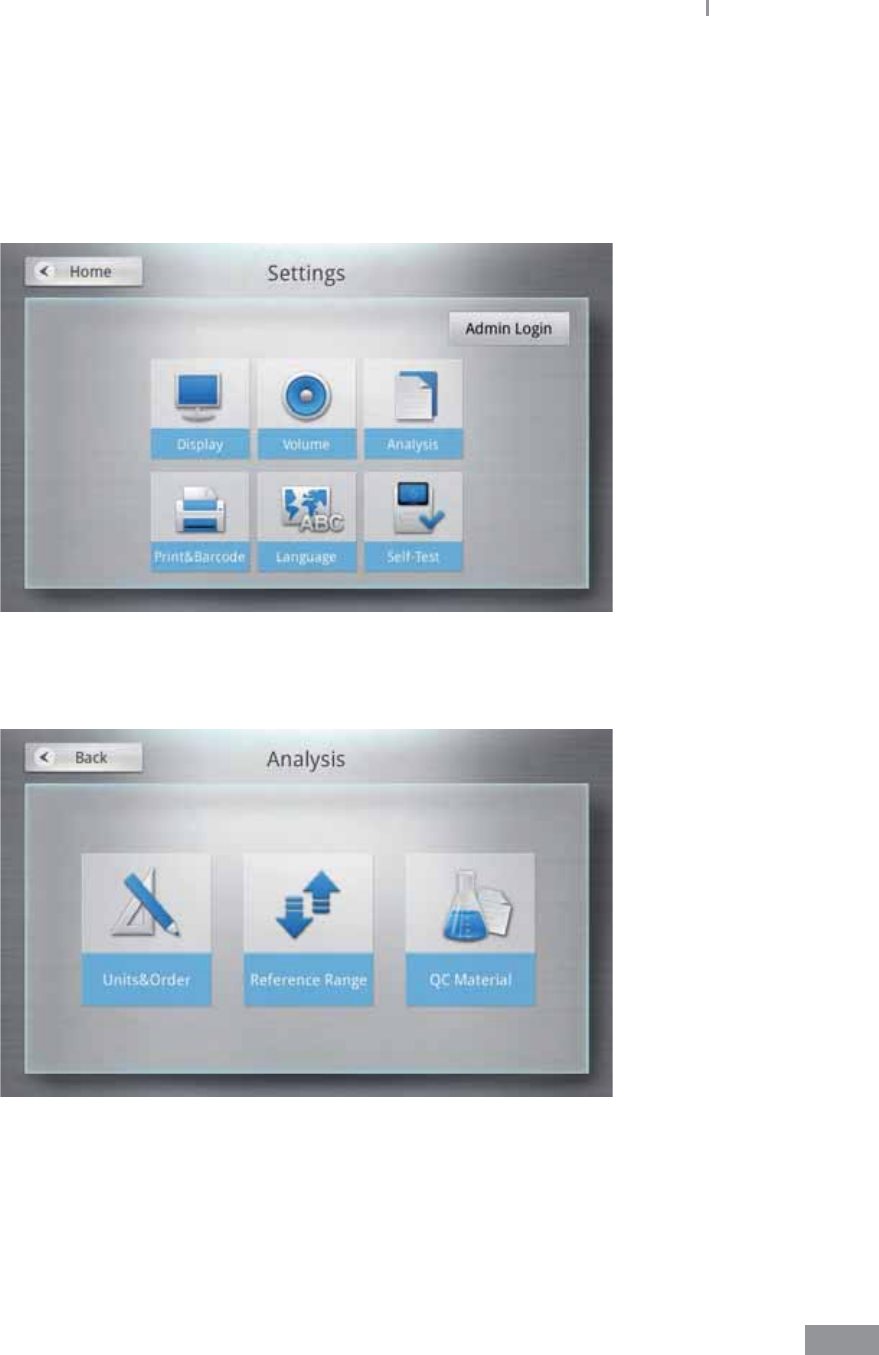
ŶAnalyzer settings (General User Settings)
1 Press the Setting button on the home screen.
2 General user settings: General user settings can be adjusted by anyone. After
entering the Settings screen, the general user settings are displayed.
70
Samsung LABGEO PA20 Analyzing
Display Calibration, LCD brightness, screensaver, and LCD o settings can be
adjusted.
Volume Master volume, booting/ending sound, touch screen, warning/ error
sound, and analysis completion sound can be adjusted.
Analysis Unit of analytes, printing order, reference range, and QC materials can
be adjusted.
Peripherals Auto-print and starting point after barcode scanning can be adjusted.
Language The analyzer language can be adjusted.
Self-Test A self-test of the analyzer can be performed to check whether it is
operating normally.
3 Administrator settings: Administrator settings require an admin login for security.
Lock Functions of analyzer can be locked and a new password can be
set.
Network Settings for network connection, server settings for EMR/LIS
connection can be set.
Date&Time The analyzer’s date, time, and display settings can be adjusted.
System Device information checking, updates, initialization and results
backups can be performed.
71
Samsung LABGEO PA20 Analyzing
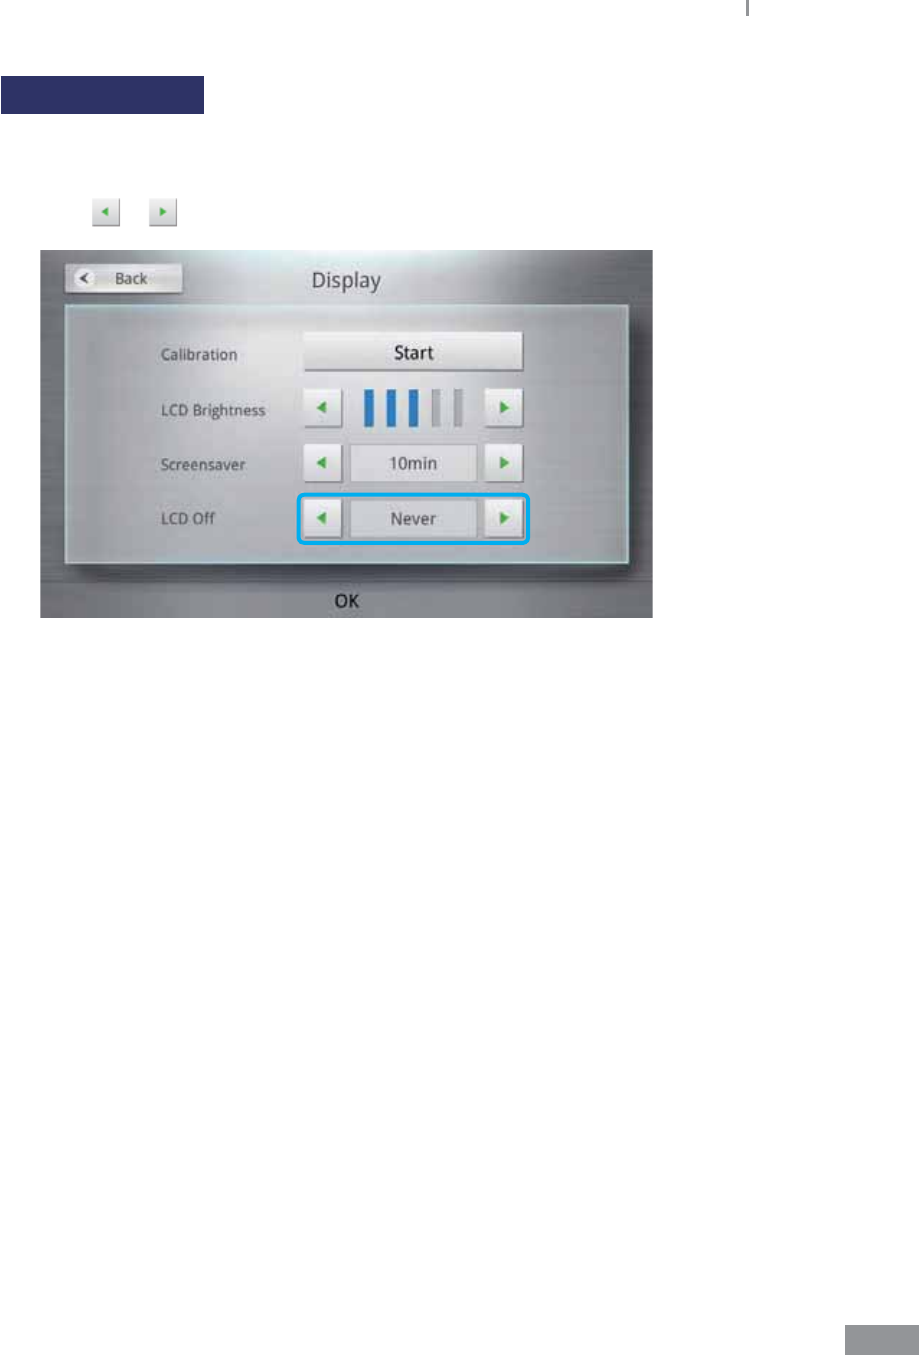
ŶDisplay settings
Display settings consist of calibration, LCD brightness, screensaver, and LCD o settings.
1 Press the Setting button on the home screen.
2 Press the Display button.
You can cancel any changes by pressing the Back button without pressing the OK
button.
72
Samsung LABGEO PA20 Analyzing
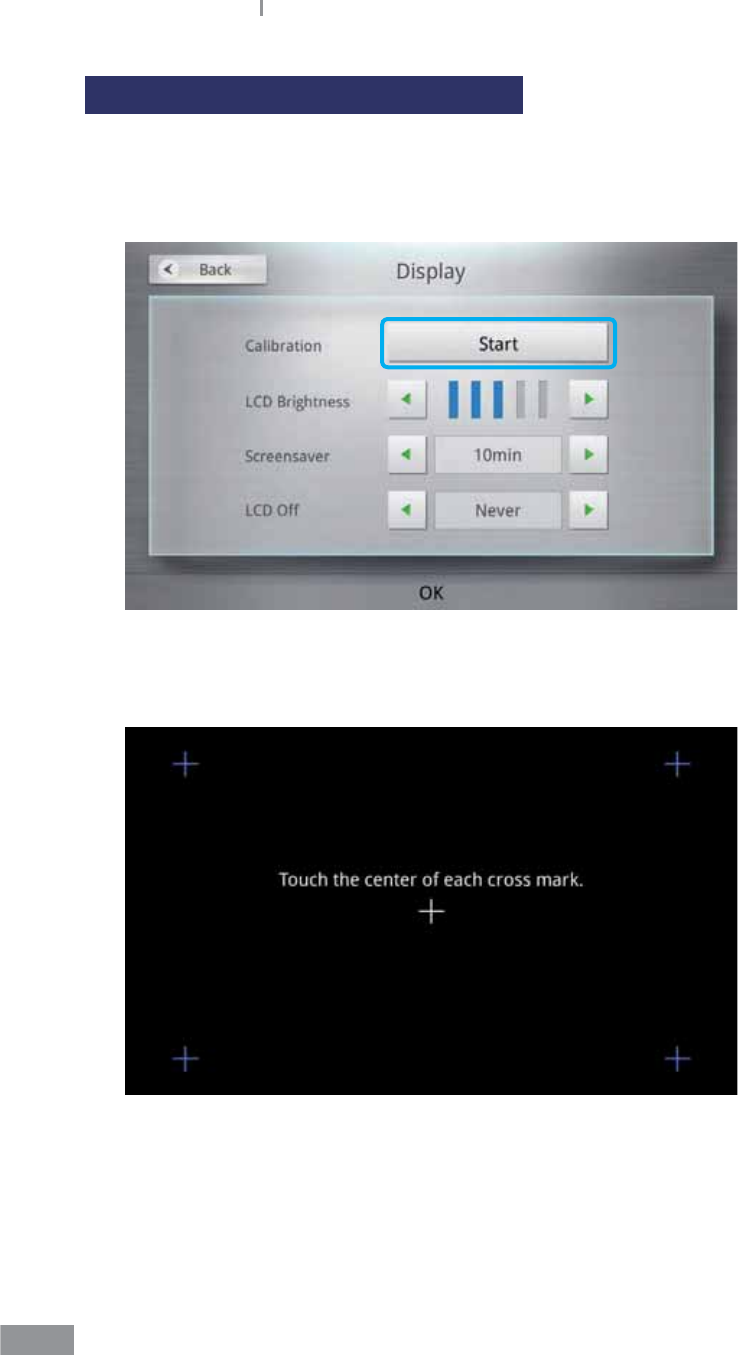
Calibration (touch screen calibration)
Calibration is performed to adjust settings to improve recognition accuracy of the touch
screen.
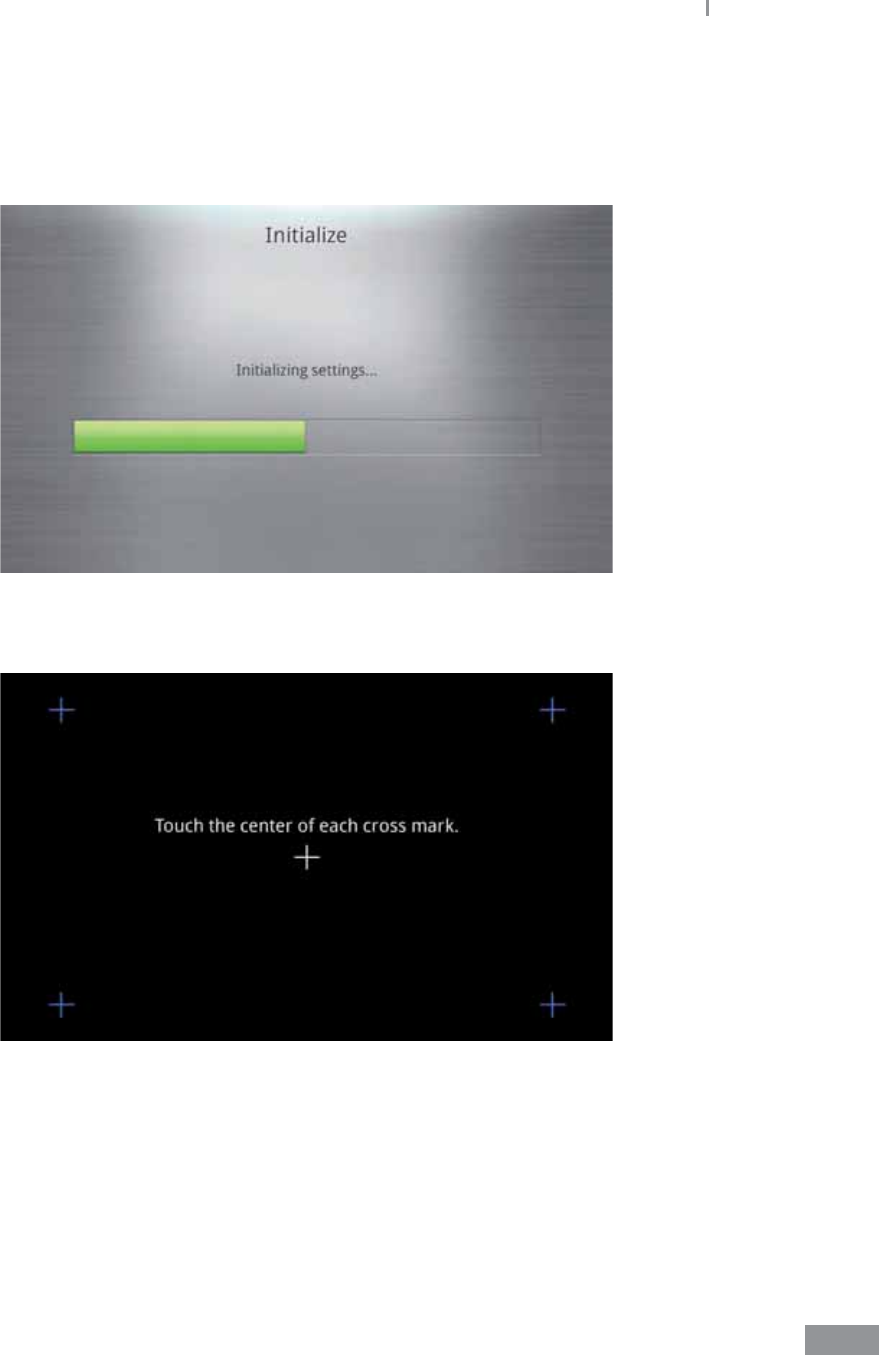
1 Select Calibration.
2 Press the center of the crosshairs (+) as they appear on the display to calibrate the
touch screen recognition.
t The crosshairs (+) turn blue after being selected.
t If the touch screen recognition is not calibrated accurately after 2-3 calibrations,
please contact Samsung Electronics Technical Support.
73
Samsung LABGEO PA20 Analyzing
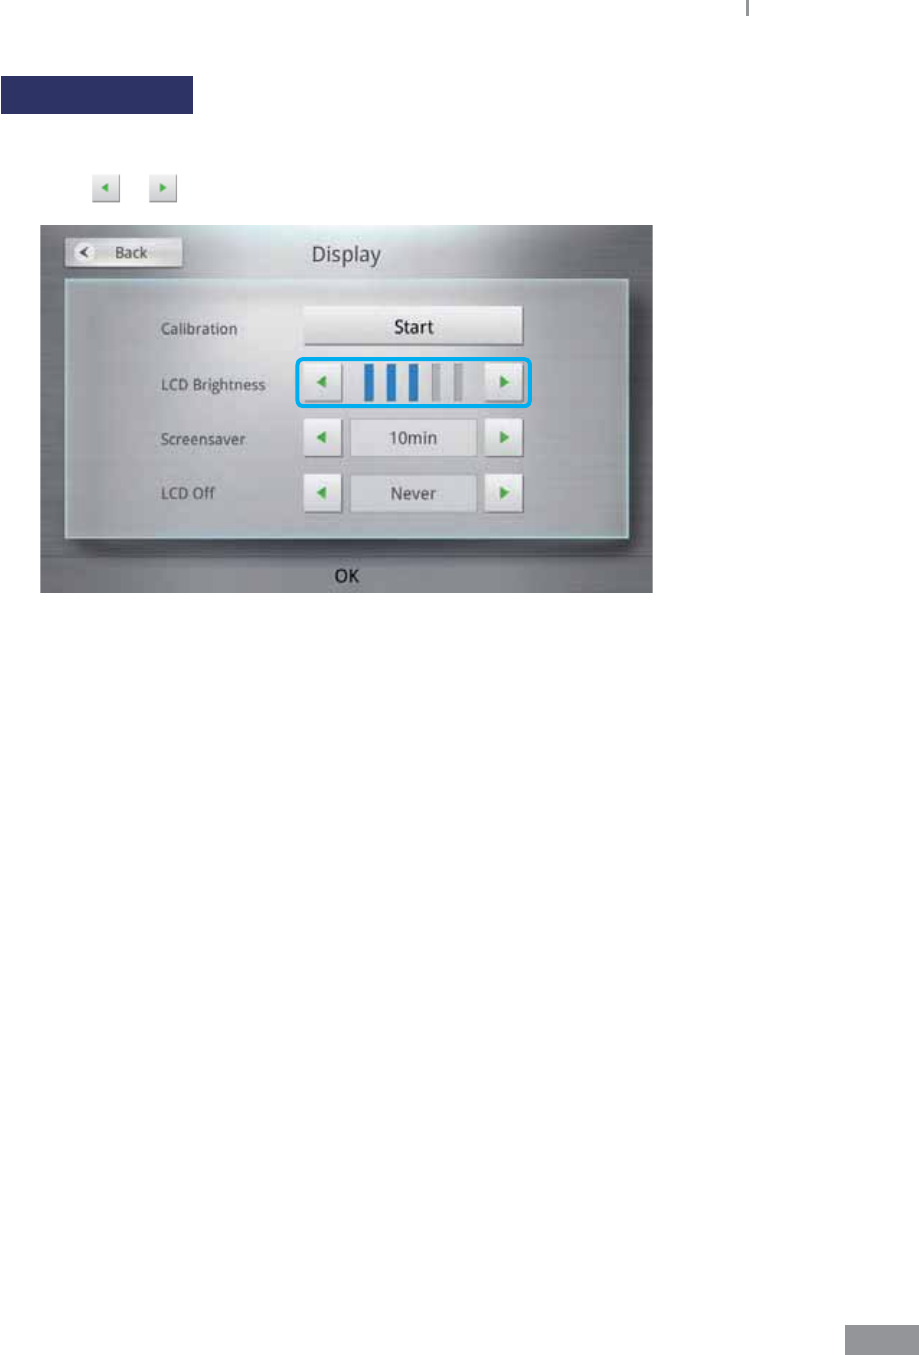
LCD Brightness
The brightness of the LCD can be adjusted. The brightness can be adjusted in 5 levels.
1 Press or for the LCD brightness.
2 Press the OK button to set the brightness.
You can cancel any changes by pressing the Back button without pressing the OK
button.
74
Samsung LABGEO PA20 Analyzing
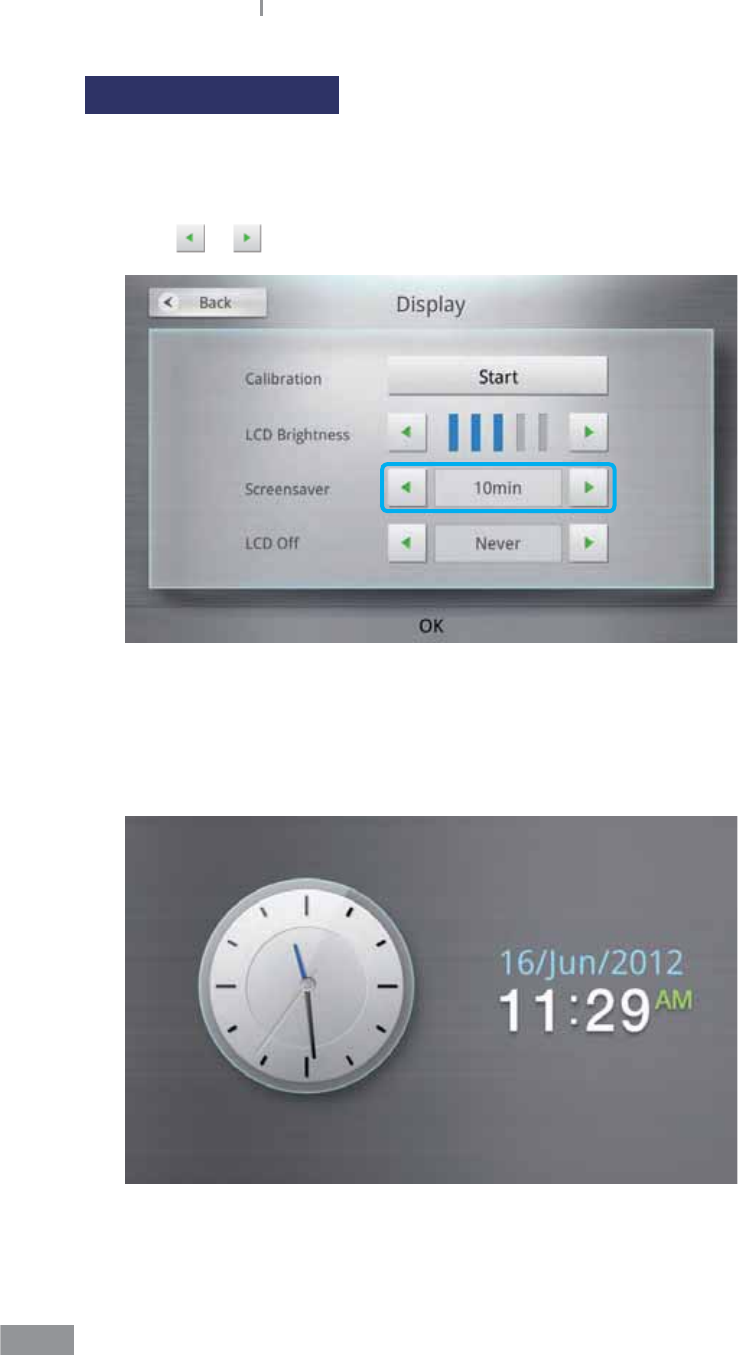
Screensaver settings
A screensaver is automatically activated after a set period of time to protect the analyzer’s
LCD screen. The screensaver can be turned on or o, and the time for activating the
screensaver can be adjusted.
1 Press or to select when the Screensaver starts.
Never Ź 10 min Ź 20 min Ź 30 min Ź 1 hr.
When set to Never, the screensaver is turned o.
2 The screensaver (a clock) is activated after the set amount of time has passed without
use.
75
Samsung LABGEO PA20 Analyzing
LCD O settings
The LCD O function protects the analyzer’s LCD screen and saves power by turning the
LCD o after a set period of time.
1 Press or to select when the LCD is to be turned O.
Never Ź 30 min Ź 1 hr Ź 2 hrs Ź 3 hrs.
When set to Never, the LCD remains on.
2 The LCD turns o automatically after the set amount of time has passed
without use.
76
Samsung LABGEO PA20 Analyzing
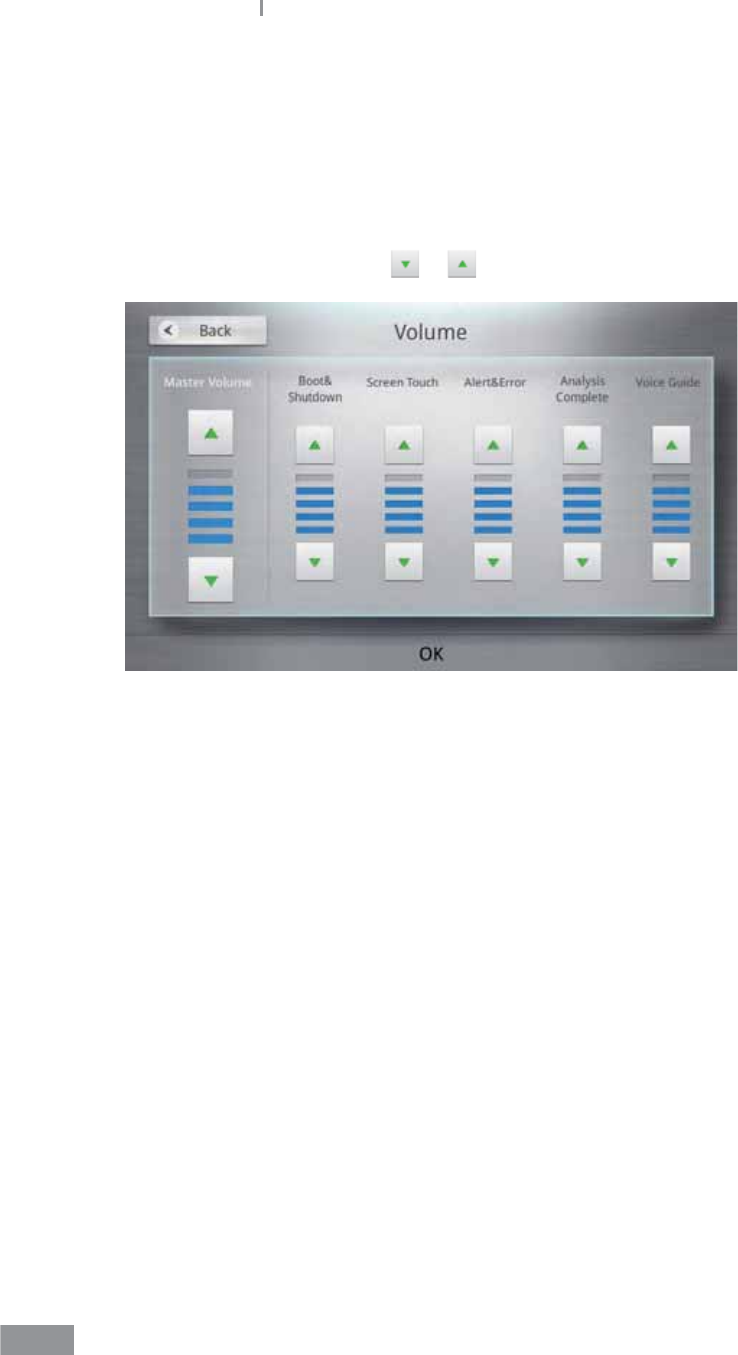
ŶVolume settings
1 Press the Settings button on the home screen.
2 Press the Volume button.
3 Set each volume by pressing or .
4 Press the OK button to set the volume. Press the Back button to cancel.
77
Samsung LABGEO PA20 Analyzing
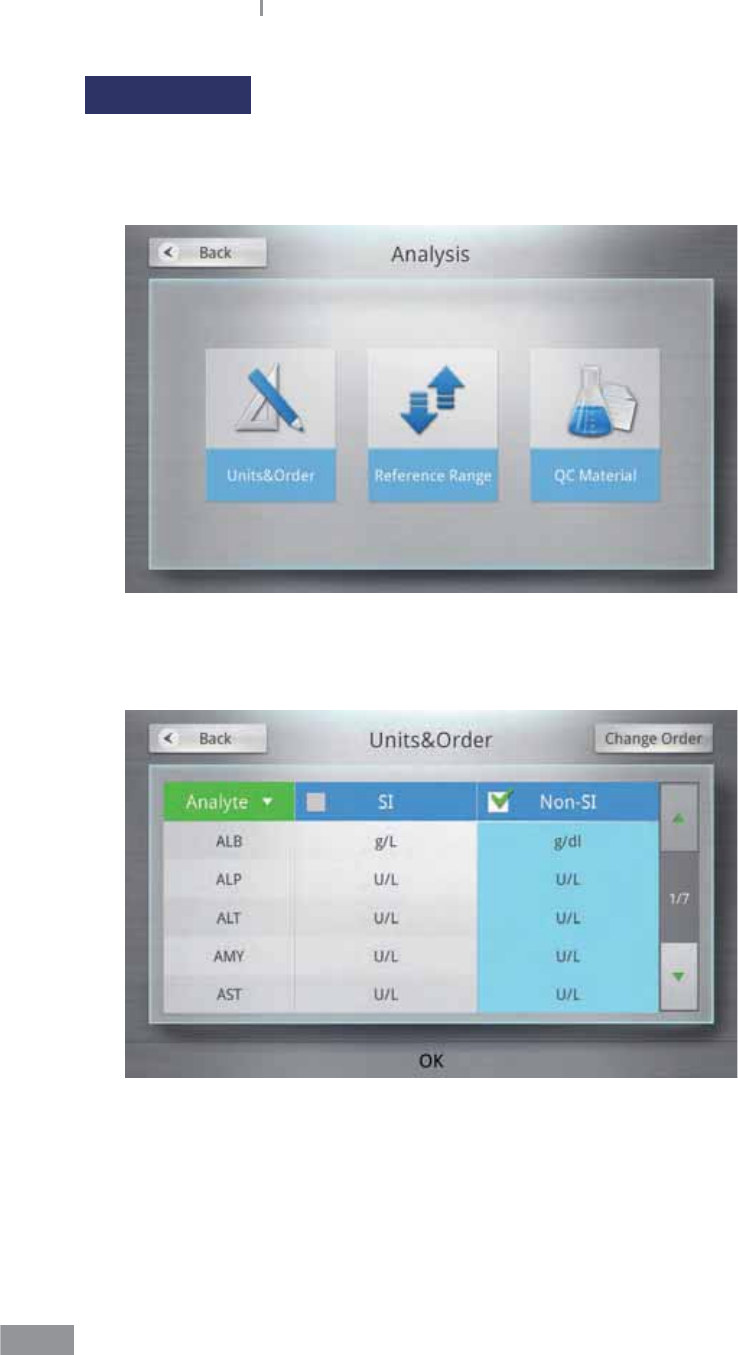
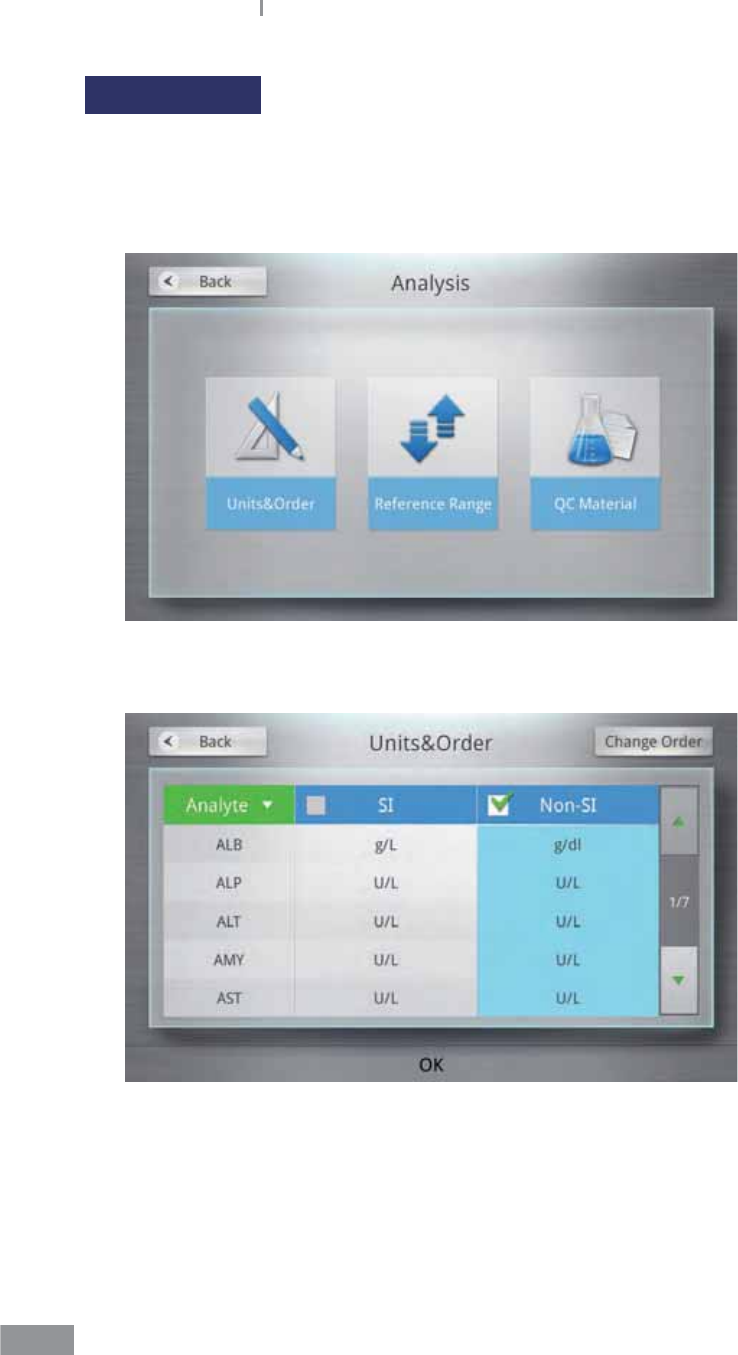
ŶAnalysis settings
Unit of analytes, printing order, reference range, and QC materials can be adjusted.
1 Press the Settings button on the home screen.
2 After pressing the Analysis button, select Units&Order, Reference Range, and QC
Material.
78
Samsung LABGEO PA20 Analyzing
Unit settings
The units of analytes displayed in analysis results can be adjusted.
1 Press the Units&Order button.
2 SI and Non-SI (Conventional) can be chosen for each analyte.
Check the box on the left to select SI or Non-SI for all analytes.
79
Samsung LABGEO PA20 Analyzing
Conversion between SI and non-SI Units (Non-SI X Factor = SI)
NO Abbr. Full Name Conventional
Unit
Conversion
Factor SI Unit
1 ALT Alanine Aminotransferase U/L 1 U/L
2 AST Aspartate
Aminotransferase U/L 1 U/L
3 CK Creatine kinase U/L 1 U/L
4 LD Lactate dehydrogenase U/L 1 U/L
5 BUN Blood Urea Nitrogen mg/dL 0.357 mmol/L
6 K Potassium mEq/L 1 mmol/L
7 TCO2 Total CO2 mEq/L 1 mmol/L
8 AMY Amylase U/L 1 U/L
9 GGT r-Glutamyltransferase U/L 1 U/L
10 ALP Alkaline Phosphatase U/L 1 U/L
11 Na Sodium mEq/L 1 mmol/L
12 Cl Chloride mEq/L 1 mmol/L
13 CHOL Total Cholesterol mg/dL 0.0259 mmol/L
14 GLU Glucose mg/dL 0.0555 mmol/L
15 TRIG Triglyceride mg/dL 0.0113 mmol/L
16 TBIL Total Bilirubin mg/dL 17.1 mol/L
17 TP Total Protein g/dL 10 g/L
18 DBIL Direct Bilirubin mg/dL 17.1 mol/L
19 CREA Creatinine mg/dL 88.4 mol/L
20 Ca Calcium mg/dL 0.25 mmol/L
21 ALB Albumin g/dL 10 g/L
22 HDL High-density lipoprotein
cholesterol mg/dL 0.0259 mmol/L
23 UA Uric Acid mg/dL 59.48 mol/L
24 LDL Low-density lipoprotein
cholesterol mg/dL 0.0259 mmol/L
25 HbA1c HbA1c % ((%) - 2.15) x
10.929 mmol/mol
26 TnI Troponin I ng/ml 1 ug/L
27 CK_MB Creatine Kinase-MB ng/ml 1 ug/L
28 Myo Myoglobin ng/ml 1 ug/L
29 NT-
BMP
N-terminal pro-Brain
Natriuretic Peptide ng/ml 1 ug/L
80
Samsung LABGEO PA20 Analyzing
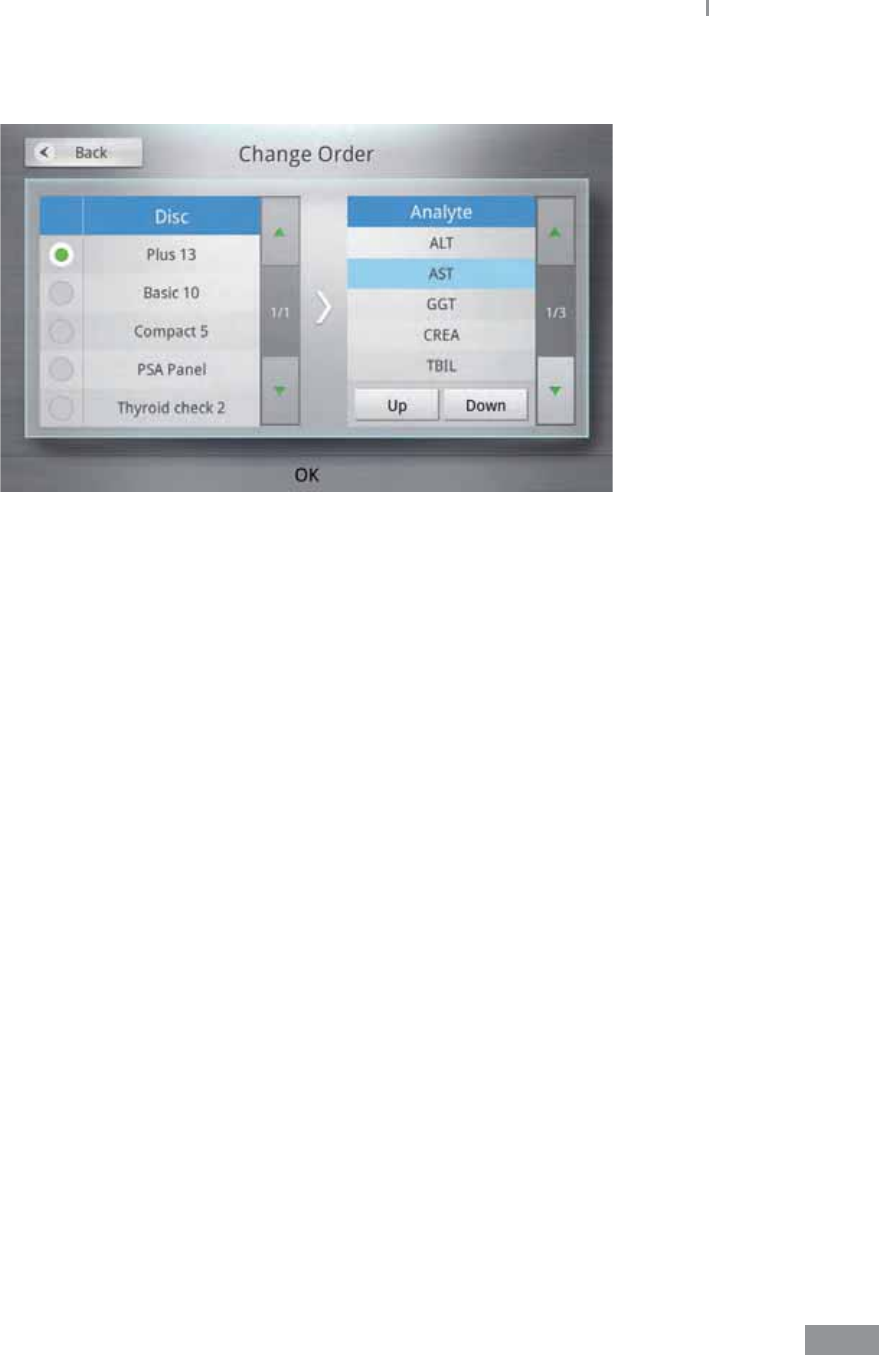
Change order
The order of analytes displayed when viewing analysis results can be adjusted.
The changes aect the Results screen and print-outs.
1 Press the Units&Order button.
2 Press the Change Order button in the upper-left corner of the screen.
81
Samsung LABGEO PA20 Analyzing
3 Select Disc.
4 Select the analyte you wish to change the order of, make your changes by pressing the
Up and Down buttons, then press the OK button.
82
Samsung LABGEO PA20 Analyzing
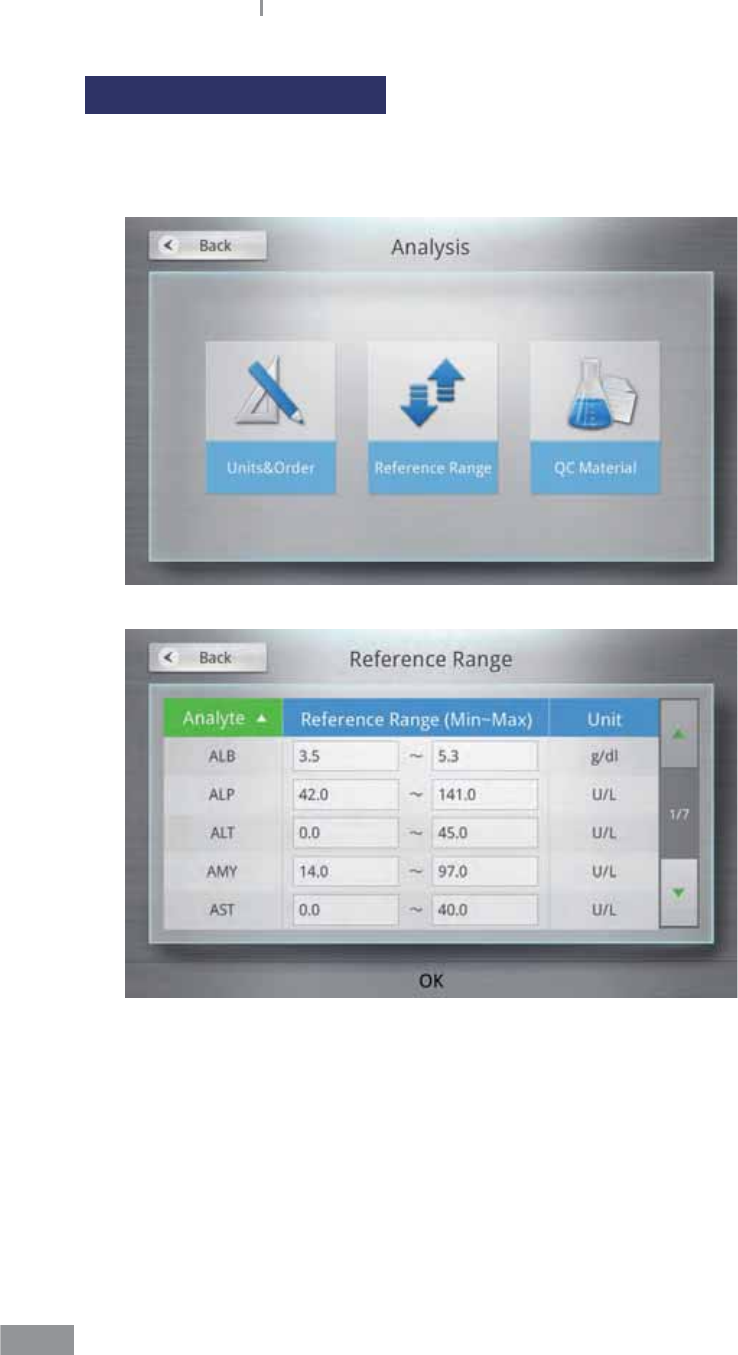
Reference range settings
The reference range of analytes can be adjusted.
1 Press the Reference Range button.

83
Samsung LABGEO PA20 Analyzing
2 Press the entry eld of the analyte and a number pad appears on the screen.
Enter a value for the analyte and press the OK button.
84
Samsung LABGEO PA20 Analyzing
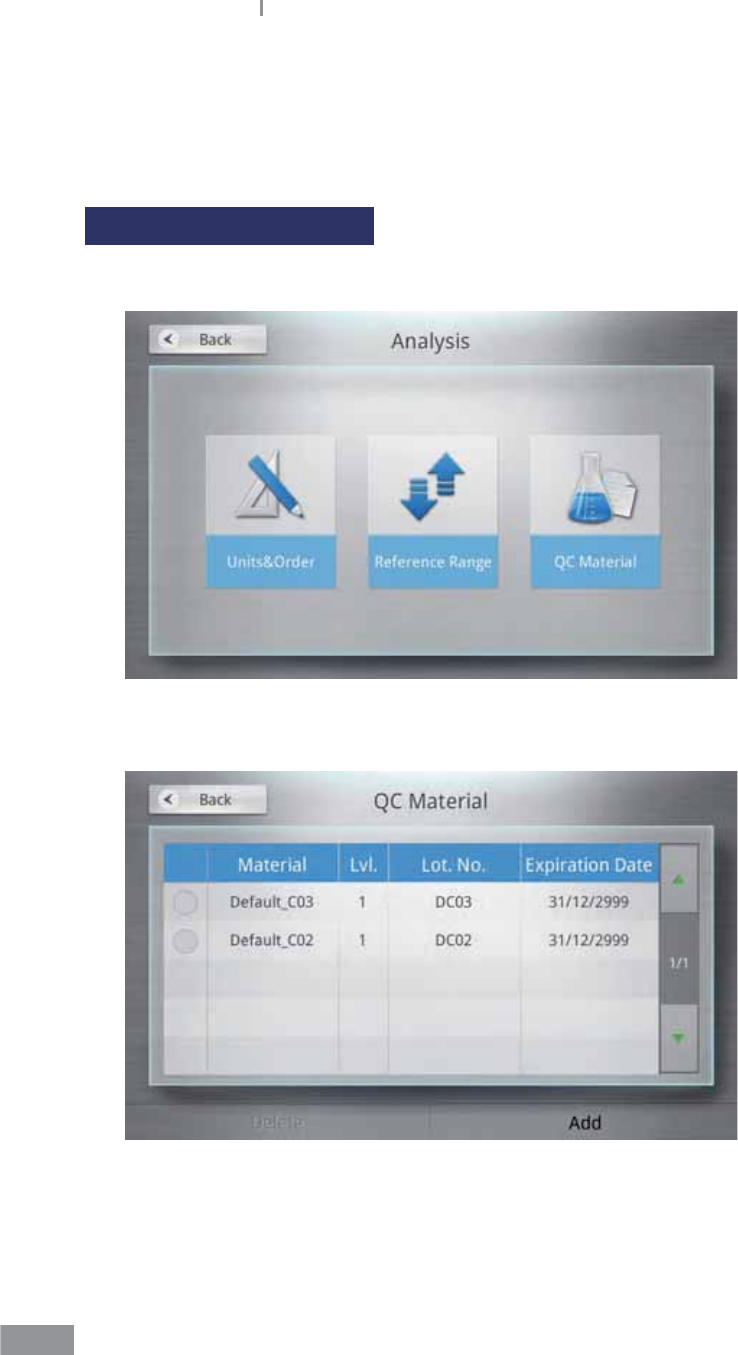
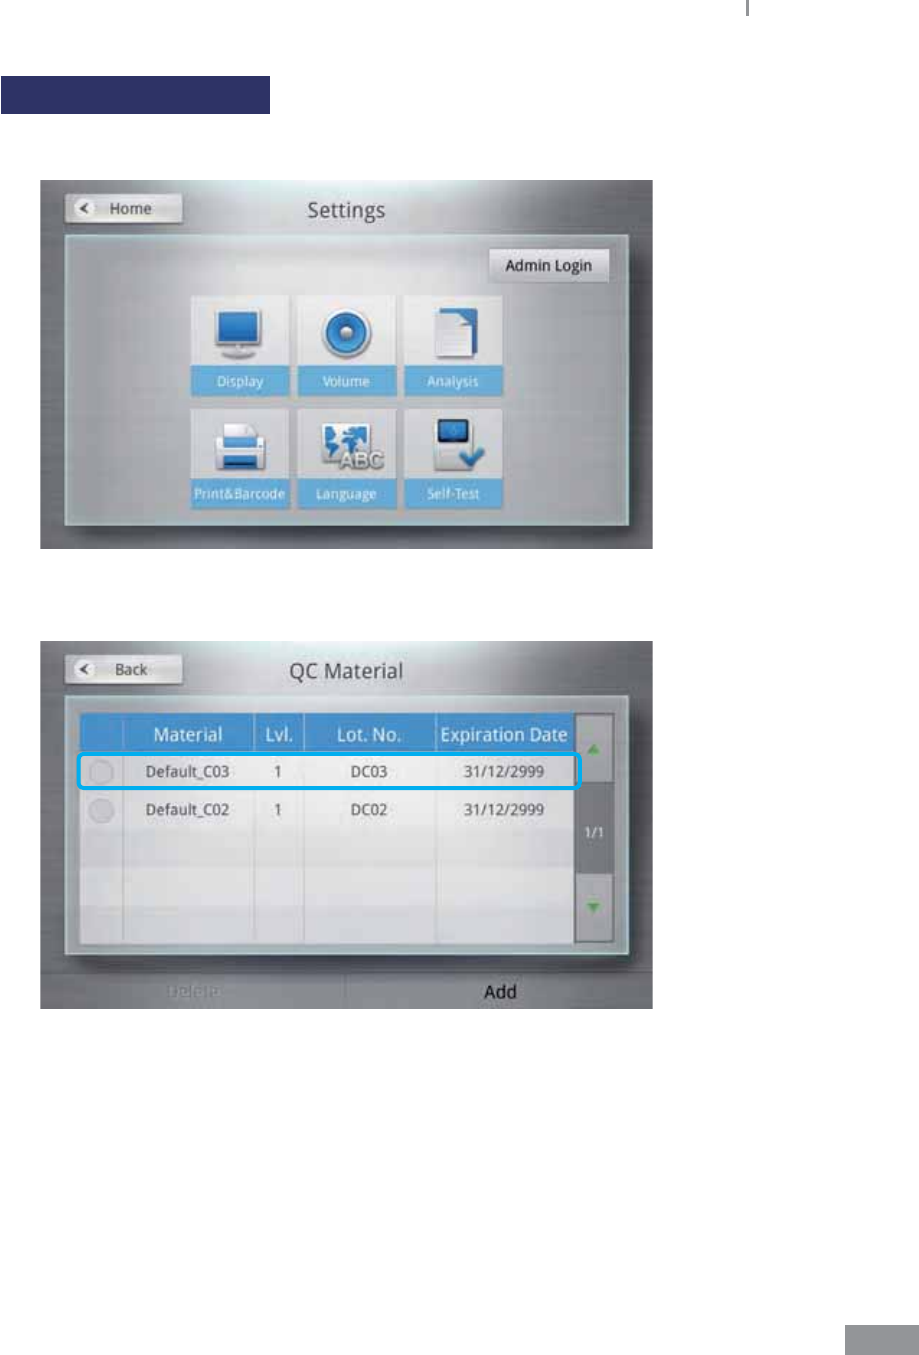
ŶQC material
QC materials can be set.
Registering QC Material
1 Press the QC Material button.
2 Press the Add button in the lower-right corner.
85
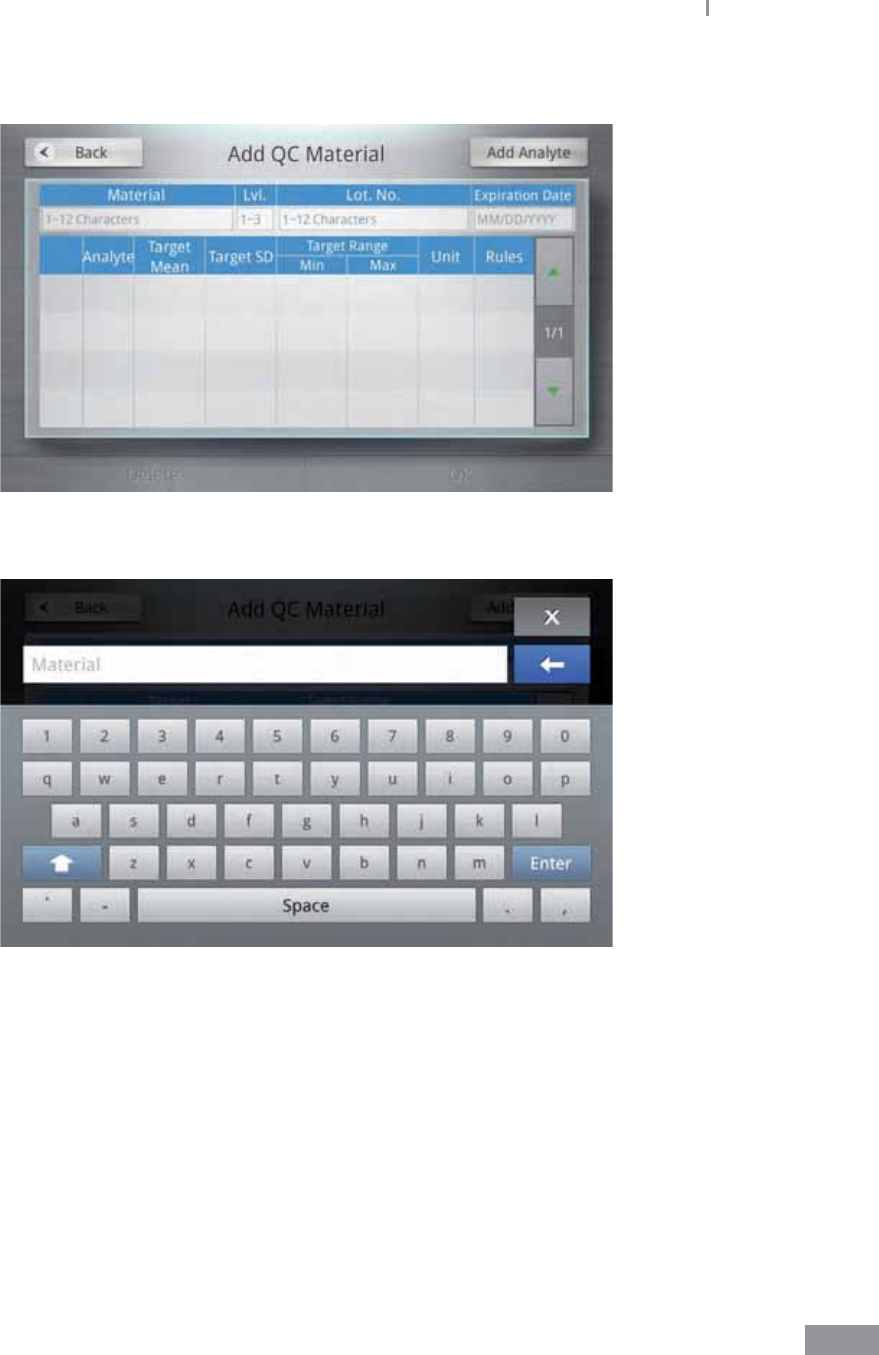
Samsung LABGEO PA20 Analyzing
3 To display the keypad, tap an empty eld.
ŶKeyboard IME
86
Samsung LABGEO PA20 Analyzing
ŶNumeric Keypad
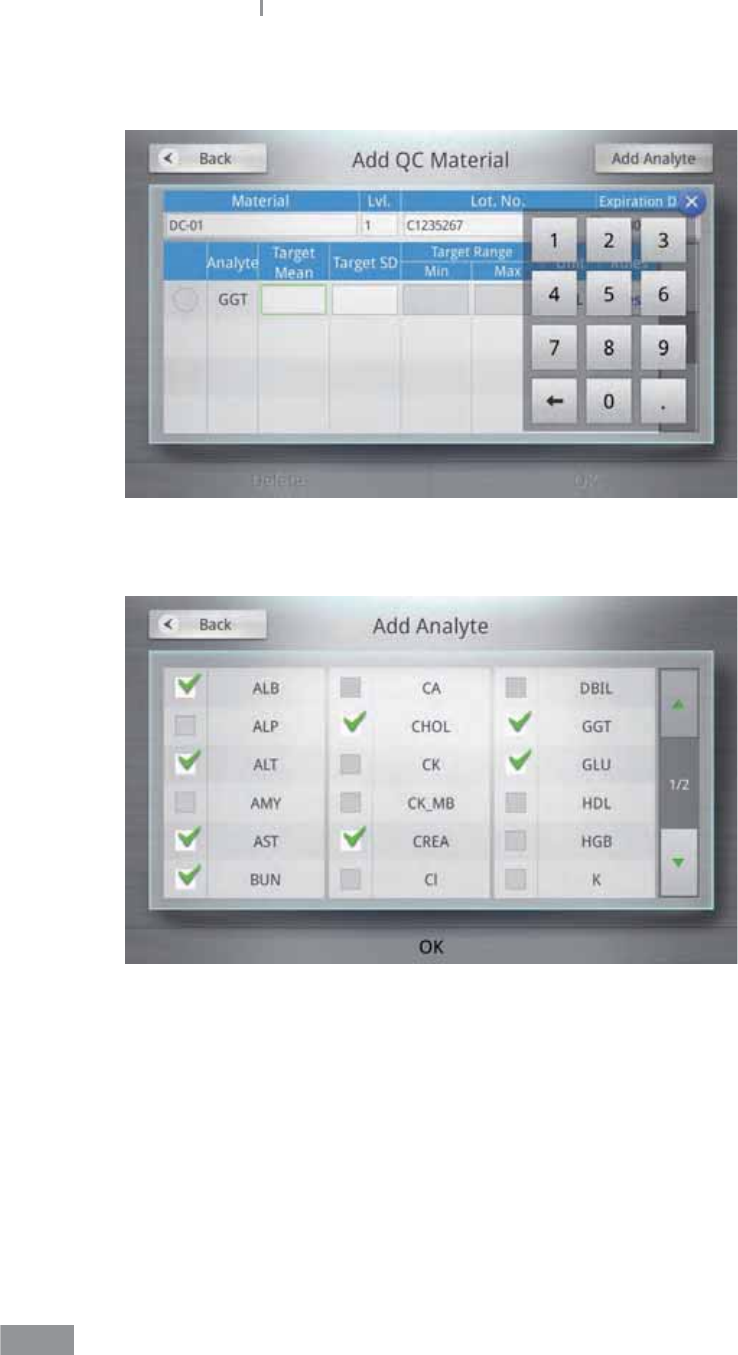
4 Select the analyte to add and press OK.
87
Samsung LABGEO PA20 Analyzing
5 To add the selected analyte, press the Add Analyte button.
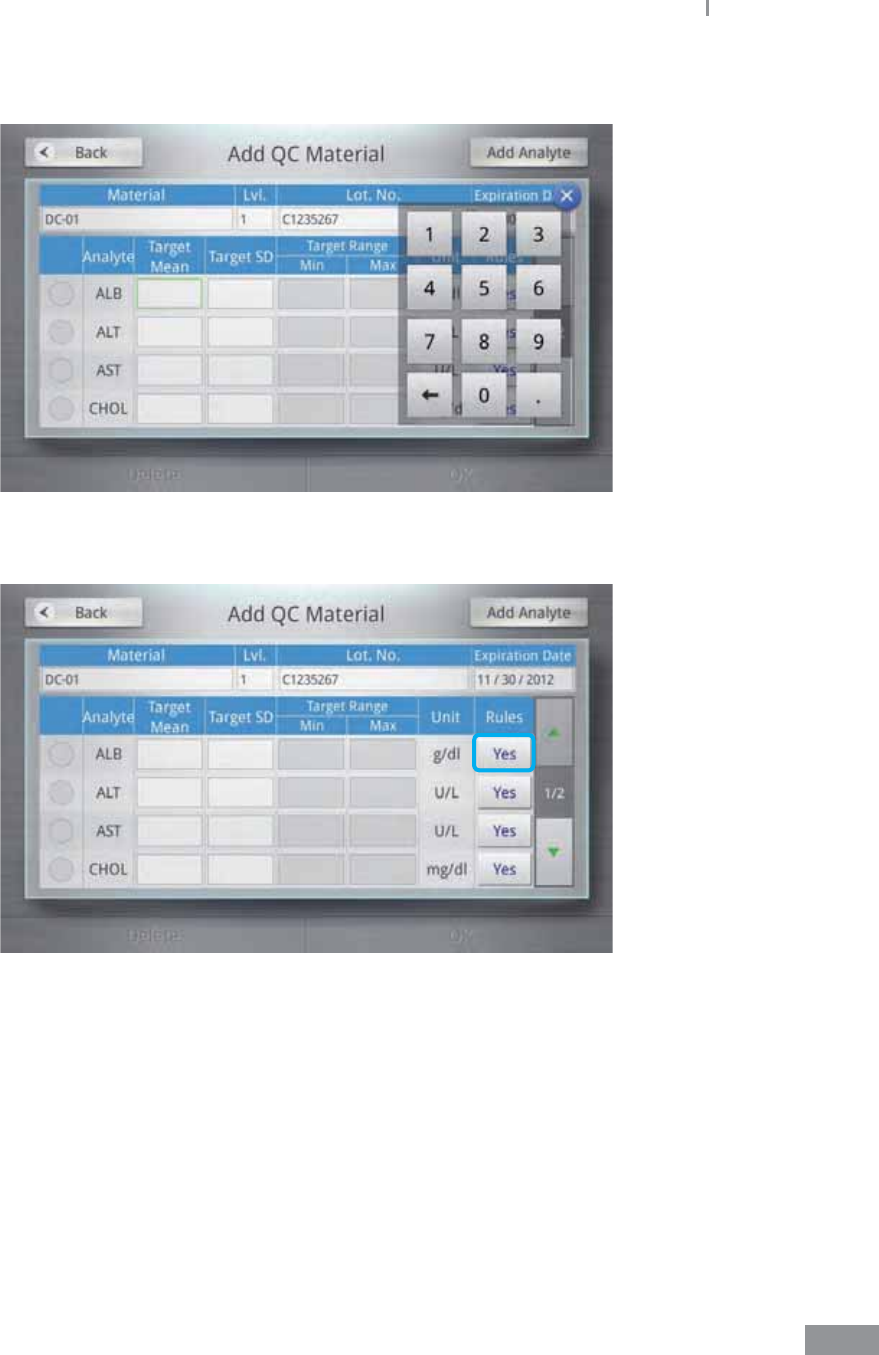
6 To change the QC rules for the analyte, press the Yes button on the right.
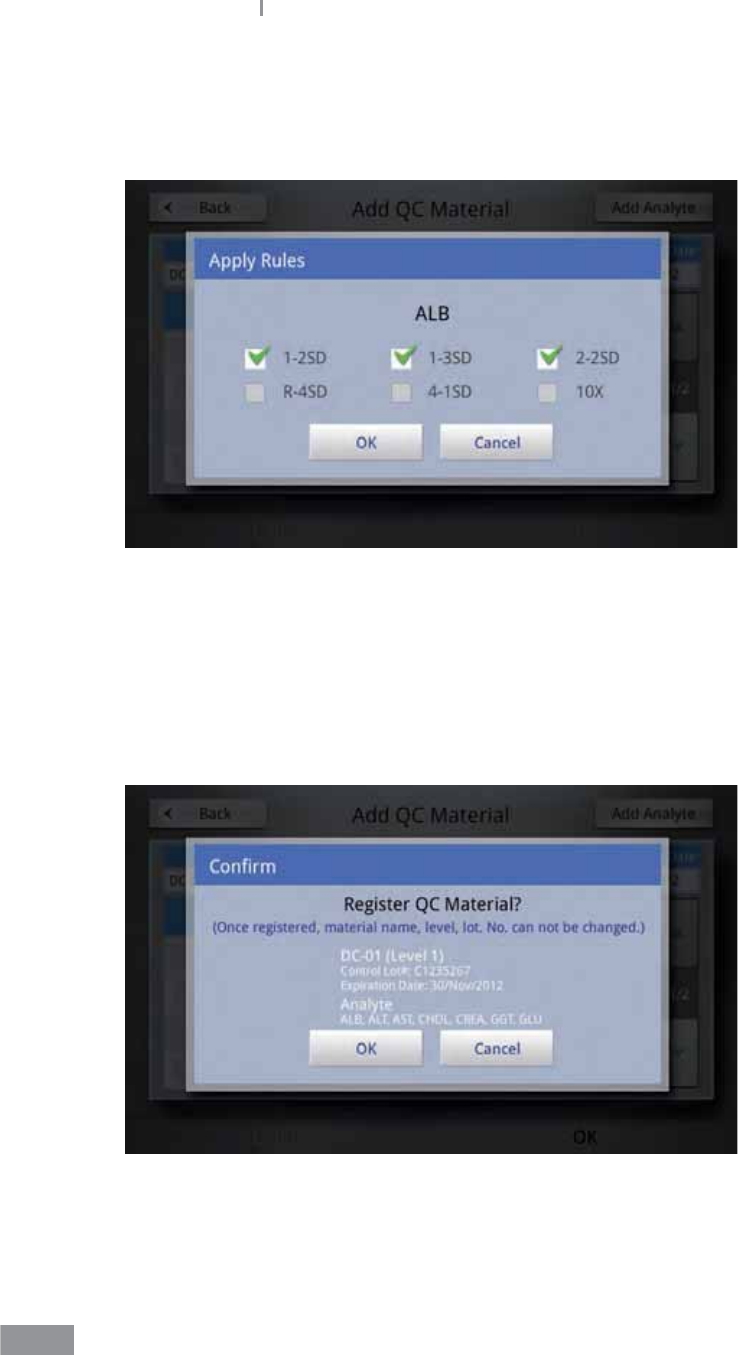
88
Samsung LABGEO PA20 Analyzing
7 Set the rules and press the OK button.
When none of the options have been selected, the minimum and maximum target
range can be entered manually.
The quality control policy should comply with the Westgard multi-rule. For more details,
refer to Other information in Chapter8.
8 Press the OK button after inputting the values.
Press the OK button in the pop-up conrmation window, and QC material
registration is completed.
89
Samsung LABGEO PA20 Analyzing
Changing QC material
1 Press the QC Material button.
2 Select the Material to change.
90
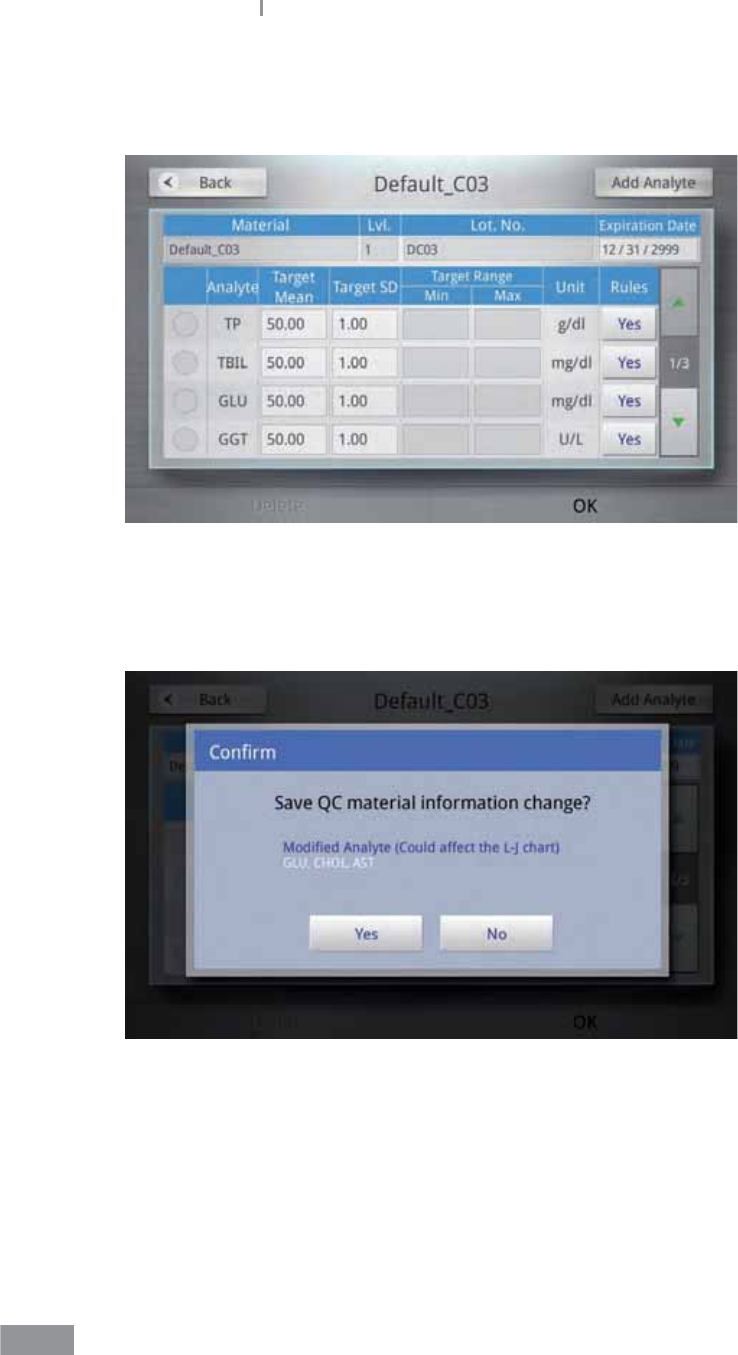
Samsung LABGEO PA20 Analyzing
3 Change the material information.
The name of the material, level, and Lot. No. cannot be changed.
4 Make changes and press the OK button.
Press the OK button in the pop-up conrmation window to save your QC material
changes.

91
Samsung LABGEO PA20 Analyzing
Deleting QC material
1 Press the QC Material button.
2 Select a Material to delete.
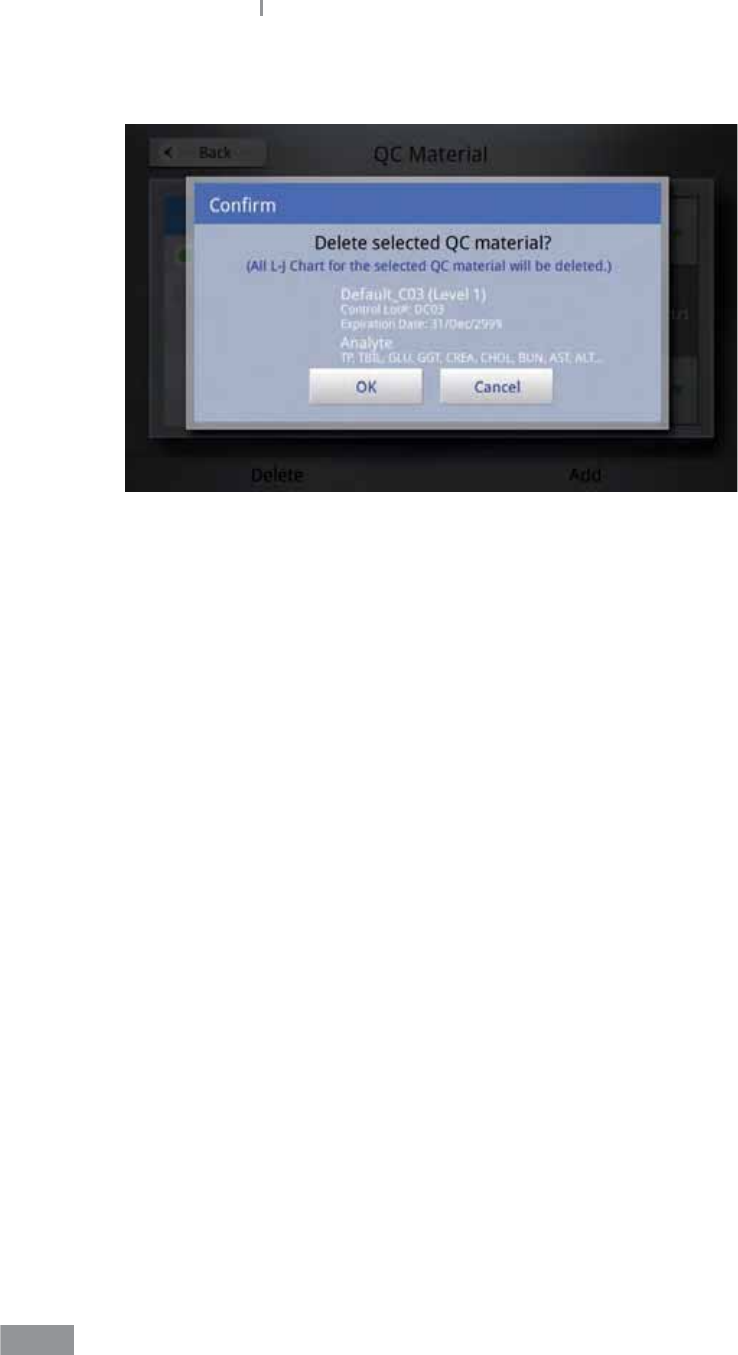
92
Samsung LABGEO PA20 Analyzing
3 Press the OK button in the pop-up conrmation window to delete the QC material.

93
Samsung LABGEO PA20 Analyzing
ŶPrint settings
Set the auto-print function to automatically print results when an analysis completes.
1 Press the Setting button on the home screen.
2 Press the Peripherals button.
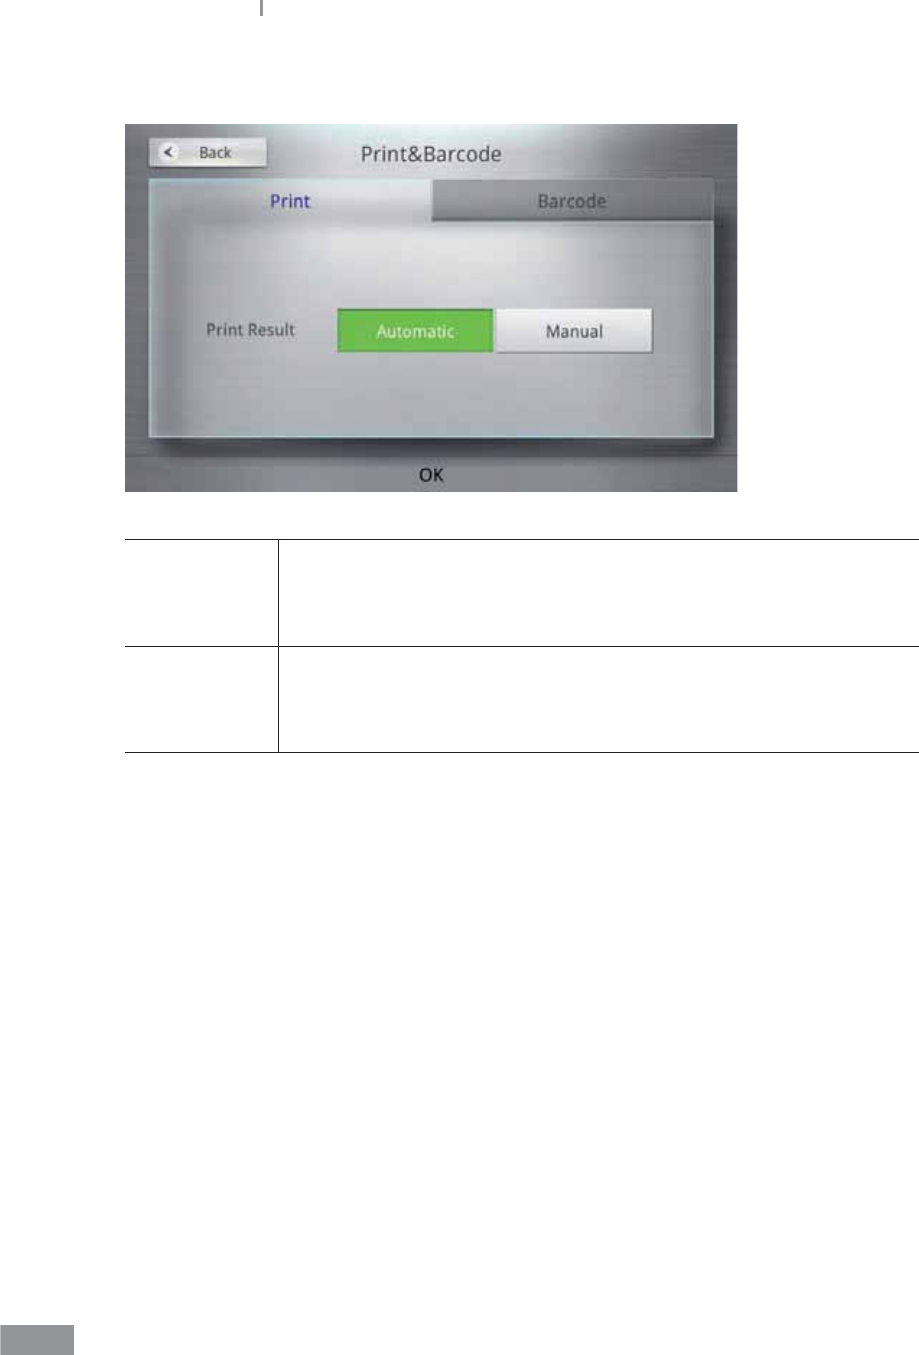
94
Samsung LABGEO PA20 Analyzing
3 Press Print and set the Print Result.
Manual
The results are not printed automatically when the analysis is
completed. To print a result, the user must select the Print button
manually from the analysis completion screen or the analysis result
viewing screen in the order list.
Automatic
Analysis results are printed automatically when the analysis completes
and the printer is connected. Results can also be printed manually
from the Results screen and the analysis result viewing screen in the
order list.
95
Samsung LABGEO PA20 Analyzing
ŶBarcode settings
Set the format of input values (Start Point, ID Length) when an ID is entered using a
barcode reader.
1 Press the Setting button on the home screen.
2 Press the Peripherals button.
96
Samsung LABGEO PA20 Analyzing
3 Select the Barcode tab.
4 Set the barcode format (Start Point, ID Length).
Start Point Set a valid start point for analysis ID input by the barcode scanner.
ID Length Set a valid ID length for analysis ID input by the barcode scanner.
97
Samsung LABGEO PA20 Analyzing
ŶLanguage settings
Select the language to be used by the analyzer.
1 Press the Setting button on the home screen.
2 Select the Language button.

98
Samsung LABGEO PA20 Analyzing
3 Select a language from English, Spanish, or Korean, and press the OK button. Press the
Back button to cancel.

99
Samsung LABGEO PA20 Analyzing
ŶSelf-test
Tests the hardware status of the analyzer.
1 Press the Setting button on the home screen.
2 Press the Self-Test button.
100
Samsung LABGEO PA20 Analyzing
When performing a self-test without a disc, the home position, barcode and RFID are
marked as N/A.
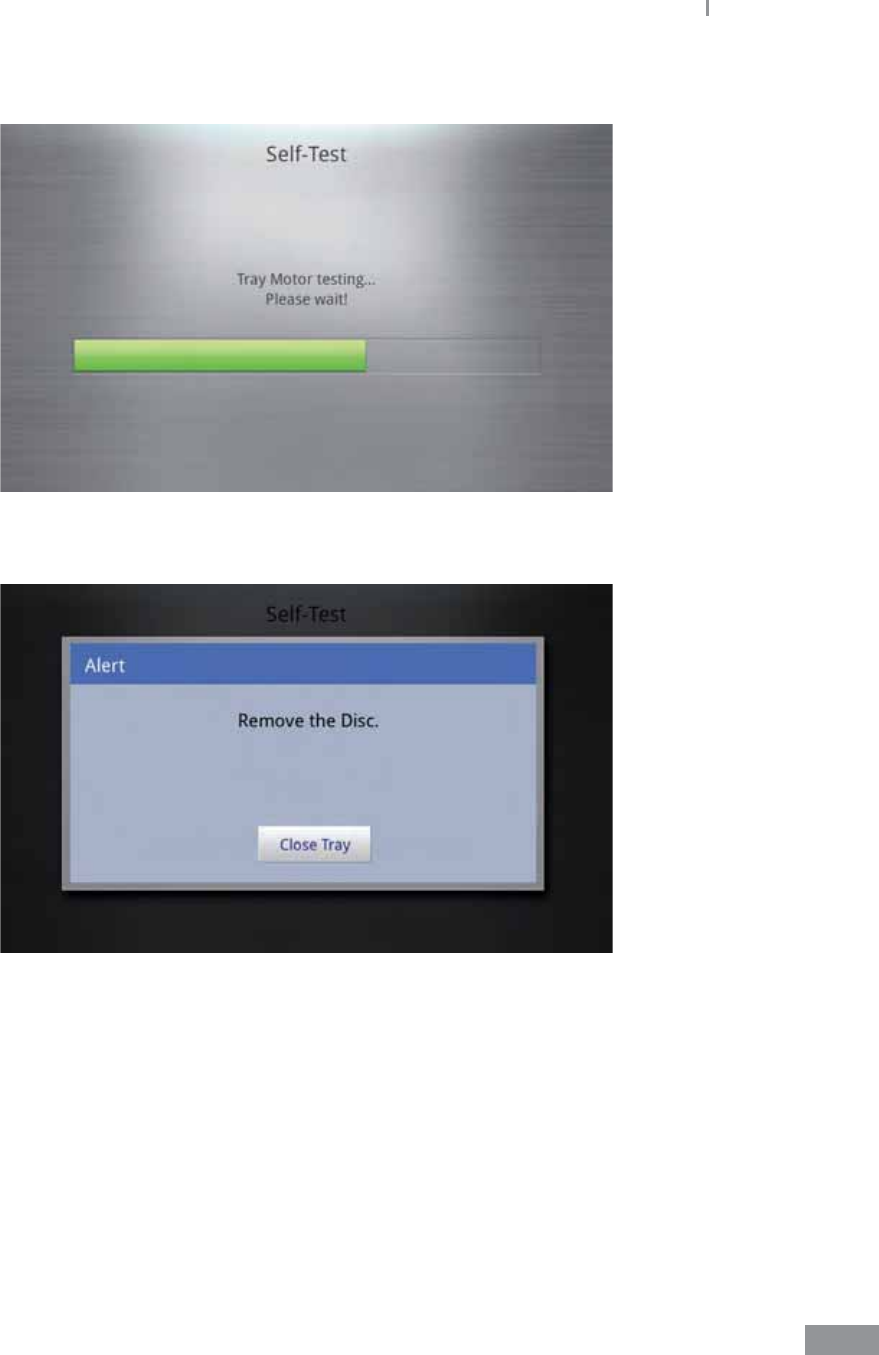
3 Press the Diagnosis button. A pop-up window prompts you for a disc to be inserted.
Select Without Disc if you wish to perform the self-test without a disc.
101
Samsung LABGEO PA20 Analyzing
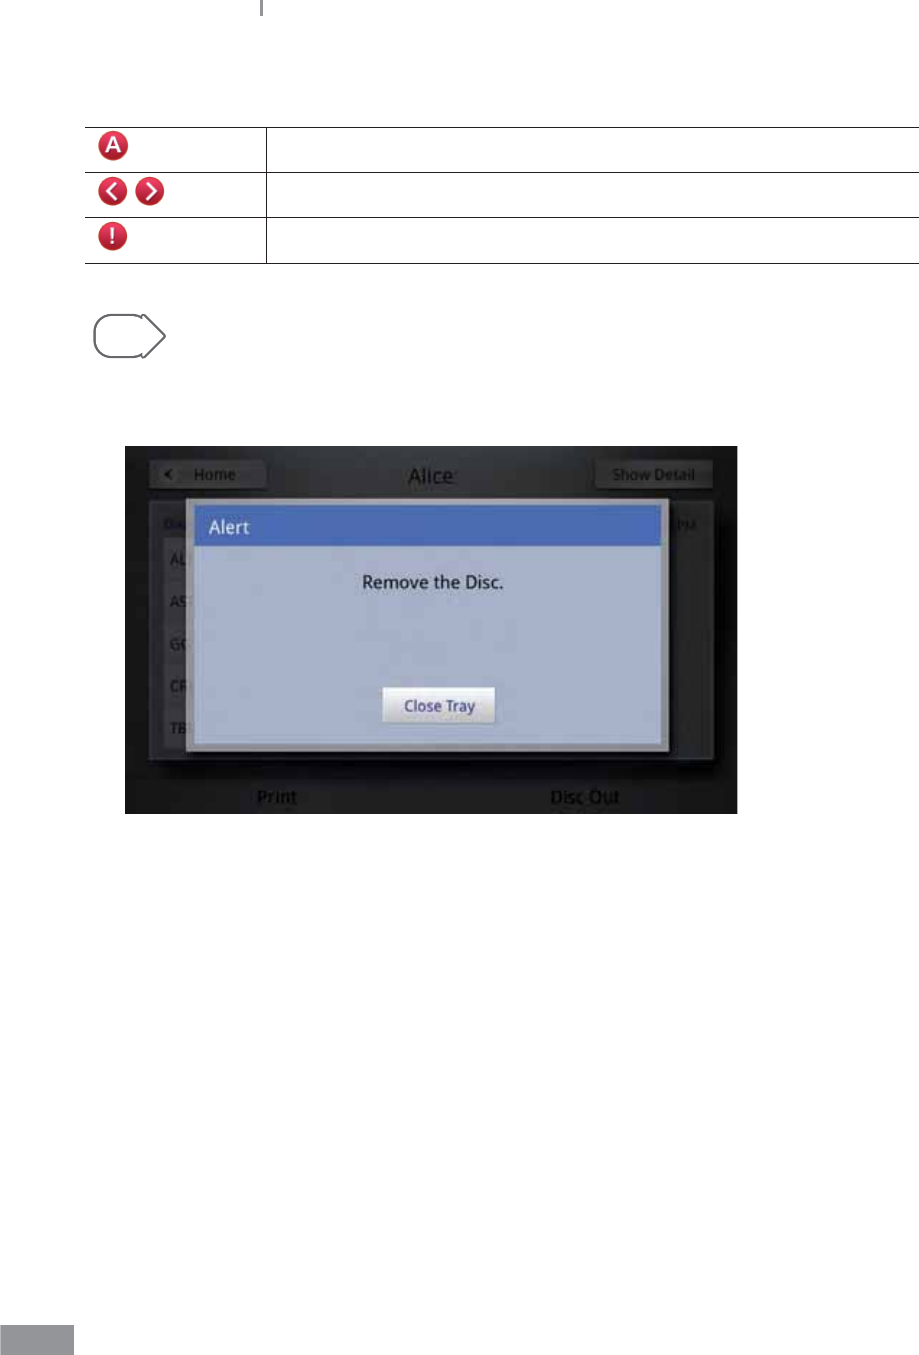
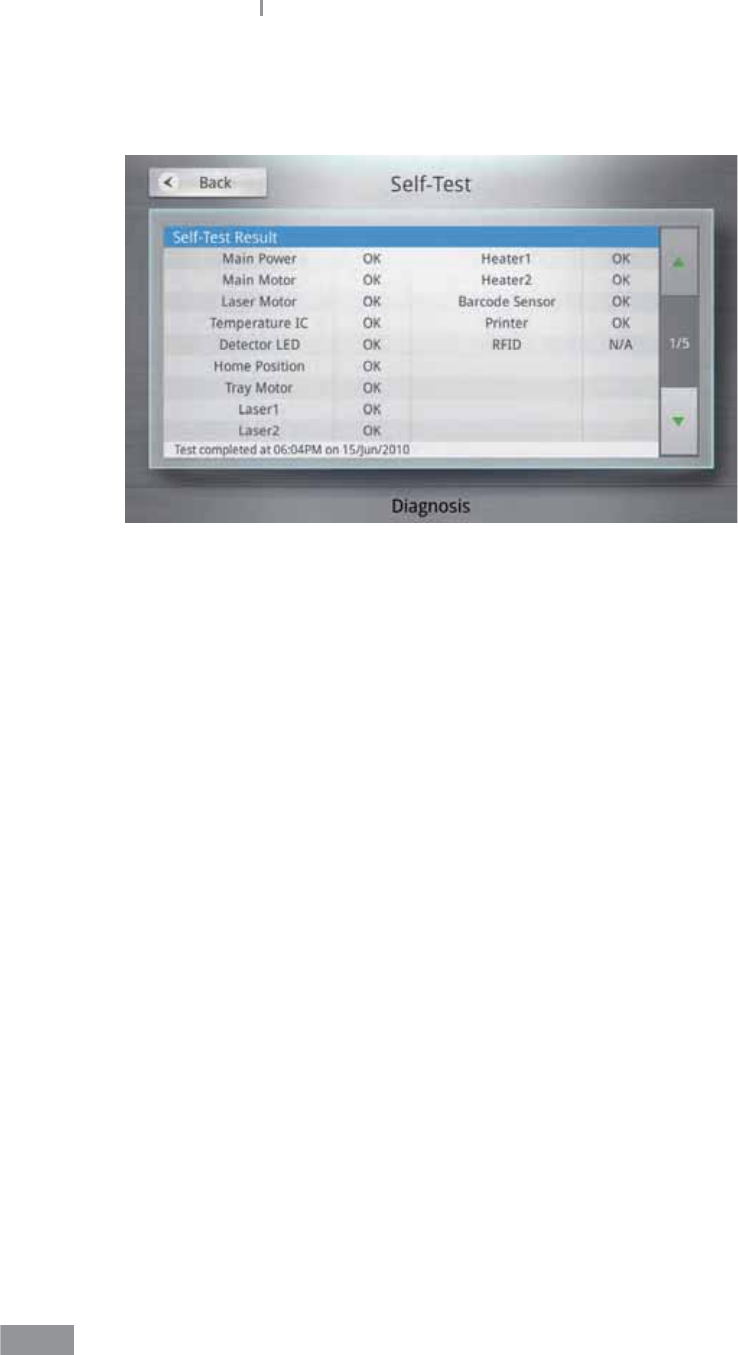
4 The Self-test runs.
5 A pop-up window prompts you to Remove the Disc when the self-test is completed.
102
Samsung LABGEO PA20 Analyzing
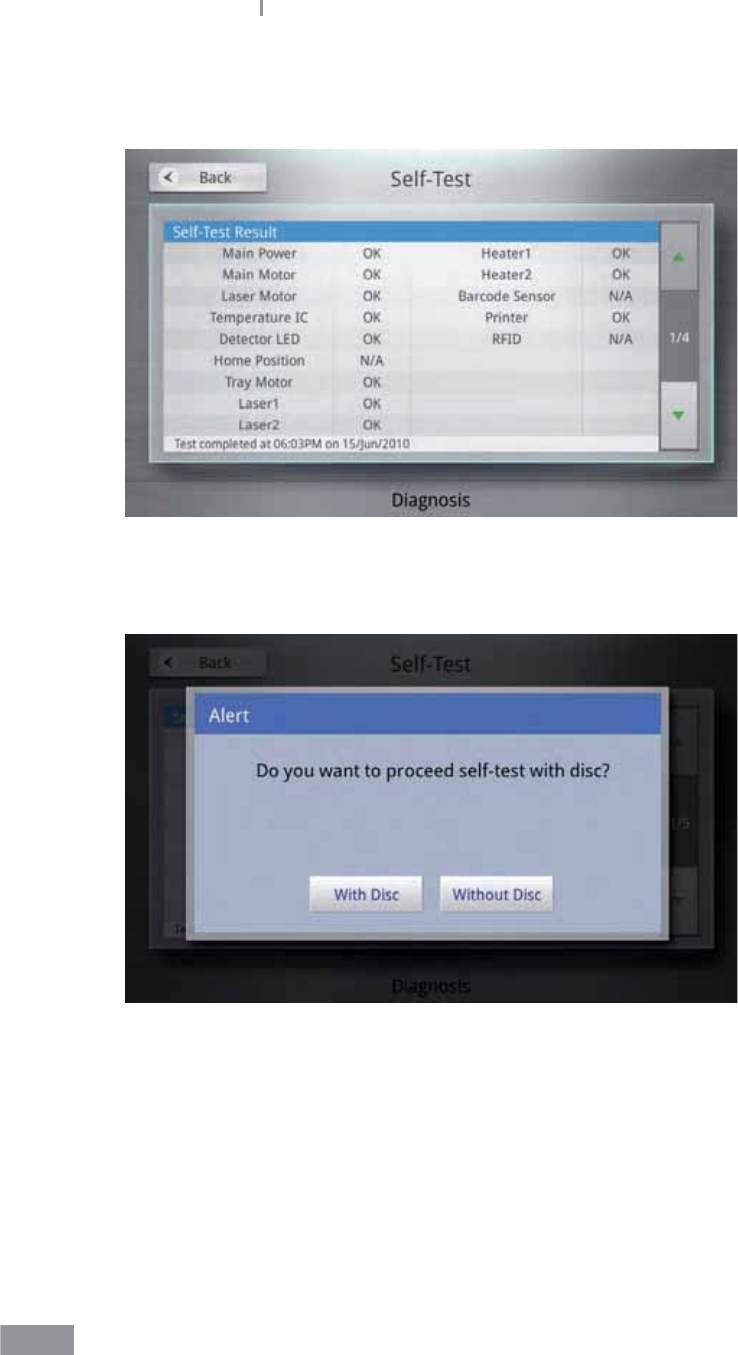
6 Check the self-test results.
Press the Back button to go back to the previous screen.
103
Samsung LABGEO PA20 Analyzing
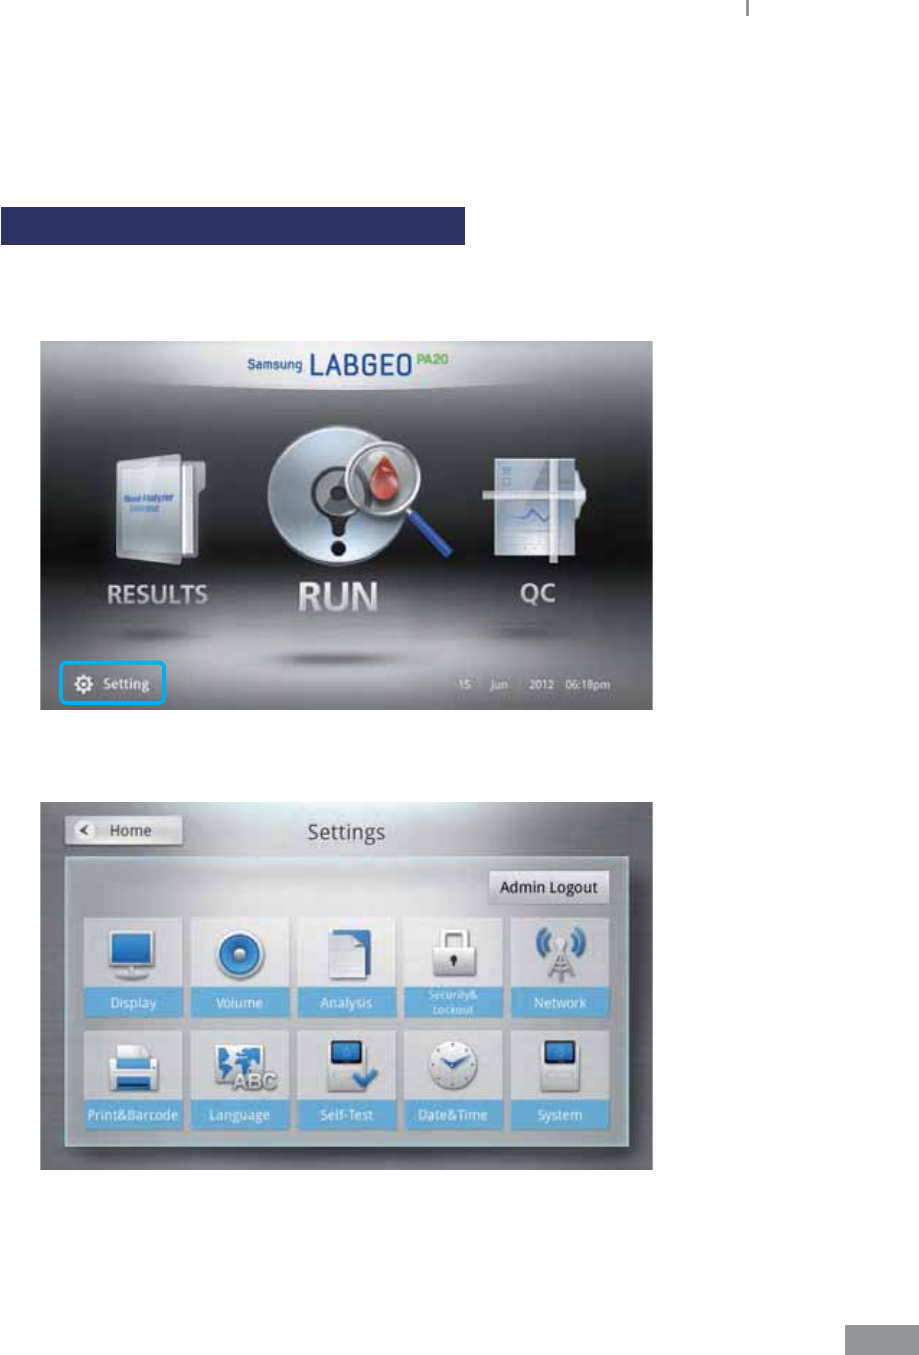
ŶAnalyzer settings (Administrator Settings)
Enter the analyzer settings in administrator mode.
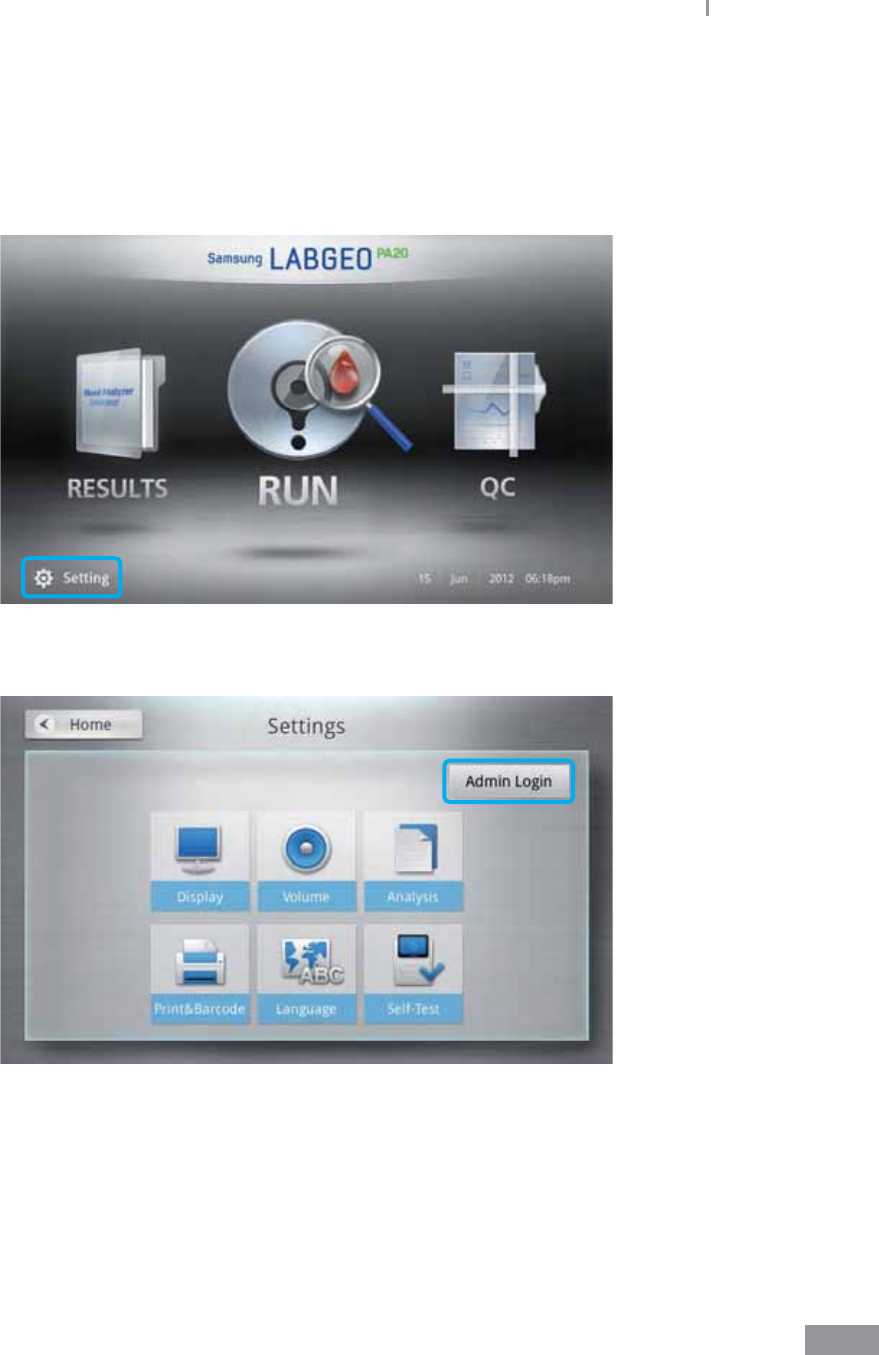
1 Press the Setting button on the home screen.
2 Press the Admin Login button.
104
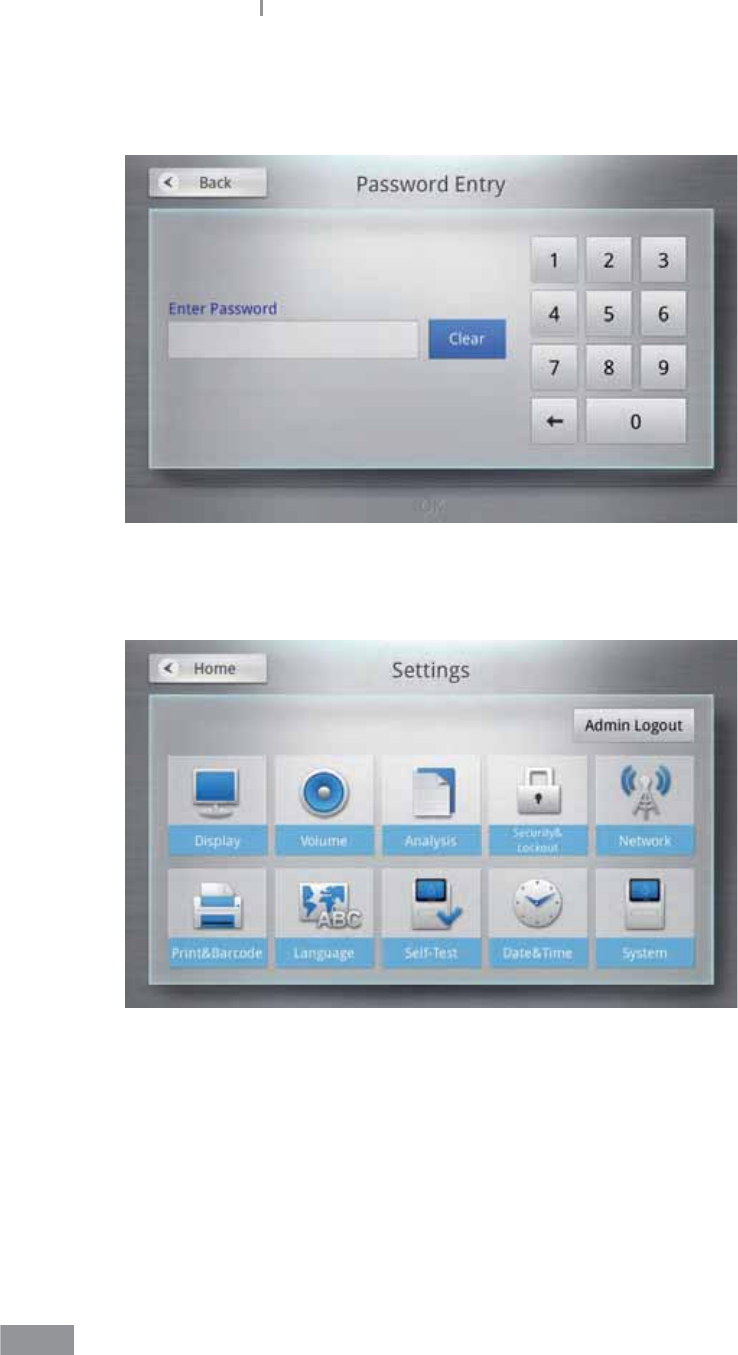
Samsung LABGEO PA20 Analyzing
3 Enter a Password and press the OK button.
(The factory default password is “0000”.)
4 The Lock, Network, Time, and System buttons are also displayed among the Settings
options.
105
Samsung LABGEO PA20 Analyzing
ŶLock settings
Analyzer functions can be locked and new password can be set.
Setting security levels for each function
1 Press the Setting button on the home screen.
Lock settings only appear in Admin Login mode.
2 Press the Security&Lockout button.
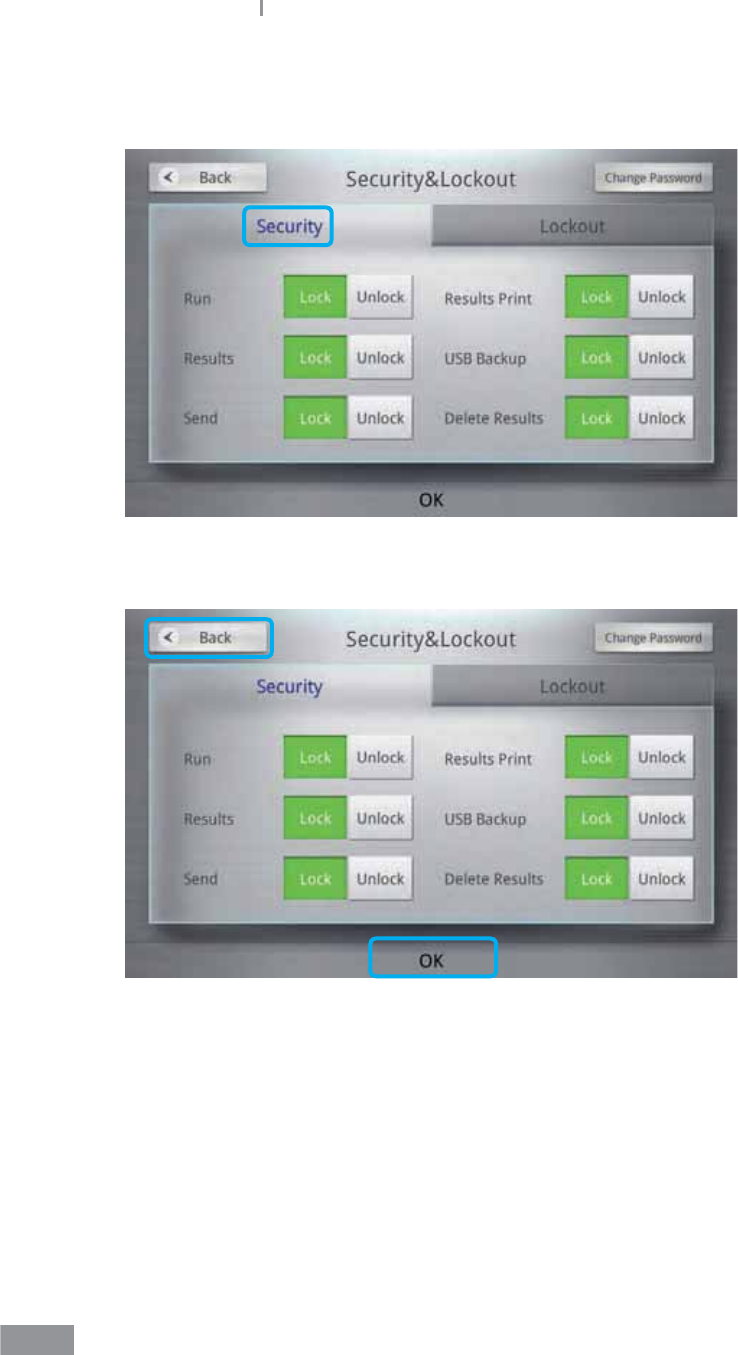
106
Samsung LABGEO PA20 Analyzing
3 Press the Lock button for the items you wish to lock with a password. You can view
locked items after entering the password.
4 Press the OK button to save your changes. Press the Back button to cancel changes.
107
Samsung LABGEO PA20 Analyzing
Locking quality control
1 Press the Setting button on the home screen.
Security&Lock out settings only appear in Admin Login mode.
2 Press the Security&Lockout button.
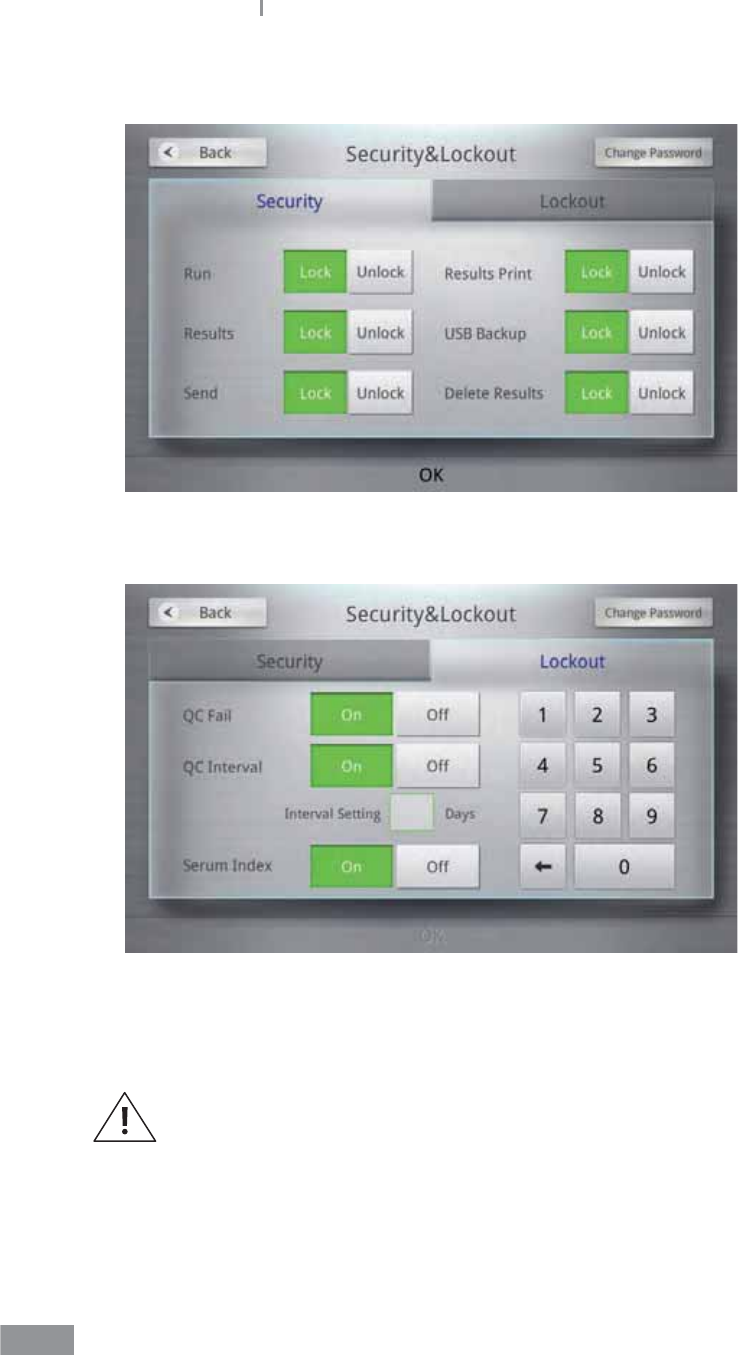
108
Samsung LABGEO PA20 Analyzing
3 Select the Lockout tab.
4 Change the QC lock settings.
If the lock feature is activated for QC, you cannot perform additional tests. Perform QC or
deactivate the lock to test additional samples.
If the QC lock is engaged for longer than a day without QC being performed,
you cannot perform additional tests.
109
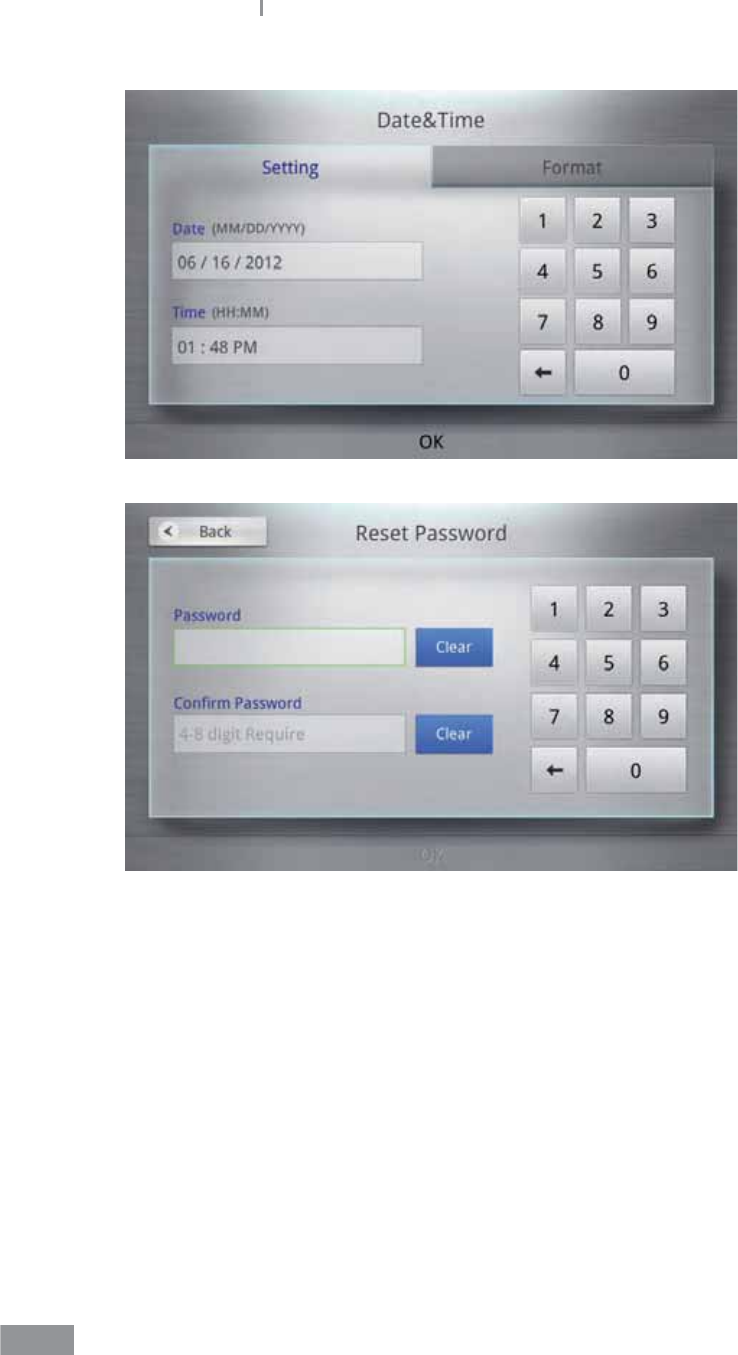
Samsung LABGEO PA20 Analyzing
Changing password
1 Press the Setting button on the home screen.
Password settings only appear in Admin Login mode.
2 Press the Security&Lockout button.
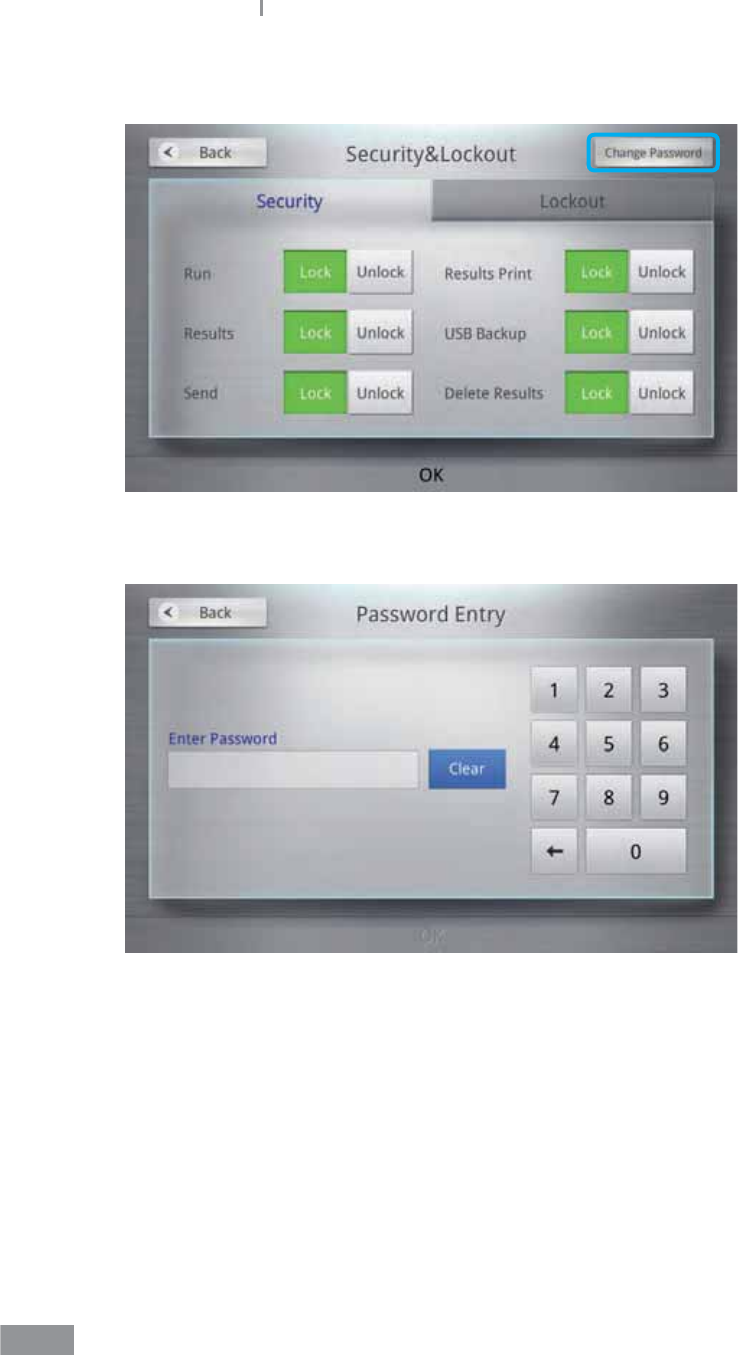
110
Samsung LABGEO PA20 Analyzing
3 To change the password, press the Change Password button.
4 Enter a password and press the OK button.
111
Samsung LABGEO PA20 Analyzing
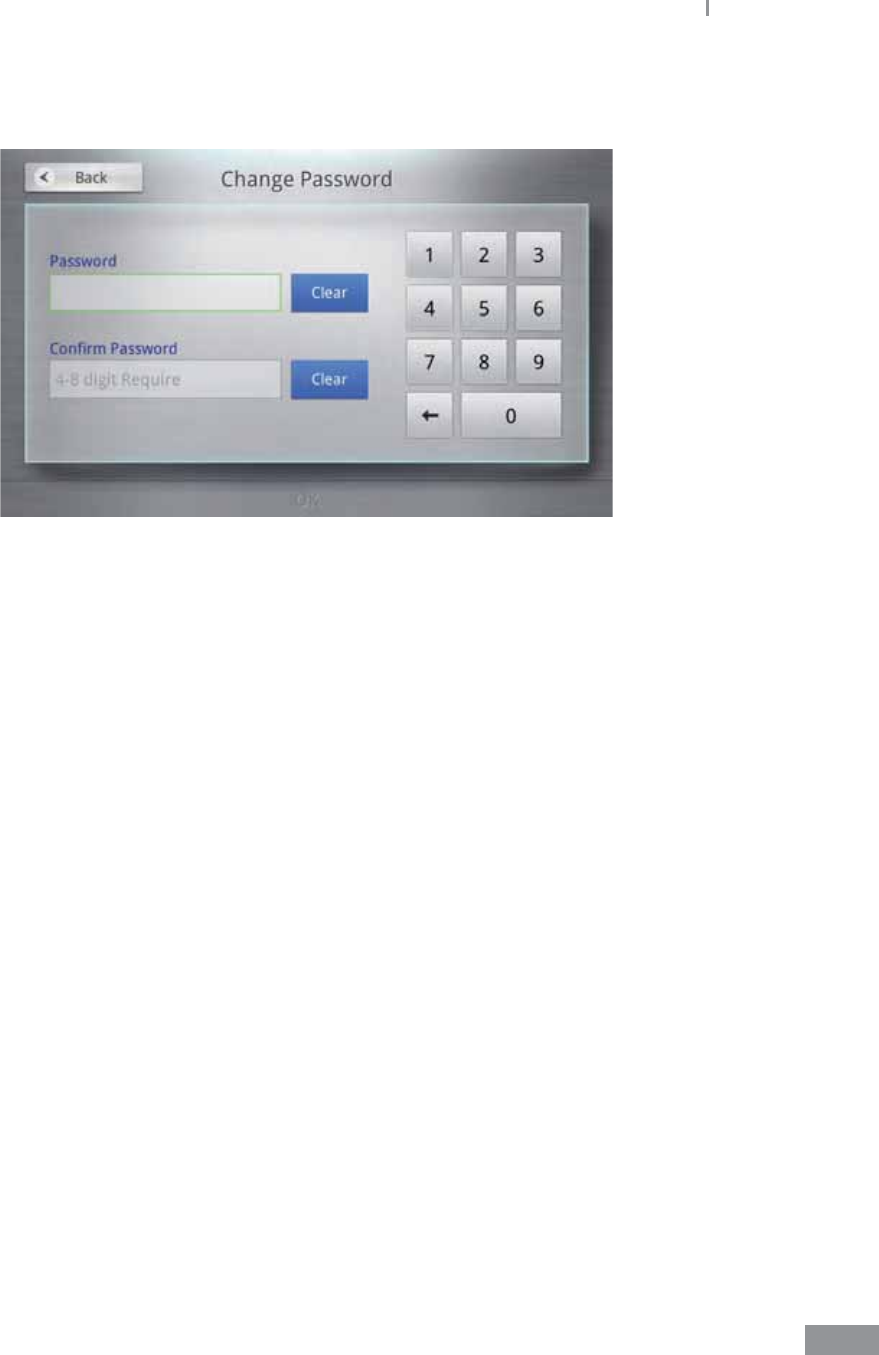
5 Enter a new password in the Password and the Conrm password elds and press the
OK button.
112
Samsung LABGEO PA20 Analyzing
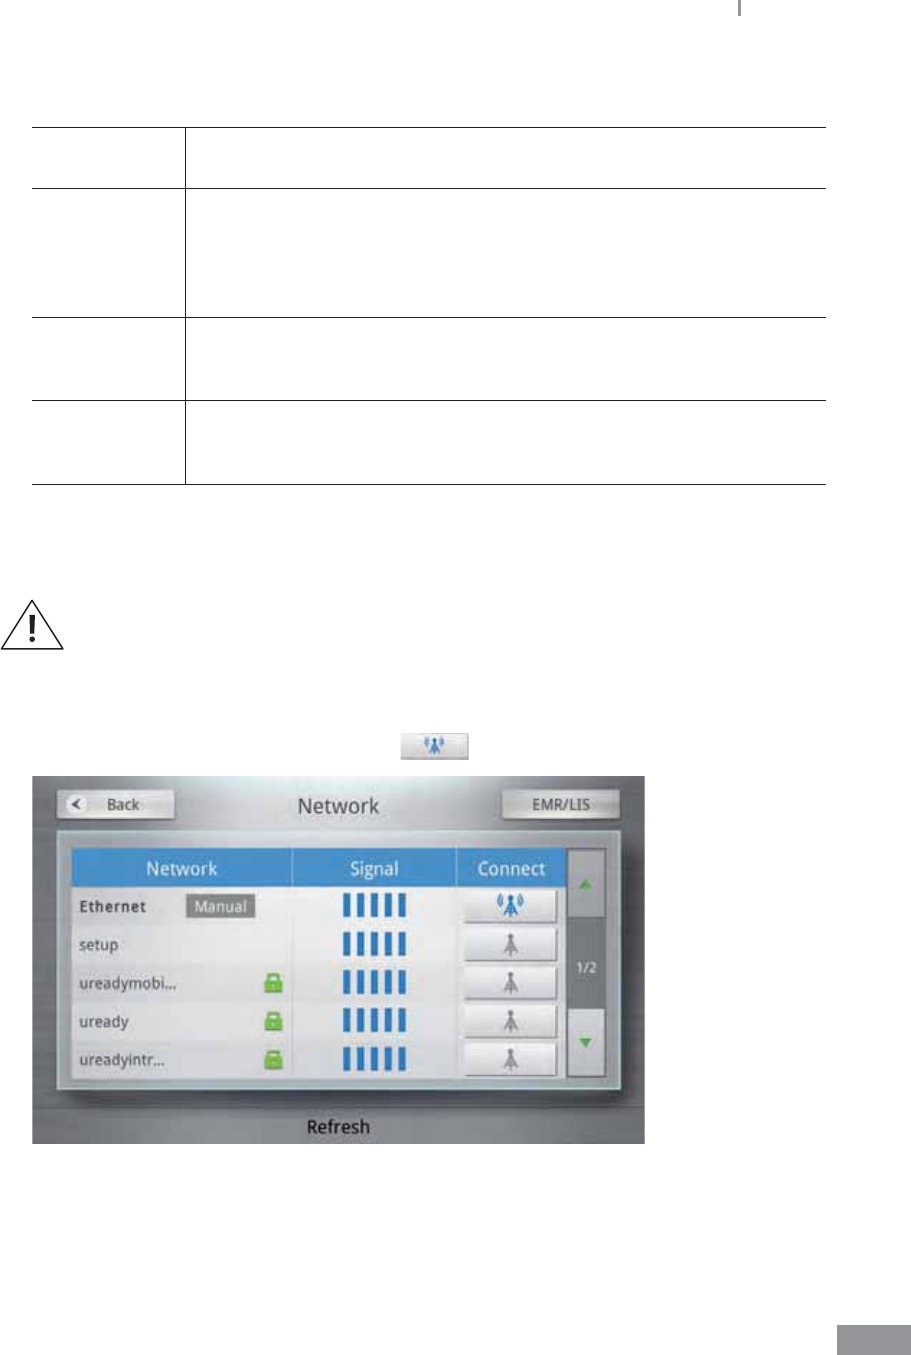
ŶNetwork settings
Network selection, IP address, subnet mask, gateway, and DNS servers can be set in
Network settings. (These settings are used to connect to the LABGEO Data Manager and
EMR/LIS.)
Connecting to a network
1 Press the Setting button on the home screen.
Network settings only appear in Admin Login mode.
2 Press the Network button.

113
Samsung LABGEO PA20 Analyzing
3 Ethernet and wireless access point list is displayed. To connect the network, press
button.
t : The wireless AP needs the password to connect.
t signal ( ): The signal strength of wireless AP.
4 Attempts to connect to the network. If the connection is successful, the button is
changed .

114
Samsung LABGEO PA20 Analyzing
Setting network connections
1 Select the network.
2 Select Auto or Manual.
115
Samsung LABGEO PA20 Analyzing
3 Enter IP Address, Subnet Mask, Gateway, and DNS Server information.
IP Address Choose Auto if the IP address is automatically leased from a DHCP
server, and Manual to specify an IP address manually.
Subnet Mask
Subnet mask can only be changed if the IP address is entered
manually. The Factory default setting is 255.255.255.0.
The subnet mask can be changed according to your network settings.
When entering an IP address manually, not entering a correct subnet
mask may result in connection failures.
Gateway
Gateway can only be changed if the IP address is entered manually.
Enter a gateway according to your network settings. Entering a
gateway address is optional.
DNS Server
DNS server can only be changed if the IP address is entered manually.
Enter a DNS server address according to your network settings.
Entering a DNS server address is optional.
4 Press the OK button to save your network settings, then go back to the previous
screen.
If you set the IP address to Automatic, the address may be set incorrectly and
may not work with EMR or the LABGEO Data Manager. Set the IP address to
Manual to avoid this problem.
Disconnecting to a network
To disconnect the connected network, press button.
116
Samsung LABGEO PA20 Analyzing
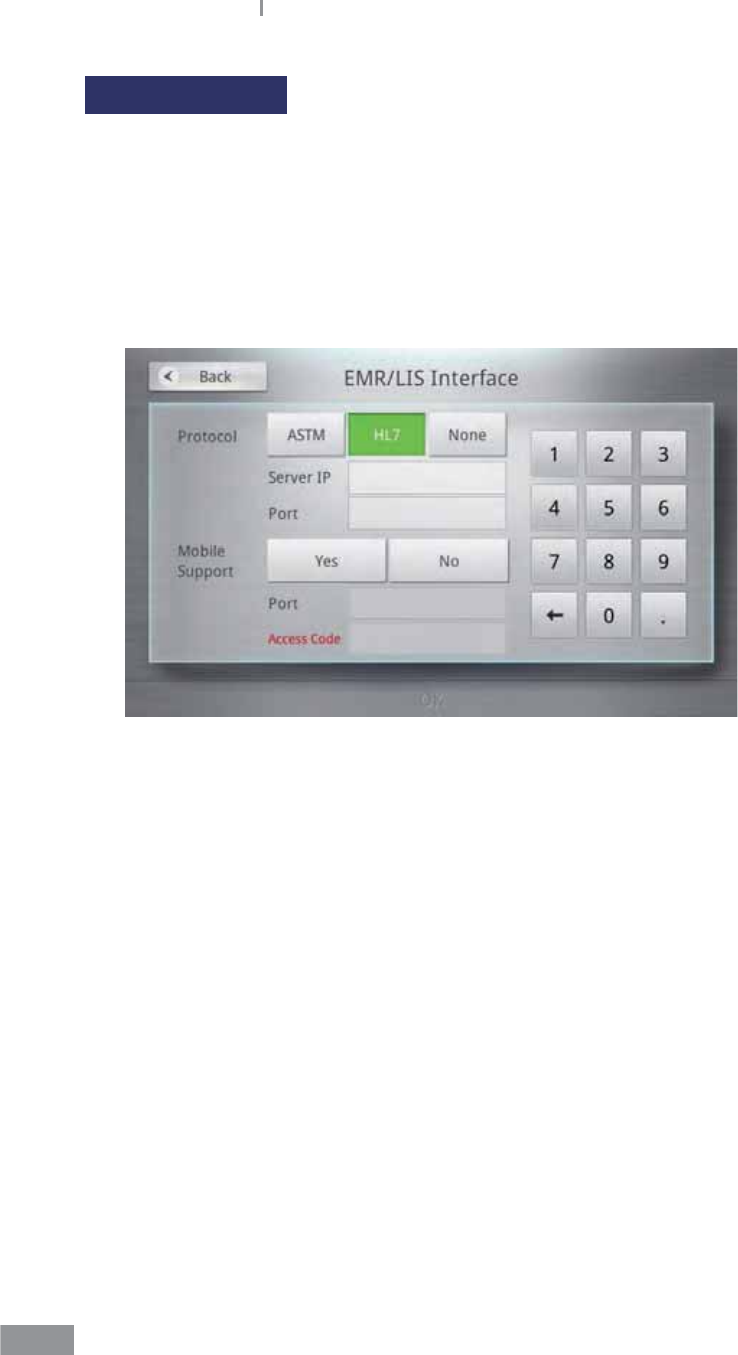
Setting EMR/LIS
1 Press the EMR/LIS button.
2 Select EMR/LIS protocol.
3 Enter the server IP address and port.
4 Press the OK button to save connection information and the analyzer can be access to
EMR/LIS server program.

117
Samsung LABGEO PA20 Analyzing
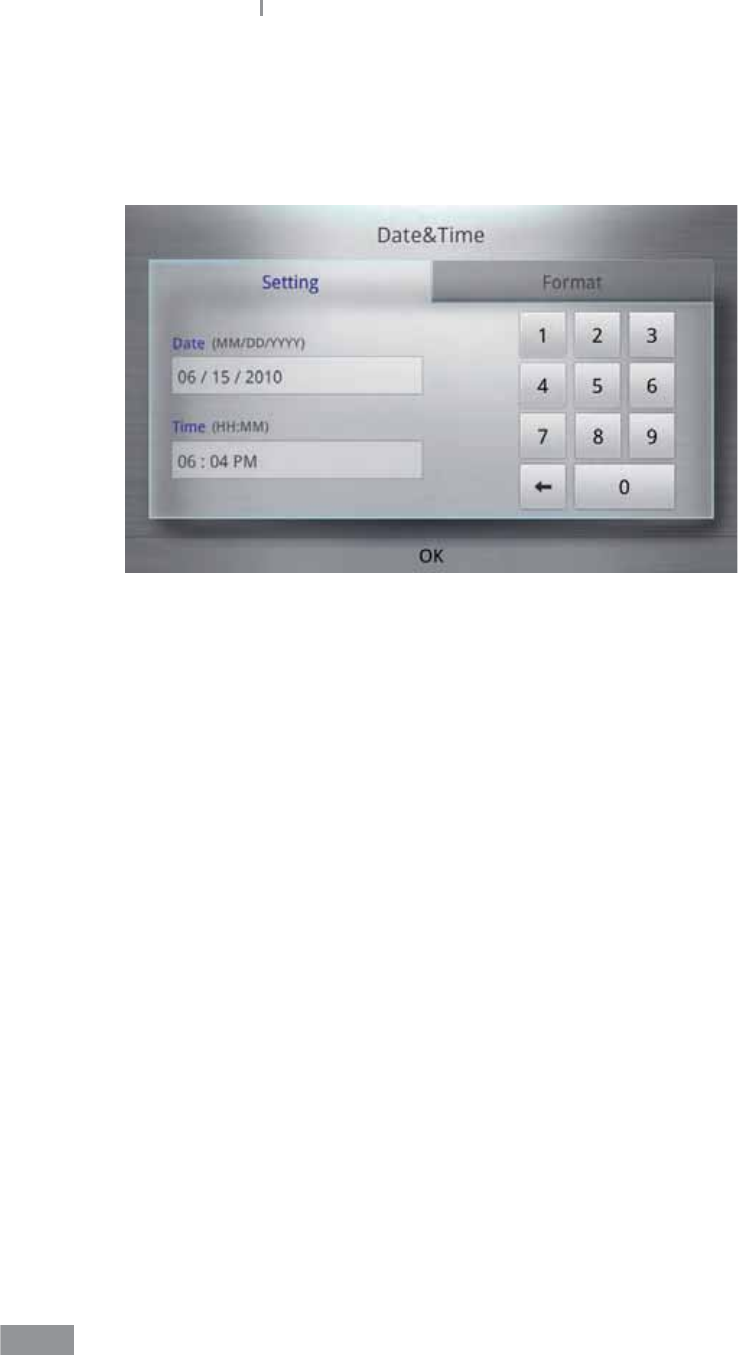
ŶLock settings
Select the time and date for the analyzer.
1 Press the Setting button on the home screen.
Date&Time settings only appear in Admin Login mode.
2 Press the Date&Time button.
118
Samsung LABGEO PA20 Analyzing
3 Enter the date and time, then press the OK button. Press the Back button to cancel
changes.
The year can be chosen between 2000 and 2037.
Enter HH:MM in 12-hour notation.

119
Samsung LABGEO PA20 Analyzing
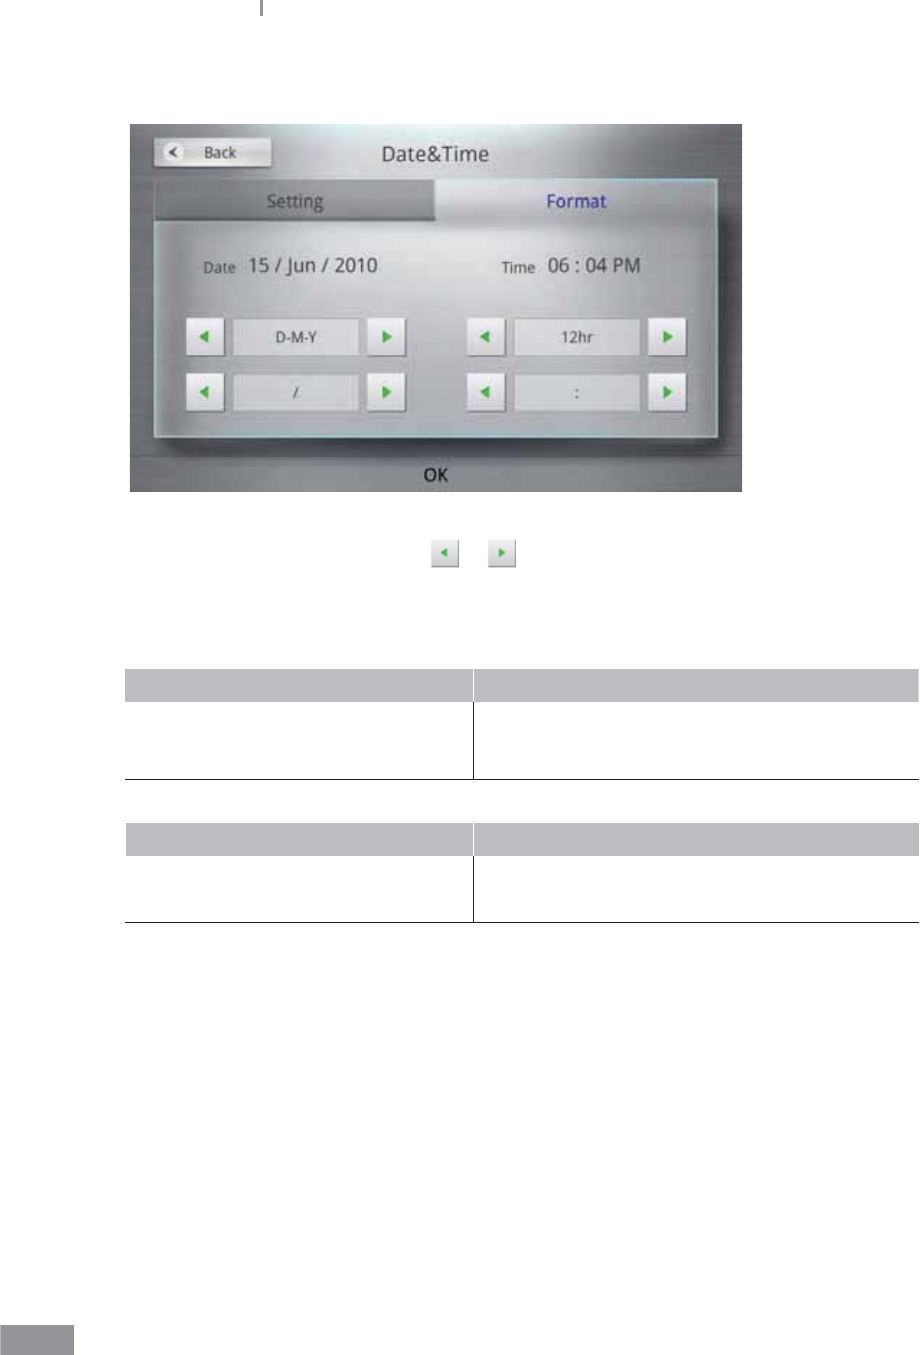
ŶChanging Date&time format
Select the format of the date and time displayed by the analyzer.
1 Press the Setting button on the home screen.
Date&Time settings only appear in Admin Login mode.
2 Press the Date&Time button.
120
Samsung LABGEO PA20 Analyzing
3 Select the Format tab.
4 Select display format by pressing or , then press the OK button. Press the Back
button to cancel changes
Display format options are as follows.
Display formatting does not apply when setting the date.
Date Date Separator
YYYY-MM-DD e.g.) 2012/10/31
MM-DD-YYYY e.g.) 2012/10/31
DD-MM-YYYY e.g.) 2012/10/31
/ e.g.) 2012/10/31
- e.g.) 2012-10-31
, e.g.) 2012, 10, 31
Time Time Separator
12 hour, 24 hour
: e.g.) 12:30 PM
. e.g.) 12.30 PM
, e.g.) 12,30 PM
121
Samsung LABGEO PA20 Analyzing
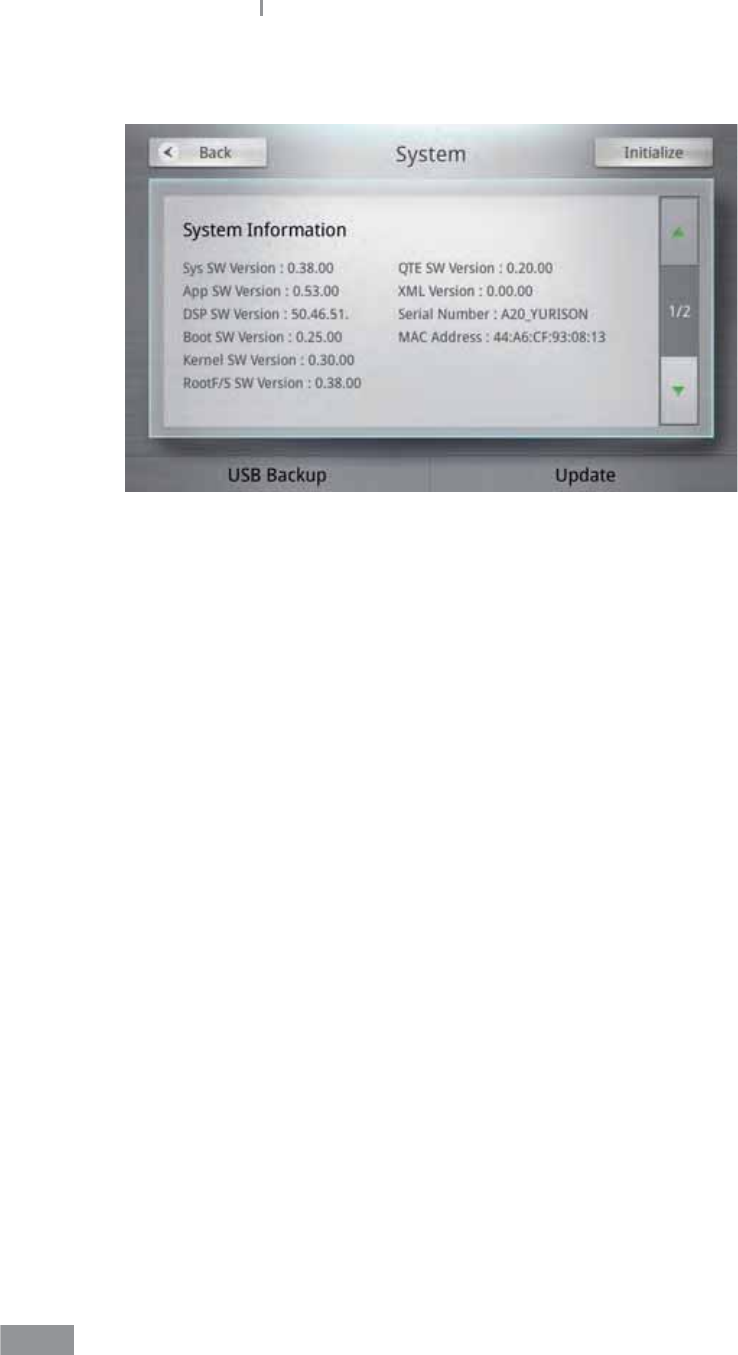
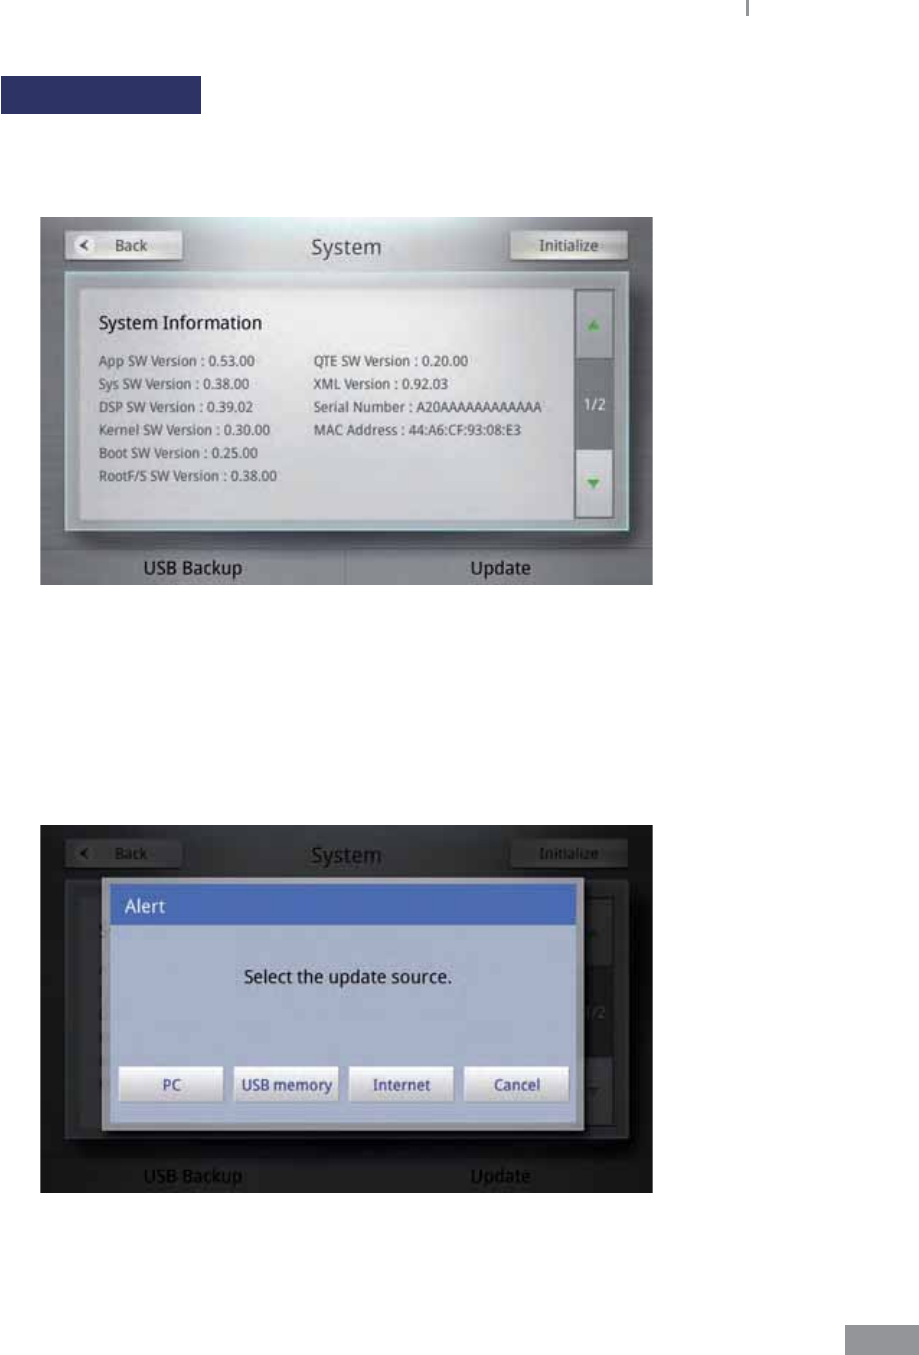
ŶSystem settings
System information checks, updates, and initialization of the analyzer can be performed.
1 Press the Setting button on the home screen.
System settings only appear in Admin Login mode.
2 Press the System button.
122
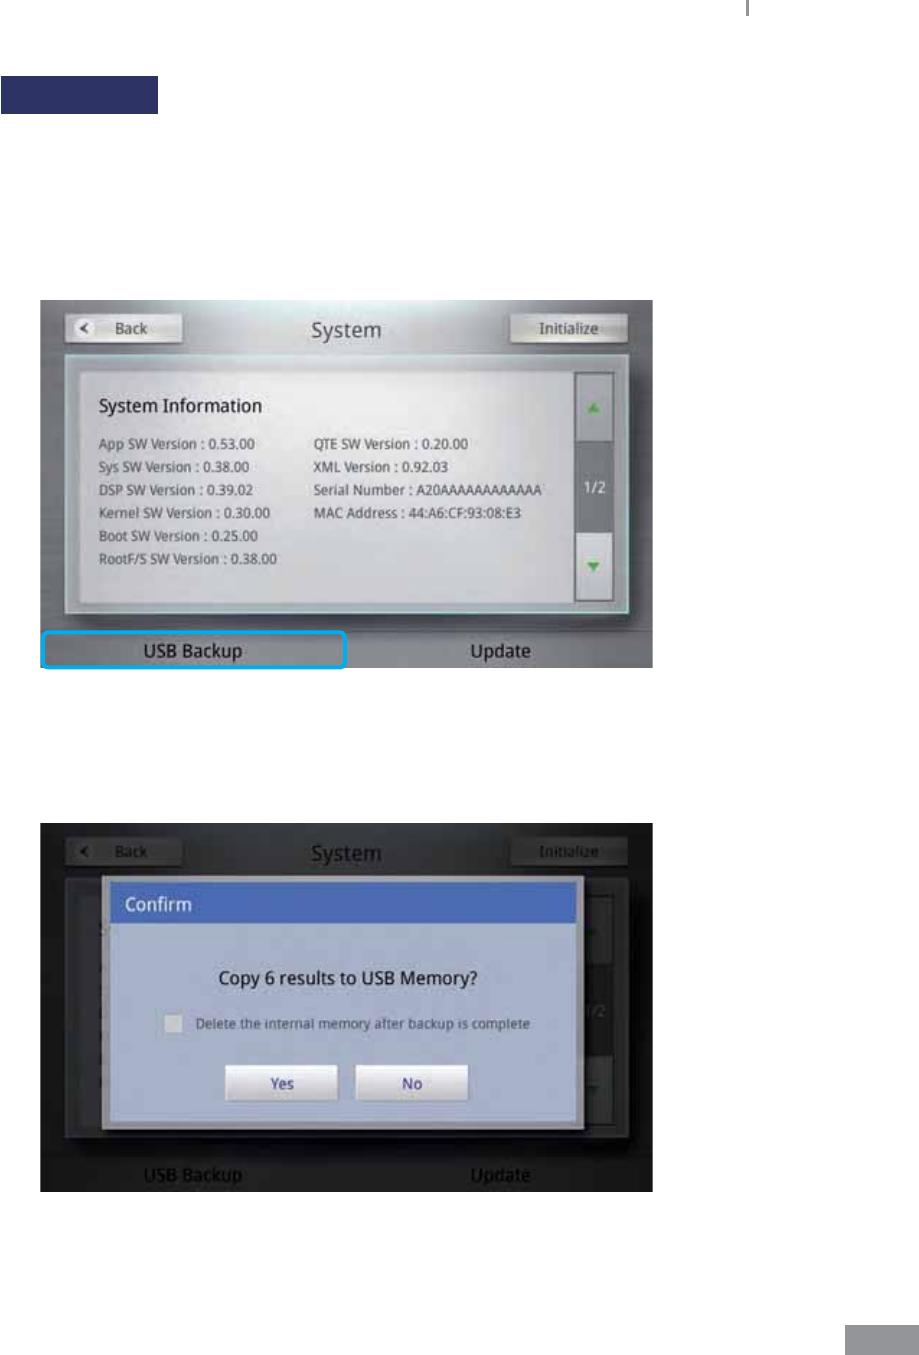
Samsung LABGEO PA20 Analyzing
3 Check the current system information.
123
Samsung LABGEO PA20 Analyzing
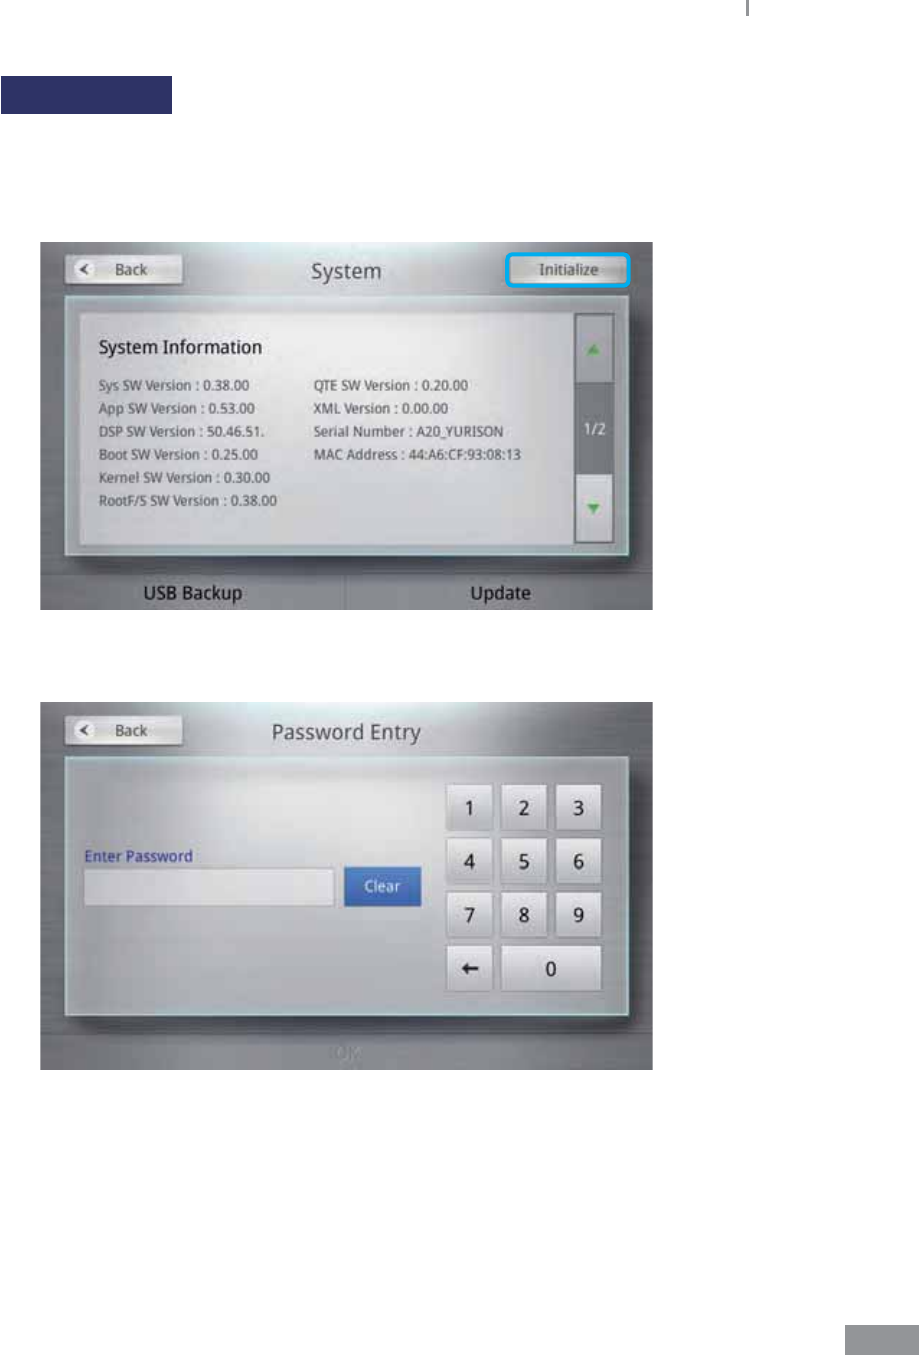
System Reset
Initializes the analyzer system.
1 To initialize the system to its factory defaults, press the Initialize button in the upper
right corner of the display.
2 Enter the password for the analyzer.
124
Samsung LABGEO PA20 Analyzing
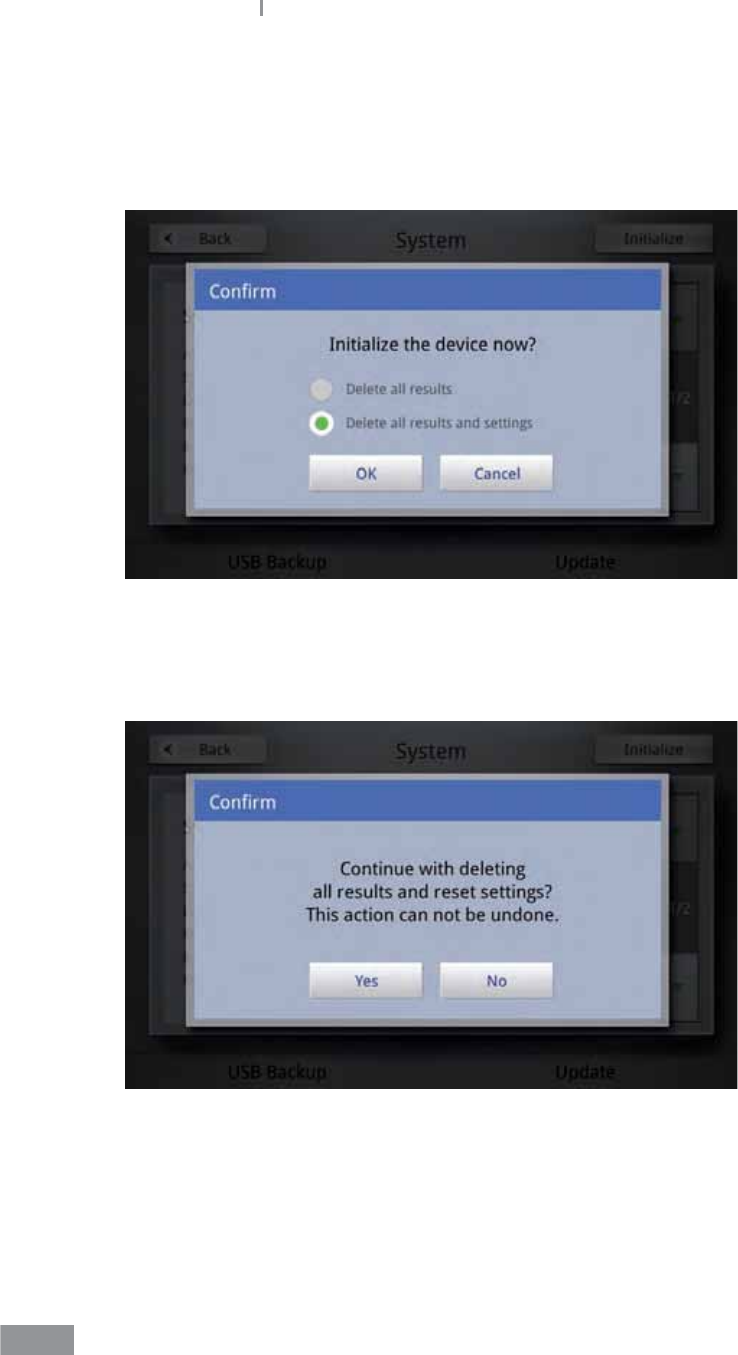
3 A pop-up window ‘Initialize the device now?’ prompts you to initialize the system.
Select your initialization options and press the OK button.
Delete all results: Only deletes analysis results.
Delete all results and settings: Deletes all saved analysis results and all other settings.
4 Press the Yes button when a pop-up window prompts you to Conrm the
initialization.
Press the No button to cancel the initialization.
125
Samsung LABGEO PA20 Analyzing
5 When selecting Delete all results, the home screen is displayed when the initialization
completes.
When selecting Delete all results and settings, the analyzer reboots when the
initialization completes.
In this case, the touch screen must be calibrated and the Time and Date, password
must be changed.
126
Samsung LABGEO PA20 Analyzing
127
Samsung LABGEO PA20 Analyzing
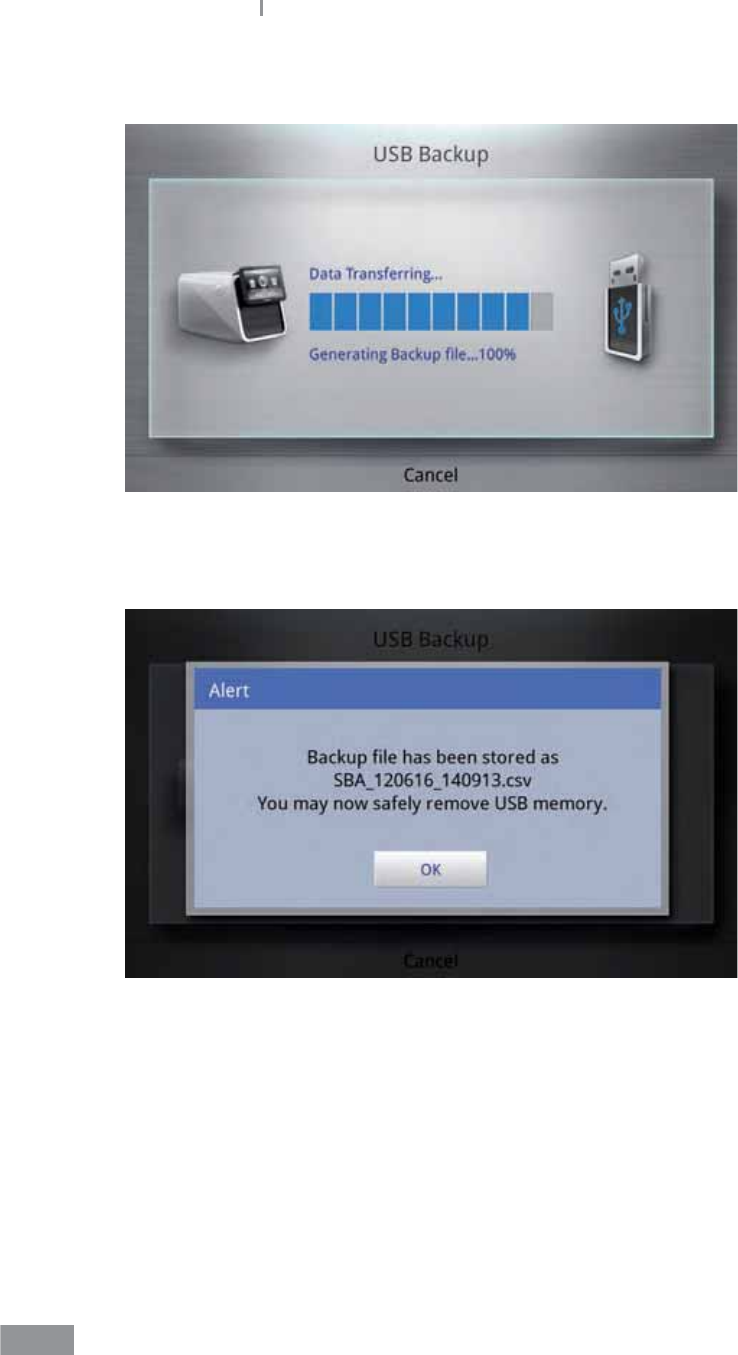
USB Backup
Saves the analysis results saved in the analyzer to a USB memory device.
t QC results cannot be backed up.
t Results backed up to a USB memory device can be transferred to a PC using the import
function in the LABGEO Data Manager.
1 Press the USB Backup button in the lower-left corner of the system display.
2 Press the Yes button when a pop-up window prompts you to Conrm backup.
You can check the Delete the internal memory after backup is complete.
128
Samsung LABGEO PA20 Analyzing
3 Press the Cancel button to cancel the USB backup.
4 When a pop-up window noties you that the backup has completed, press the OK
button, then remove the USB memory device.
129
Samsung LABGEO PA20 Analyzing
System updates
Updates the analyzer system.
1 Press the Update button in the lower-right corner of the system display.
2 The system can be updated using a PC, a USB memory device, or online. Select the
desired update source.
t PC, Internet: The analyzer must be connected to a LAN or USB cable.
t USB memory: A USB memory device can be used to update the system by copying
the update les to the USB memory device and plugging it into the USB port on the
rear of the analyzer.

130
Samsung LABGEO PA20 Analyzing
3 The analyzer reboots when the update completes.
The system does not reboot when only the disc information(XML) has been updated.
131
Samsung LABGEO PA20 Analyzing
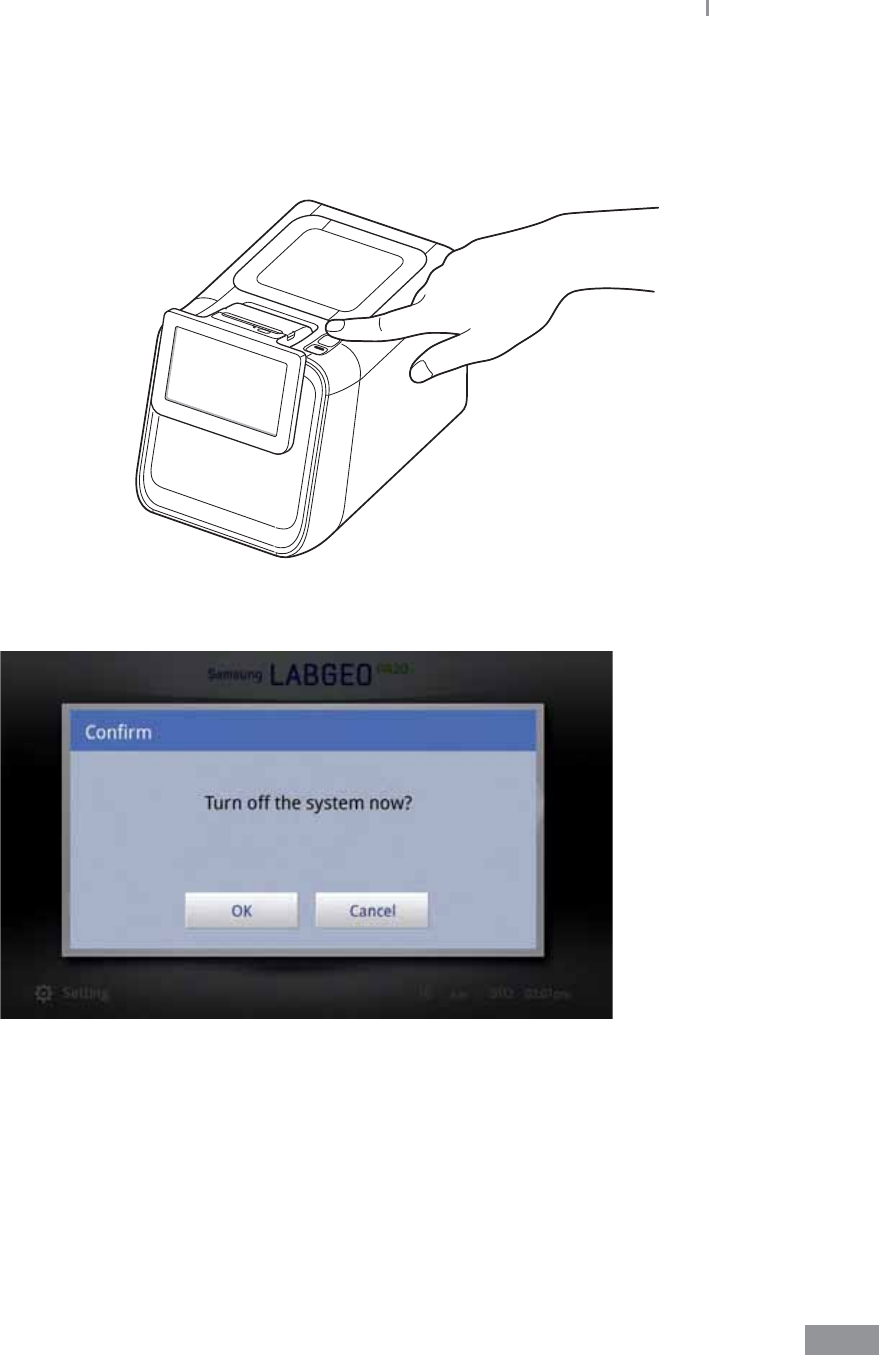
ŶTurning o power
1 Press the power button on the right-hand side of the analyzer.
2 Press the OK button in the system shutdown conrmation pop-up window.
Samsung LABGEO PA20

Using the LABGEO
Data Manager
5
Introduction to the LABGEO Data Manager .................................134
Installation of the LABGEO Data Manager ...................................135
Running the LABGEO Data Manager .............................................139
Home screen .......................................................................................140
Registering a blood analyzer device .......................................................................141
Viewing analysis results ...................................................................147
Editing analysis results .....................................................................148
Selecting and editing multiple analysis results ...................................................150
Printing analysis results ...................................................................151
Removing the LABGEO Data Manager ..........................................153

134
Using the LABGEO Data Manager
ŶIntroduction to the LABGEO Data Manager
The LABGEO Data Manager connects to the blood analyzer, update server, and printer to
provide an easy way to save the blood analyzer’s results, download the latest software
updates, and print the analysis results.
The features of the LABGEO Data Manager are as follows.
ŶAnalysis results management
t Transfer analysis results: Receive analysis results transferred from the blood analyzer
t Display analysis results: Displays analysis results on the PC screen
t Sort analysis results: Sorts analysis results by analytes chosen by the user
t Search analysis results: Searches analysis results that meet search criteria
t Print analysis results: Prints analysis results
t Decide which analytes from analysis results to print: Allows users to print only
selected analytes from analysis results
t Edit analysis results: Allows users to add and edit patient information to analysis
results
t Import analysis results: Allows users to import and add analysis results from a USB
memory device
ŶBlood analyzer and the LABGEO Data Manage updates
t Analyzer software update: Downloads the latest software and updates the analyzer
software
t LABGEO Data Manager update: Updates the LABGEO Data Manager
ŶOther functions
t Account management: Create and delete accounts, change passwords
t Language selection: Change the language you use
t Login/Logout: Login and logout for individual user-controlled access
t Auto-print: Automatically prints data received from the analyzer depending on user
preferences
135
Samsung LABGEO PA20 Using the LABGEO Data Manager
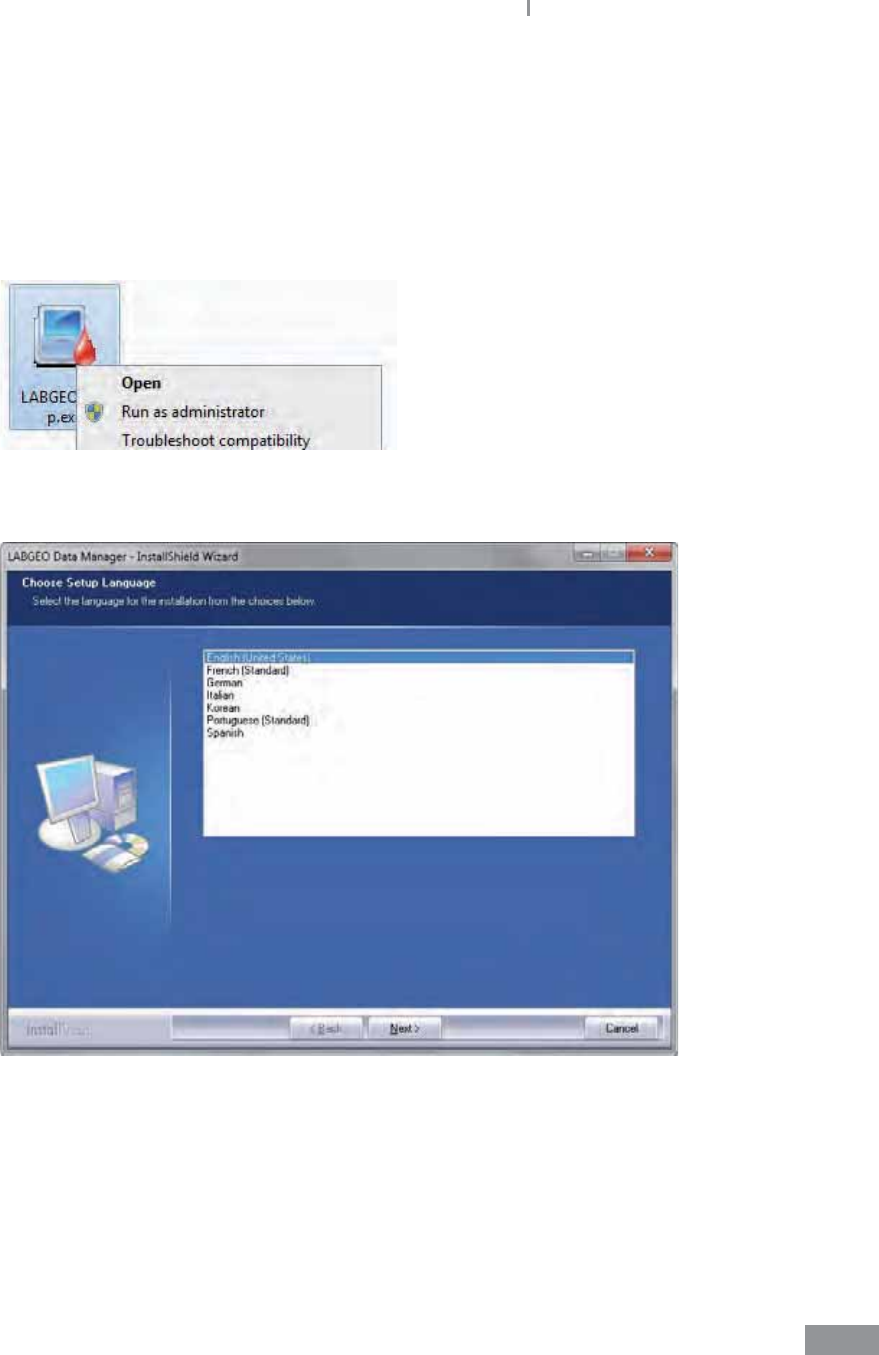
ŶInstallation of the LABGEO Data Manager
1 Insert the installation CD into your computer’s CD/DVD drive; the LABGEO Data
Manager installer should begin automatically. If the installation does not begin
automatically, run LABGEOSetup.exe in the CD as an administrator (for Windows XP,
select Open).
2 Select the language to install and click the Next button.
136
Samsung LABGEO PA20 Using the LABGEO Data Manager
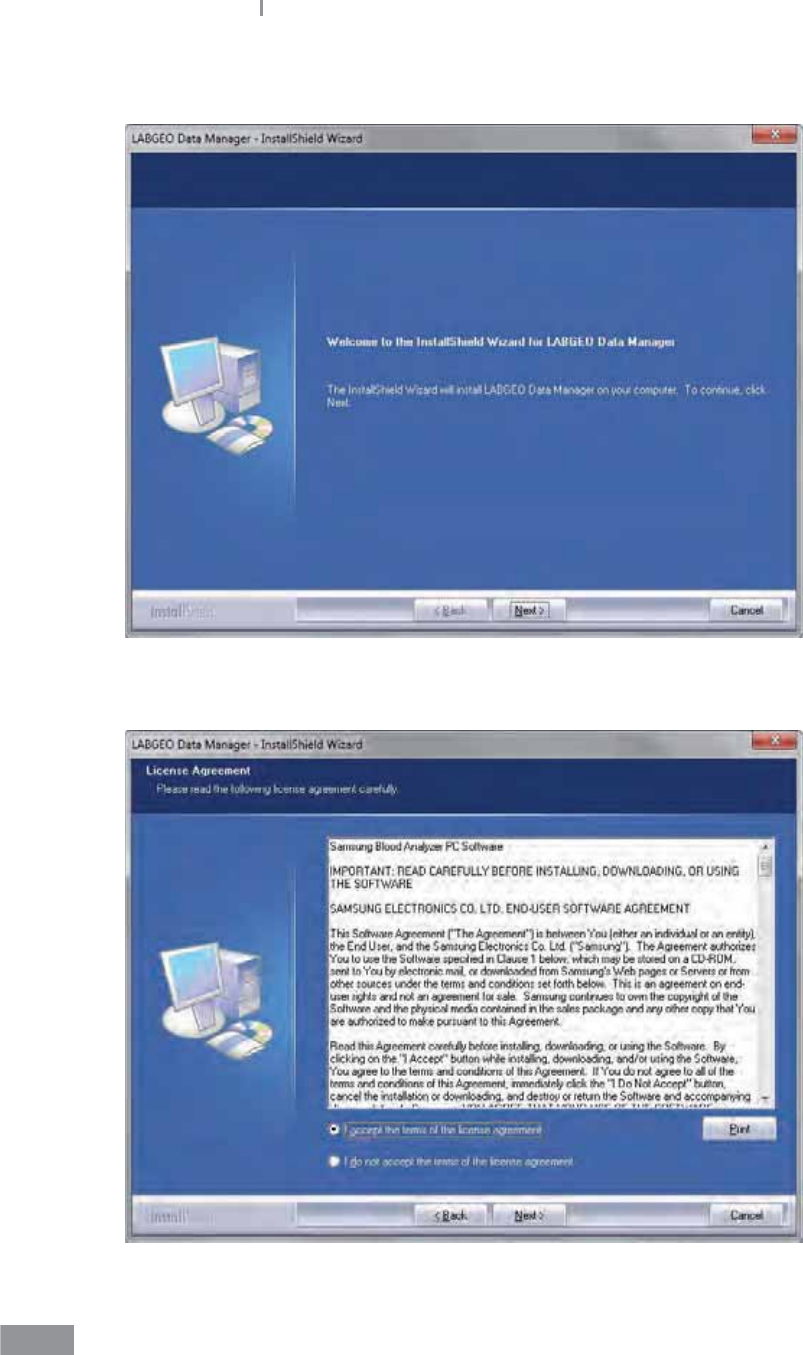
3 Click the Next button.
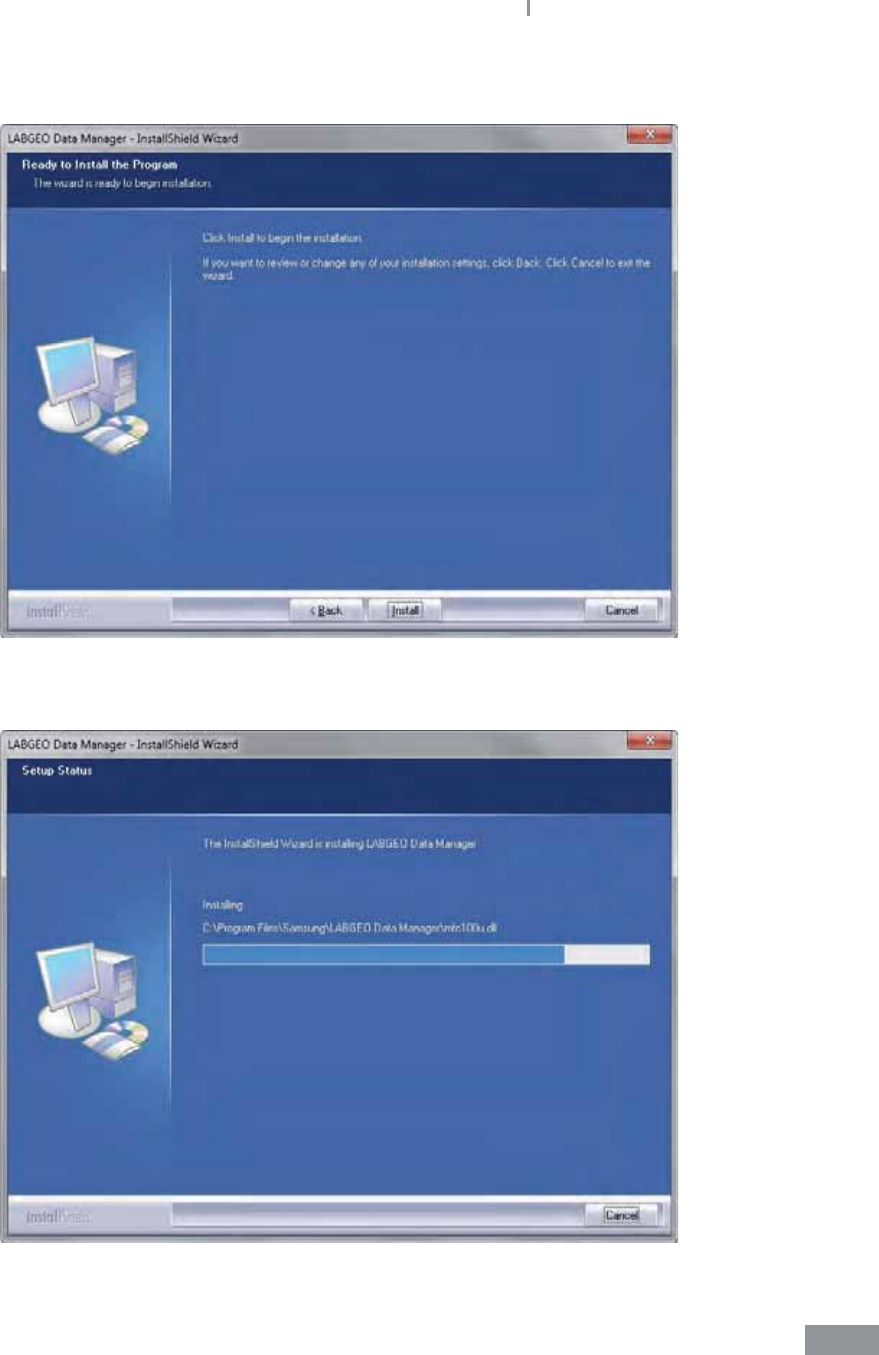
4 Check “I agree to end-user license agreement” and click Next.
137
Samsung LABGEO PA20 Using the LABGEO Data Manager
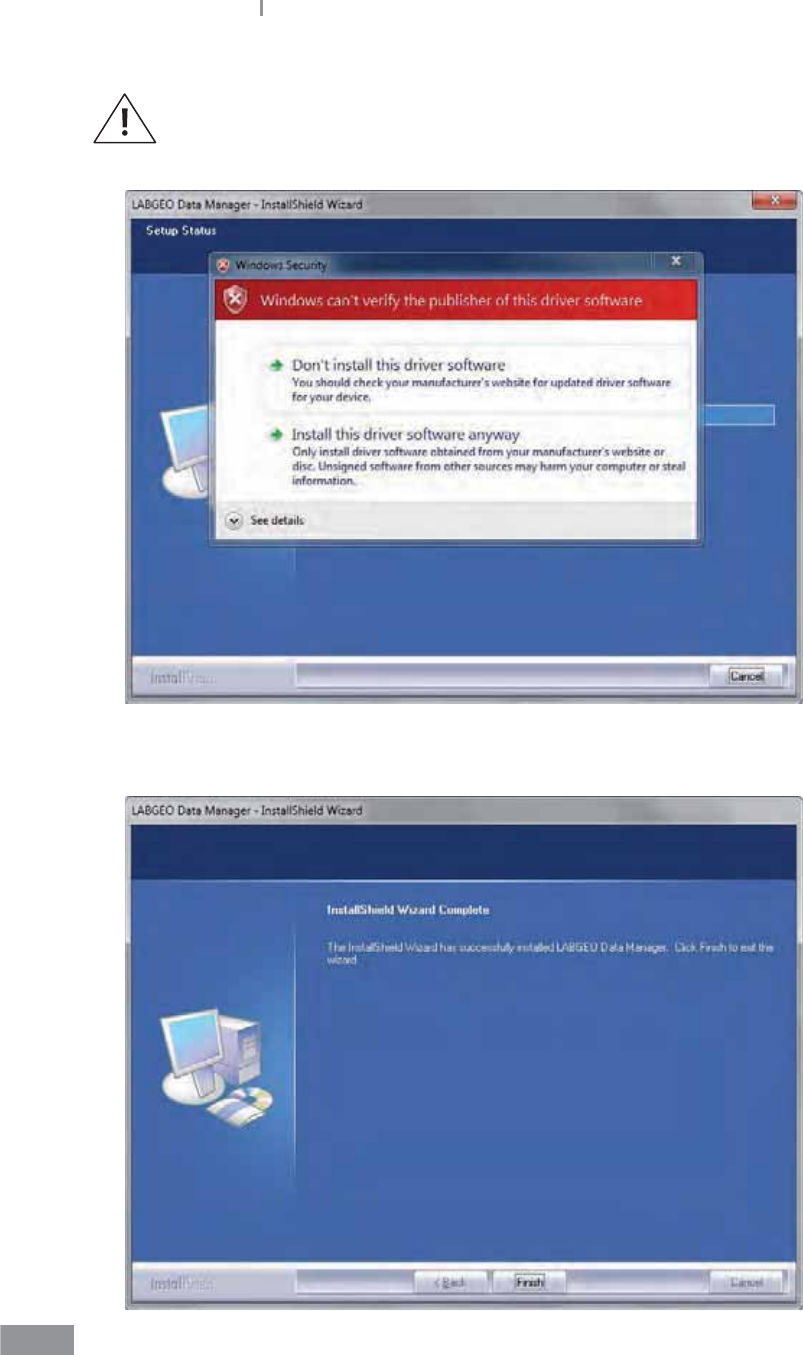
5 Click Install to start installing the LABGEO Data Manager.
6 Installation begins.
138
Samsung LABGEO PA20 Using the LABGEO Data Manager
When a pop-up window like the one below appears, select “Install this driver
anyway” and proceed (in Windows XP, click Continue).
7 Click the Finish button when the installation is nished.
139
Samsung LABGEO PA20 Using the LABGEO Data Manager
ŶRunning the LABGEO Data Manager
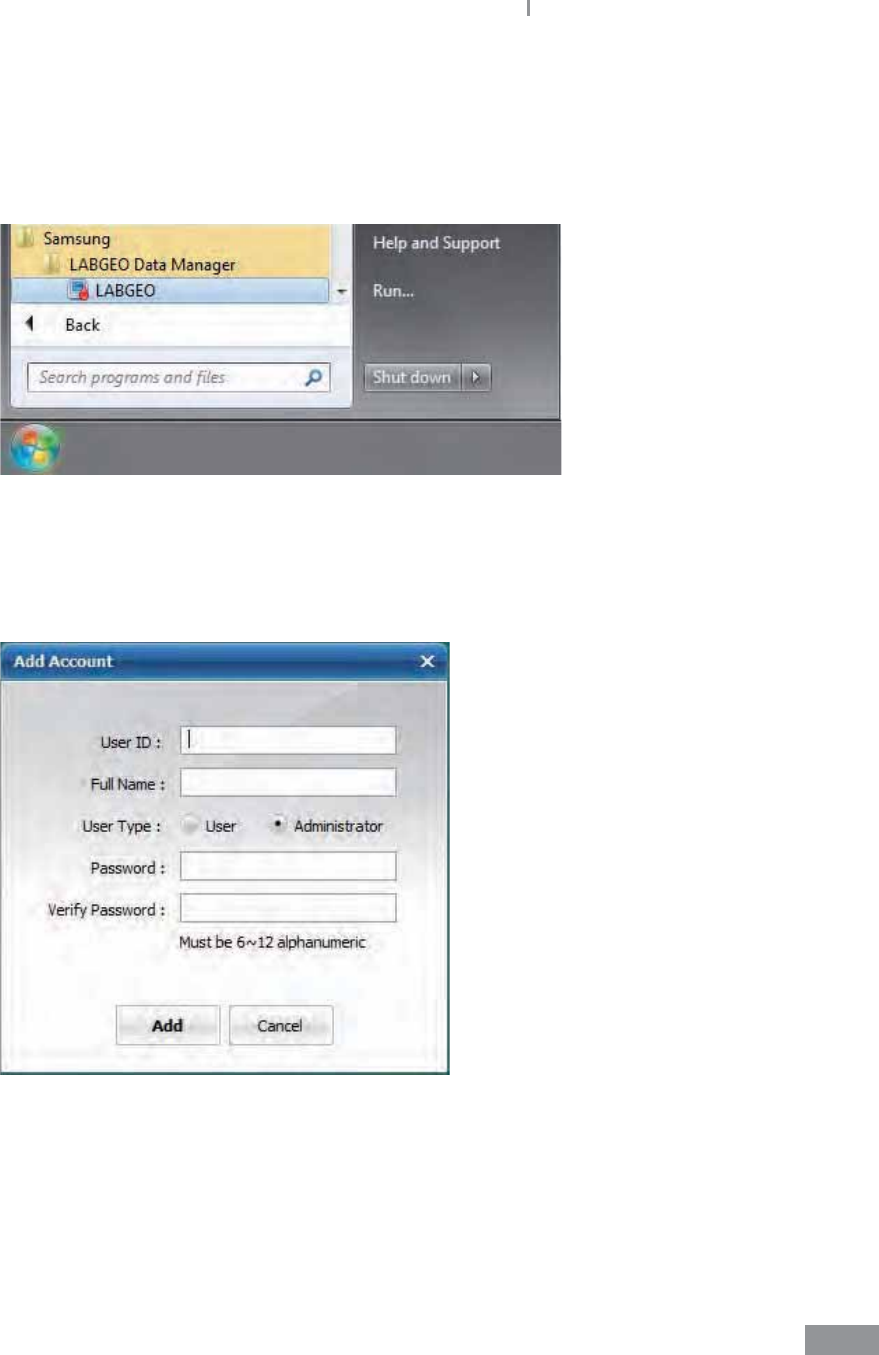
1 Run the LABGEO Data Manager from the shortcut in the desktop or under (All)
Programs in the Start Menu.
2 When the program runs, a window for creating a new account is displayed.
Enter your ID and a 6 to 12 character password using a combination of letters and
numbers, then click the “Add” button. The message, “New account has been added,” is
displayed and the program begins.
140
Samsung LABGEO PA20 Using the LABGEO Data Manager
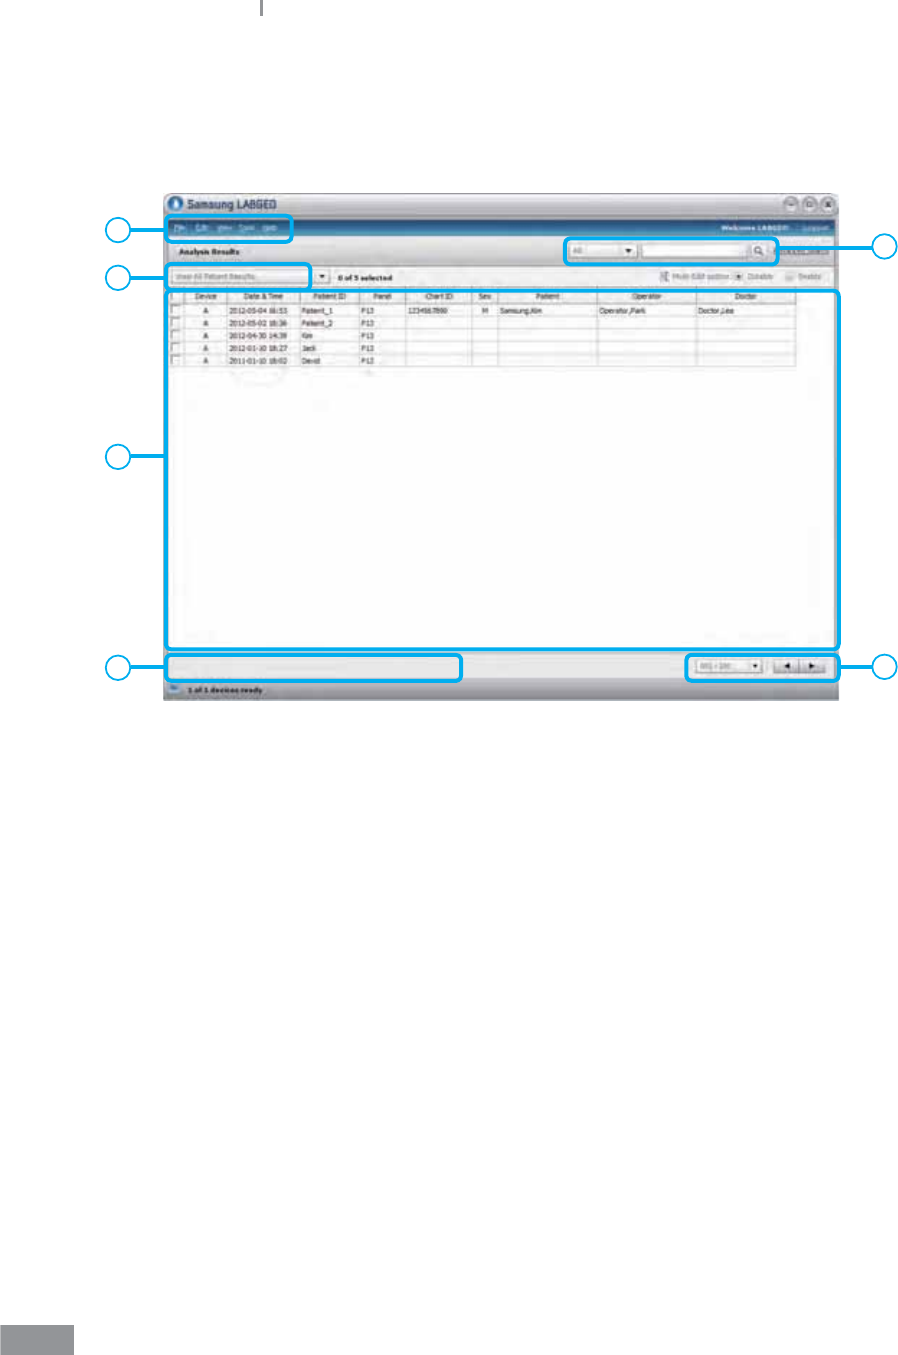
ŶHome screen
This is the home screen of the LABGEO Data Manager.
b
c
ef
d
a
a. Menu bar
b. Dropdown selector for results viewing categories:
View results for all patients,
Only view results without patient information,
View QC results (Old),
View QC results (New)
c. Results list
d. Search results menu
e. Shortcut buttons
f. View next result

141
Samsung LABGEO PA20 Using the LABGEO Data Manager
Registering a blood analyzer device
1 Select “Blood Analyzer Administrator” under the Tools menu.
Select the connection type and click the Next button.
Local (USB) Choose when the blood analyzer is connected to the PC by
a USB cable.
Network (LAN) Choose when the analyzer and the PC are connected to the
same local area network
Input IP address (LAN) Choose when connecting to the analyzer by manually
entering the IP address.
142
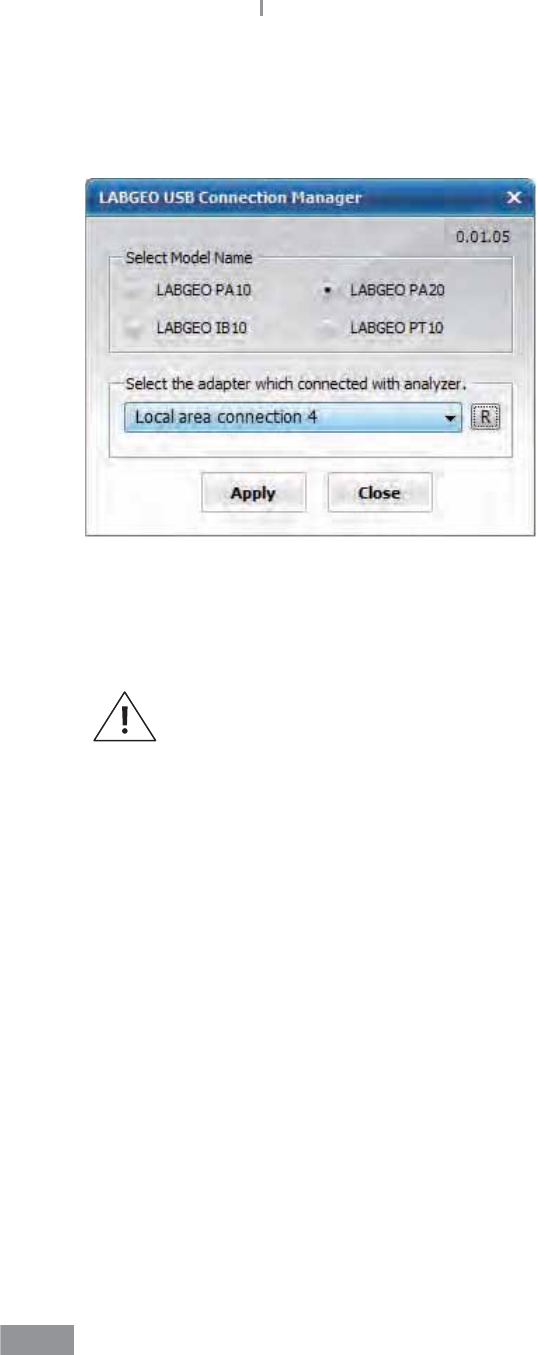
Samsung LABGEO PA20 Using the LABGEO Data Manager
USB connection settings
t When the analyzer is connected to the PC by a USB cable, the following settings are
required.
a. Select “USB Connection Settings” under the Tools menu.
b. Select the model number of the connected blood analyzer, select the adapter connected
to the analyzer, and click Apply.
If connecting the analyzer via USB does not work, remove the Linux USB
Ethernet/RNDIS gadget via the Device Manager (in the Control panel). Then,
reboot the PC and try again.
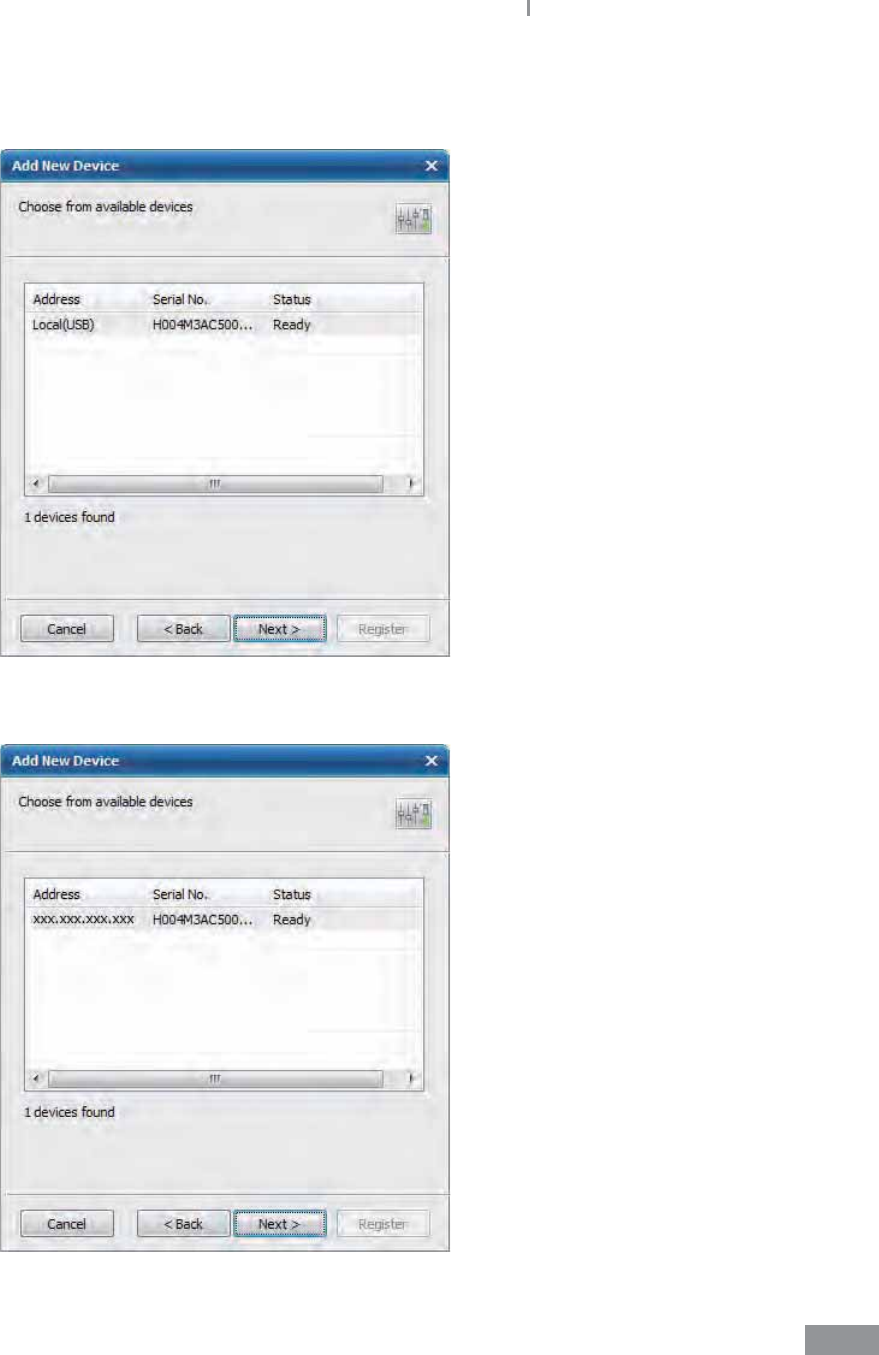
143
Samsung LABGEO PA20 Using the LABGEO Data Manager
2 Click the Next button and a list of available blood analyzers is displayed. Select the
blood analyzer to connect with and click Next.
<USB Connection>
<LAN Connection>
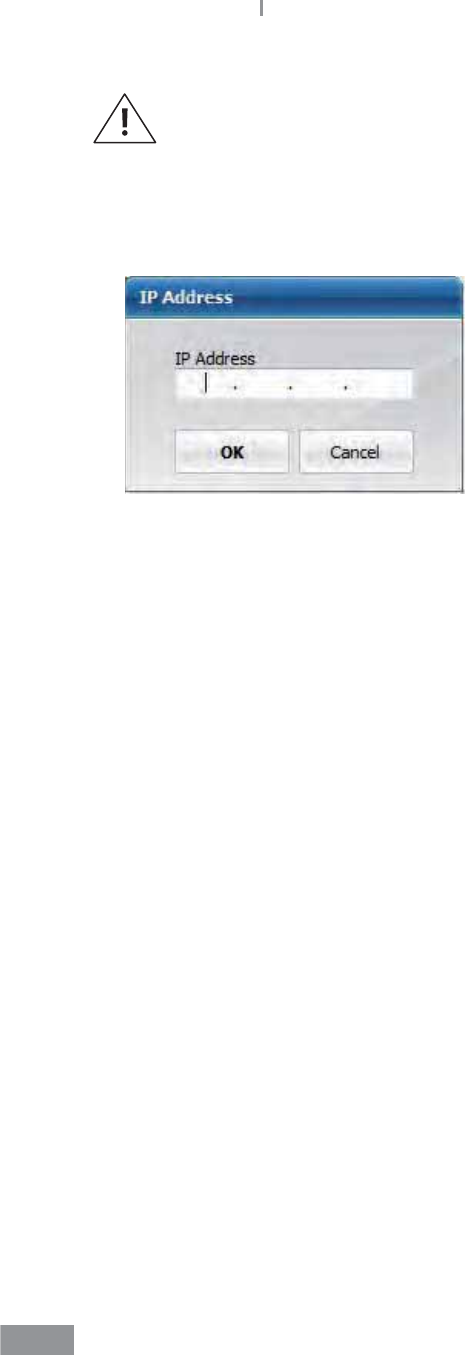
144
Samsung LABGEO PA20 Using the LABGEO Data Manager
If the analyzer does not appear on the list, check the connection between
the analyzer and the PC. If the rewall is activated, register LABGEO.exe (as an
exception) and try again.
3 When entering an IP address, enter the IP address of the analyzer you wish to connect
to see a connection screen similar to <Network (LAN)>.
<Enter IP address (LAN)>
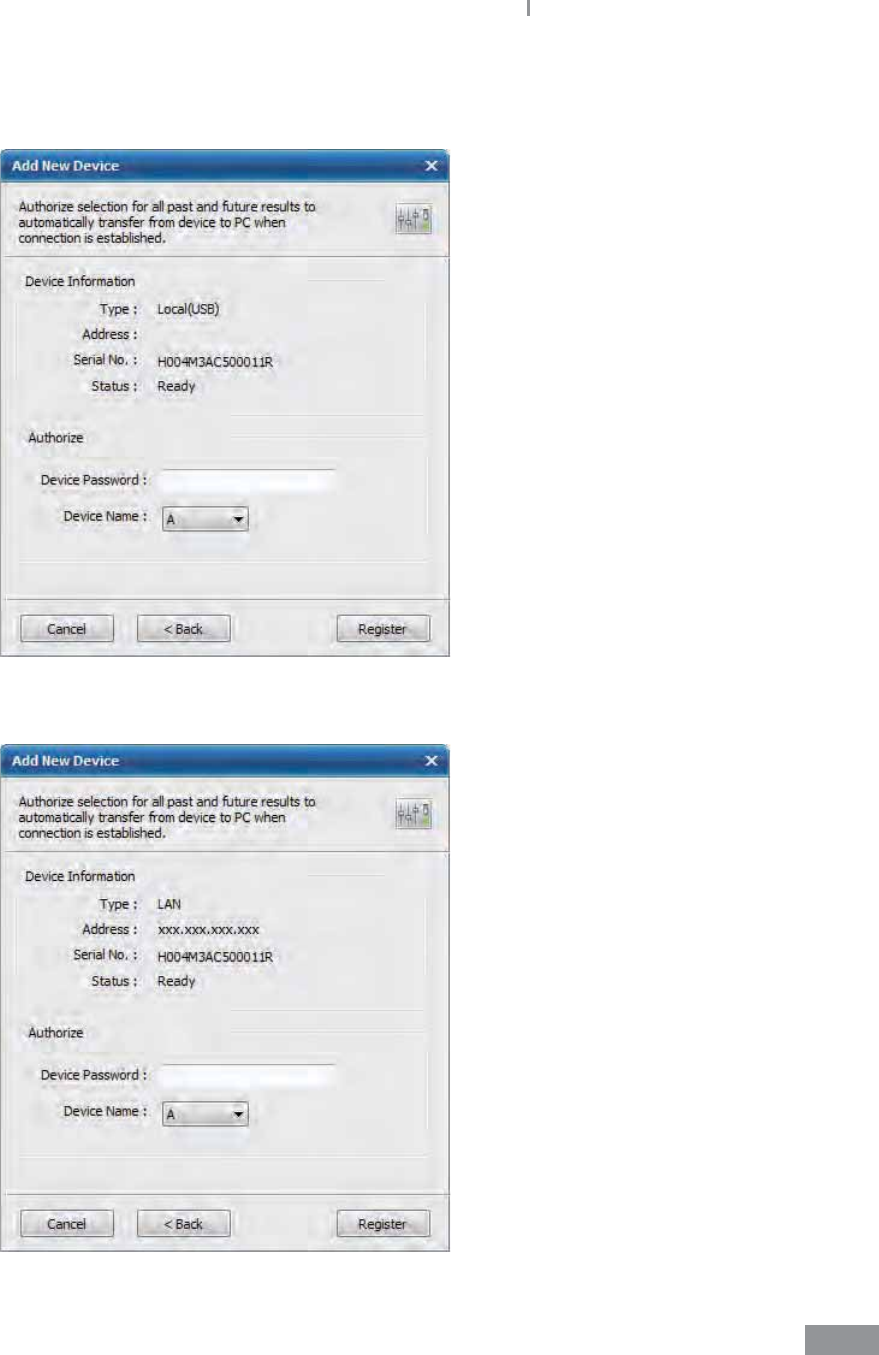
145
Samsung LABGEO PA20 Using the LABGEO Data Manager
4 Select the password for the blood analyzer you wish to connect to, designate a letter
for identication, and click “Register”.
<USB Connection>
<LAN Connection>
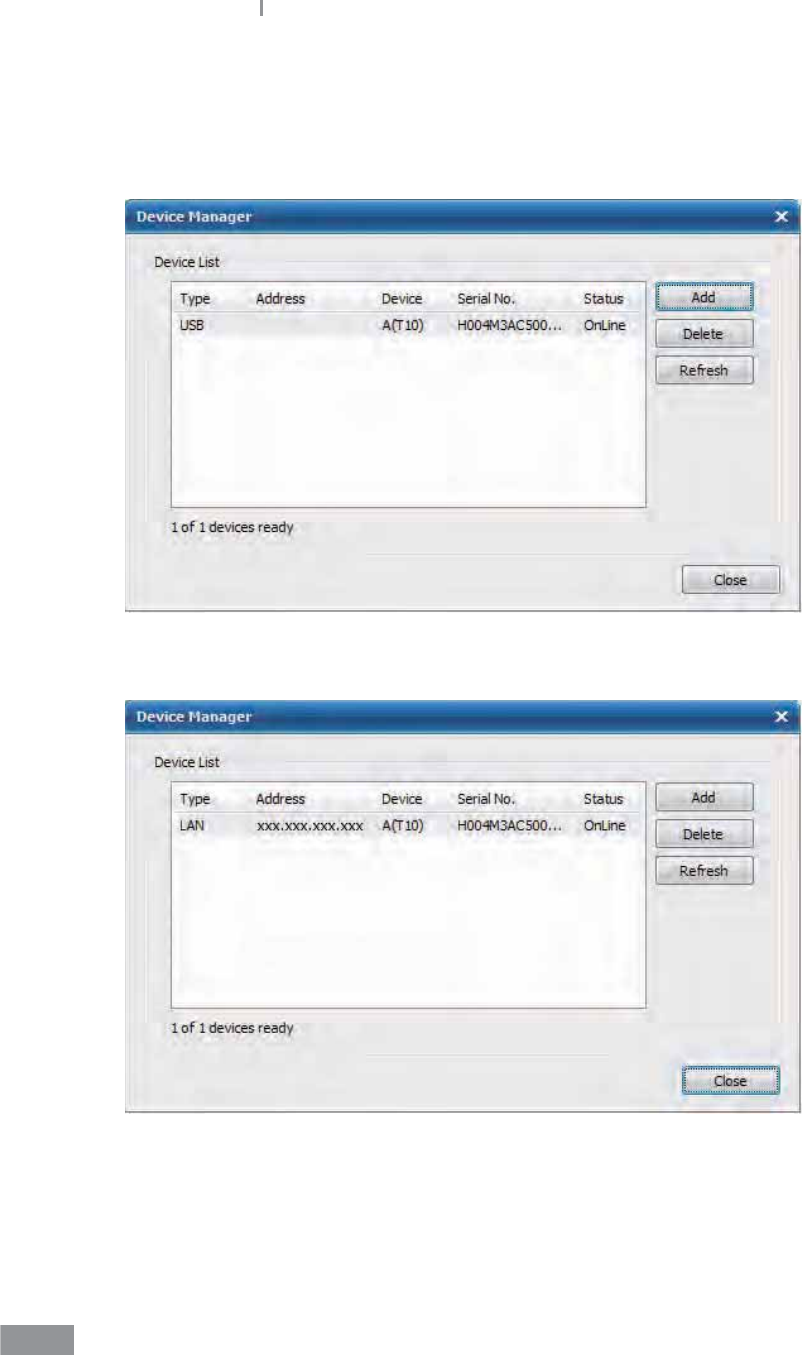
146
Samsung LABGEO PA20 Using the LABGEO Data Manager
5 When registration is completed, a list of registered analyzers is displayed, as shown in
the gure below.
You can use the “Add”, “Delete” and “Refresh” buttons to add, delete or update the
connection status of blood analyzers.
<USB Connection>
<LAN Connection>
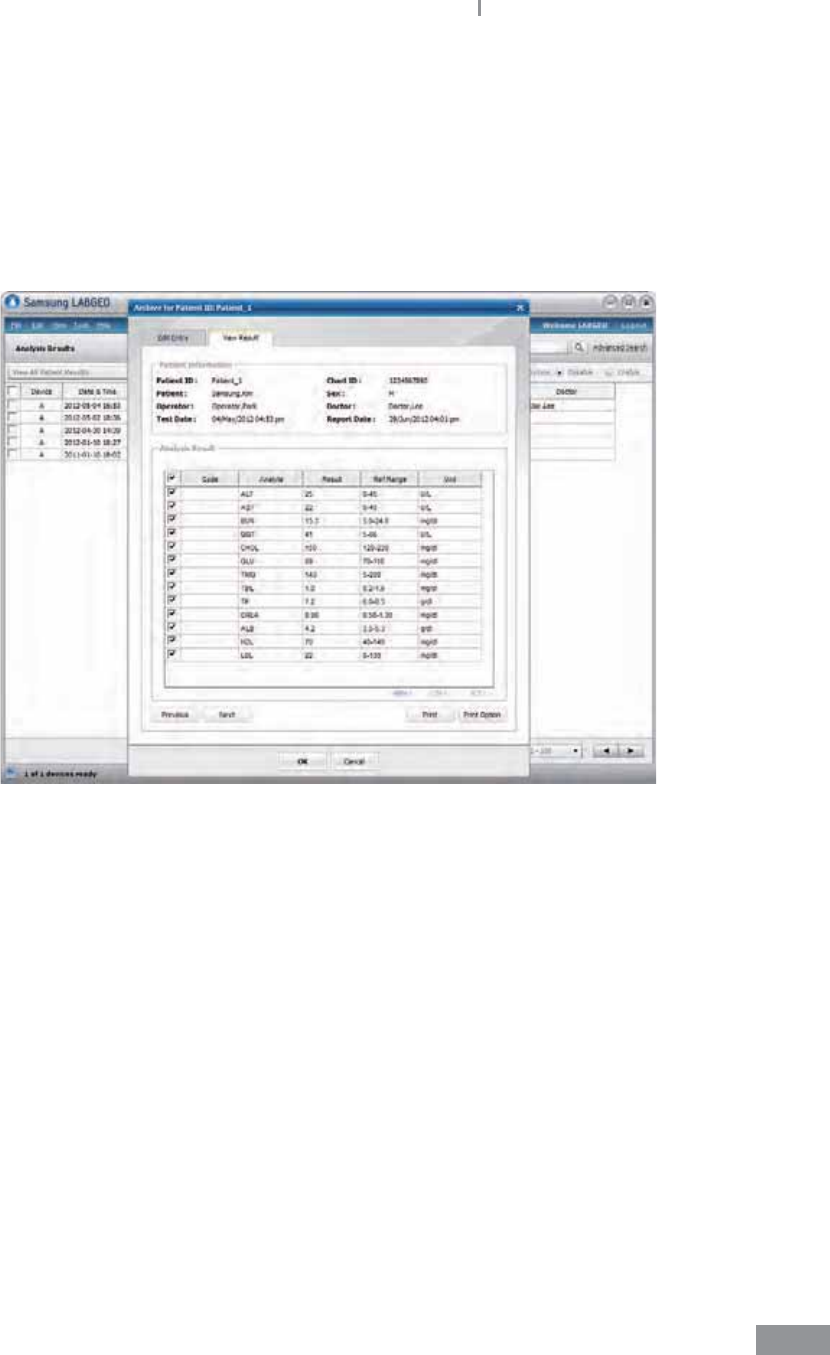
147
Samsung LABGEO PA20 Using the LABGEO Data Manager
ŶViewing analysis results
You can view the results by double-clicking on the result you wish to view from the analysis
results list or select a result and click on the View button.
You can sort the analysis results by clicking on the name of each analyte.
An analysis results list shows up to 100 results in a single page.
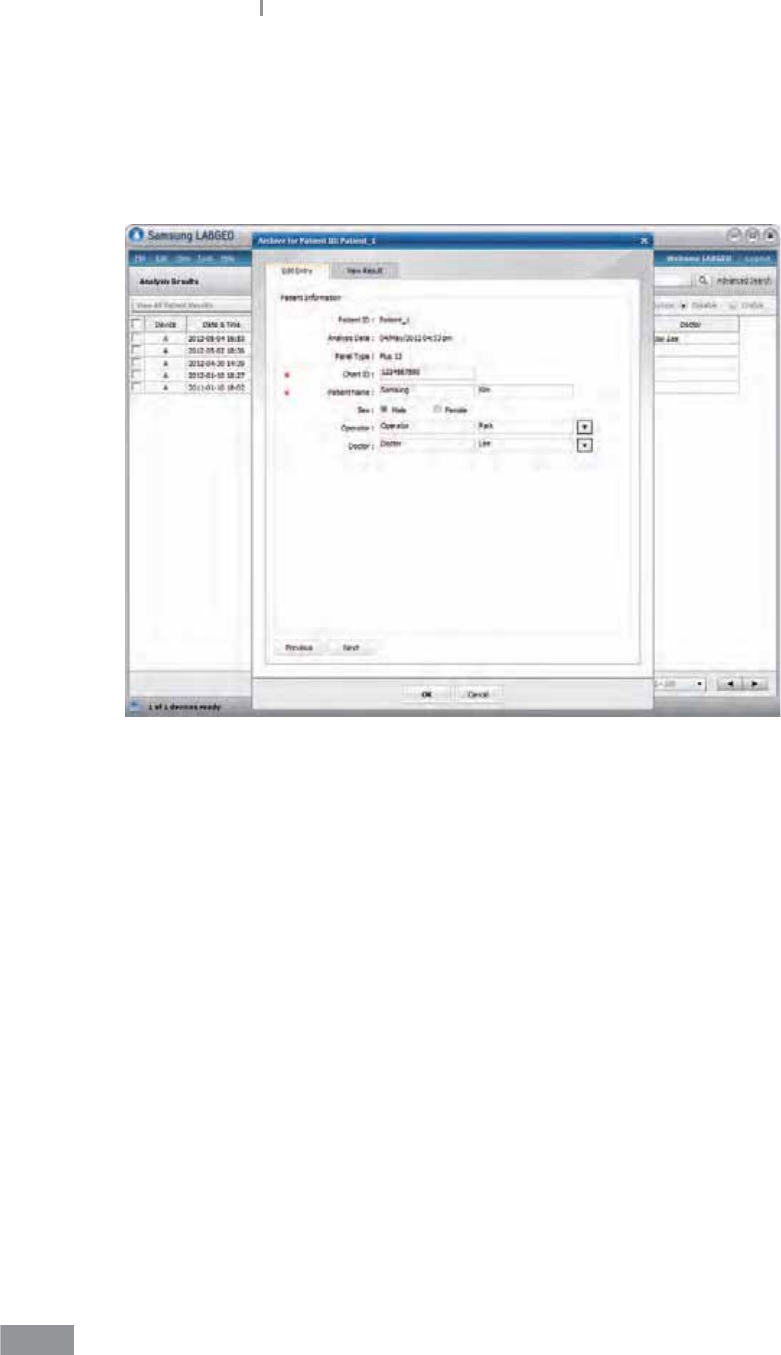
148
Samsung LABGEO PA20 Using the LABGEO Data Manager
ŶEditing analysis results
1 To edit one analysis result, select the result and then click on the Edit button on the
bottom or click on the Edit Patient Information Tab in the analysis result view screen.
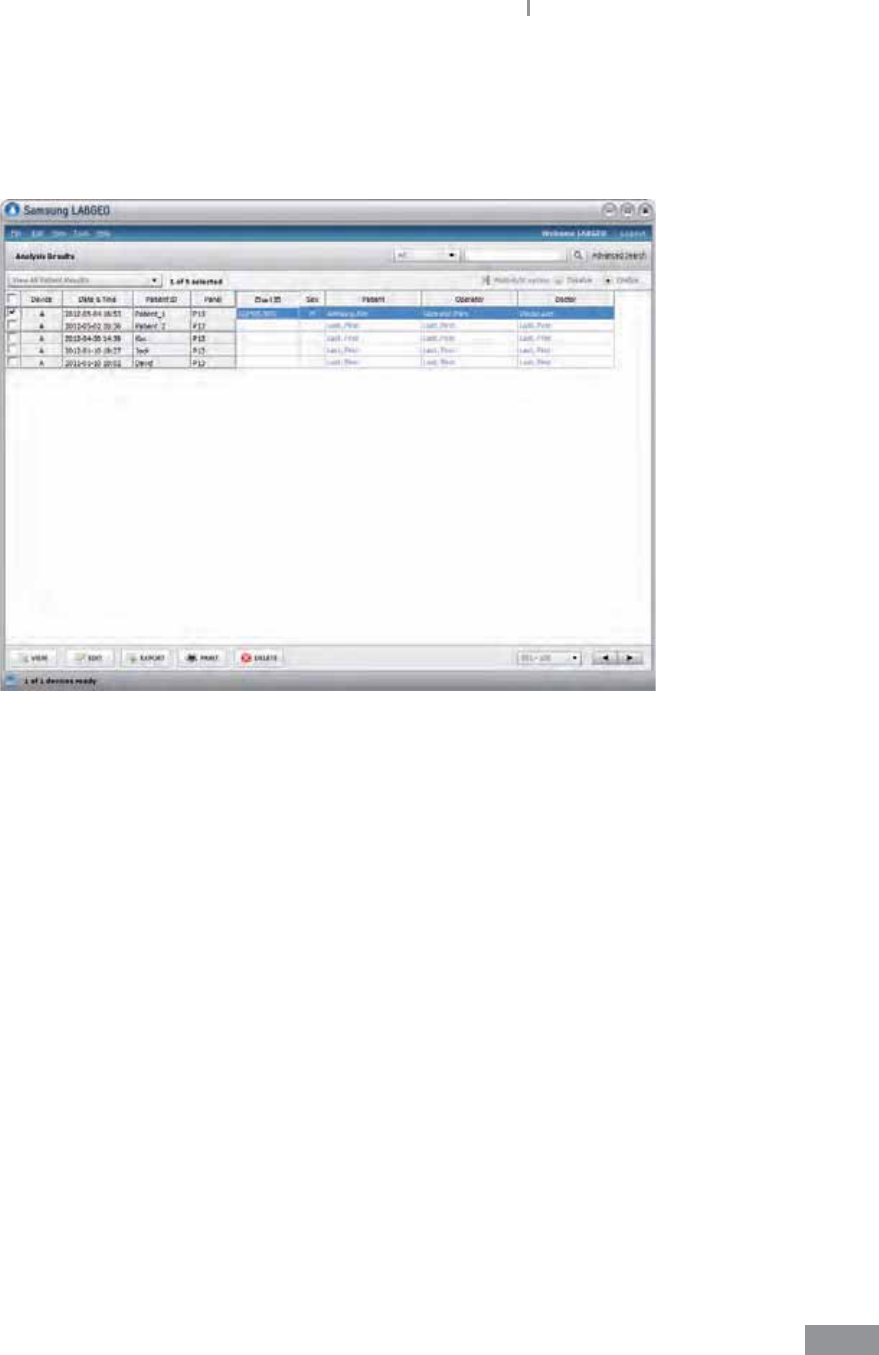
149
Samsung LABGEO PA20 Using the LABGEO Data Manager
2 To edit multiple analysis results, switch to multiple-edit mode by clicking Edit >
Multiple-Edit Mode in the menu or switch the multiple-edit mode on in the upper-
right corner of the screen to edit the list like a spreadsheet. When editing patient
information, chart number and patient name are required information.
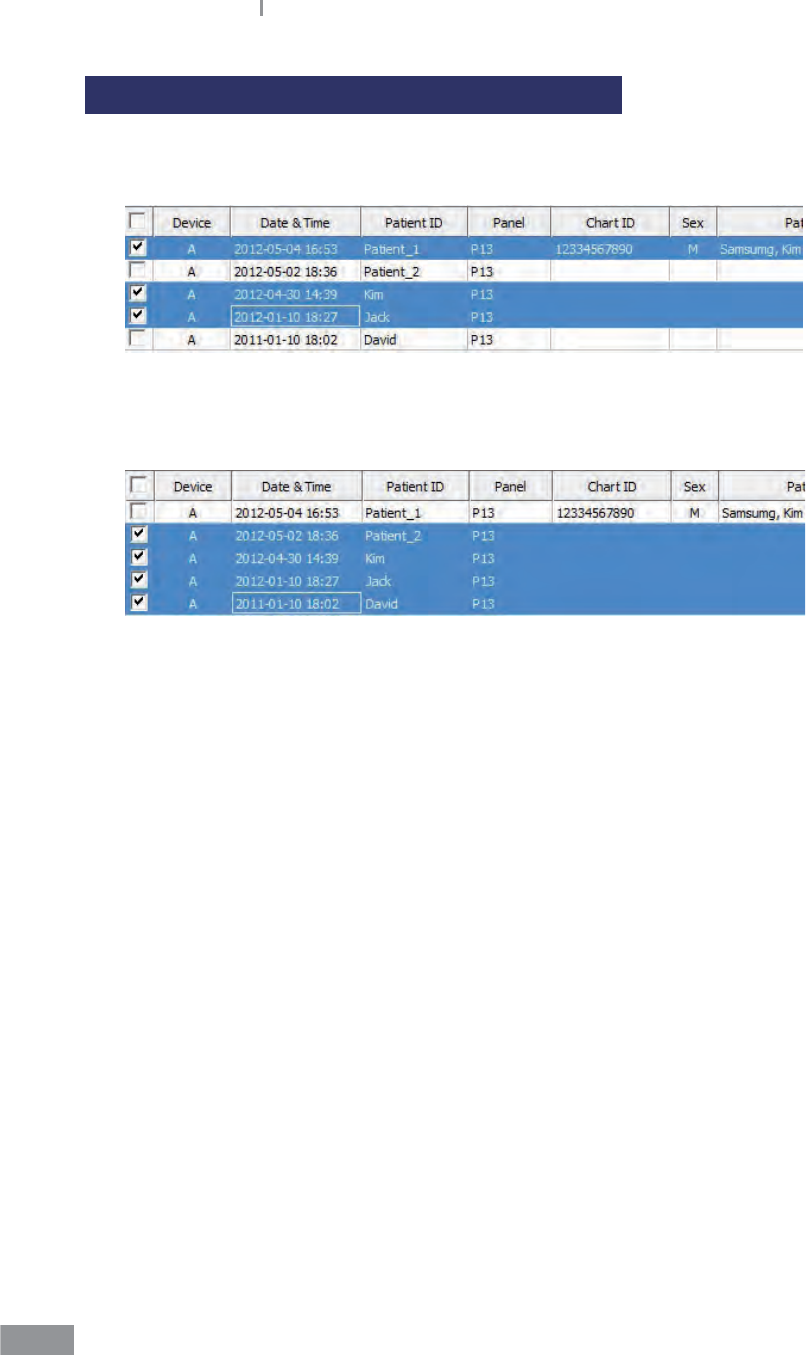
150
Samsung LABGEO PA20 Using the LABGEO Data Manager
Selecting and editing multiple analysis results
1 Hold down Ctrl and click individual analysis results you wish to select.
Hold down Shift and click to select a group of analysis results.
2 You can also select multiple analysis results by clicking one result, and dragging the
cursor.

151
Samsung LABGEO PA20 Using the LABGEO Data Manager
ŶPrinting analysis results
Entering hospital information and insurance codes
1 Hospital information and insurance codes can be added and modied under the
Tools>Customization menu.
<Hospital information editing screen>
<Insurance code editing screen>
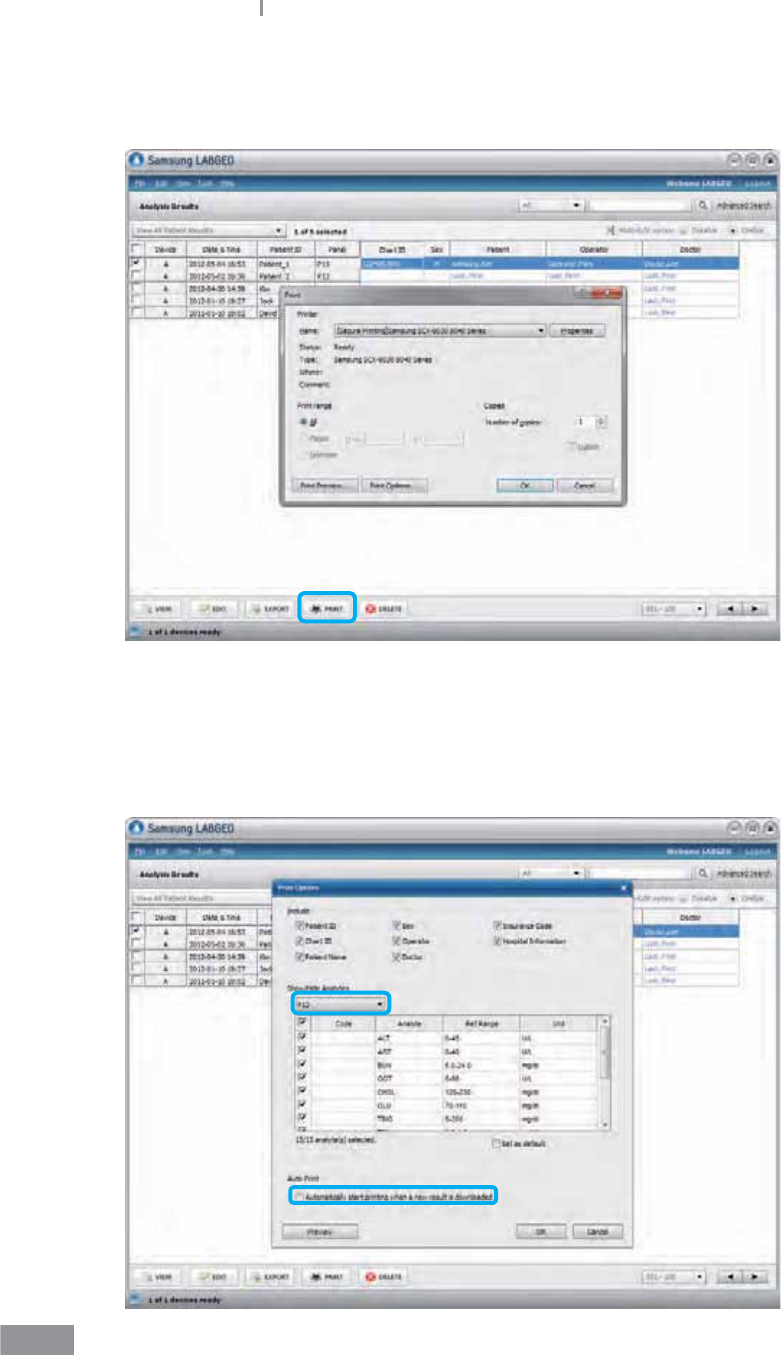
152
Samsung LABGEO PA20 Using the LABGEO Data Manager
2 To print the selected results, click the Print button at the bottom or click File > Print in
the menu.
3 By clicking File > Print Options in the menu, you can select analytes to include when
printing by panel.
t By checking Auto-print under File > Print Options, the software automatically prints
any new analysis result received from the blood analyzer.
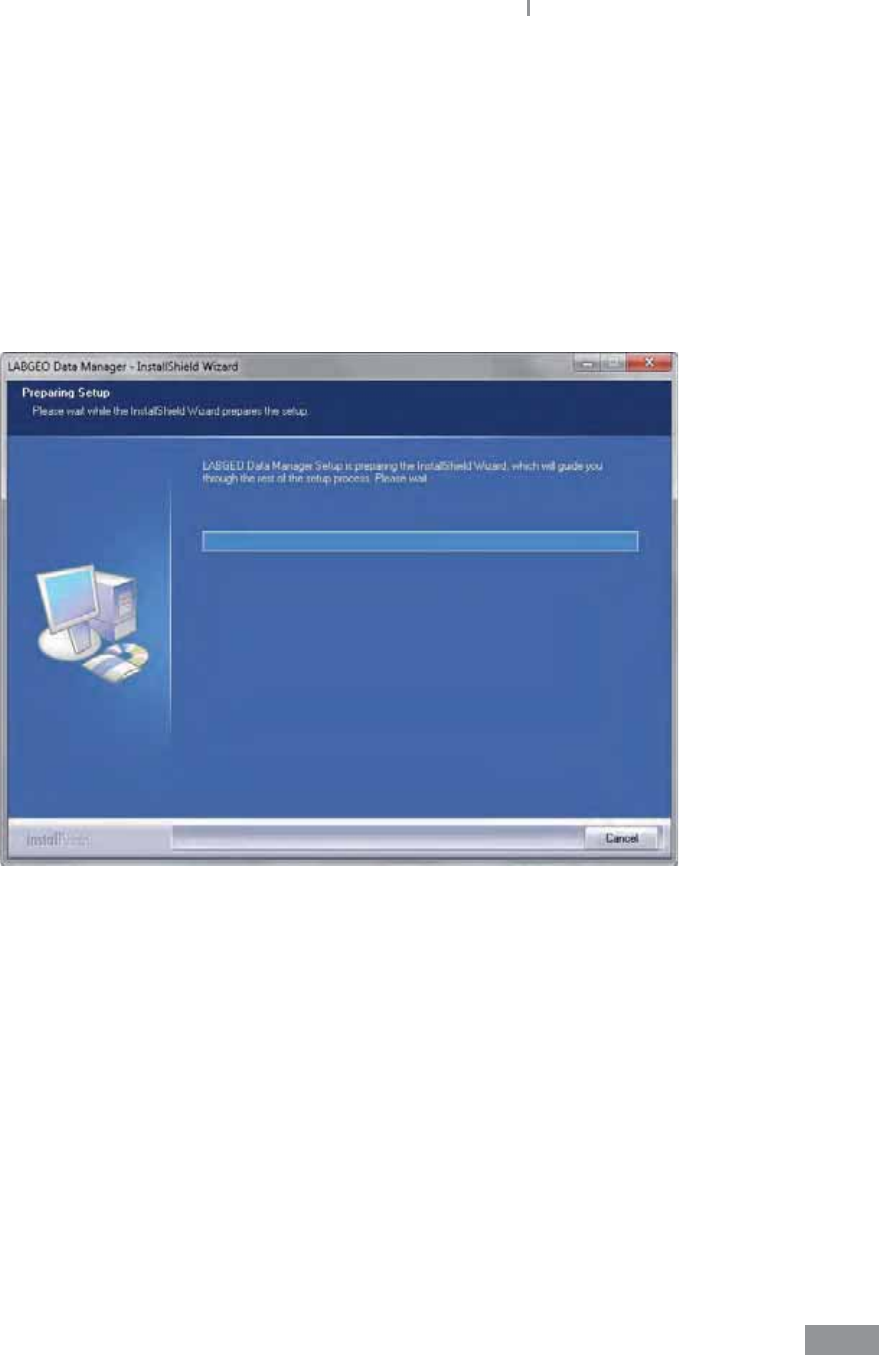
153
Samsung LABGEO PA20 Using the LABGEO Data Manager
ŶRemoving the LABGEO Data Manager
1 Caution: You must close the program before uninstalling it.
Uninstalling the program also erases all the program’s data stored on the PC.
2 To uninstall the LABGEO Data Manager, run LABGEOSetup.exe in the installation CD or
go to Control Panel > Add/remove Programs, select the LABGEO Data Manager, and
click Remove.
When the software uninstallation begins, the following screen is displayed.
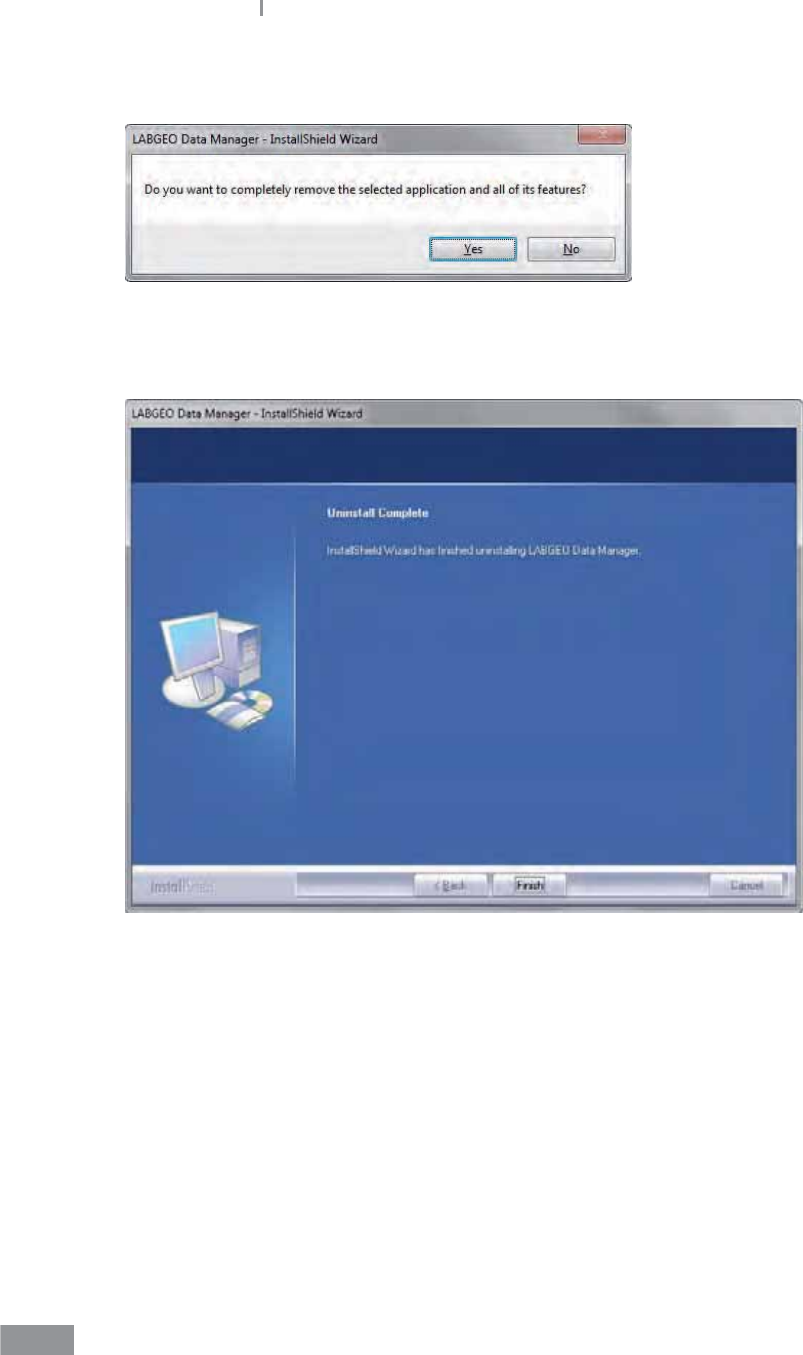
154
Samsung LABGEO PA20 Using the LABGEO Data Manager
3 Click Yes when you see the pop-up as below.
4 Click the Complete button when the uninstallation of the LABGEO Data Manager is
completed.

6
Maintenance
Maintenance .......................................................................................156
Maintenance ....................................................................................................................156
Cleaning the exterior ....................................................................................................156
Cleaning the Disc Tray ..................................................................................................157
Transportation and Storage .......................................................................................157

156
Maintenance
ŶMaintenance
No maintenance of the Samsung LABGEOPA20 is required other than cleaning the exterior
and disc tray.
Maintenance
ŶCheck the analyzer on a regular basis even when it works properly. If you nd a
problem with the analyzer, stop operating it and contact Samsung Technical Support.
ŶClean the analyzer on a regular basis.
Cleaning the exterior
Cleaning the exterior of the Samsung LABGEOPA20 should be performed whenever
necessary. Most spills and stains can be removed with water or mild detergent.
ŶSwitch the Analyzer o and unplug the power supply when the shutdown procedure is
completed.
ŶClean the outside of the Analyzer and the touch display with a clean, lint-free and non-
abrasive cloth dampened in water or a mild detergent.
t To disinfect the exterior of the instrument, rst remove as much of the spilled
material as possible with a cloth dampened in disinfectant (e.g., 30% isopropyl
alcohol). The surface of the Analyzer should be exposed to the disinfectant for at
least 10 minutes before wiping o with a fresh damp cloth.
ŶAllow the Analyzer to air dry.
ŶPlug in the power supply and switch on the Analyzer.
Do not use any cleaning liquid or equipment other than those recommended
above. Do not immerse the Analyzer in water or other liquids. The Analyzer
must be switched o and unplugged before cleaning.

157
Samsung LABGEO PA20 Maintenance
Cleaning the Disc Tray
ŶTo clean or disinfect the disc tray, tap “Run” on the home screen to open the tray and
follow the instructions above.
Transportation and Storage
ŶDo not move the analyzer while the disc is being analyzed. Please be careful with
physical impact or vibration when transportation when moving the analyzer.
ŶThe main body should be cleaned up. Store and keep in a steady place avoiding the
moisture, dust, chemicals, ammable gases and direct sunshine when you do not use
this device for a long term.
Samsung LABGEO PA20

7
Troubleshooting
Troubleshooting ................................................................................160
Check before requesting repair ................................................................................160
Restoring factory settings ...........................................................................................160
Error List ..............................................................................................161

160
Troubleshooting
ŶTroubleshooting
Check before requesting repair
ŶThe power switches of the blood analyzer are located on the front and back of the
device.
The front power switch only responds when the rear power switch is turned on. Please
make sure that the rear power switch is turned on rst.
ŶIf the power still doesn’t turn on, contact Samsung Electronics Technical Support.
Restoring factory settings
ŶThe analyzer’s factory setting can be restored when it functions abnormally or when
settings need to be restored to factory settings.
Please refer to System Reset under Settings. You can delete only the stored data or all
data and all settings.
Select Settings > System > Initialization > Delete all results and settings.

161
Samsung LABGEO PA20
ŶError List
Error Code Message Problem Solution
202001B Setting Error Unable to save settings
after making changes.
Contact Technical
Support.
203001C Lack of Storage Space
Error
Insucient storage
space.
Backup analysis results
on the device to a USB
memory device or a PC,
then delete the results
from the analyzer.
203002C System Error
USB memory device
is not compatible or
shows a le error in the
drive.
Try again or use a
compatible
204012B Update Server Connect
Error
Connection to update
server is unstable.
Contact Technical
Support.
205001C Data Transfer Error Analyzer’s LAN
connection is unstable.
Make sure that the LAN
cable is plugged in
securely. If the problem
persists, contact
Technical Support.
205003C Data Transfer Error
Connection between
the analyzer and PC is
unstable.
Make sure that the
LAN cable connection
between the analyzer
and PC are secure.
205004C Data Transfer Error
There are no analysis
results to transfer to the
PC.
Make sure that there
are analysis results to
backup in the analyzer.
205006C Data Transfer Error
There is insucient
storage space on the
PC to receive analysis
results from the
analyzer.
Check the available
space on the PC (HDD
and external storage)
and make more space
available.
205007C Printer Connect Error
Connected to the
internal printer is
unstable.
Contact Technical
Support.
205101B Data Transfer Error Response from the PC
has timed out.
Check your network
connections.
205201B Data Transfer Error Response from EMR has
timed out.
Check your network
connections.

162
Samsung LABGEO PA20
Error Code Message Problem Solution
205102B Data Transfer Error Connection to the PC
has connection errors.
Check your network
connections.
205202B Data Transfer Error Connection to the EMR
has connection errors.
Check your network
connections.
206001A Barcode Read Error The barcode on the disc
is contaminated.
Try again after replacing
the contaminated disc
with a new one.
206002A Barcode Error The disc is not for the
blood analyzer.
Replace the disc with a
disc for analysis.
206003A Barcode Error The disc has expired.
Replace the disc
with one with a valid
expiration date and run
the analysis again.
206004A
Barcode Error
Analyzer is unusable
due to disc barcode
error.
Contact Technical
Support.
206005A
206007A Barcode Error
Using disc with new
analytes requires a
software update.
Contact Technical
Support.
206008A -
206010A Barcode Error
Unable to use the
device due to disc
barcode error.
Contact Technical
Support.
206020A Barcode Error
Unable to use the
device due to disc
barcode error.
Contact Technical
Support.
206100A-
206103A RFID Error
Unable to use the
device due to RFID
error.
Contact Technical
Support.
207002A Analysis Info Error Analyzer requires new
analysis information.
Contact Technical
Support.
207042C Used Disc The disc has been used
before.
Try again after replacing
the contaminated disc
with a new one.
208202B Insucient Sample
The amount of the
injected blood sample
is insucient.
Make sure that a
sucient amount
of blood has been
injected.
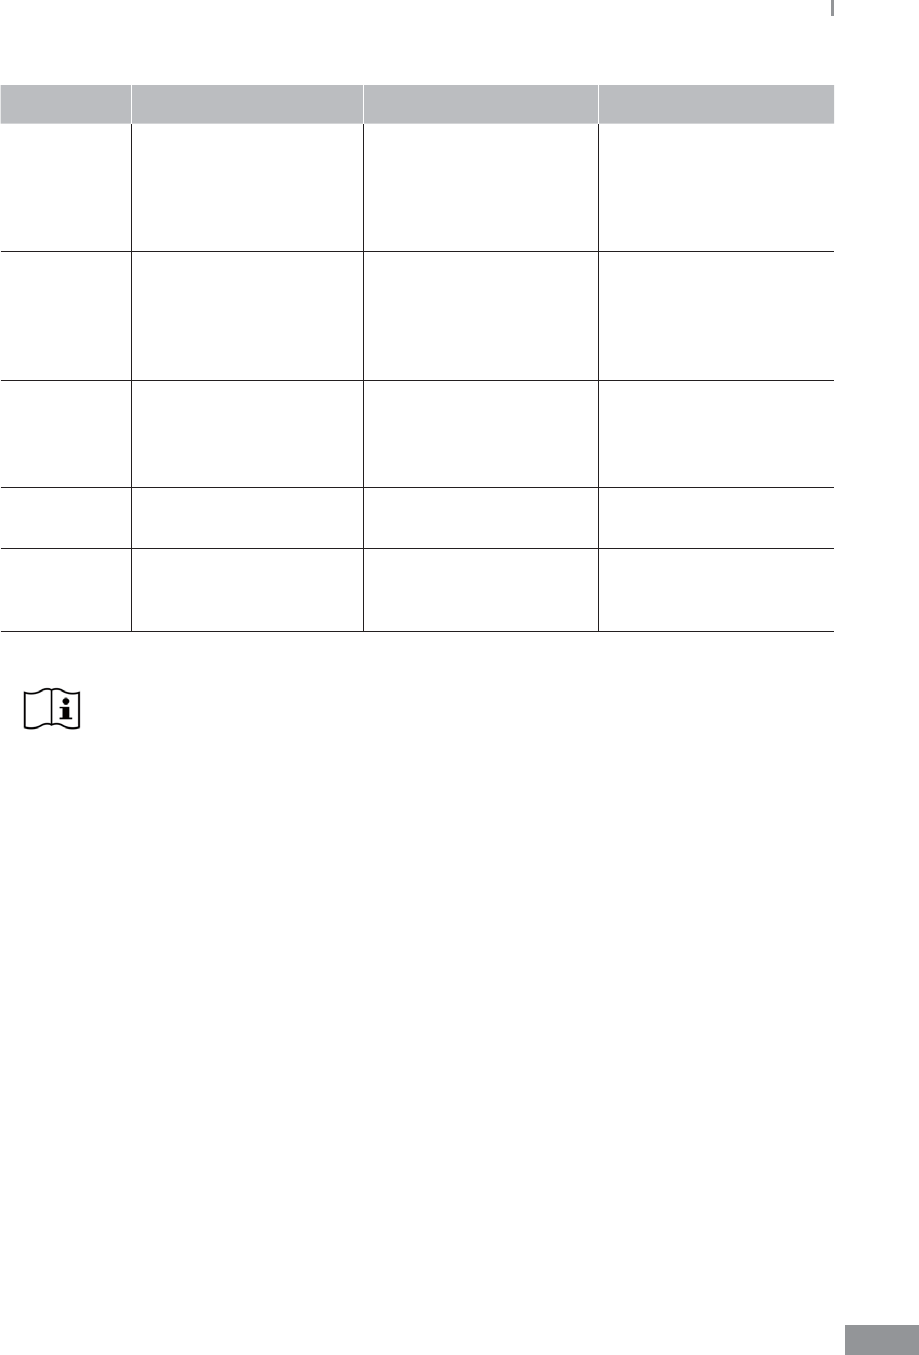
163
Samsung LABGEO PA20
Error Code Message Problem Solution
209001C Out of USB storage
space
Insucient space on the
external USB memory
device connected for
backing up data from
the analyzer.
Delete the les on the
USB memory device or
use a new USB memory
device.
209002C USB is Locked
The external USB
memory device
connected to the
analyzer is write-
protected.
Make sure that the
write-protection on the
USB memory device is
unlocked.
209003C Not Connected USB The connection to the
external
Make sure that a
sucient amount
of blood has been
injected.
305010A Temperature IC Error Unable to use the
internal temperature IC.
Contact Technical
Support.
305011A Temperature Error
Unable to temperature
monitoring when
analyzing.
Contact Technical
Support.
If the display shows other error code besides listed codes or if you have a
question regarding the error codes, contact Samsung Technical Support at
XXX-XXX-XXXX.
Samsung LABGEO PA20

Other Information
8
Quaility control policy ......................................................................166
Westgard multi-rule technique .................................................................................166
System information ...........................................................................167
Other information .............................................................................168
Product Service ..................................................................................169
Index ....................................................................................................170
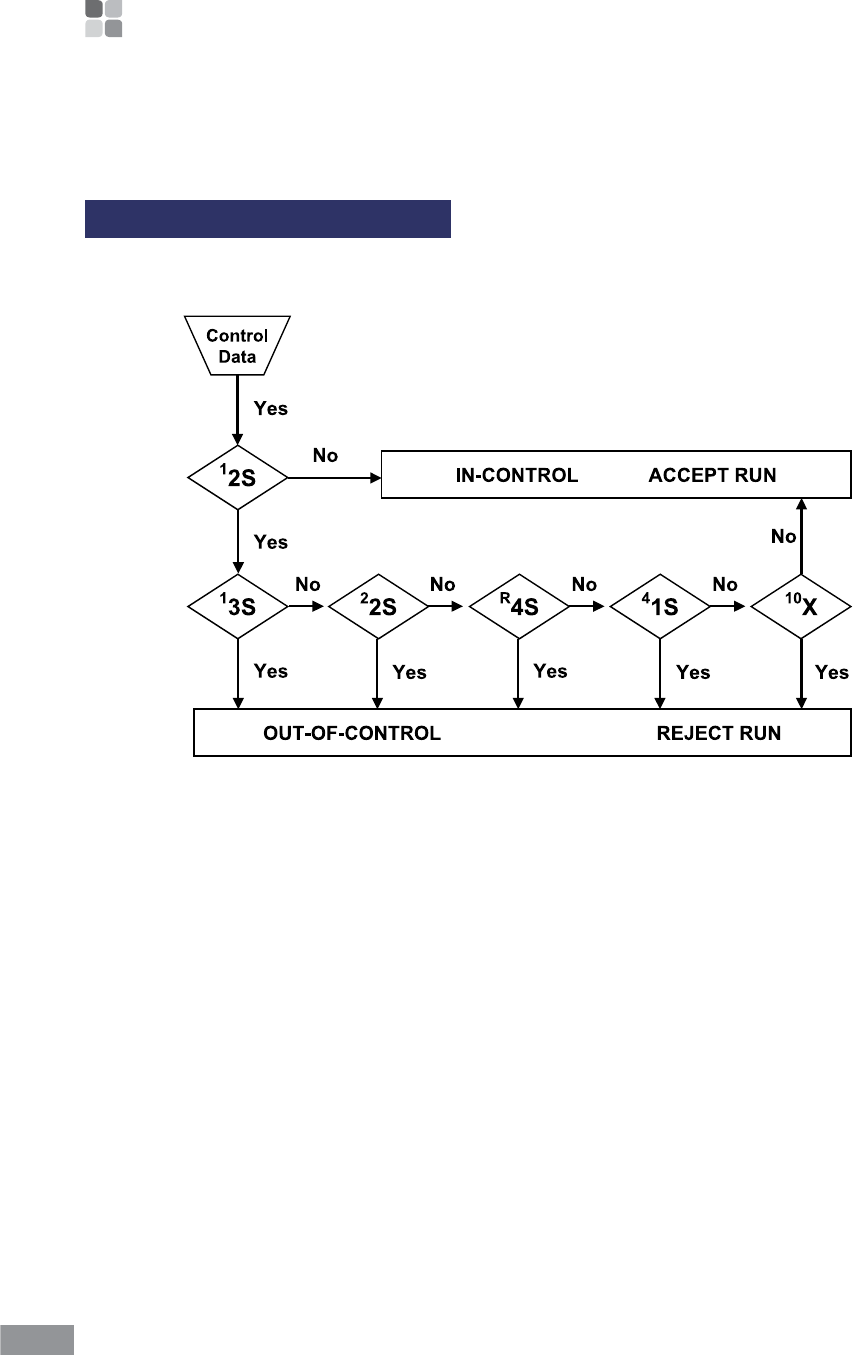
166
Other information
ŶQuaility control policy
Westgard multi-rule technique
ŶLevey-Jenning Approach
1:2S Warning rule: 1 control outside 2SD and 1 control within 2SD.
1:3S Rejection rule (random error): 1 of the controls is outside 3SD.
2:2S Rejection rule (systematic error): 2 consecutive controls are outside 2Sd. The problem
should be corrected before running the control again.
R:4S Rejection rule (random error): 1 control is outside 2SD in one direction 1 control is
outside 2SD in the other direction (separating them by 4SD).
4:1S Rejection rule (systematic error): 4 consecutive controls exceed the same mean plus or
minus 1SD.
10:mean Rejection rule (systematic error): 10 consecutive controls fall on one side of the
mean (shift).
167
Samsung LABGEO PA20
ŶSystem information
Category Item Specications Notes
Processor/OS ARM CortexTM-A8 1GHz CPU/Embedded
Linux
System
Memory
NAND 512MB x 8bit x 1ea (2Gbit)
SDRAM 64MB x 16bit x 4ea (2Gbit)
I/O
Display 7 inch wide, 800 x 480, TFT LCD
Touch 7 inch 4-wire panel
LED Power Status
Key Power, Stop
Printer Built-in Thermal Printer (2 inch)
Thermal Paper
(recommended)
HANSOL PAPER 65GSM
Paper width (58mm, 2.36’’)
Paper roll size : max. 40mm (1.57’’)
Barcode USB Barcode Reader (Option)
Interface
Ethernet 10/100 Base-T
Wireless Lan 802g.11a/b/g/n. Dual band
USB Host USB 2.0 3 port (Front 1ea, Rear 2ea)
USB Client USB 2.0 1 port
Power SMPS Input : 120W, 100-240V~, 50-60Hz
Output : DC +24V, +15V, -15V, +5V, +3.3V
Light Source LEDs 340nm - 700nm
Laser Laser Diode Class IV, 808 nm, Power < 1.5W,
Fiber-Coupled Output (NA=0.22)
Size
246mm(W) x 375mm(D) x 289mm(H)
Weight 9.2Kg
Temperature Operating : 10 - 32˚C
Storage & Shipping : -10 - 40 ˚C
168
Samsung LABGEO PA20
Category Item Specications Notes
Type of
Installation For Indoor use only
Humidity Operating : 0% to 80%
Storage & Shipping : 0% to 80%
Altitude
Operating : 3,048m
Storage & Shipping : 10,668m
ŶOther information
Medical Device Name Clinical Chemistry and Immunology Analyzer
Model Name Samsung LABGEO PA20
Manufacturer and Address
Samsung Electronics Co., Ltd.,
129 Samsung-ro, Yeongtong-gu, Suwon-si,
Gyeonggi-do
Operating System 2.6.32.9
Maximum Analysis Capability Normal : 5,000
Quality Control : 3,000
PC S/W Operation Environment
OS Windows XP, Windows 2000, Windows
Vista, Windows 7
H/W
Pentium 4 or higher
More than 100 MB of available HDD
space

169
Samsung LABGEO PA20
ŶProduct Service
Samsung Electronics Co., Ltd.
129 Samsung-ro, Yeongtong-gu, Suwon-si, Gyeonggi-do
Please contact your retailer for service inquiries.
License Notication
The complete text of the license can be seen in the License.pdf le under the PA20 folder in
the installation CD.

170
Samsung LABGEO PA20
B
Backup 127
Beginning analysis 36
C
Calibration 72
Canceling analysis 43
Cautions before analyzing 12
Cautions during use 13
Cautions for system
installation 14
Cautions in preparing blood
samples 14
Change language 97
Changing password 109
Check before requesting
repair 160
Cleaning 156
D
Display settings 64
E
Error List 161
Executing software 139
I
ID 55, 56, 95
Initialization 123
Installation 25
Intended use 18
Introduction of features 23
L
LABGEO Data Manager 133
LCD Brightness 73
LCD O settings 75
P
Preheating 36
Preparing blood for
analysis 14
Printing analysis results 56
Q
Quality control 84
R
Registering analyzer 141
Restoring factory settings 160
ŶIndex

171
Samsung LABGEO PA20
S
Safety Warnings and
Caution 8
Screensaver settings 74
Searching results 54
Security 105
Self-test 99
Setting auto-mode 114
Setting date and time 117
Setting network 112
Setting viewing method 80
Setting volume 76
Storage and maintenance
after use 156
System information 167
System settings 121
T
Trouble shooting 159
Touch calibration 72
Transferring analysis results 61
Turning power o 131
Turning power on 36
U
Update 129
User setting screen 103
V
Viewing results 47
W
What’s in the box 21
Federal Communication Commission Interference Statement
7KLVHTXLSPHQWKDVEHHQWHVWHGDQGIRXQGWRFRPSO\ZLWKWKHOLPLWVIRUD&ODVV%GLJLWDO
GHYLFHSXUVXDQWWR3DUWRIWKH)&&5XOHV7KHVHOLPLWVDUHGHVLJQHGWRSURYLGH
UHDVRQDEOHSURWHFWLRQDJDLQVWKDUPIXOLQWHUIHUHQFHLQDUHVLGHQWLDOLQVWDOODWLRQ7KLV
HTXLSPHQWJHQHUDWHVXVHVDQGFDQUDGLDWHUDGLRIUHTXHQF\HQHUJ\DQGLIQRWLQVWDOOHGDQG
XVHGLQDFFRUGDQFHZLWKWKHLQVWUXFWLRQVPD\FDXVHKDUPIXOLQWHUIHUHQFHWRUDGLR
FRPPXQLFDWLRQV+RZHYHUWKHUHLVQRJXDUDQWHHWKDWLQWHUIHUHQFHZLOOQRWRFFXULQD
SDUWLFXODULQVWDOODWLRQ,IWKLVHTXLSPHQWGRHVFDXVHKDUPIXOLQWHUIHUHQFHWRUDGLRRUWHOHYLVLRQ
UHFHSWLRQZKLFKFDQEHGHWHUPLQHGE\WXUQLQJWKHHTXLSPHQWRIIDQGRQWKHXVHULV
HQFRXUDJHGWRWU\WRFRUUHFWWKHLQWHUIHUHQFHE\RQHRIWKHIROORZLQJPHDVXUHV
Ǹ 5HRULHQWRUUHORFDWHWKHUHFHLYLQJDQWHQQDG
Ǹ ,QFUHDVHWKHVHSDUDWLRQEHWZHHQWKHHTXLSPHQWDQGUHFHLYHUG
Ǹ &RQQHFWWKHHTXLSPHQWLQWRDQRXWOHWRQDFLUFXLWGLIIHUHQWIURPWKDWWRZKLFKWKHUHFHLYHU
LVFRQQHFWHGG
Ǹ &RQVXOWWKHGHDOHURUDQH[SHULHQFHGUDGLR79WHFKQLFLDQIRUKHOSG
FCC Caution:
$Q\FKDQJHVRUPRGLILFDWLRQVQRWH[SUHVVO\DSSURYHGE\WKHSDUW\UHVSRQVLEOHIRU
FRPSOLDQFHFRXOGYRLGWKHXVHU¶VDXWKRULW\WRRSHUDWHWKLVHTXLSPHQW
7KLVGHYLFHFRPSOLHVZLWK3DUWRIWKH)&&5XOHV2SHUDWLRQLVVXEMHFWWRWKHIROORZLQJWZR
FRQGLWLRQV7KLVGHYLFHPD\QRWFDXVHKDUPIXOLQWHUIHUHQFHDQGWKLVGHYLFHPXVW
DFFHSWDQ\LQWHUIHUHQFHUHFHLYHGLQFOXGLQJLQWHUIHUHQFHWKDWPD\FDXVHXQGHVLUHGRSHUDWLRQ
)RUSURGXFWDYDLODEOHLQWKH86$&DQDGDPDUNHWRQO\FKDQQHOaFDQEHRSHUDWHG
6HOHFWLRQRIRWKHUFKDQQHOVLVQRWSRVVLEOH
7KLVGHYLFHDQGLWVDQWHQQDVPXVWQRWEHFRORFDWHGRURSHUDWLRQLQFRQMXQFWLRQZLWKDQ\
RWKHUDQWHQQDRUWUDQVPLWWHU
IMPORTANT NOTE:
FCC Radiation Exposure Statement:
7KLVHTXLSPHQWFRPSOLHVZLWK)&&UDGLDWLRQH[SRVXUHOLPLWVVHWIRUWKIRUDQXQFRQWUROOHG
HQYLURQPHQW7KLVHTXLSPHQWVKRXOGEHLQVWDOOHGDQGRSHUDWHGZLWKPLQLPXPGLVWDQFHFP
EHWZHHQWKHUDGLDWRU\RXUERG\

HM68-01006C/2012-07