Samsung Electronics Co LS22E360 LCD Monitor User Manual
Samsung Electronics Co Ltd LCD Monitor
UserManual.wiki
>
Samsung Electronics Co
>
LS22E360 User Manual
>
user manual
Contents
1.
user manual
2.
users manual_v1
user manual
Navigation menu
Upload a User Manual
Namespaces
Wiki Guide
HTML
PDF
Info
Views
User Manual
Discussion / Help
Navigation


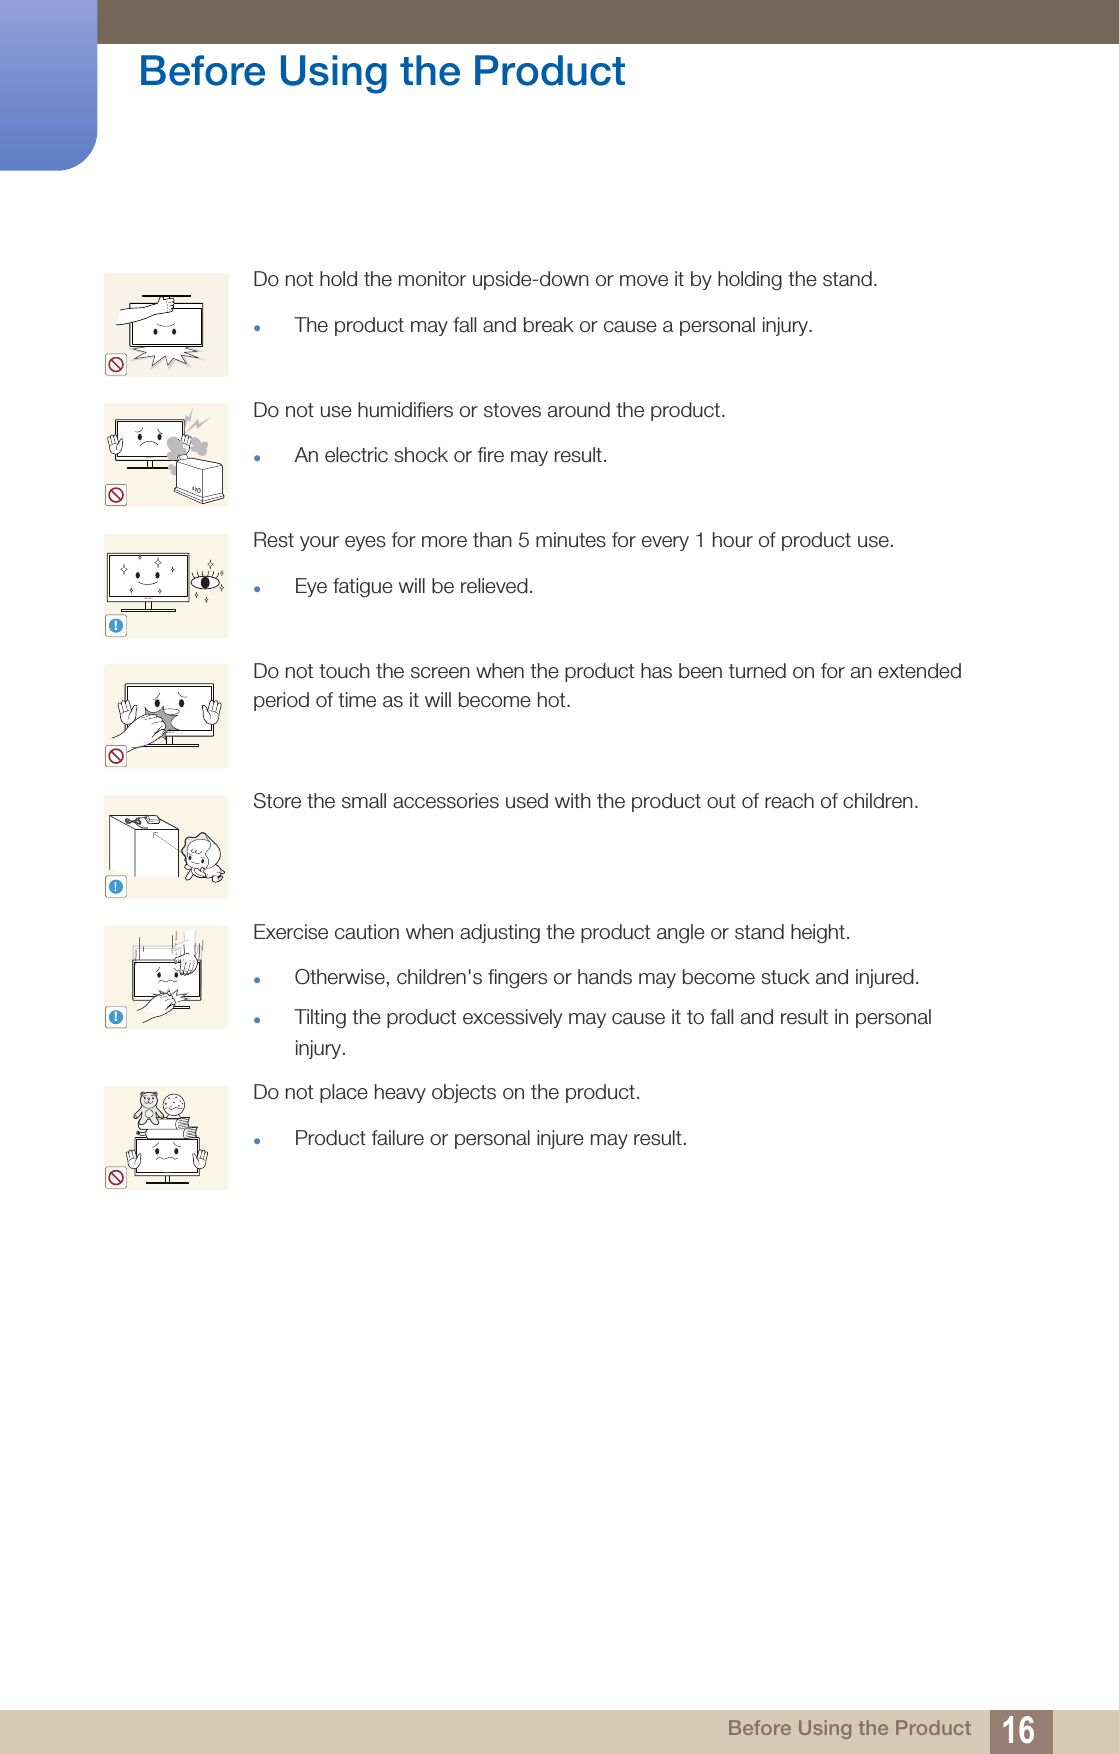
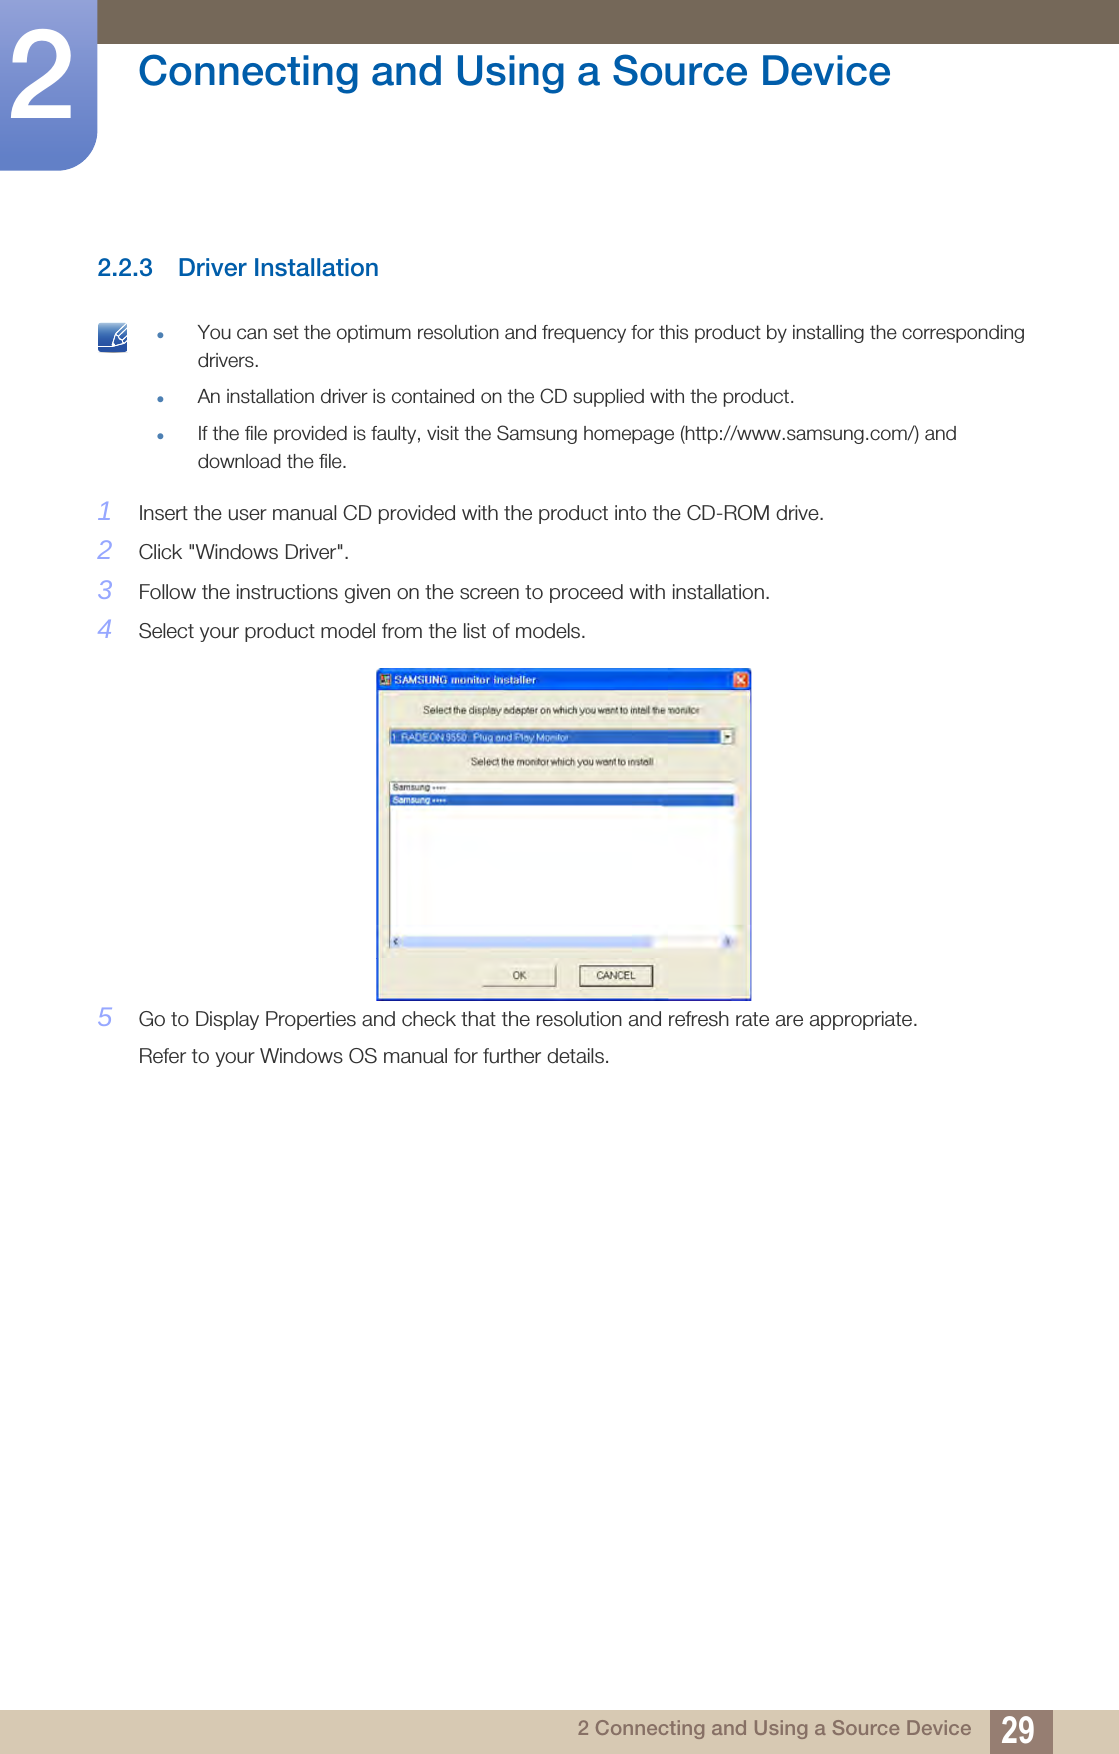
![19Preparations11 Preparations1.2 Parts1.2.1 Frontal Buttons The color and shape of parts may differ from what is shown. Specifications are subject to change without notice to improve quality. Icons Description Open or close the onscreen display (OSD) menu, or return to the parent menu.OSD control lock: Maintain the current settings, or lock the OSD control to prevent unintended changes to settings.Enable: To lock the OSD control, press and hold the [ ] button for 10 seconds. Disable: To unlock the OSD control, press and hold the [ ] button for more than 10 seconds. If the OSD control is locked,Brightness and Contrast can be adjusted. Game Mode is available. INFORMATION can be viewed. Press to enable or disable Game Mode.The items below are not available if the Game Mode function is enable.S22E360H / S22E391HPICTURE Contrast, Sharpness, Bright, Angle, UpscaleCOLORSETUP&RESET Eco SavingS24E360HL / S24E391HL / S27E360H / S27E391HPICTURE Contrast, Sharpness, Bright, UpscaleCOLORSETUP&RESET Eco SavingFunction Key GuideSAMSUNGAUMENUGAMEMODESOURCEAUAUTOMENU SOURCEGAMEMODEMENU SOURCEGAMEMODEAUTOMENUMENUMENU→ SAMSUNGMAGICSAMSUNGMAGICSAMSUNGMAGIC→ → SAMSUNGMAGICSAMSUNGMAGIC→](https://usermanual.wiki/Samsung-Electronics-Co/LS22E360.user-manual/User-Guide-2466467-Page-19.png)
![20Preparations11 PreparationsMove to the upper or lower menu or adjust the value for an option on the OSD menu.Use this button to control the brightness and contrast of the screen.Confirm a menu selection.Pressing the [ ] button when the OSD menu is not displayed will change the input source (Analog/HDMI). If you power on the product or change the input source by pressing the [ ] button, a message that shows the changed input source will appear at the top left corner of the screen. Press the [ ] button to automatically adjust the screen settings. Changing the resolution in Display Properties will activate the Auto Adjustment function.Available only in Analog mode. Turn the screen on or off. Function Key GuideWhen a control button on the product is pressed, the Function Key Guide will be displayed before the onscreen menu opens. (The guide shows the function of the button pressed.) To access the onscreen menu when the guide is displayed, press the corresponding button again.Function Key Guide may vary depending on the function or product model. Refer to the actual product. The function buttons page shows if Game Mode is enabled.[]: Off[]: On Icons DescriptionAUTOAUTO](https://usermanual.wiki/Samsung-Electronics-Co/LS22E360.user-manual/User-Guide-2466467-Page-20.png)
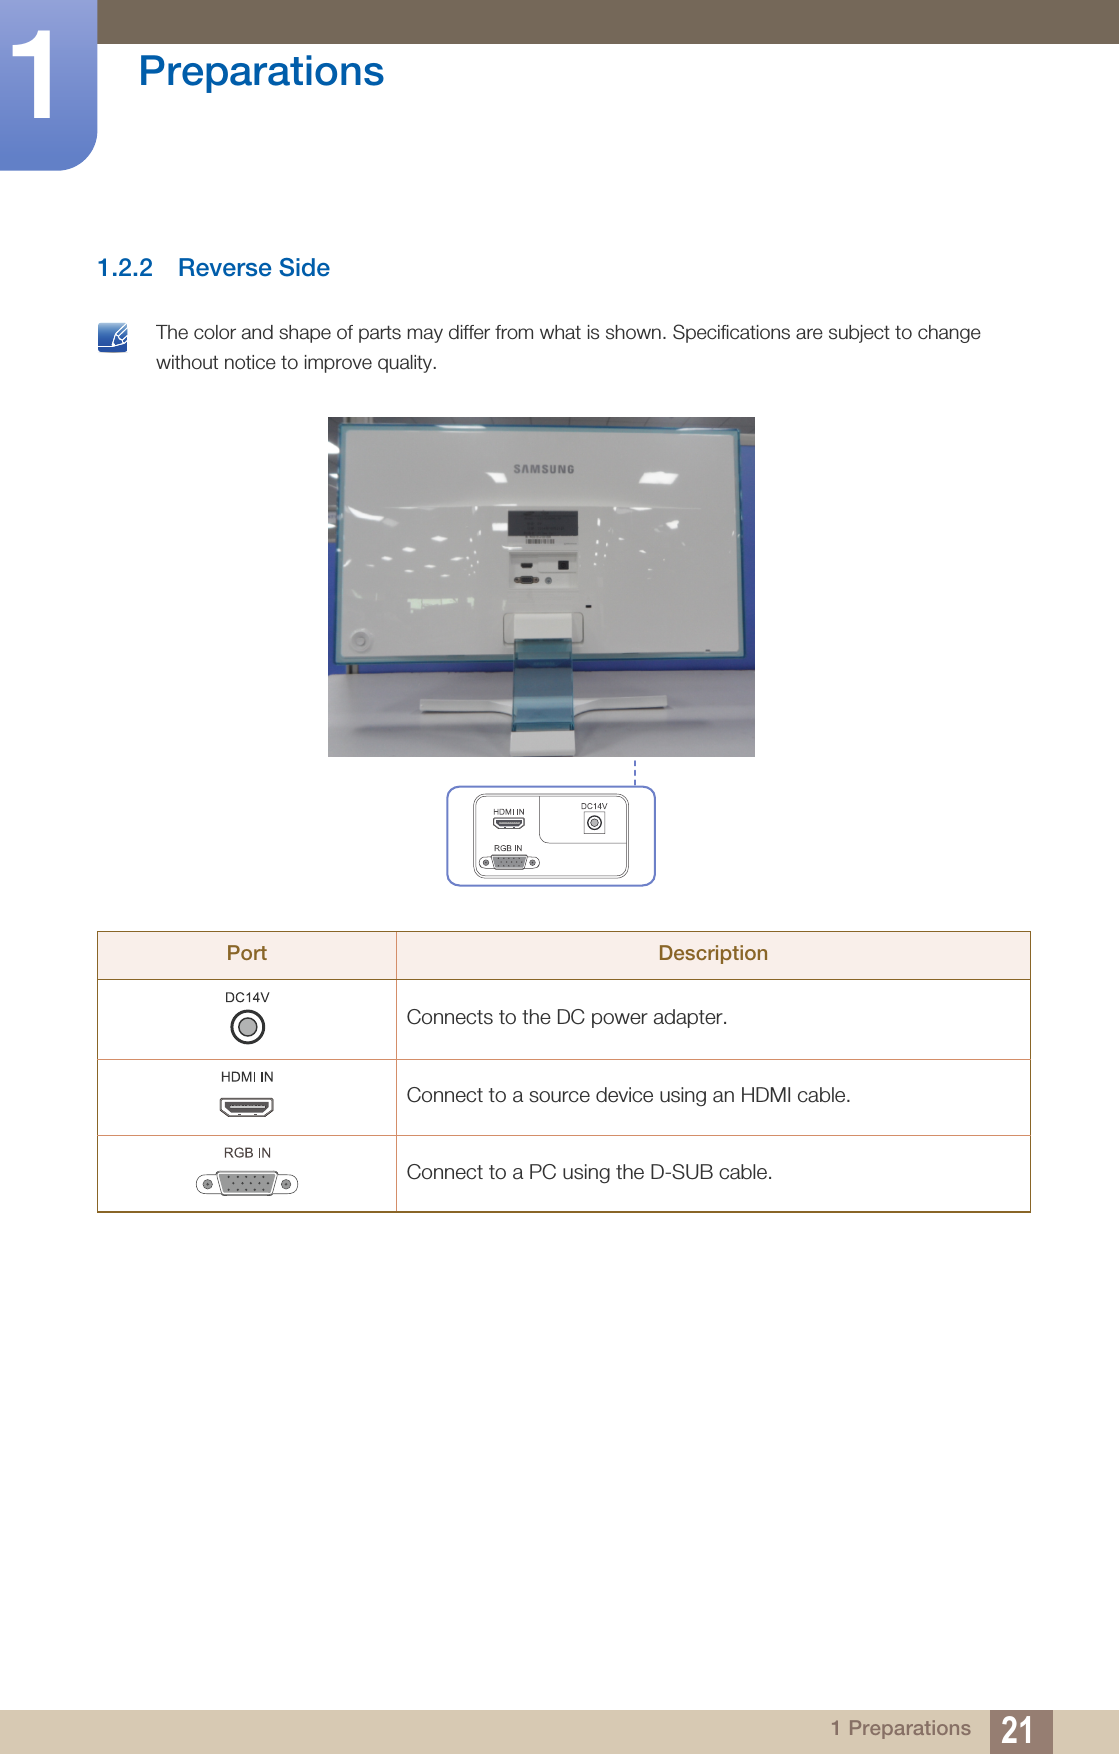
![262 Connecting and Using a Source Device2 Connecting and Using a Source Device2.1 Before Connecting2.1.1 Pre-connection CheckpointsBefore connecting a source device, read the user manual provided with it.The number and locations of ports on source devices may differ from device to device.Do not connect the power cable until all connections are completed.Connecting the power cable during connection may damage the product.Check the types of ports at the back of the product you want to connect.2.2 Connecting and Using a PC2.2.1 Connecting to a PCSelect a connection method suitable for your PC. Connecting parts may differ in different products.The exterior may differ depending on the product. Connection Using the D-SUB Cable (Analog Type) Do not connect the power cable before connecting all other cables. Ensure you connect a source device first before connecting the power cable. 1Connect the D-SUB cable to the [RGB IN] port on the back of the product and the RGB port on the PC.2Connect the DC power adapter to the product and a power socket. Next, turn on the power switch on the PC. (For details, refer to "2.2.2 Connecting the Power".)3Press [ ] to change the input source to Analog.RGB IN](https://usermanual.wiki/Samsung-Electronics-Co/LS22E360.user-manual/User-Guide-2466467-Page-22.png)
![27Connecting and Using a Source Device22 Connecting and Using a Source DeviceConnection Using the HDMI Cable Do not connect the power cable before connecting all other cables. Ensure you connect a source device first before connecting the power cable. 1Connect the HDMI cable to the [HDMI IN] port on the back of the product and the HDMI port on the PC.2Connect the DC power adapter to the product and a power socket. Next, turn on the power switch on the PC. (For details, refer to "2.2.2 Connecting the Power".)3Press [ ] to change the input source to HDMI.Connection Using the HDMI-DVI Cable Do not connect the power cable before connecting all other cables. Ensure you connect a source device first before connecting the power cable. 1Connect the HDMI-DVI cable to the [HDMI IN] port on the back of the product and the DVI port on the PC.2Connect the DC power adapter to the product and a power socket. Next, turn on the power switch on the PC. (For details, refer to "2.2.2 Connecting the Power".)3Press [ ] to change the input source to HDMI.HDMI INHDMI IN](https://usermanual.wiki/Samsung-Electronics-Co/LS22E360.user-manual/User-Guide-2466467-Page-23.png)
![28Connecting and Using a Source Device22 Connecting and Using a Source Device2.2.2 Connecting the Power Connecting parts may differ in different products.The exterior may differ depending on the product. Power connection using integrated DC power adapterConnect the power adapter to [DC14V] jack on the rear of the product. Plug in the power cable to the power socket. The input voltage is switched automatically. Power connection using detachable DC power adapterConnect the power adapter to [DC14V] jack on the rear of the product. Connect the power cable to the DC power adapter. Next, connect the DC power adapter to the product. Plug in the power cable to the power socket. The input voltage is switched automatically. DC14V DC14V](https://usermanual.wiki/Samsung-Electronics-Co/LS22E360.user-manual/User-Guide-2466467-Page-24.png)
![30Connecting and Using a Source Device22 Connecting and Using a Source Device2.2.4 Setting Optimum ResolutionAn information message about setting optimum resolution will appear if you power on the product for the first time after purchase.Select a language on the product and change the resolution on your PC to the optimum setting.1Press [ ] to move to the language you want and press [ ].2To hide the information message, press [ ] or [ ]. If the optimum resolution is not selected, the message will appear up to three times for a specified time even when the product is turned off and on again.The optimum resolution can also be selected in Control Panel on your PC. 5HWXUQ(QJOLVK7KHRSWLPDOUHVROXWLRQIRUWKLVPRQLWRULVDVIROORZV****x**** **Hz8VHWKHDERYHVHWWLQJVWRVHWWKHUHVROXWLRQRQ\RXU3&6HWXS*XLGHMENU](https://usermanual.wiki/Samsung-Electronics-Co/LS22E360.user-manual/User-Guide-2466467-Page-26.png)
![313 Screen Setup3 Screen SetupConfigure the screen settings such as brightness.A detailed description of each function is provided. Refer to your product for details.3.1 BrightnessYou can adjust the general brightness of the picture. (Range: 0~100)A higher value will make the picture appear brighter. This menu is not available when Bright is set to Dynamic Contrast mode.This menu is not available when Eco Saving is enabled.The functions available on the monitor may vary depending on the model. Refer to the actual product. 3.1.1 Configuring Brightness1Press any button on the front of the product to display the Function Key Guide. Next, press [ ] to display the corresponding menu screen. 2Press [ ] to move to PICTURE and press [ ] on the product.3Press [ ] to move to Brightness and press [ ] on the product.The following screen will appear. 4Adjust the Brightness using the [ ] buttons.5The selected option will be applied.SAMSUNGMAGICMENUPICTURE BrightnessContrastSharpnessGame ModeSAMSUNGMAGICBrightSAMSUNGMAGICAngleUpscaleSAMSUNGMAGIC1007560OffCustomOffOffAUTOAdjust the brightness level. Values closer to 100 mean a brighter screen.PICTURE BrightnessContrastSharpnessGame ModeImage SizeSAMSUNGMAGICBrightSAMSUNGMAGICUpscale1007560OffCustomOffWideAUTOAdjust the brightness level. Values closer to 100 mean a brighter screen.](https://usermanual.wiki/Samsung-Electronics-Co/LS22E360.user-manual/User-Guide-2466467-Page-27.png)
![32Screen Setup33 Screen Setup3.2 ContrastAdjust the contrast between the objects and background. (Range: 0~100)A higher value will increase the contrast to make the object appear clearer. This option is not available when Bright is in Cinema or Dynamic Contrast mode.This menu is not available when Game Mode is enabled.The functions available on the monitor may vary depending on the model. Refer to the actual product. 3.2.1 Configuring Contrast1Press any button on the front of the product to display the Function Key Guide. Next, press [ ] to display the corresponding menu screen. 2Press [ ] to move to PICTURE and press [ ] on the product.3Press [ ] to move to Contrast and press [ ] on the product. The following screen will appear.4Adjust the Contrast using the [ ] buttons.5The selected option will be applied.SAMSUNGMAGICMENU 1007560OffCustomOffOffAUTOBrightnessContrastSharpnessGame ModeSAMSUNGMAGICBrightSAMSUNGMAGICAngleUpscaleSAMSUNGMAGICAdjust the contrast level. Values closer to 100 mean a bigger light/dark contrast. AUTOSAMSUNGMAGICBrightSAMSUNGMAGICUpscaleBrightnessContrastSharpnessGame ModeImage Size1007560OffCustomOffWideAdjust the contrast level. Values closer to 100 mean a bigger light/dark contrast.](https://usermanual.wiki/Samsung-Electronics-Co/LS22E360.user-manual/User-Guide-2466467-Page-28.png)
![33Screen Setup33 Screen Setup3.3 SharpnessMake the outline of objects more clear or blurry. (Range: 0~100)A higher value will make the outline of objects clearer. This option is not available when Bright is in Cinema or Dynamic Contrast mode.This menu is not available when Upscale is in Mode1 or Mode2.This menu is not available when Game Mode is enabled.The functions available on the monitor may vary depending on the model. Refer to the actual product. 3.3.1 Configuring Sharpness1Press any button on the front of the product to display the Function Key Guide. Next, press [ ] to display the corresponding menu screen. 2Press [ ] to move to PICTURE and press [ ] on the product.3Press [ ] to move to Sharpness and press [ ] on the product. The following screen will appear.4Adjust the Sharpness using the [ ] buttons.5The selected option will be applied.SAMSUNGMAGICSAMSUNGMAGICMENUPICTURE 1007560OffCustomOffOffAUTOBrightnessContrastSharpnessGame ModeSAMSUNGMAGICBrightSAMSUNGMAGICAngleUpscaleSAMSUNGMAGICAdjust the sharpness of the picture. Values closer to 100 mean a sharper image.PICTURE 1007560OffCustomOffWideAUTOBrightnessContrastSharpnessGame ModeImage SizeSAMSUNGMAGICBrightSAMSUNGMAGICUpscaleAdjust the sharpness of the picture. Values closer to 100 mean a sharper image.](https://usermanual.wiki/Samsung-Electronics-Co/LS22E360.user-manual/User-Guide-2466467-Page-29.png)
![34Screen Setup33 Screen Setup3.4 Game ModeConfigure the product screen settings for game mode.Use this feature when playing games on a PC or when a game console such as PlayStation™ or Xbox™ is connected. The functions available on the monitor may vary depending on the model. Refer to the actual product. 3.4.1 Configuring Game Mode1Press any button on the front of the product to display the Function Key Guide. Next, press [ ] to display the corresponding menu screen. 2Press [ ] to move to PICTURE and press [ ] on the product.3Press [ ] to move to Game Mode and press [ ] on the product. The following screen will appear.4Press [ ] to move to the option you want and press [ ].5The selected option will be applied. When the monitor turns off, enters power-saving mode or changes input sources, Game Mode turns Off even if it is set to On.If you want to keep Game Mode enabled all the time, select Always On. MENUPICTURE 1007560OffCustomOffBrightnessContrastSharpnessGame ModeSAMSUNGMAGICBrightSAMSUNGMAGICAngleUpscaleSAMSUNGMAGICOffOnAlways OnAUTOOptimizes image settings for playing games.PICTURE 1007560OffCustomOffBrightnessContrastSharpnessGame ModeImage SizeSAMSUNGMAGICBrightSAMSUNGMAGICUpscaleOffOnAlways OnAUTOOptimizes image settings for playing games.](https://usermanual.wiki/Samsung-Electronics-Co/LS22E360.user-manual/User-Guide-2466467-Page-30.png)
![35Screen Setup33 Screen Setup3.5 SAMSUNG MAGIC BrightThis menu provides an optimum picture quality suitable for the environment where the product will be used. This menu is not available when Eco Saving is enabled.This menu is not available when Angle is enabled.This menu is not available when Game Mode is enabled.The functions available on the monitor may vary depending on the model. Refer to the actual product. You can customize the brightness to suit your preferences.3.5.1 Configuring SAMSUNG MAGIC Bright1Press any button on the front of the product to display the Function Key Guide. Next, press [ ] to display the corresponding menu screen. 2Press [ ] to move to PICTURE and press [ ] on the product.3Press [ ] to move to Bright and press [ ] on the product. The following screen will appear.Custom: Customize the contrast and brightness as required.Standard: Obtain a picture quality suitable for editing documents or using Internet.Cinema: Obtain the brightness and sharpness of TVs suitable for enjoying video and DVD content.Dynamic Contrast: Obtain balanced brightness through automatic contrast adjustment.SAMSUNGMAGICMENUSAMSUNGMAGIC1007560505022000PICTURE 1007560CustomOffOffWideCustomStandardCinemaDynamic ContrastAUTOBrightnessContrastSharpnessGame ModeSAMSUNGMAGICBrightSAMSUNGMAGICAngleUpscaleSAMSUNGMAGICSet to an optimum picture quality suitable for the working environment.1007560505022000PICTURE 1007560CustomOffOffWideCustomStandardCinemaDynamic ContrastAUTOBrightnessContrastSharpnessGame ModeImage SizeSAMSUNGMAGICBrightSAMSUNGMAGICUpscaleSet to an optimum picture quality suitable for the working environment.](https://usermanual.wiki/Samsung-Electronics-Co/LS22E360.user-manual/User-Guide-2466467-Page-31.png)
![36Screen Setup33 Screen SetupWhen the external input is connected through HDMI and PC/AV Mode is set to AV, Bright has four automatic picture settings (Dynamic, Standard, Movie and Custom) that are preset at the factory. You can activate either Dynamic, Standard, Movie or Custom. You can select Custom which automatically recalls your personalized picture settings.Dynamic: Select this mode to view a sharper image than in Standard mode.Standard: Select this mode when the surroundings are bright. This also provides a sharp image.Movie: Select this mode when the surroundings are dark. This will save power and reduce eye fatigue.Custom: Select this mode when you want to adjust the image according to your preferences.4Press [ ] to move to the option you want and press [ ].5The selected option will be applied.PICTURE 1007560CustomOffOffWideDynamicStandardMovieCustomAUTOBrightnessContrastSharpnessGame ModeSAMSUNGMAGICBrightSAMSUNGMAGICAngleUpscaleSAMSUNGMAGICSet to an optimum picture quality suitable for the working environment.1007560505022000PICTURE 1007560CustomOffOffWideDynamicStandardMovieCustomAUTOBrightnessContrastSharpnessGame ModeImage SizeSAMSUNGMAGICBrightSAMSUNGMAGICUpscaleSet to an optimum picture quality suitable for the working environment.SAMSUNGMAGIC](https://usermanual.wiki/Samsung-Electronics-Co/LS22E360.user-manual/User-Guide-2466467-Page-32.png)
![37Screen Setup33 Screen Setup3.6 SAMSUNG MAGIC Angle (S22E360H / S22E391H)Angle allows you to configure the settings to obtain the optimum picture quality according to your viewing angle. This option is not available when Bright is in Cinema or Dynamic Contrast mode.This menu is not available when Game Mode is enabled.The functions available on the monitor may vary depending on the model. Refer to the actual product. This feature provides the viewing angle, brightness, and tint to suit your preferences.3.6.1 Configuring SAMSUNG MAGIC Angle1Press any button on the front of the product to display the Function Key Guide. Next, press [ ] to display the corresponding menu screen. 2Press [ ] to move to PICTURE and press [ ] on the product.3Press [ ] to move to Angle and press [ ] on the product. The following screen will appear.Off : Select this option to view directly in front of the product.Lean Back Mode 1 : Select this option to view from a place slightly lower than the product.Lean Back Mode 2 : Select this option to view from a place lower than Lean Back Mode 1.Standing Mode : Select this option to view from a place higher than the product.Side Mode : Select this option to view from either side of the product.SAMSUNGMAGICSAMSUNGMAGICMENUSAMSUNGMAGICPICTURE 1007560CustomOffOffWideAUTOOffLean Back Mode 1Lean Back Mode 2Standing ModeSide ModeGroup ViewCustomBrightnessContrastSharpnessGame ModeSAMSUNGMAGICBrightSAMSUNGMAGICAngleUpscaleSAMSUNGMAGICSelect an angle that best suits your viewing position.423115 5①② ③④⑤](https://usermanual.wiki/Samsung-Electronics-Co/LS22E360.user-manual/User-Guide-2466467-Page-33.png)
![38Screen Setup33 Screen SetupGroup View: Select this option for more than one viewer to view from places , and .Custom: Lean Back Mode 1 will be applied by default if Custom is selected.4Press [ ] to move to the option you want and press [ ].5The selected option will be applied.① ④⑤](https://usermanual.wiki/Samsung-Electronics-Co/LS22E360.user-manual/User-Guide-2466467-Page-34.png)
![39Screen Setup33 Screen Setup3.7 SAMSUNG MAGIC UpscaleUpscale function can enhance the layers of the picture details and the vividness of the picture. The function has more obvious effects on low-resolution pictures.This menu is not available when Bright is in Cinema or Dynamic Contrast mode.This menu is not available when Game Mode is enabled.The functions available on the monitor may vary depending on the model. Refer to the actual product. 3.7.1 Configuring SAMSUNG MAGIC Upscale1Press any button on the front of the product to display the Function Key Guide. Next, press [ ] to display the corresponding menu screen. 2Press [ ] to move to PICTURE and press [ ] on the product.3Press [ ] to move to Upscale and press [ ] on the product. The following screen will appear.Comparing with Mode1, Mode2 has a stronger effect.4Press [ ] to move to the option you want and press [ ].5The selected option will be applied.SAMSUNGMAGICSAMSUNGMAGICMENUSAMSUNGMAGICPICTURE 1007560CustomOffOffWideAUTOOffMode1Mode2BrightnessContrastSharpnessGame ModeSAMSUNGMAGICBrightSAMSUNGMAGICAngleUpscaleSAMSUNGMAGICEnhance picture detail and vividness.PICTURE 1007560CustomOffOffWideAUTOOffMode1Mode2BrightnessContrastSharpnessGame ModeImage SizeSAMSUNGMAGICBrightSAMSUNGMAGICUpscaleEnhance picture detail and vividness.](https://usermanual.wiki/Samsung-Electronics-Co/LS22E360.user-manual/User-Guide-2466467-Page-35.png)
![40Screen Setup33 Screen Setup3.8 Image SizeChange the picture size. The functions available on the monitor may vary depending on the model. Refer to the actual product. 3.8.1 Changing the Image Size1Press any button on the front of the product to display the Function Key Guide. Next, press [ ] to display the corresponding menu screen. 2Press [ ] to move to PICTURE and press [ ] on the product.3Press [ ] to move to Image Size and press [ ] on the product. The following screen will appear.In PC modeAuto: Display the picture according to the aspect ratio of the input source.Wide: Display the picture in full screen regardless of the aspect ratio of the input source.MENUPICTURE 10075505022000AUTOAutoWideImage SizeHDMI Black LevelH-PositionV-PositionCoarseFineChoose the size and aspect ratio of the picture displayed on screen.PICTURE 1007560OffAUTOBrightnessContrastSharpnessGame ModeImage SizeSAMSUNGMAGICBrightSAMSUNGMAGICUpscaleAutoWideChoose the size and aspect ratio of the picture displayed on screen.](https://usermanual.wiki/Samsung-Electronics-Co/LS22E360.user-manual/User-Guide-2466467-Page-36.png)
![41Screen Setup33 Screen Setup4:3: Display the picture with an aspect ratio of 4:3. Suitable for videos and standard broadcasts.16:9: Display the picture with an aspect ratio of 16:9.Screen Fit: Display the picture with the original aspect ratio without cutting off. Changing the screen size is available when the following conditions are satisfied.The function may not be supported depending on the ports provided with the product.A digital output device is connected using the HDMI cable.The input signal is 480p, 576p, 720p, or 1080p and monitor can display normally (Not every model can support all of these signals.).This can only be set when the external input is connected through HDMI and PC/AV Mode is set to AV. 4Press [ ] to move to the option you want and press [ ].5The selected option will be applied.In AV modePICTURE AUTO100755050220004:316:9Screen FitImage SizeHDMI Black LevelH-PositionV-PositionCoarseFineChoose the size and aspect ratio of the picture displayed on screen.PICTURE 1007560OffWideAUTOBrightnessContrastSharpnessGame ModeImage SizeSAMSUNGMAGICBrightSAMSUNGMAGICUpscaleAutoWide4:316:9Screen FitChoose the size and aspect ratio of the picture displayed on screen.](https://usermanual.wiki/Samsung-Electronics-Co/LS22E360.user-manual/User-Guide-2466467-Page-37.png)
![42Screen Setup33 Screen Setup3.9 HDMI Black LevelIf a DVD player or set-top box is connected to the product via HDMI, image quality degradation (contrast/color degradation, black level, etc.) may occur, depending on the connected source device. In such case, HDMI Black Level can be used to adjust the image quality. If this is the case, correct the degraded picture quality using HDMI Black Level. This function is only available in HDMI mode.The functions available on the monitor may vary depending on the model. Refer to the actual product. 3.9.1 Configuring the HDMI Black Level Settings1Press any button on the front of the product to display the Function Key Guide. Next, press [ ] to display the corresponding menu screen. 2Press [ ] to move to PICTURE and press [ ] on the product.3Press [ ] to move to HDMI Black Level and press [ ] on the product. The following screen will appear.Normal: Select this mode when there is no contrast ratio degradation.Low: Select this mode to reduce the black level and increase the white level when there is a contrast ratio degradation.4Press [ ] to move to the option you want and press [ ].5The selected option will be applied. HDMI Black Level may not be compatible with some source devices. MENUPICTURE AUTONormalLowImage SizeHDMI Black LevelH-PositionV-PositionCoarseFineOptimize HDMI picture brightness and contrastby adjusting the black level of the video signal.PICTURE AUTONormalLowHDMI Black LevelResponse TimeH-PositionV-PositionCoarseFineOptimize HDMI picture brightness and contrast by adjusting the black level of the video signal.](https://usermanual.wiki/Samsung-Electronics-Co/LS22E360.user-manual/User-Guide-2466467-Page-38.png)
![43Screen Setup33 Screen Setup3.10 Response Time (S24E360H L / S24E391HL / S27E360H / S27E391H /Accelerate the panel response rate to make video appear more vivid and natural. It is best to set Response Time to Standard or Faster when you are not viewing a movie.The functions available on the monitor may vary depending on the model. Refer to the actualproduct. 3.10.1 Configuring the Response Time1Press any button on the front of the product to display the Function Key Guide. Next, press [ ] to display the corresponding menu screen. 2Press [ ] to move to PICTURE and press [ ] on the product.3Press [ ] to move to Response Time and press [ ] on the product. The following screen will appear.4Press [ ] to move to the option you want and press [ ].5The selected option will be applied.MENUPICTURE AUTOHDMI Black LevelResponse TimeH-PositionV-PositionCoarseFineStandardFasterFastestAccelerate the panel response rate to make video appear more vivid and natural.0S27E391H)](https://usermanual.wiki/Samsung-Electronics-Co/LS22E360.user-manual/User-Guide-2466467-Page-39.png)
![44Screen Setup33 Screen Setup3.11 H-Position & V-PositionH-Position: Move the screen to the left or right.V-Position: Move the screen up or down. This menu is available in Analog mode only. This menu is only available when Image Size is set to Screen Fit in AV Mode. When a 480P or 576P or 720P or 1080P signal is input in AV mode and the monitor can display normally, select Screen Fit to adjust horizontal position in 0-6 levels.The functions available on the monitor may vary depending on the model. Refer to the actual product. 3.11.1 Configuring H-Position & V-Position1Press any button on the front of the product to display the Function Key Guide. Next, press [ ] to display the corresponding menu screen. 2Press [ ] to move to PICTURE and press [ ] on the product.3Press [ ] to move to H-Position or V-Position, and press [ ]. The following screen will appear.MENUPICTURE BrightnessContrastSharpnessGame ModeSAMSUNGMAGICBrightSAMSUNGMAGICAngleUpscaleSAMSUNGMAGIC1007560OffCustomOffOffAUTOAdjust the brightness level. Values closer to 100 mean a brighter screen.PICTURE AUTOWide505022000Image SizeHDMI Black LevelH-PositionV-PositionCoarseFineMove the image displayed on the screen to the left or right.PICTURE AUTOFaster505022000HDMI Black LevelResponse TimeH-PositionV-PositionCoarseFineMove the image displayed on the screen to the left or right.](https://usermanual.wiki/Samsung-Electronics-Co/LS22E360.user-manual/User-Guide-2466467-Page-40.png)
![45Screen Setup33 Screen Setup4Press [ ] to configure H-Position or V-Position.5The selected option will be applied.PICTURE BrightnessContrastSharpnessGame ModeSAMSUNGMAGICBrightSAMSUNGMAGICAngleUpscaleSAMSUNGMAGIC1007560OffCustomOffOffAUTOAdjust the brightness level. Values closer to 100 mean a brighter screen.PICTURE AUTOWide505022000Image SizeHDMI Black LevelH-PositionV-PositionCoarseFineMove the image displayed on the screen up or down.PICTURE AUTOFaster505022000HDMI Black LevelResponse TimeH-PositionV-PositionCoarseFineMove the image displayed on the screen up or down.](https://usermanual.wiki/Samsung-Electronics-Co/LS22E360.user-manual/User-Guide-2466467-Page-41.png)
![46Screen Setup33 Screen Setup3.12 CoarseAdjust the screen frequency. This menu is available in Analog mode only.The functions available on the monitor may vary depending on the model. Refer to the actual product. 3.12.1 Adjusting Coarse1Press any button on the front of the product to display the Function Key Guide. Next, press [ ] to display the corresponding menu screen. 2Press [ ] to move to PICTURE and press [ ] on the product.3Press [ ] to move to Coarse and press [ ] on the product. The following screen will appear.4Adjust the Coarse using the [ ] buttons.5The selected option will be applied.MENUPICTURE AUTOWide505022000Image SizeHDMI Black LevelH-PositionV-PositionCoarseFineAdjust the screen frequency.PICTURE AUTOFaster505022000HDMI Black LevelResponse TimeH-PositionV-PositionCoarseFineAdjust the screen frequency.](https://usermanual.wiki/Samsung-Electronics-Co/LS22E360.user-manual/User-Guide-2466467-Page-42.png)
![47Screen Setup33 Screen Setup3.13 FineFine-adjust the screen to obtain a vivid picture. This menu is available in Analog mode only.The functions available on the monitor may vary depending on the model. Refer to the actual product. 3.13.1 Adjusting Fine1Press any button on the front of the product to display the Function Key Guide. Next, press [ ] to display the corresponding menu screen. 2Press [ ] to move to PICTURE and press [ ] on the product.3Press [ ] to move to Fine and press [ ] on the product. The following screen will appear.4Adjust the Fine using the [ ] buttons.5The selected option will be applied.MENUPICTURE AUTOWide505022000Image SizeHDMI Black LevelH-PositionV-PositionCoarseFineFine-tune the screen to get a vivid picture.PICTURE AUTOFaster505022000HDMI Black LevelResponse TimeH-PositionV-PositionCoarseFineFine-tune the screen to get a vivid picture.](https://usermanual.wiki/Samsung-Electronics-Co/LS22E360.user-manual/User-Guide-2466467-Page-43.png)
![484 Configuring Tint4 Configuring TintA detailed description of each function is provided. Refer to your product for details.Adjust the tint of the screen. This menu is not available when Bright is set to Cinema or Dynamic Contrast mode. This menu is not available when Game Mode is enabled.SAMSUNGMAGIC4.1 RedAdjust the value of the color red in the picture. (Range: 0~100)A higher value will increase the intensity of the color.4.1.1 Configuring Red1Press any button on the front of the product to display the Function Key Guide. Next, press [ ] to display the corresponding menu screen. 2Press [ ] to move to COLOR and press [ ] on the product.3Press [ ] to move to Red and press [ ] on the product. The following screen will appear.4Adjust the Red using the [ ] buttons.5The selected option will be applied.MENUCOLOR RedGreenBlueColor ToneGammaAdjust the red saturation level. Values closer to 100 mean greater intensity for the color.505050NormalMode1AUTO](https://usermanual.wiki/Samsung-Electronics-Co/LS22E360.user-manual/User-Guide-2466467-Page-44.png)
![49Configuring Tint44 Configuring Tint4.2 GreenAdjust the value of the color green in the picture. (Range: 0~100)A higher value will increase the intensity of the color.4.2.1 Configuring Green1Press any button on the front of the product to display the Function Key Guide. Next, press [ ] to display the corresponding menu screen. 2Press [ ] to move to COLOR and press [ ] on the product.3Press [ ] to move to Green and press [ ] on the product.The following screen will appear.4Adjust the Green using the [ ] buttons.5The selected option will be applied.MENUCOLOR RedGreenBlueColor ToneGamma505050NormalMode1AUTOAdjust the green saturation level. Values closer to 100 mean greater intensity for the color.](https://usermanual.wiki/Samsung-Electronics-Co/LS22E360.user-manual/User-Guide-2466467-Page-45.png)
![50Configuring Tint44 Configuring Tint4.3 BlueAdjust the value of the color blue in the picture. (Range: 0~100)A higher value will increase the intensity of the color.4.3.1 Configuring Blue1Press any button on the front of the product to display the Function Key Guide. Next, press [ ] to display the corresponding menu screen. 2Press [ ] to move to COLOR and press [ ] on the product.3Press [ ] to move to Blue and press [ ] on the product. The following screen will appear.4Adjust the Blue using the [ ] buttons.5The selected option will be applied.MENUCOLOR RedGreenBlueColor ToneGamma505050NormalMode1AUTOAdjust the blue saturation level. Values closer to 100 mean greater intensity for the color.](https://usermanual.wiki/Samsung-Electronics-Co/LS22E360.user-manual/User-Guide-2466467-Page-46.png)
![51Configuring Tint44 Configuring Tint4.4 Color ToneAdjust the general color tone of the picture. This menu is not available when Angle is enabled.This option is not available when Bright is in Cinema or Dynamic Contrast mode.This menu is not available when Game Mode is enabled.The functions available on the monitor may vary depending on the model. Refer to the actual product. 4.4.1 Configuring the Color Tone Settings1Press any button on the front of the product to display the Function Key Guide. Next, press [ ] to display the corresponding menu screen. 2Press [ ] to move to COLOR and press [ ] on the product.3Press [ ] to move to Color Tone and press [ ] on the product. The following screen will appear.Cool 2: Set the color temperature to be cooler than Cool 1.Cool 1: Set the color temperature to be cooler than Normal mode.Normal: Display the standard color tone.Warm 1: Set the color temperature to be warmer than Normal mode.Warm 2: Set the color temperature to be warmer than Warm 1.Custom: Customize the color tone. When the external input is connected through HDMI and PC/AV Mode is set to AV, Color Tone has four color temperature settings (Cool, Normal, Warm and Custom). 4Press [ ] to move to the option you want and press [ ].5The selected option will be applied.SAMSUNGMAGICSAMSUNGMAGICMENUCOLOR 505050NormalMode1RedGreenBlueColor ToneGammaCool 2 Cool 1 NormalWarm 1 Warm 2CustomAUTOSelect a color tone that best suits your viewing needs.](https://usermanual.wiki/Samsung-Electronics-Co/LS22E360.user-manual/User-Guide-2466467-Page-47.png)
![52Configuring Tint44 Configuring Tint4.5 GammaAdjust the mid-range brightness (Gamma) of the picture. This menu is not available when Angle is enabled.This option is not available when Bright is in Cinema or Dynamic Contrast mode.This menu is not available when Game Mode is enabled.The functions available on the monitor may vary depending on the model. Refer to the actual product. 4.5.1 Configuring Gamma1Press any button on the front of the product to display the Function Key Guide. Next, press [ ] to display the corresponding menu screen. 2Press [ ] to move to COLOR and press [ ] on the product.3Press [ ] to move to Gamma and press [ ] on the product. The following screen will appear.4Press [ ] to move to the option you want and press [ ].5The selected option will be applied.SAMSUNGMAGICSAMSUNGMAGICMENUCOLOR 505050NormalMode1RedGreenBlueColor ToneGammaAUTOMode1 Mode2Mode3Adjust the middle level of luminance.](https://usermanual.wiki/Samsung-Electronics-Co/LS22E360.user-manual/User-Guide-2466467-Page-48.png)
![535 Coordinating OSD5 Coordinating OSDA detailed description of each function is provided. Refer to your product for details.5.1 LanguageSet the menu language. A change to the language setting will only be applied to the onscreen menu display.It will not be applied to other functions on your PC. 5.1.1 Configuring Language1Press any button on the front of the product to display the Function Key Guide. Next, press [ ] to display the corresponding menu screen. 2Press [ ] to move to MENU SETTINGS and press [ ] on the product. 3Press [ ] to move to Language and press [ ] on the product. The following screen will appear.4Press [ ] to move to the language you want and press [ ]. 5The selected option will be applied.MENUMENU SETTINGS AUTODeutschEnglishEspañolFrançaisItalianoMagyarLanguageMenu H-PositionMenu V-PositionDisplay TimeTransparency Set the menu language.](https://usermanual.wiki/Samsung-Electronics-Co/LS22E360.user-manual/User-Guide-2466467-Page-49.png)
![54Coordinating OSD55 Coordinating OSD5.2 Menu H-Position & Menu V-PositionMenu H-Position: Move the menu position to the left or right. Menu V-Position: Move the menu position up or down. 5.2.1 Configuring Menu H-Position & Menu V-Position1Press any button on the front of the product to display the Function Key Guide. Next, press [ ] to display the corresponding menu screen. 2Press [ ] to move to MENU SETTINGS and press [ ] on the product.3Press [ ] to move to Menu H-Position or Menu V-Position, and press [ ] on the product.The following screen will appear.4Press [ ] to configure Menu H-Position or Menu V-Position.5The selected option will be applied.MENUMENU SETTINGS AUTOLanguageMenu H-PositionMenu V-PositionDisplay TimeTransparency English100220 secOnMove the menu position to the left or right.MENU SETTINGS AUTOLanguageMenu H-PositionMenu V-PositionDisplay TimeTransparency English100220 secOnMove the menu position up or down.](https://usermanual.wiki/Samsung-Electronics-Co/LS22E360.user-manual/User-Guide-2466467-Page-50.png)
![55Coordinating OSD55 Coordinating OSD5.3 Display TimeSet the on-screen display (OSD) menu to automatically disappear if the menu is not used for a specified period of time.Display Time can be used to specify the time after which you want the OSD menu to disappear.5.3.1 Configuring Display Time1Press any button on the front of the product to display the Function Key Guide. Next, press [ ] to display the corresponding menu screen. 2Press [ ] to move to MENU SETTINGS and press [ ] on the product.3Press [ ] to move to Display Time and press [ ] on the product. The following screen will appear.4Press [ ] to move to the option you want and press [ ].5The selected option will be applied.MENUMENU SETTINGS English100220 secOnLanguageMenu H-PositionMenu V-PositionDisplay TimeTransparency 5 sec10 sec20 sec200 secAUTOSet how long the menu window will remain on screen for when it is not in use.](https://usermanual.wiki/Samsung-Electronics-Co/LS22E360.user-manual/User-Guide-2466467-Page-51.png)
![56Coordinating OSD55 Coordinating OSD5.4 TransparencySet the transparency for the menu windows.5.4.1 Changing Transparency1Press any button on the front of the product to display the Function Key Guide. Next, press [ ] to display the corresponding menu screen. 2Press [ ] to move to MENU SETTINGS and press [ ] on the product.3Press [ ] to move to Transparency and press [ ] on the product. The following screen will appear.4Press [ ] to move to the option you want and press [ ].5The selected option will be applied.MENUMENU SETTINGS English100220 secOnLanguageMenu H-PositionMenu V-PositionDisplay TimeTransparency OffOnAUTOConfigure the transparency of the menu windows.](https://usermanual.wiki/Samsung-Electronics-Co/LS22E360.user-manual/User-Guide-2466467-Page-52.png)
![576 Setup and Reset6 Setup and ResetA detailed description of each function is provided. Refer to your product for details.6.1 Reset All Return all the settings for the product to the default factory settings.6.1.1 Initializing Settings (Reset All)1Press any button on the front of the product to display the Function Key Guide. Next, press [ ] to display the corresponding menu screen. 2Press [ ] to move to SETUP&RESET and press [ ] on the product.3Press [ ] to move to Reset All and press [ ] on the product. The following screen will appear.4Press [ ] to move to the option you want and press [ ].5The selected option will be applied.MENUSETUP&RESET AUTOOffAccelerationAutoReset AllEco SavingOff TimerPC/AV ModeKey Repeat TimeSource Detection Return all the settings for the product to the default factory settings. $OOWKHPHQXVHWWLQJVZLOOEHUHVHWWRGHIDXOW$UH\RXVXUH\RXZDQWWRUHVHW"<HV 1RAUTO](https://usermanual.wiki/Samsung-Electronics-Co/LS22E360.user-manual/User-Guide-2466467-Page-53.png)
![58Setup and Reset66 Setup and Reset6.2 Eco Saving The Eco Saving function reduces power consumption by controlling the electric current used by the monitor panel. This menu is not available when Bright is in Dynamic Contrast mode.This menu is not available when Game Mode is enabled. 6.2.1 Configuring Eco Saving1Press any button on the front of the product to display the Function Key Guide. Next, press [ ] to display the corresponding menu screen. 2Press [ ] to move to SETUP&RESET and press [ ] on the product.3Press [ ] to move to Eco Saving and press [ ] on the product. The following screen will appear.75%: Change the monitor power consumption to 75% of the default level.50%: Change the monitor power consumption to 50% of the default level.Off: Deactivate the Eco Saving function.4Press [ ] to move to the option you want and press [ ].5The selected option will be applied.SAMSUNGMAGICMENUSETUP&RESET AccelerationAutoAUTO75%50%OffReset AllEco SavingOff TimerPC/AV ModeKey Repeat TimeSource Detection Adjust the power consumption of the product to save energy.](https://usermanual.wiki/Samsung-Electronics-Co/LS22E360.user-manual/User-Guide-2466467-Page-54.png)
![59Setup and Reset66 Setup and Reset6.3 Off TimerYou can set the product to automatically turn off.6.3.1 Configuring Off Timer1Press any button on the front of the product to display the Function Key Guide. Next, press [ ] to display the corresponding menu screen. 2Press [ ] to move to SETUP&RESET and press [ ] on the product.3Press [ ] to move to Off Timer and press [ ] on the product. 4Press [ ] to move to Off Timer and press [ ] on the product. The following screen will appear.Off: Deactivate the off timer so that the product does not power off automatically.On: Activate the off timer so that the product powers off automatically.5Press [ ] to move to the option you want and press [ ].6The selected option will be applied.MENUSETUP&RESET OffAccelerationAutoAUTOReset AllEco SavingOff TimerPC/AV ModeKey Repeat TimeSource Detection Enable or disable the Off Timer. AUTOOff TimerOff TimerTurn Off After OffOnEnable or disable the Off Timer.](https://usermanual.wiki/Samsung-Electronics-Co/LS22E360.user-manual/User-Guide-2466467-Page-55.png)
![60Setup and Reset66 Setup and Reset6.3.2 Configuring Turn Off After1Press any button on the front of the product to display the Function Key Guide. Next, press [ ] to display the corresponding menu screen. 2Press [ ] to move to SETUP&RESET and press [ ] on the product.3Press [ ] to move to Off Timer and press [ ] on the product. 4Press [ ] to move to Turn Off After and press [ ] on the product. The following screen will appear. 5Press [ ] to configure Turn Off After.6The selected option will be applied. The off timer can be set within a range of 1 to 23 hours. The product will automatically power off after the specified number of hours.This option is only available when Off Timer is set to On.For products for the market in Europe, the Off Timer is set to automatically activate 4 hours after the product powers on. This is done in accordance with power supply regulations. If you do not want the timer to activate, go to MENU SETUP&RESET and set Off Timer to Off. MENU AUTOOff TimerOff TimerTurn Off After On4hSet the monitor to automatically turn off after a certain time period.→](https://usermanual.wiki/Samsung-Electronics-Co/LS22E360.user-manual/User-Guide-2466467-Page-56.png)
![61Setup and Reset66 Setup and Reset6.4 PC/AV ModeSet PC/AV Mode to AV. The picture size will be enlarged. This option is useful when you view a movie. This function does not support Analog mode.Supplied for the wide models only such as 16:9 or 16:10.If the monitor (when set to HDMI) is in power saving mode or is displaying the message Check Signal Cable, press the MENU button to display the On Screen Display(OSD). You can select PC or AV. 6.4.1 Configuring PC/AV Mode1Press any button on the front of the product to display the Function Key Guide. Next, press [ ] to display the corresponding menu screen. 2Press [ ] to move to SETUP&RESET and press [ ] on the product.3Press [ ] to move to PC/AV Mode and press [ ] on the product. 4Press [ ] to move to HDMI and press [ ] on the product. And press [ ] again.The following screen will appear.5Press [ ] to move to the option you want and press [ ].6The selected option will be applied.MENUSETUP&RESET AUTOOffAccelerationAutoReset AllEco SavingOff TimerPC/AV ModeKey Repeat TimeSource Detection Set to AV to enlarge the picture.PC/AV Mode AUTOHDMI PCAVSelect the PC/AV modefor the HDMI source.](https://usermanual.wiki/Samsung-Electronics-Co/LS22E360.user-manual/User-Guide-2466467-Page-57.png)
![62Setup and Reset66 Setup and Reset6.5 Key Repeat TimeControl the response rate of a button when the button is pressed. 6.5.1 Configuring Key Repeat Time1Press any button on the front of the product to display the Function Key Guide. Next, press [ ] to display the corresponding menu screen. 2Press [ ] to move to SETUP&RESET and press [ ] on the product.3Press [ ] to move to Key Repeat Time and press [ ] on the product. The following screen will appear.Acceleration, 1 sec, or 2 sec can be selected. If No Repeat is selected, a command responds only once when a button is pressed.4Press [ ] to move to the option you want and press [ ].5The selected option will be applied.MENUSETUP&RESET AUTOOffAccelerationAutoAcceleration1 sec2 secNo RepeatReset AllEco SavingOff TimerPC/AV ModeKey Repeat TimeSource Detection Configure the response rate of a button when the button is pressed.](https://usermanual.wiki/Samsung-Electronics-Co/LS22E360.user-manual/User-Guide-2466467-Page-58.png)
![63Setup and Reset66 Setup and Reset6.6 Source DetectionYou can activate Source Detection.6.6.1 Configuring Source Detection1Press any button on the front of the product to display the Function Key Guide. Next, press [ ] to display the corresponding menu screen. 2Press [ ] to move to SETUP&RESET and press [ ] on the product.3Press [ ] to move to Source Detection and press [ ] on the product.The following screen will appear.Auto: The input source is automatically recognized.Manual: Manually select an input source.4Press [ ] to move to the option you want and press [ ].5The selected option will be applied.MENUSETUP&RESET AUTOOffAutoAutoManualReset AllEco SavingOff TimerPC/AV ModeKey Repeat TimeSource Detection Decide how input sources will be detected.](https://usermanual.wiki/Samsung-Electronics-Co/LS22E360.user-manual/User-Guide-2466467-Page-59.png)
![647 INFORMATION Menu and Others7 INFORMATION Menu and OthersA detailed description of each function is provided. Refer to your product for details.7.1 INFORMATIONView the current input source, frequency and resolution.7.1.1 Displaying INFORMATION1Press any button on the front of the product to display the Function Key Guide. Next, press [ ] to display the corresponding menu screen. 2Press [ ] to move to INFORMATION. The current input source, frequency and resolution will appear. The displayed menu items may vary depending on the model. MENUINFORMATION Analog**kHz **Hz PP**** x ****Optimal Mode**** x **** **HzPICTURECOLORMENU SETTINGSSETUP&RESETINFORMATIONAUTO](https://usermanual.wiki/Samsung-Electronics-Co/LS22E360.user-manual/User-Guide-2466467-Page-60.png)
![65INFORMATION Menu and Others77 INFORMATION Menu and Others7.2 Configuring Brightness and Contrast in the Initial ScreenAdjust the Brightness, Contrast using the [ ] buttons when the initial screen (that displays no menu screen) is displayed. Brightness : This menu is not available when Bright is set to Dynamic Contrast mode.This menu is not available when Eco Saving is enabled. Contrast : This option is not available when Bright is in Cinema or Dynamic Contrast mode.This menu is not available when Game Mode is enabled. 1Press any button on the front of the product (when no menu screen is displayed) to display the Function Key Guide. Next, press [ ]. The following screen will appear.2Press the [ ] button to alternate between the Brightness and Contrast settings.3Adjust the Brightness, Contrast using the [ ] buttons.SAMSUNGMAGICSAMSUNGMAGICBrightnessContrast75100](https://usermanual.wiki/Samsung-Electronics-Co/LS22E360.user-manual/User-Guide-2466467-Page-61.png)


![82Appendix AppendixINDIA 1800 3000 82821800 266 8282http://www.samsung.com/inINDONESIA 0800-112-8888 (Toll Free)(021) 56997777http://www.samsung.com/idJAPAN 0120-327-527 http://www.samsung.comMALAYSIA 1800-88-9999 http://www.samsung.com/myNEW ZEALAND 0800 SAMSUNG (0800 726 786) http://www.samsung.com/nzPHILIPPINES 1-800-10-7267864 [PLDT]1-800-8-7267864 [Globe landlineand Mobile]02-4222111 [Other landline]http://www.samsung.com/phSINGAPORE 1800-SAMSUNG (726-7864) http://www.samsung.com/sgTAIWAN 0800-32-9999 http://www.samsung.com/twTHAILAND 0-2689-3232,1800-29-3232http://www.samsung.com/thVIETNAM 1800 588 889 http://www.samsung.comMENAALGERIA 0800 100 100 http://www.samsung.com/n_africaBAHRAIN 8000-4726 http://www.samsung.com/ae (English)http://www.samsung.com/ae_ar (Arabic)EGYPT 08000-726786 http://www.samsung.comIRAN 021-8255 http://www.samsung.comJORDAN 0800-2227306 5777444http://www.samsung.com/Levant (English)KUWAIT 183-2255 (183-CALL) http://www.samsung.com/ae (English)http://www.samsung.com/ae_ar (Arabic)MOROCCO 080 100 2255 http://www.samsung.comOMAN 800-SAMSUNG (726-7864) http://www.samsung.com/ae (English)http://www.samsung.com/ae_ar (Arabic)ASIA PACIFIC](https://usermanual.wiki/Samsung-Electronics-Co/LS22E360.user-manual/User-Guide-2466467-Page-78.png)