Samsung Electronics Co LS27D85 LCD Monitor User Manual SD850 WW BN46 00424A X2Eng 40519 00
Samsung Electronics Co Ltd LCD Monitor SD850 WW BN46 00424A X2Eng 40519 00
Contents
- 1. SD850-WW BN46-00424A-X2Eng 40519.00
- 2. user manual
SD850-WW BN46-00424A-X2Eng 40519.00
![19Preparations11 Preparations1.2 Parts1.2.1 Frontal Button The color and shape of parts may differ from what is shown.Specifications are subject to change without notice to improve quality. Icons DescriptionThe Eco Light Sensor feature optimizes the view condition and contributes to power saving by adjusting the screen brightness depending on the ambient light intensity.Open or close the onscreen display (OSD) menu, or return to the parent menu.zOSD control lock: Maintain the current settings, or lock the OSD control to prevent unintended changes to settings.zEnable: To lock the OSD control, press and hold the [ ] button for 10 seconds. zDisable: To unlock the OSD control, press and hold the [ ] button for 10 seconds. If the OSD control is locked, Brightness, Contrast and Volume can be adjusted. PIP/PBP and ECO are available. Information can be viewed. Press [ ] to display and access the following menu items.zEco Light Sensor - Sensitivity - Brightness Level - Eco Saving - Eco Icon DisplayMENU SOURCE PIP/PBPMENU SOURCE PIP/PBPFunction Key Guide](https://usermanual.wiki/Samsung-Electronics-Co/LS27D85.SD850-WW-BN46-00424A-X2Eng-40519-00/User-Guide-2281104-Page-19.png)
![20Preparations11 PreparationsMove to the upper or lower menu or adjust the value for an option on the OSD menu.Adjust the screen brightness, contrast and volume.Confirm a menu selection.Pressing the [ ] button when the OSD menu is not displayed will change the input source (DVI/HDMI/DisplayPort). If you power on the product or change the input source by pressing the [ ] button, a message that shows the changed input source will appear at the top left corner of the screen. Press the button when configuring settings for the PIP/PBP function is required.Turn the screen on or off. Function Key GuideWhen a control button on the product is pressed, the Function Key Guide will be displayed before the onscreen menu opens. (The guide shows the function of the button pressed.) To access the onscreen menu when the guide is displayed, press the corresponding button again.The Function Key Guide may vary depending on the function or product model.Refer to the actual product.Icons Description](https://usermanual.wiki/Samsung-Electronics-Co/LS27D85.SD850-WW-BN46-00424A-X2Eng-40519-00/User-Guide-2281104-Page-20.png)
![21Preparations11 Preparations1.2.2 Reverse Side The color and shape of parts may differ from what is shown.Specifications are subject to change without notice to improve quality. Port DescriptionConnect the power cord for your monitor to the [POWER IN] port on the back of the product.Connects to a source device via a DVI cable.Connect to a source device using an HDMI cable.Connects to a PC using a DP cable.Connects to a PC using a USB cable. This port can only connect to a PC. 34123412](https://usermanual.wiki/Samsung-Electronics-Co/LS27D85.SD850-WW-BN46-00424A-X2Eng-40519-00/User-Guide-2281104-Page-21.png)
![22Preparations11 PreparationsConnect to a USB device. Compatible with a USB cable version 3.0 or lower. High-speed charging is possible using the [ ] and [ ] ports only. These ports charge devices faster than typical USB ports. The speed depends on the connected devices. Connect to an audio output device such as headphones.Connect to an audio-input source using an audio cable.Port Description1 2](https://usermanual.wiki/Samsung-Electronics-Co/LS27D85.SD850-WW-BN46-00424A-X2Eng-40519-00/User-Guide-2281104-Page-22.png)
![28Preparations11 Preparations1.4 "MagicRotation Auto"The "MagicRotation Auto" function detects the rotation of monitors that are fitted with a rotation sensor and rotates the Windows screen accordingly.[Software Installation]1Insert the user manual CD provided with the product into the CD-ROM drive.2Follow the instructions given on the screen to proceed with installation. After installation, the application menu language will be displayed in the language of the operating system. (This complies with the basic policies of Windows.) [Caution]1Compatible only with Windows 7 (32 bit or 64 bit) and Windows 8 (32 bit or 64 bit).2Compatible with a graphics card that complies with the DDC/CI and MS API standardsWith a graphics card that does not comply with the aforementioned standards, the "MagicRotation Auto" function may not be available.3To maximize the performance of the function, update the graphics card driver to the latest version.4Fourteen languages are available as installation languages.5If the orientation is set to a mode other than "Landscape" in the screen resolution menu on Windows 7, the "MagicRotation Auto" function may not work properly. 6The OSD menu will be displayed if the monitor is rotated. When the monitor is rotated, the screen reconfiguration process may be displayed or screen burn-in may appear, depending on the graphics card. This is performed by the Windows operating system and has nothing to do with the product.7If you do not want the screen to rotate automatically when the monitor is rotated, press the Windows and L keys at the same time to lock the Windows operating system. If the operating system cannot be locked, it is due to the constraints of Windows API and has nothing to do with the product.(QJOLVK)UDQoDLV'HXWVFK0DJ\DU,WDOLDQR3ROVNL3RUWXJXrVƧNJLjLjǁƿǀ(VSDxRO6YHQVND7UNoHᣣᧄ⺆㩷∝䇁ଞ˲߭](https://usermanual.wiki/Samsung-Electronics-Co/LS27D85.SD850-WW-BN46-00424A-X2Eng-40519-00/User-Guide-2281104-Page-28.png)
![29Preparations11 Preparations1.5 Rotating the monitorWhen rotating the monitor, the rotation angle is displayed on the monitor screen.The on-screen display (OSD) menu items will automatically rotate when the screen rotates.[Caution]1If the "MagicRotation Auto" software is not installed on the monitor, contents on the screen cannot be rotated. The OSD can still rotate by 90° and display properly.2Once rotated, the OSD may appear in a different view mode from the mode before it was rotated. 0° 90°MENUSOURCEPIP/PBPMENU SOURCE PIP/PBP](https://usermanual.wiki/Samsung-Electronics-Co/LS27D85.SD850-WW-BN46-00424A-X2Eng-40519-00/User-Guide-2281104-Page-29.png)
![302 Connecting and Using a Source Device2 Connecting and Using a Source Device2.1 Before Connecting2.1.1 Pre-connection CheckpointszBefore connecting a source device, read the user manual provided with it.The number and locations of ports on source devices may differ from device to device.zDo not connect the power cable until all connections are completed.Connecting the power cable during connection may damage the product.zCheck the types of ports at the back of the product you want to connect.2.2 Connecting and Using a PCSelect a connection method suitable for your PC. Connecting parts may differ in different products. 2.2.1 Connection Using the DVI Cable Do not connect the power cable before connecting all other cables. Ensure you connect a source device first before connecting the power cable. 1Connect the DVI cable to the [DVI IN] port on the back of the product and the DVI port on the PC.2Press [ ] to change the input source to DVI. zProvided ports may vary depending on the product.zUsing a DVI cable that does not come with the product may degrade the display resolution. DVI INzIf audio is supported,and stereo cable is connected , the volume can be adjusted using the[ ] buttons on the front of the product.](https://usermanual.wiki/Samsung-Electronics-Co/LS27D85.SD850-WW-BN46-00424A-X2Eng-40519-00/User-Guide-2281104-Page-30.png)
![31Connecting and Using a Source Device22 Connecting and Using a Source Device2.2.2 Connection Using the DVI-HDMI Cable Do not connect the power cable before connecting all other cables. Ensure you connect a source device first before connecting the power cable. 1Connect the HDMI-DVI cable to the [DVI IN] port on the back of the product and the HDMI port on the PC.2Press [ ] to change the input source to DVI. zIf audio is supported,and stereo cable is connected, the Volume product.zProvided ports may vary depending on the product. 2.2.3 Connection Using the HDMI Cable Do not connect the power cable before connecting all other cables. Ensure you connect a source device first before connecting the power cable. 1Connect the HDMI cable to the [HDMI IN] port on the back of the product and the HDMI port on the PC.2Press [ ] to change the input source to HDMI. zIf audio is supported, the Volume can be adjusted using the [ ] buttons on the front of the product.zProvided ports may vary depending on the product. DVI INDVI INHDMI INcan be adjusted using the [ ] buttons on the front of the](https://usermanual.wiki/Samsung-Electronics-Co/LS27D85.SD850-WW-BN46-00424A-X2Eng-40519-00/User-Guide-2281104-Page-31.png)
![32Connecting and Using a Source Device22 Connecting and Using a Source Device2.2.4 Connection Using the HDMI-DVI Cable Do not connect the power cable before connecting all other cables. Ensure you connect a source device first before connecting the power cable. 1Connect the HDMI-DVI cable to the [HDMI IN] port on the back of the product and the DVI port on the PC.2Press [ ] to change the input source to HDMI. zIn order to hear the sound when connected to a PC with HDMI to DVI cable, please connect audio cable, and set PC/AV Mode to DVI PC.zProvided ports may vary depending on the product. HDMI INPC/AV Mode DVIHDMIDisplayPort PCAVDVI PCSelect the PC/AV mode for the HDMI source.](https://usermanual.wiki/Samsung-Electronics-Co/LS27D85.SD850-WW-BN46-00424A-X2Eng-40519-00/User-Guide-2281104-Page-32.png)
![33Connecting and Using a Source Device22 Connecting and Using a Source Device2.2.5 Connection Using the DP Cable Do not connect the power cable before connecting all other cables. Ensure you connect a source device first before connecting the power cable. 1Connect one end of the DP cable to the [DP IN] port on the side of the product and the other end to the DP port on the PC.2Press [ ] to change the input source to DisplayPort. zIf audio is supported, the Volume can be adjusted using the [ ] buttons on the front of the product.zProvided ports may vary depending on the product. DP IN](https://usermanual.wiki/Samsung-Electronics-Co/LS27D85.SD850-WW-BN46-00424A-X2Eng-40519-00/User-Guide-2281104-Page-33.png)
![34Connecting and Using a Source Device22 Connecting and Using a Source Device2.2.6 Connecting to Headphones or Speakers Do not connect the power cable before connecting all other cables. Ensure you connect a source device first before connecting the power cable. 1Connect the stereo cable to the [AUDIO IN] port on the back of the product and the AUDIO OUT port on the PC.2Connect an audio output device such as headphones or speakers to [AUDIO OUT] on the product. zIf the stereo cable is connected, the Volume can be adjusted using the [ ] buttons on the front of the product.zProvided ports may vary depending on the product. AUDIO OUTAUDIO IN](https://usermanual.wiki/Samsung-Electronics-Co/LS27D85.SD850-WW-BN46-00424A-X2Eng-40519-00/User-Guide-2281104-Page-34.png)
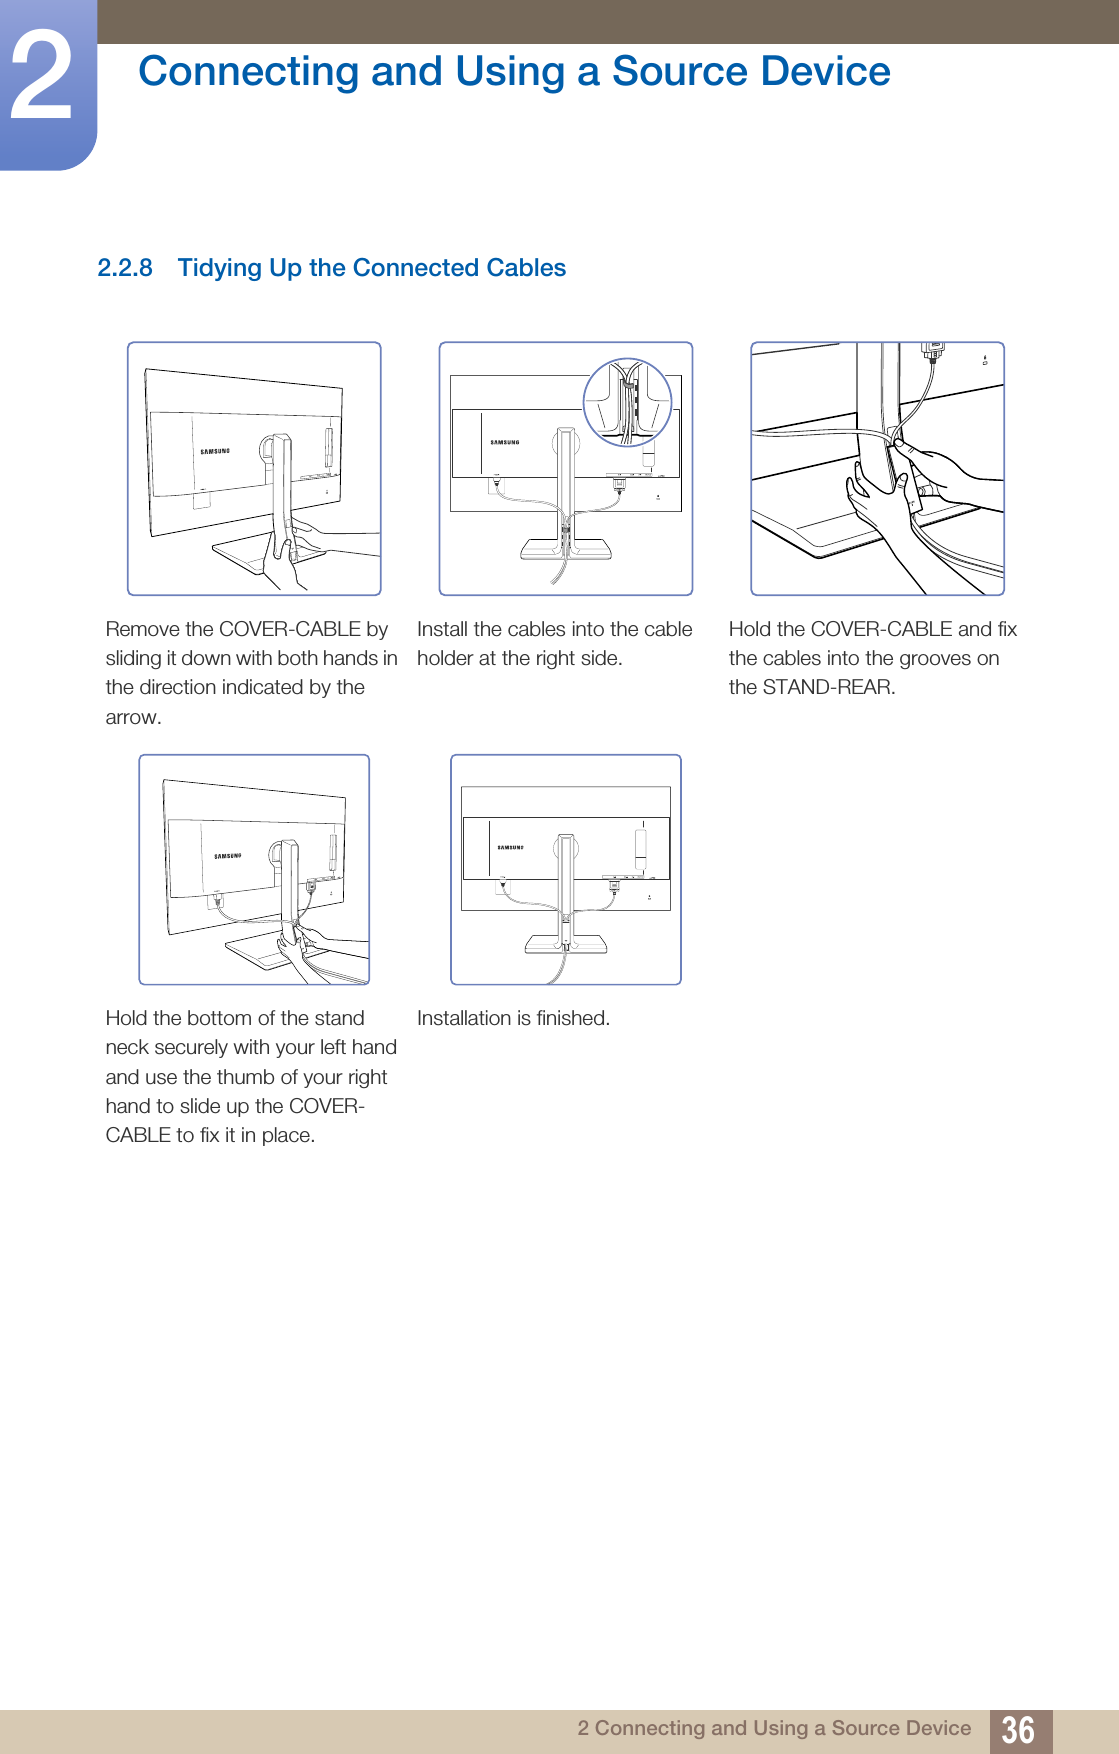
![35Connecting and Using a Source Device22 Connecting and Using a Source Device2.2.7 Connecting the Power zConnecting parts may differ in different products.zThe exterior may differ depending on the product. zTo use the product, connect the power cable to a power outlet and the [POWER IN] port on the product. The input voltage is switched automatically. POWER IN](https://usermanual.wiki/Samsung-Electronics-Co/LS27D85.SD850-WW-BN46-00424A-X2Eng-40519-00/User-Guide-2281104-Page-35.png)
![37Connecting and Using a Source Device22 Connecting and Using a Source Device2.3 Connecting the Product to a PC as a USB HUB2.3.1 Connecting a PC to the Product The product can function as a HUB by connecting to a PC via a USB cable. You can connect a source device directly to the product and control the device from the product, without having to connect the device to the PC. To use the product as a USB hub, connect the product to a PC using a USB cable.Connect the USB cable to [ ] on the back of the product and USB [ ] on the PC. A USB 2.0 cable can be used to connect the product to a PC. However, to take full advantage of the USB 3.0 function, connect a USB 3.0 cable between the PC and the product. Ensure the PC supports USB 3.0. 2.3.2 Utilizing the Product as a USB HUBUsing the product as a hub, connect and use various source devices with the product at the same time.A PC cannot connect to multiple source devices at the same time as it has a limited number of input/output ports available. The HUB feature on the product will improve your work efficiency by allowing you to connect multiple source devices to the USB ports on the product at the same time without connecting them to a PC.If multiple source devices are connected to the PC, the many cables around the PC may look messy. Connecting the devices directly to the product will resolve such inconvenience.Connect a mobile device such as an MP3 player or smartphone to the product when connected to a PC. This allows you to control the device from the PC or charge the device battery. zTo detect and start a source device faster, connect the device to the USB 3.0 port on the product.zAn external mass-storage HDD requires an external power supply. Be sure to connect it to a power source.](https://usermanual.wiki/Samsung-Electronics-Co/LS27D85.SD850-WW-BN46-00424A-X2Eng-40519-00/User-Guide-2281104-Page-37.png)
![38Connecting and Using a Source Device22 Connecting and Using a Source DevicezHigh-speed charging is possible using the [ ] and [ ] ports only. These ports charge devices faster than typical USB ports. The speed depends on the connected devices.zBattery charging is possible in power-saving mode. However, it is not possible when the product is powered off.zBattery charging is not possible if the power cable is disconnected from the power socket.zMobile devices should be purchased separately. 12](https://usermanual.wiki/Samsung-Electronics-Co/LS27D85.SD850-WW-BN46-00424A-X2Eng-40519-00/User-Guide-2281104-Page-38.png)

![40Connecting and Using a Source Device22 Connecting and Using a Source Device2.5 Setting Optimum ResolutionAn information message about setting optimum resolution will appear if you power on the product for the first time after purchase.Select a language on the product and change the resolution on your PC to the optimum setting.1Press [ ] to move to the language you want and press [ ].2To hide the information message, press [ ] or [ ]. zIf the optimum resolution is not selected, the message will appear up to three times for a specified time even when the product is turned off and on again.zThe optimum resolution can also be selected in Control Panel on your PC. 5HWXUQ(QJOLVK7KHRSWLPDOUHVROXWLRQIRUWKLVPRQLWRULVDVIROORZV****x**** **Hz8VHWKHDERYHVHWWLQJVWRVHWWKHUHVROXWLRQRQ\RXU3&6HWXS*XLGH](https://usermanual.wiki/Samsung-Electronics-Co/LS27D85.SD850-WW-BN46-00424A-X2Eng-40519-00/User-Guide-2281104-Page-40.png)
![413 Screen Setup3 Screen SetupConfigure the screen settings such as brightness.A detailed description of each function is provided. Refer to your product for details.3.1 BrightnessYou can adjust the general brightness of the picture. (Range: 0~100)A higher value will make the picture appear brighter. zThis menu is not available when Bright is set to Dynamic Contrast mode.zThis menu is not available when Eco Light Sensor or Eco Saving is set to On. 3.1.1 Configuring Brightness1Press any button on the front of the product to display the Function Key Guide. Next, press [ ] to display the corresponding menu screen. 2Press [ ] to move to Picture and press [ ] on the product.3Press [ ] to move to Brightness and press [ ] on the product.The following screen will appear. 4Adjust the Brightness using the [ ] buttons.5The selected option will be applied.SAMSUNGMAGICPicture BrightnessContrastSharpnessGame ModeColor1007560 OffCustomOffSAMSUNGMAGICBrightSAMSUNGMAGICUpscaleAdjust the brightness level. Values closer to 100 mean a brighter screen.](https://usermanual.wiki/Samsung-Electronics-Co/LS27D85.SD850-WW-BN46-00424A-X2Eng-40519-00/User-Guide-2281104-Page-41.png)
![42Screen Setup33 Screen Setup3.2 ContrastAdjust the contrast between the objects and background. (Range: 0~100)A higher value will increase the contrast to make the object appear clearer. zThis option is not available when Bright is in Cinema or Dynamic Contrast mode.zThis menu is not available when Game Mode is enabled.zThis menu is not available when PIP/PBP Mode is set to On and the Size is set to (PBP Mode). 3.2.1 Configuring Contrast1Press any button on the front of the product to display the Function Key Guide. Next, press [ ] to display the corresponding menu screen. 2Press [ ] to move to Picture and press [ ] on the product.3Press [ ] to move to Contrast and press [ ] on the product. The following screen will appear.4Adjust the Contrast using the [ ] buttons.5The selected option will be applied.SAMSUNGMAGIC SAMSUNGMAGICBrightSAMSUNGMAGICUpscalePictureBrightnessContrastSharpnessGame ModeColor1007560 OffCustomOffAdjust the contrast level. Values closer to 100 mean a bigger light/dark contrast.](https://usermanual.wiki/Samsung-Electronics-Co/LS27D85.SD850-WW-BN46-00424A-X2Eng-40519-00/User-Guide-2281104-Page-42.png)
![43Screen Setup33 Screen Setup3.3 SharpnessMake the outline of objects more clear or blurry. (Range: 0~100)A higher value will make the outline of objects clearer. zThis option is not available when Bright is in Cinema or Dynamic Contrast mode.zThis menu is not available when Upscale is in Mode1 or Mode2.zThis menu is not available when Game Mode is enabled.zNot available when PIP/PBP Mode is set to On. 3.3.1 Configuring Sharpness1Press any button on the front of the product to display the Function Key Guide. Next, press [ ] to display the corresponding menu screen. 2Press [ ] to move to Picture and press [ ] on the product.3Press [ ] to move to Sharpness and press [ ] on the product. The following screen will appear.4Adjust the Sharpness using the [ ] buttons.5The selected option will be applied.SAMSUNGMAGICSAMSUNGMAGIC1007560OffCustomOffWide SAMSUNGMAGICBrightSAMSUNGMAGICUpscalePictureBrightnessContrastSharpnessGame ModeColor1007560 OffCustomOffAdjust the sharpness of the picture. Values closer to 100 mean a sharper image.](https://usermanual.wiki/Samsung-Electronics-Co/LS27D85.SD850-WW-BN46-00424A-X2Eng-40519-00/User-Guide-2281104-Page-43.png)
![44Screen Setup33 Screen Setup3.4 Game ModeConfigure the product screen settings for game mode.Use this feature when playing games on a PC or when a game console such as PlayStation™ or Xbox™ is connected. Not available when PIP/PBP Mode is set to On. 3.4.1 Configuring Game Mode1Press any button on the front of the product to display the Function Key Guide. Next, press [ ] to display the corresponding menu screen. 2Press [ ] to move to Picture and press [ ] on the product.3Press [ ] to move to Game Mode and press [ ] on the product. The following screen will appear.4Press [ ] to move to the option you want and press [ ].5The selected option will be applied. zWhen the monitor turns off, enters power-saving mode or changes input sources, Game Mode turns Off even if it is set to On.zIf you want to keep Game Mode enabled all the time, select Always On. 1007560OffCustomOffOffOnAlways OnSAMSUNGMAGICBrightSAMSUNGMAGICUpscalePictureBrightnessContrastSharpnessGame ModeColorOptimizes image settings for playing games.](https://usermanual.wiki/Samsung-Electronics-Co/LS27D85.SD850-WW-BN46-00424A-X2Eng-40519-00/User-Guide-2281104-Page-44.png)
![45Screen Setup33 Screen Setup3.5 SAMSUNG MAGIC BrightThis menu provides an optimum picture quality suitable for the environment where the product will be used. zThis menu is not available when Eco Light Sensor is enabled.zThis menu is not available when Game Mode is enabled.zNot available when PIP/PBP Mode is set to On. You can customize the brightness to suit your preferences.3.5.1 Configuring SAMSUNG MAGIC Bright1Press any button on the front of the product to display the Function Key Guide. Next, press [ ] to display the corresponding menu screen. 2Press [ ] to move to Picture and press [ ] on the product.3Press [ ] to move to Bright and press [ ] on the product. The following screen will appear.zCustom: Customize the contrast and brightness as required.zStandard: Obtain a picture quality suitable for editing documents or using Internet.zCinema: Obtain the brightness and sharpness of TVs suitable for enjoying video and DVD content.zDynamic Contrast: Obtain balanced brightness through automatic contrast adjustment.SAMSUNGMAGIC1007560505022000 1007560CustomOffOffWideCustomStandardCinemaDynamic ContrastSAMSUNGMAGICBrightSAMSUNGMAGICUpscalePictureBrightnessContrastSharpnessGame ModeColorSet to an optimum picture quality suitable for the working environment.](https://usermanual.wiki/Samsung-Electronics-Co/LS27D85.SD850-WW-BN46-00424A-X2Eng-40519-00/User-Guide-2281104-Page-45.png)
![46Screen Setup33 Screen SetupWhen the external input is connected through DVI/HDMI/DP and PC/AV Mode is set to AV, Bright has four automatic picture settings (Dynamic, Standard, Movie and Custom) that are preset at the factory. You can activate either Dynamic, Standard, Movie or Custom. You can select Custom which automatically recalls your personalized picture settings.zDynamic: Select this mode to view a sharper image than in Standard mode.zStandard: Select this mode when the surroundings are bright. This also provides a sharp image.zMovie: Select this mode when the surroundings are dark. This will save power and reduce eye fatigue.zCustom: Select this mode when you want to adjust the image according to your preferences.4Press [ ] to move to the option you want and press [ ].5The selected option will be applied.1007560505022000 1007560CustomOffOffWideDynamicStandardMovieCustomSAMSUNGMAGICBrightSAMSUNGMAGICUpscalePictureBrightnessContrastSharpnessGame ModeColorSet to an optimum picture quality suitable for the working environment.SAMSUNGMAGIC](https://usermanual.wiki/Samsung-Electronics-Co/LS27D85.SD850-WW-BN46-00424A-X2Eng-40519-00/User-Guide-2281104-Page-46.png)
![47Screen Setup33 Screen Setup3.6 SAMSUNG MAGIC UpscaleUpscale function can enhance the layers of the picture details and the vividness of the picture. zThe function has more obvious effects on low-resolution pictures.zThis menu is not available when Bright is in Cinema or Dynamic Contrast mode.zThis menu is not available when Game Mode is enabled. 3.6.1 Configuring SAMSUNG MAGIC Upscale1Press any button on the front of the product to display the Function Key Guide. Next, press [ ] to display the corresponding menu screen. 2Press [ ] to move to Picture and press [ ] on the product.3Press [ ] to move to Upscale and press [ ] on the product. The following screen will appear.Comparing with Mode1, Mode2 has a stronger effect.4Press [ ] to move to the option you want and press [ ].5The selected option will be applied.SAMSUNGMAGICSAMSUNGMAGICSAMSUNGMAGICPicture 1007560CustomOffOffWideOffMode1Mode2BrightnessContrastSharpnessGame ModeColorSAMSUNGMAGICBrightSAMSUNGMAGICUpscaleEnhance picture detail and vividness.](https://usermanual.wiki/Samsung-Electronics-Co/LS27D85.SD850-WW-BN46-00424A-X2Eng-40519-00/User-Guide-2281104-Page-47.png)
![48Screen Setup33 Screen Setup3.7 ColorA detailed description of each function is provided. Refer to your product for details. zAdjust the tint of the screen. This menu is not available when Bright is set to Cinema or Dynamic Contrast mode.zThis menu is not available when Game Mode is enabled.zNot available when PIP/PBP Mode is set to On. 3.7.1 Configuring Color1Press any button on the front of the product to display the Function Key Guide. Next, press [ ] to display the corresponding menu screen. 2Press [ ] to move to Picture and press [ ] on the product.3Press [ ] to move to Color and press [ ] on the product. The following screen will appear.zRed: Adjust the red saturation level. Values closer to 100 mean greater intensity for the color.zGreen: Adjust the green saturation level. Values closer to 100 mean greater intensity for the color.zBlue: Adjust the blue saturation level. Values closer to 100 mean greater intensity for the color.zColor Tone: Select a color tone that best suits your viewing needs.Cool 2: Set the color temperature to be cooler than Cool 1.Cool 1: Set the color temperature to be cooler than Normal mode.Normal: Display the standard color tone.Warm 1: Set the color temperature to be warmer than Normal mode.SAMSUNGMAGIC1007560OffCustomOffWide SAMSUNGMAGICBrightSAMSUNGMAGICUpscalePictureBrightnessContrastSharpnessGame ModeColor1007560 OffCustomOffConfigure color settings.Color RedGreenBlueColor ToneGamma505050NormalMode1Adjust the red saturation level. Values closer to 100 mean greater intensity for the color.](https://usermanual.wiki/Samsung-Electronics-Co/LS27D85.SD850-WW-BN46-00424A-X2Eng-40519-00/User-Guide-2281104-Page-48.png)
![49Screen Setup33 Screen SetupWarm 2: Set the color temperature to be warmer than Warm 1.Custom: Customize the color tone. When the external input is connected through DVI/HDMI/DP and PC/AV Mode is set to AV, Color Tone has four color temperature settings (Cool, Normal, Warm and Custom). zGamma: Adjust the middle level of luminance.Mode1Mode2Mode34Press [ ] to move to the option you want and press [ ].5The selected option will be applied.](https://usermanual.wiki/Samsung-Electronics-Co/LS27D85.SD850-WW-BN46-00424A-X2Eng-40519-00/User-Guide-2281104-Page-49.png)
![50Screen Setup33 Screen Setup3.8 HDMI Black LevelIf a DVD player or set-top box is connected to the product via HDMI, image quality degradation (contrast/color degradation, black level, etc.) may occur, depending on the connected source device. In such case, HDMI Black Level can be used to adjust the image quality. If this is the case, correct the degraded picture quality using HDMI Black Level. zThis function is only available in HDMI mode.zNot available when PIP/PBP Mode is set to On. 3.8.1 Configuring the HDMI Black Level Settings1Press any button on the front of the product to display the Function Key Guide. Next, press [ ] to display the corresponding menu screen. 2Press [ ] to move to Picture and press [ ] on the product.3Press [ ] to move to HDMI Black Level and press [ ] on the product. The following screen will appear.zNormal: Select this mode when there is no contrast ratio degradation.zLow: Select this mode to reduce the black level and increase the white level when there is a contrast ratio degradation.4Press [ ] to move to the option you want and press [ ].5The selected option will be applied. HDMI Black Level may not be compatible with some source devices. NormalLowPictureHDMI Black LevelResponse TimeOptimize HDMI picture brightness and contrast by adjusting the black level of the video signal.](https://usermanual.wiki/Samsung-Electronics-Co/LS27D85.SD850-WW-BN46-00424A-X2Eng-40519-00/User-Guide-2281104-Page-50.png)
![51Screen Setup33 Screen Setup3.9 Response TimeAccelerate the panel response rate to make video appear more vivid and natural. It is best to set Response Time to Standard or Faster when you are not viewing a movie. 3.9.1 Configuring the Response Time1Press any button on the front of the product to display the Function Key Guide. Next, press [ ] to display the corresponding menu screen. 2Press [ ] to move to Picture and press [ ] on the product.3Press [ ] to move to Response Time and press [ ] on the product. The following screen will appear.4Press [ ] to move to the option you want and press [ ].5The selected option will be applied. StandardFasterFastestPictureHDMI Black LevelResponse TimeAccelerate the panel response rate to make video appear more vivid and natural.](https://usermanual.wiki/Samsung-Electronics-Co/LS27D85.SD850-WW-BN46-00424A-X2Eng-40519-00/User-Guide-2281104-Page-51.png)
![524 Screen Adjustment4 Screen Adjustment4.1 Image SizeChange the picture size. This menu is not available when PIP/PBP Mode is set to On and the Size is set to (PBP Mode). 4.1.1 Changing the Image Size1Press any button on the front of the product to display the Function Key Guide. Next, press [ ] to display the corresponding menu screen. 2Press [ ] to move to Screen and press [ ] on the product.3Press [ ] to move to Image Size and press [ ] on the product. The following screen will appear.zAuto: Display the picture according to the aspect ratio of the input source.zWide: Display the picture in full screen regardless of the aspect ratio of the input source.z4:3: Display the picture with an aspect ratio of 4:3. Suitable for videos and standard broadcasts.z16:9: Display the picture with an aspect ratio of 16:9.zScreen Fit: Display the picture with the original aspect ratio without cutting off. zChanging the screen size is available when the following conditions are satisfied.zThe function may not be supported depending on the ports provided with the product.In PC modeIn AV modeScreen 10075Choose the size and aspect ratio of the picture displayed on screen.AutoWideImage SizeH-PositionV-PositionPIP/PBPScreen 100754:316:9Screen FitImage SizeH-PositionV-PositionPIP/PBPChoose the size and aspect ratio of the picture displayed on screen.](https://usermanual.wiki/Samsung-Electronics-Co/LS27D85.SD850-WW-BN46-00424A-X2Eng-40519-00/User-Guide-2281104-Page-52.png)
![53Screen Adjustment44 Screen AdjustmentA digital output device is connected using the DVI/HDMI/DP cable.The input signal is 480p, 576p, 720p, or 1080p and monitor can display normally (Not every model can support all of these signals.).This can only be set when the external input is connected through DVI/HDMI/DP and PC/AV Mode is set to AV. 4Press [ ] to move to the option you want and press [ ].5The selected option will be applied.](https://usermanual.wiki/Samsung-Electronics-Co/LS27D85.SD850-WW-BN46-00424A-X2Eng-40519-00/User-Guide-2281104-Page-53.png)
![54Screen Adjustment44 Screen Adjustment4.2 H-Position & V-PositionH-Position: Move the screen to the left or right.V-Position: Move the screen up or down. zThis menu is only available when Image Size is set to Screen Fit in AV Mode. When a 480P or 576P or 720P or 1080P signal is input in AV mode and the monitor can display normally, select Screen Fit to adjust horizontal position in 0-6 levels.zNot available when PIP/PBP Mode is set to On. 4.2.1 Configuring H-Position & V-Position1Press any button on the front of the product to display the Function Key Guide. Next, press [ ] to display the corresponding menu screen. 2Press [ ] to move to Screen and press [ ] on the product.3Press [ ] to move to H-Position or V-Position, and press [ ]. The following screen will appear.4Press [ ] to configure H-Position or V-Position.5The selected option will be applied.Screen Screen Fit33Image SizeH-PositionV-PositionPIP/PBPMove the image displayed on the screen to the left or right.Screen Screen Fit33Image SizeH-PositionV-PositionPIP/PBPMove the image displayed on the screen up or down.](https://usermanual.wiki/Samsung-Electronics-Co/LS27D85.SD850-WW-BN46-00424A-X2Eng-40519-00/User-Guide-2281104-Page-54.png)
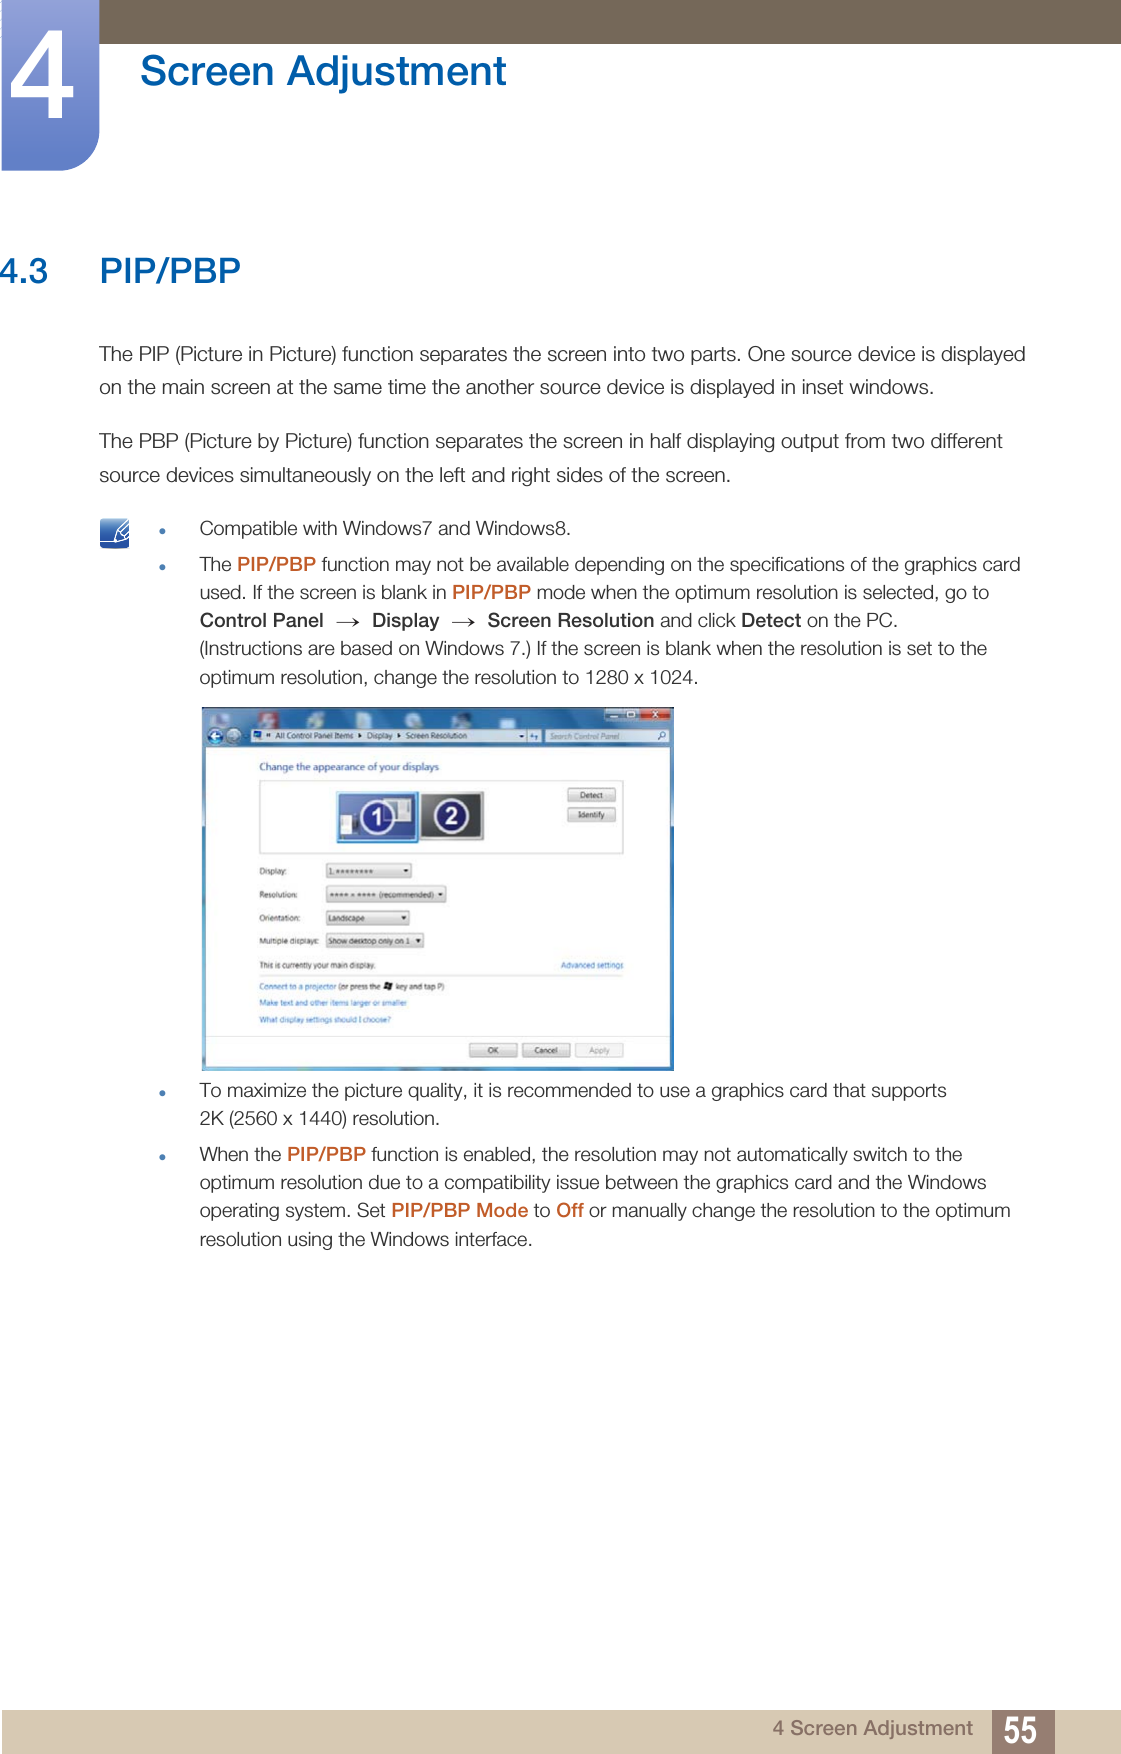
![56Screen Adjustment44 Screen Adjustment4.3.1 Configuring PIP/PBP ModeEnable or disable the PIP/PBP function.1Press any button on the front of the product to display the Function Key Guide. Next, press [ ] to display the corresponding menu screen. 2Press [ ] to move to Screen and press [ ] on the product.3Press [ ] to move to PIP/PBP and press [ ] on the product.4Press [ ] to move to PIP/PBP Mode and press [ ] on the product.The following screen will appear.zOff / On5Press [ ] to move to the option you want and press [ ].6The selected option will be applied.Screen Screen Fit33Image SizeH-PositionV-PositionPIP/PBPConfigure the settings for using Picture in Picture/Picture by Picture.PIP/PBP OffOffOnPIP/PBP ModeSizePositionSound SourceSourceImage SizeContrastTurn PIP/PBP Mode on or off.PIP/PBP 2QOffOnPIP/PBP ModeSizePositionSound SourceSourceImage SizeContrastTurn PIP/PBP Mode on or off.75/75](https://usermanual.wiki/Samsung-Electronics-Co/LS27D85.SD850-WW-BN46-00424A-X2Eng-40519-00/User-Guide-2281104-Page-56.png)
![57Screen Adjustment44 Screen Adjustment4.3.2 Configuring SizeSelect the size and aspect ratio of the sub-screen.1Press any button on the front of the product to display the Function Key Guide. Next, press [ ] to display the corresponding menu screen. 2Press [ ] to move to Screen and press [ ] on the product.3Press [ ] to move to PIP/PBP and press [ ] on the product.4Press [ ] to move to Size and press [ ] on the product.The following screen will appear.z: Select the icon image if you want to use PBP mode where the optimum resolution for the left and right sides of the screen is 1280 x 1440 (width x height).z: Select the icon image if you want to use PIP mode where the optimum resolution for the sub-screen is 720 x 480 (width x height).z: Select the icon image if you want to use PIP mode where the optimum resolution of the sub-screen is 1280 x 720 (width x height).5Press [ ] to move to the option you want and press [ ].6The selected option will be applied.PIP/PBP PIP/PBP ModeSizePositionSound SourceSourceImage SizeContrast 75/75Select the size and aspect ratio of the sub-screen.](https://usermanual.wiki/Samsung-Electronics-Co/LS27D85.SD850-WW-BN46-00424A-X2Eng-40519-00/User-Guide-2281104-Page-57.png)
![58Screen Adjustment44 Screen Adjustment4.3.3 Configuring PositionSelect the position of the sub-screen from the available options.1Press any button on the front of the product to display the Function Key Guide. Next, press [ ] to display the corresponding menu screen. 2Press [ ] to move to Screen and press [ ] on the product.3Press [ ] to move to PIP/PBP and press [ ] on the product.4Press [ ] to move to Position and press [ ] on the product.The following screen will appear.z / / / 5Press [ ] to move to the option you want and press [ ].6The selected option will be applied. zNot available when PBP is selected.zThe screen may flicker if the input signal is unstable. PIP/PBP 2QPIP/PBP ModeSizePositionSound SourceSourceImage SizeContrastSelect the position of the sub-screen from the available options.](https://usermanual.wiki/Samsung-Electronics-Co/LS27D85.SD850-WW-BN46-00424A-X2Eng-40519-00/User-Guide-2281104-Page-58.png)
![59Screen Adjustment44 Screen Adjustment4.3.4 Configuring Sound SourceSet which screen you want to hear the sound for.1Press any button on the front of the product to display the Function Key Guide. Next, press [ ] to display the corresponding menu screen. 2Press [ ] to move to Screen and press [ ] on the product.3Press [ ] to move to PIP/PBP and press [ ] on the product.4Press [ ] to move to Sound Source and press [ ] on the product.The following screen will appear. The white area of the icon means that the Sound Source comes from the main screen/sub-screen or the left/right screen. z / z / 5Press [ ] to move to the option you want and press [ ].6The selected option will be applied.PIPPBPPIP/PBP PIP/PBP ModeSizePositionSound SourceSourceImage SizeContrast2QSet which screen you want to hear the sound for.PIP/PBP PIP/PBP ModeSizePositionSound SourceSourceImage SizeContrast2Q75/75Set which screen you want to hear the sound for.](https://usermanual.wiki/Samsung-Electronics-Co/LS27D85.SD850-WW-BN46-00424A-X2Eng-40519-00/User-Guide-2281104-Page-59.png)
![60Screen Adjustment44 Screen Adjustment4.3.5 Configuring SourceSelect the source for each screen.PIP1Press any button on the front of the product to display the Function Key Guide. Next, press [ ] to display the corresponding menu screen. 2Press [ ] to move to Screen and press [ ] on the product.3Press [ ] to move to PIP/PBP and press [ ] on the product.4Press [ ] to move to Source and press [ ] (available in PIP mode (Size / )).The following screen will appear.zDVIzHDMIzDisplayPort5Press [ ] to move to the option you want and press [ ].6The selected option will be applied. zThe input source for the main screen changes.zWith the exception of the current input source, the other two input sources can be selected.zThe screen may flicker if the input signal is unstable.zIf the function button description page appears, press []. The main screen will switch in the order DVI HDMI DisplayPort. PIP/PBP 2QPIP/PBP ModeSizePositionSound SourceSourceImage SizeContrastHDMIDisplayPortSelect the source for each screen.→ →](https://usermanual.wiki/Samsung-Electronics-Co/LS27D85.SD850-WW-BN46-00424A-X2Eng-40519-00/User-Guide-2281104-Page-60.png)
![61Screen Adjustment44 Screen AdjustmentPBP1Press any button on the front of the product to display the Function Key Guide. Next, press [ ] to display the corresponding menu screen. 2Press [ ] to move to Screen and press [ ] on the product.3Press [ ] to move to PIP/PBP and press [ ] on the product.4Press [ ] to move to Source and press [ ] (available in PBP mode (Size )).The following screen will appear.zDVIzHDMIzDisplayPort56Press [ ] to move to Apply and press [ ] on the product. Pressing [ ] when Cancel is selected will clear the Source settings and display the PIP/PBP control menu page. zThe input source for the main screen changes.zThe screen may flicker if the input signal is unstable.zWhen the input signal of the left and right screens are the same, the operation cannot be performed.zIf the function button description page appears, press []. The main screen will switch in the order DVI HDMI DisplayPort. PIP/PBP 2QPIP/PBP ModeSizePositionSound SourceSourceImage SizeContrast 75/75Select the source for each screen.Source ApplyCancelHDMI DisplayPort→ → Press []to choose the left/right external input source.](https://usermanual.wiki/Samsung-Electronics-Co/LS27D85.SD850-WW-BN46-00424A-X2Eng-40519-00/User-Guide-2281104-Page-61.png)
![62Screen Adjustment44 Screen Adjustment4.3.6 Configuring Image SizeSelect the image size for sub-screen.PIP1Press any button on the front of the product to display the Function Key Guide. Next, press [ ] to display the corresponding menu screen. 2Press [ ] to move to Screen and press [ ] on the product.3Press [ ] to move to PIP/PBP and press [ ] on the product.4Press [ ] to move to Image Size and press [ ] (available in PIP mode (Size / )).The following screen will appear.zAuto: Display the picture according to the aspect ratio of the each screen input source.zWide: Display the picture in full screen regardless of the aspect ratio of the each screen input source.In PC modePIP/PBP 2QAutoWidePIP/PBP ModeSizePositionSound SourceSourceImage SizeContrastSelect the image size for each screen.](https://usermanual.wiki/Samsung-Electronics-Co/LS27D85.SD850-WW-BN46-00424A-X2Eng-40519-00/User-Guide-2281104-Page-62.png)
![63Screen Adjustment44 Screen Adjustmentz4:3: Display the picture of the sub-screen with an aspect ratio of 4:3. Suitable for videos and standard broadcasts.z16:9: Display the picture of the sub-screen with an aspect ratio of 16:9.zScreen Fit: Display the picture of the sub-screen with the original aspect ratio without cutting anything off. zThe function may not be supported depending on the ports provided with the product.zChanging the screen size is available when the following conditions are satisfied.A digital output device is connected using the DVI/HDMI/DP cable.The input signal is 480p, 576p, 720p, or 1080p and monitor can display normally (Not every model can support all of these signals.).This can only be set when the external input is connected through DVI/HDMI/DP and PC/AV Mode is set to AV. 5Press [ ] to move to the option you want and press [ ].6The selected option will be applied.In AV modePIP/PBP 2QPIP/PBP ModeSizePositionSound SourceSourceImage SizeContrast4:316:9Screen FitSelect the image size for each screen.](https://usermanual.wiki/Samsung-Electronics-Co/LS27D85.SD850-WW-BN46-00424A-X2Eng-40519-00/User-Guide-2281104-Page-63.png)
![64Screen Adjustment44 Screen AdjustmentPBP1Press any button on the front of the product to display the Function Key Guide. Next, press [ ] to display the corresponding menu screen. 2Press [ ] to move to Screen and press [ ] on the product.3Press [ ] to move to PIP/PBP and press [ ] on the product.4Press [ ] to move to Image Size and press [ ] (available in PBP mode (Size )).The following screen will appear.zAuto: Display the picture according to the aspect ratio of the each screen input source.zWide: Display the picture in full screen regardless of the aspect ratio of the each screen input source.In PC modePIP/PBP 2QPIP/PBP ModeSizePositionSound SourceSourceImage SizeContrast 75/75Select the image size for each screen.Image Size ApplyCancelAuto Auto](https://usermanual.wiki/Samsung-Electronics-Co/LS27D85.SD850-WW-BN46-00424A-X2Eng-40519-00/User-Guide-2281104-Page-64.png)
![65Screen Adjustment44 Screen Adjustmentz4:3: Display the picture of the sub-screen with an aspect ratio of 4:3. Suitable for videos and standard broadcasts.z16:9: Display the picture of the sub-screen with an aspect ratio of 16:9.zScreen Fit: Display the picture of the sub-screen with the original aspect ratio without cutting anything off. zThe function may not be supported depending on the ports provided with the product.zChanging the screen size is available when the following conditions are satisfied.A digital output device is connected using the DVI/HDMI/DP cable.The input signal is 480p, 576p, 720p, or 1080p and monitor can display normally (Not every model can support all of these signals.).This can only be set when the external input is connected through DVI/HDMI/DP and PC/AV Mode is set to AV. 5Press [ ] to move to the option you want and press [ ].6The selected option will be applied.In AV modeImage Size ApplyCancel16:9 16:9](https://usermanual.wiki/Samsung-Electronics-Co/LS27D85.SD850-WW-BN46-00424A-X2Eng-40519-00/User-Guide-2281104-Page-65.png)
![66Screen Adjustment44 Screen Adjustment4.3.7 Configuring ContrastPIPAdjust the contrast level for sub-screen.1Press any button on the front of the product to display the Function Key Guide. Next, press [ ] to display the corresponding menu screen. 2Press [ ] to move to Screen and press [ ] on the product.3Press [ ] to move to PIP/PBP and press [ ] on the product.4Press [ ] to move to Contrast and press [ ] (available in PIP mode (Size / )).The following screen will appear.5Adjust the Contrast using the [ ] buttons.6The selected option will be applied.PIP/PBP 2QPIP/PBP ModeSizePositionSound SourceSourceImage SizeContrastAdjust the contrast level for each screen.](https://usermanual.wiki/Samsung-Electronics-Co/LS27D85.SD850-WW-BN46-00424A-X2Eng-40519-00/User-Guide-2281104-Page-66.png)
![67Screen Adjustment44 Screen AdjustmentPBPAdjust the contrast level for each screen.1Press any button on the front of the product to display the Function Key Guide. Next, press [ ] to display the corresponding menu screen. 2Press [ ] to move to Screen and press [ ] on the product.3Press [ ] to move to PIP/PBP and press [ ] on the product.4Press [ ] to move to Contrast and press [ ] (available in PBP mode (Size )).The following screen will appear.5Adjust the Contrast using the [ ] buttons.6The selected option will be applied.PIP/PBP 2QPIP/PBP ModeSizePositionSound SourceSourceImage SizeContrast 75/75Adjust the contrast level for each screen.Contrast 75](https://usermanual.wiki/Samsung-Electronics-Co/LS27D85.SD850-WW-BN46-00424A-X2Eng-40519-00/User-Guide-2281104-Page-67.png)
![685 Coordinating OSD5 Coordinating OSDA detailed description of each function is provided. Refer to your product for details.5.1 LanguageSet the menu language. zA change to the language setting will only be applied to the onscreen menu display.zIt will not be applied to other functions on your PC. 5.1.1 Configuring Language1Press any button on the front of the product to display the Function Key Guide. Next, press [ ] to display the corresponding menu screen. 2Press [ ] to move to Options and press [ ] on the product. 3Press [ ] to move to Language and press [ ] on the product. The following screen will appear.4Press [ ] to move to the language you want and press [ ]. 5The selected option will be applied.Options DeutschEnglishEspañolFrançaisItalianoLanguageDisplay TimeTransparency Set the menu language.](https://usermanual.wiki/Samsung-Electronics-Co/LS27D85.SD850-WW-BN46-00424A-X2Eng-40519-00/User-Guide-2281104-Page-68.png)
![69Coordinating OSD55 Coordinating OSD5.2 Display TimeSet the on-screen display (OSD) menu to automatically disappear if the menu is not used for a specified period of time.Display Time can be used to specify the time after which you want the OSD menu to disappear.5.2.1 Configuring Display Time1Press any button on the front of the product to display the Function Key Guide. Next, press [ ] to display the corresponding menu screen. 2Press [ ] to move to Options and press [ ] on the product.3Press [ ] to move to Display Time and press [ ] on the product. The following screen will appear.4Press [ ] to move to the option you want and press [ ]. 5The selected option will be applied.Options English100220 secOn5 sec10 sec20 sec200 secSet how long the menu window will remain on screen for when it is not in use.LanguageDisplay TimeTransparency](https://usermanual.wiki/Samsung-Electronics-Co/LS27D85.SD850-WW-BN46-00424A-X2Eng-40519-00/User-Guide-2281104-Page-69.png)
![70Coordinating OSD55 Coordinating OSD5.3 TransparencySet the transparency for the menu windows.5.3.1 Changing Transparency1Press any button on the front of the product to display the Function Key Guide. Next, press [ ] to display the corresponding menu screen. 2Press [ ] to move to Options and press [ ] on the product.3Press [ ] to move to Transparency and press [ ] on the product. The following screen will appear.4Press [ ] to move to the option you want and press [ ]. 5The selected option will be applied.Options English220 secOnOffOnConfigure the transparency of the menu windows.LanguageDisplay TimeTransparency](https://usermanual.wiki/Samsung-Electronics-Co/LS27D85.SD850-WW-BN46-00424A-X2Eng-40519-00/User-Guide-2281104-Page-70.png)
![716 Setup and Reset6 Setup and Reset A detailed description of each function is provided. Refer to your product for details.6.1 ECOThe Eco Light Sensor and Eco Saving options are displayed on the same menu page so that you can conveniently configure the power saving settings.6.1.1 Eco Light SensorThe Eco Light Sensor feature optimizes the view condition and contributes to power saving by adjusting the screen brightness depending on the ambient light intensity. zThis menu is not available when Bright is in Dynamic Contrast mode.zThis menu is not available when Game Mode is enabled.zThis menu is not available when Eco Saving is set . Configuring Eco Light Sensor1Press any button on the front of the product to display the Function Key Guide. Next, press [ ] to display the corresponding menu screen. 2Press [ ] to move to Settings and press [ ] on the product.3Press [ ] to move to ECO and press [ ] on the product.4Press [ ] to move to Eco Light Sensor and press [ ] on the product.The following screen will appear.zOff: Deactivate the Eco Light Sensor function.zOn: Automatically adjust the brightness according to the ambient light intensity.5Press [ ] to move to the option you want and press [ ].6The selected option will be applied.SAMSUNGMAGIC SettingsECOUSB Super ChargingDisplayPort Ver.PC/AV ModeSource DetectionKey Repeat TimeOff Timer1.1AutoAccelerationSet the ECO mode for saving the power consumption. OffOffOffSensitivityBrightness Level Select the ECO light sensor mode.ECOOffOnEco Light SensorEco SavingEco Icon Display](https://usermanual.wiki/Samsung-Electronics-Co/LS27D85.SD850-WW-BN46-00424A-X2Eng-40519-00/User-Guide-2281104-Page-71.png)
![72Setup and Reset66 Setup and ResetConfiguring Sensitivity1Press any button on the front of the product to display the Function Key Guide. Next, press [ ] to display the corresponding menu screen. 2Press [ ] to move to Settings and press [ ] on the product.3Press [ ] to move to ECO and press [ ] on the product.4Press [ ] to move to Sensitivity and press [ ] on the product.The following screen will appear.zHigh: High sensitivity that maximizes the varying level of screen brightness depending on the ambient light intensity.zMedium: Intermediate sensitivity that sets a varying level of screen brightness between High and Low depending on the ambient light intensity.zLow: Low sensitivity that minimizes the varying level of screen brightness depending on the ambient light intensity.5Press [ ] to move to the option you want and press [ ].6The selected option will be applied. Select the sensitivity of ECO light sensor.ECOEco Light SensorEco SavingEco Icon DisplayHighMediumLowSensitivityBrightness Level](https://usermanual.wiki/Samsung-Electronics-Co/LS27D85.SD850-WW-BN46-00424A-X2Eng-40519-00/User-Guide-2281104-Page-72.png)
![73Setup and Reset66 Setup and ResetConfiguring Brightness Level1Press any button on the front of the product to display the Function Key Guide. Next, press [ ] to display the corresponding menu screen. 2Press [ ] to move to Settings and press [ ] on the product.3Press [ ] to move to ECO and press [ ] on the product.4Press [ ] to move to Brightness Level and press [ ] on the product.The following screen will appear.zBrighter: Increase the current brightness of the screen.zCurrent: Maintain the current brightness of the screen.zDimmer: Decrease the current brightness of the screen.5Press [ ] to move to the option you want and press [ ].6The selected option will be applied. Select the brightness level of ECO light sensor.OnଥࢿଥࢿECOEco Light SensorEco SavingEco Icon DisplayBrighterCurrentDimmerSensitivityBrightness Level](https://usermanual.wiki/Samsung-Electronics-Co/LS27D85.SD850-WW-BN46-00424A-X2Eng-40519-00/User-Guide-2281104-Page-73.png)
![74Setup and Reset66 Setup and Reset6.1.2 Eco SavingThe Eco Saving function reduces power consumption by controlling the electric current used by the monitor panel. zThis menu is not available when Bright is in Dynamic Contrast mode.zThis menu is not available when Game Mode is enabled.zThis menu is not available when Eco Light Sensor is set. Configuring Eco Saving1Press any button on the front of the product to display the Function Key Guide. Next, press [ ] to display the corresponding menu screen. 2Press [ ] to move to Settings and press [ ] on the product.3Press [ ] to move to ECO and press [ ] on the product.4Press [ ] to move to Eco Saving and press [ ] on the product.The following screen will appear.zOff: Deactivate the Eco Saving function.zMinimum: Change the monitor power consumption to 75% of the default level.zMaximum: Change the monitor power consumption to 50% of the default level.5Press [ ] to move to the option you want and press [ ].6The selected option will be applied.SAMSUNGMAGIC OffOffOffSensitivityBrightness Level Adjust the power consumption of the product to save energy.ECOOffMinimumMaximumEco Light SensorEco SavingEco Icon Display](https://usermanual.wiki/Samsung-Electronics-Co/LS27D85.SD850-WW-BN46-00424A-X2Eng-40519-00/User-Guide-2281104-Page-74.png)
![75Setup and Reset66 Setup and Reset6.1.3 Eco Icon DisplayConfiguring Eco Icon Display1Press any button on the front of the product to display the Function Key Guide. Next, press [ ] to display the corresponding menu screen. 2Press [ ] to move to Settings and press [ ] on the product.3Press [ ] to move to ECO and press [ ] on the product.4Press [ ] to move to Eco Icon Display and press [ ] on the product.The following screen will appear.zOff: Disable the Eco Icon Display function.zOn: Display the operation status of the Eco sensor as a pop-up guide.5Press [ ] to move to the option you want and press [ ].6The selected option will be applied.NoteszIf the screen brightness is adjusted according to the ambient light intensity when the Eco Light Sensor is on, a pop-up as shown above will appear showing the adjusting screen brightness.zIf the screen becomes brighter as the ambient light becomes brighter, the brightness slide bar level will increase with a sun image displayed. If the screen becomes darker, the brightness slide bar level will decrease with a moon image displayed. The brightness slide bar will be displayed for 3 seconds after the sensor activates. OffOffSensitivityBrightness Level Select the ECO Icon mode.ECOOffOnEco Light SensorEco SavingEco Icon DisplayEco Light Sensor Activated Eco Light Sensor ActivatedOn Check/No Signal status, Warning OSD is not workedz](https://usermanual.wiki/Samsung-Electronics-Co/LS27D85.SD850-WW-BN46-00424A-X2Eng-40519-00/User-Guide-2281104-Page-75.png)
![76Setup and Reset66 Setup and Reset6.2 USB Super ChargingCharge the battery of a connected source device quickly using the USB 3.0 port on the product. zSetting USB Super Charging to On during a data transfer will stop the data transfer. If you set USB Super Charging to Off, the standard charging and data transfer feature will be available.zHigh-speed charging is possible using the [ ] and [ ] ports only. These ports charge devices faster than typical USB ports. The speed depends on the connected devices. 6.2.1 Configuring USB Super Charging1Press any button on the front of the product to display the Function Key Guide. Next, press [ ] to display the corresponding menu screen. 2Press [ ] to move to Settings and press [ ] on the product.3Press [ ] to move to USB Super Charging and press [ ] on the product.4Press [ ] to move to USB Super Charging, USB1 or USB2 and press [ ] on the product.The following screen will appear.12 SettingsECOUSB Super ChargingDisplayPort Ver.PC/AV ModeSource DetectionKey Repeat TimeOff Timer1.1AutoAccelerationSet the USB Super charging mode.USB Super Charging OffOnUSB Super ChargingUSB1USB2 Set the USB Super charging mode.USB Super Charging OffOnUSB Super ChargingUSB1USB2 Set the USB Port1 charging On/Off.](https://usermanual.wiki/Samsung-Electronics-Co/LS27D85.SD850-WW-BN46-00424A-X2Eng-40519-00/User-Guide-2281104-Page-76.png)
![77Setup and Reset66 Setup and ResetzOff: Disable USB Super Charging.zOn: Enable the function to quickly charge a source device connected to the USB 3.0 port.5Press [ ] to move to the option you want and press [ ].6The selected option will be applied.](https://usermanual.wiki/Samsung-Electronics-Co/LS27D85.SD850-WW-BN46-00424A-X2Eng-40519-00/User-Guide-2281104-Page-77.png)
![78Setup and Reset66 Setup and Reset6.3 DisplayPort Ver.Select your Displayport. Displayport 1.1 supports High Bit Rate 1, while 1.2 supports High Bit Rate 2. zIncorrect settings may cause the screen to go blank. If this occurs, check the device specifications. zIf the monitor (when set to DVI, HDMI or DisplayPort) is in power saving mode or is displaying the message Check Signal Cable, press the [ ] button to display the On Screen Display (OSD). You can select 1.1 or 1.2. 6.3.1 Configuring DisplayPort Ver.1Press any button on the front of the product to display the Function Key Guide. Next, press [ ] to display the corresponding menu screen. 2Press [ ] to move to Settings and press [ ] on the product.3Press [ ] to move to DisplayPort Ver. and press [ ] on the product.The following screen will appear.z1.1 / 1.24Press [ ] to move to the option you want and press [ ].5The selected option will be applied. Settings1.1AutoAccelerationSelect your Displayport. Displayport 1.1 supports HBR 1, while 1.2 supports HBR 2. 1.11.2ECOUSB Super ChargingDisplayPort Ver.PC/AV ModeSource DetectionKey Repeat TimeOff Timer](https://usermanual.wiki/Samsung-Electronics-Co/LS27D85.SD850-WW-BN46-00424A-X2Eng-40519-00/User-Guide-2281104-Page-78.png)
![79Setup and Reset66 Setup and Reset6.4 PC/AV ModeSet PC/AV Mode to AV. The picture size will be enlarged. This option is useful when you view a movie. zSupplied for the wide models only such as 16:9 or 16:10.zIf the monitor (when set to DVI, HDMI or DisplayPort) is in power saving mode or is displaying the message Check Signal Cable, press the [ ] button to display the On Screen Display(OSD). You can select PC or AV. 6.4.1 Configuring PC/AV Mode1Press any button on the front of the product to display the Function Key Guide. Next, press [ ] to display the corresponding menu screen. 2Press [ ] to move to Settings and press [ ] on the product.3Press [ ] to move to PC/AV Mode and press [ ] on the product. 4Press [ ] to move to DVI, HDMI or DisplayPort and press [ ] on the product. The following screen will appear. Settings1.1AutoAccelerationSet to AV to enlarge the picture.ECOUSB Super ChargingDisplayPort Ver.PC/AV ModeSource DetectionKey Repeat TimeOff TimerPC/AV Mode PCAVDVIHDMIDisplayPort Select the PC/AV mode for the DVI source.](https://usermanual.wiki/Samsung-Electronics-Co/LS27D85.SD850-WW-BN46-00424A-X2Eng-40519-00/User-Guide-2281104-Page-79.png)
![80Setup and Reset66 Setup and ResetzSet to PC when connected to a PC.zSet to AV when connected to an AV device.zIn order to hear the sound when connected to a PC with HDMI to DVI cable, please connect audio cable, and set PC/AV Mode to DVI PC.5Press [ ] to move to the option you want and press [ ].6The selected option will be applied.PC/AV Mode DVIHDMIDisplayPort PCAVDVI PCSelect the PC/AV mode for the HDMI source.PC/AV Mode Select the PC/AV mode for the DisplayPort source.PCAVPCDVIHDMIDisplayPort](https://usermanual.wiki/Samsung-Electronics-Co/LS27D85.SD850-WW-BN46-00424A-X2Eng-40519-00/User-Guide-2281104-Page-80.png)
![81Setup and Reset66 Setup and Reset6.5 Source DetectionYou can activate Source Detection. Not available when PIP/PBP Mode is set to On. 6.5.1 Configuring Source Detection1Press any button on the front of the product to display the Function Key Guide. Next, press [ ] to display the corresponding menu screen. 2Press [ ] to move to Settings and press [ ] on the product.3Press [ ] to move to Source Detection and press [ ] on the product.The following screen will appear.zAuto: The input source is automatically recognized.zManual: Manually select an input source.4Press [ ] to move to the option you want and press [ ].5The selected option will be applied. Settings1.1AutoAccelerationDecide how input sources will be detected.AutoManualECOUSB Super ChargingDisplayPort Ver.PC/AV ModeSource DetectionKey Repeat TimeOff Timer](https://usermanual.wiki/Samsung-Electronics-Co/LS27D85.SD850-WW-BN46-00424A-X2Eng-40519-00/User-Guide-2281104-Page-81.png)
![82Setup and Reset66 Setup and Reset6.6 Key Repeat TimeControl the response rate of a button when the button is pressed. 6.6.1 Configuring Key Repeat Time1Press any button on the front of the product to display the Function Key Guide. Next, press [ ] to display the corresponding menu screen. 2Press [ ] to move to Settings and press [ ] on the product.3Press [ ] to move to Key Repeat Time and press [ ] on the product. The following screen will appear.zAcceleration, 1 sec, or 2 sec can be selected. If No Repeat is selected, a command responds only once when a button is pressed.4Press [ ] to move to the option you want and press [ ].5The selected option will be applied. Settings1.1AutoAccelerationConfigure the response rate of a button when the button is pressed.Acceleration1 sec2 secNo RepeatECOUSB Super ChargingDisplayPort Ver.PC/AV ModeSource DetectionKey Repeat TimeOff Timer](https://usermanual.wiki/Samsung-Electronics-Co/LS27D85.SD850-WW-BN46-00424A-X2Eng-40519-00/User-Guide-2281104-Page-82.png)
![83Setup and Reset66 Setup and Reset6.7 Off TimerYou can set the product to automatically turn off.6.7.1 Configuring Off Timer1Press any button on the front of the product to display the Function Key Guide. Next, press [ ] to display the corresponding menu screen. 2Press [ ] to move to Settings and press [ ] on the product.3Press [ ] to move to Off Timer and press [ ] on the product. 4Press [ ] to move to Off Timer and press [ ] on the product. The following screen will appear.zOff: Deactivate the off timer so that the product does not power off automatically.zOn: Activate the off timer so that the product powers off automatically.5Press [ ] to move to the option you want and press [ ].6The selected option will be applied. Settings1.1AutoAccelerationEnable or disable the Off Timer.ECOUSB Super ChargingDisplayPort Ver.PC/AV ModeSource DetectionKey Repeat TimeOff Timer Off TimerOff TimerTurn Off After OffOnEnable or disable the Off Timer.](https://usermanual.wiki/Samsung-Electronics-Co/LS27D85.SD850-WW-BN46-00424A-X2Eng-40519-00/User-Guide-2281104-Page-83.png)
![84Setup and Reset66 Setup and Reset6.7.2 Configuring Turn Off After1Press any button on the front of the product to display the Function Key Guide. Next, press [ ] to display the corresponding menu screen. 2Press [ ] to move to Settings and press [ ] on the product.3Press [ ] to move to Off Timer and press [ ] on the product. 4Press [ ] to move to Turn Off After and press [ ] on the product. The following screen will appear. 5Press [ ] to configure Turn Off After.6The selected option will be applied. zThe off timer can be set within a range of 1 to 23 hours. The product will automatically power off after the specified number of hours.zThis option is only available when Off Timer is set to On.zFor products for the market in some regions, the Off Timer is set to automatically activate 4 hours after the product powers on. This is done in accordance with power supply regulations. If you do not want the timer to activate, go to MENU SETUP&RESET and set Off Timer to Off. Off TimerOff TimerTurn Off After On4hSet the monitor to automatically turn off after a certain time period.→](https://usermanual.wiki/Samsung-Electronics-Co/LS27D85.SD850-WW-BN46-00424A-X2Eng-40519-00/User-Guide-2281104-Page-84.png)
![85Setup and Reset66 Setup and Reset6.8 Reset All Return all the settings for the product to the default factory settings. The functions available on the monitor may vary depending on the model. Refer to the actual product. 6.8.1 Initializing Settings (Reset All)1Press any button on the front of the product to display the Function Key Guide. Next, press [ ] to display the corresponding menu screen. 2Press [ ] to move to Settings and press [ ] on the product.3Press [ ] to move to Reset All and press [ ] on the product. The following screen will appear.4Press [ ] to move to the option you want and press [ ].5The selected option will be applied. SettingsReturn all the settings for the product to the default factory settings.Reset All $OOWKHPHQXVHWWLQJVZLOOEHUHVHWWRGHIDXOW$UH\RXVXUH\RXZDQWWRUHVHW"<HV 1R](https://usermanual.wiki/Samsung-Electronics-Co/LS27D85.SD850-WW-BN46-00424A-X2Eng-40519-00/User-Guide-2281104-Page-85.png)
![867 Information Menu and Others7 Information Menu and OthersA detailed description of each function is provided. Refer to your product for details.7.1 InformationView the current input source, frequency and resolution.7.1.1 Displaying Information1Press any button on the front of the product to display the Function Key Guide. Next, press [ ] to display the corresponding menu screen. 2Press [ ] to move to Information. The current input source, frequency and resolution will appear.Information PictureScreenOptionsSettingsInformationDisplayPort**** x ******kHz **HzInformation PictureScreenOptionsSettingsInformationHDMI**** x ******kHz **HzDisplayPort**** x ******kHz **HzInformation PictureScreenOptionsSettingsInformationHDMI**** x ******kHz **HzDisplayPort**** x ******kHz **Hz](https://usermanual.wiki/Samsung-Electronics-Co/LS27D85.SD850-WW-BN46-00424A-X2Eng-40519-00/User-Guide-2281104-Page-86.png)
![87Information Menu and Others77 Information Menu and Others7.2 Configuring Brightness, Contrast and Volume from the Initial ScreenAdjust the Brightness, Contrast, Volume using the [ ] buttons when the initial screen (that displays no menu screen) is displayed. Brightness :zThis menu is not available when Bright is set to Dynamic Contrast mode.zThis menu is not available when Eco Light Sensor is enabled. Contrast :zThis option is not available when Bright is in Cinema or Dynamic Contrast mode.zThis menu is not available when Game Mode is enabled.zThis menu is not available when PIP/PBP Mode is set to On and the Size is set to (PBP Mode). 1Press any button on the front of the product (when no menu screen is displayed) to display the Function Key Guide. Next, press [ ]. The following screen will appear.2Press the [ ] button to alternate between the Brightness, Contrast and Volume settings.3Adjust the Brightness, Contrast, Volume using the [ ] buttons.SAMSUNGMAGICSAMSUNGMAGICBrightnessContrastVolume75](https://usermanual.wiki/Samsung-Electronics-Co/LS27D85.SD850-WW-BN46-00424A-X2Eng-40519-00/User-Guide-2281104-Page-87.png)

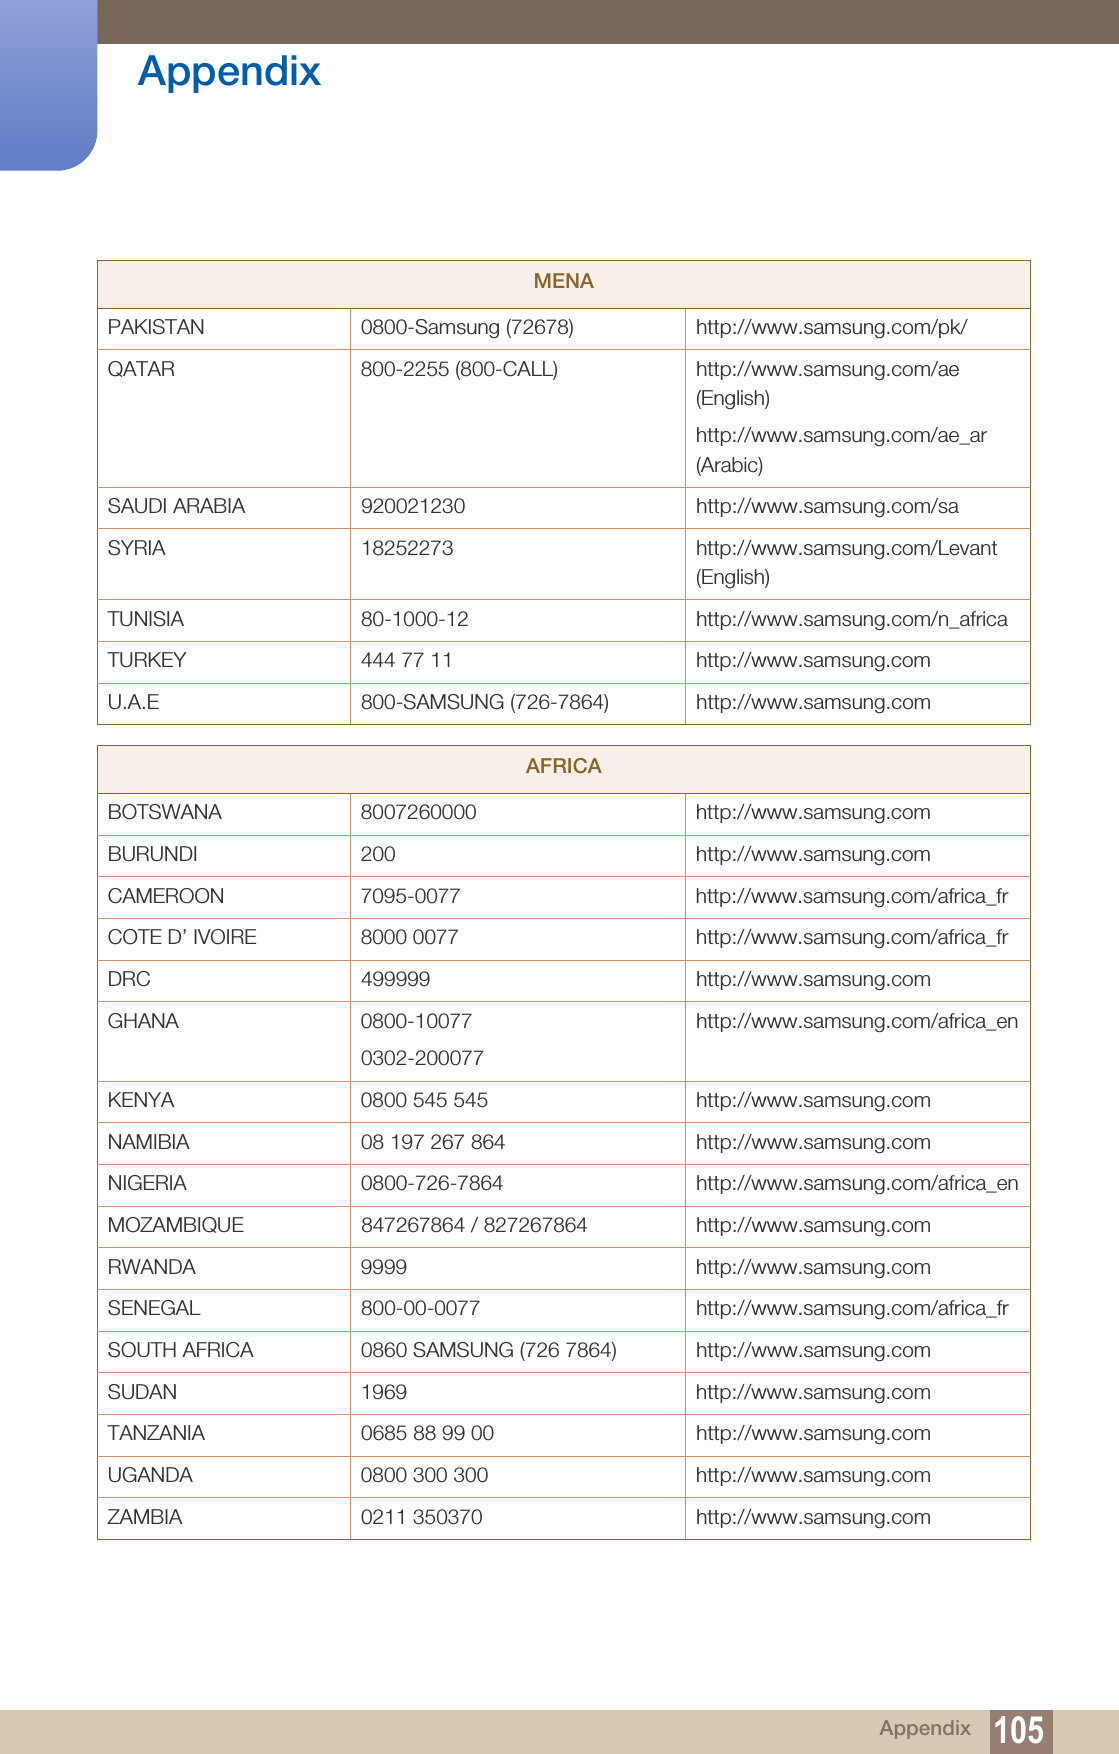
![104Appendix AppendixINDIA 1800 3000 82821800 266 8282http://www.samsung.com/inINDONESIA 0800-112-8888 (Toll Free)(021) 56997777http://www.samsung.com/idJAPAN 0120-327-527 http://www.samsung.comMALAYSIA 1800-88-9999 http://www.samsung.com/myNEW ZEALAND 0800 SAMSUNG (0800 726 786) http://www.samsung.com/nzPHILIPPINES 1-800-10-7267864 [PLDT]1-800-8-7267864 [Globe landlineand Mobile]02-4222111 [Other landline]http://www.samsung.com/phSINGAPORE 1800-SAMSUNG (726-7864) http://www.samsung.com/sgTAIWAN 0800-32-9999 http://www.samsung.com/twTHAILAND 0-2689-3232,1800-29-3232http://www.samsung.com/thVIETNAM 1800 588 889 http://www.samsung.comMENAALGERIA 0800 100 100 http://www.samsung.com/n_africaBAHRAIN 8000-4726 http://www.samsung.com/ae (English)http://www.samsung.com/ae_ar (Arabic)EGYPT 08000-726786 http://www.samsung.comIRAN 021-8255 http://www.samsung.comJORDAN 0800-2227306 5777444http://www.samsung.com/Levant (English)KUWAIT 183-2255 (183-CALL) http://www.samsung.com/ae (English)http://www.samsung.com/ae_ar (Arabic)MOROCCO 080 100 2255 http://www.samsung.comOMAN 800-SAMSUNG (726-7864) http://www.samsung.com/ae (English)http://www.samsung.com/ae_ar (Arabic)ASIA PACIFIC](https://usermanual.wiki/Samsung-Electronics-Co/LS27D85.SD850-WW-BN46-00424A-X2Eng-40519-00/User-Guide-2281104-Page-104.png)