Samsung Electronics Co ML6100 LASER PRINTER User Manual UGtest
Samsung Electronics Co Ltd LASER PRINTER UGtest
USER MANUAL

The Xerox
DocuPrint P14
Personal Laser Printer
User Guide

Copyright protection claimed includes all forms and
matters of copyrightable materials and information now
allowed by statutory or judicial law or hereinafter granted,
including without limitation, material generated from the
software programs which are displayed on the screen
such as styles, templates, icons, screen displays, looks, etc.
Printed in the United States of America.
XEROX® and all Xerox product names and product
numbers mentioned in this publication are registered
trademarks of the Xerox Corporation.
Other company trademarks are also acknowledged. PCL
and PCL 6 are trademarks of the Hewlett-Packard
Company. MS-DOS, Windows NT, Windows 95 and
Windows 98 are trademarks of Microsoft Corporation.
Adobe and PostScript are trademarks of Adobe Systems,
Inc. Macintosh, LocalTalk and TrueType are trademarks
of Apple Computer, Inc.
This printer contains an emulation of the Hewlett Packard
PCL 5e command language (recognized HP PCL 5e
commands) and processes these commands in a manner
compatible with Hewlett Packard LaserJet printer
products.
Changes are periodically made to this document.
Technical updates will be included in subsequent editions.
© 1998 by Xerox Corporation. All rights reserved.

Contents i
DocuPrint P14 User Guide
Chapter 1 Getting Started ..................................................
1-1
Introduction ...................................................................... 1-2
Printer Components......................................................... 1-3
Printer Features................................................................ 1-5
Printer Documentation .................................................... 1-6
Using the CD-ROM ....................................................... 1-7
Note, Caution and Warning Symbols ......................... 1-8
Printer Setup .................................................................... 1-9
Selecting a Location ..................................................... 1-9
Unpacking the Printer................................................. 1-10
Installing the Laser Print Cartridge............................ 1-11
Loading Paper ............................................................. 1-13
Connecting to the Computer ..................................... 1-16
Powering On the Printer............................................. 1-21
Installing Software...................................................... 1-22
Installing the PCL Driver............................................. 1-23
Installing the PostScript Driver.................................. 1-27
Installing the Remote Control Panel and
Status Monitor ............................................................ 1-30
DocuPrint P14 User Guide
Chapter 2 Loading Print Media .........................................
2-1
Selecting Print Media ...................................................... 2-2
Media Sizes and Capacities ......................................... 2-3
Basic Guidelines ........................................................... 2-4
Loading Print Media ........................................................ 2-6
Using Tray 1 or 2 .......................................................... 2-6
Using the MSF .............................................................. 2-9
Using the Rear Face Up Stacker ................................ 2-13
Duplex Printing ........................................................... 2-14
Chapter 3 Printing ................................................................
3-1
Printing a Document........................................................ 3-2
Configuring the PCL Driver ............................................. 3-3
Selecting Your Printer .................................................. 3-3
Setting Properties ......................................................... 3-4
Configuring the PostScript Driver .................................. 3-7
Using Printer Utilities ...................................................... 3-8
Status Monitor .............................................................. 3-8
Font Navigator .............................................................. 3-8
Remote Control Panel .................................................. 3-9
Using the Printer’s Control Panel ................................. 3-15
Indicator Lights ........................................................... 3-16
Control Panel Button .................................................. 3-21
Chapter 4 Maintaining the Printer ...................................
4-1
Replacing the Laser Print Cartridge................................ 4-2
Cleaning the Printer ......................................................... 4-5
Cleaning the Outside .................................................... 4-5
Cleaning the Inside ....................................................... 4-6
DocuPrint P14 User Guide
Chapter 5 Troubleshooting ................................................
5-1
Clearing Paper Jams........................................................ 5-2
Output Area................................................................... 5-4
Input Area...................................................................... 5-5
Inside the Printer........................................................... 5-6
In Optional Tray 2 ......................................................... 5-7
Solving Printing Problems .............................................. 5-9
Solving Print Quality Problems .................................... 5-14
Solving PostScript Problems ........................................ 5-17
Obtaining Service .......................................................... 5-18
Appendix A Printer Specifications .....................................
A-1
Appendix B Environmental and Safety Considerations
B-1
Introduction ......................................................................B-2
Laser Safety......................................................................B-3
Laser Safety for the United States and Canada .........B-4
Laser Safety for Finland and Sweden .........................B-5
Laser Statement (Laserturvallisuus) ...........................B-5
Ozone Safety ....................................................................B-6
Electrical Safety................................................................B-7
Radio Frequency Emissions..........................................B-10
United States and Canada .........................................B-10
Europe .........................................................................B-12
Operational Safety .........................................................B-14
Appendix C Certifications ..................................................... C-1
Quality Standards ............................................................C-2
Energy Star.......................................................................C-3
DocuPrint P14 User Guide
Appendix D Printer Options .................................................
D-1
Introduction ......................................................................D-2
Precautions.......................................................................D-3
Memory and PostScript SIMMs......................................D-4
Serial/LocalTalk Card .......................................................D-7
Paper Tray 2 ...................................................................D-10

Chapter 1: Getting Started ❖1-1
Getting Started Chapter1
Introduction .................................................................... 1-2
Printer Components ....................................................... 1-3
Printer Features .............................................................. 1-5
Printer Documentation .................................................. 1-6
Using the CD-ROM ..................................................... 1-7
Note, Caution and Warning Symbols ....................... 1-8
Printer Setup .................................................................. 1-9
Selecting a Location ................................................... 1-9
Unpacking the Printer ............................................... 1-10
Installing the Laser Print Cartridge .......................... 1-11
Loading Paper ........................................................... 1-13
Connecting to the Computer ................................... 1-16
Powering On the Printer ........................................... 1-21
Installing Software .................................................... 1-22
Installing the PCL Driver ........................................... 1-23
Installing the PostScript Driver ................................ 1-27

Introduction
1-2 ❖DocuPrint P14 User Guide
Introduction
In this chapter, you will become familiar with the features
of your printer and learn where to locate specific printer
parts.
Before you use your printer, make sure that you perform
all of the setup steps outlined in the Quick Reference Card
that came with your printer. For your convenience, the
installation instructions are also included in this chapter.
See the section “Printer Setup” (page 1-9).
Recognizing that you may have special needs, Xerox offers
several optional printer accessories to better meet your
requirements. These are explained in detail in
Appendix D: Printer Options.
Xerox, or your Xerox authorized reseller, may have
provided some or all of these options. First verify your
exact accessory options before proceeding further. If you
see features described in this section that are not available
with the printer and accessories you have, you can easily
add them yourself. For more information, refer to the
separate Supplies/Options Guide provided with your
printer.
Printer Components
Chapter 1: Getting Started ❖1-3
Printer Components
Use Figures 1.1 through 1.3 to identify the main
components of your DocuPrint P14.
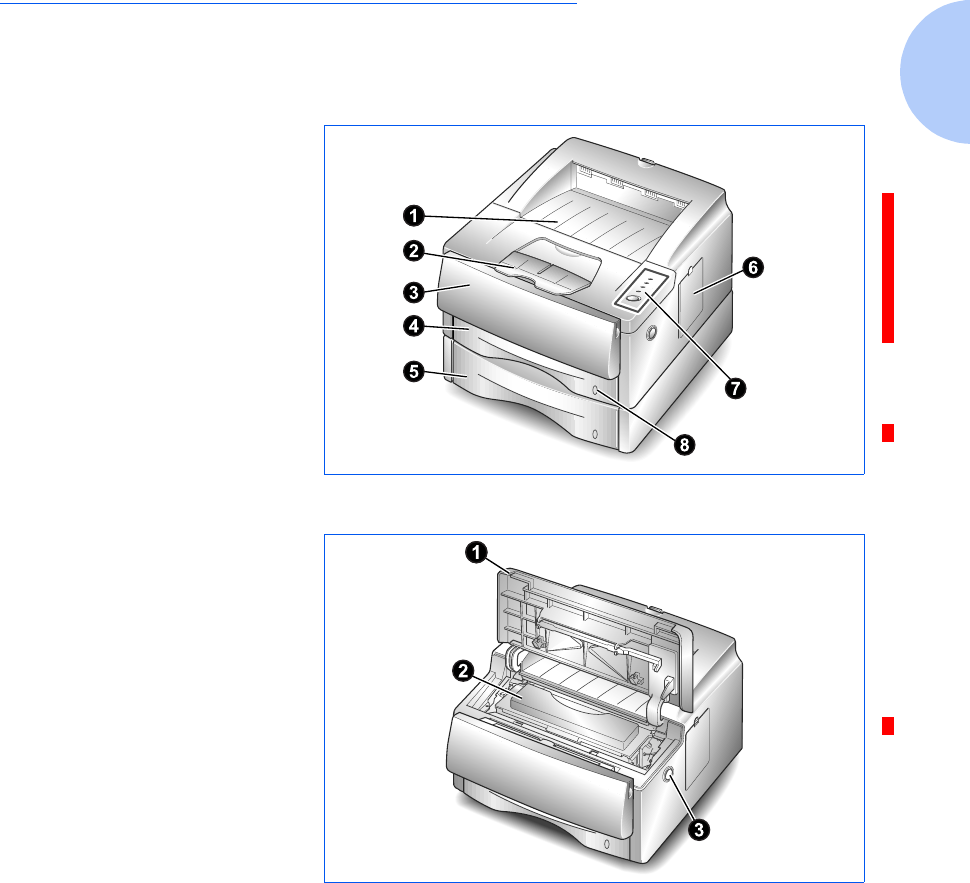
Figure 1.1 Printer Components, Front View
Front View
➊Face down stacker
➋Paper lifter
➌Multi-sheet feeder (MSF)
➍Tra y 1
➎Tray 2 (optional)
➏Control board cover
➐Control panel
➑Paper level indicator
Figure 1.2 Printer Components, Inside Front View
Inside Front View
➊Front cover
➋Laser print cartridge
➌Front cover release button

Printer Components
1-4 ❖DocuPrint P14 User Guide
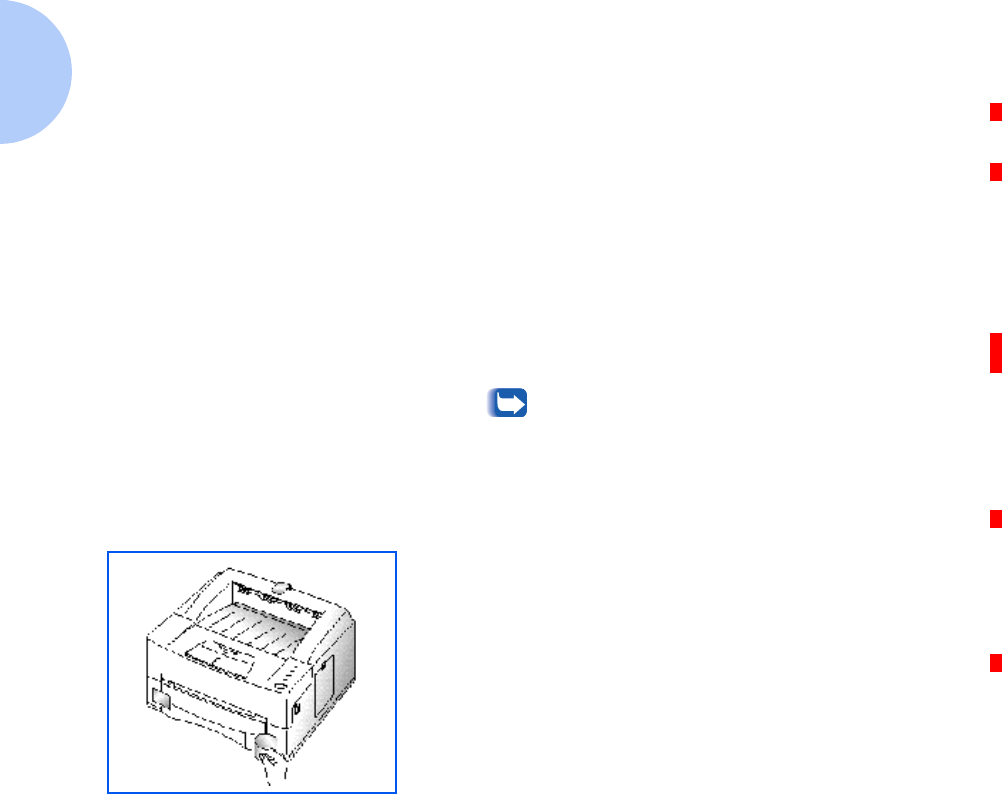
Figure 1.3 Printer Components, Rear View
Rear View
➊Rear cover (with face-up
stacker inside)
➋Printer cable connectors
➌Power cord connector
➍Power switch
➎Exhaust fan
➏Cooling vent

Printer Features
Chapter 1: Getting Started ❖1-5
Printer Features
Your Xerox DocuPrint P14 is a compact, easy to use laser
printer designed for the small office environment. It is
designed to provide years of high quality, high
performance printing.
This manual tells you how to set up, operate and maintain
your new printer, and contains advice on how you can get
the best performance from it. Please use this manual
together with the documentation provi9ded with your
computer hardware and software.
The maximum print speed for the DocuPrint P14 is 12
pages per minute. It offers true 600 x 600 dpi print
resolution and 1200 x 1200 with resolution enhancement
technology. The printer features one 250 sheet paper tray
and multi-sheet feeder. The printer understands PCL 5e
and PCL 6 printer languages, and has an option for
PostScript Level 2. Other options include a second paper
tray, and a serial/LocalTalk interface board for Apple
Macintosh compatibility.

Printer Documentation
1-6 ❖DocuPrint P14 User Guide
Printer Documentation
Your DocuPrint P14 is packaged with the following
documentation and information:
•Quick Reference Card, which shows you how to get
your printer up and running, and provides the basic
information needed to use your printer.
•This User Guide, which provides you with all of the
detailed information you will need to use, maintain,
upgrade and troubleshoot your printer.
•Supplies/Options Guide, which gives you ordering
information for printer consumables and options, as
well as recommendations for supported print media
(i.e., paper, transparencies, labels, envelopes, etc.).
•Warranty Card, which you should fill out and return
in order to receive all of the benefits of owning a Xerox
laser printer.
•The DocuPrint P14 CD-ROM, which contains the
following:
—User Guide (electronic version of this book)
—Printer Drivers
— Xerox Font Manager
For the printer drivers contained on the CD-ROM, the
majority of documentation is provided via the on-line Help
files included with the drivers. Features and functionality of
the drivers are discussed in Chapter 3: Printing.
Since the CD-ROM contains so much information of
importance, please ensure that you save it and keep it in a safe
place.

Printer Documentation
Chapter 1: Getting Started ❖1-7
Using the CD-ROM The documentation on the CD-ROM is provided as a PDF
file, which is opened in Adobe Acrobat Reader (provided
on the CD-ROM if you do not already have it installed).
This file contains hypertext links that enable you to jump
from the Table of Contents or Index directly to the page
where you are looking for information, as well as from
page to page where information is cross-referenced.
Simply move the cursor over a hypertext link and it
changes to a pointing finger. Then click on the link to
jump to the link’s destination.
The PDF files also enable you to print the specific pages
you need, rather than printing an entire chapter or
manual.
The CD-ROM is provided with an installation booklet in
its jewel case. You can also refer to the ReadMe file on the
CD-ROM for more information.

Printer Documentation
1-8 ❖DocuPrint P14 User Guide
Note, Caution and
Warning Symbols
Throughout this User Guide, several symbols are used to
emphasize useful, important and critical information.
They are as follows:
This symbol indicates particularly useful or helpful
information about your printer.
This symbol indicates a caution against
performing any action that may damage your
printer or degrade performance.
This symbol indicates a warning against
performing any action that may lead to
physical injury.

Printer Setup
Chapter 1: Getting Started ❖1-9
Printer Setup
Selecting a
Location
Place your printer on a flat, stable surface near your
workstation. Leave enough space around the printer, so
that you can easily:
• Open the printer cover.
• Open the rear cover to remove jammed paper, or
retrieve the paper when you use the rear face-up
stacker.
• Remove and install the paper tray(s) to load paper.
• Allow air circulation around the exhaust fan and vent
to prevent the printer from overheating.
Do not place the printer:
• In direct sunlight.
• Near heat sources or air conditioners. Place the printer
where the temperature is stable and set for comfort.
• In dusty or dirty environments. Dust accumulation
may prevent the printer from functioning properly.
• Near devices that contain magnets or generate
magnetic fields (such as loudspeakers or base units of
cordless telephones).
Printer Setup
1-10 ❖DocuPrint P14 User Guide
Unpacking the
Printer
1Remove the printer and all accessories from the packing
carton.
Save the carton and packing materials in case you need to
repack the printer for service or storage.
2Make sure that your printer came packed with the
following items:
•Laser print cartridge
•Power cord
• DocuPrint P14 CD-ROM
• Quick Reference Card
• Warranty Card
• IEEE 1284-compliant printer cable (may or may not be
supplied with your printer)
If any items are missing or damaged, notify your
dealer immediately.
In order to connect your DocuPrint P14 to your
computer, you have to purchase a printer cable
separately. The section “Connecting to the
Computer” (page 1-16) identifies the required cables.
3Carefully remove the shipping tapes from the printer.
Instructions for setting up your printer follow, starting
with the section “Installing the Laser Print Cartridge”
(page 1-11). If you purchased an additional memory
SIMM, paper Tray 2, or other options, refer to
Appendix D: Printer Options for installation instructions
after completing the setup procedure.
Printer Setup
Chapter 1: Getting Started ❖1-11
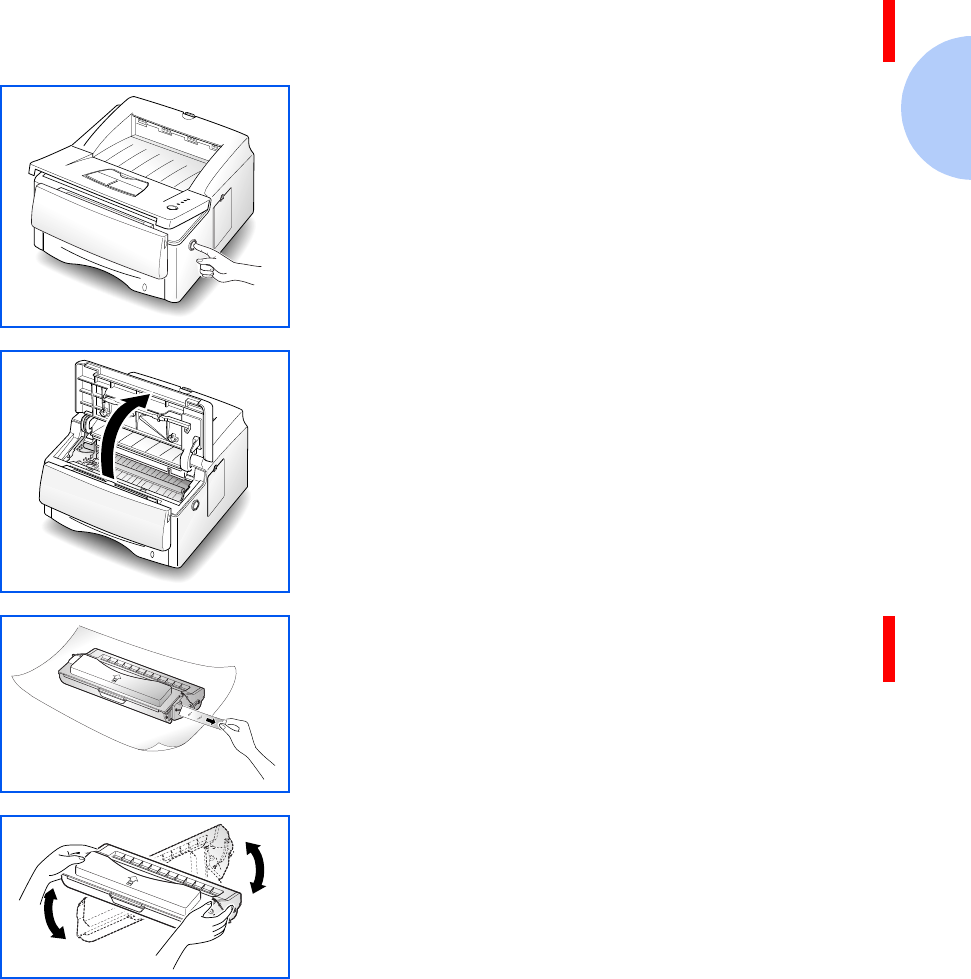
Installing the Laser
Print Cartridge
1Open the printer cover by pressing the cover release
button.
2Raise the printer cover.
3Unpack the laser print cartridge and place it on a clean
sheet of paper. Carefully remove the sealing tape and
discard it.
4Shake the cartridge from side to side 5 or 6 times to
distribute the toner evenly inside the cartridge.
Printer Setup
1-12 ❖DocuPrint P14 User Guide
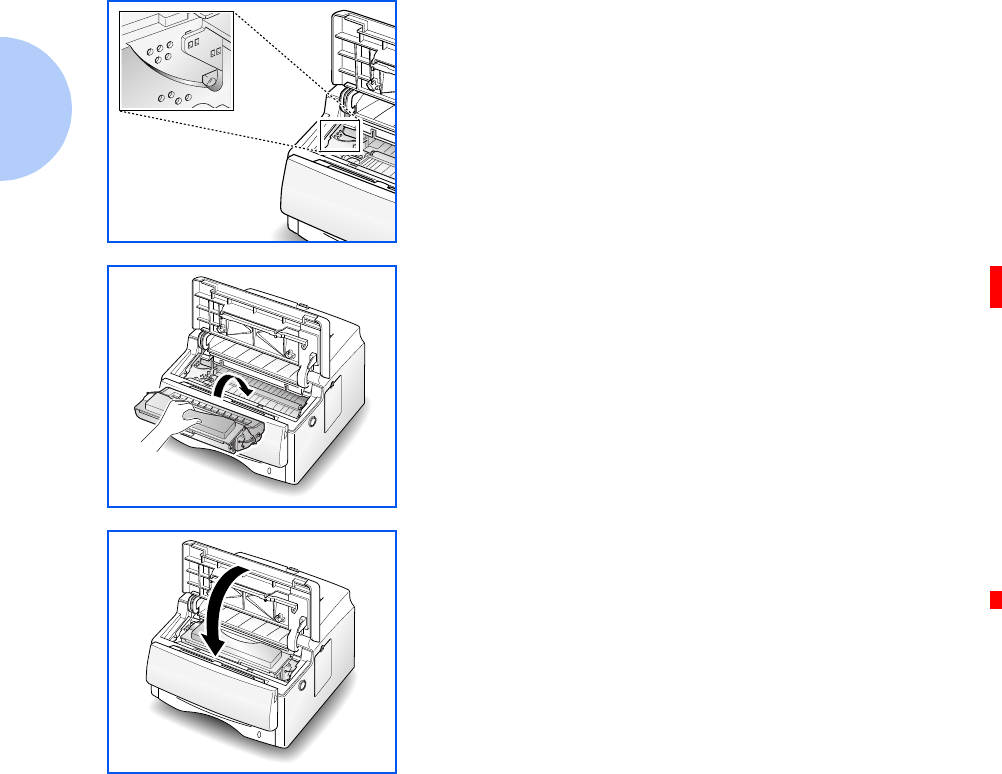
5Find the cartridge slots inside the printer, one on each
side.
6Grasp the handle and slide the cartridge down on top of
the cartridge slots, until it drops into place.
7Close the printer cover. Make sure that the cover is
securely closed.
Proceed to the next section, “Loading Paper” (page 1-13).
Printer Setup
Chapter 1: Getting Started ❖1-13
Loading Paper You can load approximately 250 sheets of paper. For the
best print quality, use any high quality xerographic copier
paper (75 g/m2 or 20 lb.).
For more information on loading paper and other print
media, refer to Chapter 2: Loading Print Media.
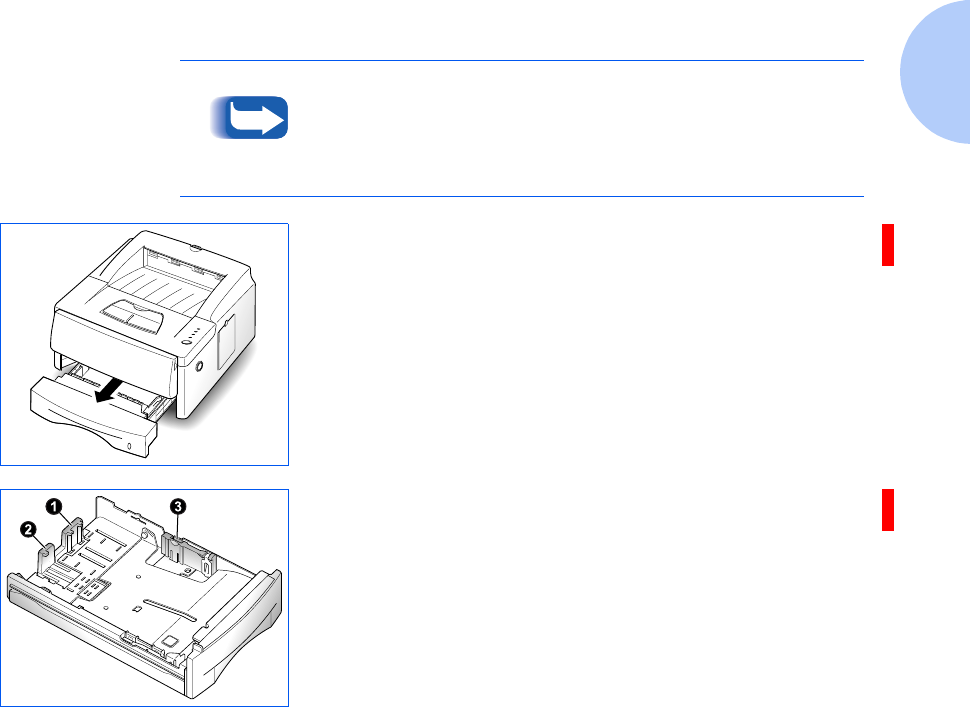
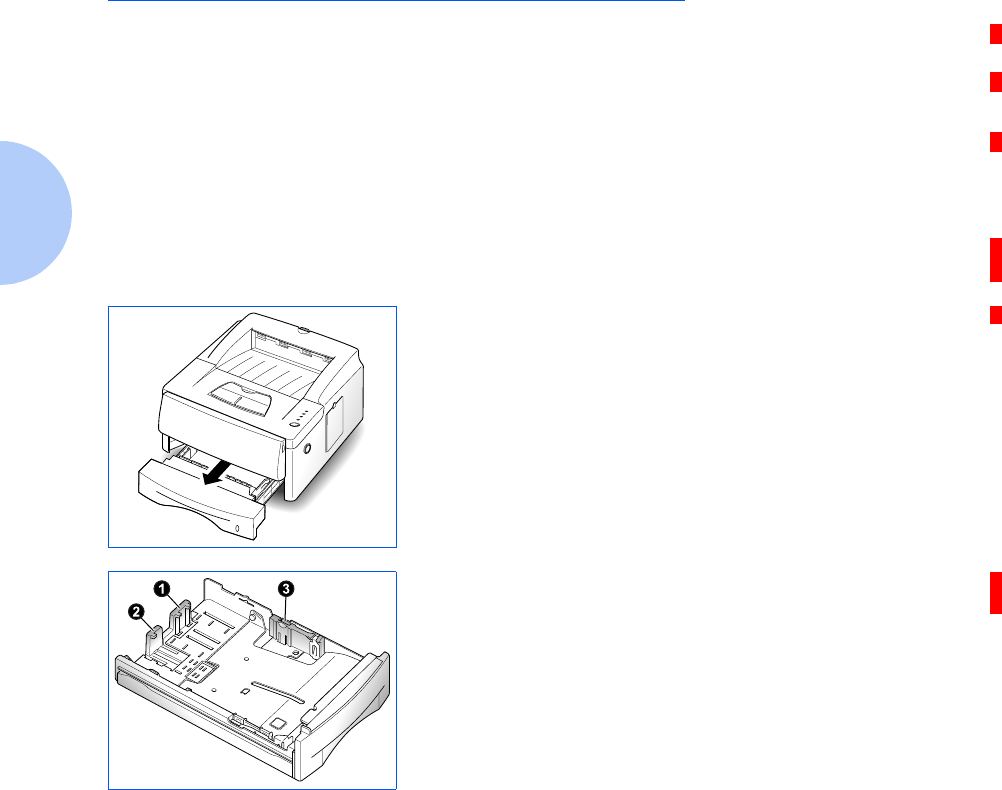
1Remove Tray 1 by pulling it towards you. Remove the
packing material from the tray, if any.
2Pull out the length guides ➊ and ➋ and the width guide ➌
(by squeezing the tab on each guide to slide the guide out).
Printer Setup
1-14 ❖DocuPrint P14 User Guide
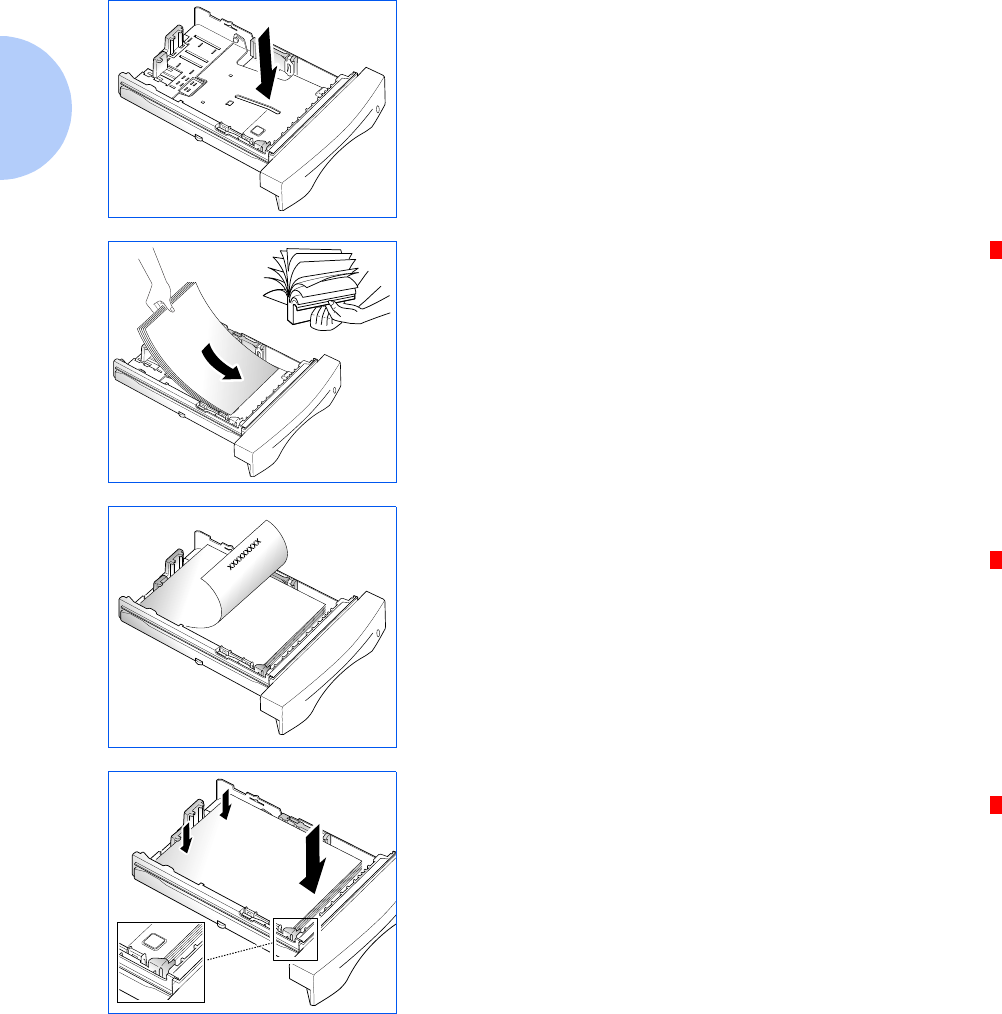
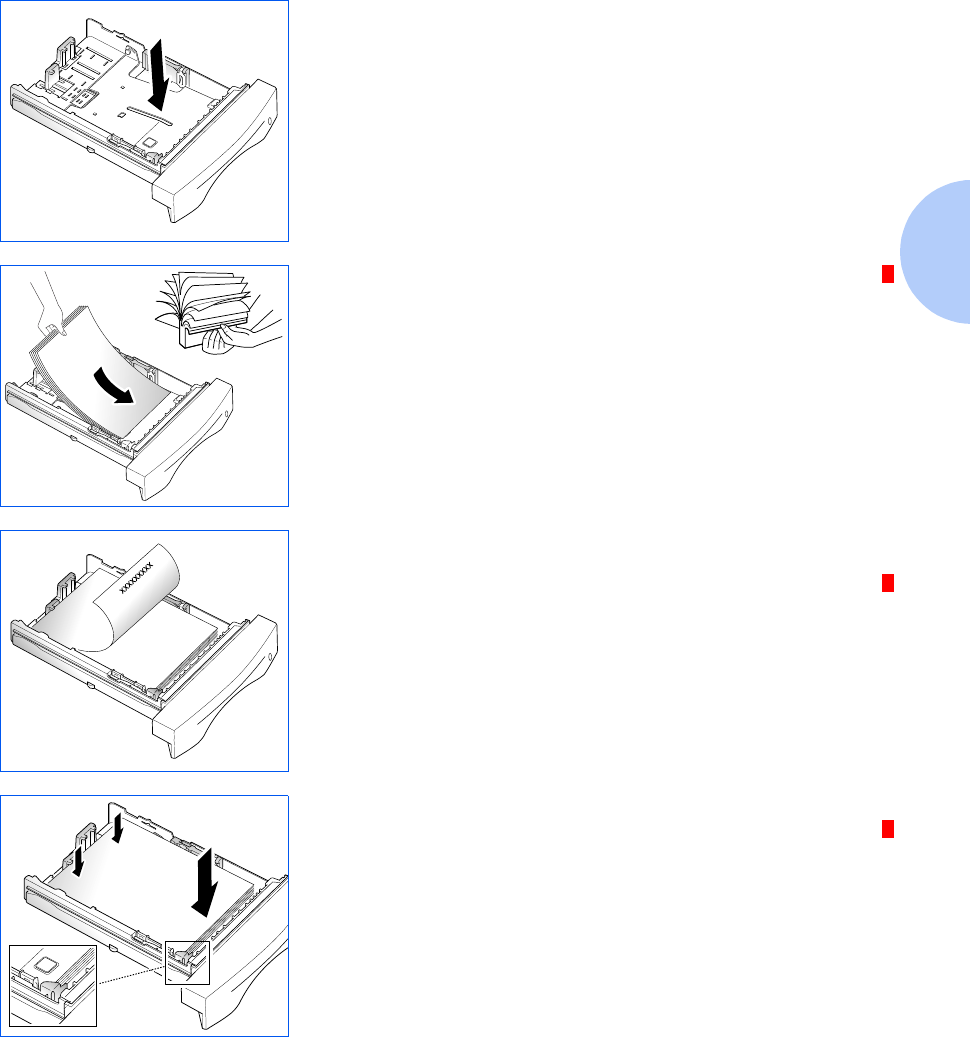
3Push down on metal plate.
4Fan the paper and load it in the tray with the print side
facing down. The print side is usually indicated on the
paper package.
For preprinted stock, such as letterhead, place the printed
design side face down with the top edge of the page toward
the front of the tray.
5Gently press the upper corners of the paper down under
the tray tab as shown.
LETTERHEAD

Printer Setup
Chapter 1: Getting Started ❖1-15
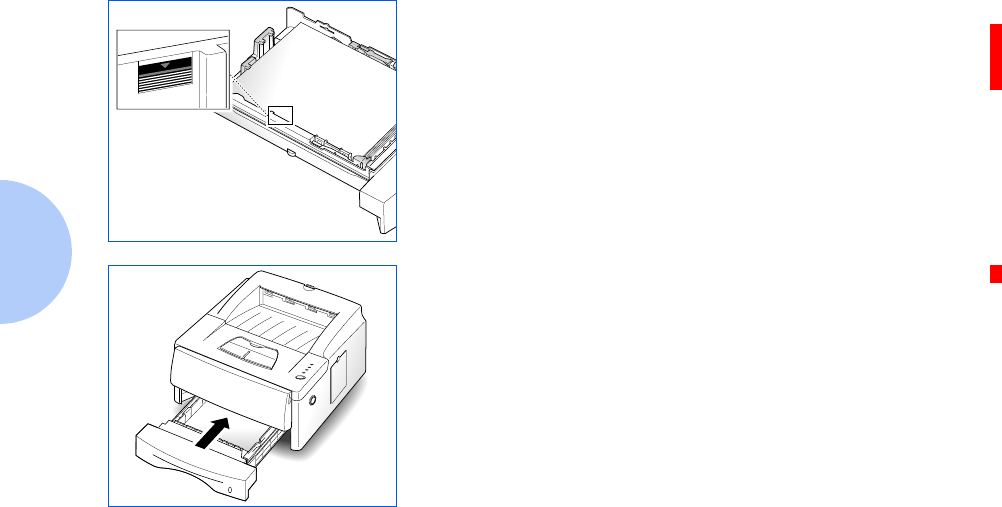
6Make sure that the stack of paper does not exceed the line
indicated by the mark on the left inside wall of the tray.
7Slide the length and width guides against the edges of the
paper stack, if necessary.
8Insert the tray back into the printer.
Proceed to the next section, “Connecting to the Computer”
(page 1-16).
Printer Setup
1-16 ❖DocuPrint P14 User Guide
Connecting to the
Computer
Your printer can be connected to a Windows-based PC or
to an Apple Macintosh computer (see the note, below).
Refer to Table 1.1 for your connection options and the
appropriate page in this manual for connection
instructions.
Table 1.1 Interface options
Interface Windows PC Macintosh
Parallel Yes (see page 1-17). Not available.
USB Yes (see page 1-18). Yes (see page 1-18).
Serial*Yes (see page 1-19). Yes (see page 1-19).
LocalTalk*Not available. Yes (see page 1-20).
* Requires installation of the optional Serial/LocalTalk interface board. Refer to the Supplies/Options Guide that
came with your printer, and to Appendix D: Printer Options for installation instructions.
To print documents from a Macintosh computer, you must
install the following optional printer accessories:
•PostScript SIMM
• Additional memory SIMM (12MB is required)
• Serial/LocalTalk interface board (if your Macintosh
does not have a USB port)
If you do not have these accessories, refer to the Supplies/
Options Guide that came with your printer, or contact your
authorized Xerox dealer. Installation instructions for these
options can be found in Appendix D: Printer Options.
Once you have installed the required options and connected
your printer, you will need to install the PostScript printer
driver. This driver is provided on the CD-ROM that came
with your printer. Installation instructions are provided in
the section “Installing the PostScript Driver” (page 1-27).
Printer Setup
Chapter 1: Getting Started ❖1-17
Using the Parallel Port
The parallel port requires a Centronics parallel interface
cable that supports bidirectional communications (IEEE
standard 1284). Ask your dealer for assistance if you need
help selecting the right cable.
To connect the printer to the computer, follow the steps
below:
1Make sure that both the printer and computer are turned
off.
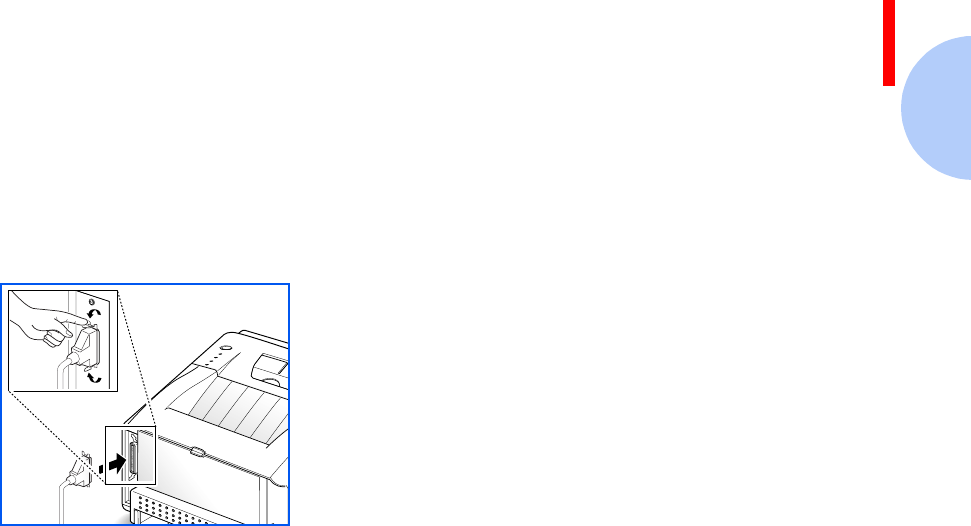
2Plug the cable into the connector on the back of the
printer.
3Push the metal clips down to fit inside the notches on the
cable plug.
4Connect the other end of the cable to the parallel port on
your computer. See your computer documentation if you
need help.
Proceed to the section “Powering On the Printer”
(page 1-21)

Printer Setup
1-18 ❖DocuPrint P14 User Guide
Using the USB Port
The USB port requires a USB v1.0-compliant cable. Ask
your dealer for assistance if you need help selecting the
right cable.
To connect the printer to the computer, follow the steps
below:
1Make sure that both the printer and computer are turned
off.
2Plug the cable into the USB connector on the back of the
printer.
3Connect the other end of the cable to the USB port on your
computer (or elsewhere in the USB chain). See your
computer documentation if you need help.
Proceed to the section “Powering On the Printer”
(page 1-21)

Printer Setup
Chapter 1: Getting Started ❖1-19
Using the Serial Port
The optional serial port requires an RS-232C cable with a
DB-9 male connector. Ask your dealer for assistance if you
need help selecting the right cable.
To connect the printer to the computer, follow the steps
below:
1Make sure that both the printer and computer are turned
off.
2Plug the cable into the serial connector on the back of the
printer.
3Connect the other end of the cable to the serial port on
your computer. See your computer documentation if you
need help.
Proceed to the section “Powering On the Printer”
(page 1-21)

Printer Setup
1-20 ❖DocuPrint P14 User Guide
Using the LocalTalk Port
The optional LocalTalk port requires a LocalTalk
PhoneNet cable with a DIN-8 connector. Ask your dealer
for assistance if you need help selecting the right cable.
To connect the printer to the computer, follow the steps
below:
1Make sure that both the printer and computer are turned
off.
2Plug the cable into the LocalTalk connector on the back of
the printer.
3Connect the other end of the cable to the LocalTalk port on
your computer (or to another LocalTalk connector that is
part of the LocalTalk network). See your computer
documentation if you need help.
Proceed to the section “Powering On the Printer”
(page 1-21)
Printer Setup
Chapter 1: Getting Started ❖1-21
Powering On
the Printer
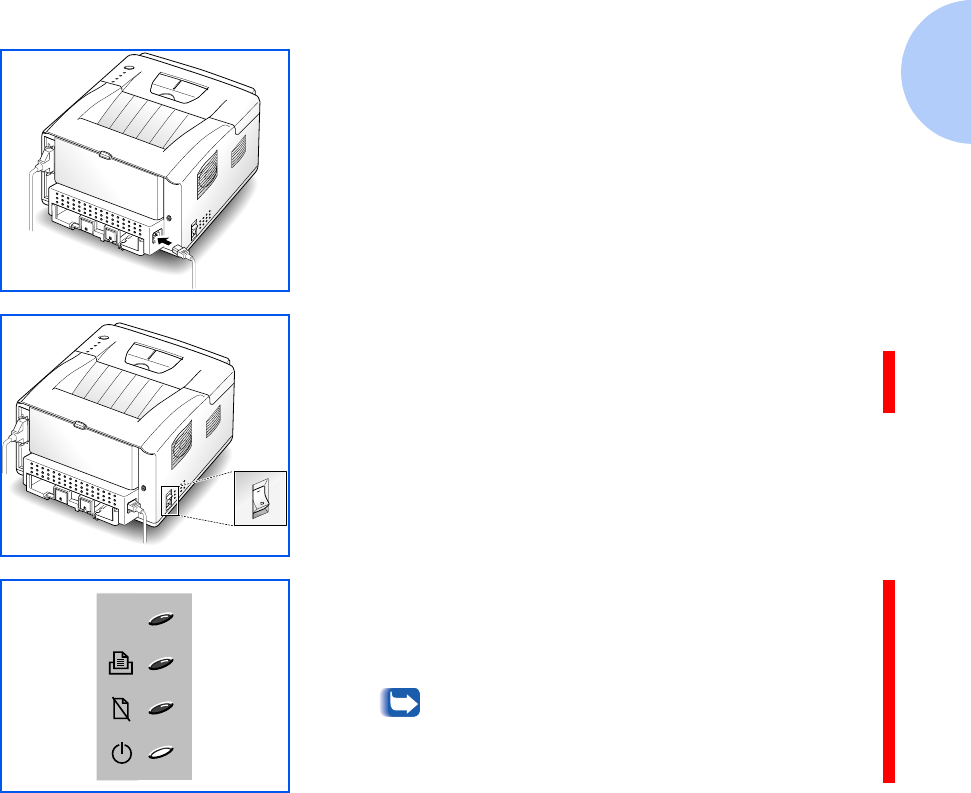
1Plug one end of the power cord into the connector on the
printer.
2Plug the other end into a properly grounded AC outlet.
3Turn the printer on.
As the printer powers up, all control panel lights turn on
briefly. Then the lights scroll sequentially several times as
the printer goes through its internal diagnostics.
4When only the READY light is steadily on (as shown at
left), press the control panel button for five seconds, then
let go. A configuration sheet should print out (if not,
recheck the installation).
The configuration sheet lists your printer model
and default settings along with the interface
ports available for your printer model.
Continue to the next section, “Installing Software”
(page 1-22).

Printer Setup
1-22 ❖DocuPrint P14 User Guide
Installing Software Included with your printer is a CD-ROM containing
printer drivers for some of the most popular Windows
software applications. To operate your printer, you must
install a printer driver, which translates data from your
application into data the printer understands. (Installation
procedures follow this section.)
The CD-ROM shipped with your printer contains the
following printer drivers and utilities.
•PCL 5e printer driver for Windows 95/9 8, Windows
3.1x and Windows NT 4.0
•PCL 6 printer driver for Windows 95/98 and
Windows NT 4.0.
•Status Monitor enables you to monitor the status of
print jobs.
•Font Navigator is a font manager. It gives a quick and
easy way to find fonts, install the fonts, and print the
font samples. Select the FontNav folder from the
CD-ROM, and execute the setup file to install the Font
navigator.
•PostScript Printer Description (PPD) files for Windows
and Macintosh to allow installation of the PostScript
option.
•Remote Control Panel, which allows you to set up
your printer to work properly with DOS applications
run inside a Windows MS-DOS command prompt
window.
•Adobe Acrobat Reader v3.02, which allows your
computer to display the on-line Xerox DocuPrint P14
user manuals.

Printer Setup
Chapter 1: Getting Started ❖1-23
Installing the
PCL Driver
Minimum Requirements
Before you start, make sure that you have the following
computer setup:
• IBM or compatible with a 486 or higher processor
• Microsoft Windows 95/98, Windows 3.1x, or Windows
NT 4.0
• 7 MB of available hard disk space
• 8 MB of RAM for Windows 3.1x
• 16 MB of RAM for Windows 95/98, Windows NT
•CD-ROM drive
• Centronics-compatible parallel cable (IEEE
1284-compliant)
If you do not have access to a CD-ROM drive, contact your
local dealer to have one installed.

Printer Setup
1-24 ❖DocuPrint P14 User Guide
Windows 95/98/NT 4.0 Installation
1Turn on the computer and start Windows.
If Windows 95/98 recognizes the new printer, go to the
section “Windows 95/98 Plug and Play” (page 1-25).
2Insert the Xerox DocuPrint P14 CD-ROM into your
CD-ROM drive.
If Windows does not automatically run the CD-ROM, go to
the section “If Windows Does Not Run the CD-ROM”
(page 1-25)
3Type in your user name and company. Then click on the
Next button.
4The driver will be installed in the directory c:\p14util. If
you want to change this, type in the directory you want.
Then click on the Next button.
5Follow the instructions on the screen.

Printer Setup
Chapter 1: Getting Started ❖1-25
Windows 95/98 Plug and Play
1At the ‘New Hardware Found’ dialog box, click on the OK
button.
2Insert the Xerox DocuPrint P14 CD-ROM into your
CD-ROM drive.
3Using the Browse button, select d:\win95\Win95.inf
(where “d” is your CD-ROM drive letter), then click OK.
4Follow the instructions on the screen.
If Windows Does Not Run the CD-ROM
1Select Run from the Start menu.
2Type d:\win95\setup.exe on the command line (where
“d” is your CD-ROM drive letter), then click OK.
3Follow the instructions on the screen.

Printer Setup
1-26 ❖DocuPrint P14 User Guide
Windows 3.1x Installation
1Make sure the printer is plugged and connected to your
computer. Turn on your printer and computer.
2Insert the CD-ROM disk into your CD-ROM drive.
3In the Program Manager window, select Run from the
File menu. The Run dialog box appears.
4Type d:\win95\setup.exe on the command line (where
“d” is your CD-ROM drive letter), then click on the OK
button.
5Follow the instructions on the screen.
Uninstalling the Printer Driver
An uninstall utility is supplied with the printer driver to
enable you to remove the driver and all associated files
from your hard disk, if so required.
To uninstall the driver, proceed as follows:
1WIndows 95/98/NT 4.0: From the Start menu, select
Programs > Xerox DocuPrint P14 > Uninstall P14
Driver.
WIndows 3.1x: From the Program Manager window,
select the Xerox DocuPrint P14 group from the File
menu, then select Uninstall P14 Driver..

Printer Setup
Chapter 1: Getting Started ❖1-27
Installing the
PostScript Driver
Your Xerox DocuPrint P14 CD-ROM contains PostScript
printer description (PPD) files for both Windows 95/98/
NT 4.0 and Macintosh.
Installing the PostScript printer driver requires the use of
the operating system files on the original CD-ROM or
diskettes that came with your system.
Using the PostScript printer driver requires installation of
the PostScript option. If you do not have this option, refer
to the Supplies/Options Guide that came with your printer.
Installation instructions are provided in
Appendix D: Printer Options.
Windows 95/98 and NT 4.0 Installation
1Insert the Xerox DocuPrint P14 CD-ROM into your
CD-ROM drive.
2Copy the two files from the d:\win95\ps folder (where “d”
is your CD-ROM drive letter) to any folder on your hard
drive (for example, c:\windows).
3Select Start > Settings > Printers from the Windows task
bar.
4Double click the Add Printer icon, and click Next.
5Click on Next again.
6Click on Have Disk, then click Browse. Select any folder
designated in Step 2.

Printer Setup
1-28 ❖DocuPrint P14 User Guide
7Click Next.
You are asked whether the printer is to be set as the
default printer, and whether or not to print a test page.
Make your selection, then you are prompted to insert your
Windows operating system disk (CD-ROM or diskette).
8Insert the original CD-ROM for your Windows operating
system. Select the CD-ROM drive, then select your Win95
(or Win98) folder. Then click OK.
If you insert a diskette, select the disk drive and
click on the OK button.
9If you are asked for the DocuP14.PPD file, reinsert the
Xerox DocuPrint P14 CD-ROM, click Browse, and locate
the file in the folder d:\PostScript\Win95 (or WinNT)
(where “d:” represents your CD-ROM drive letter). Follow
the instructions on the screen.

Printer Setup
Chapter 1: Getting Started ❖1-29
Macintosh Installation
1Make sure that the Macintosh and your printer are
connected to each other with the proper cable. Turn on the
Macintosh computer and printer.
2Insert the CD-ROM shipped with your printer into your
CD-ROM drive.
3Make a copy of the PS\English\Others\Mac\ML-6000.PPD
to ‘Printer Descriptions’ from Extensions folder.
4Click on Laser Writer 8.x (provided with Macintosh). The
name of your printer appears.
If you are not using Laser Writer 8.x driver, you
can’t proceed with the following steps.
5Click on your printer name.
6Click on the Setup button.
If there is a Create button, click on the Create
button. The installation is completed, and you
do not need to proceed with the following steps.
This step appears on some driver versions.
7Click on the Auto Setup button. The ML-6000.PPD file is
installed automatically.
If you fail to Auto setup, click Select PPD and
choose ML-6000 PPD.
8Make sure the PS file is installed correctly. Click on the OK
button, then close Chooser.

1-30 ❖DocuPrint P14 User Guide
Installing the
Remote Control
Panel and Status
Monitor
Windows 95/98/NT 4.0 Installation
1Select Run from the Start menu.
2Type d:\win95utils\setup.exe on the command line
(where “d” is your CD-ROM drive letter), then click OK.
3Follow the instructions on the screen.
Windows 3.1x Installation
1In the Program Manager window, select Run from the
File menu. The Run dialog box appears.
2Type d:\win95utils\setup.exe on the command line
(where “d” is your CD-ROM drive letter), then click on the
OK button.
3Follow the instructions on the screen.

Chapter 2: Loading Print Media ❖2-1
Loading Print Media Chapter2
Selecting Print Media .................................................... 2-2
Media Sizes and Capacities ....................................... 2-3
Basic Guidelines ......................................................... 2-4
Loading Print Media ...................................................... 2-6
Using Tray 1 or 2 ........................................................ 2-6
Using the MSF ............................................................ 2-9
Using the Rear Face Up Stacker .............................. 2-13
Duplex Printing ......................................................... 2-14

Selecting Print Media
2-2 ❖DocuPrint P14 User Guide
Selecting Print Media
One of the most important things you can do to assure the
best possible print quality from your printer is to select the
correct paper. Your printer produces letter quality output
on most plain bond papers, including cotton bond and
photocopying papers; it does not require special papers.
However, the print quality varies with different paper
types. Be sure to test a small quantity of paper before you
purchase a large quantity.
Refer to the separate Supplies/Options Guide that came
with your printer for a listing of Xerox recommended print
media.

Selecting Print Media
Chapter 2: Loading Print Media ❖2-3
Media Sizes and
Capacities
Table 2.1 shows the DocuPrint P14 supported media sizes
and input capacities.
Table 2.1 Supported Media Sizes and Capacities
Input Source/Capacity*
* Depending on paper thickness, maximum capacity may be reduced.
Size Tr a y 1 o r 2 MSF
Paper
Letter (8.5 x 11 in.) 250 100
Legal (8.5 x 14 in.) 250 100
Executive (7.25 x 10.5 in.) 250 100
Folio (8.5 x 13 in.) 250 100
A4 (210 x 297 mm) 250 100
A5 (148 x 210 mm) 250 100
ISO-B5 (176 x 250 mm) -- 100
Envelopes
Com-10 (4.125 x 9.5 in.) -- 10
Monarch (3.875 x 7.5 in.) -- 10
C5 (162 x 229 mm) -- 10
DL (110 x 220 mm) -- 10
C6 (114 x 162 mm) -- 10
Cards
Transparency film
Labels
-- 1 at a time

Selecting Print Media
2-4 ❖DocuPrint P14 User Guide
Basic Guidelines When selecting or loading paper, envelopes, or other
special media, keep these guidelines in mind:
• Attempting to print on damp, curled, wrinkled, or torn
paper can cause paper jams and poor print quality.
• Use cut-sheet paper only. You cannot use multipart
paper.
• Use only high quality, copier grade paper. Avoid paper
with embossed lettering, perforations, or texture that is
too smooth or too rough.
• Colored paper should be of the same high quality as
white photocopy paper. The pigments must withstand
the printer’s fusing temperature of 400oF (205oC) for
0.1 second without deterioration. Do not use paper
with a colored coating that was added after the paper
was produced.
• Preprinted forms must be printed with nonflammable,
heat-resistant inks that do not melt, vaporize, or
release hazardous emissions when subject to the
printer’s approximately 400oF (205oC) fusing
temperature for 0.1 second.
• Store paper in its ream wrapper until ready to use.
Place cartons on pallets or shelves, not on the floor. Do
not place heavy objects on top of the paper, whether it
is packaged or unpackaged. Keep it away from
moisture, or other conditions that can cause it to
wrinkle or curl.

Selecting Print Media
Chapter 2: Loading Print Media ❖2-5
• During storage, moisture-proof wrap (any plastic
container or bag) should be used to prevent dust and
moisture from contaminating your paper.
• You can use transparencies and labels designed for
laser printers.
• Always use paper and other media that conform with
those listed on the Supplies/Options Guide that came
with your printer.
• When you choose envelopes, use only well-constructed
envelopes with sharp, well creased folds.
— DO NOT use envelopes with clasps and snaps.
— DO NOT use envelopes with windows, coated
linings, self-stick adhesives, or other synthetic
materials.
— DO NOT use damaged or poorly made envelopes.
Loading Print Media
2-6 ❖DocuPrint P14 User Guide
Loading Print Media
You can load up to 250 sheets of paper in Tray 1. Refer to
Table 2.1 on page 2-3 for supported sizes. If you purchase
the optional Tray 2 (described in Appendix D: Printer
Options), you can double the capacity.
You can also use the multi-sheet feeder (MSF) to load up
to 100 sheets of paper or to feed single items one at a time.
See “Using the MSF” (page 2-9).
Using Tray 1 or 2 Use the following procedure to load either Tray 1 or the
optional Tray 2.
1Remove the tray by pulling it toward you.
2Pull out the length guides ➊ and ➋ and the width guide ➌
(by squeezing the tab on each guide to slide the guide out).
Loading Print Media
Chapter 2: Loading Print Media ❖2-7
3Push down the metal plate.
4Fan the paper and load it in the tray with the print side
facing down. The print side is usually indicated on the
paper package.
For preprinted stock, such as letterhead, place the printed
design side face down with the top edge of the page toward
the front of the tray.
5Gently press the upper corners of the paper down under
the tray tab as shown.
LETTERHEAD
Loading Print Media
2-8 ❖DocuPrint P14 User Guide
6Make sure that the stack of paper does not exceed the line
indicated by the mark on the left inside wall of the tray.
7Slide the length and width guides against the edges of the
paper stack, if necessary.
8Insert the tray back into the printer.
Loading Print Media
Chapter 2: Loading Print Media ❖2-9
Using the MSF The multi-sheet feeder (MSF) is an auxiliary input device
that you can use to feed media into the printer. You can
stack up to 100 sheets of paper for automatic loading, or
manually feed items one at a time.
When you print on envelopes, heavier weight papers,
transparencies, index cards, or paper labels, you must
manually feed them one at a time through the MSF’s
manual feed slot. Refer to Table 2.1 on page 2-3.
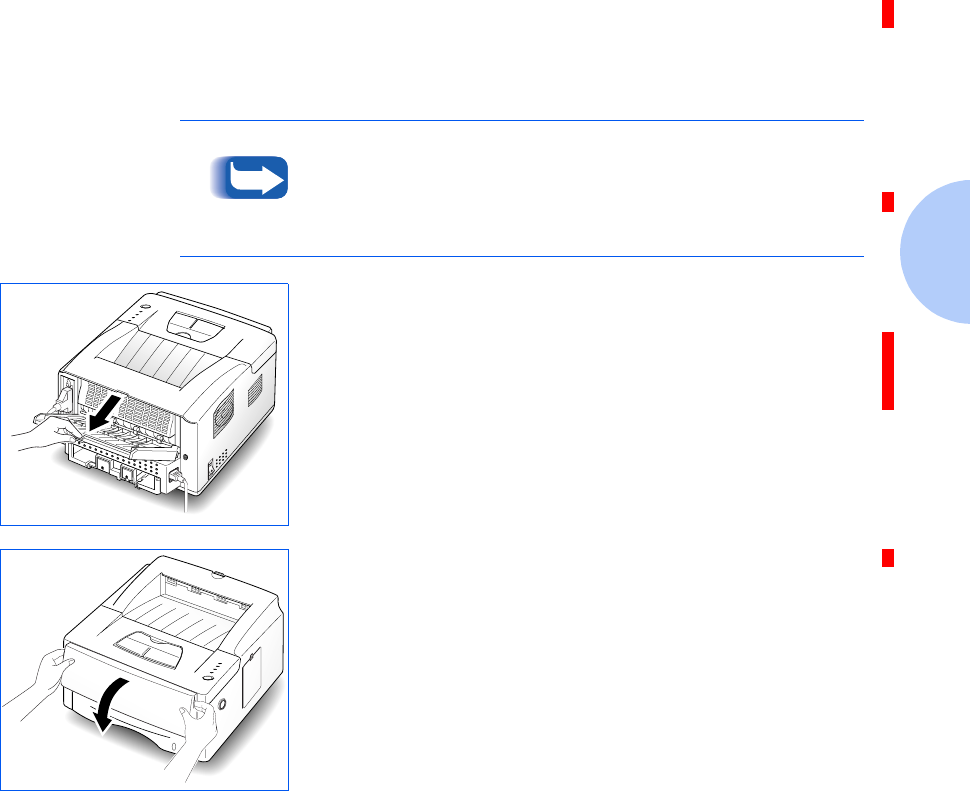
1If you are printing on envelopes or other special print
media that may be of heavier stock than ordinary paper,
you should open the rear cover and print to the face up
stacker.
For more information on using the rear face up stacker,
see the section “Using the Rear Face Up Stacker”
(page 2-13).
2Pull open the MSF cover by grasping it on both sides and
rotating it toward you.
Loading Print Media
2-10 ❖DocuPrint P14 User Guide
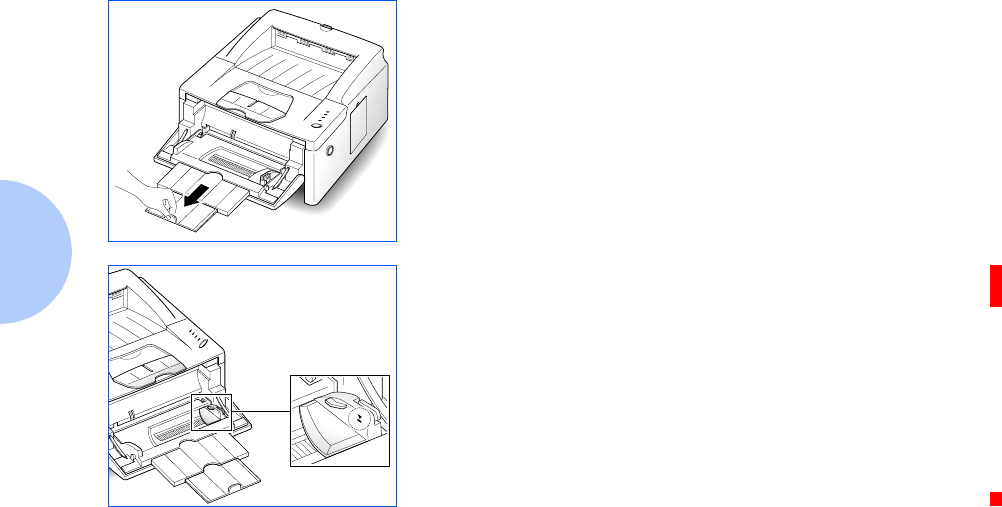
3Pull out the feeder support.
4Observe the stack height limit mark to avoid stacking your
print media above the mark.
Loading Print Media
Chapter 2: Loading Print Media ❖2-11
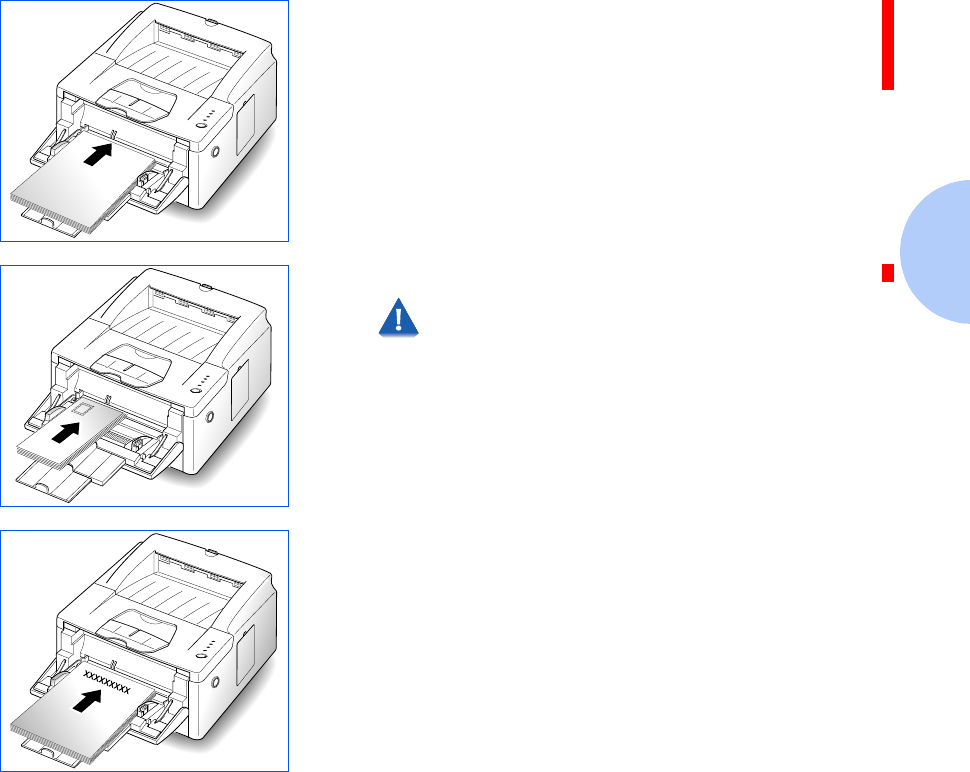
5Load the print media against the left edge of the MSF tray.
Up to 10 envelopes may be placed here. If printing cards,
transparency film or labels, only one page at a time may
be printed.
• Load letterhead paper with the design facing up. The
top edge of the sheet with the logo should enter the
printer first.
• Load a transparency sheet or a label sheet with a paper
backing with the paper side down.
• Load an envelope with the flap side down. The stamp
area is on the left side, close to the printer.
Never use envelopes with clasps, snaps,
windows, coated linings, or self-stick
adhesives. These envelopes may severely
damage the printer.
LETTERHEAD
Loading Print Media
2-12 ❖DocuPrint P14 User Guide
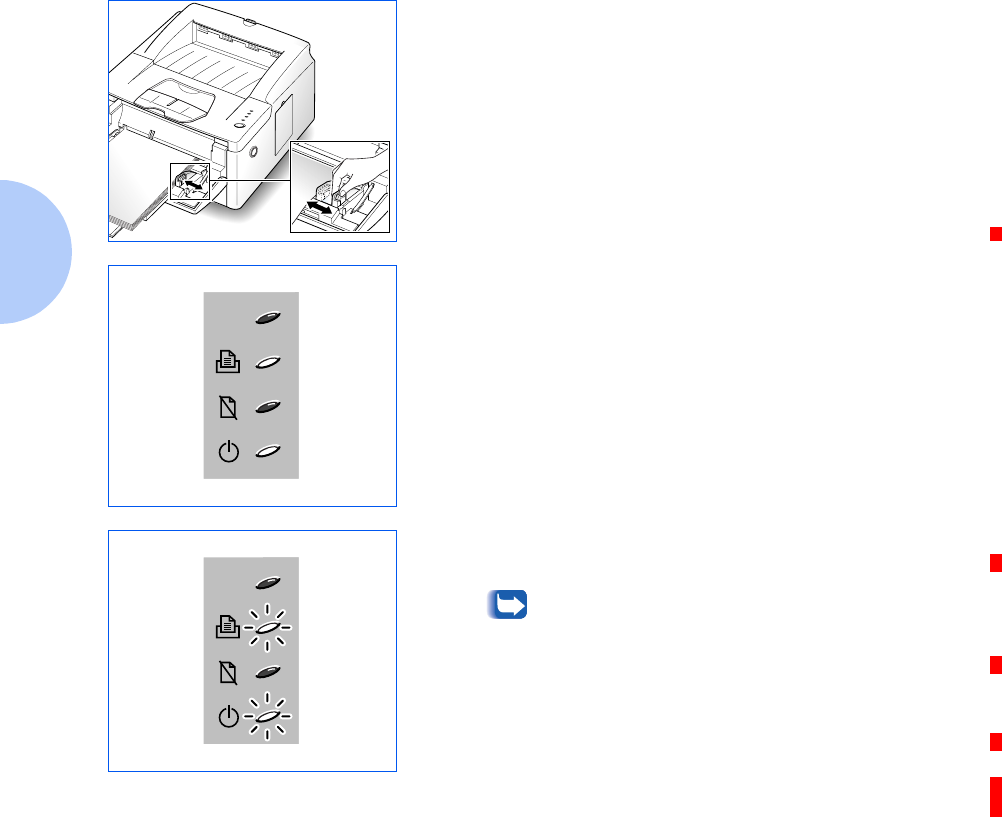
6Slide the width guide against the print media to secure it
in place.
7Before you start the print job, make sure that the paper
source, paper size, and paper type settings in your
software application are correct for the print material you
are using.
If printing using manual feed, continue to Step 8.
8Gently insert the print material into the printer until the
printer starts to pull it in, then let it go. The MANUAL and
READY lights come on as shown.
9When the MANUAL and READY lights are both blinking,
place the next sheet in the MSF.
If Auto Continue is available in your printer
driver and if you set the option to ON, the
printer will automatically use paper in the
paper tray if you do not feed paper into the
manual feed slot within 15 seconds.
With Auto Continue set to OFF, the printer will
not print unless you feed paper into the MSF. If
you press and hold the operator panel button
for about 4 seconds, the printer uses just one
sheet from the paper tray and waits the next
sheet from the manual feed slot.
Loading Print Media
Chapter 2: Loading Print Media ❖2-13
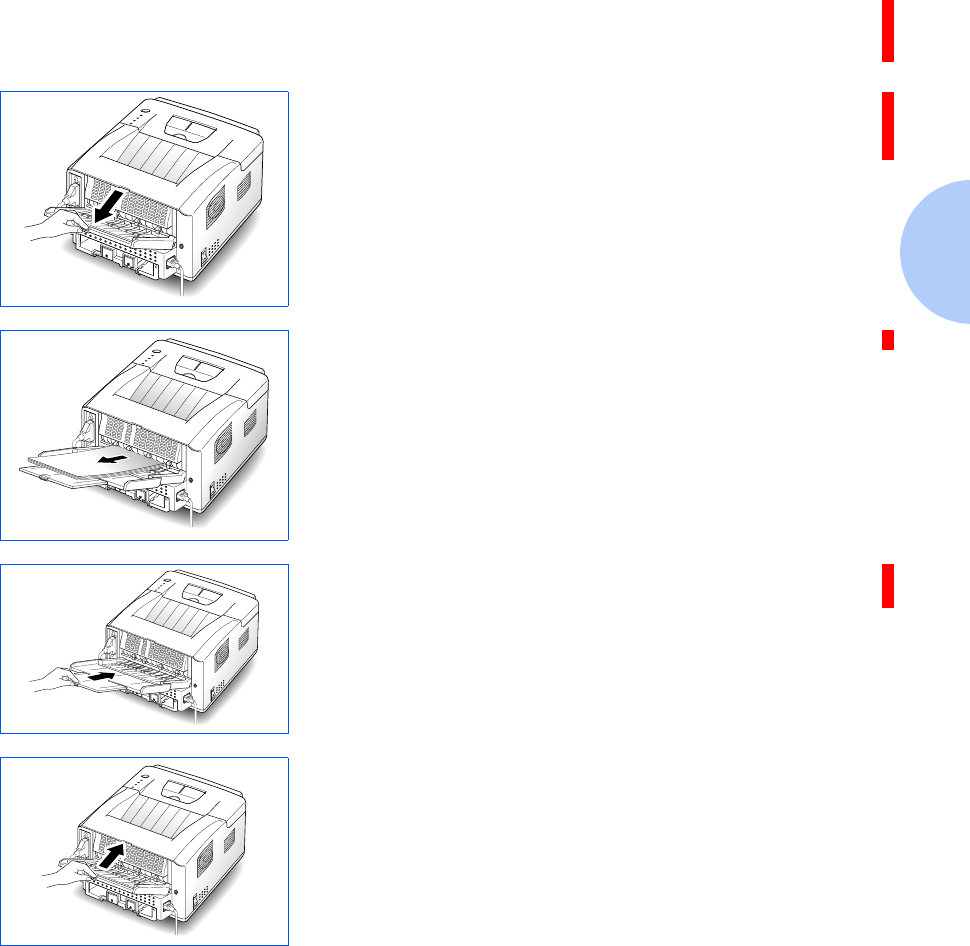
Using the Rear
Face Up Stacker
Use the rear face up stacker when you load paper,
envelopes or other special media manually, and especially
if you experience paper jams.
To use the rear face up stacker, open the rear cover and
pull out the paper support extenstions. The cover
functions as the stacker.
The printed page is placed on the stacker with the printed
side facing up.
To return to using the standard face down stacker, push in
the paper support extensions and close the rear cover.
xxxxxxxx
xxxxxxxx
Loading Print Media
2-14 ❖DocuPrint P14 User Guide
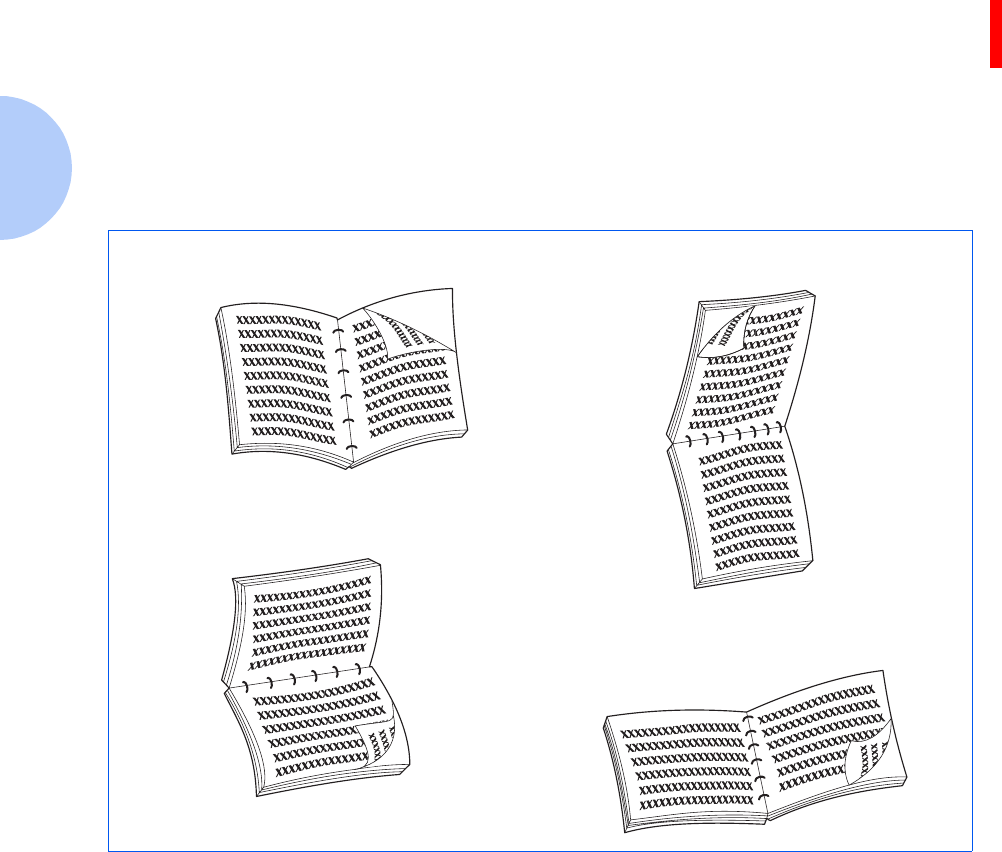
Duplex Printing Your DocuPrint P14 will print duplex (two-sided) pages by
specifying duplex printing when you print from your
applications.
You can print the first side on paper loaded in either Tray 1
or the MSF (stacked or manual feed), but the reverse side
must be fed from the MSF. For more information on
duplex printing, see “Configuring the PCL Driver”
(page 3-3).
Figure 2.1 shows proper paper orientation and binding
direction for duplex print jobs.
Figure 2.1 Duplex Printing Orientation
Orientation: Portrait
Binding: Long Edge
Orientation: Landscape
Binding: Long Edge
Orientation: Portrait
Binding: Short Edge
Orientation: Landscape
Binding: Short Edge

Chapter 3: Printing ❖3-1
Printing Chapter3
Printing a Document ...................................................... 3-2
Configuring the PCL Driver ........................................... 3-3
Selecting Your Printer ................................................ 3-3
Setting Properties ....................................................... 3-4
Configuring the PostScript Driver ................................ 3-7
Using Printer Utilities .................................................... 3-8
Status Monitor ............................................................ 3-8
Font Navigator ............................................................ 3-8
Remote Control Panel ................................................ 3-9
Using the Printer’s Control Panel ............................... 3-15
Indicator Lights ......................................................... 3-16
Control Panel Button ................................................ 3-21

Printing a Document
3-2 ❖DocuPrint P14 User Guide
Printing a Document
The following procedure describes the general steps
required for printing from various Windows applications.
The exact steps for printing a document may vary
depending on the application program you are using.
Refer to your software application’s documentation for the
exact printing procedure.
1Start the program you are using to create the document,
and open the document you want to print.
2Select Print from the File menu.
The Print dialog box appears.
Most Windows applications allow you to make
changes to the print settings, such as number of
copies, sequence of the pages, paper orientation,
and margins.
If you go to the File>Print>Properties dialog
box, you’ll access the printer driver’s Print Setup
dialog box, in which you can set other printer
properties. For Windows 3.1x, the equivalent
command is File>Print>Setup>Options. See the
section “Setting Properties” (page 3-4). When
done, click OK to close the Print Setup dialog
box.
3After making any necessary changes to the print settings,
click OK to start the print job.
To use your DocuPrint P14, you must install a printer
driver, described in Chapter 1: Getting Started. The way
you access the printer driver varies depending on the
software programs you use.
To use the PostScript driver, you must install the PostScript
option, described in Appendix D: Printer Options.

Configuring the PCL Driver
Chapter 3: Printing ❖3-3
Configuring the PCL Driver
Selecting Your
Printer
To use all of the features of your DocuPrint P14, make sure
it is selected as the default printer. When you install the
printer driver, DocuPrint P14 is automatically set as the
default printer. If you use more than one printer, select
DocuPrint P14 as the default printer as follows:
Windows 95/98/NT 4.0
1Select Start, Settings, then Printers.
2Double-click DocuPrint P14 PCL 5e.
3Select Set As Default from the Printer menu.
4To set the printer’s properties, select Properties from the
Printer menu and change the settings as described in the
section “Setting Properties” (page 3-4).
Windows 3.x
1Double-click Main from the Program Manager. Then
double-click Control Panel, and Printers.
2Select DocuPrint P14 PCL 5e.
3Click Set As Default printer.
4To set the printer’s properties, click Setup and change the
settings as described in the section “Setting Properties”
(page 3-4).

Configuring the PCL Driver
3-4 ❖DocuPrint P14 User Guide
Setting Properties The DocuPrint P14 printer driver’s Print Setup dialog box
allows you to set various printer properties.
The DocuPrint P14 PCL 5e Print Setup dialog box includes
four tabs:
•Setup
• Advanced Setup
•RCP
•About
Most Windows applications will override settings you
specify in the printer driver. Change all print settings
available in the software application first, and any
remaining settings with the printer driver.
The basic capabilities of the printer driver are described
here. For detailed explanations and assistance with specific
settings, use the driver’s Help functionality, accessed by
clicking the Help button in the dialog box.

Configuring the PCL Driver
Chapter 3: Printing ❖3-5
Setup
Use this tab to change the number of copies, resolution,
page orientation, paper size, and paper source.
Source setting identifies the default paper source. Tray 2
source is available if the optional Tray 2 is installed.
Manual Feed source is used when printing to special
media. The default Auto Continue value of the printer is 15
seconds, meaning that the printer will wait up to 15
seconds for you to press the control panel button before
printing. Afterwards the printer will attempt to print from
whatever paper source is available. If the paper source is
set to Auto Select, the printer automatically selects the
print material according to the following priority:
multi-sheet feeder, Tray 1, Tray 2.
Advanced Setup
Use this tab to change graphic settings, graphic mode,
grayscale, and graphic quality. It also includes settings that
determine how the printer handles TrueType fonts.
When you upgrade your printer memory, you have to set
the correct memory size using the Advanced Setup tab.

Configuring the PCL Driver
3-6 ❖DocuPrint P14 User Guide
RCP
Use this tab to control the following printer features:
•Auto Continue determines what action the printer
should take when a manual feed print job is sent to the
printer and there is no paper in the MSF. If set to ON,
the printer will pick up the paper from Tray 1 after ten
seconds. Otherwise, the printer will wait for you to load
paper in the MSF.
•Econo Mode determines the toner quantity the printer
should use when printing. If set to ON, the printer
conserves toner when printing. The default value is
OFF, which provides 100% usage.
•Paper Type provides the printer with information
about the type of paper to be used for a print job. If you
use paper with a weight of more than 42 lb. (90 g/m2),
or an envelope, set this to THICK and use the MSF’s
manual feed slot.
ABOUT
This tab shows the software version and copyright
information.

Configuring the PostScript Driver
Chapter 3: Printing ❖3-7
Configuring the
PostScript Driver
TBD

Using Printer Utilities
3-8 ❖DocuPrint P14 User Guide
Using Printer Utilities
Your Xerox DocuPrint P14 CD contains the following
utilities, which are installed when you install the printer
drivers:
• Status Monitor
• Font Navigator
• Remote Control Panel
Status Monitor Status Monitor is a program that runs in background and
automatically displays a message on your computer
screen whenever the printer status changes.
Font Navigator Font Navigator is a font manager for Windows 95/98,
Windows NT(4.0), and Windows 3.1x. It gives a quick and
easy way to find fonts, install fonts, and print font samples.
To access the Font Navigator in Windows 95/98 and
NT 4.0, select Start, Programs, Fon t Navi gator.

Using Printer Utilities
Chapter 3: Printing ❖3-9
Remote Control
Panel
The Remote Control Panel (RCP) is a program that allows
you to set printer-specific settings in the printer. It also
allows you to properly set up your printer to work with
DOS applications run inside the Windows MS-DOS
Command Prompt window.
DOS users can change print settings with the Remote
Control Panel (RCP) program.
To start RCP in the DOS environment, type MLRCP at the
DOS prompt, then press Enter. The Remote Control Panel
screen appears.
The screen includes the following tabs.
PRINTING
Use this tab to control the following printer features:
•Paper Size sets the paper size.
•Orientation determines how the printing is oriented
on the page.
•To p M a r g i n sets the top margin of the print material.
•Left Margin sets the left margin of the print material.
After you change RCP settings, you must send it to the
printer by pressing the Send button.

Using Printer Utilities
3-10 ❖DocuPrint P14 User Guide
•Copies sets the number of copies printed for each page.
•Paper Tray sets the default paper source.
•AUTO CR sets how the printer performs a carriage
return.
•Quality sets the printer resolution to either 300 or
600 dpi. The higher the setting, the sharper the clarity
of printed characters and graphics.
CONFIG
Use this tab to control the following printer features:
•Emulation determines the printer language that the
computer communicates with the printer.
•Auto Continue determines what action the printer
should take when a manual feed print job is sent to the
printer and there is no paper in the MSF. If set to ON,
the printer will pick up the paper from Tray 1 after ten
seconds. Otherwise, the printer will wait for you to load
paper in the MSF.
•Jam Recovery determines what action the printer
should take when a paper jam occurs. When set to
OFF, the printer does not reprint a page that has
jammed. When set to ON, the printer keeps the image
in memory for a printed page until the printer signals
that the page has successfully printed. The printer
reprints all jammed pages.

Using Printer Utilities
Chapter 3: Printing ❖3-11
•Power Save determines the length of time the printer
waits after a job is printed before it goes to a reduced
power state. If the printer is used frequently, select OFF
which keeps the printer ready to print with the
minimum warm-up time. This uses more electricity to
keep the printer warm and ready to print.
•Econo Mode determines the toner quantity the printer
should use when printing. If set to ON, the printer
conserves toner when printing. The default value is
OFF, which provides 100% usage
•Fast Print turns the fast print mode on or off.
JOB
Use this tab to control the following printer features:
•Timeout determines the amount of time (in seconds)
the printer will wait before printing the last page of a
print job that does not end with a command to print the
page or a formfeed character.
•Paper Type provides the printer with information
about the type of paper to be used for a print job. If you
use paper with a weight of more than 42 lb. (90 g/m2),
or an envelope, set this to THICK and use the MSF’s
manual feed slot.
•Density determines the overall density of the printed
image.
•Memory Enhancement mode makes the printer
process more data by optimizing the memory. When
set to ON, the complex data can be processed.

Using Printer Utilities
3-12 ❖DocuPrint P14 User Guide
I/O
Use this tab to control the following printer features
(when using the serial port only):
•Baud rate sets the rate at which data is being sent to or
from the computer.
•Robust XON sets XON/XOFF pacing (if the
handshaking protocol uses XON/XOFF pacing). When
set to ON, the printer sends a continuous stream of
XONs to the host computer to indicate that the serial
port is ready to receive more data. An XON is sent every
second as long as no data is received across the serial
port in the last second, the last XON is accepted by the
host computer, and the printer is ready to receive data
from the serial port.
TEST
Use this tab to control the following printer features:
•Self Test prints the configuration sheet. A list of the
user default settings, the installed options, and the
amount of printer memory available prints.
•Demo Page prints the standard demonstration page.

Using Printer Utilities
Chapter 3: Printing ❖3-13
PCL
•Typeface allows you to select the desired typeface. This
setting is ignored when the software application
specifies a font.
•Symbol determines the symbol set. A symbol set is a
set of alphabetic and numeric characters, punctuation,
and special symbols used when printing with a
selected font.
•Pitch sets the font pitch (only if you have selected a
scalable monospaced font). Pitch refers to the number
of fixed-space characters in a horizontal inch of type.
•Point Size sets the font point size (only if you have
selected a scalable typographic font). Point size refers
to the height of the characters in the font. One point
equals approximately 1/72 of an inch. You can select
point sizes from 1 to 1008 in increments of 0.25 points.
•Lines Per Page sets the number of lines that print on
each page. The setting can range from 1 to 225 lines
per page.
•Courier determines the courier font type: Regular or
Dark.
•Fon t Lis t prints the font list showing all the fonts
available for PCL emulation.

Using Printer Utilities
3-14 ❖DocuPrint P14 User Guide
POSTSCRIPT
Use this tab to control the following printer feature (only
when the PostScript option is installed).
•Fon t Lis t prints the font list showing all the fonts
available for PostScript.
ABOUT
This tab shows the software version and copyright
information.

Using the Printer’s Control Panel
3-16 ❖DocuPrint P14 User Guide
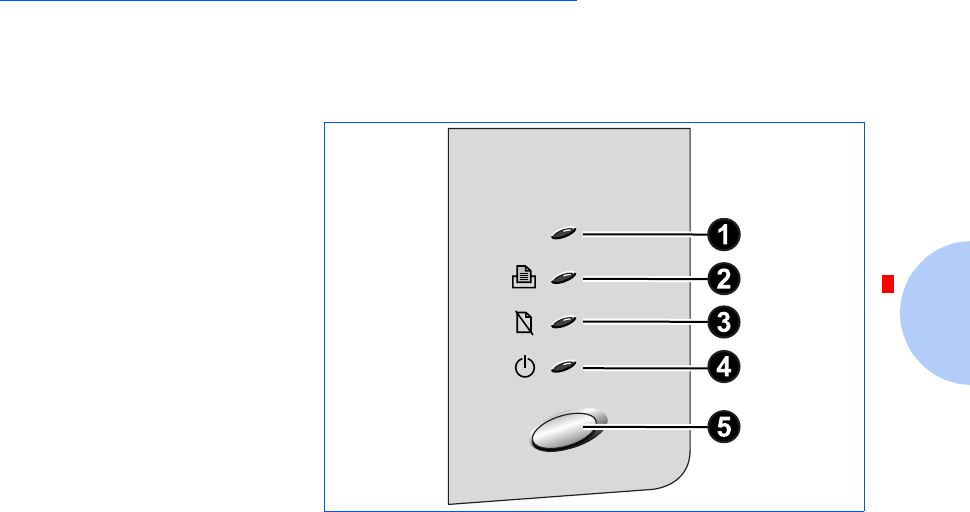
Indicator Lights The four indicator lights show the current printer status,
whether a normal or error condition exists.
An indicator light will either be:
•Off
•On
• Blinking
Refer to Table 3.1 on page 3-17 to identify the various
status and error conditions.
As the printer powers up, all control panel lights turn on
briefly. Then the lights scroll sequentially several times as
the printer goes through its internal diagnostics.
Using the Printer’s Control Panel
Chapter 3: Printing ❖3-17
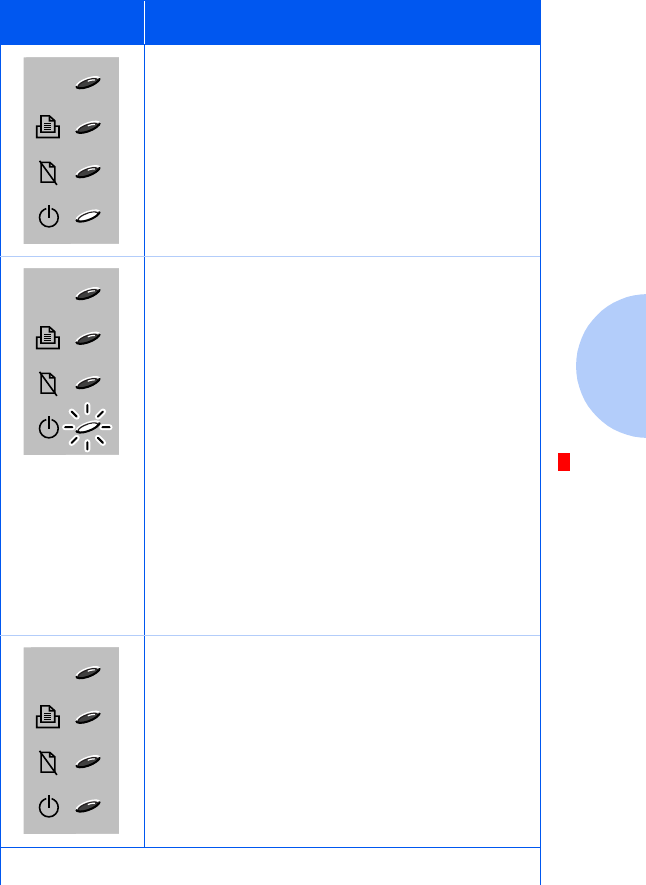
Table 3.1 Indicator Lights
Indicators Status/Condition
On-line
If the READY light is on, the printer is ready
to print.
Printer busy
If the READY light is blinking slowly, the
printer is receiving data from the computer.
Form feed
There may also be unprinted data still in the
printer. This usually happens when you use
software that does not send an ‘end-of-job’
command or formfeed character when it
finishes printing a file. Or the page may be
too complex for the printer’s memory
capacity.
Printing
If the READY light is blinking quickly, the
printer is printing a page.
Off-line
If all lights are off, the printer is off-line and
cannot receive data from the computer.
Press the control panel button to switch to
on-line.
Table 3.1 Page 1 of 4
Using the Printer’s Control Panel
3-18 ❖DocuPrint P14 User Guide
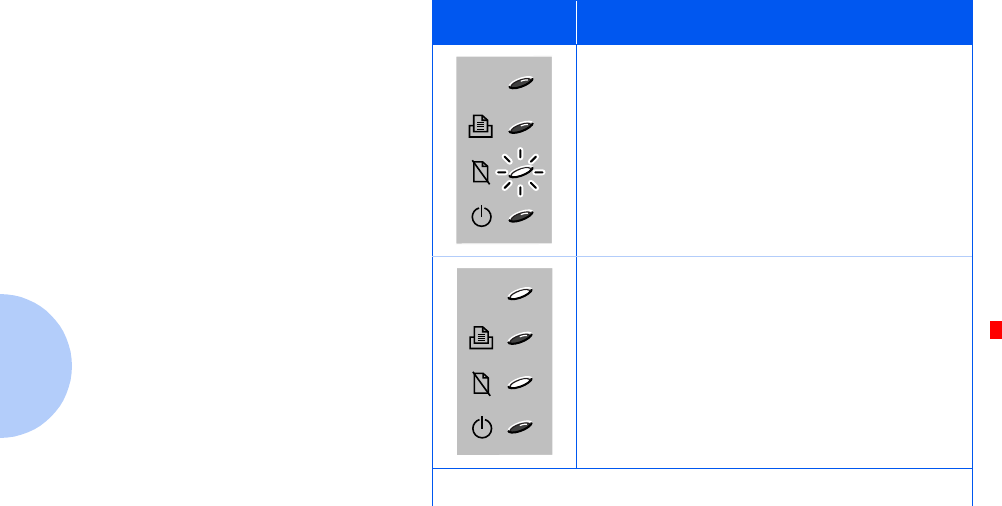
No paper
If the PAPER light is blinking, the printer is
out of paper. See the section “Loading Print
Media” (page 2-6).
Paper jam
If the ERROR and PAPER lights are on, the
printer has a paper jam. See the section
“Clearing Paper Jams” (page 5-2).
Table 3.1 Indicator Lights (continued)
Indicators Status/Condition
Table 3.1 Page 2 of 4
Using the Printer’s Control Panel
Chapter 3: Printing ❖3-19
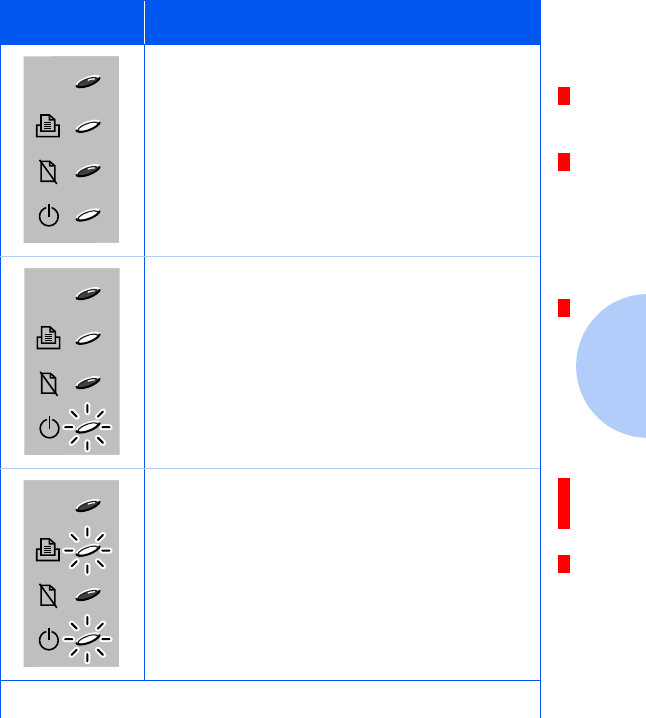
Manual feed mode
If the MANUAL FEED and READY lights are
both on, the printer is in manual feed mode.
It happens when you insert paper into the
multi-sheet feeder (MSF), or when you
select the ‘Manual Feed’ source from your
software application.
Manual feed printing
If the MANUAL FEED light is on and the
READY light is blinking, the printer is
printing a page with paper fed manually.
Waiting for next sheet from MSF
If both the MANUAL FEED and READY lights
are blinking, the printer is waiting for the
next sheet to be fed from the MSF.
Table 3.1 Indicator Lights (continued)
Indicators Status/Condition
Table 3.1 Page 3 of 4
Using the Printer’s Control Panel
3-20 ❖DocuPrint P14 User Guide
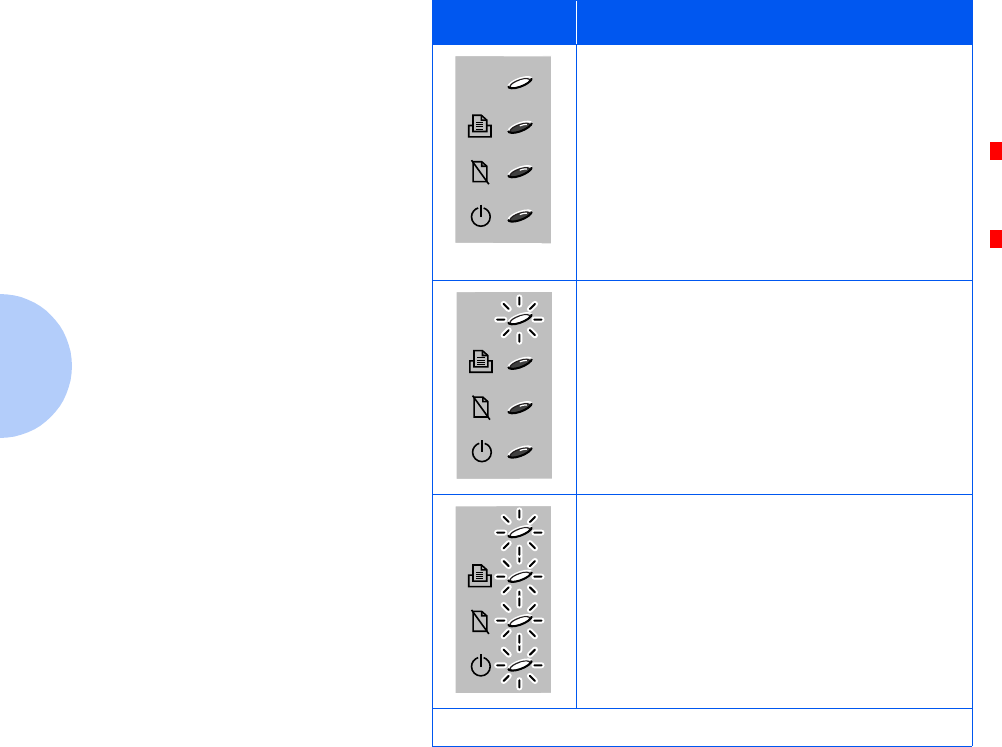
Cover open or no cartridge
If the ERROR light is on, the printer has
experienced an error.
Things to Check For:
• The printer cover is open or not closed
securely.
• The laser print cartridge is either missing
or not installed.
Overrun or memory overflow
If the ERROR light blinks for a while, then
only the READY light comes on, the printer
has insufficient memory to process the job.
The printer will print a page, telling you the
error status. Simplify the page layout and
remove any unnecessary graphics. Or, you
could add more memory.
System error
If all lights blink, the printer may have a
system error.
Turn the printer off and back on. If the
printer is still not operating properly and all
lights blink, you have to call for service.
Contact Xerox or your authorized Xerox
reseller.
Table 3.1 Indicator Lights (continued)
Indicators Status/Condition
Table 3.1 Page 4 of 4

Using the Printer’s Control Panel
Chapter 3: Printing ❖3-21
Control Panel
Button
Refer to Table 3.2 for a description of the control panel
button’s various uses.
Table 3.2 Button Functions
Function Description
On-line and
Off-line
Briefly press the button. Each time you press
it, the printer goes on-line or off-line, and
the READY light will be on or off according
to the status.
To print data, the printer should be on-line.
Printer reset Perform a reset if the printer seems to be
having difficulty printing a page, i.e., the
READY light is blinking slowly and no image
is printed after a long time. This function will
cancel the print job from the printer, erase
data from the printer and reset the printer.
Flush the operating system printer spooler
first. Follow this procedure for Windows 95,
98 and NT 4.0: File > Settings > Printers >
Right-click Xerox DocuPrint P14 > Purge
Print Documents. For Windows 3.1x, follow
this procedure: Main Group > Print
Manager > Xerox DocuPrint P14 on LPT1 >
Highlight document to delete > Document >
Delete Document.
To reset the printer, make sure that all lights
are off. If necessary, briefly press the button
to turn the printer to off-line status. Press
and hold the button for about four seconds
until all lights blink briefly, then let go of the
button. All data not printed yet will be
erased, then the READY light will come on.
Table 3.2 Page 1 of 2

Using the Printer’s Control Panel
3-22 ❖DocuPrint P14 User Guide
Self test The printer should be on-line, i.e., the
READY light is on and the other lights are
off.
Press and hold the button for about four
seconds until all lights blink briefly, then let
go of the button.
The configuration sheet will print.
Form feed If the READY light is blinking slowly and the
printer does not print any image, there is
unprinted data in the printer. To print the
remaining data, press and hold the button
for about four seconds while the READY
light is blinking.
Print quality
adjustment
If you are getting streaks or spots on your
prints, the printer’s OPC drum may need to
be cleaned.
Press and hold the button for about ten
seconds until all lights blink briefly, then let
go of the button. After cleaning the printer,
one cleaning sheet will print.
If the printer determines that a
cleaning of its OPC drum is
necessary, it will automatically print a
Print Quality Adjustment page during
the course of a normal print job.
Table 3.2 Button Functions (continued)
Function Description
Table 3.2 Page 2 of 2

Chapter 4: Maintaining the Printer ❖4-1
Maintaining the
Printer Chapter4
Replacing the Laser Print Cartridge .............................. 4-2
Cleaning the Printer ....................................................... 4-5
Cleaning the Outside .................................................. 4-5
Cleaning the Inside ..................................................... 4-6

Replacing the Laser Print Cartridge
4-2 ❖DocuPrint P14 User Guide
Replacing the Laser Print
Cartridge
The life of your laser print cartridge depends on the
amount of toner used in each print job. For instance, when
you print mostly business letters, which typically have
about a 5% page coverage, you can expect a laser print
cartridge life of approximately 6,000 pages. If you print a
lot of graphics, you may need to change the cartridge more
often. You can check how many pages have been printed
by printing a configuration sheet, as described in the
section “Control Panel Button” (page 3-21).
If the Econo Mode option is available in your software
application program, you can extend the life of your laser
print cartridge. Econo Mode uses approximately 50% less
toner than normal printing. The printed image is much
lighter, and is adequate for printing drafts or proofs.
When the laser print cartridge is near the end of its life,
white vertical streaks or hue changes will occur. You can
temporarily reestablish print quality by redistributing the
remaining toner in the cartridge:
• Open the printer cover and remove the cartridge.
• Gently shake the cartridge to distribute the toner evenly
inside the cartridge.
• Reinstall the cartridge and close the cover.
This is typically successful one time only, however. As the
toner eventually runs out, print quality problems will
reoccur and the ERROR indicator on the control panel will
light up (see page 3-20). You will have to replace the laser
print cartridge (go to page 4-3).
Replacing the Laser Print Cartridge
Chapter 4: Maintaining the Printer ❖4-3
To replace the laser print cartridge:
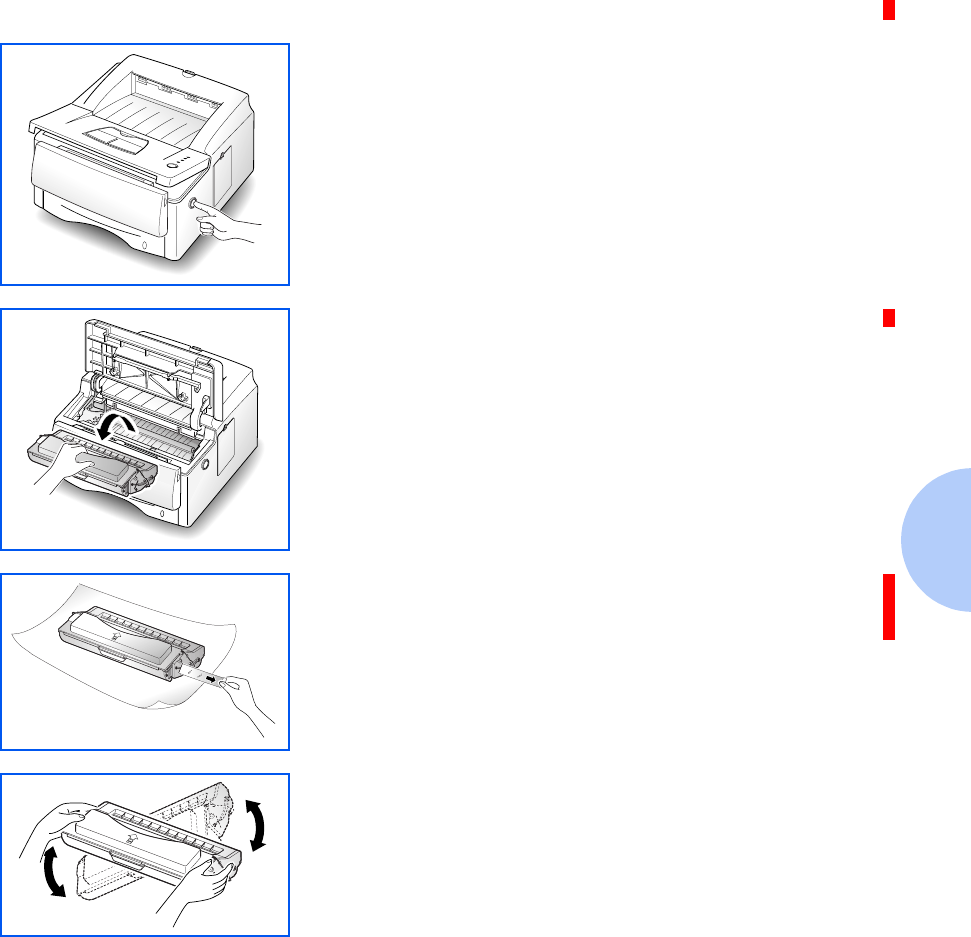
1Open the front cover by pressing the cover release button,
and raise the cover.
2Remove the old laser print cartridge. Follow the
instructions printed on the cartridge box to recycle it.
3Unpack the new laser print cartridge and place it on a
clean sheet of paper. Carefully remove the sealing tape
and discard it.
4Shake the cartridge from side to side five or six times to
distribute the toner evenly inside the cartridge.
Replacing the Laser Print Cartridge
4-4 ❖DocuPrint P14 User Guide
5Find the cartridge slots inside the printer, one on each
side.
6Grasp the handle and slide the cartridge down on top of
the cartridge slots until it drops into place. Then, close the
front cover.

Cleaning the Printer
Chapter 4: Maintaining the Printer ❖4-5
Cleaning the Printer
This section contains some general guidelines for keeping
your DocuPrint P14 clean.
Cleaning the
Outside
Wipe the outside surfaces of the printer with a soft, clean,
lint-free cloth. You can dampen the cloth slightly with
water, but be careful not to let any water drip onto the
printer or inside it.
Do not use ammonia-based sprays or volatile
solvents such as thinner to clean the printer,
as these can damage the printer surface.
Keep the front cover closed when cleaning
the outside of the printer.
Always unplug the power cord before
cleaning the inside of the printer.

Cleaning the Printer
4-6 ❖DocuPrint P14 User Guide
Cleaning the Inside When paper jams occur, unfused toner on the paper can
fall off the paper and build up inside the printer.
1Unplug the power cord.
2Remove the laser print cartridge, as described on page 4-3.
3Use a soft cloth to wipe away any dust and spilled toner
from the cartridge.
You can dampen the cloth slightly with water,
but be careful not to let any water drip onto the
printer or inside it.
4Reinsert the laser print cartridge.

Chapter 5: Troubleshooting ❖5-1
Troubleshooting Chapter5
Clearing Paper Jams ...................................................... 5-2
Output Area ................................................................. 5-4
Input Area .................................................................... 5-5
Inside the Printer ......................................................... 5-6
In Optional Tray 2 ....................................................... 5-7
Solving Printing Problems ............................................ 5-9
Solving Print Quality Problems .................................. 5-14
Solving PostScript Problems ...................................... 5-17
Obtaining Service ........................................................ 5-18

Clearing Paper Jams
5-2 ❖DocuPrint P14 User Guide
Clearing Paper Jams
By carefully selecting your print media and loading them
properly, you should be able to avoid most paper jams. If a
paper jam occurs, the following will happen:
• The Status Monitor pops up and reports problems the
printer is having.
• The control panel’s PAPER and ERROR indicator lights
both come on steadily.
If jams occur frequently, make sure that you:
• Load media properly. See the section “Loading Print
Media” (page 2-6). Make sure the adjustable guides are
positioned correctly.
• Do not overload the paper tray. Make sure the paper is
under the paper capacity mark on the inside of the tray,
and fits under the metal corner tabs of the tray.
• Do not remove a paper tray while the printer is
printing.
• Flex, fan, and straighten the stack of paper before
loading it.
To avoid tearing paper, pull the jammed paper out gently
and slowly.

Clearing Paper Jams
Chapter 5: Troubleshooting ❖5-3
• Do not load stacks of labels or transparencies in the
paper trays or multi-sheet feeder (MSF). Labels or
transparencies must be fed one at a time through the
MSF.
• Do not load wrinkled, creased, damp, or highly curled
paper.
• Do not mix paper types in one tray.
• Use only recommended print materials. See the
Supplies/Options Guide.
• Make sure the recommended print side is face down
when loading a paper tray.
• Keep print materials stored in an acceptable
environment.
Paper jams can occur in any of four areas:
•“Output Area” (page 5-4)
•“Input Area” (page 5-5)
•“Inside the Printer” (page 5-6)
•“In Optional Tray 2” (page 5-7)
Clearing Paper Jams
5-4 ❖DocuPrint P14 User Guide
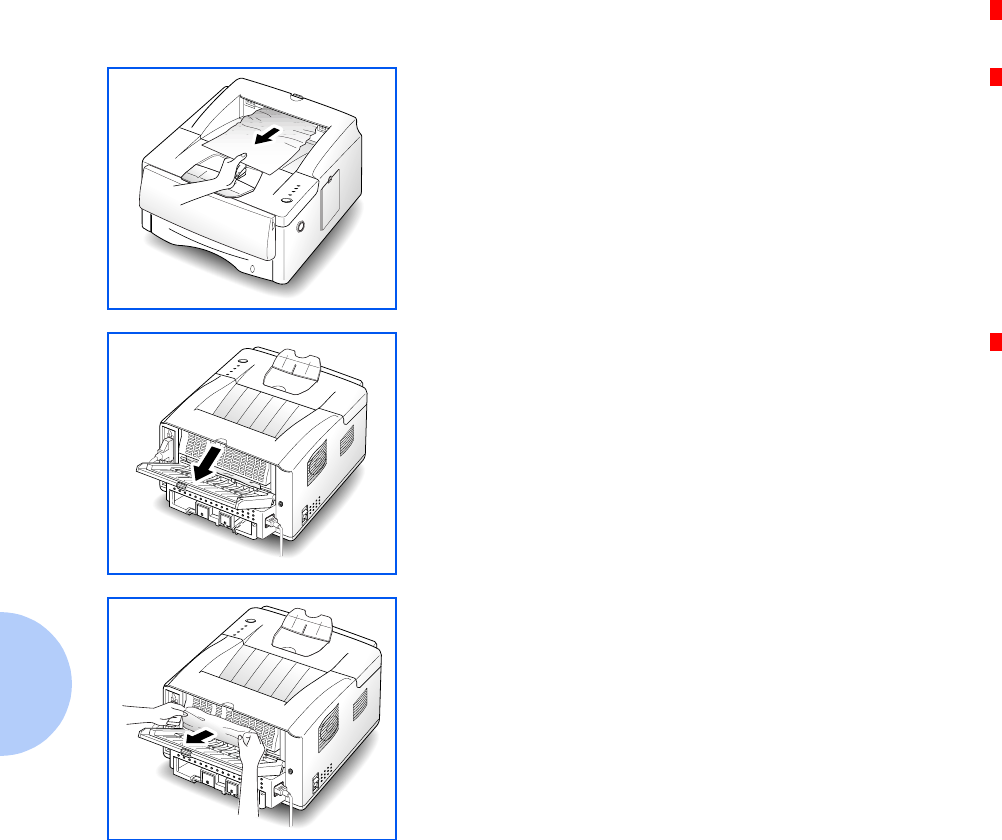
Output Area Follow the steps below to clear a paper jam from the
output area.
1If the item jams as it exits to the face down stacker and a
long portion of it is visible, pull it straight out.
If there is resistance when you pull on the item, and it
does not move immediately when you pull it, stop pulling
and continue with the next step.
2Locate the rear cover and open it outwards.
3Loosen the item if it is caught in the feed rollers, then pull
it gently out. Then close the rear cover.
4To resume printing, open the front cover, then close it
again.
Clearing Paper Jams
Chapter 5: Troubleshooting ❖5-5
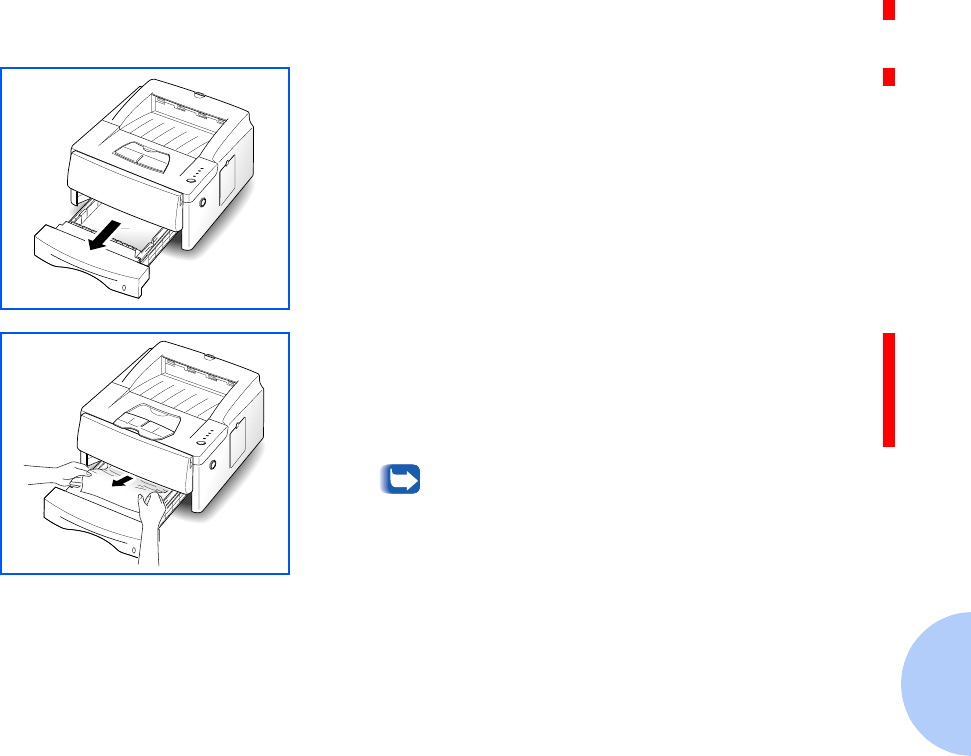
Input Area Follow the steps below to clear a paper jam from the input
area.
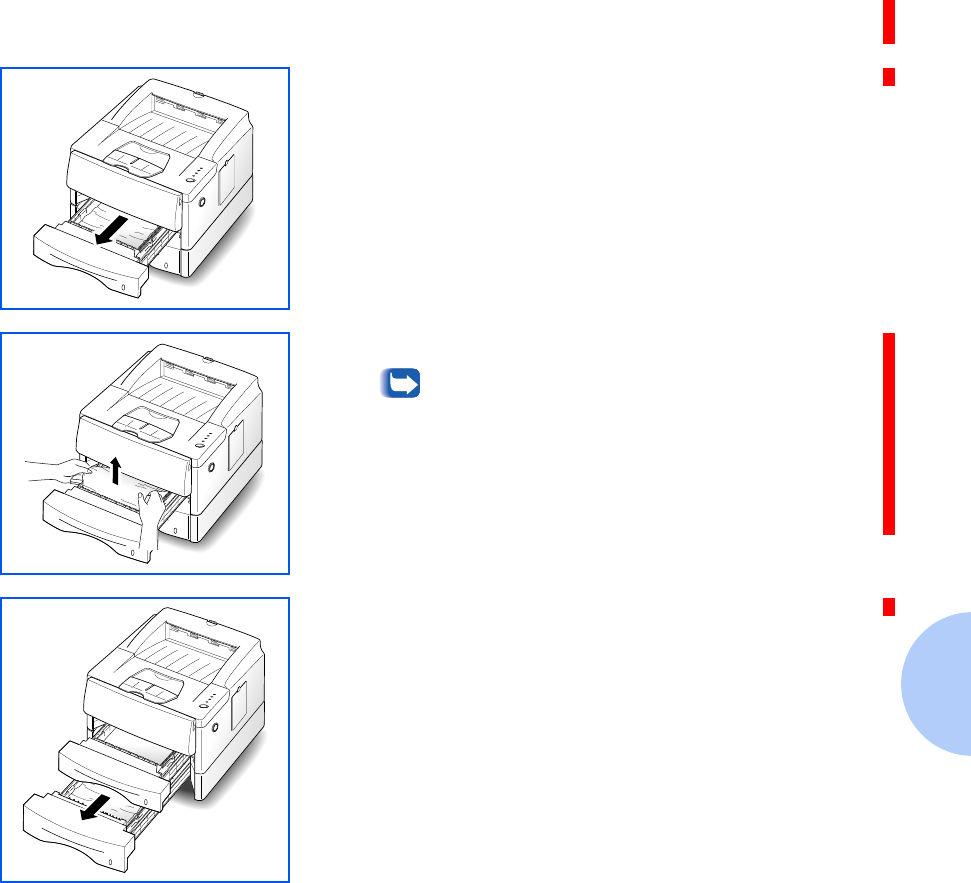
1Pull Tray 1 half way out of the printer.
2If you see the jammed item, pull the tray out of the printer
and remove the jammed item. Check if remaining paper
in the tray is properly seated.
3Slide the tray back into the printer.
If a short piece is visible and you cannot grasp it,
or if you do not see the paper, the jam has
occurred inside the printer. See the section
“Inside the Printer” (page 5-6).
4If the printer does not resume printing after you have
cleared the jam, open the printer cover, then close it again.
Clearing Paper Jams
5-6 ❖DocuPrint P14 User Guide
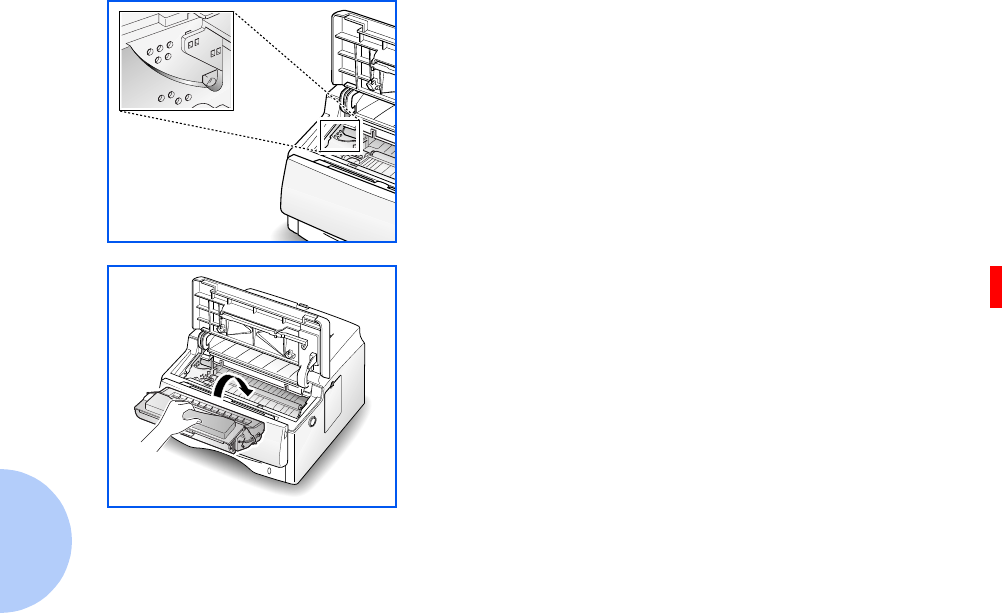
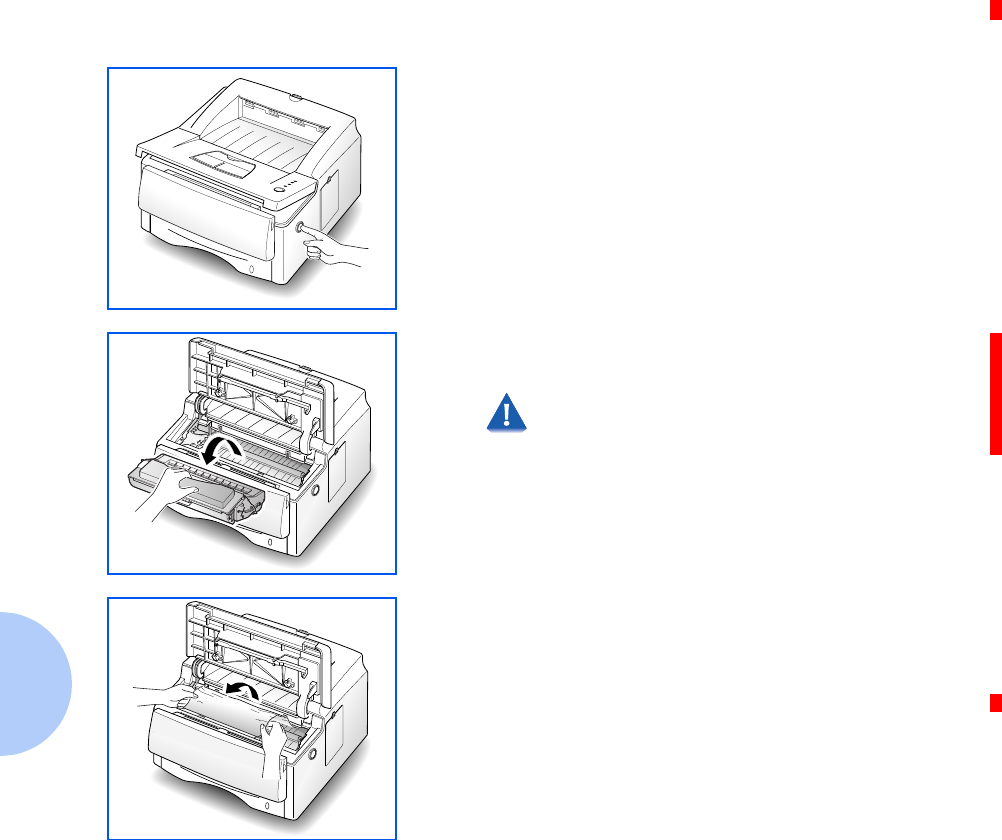
Inside the Printer Follow the steps below to clear a paper jam from inside
the printer.
1Open the front cover by pressing the cover release button,
and raise the cover.
2Remove the laser print cartridge and place it on a clean
piece of paper.
Do not expose the green drum area to bright
light and do not touch this area. Do not move
the shutter that protects the green drum.
3Gently pull the item toward you.
4Check that there are no other items in the printer.
5Reinstall the laser print cartridge, then close the printer
cover.
Clearing Paper Jams
Chapter 5: Troubleshooting ❖5-7
In Optional Tray 2 Follow the steps below to clear a paper jam from inside
the optional Tray 2.
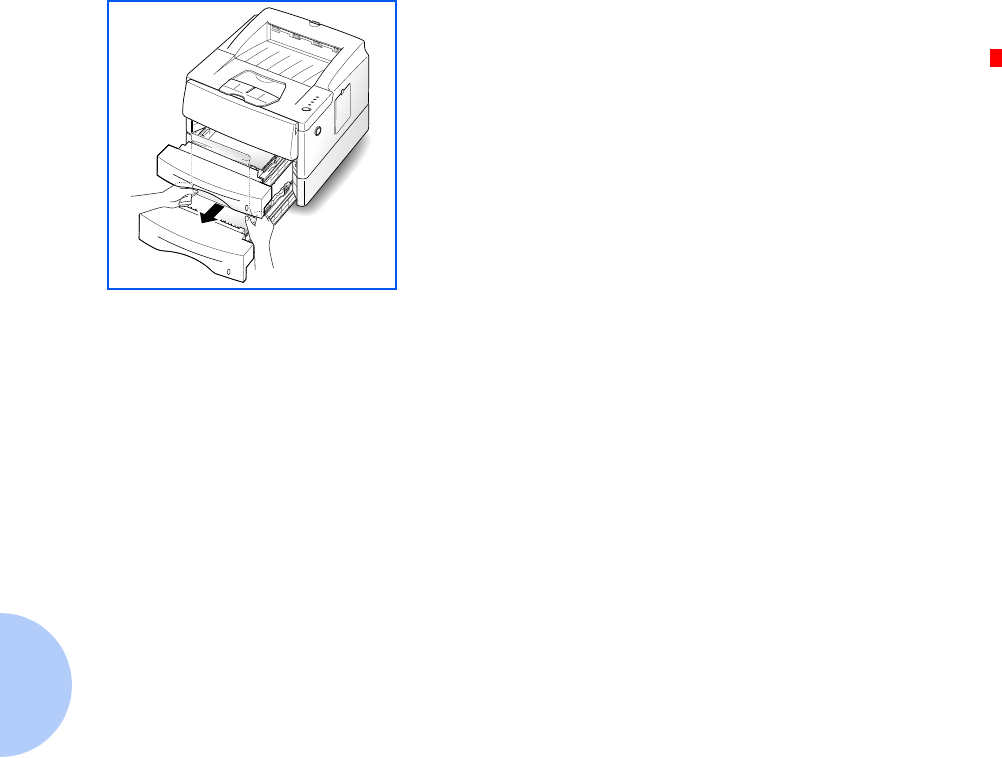
1Pull Tray 1 half way out of the printer.
2If you see the jammed paper, pull it out.
Paper may also be trapped in a vertical position
in Tray 1 while the printer was grabbing paper
from Tray 2.
3Slide Tray 1 back into the printer.
If a short piece is visible and you cannot grasp it, or if you
do not see the paper, the jam has occurred inside Tray 2.
Continue with Step 4.
4Pull Tray 2 out of the printer.
Clearing Paper Jams
5-8 ❖DocuPrint P14 User Guide
5If you see the jammed paper, pull it out.
6Slide the tray back into the printer.
7If the printer does not resume printing after you have
cleared the jam, open the printer cover, then close it again.

Solving Printing Problems
Chapter 5: Troubleshooting ❖5-9
Solving Printing Problems
If you have any problems with the operation of your
DocuPrint P14, refer to Table 5.1 on page 5-10 for
suggested remedies.
If you cannot solve a problem after carrying out the
suggested remedies in this section, call the Xerox Helpline.
See the section “Obtaining Service” (page 5-18).

Solving Printing Problems
5-10 ❖DocuPrint P14 User Guide
Table 5.1 Printer Operation Problems
Problem Possible Cause Remedy
The printer does
not print.
Your printer is not selected as
the default printer.
Select DocuPrint P14 PCL 5e, P14 PCL 6, or
P14 PS as your default printer. See the
section “Selecting Your Printer” (page 3-3)
The front cover may be open. Make sure that all covers are closed
securely.
The printer cable is not
connected properly.
Check the connection.
The printer cable is defective. Swap the cable with one known to work. If
printing is now possible, replace the bad
cable.
The port setting is incorrect. Check the Windows printer settings to make
sure that the print job is being sent to the
correct port (for example, LPT1)
The laser print cartridge is not
installed properly.
Remove and reinsert the laser print
cartridge.
A paper jam has occurred. Clear the paper jam. See the section
“Clearing Paper Jams” (page 5-2).
The printer may be configured
incorrectly.
Check the application to make sure that all
print settings are correct.
The printer driver may be
incorrectly installed.
Delete the printer driver, and reinstall the
printer driver. Try printing a configuration
sheet.
Table 5.1 Page 1 of 4

Solving Printing Problems
Chapter 5: Troubleshooting ❖5-11
Paper is not fed
into the printer.
Paper has not been loaded
correctly.
Remove the paper tray and reload the paper
correctly.
There is too much paper in the
paper tray.
Remove some of the paper from the tray.
The printer ejects
blank pages.
The laser print cartridge is out
of toner.
Replace the laser print cartridge. See the
section “Replacing the Laser Print
Cartridge” (page 4-2).
Half of the page is
blank.
The page layout is too
complex.
Simplify the page layout and remove any
unnecessary graphics from the document, if
possible.
Install more memory. See “Memory and
PostScript SIMMs” (page D-4).
The page orientation setting
may be incorrect.
Change the page orientation in your
application program.
The paper size and the software
paper size settings do not
match.
Make sure the paper size in the software
settings matches the paper in the tray.
The printer cable specifications
may be incorrect.
Replace with the cable with an IEEE-1284
rated cable.
Table 5.1 Printer Operation Problems (continued)
Problem Possible Cause Remedy
Table 5.1 Page 2 of 4

Solving Printing Problems
5-12 ❖DocuPrint P14 User Guide
The printer prints
the wrong data, or
it prints incorrect
characters.
The printer cable is not
connected properly.
Check the connection.
There may be a problem with
the printer driver software.
Exit Windows and reboot the computer.
Turn the printer off and then back on again.
The printer cable specifications
may be incorrect.
Replace the cable with an IEEE-1284 rated
cable.
The wrong printer driver is
selected.
Select the correct printer driver.
The paper keeps
jamming.
There is too much paper in the
paper tray.
Remove excess paper from the paper tray. If
printing special media, use the MSF for
printing.
An incorrect type of paper is
being used.
Use only paper that meets the specifications
required by the printer.
An incorrect output method is
being used.
Items such as thick paper should not be
printed using the standard face down
stacker. Use the rear face up stacker instead.
Table 5.1 Printer Operation Problems (continued)
Problem Possible Cause Remedy
Table 5.1 Page 3 of 4

Solving Printing Problems
Chapter 5: Troubleshooting ❖5-13
Printing is too
slow.
If using Windows 3.1x, Print
Manager may be disabled.
From the Control Panel Printers menu, check
the Use Print Manager box.
If using Windows 3.1x, the
Background Printing item in the
Options menu of Print Manager
may be set incorrectly.
Select Background Printing from the
Options menu in the Print Manager.
If using Windows 95, 98 or NT,
the spooling setting may be set
incorrectly.
From the Start menu, select Settings and
Printers. Click the DocuPrint P14 icon with
the right mouse button, select Properties,
click the Details tab, and then click the
Spool Settings button. Select the desired
spool setting from the available choices.
The computer may have
insufficient random-access
memory (RAM).
Install more random-access memory (RAM)
in your computer. See “Memory and
PostScript SIMMs” (page D-4).
Table 5.1 Printer Operation Problems (continued)
Problem Possible Cause Remedy
Table 5.1 Page 4 of 4

Solving Print Quality Problems
5-14 ❖DocuPrint P14 User Guide
Solving Print Quality
Problems
If you have any problems with the printed output of your
DocuPrint P14, refer to Table 5.2 on page 5-15 for
suggested remedies.
The causes listed in Table 5.2 are probable causes only, and
may not represent all of the possible cases which may occur
under actual operating conditions. If you experience a
problem which does not seem to fall under any of the cases
listed in this table, or if you are concerned about any other
aspect of printer operation, contact the Xerox Helpline.

Solving Print Quality Problems
Chapter 5: Troubleshooting ❖5-15
Table 5.2 Print Quality Problems
Problem Possible Cause Remedy
Irregular faded
patches of print
There is a paper quality
problem.
Use only paper that meets the specifications
required by the printer.
Toner may be unevenly
distributed.
Remove the laser print cartridge and shake
it gently to evenly distribute the toner. Then
replace the cartridge back into the printer.
Black staining There is a paper quality
problem.
Use only paper that meets printer
specifications.
A laser print cartridge from
another printer has been
installed.
Always use the same laser print cartridge
with the same printer. Using a cartridge that
has already been used in another printer
may not give satisfactory results.
The printer’s OPC drum may
need to be cleaned.
Press and hold the control panel button for
ten seconds until all lights blink, then let go
of the button. The printer cleans the OPC
drum automatically. After cleaning, one
cleaning sheet prints.
Character voids The paper may be too dry. Try printing with a different batch of paper.
Background
scatter
The paper may be too damp. Try printing with a different batch of paper.
Do not open packages of paper until
necessary so that the paper does not absorb
too much moisture from the air.
Printing over uneven surfaces. If printing onto envelopes, change your
printing layout to avoid printing over areas
that have overlapping seams on the reverse
side.
Table 5.2 Page 1 of 2

Solving Print Quality Problems
5-16 ❖DocuPrint P14 User Guide
Missing characters The paper may be too damp. Try printing with a different batch of paper.
Do not open packages of paper until
necessary so that the paper does not absorb
too much moisture from the air.
Back of printout
dirty
The transfer roller may be dirty. Print a few blank pages to clean the transfer
roller.
Incorrect fonts TrueType fonts may be
disabled.
Use the Fonts dialog box in the Control
Panel to enable TrueType fonts.
Faded graphics. Toner may be low. Remove the laser print cartridge and shake
it gently to evenly distribute the toner. Then
replace the cartridge back into the printer.
Table 5.2 Print Quality Problems (continued)
Problem Possible Cause Remedy
Table 5.2 Page 2 of 2

Solving PostScript Problems
Chapter 5: Troubleshooting ❖5-17
Solving PostScript Problems
Table 5.3 contains problems that may occur with
PostScript printing (available only if the PostScript option
is installed).
Table 5.3 PostScript Problems
Problem Possible Cause Remedy
PostScript file can not
be printed.
The PostScript option may
not be installed, or the
installed memory may be
insufficient.
Print a configuration sheet and verify that
the PS version is available for printing, and
that total system memory is at least 12 MB.
If PostScript is not available, install the
PostScript option. See “Memory and
PostScript SIMMs” (page D-4).
If system memory is not at least 12 MB,
install the 8 MB SIMM provided with the
PostScript option.
Error messages are
printed (i.e., “This job
contains binary
data...”)
The pure binary data
option is not supported by
the PostScript driver.
Open the Properties tab of the PostScript
printer driver, click on PostScript, and click
on the Advanced button. The pure binary
data option is not supported. Choose
another.
The printer name does
not appear in the
Chooser (Macintosh
only)
The LocalTalk connection is
not secure.
Make sure that the printer is powered on.
Check that the LocalTalk cable is completely
plugged into the printer and your
Macintosh.
The optional Tray 2 is
not selected in the
driver.
The printer driver has not
been configured to
recognize the optional tray.
Open the PS driver Properties and set ‘Paper
Tray 2’ item of Device option to Installed.

Obtaining Service
5-18 ❖DocuPrint P14 User Guide
Obtaining Service
If you’re unable to solve your printer problems, you may
want to call the Xerox Helpline for service. Before you call,
however, check these things:
• Is the power cord plugged into the printer?
• Is the power cord plugged directly into a wall outlet?
• Is your printer connected properly to your computer?
• Are all other devices attached to your printer plugged
in and turned on?
• Is the wall outlet turned off by any switches?
• Has a power outage occurred in your area?
• Is a laser print cartridge installed in the printer?
• Is the cover closed completely?
Once you’ve checked all these things, turn your printer off
and back on again. If your printer is still not operating
properly, call for service.
If the READY light is on, print out a configuration sheet by
pressing and holding down the control panel button for
about four seconds until all indicators blink briefly, then let
go of the button. See the section “Control Panel Button”
(page 3-21).
The configuration sheet lists your printer model, any
options you have installed, and your user default settings.
The service representative will probably ask for this
information.

Appendix A: Printer Specifications ❖A-1
Printer
Specifications Appendix A

Printer Specifications
A-2 ❖DocuPrint P14 User Guide
Item Specification and Description
Engine MLE-6100
Print Speed 12PPM (A4 Size, 5% Character Pattern)
Resolution True 600 x 600 dpi, 1200 dpi class RET
Source of Light Laser Diode (LSU:Laser Scanner Unit)
Print Method Non-impact Electrophotography
Feed Method Cassette & Manual, Option Feeder
Paper Handing (output) Face Down: 250 sheets, Face Up: 10 sheets
Feed Capacity Tray 1: 250 sheets of paper (75g/m2)
MSF: 100 sheets of paper (75g/m2), 10 envelopes
Option Tray 2: 250 sheets of paper
Warm-up time 45 seconds or less (23¡C, 50%)
First Print Time 14 seconds or less (Fast Mode)
Power Rating AC100~120V/ 220~240V(±15%), 50/60Hz (±3%)
Power Consumption Max: 650W, During Printing: 210WH (average)
Power Saving Consumption During Sleep: Max 28 W
Less than 30W during 1 hour when it turned on
Certification & Compliance C-UL, TUV, FCC, CDRH, CE, CB
Acoustic Noise Stand by: Less than 36dB, Operating: Less than 49dB
Toner Supply Laser Print Cartridge
Expected Life Span 150,000 sheets
Operating Environment Temperature: 10~30¡C, Humidity: 20~80%RH
Storage Environment Temperature: 0~35¡C, Humidity: 10~90%RH
Weight Net: Max 11Kg, Gross: 12Kg
External Dimensions 360 (W) x 368 (D) x 220 (H)mm

Printer Specifications
Appendix A: Printer Specifications ❖A-3
Print Cartridge Life Span: 5,000 pages, 5% Pattern
Developing: Non-magnetic Contact Developing
Charging: Conductive Roller Charging
Density Adjustment: 3 step (Light, Medium, Dark)
Toner Supply Method: Exchanging the Developer
Toner Checking Sensor: None
Transfer System: Conductive Roller Transfer
Fusing System: Temperature & Pressure
Ozone Emission: Less than 0.1 PPM
Emulation PCL5e, PCL 6 (compatible with HP LaserJet 5P)
Font 1 bitmap
45 scalable (35 intelligent, 10 truetype)
CPU Motorola Power PC 603e (clock speed 100MHz)
RAM Memory Standard 4M byte (16M bit x 2)
Option SIMM Module ; 4, 8, 16, 32M byte
ROM 4M byte (8M bit x 2: Program) Flash Memory
EEPROM 512 bytes
Interface Bidirectional Parallel Standard
- IEEE 1284 COMPATIBLE MODE
- IEEE 1284 NIBBLE MODE
- IEEE 1284 BYTE MODE
- IEEE 1284 ECP WITHOUT RLE
- IEEE 1284 ECP WITH RLE
USB Interface Standard
- USB 1.0 compliant
- 12Mbps 1 port
Serial/Local Interface Optional
Serial (RS-232C)
- 300, 600, 1200, 2400, 4800, 9600, 19200, 38400, 57600, 1152bps
- XON/XOFF, DTR/DST Protocol
- Rubust XON for XON/XOFF
LOCALTALK
- Macintosh Host Interface
230.4KBPS, SDLC, FMO Coding, RS-232C
Interface Switching Automatic (Serial & Parallel)
Interface Time Out 5 min (max.)
Item Specification and Description

A-4 ❖DocuPrint P14 User Guide
Appendix B: Environmental and Safety Considerations ❖B-1
Environmental
and Safety
Considerations Appendix B
Introduction .................................................................... B-2
Laser Safety .................................................................... B-3
Ozone Safety .................................................................. B-6
Electrical Safety .............................................................. B-7
Radio Frequency Emissions ........................................ B-10
Operational Safety ....................................................... B-14

Introduction
B-2 ❖DocuPrint P14 User Guide
Introduction
The Xerox DocuPrint P14 and its supplies are designed
and tested to meet strict safety requirements. These
include safety agency examination and approval, and
compliance to established environmental standards.
Please read the following instructions carefully before
operating the printer and refer to them as needed to
ensure the continued safe operation of your Xerox
DocuPrint P14. The safety testing and performance of this
product have been verified using Xerox materials only.
Follow all warnings and instructions marked on or
supplied with the product.

Laser Safety
Appendix B: Environmental and Safety Considerations ❖B-3
Laser Safety
The Xerox DocuPrint P14 complies with laser product
performance standards set by governmental, national and
international agencies as a Class 1 Laser Product. It does
not emit hazardous radiation, as the beam is totally
enclosed during all phases of customer operation and
maintenance.
The use of controls, adjustments, or procedure other than
those specified in the documentation might result in
hazardous exposure to laser light.
The laser beam inside the printer is completely confined
within the protective housings and external covers. The
radiation emitted cannot escape from the machine during
any phase of user operation.
The Xerox DocuPrint P14 contains laser danger labels.
These labels are intended for use by Xerox Service
Representatives, and are placed on or near panels or
shields that require special tools for removal. Do not
remove any of these panels. There are no operator
serviceable areas inside these covers.

Laser Safety
B-4 ❖DocuPrint P14 User Guide
Laser Safety for
the United States
and Canada
The Xerox DocuPrint P14 complies with safety standards,
and is certified as a Class 1 Laser product under the U.S.
Department of Health and Human Services (DHHS)
Radiation Performance Standard according to the
Radiation Control for Health and Safety Act of 1968. The
printer does not emit hazardous laser radiation.
Since radiation emitted inside the printer is completely
confined within the protective housings and external
covers, the laser beam cannot escape from the machine
during any phase of user operation.
The Center for Devices and Radiological Health (CDRH)
of the U.S. Food and Drug Administration implemented
regulations for laser products of August 1, 1976. These
regulations apply to laser products marketed in the United
States. The label on the machine indicates compliance
with the CDRH regulations and must be attached to laser
products marketed in the United States.
The Xerox DocuPrint P14 contains laser danger labels.
These labels are intended for use by Xerox Service
Representatives, and are placed on or near panels or
shields that require special tools for removal. Do not
remove any of these panels or shields. There are no
operator serviceable areas inside these covers.
The use of controls, adjustments, or
procedures other than those specified in
the documentation might result in
hazardous exposure to laser light.

Laser Safety
Appendix B: Environmental and Safety Considerations ❖B-5
Laser Safety for
Finland and
Sweden
Luokitus on on tehty standardin EN 60825 mukaisesti
Klassningen är gjord I enlighet met standarden EN 60825.
LUOKAN 1 LASERLAITE
KLASS 1 LASER APPARAT
VA R O I T U S !
Laitteen käyttaminene muulla kuin tässä käyttöohjessa
mainitulla tavalla saattaa alitstaa käyttäjän
turvallisuusluokan 1 ylittävälle näkymättömälle
lasersäteiylle.
VA R N I N G !
Om Apparaten används på annat sätt än I denna
bruksanvisning specficeratas, kan användaren utsättas för
osynlig laserstrålning, som överskrider gränsen för
laserklass 1.
Laser Statement
(Laserturvallisuus)
Never operate and service the printer with the protective
cover removed from laser/scanner assembly. The
reflected beam, although invisible, can damage your eyes.
Class 1 laser product
Luokan 1 laserlaite
Klass 1 laswer apparat
Allonpituus 770-795 nm
Teho 0.40mw +/-0.04 mw

Ozone Safety
B-6 ❖DocuPrint P14 User Guide
Ozone Safety
During normal operation, the Xerox DocuPrint P14
produces ozone. The ozone produced does not present a
hazard to the operator. However, it is advisable that the
machine be operated in a well ventilated area.
If you need additional information about ozone, please
request the Xerox publication Ozone (part number
600E74140) by calling 1-800-828-6571 in the United States
and Canada.

Electrical Safety
Appendix B: Environmental and Safety Considerations ❖B-7
Electrical Safety
Always follow a code of safe habits starting with the
following:
• Use only the power cord supplied with your Xerox
DocuPrint P14.
• Do not use a ground adapter plug to connect the Xerox
DocuPrint P14 to a power source receptacle that lacks a
ground connection terminal.
• Plug the power cable directly into a properly grounded
electrical outlet. Do not use an extension cord. If you
are not sure whether or not an outlet is properly
grounded, consult an electrician.
• This product is equipped with a 3-wire grounding type
plug (e.g., a plug having a third grounding pin). This
plug will fit only into a grounding-type power outlet.
This is a safety feature. To avoid risk of electrical
shock, contact your electrician to replace the receptacle
if you are unable to insert the plug into the outlet.
Never use a grounding adapter plug to connect the
printer to a power source receptacle that lacks a
ground connection terminal.
• This printer should be operated from the type of power
source indicated on the marking label. If you are not
sure of the type of power available, consult your local
power company.
• Your machine is equipped with an energy saving
device to conserve power when the machine is not in
use. The machine may be left on continuously.

Electrical Safety
B-8 ❖DocuPrint P14 User Guide
• Do not place the Xerox DocuPrint P14 where people
might step or trip on the power cable.
• Do not place objects on the power cable.
• Do not place the printer on an unstable cart, stand or
table. The printer may fall causing personal injury or
serious damage to the printer.
• Do not override or disable electrical or mechanical
interlocks.
• Do not obstruct ventilation openings. These openings
are provided to prevent overheating of the machine.
• Do not push objects into slots and openings on the
Xerox DocuPrint P14. Contacting a voltage point or
shorting out a part might result in electrical shock or
fire.
• Never remove covers or guards that require a tool for
removal, unless directed to do so in a Xerox approved
maintenance kit.
• Never defeat interlock switched. Machines are
designed to restrict operator access to unsafe areas.
Covers, guards and interlock switches are provided to
ensure that the machine will not operate with covers
opened.
• Unplug the printer from the wall outlet before
cleaning. Always use materials specifically designated
for this printer. Use of other materials may result in
poor performance and could create a hazardous
situation.

Electrical Safety
Appendix B: Environmental and Safety Considerations ❖B-9
• Do not use aerosol cleaners. Follow the instructions in
this User Guide for proper cleaning methods.
• Never use supplies or cleaning materials for purposes
other than what they were intended. Keep all supplies
and materials out of reach of children.
• Avoid exposing the drum cartridge to light for extended
periods of time.
• Do not touch the photoreceptor. Scratches or smudges
that appear on the photoreceptor will result in poor
print quality and may shorten the service life.
• Do not put your hands into the fuser are, located just
inside the exit tray area, as you may be burned.
• Do not use this printer near water, wet locations, or
outdoors.
• If any of the following conditions occur, turn off the
Xerox DocuPrint P14 power immediately. Disconnect
the power cable from the electrical outlet. Contact an
authorized Xerox Service Representative to correct the
problem:
— The Xerox DocuPrint P14 emits unusual odors, or
makes unusual noises.
— The power cord is damaged or frayed.
— Liquid is spilled into the Xerox DocuPrint P14.
— Any part of the Xerox DocuPrint P14 is damaged.
— The Xerox DocuPrint P14 is exposed to water.

Radio Frequency Emissions
B-10 ❖DocuPrint P14 User Guide
Radio Frequency Emissions
United States and
Canada
Note: This equipment has been tested and found to
comply with the limits for a Class B digital device,
pursuant to Part 15 of the FCC Rules. These limits are
designed to provide reasonable protection against harmful
interference in a residential installation. This equipment
generates, uses and can radiate radio frequency energy
and, if not installed and used in accordance with the
instructions, may cause harmful interference to radio
communications. However, there is no guarantee that
interference will not occur in a particular installation. If
this equipment does cause harmful interference to radio
or television reception, which can be determined by
turning the equipment off and on, the user is encouraged
to try to correct the interference by one or more of the
following measures:
• Reorient or relocate the receiving antenna.
• Increase the separation between the equipment and
receiver.
• Connect the equipment into an outlet on a circuit
different from that to which the receiver is connected.
• Consult the dealer or an experienced radio/TV
technician for help.

Radio Frequency Emissions
Appendix B: Environmental and Safety Considerations ❖B-11
Changes or modifications to this equipment not
specifically approved by the Xerox Corporation may void
the authority granted by the FCC to operate this
equipment.
Shielded cables must be used with this equipment to
maintain compliance with FCC regulations.
In order to allow this equipment to
operate in proximity to Industrial,
Scientific and Medical (ISM) equipment,
the external radiation from ISM
equipment may have to be limited or
special mitigation measures taken.

Radio Frequency Emissions
B-12 ❖DocuPrint P14 User Guide
Europe The CE marking applied to this product symbolises Xerox
Limited Declaration of Conformity with the following
applicable Directives of the European Union as of the
dates indicated.
January 1, 1995: Council Directive 73/23/EEC amended
by Council Directive 93/68/EEC, approximation of the
laws of the member states related to low voltage
equipment.
January 1, 1996: Council Directive 89/336/EEC,
approximation of the laws of the member state related to
electromagnetic compatibility.
This equipment has been tested and found to comply with
the limits for a Class B digital device. These limits are
designed to provide reasonable protection against harmful
interference in a residential installation. This equipment
generates, uses and can radiate radio frequency energy
and, if not installed and used in accordance with the
instructions, may cause harmful interference to radio
communications. However, there is no guarantee that
interference will not occur in a particular installation. If
this equipment does cause harmful interference to radio
or television reception, which can be determined by
turning the equipment off and on, the user is encouraged
to try to correct the interference by one or more of the
following measures:
• Reorient or relocate the receiving antenna.
• Increase the separation between the equipment and
receiver.
• Connect the equipment into an outlet on a circuit
different from that to which the receiver is connected.
• Consult the dealer or an experienced radio/TV
technician for help.

Radio Frequency Emissions
Appendix B: Environmental and Safety Considerations ❖B-13
A full declaration, defining the relevant directives and
referenced standards can be obtained from your Xerox
Limited representative or by contacting:
Xerox Limited Product Safety,
Xerox Limited Technical Centre,
PO Box 17,
Bessemer Road,
Welw yn G arde n Ci t y,
Herts AL7 1HE, England
This system is certified manufactured and
tested in compliance with strict safety
and radio frequency interference
regulations. Any authorised alteration
which includes the addition of new
functions or the connection of external
devices may impact this certification.
Please contact your local Xerox Limited
representative for a list of approval
accessories.
In order to allow this equipment to
operate in proximity to industrial,
Scientific and medical (ISM) equipment,
the external radiation from the ISM
equipment may have to be limited or
special mitigation measures taken.

Operational Safety
B-14 ❖DocuPrint P14 User Guide
Operational Safety
The Xerox DocuPrint P14 and its supplies were designed
and tested to meet strict safety requirements. These
include safety agency examination, approval, and
compliance with established environmental standards.
To ensure the continued safe operation of your Xerox
DocuPrint P14, follow these safety guidelines at all times.
• Improper connection of the grounding conductor can
result in electrical shock.
• Follow warnings and instructions marked on or
supplied with the equipment.
• Locate the Xerox DocuPrint P14 on a solid support
surface (not on plush carpet) that has adequate
strength to support the weight of the unit.
• Locate the Xerox DocuPrint P14 in an area that has
adequate ventilation and room for servicing.
• Do not locate the Xerox DocuPrint P14 near a radiator
or any other heat source.
• Do not obstruct ventilation openings. They are
provided to prevent overheating.
• Do not place or push objects of any kind into the
ventilation openings.

Operational Safety
Appendix B: Environmental and Safety Considerations ❖B-15
• Do not attempt any maintenance function that is not
specifically described in the Xerox DocuPrint P14
documentation.
• Use materials and supplies specifically designed for
your Xerox DocuPrint P14. The use of unsuitable
materials may result in poor performance and possibly
a hazardous situation.
• Do not remove the covers or guards that are fastened
with screws.
• Do not operate the Xerox DocuPrint P14 if you notice
unusual noises or odors. Disconnect the power cord
from the power source receptacle, and contact your
Xerox Service Representative immediately.

Operational Safety
B-16 ❖DocuPrint P14 User Guide


Quality Standards
C-2 ❖DocuPrint P14 User Guide
Quality Standards
The Xerox DocuPrint P8e is certified to EN60950. The
equipment is manufactured under a BS5750 Quality
system accepted by the British Standards Institution.
The Xerox DocuPrint P8e is also certified in compliance
with applicable standards by various national bodies.

Energy Star
Appendix C: Certifications ❖C-3
Energy Star
This printer contains advanced energy conservation
technology which reduces power consumption when it is
not in active use.
When the printer does not receive data for an extended
period of time, power consumption is automatically
lowered.
The energy star emblem does not represent EPA
endorsement of any product or service.

Energy Star
C-4 ❖DocuPrint P14 User Guide

Appendix D: Printer Options ❖D-1
Printer Options Appendix D
Introduction .................................................................... D-2
Precautions ..................................................................... D-3
Memory and PostScript SIMMs .................................... D-4
Serial/LocalTalk Card ..................................................... D-7
Paper Tray 2 ................................................................. D-10

Introduction
D-2 ❖DocuPrint P14 User Guide
Introduction
Your DocuPrint P14 is a full-featured laser printer that has
been optimized to meet most of your printing needs.
Recognizing that each user may have different
requirements, however, Xerox makes several options
available to enhance the printer’s capabilities:
• Additional memory, which enables your printer to
process more complex print jobs.
• PostScript, which enables your printer to use the
PostScript printing language for text and graphics.
• Serial and LocalTalk ports, which enable your printer
to interface with a Macintosh computer.
• Paper Tray 2, which extends your printer’s paper
handling capacity.
This appendix provides detailed installation instructions
for each of these options. For ordering information, refer
to the Supplies/Options Guide that came with your printer.

Precautions
Appendix D: Printer Options ❖D-3
Precautions
DISCONNECT THE POWER CORD:
Never remove the printer control board
while the printer is plugged in.
To avoid the possibility of electrical
shock, always disconnect the power cord
when installing or removing ANY internal
or external printer option.
DISCHARGE STATIC ELECTRICITY:
The control board and internal printer options
(SIMMs, PostScript, Serial/LocalTalk interface)
are sensitive to static electricity. Before
installing or removing an internal option,
discharge static electricity from your body by
touching something metal, such as the metal
back plate on any device plugged into a
grounded power source. If you walk around
before finishing the installation, again
discharge any static electricity.
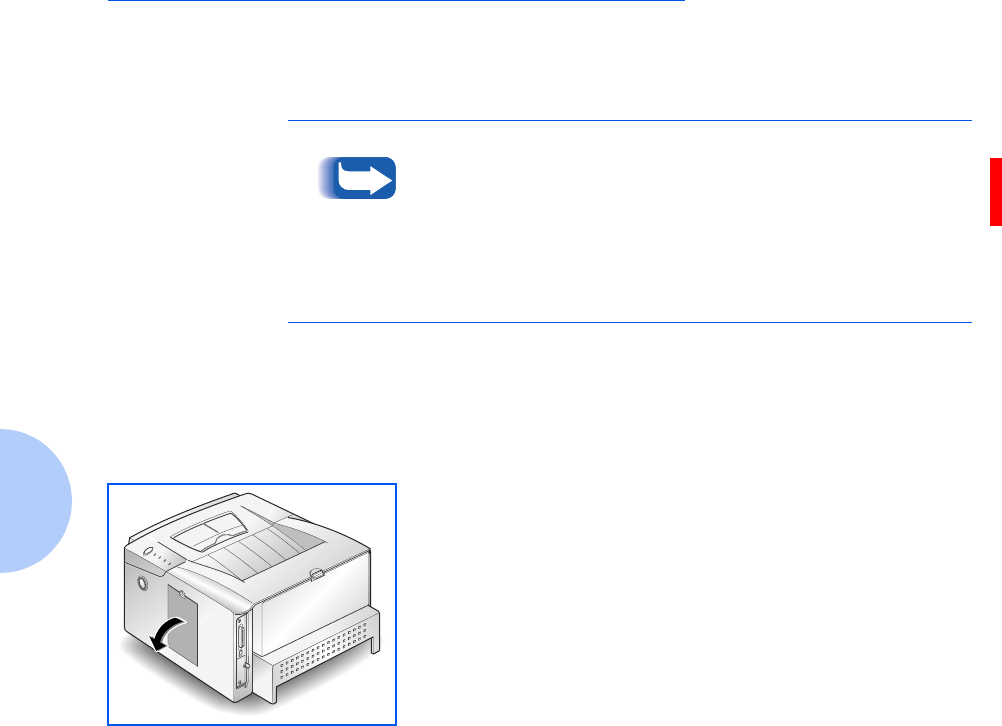
Memory and PostScript SIMMs
D-4 ❖DocuPrint P14 User Guide
Memory and PostScript SIMMs
Additional printer memory and the PostScript option are
provided on SIMMs (single inline memory modules). This
procedure is applicable to either option.
Review the precautions on page D-3 and then follow this
procedure to install SIMMs in your computer.
Since PostScript requires 12 MB of printer memory and the
DocuPrint P14 comes with 4 MB standard, installation of
the PostScript SIMM requires installation of a memory
SIMM as well.
Be sure to consult the Supplies/Options Guide that came
with your printer for supported memory SIMM
specifications.
1Turn the printer power off and disconnect the power cord
and printer cable.
2Remove the cover located at the right side of the printer.
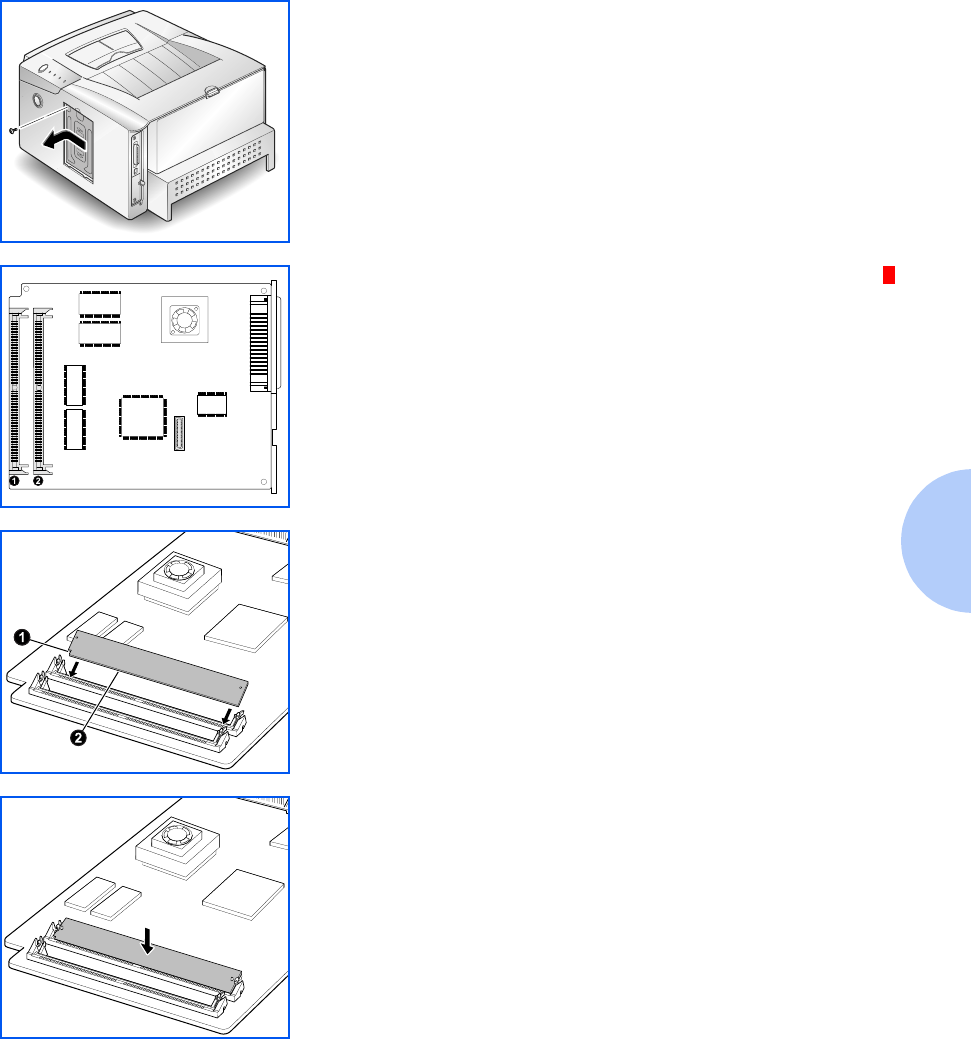
Memory and PostScript SIMMs
Appendix D: Printer Options ❖D-5
3Remove the retaining screw from the metal shield. Slide
the metal shield in the direction of the arrow marked on
the cover, then remove the shield.
4Unpack the SIMM. Avoid touching the connection points
along its edge.
5Locate the PostScript S IMM slot ➊ and the memory SIMM
slot ➋ on the control board. They are not interchangeable.
6Hold the SIMM so that the notch ➊ and connection
points ➋ are aligned with the slot as shown.
7Insert the SIMM all the way into the connector at a 30o
angle, and rotate it down until it snaps into place.
OPEN
CLOSE
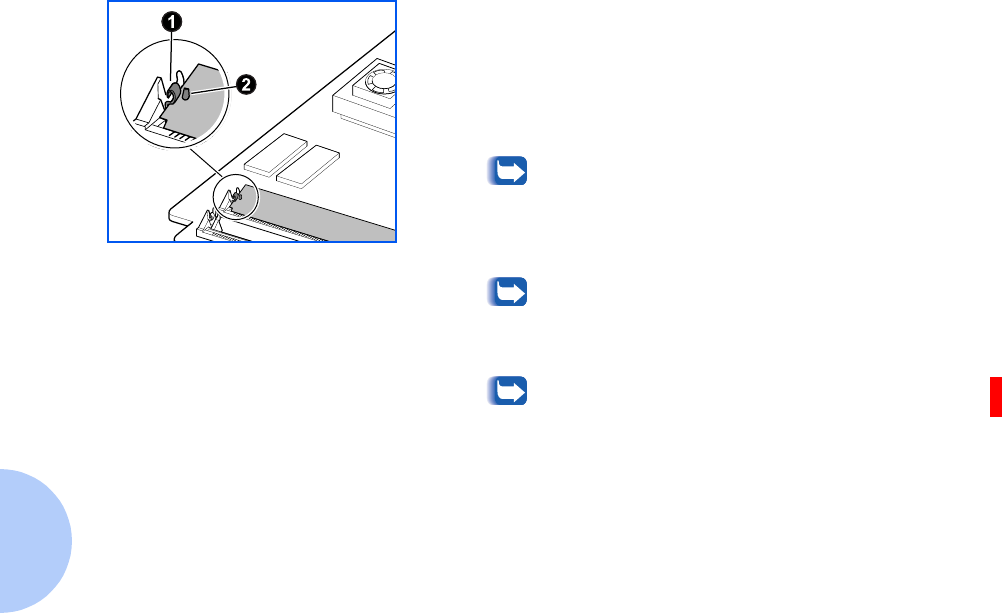
Memory and PostScript SIMMs
D-6 ❖DocuPrint P14 User Guide
8Make sure both metal clips on the connector are fastened
and the two pins on the connector are pushed through the
holes on the SIMM.
9If you do not have any other options to install, replace the
metal shield and the cover.
Whenever you change the amount of printer
memory, you have to set the Printer Memory
item on the printer driver’s Printer Properties
dialog box to the new value. Refer to the section
“Configuring the PCL Driver” (page 3-3).
For PostScript driver installation and usage
information, refer to the sections “Installing the
PostScript Driver” (page 1-27) and “Configuring
the PostScript Driver” (page 3-7).
To print documents from a Macintosh that does
not have a USB port, you must also install the
Serial/LocalTalk option. See the section “Serial/
LocalTalk Card” (page D-7).
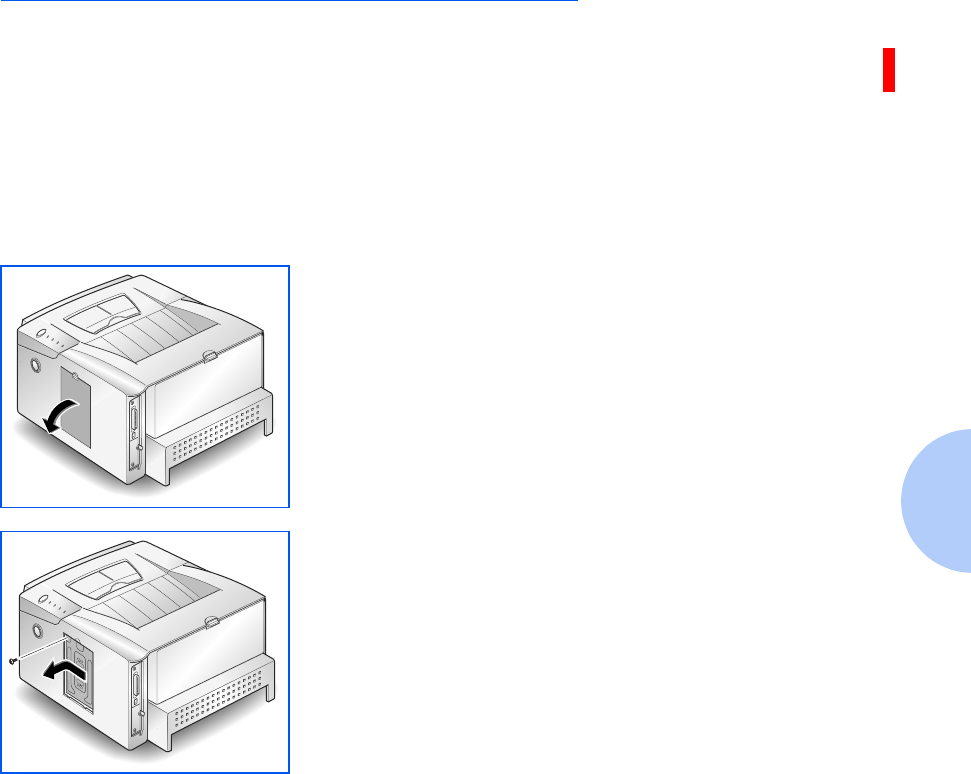
Serial/LocalTalk Card
Appendix D: Printer Options ❖D-7
Serial/LocalTalk Card
The Serial/LocalTalk option lets you connect your
DocuPrint P14 to a PC or Macintosh serial interface, or to
a Macintosh LocalTalk network.
Review the precautions on page D-3 and then follow this
procedure to install the Serial/LocalTalk option in your
computer.
1Turn off the printer and disconnect the power cord and
printer cable.
2Remove the cover located at the right side of the printer.
3Remove the retaining screw from the metal shield. Slide
the metal shield in the direction of the arrow marked on
the cover, then remove the shield.
OPEN
CLOSE
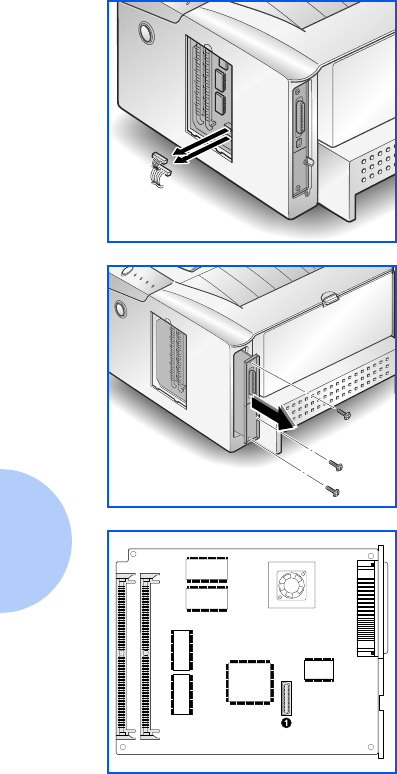
Serial/LocalTalk Card
D-8 ❖DocuPrint P14 User Guide
4Unplug the two connectors from the control board.
5Remove the three screws securing the board and pull the
board out of the printer.
6Unpack the Serial/LocalTalk card. Avoid touching its
contact pins.
7Locate the Serial/LocalTalk connector ➊ on the control
board.
8Align the connector on the Serial/LocalTalk card with the
connector on the control board.
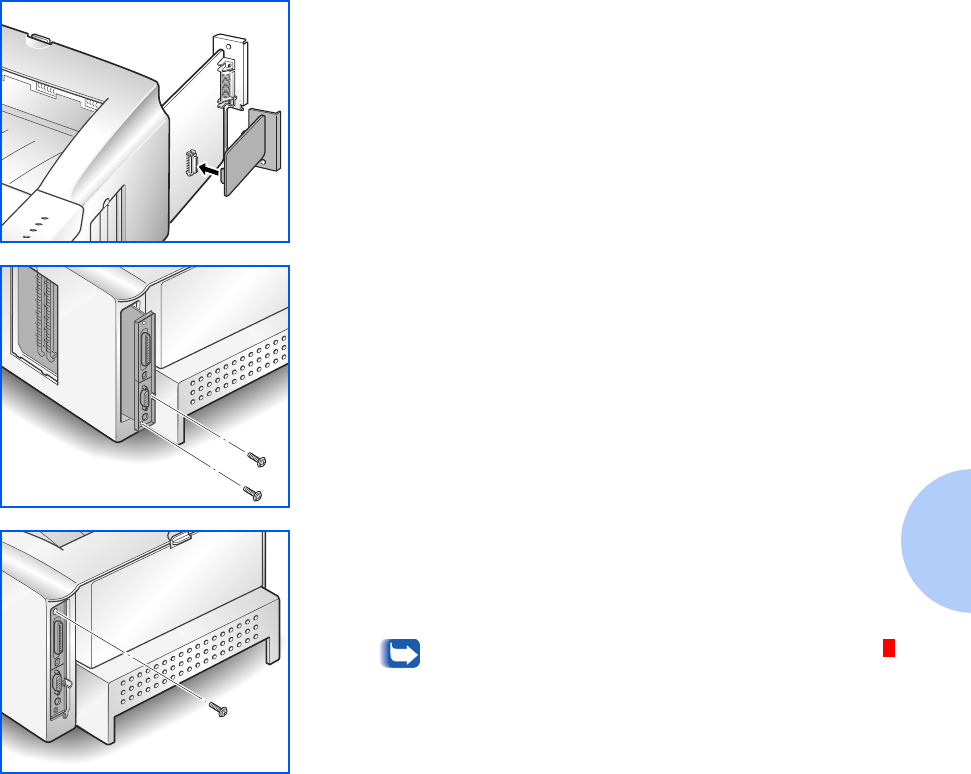
Serial/LocalTalk Card
Appendix D: Printer Options ❖D-9
9Push the card firmly into the connector until it is
completely inserted in place. The two connectors should
fit snugly together.
10 Insert the control board in place, and tighten the two
screws.
11 Tighten the third screw as shown.
12 Reconnect the two connectors that were removed in
Step 4, replace the metal shield, then close the cover.
To print documents from a Macintosh, you must
also install the PostScript option and additional
memory. See the section “Memory and PostScript
SIMMs” (page D-4).
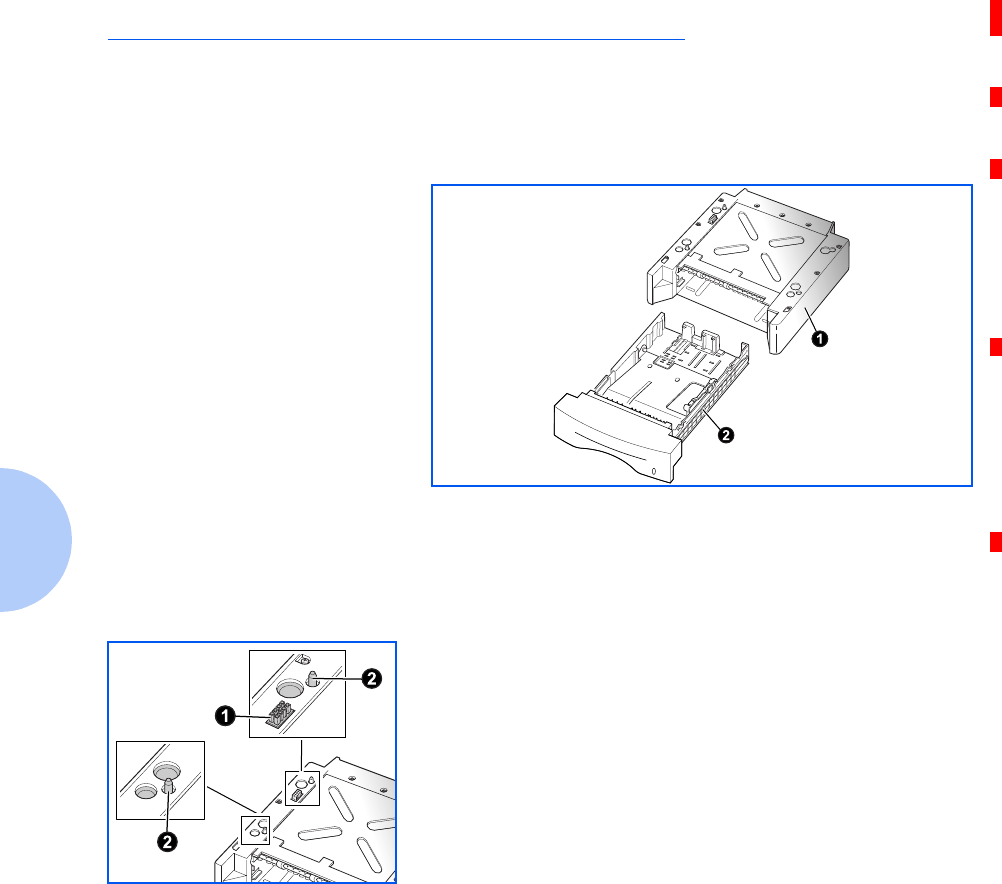
Paper Tray 2
D-10 ❖DocuPrint P14 User Guide
Paper Tray 2
You can increase the paper handling capacity of your
DocuPrint P14 by installing the optional Tray 2, which
consists of two components, as shown in Figure 5.1.
Review the precautions on page D-3 and then follow this
procedure to install Tray 2 in your computer.
Figure 5.1Tray 2 Components
➊ Support unit
➋ Paper tray
1Turn off the printer and disconnect the power cord and
interface cable.
2Observe the location of the support unit’s connector ➊ and
tabs ➋.
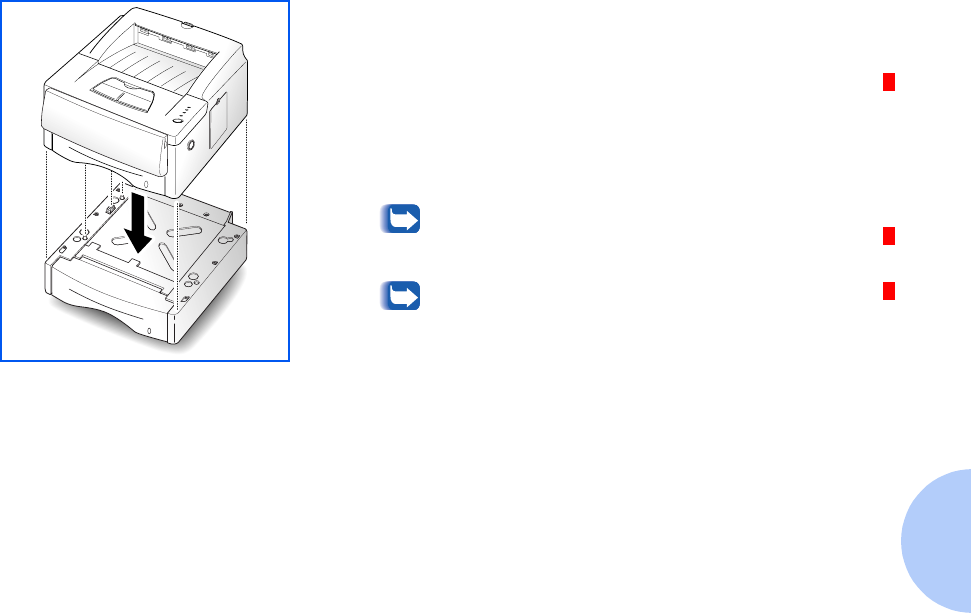
Paper Tray 2
Appendix D: Printer Options ❖D-11
3Align the printer with the support unit and lower it into
place on the tabs and connector.
4Load paper in the tray. See “Loading Print Media”
(page 2-6).
5Reconnect the printer cable and power cord, then turn on
the printer.
To verify proper installation, print a
configuration sheet. See “Control Panel Button”
(page 3-21).
To print from Tray 2, configure the printer
driver from your application prior to printing.
See “Configuring the PCL Driver” (page 3-3).

D-12 ❖DocuPrint P14 User Guide