Samsung Electronics Co MOBILE2 FM Transmitter User Manual Attachments
Samsung Electronics Co Ltd FM Transmitter Attachments
UserManual.wiki
>
Samsung Electronics Co
>
MOBILE2 User Manual
Users Manual
Navigation menu
Upload a User Manual
Namespaces
Wiki Guide
HTML
PDF
Info
Views
User Manual
Discussion / Help
Navigation

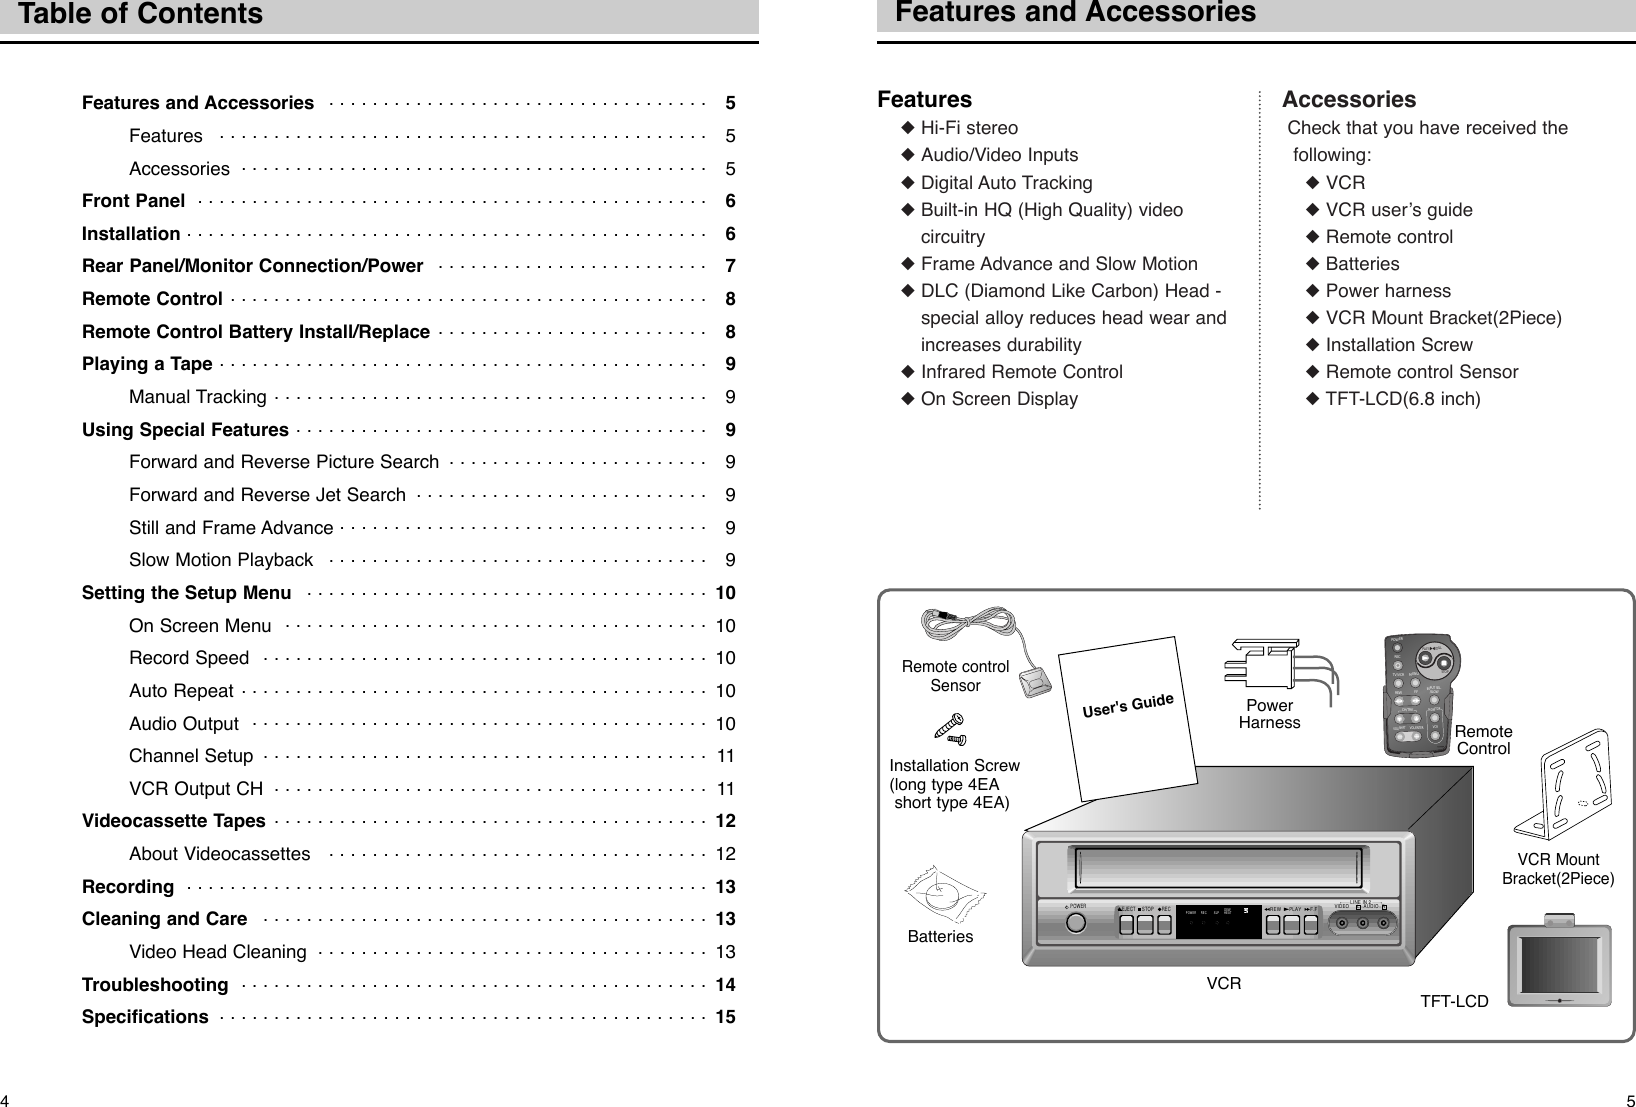
![1110Setting the Setup MenuFM FREQ. ADJ. Select FM Xmit.Freq. by pressing ENTER button, and you can enjoy the sound from this unit via your car stereo. Use the CH/TRK M/ Nbuttons key to select one of 10 frequencies from 90.7MHz to 92.5MHz. (A different FM station may be received during a long distance drive. In this case, retune the desired station as above.)PICTURE PRESET Press ENTER button to activate the ÒPICTURE PRESETÓ Picturerepeat set the VCR to play a tape repeatedly unless a tapecontrol is activated(Stop, fast-foward or rewind.)PICTURE CONTROLBright/Color/Sharuness/TintSelect one of the menu options by pressing ENTER button toadjust the brightness, color, sharpness, or tint of the monitor as desired. Use the CH/TRK M/ Nbuttons key to select a newlevel from 0 to 63; 32 is standard. LANGUAGE SELECT Select Language Reset using ENTER button.Setting the Setup Menu1. Press MENU button on your remote control.The Setup Menu will appear on screen.2. Select the item you want to adjust using ENTER button followed by the CH/TRK button on yourremote control.To make all of the VCRÕs fetures available, set the VCR functions before playing or recording a tape.SCREEN INV. ON Select Screen Reset using ENTER button.MIRROR OFF Select Mirror Reset using ENTER button.CH/TRKVOL/SHIFT VOL/ENTERMENU: MENU: CH/TRK ▲▼ CURSOR: SHIFT/ENTER buttonMENUESCREEN INV. ONMIRROR OFFFM FREQ. ADJ.PICTURE PRESETPICTURE CONTROLLANGUAGE SELECT[ENTER/SHIFT] [MENU]MENUESCREEN INV. ONMIRROR OFFFM FREQ. ADJ.PICTURE PRESETPICTURE CONTROLLANGUAGE SELECT[ENTER/SHIFT] [MENU]On Screen MenuYour VCR has on-screen menus that allow you to access and control the VCRÕs programmable features. You will use the buttons on the remote control to work with the on-screen programming. CH/TRK M/ Nbuttons also have the shift cursor function in the on screen.SCREEN INV. OFF Tint 32ENTERFMENUESCREEN INV. ONMIRROR OFFFM FREQ. ADJ.PICTURE PRESETPICTURE CONTROLLANGUAGE SELECT[ENTER/SHIFT] [MENU]MIRROR ONSharpness 32ENTERFColor 32ENTERFBright25 ENTERFMENUESCREEN INV. ONMIRROR OFFFM FREQ. ADJ.PICTURE PRESETPICTURE CONTROLLANGUAGE SELECT[ENTER/SHIFT] [MENU]EFM FREQ. 91.1MhzFMENUESCREEN INV. ONMIRROR OFFFM FREQ. ADJ.PICTURE PRESETPICTURE CONTROLLANGUAGE SELECT[ENTER/SHIFT] [MENU]E EnglishENTERE KoreaENTEREFM FREQ. 91.7MhzF](https://usermanual.wiki/Samsung-Electronics-Co/MOBILE2/User-Guide-162236-Page-7.png)
![Display Control21Display Control20*** SETUP MENU ***EDimmer (1) GFM Xmit. Freq. (90.7) JBright (32) JColor (32) JSharpness (32) JTint (32) JRecord speed (SP) JAuto Repeat (off) JDisplay Reset Jm n ENTER MENUDimmerYou can adjust the brightness of the display to 1 to 4 depending on the ambient illumination.FM Xmit. Freq. It changes FM frequencies received by your car stereo. [Note 1]BrightIt adjusts the brightness of the screen. ColorIt adjusts the color of the screen. SharpnessIt adjusts the sharpness of the screen. TintIt adjusts the tint of the screen.Record SpeedIt adjusts recording speed for your VCR.Auto RepeatIt turns on/off the automatic repeat function of your VCR.Display ResetIt resets the screen to default values.[Note 1]Tuning in to FM stationsYou can enjoy FM broadcasts via your car stereo. As this monitor does not have built-inspeakers, you should use your FM tuner. Frequency range : 90.7MHz to 92.5MHzTo set FM frequencies1. Select the menu screen.2. Select FM Xmit. Freq. and press the ENTER key.3. Use the mor nkey to select one within the frequency range. 4. Tune your car FM radio (or FM receiver ) to the selected station.A different FM station may be received during a long distance drive. In this case, followthe steps above to retune it to the desired station.](https://usermanual.wiki/Samsung-Electronics-Co/MOBILE2/User-Guide-162236-Page-12.png)