Samsung Electronics Co NP-P40 Notebook PC User Manual Platy English
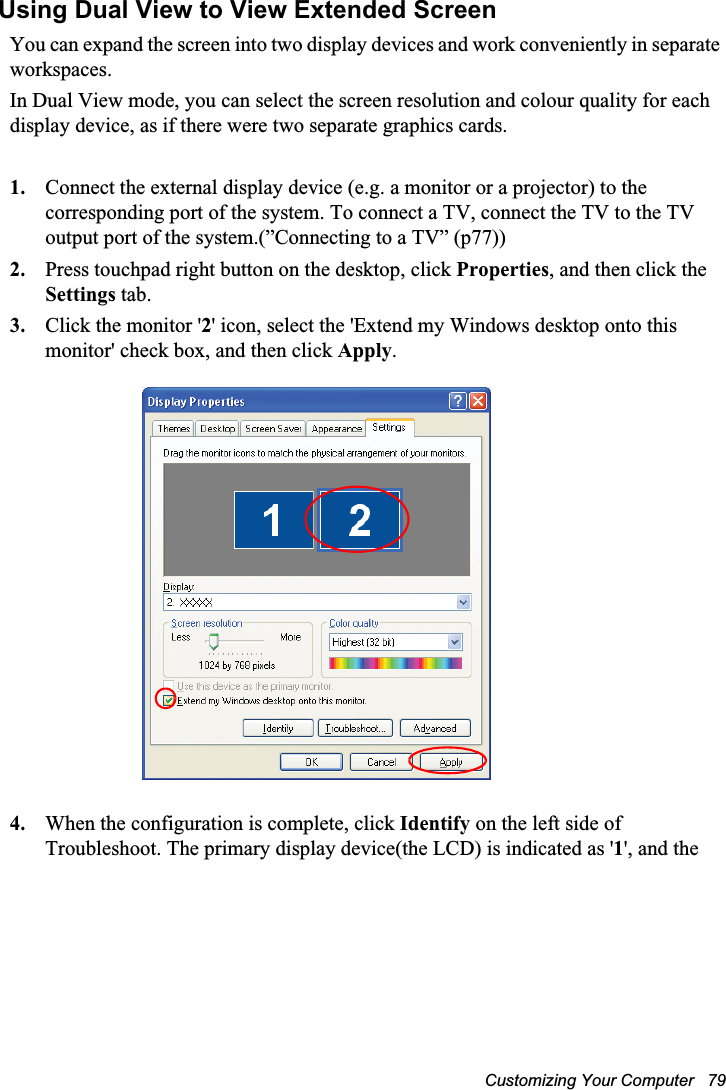
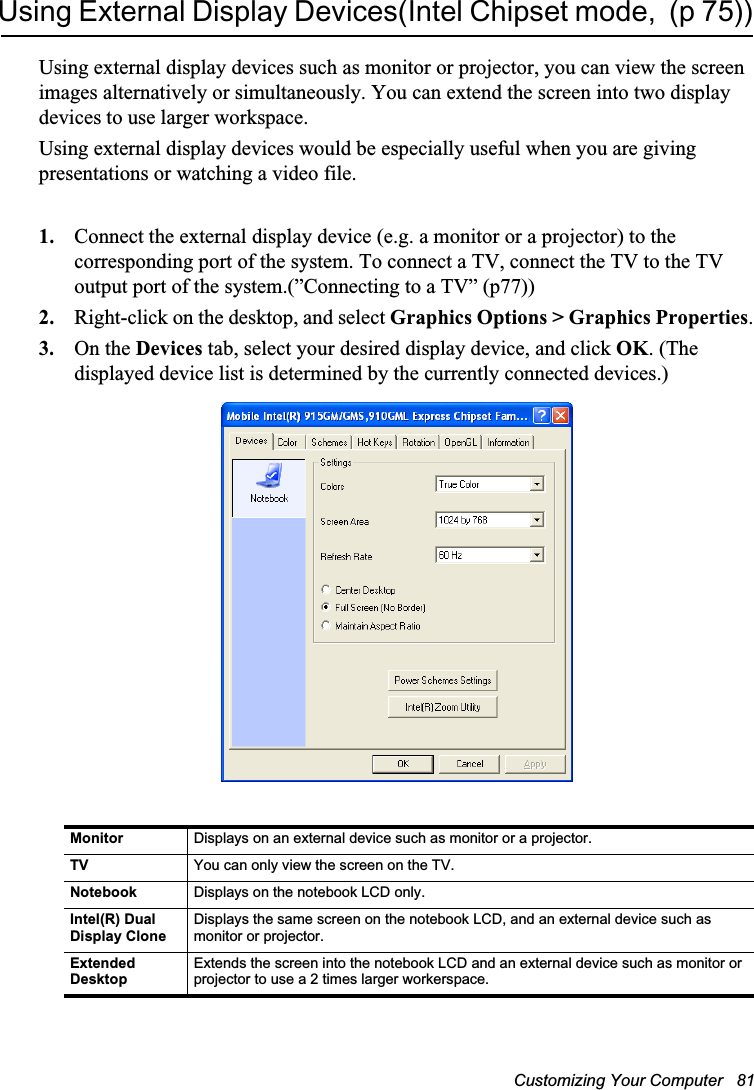
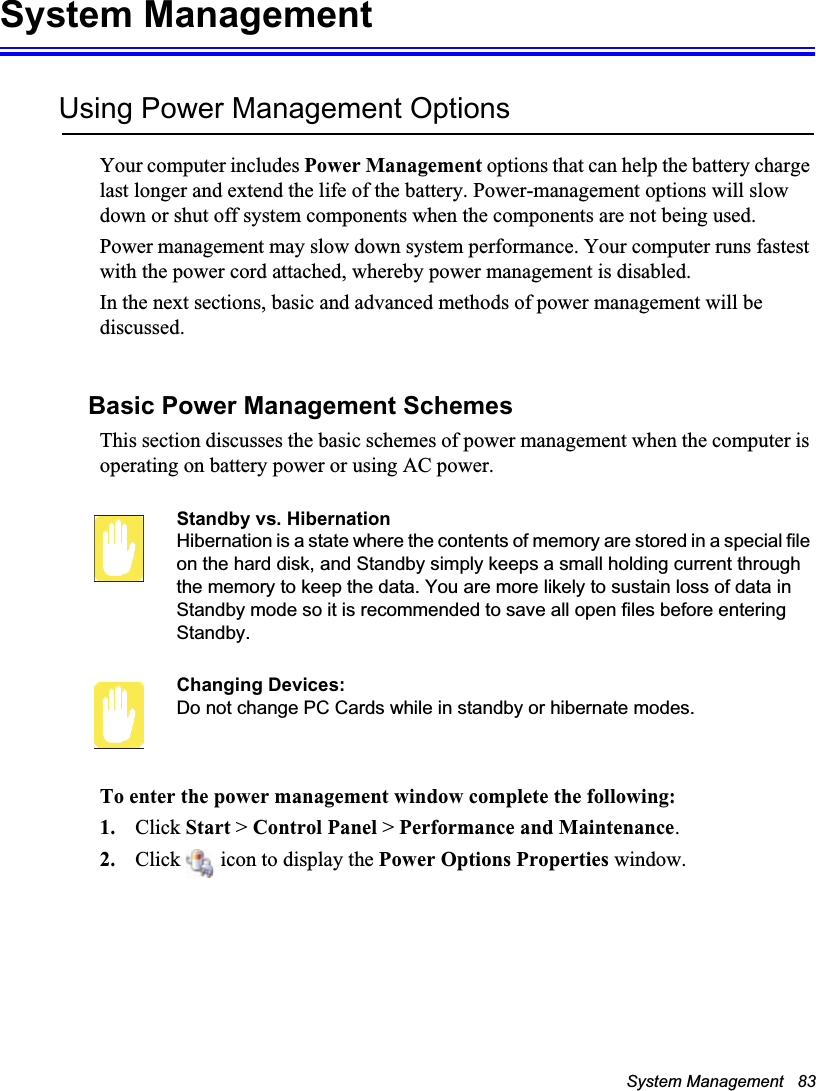
Samsung Electronics Co Ltd Notebook PC Platy English
UserManual.wiki
>
Samsung Electronics Co
>
NP-P40 User Manual
>
Users Manual 2
Contents
1.
Users Manual 1
2.
Users Manual 2
Users Manual 2
Navigation menu
Upload a User Manual
Namespaces
Wiki Guide
HTML
PDF
Info
Views
User Manual
Discussion / Help
Navigation
![68 Users ManualInfrared CommunicationYour computer may have infrared port. Using the infrared port, you can transfer data to computer, printer, camera and other devices through infrared communication.Restrictions in UseFor infrared communication, the devices should have infrared communication capability, and should be located within 1 m of each other. In addition, there should be no obstacle between the infrared ports of the target devices.To establish infrared connectionThe procedures to communicate with another computer through infrared port are described below.1. Locate the target computers so that the infrared ports face each other.2. When infrared communication is available, a beep sounds and Send files to another computer icon ( ) appears on the desktop.You can now transfer data through infrared communication.To transmit data through infrared communicationThe procedures to transmit files to another computer are described below.1. Connect the target computers through infrared communication.2. Drag a file over the Send files to another computer icon( ) in one of the computer.3. [Wireless Link] dialog box appears on the other computer screen. Click Yes.4. When the file transmission is completed, click Close to close the [Receiving Files] dialog box.To change infrared communication configurationTo change the folder to save the received files, or to receive images from a digital camera, click Start > Control Panel > Printers and Other Hardware > Wireless Link and change the configuration.](https://usermanual.wiki/Samsung-Electronics-Co/NP-P40.Users-Manual-2/User-Guide-505397-Page-8.png)
![Customizing Your Computer 73Configuring the PasswordSetting the Supervisor PasswordBy configuring a supervisor password, you can restrict system access to authorized users only.Do not lose or forget your password. If you have forgotten your password, contact the Samsung service center. 1. Select the Security menu in the System Setup. To enter System Setup, see “Starting System Setup” on page 71.2. On the Set Supervisor Password item, press <Enter>.3. Enter a password, press <Enter>, re-enter the password for confirmation, and press <Enter> again.4. When a message confirming the password configuration appears in the [Setup Notice] window, press <Enter>.Setting the User PasswordYou can configure user passwords so that other users can use the system.Before configuring a user password, a supervisor password must have been configured.Users can start the system with their user password, but cannot enter into the System Setup.Deactivating the supervisor password also deactivates the user password.On the Set User Password item, press <Enter>, and complete step 3-4 of "Setting the Supervisor Password".](https://usermanual.wiki/Samsung-Electronics-Co/NP-P40.Users-Manual-2/User-Guide-505397-Page-13.png)
![74 Users ManualActivating the Booting PasswordBefore activating the booting password, the supervisor password must have been configured.Set the Password on boot option to [Enabled]. From now on, system booting will not proceed without the password.Deactivating the Password1. On the password to delete, press <Enter>. (e.g. supervisor password)2. Enter the current configured password, and press <Enter>.3. Leave the 'Enter New Password' and 'Confirm New Password' field empty, and press <Enter> to deactivate the password.](https://usermanual.wiki/Samsung-Electronics-Co/NP-P40.Users-Manual-2/User-Guide-505397-Page-14.png)
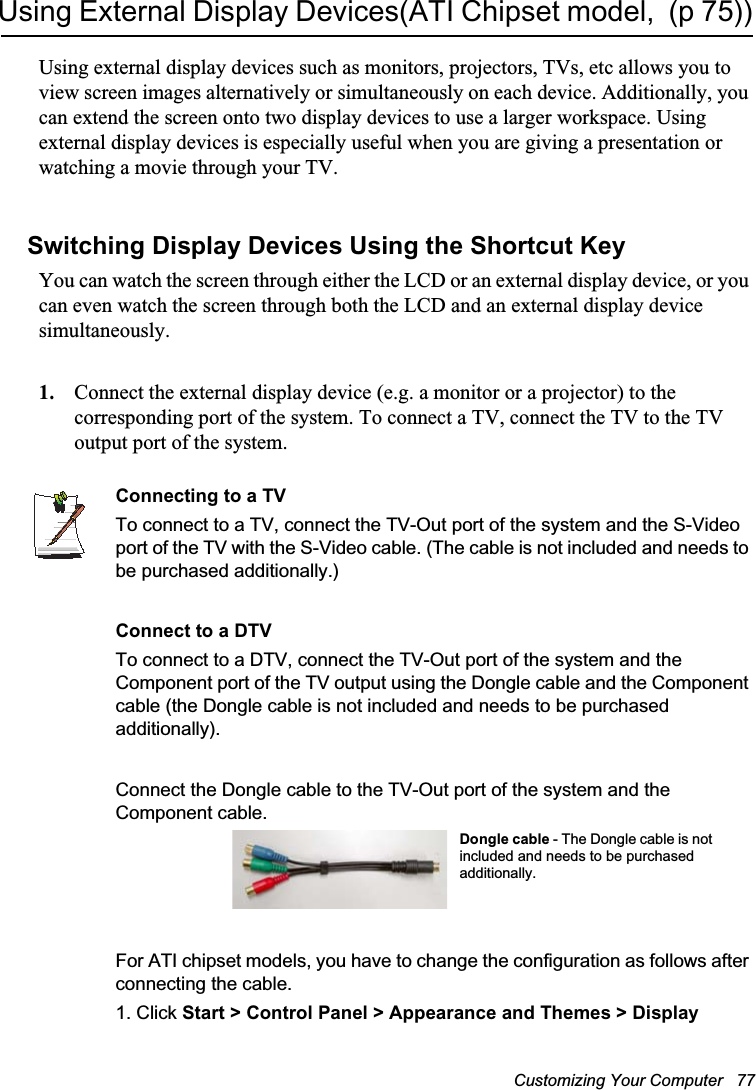
![Customizing Your Computer 75Configuring Resolution and Color DepthScreen resolution is the number of pixels displayed on the screen. High resolution makes the overall screen area large, although individual items appear small. Color quality is determined by the number of bits used to represent a pixel on the screen. High color quality displays more number of colours on your screen.1. Select Start > Control Panel > Appearance and Themes > Change the screen resolution.2. Make changes on the Settings tab of the [Display Properties] dialog box.The Graphics Chipset- For P40 model, either an ATI or Intel Graphics Chipset is installed. You can view the installed graphics chipset in the Display Properties window.. ATI Graphics Chipset : ATI MOBILITY RADEON X300/X600 Chipsetor ATI MOBILITY RADEON Graphic Chipset. Intel Graphics Chipset : Mobile Intel(R) 915GM Express Chipset3. When you have completed configuration, click Apply.To change the number of colors displayed on a monitor, select an appropriate colour quality.To change your screenresolution, move the sliderto select an appropriateresolution.You can view the graphicschipset.](https://usermanual.wiki/Samsung-Electronics-Co/NP-P40.Users-Manual-2/User-Guide-505397-Page-15.png)

![80 Users Manualsecondary display device is indicated as '2'. Now you can view the screen through two monitors. When you use Dual View, configuring the LCD as the 'Primary' monitor is recommended.If the screen of the secondary display device is displayed at 640x480 pixels, with 256 colours, change the settings to the desired screen resolution and colour quality in the [Display Properties] dialog box.Deactivating Dual View ModeClick the monitor '2' icon, clear the 'Extend my Windows desktop onto this monitor' check box, and then click Apply.To move a window between display devices in Dual View modeClick the title bar of the window in the primary display device (1, the LCD), and drag it to the secondary display device (2). The window is moved to the secondary display device.2 : Secondary1 : Primary](https://usermanual.wiki/Samsung-Electronics-Co/NP-P40.Users-Manual-2/User-Guide-505397-Page-20.png)

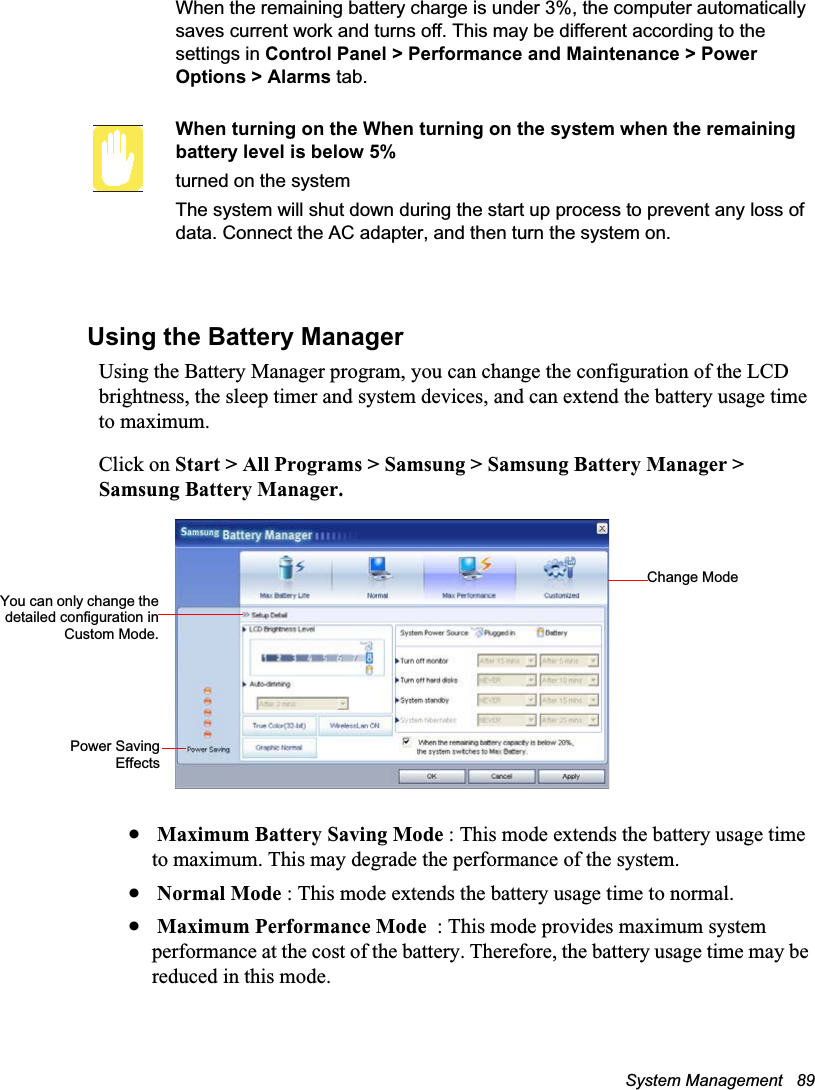
![90 Users Manualx Custom Mode : In this mode, a user can configure a detailed configuration to save the battery usage time. A user can adjust the LCD brightness, select the time before the system sleeps, select the screen color quality and select the graphics mode. A user can also turn the wireless LAN function on and off.The Screen Color Quality, Graphics Mode and Wireless LAN in the Detailed Configuration represent the current configuration. Selecting the Set button applies the configuration even without pressing the 'OK' or 'Apply' button.Controlling the LCD BrightnessIf you restart the system after changing the LCD Brightness in Custom Mode, the LCD brightness is changed to its default value. To keep the brightness value configured in Custom Mode, configure the [Brightness Control Mode] item to 'User Control' in the [Boot] menu of the System Setup. (See P. 6-2.)If it is configured to [Auto], the LCD brightness is changed to level 8 when the power is supplied by the AC adapter, or to level 1 when the power is supplied by the battery according to the default brightness values.Power Saving EffectThis shows the battery usage time after changing the system configuration in 10 levels for Maximum Battery Saving Mode and in 5 levels for Maximum Performance Mode.When Running a Game or Multimedia ApplicationA game or multimedia application may not work smoothly in Maximum Battery Saving Mode. It is recommended selecting at least Normal Mode in this case.](https://usermanual.wiki/Samsung-Electronics-Co/NP-P40.Users-Manual-2/User-Guide-505397-Page-30.png)

![Troubleshooting 99Questions and AnswersThis section provides information on possible problems, solutions and other references for system use.Windows Related Q1 The system does not shutdown properly.A When the system does not shutdown normally, press and hold the Power button until the system manually shuts off. If the Power-Saving Mode is configured into the Power button, press and hold for more than 4 seconds to shut the system off. When the system is turned on after such manual shutdown, Scandisk will run to check errors in the system. Q2 The system freezes during program operationA1 There is an error with the program currently being used. Press the <Ctrl>, <Alt>, and <Delete> keys simultaneously and click and Task in the [Windows Task Manager] window. A2 There is an error with the Windows OS. Reboot the system by using the Power button.Q3 The system enters rest mode when operating on battery power if the battery charge is too low.AConnect the AC power immediately. Operating in rest mode for a long period of time may cause loss of data.](https://usermanual.wiki/Samsung-Electronics-Co/NP-P40.Users-Manual-2/User-Guide-505397-Page-39.png)
![Troubleshooting 101Q7 A DVD or an MPEG file is only played on the LCD (ATI chipset model)AWhen both the LCD and the CRT are being used simultaneously, video plays on one of them by default.1. Right-click over the Desktop and select Properties.2. In the [Display Properties] window, click the Settings tab > Advanced > ATI Overlay tab.3. Select the Theater Mode option, and then configure the Overlay Display Mode to 'Theater Mode' or 'All The Same’ and then click on Apply. Then you can view the video on both the LCD and CRT screens.Q8 When I change the power source to the battery by removing the AC adapter or change the display device to CRT from LCD, I sometimes see a POWERPLAY warning message (ATI chipset models)AThe PowerPlay function is a new technology that extends the battery usage time. PowerPlay works only when the system is operating on battery power and using an LCD. When the PowerPlay function is disabled due to a changed operating environment, the PowerPlay function warning message may be displayed.Q9 I cannot see the Taskbar on the Desktop when I use a projector (ATI chipset models)AThis happens because the project does not support 1400x1050 pixels. However the 15.0" SXGA+ LCD supports 1400x1050 pixels. In this case, change the system screen resolution to 1024 x 768 pixels (recommended).Q10 The "Video mode not supported" or "Input signal exceeded" message appears for some older model TVs or monitors.AThis problem may occur when the TV or monitor does not support the current system resolution. Change the resolution of the external display device to 800x600 pixels or lower, or do not use Full screen DOS mode.Q11 When I used an external display device with the SXGA+ system and disconnected the device from the system, the original screen resolution is not restored.AIn general, when using an external display device with low resolution, the LCD resolution is degraded while using the device and the original resolution is restored automatically after disconnecting the external display device. If the](https://usermanual.wiki/Samsung-Electronics-Co/NP-P40.Users-Manual-2/User-Guide-505397-Page-41.png)
![Troubleshooting 107Q3 I cannot share an Internet connection.A1 It may require some time to synchronize the computers to share an Internet connection after the Internet connection sharing configuration is completed. If you cannot share Internet connection even after a longer period, restart the computer.A2 Check if the connection between the network adapters is configured to bridge. If there is a configured bridge connection between the network adapters through the network configuration wizard, remove the network bridge, and reconfigure the Internet connection sharing.A bridge connection is created when you ran Network Setup Wizard from the [Network Connections] window, and selected both the internal connection adapter and another adapter in the wizard.Q4 I cannot connect to the AP.Check the Computer SettingsA1 Verify whether the wireless LAN function of the computer is on by doing the following. If the wireless LAN function is off, turn it on. - For Windows XP, verify that the wireless network connection has been set to "Enable" in Start > Control Panel > Network Connections.- If there is a Wireless LAN On/Off button, check if the wireless LAN button is pressed.A2 Verify whether the same network key (encryption key) has been entered in both the AP and the computer. The network key is an encryption key for encrypting data transmitted between the AP and the computer. It is recommended setting the network key manually.Check the AP SettingsFor the AP settings, refer to the User's Guide provided by the AP manufacturer.A3 Verify whether the environment is suitable for using a wireless LAN. The use of a wireless LAN may be restricted according to the environment and distance. Obstacles such as walls or doors affect the use of a wireless LAN. Install the AP in a high and open space 50cm from the wall and far removed from any other radio signal sources. A4 Verify whether the AP is operating properly. - When the AP is not operating normally, turn off the AP and after a short while turn it on again.](https://usermanual.wiki/Samsung-Electronics-Co/NP-P40.Users-Manual-2/User-Guide-505397-Page-47.png)
![Troubleshooting 109disable the [View Available Wireless Networks] window supported by WZC service. Exit the wireless LAN related program then check whether the window is enabled.A3 Initialize the device driver. Click Start > Control Panel > Performance and Maintenance > System > Hardware tab > Device Manager > Network adapters, and select the wireless LAN adapter. Right-click the network adaptor and select 'Disable'. Then right-click over the network adaptor and select 'Enable' after a short wait to check that the device is operating properly.A4 Right-click the My computer icon, and select Manage. When the Computer Management window appears, double-click Services and Applications on the left, and then click Services from the sub menu tree. Select the Standard tab in the right pane, double-click Wireless Zero Configuration and check that Startup Type is configured to Automatic, and the Service status is Started.A5 In the case of Windows XP, click Advanced in the [Wireless Network Connection] dialog box (see ”Connecting to an Access Point (AP)” (p49)) and make sure that 'Use Windows to configure my wireless network settings' is selected.This may happen when a third-party wireless network setup program (e.g. PROSet) other than Windows XP default program is installed. For setting up a wireless network using the Windows XP program, this option should be selected.Q6 When connecting to a computer-to-computer (Ad Hoc) network, I cannot connect to another computer connected to the same computer-to-computer network. A1 Make sure that the security settings and network name of the computer-to-computer (Ad Hoc) network is correct.A2 Check the TCP/IP properties of the computers to be connected through the computer-to-computer (Ad Hoc) network. All of the computers to be connected through a computer-to-computer (Ad Hoc) network should be configured so that their IP addresses are within the same subnet range. - If the TCP/IP Settings are configured to DHCP, the address is automatically configured to an address within the subnet IP range. This will take about 2~3 minutes.- If the IP address is configured to static IP in TCP/IP properties, select Use the following IP address in the TCP/IP properties of the wireless adapter, configure IP address:10.0.0.1~10.0.0.254, and Subnet mask: 255.255.0.0, and then try again.](https://usermanual.wiki/Samsung-Electronics-Co/NP-P40.Users-Manual-2/User-Guide-505397-Page-49.png)
![Troubleshooting 111A2 This may be caused by selecting the ’Use IEEE 802.1x network authentication’ option when IEEE 802.1x authentication is not available.Check the properties of the AP in the wireless network settings. If the ’Use IEEE 802.1x authentication in this network’ option is selected, deselect the option on the Authentication tab.For more detailed information about authentication server, ask your network administrator.A3 If the AP is configured to ’Use network authentication (Shared Key)’If the AP is configured to authentication shared mode, all computers to be connected should be configured as follows:- If you are using Windows XP, select network authentication(shared mode) in the wireless network settings. Click Start > Control Panel > Network and Internet Connections > Network Connections. Right-click the Wireless Network Connection icon, and click View Available Wireless Networks > Advanced. In the Wireless Networks tab, select an AP in the Available Networks field and click Configure and select ’Network Authentication (Shared Mode).- If you are using Windows 2000, check that the network authentication mode is configured to Share in the security settings of the wireless LAN program (PROSet).For more network authentication procedures, ask your AP (Access Point) administrator.Q12 After PROSet is installed, The “AEGIS Protocol (IEEE 802.1x) v2.2.1.0” appears in the [Local Area Connection Properties] window.AThe AEGIS Protocol is a security authentication protocol that is automatically installed when PROSet is installed and does not affect the operation of other programs.Q13 Although I have turned the wireless LAN off using the Off Button on thePROSet, the wireless LAN operating light is still on.AThis is normal. The Off Button for the Wireless LAN on the PROSet only turnsoff the S/W and not the H/W for the Wireless LAN.Q14 After installing the PROSet, I cannot manage the wireless network underWindows.](https://usermanual.wiki/Samsung-Electronics-Co/NP-P40.Users-Manual-2/User-Guide-505397-Page-51.png)
![Troubleshooting 113Games and Programs RelatedQ1 3D game is not executed, or some functions are not working.AChange the graphic setting of the game to '2D' or 'Software Renderer', then execute the program again.Q2 I launched a game right after installing it, and the game is not executed.AThis problem may occur when the game is not compatible with Windows XP.Launch the game again, and it will be executed properly.Q3 A game runs only in small screen format.(ATI chipset models)AThis may happen when the display settings are configured to reduced mode ('Use Centered Output'). To view the game in full screen mode, complete the following procedures.1. Right-click on the desktop using the touchpad, and then select Properties. 2. In the [Display Properties] window, click the Settings tab > Advanced > ATI Display tab.3. Select the Panel item, and select ‘Extend the image to the screen size’ in the Display Properties.(Intel chipset models)A1 Before launching a game, right-click over the Desktop, and select Graphics Option >Fit to Monitor > Available.A2 Before launching a game, configure to the Full Screen mode as follows.1. Right-click in the video screen, 2. Click Graphics Options > Graphics Properties > Devices tab.3. Click the corresponding device and then select 'Full Screen'.4. Click OK.Q4 While playing a 3D game, I tried to change display devices using <Fn> + <F4/ > keys, then the system does not operate.AWhen you use <Fn> + <F4 / > keys while playing a 3D game, a system error may occur. Do not use <Fn> + <F4 / > keys while playing a 3D game.](https://usermanual.wiki/Samsung-Electronics-Co/NP-P40.Users-Manual-2/User-Guide-505397-Page-53.png)
![114 Users ManualQ5 <Fn+F4/ > Key combination does not work.A While displaying video of VCD or MPEG, or the display setting is Dual View, you cannot toggle display devices. Also the installation of NetWare Client 32 program disables the function of <Fn+F4/ >.Q6 While playing a game, pressing the <Fn>+<F4 / >keys does not work or the screen is not properly displayed.ASome games and 3D application programs may change the display device control. Therefore, pressing the <Fn>+<F4 / > keys may terminate the running program or may display an abnormal screen.Press the <Fn>+<F4 / > keys before launching a program and do not press them while running the program.Q7 Running speed of a game is too slow or fast.AChange the setting of Power Schemes to 'Always On'.(Click Start > Control Panel > Performance and Maintenance > Power Options > Power Schemes tab, then configure the Power schemes field to 'Always On'.)Q8 Pressing <Fn>+<F2/ > keys while running a game may cause abnormal operation of the system.ADo not press <Fn>+<F2/ > keys while a game is running, because it may cause a system error. Q9 Some part of a game image is not displayed or is displayed in black.AThis may happen when running a game designed for DirectX 8.1, such as NHL 2003, MVP Baseball 2003, etc.Q10 When playing a game, the image display temporarily freezes a number of times.(ATI chipset models)AThis may happen when the PowerPlay setting is configured to ‘Optimal Battery usage time’ or ‘Balance’.1. Right-click over the Desktop and then select Properties.2. In the [Display Properties] window, select the Settings tab > Advanced > ATI POWERPLAY tab.](https://usermanual.wiki/Samsung-Electronics-Co/NP-P40.Users-Manual-2/User-Guide-505397-Page-54.png)
![Troubleshooting 119HD TV RelatedQ1 On a component TV, the Full Screen DOS Mode screen does not display.AA component TV does not support the Full Screen DOS Mode screen due to an output power problem of the TV. Please use DOS mode in a window when using a component TV.Q2 The colors are too blurred.ADepending on the model of the TV or the color settings, a specific color may dominate. Adjust the color settings of the TV.Q3 When I watch a DVD and the resolution is higher than 540, the screen is not displayed or an error message appears.AThe DVD international standard does not support resolutions higher than 480P. Configure the resolution of the component output mode to lower than 480P.Q4 How can I configure a component TV device?(ATI chipset models)A1. Right-click over the Desktop and then select Properties.2. In the [Display Properties] window, select the Settings tab > Advanced > ATI Display tab.3. Select the YPbPr item and click the Apply button.4. Click the YPbPr button and select the appropriate TV type and then click the Apply button.(Intel chipset models)AOpen the Graphics Properties window according to the following procedures.1. Right-click over the Desktop and then select Graphics Option >Graphics Properties.2. Select TV from the Device tab.3. Select a resolution or type and click the Apply button.Q5 The screen does not display on the component TV.(ATI chipset models)](https://usermanual.wiki/Samsung-Electronics-Co/NP-P40.Users-Manual-2/User-Guide-505397-Page-59.png)
![124 Users Manual5. After the restoration is complete, Windows restarts. In the [System Restore completed] dialog, click OK.Your computer has been restored to the selected restore point.Undoing the last restorationThe procedures to undo a restoration are described below.1. Click Start > All Programs > Accessories > System Tools > System Restore.2. Select "Undo my last restoration", and then click Next.3. Confirm the restoration information to undo, and than click Next. System Restore shuts down Windows and starts undoing the restoration. 4. After the undo restoration is complete, Windows restarts. In the [Undo the last restoration completed] dialog, click OK.Your computer has been restored to the point prior to the last restoration.](https://usermanual.wiki/Samsung-Electronics-Co/NP-P40.Users-Manual-2/User-Guide-505397-Page-64.png)