Samsung Electronics Co NX1000 Digital Camera User Manual
Samsung Electronics Co Ltd Digital Camera
UserManual.wiki
>
Samsung Electronics Co
>
NX1000 User Manual
User Manual
Navigation menu
Upload a User Manual
Namespaces
Wiki Guide
HTML
PDF
Info
Views
User Manual
Discussion / Help
Navigation
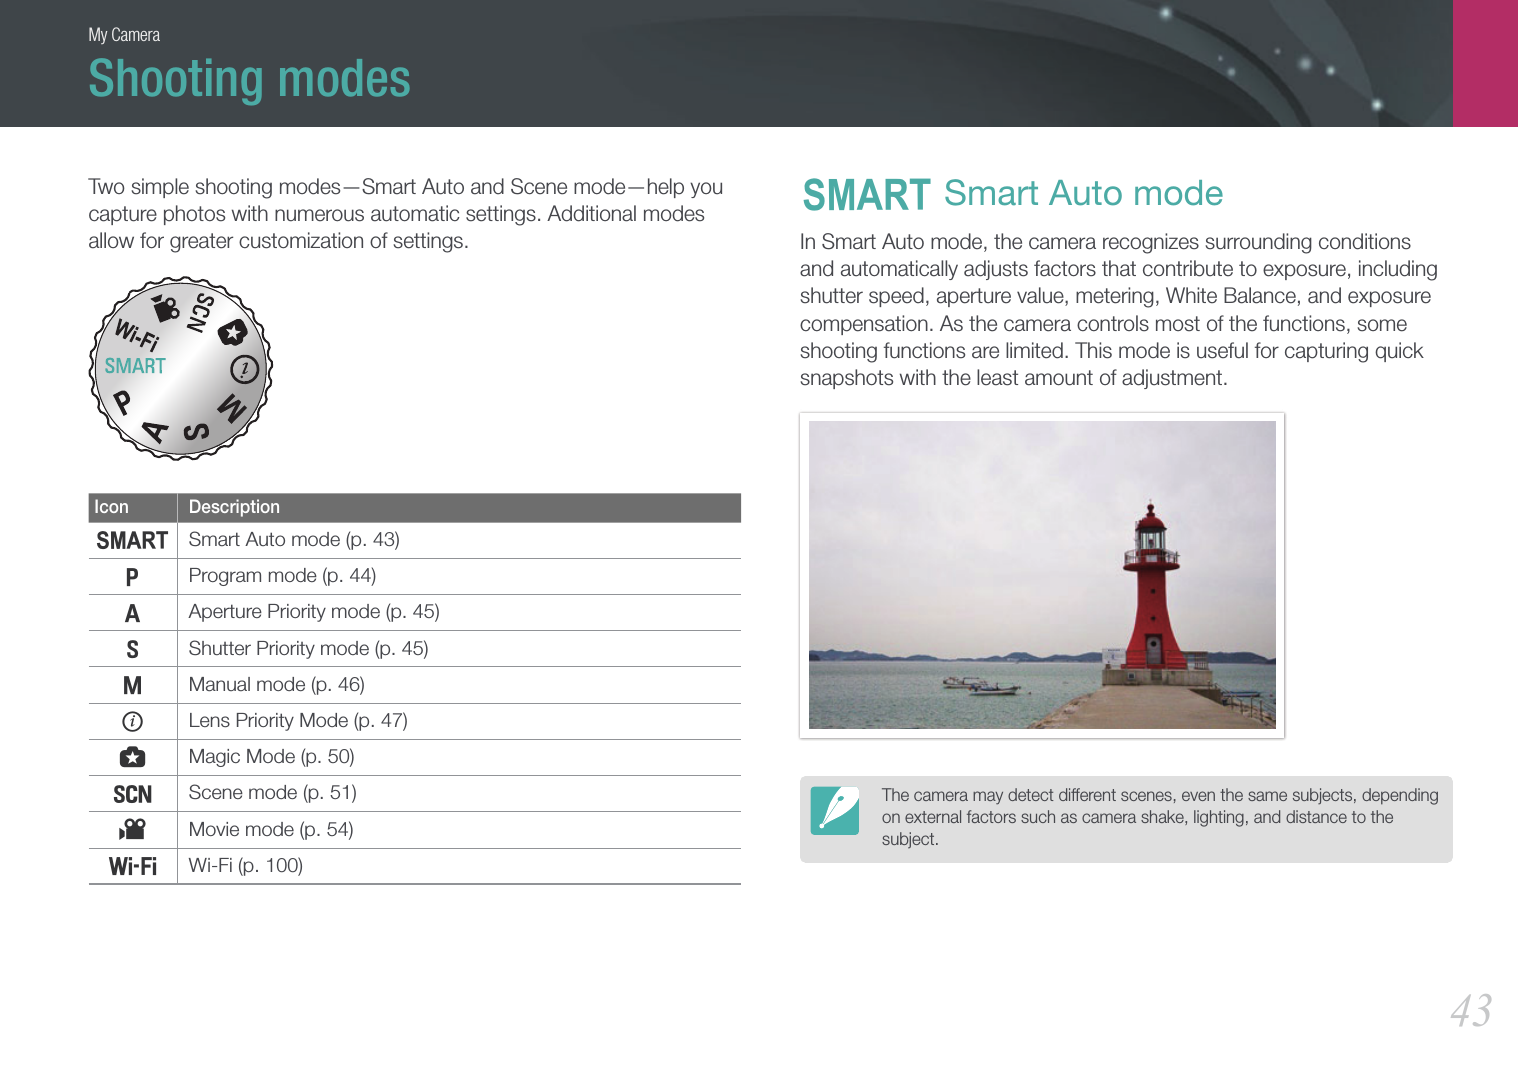
![6Indications used in this manualShooting mode indicationsShooting mode IndicationSmart AutotProgramPAperture PriorityAShutter PrioritySManualMLens PriorityiMagicgScenesMovievWi-FiB Icons used in this manualIcon FunctionAdditional informationSafety warnings and precautions[ ]Camera buttons. For example, [Shutter] represents the shutter button.( )Page number of related information→The order of options or menus you must select to perform a step; for example: Select J → Quality (represents select J, and then Quality). The number next to the icon may vary depending on the shooting mode. That is, some options may be located under K or L. This manual is based on Program mode.*Annotation](https://usermanual.wiki/Samsung-Electronics-Co/NX1000/User-Guide-1689960-Page-7.png)
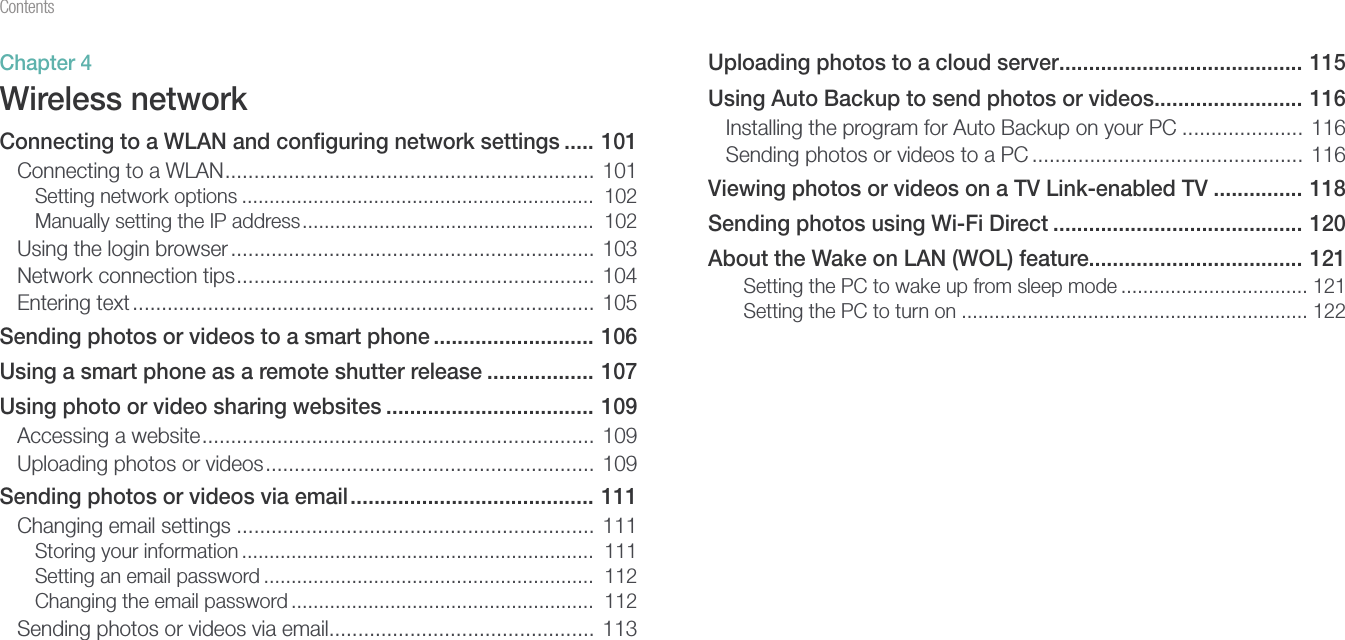


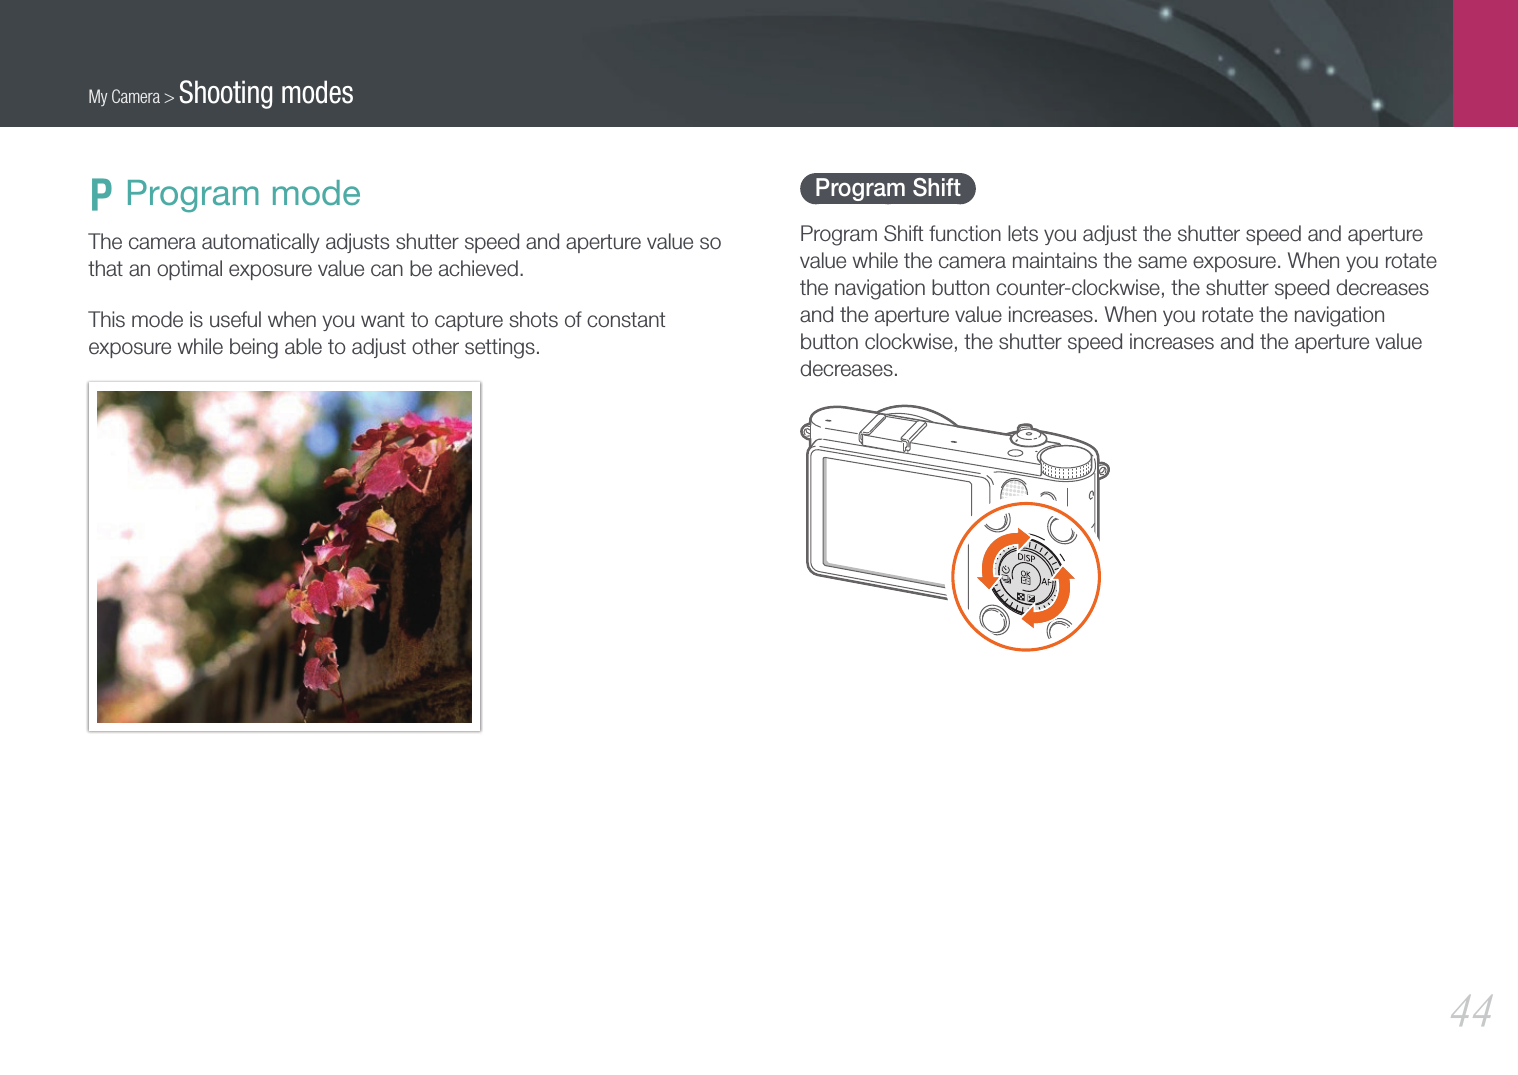
![My Camera > Shooting modes46M Manual modeManual mode lets you adjust the shutter speed and aperture value manually. In this mode, you can fully control the exposure of your photos.This mode is useful in controlled shooting environments, such as a studio, or when it is necessary to fine-tune camera settings. The Manual mode is also recommended for shooting night scenes or fireworks.Framing modeWhen you adjust the aperture value or shutter speed, the exposure changes according to the settings, so the display may darken. With this function on, the brightness of the display is constant regardless of the settings, so you can better frame your shot.To use Framing Mode,In Shooting mode, press [m] → K → Framing Mode → an option.Using bulbUse a bulb to shoot night scenes or the night sky. During the interval between the first [Shutter] press and the second [Shutter] press, the shutter is left open so you can create moving light effects.To use a bulb,Press [I] to select a shutter speed, and then rotate the navigation button counter-clockwise to Bulb → press [Shutter] to start shooting → press [Shutter] again to stop shooting.• If you set a high ISO value or open the shutter for a long time, image noise may increase.• The continuous shooting function cannot be used with the Bulb function.](https://usermanual.wiki/Samsung-Electronics-Co/NX1000/User-Guide-1689960-Page-47.png)
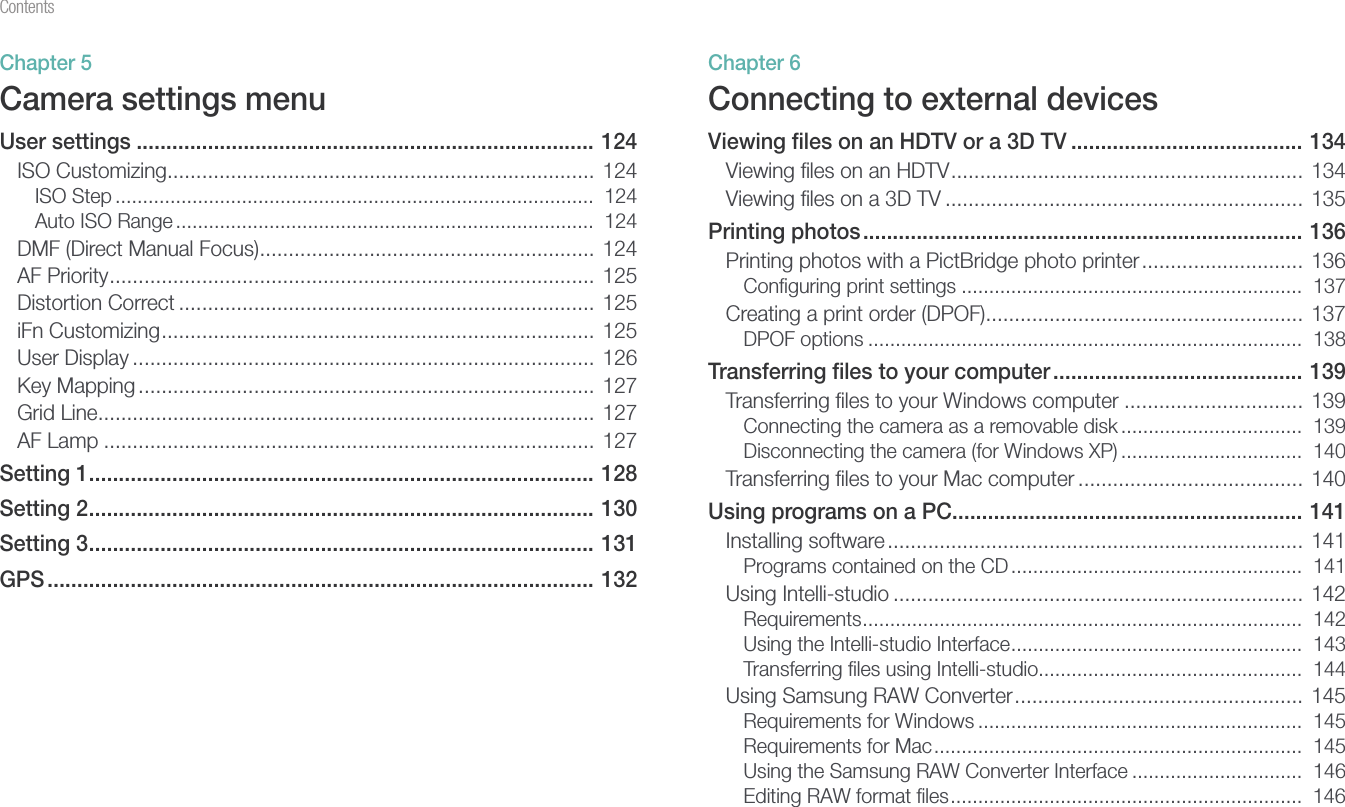
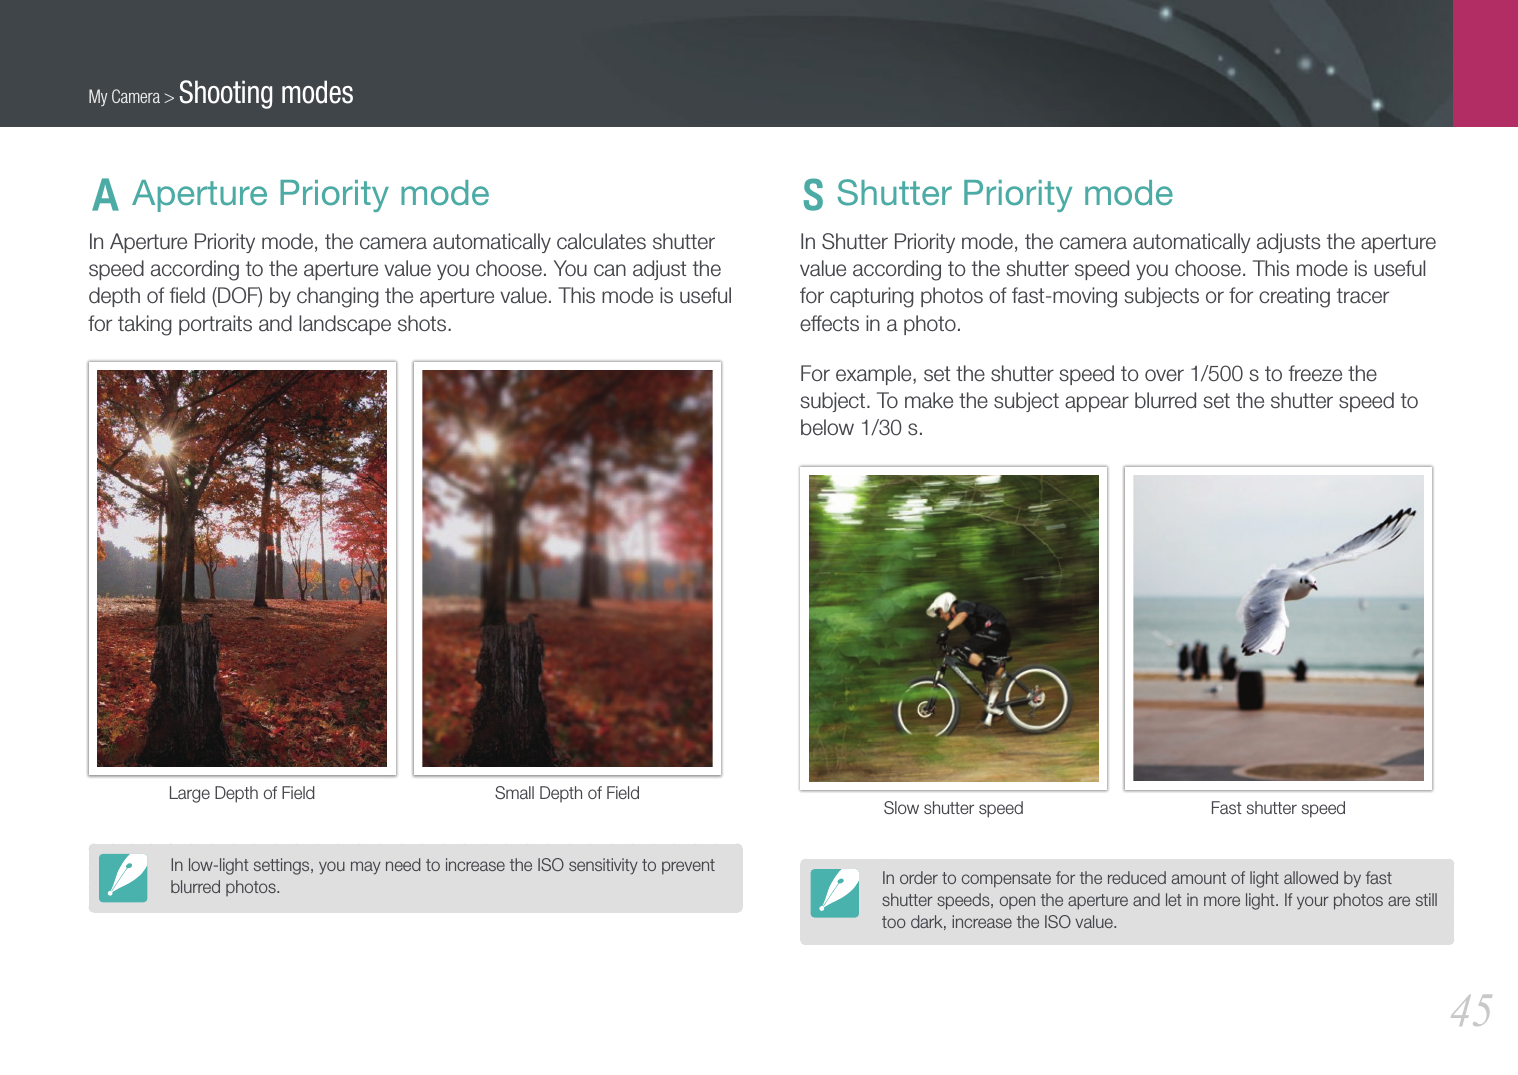
![My Camera > Shooting modes47i Lens Priority modeUsing the E modeYou can select an appropriate scene (i-Scene) or a filter effect to the lens you attached. Available scenes and filter effects may differ depending on the lens attached.1 Rotate the mode dial to i.2 Press [i-Function] on the lens to select E.• You can also use this function by pressing [f].3 Adjust the focus ring to select a scene or filter effect.• If you pressed [f] to select E, press [o], and then rotate the navigation button or press [C/F] to select an option.BacklightE4 Fully press [Shutter] to capture the photo.Available scene modes and filter effects (for SAMSUNG 20-50 mm F3.5-5.6 ED II lens): Beauty Shot, Portrait, Children, Backlight, Landscape, Sunset, Dawn, Beach & Snow, Night, Vignetting, Miniature, Fish Eye, Sketch, Defog, Halftone Dots](https://usermanual.wiki/Samsung-Electronics-Co/NX1000/User-Guide-1689960-Page-48.png)
![My Camera > Shooting modes48Using i-Function in PASM modesWhen you use the i-Function button on an i-Function lens, you can manually select and adjust shutter speed, aperture value, exposure value, ISO sensitivity, and White Balance on the lens.1 Rotate the mode dial to P, A, S, or M.2 Press [i-Function] on the lens to select a setting.• You can also rotate the navigation button or press [C/F] to select a setting.Auto3 Adjust the focus ring to select an option.Auto4 Fully press [Shutter] to capture the photo.](https://usermanual.wiki/Samsung-Electronics-Co/NX1000/User-Guide-1689960-Page-49.png)
![My Camera > Shooting modes49Available optionsShooting mode PASMAperture value-O-OShutter speed--OOExposure valueOOO -ISOOOOOWhite BalanceOOOOZOOOOTo select items to appear when you press [i-Function] on the lens in Shooting mode, press [m] → X → iFn Customizing → an option → [m].Using ZThe Z allows you to zoom in on a subject with less degradation of photo quality than the Digital zoom. However, the photo resolution may change compared to when you zoom in by rotating the zoom ring.1 Rotate the mode dial to P, A, S, M, or i.2 Press [i-Function] on the lens to select Z.• You can also rotate the navigation button or press [C/F] to select a setting.3 Adjust the focus ring to select an option.• Photo resolution varies according to the zoom rate if you use the Z.3:2 16:9 1:1x1.24560X3040 (13.9M)4560X2568 (11.7M)3040X3040 (9.2M)x1.43888X2592 (10.1M)3888X2184 (8.5M)2592X2592 (6.7M)x1.73264X2176 (7.1M)3264X1840 (6.0M)2176X2176 (4.7M)x22736X1824 (5.0M)2736X1536 (4.2M)1824X1824 (3.3M)These figures are based on the maximum resolution at each image ratio.4 Fully press [Shutter] to capture the photo.• Z is not available when you capture burst shots.• Z is not available when you capture photos in the RAW file format.• Z is deactivated when you record videos by pressing the video recording button.](https://usermanual.wiki/Samsung-Electronics-Co/NX1000/User-Guide-1689960-Page-50.png)
![My Camera > Shooting modes50g Magic modeYou can apply various filter effects and frame effects to your photos or videos to create unique images. The shape and the feel of the photos or videos will change according to the effect you select.To set an effect,In Shooting mode, press [f] → Magic Mode → Magic Frame or Smart Filter → a desired effect.• If you select Sketch among filter effects, the photo size will automatically change to 5.9M and below.• If you set a frame effect, the photo size will be automatically set to 2M.• You cannot record a video with a frame effect.• If you set a filter effect, the size of the video will be 640X480 or below.](https://usermanual.wiki/Samsung-Electronics-Co/NX1000/User-Guide-1689960-Page-51.png)
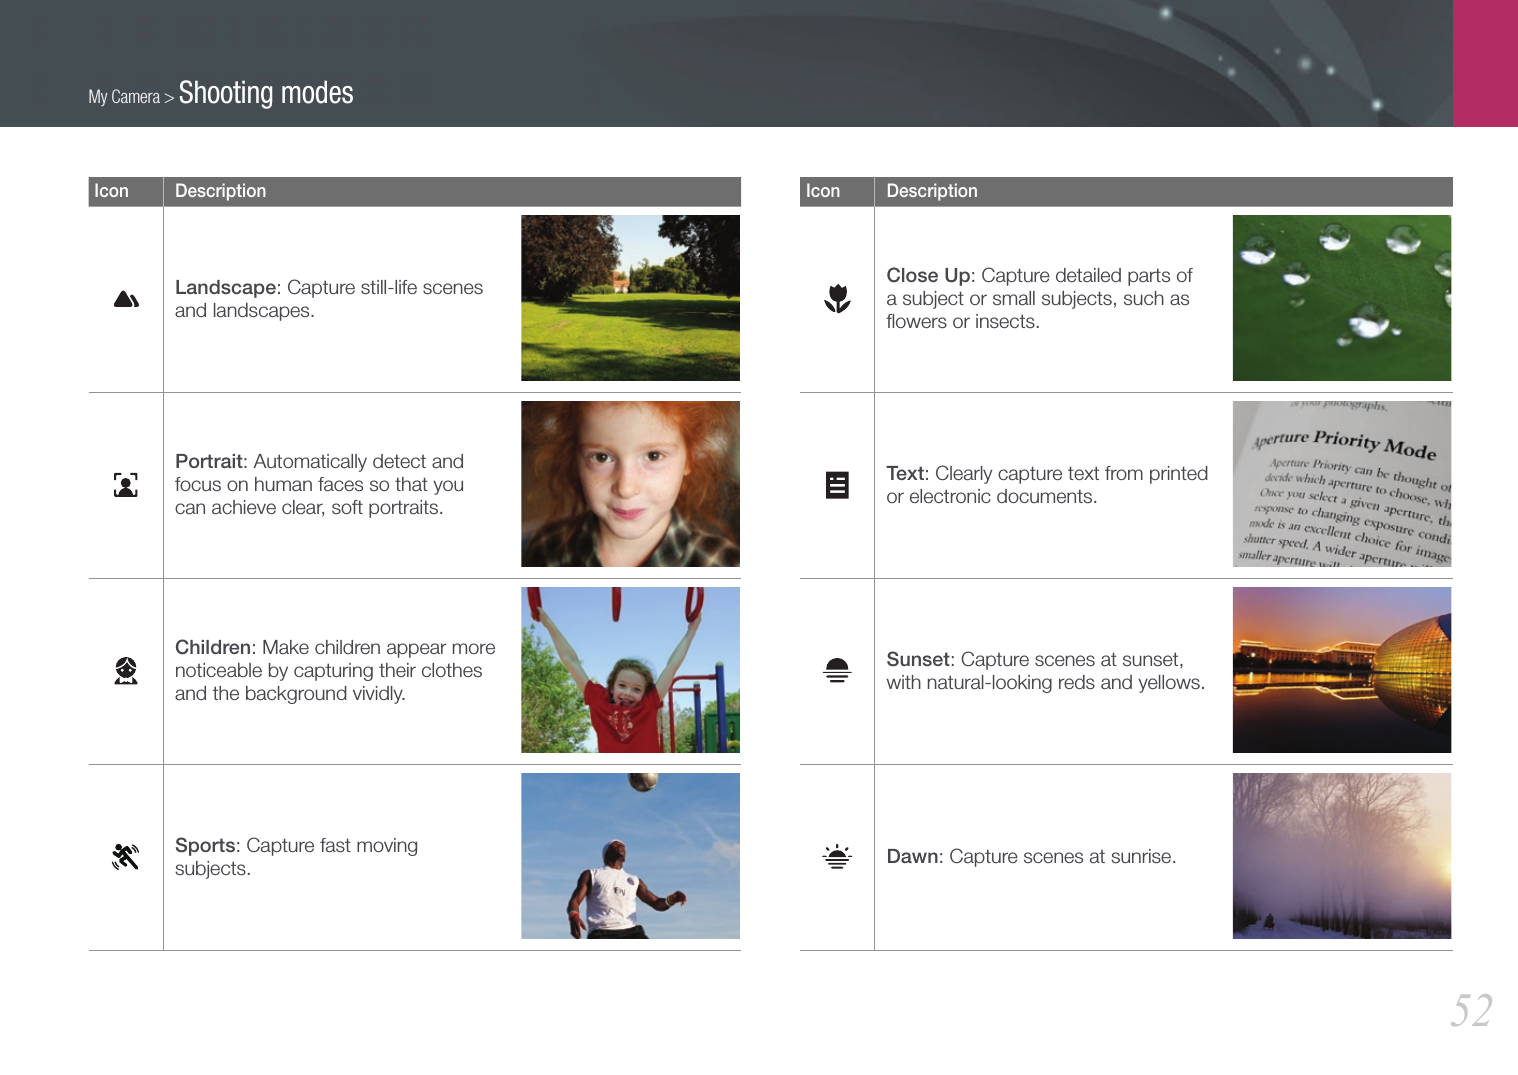
![My Camera > Shooting modes51s Scene modeIn Scene mode, the camera selects the best settings for each type of scene.You can select a desired scene by pressing [f] in Shooting mode.Icon DescriptionPanorama: Capture a 2D or 3D panoramic photo. Captured 3D panoramic photos can be viewed only on a 3D TV.• The maximum size of a 2D panoramic photo is 8000 X 1152 (horizontal) and 1728 X 4752 (vertical).• The maximum size of a 3D panoramic photo is 3300 X 768 (horizontal).• In Panorama mode, some shooting options are not available.• The camera may stop shooting due to the shooting composition or the subject's movement.• In Panorama mode, your camera may not capture the entire last scene if you stop moving the camera to improve the photo quality. To capture the entire scene, move your camera slightly beyond the point where you want the scene to end.Icon Description• In 3D Panorama mode, your camera may not capture the very beginning or end of a scene due to the nature of the 3D effect. To capture the entire scene, move slightly beyond the beginning and end points you want to capture.• In 3D Panorama mode, photos are captured in both JPEG and MPO file formats.• You can view an MPO file that supports the 3D effect only on an MPO-compatible display, such as 3D TV or 3D monitor. On your camera's display, you can view only JPEG files.• Use proper 3D glasses when you view an MPO file on a 3D TV or 3D monitor.Beauty Shot: Hide facial imperfections.Night: Capture scenes at night or in low lighting. Use a tripod to prevent your camera from shaking that is caused by low shutter speed.](https://usermanual.wiki/Samsung-Electronics-Co/NX1000/User-Guide-1689960-Page-52.png)

![My Camera > Shooting modes54v Movie modeIn Movie mode, you can shoot videos in Full High Definition (1920X1080) and capture sound via the camera’s microphone.In order to adjust the exposure level, you can select Program in the Movie AE Mode options menu so that the aperture value and shutter speed can be automatically set or select Aperture Priority to manually set the aperture value. You can also select Shutter Priority to manually set the shutter speed or select Manual to manually set both the aperture value and shutter speed. While shooting a video, press [F] to activate or deactivate the AF function.Select Fader to fade in or out a scene. You can also select Voice to mute or un-mute voice.The camera lets you capture video files up to 25 minutes in length at 30 or 24 fps, and saves the files in MP4 (H.264) format. 24 fps is available only with 1920X810.• H.264 (MPEG-4 part10/AVC) is the latest video coding format established in 2003 collaboratively by ISO-IEC and ITU-T. Since this format uses a high compression rate, more data can be saved in less memory space.• If you have the image stabilizer option on when shooting a movie, the camera may record the image stabilizer sound.• The zoom sound or other lens sounds may be recorded if you adjust the lens while recording a video.• When using an optional video lens, the autofocus noise is not recorded.• If you remove the camera lens while recording a movie, the recording will be interrupted. Do not change the lens while recording.• If you remove an external zoom microphone while recording a movie, the recording will be interrupted. Do not remove it while recording.• If you change the shooting angle of the camera suddenly while shooting a movie, the camera may not be able to record images accurately. Use a tripod to minimize camera shake.• In Movie mode, the camera supports only the Multi AF function. You cannot use any other focus area setting functions, such as Face Detection AF.• When the size of a movie file exceeds 4 GB, the camera automatically stops recording. If this occurs, continue shooting by starting a new movie file.• If you use a slow writing memory card, the recording of your movie can be interrupted because the card cannot process data at the rate the video is being shot. If this occurs, replace the card with a faster memory card or reduce the image size (for example, from 1280X720 to 640X480).• When formatting a memory card, always format using the camera. If you format on another camera or a PC, you can lose files on the card or cause a change in the capacity of the card.](https://usermanual.wiki/Samsung-Electronics-Co/NX1000/User-Guide-1689960-Page-55.png)
![Shooting Functions5757Shooting FunctionsShooting FunctionsAs you increase the resolution, your photo or video will include more pixels, so it can be printed on larger paper or displayed on a larger screen. When you use a high resolution, the file size will also increase. Select a low resolution for photos that will be displayed in a digital picture frame or uploaded to the web.To set the size, In Shooting mode, press [f] → Photo Size or Movie Size → an option.Photo size optionsIcon Size Recommended for20.0M (5472X3648) (3:2) Printing on A1 paper.10.1M (3888X2592) (3:2) Printing on A2 paper.5.9M (2976X1984) (3:2) Printing on A3 paper.2.0M (1728X1152) (3:2) Printing on A5 paper.16.9M (5472X3080) (16:9) Printing on A1 paper or viewing on an HDTV.7.8M (3712X2088) (16:9) Printing on A3 paper or viewing on an HDTV.4.9M (2944X1656) (16:9) Printing on A4 paper or viewing on an HDTV.2.1M (1920X1080) (16:9) Printing on A5 paper or viewing on an HDTV.13.3M (3648X3648) (1:1) Printing a square photo on A1 paper.7.0M (2640X2640) (1:1) Printing a square photo on A3 paper.4.0M (2000X2000) (1:1) Printing a square photo on A4 paper.1.1M (1024X1024) (1:1) Attaching to an email.Size](https://usermanual.wiki/Samsung-Electronics-Co/NX1000/User-Guide-1689960-Page-58.png)

![Shooting Functions5959Shooting FunctionsShooting FunctionsThe camera saves photos in either the JPEG or RAW format.Photos captured by a camera are often transformed to the JPEG format and stored in the memory according to the settings of the camera at the time of shooting. RAW files are not transformed to the JPEG format and are stored in the memory without any changes. RAW files have the file extension “SRW”. To adjust and calibrate exposures, White Balances, tones, contrasts, and colors of the RAW files, or to convert them into JPEG or TIFF format, use the Samsung RAW Converter program found on the supplied CD-ROM. Ensure you have enough available memory to save photos in the RAW format.To set the quality, In Shooting mode, press [f] → Quality → an option.Photo quality optionsIcon Format DescriptionJPEGSuper Fine:• Compressed for the best quality.• Recommended for printing in large size.JPEGFine:• Compressed for better quality.• Recommended for printing in normal size.Icon Format DescriptionJPEGNormal:• Compressed for normal quality.• Recommended for printing in small size or uploading to the web.RAWRAW:• Save a photo without data loss.• Recommended for editing after shooting.RAW+JPEG RAW + S.Fine: Save a photo in both the JPEG (S.Fine quality) and RAW format.RAW+JPEG RAW + Fine: Save a photo in both the JPEG (Fine quality) and RAW format.RAW+JPEG RAW + Normal: Save a photo in both the JPEG (Normal quality) and RAW format.Video quality optionsIcon Extension DescriptionMP4 (H.264) Normal: Record videos in normal quality.MP4 (H.264) HQ: Record videos in high quality. Quality](https://usermanual.wiki/Samsung-Electronics-Co/NX1000/User-Guide-1689960-Page-60.png)
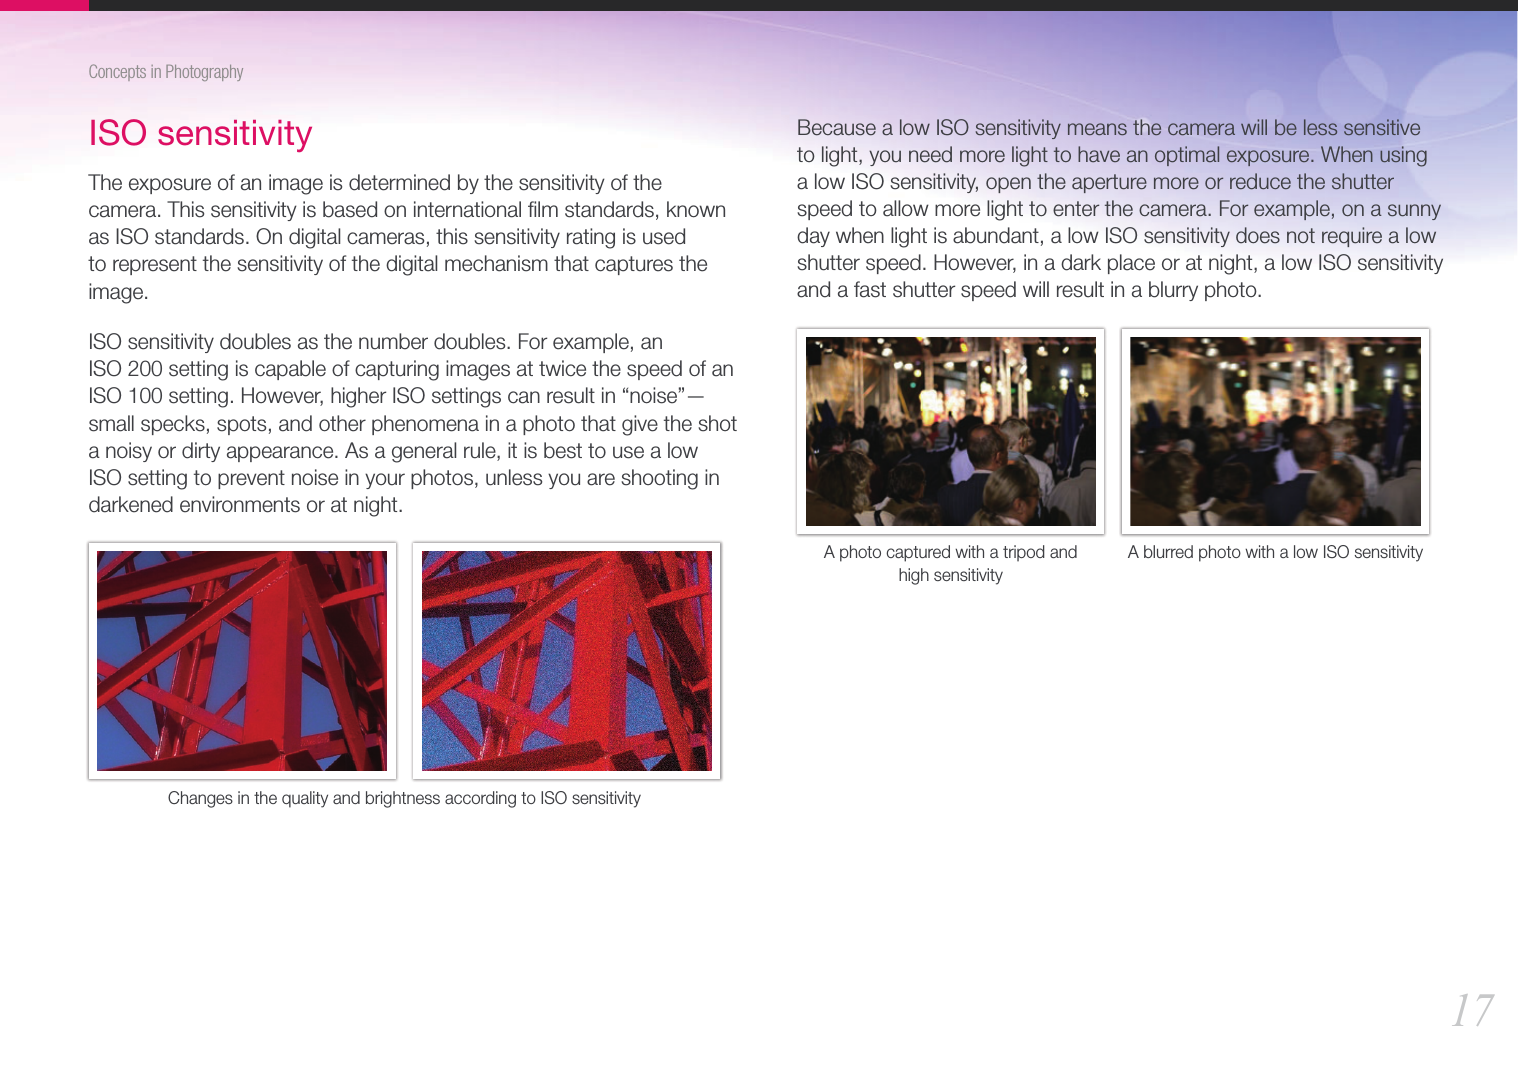
![Shooting Functions6060Shooting FunctionsShooting FunctionsThe ISO sensitivity value represents the sensitivity of camera to light. The larger the ISO value, the more sensitive the camera is to light. Consequently, by selecting a higher ISO sensitivity value, you can capture photos in dim or dark places at faster shutter speeds. However, this may increase electronic noise and result in a grainy photo.To set ISO sensitivity, In Shooting mode, press [f] → ISO → an option.ExamplesISO 100 ISO 400ISO 800 ISO 3200• Increase the ISO value in places where flash use is prohibited. You can capture a clear photo by setting a high ISO value without having to secure more light.• Use the Noise Reduction function in order to reduce the visual noise that can appear on photos of a high ISO value. (p. 124) ISO sensitivity](https://usermanual.wiki/Samsung-Electronics-Co/NX1000/User-Guide-1689960-Page-61.png)
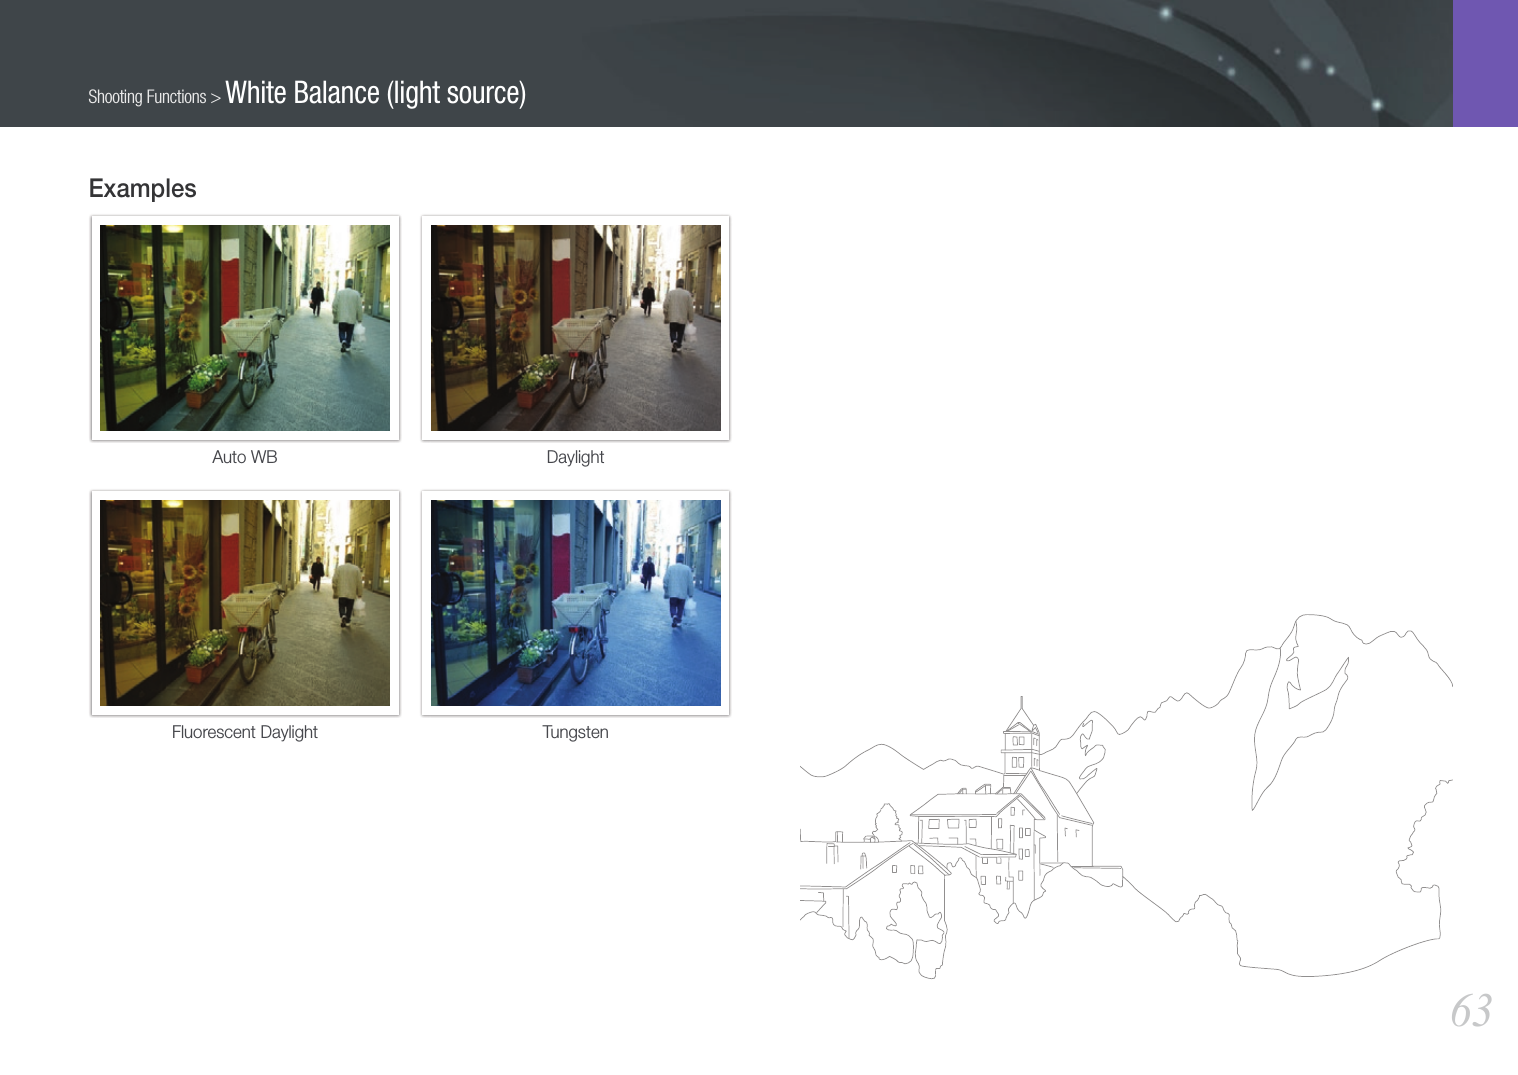
![Shooting Functions6161Shooting FunctionsShooting FunctionsThe color of a photo depends on the type and quality of the light source. If you want the color of your photo to be realistic, select an appropriate lighting condition to calibrate the White Balance, such as Auto WB, Daylight, Cloudy, Tungsten, or adjust color temperature manually. You can also adjust color for the preset light sources so that the colors of the photo match the actual scene under mixed lighting conditions.To set the White Balance, In Shooting mode, press [f] → White Balance → an option.White Balance optionsIcon DescriptionAuto WB*: Use automatic settings depending on the lighting conditions.Daylight*: Select when taking outdoor photos on a sunny day. This option results in photos closest to the natural colors of the scene.Cloudy*: Select when taking outdoor photos on a cloudy day or in shadows. Photos captured on cloudy days tend to be more bluish than on sunny days. This option offsets that effect.Fluorescent White*: Select when shooting under a daylight fluorescent lamp. Especially for white fluorescent light with a color temperature of about 4,200K.Icon DescriptionFluorescent NW*: Select when shooting under a daylight fluorescent lamp. Especially for white fluorescent light of very white hues with a temperature of about 5,000K.Fluorescent Daylight*: Select when shooting under a daylight fluorescent lamp. Especially for white fluorescent light of slightly bluish hue with a temperature of about 6,500K.Tungsten*: Select when taking indoor photos under incandescent bulbs or halogen lamps. Incandescent tungsten bulbs tend to have a reddish hue. This option offsets that effect.Flash WB*: Select when using a flash.Custom Set: Use your pre-defined settings. You can manually set the White Balance by shooting a white sheet of paper. Fill the spot metering circle with the paper and set the White Balance.* These options can be customized.White Balance (light source)](https://usermanual.wiki/Samsung-Electronics-Co/NX1000/User-Guide-1689960-Page-62.png)
![62Shooting Functions > White Balance (light source)Option DescriptionColor Temperature: Manually adjust the color temperature of the light source. Color temperature is a measurement in degrees Kelvin that indicates the specific type of light source. As the color temperature increases, the color distribution becomes cooler. Alternatively, as the color temperature decreases, the color distribution becomes warmer.Clear skyFluorescent HFluorescent LCloudyHalogen lampDaylightTungstenCandle lightCustomizing preset optionsYou can also customize preset White Balance options.To customize preset options,In Shooting mode, press [f] → White Balance → an option → [D] → rotate the navigation button or press [D/I/C/F]. BackWhite Balance : DaylightResetDaylight](https://usermanual.wiki/Samsung-Electronics-Co/NX1000/User-Guide-1689960-Page-63.png)
![Shooting Functions6464Shooting FunctionsShooting FunctionsPicture Wizard lets you apply different photo styles to your photo to create various looks and emotional moods. You can also create and save your own photo styles by adjusting color, saturation, sharpness, and contrast for each style. There is no rule for which style is suitable in which conditions. Experiment with different styles and find your own settings.To set a photo style, In Shooting mode, press [f] → Picture Wizard → an option.ExamplesStandard Vivid PortraitLandscape Forest RetroCool Calm ClassicYou can also adjust the value of the preset style settings. Select a Picture Wizard option, press [D], and then adjust color, saturation, sharpness, or contrast. Picture Wizard (photo styles)](https://usermanual.wiki/Samsung-Electronics-Co/NX1000/User-Guide-1689960-Page-65.png)
![Shooting Functions6565Shooting FunctionsShooting FunctionsAF modeLearn how to adjust the camera’s focus according to the subjects.You can select a focusing mode appropriate to the subject among Single Auto Focus, Continuous Auto Focus, and Manual Focus. The AF function is activated when you press [Shutter] halfway. In the MF mode, you have to rotate the focus ring on the lens to focus manually.In most cases, you can have a focus by selecting Single AF. Fast moving subjects or subjects of a color similar to the background are difficult to focus. Select an appropriate focusing mode for such instances.If your lens has an AF/MF switch, set the switch to MF to adjust the focus manually.When your lens has no AF/MF switch, press [F] to select a desired AF mode.To set the auto focus mode, In Shooting mode, press [F] → an option.Single AFSingle AF is appropriate for shooting a still subject. When you press [Shutter] halfway, the focus fixes in the focus area. The area turns green when the focus is achieved.](https://usermanual.wiki/Samsung-Electronics-Co/NX1000/User-Guide-1689960-Page-66.png)
![66Shooting Functions > AF modeContinuous AFWhile you are pressing [Shutter] halfway, the camera continues to automatic focusing. Once the focus area is fixed on the subject, the subject is always in focus even when moving. This mode is recommended for shooting a person on a bicycle, a running dog, or a car racing scene.Manual focusYou can manually focus on a subject by rotating the focus ring on the lens. The MF Assist function lets you easily achieve a focus. While you are rotating the focus ring, the focus area is magnified or the focus aid bar appears to help you achieve a clear focus. This mode is recommended for shooting an object similar in color to the background, a night scene, or fireworks.](https://usermanual.wiki/Samsung-Electronics-Co/NX1000/User-Guide-1689960-Page-67.png)
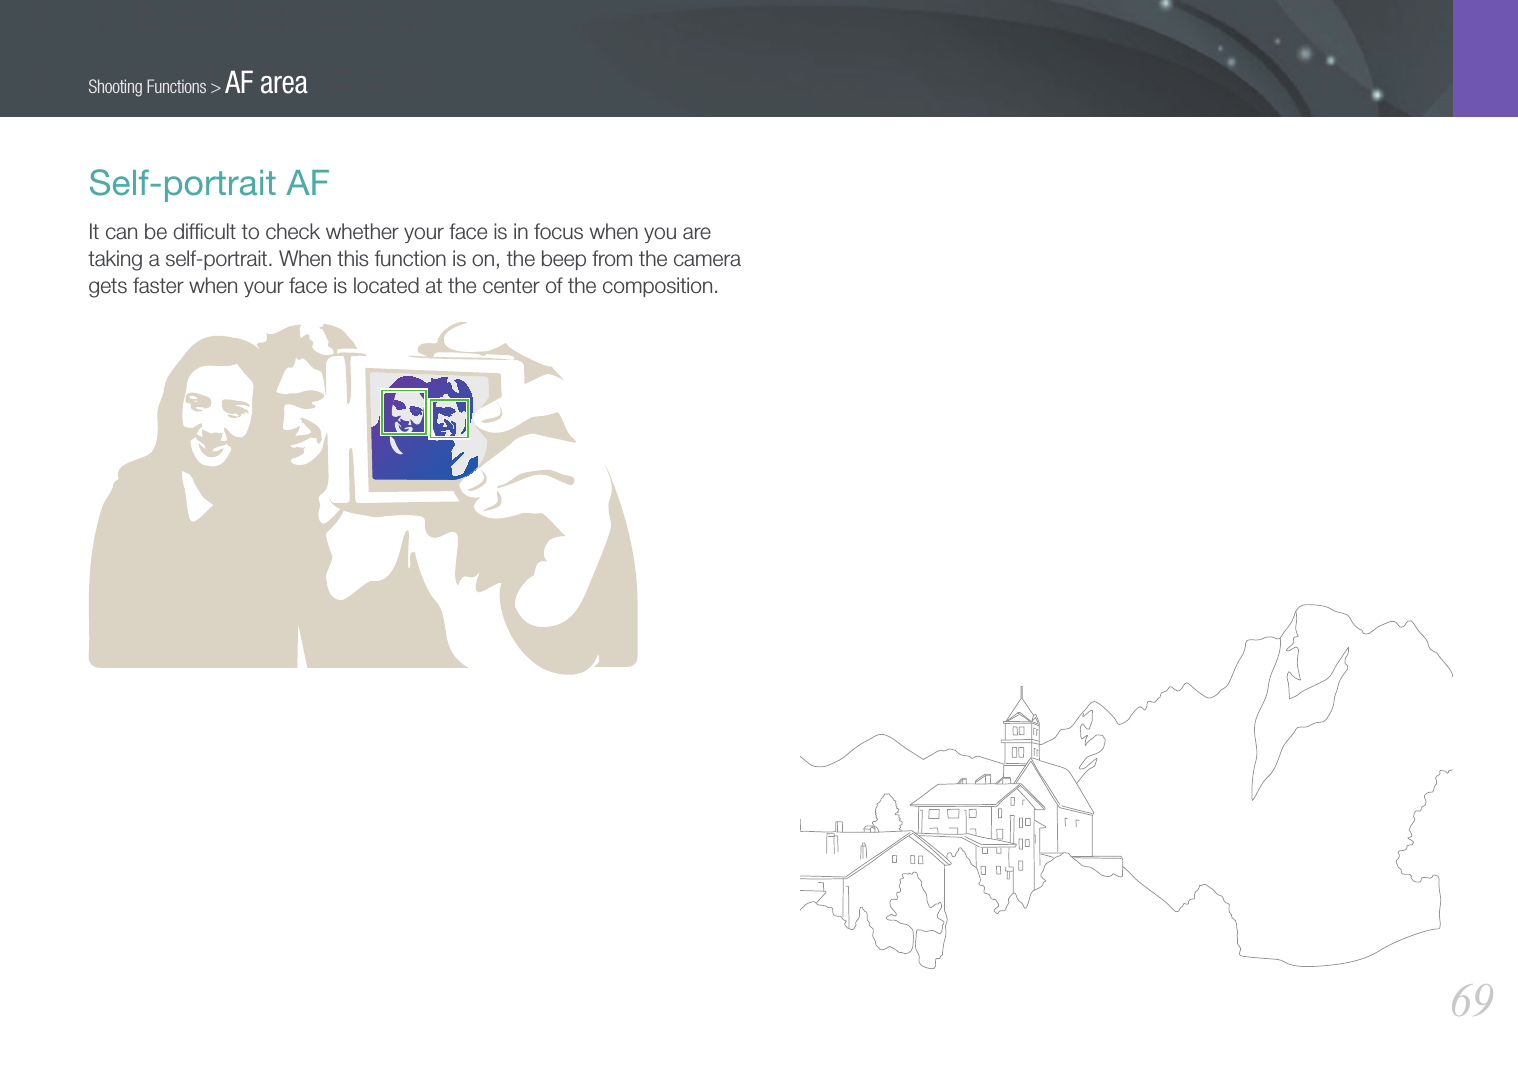
![Shooting Functions6767Shooting FunctionsShooting FunctionsThe AF area function changes the positions of the focus area.Generally, cameras focus on the nearest subject. When there are a lot of subjects, however, unwanted subjects can be in focus. In order to prevent unwanted subjects from being in focus, change the focus area so that a desired subject is in focus. You can get a clearer and sharper photo by selecting an appropriate focus area.To set the auto focus area, In Shooting mode, press [f] → AF Area → an option.Selection AFYou can set the focus on an area you want. Apply an out-of-focus effect to make the subject more distinguishable.The focus on the photo below was repositioned and resized so that it fits the subject’s face.AF Zoom MoveTo resize or move the focus area, in Shooting mode, press [o]. Press [D/I/C/F] to adjust the location of the focus area. Rotate the navigation button to adjust the size of the focus area.AF area](https://usermanual.wiki/Samsung-Electronics-Co/NX1000/User-Guide-1689960-Page-68.png)
![68Shooting Functions > AF areaMulti AFThe camera displays a green rectangle in places where focus is set correctly. The photo is divided into two or more areas, and the camera obtains focus points of each area. It is recommended for scenery photos.When you press [Shutter], the camera displays the focus areas in green as shown in the photo below.Face detection AFThe camera focuses on human faces preferentially. Faces of up to 10 people can be detected. This setting is recommended for shooting a group of people.When you press [Shutter] halfway, the camera focuses on faces as shown in the photo below. In cases of shooting a group of people, the camera displays the focus on the nearest person’s face in white and the rest of the people’s faces in gray.](https://usermanual.wiki/Samsung-Electronics-Co/NX1000/User-Guide-1689960-Page-69.png)
![Shooting Functions7070Shooting FunctionsShooting FunctionsIn the manual focus (MF) mode, you have to rotate the focus ring on the lens to focus manually. When you set the MF Assist function, you can achieve a clearer focus. This function is only available on a lens that supports manual focus.To set the manual focus assist, In Shooting mode, press [m] → K or k → MF Assist → an option.* DefaultOption DescriptionOffDo not use the MF Assist function.Enlarge x5*The focus area is magnified by 5 times when you rotate the focus ring.* DefaultOption DescriptionEnlarge x8The focus area is magnified by 8 times when you rotate the focus ring.FA (Focus aid bar)The focus aid bar rises as the focus improves when you rotate the focus ring. MF assist](https://usermanual.wiki/Samsung-Electronics-Co/NX1000/User-Guide-1689960-Page-71.png)
![Shooting Functions7171Shooting FunctionsShooting FunctionsUse the Optical Image Stabilization (OIS) function to minimize camera shake. OIS may not be available with some lenses.Camera shake tends to occur in dark places or when shooting indoors. In such cases, the camera uses slower shutter speeds in order to increase the amount of light taken in, which can result in a blurry photo. You can prevent this situation by using the OIS function.If your lens has an OIS switch, you have to turn the switch to use the OIS function.To set OIS options, In Shooting mode, press [m] → K or k → OIS → an option.Optical Image Stabilization (OIS)OIS options* DefaultIcon DescriptionMode 1*: The OIS function is applied only when you press [Shutter] in full or half.Mode 2: The OIS function is on.Off: The OIS function is off. (This option may not be available with some lenses.)Without OIS correction With OIS correction](https://usermanual.wiki/Samsung-Electronics-Co/NX1000/User-Guide-1689960-Page-72.png)
![Shooting Functions7272Shooting FunctionsShooting FunctionsYou can set the shooting method such as Continuous, Burst, Timer and so on.Select Single to capture one photo at a time. Select Continuous or Burst to shoot fast moving subjects. Select AE Bracket, WB Bracket, or P Wiz Bracket to adjust exposure, White Balance, or apply Picture Wizard effects. You can also select Timer to capture a photo of yourself.To set the shooting method, In Shooting mode, press [C] → an option.SingleCapture one photo whenever you press [Shutter]. Recommended for general conditions.ContinuousContinuously capture photos while you are pressing [Shutter]. You can capture up to 3 photos (Continuous Low (3fps)) or 8 photos (Continuous High (8fps)) per second.Drive (shooting method)](https://usermanual.wiki/Samsung-Electronics-Co/NX1000/User-Guide-1689960-Page-73.png)
![73Shooting Functions > Drive (shooting method)BurstConsecutively capture up to 10 shots per second (3 seconds), 15 shots per second (2 seconds), or 30 shots per second (1 second) when you press [Shutter] once. Recommended for shooting the rapid motion of fast moving subjects such as racing cars.To set the number of shots, in Shooting mode, press [C] → Burst, and then press [D].TimerCapture a photo with a delay of 2 to 30 seconds. The delay is adjustable in increments of 1 second.To set the delay, in Shooting mode, press [C] → Timer, and then press [D].](https://usermanual.wiki/Samsung-Electronics-Co/NX1000/User-Guide-1689960-Page-74.png)
![74Shooting Functions > Drive (shooting method)Auto Exposure Bracketing (AE Bracket)When you press [Shutter], the camera captures 3 consecutive photos: the original, one a step darker, and one a step lighter. Use a tripod to prevent blurry photos as the camera captures three photos continuously. You can adjust the settings in Bracket Set menu.Exposure -2OriginalExposure +2White Balance Bracketing (WB Bracket)When you press [Shutter], the camera captures 3 consecutive photos: the original and two more with different White Balance settings. The original photo is captured when you press [Shutter]. The other two are automatically adjusted according to the White Balance you have set. You can adjust the settings in Bracket Set menu.WB-2OriginalWB+2](https://usermanual.wiki/Samsung-Electronics-Co/NX1000/User-Guide-1689960-Page-75.png)
![75Shooting Functions > Drive (shooting method)Picture Wizard Bracketing (P Wiz Bracket)When you press [Shutter], the camera captures three consecutive photos, each with a different Picture Wizard setting. The camera captures a photo and applies the three Picture Wizard options you have set to the image captured. You can select three different settings in Bracket Set menu.VividStandardRetroBracketing settingYou can set up the options for AE Bracket, WB Bracket, and P Wiz Bracket.To set a bracketing option, In Shooting mode, press [m] → L → Bracket Set → an option.Option DescriptionAE Bracket SetSet the order and the area of bracket. • Bracket Order: Set the order in which the camera captures the original, lighter, and darker photo (represented by 0, +, and -).• Bracket Area: Set the exposure range of the 3 bracketed photos.WB Bracket SetAdjust the White Balance interval range of the 3 bracketed photos. For example, AB-/+3 adjusts the Amber value plus or minus three steps. MG-/+3 adjusts the Magenta value the same amount.P Wiz Bracket SetSelect 3 Picture Wizard settings the camera uses to capture the 3 bracketed photos.](https://usermanual.wiki/Samsung-Electronics-Co/NX1000/User-Guide-1689960-Page-76.png)
![Shooting Functions7676Shooting FunctionsShooting FunctionsIn order to capture a realistic photo of a subject, the amount of light should be constant. When the light source varies, you can use a flash and supply a constant amount of light. Select appropriate settings according to a light source and a subject.To set flash options, In Shooting mode, press [f] → Flash → an option.Flash optionsIcon DescriptionOff: Do not use the flash.Smart Flash: The camera automatically adjusts the brightness of the flash according to the amount of light in the surrounding environment.Auto: The flash automatically fires in dark places.Auto Red-eye: The flash automatically fires and prevents red-eyes.Fill in: The flash fires whenever you capture a photo.Fill-in Red: The flash fires whenever you capture a photo and prevents red-eyes.Icon Description1st Curtain: The flash fires immediately after the shutter opens. The camera captures a photo of a subject earlier in an action sequence clearly. Ball moving direction2nd Curtain: The flash fires just before the shutter closes. The camera captures a photo of a subject later in an action sequence clearly. Ball moving direction• The available options may differ depending on the shooting mode.• There is an interval between two bursts of the flash. Do not move until the flash fires a second time.• Flash options and the flash intensity adjustment are available only when you use the NX exclusive external flash.• You can capture a photo with a flash that is not fully charged, but it is recommended to use a fully charged flash.Use only Samsung-approved flashes. Using incompatible flashes may damage your camera. Flash](https://usermanual.wiki/Samsung-Electronics-Co/NX1000/User-Guide-1689960-Page-77.png)
![77Shooting Functions > FlashCorrecting the red-eye effectIf the flash fires when you capture a photo of a person in the dark, a red glow may appear in the eyes. To correct the red-eye effect, select Auto Red-eye or Fill-in Red.Without red-eye correction With red-eye correctionIf the subject is too far from the camera or moves when the first flash fires, red-eyes may not be reduced.Adjusting the flash intensityAdjust the flash intensity to avoid overexposure or underexposure. You can adjust it ±2 levels.To set the flash intensity,In Shooting mode, press [f] → Flash → an option → [D] → rotate the navigation button or press [C/F]. Flash OptionBack ResetFlash : Fill in](https://usermanual.wiki/Samsung-Electronics-Co/NX1000/User-Guide-1689960-Page-78.png)
![Shooting Functions7979Shooting FunctionsShooting FunctionsThe metering mode refers to the way in which a camera measures the quantity of light.The camera measures the amount of light in a scene, and in many of its modes, uses the measurement to adjust various settings. For example, if a subject looks darker than its actual color, the camera captures an overexposed photo of it. If a subject looks lighter than its actual color, the camera captures an underexposed photo of it.The brightness and overall mood of the photo can also be affected by how the camera measures the amount of light. Select an appropriate setting for a shooting condition.To set a metering option, In Shooting mode, press [f] → Metering → an option.MultiThe Multi mode calculates the amount of light in multiple areas. When light is sufficient or insufficient, the camera adjusts the exposure by averaging the overall brightness of the scene. This mode is suitable for general photos.Metering](https://usermanual.wiki/Samsung-Electronics-Co/NX1000/User-Guide-1689960-Page-80.png)

![81Shooting Functions > MeteringMeasuring the exposure value of the focus area When this function is turned on, the camera automatically sets an optimal exposure by calculating the brightness of the focus area. This function is only available when you select Spot metering or Multi metering, and Selection AF.To set this function, In Shooting mode, press [m] → K → Link AE to AF Point → an option.](https://usermanual.wiki/Samsung-Electronics-Co/NX1000/User-Guide-1689960-Page-82.png)
![Shooting Functions8282Shooting FunctionsShooting FunctionsThis function automatically corrects the loss of bright detail that can occur due to shading differences in the photo.To set Smart Range options, In Shooting mode, press [f] → Smart Range → an option.Without Smart Range effect With Smart Range effectSmart Range](https://usermanual.wiki/Samsung-Electronics-Co/NX1000/User-Guide-1689960-Page-83.png)
![Shooting Functions8383Shooting FunctionsShooting FunctionsThis function lets you select a color that you want to emphasize, and desaturates the others. You can select red, green, blue, or yellow from the menu.To set Selective Color options,In Shooting mode, press [f] → Selective Color → an option.ExamplesOriginal When red is selectedSelective Color](https://usermanual.wiki/Samsung-Electronics-Co/NX1000/User-Guide-1689960-Page-84.png)
![Shooting Functions8484Shooting FunctionsShooting FunctionsDigital imaging devices such as digital cameras, monitors, and printers have their own methods for representing colors, which are called color spaces.Your camera lets you select two color spaces: sRGB or Adobe RGB. sRGB is widely used for creating colors on PC monitors and is also the standard color space for Exif. sRGB is recommended for regular images and images you intend to publish on the Internet.Adobe RGB is used for commercial printing and has a larger color range than sRGB. Its wider range of colors helps you to easily edit photos on a computer. Note that individual programs are generally compatible with a limited number of color spaces. If you open an image in a program that is not compatible with the image’s color space, the colors will appear lighter.To set the color space, In Shooting mode, press [m] → L → Color Space → an option.Color spaceAdobe RGBsRGB](https://usermanual.wiki/Samsung-Electronics-Co/NX1000/User-Guide-1689960-Page-85.png)
![Shooting Functions8585Shooting FunctionsShooting FunctionsExposure compensationThe camera automatically sets the exposure by measuring the levels of light from the photo’s composition and the position of a subject. If the exposure set by the camera is higher or lower than you expected, you can adjust the exposure value manually. The exposure value is adjustable in ±3 increments. The camera displays the exposure warning in red for each step beyond ±3 range.To adjust the exposure value, press [I], and then rotate the navigation button. You can also adjust the exposure value by pressing [f], and then selecting EVC (Exposure Value Compensation).You can check the exposure value by the position of the exposure level indicator.Exposure level indicatorIncreased exposure (brighter)Decreased exposure (darker) Exposure warning Standard exposure index-2Original+2 Exposure compensation/lock](https://usermanual.wiki/Samsung-Electronics-Co/NX1000/User-Guide-1689960-Page-86.png)
![86Shooting Functions > Exposure compensation/lockAfter locking the exposure, aim the lens where you desire, and press [Shutter].Exposure lockWhen you cannot achieve an appropriate exposure because of a strong color contrast, lock the exposure and then capture a photo.To lock the exposure, adjust the photo's composition on which you want to calculate the exposure, and then press the custom button. (p. 127)](https://usermanual.wiki/Samsung-Electronics-Co/NX1000/User-Guide-1689960-Page-87.png)
![Shooting Functions8787Shooting FunctionsShooting FunctionsThe functions available for video are explained below.Movie AE modeSet the exposure mode for recording a video.To set Movie AE options, In Video Shooting mode, press [f] → Movie AE Mode → an option.* Default Icon DescriptionProgram*: The aperture value and shutter speed are adjusted automatically.Aperture Priority: Set the aperture value manually before recording a video. Rotate the navigation button to adjust the aperture value.Shutter Priority: Set the shutter speed manually before recording a video. Rotate the navigation button to adjust the shutter speed.Manual: Set both the aperture value and shutter speed manually before recording a video. Press [I] to select an aperture value or shutter speed, and then rotate the navigation button to adjust the value.Multi MotionSet the playing speed of a video.To set recording speed options,In Video Shooting mode, press [m] → l → Multi Motion → an option.Icon Descriptionx0.25: Record a video and play it at 1/4 normal speed.x0.5: Record a video and play it at 1/2 normal speed.x1: Record a video and play it at normal speed.x5: Record a video and play it at 5X normal speed.x10: Record a video and play it at 10X normal speed.x20: Record a video and play it at 20X normal speed.• If you select an option other than x1, sound will not be recorded.• The available options may differ according to the video size.Video functions](https://usermanual.wiki/Samsung-Electronics-Co/NX1000/User-Guide-1689960-Page-88.png)
![88Shooting Functions > Video functionsFaderYou can fade in or fade out a scene using the fader function on the camera without having to do it on a PC. Use the function appropriately and add dramatic effects on your videos.To set fader options, In Video Shooting mode, press [f] → Fader → an option.Icon DescriptionOff: Fader function not used.In: Scene gradually fades in.Out: Scene gradually fades out.In-out: The fader function is applied at the start and end of the scene.VoiceSometimes, a muted video is more appealing than the one with sound. Turn the voice off to record a muted video. To set voice options, In Video Shooting mode, press [f] → Voice → an option.](https://usermanual.wiki/Samsung-Electronics-Co/NX1000/User-Guide-1689960-Page-89.png)
![90Playback/EditingLearn how to search photos and videos quickly through the thumbnail view and to protect and delete files.Viewing photos1 Press [y].• The most recent file you captured will be displayed.2 Rotate the navigation button or press [C/F] to scroll through files.You may not be able to edit or play back files that were captured with other cameras, due to unsupported sizes or codecs. Use a computer or another device to edit or play back these files.Viewing image thumbnailsIn order to search for photos and videos you want, convert to the thumbnail view. The thumbnail view displays multiple images at a time so that you can easily look through items you wish to find. You can also classify and display files by their type, day recorded, and week recorded.MenuPress [I] to view files as thumbnails.• Press once to view 3 thumbnails.• Press twice to view 15 or 40 thumbnails. (In the single view, press [m] → x → Thumbnail mode to select the number of files to view. (p. 95))Alternatively, in the singe view, press [m] → x → View → an option. Searching and managing files](https://usermanual.wiki/Samsung-Electronics-Co/NX1000/User-Guide-1689960-Page-91.png)