Samsung Electronics Co NX210 Digital Camera User Manual NX210 ENG D1 120316
Samsung Electronics Co Ltd Digital Camera NX210 ENG D1 120316
UserManual.wiki
>
Samsung Electronics Co
>
NX210 User Manual
User Manual
Navigation menu
Upload a User Manual
Namespaces
Wiki Guide
HTML
PDF
Info
Views
User Manual
Discussion / Help
Navigation
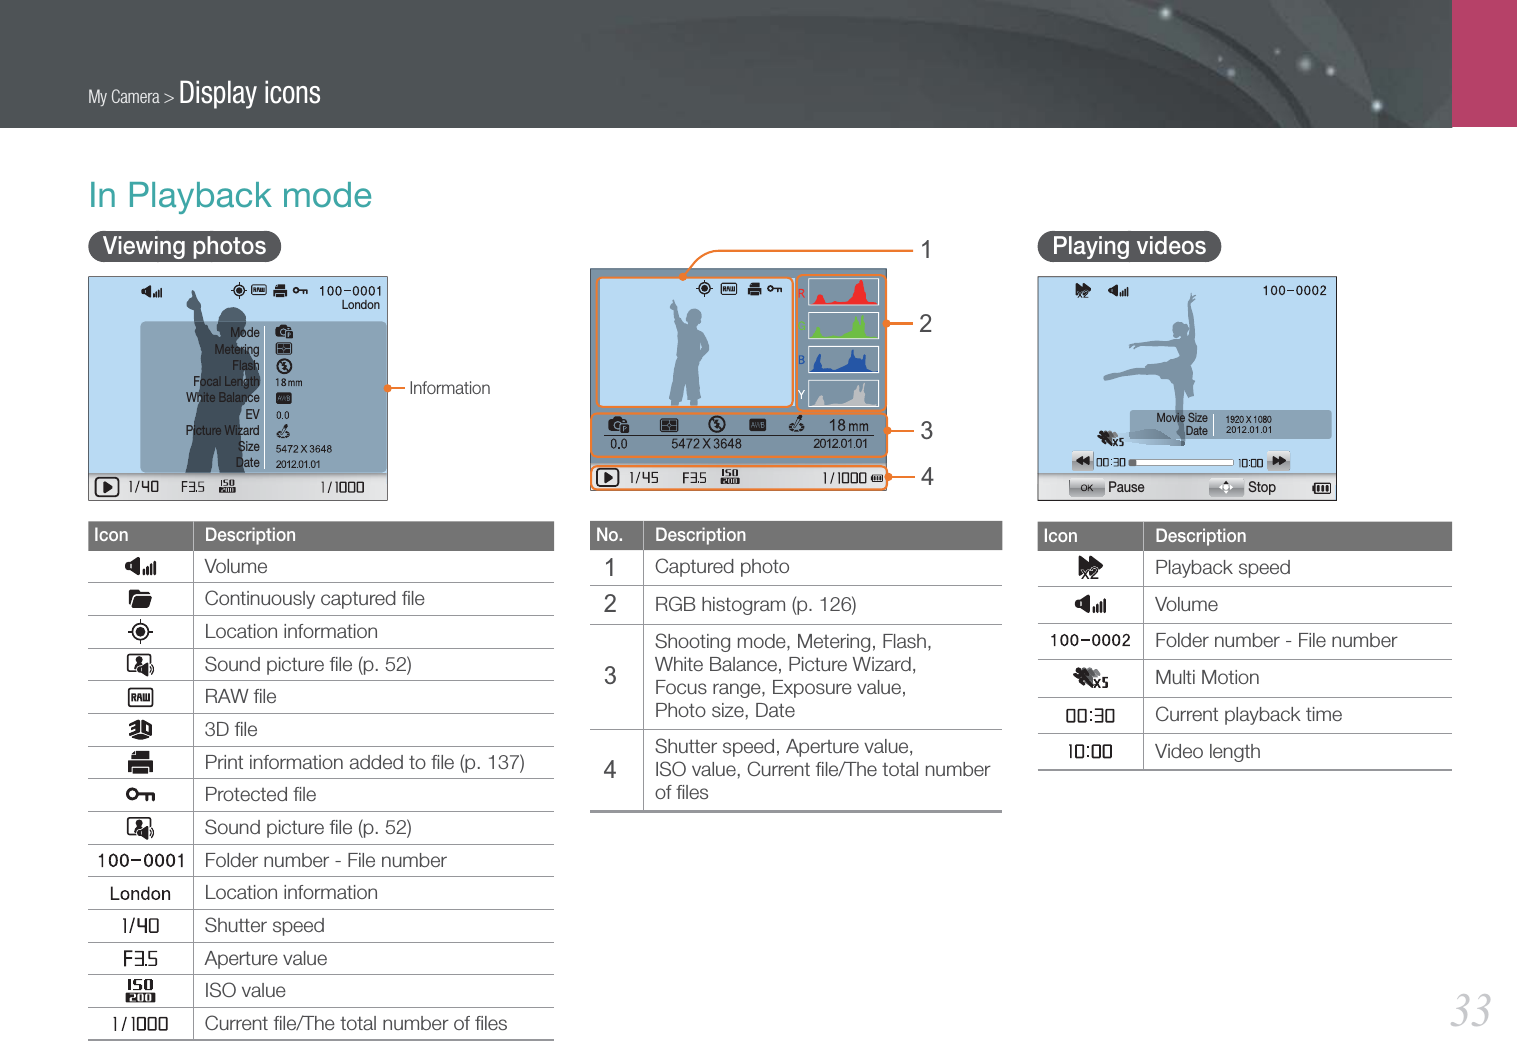
![6Indications used in this manualShooting mode indicationsShooting mode IndicationSmart AutotProgramPAperture PriorityAShutter PrioritySManualMLens PriorityiMagicgScenesMovievWi-FiB Icons used in this manualIcon FunctionAdditional informationSafety warnings and precautions[ ]Camera buttons. For example, [Shutter] represents the shutter button.( )Page number of related information→The order of options or menus you must select to perform a step; for example: Select J → Quality (represents select J, and then Quality). The number next to the icon may vary depending on the shooting mode. That is, some options may be located under K or L.*Annotation](https://usermanual.wiki/Samsung-Electronics-Co/NX210/User-Guide-1680007-Page-7.png)


![My Camera > Shooting modes46M Manual modeManual mode lets you adjust the shutter speed and aperture value manually. In this mode, you can fully control the exposure of your photos.This mode is useful in controlled shooting environments, such as a studio, or when it is necessary to fine-tune camera settings. The Manual mode is also recommended for shooting night scenes or fireworks.Framing modeWhen you adjust the aperture value or shutter speed, the exposure changes according to the settings, so the display may darken. With this function on, the brightness of the display is constant regardless of the settings, so you can better frame your shot.To use Framing Mode,In Shooting mode, press [m] → K → Framing Mode → an option.Using bulbUse a bulb to shoot night scenes or the night sky. During the interval between the first [Shutter] press and the second [Shutter] press, the shutter is left open so you can create moving light effects.To use a bulb,Completely scroll the jog dial to the left to Bulb → press [Shutter] to start shooting → press [Shutter] again to stop shooting.• If you set a high ISO value or open the shutter for a long time, image noise may increase.• The continuous shooting function cannot be used with the Bulb function.](https://usermanual.wiki/Samsung-Electronics-Co/NX210/User-Guide-1680007-Page-47.png)
![My Camera > Shooting modes47i Lens Priority modeUsing the E modeYou can select an appropriate scene (i-Scene) or a filter effect to the lens you attached. Available scenes and filter effects may differ depending on the lens attached.1 Rotate the mode dial to i.2 Press [i-Function] on the lens to select E.• You can also use this function by pressing [f].3 Adjust the focus ring to select a scene or filter effect.• You can also scroll the jog dial to select a scene or a filter effect.BacklightE4 Fully press [Shutter] to capture the photo.Available scene modes and filter effects (for SAMSUNG 18-55 mm F3.5-5.6 OIS III lens): Night, Children, Sunset, Portrait, Dawn, Backlight, Landscape, Beach & Snow, Miniature, Fish Eye, Sketch, Defog, Halftone Dots, Soft Focus](https://usermanual.wiki/Samsung-Electronics-Co/NX210/User-Guide-1680007-Page-48.png)
![My Camera > Shooting modes48Using i-Function in PASM modesWhen you use the i-Function button on an i-Function lens, you can manually select and adjust shutter speed, aperture value, exposure value, ISO sensitivity, and White Balance on the lens.1 Rotate the mode dial to P, A, S, or M.2 Press [i-Function] on the lens to select a setting.• You can also rotate the navigation button or press [C/F] to select a setting.Auto3 Adjust the focus ring to select an option.• You can also scroll the jog dial to select an option.Auto4 Fully press [Shutter] to capture the photo.](https://usermanual.wiki/Samsung-Electronics-Co/NX210/User-Guide-1680007-Page-49.png)
![My Camera > Shooting modes49Available optionsShooting mode PASMAperture value-O-OShutter speed--OOExposure valueOOO -ISOOOOOWhite BalanceOOOOZOOOOTo select items to appear when you press [i-Function] on the lens in Shooting mode, press [m] → X → iFn Customizing → an option → [m].Using ZThe Z allows you to zoom in on a subject with less degradation of photo quality than the Digital zoom. However, the photo resolution may change than when you zoom in by rotating the zoom ring.1 Rotate the mode dial to P, A, S, M or i.2 Press [i-Function] on the lens to select Z.• You can also rotate the navigation button or press [C/F] to select a setting.3 Adjust the focus ring to select an option.• You can also scroll the jog dial to select an option.• Photo resolution varies according to the zoom rate if you use the Z.3:2 16:9 1:1x1.24560X3040 (13.9M)4560X2568 (11.7M)3040X3040 (9.2M)x1.43888X2592 (10.1M)3888X2184 (8.5M)2592X2592 (6.7M)x1.73264X2176 (7.1M)3264X1840 (6.0M)2176X2176 (4.7M)x22736X1824 (5.0M)2736X1536 (4.2M)1824X1824 (3.3M)These figures are based on the maximum resolution at each image ratio.4 Fully press [Shutter] to capture the photo.• Z is not available when you capture burst shots.• Z is not available when you capture photos in the RAW file format.• Z is deactivated when you record videos by pressing the video recording button.](https://usermanual.wiki/Samsung-Electronics-Co/NX210/User-Guide-1680007-Page-50.png)
![My Camera > Shooting modes50g Magic modeYou can apply various filter effects and frame effects to your photos or videos to create unique images. The shape and the feel of the photos or videos will change according to the effect you select.To set an effect,In Shooting mode, press [f] → Magic Mode → Magic Frame or Smart Filter → a desired effect.• If you select Sketch among filter effects, the photo size will automatically change to 5.9M and below.• If you set a frame effect, the photo size will be automatically set to 2M.• You cannot record a video with a frame effect.• If you set a filter effect, the size of the video will be 640X480 or below.](https://usermanual.wiki/Samsung-Electronics-Co/NX210/User-Guide-1680007-Page-51.png)
![My Camera > Shooting modes51s Scene modeIn Scene mode, the camera selects the best settings for each type of scene.You can select a desired scene by pressing [f] in Shooting mode.Icon DescriptionBeauty Shot: Hide facial imperfections.Night: Capture scenes at night or in low lighting. Use a tripod to prevent your camera from shaking that is caused by low shutter speed.Landscape: Capture still-life scenes and landscapes.Icon DescriptionPortrait: Automatically detect and focus on human faces so that you can achieve clear, soft portraits. Children: Make children appear more noticeable by capturing their clothes and the background vividly.Sports: Capture fast moving subjects.Close Up: Capture detailed parts of a subject or small subjects, such as flowers or insects.](https://usermanual.wiki/Samsung-Electronics-Co/NX210/User-Guide-1680007-Page-52.png)
![My Camera > Shooting modes52Icon DescriptionText: Clearly capture text from printed or electronic documents. Sunset: Capture scenes at sunset, with natural-looking reds and yellows. Dawn: Capture scenes at sunrise.Backlight: Capture backlit subjects.Icon DescriptionFireworks: Capture colorful fireworks at night. Use a tripod to prevent your camera from shaking.Beach & Snow: Reduce underexposed photos due to sunlight reflected from sand or snow.Sound picture: Add a voice memo before and after capturing a photo.To set the recording time, press [m] → L → Sound Recording Time.](https://usermanual.wiki/Samsung-Electronics-Co/NX210/User-Guide-1680007-Page-53.png)
![My Camera > Shooting modes54v Movie modeIn Movie mode, you can shoot videos in Full High Definition (1920X1080) and capture sound via the camera’s microphone.In order to adjust the exposure level, you can select Program in the Movie AE Mode options menu so that the aperture value and shutter speed can be automatically set or select Aperture Priority to manually set the aperture value. You can also select Shutter Priority to manually set the shutter speed or select Manual to manually set both the aperture value and shutter speed. While shooting a video, press [F] to activate or deactivate the AF function.Select Fader to fade in or out a scene. You can also select Voice to mute or un-mute voice.The camera lets you capture video files up to 25 minutes in length at 24, 30 or 60 fps, and saves the files in MP4 (H.264) format. 24 fps is available only with 1920X810, 60 fps is available only with 1280X720.• H.264 (MPEG-4 part10/AVC) is the latest video coding format established in 2003 collaboratively by ISO-IEC and ITU-T. Since this format uses a high compression rate, more data can be saved in less memory space.• If you have the image stabilizer option on when shooting a movie, the camera may record the image stabilizer sound.• The zoom sound or other lens sounds may be recorded if you adjust the lens while recording a video.• When using an optional video lens, the autofocus noise is not recorded.• If you remove the camera lens while recording a movie, the recording will be interrupted. Do not change the lens while recording.• If you remove an external zoom microphone while recording a movie, the recording will be interrupted. Do not remove it while recording.• If you change the shooting angle of the camera suddenly while shooting a movie, the camera may not be able to record images accurately. Use a tripod to minimize camera shake.• In Movie mode, the camera supports only the Multi AF function. You cannot use any other focus area setting functions, such as Face Detection AF.• When the size of a movie file exceeds 4 GB, the camera automatically stops recording. If this occurs, continue shooting by starting a new movie file.• If you use a slow writing memory card, the recording of your movie can be interrupted because the card cannot process data at the rate the video is being shot. If this occurs, replace the card with a faster memory card or reduce the image size (for example, from 1280X720 to 640X480).• When formatting a memory card, always format using the camera. If you format on another camera or a PC, you can lose files on the card or cause a change in the capacity of the card.](https://usermanual.wiki/Samsung-Electronics-Co/NX210/User-Guide-1680007-Page-55.png)

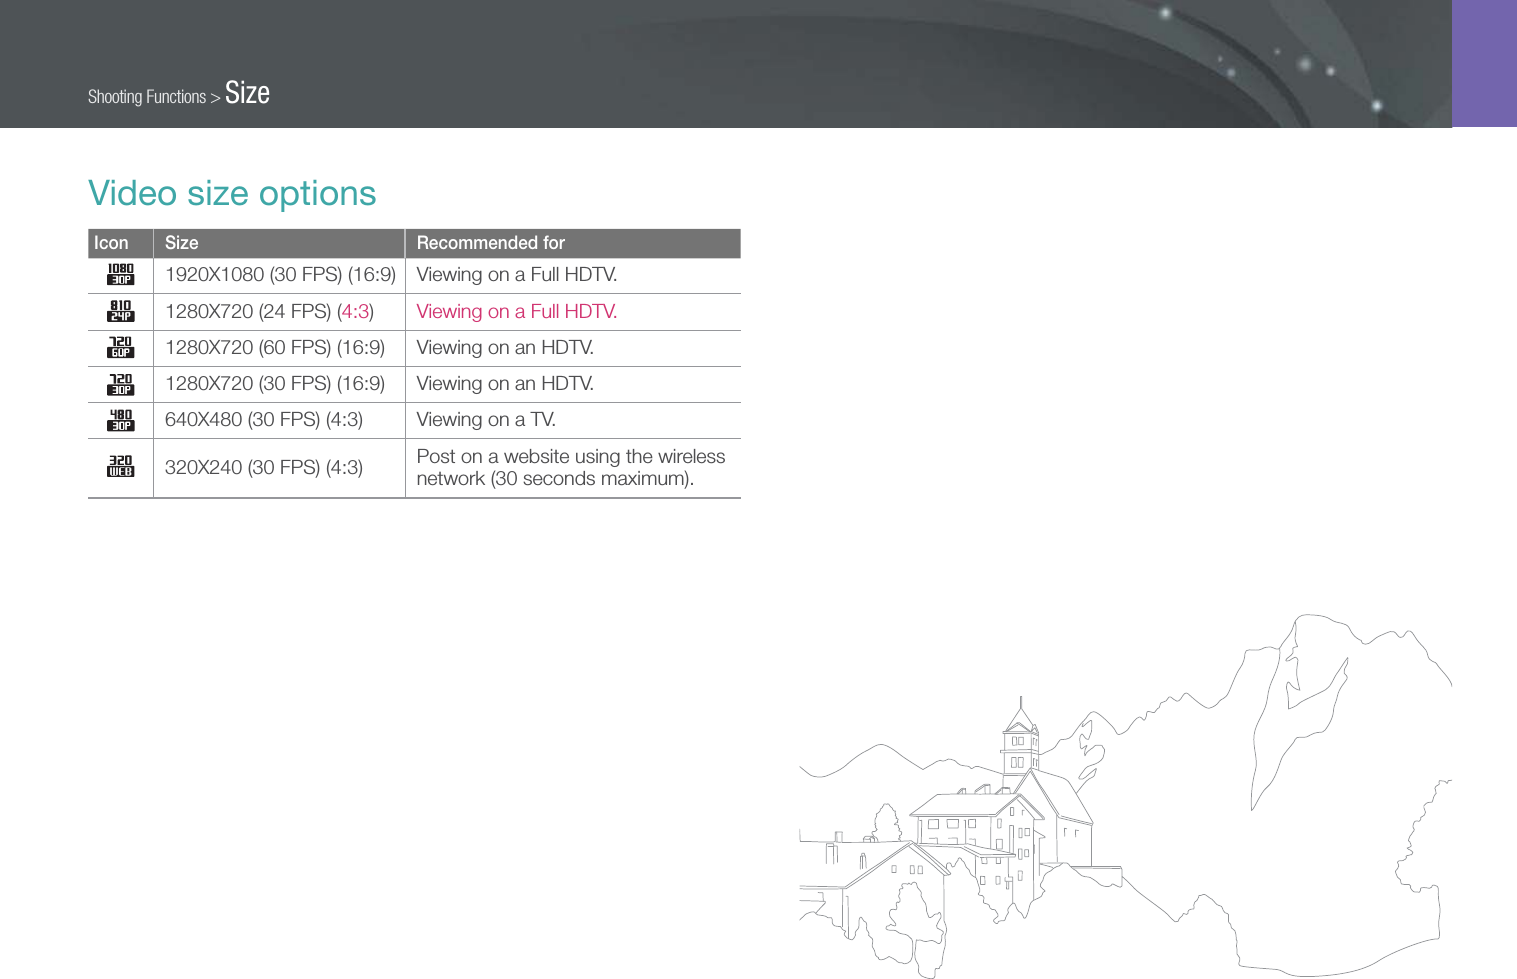
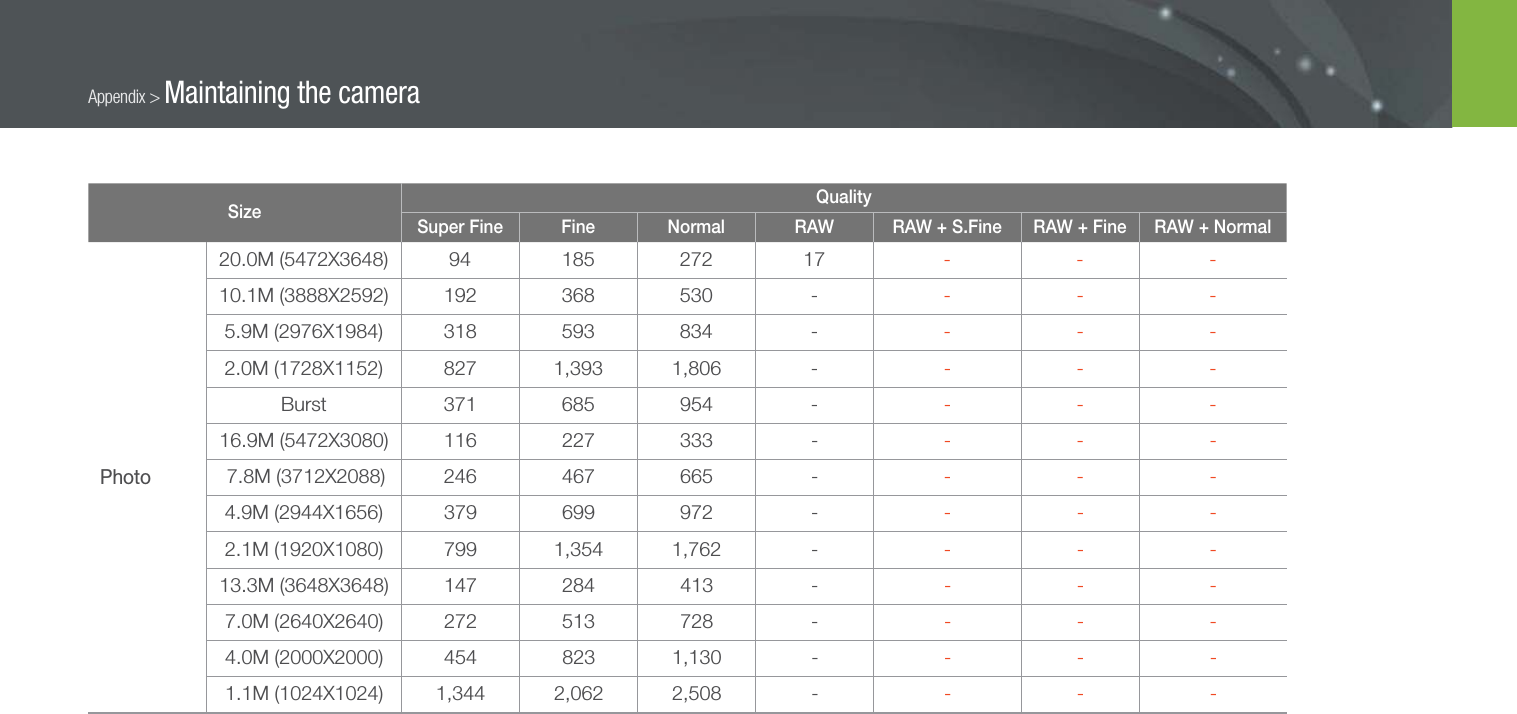
![Shooting Functions5757Shooting FunctionsShooting FunctionsAs you increase the resolution, your photo or video will include more pixels, so it can be printed on larger paper or displayed on a larger screen. When you use a high resolution, the file size will also increase. Select a low resolution for photos that will be displayed in a digital picture frame or uploaded to the web.To set the size, In Shooting mode, press [f] → Photo Size or Movie Size → an option.Photo size optionsIcon Size Recommended for20.0M (5472X3648) (3:2) Printing on A1 paper.10.1M (3888X2592) (3:2) Printing on A2 paper.5.9M (2976X1984) (3:2) Printing on A3 paper.2.0M (1728X1152) (3:2) Printing on A5 paper.16.9M (5472X3080) (16:9) Printing on A1 paper or viewing on an HDTV.7.8M (3712X2088) (16:9) Printing on A3 paper or viewing on an HDTV.4.9M (2944X1656) (16:9) Printing on A4 paper or viewing on an HDTV.2.1M (1920X1080) (16:9) Printing on A5 paper or viewing on an HDTV.13.3M (3648X3648) (1:1) Printing a square photo on A1 paper.7.0M (2640X2640) (1:1) Printing a square photo on A3 paper.4.0M (2000X2000) (1:1) Printing a square photo on A4 paper.1.1M (1024X1024) (1:1) Printing a square photo on A5 paper.Size](https://usermanual.wiki/Samsung-Electronics-Co/NX210/User-Guide-1680007-Page-58.png)
![Shooting Functions5959Shooting FunctionsShooting FunctionsThe camera saves photos in either the JPEG or RAW format.Photos captured by a camera are often transformed to the JPEG format and stored in the memory according to the settings of the camera at the time of shooting. RAW files are not transformed to the JPEG format and are stored in the memory without any changes. RAW files have the file extension “SRW”. To adjust and calibrate exposures, White Balances, tones, contrasts, and colors of the RAW files, or to convert them into JPEG or TIFF format, use the Samsung RAW Converter program found on the supplied CD-ROM. Ensure you have enough available memory to save photos in the RAW format.To set the quality, In Shooting mode, press [f] → Quality → an option.Photo quality optionsIcon Format DescriptionJPEGSuper Fine:• Compressed for the best quality.• Recommended for printing in large size.JPEGFine:• Compressed for better quality.• Recommended for printing in normal size.Icon Format DescriptionJPEGNormal:• Compressed for normal quality.• Recommended for printing in small size or uploading to the web.RAWRAW:• Save a photo without data loss.• Recommended for editing after shooting.RAW+JPEG RAW + S.Fine: Save a photo in both the JPEG (S.Fine quality) and RAW format.RAW+JPEG RAW + Fine: Save a photo in both the JPEG (Fine quality) and RAW format.RAW+JPEG RAW + Normal: Save a photo in both the JPEG (Normal quality) and RAW format.Video quality optionsIcon Extension DescriptionMP4 (H.264) Normal: Record videos in normal quality.MP4 (H.264) HQ: Record videos in high quality. Quality](https://usermanual.wiki/Samsung-Electronics-Co/NX210/User-Guide-1680007-Page-60.png)
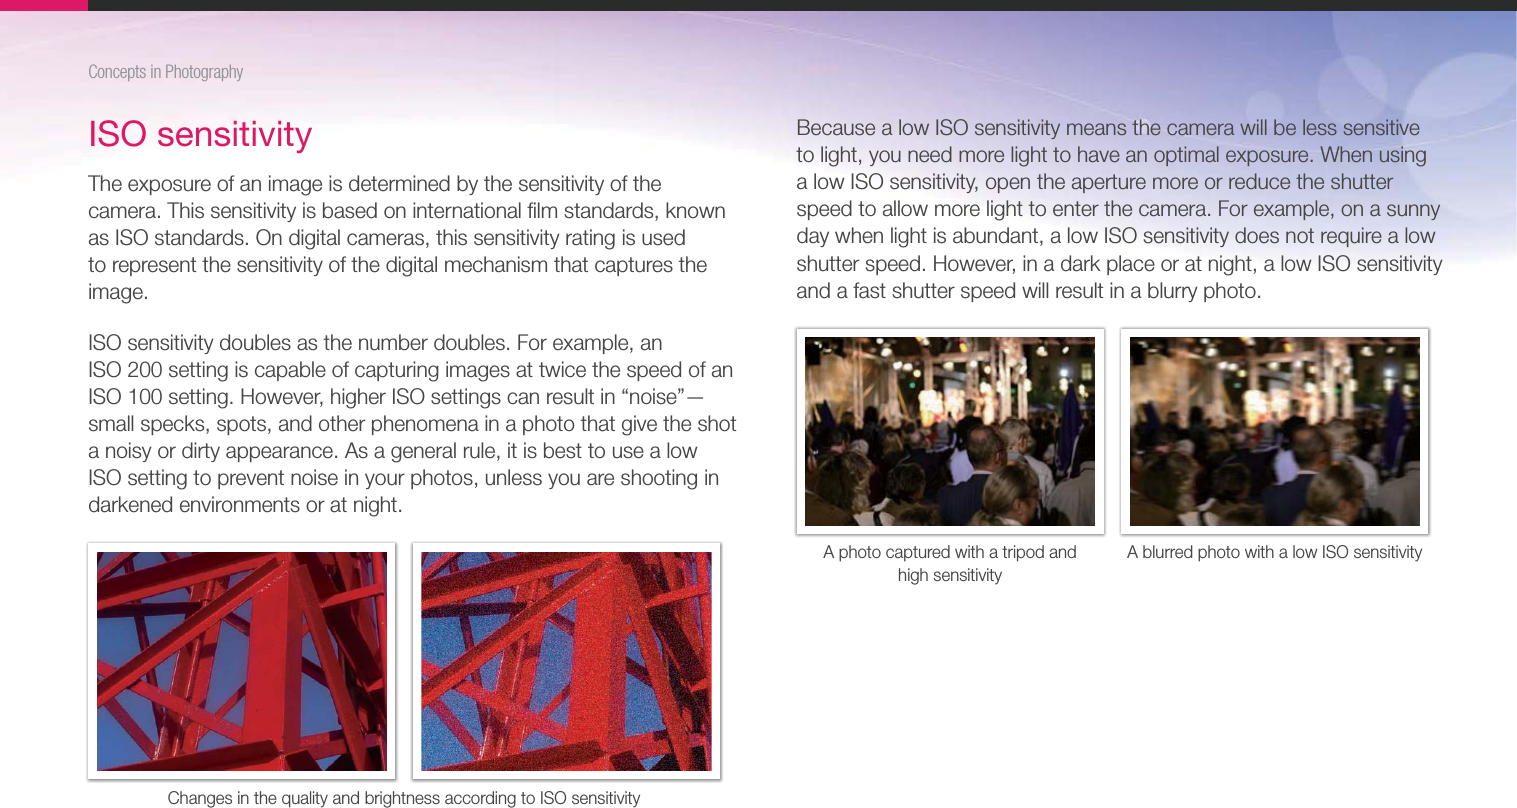
![Shooting Functions6060Shooting FunctionsShooting FunctionsThe ISO sensitivity value represents the sensitivity of camera to light. The larger the ISO value, the more sensitive the camera is to light. Consequently, by selecting a higher ISO sensitivity value, you can capture photos in dim or dark places at faster shutter speeds. However, this may increase electronic noise and result in a grainy photo.To set ISO sensitivity, In Shooting mode, press [I] → an option.ExamplesISO 100 ISO 400ISO 800 ISO 3200• Increase the ISO value in places where flash use is prohibited. You can capture a clear photo by setting a high ISO value without having to secure more light.• Use the Noise Reduction function in order to reduce the visual noise that can appear on photos of a high ISO value. (p. 124) ISO sensitivity](https://usermanual.wiki/Samsung-Electronics-Co/NX210/User-Guide-1680007-Page-61.png)
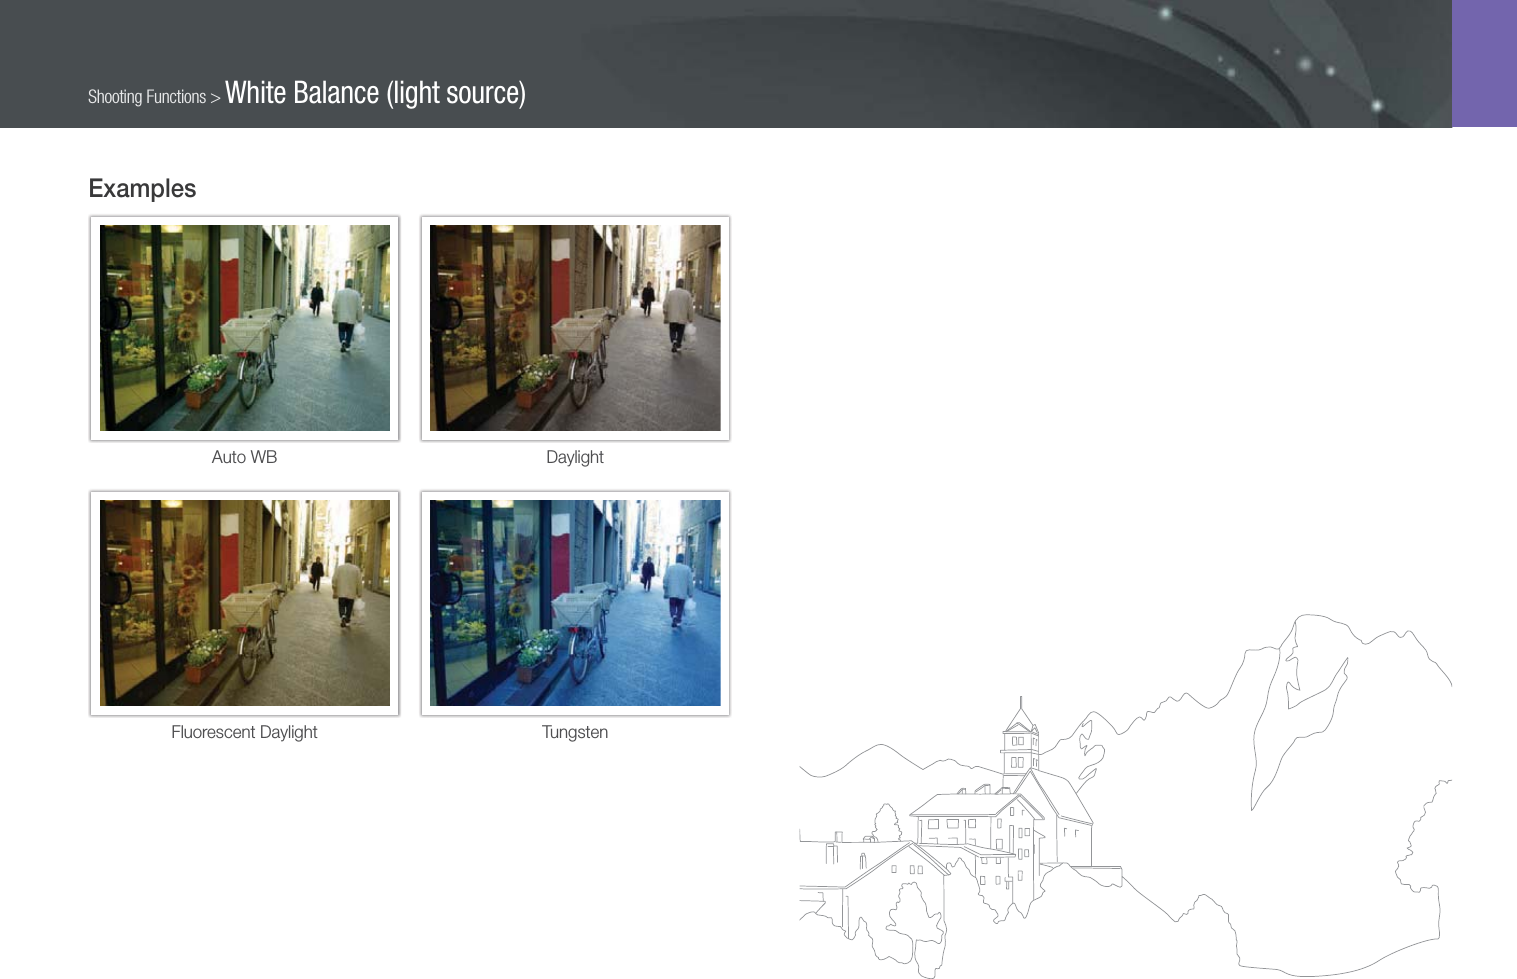
![Shooting Functions6161Shooting FunctionsShooting FunctionsThe color of a photo depends on the type and quality of the light source. If you want the color of your photo to be realistic, select an appropriate lighting condition to calibrate the White Balance, such as Auto WB, Daylight, Cloudy, or Tungsten, or adjust color temperature manually. You can also adjust color for the preset light sources so that the colors of the photo match the actual scene under mixed lighting conditions.To set the White Balance, In Shooting mode, press [f] → White Balance → an option.White Balance optionsIcon DescriptionAuto WB*: Use automatic settings depending on the lighting conditions.Daylight*: Select when taking outdoor photos on a sunny day. This option results in photos closest to the natural colors of the scene.Cloudy*: Select when taking outdoor photos on a cloudy day or in shadows. Photos captured on cloudy days tend to be more bluish than on sunny days. This option offsets that effect.Fluorescent White*: Select when shooting under a daylight fluorescent lamp. Especially for white fluorescent light with a color temperature of about 4,200K.Icon DescriptionFluorescent NW*: Select when shooting under a daylight fluorescent lamp. Especially for white fluorescent light of very white hues with a temperature of about 5,000K.Fluorescent Daylight*: Select when shooting under a daylight fluorescent lamp. Especially for white fluorescent light of slightly bluish hue with a temperature of about 6,500K.Tungsten*: Select when taking indoor photos under incandescent bulbs or halogen lamps. Incandescent tungsten bulbs tend to have a reddish hue. This option offsets that effect.Flash WB*: Select when using a flash.Custom Set: Use your pre-defined settings. You can manually set the White Balance by shooting a white sheet of paper. Fill the spot metering circle with the paper and set the White Balance.* These options can be customized.White Balance (light source)](https://usermanual.wiki/Samsung-Electronics-Co/NX210/User-Guide-1680007-Page-62.png)
![62Shooting Functions > White Balance (light source)Option DescriptionColor Temperature: Manually adjust the color temperature of the light source. Color temperature is a measurement in degrees Kelvin that indicates the specific type of light source. As the color temperature increases, the color distribution becomes cooler. Alternatively, as the color temperature decreases, the color distribution becomes warmer.Clear skyFluorescent HFluorescent LCloudyHalogen lampDaylightTungstenCandle lightCustomizing preset optionsYou can also customize preset White Balance options.To customize preset options,In Shooting mode, press [f] → White Balance → an option → [D] → rotate the navigation button or scroll the jog dial, or press [D/I/C/F]. BackWhite Balance : DaylightResetDaylight](https://usermanual.wiki/Samsung-Electronics-Co/NX210/User-Guide-1680007-Page-63.png)
![Shooting Functions6464Shooting FunctionsShooting FunctionsPicture Wizard lets you apply different photo styles to your photo to create various looks and emotional moods. You can also create and save your own photo styles by adjusting color, saturation, sharpness, and contrast for each style. There is no rule for which style is suitable in which conditions. Experiment with different styles and find your own settings.To set a photo style, In Shooting mode, press [f] → Picture Wizard → an option.ExamplesStandard Vivid PortraitLandscape Forest RetroCool Calm ClassicYou can also adjust the value of the preset style settings. Select a Picture Wizard option, press [D], and then adjust color, saturation, sharpness, or contrast. Picture Wizard (photo styles)](https://usermanual.wiki/Samsung-Electronics-Co/NX210/User-Guide-1680007-Page-65.png)
![Shooting Functions6565Shooting FunctionsShooting FunctionsAF modeLearn how to adjust the camera’s focus according to the subjects.You can select a focusing mode appropriate to the subject among Single Auto Focus, Continuous Auto Focus, and Manual Focus. The AF function is activated when you press [Shutter] halfway. In the MF mode, you have to rotate the focus ring on the lens to focus manually.In most cases, you can have a focus by selecting Single AF. Fast moving subjects or subjects of a color similar to the background are difficult to focus. Select an appropriate focusing mode for such instances.If your lens has an AF/MF switch, set the switch to MF to adjust the focus manually.When your lens has no AF/MF switch, press [F] to select a desired AF mode.To set the auto focus mode, In Shooting mode, press [F] → an option.Single AFSingle AF is appropriate for shooting a still subject. When you press [Shutter] halfway, the focus fixes in the focus area. The area turns green when the focus is achieved.](https://usermanual.wiki/Samsung-Electronics-Co/NX210/User-Guide-1680007-Page-66.png)
![66Shooting Functions > AF modeContinuous AFWhile you are pressing [Shutter] halfway, the camera continues to automatic focusing. Once the focus area is fixed on the subject, the subject is always in focus even when moving. This mode is recommended for shooting a person on a bicycle, a running dog, or a car racing scene.Manual focusYou can manually focus on a subject by rotating the focus ring on the lens. The MF Assist function lets you easily achieve a focus. While you are rotating the focus ring, the focus area is magnified or the focus aid bar appears to help you achieve a clear focus. This mode is recommended for shooting an object similar in color to the background, a night scene, or fireworks.](https://usermanual.wiki/Samsung-Electronics-Co/NX210/User-Guide-1680007-Page-67.png)
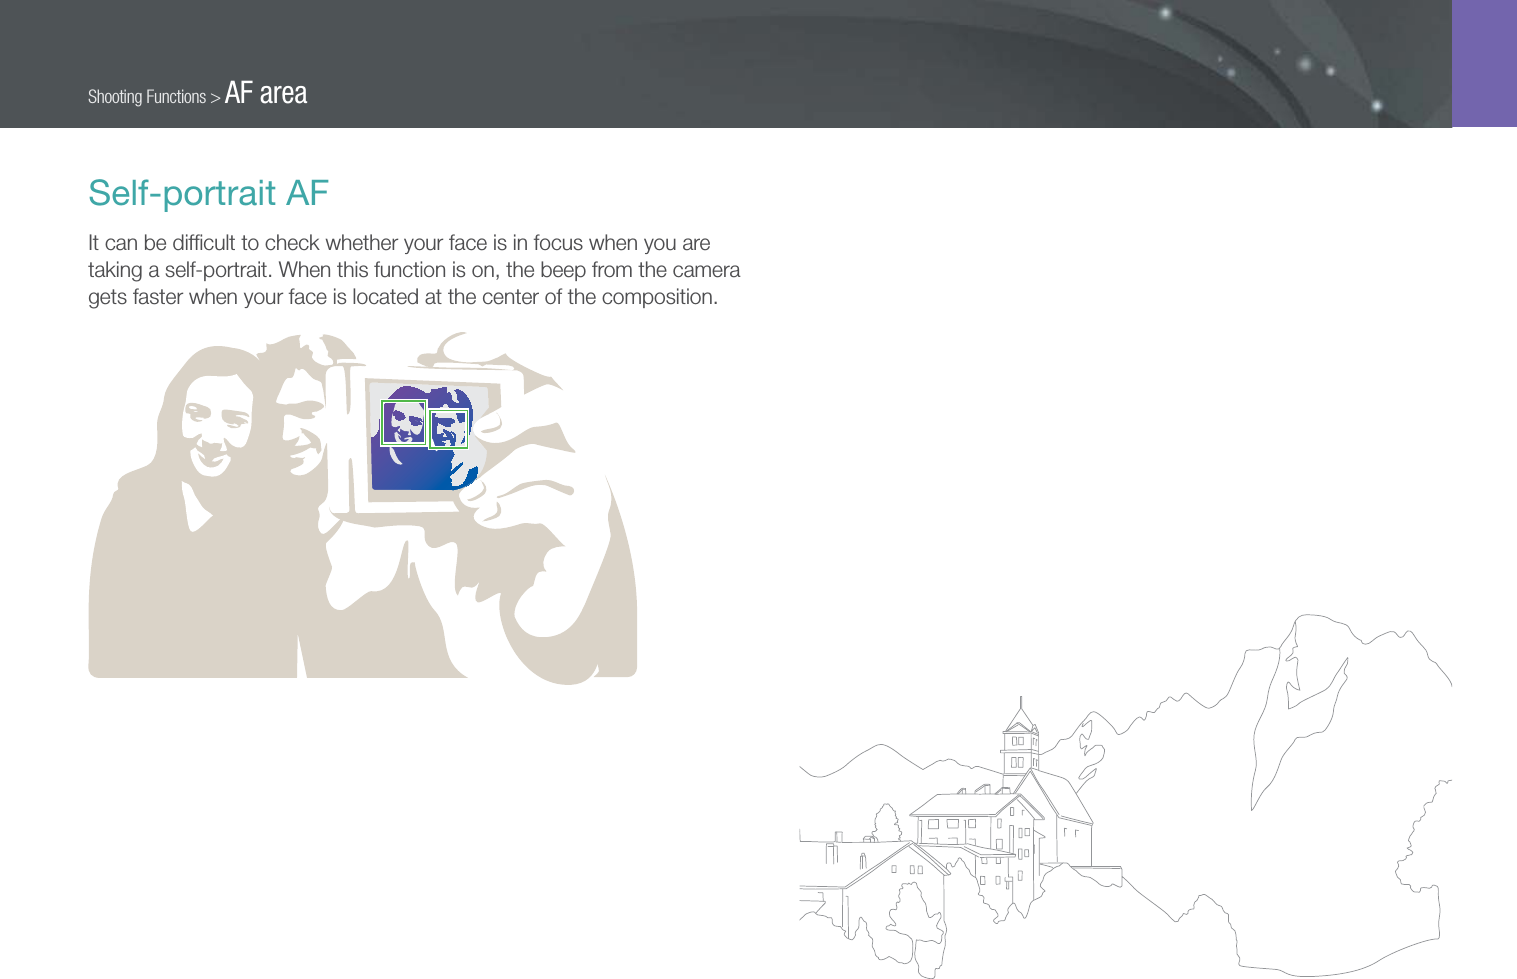
![Shooting Functions6767Shooting FunctionsShooting FunctionsThe AF area function changes the positions of the focus area.Generally, cameras focus on the nearest subject. When there are a lot of subjects, however, unwanted subjects can be in focus. In order to prevent unwanted subjects from being in focus, change the focus area so that a desired subject is in focus. You can get a clearer and sharper photo by selecting an appropriate focus area.To set the auto focus area, In Shooting mode, press [f] → AF Area → an option.Selection AFYou can set the focus on an area you want. Apply an out-of-focus effect to make the subject more distinguishable.The focus on the photo below was repositioned and resized so that it fits the subject’s face.AF Zoom MoveTo resize or move the focus area, in Shooting mode, press [o]. Use the navigation button to move the focus area. Scroll the jog dial to resize the focus area.AF area](https://usermanual.wiki/Samsung-Electronics-Co/NX210/User-Guide-1680007-Page-68.png)
![68Shooting Functions > AF areaMulti AFThe camera displays a green rectangle in places where focus is set correctly. The photo is divided into two or more areas, and the camera obtains focus points of each area. It is recommended for scenery photos.When you press [Shutter], the camera displays the focus areas in green as shown in the photo below.Face detection AFThe camera focuses on human faces preferentially. Faces of up to 10 people can be detected. This setting is recommended for shooting a group of people.When you press [Shutter] halfway, the camera focuses on faces as shown in the photo below. In cases of shooting a group of people, the camera displays the focus on the nearest person’s face in white and the rest of the people’s faces in gray.](https://usermanual.wiki/Samsung-Electronics-Co/NX210/User-Guide-1680007-Page-69.png)
![Shooting Functions7070Shooting FunctionsShooting FunctionsIn the manual focus (MF) mode, you have to rotate the focus ring on the lens to focus manually. When you set the MF Assist function, you can achieve a clearer focus. This function is only available on a lens that supports manual focus.To set the manual focus assist, In Shooting mode, press [m] → K or k → MF Assist → an option.* DefaultOption DescriptionOffDo not use the MF Assist function.Enlarge x5*The focus area is magnified by 5 times when you rotate the focus ring.* DefaultOption DescriptionEnlarge x8The focus area is magnified by 8 times when you rotate the focus ring.FAThe focus aid bar rises as the focus improves, when you rotate the focus ring. MF assist](https://usermanual.wiki/Samsung-Electronics-Co/NX210/User-Guide-1680007-Page-71.png)
![Shooting Functions7171Shooting FunctionsShooting FunctionsUse the Optical Image Stabilization (OIS) function to minimize camera shake. OIS may not be available with some lenses.Came shake tends to occur in dark places or when shooting indoors. In such cases, the camera uses slower shutter speeds in order to increase the amount of light taken in, which can result in a blurry photo. You can prevent this situation by using the OIS function.If your lens has an OIS switch, you have to turn the switch to use the OIS function.To set OIS options, In Shooting mode, press [m] → K or k → OIS → an option.Optical Image Stabilization (OIS)OIS options* DefaultIcon DescriptionMode 1: The OIS function is applied only when you press [Shutter] in full or half.Mode 2*: The OIS function is on.Off: The OIS function is off. (This option may not be available with some lenses.)Without OIS correction With OIS correction](https://usermanual.wiki/Samsung-Electronics-Co/NX210/User-Guide-1680007-Page-72.png)
![Shooting Functions7272Shooting FunctionsShooting FunctionsYou can set the shooting method such as Continuous, Burst, Timer and so on.Select Single to capture one photo at a time. Select Continuous or Burst to shoot fast moving subjects. Select AE Bracket, WB Bracket, or P Wiz Bracket to adjust exposure, White Balance, or apply Picture Wizard effects. You can also select Timer to capture a photo of yourself.To set the shooting method, In Shooting mode, press [C] → an option.SingleCapture one photo whenever you press [Shutter]. Recommended for general conditions.ContinuousContinuously capture photos while you are pressing [Shutter]. You can capture up to 3 photos (Continuous Low (3fps)) or 8 photos (Continuous High (8fps)) per second.Drive (shooting method)](https://usermanual.wiki/Samsung-Electronics-Co/NX210/User-Guide-1680007-Page-73.png)
![73Shooting Functions > Drive (shooting method)BurstConsecutively capture up to 10 shots per second (3 seconds), 15 shots per second (2 seconds), or 30 shots per second (1 second) when you press [Shutter] once. Recommended for shooting the rapid motion of fast moving subjects such as racing cars.To set the number of shots, in Shooting mode, press [C] → Burst, and then press [D].TimerCapture a photo with a delay of 2 to 30 seconds. The delay is adjustable in increments of 1 second.To set the delay, in Shooting mode, press [C] → Timer, and then press [D].](https://usermanual.wiki/Samsung-Electronics-Co/NX210/User-Guide-1680007-Page-74.png)
![74Shooting Functions > Drive (shooting method)Auto Exposure Bracketing (AE Bracket)When you press [Shutter], the camera captures 3 consecutive photos: the original, one a step darker, and one a step lighter. Use a tripod to prevent blurry photos as the camera captures three photos continuously. You can adjust the settings in Bracket Set menu.Exposure -2OriginalExposure +2White Balance Bracketing (WB Bracket)When you press [Shutter], the camera captures 3 consecutive photos: the original and two more with different White Balance settings. The original photo is captured when you press [Shutter]. The other two are automatically adjusted according to the White Balance you have set. You can adjust the settings in Bracket Set menu.WB-2OriginalWB+2](https://usermanual.wiki/Samsung-Electronics-Co/NX210/User-Guide-1680007-Page-75.png)
![75Shooting Functions > Drive (shooting method)Picture Wizard Bracketing (P Wiz Bracket)When you press [Shutter], the camera captures three consecutive photos, each with a different Picture Wizard setting. The camera captures a photo and applies the three Picture Wizard options you have set to the image captured. You can select three different settings in Bracket Set menu.VividStandardRetroBracketing settingYou can set up the options for AE Bracket, WB Bracket, and P Wiz Bracket.To set a bracketing option, In Shooting mode, press [m] → L → Bracket Set → an option.Option DescriptionAE Bracket SetSet the order and the area of bracket. • Bracket Order: Set the order in which the camera captures the original, lighter, and darker photo (represented by 0, +, and -).• Bracket Area: Set the exposure range of the 3 bracketed photos.WB Bracket SetAdjust the White Balance interval range of the 3 bracketed photos. For example, AB-/+3 adjusts the Amber value plus or minus three steps. MG-/+3 adjusts the Magenta value the same amount.P Wiz Bracket SetSelect 3 Picture Wizard settings the camera uses to capture the 3 bracketed photos.](https://usermanual.wiki/Samsung-Electronics-Co/NX210/User-Guide-1680007-Page-76.png)
![Shooting Functions7676Shooting FunctionsShooting FunctionsIn order to capture a realistic photo of a subject, the amount of light should be constant. When the light source varies, you can use a flash and supply a constant amount of light. Select appropriate settings according to a light source and a subject.To set flash options, In Shooting mode, press [f] → Flash → an option.Flash optionsIcon DescriptionOff: Do not use the flash.Smart Flash: The camera automatically adjusts the brightness of the flash according to the amount of light in the surrounding environment.Auto: The flash automatically fires in dark places.Auto Red-eye: The flash automatically fires and prevents red-eyes.Fill in: The flash fires whenever you capture a photo.Fill-in Red: The flash fires whenever you capture a photo and prevents red-eyes.Icon Description1st Curtain: The flash fires immediately after the shutter opens. The camera captures a photo of a subject earlier in an action sequence clearly. Ball moving direction2nd Curtain: The flash fires just before the shutter closes. The camera captures a photo of a subject later in an action sequence clearly. Ball moving direction• The available options may differ depending on the shooting mode.• There is an interval between two bursts of the flash. Do not move until the flash fires a second time.• Flash options and the flash intensity adjustment are available only when you use the NX exclusive external flash.• You can capture a photo with a flash that is not fully charged, but it is recommended to use a fully charged flash.Use only Samsung-approved flashes. Using incompatible flashes may damage your camera. Flash](https://usermanual.wiki/Samsung-Electronics-Co/NX210/User-Guide-1680007-Page-77.png)
![77Shooting Functions > FlashCorrecting the red-eye effectIf the flash fires when you capture a photo of a person in the dark, a red glow may appear in the eyes. To correct the red-eye effect, select Auto Red-eye or Fill-in Red.Without red-eye correction With red-eye correctionIf the subject is too far from the camera or moves when the first flash fires, red-eyes may not be reduced.Adjusting the flash intensityAdjust the flash intensity to avoid overexposure or underexposure. You can adjust it by ±2 levels.To set the flash intensity,In Shooting mode, press [f] → Flash → an option → [D] → scroll the jog dial or rotate the navigation button, or press [C/F]. Flash OptionBack ResetFlash : Fill in](https://usermanual.wiki/Samsung-Electronics-Co/NX210/User-Guide-1680007-Page-78.png)
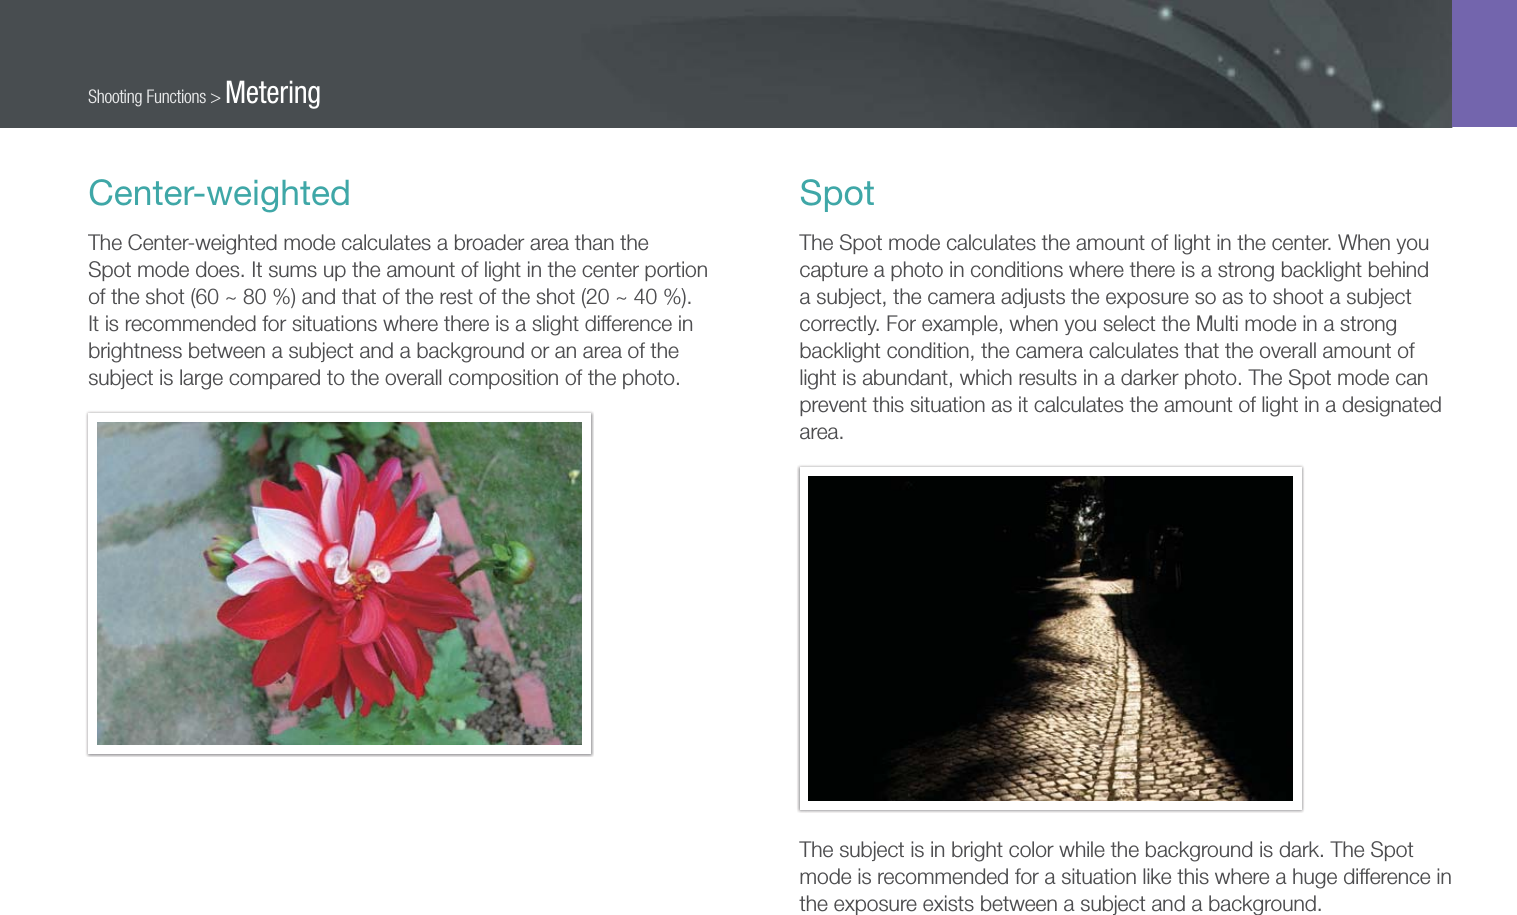
![Shooting Functions7979Shooting FunctionsShooting FunctionsThe metering mode refers to the way in which a camera measures the quantity of light.The camera measures the amount of light in a scene, and in many of its modes, uses the measurement to adjust various settings. For example, if a subject looks darker than its actual color, the camera captures an overexposed photo of it. If a subject looks lighter than its actual color, the camera captures an underexposed photo of it.The brightness and overall mood of the photo can also be affected by how the camera measures the amount of light. Select an appropriate setting for a shooting condition.To set a metering option, In Shooting mode, press [f] → Metering → an option.MultiThe Multi mode calculates the amount of light in multiple areas. When light is sufficient or insufficient, the camera adjusts the exposure by averaging the overall brightness of the scene. This mode is suitable for general photos.Metering](https://usermanual.wiki/Samsung-Electronics-Co/NX210/User-Guide-1680007-Page-80.png)
![81Shooting Functions > MeteringMeasuring the exposure value of the focus area When this function is turned on, the camera automatically sets an optimal exposure by calculating the brightness of the focus area. This function is only available when you select Spot metering or Multi metering, and Selection AF.To set this function, In Shooting mode, press [m] → K → Link AE to AF Point → an option.](https://usermanual.wiki/Samsung-Electronics-Co/NX210/User-Guide-1680007-Page-82.png)
![Shooting Functions8282Shooting FunctionsShooting FunctionsThis function automatically corrects the loss of bright detail that can occur due to shading differences in the photo.To set Smart Range options, In Shooting mode, press [f] → Smart Range → an option.Without Smart Range effect With Smart Range effectSmart Range](https://usermanual.wiki/Samsung-Electronics-Co/NX210/User-Guide-1680007-Page-83.png)
![Shooting Functions8383Shooting FunctionsShooting FunctionsThis function lets you select a color that you want to emphasize, and desaturates the others. You can select red, green, blue, or yellow from the menu.To set Selective Color options,In Shooting mode, press [f] → Selective Color → an option.ExamplesOriginal When red is selectedSelective Color](https://usermanual.wiki/Samsung-Electronics-Co/NX210/User-Guide-1680007-Page-84.png)
![Shooting Functions8484Shooting FunctionsShooting FunctionsDigital imaging devices such as digital cameras, monitors, and printers have their own methods for representing colors, which are called color spaces.Your camera lets you select two color spaces: sRGB or Adobe RGB. sRGB is widely used for creating colors on PC monitors and is also the standard color space for Exif. sRGB is recommended for regular images and images you intend to publish on the Internet.Adobe RGB is used for commercial printing and has a larger color range than sRGB. Its wider range of colors helps you to easily edit photos on a computer. Note that individual programs are generally compatible with a limited number of color spaces. If you open an image in a program that is not compatible with the image’s color space, the colors will appear lighter.To set the color space, In Shooting mode, press [m] → L → Color Space → an option.Color spaceAdobe RGBsRGB](https://usermanual.wiki/Samsung-Electronics-Co/NX210/User-Guide-1680007-Page-85.png)
![Shooting Functions8585Shooting FunctionsShooting FunctionsExposure compensationThe camera automatically sets the exposure by measuring the levels of light from the photo’s composition and the position of a subject. If the exposure set by the camera is higher or lower than you expected, you can adjust the exposure value manually. The exposure value is adjustable in ±3 increments. The camera displays the exposure warning in red for each step beyond ±3 range.To adjust the exposure value, while holding down [W], scroll the jog dial or rotate the navigation button. You can also adjust the exposure value by pressing [f], and then selecting EVC (Exposure Value Compensation).You can check the exposure value by the position of the exposure level indicator.Exposure level indicatorIncreased exposure (brighter)Decreased exposure (darker) Exposure warning Standard exposure index-2Original+2 Exposure compensation/lock](https://usermanual.wiki/Samsung-Electronics-Co/NX210/User-Guide-1680007-Page-86.png)
![86Shooting Functions > Exposure compensation/lockAfter locking the exposure, aim the lens where you desire, and press [Shutter].Exposure lockWhen you cannot achieve an appropriate exposure because of a strong color contrast, lock the exposure and then capture a photo.To lock the exposure, adjust the photo's composition on which you want to calculate the exposure, and then press the custom button. (p. 127)](https://usermanual.wiki/Samsung-Electronics-Co/NX210/User-Guide-1680007-Page-87.png)
![Shooting Functions8787Shooting FunctionsShooting FunctionsThe functions available for video are explained below.Movie AE modeSet the exposure mode for recording a video.To set Movie AE options, In Video Shooting mode, press [f] → Movie AE Mode → an option.* Default Icon DescriptionProgram*: The aperture value and shutter speed are adjusted automatically.Aperture Priority: Set the aperture value manually before recording a video. Scroll the jog dial or rotate the navigation button to adjust the aperture value.Shutter Priority: Set the shutter speed manually before recording a video. Scroll the jog dial or rotate the navigation button to adjust the shutter speed.Manual: Set both the aperture value and shutter speed manually before recording a video. Rotate the navigation button to adjust the aperture value and scroll the jog dial to adjust the shutter speed.Multi MotionSet the playing speed of a video.To set recording speed options,In Video Shooting mode, press [m] → l → Multi Motion → an option.Icon Descriptionx0.25: Record a video and play it at 1/4 normal speed.x0.5: Record a video and play it at 1/2 normal speed.x1: Record a video and play it at normal speed.x5: Record a video and play it at 5X normal speed.x10: Record a video and play it at 10X normal speed.x20: Record a video and play it at 20X normal speed.• If you select an option other than x1, sound will not be recorded.• The available options may differ according to the video size.Video functions](https://usermanual.wiki/Samsung-Electronics-Co/NX210/User-Guide-1680007-Page-88.png)
![88Shooting Functions > Video functionsFaderYou can fade in or fade out a scene using the fader function on the camera without having to do it on a PC. Use the function appropriately and add dramatic effects on your videos.To set fader options, In Video Shooting mode, press [f] → Fader → an option.Icon DescriptionOff: Fader function not used.In: Scene gradually fades in.Out: Scene gradually fades out.In-out: The fader function is applied at the start and end of the scene.VoiceSometimes, a muted video is more appealing than the one with sound. Turn the voice off to record a muted video. To set voice options, In Video Shooting mode, press [f] → Voice → an option.](https://usermanual.wiki/Samsung-Electronics-Co/NX210/User-Guide-1680007-Page-89.png)

![90Playback/EditingLearn how to search photos and videos quickly through the thumbnail view and to protect and delete files.Viewing photos1 Press [y].• The most recent file you captured will be displayed.2 Rotate the navigation button or press [C/F] to scroll through files.You may not be able to edit or play back files that were captured with other cameras, due to unsupported sizes or codecs. Use a computer or another device to edit or play back these files.Viewing image thumbnailsIn order to search for photos and videos you want, convert to the thumbnail view. The thumbnail view displays multiple images at a time so that you can easily look through items you wish to find. You can also classify and display files by their type, day recorded, and week recorded.MenuScroll the jog dial to the left to display 3, 15, or 40 thumbnails.(Scroll the jog dial to the right to return to the previous mode.)Alternatively, in the singe view, press [m] → x → View → an option. Searching and managing files](https://usermanual.wiki/Samsung-Electronics-Co/NX210/User-Guide-1680007-Page-91.png)
![91Playback/Editing > Searching and managing filesViewing files by category in Smart Album1 In the thumbnail view, press [m].2 Select a category, and then press [o].* DefaultOption DescriptionTypeView files by the file type such as photo or video.Date*View files by the date they were saved.WeekView files by the week they were saved.LocationView file by the place they were saved. (Only the photos captured with a GPS module have the location information.)Viewing files as a folderContinuous, burst, and bracketing shots appear as a folder. Deleting a folder will delete all photos in the folder.: Single View](https://usermanual.wiki/Samsung-Electronics-Co/NX210/User-Guide-1680007-Page-92.png)
![92Playback/Editing > Searching and managing filesProtecting filesProtect your files from accidental deletion.1 In Playback mode, press [m] → z → Protect → an option. (Single, Select, All)2 Rotate the navigation button or press [C/F] to select a file, and then press [o].3 Press [f].Deleting filesDelete files in Playback mode and secure more space on your memory card. Protected files are not deleted.Deleting a single fileYou can select a single file and delete it.1 In Playback mode, select a file, and then press [ ].• Alternatively, in Playback mode, press [m] → z → Delete → Single.2 When the pop-up message appears, select Yes.](https://usermanual.wiki/Samsung-Electronics-Co/NX210/User-Guide-1680007-Page-93.png)
![93Playback/Editing > Searching and managing filesDeleting multiple filesYou can select multiple files and delete them.1 In Playback mode, press [ ] → Multiple Delete.• Alternatively, in Playback mode, press [m] → z → Delete → Select.2 Select files you want to delete by rotating the navigation button or pressing [C/F], and then press [o].• Press [o] again to cancel your selection.3 Press [ ].4 When the pop-up message appears, select Yes.Deleting all filesYou can delete all files on the memory card at once.1 In Playback mode, press [m].2 Select z → Delete → All.3 When the pop-up message appears, select Yes.](https://usermanual.wiki/Samsung-Electronics-Co/NX210/User-Guide-1680007-Page-94.png)
![94Playback/EditingEnlarging a photoYou can enlarge photos when viewing them in Playback mode. You can also use the Trim function to extract the portion of the image displayed on the screen and save it as a new file.Magnified areaMagnification (the maximum magnification may differ by resolution) Full Image TrimScroll the jog dial to the right to enlarge a photo. (Scroll the jog dial to the left to reduce a photo.)To Do thisMove magnified areaPress [D/I/C/F].Crop the enlarged imagePress [f]. (saved as a new file)Return to the original imagePress [o].You can scroll through files by rotating the navigation button, even when a photo is enlarged.Viewing a slide showYou can view photos in a slide show, apply various effects to the slide show, and play background music.1 In Playback mode, press [m].2 Select .3 Select a slide show effect option.• Skip to step 4 to start a slide show with no effects.Option DescriptionImagesSet the photos you want to view as a slide show.• All: View all photos in a slide show.• Date: View photos captured on a specific date in a slide show.• Sound picture: View voice recorded photos in a slide show.• Select: View selected photos in a slide show.EffectSelect a transition effect. Select Off for no effects.IntervalSelect the amount of time each photo is displayed.MusicPlay background music.4 Select Slide Show → Play or Repeat.• Slide show begins right away.Viewing photos](https://usermanual.wiki/Samsung-Electronics-Co/NX210/User-Guide-1680007-Page-95.png)
![95Playback/Editing > Viewing photosAuto rotatingWith Auto Rotate on, the camera automatically rotates photos you have captured vertically so they fit the screen horizontally.To set auto rotate options, In Playback mode, press [m] → x → Auto Rotate → an option.](https://usermanual.wiki/Samsung-Electronics-Co/NX210/User-Guide-1680007-Page-96.png)
![96Playback/EditingYou can play a video, capture an image from a video, or crop a video.Pause StopVideo viewing controlsTo Do thisRewindPress [C].Scan backward in 2X, 4X, and 8X increments each time you press [C]. Pause/PlayPress [o].Fast forwardPress [F].Scan forward in 2X, 4X, and 8X increments each time you press [F].Volume controlScroll the jog dial to the left or right.StopPress [D].Trimming a video during playback1 Press [o] at the point where you want the new video to begin.2 When paused, press [ ].3 Press [o] at the point where you want the new video to end.4 When paused, press [ ].5 When the pop-up message appears, select Yes.The cut file is saved as a separate file under a new name.Playing videos](https://usermanual.wiki/Samsung-Electronics-Co/NX210/User-Guide-1680007-Page-97.png)
![97Playback/Editing > Playing videosCapturing an image during playback1 Press [o] at the point where you want to save a still image.2 Press [I].• The resolution of the captured image is the same as the video resolution.• The captured file is saved as a separate file under a new name.](https://usermanual.wiki/Samsung-Electronics-Co/NX210/User-Guide-1680007-Page-98.png)
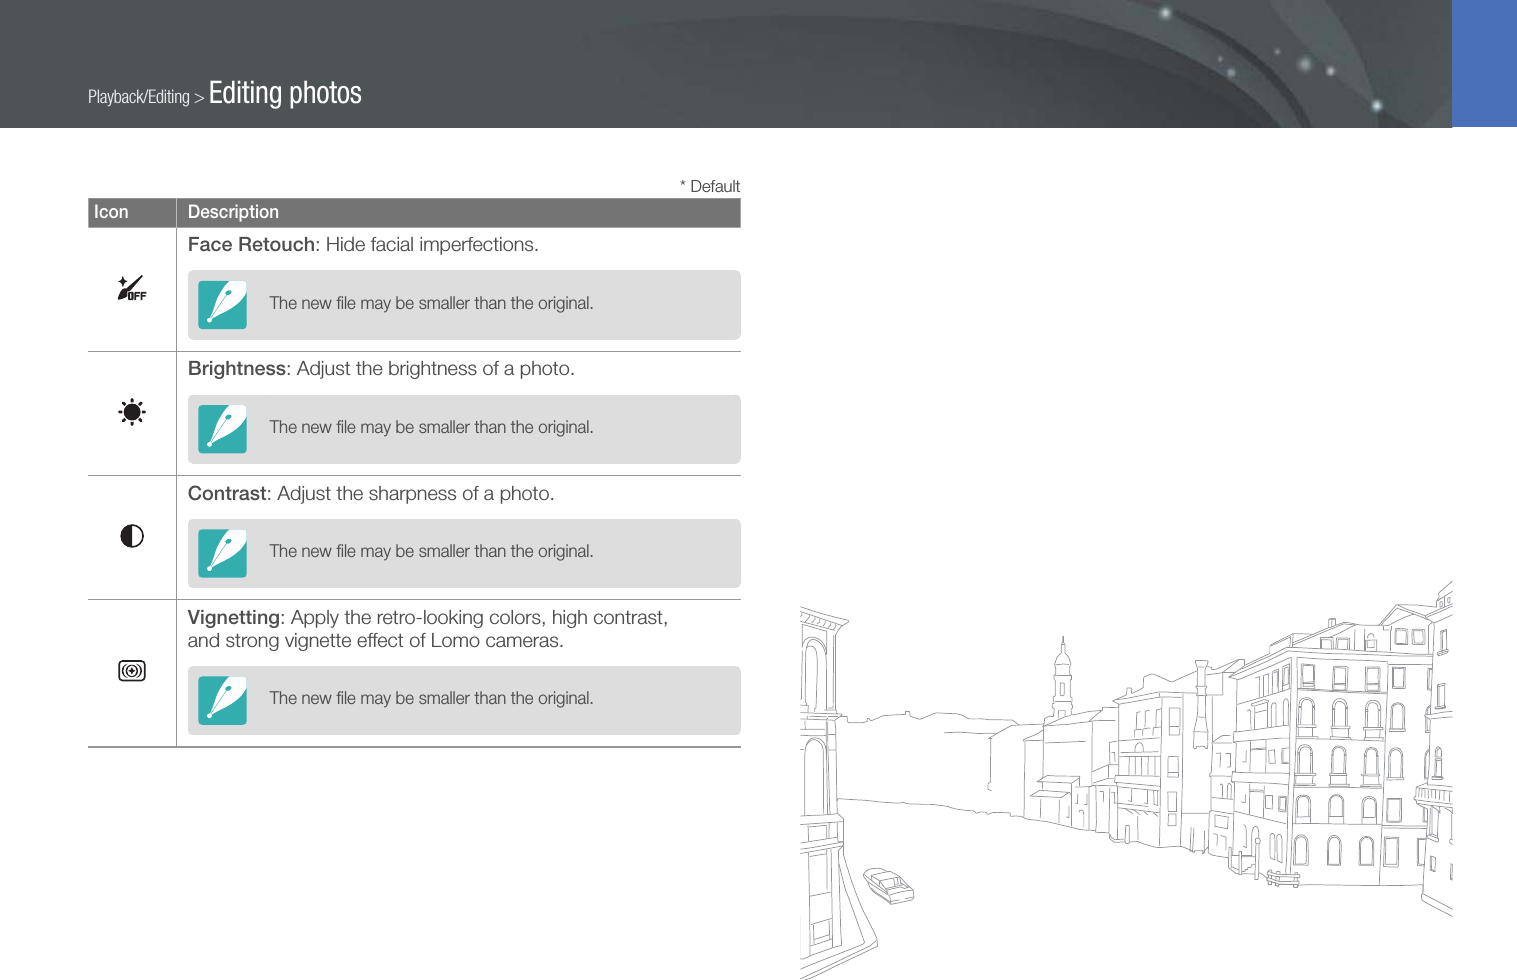
![98Playback/EditingPerform photo editing tasks, such as resizing, rotating, eliminating red-eye effects, and adjusting brightness, contrast, or saturation. Edited photos are saved as new files under different file names. 3D photos, panoramic photos, and 3D panoramic photos cannot be edited with the Image Edit function.To set Image Edit options, In Playback mode, press [f] → an option.Options* DefaultIcon DescriptionSmart Filter: Apply various filter effects to photos and create unique images. (Off*, Miniature, Soft Focus, Old Film 1, Old Film 2, Halftone Dots, Sketch, Fish Eye, Defog, Negative)The new file may be smaller than the original.Red-eye Fix: Remove red-eyes on a photo. (Off*, On)The new file may be smaller than the original.* DefaultIcon DescriptionBacklight: Correct the brightness of an underexposed photo. (Off*, On)Before correction After correctionThe new file may be smaller than the original.Resize: Resize the size of a photo.The available resolutions may differ depending on the size of the selected photo.Rotate: Rotate a photo. (Off*, Right 90˚, Left 90˚, 180˚, Horizontal, Vertical)You cannot rotate protected files or RAW files.Editing photos](https://usermanual.wiki/Samsung-Electronics-Co/NX210/User-Guide-1680007-Page-99.png)
![101Wireless networkConnecting to a WLAN and configuring network settingsLearn to connect via an access point (AP) when you are in a range of a WLAN. You can also configure network settings.Connecting to a WLAN1 Rotate the mode dial to B.2 Select , , , , or .3 Press [m], and then select Wi-Fi Setting.• In some modes, press [m] or follow the on-screen instructions until the Wi-Fi Setting screen appears.• The camera automatically searches for available AP devices.4 Select an AP.Wi-Fi SettingExit ManualSamsung 2Samsung 1Samsung 3Samsung 4Samsung 5Icon/Option DescriptionAd hoc APSecured APWPS APSignal strengthWPS button connectionConnect to a WPS APRefreshRefresh connectable APsAdd wireless networkAdd an AP manually• Press [f] to open network setting options.• When you select a secured AP, a pop-up window appears. Enter the required passwords to connect to the WLAN. For information about entering text, refer to "Entering text". (p. 105)• When a login page appears, refer to "Using the login browser". (p. 103)• When you select an unsecured AP, the camera will connect to the WLAN.• If you select a WPS profile supported AP, select WPS PIN connection, and then enter a PIN on the AP device. You can also connect to a WPS profile supported AP by selecting WPS button connection on the camera, and then pushing the WPS button on the AP device.](https://usermanual.wiki/Samsung-Electronics-Co/NX210/User-Guide-1680007-Page-102.png)
![102Wireless network > Connecting to a WLAN and configuring network settingsSetting network options1 In the Wi-Fi Setting screen, move to an AP, and then press [f].2 Select each option and enter the required information.Option DescriptionAuthenticationSelect a network authentication type.Data EncryptionSelect an encryption type.Network PasswordEnter the network password.IP SettingSet the IP address manually.Manually setting the IP address1 In the Wi-Fi Setting screen, move to an AP, and then press [f].2 Select IP Setting → Manual.3 Select each option, and then enter the required information.Option DescriptionIPEnter the static IP address.Subnet MaskEnter the subnet mask.GatewayEnter the gateway.DNS ServerEnter the DNS address.](https://usermanual.wiki/Samsung-Electronics-Co/NX210/User-Guide-1680007-Page-103.png)
![103Wireless network > Connecting to a WLAN and configuring network settingsUsing the login browserYou can enter your login information via the login browser when connecting to some APs, sharing sites, or cloud servers.Button Description[D/I/o/F]Move to an item or scroll the page.[o]Select an item.[m]Access the following options:• Previous Page: Move to the previous page.• Next Page: Move to the next page.• Reload: Reload the page.• Stop: Stop loading the page.• Exit: Close the login browser.[ ]Close the login browser.• You can reduce or enlarge a web page by scrolling the jog dial.• You cannot select some items depending on the page you connected to. This does not indicate a malfunction.• The login browser may not close automatically after you log into some pages. If this occurs, close the login browser by pressing [ ], and then proceed with the desired operation.• It may take longer to load the login page due to the page size or network speed. If this occurs, wait until the login information input window appears.](https://usermanual.wiki/Samsung-Electronics-Co/NX210/User-Guide-1680007-Page-104.png)
![105Wireless network > Connecting to a WLAN and configuring network settingsEntering textLearn how to enter text. The icons in the table below let you move the cursor, change the case, etc. Use the jog dial or the navigation button to scroll to a desired key, and then press [o] to enter the key.Back BackspaceDoneIcon DescriptionDelete the last letter.Move the cursor.In ABC mode, change the case.Enter ".com".Switch between Symbol mode and ABC mode.Enter a space.DoneSave the displayed text.View the entering text guide.• You can enter only English alphabets, regardless of the display language.• To move to Done directly, press [y].• You can enter up to 64 characters.](https://usermanual.wiki/Samsung-Electronics-Co/NX210/User-Guide-1680007-Page-106.png)
![109Wireless networkUpload your photos or videos to file sharing websites. Available websites will be displayed on your camera.Accessing a website1 Rotate the mode dial to B.2 Select .3 Select a website.• The camera will automatically attempt to connect to a WLAN via the most recently connected AP device.• If the camera has not previously been connected to a WLAN, it will search for available AP devices. (p. 101)4 Enter your ID and password, and then select Login.• For information about entering text, refer to "Entering text". (p. 105)• To select an ID from the list, select → an ID.• If you have previously logged in to the website, you may be logged in automatically.You must have an existing account on the file sharing website to use this feature.Uploading photos or videos1 Access the website with your camera.2 Scroll to the files you want to upload, and then press [o].• You can select up to 20 files. The total size must be 10 MB or less.3 Select Upload.• If you connected to Facebook, select Upload → Upload.• If you connected to Facebook, you can enter your comments by selecting the Comment box. For information about entering text, refer to "Entering text". (p. 105)Using photo or video sharing websites](https://usermanual.wiki/Samsung-Electronics-Co/NX210/User-Guide-1680007-Page-110.png)
![110Wireless network > Using photo or video sharing websites• You cannot upload RAW files.• You can upload up to 20 files at a time.• The maximum photo resolution you can upload is 2M, and the longest video you can upload is 30 seconds at resolution or a video recorded using . If the selected photo resolution is higher than 2M, it will be automatically resized to a lower resolution. If you connected to Facebook, the photo resolution will be resized to 1M resolution.• The method of uploading photos or videos may differ depending on the selected website.• If you cannot access a website because of firewall or user authentication settings, contact your network administrator or network service provider.• Uploaded photos or videos may be automatically titled with the date they were captured.• The speed of your internet connection may affect how quickly photos upload or web pages open.• When there are no files in the camera memory, you cannot use this feature.• You can also upload photos or videos to file sharing websites in Playback mode by pressing [m], and then selecting z → Share(Wi-Fi) → a desired website.](https://usermanual.wiki/Samsung-Electronics-Co/NX210/User-Guide-1680007-Page-111.png)
![111Wireless networkYou can change settings in the email menu, and send photos or videos stored on the camera via email.Changing email settingsIn the email menu, you can change settings for storing your information. You can also set or change the email password. For information about entering text, refer to "Entering text". (p. 105)Storing your information1 Rotate the mode dial to B.2 Select .3 Press [m].4 Select → Sender Setting.5 Select the Name box, enter your name, and then select Done.Sender SettingNameBackEmailOK Reset6 Select the Email box, enter your email address, and then select Done.7 Select OK to save your changes.• To delete your information, select Reset.Sending photos or videos via email](https://usermanual.wiki/Samsung-Electronics-Co/NX210/User-Guide-1680007-Page-112.png)
![112Wireless network > Sending photos or videos via emailSetting an email password1 Rotate the mode dial to B.2 Select .3 Press [m].4 Select → Setting Password → On.• To deactivate the password, select Off.5 When the pop-up appears, press [o].• The pop-up disappears automatically even if you do not press [o].6 Enter a 4-digit password.7 Enter the password again.8 When the pop-up appears, press [o].• The pop-up disappears automatically even if you do not press [o].Changing the email password1 Rotate the mode dial to B.2 Select .3 Press [m].4 Select → Change Password.5 Enter your current 4-digit password.6 Enter a new 4-digit password.7 Enter the new password again.8 When the pop-up appears, press [o].• The pop-up disappears automatically even if you do not press [o].](https://usermanual.wiki/Samsung-Electronics-Co/NX210/User-Guide-1680007-Page-113.png)
![113Wireless network > Sending photos or videos via emailSending photos or videos via emailYou can send photos or videos stored on the camera via email. For information about entering text, refer to "Entering text". (p. 105)1 Rotate the mode dial to B.2 Select .3 Select the Sender box, enter your email address, and then select Done.• If you have previously saved your information, it will be inserted automatically. (p. 111)• To use an address from the list of previous recipients, select → an address. 4 Select the Receiver box, enter an email address, and then select Done.• To use an address from the list of previous recipients, select → an address.• Select to add additional recipients. You can input up to 30 recipients.• Select to delete an address from the list.5 Select Next.6 Scroll to files to send, and then press [o].• You can select up to 20 files. The total size must be 10 MB or less.7 Select Next.8 Select the Comment box, enter your comments, and then select Done.9 Select Send.• The camera will automatically attempt to connect to a WLAN via the most recently connected AP device and send the email.• If the camera has not previously been connected to a WLAN, it will search for available AP devices. (p. 101)](https://usermanual.wiki/Samsung-Electronics-Co/NX210/User-Guide-1680007-Page-114.png)
![114Wireless network > Sending photos or videos via email• You cannot send RAW files.• You can send up to 20 files at a time.• Even if a photo appears to have transferred successfully, errors with the recipient’s email account may cause the photo to be rejected or recognized as spam. • You may not be able to send an email if no network connection is available or if your email account settings are incorrect.• The maximum photo resolution you can send is 2M and the longest video you can send is 30 seconds at resolution or a video recorded using . If the selected photo resolution is higher than 2M, it will be automatically resized to a lower resolution.• If you cannot send an email because of firewall or user authentication settings, contact your network administrator or network service provider.• When there are no files in the camera memory, you cannot use this feature.• You can also send an email in Playback mode by pressing [m], and then selecting z → Share(Wi-Fi) → Email.](https://usermanual.wiki/Samsung-Electronics-Co/NX210/User-Guide-1680007-Page-115.png)
![115Wireless networkYou can upload your photos to SkyDrive. To upload files, you must visit the Microsoft website and register before connecting your camera.1 Rotate the mode dial to B.2 Select .• You can change the uploading photo size by pressing [m], and then selecting → Upload Image Size.3 Select SkyDrive.• If the pop-up message that prompts you to create an account appears, select OK.• The camera will attempt to connect to a WLAN via the most recently connected AP.• If the camera has not previously been connected to a WLAN, it will search for available AP devices. (p. 101)4 Log in with your ID and password.• For information about entering text, refer to "Entering text". (p. 105)• If you connected to SkyDrive, refer to "Using the login browser". (p. 103)5 Scroll to the photos you want to upload, and then press [o].6 Select Upload.• You can also upload photos to a cloud server in Playback mode by pressing [m], and then selecting z → Share(Wi-Fi) → a cloud server.• When there are no photos in the camera memory, you cannot use this feature.Uploading photos to a cloud server](https://usermanual.wiki/Samsung-Electronics-Co/NX210/User-Guide-1680007-Page-116.png)
![116Wireless networkYou can send photos or videos that you captured with the camera to a PC wirelessly. The Auto Backup feature works only with the Windows OS.Installing the program for Auto Backup on your PC1 Install Intelli-studio on the PC. (p. 141)2 Connect the camera to the PC with the USB cable.3 Click OK on the pop-up window.• The Auto Backup program is installed on the PC. Follow the on-screen instructions to complete the installation.4 Remove the USB cable.5 Connect the camera to the PC again with the USB cable.• The camera stores information about the PC, so that the camera can send files to the PC.Before installing program, ensure that the PC is connected to a network. If no internet connection is available, you must install the program from the provided CD.Sending photos or videos to a PC1 Rotate the mode dial to B.2 Select .• You must configure the backup PC information to use the Auto Backup feature. For more details, refer to “Installing the program for Auto Backup on your PC”. (p. 116)3 Press [m] to set options.• To turn off your PC automatically after the transfer is complete, select → Shut down PC after backup → On.• To view the help for the Auto Backup function, select → Help.4 Press [o] to start the backup.• To cancel sending, press [o].• You cannot select individual files to backup. This function backs up only new files on the camera.• The backup's progress will be shown on the PC monitor.• When the transfer is completed, the camera will turn off automatically in approximately 30 seconds. Select Cancel to return to the previous screen and prevent the camera from turning off automatically.Using Auto Backup to send photos or videos](https://usermanual.wiki/Samsung-Electronics-Co/NX210/User-Guide-1680007-Page-117.png)
![117Wireless network > Using Auto Backup to send photos or videos• If the PC supports the Wake on LAN (WOL) feature, you can turn on the PC automatically by searching for the PC from your camera. (p. 121)• When you connect the camera to the WLAN, select the AP that is connected to the PC.• The camera will search for available access points even if you are connecting to the same access point again.• If you turn off the camera or remove the battery while sending files, the file transfer will be interrupted.• While you are using this feature, only [Power] is available on your camera.• You can connect only one camera to the PC at a time for sending files.• The backup may be canceled due to network conditions.• Photos or videos can be sent to a PC one time only. Files cannot be sent again even if you reconnect your camera to another PC.• When there are no files in the camera memory, you cannot use this feature.• You must turn off Windows Firewall and any other firewalls before using this feature.• You can send up to 1,000 files.• On the PC software, the server name must be entered in the Latin alphabet and can contain no more than 48 characters.](https://usermanual.wiki/Samsung-Electronics-Co/NX210/User-Guide-1680007-Page-118.png)
![118Wireless networkTV Link is a technology for sharing media files between a camera and TV connected to the same AP device. With this technology, you can view your photos or videos on a widescreen TV.1 Rotate the mode dial to B.2 Select .• If the guide message appears, press [o].• The camera will automatically attempt to connect to a WLAN via the most recently connected AP device.• If the camera has not previously been connected to a WLAN, it will search for available AP devices. (p. 101)3 Connect your TV to a wireless network via an AP device.• Refer to your TV’s user manual for more information.4 On the TV, search for the camera and browse the shared photos or videos.• For information about searching for the camera and browsing the photos or videos on the TV, refer to the TV's user manual.• Videos may not play smoothly depending on the type of TV or network condition. If this happens, re-record the video in or quality and play it again. If videos do not play smoothly on your TV over the wireless connection, try connecting the camera to the TV with the HDMI cable.APViewing photos or videos on a TV Link-enabled TV](https://usermanual.wiki/Samsung-Electronics-Co/NX210/User-Guide-1680007-Page-119.png)
![120Wireless networkWhen the camera connects via a WLAN to a device that supports the Wi-Fi Direct function, you can send photos to the device. This feature may not be supported on some devices.1 On the device, turn on the Wi-Fi Direct option.2 On the camera, in Playback mode, scroll to a photo.3 Press [m], and then select z → Share(Wi-Fi) → Wi-Fi Direct.• When in the single image view, you can send only one photo at a time.• When in the thumbnails view, you can select multiple photos by scrolling to thumbnails, and then pressing [o]. Select Next when you are finished selecting photos.4 Select the device from the camera's list of Wi-Fi Direct devices.• Ensure that the device's Wi-Fi Direct option is turned on. • You can also select your camera from the device's list of Wi-Fi Direct devices.5 On the device, allow the camera to connect to the device.• The photo will be sent to the device.• You can send up to 20 files at a time.• When there are no photos in the camera memory, you cannot use this feature.• If you cancel the connection attempt before it is complete, the camera may not be able to reconnect to the device. In this case, update your device with the latest firmware.Sending photos using Wi-Fi Direct](https://usermanual.wiki/Samsung-Electronics-Co/NX210/User-Guide-1680007-Page-121.png)


![124Camera settings menuYou can set the user environment with these settings.To set user options, In Shooting mode, press [m] → u or X → an option.ISO CustomizingISO stepYou can set the size for the ISO sensitivity by either 1/3 or 1 step.Auto ISO rangeYou can set the maximum ISO value under which each EV step is chosen when you set the ISO Auto.* DefaultOption Value1 StepISO 200, ISO 400, ISO 800*, ISO 1600, ISO 32001/3 StepISO 125, ISO 160, ISO 200, ISO 250, ISO 320, ISO 400, ISO 500, ISO 640, ISO 800*, ISO 1000, ISO 1250, ISO 1600, ISO 2000, ISO 2500, ISO 3200Noise ReductionUse the Noise Reduction to reduce the visual noise in photos.* DefaultOption DescriptionHigh ISO NRThis function reduces noise that may occur when you set a high ISO sensitivity. (Off, On*)Long Term NRThis function reduces noise when you set the camera for a long exposure. (Off, On*)DMFYou can adjust the focus manually by rotating the focus ring after achieving the focus by half-pressing [Shutter]. This feature may not be available with some lenses.User settings](https://usermanual.wiki/Samsung-Electronics-Co/NX210/User-Guide-1680007-Page-125.png)
![125Camera settings menu > User settingsAF PriorityYou can set the camera to capture photos only when the subject is in focus.When you capture continuous or burst shots, the camera will capture photos even if the AF priority function is turned on and the subject is not in focus.Distortion CorrectYou can correct lens distortion that might occur from lenses. This feature may not be available with some lenses.iFn CustomizingYou can select options that can be adjusted when you press [i-Function] on an i-Function lens.Option DescriptionApertureSet to adjust the aperture value.Shutter SpeedSet to adjust the shutter speed.EVSet to adjust the exposure value.ISOSet to adjust ISO sensitivity.WBSet to adjust the white balance.ZSet to adjust the zoom ratio.](https://usermanual.wiki/Samsung-Electronics-Co/NX210/User-Guide-1680007-Page-126.png)
![128Camera settings menuLearn about the menu items of the Setting 1.To set Setting 1 options, In Shooting or Playback mode, press [m] → q → an option.* DefaultItem DescriptionLanguageSet a language the camera shows on the display.File NameSet the method of creating file names.• Standard*: SAM_XXXX.JPG (sRGB)/ _SAMXXXX.JPG (Adobe RGB)• Date: - sRGB files - MMDDxxxx.JPG. For example, for a photo captured on Jan. 01, the file name would be 0101xxxx.jpg. - Adobe RGB files - MDDxxxx.JPG for the months Jan through Sept. For the months Oct through Dec, the month number is replaced by the letters A (Oct.), B (Nov.) and C (Dec.). For example, for a photo captured on Feb. 03, the file name would be 203xxxx.jpg. For a photo captured on Oct. 05, the file name would be A05xxxx.jpg.* DefaultItem DescriptionFile NumberSet the method of numbering files and folders.• Reset: After using the reset function, the next file name is started at 0001.• Series*: New file numbers continue the existing number sequence, even if you have installed a new memory card, formatted the card, or deleted all photos.• The first folder name is 100PHOTO, if you have selected the sRGB color space and Standard file naming, the first file name is SAM_0001.• File name numbers are increased by 1 from SAM_0001 to SAM_9999.• Folder numbers are increased by 1 from 100PHOTO to 999PHOTO.• The maximum number of files that can be saved in one folder is 9,999.• File numbers are assigned according to DCF (Design rule for Camera File system) specifications.• If you change a file name (for example, on a computer), the camera will not be able to play the file.Setting 1](https://usermanual.wiki/Samsung-Electronics-Co/NX210/User-Guide-1680007-Page-129.png)
![130Camera settings menuLearn about the menu items of the Setting 2.To set Setting 2 options, In Shooting or Playback mode, press [m] → w → an option.* DefaultItem DescriptionQuick ViewSet the Quick View time length – the amount of time the camera displays a photo immediately after you captured it. (Off, 1 sec*, 3 sec, 5 sec, Hold)Display AdjustAdjust the display brightness, auto brightness setting, or display color.• Display Brightness: You can adjust the display brightness manually.• Auto Brightness: Turn auto brightness on or off. (Off, On*)• Display Color: You can adjust the display color manually.Display SaveSet the display off time. The display turns off if you do not use the camera for the time you set. (Off, 30 sec*, 1 min, 3 min, 5 min, 10 min)* DefaultItem DescriptionPower SaveSet power shut off time. The camera shuts off if you do not use it for the time you set. (30 sec, 1 min*, 3 min, 5 min, 10 min, 30 min)• The camera retains the power-off time setting even if you replace the battery.• Power save may not work if the camera is connected to a computer, TV, or printer, playing a slide show or movie.Date & TimeSet date, time, date format, time zone and whether to imprint the date on photos. (Time Zone, Date, Time, Type, Imprint)• The date appears on the lower right side of the photo.• When you print a photo, some printers may not print the date appropriately. Help Guide DisplaySet to display help text about menus and functions. (Off, On*)Press [ ] to hide the help text for a short time.Setting 2](https://usermanual.wiki/Samsung-Electronics-Co/NX210/User-Guide-1680007-Page-131.png)
![131Camera settings menuLearn about the menu items of the Setting 3.To set Setting 3 options, In Shooting or Playback mode, press [m] → e → an option.* Default Item DescriptionSound• System Volume: Set the sound volume or turn all sound off entirely. (Off, Low, Medium*, High)• AF Sound: Set the sound the camera makes in AF mode on or off. (Off, On*)• Button Sound: Set the sound the camera makes when you press buttons on or off. (Off, On*)Sensor Cleaning• Sensor Cleaning: Remove dust from the sensor.• Start-Up Action: When on, the camera performs sensor cleaning each time you turn it on. (Off*, On)As this product uses interchangeable lenses, the sensor can get dust on it when you change lenses. This can lead to dust particles appearing in the photos you capture. It is recommended not to change lenses when you are in a particularly dusty area. Also, make sure to attach the lens cap to the lens when not using it.Video OutSet the video signal output appropriate for your country when connecting the camera to an external video device such as a monitor or TV.• NTSC*: USA, Canada, Japan, Korea, Taiwan, Mexico, etc• PAL (Supports only PAL B, D, G, H, or I): Australia, Austria, Belgium, China, Denmark, Finland, France, Germany, England, Italy, Kuwait, Malaysia, New Zealand, Singapore, Spain, Sweden, Switzerland, Thailand, Norway, etc* Default Item DescriptionAnynet+ (HDMI-CEC)When you connect the camera to an HDTV that supports Anynet+ (HDMI-CEC), you can control the play function of the camera with the TV remote control.• Off: You cannot control the play function of camera with the TV remote control.• On*: You can control the play function of camera with the TV remote control.HDMI OutputWhen you connect the camera to an HDTV with an HDMI cable, you can change the resolution of the image.• NTSC: Auto*, 1080i, 720p, 480p• PAL: Auto*, 1080i, 720p, 576pIf the connected HDTV does not support the resolution you select, the camera sets the resolution one level lower.Firmware UpdateDisplay the firmware version of the camera body and lens, and update the firmware.• Body Firmware: View the firmware version of the camera body, and update the firmware.• Lens Firmware: View the firmware version of the lens, and update the firmware.• You can download firmware upgrades from www.samsung.com.• You cannot run a firmware upgrade without a fully charged the battery. Recharge the battery fully before running a firmware upgrade.• If you update the firmware, user settings values will be reset. (Date, time, language, video out will not change.)• Do not turn the camera off while the update is in progress.Setting 3](https://usermanual.wiki/Samsung-Electronics-Co/NX210/User-Guide-1680007-Page-132.png)
![132Camera settings menuLearn about the menu items of the GPS setting. You should purchase an optional GPS accessory in order to use the GPS function.To set GPS options, In Shooting or Playback mode, press [m] → U → an option.* DefaultItem DescriptionGeotaggingSet to capture photos with location information using the Global Positioning System (GPS). Location information is added to the Exif data associated with the photo. (Off, On*)GPS Valid Time SettingsSet the time to use the last location information when the camera fails to receive GPS signals. If the camera fails to receive GPS signals after the specified time, the location information will not be recorded onto the photos. (15 sec*, 30 sec, 1 min, 3 min, 10 min, 30 min)Location DisplaySet to display the location information on the top right screen of Shooting mode. The location information will appear in Korean only when you are in Korea and the display language is set to Korean. When another language is set, the location information will appear in English. (Off, On*)GPS ResetSet to search for GPS satellites closest to your current position. (Yes, No) GPS](https://usermanual.wiki/Samsung-Electronics-Co/NX210/User-Guide-1680007-Page-133.png)
![134Connecting to external devicesPlay back photos or videos by connecting your camera to an HDTV (3D TV) using an optional HDMI cable.Viewing files on an HDTV1 In Shooting or Playback mode, press [m] → e → HDMI Output → an option.2 Turn off your camera and HDTV.3 Connect the HDTV and the camera using the optional HDMI cable.4 Make sure that the HDTV and camera are turned on, and then select the HDMI mode on the HDTV.• The HDTV screen mirrors the camera's display.5 View the videos and photos using the buttons on the camera.• When using the HDMI cable, you can connect the camera to an HDTV using the Anynet+(CEC) method. • The Anynet+(CEC) functions allow you to control connected devices using the TV remote control.• If the HDTV supports Anynet+(CEC), the TV turns on automatically when used in conjunction with the camera. This feature may not be available on some HDTVs.• When connected to an HDTV by an HDMI cable, the camera cannot capture a photo or video.• When connected to an HDTV, some of the camera’s playback functions may not be available.• The length of time after which the camera and an HDTV are connected may vary depending on the memory card that you are using.• As the main feature of a memory card is to increase the transfer speed, it is not necessarily true to say that a memory card with a faster transfer speed is also fast in using the HDMI function.Viewing files on an HDTV or a 3D TV](https://usermanual.wiki/Samsung-Electronics-Co/NX210/User-Guide-1680007-Page-135.png)
![135Connecting to external devices > Viewing files on an HDTV or a 3D TVViewing files on a 3D TVYou can view photos captured in 3D mode or 3D Panorama mode on a 3D TV.1 In Shooting or Playback mode, press [m] → e → HDMI Output → an option.2 Turn off your camera and 3D TV.3 Connect your camera to your 3D TV with the optional HDMI cable.4 Turn on your camera.• If you have an Anynet+ compatible Samsung 3D TV and you have turned on your camera's Anynet+ function, the 3D TV turns on automatically and displays the camera screen, while the camera automatically enters Playback mode.• If you turn Anynet+ off in your camera, the 3D TV does not turn on automatically.5 Press [I] on the camera or the mode switching button on the TV to switch to 3D Mode.• Press [I] or the mode switching button again to switch to 2D Mode.6 Turn on your TV's 3D function.• Refer to your TV's user manual for more details.7 View 3D photos with the buttons on your TV's remote control.• You cannot view an MPO file in 3D effect on TVs that do not support the file format.• Use proper 3D glasses when you view an MPO file on a 3D TV.Do not view the 3D images captured by your camera on a 3D TV or 3D monitor for an extended period of time. It may cause unpleasant symptoms, such as eyestrain, fatigue, nausea, and more.](https://usermanual.wiki/Samsung-Electronics-Co/NX210/User-Guide-1680007-Page-136.png)
![136Connecting to external devicesPrint photos on your camera by connecting to printers directly or saving Digital Print Order Format (DPOF) information on a memory card.Printing photos with a PictBridge photo printerYou can print photos with a PictBridge-compatible printer by connecting your camera directly to the printer.1 With the printer on, connect your camera to the printer with the USB cable.2 Turn on your camera.• When the pop-up message appears on the camera display, select Printer.If your printer has the mass storage feature, you must first set the USB mode to Printer in the settings menu.3 Scroll the jog dial or press [C/F] to select a photo.• Press [m] to set printing options.4 Press [o] to print.Printing photos](https://usermanual.wiki/Samsung-Electronics-Co/NX210/User-Guide-1680007-Page-137.png)
![137Connecting to external devices > Printing photosConfiguring print settingsImagesSizeLayoutTypeQualityDateExit PrintOne PhotoOption DescriptionImagesSelect whether to print the current photo or all photos.SizeSpecify the size of the print.LayoutSet the number of photos per page.TypeSelect the type of paper.QualitySet the print quality.DateSet to print the date.File NameSet to print the file name.ResetReset setting to their default values.Some options may not be supported by some printers.Creating a print order (DPOF)DPOF (Digital Print Order Format) lets you set the print size of a photo and the number of copies to be printed. The camera saves the DPOF information in the MISC folder of your memory card. Your camera displays a DPOF indicator when it displays an image with DPOF information. If you have set DPOF information for your images, you can take the memory card to a digital printing shop for printing.To set DPOF options, In Playback mode, press [m] → x → DPOF → an item.](https://usermanual.wiki/Samsung-Electronics-Co/NX210/User-Guide-1680007-Page-138.png)
![138Connecting to external devices > Printing photosDPOF optionsOption DescriptionStandardYou can select photos to print and the number of copies for photos.• Select: Select the number of copies for photos you select. (Select photos you want to print → Select the number of copies by scrolling the jog dial left or right, and then pressing [f].)• All: Select the number of copies for all photos. (Select the number of copies by pressing [D/I], and then pressing [o].)• Reset: Cancel all DPOF printing quantity selections. IndexThis option lets you print all photos set to be printed as thumbnails in a single paper. The print size that you have set is available only with DPOF 1.1-compatible printers.SizeYou can specify the size of the print.• Select: Select the print size for photos you choose. (Select photos you want to print → Select the print size by scrolling the jog dial left or right, and then pressing [f].)• All: Select the print size of all the photos saved in the memory card. (Select the print size by pressing [D/I], and then pressing [o].)• Reset: Cancel the DPOF print size for all photos.](https://usermanual.wiki/Samsung-Electronics-Co/NX210/User-Guide-1680007-Page-139.png)

![160Appendix > Before contacting a service centerSituation Suggested remediesPhotos are distortedThis camera can have minute distortion when using a wide-angle lens that enables shooting with a wide angle of view. This is normal, and does not cause malfunction.Playback screen does not appear on the connected external device• Ensure that HDMI cable is properly connected to the external monitor.• Ensure that the memory card is properly recorded.Your computer does not recognize your camera• Ensure that the USB cable is connected correctly.• Ensure that your camera is switched on.• Ensure that you are using a supported operating system.Your computer disconnects the camera while transferring filesThe file transfer may be interrupted by static electricity. Disconnect the USB cable and connect it again. Your computer cannot play videosDepending on the software you use, video files may not play. To play video files captured with your camera, install and use the Intelli-studio program on your computer. (p. 141)Intelli-studio is not functioning properly• End Intelli-studio and restart the program.• You cannot use Intelli-studio on Macintosh computers.Situation Suggested remediesCannot set the DPOF for RAW filesYou cannot set the DPOF for RAW files.Auto Focus does not work• Subject is not in focus. When the subject is outside the AF area, shoot by moving the subject inside the AF area and half pressing [Shutter].• Subject is too close. Step back from the subject and shoot.• The focus mode is set to MF. Switch the mode to AF.AEL feature does not workAEL feature does not work in t, M, i, g and s modes. Select another mode to use this feature.Lens does not work• Ensure that the lens is properly mounted. • Remove the lens from the camera and re-mount it.External flash or GPS does not workEnsure that the external device is properly mounted and turned on.The date & time settings screen appears when you power on the camera• Set the date and time again.• This screen appears when the camera’s internal power source is completely discharged. Insert a fully charged battery and wait at least 72 hours in power off status for the internal power source to be recharged.](https://usermanual.wiki/Samsung-Electronics-Co/NX210/User-Guide-1680007-Page-161.png)
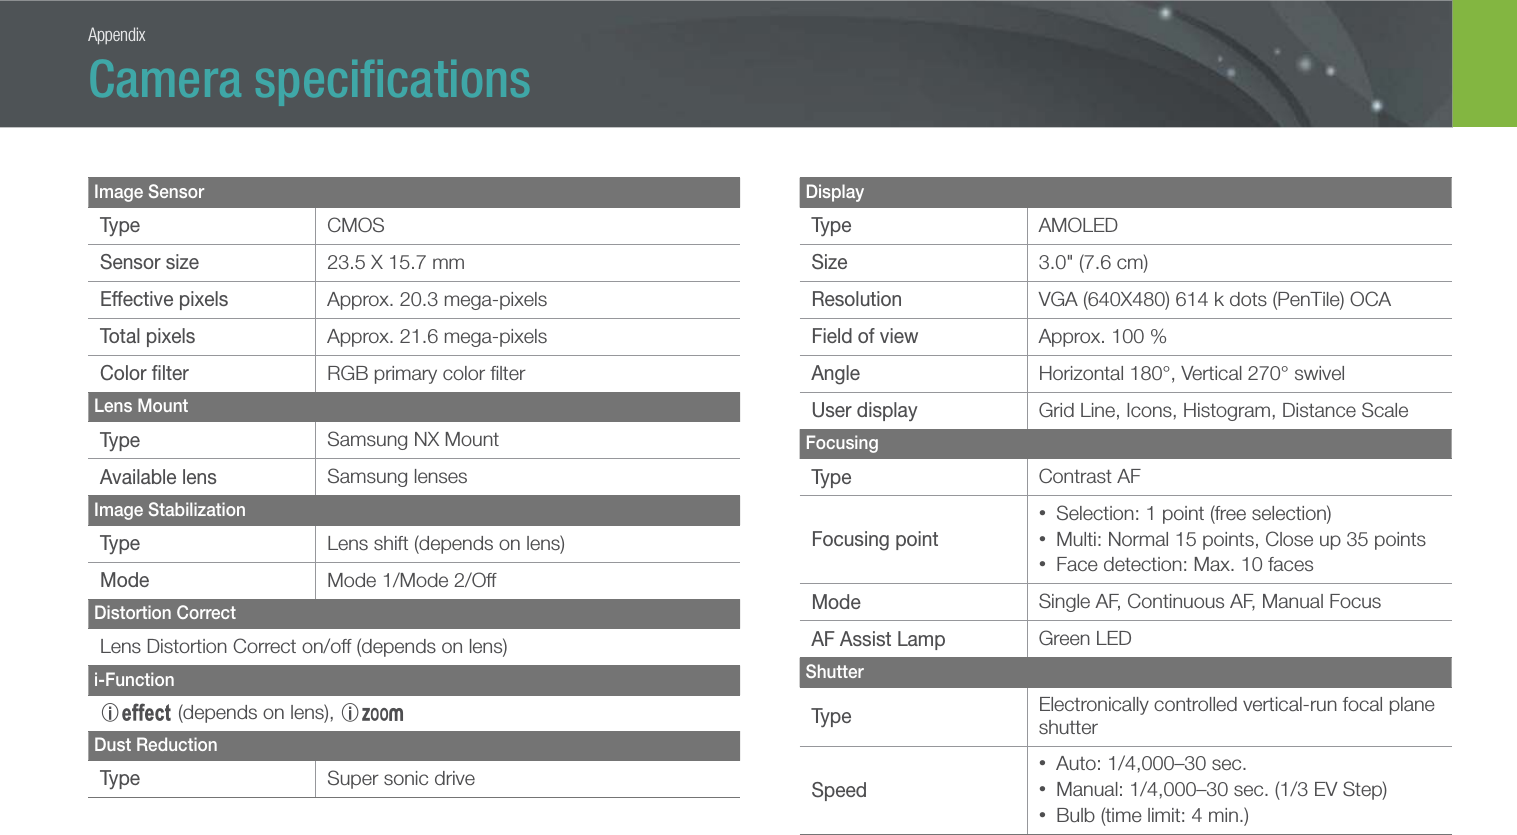
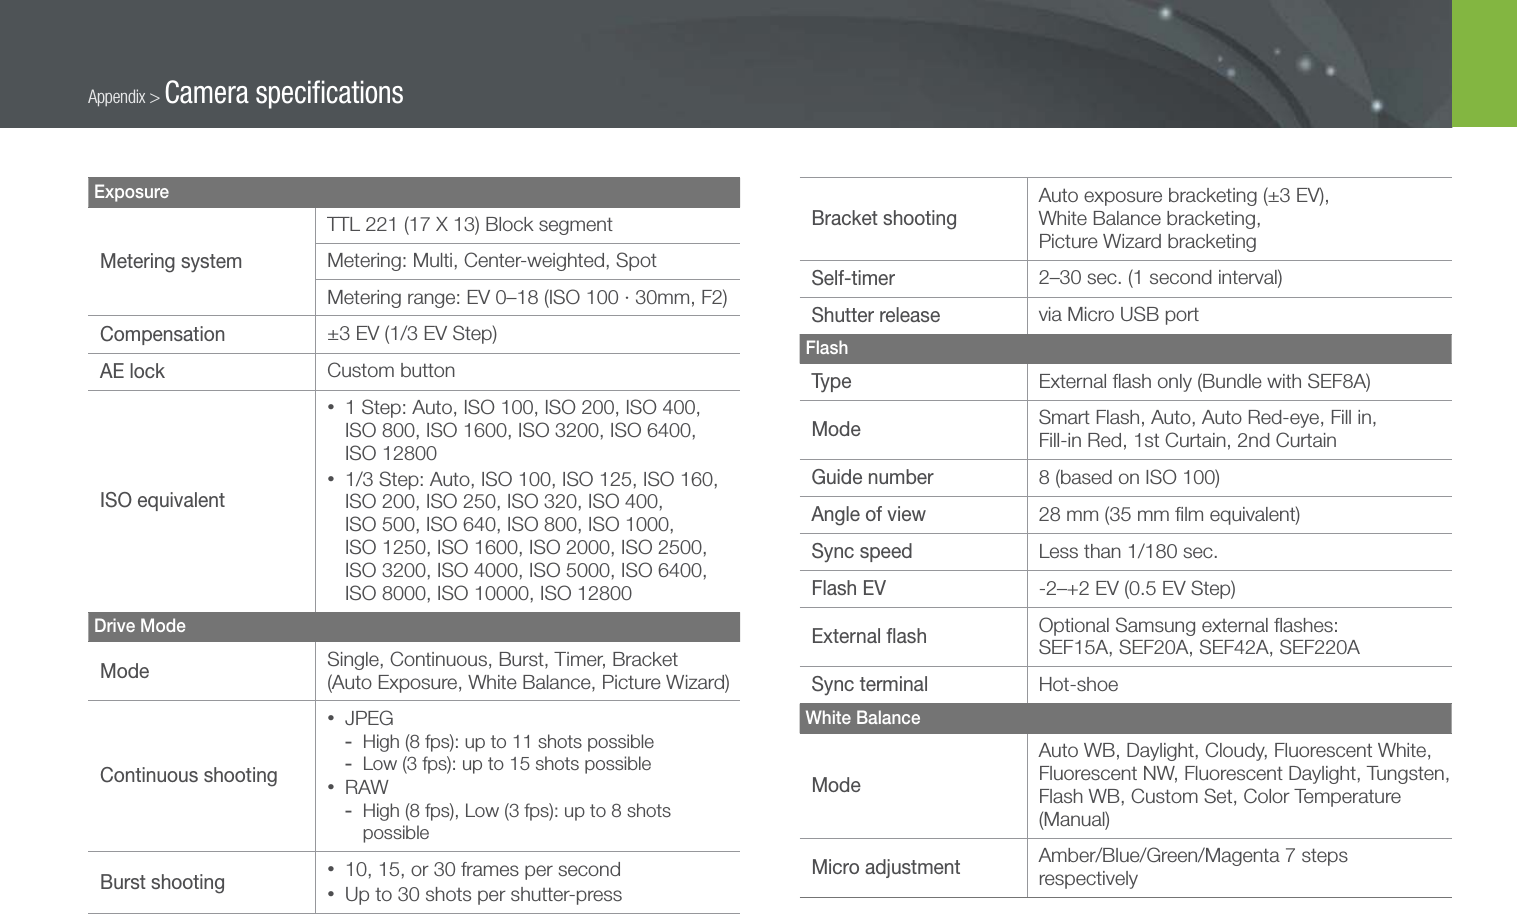
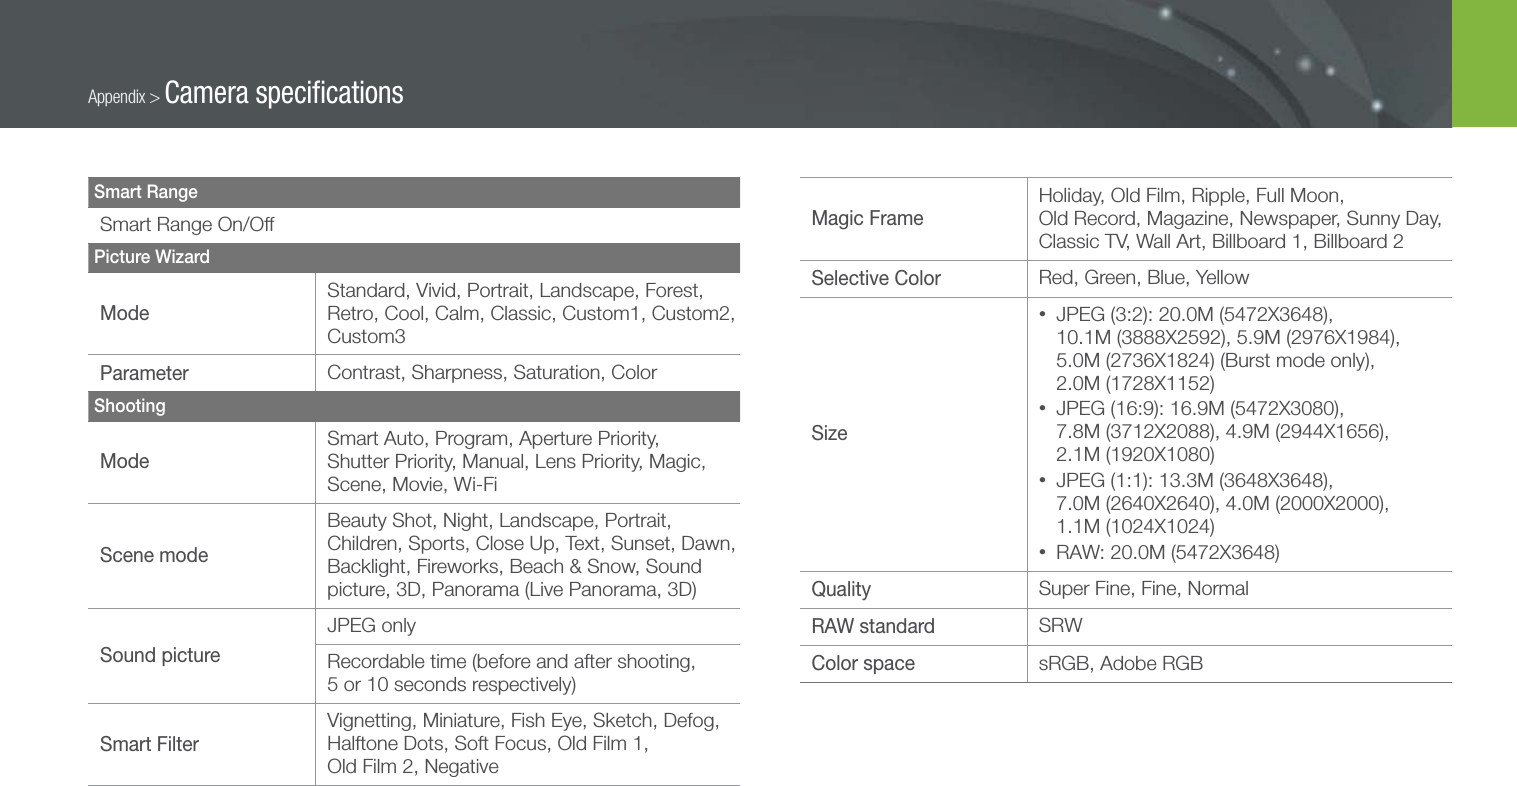
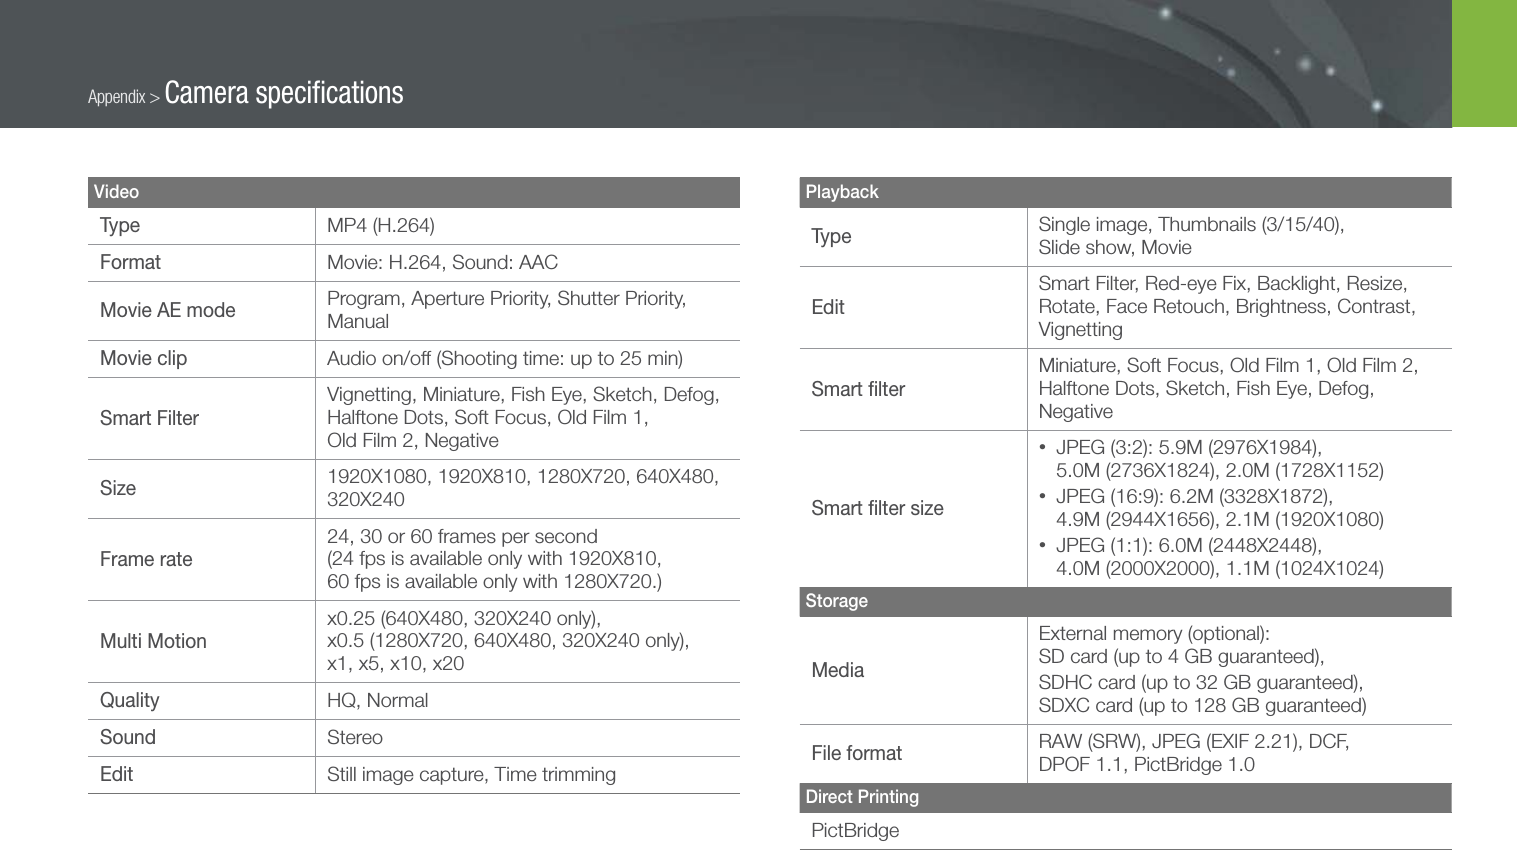
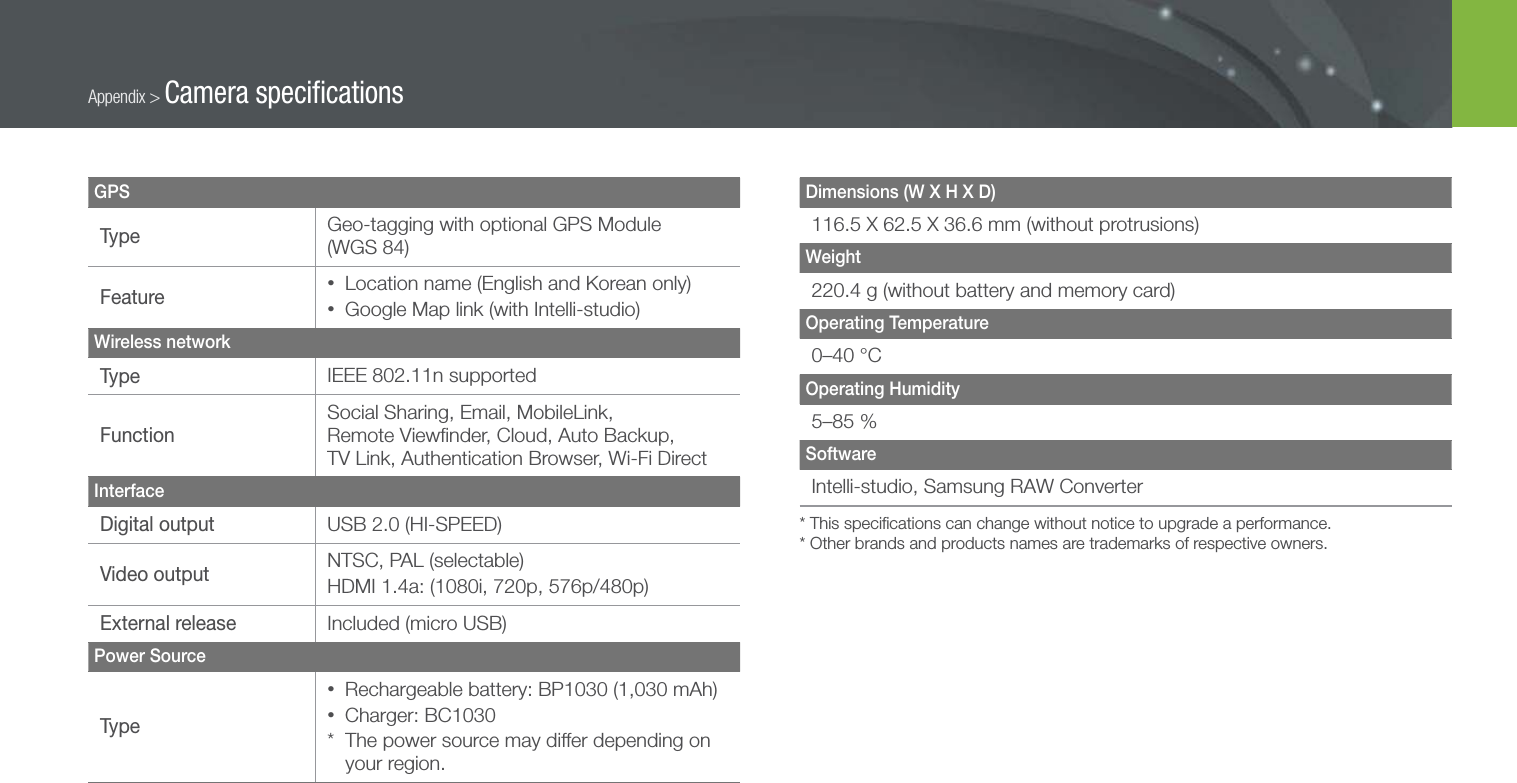


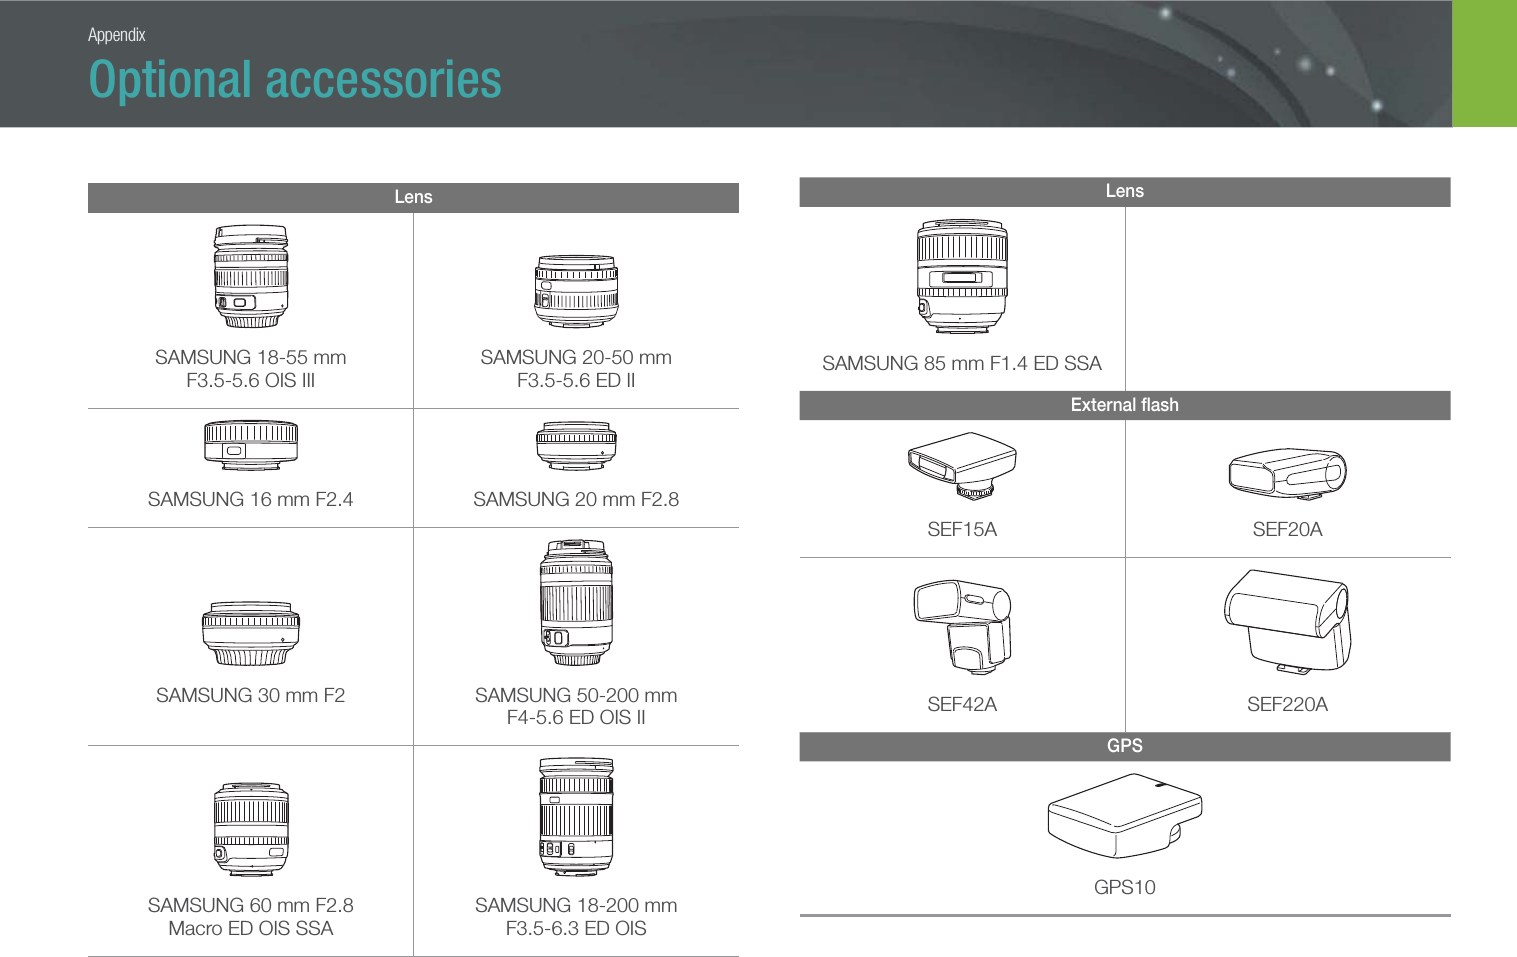
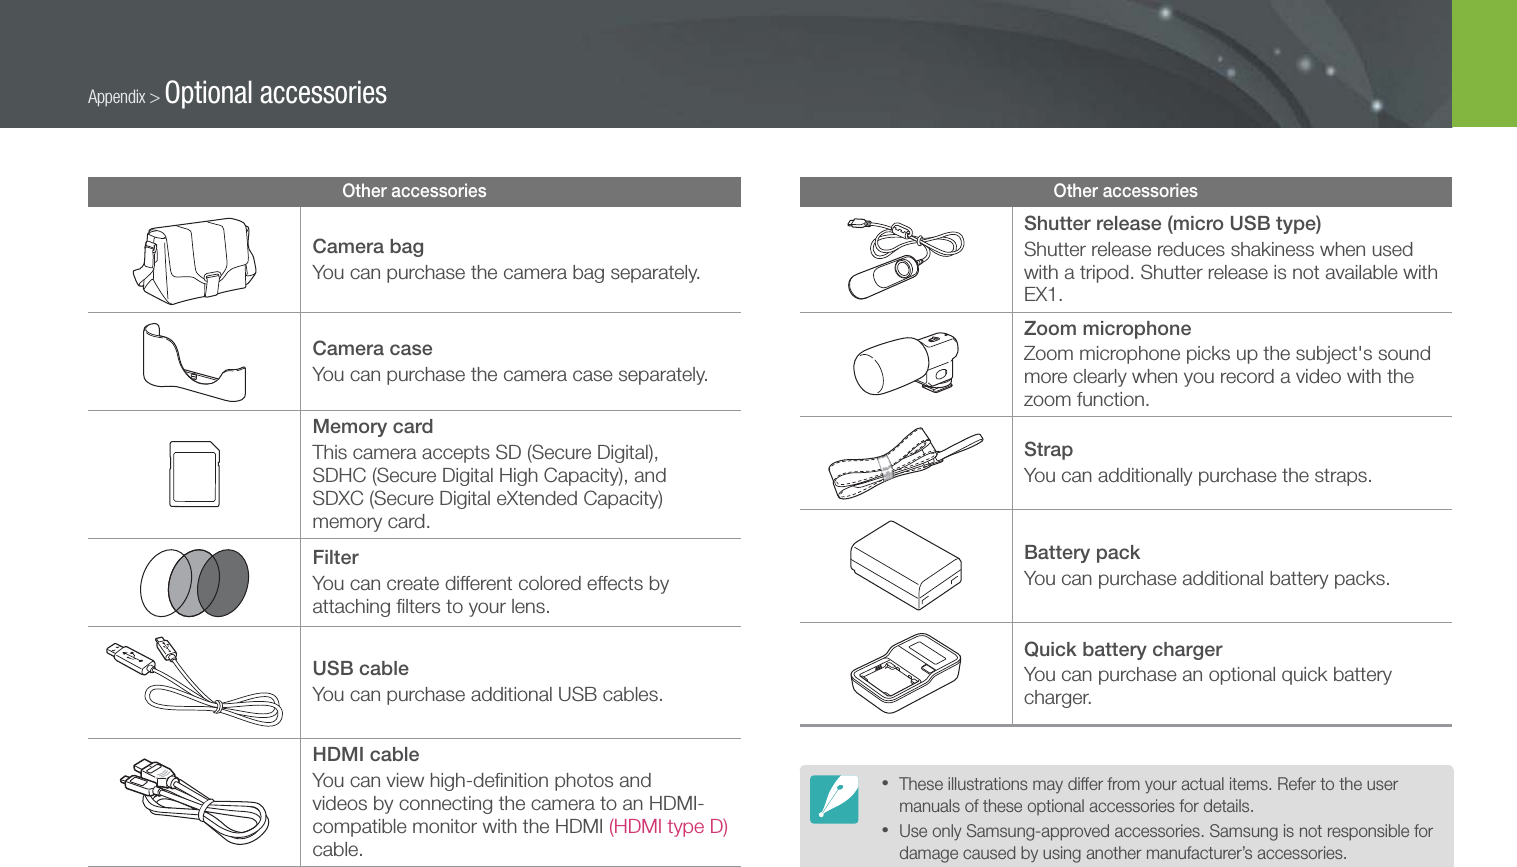
![176Correct Disposal of This Product (Waste Electrical & Electronic Equipment)(Applicable in the European Union and other European countries with separate collection systems) This marking on the product, accessories or literature indicates that the product and its electronic accessories (e.g. charger, headset, USB cable) should not be disposed of with other household waste at the end of their working life. To prevent possible harm to the environment or human health from uncontrolled waste disposal, please separate these items from other types of waste and recycle them responsibly to promote the sustainable reuse of material resources. Household users should contact either the retailer where they purchased this product, or their local government office, for details of where and how they can take these items for environmentally safe recycling. Business users should contact their supplier and check the terms and conditions of the purchase contract. This product and its electronic accessories should not be mixed with other commercial wastes for disposal.Correct disposal of batteries in this product(Applicable in the European Union and other European countries with separate battery return systems)This marking on the battery, manual or packaging indicates that the batteries in this product should not be disposed of with other household waste at the end of their working life. Where marked, the chemical symbols Hg, Cd or Pb indicate that the battery contains mercury, cadmium or lead above the reference levels in EC Directive 2006/66. If batteries are not properly disposed of, these substances can cause harm to human health or the environment. To protect natural resources and to promote material reuse, please separate batteries from other types of waste and recycle them through your local, free battery return system.This Class [B] digital apparatus complies with Canadian ICES-003.Dispose unwanted electronics through an approved recycler. To find the nearest recycling location, go to our website: www.samsung.com/recyclingdirect Or call, (877) 278 - 0799Appendix](https://usermanual.wiki/Samsung-Electronics-Co/NX210/User-Guide-1680007-Page-177.png)