Samsung Electronics Co RMC30D1 Television Remote Control Transmitter User Manual
Samsung Electronics Co Ltd Television Remote Control Transmitter Users Manual
Users Manual
imagine the possibilities
Thank you for purchasing this Samsung product.
To receive more complete service, please register
your product at
www.samsung.com/register
Touch Control
user manual
LED TV - D7000 and above
PDP TV - D8000
Contact SAMSUNG WORLDWIDE
If you have any questions or comments relating to Samsung products, please contact
the SAMSUNG customer care center.
Comment contacter Samsung dans le monde
Si vous avez des suggestions ou des questions concernant les produits Samsung,
veuillez contacter le Service Consommateurs Samsung.
Comuníquese con SAMSUNG WORLDWIDE
Si desea formular alguna pregunta o comentario en relación con los productos de
Samsung, comuníquese con el centro de atención al cliente de SAMSUNG.
Country
Customer Care Center
Web Site Address
CANADA 1-800-SAMSUNG
(726-7864)
www.
samsung.
com
Samsung Electronics Canada
Inc., Customer Service 55
Standish Court Mississauga,
Ontario L5R 4B2 Canada
South
America
01-800-SAMSUNG
(726-7864)
www.
samsung.
com
C.P 11570 AV. Presidente
Masaryk No.111, Int. 701 Col.
Chapultepec Morales, Delegacion
Miguel Hidalgo Mexico D.F
U.S.A 1-800-SAMSUNG
(726-7864)
www.
samsung.
com
Samsung Electronics America,
Inc. 85 Challenger Road
Ridgefield Park, NJ 07660-2112
A Warning that batteries (battery pack or batteries installed) shall not be exposed to
excessive heat such as sunshine, fire or the like.
CAUTION
Danger of explosion if battery is incorrectly replaced. Replace only with the same or
equivalent type.
“excessive sound pressure from earphones and headphones can cause hearing loss.”
BN68-03328B-00
[RMC30D1_ZA]BN68-03328B-00L03.indb 1 2011-01-11 오후 3:40:09
2
Touch Control
Contents
* Product design and specifi cations may be changed without notice.
* Avoid displaying still images (such as jpeg picture fi les) or still image elements (such
as TV Program logos, panorama or 4:3 format images, stock or news bars at the
screen bottom etc.) on the screen. The continuous display of a still picture can
cause ghosting of LCD screen, which can affect image quality. To reduce the risk
of this occurring, please follow these recommendations:
•Avoid displaying the same TV channel for long periods.
•Always try to display any image on a full screen. Use the TV set picture format menu for
best possible match.
•Reduce brightness and contrast values to the minimum required to achieve the desired
picture quality. Exceeding these values may speed up the burn-in process.
•Frequently use all the Touch Control features designed to reduce image retention and
screen burn-in. Refer to the proper user manual section for details.
Use basic functions
........
03 Description
04 Inserting the battery
04 Charging the battery
First Time User Setup
........
05 First Time User Setup
How To Use Touch Control
........
06 How To Use Touch Control
Setting up the Network
........
07 Setting Up Your Touch Control
TV Control menu
........
10 TV Control menu
Applications
........
12 Applications
Multi Display
........
13 Multi Display
AllShare
........
14 AllShare
Channel List
........
16 View the Channel List
16 Touch Control Channel List
17 Scheduling Auto Channel Display
Universal Remote
........
18 Add External device
20 Learning Remote
Activity
........
21 Activity
Settings menu
........
22 Settings
Troubleshooting
........
24 Troubleshooting
Specifi cation
........
25 Specifi cation
[RMC30D1_ZA]BN68-03328B-00L03.indb 2 2011-01-11 오후 3:40:10
3
Touch Control
Use basic functions
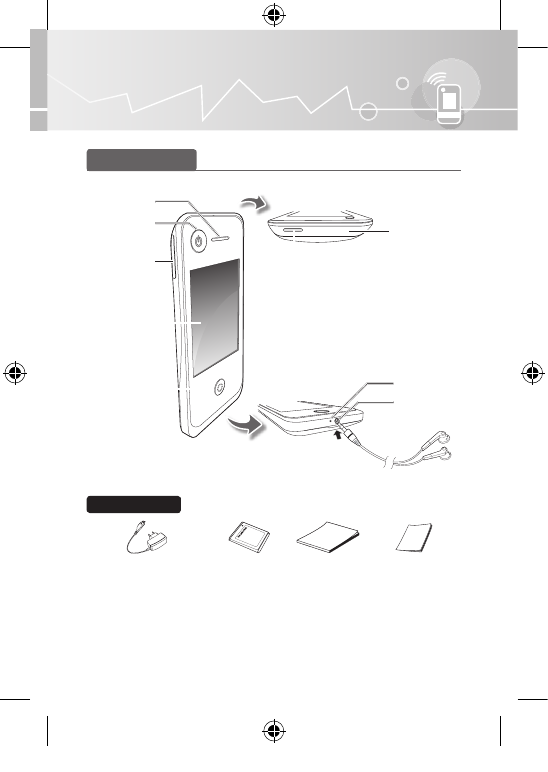
Description
Accessories
Power Adapter
(Depending on the country)
Battery User Manual Quick Setup Guide
Power on/off
: Press more than 1 seconds
TV Power
button
Speaker
Microphone
Volume button
Touch screen
Home button
IR transmitter /
IR receiver for
learning external
devices.
Earphone jack
User Manual
[RMC30D1_ZA]BN68-03328B-00L03.indb 3 2011-01-11 오후 3:40:10
4
Touch Control
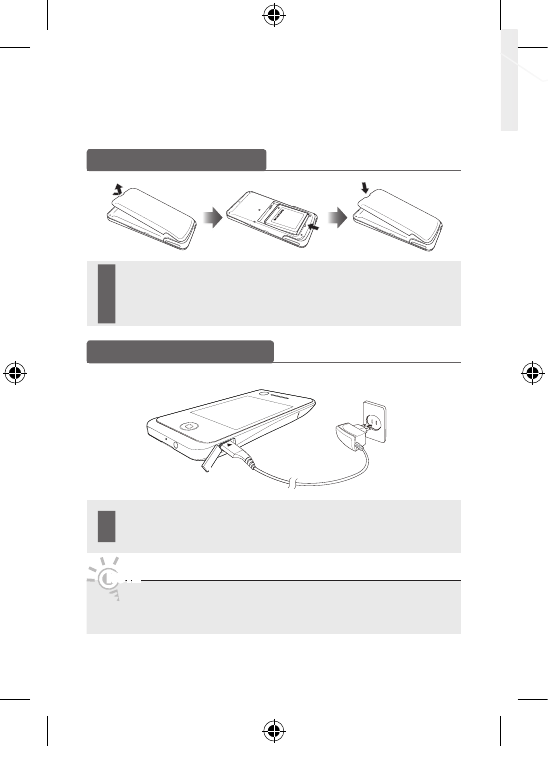
Charging the battery
Charge the battery fully before using the Touch Control.
1Insert the charging cable into the charging port, as shown above.
2Plug the power adapter into the outlet.
NOTE
•Be sure to use the supplied Power Adapter for charging the battery.
Inserting the battery
1Pull up using the slot provided, while lifting the cover off the Touch Control.
2Insert the battery with the Samsung logo facing up.
3Align the cover and press it firmly into place, making sure it snaps into place
at the corners.
Charge Port
[RMC30D1_ZA]BN68-03328B-00L03.indb 4 2011-01-11 오후 3:40:11
5
Touch Control
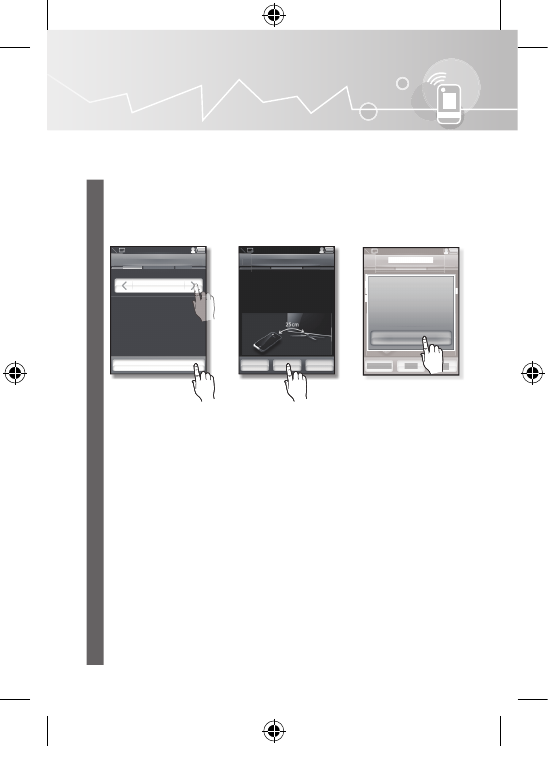
The default setup screen appears when your Touch Control is turned on for the fi rst
time. To connect the Touch Control to the TV, you must complete the following steps.
1Turn on TV.
•The Touch Control uses IR signals. Point the Touch Control at the IR sensor on
the TV when you press a button.
2Select the desired Language and tap <Next>.
3Keep within 10inches (25cm) between Touch Control and center of Samsung
TV. Tap <Next>.
•It may take about one minute to connect TV. If the connection fails, check the
wireless settings on the TV and try again.
•If the connection fails few times, tap <Skip> and refer to “Setting up the network”
(p. 7).
4Tap <OK>.
5You can see the Gesture Guide. Tap <Next>.
6You can continue to initialize the TV using Touch Control.
•For initial TV settings, refer to the TV manual.
First Time User Setup
Language
Please turn on TV.
English
Language
Next
TV Connection
Connecting Touch Control and
TV. Please place the Touch
Control and TV within 25cm and
then press the next button.
Previous Next Skip
TV Connection
TV Connection
Connecting Touch Control and
TV. Please place the Touch
Control and TV within 25cm and
then press the next button.
Previous
Next
Skip
OK
Select Allow on TV to
connect with Touch Control.
[RMC30D1_ZA]BN68-03328B-00L03.indb 5 2011-01-11 오후 3:40:11
6
Touch Control
How To Use Touch Control
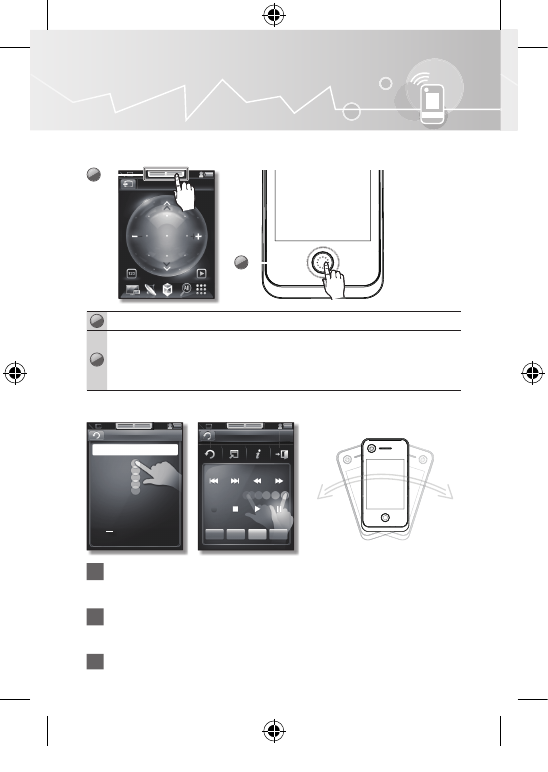
Mode Switch / Home Button Functions
1Mode Switch: Switch to the <TV Control> or <Applications> screen.
2
You can use Home Button Functions as below.
- One Click: Go to Home Screen or Exit.
- Double Click: Switch to the <TV Control> or <Applications> screen.
- Long Press: Synchronize with current TV process.
Double Tap / Flick / Shake
1123 Screen: The following fl ick commands are available.
- Up/Down: Change the channel.
- Left/Right: Adjust the volume.
2Playback Screen: The following commands and available.
- Up / Down / Left / Right Flick: Direction keys.
- Double tap: Enter key.
3Shake the Touch Control twice: Mute TV.
TV
1 2
456
789
0
PRE-
CH
123 Playback
RETURN TOOLS INFO EXIT
A B C D
2
1
[RMC30D1_ZA]BN68-03328B-00L03.indb 6 2011-01-11 오후 3:40:12
7
Touch Control
Setting up the Network
Setting Up Your Touch Control
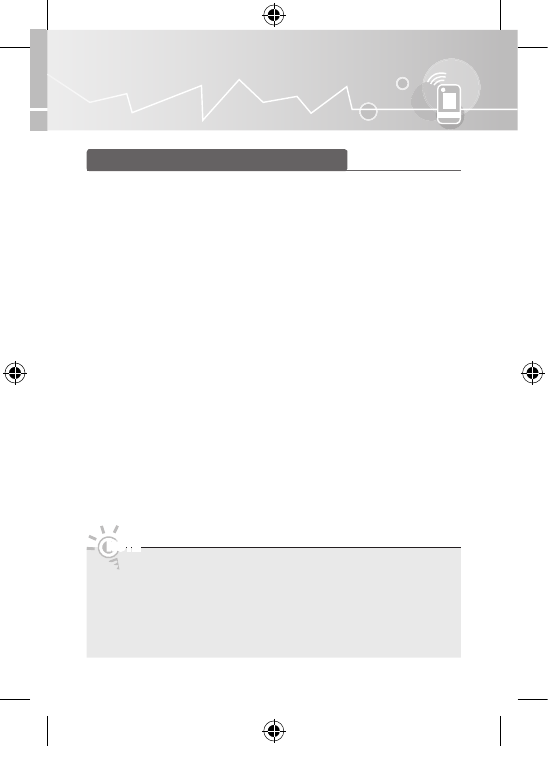
You can set up your Touch Control to control your TV in three ways:
•As a standard, IR (InfraRed) remote
As an IR remote, your LCD Touch Control works the same way as a standard push
button remote, except you touch icons and symbols on the LCD screen to control
your TV instead of pushing buttons. Using your Touch Control as an IR remote
requires no more set up than a standard remote and gives you access to most of
the remote’s functions and features.
•As an extended distance, Wi-Fi remote
As an extended distance, Wi-Fi remote, your Touch Control offers all the functions
and features of the IR mode and, because it uses Wi-Fi radio waves instead of
infra red waves to control your TV, it lets you control your TV from a much greater
distance and even from around corners. It also gives you access to the <Multi
Display> function which lets you watch the program or content that is on your TV
screen on the LCD screen of the Touch Control. The long distance, Wi-Fi mode
requires a few additional setup steps.
•As a networked, Wi-Fi remote
Using the Touch Control as a networked Wi-Fi remote, you can use all the same
functions provided under IR or long distance mode, various Widget services, and the
multimedia function that allows you to play music, movie, or photo fi les (saved on
the PC) on the TV or Touch Control display. You can also download and upgrade the
Touch Control software from the Internet. Activating networked Wi-Fi mode involves
several steps. To use networked Wi-Fi mode, a LAN connection and a wireless
router are required. The TV should be connected to a wired or wireless network. To
use the multimedia function, download Samsung PC Share Manager to the PC. To
download PC Share Manager, visit http://www.samsung.com.
NOTE
•The Touch Control and TV operate interactively when they are connected via
Wi-Fi.
•To use the Touch Control in Wi-Fi remote mode as an IR remote, go to
Settings → Network and set Wi-Fi Settings to Off.
•A Touch Control that cannot connect to the TV using Wi-Fi will not operate
interactively with the TV. If this is the case, it is recommended that you turn off
Wi-Fi.
[RMC30D1_ZA]BN68-03328B-00L03.indb 7 2011-01-11 오후 3:40:12
8
Touch Control
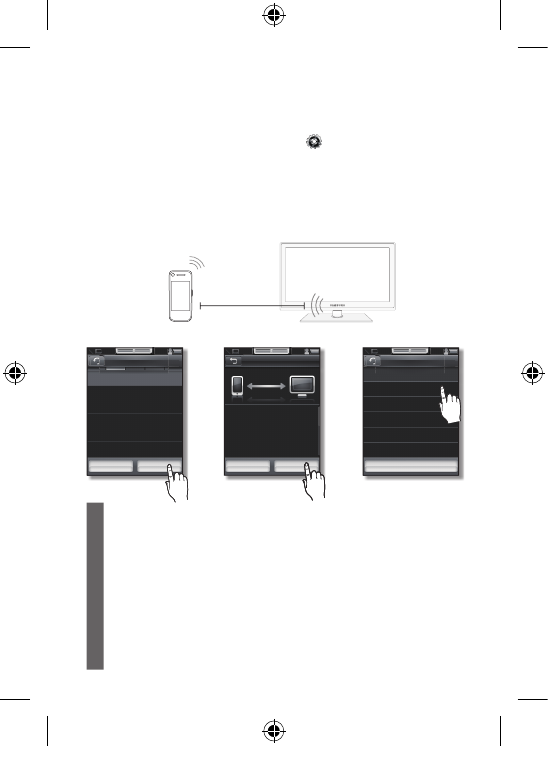
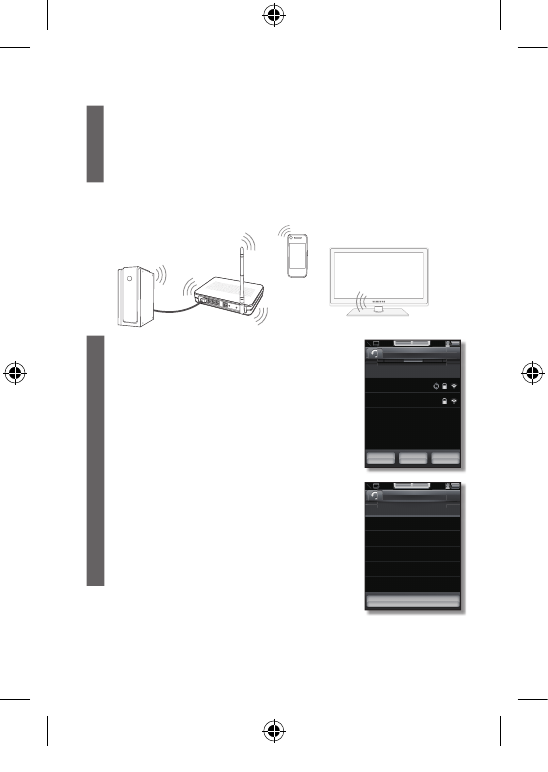
You can set up the network using One Foot Connection, WPS(PBC) and wireless
router.
Go to Applications > Settings and tap Network.
•A connection can be established using Network Setup unless the TV and Touch Control
are connected in First Time User Setup.
•Confi gure the network settings for the TV before you connect the TV and Touch Control.
For details, refer to the TV manual.
Using One Foot Connection
•Keep within 10inches (25cm) between Touch Control and center of Samsung TV.
1Before you start pairing, go to <Network> and check <Wi-Fi Settings> is set to
<On>.
2Keep within 10 inches (25cm) between Touch Control and center of Samsung
TV.
•To connect using One Foot Connection, turn off any other devices nearby that
support auto confi guration fi rst.
3Tap <Start> to go to next step.
4Select <One Foot Connection> and tap <Next>.
•It may take about one minute to establish a wireless connection between the TV
and Touch Control.
•If the connection fails, choose one of the other connection methods: PBC(WPS)
or One Foot Connection.
Network Settings
Select a connection type
Previous Next
General
WPS(PBC)
c
One Foot Connection
Connect TV
Select a TV
Search
c
TV A (192.168.1.16)
TV B (192.168.0.6)
TV C (192.168.1.11)
Network Settings
IP Set OK
TV and Touch Control are
connected without Access
Point. You cannot use network
function if you don’t connect
Access Point. To use network
function from Touch Control,
run Network settings on TV.
Touch Control
TV
Within 10
Inches (25 cm)
[RMC30D1_ZA]BN68-03328B-00L03.indb 8 2011-01-11 오후 3:40:13
9
Touch Control
5On the <Connect TV> screen, select the TV you want to connect.
•If the TV you want to connect cannot be found on the list, tap <Search> to retry.
6Select <Allow> on TV using Touch Control.
(This image does not appear when TV is on Plug & Play process.)
7When done, press the home button.
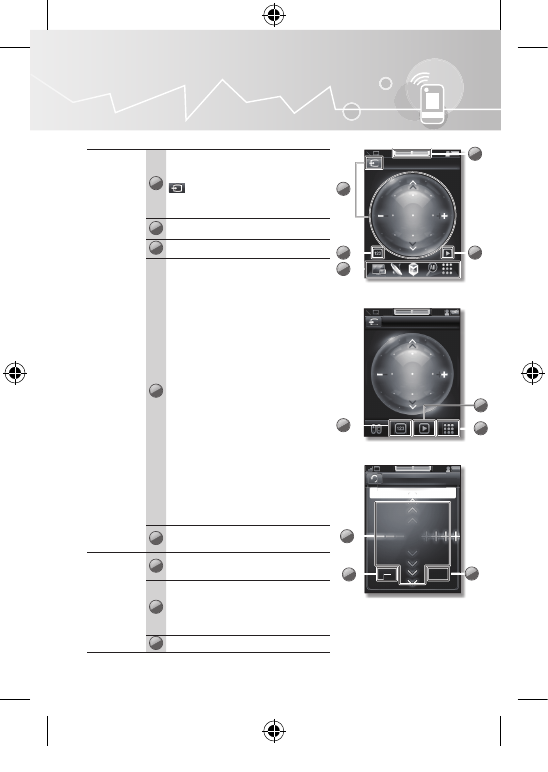
Using the wireless router
1Before you start pairing, go to <Network> and check
<Wi-Fi Settings> is set to <On>.
2On the <Network> screen, tap <Network Settings>.
3Tap <Start> to go to next step.
4Tap <General> and tap <Next>. A list of available APs
will appear. Select the AP (Access Point) connected to
the TV.
•If the connection fails, choose one of the other
connection methods: PBC(WPS) or One Foot
Connection.
5On the <Connect TV> screen, select the TV you want
to connect.
•If the TV you want to connect cannot be found on the
list, tap <Search> to retry.
6Select <Allow> on TV using Touch Control.
(This image does not appear when TV is on Plug & Play
process.)
7When done, press the home button.
TV
Wireless
Router
PC
Touch Control
Connect TV
Select a TV
Search
c
TV A (192.168.1.16)
TV B (192.168.0.6)
TV C (192.168.1.11)
Network Settings
Select a Network
Add Network
c
AP Name
AP Name
Previous Search Next
[RMC30D1_ZA]BN68-03328B-00L03.indb 9 2011-01-11 오후 3:40:14
10
Touch Control
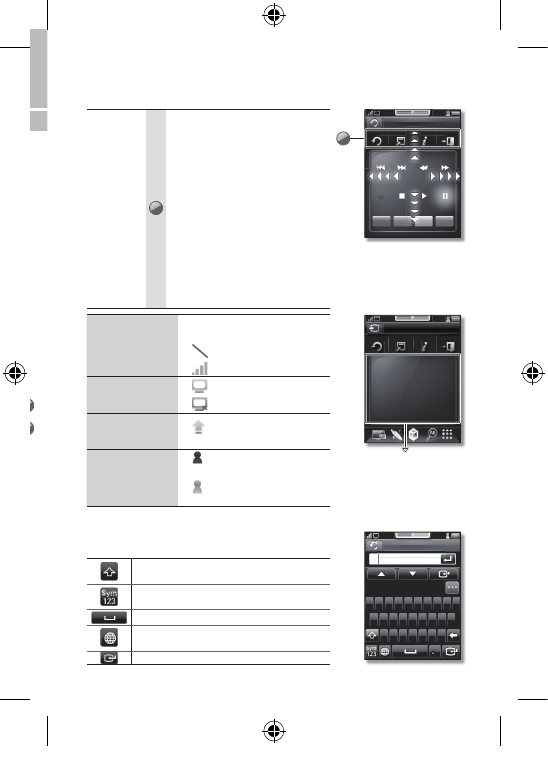
TV Control menu
TV Control
Screen
1
</> : Tap to Change the Channel.
– / + : Tap to adjust the Volume.
: Displays the Source screen.
You can execute the universal
remote, or register the device.
2Displays the 123 Screen.
3Displays the Playback screen.
4
MULTI DISPLAY: Display the show
you are currently viewing on the TV
to the Touch Control. You can view
the current show or change the
channel on the Touch Control.
CHANNEL: This menu can be
regarded as the STB Channel List
function on the TV. It allows you
to view broadcast information or
change simple settings (scheduling)
using the Touch Control without
interrupting your TV viewing.
SMART HUB: View all the content
items from the TV.
SEARCH: This integrated search
service allows you to search
using the Touch Control without
interrupting your TV viewing.
HOTKEY: Search for all the buttons
that cannot currently be found on
the display of the Touch Control.
5Switch to the <TV Control> or
<Applications> screen.
123 Screen
6Press numbers to directly access
channels.
7
Press the dash (-) to access
additional digital channels broadcast
on the same channel.
For example, 22-1, 22-2, etc.
8Return to the previous channel.
The following fl ick
commands are available.
– Up / Down: Change
the channel.
– Left / Right: Control
the volume.
123
456
789
0
PRE-
CH
7
6
8
123
6-1
TV
2
1
3
5
4
<WiFi Mode>
TV
<IR Mode>
24
3
[RMC30D1_ZA]BN68-03328B-00L03.indb 10 2011-01-11 오후 3:40:15
11
Touch Control
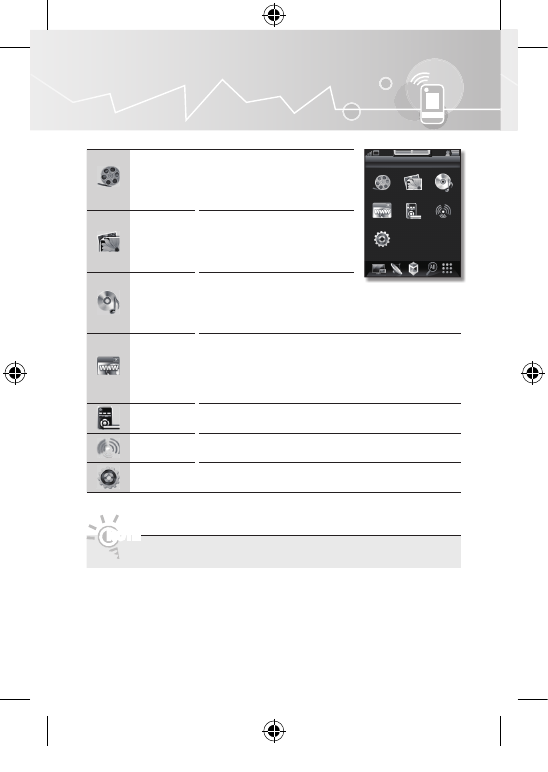
Playback
Screen 9
RETURN: Returns to the previous
menu.
TOOLS: Quickly select frequently
used functions.
INFO: Displays information on the
TV screen.
EXIT: Exits the menu.
Use these buttons in AllShare and
<Anynet+> (HDMI-CEC) modes.
(The � button also controls
recording for Samsung recorders
that support the <Anynet+> (HDMI-
CEC), features.)
Color button: Buttons used in the
<SMART HUB> menu, etc.
Wi-Fi Signal Status
Indicates the strength of the
Wi-Fi signal.
• No Wi-Fi signal
• Strong Wi-Fi signal
TV connect status
• Connected to the TV.
• Not connected to the TV.
<S/W Upgrade>
status
• Indicate you can upgrade the
software to the latest version.
Touch Control
Service Account
status
• Indicate you are logged on to
Touch Control Service.
• Indicate you are logged out of
Touch Control Service.
Using the QWERTY keyboard
You can use the QWERTY keyboard to type text on the
TV screen.
Enables you to change the text fi elds to
lower case and upper case.
Enables you to change the text fi elds to
numbers and icons.
Inputs a blank space on the text fi elds.
Changes the language for the QWERTY
keyboard.
Confi rms your input.
Keyboard
A
Apple Africa Animal
Q
A
Z
R
F
V
Y
H
N
W
S
X
T
G
B
U
J
M
E
D
C
O
L
PI
K
The following commands
are available.
– Up / Down / Left / Right
fl ick: Direction keys
– Double tap: Enter key
Playback
RETURN TOOLS INFO EXIT
A B C D
9
4
3
Drag, Flick, Double tap:
Control Web Browser in
<SMART HUB>
MEDIA
RETURN TOOLS INFO EXIT
SCROLL
UP
PIP
ZOOM
POINTER
BACK
SCROLL
DOWN
[RMC30D1_ZA]BN68-03328B-00L03.indb 11 2011-01-11 오후 3:40:17
12
Touch Control
Applications
Videos
Displays the <Videos> function.
Before you can use the <Videos>
function, you must link your PC
and the Touch Control to your
home network.
Photos
Displays the <Photos> function.
Before you can use the <Photos>
function, you must link your PC
and the Touch Control to your
home network.
Music
Displays the <
Music
> function.
Before you can use the <
Music
>
function, you must link your PC and
the Touch Control to your home
network.
Widgets
Add and use various widgets.
•<YouTube> : You can enjoy the online video clip community.
•<Your Video>: Log in with a widget ID and search for
information about movies.
•<Social TV>: Access social network services.
Remotes You can add the external device you want to control.
Activity Add a action macro or execute the macro you added.
Settings Set the Touch Control menus.
NOTE
•Widget items vary depending on the country.
Videos
Widgets
Settings
Photos
Remotes
Music
Activity
Applications
[RMC30D1_ZA]BN68-03328B-00L03.indb 12 2011-01-11 오후 3:40:17
13
Touch Control
Multi Display
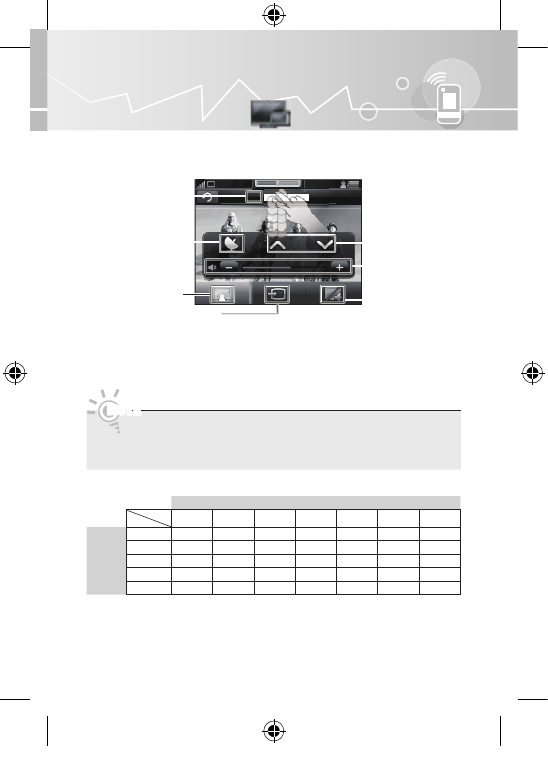
You can watch the channel displayed on the main TV simultaneously on the LCD
screen of the Touch Control.
The following fl ick commands are available.
•2-Finger Flick up: Touch Control → Display the content playing on the Touch Control to
the TV.
•2-Finger Flick down: TV → Display the content playing on the TV to the Touch Control.
•The Touch Control does not support 3D pictures.
•You can hear the sound from the Touch Control via earphones in Multi Display
or Preview mode. If using earphones, the speaker of the Touch Control will
automatically be muted.
Multi Display Scenario
Main TV
DTV ATV AV (CVBS) Comp. HDMI (DVI) PC Multimedia
Touch
Control
DTV
ATV
AV (CVBS)
Comp.
HDMI (DVI)
• : View a different source on the Touch Control from the TV at the same time.
(E.g. You can view a DTV broadcast on the TV and content playing on the Touch
Control from an external device connected via HDMI at the same time.)
• : View the same source on the Touch Control and TV at the same time.
• : Not available
NOTE
Channel information
Shows the channel
list and selects the
channel.
EXIT button
Displays and selects the
available video sources.
Channel button
ON/OFF the main
TV button
Touch Control
volume control
11-1 Program Name
11-1 Program Name
[RMC30D1_ZA]BN68-03328B-00L03.indb 13 2011-01-11 오후 3:40:18
14
Touch Control
AllShare
[
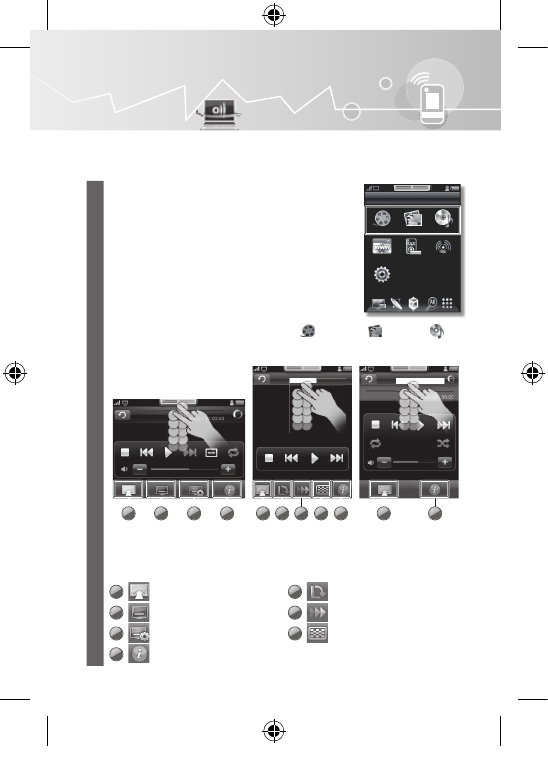
Before you can use the AllShare function, you must link your TV, PC
and the Touch Control to your home network.
1You can view or play the contents on TV or Touch Control.
2On the Applications screen, Select <Videos >, <Photos >, <Music >.
The following fl ick commands are available.
•2-Finger Flick up: Touch Control → Display the content playing on the Touch
Control to the TV.
1 : Multi Display Button
2 : Subtitle Button
3 : Subtitle Setting Button
4 : Information Button
5 : Rotate Button
6 : Speed Button
7 : Effect Button
Videos
Widgets
Settings
Photos
Remotes
Music
Activity
SERVICE
Lucky (feat. Colbie...)_59R4492
1 2 3 4 1 41 5 6 7 4
_59R4492
Lucky (feat. Colbie...)
<Photos>
<Videos>
<Music>
[RMC30D1_ZA]BN68-03328B-00L03.indb 14 2011-01-11 오후 3:40:19
15
Touch Control
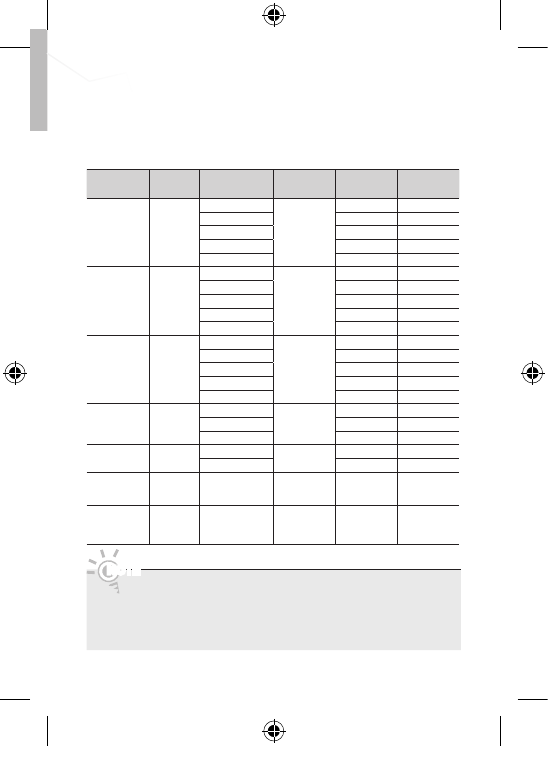
List of supported video file formats
File
Extention Container Video Codec Audio Codec Bit rate
(Mbsp) Resolution
*.avi AVI
Divx 4.x/5.1
MP3
AC3
LPCM
ADPCM
6 720x480
Divx 3.11 2 720x480
XviD 6 720x480
H.264 BP 2 320x240
MPEG4 SP/ASP 6 720x480
*.mkv MKV
Divx 4.x/5.1
MP3
AC3
LPCM
ADPCM
6 720x480
Divx 3.11 2 720x480
XviD 6 720x480
H.264 BP 2 320x240
MPEG4 SP/ASP 6 720x480
*.asf ASF
Divx 4.x/5.1 MP3
AC3
LPCM
ADPCM
WMA
6 720x480
Divx 3.11 2 720x480
XviD 6 720x480
H.264 BP 2 320x240
MPEG4 SP/ASP 6 720x480
*.mp4 MP4
H.264 BP MP3
ADPCM
AAC
2 320x240
MPEG4 SP/ASP 6 720x480
XVID 6 720x480
*.3gp 3GPP H.264 BP ADPCM
AAC
2 320x240
MPEG4 SP/ASP 6 720x480
*.mpg
*.mpeg PS H.264 BP
AC3
LPCM
AAC
2 320x240
*.ts
*.tp
*.trp
TS H.264 BP
AC3
AAC
MP3
2 320x240
•You must install “Samsung AllShare” on your PC and allow access to your TV
and the Touch Control to play contents from your PC on your TV using the
remote.
•The PC, TV and Touch Control should be connected to the same sub-network.
•You can download “Samsung AllShare” from www.Samsung.com
NOTE
[RMC30D1_ZA]BN68-03328B-00L03.indb 15 2011-01-11 오후 3:40:19
16
Touch Control
Channel List
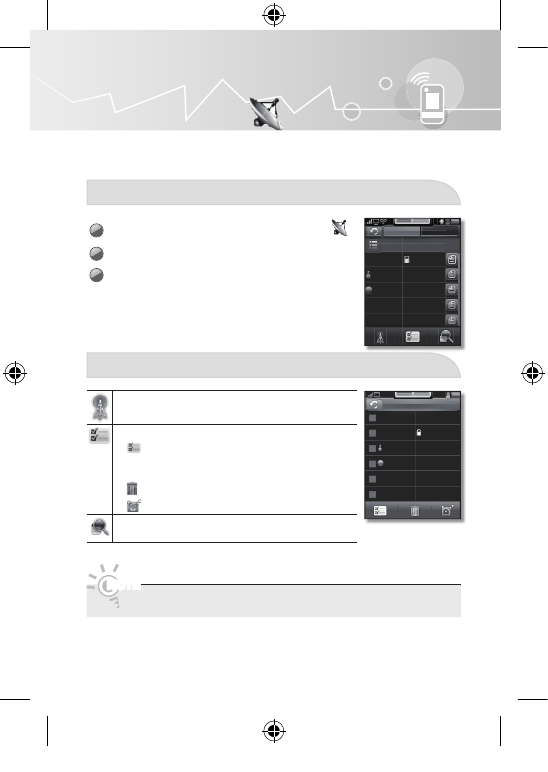
You can confi gure various settings for your TV channels with features such as program
information, channel editing, and scheduling.
View the Channel List
1On the TV Control and Applications screen, touch .
2The list of channels added to the TV will appear.
3Tap a <Channel>. The current channel on the TV
switches to the selected channel.
Touch Control Channel List
You can select the air or cable antenna signal type.
You can edit a channel.
• Adds a favorite channel. Select a channel and
press this button to add a channel to the list of favorite
channels.
• Deletes a selected channel.
• Deselects a channel.
Searches for a channel.
NOTE
•The menu may vary depending on the country.
Edit
c
6-1 Cable
7-1 Cable
5998-990 Cable
c
5998-990 Cable
10-1 Cable
11-1 Cable
Channel Schedule
TV
7-1 Cable
5998-990 Cable
9-11 Cable
10-1 Cable
11-1 Cable
[RMC30D1_ZA]BN68-03328B-00L03.indb 16 2011-01-11 오후 3:40:20
17
Touch Control
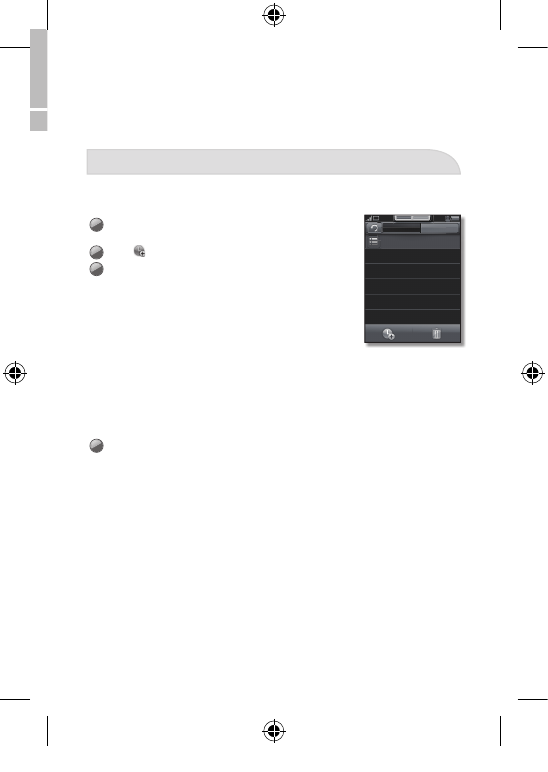
Scheduling Auto Channel Display
You can set a desired channel to be displayed automatically at the intended time. Set
the current time fi rst to use this function.
1Tab <Schedule>. The Schedule Manager screen will
be displayed.
2Tab The Timer Viewing screen appears.
3Touch to set the Antenna, Channel, Repeat or Start
Time.
•<Antenna>: Select <Air> or <Cable>.
•<Channel>: Select the desired channel.
•<Repeat>: Select <Once>, <Manual>, <Sat~Sun>,
<Mon~Fri> or <Everyday> to set at your convenience.
If you select <Manual>, you can set the day you want.
The
c
mark indicates the date is selected.
•<Date>: You can set desired date.
(It is available when you select <Once> in
<Repeat>.)
•<Start Time>: You can set start time you want.
Only memorized channels can be reserved.
4Tap <OK> to complete the scheduling.
Channel Schedule
Booking list
Today ProgramTitle
Today ProgramTitle
06/18 ProgramTitle
06/19 ProgramTitle
06/19 ProgramTitle
[RMC30D1_ZA]BN68-03328B-00L03.indb 17 2011-01-11 오후 3:40:21
18
Touch Control
Universal Remote
This function lets you control connected external devices such as Blu-ray players,
DVD players, etc. with your Touch Control. The Touch Control can learn the navigation,
number, and other keys needed to operate and control the device. The Touch Control
controls the devices with its standard IR (infra red) control functionality.
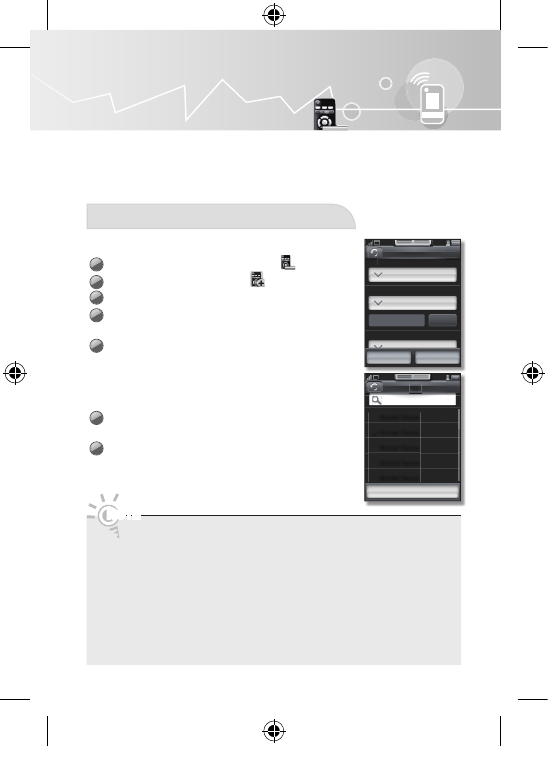
Add External device
By Searching Device
1On the <Applications> screen, touch .
2On the Remotes screen, touch .
3Tap <By Searching Device>.
4Tap <Source>.
•Select the input source on the list.
5Tap <Device Type>.
•Select the input device type.
•To change the device name, tap <Rename>.
(The option to select the Rename button is available
only when Source is set to Not Selected.)
6Tap <Manufacturer>.
•Select or search for the input device.
7Tap <Model Name>.
•Select or search for the input device code set you want.
NOTE
If the model name you want cannot be found, tap <Find More>.
You can search for the model name using <More models> and download
the code set.
If the model name you want cannot be found in <More models>, search for
the codeset using <Suggested Codeset>.
1. Tap <Suggested Codeset>.
•A test screen will be displayed.
2. Tap the <Test> button to test the selected code set number.
•If the selected external device turns on or off, this indicates the device is
connected.
Add
Source
HDMI2
Device type1
Device type1 Edit
Device Type
Manufacturer
Samsung
Apply Add/Edit btn
TV
Model Name
c
Model Name
Model Name
Model Name
Model Name
Find More
[RMC30D1_ZA]BN68-03328B-00L03.indb 18 2011-01-11 오후 3:40:22
19
Touch Control
3. Touch the <OK> button.
4. Touch the <Apply> button.
•The setup is complete and the device will be added to the Remotes list.
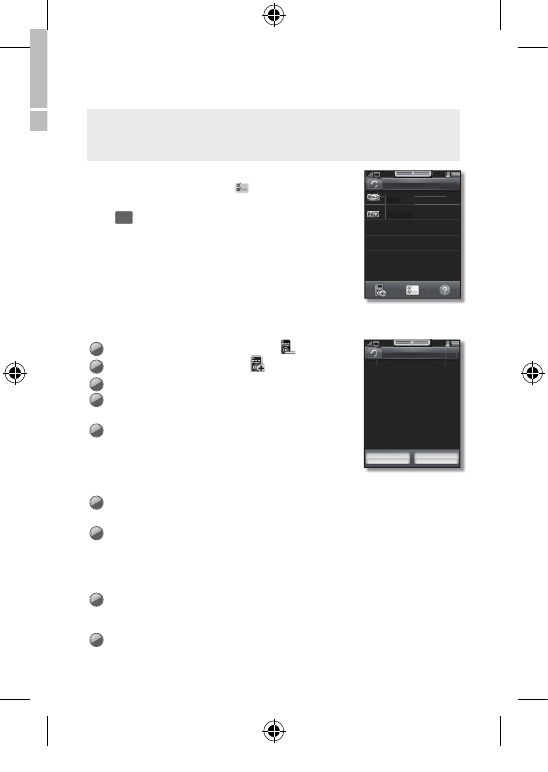
To learn an additional key using the Universal Remote menu
or to delete the added device, tap .
•Select a device and tap <Delete> to delete the device.
•Tap
<
and select <Add / Edit button> for the device you
want to pair the remote control with, then instructions on how
to perform pairing will be displayed. Tap <Help> for more
details or <OK> to start pairing.
By Learning IR Code
If the codeset of the device you want to add cannot be
found in the list or the Internet, you can add the device by
learning IR code.
1On the <Applications> screen, touch .
2On the Remotes screen, touch .
3Tap <By Learning IR Code>.
4Tap <Source>.
•Select the input source on the list.
5Tap <Device Type>.
•Select the input device type.
•To change the device name, tap <Rename>.
(The option to select the Rename button is available
only when Source is set to Not Selected.)
6Tap <Learn>. Start the extenal device registration process.
•Tap <Help> for learning guide or tap <OK> to start learning.
7You must now assign the control buttons on the device’s remote control to
corresponding buttons on the Touch Control’s. To begin, tap a button on the
Touch Control’s screen to which you want to assign a button from the device’s
remote.
•The selected button blinks.
8Press the corresponding button on the device’s remote.
•When the button on the Touch Control’s screen stops blinking, the assignment is
complete. Assign the other buttons in the same way.
9Select <OK> to complete the program.
Remotes
BDP
HD DVD
Help
Select a button, and enter
the device remote control
button you wish to learn
within 10 seconds. Press
OK to fi nish learning.
OK Help
[RMC30D1_ZA]BN68-03328B-00L03.indb 19 2011-01-11 오후 3:40:22
20
Touch Control
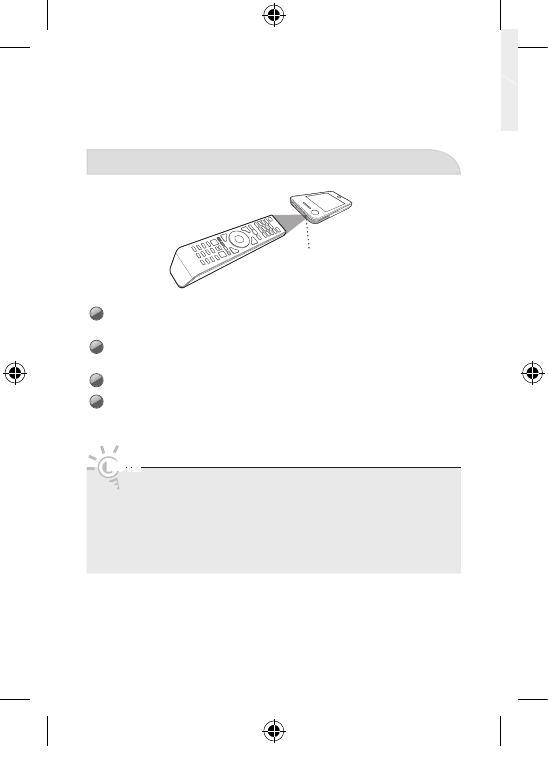
Learning Remote
1Press button more than 1 second while keeping the remote controls 1 inch (2cm)
from each other as described in the picture.
2The learning LED is directly facing the remote to be learnt (within 45-60 degree
depending on the LED chosen).
3The two remotes are placed on a fl at non glossy surface.
4The remote to be learnt does not feature a long signal.
NOTE
•Put Touch Control and the device remote about 2cm apart and confi gured
as shown above. If you do not, the remote learning process may not operate
normally.
•Some external device remote controls are not compatible with the Touch
Control. Search the codeset to fi nd the compatible remotes.
•During remote control learning, ensure there is no object between the IR
sensors on the Touch Control and the remote control for the external device.
IR receiver
– Ensure the sensor on the
remote you want to pair
with is pointing to the IR
receiver.
[RMC30D1_ZA]BN68-03328B-00L03.indb 20 2011-01-11 오후 3:40:23
21
Touch Control
To add new Activity
1On the <Applications> screen, touch .
2On the <Activity> screen, touch .
3Enter the name of the Activity you want to register and tap .
4Select the device you want to control and tap <Next>.
5Select a command button on the Touch Control for the device and tap <Next>.
6The command button has been added.
•To add another command button, tap <Add device> and perform step 4.
•Tap to delete all the added devices. To delete a selected device, select the
device and tap .
•To change the name of Activity, tap .
•To test the command buttons that have been added so far, tap .
7Tap to complete the Activity settings.
•If several devices that have an IR code for volume control are included in the
list of devices added to Activity, select the device you want to use as the main
volume control and tap <OK>. The Activity settings will be complete.
•Up to 10 items can be added to Activity.
8A list of items added to Activity will be displayed.
•Tap an item from the list to automatically start commands according to the item
settings. To perform commands manually, tap M.
•After <OK> is selected, specify the sequence of devices (commands) you want
to start.
To delete and edit Activity
To delete or edit an item from the list of items added to Activity, tap .
•Select an item and tap <Delete>. The item will be deleted.
•Tap
<
next to the item you want to edit. The current settings for the item can
be viewed or modifi ed.
Activity
[RMC30D1_ZA]BN68-03328B-00L03.indb 21 2011-01-11 오후 3:40:23

22
Touch Control
Settings menu
Settings
You can control a range of settings on the Touch Control.
On the Applications screen, tap <Settings>.
General Settings
Set the Basic settings.
•<Backlight Duration>: Set the interval time of the auto LCD off.
•<Brightness>: Control the brightness of the screen.
•<Touch Alert Tone>: Set the screen touch mode to sound, vibration or both.
•<Button Sound>: Set the touch button sound.
•<Button Volume>: Control the volume of the remote.
•<Vibration>: Change the vibration intensity.
Language
Select the menu language from three choices.
•<Language>: Set the desired language type.
Network
For confi guring <Network> settings, see page 6.
•Network conditions and environmental factors (including but not limited to) volume of
network traffi c, building materials, and construction may lower actual data throughput
rate.
•Environmental conditions will affect wireless signal coverage.
Settings
General Settings
Language
Network
Mute Gesture
On
Account Management
S/W Upgrade
Initialization
[RMC30D1_ZA]BN68-03328B-00L03.indb 22 2011-01-11 오후 3:40:24
23
Touch Control
Mute Gesture
Mute function by shaking the Touch Control twice.
Account Management
Manage consolidated user accounts using the Touch Control.
S/W Upgrade
Upgrade the software of the Touch Control to the latest version. The charger must be
connected before you perform an upgrade.
Initialization
Reset the Touch Control to initial settings. The user settings will be deleted and
manufacturer’s default settings restored.
Self Diagnosis
Test the current state of network and the video and sound.
System Information
Check the network and software version information.
Use Mode
You can select <Home Mode> or <Shop Mode>.
•<Home Mode>: The auto LCD off is turned on.
•<Shop Mode>: The auto LCD off is turned off.
[RMC30D1_ZA]BN68-03328B-00L03.indb 23 2011-01-11 오후 3:40:24
24
Touch Control
Troubleshooting
Issues Solutions and Explanations
The signal type icon of the
Touch Control has changed
even though I didn't change the
setting.
The icon may change from time to time depending
on the condition of network or TV connection.
The screen on the Touch
Control turns off continuously.
The automatic screen turn off mode operates
automatically to extend the life cycle of batteries.
The automatic screen turn off time setting can
be changed by selecting <Settings>, <General
Settings> and <Backlight Duration>. The time can
be extended to a maximum of 3 minutes. (You can
select 1 minute, 2 minutes or 3 minutes.)
The arrow on the top right does
not disappear.
Upgraded software has been added on Samsung.
com. Access Settings and perform a software
upgrade to upgrade the software to the latest
version.
The touch-screen function
doesn't work.
The capacitor type touch-sensor technology of the
remote does not respond to the touch of a fi ngermail
or stylus. Touch the screen lightly with your fi nger.
The corresponding function will start with a beep.
I want to turn off the power.
To turn the set on or off, press the Power on/off
button for more than one second or slide up and
remove the cover on the back of the remote, insert
the batteries again and close the cover.
[RMC30D1_ZA]BN68-03328B-00L03.indb 24 2011-01-11 오후 3:40:24
25
Touch Control
Specifi cation
Model RMC30D1
Panel Type 3 inches (2.95 inches measured diagonally)
TFT-LCD
Resolution 320x240
Touch Sensor Capacitive, Single Touch
Sound Mono (Inner Speaker, 0.2Watt) /
Stereo (Phone Jack)
Network Wireless Network IEEE 802.11 b/g/n
Power DC Charger 5V, 0.7A
AC input AC 100 to 240 VAC / frequency: 50 ~ 60 Hz
Play Time(Hour) 3 Hours
Weight 0.28lbs (125g)
Dimensions (L X W X D) 57.5 X 13.5 X 120(mm)
2.26 x 0.53 x 4.72 (inches)
Environmental Considerations
Operating Temperature
Operating Humidity
Storage Temperature
Storage Humidity
50°F to 104°F (10°C to 40°C)
10% to 80%, non-condensing
-4°F to 113°F (-20°C to 45°C)
5% to 95%, non-condensing
* Design and specifi cations are subject to change without prior notice.
* For information about the power supply, and more information about power
consumption, refer to the label attached to the product.
Open Source License Notice
•In the case of using open source software, Open Source Licenses are available on the
product menu.
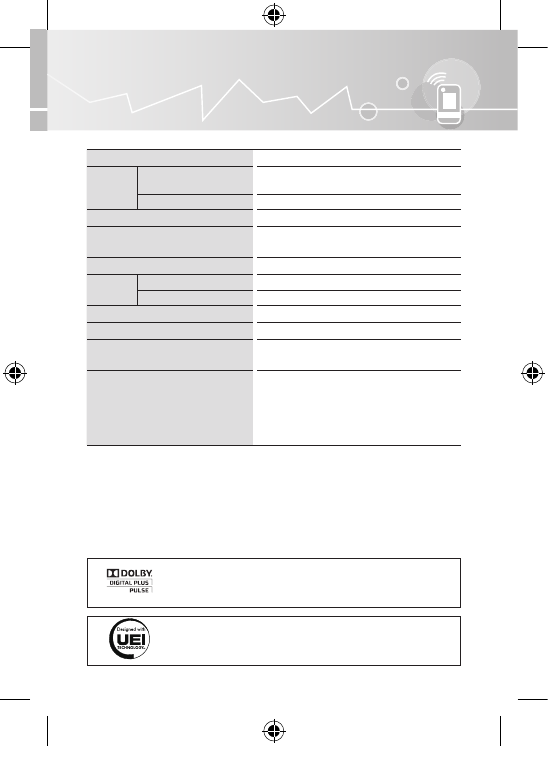
Manufactured under license from Dolby Laboratories. Dolby and the double-D symbol
are trademarks of Dolby Laboratories.
Designed with UEI Technology™
Under License from Universal Electronics Inc.
Portions © UEI 2000 - 2011
[RMC30D1_ZA]BN68-03328B-00L03.indb 25 2011-01-11 오후 3:40:24
26
Touch Control
FCC Statement
Federal Communication Commission Interference Statement
This equipment has been tested and found to comply with the limits for a Class B
digital device, pursuant to Part 15 of the FCC Rules. These limits are designed to
provide reasonable protection against harmful interference in a residential installation.
This equipment generates, uses and can radiate radio frequency energy and, if not
installed and used in accordance with the instructions, may cause harmful interference
to radio communications. However, there is no guarantee that interference will not
occur in a particular installation. If this equipment does cause harmful interference to
radio or television reception, which can be determined by turning the equipment off
and on, the user is encouraged to try to correct the interference by one of the following
measures:
•Reorient or relocate the receiving antenna.
•Increase the separation between the equipment and receiver.
•Connect the equipment into an outlet on a circuit different from that to which the receiver
is connected.
•Consult the dealer or an experienced radio/TV technician for help.
FCC Caution: Any changes or modifications not expressly approved by the party
responsible for compliance could void the user’s authority to operate this equipment.
This device complies with Part 15 of the FCC Rules. Operation is subject to the
following two conditions: (1) This device may not cause harmful interference, and (2)
this device must accept any interference received, including interference that may
cause undesired operation.
For product available in the USA/Canada market, only channel 1~11 can be operated.
Selection of other channels is not possible.
This device and its antenna(s) must not be co-located or operation in conjunction with
any other antenna or transmitter.
[RMC30D1_ZA]BN68-03328B-00L03.indb 26 2011-01-11 오후 3:40:24
27
Touch Control
Radio Frequency Safety Exposure
THIS MODEL MEETS THE U.S. GOVERNMENT’S REQUIREMENTS FOR EXPOSURE
TO RADIO WAVES.
Your wireless device contains a radio transmitter and receiver. Your device is designed
and manufactured not to exceed the emission limits for exposure to radio frequency
(RF) energy set by the Federal Communications Commission of the U.S. Government.
These limits are part of comprehensive guidelines and establish permitted levels of RF
energy for the general population. The guidelines are based on standards that were
developed by independent scientific organizations through periodic and thorough
evaluation of scientific studies.
The exposure standard for wireless mobile devices employs a unit of measurement
known as the Specific Absorption Rate (SAR). The SAR limit set by the FCC is 1.6
W/kg. Tests for SAR are conducted using standard operating positions accepted by
the FCC with the device transmitting at its highest certified power level in all tested
frequency bands. Although the SAR is determined at the highest certified power level,
the actual SAR level of the device while operating can be well below the maximum
value. This is because the device is designed to operate at multiple power levels so as
to use only the power required to reach the network. In general, the closer you are to a
wireless base station antenna, the lower the output.
Before a device model is available for sale to the public, it must be tested and certified
to the FCC that it does not exceed the limit established by the U.S. government-
adopted requirement for safe exposure. The tests are performed on position and
locations (for example, at the ear and worn on the body) as required by FCC for each
model. The highest SAR value for this model as reported to the FCC when tested for
use at the ear is 0.131 W/kg, and when worn on the body, is 0.410 W/kg. (Body-worn
measurements differ among device models, depending upon available accessories and
FCC requirements). While there may be differences between the SAR levels of various
devices and at various positions, they all meet the U.S. government requirement.
The FCC has granted an Equipment Authorization for this model with all reported
SAR levels evaluated as in compliance with the FCC RF exposure guidelines. SAR
information on this model is on file with the FCC and can be found under the Display
Grant section at https://gullfoss2.fcc.gov/oetcf/eas/reports/GenericSearch.cfm after
search on FCC ID A3LRMC30D1. For body worn operation, this device has been
tested and meets the FCC RF exposure guidelines when used with touch positions
from the body. Non-compliance with the above restrictions may result in violation of
FCC RF Exposure guidelines.
[RMC30D1_ZA]BN68-03328B-00L03.indb 27 2011-01-11 오후 3:40:24
28
Touch Control
IC Statement
This Class B digital apparatus complies with Canadian ICES-003.
Operation is subject to the following two conditions: (1) this device may not cause
interference, and (2) this device must accept any interference, including interference
that may cause undesired operation of the device.
Cet appareil numérique de la classe B est conforme á la norme NMB-003 du Canada.
For product available in the USA/Canada market, only channel 1~11 can be operated.
Selection of other channels is not possible.
This device and its antenna(s) must not be co-located or operation in conjunction with
any other antenna or transmitter.
The device could automatically discontinue transmission in case of absence of
information to transmit, or operational failure. Note that this is not intended to prohibit
transmission of control or signaling information or the use of repetitive codes where
required by the technology.
IC Radiation Exposure Statement
This device is in compliance with SAR for general population/uncontrolled exposure
limits in IC RSS-102 and has been tested in accordance with the measurement
methods and procedures specified in IEEE 1528. This equipment should be installed
and operated with a minimum separation distance of 1.5 cm between the device and
your body.
The devcie and its antenna must mot be co-located or operated in conjunction with
any other antenna or transmitter.
[RMC30D1_ZA]BN68-03328B-00L03.indb 28 2011-01-11 오후 3:40:24
29
Touch Control
SAMSUNG TOUCH CONTROL
LIMITED WARRANTY TO ORIGINAL PURCHASER
This Samsung product is warranted for the period of twelve (12) months from the
original date of purchase, against defective materials and workmanship.
In the event that warranty service is required, you should first return the product to the
retailer from whom it was purchased. However, Samsung Authorized Service Centers
will comply with this warranty during the Warranty Period. To obtain details, please
contact your nearest Authorized Service Center.
PROCEDURE FOR MAKING A WARRANTY CLAIM
To make a claim under the warranty, you must contact the Samsung Contact Center
(see details above) during the Warranty Period to discuss the problems you are having
with the product. If a repair or replacement is required, you will be provided with a
Warranty Claim Number and address of an Authorised Service Center.
If you are provided with a Warranty Claim Number, to obtain a repair or replacement
of the product, you must send the product to the Authorised Service Center advised
together with:
(i) a copy of your completed warranty card or, if you have already provided this to
Samsung, your name, address and contact telephone number;
(ii) your original receipt, invoice or sales slip for the purchase of the product as new;
(iii) your Warranty Claim Number.
Samsung will then repair or replace the product and return it to you using the
contact details provided.
WARRANTY CONDITIONS
1. The warranty is only valid if the above procedure for making a warranty claim is
followed.
2. Samsung’s obligations are limited to the repair or, at its discretion, replacement of
the product or the defective part.
3. Warranty repairs must be carried out by Samsung Authorised Service Centers. No
re-imbursement will be made for repairs carried out by service centers or dealers
that are not authorised by Samsung and any such repair work and damage to the
products caused by such repair work will not be covered by this warranty.
4. This product is not considered to be defective in materials nor workmanship by
reason that it requires adaptation in order to conform to national or local technical
or safety standards in force in any country other than the one for which the product
was originally designed and manufactured. This warranty will not cover, and no re-
imbursement will be made for such adaptation, nor any damage which may result.
5. The warranty does not apply to any product that has been damaged or rendered
defective as a result of any of the following excluded reasons, namely:
a. as a result of accident, misuse, or abuse;
[RMC30D1_ZA]BN68-03328B-00L03.indb 29 2011-01-11 오후 3:40:24
30
Touch Control
b. through the failure to use this product for its normal purposes;
c. by the use of parts not manufactured or sold by Samsung;
d. by modification without the written permission of Samsung;
e. by damage resulting from transit, neglect, power surge or failure;
f. by damage resulting from lightning, water, fire, or acts of God;
g. as a result of normal wear and tear; or
h. difference in broadcasting methods or product standards between countries.
6. This warranty is valid for any person who legally acquired possession of the product
during the warranty period.
7. NOTHING IN THESE WARRANTY CONDITIONS SHALL EXCLUDE OR LIMIT
SAMSUNG’S LIABILITY FOR DEATH OR PERSONAL INJURY CAUSED BY
THE PROVEN NEGLIGENCE OF SAMSUNG, UNLESS SUCH LIMITATION OR
EXCLUSION IS PERMITTED BY APPLICABLE LAW.
8. WITH THE EXCEPTION OF SAMSUNG’S LIABILITY WHICH CANNOT BE
EXCLUDED OR LIMITED BY LAW, SAMSUNG SHALL NOT BE LIABLE FOR: ANY
INDIRECT, INCIDENTAL, SPECIAL OR CONSEQUENTIAL DAMAGES LOSSES
OR EXPENSES; OR LOST PROFITS; OR LOSS OF USE OR LOSS OF DATA;
OR DAMAGE TO GOODWILL, REPUTATION OR LOST BUSINESS, ARISING
DIRECTLY OR INDIRECTLY, FROM THE PURCHASE, USE OR SALE OF THE
PRODUCT, WHETHER OR NOT SAMSUNG WAS ADVISED OR AWARE OF THE
POSSIBILITY OF SUCH DAMAGES, LOSSES OR EXPENSES.
9. WITH THE EXCEPTION OF SAMSUNG’S LIABILITY WHICH CANNOT BE
EXCLUDED OR LIMITED BY LAW, SAMSUNG’S LIABILITY UNDER OR IN
CONNECTION WITH THIS WARRANTY OR THE PURCHASE, USE OR SALE OF
THE PRODUCT SHALL NOT EXCEED THE PRICE PAID FOR THE PRODUCT AS
NEW.
10. UNLESS PROVIDED FOR IN THIS WARRANTY, ALL CONDITIONS, WARRANTIES
AND TERMS IMPLIED BY STATUTE OR OTHERWISE ARE HEREBY EXCLUDED
TO THE MAXIMUM EXTENT PERMISSIBLE BY LAW.
11. The above warranty conditions do not affect your statutory rights as a consumer or
otherwise.
[RMC30D1_ZA]BN68-03328B-00L03.indb 30 2011-01-11 오후 3:40:24