Samsung Electronics Co S100 300 MHz Notebook Computer User Manual MANUAL
Samsung Electronics Co Ltd 300 MHz Notebook Computer MANUAL
MANUAL

USER'S GUIDE
eGO-note Handheld PC
SAMSUNG

1
Notice
The information within this manual is subject to change without notice.
The manufacturer shall not be held liable for technical or editorial errors
or omissions contained in herein; nor for incidental or consequential
damages resulting from the furnishing, performance or use of this
material.
No part of this publication may be reproduced, stored in a retrieval
system, or transmitted, in any form or by any means, mechanical
photocopying, recording or otherwise, without the prior written
permission of the manufacturer.
Product names mentioned herein are for identification purposes only, and
may be trademarks and/or registered trademarks of their respective
companies.
1998. All rights reserved
Important Safety Instruction
Read all of these instructions, and save these instructions for later use.
•Follow all warnings and instructions marked on the product.
Unplug this product from the wall outlet before cleaning. Do
not use liquid cleaners or aerosol cleaners. Use a damp cloth
for cleaning.
•Do not use this product near water. Never spill liquid of any
kind on the product.
•Do not place this product on an unstable cart, stand, or table.
•Slots and openings in the cabinet are provided for ventilation,
to ensure reliable operation of the product on a bed, sofa, rug,
or other similar surface. This product should never be placed
near or over a radiator or heat register. This product should not
be placed in a built-in installation unless proper ventilation is
provided.
•Before connecting this product to a power source, check the
required voltage and frequency match the available power
source.

2 User’s Manual
•This computer is powered by an internal battery pack or by an
external AC power source through an external AC adapter. Use
of another battery pack or external AC adapter may present
risk of fire or explosion.
•This product is equipped with a 2-wire type plug. If you are
unable to insert the plug into the outlet, contact your electrician
to replace your obsolete outlet.
•Do not allow anything to rest on the power cord.
•Do not place this product in a location where someone may trip
over the cord.
•If an extension cord is used with this product, make sure that
the total of the ampere ratings on the products plugged into the
extension cord do not exceed the extension cord ampere rating.
•Never push objects of any kind into this product through the
cabinet slots, as they may touch dangerous voltage points or
short out parts; that could result in a risk of fire or electric
shock.
•Except as explained elsewhere in this manual, do not attempt
to service this product yourself.
•Handle battery and other optional products with care. If
dropped, they may be damaged.
•Do not allow the battery to be exposed to direct sunlight for
extended periods of time.
•Do not attempt to disassemble the battery. If the battery is
disassembled and the electrodes are exposed to outside, the
battery may generate heat and smoke by chemical reaction.
•Do not expose the battery to moisture or chemicals.
•Charge the battery only as described in this document.
•Do not short circuit the battery terminals as the resulting high
currents can damage the battery.
•The battery should not be used to power other products.
•Do not dispose of a used battery in a fire or incinerator, as an
explosion may result.
•The battery should be recycled.
•Do not subject the battery to temperature less than -20 degrees
Centigrade or greater than 50 degrees Centigrade.

3
•Unplug this product from the wall outlet and refer problems to
the service representative under the following conditions:
- When the power cord or plug is damaged or frayed.
- If liquid has been spilled into product.
- If the product has been exposed to rain or water.
- If the product does not operate normally when the
operating instructions are followed, adjust only those
controls that are covered by the operating Instructions.
Improper adjustment of other controls may result in
damage.
Battery Disposal
Warning : Do not put rechargeable batteries or products powered by non-
removable rechargeable batteries in the garbage.
Contact your customer service representative for information on how to
dispose of batteries that you cannot use or recharge any longer.
Follow all local regulations when old batteries.
Federal Communications Commission (FCC)
This device complies with Part 15 of the FCC Rules. Operation is subject
to the following two conditions:(1) this device may not cause harmful
interference, and (2) this device must accept any interference received,
including interference that may cause undesired operation.
NOTE:
This equipment has been tested and found to comply with the limits for
a Class B digital device pursuant to Part 15 of the FCC Rules. These
limits are designed to provide reasonable protection against harmful
interference in a residential installation. This equipment generate uses
and can radiate radio frequency energy and if not installed and used in
accordance with the instructions may cause harmful interference will not
occur in a particular installation. If this equipment does cause harmful
interference to radio or television reception, which can be determined by
turning the equipment off and on, the user is encouraged to try to correct
the interference by one or more of the following measures:
• Reorient or relocate the receiving antenna.
• Increase the separation between the equipment and receiver.

4 User’s Manual
• Connect the equipment into an outlet on a circuit different from that
to which the receiver is connected.
• Consult the dealer or an experienced radio/TV technician for help.
If necessary, the user should consult the dealer or an experienced radio/
television technician for additional suggestions. The user may find the
following booklet helpful: "Something About Interference." This is
available at FCC local regional offices. Our company is not responsible
for any radio or television interference caused by unauthorized
modifications of this equipment or the substitution or attachment of
connecting cables and equipment other than those specified by our
company. The correction will be the responsibility of the user. Use only
shielded data cables with this system.
Canadian Radio Interference Regulations
This apparatus does not exceed the class B limits for radio noise
emissions set out in the radio interference regulations of the Canadian
Department of Communications.
Le présent appareil n’émet pas de bruits radioélectriques dépassant les
limites applicable aux appareils de la classe B prescrites par le règlement
de brouillage radioélectrique dicté par le Ministère des Communictions
du Canada.

5
Table of Contents
Using your Documentation .............................................................. 1
Special Features of Manual ........................................................... 1
Using the Software User Documentation ...................................... 2
Introducing the eGO-note ................................................................ 3
Using the eGO-note for the First Time ........................................... 5
Installing the Rechargeable Battery Pack ..................................... 5
Turning On the eGO-note ............................................................. 9
Tips for Using the eGO-note ....................................................... 10
Handling Spills ............................................................................ 11
Storing the eGO-note for Long Periods ...................................... 12
Operating Notes .............................................................................. 13
Keyboard ..................................................................................... 13
Touchpad ..................................................................................... 14
Indicator lights ............................................................................ 15
Quick Start Buttons ..................................................................... 15
Voice Recording ......................................................................... 16
Infrared Communications ........................................................... 16
Battery Management ................................................................... 17
Connecting Peripheral Devices ...................................................... 18
Connecting Modem ..................................................................... 19
Port replicator (Optional) ............................................................ 20
Synchronizing the eGO-note with a Computer ............................ 23
Upgrading the eGO-note ................................................................ 25
PC Card ....................................................................................... 25
CF Card (Compact Flash data storage Card) .............................. 26
Memory Module ......................................................................... 27
Before You Install Memory ..................................................... 27
Installing a Memory Module ................................................... 28
Troubleshooting .............................................................................. 30
Specifications ................................................................................... 32
Using your Documentation 1
Using your Documentation
Congratulation on your purchase of the Samsung eGO-note with
Microsoft operating system, Windows CE HPC-pro(Handheld PC-Pro).
Special Features of Manual
Three types of messages with icons appear in the manual:
A note informs you of special circumstances.
A caution warns you of possible damage to equipment.
A warning indicates the possibility of personal injury.
Keys that you need to press to perform certain functions are shown in the
manual enclosed in angle brackets. For example,
<Ctrl>
indicates the control key (Ctrl on the keyboard).
If you need to press two keys at the same time, the key names are shown
joined by a plus sign. For example,
<Alt+Pg Up>
means that you should press the Alt key and hold it and then press the Pg
Up key.

2 User’s Manual
Using the Software User Documentation
The eGO-note shipped from the factory with several software programs
installed. The software may include its own online or printed
documentation. Refer to the documentation or the Help options in the
software for more information.
Introducing the eGO-note 3
Introducing the eGO-note
The eGO-note is a lightweight handheld PC that includes features to meet
your computing needs at home or on the road.
Item Check list:
•eGO-note
•Case (Black)
•Serial cable
•Monitor cable
•AC adapter
•Power cord
•Port replicator (optional)
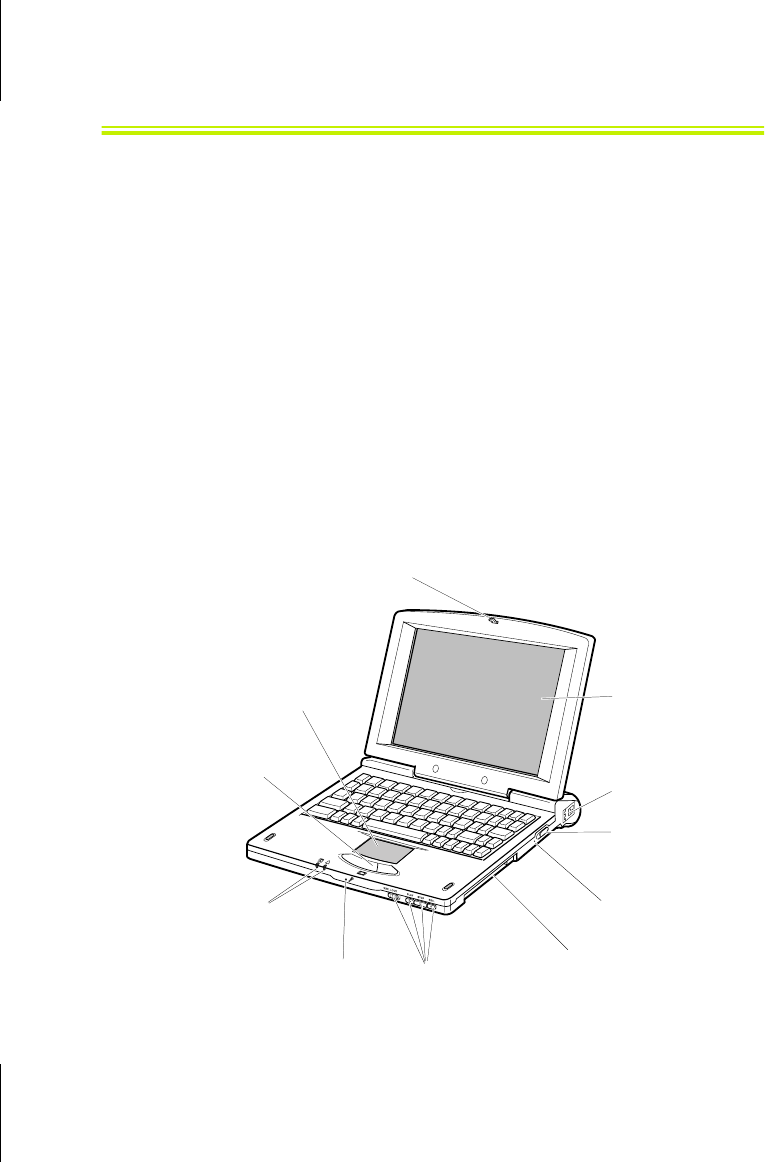
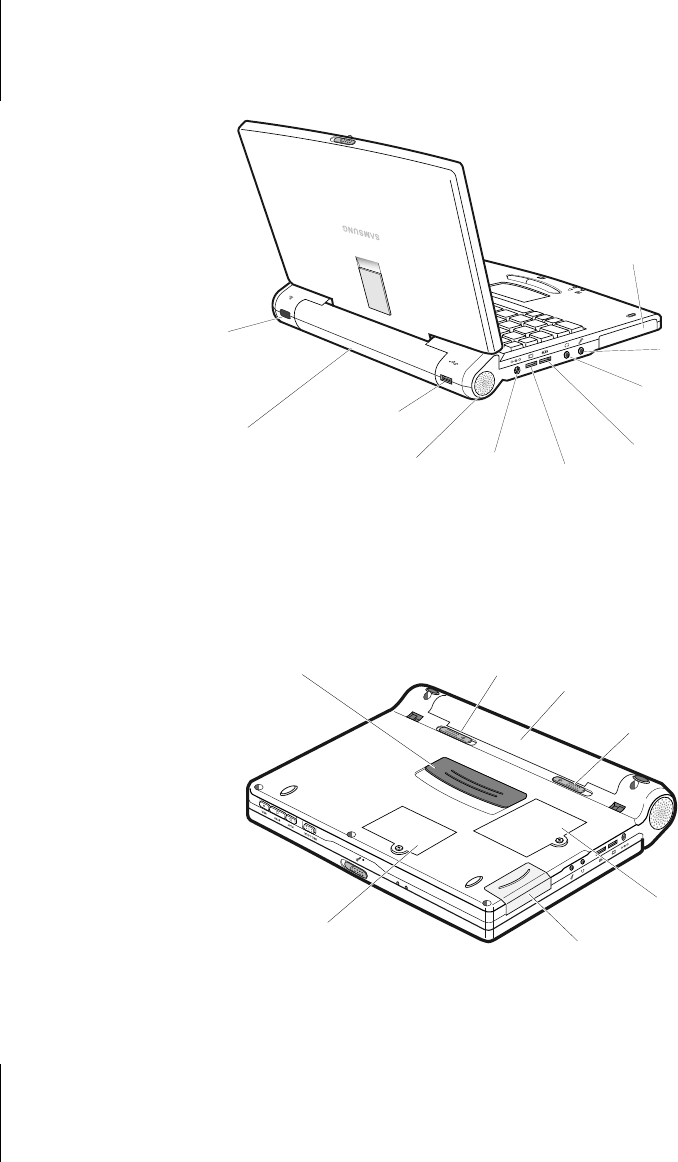
Figures 1 through 3 show you the features of the eGO-note.
Figure 1. Front View of eGO-note
Cover latch
LCD
Power button
PC Card
compartment
Soft Reset
Button
Touchpad
Indicator
lights
Microphone Voice Recorder
Buttons
Modem
connector
Mouse
Buttons
4 User’s Manual
Figure 2. Back View of eGO-note
Figure 3. Bottom View of eGO-note
Infrared
port
USB port
Speaker
Battery
compartment
AC adapter
jack
Headphone
jack
External-
Mic jack
Compact
Flash data
storage card
compartment
Serial port
Video
port
Docking
connector
RAM Memory
module
compartment
Battery
compartment
Battery pack
open latch
ROM Memory
module
compartment
Compact Flash data
storage card
compartment
Battery pack
lock latch

Using the eGO-note for the First Time 5
Using the eGO-note for the First Time
This section gives you detailed information on using the eGO-note for
the first time.
Be aware that data you enter may not be properly
maintained until the backup battery is fully recharged. To
charge the backup battery, install a rechagable battery
first.
Your eGO-note is powered with below three ways.
•Rechargeable Li-Ion battery pack,
•AA size Alkaline battery pack and
•AC adapter separate from the eGO-note.
If you would like to use the eGO-note immediately, then install six AA
size Alkaline batteries into the Alkaline battery pack.
Installing the Rechargeable Battery Pack
To install the rechargeable battery pack:
1. With the eGO-note’s power off, close the LCD panel and turn
the eGO-note over so the bottom of the unit faces up.
2. Unlock the battery locking latch.(Figure 4)
3. Slide the battery pack into the compartment. Make sure the
battery is fully inserted into the compartment.
Only use the eGO-note rechargeable battery pack.

6 User’s Manual
Figure 4. Installing the Rechargeable Battery Pack
4. Push the battery straight until it snaps into place.
5. Plug in the eGO-note with the eGO-note AC adapter.
6. Connect the power cord to the AC adapter and then to an
electrical outlet.(Figure 5)
Figure 5. Installing the Power Cord
Power connector
Power cord
AC adapter
Using the eGO-note for the First Time 7
The left indicator light turns on amber after 2 or 3 seconds when the
Power cord is connected, indicating that the battery is recharging. Leave
the eGO-note plugged in for several hours. The indicator light turns green
when the battery is fully charged.
If a fault condition happens in the rechargeable battery pack, charging is
interrupted and the left amber indicator light is blinking until the battery
pack is removed.
All batteries lose their charge if they sit unused for an
extended time period. When not used, battery can
discharge fully in 2 weeks. The battery may have
discharged in the time it took for the eGO-note to go from
the factory to you.
The battery charges in about 3.5 hours either the eGO-note is turned on
or off.
If “Backup battery is low” message comes up, connect the
AC adapter, or synchronize the eGO-note to your desktop
computer to save data.
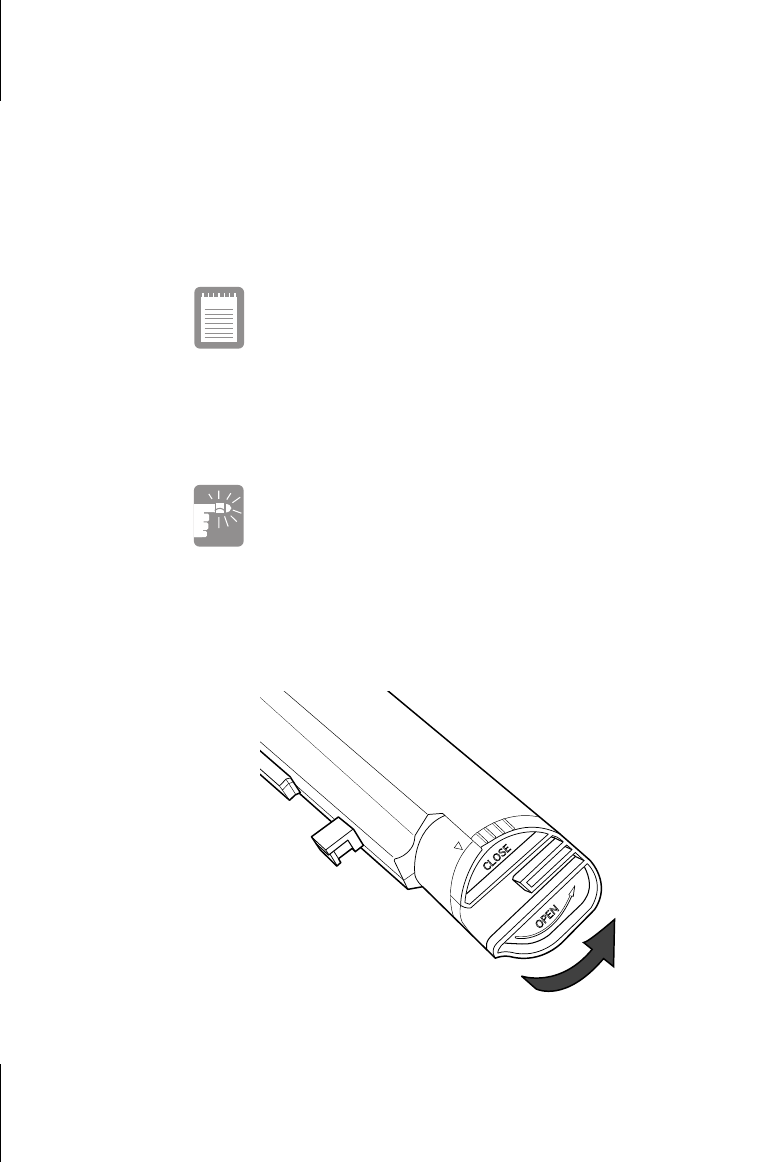
To install the AA size Alkaline battery into the pack:
1. Turn the tap of the Alkaline battery pack to OPEN direction.
Figure 6. Opening the Alkaline battery pack
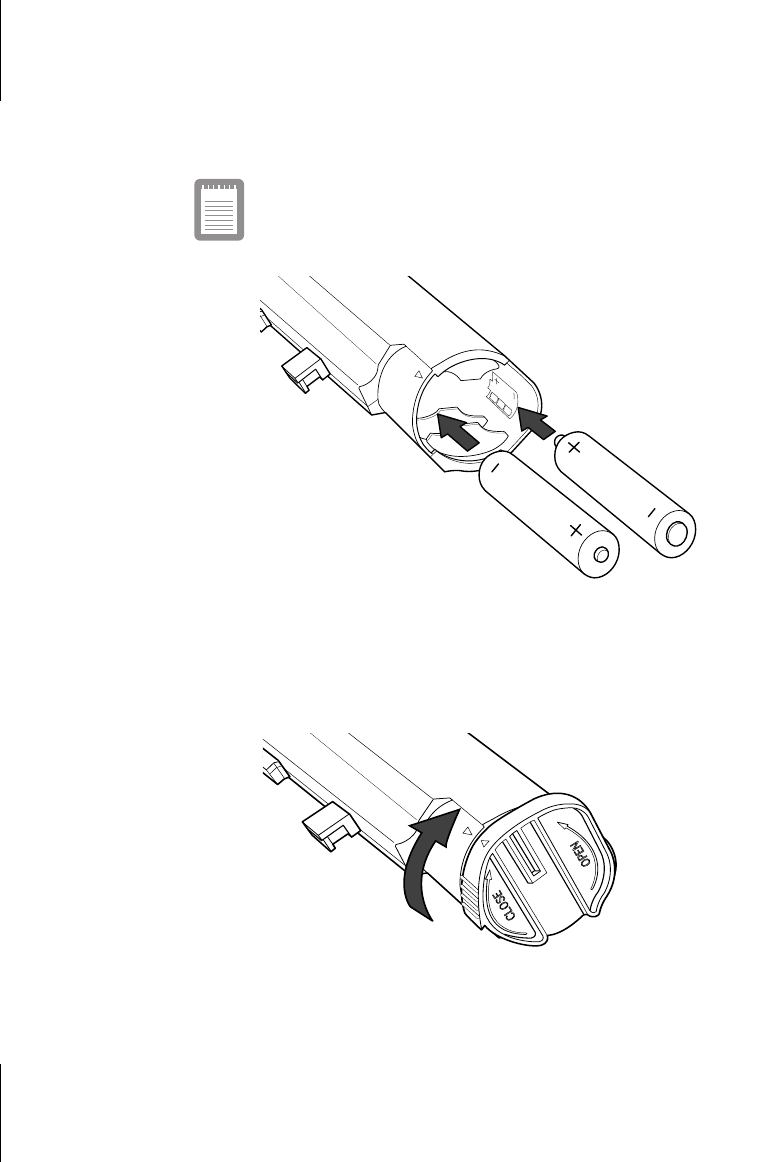
8 User’s Manual
2. Insert three Alkaline batteries first into the battery pack
according to the direction of the indication. And insert other
three Alkaline batteries in the opposite direction.
The battery life varies with brands. We recommand you to
use one of DURACELL ULTRA-MX1500(AA) or
PANASONIC Alkaline batteries with this product.
Figure 7. Inserting the Alkaline batteries into the pack
3. Point the tap arrow to the pack arrow and close the tap as
indicated on the tap.
Figure 8. Closing the Alkaline battery pack
Using the eGO-note for the First Time 9
The method of installing the Alkaline battery pack is same
as the rechargeable battery pack.
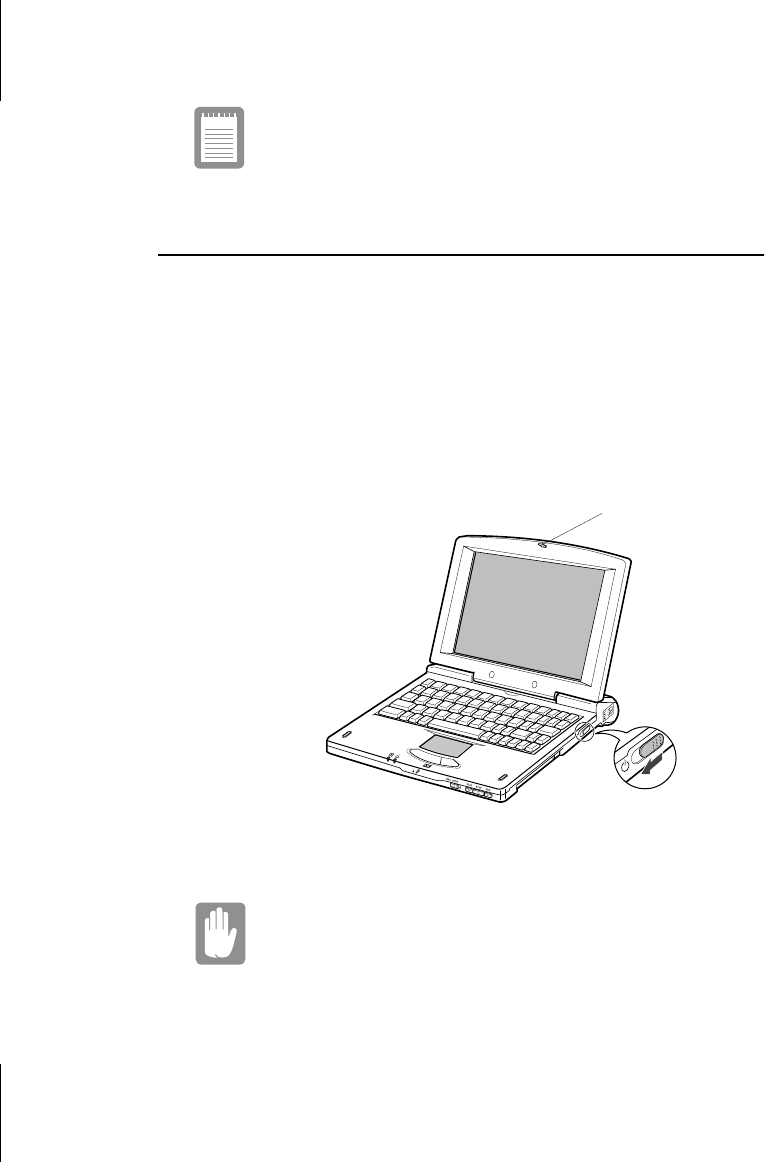
Turning On the eGO-note
The methods of turning on and setting the eGO-note’s power for the first
time are explained here.
1. Push to the right and hold the cover latch on the front of the
cover. And lift up the cover.
2. Slide and then release the power button (Figure 9). In a moment,
it is replaced by Microsoft Windows CE.
Figure 9. Turning On the eGO-note’s Power
When you turn on the eGO-note, the LCD display will turn
on for 1~3 seconds after.
3. Adjust the LCD Display contrast.
Power button
Cover latches

10 User’s Manual
You may wish to adjust the LCD (liquid-crystal display) when
you begin using your eGO-note. You can adjust the contrast on
a DSTN (double layer super twist nematic) LCD.
To adjust the LCD:
•Press <Atl+ > > to increase the display contrast.
•Press <Atl+ < > to decrease the display contrast.
4. Follow the instructions on the screen. Press <Enter>.
5. Set your home location and click Next.
Place your finger on the touchpad and slide your finger in the
direction you want the cursor to move. Select the location arrow
to see a list of cities and choose your location.
6. Set the time and date. Click Next.
Click the arrow on the calendar until it displays the correct
month and click the date.
Change the time on the right side.
7. Fill your personal information in Owner Properties. Then a
message tells you, “Setup is now complete.” and click Done.
Now your eGO-note is set. If you want to make changes, click Start >
Setting > Control Panel and use World Clock, Owner icons.
Tips for Using the eGO-note
The following information helps you avoid potential problems as you use
the eGO-note:
Do not try to disassemble the eGO-note. Opening the
system chassis voids your warranty. Only an authorized
manufacturer’s service center can replace or add any
parts inside the chassis.
•Follow all the instructions and cautions in the user
documentation.
•The LCD has a polarized surface and can be damaged easily.
To prevent damage, avoid touching the screen.

Using the eGO-note for the First Time 11
•Use only manufacturer’s provided memory module.
•Because this PC is small and has restricted air flow around
components, it is more likely to overheat than a desktop
computer. Keep the PC in well air circulating place and do not
cover with clothes.
•Avoid using or storing the eGO-note in extremely hot or cold
areas, such as a car on a hot day. Keep the eGO-note away
from heaters and out of direct sunlight. Exposure to excessive
heat may damage eGO-note components.
If you have left your eGO-note in a hot place, let it cool down
slowly to room temperature (with the LCD panel open) before
using it.
•Do not remove the memory-module compartment door, or try
to install a memory module when the eGO-note is on.
•Set up your work area to avoid physical strain. Sit with your
back straight and supported by your chair. Adjust your chair or
work table so that your arms and wrists can remain in a relaxed
position, parallel with the floor. Avoid bending or twisting
your wrists as you work. Your hands should “float” slightly
above the keyboard. Refer to a book on office ergonomics for
more information on setting up your work area.
•Take frequent breaks from working at the eGO-note to rest
your eyes and stretch your muscles.
•Remember to save your data files frequently and to make
backup copies of your files.
Handling Spills
Do not spill anything on your eGO-note. The best way to avoid
spills is to avoid eating and drinking around your eGO-note. If you
do spill something on the eGO-note, turn off it, unplug it
immediately, and do the following:
•If you spill liquid on the keyboard, drain as much of the liquid
from the keyboard as possible. Be careful not to let the liquid
drip onto the LCD panel. Allow the system to dry for several
days before trying to use it.

12 User’s Manual
•If you spill liquid on an external keyboard or keypad, unplug it
and drain as much of the liquid as possible. Allow the
keyboard to sit at room temperature for a full day before trying
to use it.
Sweet liquids leave a sticky residue that may jam the
keyboard despite your efforts to dry it.
•If you spill liquid on the LCD panel, clean it immediately with
a soft cloth and denatured alcohol. Do not use water, window
cleaner, acetone, aromatic solvent, or dry, rough towels to
clean it.
Some liquids damage the polarized LCD screen. If your
screen is damaged, contact your authorized
manufacturer’s service center for a replacement.
Storing the eGO-note for Long Periods
If possible, leave the power cord connected to the eGO-note and an
electrical outlet when the eGO-note is not in use. This helps extend the
life of the battery and keeps the battery fully charged.
If you will not be using the eGO-note for a long period of time (a month
or more), you should charge the battery until it is completely full. After
you have done so, remove the battery from the unit.

Operating Notes 13
Operating Notes
This part will help you with understanding the basic usage of the eGO-
note.
Keyboard
Your eGO-note has an 65-key keyboard. By pressing designated key
combinations, you can have access to almost all the key functions of a
full-sized keyboard.
•Full-sized typewriter keys are arranged like a standard
typewriter keyboard and are used for text entry.
•Cursor control keys move the cursor. They may perform other
functions, depending on the software.
•Windows keys open Windows menus.
To clean the keyboard, use slightly damp cotton swabs. Scrub the keys
and the surface around the keys.
Do not allow liquid to drip into the keyboard or you may
damage the keyboard.
The <Alt> key activates special functions when it is pressed in
combination with another key. Table 1 shows the special key
combinations.
Table 1. Description of Special Function Keys
<Alt> Key
Combination Function
<Alt+ PgUp>
Page Up:
Turns the page on display to previous page in the
program.
<Alt+ PgDn>
Page Down:
Turns the page on display to next page in the
program.
<Alt+ Home>
Home
: Moves a cursor to the front of a sentence.
14 User’s Manual
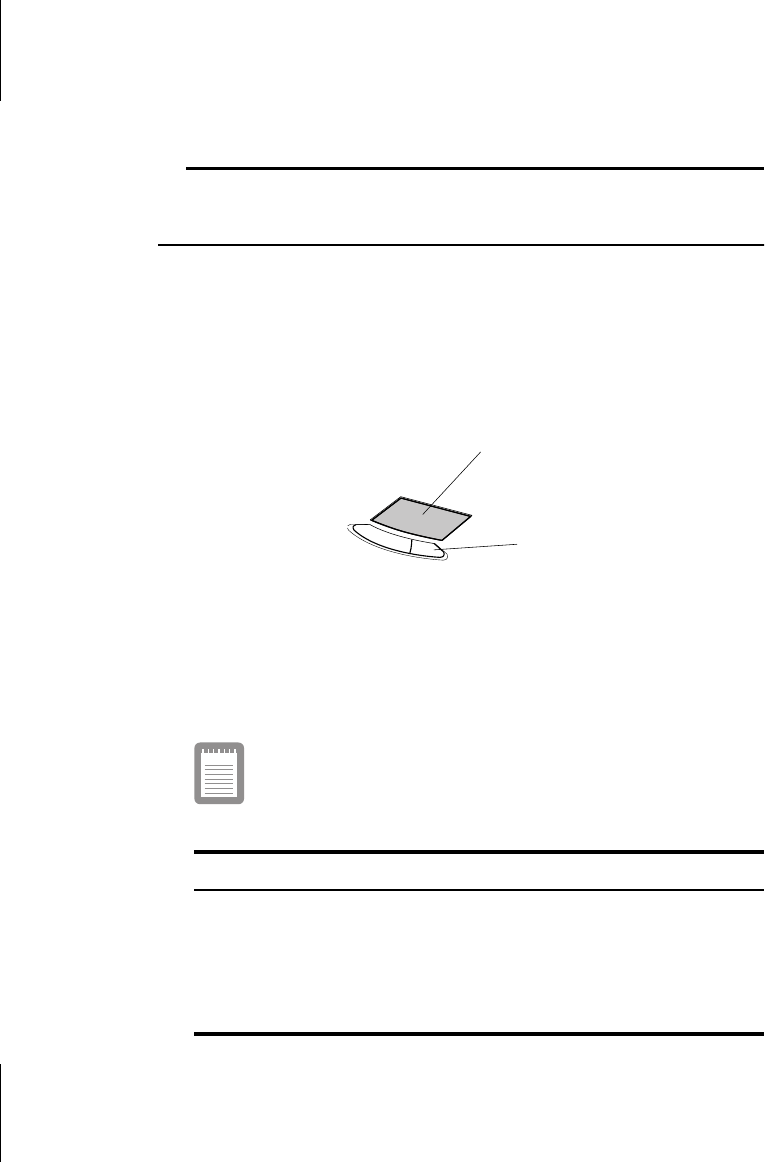
Touchpad
Your eGO-note is equipped with a touchpad, which is an integrated-
pointing device that is used to perform standard mouse functions (Figure
10). The touchpad is an advanced and reliable pointing device that works
with a touch of your finger.
Figure 10. Touchpad
Table 2 explains how to use the touchpad.
Press on the touchpad gently. The touchpad responds to
light pressure.
Table 2. Using the Touchpad
<Alt+ End>
End:
Moves a cursor to the back of a sentence.
<Alt+ > >
Contrast up:
Increases the LCD contrast.
<Alt+ < >
Contrast down:
Decreases the LCD contrast.
Mouse Action How To
Move cursor Place your finger on the touchpad and slide your finger
in the direction you want the cursor to move. The faster
you move your finger, the faster the cursor moves
across the screen.
Click Tap the touchpad once with your finger.
Double-click Tap the touchpad twice with one finger.
Touchpad
Mouse Buttons
Operating Notes 15
You can use the buttons below the touchpad the way you use standard
mouse buttons. For information on attaching and using another pointing
device or keyboard with your eGO-note, see “Connecting Peripheral
Devices”.
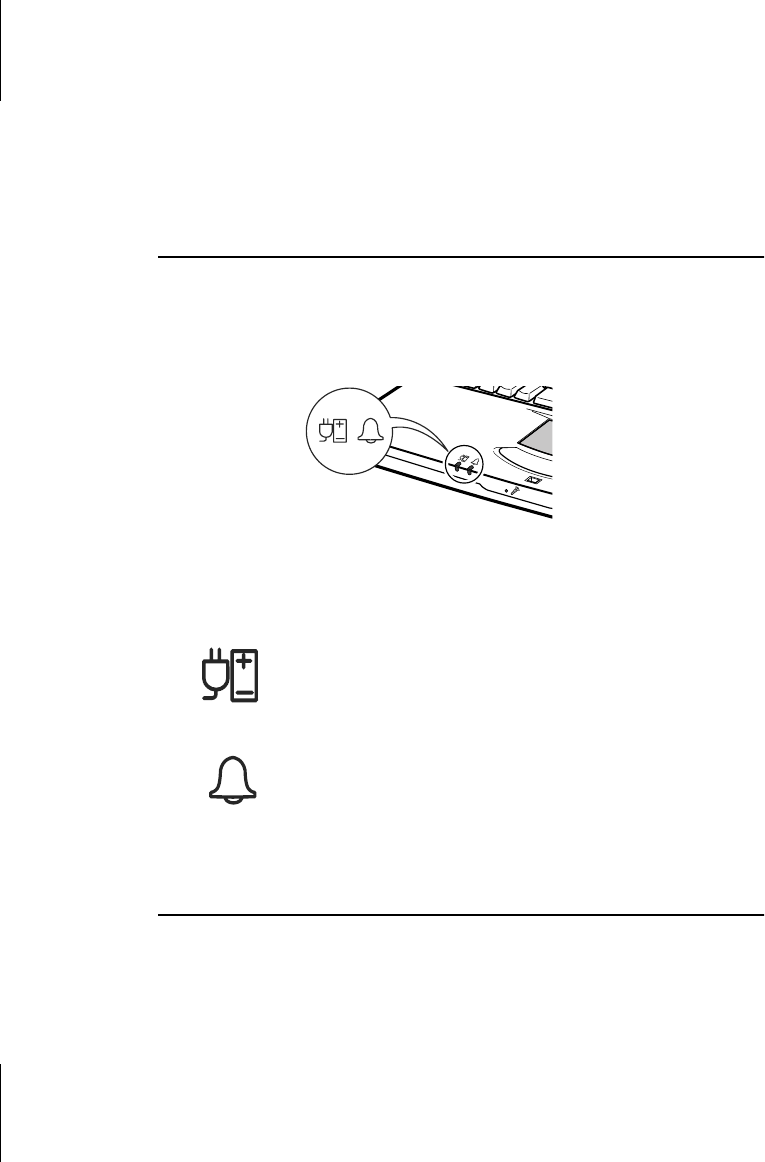
Indicator lights
System Status lights show the status of battery charge and alarm
functions. The lights appear on the left edge of the eGO-note (Figure 11).
Figure 11. Indicator lights
Battery charge light: When the power cord is connected,
light gives information about the battery charge. Light is
amber when the battery is charging normally. Light is
green when the battery is fully charged.
Alarm light: Light is goes on when an alarm you have set
is activated.
Quick Start Buttons
Quick Start Buttons are for certain program to start quickly, even if the
eGO-note is powered off.
16 User’s Manual
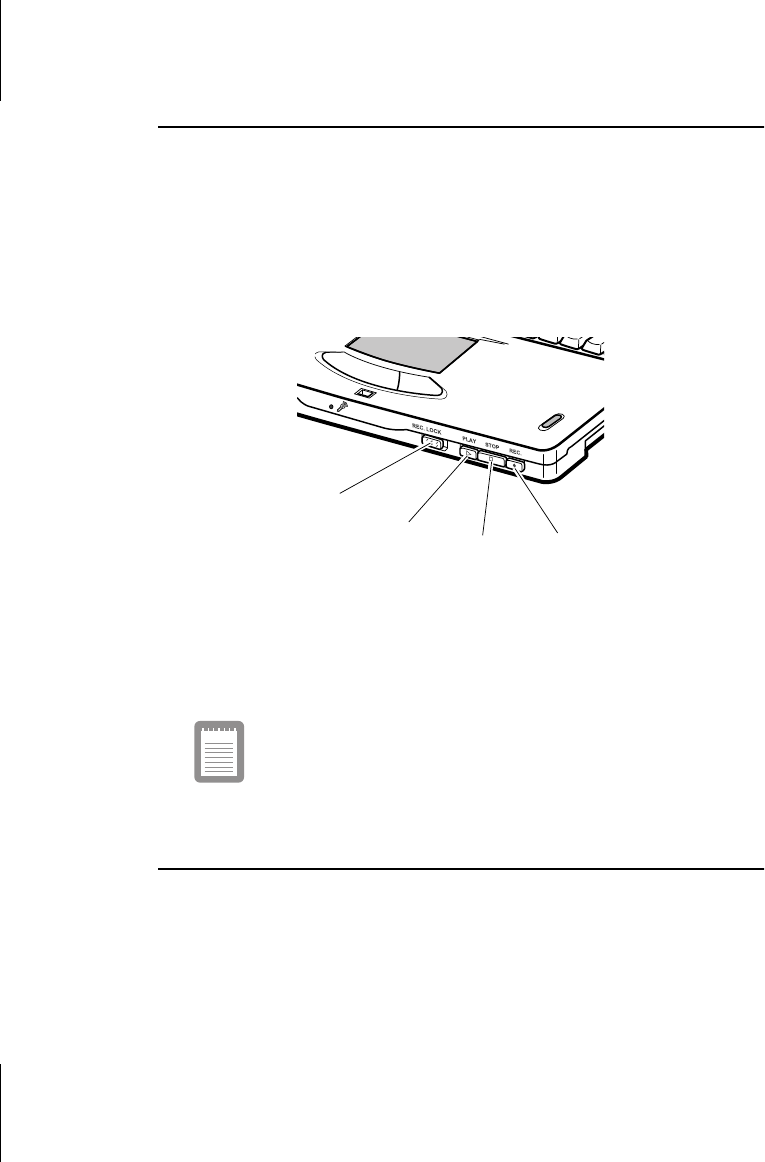
Voice Recording
This function is to record quick thoughts or ideas in the certain place or
on the road. You can do voice recording by just clicking the buttons on
the front edge of the eGO-note.
To start voice recording:
1. Unlock the REC LOCK button.
Figure 12. Voice Recording
2. Press the REC button and hold it to record.
3. Release the REC button to stop recording.
See Microsoft Windows CE User’s Guide for more
information about Voice Recording.
Infrared Communications
You can use infrared(IR) beaming for wireless transfer of information
between the eGO-note and another eGO-note, or any other notebook PC
that is IR-ready.
To use infrared beaming:
Record Play
Rec Lock
button
Stop

Operating Notes 17
•Position the eGO-note IR port and the IR port of the other
device so that they are lined up and within three feet (one
meter) of each other without blocking.
•Turn off fluorescent lights in the immediate area or move to a
location with different lighting.
•In case of Communication with notebook PC, see
“Synchronizing the eGO-note with a Computer” on page 23.
Refer to the Windows CE user’s Guide for more
information of IR beaming.
Battery Management
Conserve next tips for the long lasting battery:
•Recharge the batteries while you are on the road by plugging in
the eGO-note with the AC adapter whenever circumstances
permit.
•Change the default shut-off time when running on batteries.
The default is three minutes. Choose Start > Setting > Control
Panel > Power and select Power Off tap, then select shorter
time.
•Adjust the LCD display contrast not to bright.
•Disable sounds you don’t need to hear. Choose Start > Setting
> Control Panel > Volume & Sounds icon, then select as you
need.
18 User’s Manual
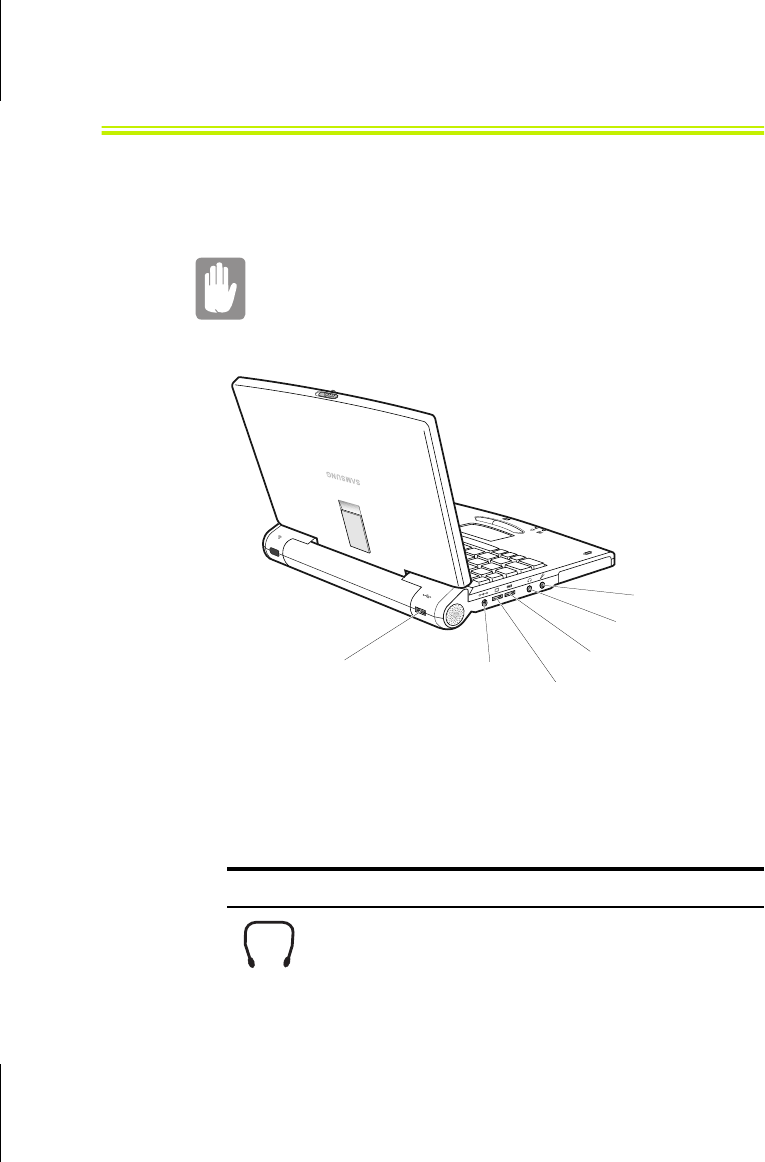
Connecting Peripheral Devices
The connectors on the eGO-note enables you to attach peripheral devices
to the eGO-note.(Figure 13)
Turn off your eGO-note before you connect a Video cable.
Connecting a Video cable with your eGO-note turned on
may seriously damage the connected device or your eGO-
note.
Figure 13. Peripheral Connectors
Table 3 shows the icons located near each connector and tells you the
devices that you can attach to the connectors.
Table 3. Connecting Peripheral Devices
Icon Connector
Headphone jack:
Connect stereo headphones or speakers to
this jack. Speakers connected to this jack override the on-
board speakers.
USB port Serial port
Video port
Headphone jack
External-Mic jac
k
AC adapter
jack
Connecting Peripheral Devices 19
The port replicator is optional. If you order a port
replicator, please refer to a port replicator user’s guide.
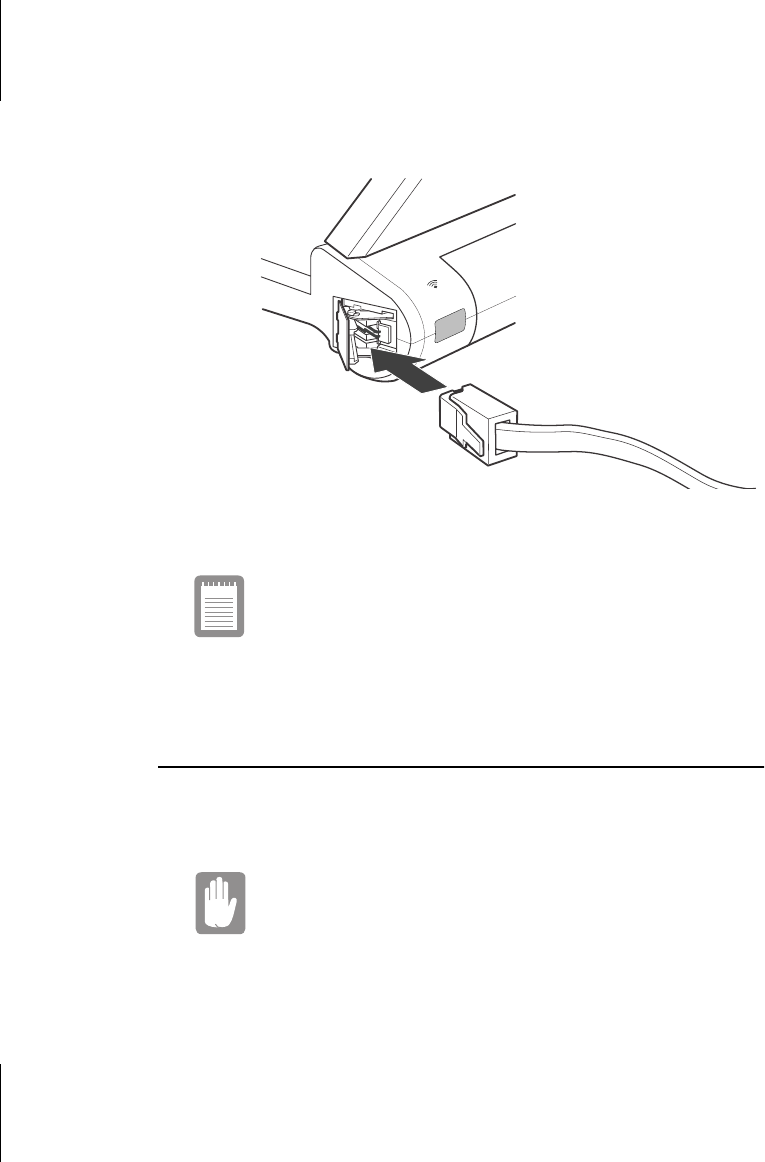
Connecting Modem
The eGO-note integrated 56K soft modem with RJ_11 connector.
Microphone jack:
Connect an external microphone to this
jack.
Power cord connector:
Plug in the power cord to run the
eGO-note and charge the battery.
Serial port:
Plug a serial device, such as a serial printer, into
this 9-pin port. If the device has a 25-pin connector, you
need a 25-to-9-pin serial adapter.
Video port:
Plug the interface cable of an external monitor
into this 15-pin connector and then plug the monitor power
cord into a grounded outlet. Make sure to power off the eGO-
note before connecting the video cable.
USB (universal serial bus) port:
Connect USB devices to this
port. USB input/output devices include keyboards, pointing
devices, and monitors. You must enable the USB port before
you can use USB devices.
Modem port:
Connect a telephone line to the modem port.
Docking connector:
Connect a docking option to this
connector. Port replicator is optional good.
20 User’s Manual
To connect a telephone line to the modem port:
1. Connect a telephone line in correct direction as Figure 14.
Figure 14. Connecting a telephone line to the modem port
Refer to the Windows CE user’s Guide for the system
setting for the modem.
Port replicator (Optional)
The eGO-note is expandable by connecting a port replicator. You have to
purchase a port replicator for it is optional product.
Make sure to power off the eGO-note before connecting a
port replicator.
Figure 15 shows features of a port replicator.
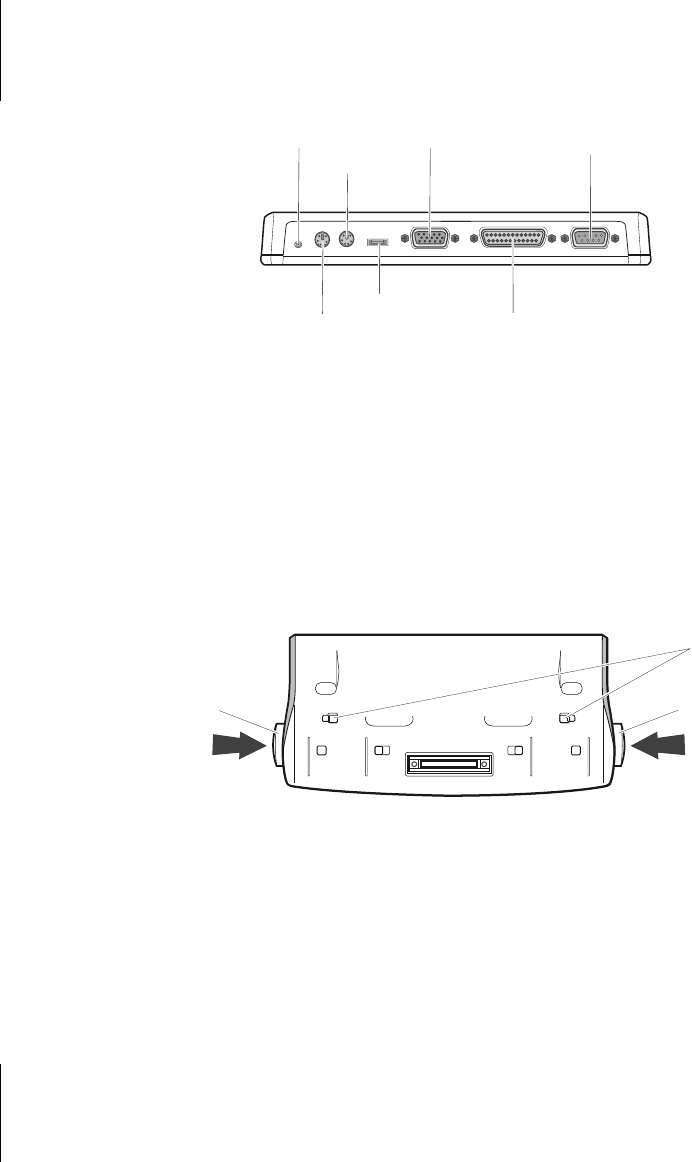
Connecting Peripheral Devices 21
Figure 15. Port replicator
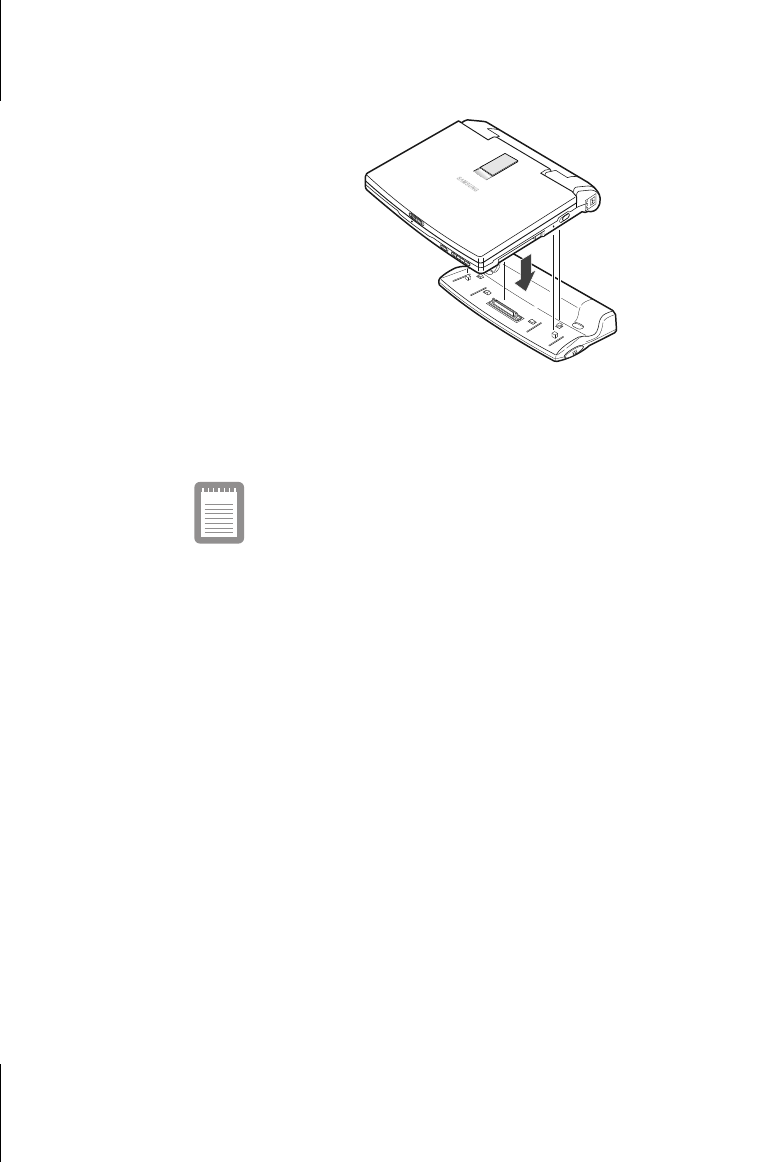
To install the eGO-note on a port replicator:
1. Turn off the eGO-note and open a docking connector
compartment door.
2. Press eject buttons on side edge of a port replicator. (Figure 16)
Figure 16. Pressing the eject buttons on a Port replicator
3. Place the eGO-note straight on a port replicator and press
firmly. Then eject buttons pops out.(Figure 17)
AC adapter jack Video port Serial portPS/2
keyboard
PS/2 mouse USB port Printer port
Locking
hook
Eject
Button
Eject
Button
22 User’s Manual
Figure 17. Connecting the eGO-note to a Port replicator
4. Connect the AC adapter on back of a port replicator.
Connect the serial cable to a serial port on a port replicator
when the eGO-note is with a port replicator.
Synchronizing the eGO-note with a Computer 23
Synchronizing the eGO-note with a
Computer
You can synchronize the eGO-note and a desktop PC to make the up-to
date information.
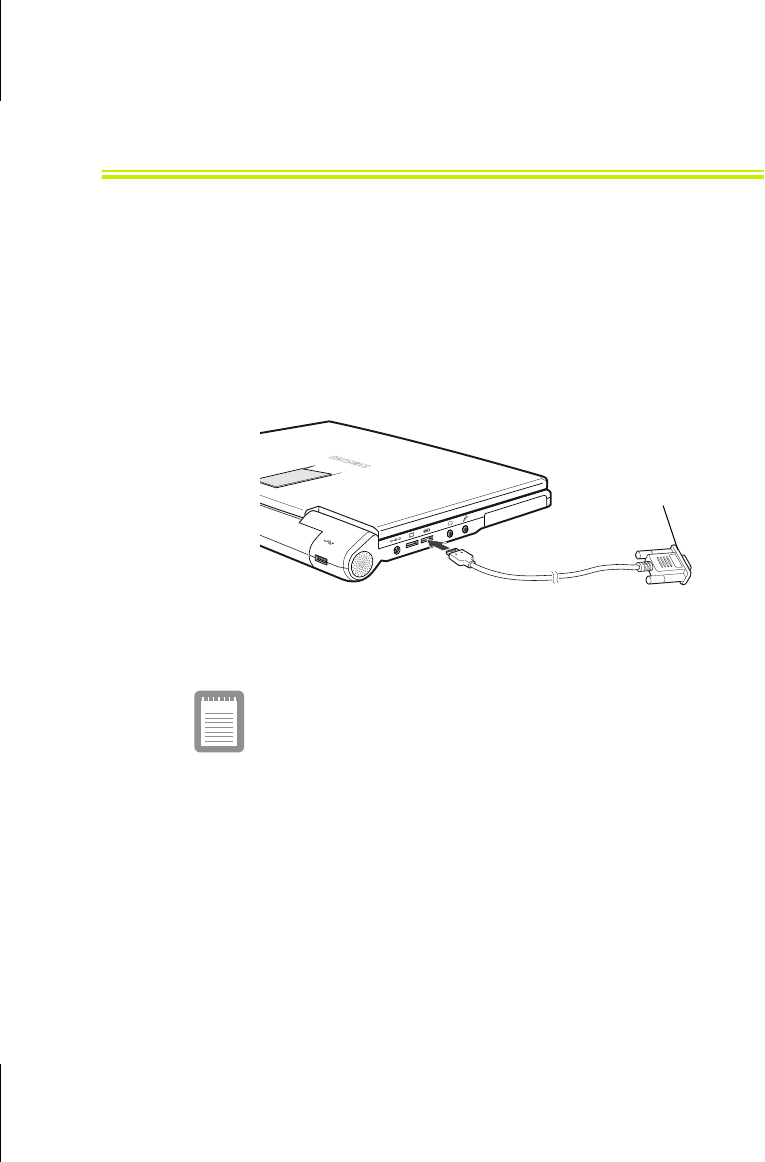
To connect the eGO-note and a PC and set a PC:
1. Connect the serial cable to the serial port on the eGO-note and
the other side of the cable to the serial port on the a PC.
Figure 18. Connecting the serial cable
Another way to synchronizing the eGO-note with other
general computer, is to position the IR port and the IR port
of the other computer.
2. Install Windows CE Services from the provided Microsoft CD
to prepare a PC for synchronizing with the eGO-note.
Insert CD in the CD-ROM drive on your PC. Then the
installation wizard presents welcome, licensing information and
so on. Choose options as you want.
3. Select Typical option on Windows CE Service Setup dialog box.
and follow the on-screen instructions.
4. When the software is installed, the Get Connected dialog box
appears. Then click Start.
5. Click Next on New Partnership Wizard dialog box.
Serial port of
General Computer

24 User’s Manual
Insert the device name and description. Leave the “On Connect”
option checked for synchronization. This will synchronize the
eGO-note each time it is connected.
6. After the partnership is established, ActiveSync on your
Computer automatically starts the initial synchronization
process.
7. When the synchronization is completed, a computer displays
the Mobile Devices window with the message “Connected, Up-
to-date” in the lower right corner.
During installation, Windows CE Services places a Mobile
Devices shortcut on the eGO-note. For details about the
Mobile Devices program window, see the
Microsoft
handheld PC-professional User’s Guide
.

Upgrading the eGO-note 25
Upgrading the eGO-note
PC Card
By installing PC Cards, you can add functions to the eGO-note similar to
notebook computers.
You can install Type I or II cards in the slots to the eGO-note. And you
can install PC Cards while the eGO-note is on.
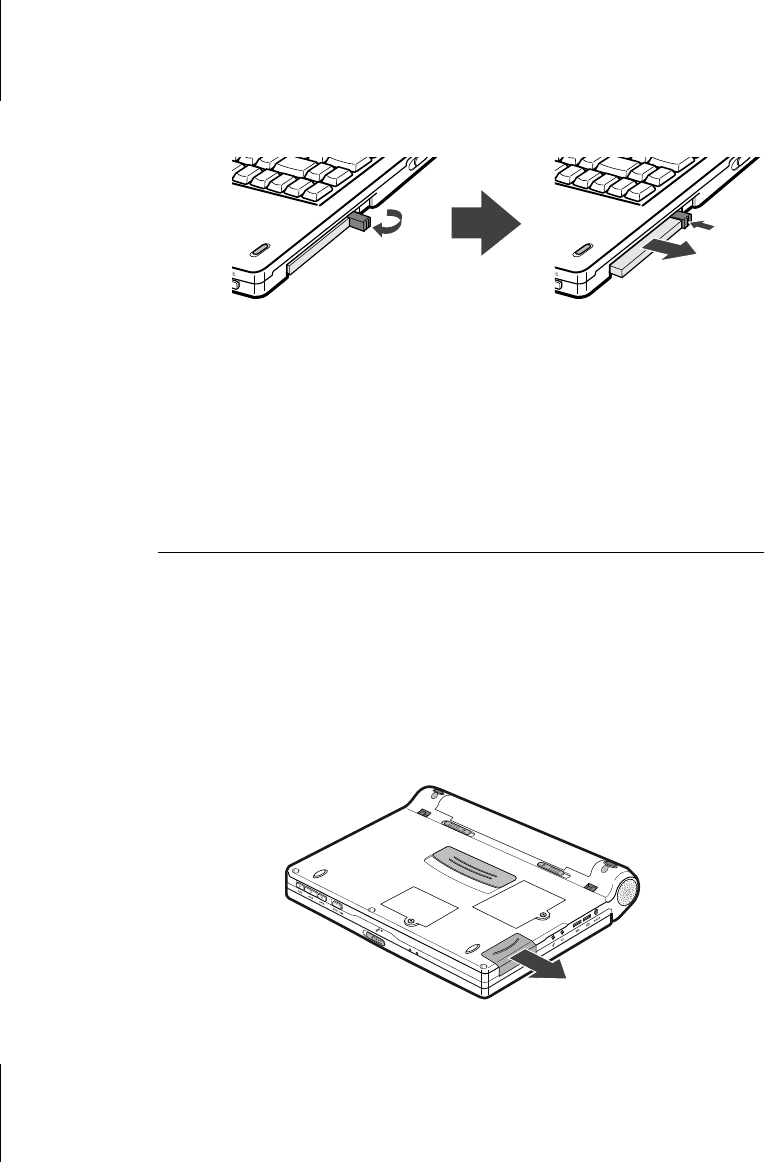
To insert a PC Card into a slot:
1. Insert the PC card into an appropriate slot according to your PC
card type.
2. Press the PC card firmly into the connector until the eject button
pops out. Then, pull the eject button out slightly and fold it to
the right. (Figure 19).
Figure 19. Inserting PC card
The eject button for the card slot operates in two steps.
To remove a PC Card:
1. Raise the PC card eject button for the PC card you want to
remove. Then, press the PC card eject button until the PC card
pops out.
26 User’s Manual
2. Remove the PC card and save it for future use.
Figure 20. Removing a PC Card
Windows CE automatically assigns eGO-note’s resources (such as
communication ports and memory addresses) to a PC Card installed in
your eGO-note. For further information on configuring a PC Card in
Windows CE, see the user’ documentation.
CF Card (Compact Flash data storage Card)
To install a CompactFlash data storage card in the eGO-note, follow
these steps:
1. Open the door to the CompactFlash data storage card
compartment on the back of the eGO-note.
2. Identify the connecting edge of the card. There may be an arrow
symbol on the card to help you.
Figure 21. Opening the CF card compartment door
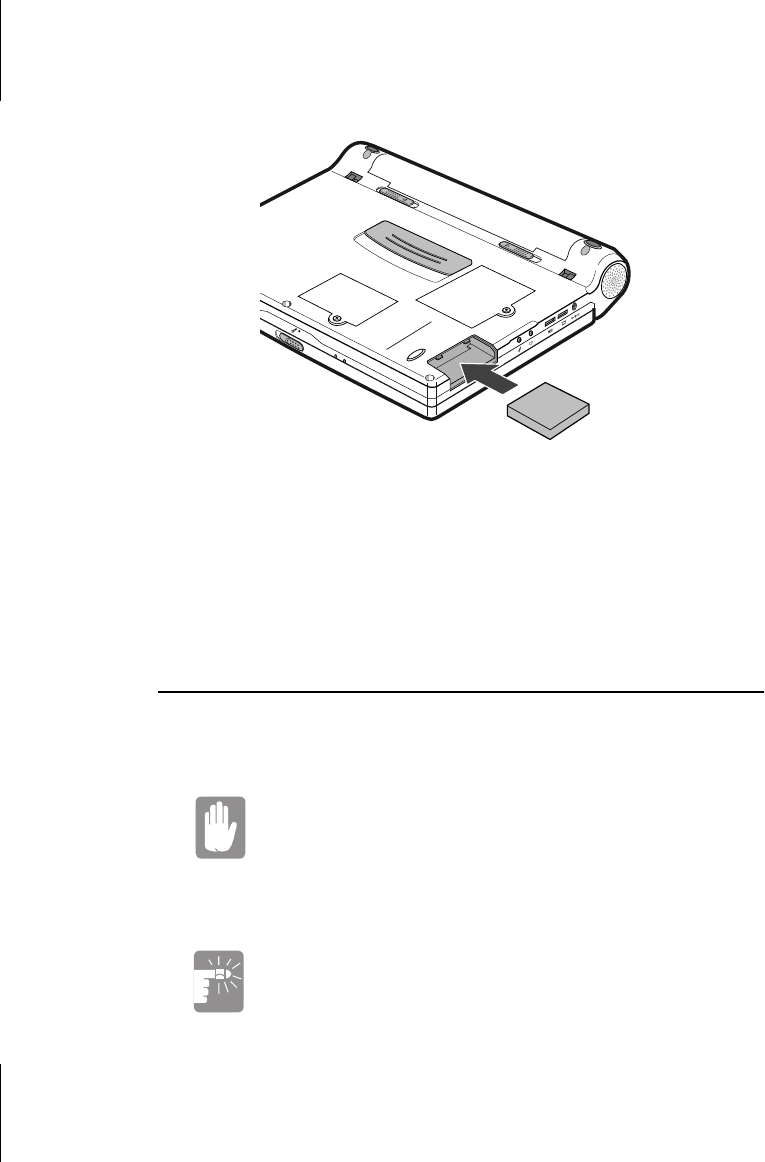
Upgrading the eGO-note 27
3. Insert the CompactFlash card.
Figure 22. Inserting the CF card
4. Close the CF card compartment door.
5. Follow the information of the enclosed documentation with CF
card.
Memory Module
You can increase the memory by installing an optional memory module.
16 MB RAM is on board and upgradable to 48 MB.
To avoid possible system problems, use only approved
memory module in your eGO-note.
Before You Install Memory
Back up your data before increasing a memory module by
synchronizing with a general computer.
Take the following precautions when installing a memory module:
28 User’s Manual
•Before you remove the memory module compartment door,
turn off the eGO-note, unplug the power cord, and remove the
battery. Also, disconnect any peripheral devices.
•Before handling a memory module, discharge any static
electricity by touching a grounded surface or using a grounding
wrist strap.
•Do not insert objects with conductive material, such as metal
screwdrivers or graphite pencils, into a memory-module
compartment.
•Be careful in handling the metal plate of the memory door.
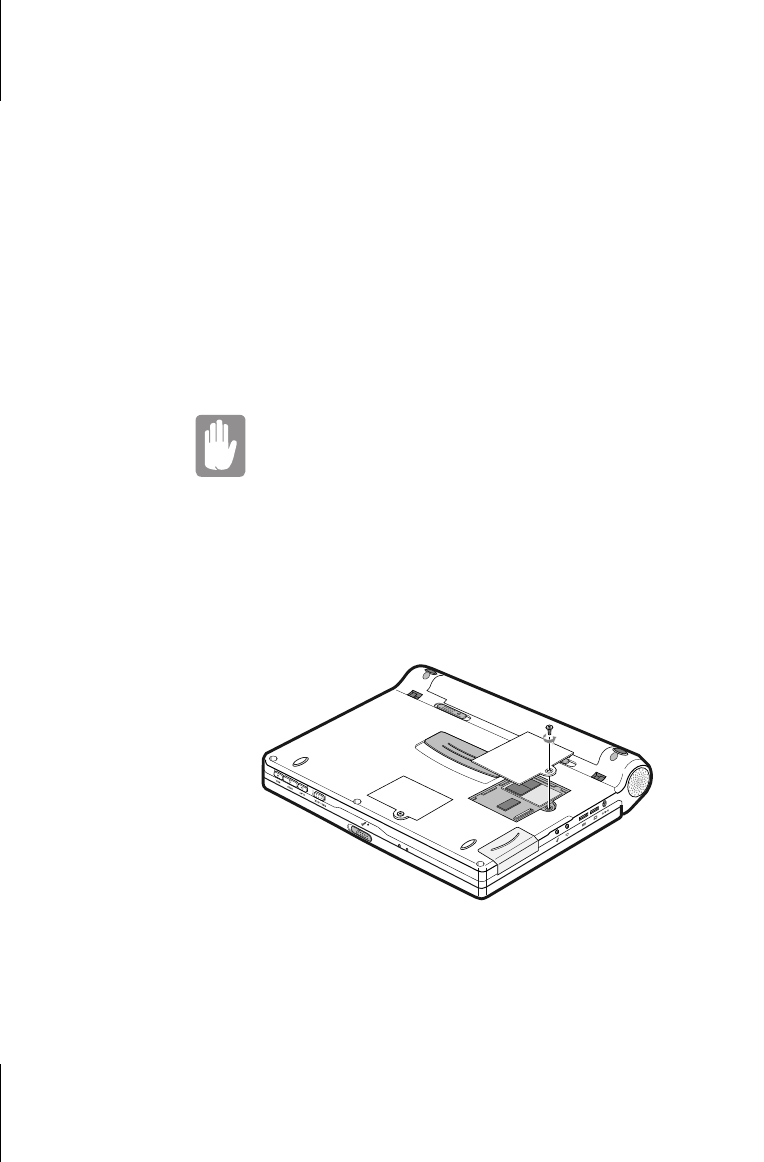
Installing a Memory Module
Handle a memory module carefully. Hold them only by the
edges.
To install a memory module:
1. Turn the eGO-note over so that the bottom faces up.
2. Using a screwdriver, remove the screw and the memory-module
compartment door. (Figure 23).
Figure 23. Removing the Memory Module compartment door
3. Align the connector on the memory module with the connector
of the slot.
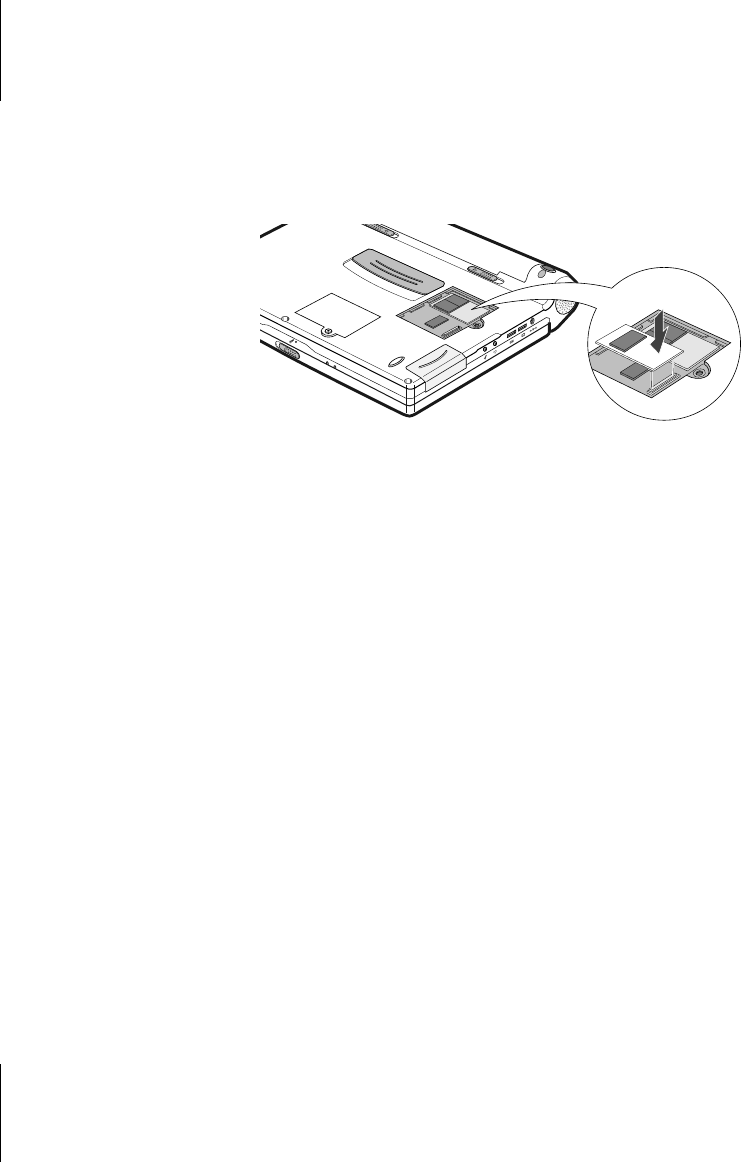
Upgrading the eGO-note 29
4. Push the memory module into the slot until the connectors are
fully engaged.
5. Push down on the edge of a memory module until the module
snaps into place.(Figure 24)
Figure 24. Installing a Memory Module
6. Align a memory module compartment door and push the door
down until it snaps into place.
7. Reinstall the screw you removed.
8. Follow the information of the enclosed documentation with a
memory module.

30 User’s Manual
Troubleshooting
If you have difficulty running the eGO-note, follow these steps:
1. Consult the following sections for advice on how to handle HPC
problems or Window CE user’s guide.
2. If steps 1 does not help you to resolve the problem, contact your
reseller for assistance.
The eGO-note does nothing when you turn it on.
• Adjust the contrast using <Alt+ >> or <Alt+ <> keys.
• Connect AC adapter, if you use the battery pack.
• Check AC-IN indicator light, when you use the AC adapter.
• Check if the power cable is damaged.
• Check the AC adapter and power cord is correctly connected.
• When the eGO-note is connected with peripheral devices, disconnect
for a moment.
• Remove AC adapter and the battery pack for few seconds, then
connect it and wait for 5 seconds before turn the power on.
The LCD display does not show anything.
• Adjust the LCD display Contrast.
Backup Battery is Running Low
message shows on LCD.
• Connect the AC adapter to charge the Backup Battery.
The screen is frozen and the Quick Start button doesn’t help
to turn on /off the eGO-note.
• Press the Soft Reset Button with a paper clip.


32 User’s Manual
Specifications
Table 4 gives the specifications for your eGO-note.
Table 4. System Specifications
Dimension
Width 8.9 in (227 mm)
Height 1.1 in (28 mm)
Depth 7.76 in (197 mm)
Weight (with Li-Ion battery) 2.4 lb (1090 g)
LCD viewing area (8.03 DSTN) 6.7 x 4.93 in (167 x 125.3 mm)
Environment
Ambient temperature, operating 50o–90o F (10o– 32oC)
Ambient temperature, storage 23o–104o F (-5o– 40o C)
Relative humidity (noncondensing),
operating
20–80%
Relative humidity (noncondensing),
storage
5–90%
Altitude, operating 0 to 8,000 ft (0 to 2,348 m)
Altitude, storage 0 to 40,000 ft (0 to 12,192 m)
Shock, operating 10 G for 11 ms half sine
Shock, nonoperating 60 G for 11 ms half sine
Li-Ion Battery
Weight 0.46 lbs (210 g)
Nominal open circuit voltage 7.2 VDC
Capacity, typical 2800 mAhr, 20whr
Charging time, approximate, with eGO-
note turned off
3.5 hr (Li-Ion)
Charging time, approximate, with eGO-
note turned on
3.5 hr (Li-Ion)
Average battery life, with no power
management enabled
9 hrs

Specifications 33
External AC Adapter
Operating voltage 100 VAC to 240 VAC
Line frequency 50-60 Hz
Input current 0.5 A 100 V—0.23 A 240 V
Output current 2.0 A
Output voltage 10 VDC