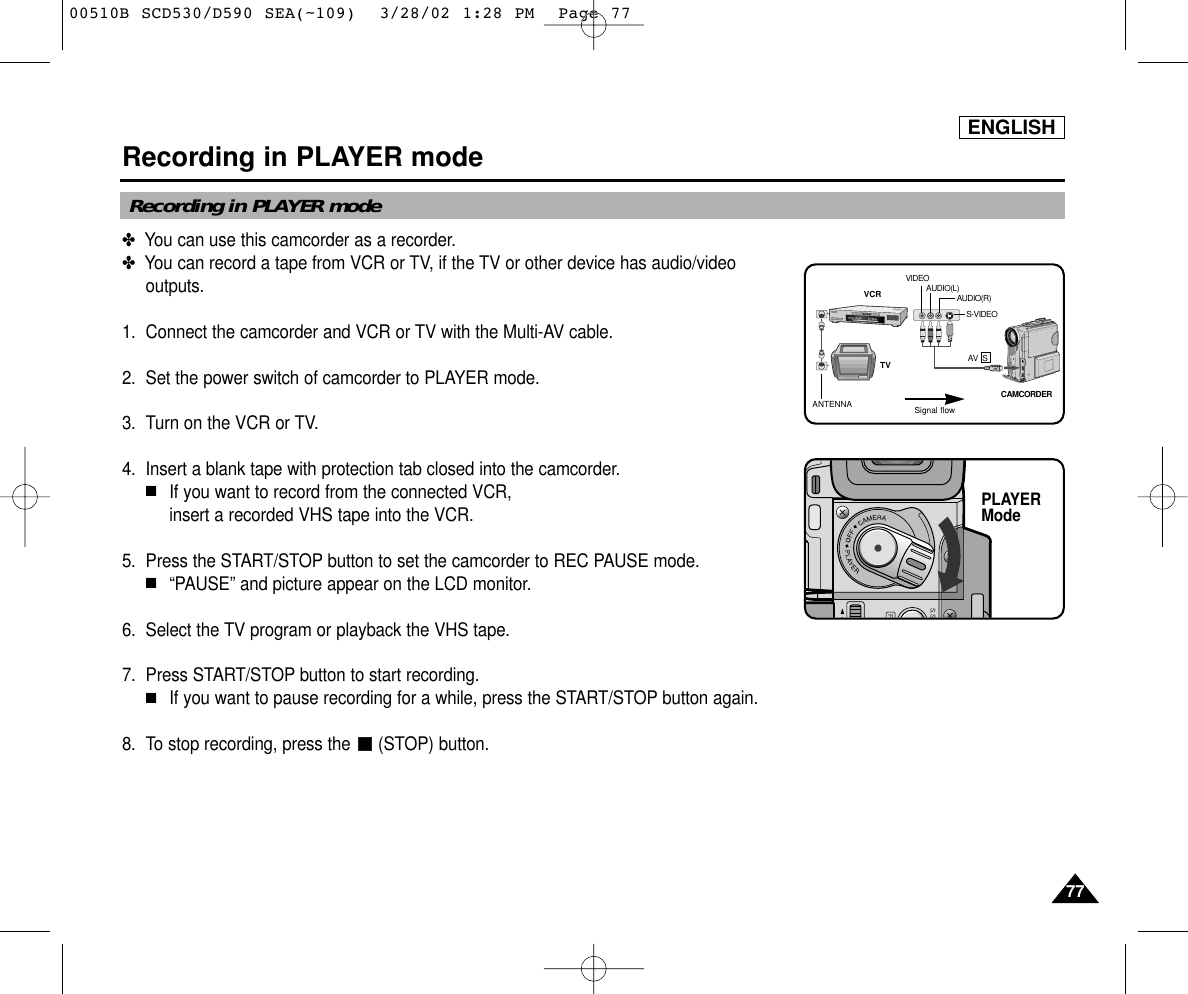
Samsung Electronics Co SCD590 Digital Camcorder User Manual 00510B SCD530 D590 SEA 027
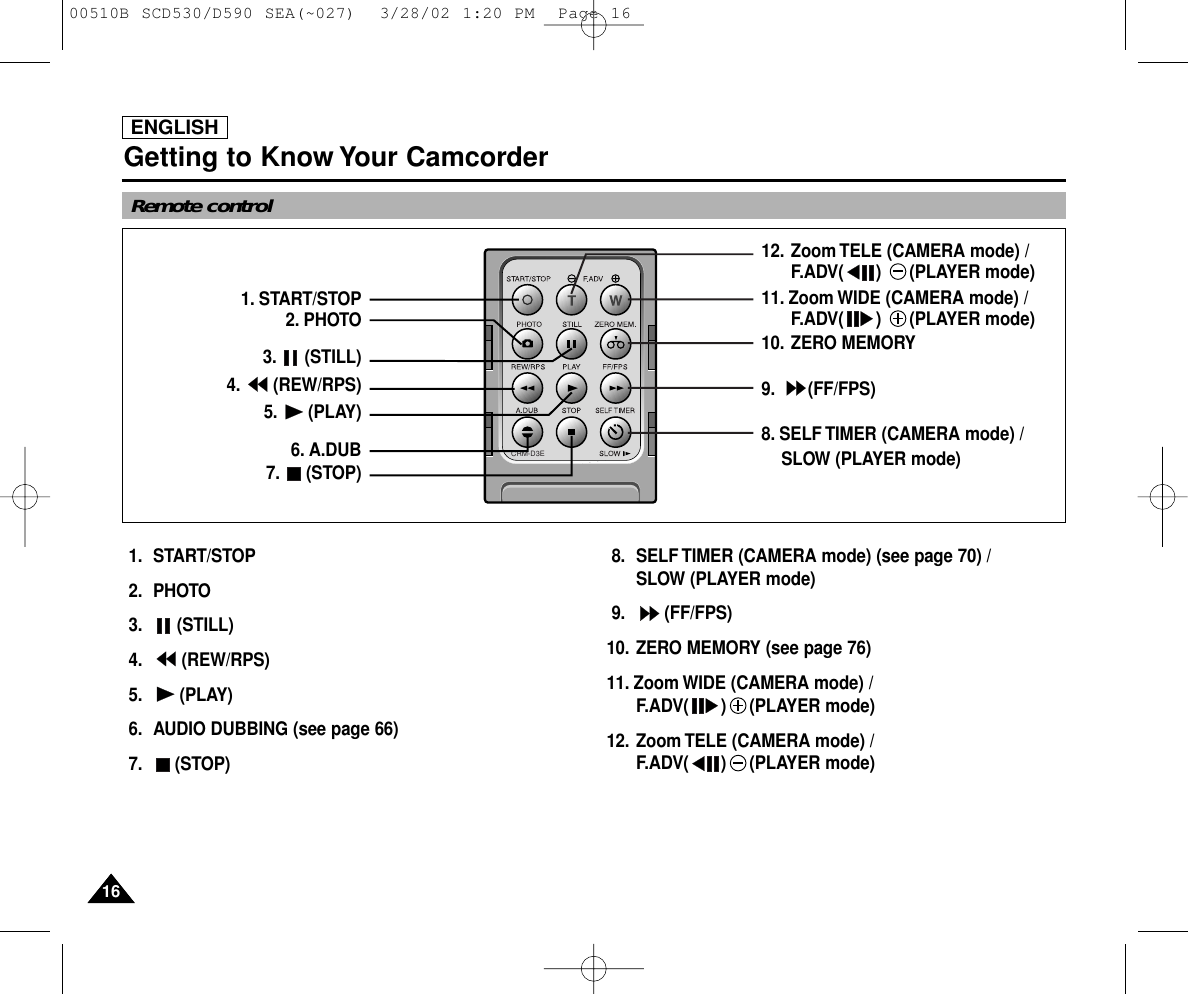
Samsung Electronics Co Ltd Digital Camcorder 00510B SCD530 D590 SEA 027
UserManual.wiki
>
Samsung Electronics Co
>
SCD590 User Manual
users manual
Navigation menu
Upload a User Manual
Namespaces
Wiki Guide
HTML
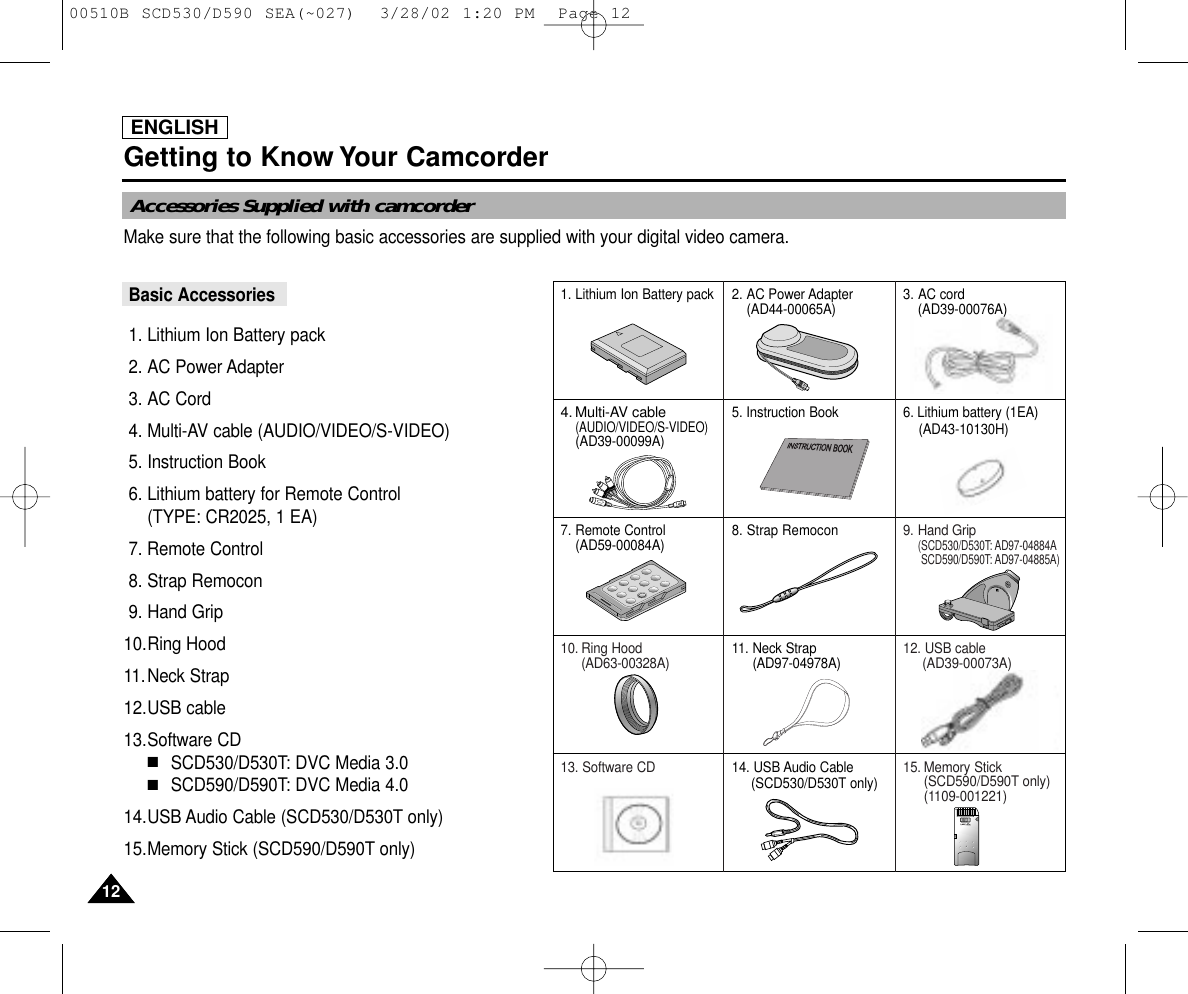
PDF
Info
Views
User Manual
Discussion / Help
Navigation


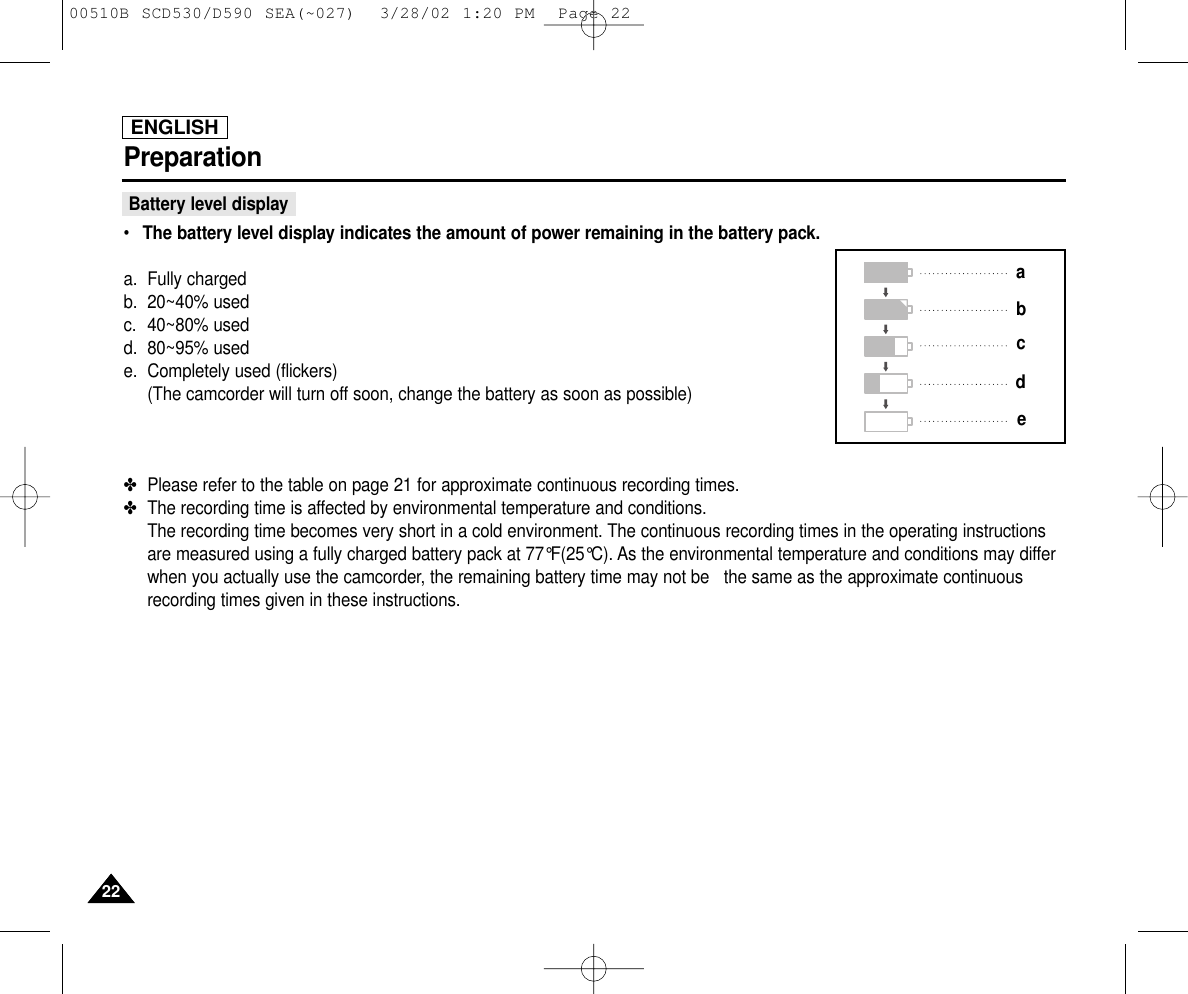
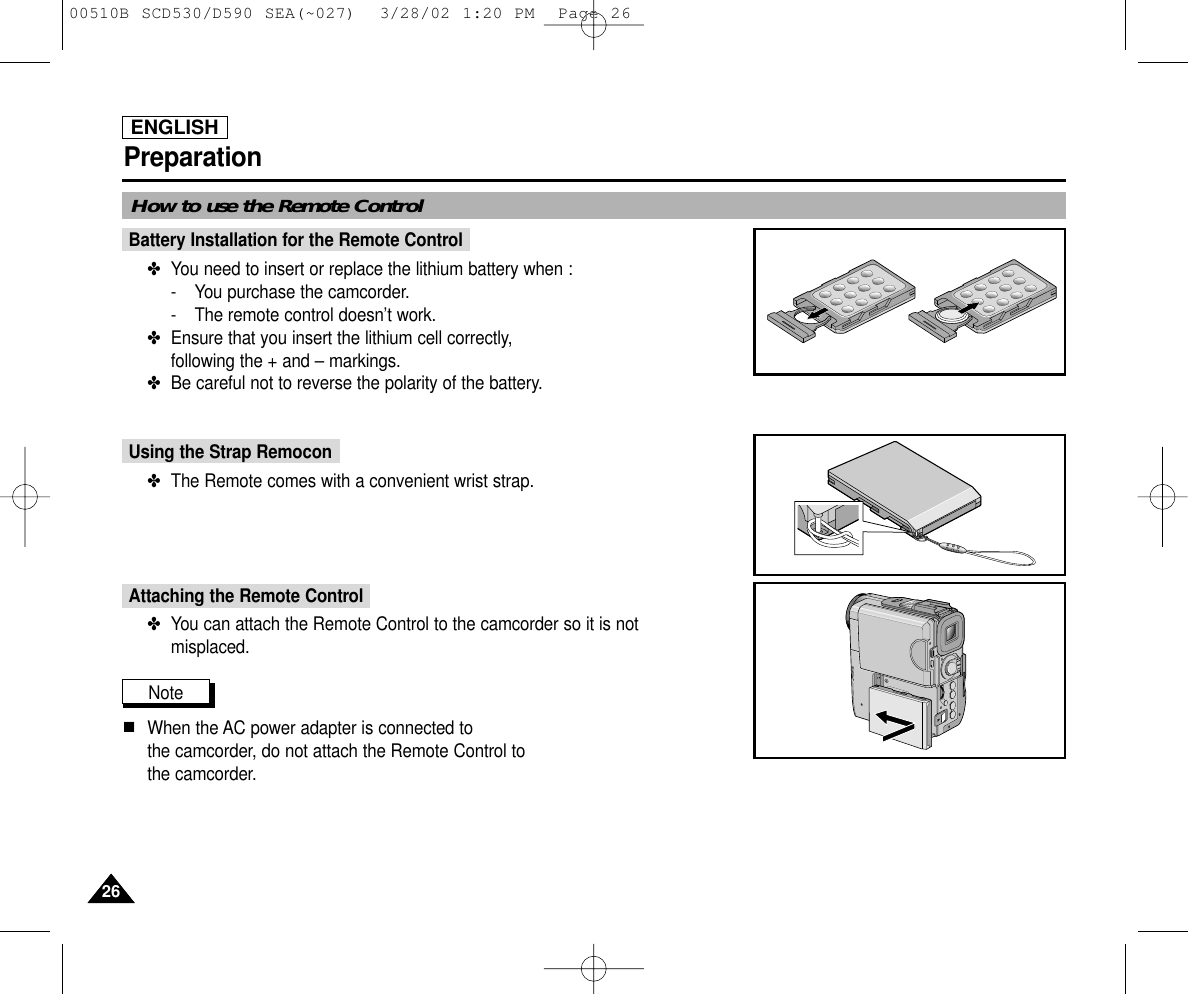
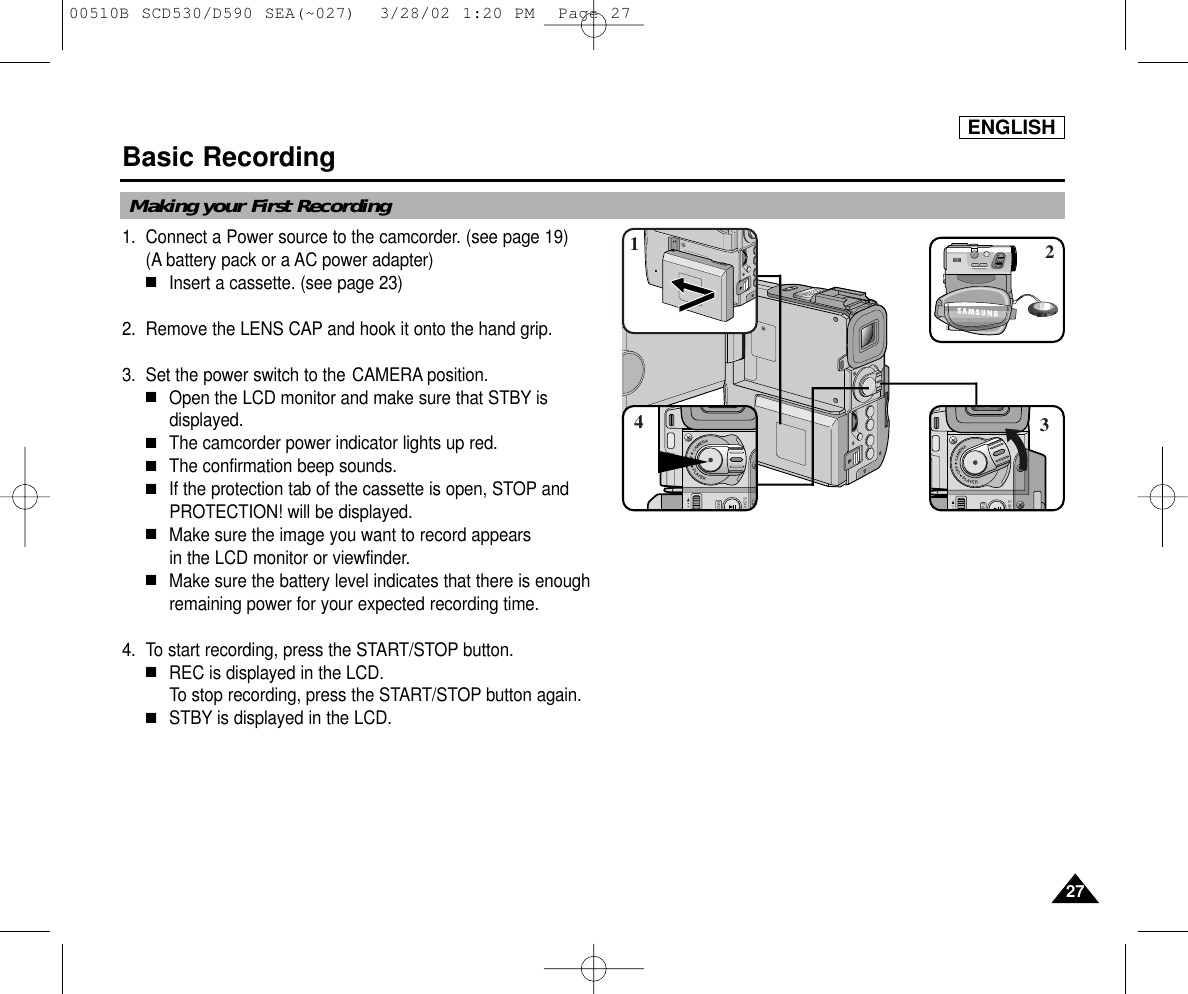
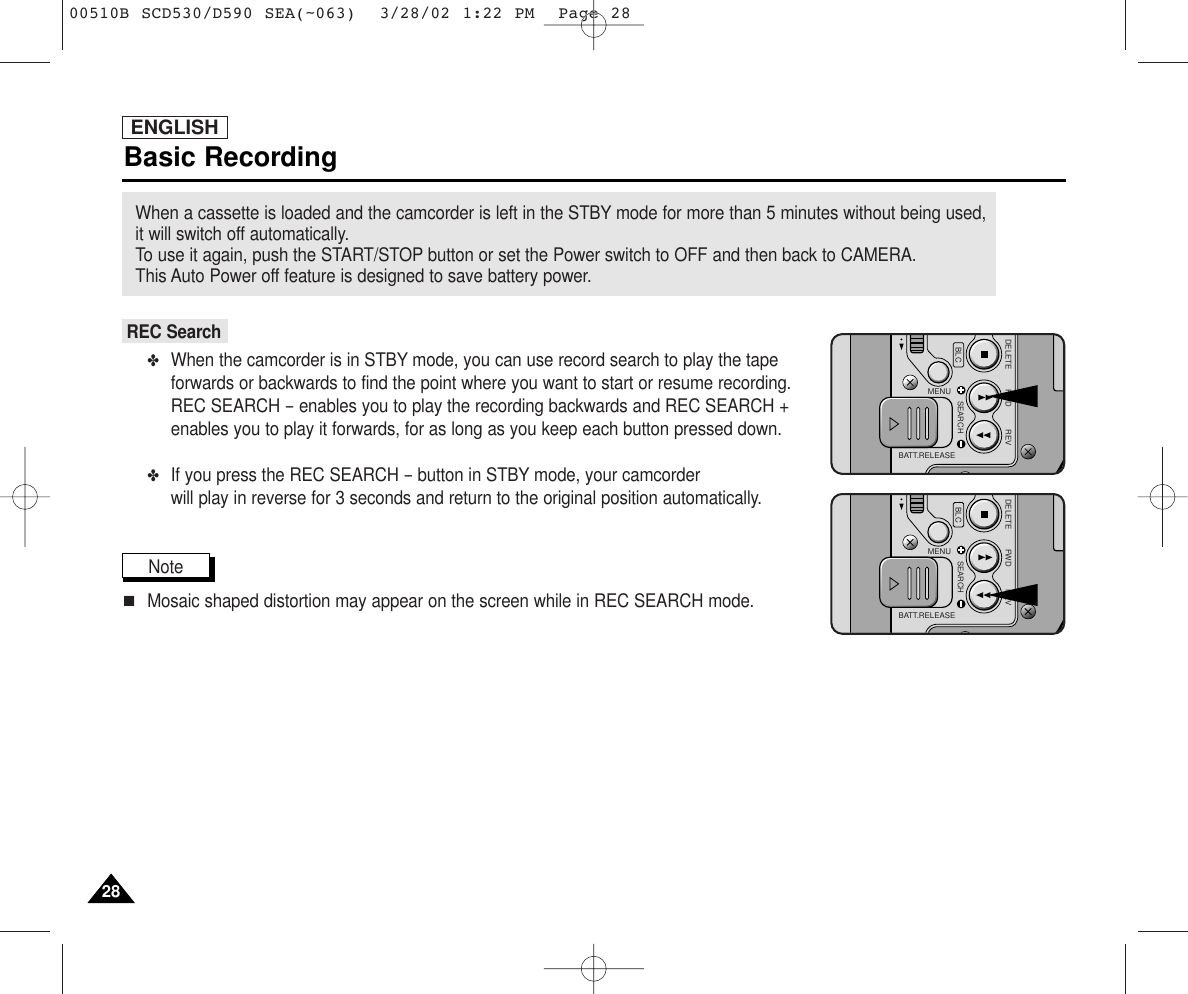
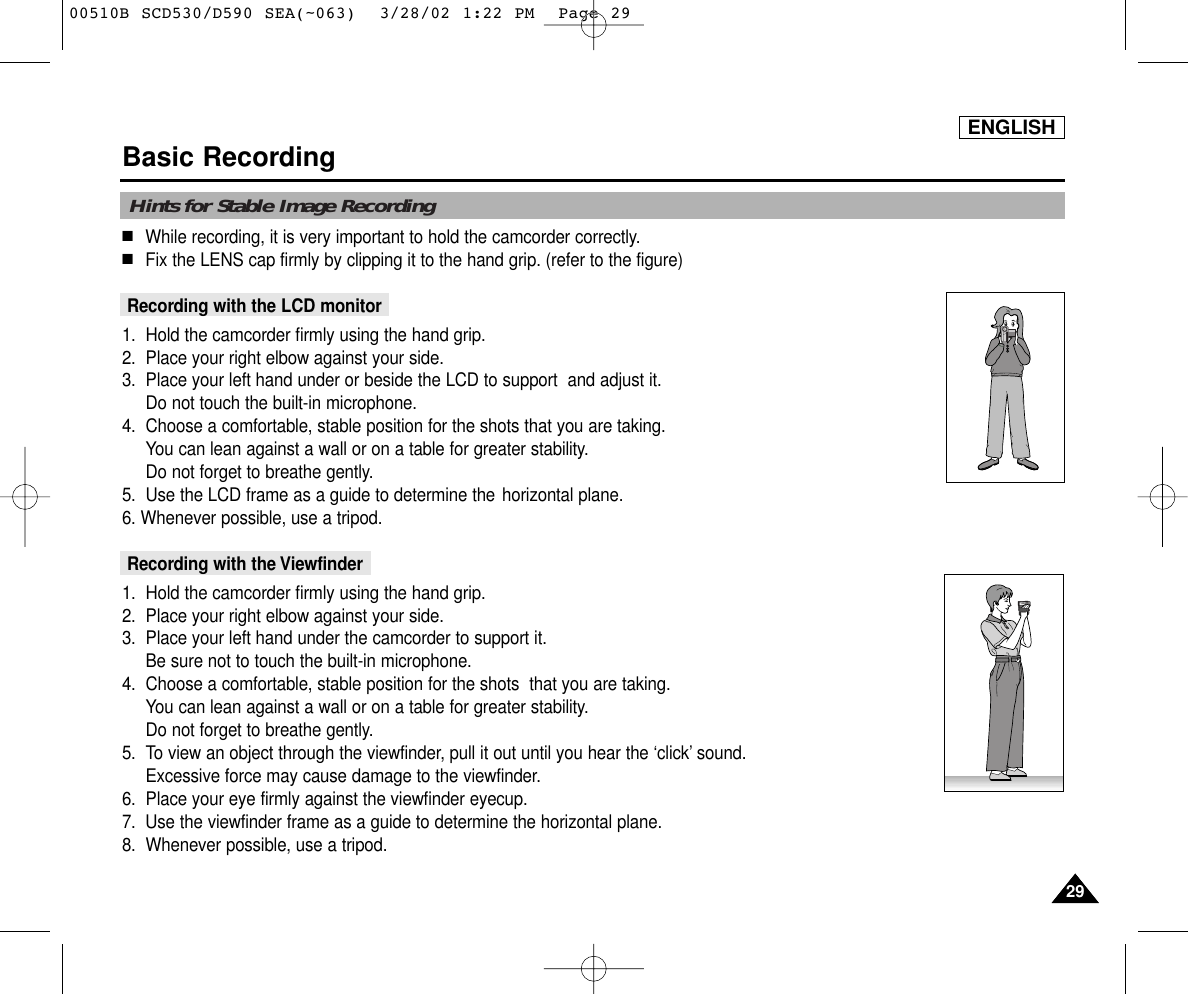
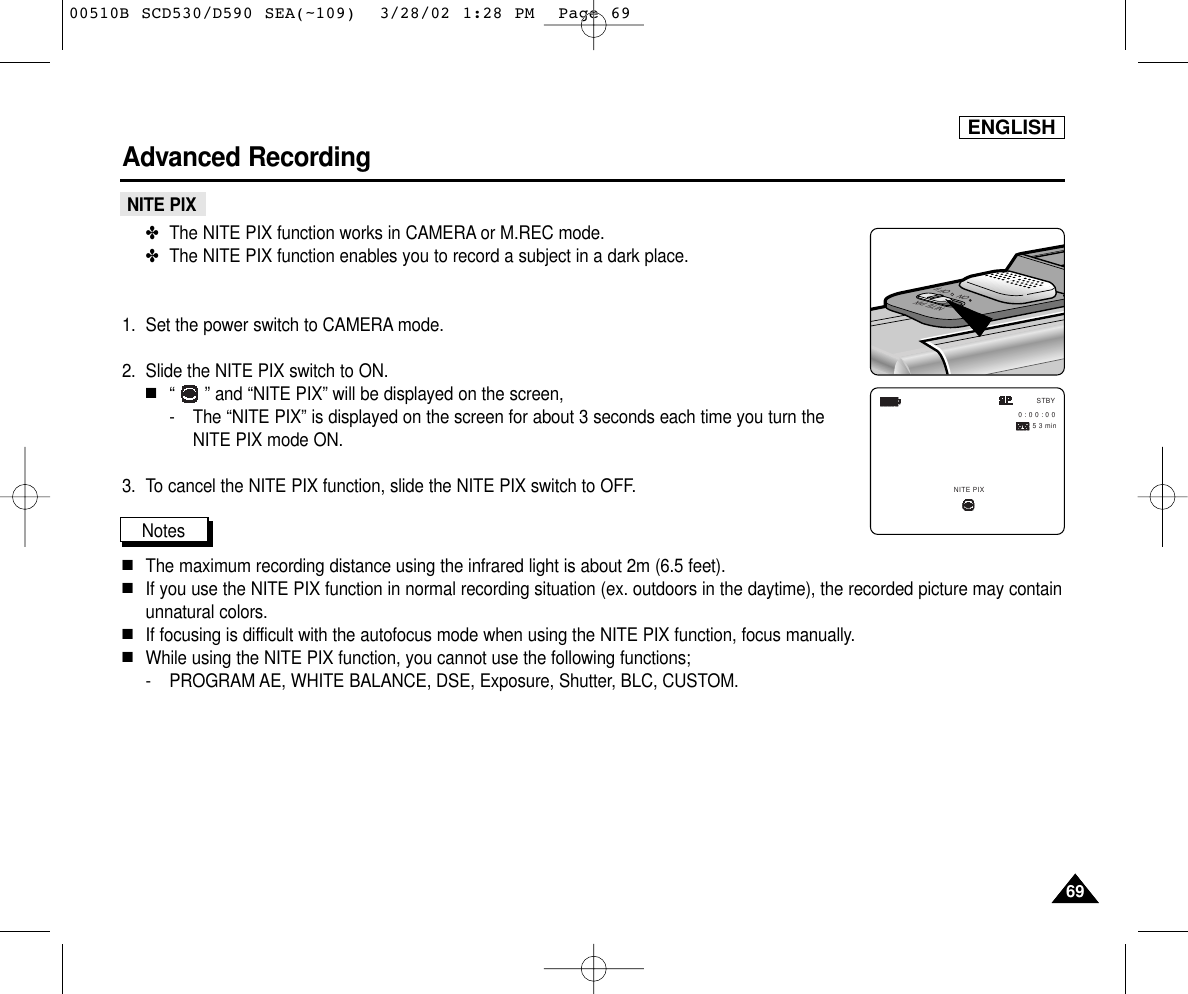
![ENGLISH1717Getting to Know Your Camcorder1. Battery level (see page 22)2. Custom or Easy mode (see pages 61, 62)3. DSE (Digital Special Effects) mode (see page 48)4. Program AE (see page 42)5. BLC (Back Light Compensation) (see page 64)6. White Balance mode (see page 44)7. Manual focus (see page 63) 8. Shutter speed and EXPOSURE (see page 60)9. Zoom position (see page 45)10. DATE/TIME (see page 56) 11. USB12. REMOCON13. WIND CUT (see page 55)14. Audio recording mode (see page 54)15. Remaining Tape (measured in minutes) 16. Tape counter 17. Zero memory indicator (see page 76)18. Operating mode19. Record speed mode20. PHOTO mode21. Self recording and waiting timer (see page 70)22. EIS (see page 47)23. NITE PIX (see page 69)24. FLASH mode (see page 50)25. Volume control (see page 33)26. Audio playback channel27. DV IN (DV data transfer mode) (see page 79)28. DEW (see page 7)29. Message LineOSD in CAMERA modeTAPE !MIRRORBLCSHUTTER NITE PIXZOOMSHUTTEREXPOSUREEXPOSURECUSTOM M - 0 : 0 0 : 0 0 5 5 min1 6 bit10:00 PMJAN. 1, 2002REC12345679822 21 20 19 181615171413121124102327OSD in PLAYER mode. . . CSOUND [ 2 ]M - 0 : 0 0 : 0 0 5 5 min1 6 bit10:00 PMJAN. 1, 2002VOL. [ 1 1 ]DV2629172820 19 182725 10OSD (On Screen Display in CAMERA and PLAYER modes)00510B SCD530/D590 SEA(~027) 3/28/02 1:20 PM Page 17](https://usermanual.wiki/Samsung-Electronics-Co/SCD590/User-Guide-242032-Page-22.png)
![ENGLISHGetting to Know Your Camcorder1818✤These items are available on model SCD590/D590T only.30.Folder number-file number (see page 88)31.Image counter- Current still image/Total number of recordable still images.32.CARD indicator33.Image recording and loading indicator 34.Quality (see page 89)35.ERASE PROTECTION indicator (see page 96)36.Print Mark(see page 95)37.SLIDE SHOWTurning the OSD on/off (On Screen Display)✤You can turn the OSD on/off by setting the menu’s DISPLAY function.✤The OSD is displayed in the viewfinder and the LCD monitor.✤When you set the power switch to CAMERA or PLAYER, the OSD is automaticallyturned on.✤Refer to page 57.●Turning OSD on/off- When you turn the OSD off, In CAMERA mode: The STBY, REC, EASY.Q and CUSTOM.Q modes are alwaysdisplayed on the OSD, even when the OSD is turned OFF and the key input isdisplayed for 3 seconds then turned off. In PLAYER mode: When you press any Function button, the function is displayed onthe OSD for 3 seconds before it turns off. ●Turning on/off the DATE/TIME- The DATE/TIME is not affected when the OSD function is switched ON or OFF.- To turn the DATE/TIME on or off, access the menu and change the DATE/TIME mode. (see page 56)- You may also use the Dial Navigator to turn the DATE/TIME ON or OFF. (only in CAMERA / M.REC mode)OSD in M.REC modeMEMORY CARD !MIRRORSHUTTEREXPOSURECUSTOM10:00 PMJAN. 1, 2002[ 2 2 / 2 4 0 ]S.QOSD in M.PLAY modeMEMORY CARD !SLIDE10:00 PMJAN. 1, 2002 0 0 0 - 0 0 2 2 [ 2 2 / 2 2 ]0 0 13431333235373036OSD (On Screen Display in M.REC/M.PLAY modes)00510B SCD530/D590 SEA(~027) 3/28/02 1:20 PM Page 18](https://usermanual.wiki/Samsung-Electronics-Co/SCD590/User-Guide-242032-Page-23.png)
![ENGLISH3030Basic Recording✤Your camcorder is equipped with a 2.5 inch color Liquid Crystal Display(LCD) screen, which enables you to view what youare recording or playing back directly.✤Depending on the conditions under which you are using the camcorder (indoors or outdoors for example), you can adjust ;■BRIGHT SELECT■BRIGHT ADJUST■COLOR ADJUST1. Set the POWER switch to CAMERA position.■In the PLAYER mode, you may only setup the LCD while the tape is playing. 2. Open the LCD screen, and the LCD switches on.3. Press the MENU button.4. Move the MENU SELECTOR so that VIEWER is highlighted and then push the MENU SELECTOR. 5. Move the MENU SELECTOR so that LCD ADJUST is highlighted.6. Push the MENU SELECTOR to enter the sub-menu.7. Move the MENU SELECTOR so that it highlights the menu item you want to adjust (BRIGHT SELECT, BRIGHT ADJUST, COLOR ADJUST).CAM MODEVIEWER SETLCD ADJUSTDATE / TIMEDISPLAYCAM MODEINITIALLCD ADJUSTDATE/TIMEDISPLAYCAMERAA/VMEMORY (SCD590/D590T only)VIEWERCAM MODELCD ADJUSTVIEWER SETBRIGHT SELECT . . . . NORMALBRIGHT ADJUST . . . . . . [ 1 8 ]COLOR ADJUST . . . . . . [ 1 8 ]CAM MODEBRIGHT SELECTVIEWER SETNORMALSUPERBLACK LIGHTS.SHOWFADECAMERAModeAdjusting the LCD✽ SCD530/D590 only00510B SCD530/D590 SEA(~063) 3/28/02 1:22 PM Page 30](https://usermanual.wiki/Samsung-Electronics-Co/SCD590/User-Guide-242032-Page-35.png)
![ENGLISH3333Basic RecordingAdjusting the LCD during PLAY✤ You can adjust the LCD during playback.✤ The adjustment method is the same procedure as used in CAMERA mode. (see page 30) The Speaker works in PLAYER mode only.■When you use the LCD screen for playback, you can hear the recorded sound from the built-in Speaker.- Follow the instructions below to decrease or mute speaker volume in the PLAYER mode. - Take the following steps to lower the volume or mute the sound while playing a tape on the PLAYER.1. Set the power switch to PLAYER mode.2. Press (PLAY/STILL) to play the tape.3. When you hear sounds once the tape is in play, use the MENU SELECTOR to adjust the volume.■A volume level display will appear on the LCD. Levels may be adjusted from anywhere between 00 to 19 and you will not hear any sound when the volume is set on 00.■You can adjust the headphone volume separately from the built-in speaker.■If you close the LCD while playing, you will not hear sound from the speaker.Notes■Sometimes audio may sound distorted when the volume is turned up high.If this happens, turn down the volume.■The speaker turns off when you use headphones.FADES.SHOW DELETEBLCFADE BLC 0 : 2 3 : 4 7 5 5 min10:00 PMJAN. 1, 2002VOL. [ 1 1 ]23-1<3-2>Controlling Sound from the Speaker00510B SCD530/D590 SEA(~063) 3/28/02 1:22 PM Page 33](https://usermanual.wiki/Samsung-Electronics-Co/SCD590/User-Guide-242032-Page-38.png)


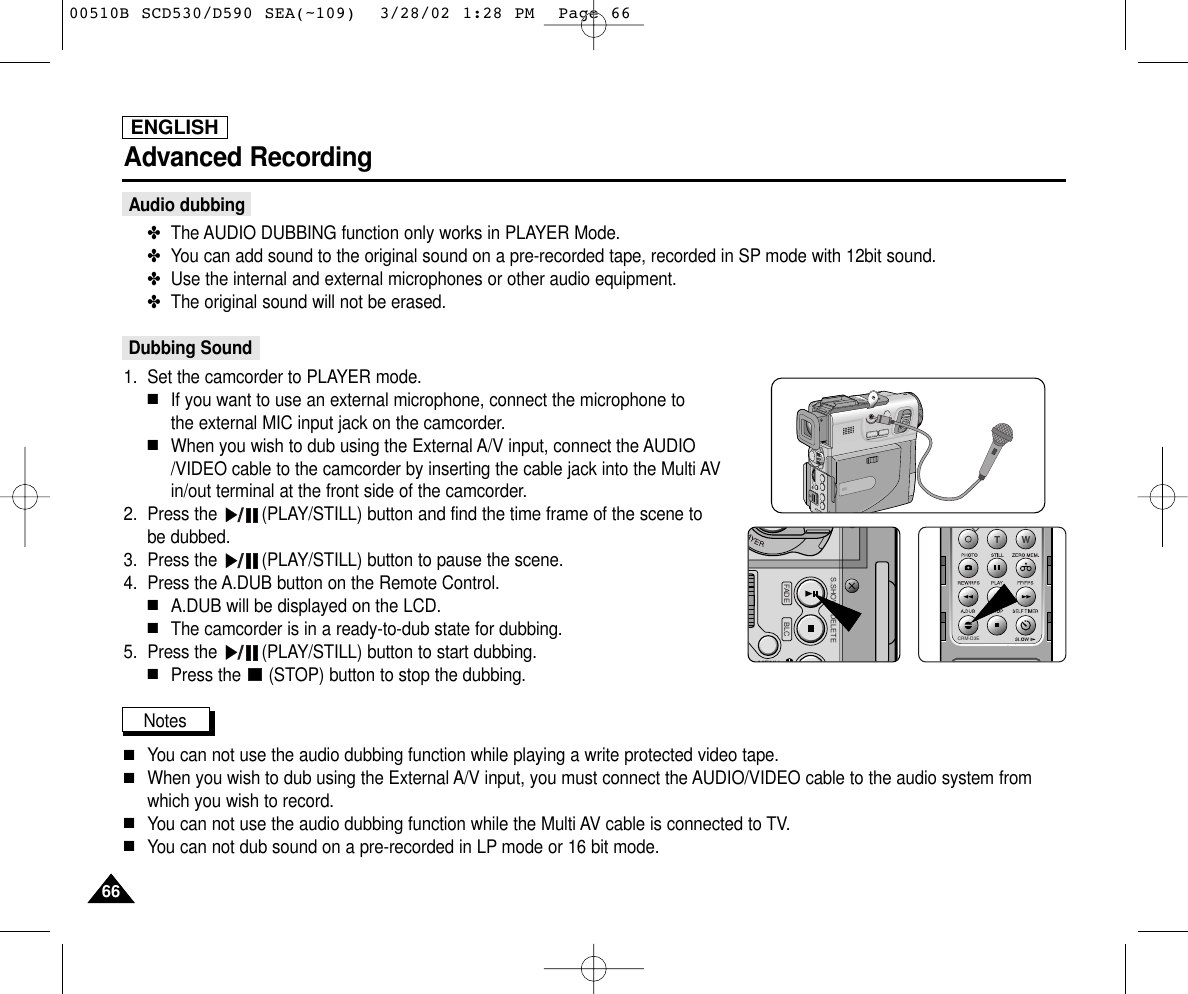
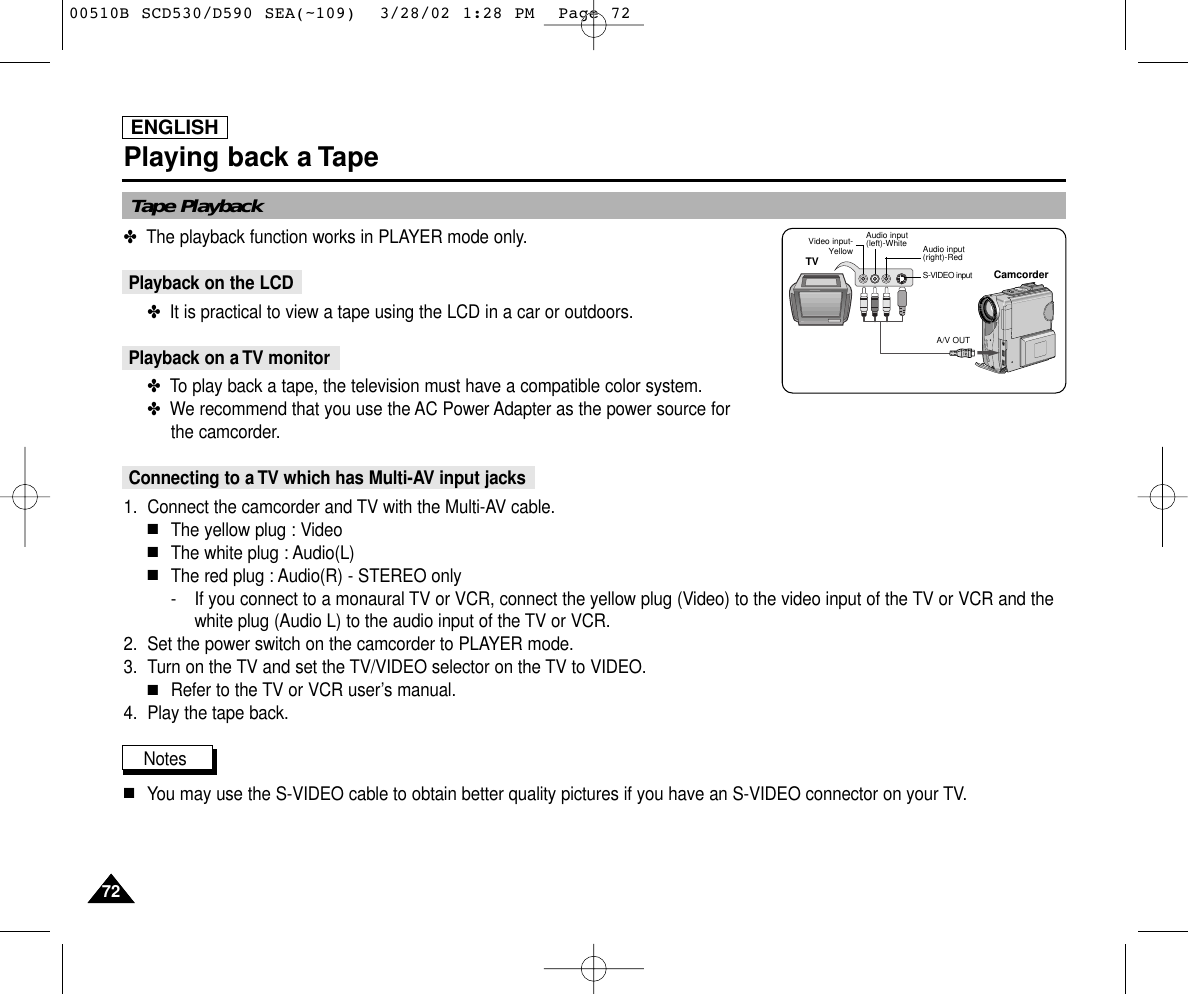
![ENGLISH6767Advanced RecordingDubbed audio Playback1. Insert the dubbed tape and press MENU button.2. Move the MENU SELECTOR to highlight A/V.3. Push the MENU SELECTOR to enter the sub-menu.4. Use the MENU SELECTOR to select AUDIO SELECT from the submenu. 5. Push the MENU SELECTOR to enter the sub-menu.6. Using the MENU SELECTOR, select the AUDIO playback channel. ■Push the MENU SELECTOR to confirm the audio playback channel.- SOUND1 : play the original sound.- SOUND2 : play the dubbed sound.- MIX(1+2) : play back SOUND1 and 2 equally mixed.7. To exit, press the MENU button.8. Press the (PLAY/STILL) button to playback the dubbed tape.Note■When you playback added sound (SOUND2 or MIX mode), you may experience loss of sound quality.PLAYER MODEA / V SETAUDIO SELECTSOUND [ 1 ]SOUND [ 2 ]MIX [ 1 + 2 ]PLAYER MODEREC MODEPHOTO SEARCHPHOTO COPYAUDIO MODE 12SOUND1AUDIO SELECTWIND CUTA / V SETLINE IN SELECT VIDEO00510B SCD530/D590 SEA(~109) 3/28/02 1:28 PM Page 67](https://usermanual.wiki/Samsung-Electronics-Co/SCD590/User-Guide-242032-Page-72.png)

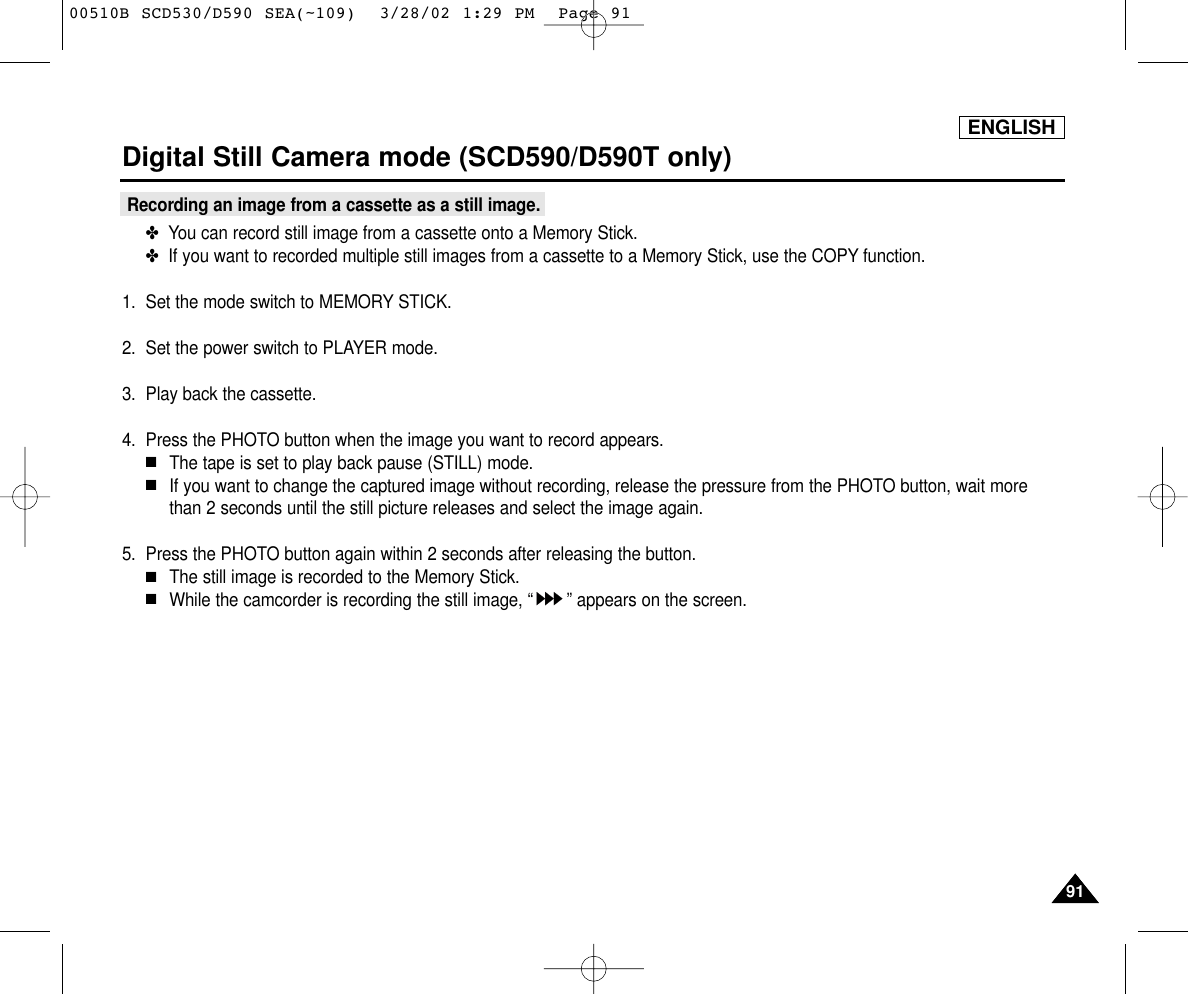
![ENGLISH9090Digital Still Camera mode (SCD590/D590T only)✤ You cannot record moving pictures onto a Memory Stick.✤ Audio cannot be recorded onto the Memory Stick.Recording images to a Memory Stick.1. Set the mode switch to MEMORY STICK.2. Set the power switch to CAMERA.3. Press the PHOTO button.■If you do not wish to record, after releasing the pressurefrom the button, wait more than 2 seconds until the stillpicture release.4. Press the PHOTO button once again within 2 seconds afterreleasing the button.■The still image is recorded to the Memory Stick.■While the camcorder is recording the still image, “ ” appears on the screen.S.SHOWFADE1CUSTOM EASYMICPHOTO[ 2 2 / 2 4 0 ]S.QM.RECModePHOTORecording Still images to a Memory Stick in M.REC Mode.00510B SCD530/D590 SEA(~109) 3/28/02 1:29 PM Page 90](https://usermanual.wiki/Samsung-Electronics-Co/SCD590/User-Guide-242032-Page-93.png)
![ENGLISH9393Digital Still Camera mode (SCD590/D590T only)To view the Multi Screen1. Set the mode switch to MEMORY STICK.2. Set the power switch to PLAYER.■The last recorded image appears.3. Press the PHOTO button to view 6 images on a single screen.■A selection mark ( ) appears under the image.■Move the MENU SELECTOR downwards to go the previous image and upwards to go to the next image.■Jump to the next/previous multi screen with the (FWD) or (REV) buttons.4. Press the PHOTO button.■The image you have marked fills the whole display.Note■You can delete the selection marked image by pressing (DELETE) on the function keys. (see page 97)19 20 2122 23 24[22/24]100-002200510B SCD530/D590 SEA(~109) 3/28/02 1:29 PM Page 93](https://usermanual.wiki/Samsung-Electronics-Co/SCD590/User-Guide-242032-Page-96.png)