Samsung Electronics Co SCHLC11R Portable Wireless Router with Multi-band CDMA/LTE and WLAN User Manual
Samsung Electronics Co Ltd Portable Wireless Router with Multi-band CDMA/LTE and WLAN Users Manual
Users Manual

User manual
SCH-LC11R
introducing your mobile device
In this section, learn about your mobile device’s layout, keys, display, and icons
Unpack
Check your product box for the following items:
Mobile device
Battery
Travel adapter (charger)
User manual
The items supplied with your device may vary depending on the software and accessories available in your region or
offered by your service provider. You can obtain additional accessories from your local Samsung dealer.
Device layout
The front of your device includes the following keys and features:
The rear of your device includes the following keys and features:
Keys
Key Function
Power Turn the device on and off (press and hold);
Side keys Short press of the side key will help you set up your
device automatically. Long press of the side key will reset
the status of your device as the state of the factory
LED indicators
Your device’s LED indicators consist of four LEDs:
LED Display
LED 1 LTE Network Status (including the signal strength)
LED 2 1x / EVDO Network Status (including the signal strength)
LED 3 WiFi & Internet Status
LED 4 Power & Charging
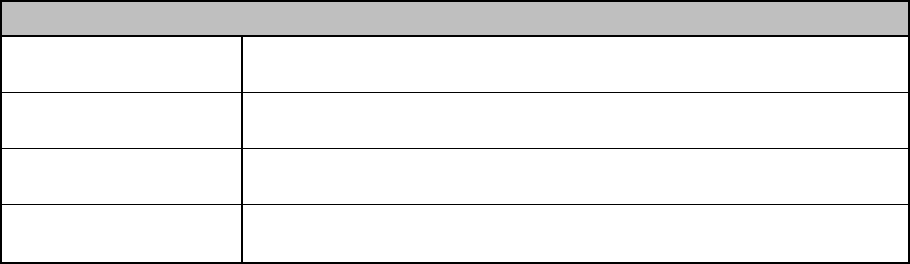
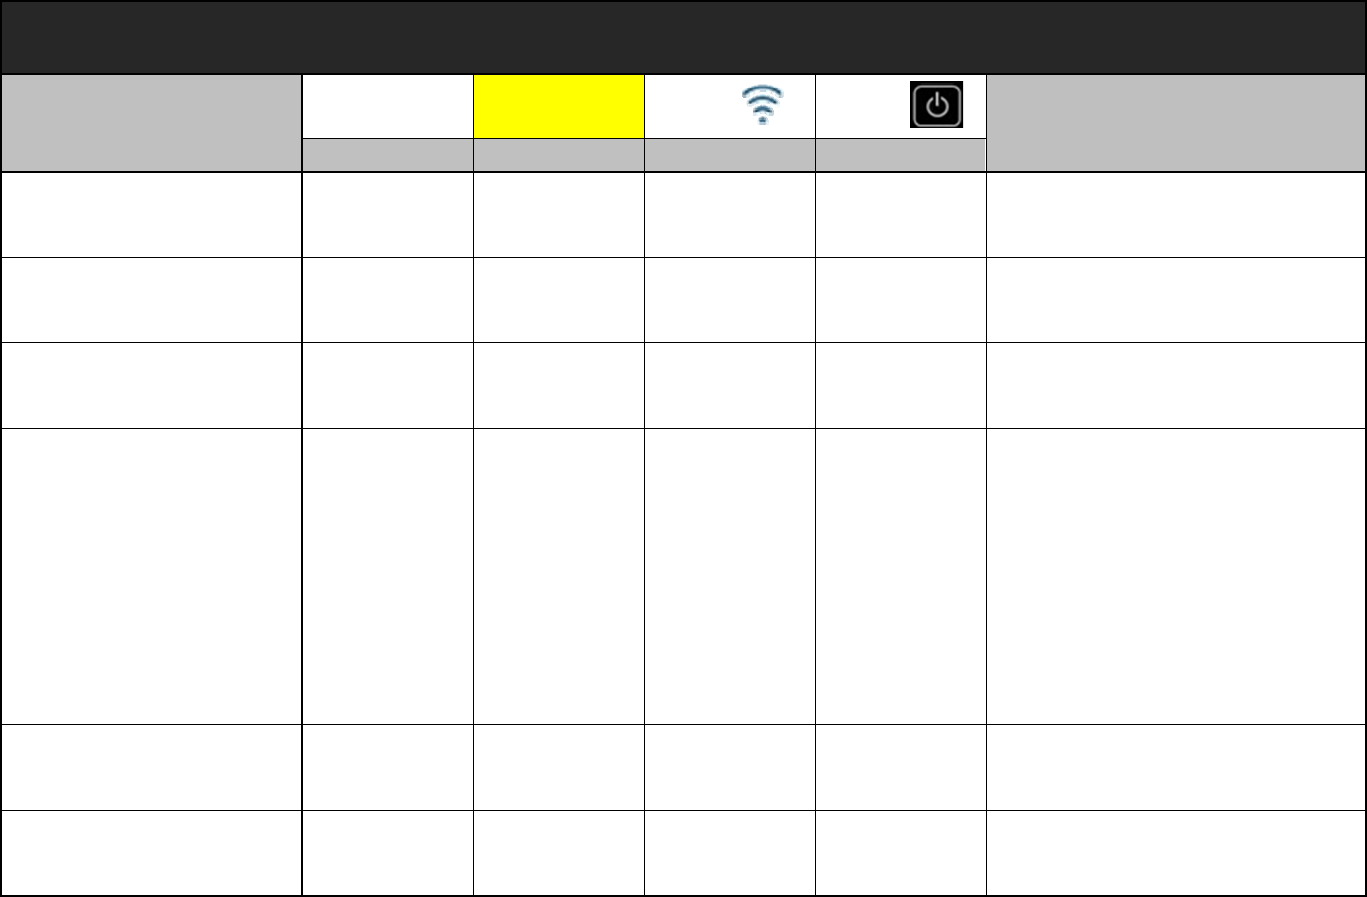
Power & Charging Status I ndication
Scenario LED 1 LED 2 LED 3 LED 4 Comments
TA
t
t
Power Off / No
Battery [X][X][X][X]ㅡ No light
Power On [X][X][X][B]
ㅡ LED4 : Blue - Solid
ㅡ means a remained battery
capacity of 100~20%
Low Battery [X][X][X][Y]
ㅡ LED4 : Yellow - Solid
ㅡ means a remained battery
capacity of 20~6%
Critical Low
Battery [X][X][X][R]
ㅡ LED4 : Red - Solid
ㅡ means a remained battery
capacity of 5~1%
TA
connected
Charging [X][X][X][G]
- Blinking -
ㅡ LED4 : Green - Blinking
Charging Error [X][X][X][R]
- Blinking -
ㅡ LED4 : Red - Blinking
Fully Charged [X][X][X][G]ㅡ LED4 : Green - Solid
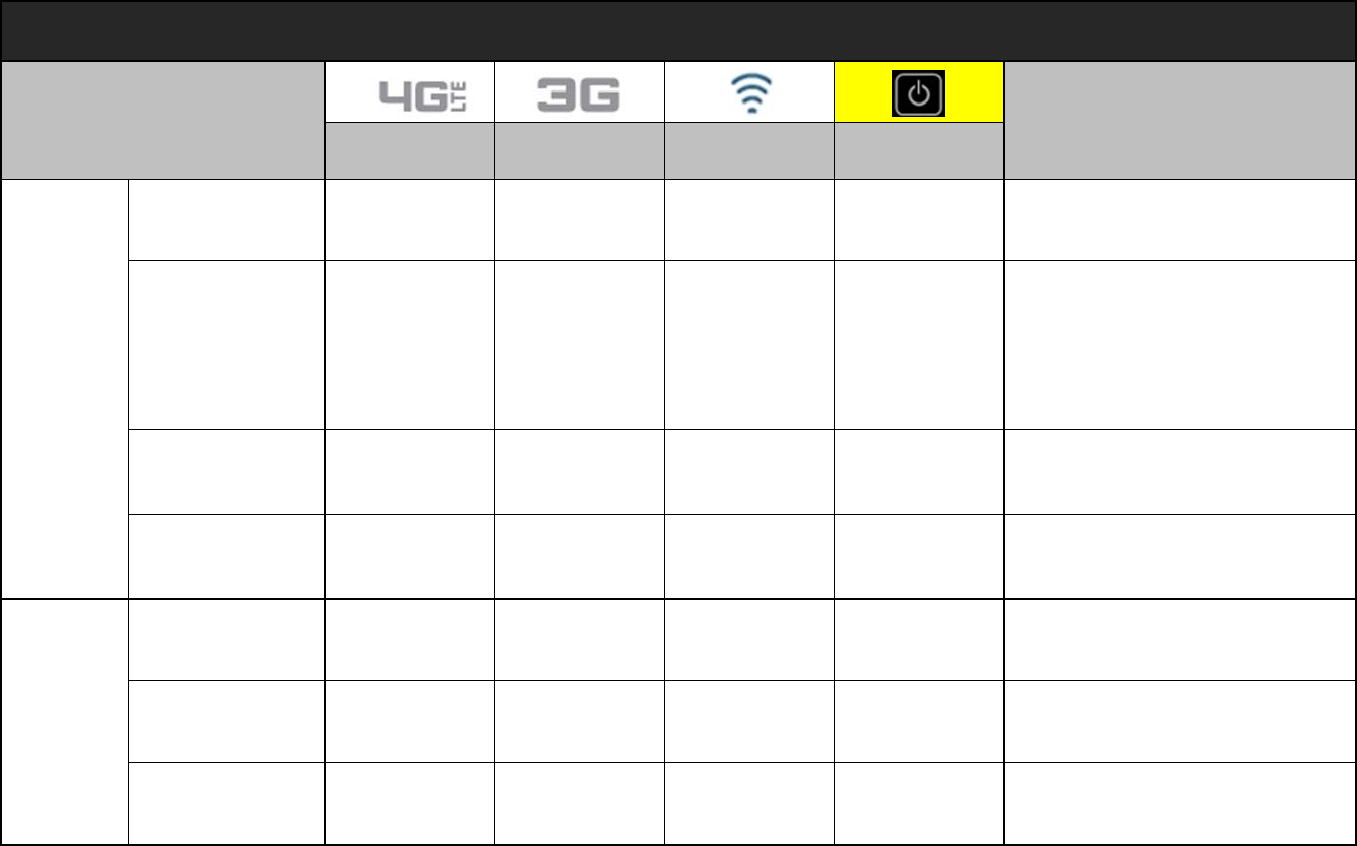
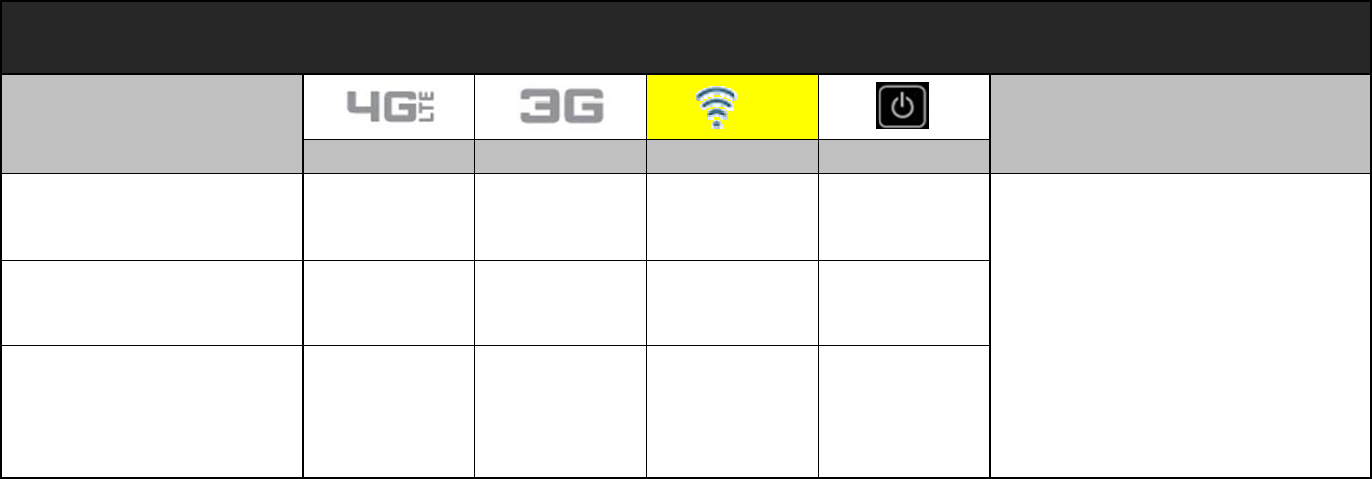
LTE Network Service I ndication
Scenario LED 1 LED 2 LED 3 LED 4 Comments
LTE_Strong / Modest RF
Signal [B][X][X][B]
ㅡ LED1 : Blue - Solid
ㅡ Strong RF signals, meaning to
2~4 Antenna Bars
LTE_Weak RF Signal [Y][X][X][B]
ㅡ LED1 : Yellow - Solid
ㅡ Weak RF signals, meaning 1
Antenna Bar
LTE_Critical Weak RF &
No Service [R][X][X][B]
ㅡ LED1 : Red - Solid
ㅡ Antenna Icon Only & No Service
LTE Service Roaming [W][X][X][B]ㅡ LED1 : White - Solid
LTE Service Failure [R]
- Blinking -[X][X][B]ㅡ LED1 : Red - Blinking
No WAN Connection [X][X][X][B]ㅡ LED1 : No light
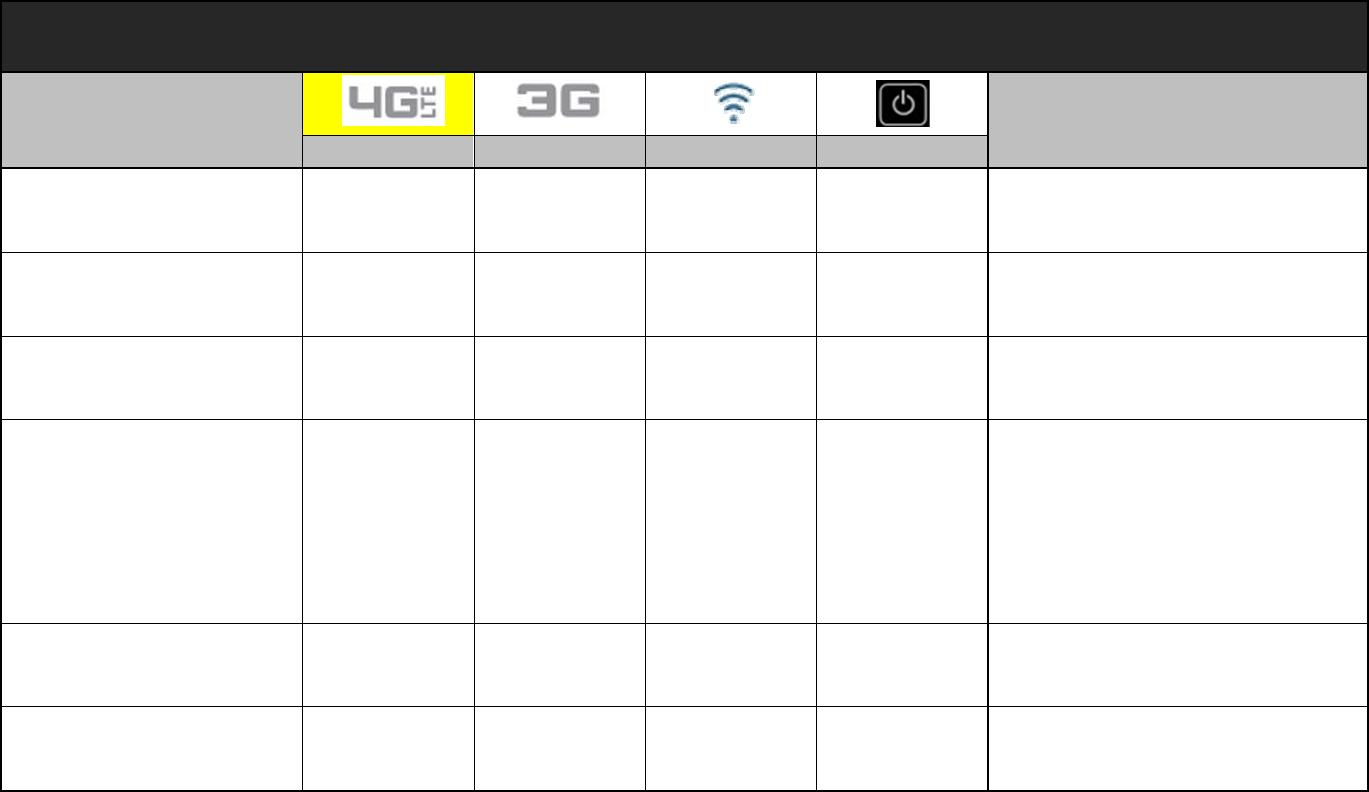
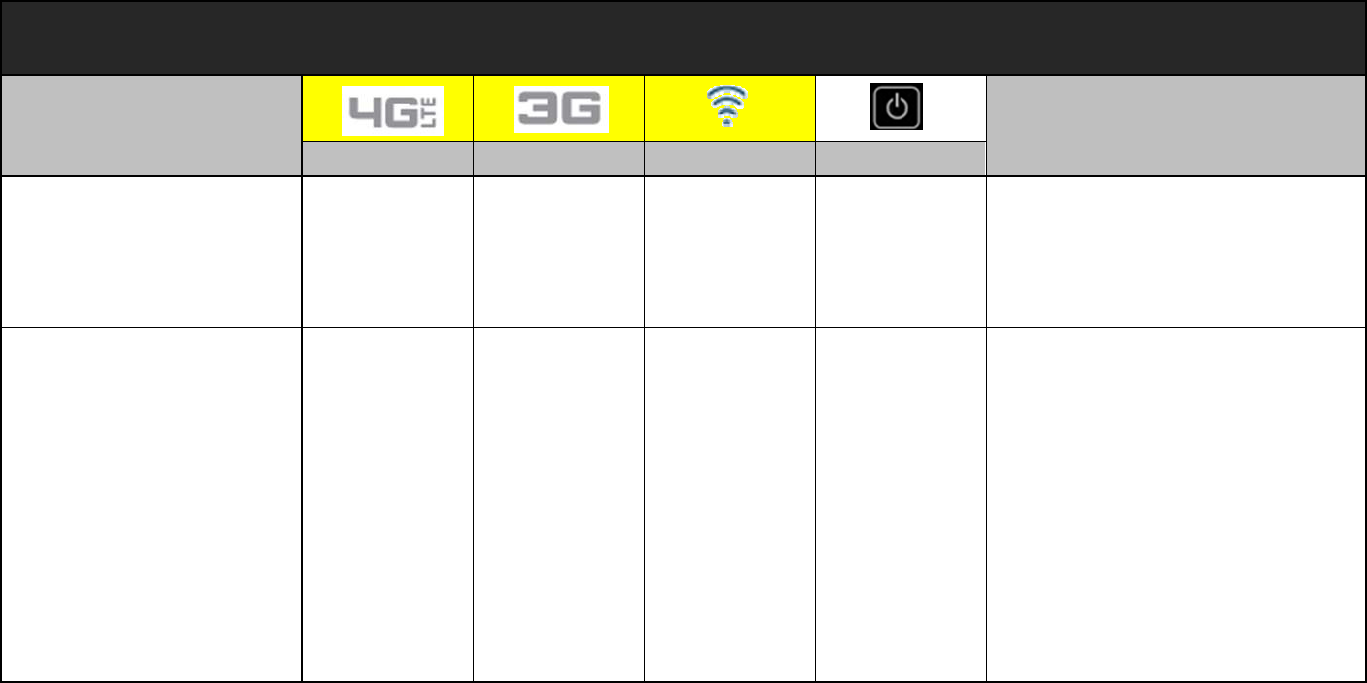
1x / EVDO Netw ork Service I ndication
LTE EV
1x
Scenario LED 1 LED 2 LED 3 LED 4 Comments
1x / EVDO_Strong /
Modest RF Signal [X][B][X][B]
ㅡ LED2 : Blue - Solid
ㅡ Strong RF signals, meaning to
2~4 Antenna Bars
1x / EVDO_Weak RF
Signal [X][Y][X][B]
ㅡ LED2 : Yellow - Solid
ㅡ Weak RF signals, meaning 1
Antenna Bar
1x / EVDO_Critical Weak
RF & No Service [X][R][X][B]
ㅡ LED2 : Red - Solid
ㅡ Antenna Icon Only & No Service
1x / EVDO Service
Roaming [X][W][X][B]ㅡ LED2 : White - Solid
1x / EVDO Service Failure [X][R]
- Blinking -[X][B]ㅡ LED2 : Red - Blinking
No WAN Connection [X][X][X][B]ㅡ LED2 : No light
WiFi & I nternet Status I ndication
Scenario LED 1 LED 2 LED 3 LED 4 Comments
WiFi Standby
(No WLAN connection & No
WiFi connected)
[X][X][G][B]ㅡ LED3 : Green - Solid
WiFi Connected
(WiFi connected but no data
transfer)
[X][X][B][B]ㅡ LED2 : Blue - Solid
Data Transfer [X][X]
[B]
- Blinking
in proportion to
data rate -
[B]
ㅡ LED2 : Blue - Blinking
ㅡ Blinking rates depends on the
data transfer rates
Combined I ndication
Scenario LED 1 LED 2 LED 3 LED 4 Comments
OTADM Downloading and
Updating
[B]
- Blinking
→
[B]
→
Blinking
→
[B]
→
Blinking -[B]
ㅡ LED1, LED2, LED3 : Blue -
Blinking Sequentially
No SIM [W][W][W][B]
ㅡ LED1, LED2, LED3 : White -
Solid

assembling and preparing your mobile
device
Get started by assembling and setting up
your mobile device for its first use.
Install the SIM card and battery
When you subscribe to a cellular service, you will receive a Subscriber Identity Module, or SIM card, with subscription details,
such as your personal identification number (PIN) and optional services.
To install the SIM card and battery,
1. Remove the battery cover. If the device is on, press and hold [ ] to turn it off.
2. Insert the SIM card. Place the SIM card in the device with the gold-coloured contacts facing down.
3. Insert the battery.
4. Replace the battery cover.
Charge the battery
Before using the device for the first time, you must charge the battery.
1. Open the cover to the multifunction jack on the side of the device.
2. Plug the small end of the travel adapter into the multifunction jack. Improperly connecting the travel adapter can cause
serious damage to the device. Any damages by misuse are not covered by the warranty.
3. Plug the large end of the travel adapter into a power outlet.
4. When the battery is fully charged (the [|||||] icon is no longer moving), unplug the travel adapter from the power outlet.
5. Unplug the travel adapter from the device.
6. Close the cover to the multifunction jack.
About the low battery indicator
When your battery is low, the device will change its LED color from green to yellowr. If the battery level becomes too low, it will
show red colors and the device will automatically power off. Recharge your battery to continue using your device.
Connecting your device
Getting Connected
With your new mobile hotspot and your computer, a wireless Internet connection can always be at your fingertips.
Connecting to Your Device
The following should occur once you press the Power Key ():
• Your device is powered as soon as you press the Power Key () and the Power LED lights up solid green
(if there is more than a 20% charge.)
• Once your device is powered and has been activated, it automatically connects to the Internet provided
that Mobile Broadband service is available and one or more Wi-Fi devices are connected with your device.
• The 3G and/or 4G LTE Status LED indicator on the device lights solid green
(if there is more than a 20% charge) to indicate the device is in service and ready to connect.
3G/4G LTE Network
Auto-connect enable
If enabled, the 3G/4G LTE Mobile Hotspot will connect to the network whenever it is powered up.
If disabled, a connection must be established manually, using this Web UI.
Exposure to Radio Frequency (RF) Signals
Your wireless device is a radio transmitter and receiver.
It is designed and manufactured not to exceed the
exposure limits for radio frequency (RF) energy set by
the Federal Communications Commission (FCC) of the
U.S. government. These FCC exposure limits are derived
from the recommendations of two expert organizations,
the National Counsel on Radiation Protection and
Measurement (NCRP) and the Institute of Electrical
and Electronics Engineers (IEEE). In both cases, the
engineering experts drawn from industry, government,
The exposure limit set by the FCC for wireless mobile
devices employs a unit of measurement known as the
the rate of absorption of RF energy by the human body
expressed in units of watts per kilogram (W/kg). The FCC
requires wireless devices to comply with a safety limit
of 1.6 watts per kilogram (1.6 W/kg). The FCC exposure
limit incorporates a substantial margin of safety to give
additional protection to the public and to account for
any variations in measurements.
SAR tests are conducted using recommended operating
positions accepted by the FCC with the device
tested frequency bands. Although the SAR is determined
of the device while operating can be well below the
maximum value. This is because the device is designed
to operate at multiple power levels so as to use only the
power required to reach the network. In general, the
closer you are to a wireless base station antenna, the
lower the power output.
Before a new model device is available for sale to the
it does not exceed the exposure limit established by
the FCC. Tests for each model device are performed in
positions and locations (e.g. near the body) as required
by the FCC.
Health and safety information
For typical operations, this model device has been
tested and meets the FCC exposure guidelines.
SAR information on this and other model devices can
be viewed on-line at http://www.fcc.gov/oet/ea/fccid/.
This site uses the FCC ID number A3LSCHLC11R.
You can check the FCC ID in Label inside the battery compartment.
Once you have the FCC ID number for a particular device,
follow the instructions on the website and it should
provide values for typical or maximum SAR for
a particular device
SAR information can also be obtained at www.fcc.gov/
cgb/sar.
Operating Environment
Remember to follow any special regulations in force in
any area and always switch your device
forbidden to use it, or when it may cause interference or
danger. When connecting the device or any accessory to
another device, read its user’s guide for detailed safety
instructions. Do not connect incompatible products.
FCC Notice and Cautions
FCC Notice
This device complies with Part 15 of the FCC Rules. Operation is subject to the
following two conditions:
(1) this device may not cause harmful interference, and
(2) this device must accept any interference received, including interference that
may cause undesired operation.
This equipment has been tested and found to comply with the limits for a Class B
digital device, pursuant to part 15 of the FCC Rules. These limits are designed to
provide reasonable protection against harmful interference in a residential
installation. This equipment generates, uses and can radiate radio frequency
energy and, if not installed and used in accordance with the instructions, may
cause harmful interference to radio communications. However, there is no
guarantee that interference will not occur in a particular installation. If this
equipment does cause harmful interference to radio or television reception, which
can be determined by turning the equipment off and on, the user is encouraged
to try to correct the interference by one or more of the following measures:
- Reorient or relocate the receiving antenna.
- Increase the separation between the equipment and receiver.
- Connect the equipment into an outlet on a circuit from that to which the
receiver is connected.
- Consult the dealer or an experienced radio/TV technician for help.
The equipment may cause TV or radio interference if used in close proximity to
receiving equipment. The FCC can require you to stop using the equipment if such
interference cannot be eliminated. Vehicles using petroleum gas (such as
propane or butane) must comply with the National Fire Protection Standard
(NFPA-58). For a copy of this standard, contact the National Fire Protection
Association, One Battery march Park, Quincy, MA 02269, Attn: Publication Sales
Division.
Cautions
Changes or modifications made in the radio device, not expressly approved by Samsung,
will void the user’s authority to operate the equipment.
The use of any unauthorized accessories may be dangerous and void the device warranty if
said accessories cause damage or a defect to the device. Although your device is quite
sturdy, it is a complex piece of equipment and can be broken. Avoid dropping, hitting,
bending or sitting on it.