Samsung Electronics Co SCHN150 Tri-Mode Dual-Band Analog/PCS Phone User Manual FCC SCH N150
Samsung Electronics Co Ltd Tri-Mode Dual-Band Analog/PCS Phone FCC SCH N150
UserManual.wiki
>
Samsung Electronics Co
>
SCHN150 User Manual
Users Manual
Navigation menu
Upload a User Manual
Namespaces
Wiki Guide
HTML
PDF
Info
Views
User Manual
Discussion / Help
Navigation


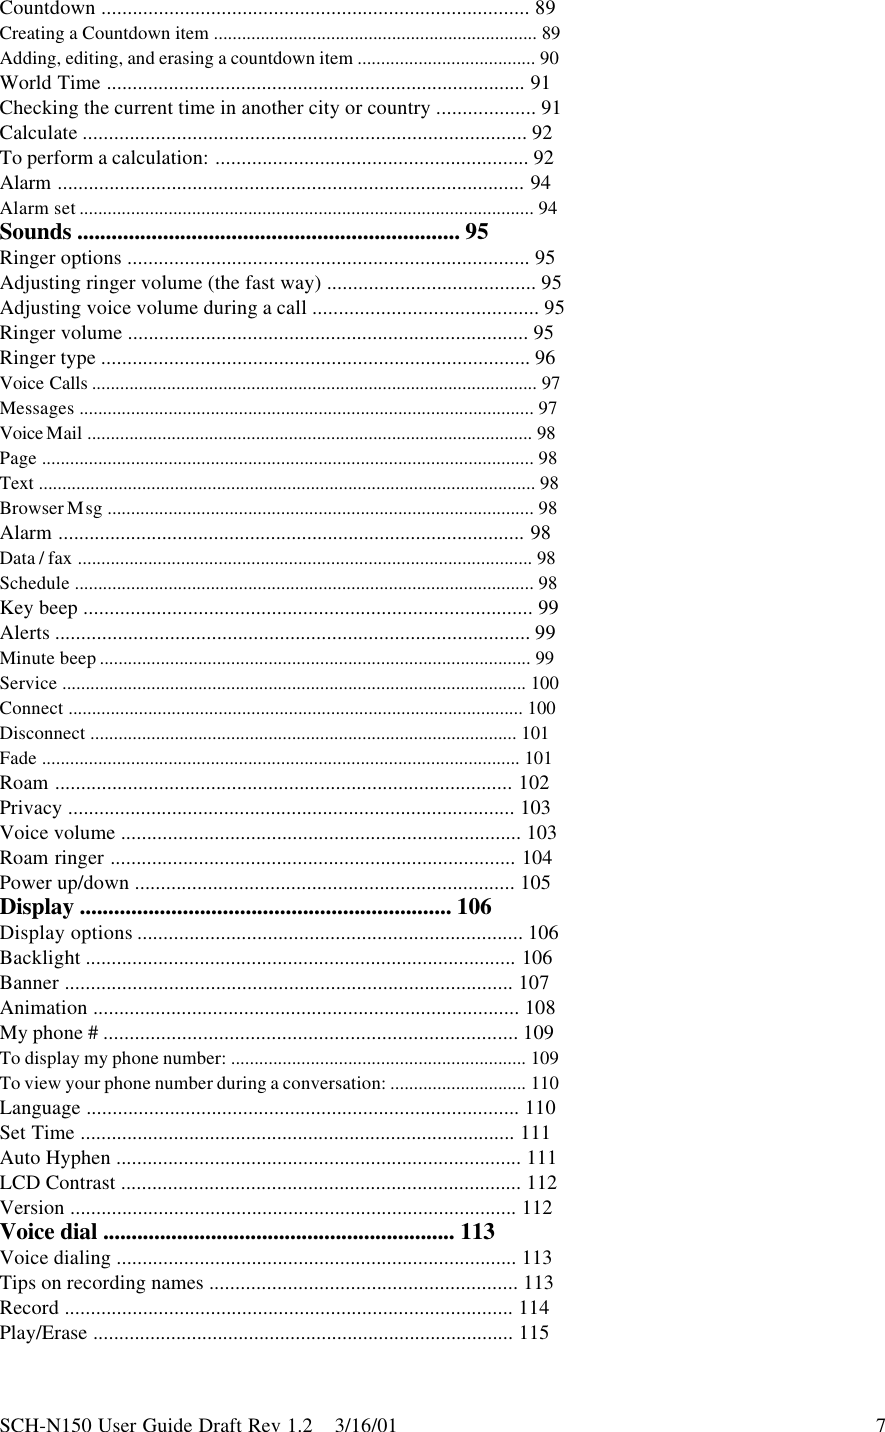


![SCH-N150 User Guide Draft Rev 1.2 3/16/01 12Getting to know your phoneAntennaA device for transmitting or receiving signals. The shape and size of theantenna is determined, in part, by the frequency of the signals that theyreceive. An antenna makes the call sound clearer when it is fullyextended. Use only in the normal position and do not touch theantenna unnecessarily when the phone is active.Backlight featuresYour keypad has backlighting for easy visibility. For further informationon this feature see “ Backlight” on page 106.C (Clear) key:The clear key is used to erase numbers or characters have beenentered incorrectly, or it can be used to return to a previous screen in the menu..If an incorrect number or character has been entered on the displayscreen, press the C key once briefly, to erase it..To erase all digits or characters from the display screen, press this key for one second..To back up one menu level, press once, briefly..To return to standby mode from any menu, press .Display screenThe display has two areas, an upper line of stationary icons, and thelower text and graphic area..The top line of icons shown on the LCD (liquid crystal display), aredisplayed according to the phone’s operating mode. For furtherinformation see “ Turning your phone on” on page 25..The lower area of the LCD displays the In -Use information, for example (ifavailable), the calling party’s name and number, the call timer, mute andcall waiting, as well as menus, sub menus etc.End (power on/off key)This key is utilized several ways:.Press and hold [END] to turn on your phone..Press and hold [END] to turn off your phone..Press [END] once to disconnect a call or to return to standby mode and cancel your input.Front flipClosing your phone’s flip ends a call except when you are sending new messages from the Mail Kit.There are several options that can be set when you open the phone’s flip:.Answer an incoming call: To set this option, and for further information see “ Answer mode” on page 129.Voice dial an individual: To set this option, and for further information see “ Play/Erase” on page 119..Control the backlight: To set this option, and for further information see“ Backlight” on page 106.Headset connectorThis is where the optional headset is connected. The headset includesan earpiece and microphone in a convenient, lightweight unit so youcan converse without using your hands..Before using, gently pry open the top of the cover to expose the headsetconnector.](https://usermanual.wiki/Samsung-Electronics-Co/SCHN150/User-Guide-145102-Page-13.png)
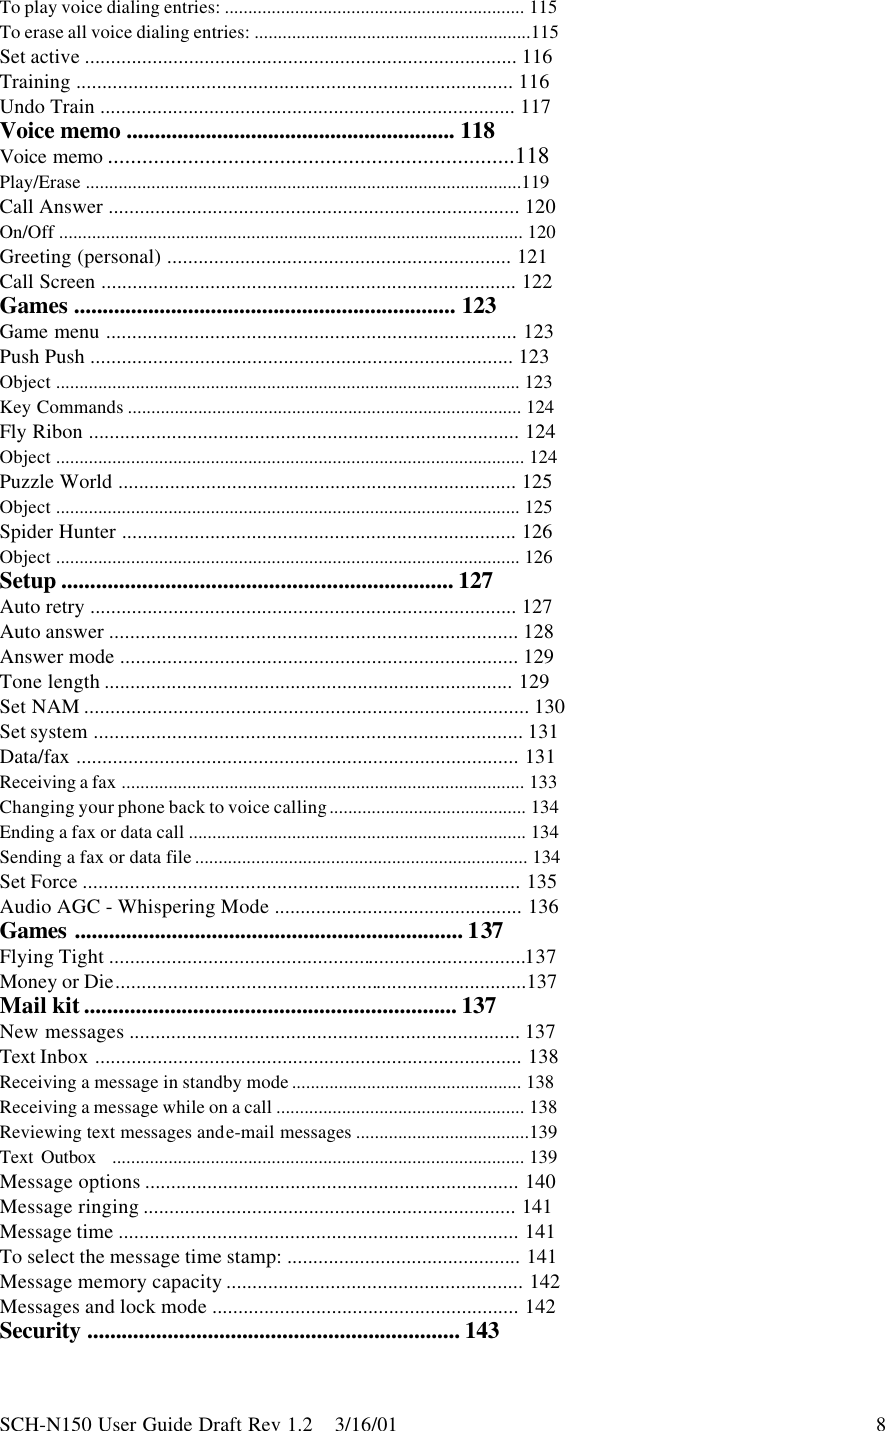
![SCH-N150 User Guide Draft Rev 1.2 3/16/01 13Right Navigation KeyPressing navigation key right allows you to access certain information such as stockquotes and weather via the Internet. Browsing the web via the phone isnot the same as using your computer. Site providers have selected onlythe critical aspects of their site to present to wireless phone users, andhave removed most graphics.Large LED indicatorFlashes to indicate an incoming call or message. When the phone isclosed and the ringer is set to off, the LED indicator will notify you thatthere is an incoming call or message..Lights up when you turn on the phone..When connected to chargers, shows red if not fully charged, and turns green if fully charged.Menu keyPress to enter the menu facility.MicrophoneA typical microphone used for conversation, but this microphone alsoaccepts voice commands for voice dialing.ReceiverIs for listening to voice conversations.Travel adapter outletLocated at the bottom of the phone..Before using, gently pry the cover from the phone to expose the traveladapter outlet..Plug in the travel adapter that is supplied with your phone..Using your thumb and first finger, gently squeeze the two buttons locatedon either side of the travel adapter and insert into your phone’s outlet.The yellow arrow on the travel adapter should be facing upwards andpointing toward the phone..When you unplug the travel adapter from your phone, squeeze the sametwo buttons and pull gently on the charger to disconnect without causingdamage to either device.Numeric key functionsNumeric keys can be used to enter text, numbers and special characters.Send keyThis key performs several useful functions:.Press [SEND] to answer calls..Dial a number and press [SEND] to connect..Press it twice in when in standby mode to redial the last outgoing number.OK/ Message keyWhen in the menu facility, this key stores information that youhave entered and acts as an “ OK” button when you press it center. When in standby mode, it functions as a “Mail Kit” access key toreview received messages and send messages.](https://usermanual.wiki/Samsung-Electronics-Co/SCHN150/User-Guide-145102-Page-14.png)
![SCH-N150 User Guide Draft Rev 1.2 3/16/01 14Entering text, numbers, or symbolsAt various times when using your phone, you will need to enter text.For example, when storing a name in the Phone Book, entering eventsin your Calendar, or creating a bookmark in the MiniBrowser.If you want to enter text on the display screen, selecting the [MENU] keygives you the opportunity to enter T9 Word, ABC, 123 or Symbols. To change theInput Mode:1. Scroll through the options presented, then press the [OK/Message] key to select.Note: To change the input mode, press [MENU] to display options. Use the navigation key and [OK/Message]to select your choice and begin typing normally.2. The menu key allows you to choose from 4 options:. Word: This is the predictive word entry mode, allowing quick and easy entry of frequently used words.. ABC: This is the alpha mode. See Note below.. Symbol: For numbers that have symbols associated.. 123: This is the number mode.3. Entering text, numbers, or symbols:.Press [# Space] to insert a space..Press [C] to clear the last number, letter, or symbol, or.Press and hold [C] to completely clear the input field..If you wish to change input mode again, press [MENU] to display the input options,then [OK/Message] to change and lock in the option of choice.Alphabetical text entryAlphabetical text characters may be entered in the alphabetical Input Mode,or ABC mode, by pressing the key corresponding to the letter that you wantto enter. Press the same key repeatedly to change between the charactersrepresented by each key. To change capitalization formats while entering text,press the [* Shift] key to toggle between ABC, Abc, and abc modes.Note: For example, quickly press [2 ABC] three times to display the letter‘C’, and quickly press the [5 JKL] key twice to display the letter ‘K’. This iscalled multi-tap typing.Number entry123 mode enables you to enter numbers into a text message. Pressthe keys corresponding to the desired digits, and manually switch backto text entry mode of choice using [MENU].Symbol entrySymbol mode enables you to enter symbols into a text message. Use the[MENU] key to display the options and press the navigation key up or downto select the symbol option. When displayed, use the navigation key to manipulatethe symbols. When in Symbol input mode, press the key shown on thedisplay under the symbol that you desire to enter.Here are the list of available symbol characters:.[1 .−’]! _ \.[2 ABC] @ + ?.[3 DEF] # = ..[4 GHI] % : ,.[5 JKL] & ” {](https://usermanual.wiki/Samsung-Electronics-Co/SCHN150/User-Guide-145102-Page-15.png)
![SCH-N150 User Guide Draft Rev 1.2 3/16/01 15.[6 MNO] * ’ }.[7 PQRS] < ( $.[8 TUV] > ) [.[9 WXYZ] - / ].[0 Next] 0Word or T9® text entryT9word, T9 Text Input, enables you to easily enter text.T9 (for “text on 9 keys” ) requires only one key press per letter andquickly recognizes the most commonly used word of a numeric sequence.For example, to enter the word “ hello,” you can spell out the word bypressing only five keys, 4-3-5-5-6. T9 Text Input knows the mostcommonly used sequence for that numeric sequence is “hello” .If two or more words share the same numeric sequence, T9 softwareprovides the most commonly used word, with the ability to scroll to thenext most commonly used word by pressing the [0 Next] key.Press the [0 Next] key repeatedly to display all of the available words that T9knows. When the word you want displays, continue to enter text in thesame way, or change to another text or character entry mode.Note: To type words not found in the T9 mode, change the text input mode toABC (Alpha) mode. Words typed in this mode are automatically added to the T9dictionary so you can type them using the T9 English mode the next time. Youcan include numbers between letters without exiting the T9 input mode bysimply pressing and holding the desired numeric key.](https://usermanual.wiki/Samsung-Electronics-Co/SCHN150/User-Guide-145102-Page-16.png)
![SCH-N150 User Guide Draft Rev 1.2 3/16/01 16Getting StartedGetting serviceYou must contact your service provider to obtain service for your Samsung N150phone. It is suggested that you read this user guide to fully understandthe features that your phone supports.Turning your phone onWhen you are ready to turn your phone on, fully extend the antenna forthe clearest reception. Open the phone’s flip cover and selectthe [END] key and hold down for more than one second to turn thephone on:Note: Your phone has a built-in antenna. As with any other radio-transmittingdevice, do not touch the antenna as it affects call quality and can cause thephone to operate at a higher power level than is necessary.The service light in the top left of the phone flashes, and an alertsounds. The phone begins searching for a network signal. When asignal is found, the date, time and day display, and the phone entersstandby mode. You can now send and receive calls. The standby modescreen is shown below:. Signal strength icon .. Battery strength icon. Time and date. . Roam. Message. Digital Mode. VibrateNote: If the phone is out-of-service the icon displays. If this happensyou cannot place or receive calls. You can try later when service becomesavailable. For further information see “ The top line of the display screen” onpage 36Answering a callWhen you receive a call, the phone will ring and a phone icon isdisplayed on the screen. If the caller can be identified, the caller’sphone number (or name if pre-stored in your Phone Book) isdisplayed. If the caller cannot be identified, only the phone icon and “Number Unavailable” displays.There are several ways to answer an incoming call (See Answer Mode on page 129?):.Open the flip..Press the [SEND] key..Press any key.You can also easily set your phone to automatically answer a call after 5 rings,3 rings, or 1 ring by setting the Auto Answer feature (See page 129?). This canbe useful when driving around in a hands-free environment.Turning your phone offTo turn your phone off, press and hold the [END] key for more than 2seconds. Notice that when the phone is turned off, both the displayscreen and backlight are off.Note: If your phone is on and the [END] key is selected for less than onesecond, the phone will not turn off. This feature stops your phone from beingturned off accidentally.](https://usermanual.wiki/Samsung-Electronics-Co/SCHN150/User-Guide-145102-Page-17.png)
![SCH-N150 User Guide Draft Rev 1.2 3/16/01 181.Minute Beep2.Service3.Connect4.Disconnect5.Fade6.Roam7.Privacy5.Voice Volume6.Roam Ringer7.Pwr Up/Down6.Display1.Backlight2.Banner3.Idle Screen4.My Phone #5.Language6.Set Time7.Auto Hyphen8. Version7.Voice Dial1. Record2. Review3. Erase All4. Set Active5. Language6. Training7. Undo Train8.Games1. 1.Flying tight 2.Money or die9.Setup1.Auto Retry2.Auto Answer3.Answer M de4.Tone Length5.Set NAM6.Set System7.Data/Fax8.Set Force9.Whisper Mode0.Security1.Lock Mode2.Restrict3.Lockcode4.Emergency #5.Send Pin6.Clear Mem7.Reset Phone8.Voice Privacy[OK/Message] Key1.New Messages2.Voice3.Txt Inbox](https://usermanual.wiki/Samsung-Electronics-Co/SCHN150/User-Guide-145102-Page-19.png)
![SCH-N150 User Guide Draft Rev 1.2 3/16/01 194.Txt Outbox5.Filed Msg6.Msg Setup1.General1.Scroll Timer2.Msg. Reminder2.New Message1.Call Back #2.Save Message3.Entry Method4.Delivery Ack5.Canned Msg3.Erase1. Entire Inbox2. Entire Outbox3.All Messages[In-Use Menu: During a call]1. Mute/Quit2. Calls3. PhoneBook4. Silent/Quit5. Send Tel#6. My Phone#7. Version8.Voice Privacy](https://usermanual.wiki/Samsung-Electronics-Co/SCHN150/User-Guide-145102-Page-20.png)
![SCH-N150 User Guide Draft Rev 1.2 3/16/01 20Using your phone’s menusThe phone offers a range of functions that allow you to tailor the phoneto your personal requirements. These functions are arranged in menusand submenus.The menus and submenus can be accessed by scrolling or using shortcuts.Accessing menus by scrollingMenu items are numbered and can be accessed by scrolling thenselecting that option. For example:1.Press the [MENU] key in standby mode to access the menu.2.To enter the Sounds menu, press the navigation key right until the Sounds menu animation displays.3.Press the [OK/Message] key to select this option.4. Again, press the navigation key right or down to scroll to Alerts.5. Press the [OK/Message] key to enter the Alerts menu.6. Scroll to Connect, using the same navigation key.7. Press the [OK/Message] key to enter the Connect menu.8. Press the navigation key up or down to select the desired setting.9. Press the [OK/Message] key to confirm your selection.10. Your phone saves this setting and returns to standby mode.Returning to the previous menu.To return to the previous menu, press the [C] key..Select the [C] key to exit the menu without saving the setting.Accessing menus by using their short cut numberThe menu items are numbered and can be accessed by using theirshortcut numbers.1. In standby mode, press the [MENU] key to access the menu options.2. Key in the first digit of the required ‘shortcut’ number shown on thedisplay, repeat this action for each digit displayed as menus are displayed.For example:Setting the Connect tone to ‘on’.1. Press the [5 JKL] key for Sounds.2. Press the [4 GHI] key for Alerts.3. Press the [3 DEF] key for Connect.Note: For further details see “ List of menu functions” on page 27 for thenumbers assigned to each menu item.Your phone’s modesLock modeWhen you lock your phone using the Lock mode menu option, phoneuse becomes restricted. You can receive messages and calls, but youcannot make an outgoing call until the phone is unlocked. To unlockthe phone, press [MENU], navigation key, or [OK/Message] key and enter thelock code. The phone will return to standby mode.Power save modeYour phone comes with a Power Save feature that automaticallyactivates if your phone is unable to find a signal after 15 minutes ofsearching. While this feature is active, the phone’s battery charge isconserved. The phone automatically rechecks periodically for a signal.To manually force the phone to recheck for a signal, press any key. A](https://usermanual.wiki/Samsung-Electronics-Co/SCHN150/User-Guide-145102-Page-21.png)
![SCH-N150 User Guide Draft Rev 1.2 3/16/01 21message on the display screen will inform you when your phone isoperating in the Power Save mode.Standby modeStandby is the fundamental state of your phone. The phone goes intostandby mode soon after you turn it on, or if your phone is on,whenever you press the [END] key. When your phone is in standbymode, you will see the power up animation (the animation displayedwhen you turn on your phone), and the service provider logo, followedby the date/day/time and the active top line icons.While in standby mode, you can enter a phone number, press the [SEND]key to dial it, or press the [OK/Message] key to save it in the Phone Book.Press the [END] key at any time to return to the standby mode, but becareful; if you are on a call when you press the [END] key, you willreturn to standby mode and disconnect the call.The menu is accessed when you are in standby mode by pressing the [MENU]key. For further details see “ List of menu functions” on page 27for a listing of the menu items.Send/Talk modeYou can send and answer calls only when your phone is turned on.During a call, the phone is in conversation or talk mode. While you arein this mode, pressing [MENU] gives you a list of options referred to as‘In-Use Options’.](https://usermanual.wiki/Samsung-Electronics-Co/SCHN150/User-Guide-145102-Page-22.png)
![SCH-N150 User Guide Draft Rev 1.2 3/16/01 231. Insert the contact end on the bottom of the battery into the slots on thebottom of the phone.2. Slide the battery up until you hear it click into place.Removing the batteryTo remove the battery from your phone:1. Turn the phone off (by pressing and holding [END] until the closinganimation sequence begins.)2. Push the catch button up on the top of the battery on the back side of thephone. (see illustration). The battery will easily slide out from the phone.Charging the batteryNote: A standard battery is provided with your phone. The battery must be fullycharged before using your phone for the first time. The phone can be usedwhile the battery is charging.Your phone is powered by a rechargeable Li-ion battery. Only useSamsung approved chargers and batteries. These chargers aredesigned to maximize battery life. Using other chargers voids yourwarranty and may cause damage.When the phone has finished charging it can be disconnected from the charger.Low battery indicatorYou can tell whether or not your battery needs to be recharged bychecking the indicator (it’s located in the upper-right corner ofthe display). The presence of all three bars indicates a full charge, twobars indicates a medium charge, and one bar indicates a minimumcharge. No bars (the battery icon is empty) indicates the battery nolonger has any charge and must be recharged.The empty battery iconTwo to three minutes before the battery charge level gets too low tooperate the phone, the battery sensor will let you know by blinking anempty battery icon ( ), and sounding a tone. If you continue tooperate the phone without charging the battery, the phone will turn offautomatically. If this happens, your wireless call will be ended. But ifyou plug into a charging device, you can continue your call. Be sure tomonitor the battery strength icon and make sure your battery issufficiently charged.Charging with the travel adapterThe travel adapter allows you to charge your phone’s battery from anystandard 110 V AC wall outlet. Also, using the travel adapter allows you tomake a phone call while the battery is charging. The travel adapter willfully charge an “ empty” standard battery in about three hours, and an“ empty” extended battery in about four hours.Follow these steps:1. With the battery connected to the phone, connect the travel adapter tothe accessory connector on the bottom of the phone.2. Connect the charger to a standard 110 V AC wall outlet. The battery begins charging.3. The LED on the travel adapter indicates the status of the battery charge.. Red indicates that the battery is charging.. Green indicates that the battery is fully charged.. Flashing Red indicates that the battery is operating at a temperature that is too high or too low, or that the charger is not plugged in correctly.](https://usermanual.wiki/Samsung-Electronics-Co/SCHN150/User-Guide-145102-Page-24.png)
![SCH-N150 User Guide Draft Rev 1.2 3/16/01 25CallsOutgoingTo place a call:1. Press [END] to power on your phone. The phone first shows ananimated sequence and the icons discussed earlier will display Thisindicates your phone is turned on. (Note that you will not hear a dial tone).2. Enter the phone number you wish to call (up to 32 digits) by pressing thedigit keys. The phone number is displayed from left to right.3. Press the [SEND] key. The phone calls the number entered.IncomingYour phone signals an incoming call or message in the following ways:.The backlight illuminates..The red LED on the top of the handset flashes..The ringer sounds (unless you have set the ringer to Vibrate or Off).Incoming call notification continues until one of the following events occurs:.You answer the call..The calling party ends the call..The call is sent to Voicemail.Your phone provides the following voice call notification features..Eight ring volume settings and Vibrate or Off..Nine unique monotone ring types and four melody tones (see “ Ringer type” on page 96)..Name display with Caller ID, if available..Automatic storage of an incoming call’s information in the Call logs(the last 10 calls you answered are stored in the Incoming call log andthe last 10 calls you missed are stored in the Missed call log).MissedYour phone keeps a list of calls that were not answered when thephone is on and service is available. The phone indicates a missed callby displaying a text notification on the screen. Additionally, if callerinformation is available, a Missed entry is created, and the screendisplays the phone number of the most recent missed call.Your phone gives you two very convenient options when you havemissed a call:.Press [SEND] to call the displayed number..Pressing [OK/Message] saves the number in the Phone Book.To view a list of your missed calls, see “Reviewing outgoing, incoming or missed calls ” on page ?..Press [C] to clear the “ Missed Call” message from the display.Erase LogsYou can erase any of the three lists (Outgoing, Incoming or Missedcalls) or you can easily erase all three lists at once. Here is an example:1. Press [MENU] to display the menu.2. Press [1 .-’] for the Call menu.3. Press [4 GHI] for Erase Logs.4. Press [4 GHI] for All.5. Pressing [OK/Message] erases all your logs.6. Pressing [C] cancels the action if you do not wish to erase all your logs:Keeping track of call logsYour phone saves a log of call activity and permits you to easily return calls.](https://usermanual.wiki/Samsung-Electronics-Co/SCHN150/User-Guide-145102-Page-26.png)
![SCH-N150 User Guide Draft Rev 1.2 3/16/01 26Your phone retains the following call logs in memory:.Outgoing - the last 10 calls dialed..Incoming - the last 10 incoming calls..Missed - the last 10 calls missed.Each Call Log contains the name and phone number (if available).In addition to the Incoming, Outgoing, and Missed calls lists, yourphone maintains an air time log. For further information see “ AirTime” on page 47.You can quickly access your last ten incoming, outgoing, and missedcalls from standby mode by pressing [MENU] [1 .-’]. Then justusing the navigation key and [OK/Message] to review your calls.Reviewing outgoing, incoming, or missed callsWhen a call log is displayed, press the appropriate number to beautomatically connected.1. Press [MENU] to display the menu.2. Press [1 .-’] for Calls.. Press the associated digit key to select an option:. Press [1 .-’] for Outgoing calls.. Press [2 ABC] for Incoming calls.. Press [3 DEF] for Missed calls.3. When the list of calls displays, press the navigation key to scan the logs. Ifthere is a Phone Book match, the name displays. If there is no PhoneBook match, only the phone number displays.4. When a log is highlighted you can press:. [SEND] to be connected to that party.. [OK/Message] to review information available on that call (name and phone number (if available) and time/date stamp).. When you are viewing this information you can press [OK/Message] for more options (Talk, Store , and Prepend the number).5. Press [C] to exit the Call Logs list and return to the previous screen.To view Call Logs during a conversation:1. Press [MENU] to display the In-Use Menu.2. Press [2 ABC] for Calls.3. You can select Outgoing, Incoming, Missed call logs to review.4. Press [C] to exit the Call Logs list and return to the previous screen.Air TimeYour phone logs the amount of air time or talk time used for all calls.You can view the last five incoming, outgoing, and missed calls logsfrom standby mode:To view the call logs:1. Press [MENU].2. Press [1 .-’] for Calls.3. Select [5 JKL] for Air Time.4. Then use the scroll key to review your options.5. Press the desired key to be automatically connected to the option of choice.Last callLast Call allows you to view the amount of time spent on the last call made:1. Press [MENU] to display the menu.2. Press [1 .-’] for Calls.3. Press [5 JKL] for Air Time.](https://usermanual.wiki/Samsung-Electronics-Co/SCHN150/User-Guide-145102-Page-27.png)
![SCH-N150 User Guide Draft Rev 1.2 3/16/01 274. Press [1 .-’] for Last Call. The amount of time spent on your last call displays.5. Press [C] to return to the previous display screen, or press [OK/Message] to quit.Home CallHome Call air time is the amount of time the phone has been used in your home service areassince it was last erased. Air times for all incoming and outgoing calls are saved here.This feature is not intended for billing purposes.To view or erase total air time:1. Press [MENU] to display the menu.2. Press [1 .-’] for Calls.3. Press [5 JKL] for Air Time.4. Press [2 ABC] for Home Call. The screen displays the total number of callsand the total air time for calls made from your Home service areas since you set this total to zero (by usingthe “ Erase Total” option).5. Press [C] to return to the previous display screen, or press [OK/Message] to quit.Roam CallRoam Call air time is the amount of time the phone has been used in your roaming service areassince it was last erased. Air times for all incoming and outgoing calls are saved here.This feature is not intended for billing purposes.To view or erase total air time:1. Press [MENU] to display the menu.2. Press [1 .-’] for Calls.3. Press [5 JKL] for Air Time.4. Press [3 DEF] for Roam Call. The screen displays the total number of callsand the total air time for calls made from your Roaming service areas since you set this total to zero (by usingthe “ Erase Total” option).5. Press [C] to return to the previous display screen, or press [OK/Message] to quit.LifetimeLifetime air time is the amount of time the phone has been used since itwas first activated. Air times for all incoming and outgoing calls are saved here.To view your total lifetime air time:1. Press [MENU] to display the menu.2. Press [1 .-’] for Calls .3. Press [5 JKL] for Air Time.4. Press [4 GHI] for Lifetime.5. Press [OK/Message] to quit or [C] to return to the previous menu.Note: You cannot erase any information created by this option.Erase AllTo erase your total air time:1. Press [MENU] to display the menu.2. Press [1 .-’] for Calls.3. Press [5 JKL] for Air Time.4. Press [5 JKL] to Erase Total. Press [OK/Message] to erase the “Last Call”, “ Home Call ”, and “ Roam Call ” airtime measurement, or press [C] to cancel the operation and return to the previous display screen.Note: If you choose the Erase All option, the counters for all air times except Lifetime is reset to “ zero ” andbegins counting the next time you make or receive a call.](https://usermanual.wiki/Samsung-Electronics-Co/SCHN150/User-Guide-145102-Page-28.png)
![SCH-N150 User Guide Draft Rev 1.2 3/16/01 28Phone BookYour phone allows you store up to 90 numbers and names in thePhone Book. Each entry can have up to 8 associated phone numbers.Each entry can contain up to 32 digits including hard pauses, with anassociated name of up to 12 characters. (Name entry is optional)Stored phone numbers can be categorized as one of eight categories -Speed Dial, Home, Office, Mobile, Pager, Fax, No Label, and Voice Dial.The memory location can be specified for each entry. You can also storean e-mail address associated to each entry. Memory locations can bemarked “Secret”, preventing any unauthorized viewing the telephone number.One-Touch and Two-Touch dialing makes it easy to call a phonenumber stored in your Phone Book. See “ Shortcuts to memory dialing” on page 70.Find NameThis option allows you to find an entry by location name :1. Press [MENU] to display the menu.2. Press [2 ABC] for the Phone Book.3. Pressing [1 .-’] displays the Find Name option.4. Use the navigation key up or down to scroll the entry names or numbers.5. Pressing [OK/Message] selects the number.6. The phone display screen shows the details.7. Press [SEND] to place the call, or enter the first few numbers of thephone number to display the speed dial number. For further informationsee “ Setting speed dial” on page 68.8. With a selected entry, pressing [MENU] allows you to access the following options:.Talk: Pressing Talk dials the number.Add #: Allows you to add a new phone number to the existing entry ..Edit: Edits the phone number, name, entry , secret setting, category, relation, or ring type..Prepend: Allows you to prepend extra digits to either a feature code or a phone number before dialing..Erase: Erases the number..Name Ring: Allows you to select a unique tone to identify an incoming call by the ringer type..E-mail adrs : Allows you to add an e-mail address.Note: Stored names display alphabetically.Add EntryThis option allows you to store a new phone number along with a name, location number,category, relation, and ringer type in your Phone Book.To add a new entry:1. Press [MENU] to display the menu.2. Press [2 ABC] for Phone Book.3. Press [2 ABC] for Add Entry.4. The display screen prompts ‘Add Entry’.5. Enter the phone number. (Up to 32 digits can be entered.) Press the digit keys to enter the phone number.6. Press [OK/Message] to save the entry, or press [MENU] for the following options: For further information see “Pause dialing” on page 65.Ÿ P pause: Adds a hard pause. Pauses can be very useful when dialing automated service numbers that require key tone entry such as for a calling card or credit card number.Ÿ T pause: Adds an automatic two second pause.Ÿ Hyphen: Hyphen allows you to add a hyphen between numbers.7. Press the navigation key up or down to scroll through the options.8. Press [OK/Message] to select the option. The option menu closes, and selected pause (P or T) or hyphen (-) displays.](https://usermanual.wiki/Samsung-Electronics-Co/SCHN150/User-Guide-145102-Page-29.png)
![SCH-N150 User Guide Draft Rev 1.2 3/16/01 299. Press [OK/Message] to save the entry and option.10. Press [OK/Message] again to select ‘000:New Entry?’.11. Your phone book options screen display. Scroll through the following options, pressing the navigation key up or down . The phone allows you to overwrite any existing information, or if nothing is displayed, you can enter information or select from options.Ÿ Number: Telephone numberŸ Name: Associated Name.Ÿ Entry : The memory location number allocated to the name in the list of names and numbers you created.Ÿ Secret: This field allows you to set the added entry “secret” to prevent other users from viewing.Ÿ Category: This is the category label associated with each phone number entry. For example; Speed Dial, Home, Office, Mobile, Pager, Fax, No Label, or Voice Dial.Ÿ Relation : This is the relation group associated with each phone number entry. For example; No Group, Friend, Family, Colleague, or VIP.Ÿ Ring Type: This field allows you to set a distinctive Ring Type for the entry.11. Press [MENU] and edit the information, then press [OK/Message] to save the edited information.12. For example, to label a name to the entry, scroll to the Name display, press [MENU] to enter the name at the screen prompt, and press [OK/Message] to save. (The text entry mode default is ABC).13. As another example, to change the displayed category label, scroll to the Category display and press [MENU] to select from Speed Dial, Home, Office, Mobile, Pager, Fax, No Label, or Voice Dial. Then, press [OK/Message] to save setting.14. When editing options is complete, from the information display screen, press [OK/Message] to store entry information to the phone book.Find EntryThis option allows you to find an entry by location number:1. Press [MENU] to display the menu.2. Press [2 ABC] for the Phone Book.3. Press [3 DEF] for Find Entry. The Phone Book ‘Look Up’ screen displays.4. Press the navigation key to scroll through the entries or enter the memory location number for the entry.5. Press [OK/Message] to select the entry. The information for the entry displays.6. Scroll to the number that you wish to dial, then press [SEND] to place a call, or press [OK/Message] to display the entry name, phone number, and the category label associated with the entry. Note: If no name is associated with the number, the name label displays “No Name”.7. Pressing [MENU] permits access to the entry options. For further information on these options, see “ Find name” on page 53.Relation SearchThis option allows you to find an entry by relation group:1. Press [MENU] to display the menu.2. Press [2 ABC] for the Phone Book.3. Press [4 GHI] for Relation Search. Press the navigation key left or right to scroll through the relation groups displayed at the bottom of the screen.4. When you have reached a desired relations group, press the navigation key down tofind the desired entry within this group, then press [OK/Message] to select the entry.5. Press the navigation up or down to scroll through numbers under different category labels.6. Press [OK/Message] to select the desired number under a category label.7. Pressing [MENU] permits access to the entry options. For further information on these options, see “Find name” on page 53.](https://usermanual.wiki/Samsung-Electronics-Co/SCHN150/User-Guide-145102-Page-30.png)
![SCH-N150 User Guide Draft Rev 1.2 3/16/01 30Add e-mailTo add an e-mail address to a new phone book entry:1. Press [MENU] to display the menu.2. Press [2 ABC] for Phone Book.3. Press [5 JKL] for E-mail address.4. Enter the e -mail address using the alphanumeric keys. You can enter only up to 48 characters in length for an e-mail address.5. Press [MENU] to select from entry modes Word, ABC, Symbols, or 123.In ABC mode, you can press [* Shift] to toggle between lower case and upper case letters, andenter ‘@’ or ‘.’ by pressing [1 .-’] repeatedly. To enter ‘@’ or ‘.’ in Symbols mode, byenter the number associated with each symbol.6. Press [OK/Message] to save the entry . The “000: New Entry?” prompt displays.7. Press [OK/Message] again to display the phone book information screen.9. Scroll to the desired edit item, then p ress [MENU] to edit the information,or press [OK/Message] to save the information as it is.*NOTE: The Category label cannot be edited and only displays as “E-mail”.10. For example, to add a name to the entry, scroll to the Name display, press [MENU] toenter the name at the screen prompt, and press [OK/Message] to save setting.(The text entry mode default is ABC).10. As another example, to edit the displayed Entry Location number, scroll tothe Entry, press [MENU] to change to the desired entry location number,then press [OK/Message] to save setting.11. When editing options is completed, from the information display screen, press [OK/Message] to store the e-mail address and information to the phone book.Adding a new phone number to an existing entryTo store a new phone number to an existing entry:1. Press [MENU] to display the menu.2. Press [2 ABC] for Phone Book.3. Press [2 ABC] for Add Entry. Enter the phone number using the keypad andpress [OK/Message]. (You can enter up to 32 digits) Press the entry locationnumber or scroll down to the entry you wish to add this phone number andpress [OK/Message].4. Or, press [1 .-’] or [3 DEF] to find the name or the entry you wish toadd a new phone number. Press the entry name or location, or scroll down tothe entry you wish to add this phone number and press [OK/Message].Press [MENU] for options. Scroll down to “Add #” and press [OK/Message].Enter the phone number using the keypad and press [OK/Message]. (You can enter up to 32 digits)5. Edit the options from the information screen as necessary. (See page ?? under Add Entry)6. When editing is complete, press [OK/Message] to store the new number added.If you access this existing entry later, you can view this newly added phone numberunder the new category label or relation group saved.Editing the phone book entryA stored entry in the Phone Book can be easily changed.To change a Phone Book entry:1. From standby mode, press the navigation key left and search for the Phone Book entry thatyou want to change using one of the search methods described under “Find Name ” or“Find Entry” on page 52.2. Highlight the entry and press [OK/Message].3. Press [MENU] for Options.4. Press the navigation key down and select ‘Edit’ by pressing [OK/Message]. The Phone Book information screen will display.](https://usermanual.wiki/Samsung-Electronics-Co/SCHN150/User-Guide-145102-Page-31.png)
![SCH-N150 User Guide Draft Rev 1.2 3/16/01 315. Press the navigation key to scroll through the available choices. You can edit the phone number, the entryname, the entry location, and turn secret on or off, edit the entry category or relation, or change ring type.(See page ?? under Add Entry)6. Press [MENU] for options when the desired information is highlighted.7. Edit the information and p ress [OK/Message] to accept or [C] to return to the previous menu.8. Press [OK/Message] to save all the edits and exit.Prepending a phone numberThe Prepend option lets you add digits such as area codes and networkfeature activation codes in front of a phone number that is stored in yourPhone Book or Call Logs.Note: You can only enter up to 10 digits for prepending numbers to any phone number.To Prepend a stored phone number:1. Press [MENU] to display the menu.2. Press [1 .-’] for Calls or [2 ABC] for Phone Book.3. Find the number you want to Prepend using one of the search methods described under “Answering a call” on page 52, and then press [OK/Message].4. Press [MENU] to display options. Scroll down to “Prepend”.5. Press [OK/Message] to Prepend the number.6. The screen displays “ Prepending” . Use the keypad to enter the calling prefix digits and then press [SEND] to place the call.Erasing a phone book entryTo erase an entry in the Phone Book:1. From standby mode, press the navigation key left and search for the Phone Book entry thatyou want to erase using one of the search methods described under “Find Name” or “Find Entry” on page 52.2. Highlight the entry and p ress [OK/Message] to display the entry to erase.3. Press [MENU] for options.4. Scroll down to the ‘Erase’ option.5. Press [OK/Message] for Erase. Your phone will prompt for confirmation.Toggle between ‘Yes’ or ‘No’, then p ress [OK/Message] to confirm and erase the entry,or press [C] to cancel and return to the Phone Book information screen. The “Erased” notification displays.Erasing all entries in the phone bookSee “Clear MEM” on page 149.Adding a name ringerYou can associate nine tones or four melodies to thenumbers stored in your Phone Book. When you receive an incoming call froma number matching an entry in your Phone Book, your phone will play theassociated ringer to announce the call.Note: If the Caller ID information was unavailable for an incoming call, thenthe Name Ringer option will also be unavailable.To add a Name Ringer to a Phone Book entry:1. From standby mode, press the navigation key left and search for the Phone Book entry thatyou want to add a name ringer using one of the search methods described under “Find Name” or“Find Entry” on page 52.2. Highlight the entry and press [OK/Message].3. Press [MENU] for Options.4. Press the navigation key to scroll down to ‘Name Ring’ and press [OK/Message].](https://usermanual.wiki/Samsung-Electronics-Co/SCHN150/User-Guide-145102-Page-32.png)
![SCH-N150 User Guide Draft Rev 1.2 3/16/01 325. Your phone displays the current ringer setting. Use the scroll key to listen to available ringers and melodies.6. Press [OK/Message] to save the selected ringer.Adding an E-mail addressTo add an e-mail address to an existing entry:1. From standby mode, press the navigation key left and search for the Phone Book entry thatyou want to change using one of the search methods described under “Find Name ” or“Find Entry” on page 52.2. Highlight the entry and press [OK/Message].3. Press [MENU] for Options.4. Press the navigation key to scroll down to ‘E-mail adrs’ and press [OK/Message].5. Enter the e -mail address using the alphanumeric keys. You can enter only up to 48 characters in length for an e-mail address.6. Press [MENU] to select from entry modes Word, ABC, Symbols, or 123.In ABC mode, you can press [* Shift] to toggle between lower case and upper case letters, andenter ‘@’ or ‘.’ by pressing [1 .-’] repeatedly. To enter ‘@’ or ‘.’ in Symbols mode, byenter the number associated with each symbol.7. Press [OK/Message] to save the e-mail address to the entry.Setting phone book numbers to SecretYour phone allows you to hide a confidential number so that only a personwith your phone’s Lock Code can view the name and number.To make an existing entry “Secret”, see editing the phone book entry on page 59.When you have made the number “Secret”, the phone does not permitanyone to view information on that particular entry unless the four digitLock code is entered.Setting Speed DialFor each name entered in the Phone Book, the option of designating aSpeed Dial number is available.2. 1 From standby mode, press the navigation key left and search for the Phone Book entry thatyou want to change using one of the search methods described under “Find Name ” or“Find Entry” on page 52.2. Highlight the entry and press [OK/Message].3. Press [MENU] for Options.4. Press the navigation key down and select ‘Edit’ by pressing [OK/Message]. The Phone Book information screen will display.5. Use the navigation key to scroll to the Category option. Press [MENU].6. Scroll to the ‘Speed Dial’ label is displayed. To cancel, press [C] to return to the previous menu.7. Press [OK/Message] to select ‘Speed Dia l’.8. You will be prompted with “Overwrite?” message. Select‘Yes’ to confirm, or ‘No’ to cancel.Storing phone numbers at the end of a callTo store a phone number after ending an incoming call:1. Once you have pressed [END] to end your call, the screen displays the call time (length of call), phone number of the party (if available), and the “ OK: Save” option.2. To store the phone number, press [OK/Message]. The procedure from this pointis the same as “Add Entry” on page ??.Note: If the Caller ID information was unavailable, then the store option will be unavailable.](https://usermanual.wiki/Samsung-Electronics-Co/SCHN150/User-Guide-145102-Page-33.png)
![SCH-N150 User Guide Draft Rev 1.2 3/16/01 33To store a phone number from the Call Logs:1. Press [MENU] to display the menu.2. Press [1 .-’] for Calls.3. Press [1. –’] for Outgoing call logs or [2 ABC] for Incoming call logs.4. Scroll to the number in the logs to store to the phone book and press [OK/Message].5. Press [MENU] for options. Scroll down to ‘Store’ and press [OK/Message].6. Store the number to the phone book as a new entry or to update the existing entry.(See page ?? under Add Entry or page ?? under ‘Adding a new phone number under an existing entry’)Shortcuts to storing phone numbersIn standby mode, you can store a phone number quickly by entering the number, andthen pressing [OK/Message]. Then follow the prompts to designate the label,name and entry.Pause dialingWhen you call automated systems, you are some times required toenter a password or account number. Instead of manually entering thenumbers each time, the numbers can be stored in your Phone Bookseparated by special characters called pauses.There are two kinds of pauses that can be entered on your phone:Ÿ Hard pause (P pause) - A hard pause stops the dialing sequence until [SEND] is pressed.Ÿ Two second pause (T pause) - A two second pause stops the dialing sequence for two seconds and then automatically sends the remaining digits.Your phone has two pause dialing methods: pause dialing from thePhone Book (see “Pause dialing from a stored phone book entry” onpage 57), and manual pause dialing (see “ Manual pause dialing” on page 58).Note: Multiple two second pauses can be entered to extend the length of apause. For example, two consecutive two second pauses cause a total pausetime of four seconds. However, keep in mind that pauses count as digitstowards the 32 digit dialing maximum.Storing pauses in a phone book entryTo store a number in your Phone Book that contains pauses:1. Enter the phone number you want to store.2. Press [MENU] to display options. Press the navigation key to scroll and press [OK/Message] to enter the desired pause.Ÿ Select ‘P pause’ to insert a Hard Pause. The letter “P” displays within the number, meaning that a hard pause will occur at that point in the dialing sequence. Enter the digits that need to follow the pause (such as your account number).Ÿ Select ‘T pause’ to insert a two second pause. The letter “T” displays within the number, meaning that a “ Timed” pause will occur at that point in the dialing sequence. Enter the digits that need to follow the pause (such as your account number).3. Store the number in your Phone Book as you normally would by pressing [OK/Message] and following the display prompts.Pause dialing from a stored phone book entryPause dialing from the Phone Book:1. If you stored the number using a two second pause(s), simply dial the number from the Phone Book.2. If you stored the number using a hard pause(s), simply dial the number from the Phone Book and wait for the appropriate prompt from the number you are calling (credit card number, bank account number, etc.). When prompted, press [SEND] to send the number that](https://usermanual.wiki/Samsung-Electronics-Co/SCHN150/User-Guide-145102-Page-34.png)
![SCH-N150 User Guide Draft Rev 1.2 3/16/01 34 follows your hard pause. “SENDING DTMF” flashes on the screen (the transmitted tones are audible).Manual pause dialingTo perform manual pause dialing without first storing the number inthe Phone Book, enter pauses manually using the Digit Entry menuduring the dialing process.To manually dial a number using a pause(s):1. Enter the phone number of the service you want to call. For example, your bank’s automated phone number might be an 800 number.2. Press [MENU] to display digit dialing options. − Scroll and press [OK/Message] for a Hard Pause (P pause). The screen displays a “ P” indicating a hard pause. Enter the number to be sent after the pause by pressing the digit keys, and then press [SEND]. After connecting, press [SEND] again to transmit the additional number following the Hard Pause “P”.− Scroll and press [OK/Message] for a 2 second Pause (T pause). The screen displays a “ T” indicating a timed pause. The screen prompts for the number to be sent after the pause. Enter the number to be sent after the pause by pressing the digit keys, and then press [SEND]. The phone transmits the number that follows the pause 2 seconds after connection.Note: Storing numbers with pauses is convenient if you plan to dial the number often.To access your phone book during a conversation:1. Press [MENU] to display the In-Use Menu.2. Press [3 DEF] for Phone Book.3. Follow the procedures for “Find Name ” or “Find Entry” on page ??.](https://usermanual.wiki/Samsung-Electronics-Co/SCHN150/User-Guide-145102-Page-35.png)
![SCH-N150 User Guide Draft Rev 1.2 3/16/01 35Dialing numbers from the phone bookDialing numbers from your Phone Book is quick and easy. Differentmethods are explained below:Shortcuts to memory dialingSpeed Dialing: From standby mode, enter the number of thememory location, and press [SEND].Scrolling to the number: From standby mode, press the navigation key left toaccess the Phone Book and select [1 .-’] or [3 DEF].Scroll until the desired number is reached, then press [SEND] to dial.Note: For the One-Touch & Two Touch dialing to work as described below, thecategory setting in the phone book must be set to Speed Dial for the entry.One-Touch Dialing: Memory locations 1 through 9 are special One-Touchlocations. You can dial the phone numbers stored in the Phone Book memory from 1through 9 simply by pressing one key. For example, for location number 001. Pressand hold [1 .-’]. The name and number is displayed and dialed.Two-Touch Dialing: Memory locations 10 through 89 are special Two-Touch locations.For example, for location number 013, p ress [1 .-’] and then hold down [3 DEF].The name and number are displayed and dialed.](https://usermanual.wiki/Samsung-Electronics-Co/SCHN150/User-Guide-145102-Page-36.png)
![SCH-N150 User Guide Draft Rev 1.2 3/16/01 36Web/MiniBrowserYour phone comes equipped with wireless Internet access by using theMiniBrowser. The MiniBrowser allows you to access up-to-the-minuteinformation through your phone. View specially designed versions ofpopular Internet sites which may include news, sports, weather, stockquotes, etc. Browsing the web through your phone is unlike using yourpersonal computer since site providers have selected only the critical aspects ofthe site to present to wireless phone users and have removed most graphics.Each time you launch the MiniBrowser, the phone connects to theInternet and the service indicator icon ( ) displays. Any time theservice indicator icon is visible on the display, you are connected to theInternet and are invoiced accordingly. Rates and pricing varyaccording to your service option.The MiniBrowser disconnects an Internet connection after a certainperiod of inactivity, however some information from your sessionremains stored in the phone, and (if you leave your phone turned on)you can access this information without reconnecting to the Internet. Ifyou are viewing this stored information, and you select a link to a sitethat was not accessed in your last session, then you will beautomatically re-connected to the Internet. For this reason, you mayfind that you are billed for several network connections within a singlesession. This is normal and is designed to minimize your bill.Note: The phone must be in a digital network to use the MiniBrowser.When you are in a digital network, the icon is displayed.Launching the MiniBrowserNote: The first time you use the MiniBrowser, you will be required to gothrough a security setup process that takes approximately three to five minutes.Please follow the on-screen prompts to complete the security setup process.This initial setup process occurs only the first time you access the service.Note: When the security key is initially sent to the carrier, it creates a uniquevalue. If the phone is reset for any reason, you must contact the carrier to resetthe security key. The old key is no longer valid and will not allow theMiniBrowser to operate correctly.To launch the MiniBrowser:1. From the standby mode, press the navigation key right, or press [MENU] [3 DEF].2. Press [1 .-’] to launch the MiniBrowser. Note: A reminder of the charge may appear (depending on your promptsetting - see “ The MiniBrowser start and end prompts” on page 73). Todismiss the prompt, simply choose yes or no. If no prompt is displayed, youare immediately connected to the Internet.3. Once connected, the Home page (or the last page visited) will bedisplayed. To access the Home menu page from any other menu in theMiniBrowser, press and hold [MENU].An example of a Home Page is shown below:1. Financial2. Traffic3. Travel4. Weather5. Sports6. Entertainment](https://usermanual.wiki/Samsung-Electronics-Co/SCHN150/User-Guide-145102-Page-37.png)
![SCH-N150 User Guide Draft Rev 1.2 3/16/01 377. Games8. Shopping9. PortalsNote: What displays when accessing the MiniBrowser is dependent on theservice provider content. To view additional text, use the scroll keys.Exiting the Web/MiniBrowser1. Press [END] or close the flip to exit the Web/MiniBrowser.3. If the ‘Prompt to end’ or ‘Prompt both’ option is selected in the MiniBrowser setup ( [MENU] [3 EDF] [2 ABC] ), you will be prompted whether you want to end the MiniBrowser call.The MiniBrowser start and end promptsYour phone can be set to view a prompt each time you start or end aMiniBrowser session. You have the option to change when the startprompt is displayed. Tochange the settings:1. Press to [MENU] display the menu.2. Press [3 DEF] for Web.3. Press [2 ABC] for Prompt.4. Use the navigation key to select one of the four options: − To Start: You will see the prompt when you enter the browser, but not when you exit it.) − To End: You will see the prompt only when you exit the browser. − Both: You will be prompted when you enter or exit the browser. − None: You will never see this prompt.5. Press [OK/Message] to save your setting or [C] to cancel.The MiniBrowser soft keysAt the bottom of the MiniBrowser display is a solid bar which containsbrowser commands. The left and right navigation keys as “Soft” keys ( OK HOME )below the solid bar are used to execute the commands. These two keys are called“soft” keys because their function changes depending on where youare in the MiniBrowser software.Navigating the webWhen you use the MiniBrowser, some keys on your phone operate differentlythan during a normal phone call. These keys are explained below. TheMiniBrowser presents on-screen items in one of the following ways: − Text or numeric input − Links (embedded in content) − Numbered options (some options may not be numbered) − Simple textYou can select options or links by using the soft keys.How the keys work in the MiniBrowserUp/down navigation keys: Use the navigation keys to scroll to and select fromMiniBrowser options. The currently selected option is indicated by an arrow.You can also use the navigation keys to scroll up or down a line at a timewhen editing text.Right/left navigation keys: These are the soft keys. The left soft key is used as “OK” or “Retry ”.The right soft key is used to access secondary options, or a menu of secondary options such as“Cancel”, “Done”, etc.](https://usermanual.wiki/Samsung-Electronics-Co/SCHN150/User-Guide-145102-Page-38.png)
![SCH-N150 User Guide Draft Rev 1.2 3/16/01 38[OK/Message] key: This key is used for selecting the highlighted item bypressing down the button..[C] key: This key performs two functions:− Backs you up in the browser. Pressing it once backs you up one page. Pressing and holding it down backs you up to the Home page.− Clears out entered text or numbers. When entering numbers or text,press [C] to clear the last number, letter, or symbol. Press and hold [C]to completely clear the input field.[* Shift] key: This is the shift key. Press before entering text to create upper case letters. This key is also used to move back one space on the display.[0 Next] key: Enters a 0. Moves to the next word in T9 mode.[# S pace] key: This is the space key. Press to insert a space when entering text.Numbered keys 0 - 9: If items on a menu are numbered, these keys can beused to select them.[END] key: Exits the MiniBrowser and returns the phone to standby mode.[MENU] key: Enters MiniBrowser menu at any time.Entering text, numbers, or symbolsIf you want to enter text on the display screen, pressing the right navigationkey as “Soft” key for Input Mode change gives you the opportunity toenter alpha, word, Symbols, or 123.1. Entering text, numbers, or symbols: - Press [# Space] to insert a space. - Press [C] to clear the last number, letter, or symbol, or - Press and hold [C] to completely clear the input field.- If you wish to change input mode again, press the right navigation key to select the input option.2. The menu key allows you to choose from 4 options: − alpha: This is the text entry mode (same as ABC mode). See Note below. − word: This is the predictive word entry mode. You can quickly and easily enter frequently used words. − SYM1 ~ SYM4: This is the Symbol entry mode using numeric keys with associated symbols . − NUM: This is the number entry mode.Note: For example, quickly press [2 ABC] three times to display the letter‘C’, and quickly press the [5 JKL] key twice to display the letter ‘K’. This iscalled multi-tap typing.Alphabetical text entrySee “Alphabetical text entry” on page 8? for description. Press the right navigation soft keyto toggle between entry modes.Number entrySee “Number entry” on page 8? for description. Press the right navigation soft keyto toggle between entry modes.Symbol entrySee “Symbol entry” on page 8? for description. Press the right navigation soft keyto toggle between entry modes. Once you reach SYM1 (Symbol set-1),you can press up or down navigation key to toggle between SYM1, SYM2,SYM3, and SYM4.Here are the list of available symbol characters:](https://usermanual.wiki/Samsung-Electronics-Co/SCHN150/User-Guide-145102-Page-39.png)
![SCH-N150 User Guide Draft Rev 1.2 3/16/01 39.[1 .−’]. @ ; S.[2 ABC] ! # < T.[3 DEF] ? : > S.[4 GHI] , / = r.[5 JKL] - $ R R.[6 MNO] ’ & S.[7 PQRS] ” % _.[8 TUV] ( + r.[9 WXYZ] ) * Word or T9® text entrySee “Word or T9® text entry” on page 8? for description.Using linksLinks have several purposes, including jumping to a different page,jumping to a different site or even initiating a phone call. Links areshown inside of brackets ( [ ] ), and you can normally use the leftsoft key to select a link when it is highlighted.Making a phone call while using a MiniBrowserYou may initiate a phone call from the MiniBrowser if the site you areusing supports this feature (the phone number may be highlighted andthe left soft key will appear as ’Call’). Pressing the “ Call” soft key willdial the number. In most cases you can also use [SEND] to dial thenumber. The Internet connection is terminated when you initiate thecall. After you end the call, your phone returns to standby mode.](https://usermanual.wiki/Samsung-Electronics-Co/SCHN150/User-Guide-145102-Page-40.png)
![SCH-N150 User Guide Draft Rev 1.2 3/16/01 40SchedulerTodayYou can schedule up to 9 events for the current day by indicating eachevent’s start and end time. You can be alerted by the Calendar functionbefore an event is commenced. Events that are scheduled for futuredates automatically display on your Today events schedule for thatparticular day.How to schedule an event:1. Press [MENU] to display the menu.2. Press [4 GHI] for Scheduler.3. Press [1 .-’] for Today the New Event screen displays.4. Pressing [MENU] will offer further options. For example: − Word − ABC − Symbol − 1235. Choose your option by pressing [OK/Message] and enter your event information. For more information on Text and Symbol Entry see “ Entering text, numbers, or symbols ” on page 766. Press [OK/Message] to continue. The start time and date screen displays.7. Add the start time and date using the numeric keys, then press [OK/Message] to display the next screen.8. Add the end time and date. Press [OK/Message] to save the information.9. If an error is made, or duplicate information is already saved, pressing [MENU] offers the following options: − Add New: Allows you to add an event − Edit: Allows you to edit the event − Eras e: Allows you to delete the event.10. Using the navigation key, scroll through the options and press [OK/Message] to select.11. After the correct information has been entered, an alarm screen is displayed. Select an alarm to notify you of your event. Your Alarm optionsare: No Alarm, On Time, 10 minutes Before, 30 minutes Before, and 1 hour Before . 12. Make your choice and press [OK/Message] to save setting. Then, your phone will return to standby mode.View MonthView month permits you to view, in calendar format, the current month, a pastmonth, or future month. In view month, the current date is highlighted on thecalendar. Days with scheduled events are underlined.1. Press [MENU] to display the menu.2. Press [4 GHI] for Scheduler.3. Press [2 ABC] for View Month. The Calendar displays. − Remember, the current date is highlighted. − Use the navigation keys to select the month and day.4. Pressing [MENU] displays two options through the pop-up display screen, they are: − View (Permits you to view previous entries). − Add New (Permits you to add a new entry).](https://usermanual.wiki/Samsung-Electronics-Co/SCHN150/User-Guide-145102-Page-41.png)
![SCH-N150 User Guide Draft Rev 1.2 3/16/01 415. Enter your event information. Up to 32 characters can be entered. For more information on Text and Symbol entry methods, see “Entering text, numbers, or symbols ” on page 76.6. Press [OK/Message] to accept your entry.7. Enter the start time and date, and press [OK/Message] to save the information. The end time and date form will be displayed.8. Enter the end time and date, and press [OK/Message] to save the information.9. The alarm screen displays. Scroll to select an alarm to notify you of your event.Your Alarm options are: No Alarm, On Time, 10 minutes Before, 30 minutes Before,and 1 hour Before .10. Press [OK/Message] to save your selection..How to view an event:1. Press [MENU] to display the menu.2. Press [4 GHI] for Scheduler.3. Press [2 ABC] for View Month and the Calendar displays.4. Use the navigation key to display all of an event’s information. If more than one event is scheduled, use the navigation key to display them.5. Press [MENU] to display the options and select ‘View’. The events scheduled displays in order.6. Press [C] for Exit. This returns the screen to the Scheduler menu.Jump to DateJump To Date allows you to specify the calendar date you wish to ‘jump’ tofor viewing and adding events scheduled on that date.Once the date is entered, you can add, edit and erase events in yourcalendar.Using Jump to Date1. Press [MENU] to display the menu.2. Press [4 GHI] for Scheduler.3. Press [3 DEF] for Jump To Date.4. Enter the date of the event and press [OK/Message] to continue.5. The Calendar screen displays the newly entered highlighted date.6. Pressing [MENU] displays the options View and Add new.7. Press [OK/Message] to select View.8. Pressing [MENU] opens the Add new, Edit, Erase options.9. You can either schedule a new event, or edit or erase an old one. Press [OK/Message] to select the option.To Do ListThe To Do List can help you keep track of, and prioritize the things youneed to do. You can enter and prioritize up to 20 items.How to create a to do list1. Press [MENU] to display the menu.2. Press [4 GHI] for Scheduler.3. Press [4 GHI] for To Do List.4. Select [MENU] for options. Select from Word, ABC, Symbol, or 123 for entry method.5. Enter the new list to do through the alphanumeric keys.6. Press [OK/Message] to lock in your choice. This action opens the Time/Date screen.7. Enter the time and date and press [OK/Message] to continue. The To Do List opens.](https://usermanual.wiki/Samsung-Electronics-Co/SCHN150/User-Guide-145102-Page-42.png)
![SCH-N150 User Guide Draft Rev 1.2 3/16/01 428. Using the navigation keys, set the priority for a To Do List item. Your choices are High and Low.9. Press [OK/Message] to save your prioritized To Do List item.To view, edit, add, or erase to do list items1. Press [MENU] to display the menu.2. Press [4 GHI] for Scheduler.3. Press [4 GHI] for To Do List.4. Press [MENU] and using the navigation keys find the To Do List item you want to change.5. Press [OK/Message] to select the correct option. Your choices are ‘Add new’, ‘Edit’, and ‘Erase’.6. Continue to add a new item, edit , or erase an existing item by following the prompts.CountdownHave you ever wanted to know how much time it takes you to dosomething, or how many minutes, hours, days and months until aspecial event? The Countdown option can help you answer thesequestions. You can create up to 5 countdown timers using this feature.Creating a Countdown itemUse this procedure the first time you program a countdown timer or ifyou’ve erased them all.1. Press [MENU] to display the menu.2. Press [4 GHI] for Scheduler.3. Press [5 JKL] for Countdown.4. The screen prompts for new countdown. Enter a name for your new countdown timer.5. Press [OK/Message] when complete.6. Enter the date and time that you want to “Countdown ” to. For example, if today’s date is November 10, 2000 and you wish to know how many months, days, and hours are left before 7:00 PM February 14, 2001 enterthe time 07:00 PM and the date 02/14/2001. − You can press the digital keys [2 ABC] or [7 PQRS] for AM or PM. − Countdown timers can be entered for dates up to year 2099.7. Press [OK/Message] to store the countdown timer.Viewing, Adding, editing, and erasing a countdown itemUse this procedure if you have a countdown timer(s) alreadyprogrammed.1. Press [MENU] to display the menu.2. Press [4 GHI] for Scheduler.3. Press [5 JKL] for Countdown. − Countdown timers display in order of the least amount of time passed since the countdown commenced, and least amount of time remaining until the specified date.4. Press [MENU] to display options. Select one of the following: − Add New: Allows you to add an event − Edit: Allows you to edit the event − Eras e: Allows you to delete the event.5. Press [C] for Exit. This returns the screen to viewing the already programmed countdown timer(s).6. Or, after an option is selected follow the display prompts to continue.](https://usermanual.wiki/Samsung-Electronics-Co/SCHN150/User-Guide-145102-Page-43.png)
![SCH-N150 User Guide Draft Rev 1.2 3/16/01 43World TimeHave you ever wanted to call a friend in another part of the world butwondered what time of the day it is there? To know what time it isbefore you call, use the World Time clock function. World Timedisplays what time it is in twenty-four different time zones around theworld together with one or more major cities, states, regions orcountries in a time zone.Note: The World Time does not support Daylight Savings Time forother countries than your own country.To check the current time in another city or country:1. Press [MENU] to display the menu.2. Press [4 GHI] for Scheduler.3. Press [6 MNO] for World Time4. The display screen shows the world map.5. The current date and time for New York displays. 6. You can press the navigation key up and down or left and right to toggle between world times in the following 24 time zones (time zones are identified by one or more cities, states, regions or countries in a time zone) Beginning with GMT.• Alaska • San Francisco • Denver, Arizona• Chicago, Mexico • New York. • Caracas• Buenos Aires • Mid Atlantic • Cape Verde• London, Madrid • Paris, Berlin • Athens, Helsinki• Moscow • Abu Dabi • Tashkent• Alma-ata • Bangkok, Jakarta • Hongkong, Beijing• Seoul, Tokyo • Guam, Sydney • Okhotsk• Wellington • Samoa, Midway • Honolulu, Hawaii6. Press [C] to return the previous menu.CalculatorYou can perform calculations including addition, subtraction,multiplication and division on your phone.To perform a calculation:1. Press [MENU] to display the menu.2. Press [4 GHI] for Scheduler.3. Press [7 PQRS] for Calculator.4. Press digit keys to enter the first number in your calculation. Numbers can be up to 9 digits long. − Press [* Shift] to enter a decimal point. − Press [# Space] to change the sign of a number to a negative (-).5. Use the navigation keys to set the operator for your calculation. Your choices are:](https://usermanual.wiki/Samsung-Electronics-Co/SCHN150/User-Guide-145102-Page-44.png)
![SCH-N150 User Guide Draft Rev 1.2 3/16/01 44 − [+] addition − [-] subtraction − [x] multiplication − [/] division6. Press the digit keys to enter the second number of your calculation.7. Press [OK/Message] to perform the calculation and see the result, or:8. You can continue to perform calculations with the same operator orchange the operator and continue your calculations. Every time that youchange the operator, the previous calculation is performed and the resultis displayed as the top number in the display.9. Press [OK/Message] to perform the calculation and view the result.Alarm SetYour phone can set one alarm clock.The alarm can be set to go off once or daily at a programmedtime. Once you set an alarm, it is easy to change it’s time or to turn it off.1. Press [MENU] to display the menu.2. Press [4 GHI] for Scheduler.3. Press [8 TUV] for Alarm Set.4. Press the navigation key to scroll through the alarm options, ‘Once’ ‘Daily’, or ‘Off’. Select the alarm option you want to set by pressing [OK/Message].5. Press the digit keys to set the alarm time. Since your phone only supports 12-hour time display, press [2 ABC] for AM and [7 PQRS] for PM at the end of each time entry .6. Press [OK/Message] to save the setting and return to the standby mode. Or, press [C]to return to the previous alarm options menu.7. To change the alarm time or turn the alarm off, repeat steps 1. to 6. above.4. Once the alarm is set, a graphic icon notifying you that the alarm is active will always be displayed in standby mode.](https://usermanual.wiki/Samsung-Electronics-Co/SCHN150/User-Guide-145102-Page-45.png)
![SCH-N150 User Guide Draft Rev 1.2 3/16/01 45Sounds_Ringer optionsYour phone provides a variety of ringer options through the Soundsmenu. These options allow you to customize your ringer type andringer volume settings in order to easily recognize a certain type ofincoming call, scheduler, or messages .Note: To adjust your ringer volume, (for example, to quickly turn it off or tothe vibrate mode before you enter a meeting, concert, etc.) see Ringer Volume settings.Shortcut for adjusting ringer volumeFrom the standby mode, you can adjust the volume (8 levels) of the ringer,mute the ringer, or set to vibrate mode by pressing the navigation keys up or down.Ringer volumeThree options can be found under the Ringer Volume option forSounds. To activate these options:1. Press [MENU] to display the menu.2. Press [5 JKL] for Sounds.3. Press [1 .-’] for Ringer Volume. The three options display. 1: Calls , 2: Messages , 3: Alarm.4. Either press the associated digit key, or scroll to the option and select it. The screen displays the volume icon which changes according to the setting selected.5. Press the navigation key to change the setting. When you reach the lowest setting, the phone will vibrate alerting you of the vibrate option. Also, when ringer volume reaches silence, an audible alert notifies you that ringer may be silenced if selected at that level. 6. When the desired setting is reached, press [OK/Message] to save the setting.7. You can press [C] to return to the previous menu at any time.One-touch Vibrate AlertThis feature is also called the “Manner Mode” which allows you toinstantaneously silence the ringer in standby mode. This feature is usefulwhen you are entering a quiet place.To revert the ringer option of your phone immediately to vibrate alert:1. Simply press and hold [# Space] for over 1 second in standby mode.2. “Entering Manner Mode” prompt message displays and your phonevibrates for a few seconds alerting you that vibrate alert is active.The vibrate alert icon on the screen will turn on.3. To exit from Manner Mode, press and hold [# Space] for over 1 secondin standby mode.4. “Exiting Manner Mode” prompt message displays and your phoneautomatically reactivates the previous ringer volume setting.Ringer typeFive options are found for Ringer type under the Sounds menu.To activate these options:1. Press [MENU] to display the menu.2. Press [5 JKL] for Sounds.](https://usermanual.wiki/Samsung-Electronics-Co/SCHN150/User-Guide-145102-Page-46.png)
![SCH-N150 User Guide Draft Rev 1.2 3/16/01 463. Press [2 ABC] for Ringer Type.4. Either press the numeric key or scroll and select the option of choice using the navigation key and [OK/Message] to activate that option.5. Press the navigation key to scan through the nine monotone ringer types, and four melody tones. Each tone plays as you scroll through the options.6. When the desired ringer type is displayed, press [OK/Message] to save the setting. Or,7. Press [C] to cancel and return to the previous menu.Voice CallsTo view or change the ringer type for voice calls :1. Press [MENU] to display the menu.2. Press [5 JKL] for Sounds.3. Press [2 ABC] for Ringer Type.4. Press [1 .-’] for Voice Calls.5. Use the navigation key to select from the nine monotone rings andfour melody tones .6. To select your choice of melody or ringers, press [OK/Message]. Or,7. Press [C] to cancel and return to the previous menu.MessagesTo view or change the ringer type for incoming messages :1. Press [MENU] to display the menu.2. Press [5 JKL] for Sounds.3. Press [2 ABC] for Ringer Type.4. Press [2 ABC] for Messages. Four options display. 1: Voice Mail, 2: Page, 3: Text, and4: Browser MSG.5. Either press the numeric key, or scroll and select the option of choice using the navigation key and [OK/Message] to activate that option.7. Press the navigation key to scan through the nine monotone ringer types, and fourmelody tones. Each tone plays as you scroll through the options.8. When the desired ringer type is displayed, press [OK/Message] to save the setting. Or,9. Press [C] to cancel and return to the previous menu.AlarmTo view or change the ringer type for alarm:1. Press [MENU] to display the menu.2. Press [5 JKL] for Sounds.3. Press [2 ABC] for Ringer Type.4. Press [3 DEF] for Alarm.5. Use the navigation key to select from the nine monotone rings andfour melody tones.6. To select your choice of melody or ringers, press [OK/Message]. Or,7. Press [C] to cancel and return to the previous menu.Data /Fax Incoming CallTo view or change the ringer type for incoming data/fax calls:1. Press [MENU] to display the menu.2. Press [5 JKL] for Sounds.3. Press [2 ABC] for Ringer Type.4. Press [4 GHI] for Data/Fax In.5. Use the navigation key to select from the nine monotone rings andfour melody tones.](https://usermanual.wiki/Samsung-Electronics-Co/SCHN150/User-Guide-145102-Page-47.png)
![SCH-N150 User Guide Draft Rev 1.2 3/16/01 476. To select your choice of melody or ringers, press [OK/Message]. Or,7. Press [C] to cancel and return to the previous menu.ScheduleTo view or change the ringer type for schedule alerts:1. Press [MENU] to display the menu.2. Press [5 JKL] for Sounds.3. Press [2 ABC] for Ringer Type.4. Press [5 JKL] for Schedule.5. Use the navigation key to select from the nine monotone rings andfour melody tones.6. To select your choice of melody or ringers, press [OK/Message]. Or,7. Press [C] to cancel and return to the previous menu.Key beepKey Beep allows you to designate the volume of the tone when a key ispressed on the phone. There are eight levels of volume associated withthe key beep.To view or change the Key Beep volume level:1. Press [MENU] to display the menu.2. Press [5 JKL] for Sounds.3. Press [3 DEF] for Key Beep.4. Press the navigation key to change the setting.5. When the desired setting is reached, press [OK/Message] to save the setting.6. You can press [C] to return to the previous menu at any time.AlertsYour phone beeps to notify you of an event or action, this is called analert. You can easily turn alert beeps on or off. The other partydoes not hear the alerts when you are on a call.Minute beepYou can set the minute beep option to sound an alert 10 secondsbefore each elapsed minute to remind you of the length of the current call.To turn minute beep on or off:1. Press [MENU] to display the menu.2. Press [5 JKL] for Sounds.3. Press [4 GHI] for Alerts.4. Press [1 .-’] for Minute Beep.5. Scroll between On and Off using the navigation key. When thedesired setting is displayed, press [OK/Message] to save.6. To cancel, press [C] to return to the previous menu.ServiceYou can set the service alert option to sound an alert when the phone goesin and out of service coverage areas. To set the service alert On or Off:1. Press [MENU] to display the menu.2. Press [5 JKL] for Sounds.3. Press [4 GHI] for Alerts.4. Press [2 ABC] for Service.5. Scroll between On and Off using the navigation key. When the desired setting is displayed,press [OK/Message] to save.6. To cancel, press [C] to return to the previous menu.](https://usermanual.wiki/Samsung-Electronics-Co/SCHN150/User-Guide-145102-Page-48.png)
![SCH-N150 User Guide Draft Rev 1.2 3/16/01 48ConnectWith the Connect option set to on, the phone sounds a connect alerttone when your call is connected.To set the connect alert On or Off:1. Press [MENU] to display the menu.2. Press [5 JKL] for Sounds.3. Press [4 GHI] for Alerts.4. Press [3 DEF] for Connect.5. Scroll between On and Off using the navigation key. When the desired setting is displayed,press [OK/Message] to save.6. To cancel, press [C] to return to the previous menu.DisconnectWhen the Disconnect option is set to on, the phone sounds adisconnect alert tone a call is dropped or failed.To set the disconnect alert On or Off:1. Press [MENU] to display the menu.2. Press [5 JKL] for Sounds.3. Press [4 GHI] for Alerts.4. Press [4 GHI] for Disconnect.5. Scroll between On and Off using the navigation key. When the desired setting is displayed,press [OK/Message] to save.6. To cancel, press [C] to return to the previous menu.FadeWhen the Fade menu option is set to on, the phone sounds an alertwhen a dropped call occurs during conversation because of a signal fade.To set the fade alert On or Off:1. Press [MENU] to display the menu.2. Press [5 JKL] for Sounds.3. Press [4 GHI] for Alerts.4. Press [5 JKL] for Fade.5. Scroll between On and Off using the navigation key. When the desired setting is displayed,press [OK/Message] to save.6. To cancel, press [C] to return to the previous menu.Note: When call fail or drop occurs, a text notification displays to alert you.. Press [C] to clear the notification and return to standby mode.. If the dropped call was an outgoing call from your phone, you can redial the number automatically by pressing [SEND] twice.RoamWhen the Roam option is set to on, the phone sounds a distinctiveringer type for incoming roaming calls .To set a distinctive ringer for incoming roam calls:1. Press [MENU] to display the menu.2. Press [5 JKL] for Sounds.3. Press [4 GHI] for Alerts.4. Press [6 MNO] for Roam.5. Scroll between On and Off using the navigation key. When the desired setting is displayed,press [OK/Message] to save.6. To cancel, press [C] to return to the previous menu.](https://usermanual.wiki/Samsung-Electronics-Co/SCHN150/User-Guide-145102-Page-49.png)
![SCH-N150 User Guide Draft Rev 1.2 3/16/01 49PrivacyWhen the Privacy option is set to on, the phone sounds an alert when anincoming call is a voice privacy activated call.1. Press [MENU] to display the menu.2. Press [5 JKL] for Sounds.3. Press [4 GHI] for Alerts.4. Press [7 PQRS] for Privacy.5. Scroll between On and Off using the navigation key. When the desired setting is displayed,press [OK/Message] to save.6. To cancel, press [C] to return to the previous menu.Voice VolumeThe Voice Volume option allows you to adjust the voice volume of the earpiece speaker while on a call. There are eight levels of volume associatedwith the voice volume.To view or change the Voice Volume level:1. Press [MENU] to display the menu.2. Press [5 JKL] for Sounds.3. Press [5 JKL] for Voice Volume .4. Press the navigation key to change the setting.5. When the desired setting is reached, press [OK/Message] to save the setting.6. You can press [C] to return to the previous menu at any time.Roam RingerWhen the Roam Ringer option is set to on, the phone sounds an alert whenthe phone enters or leaves a roam service area.To set the roam ringer alert on or off:1. Press [MENU] to display the menu.2. Press [5 JKL] for Sounds.3. Press [6 MNO] for Roam Ringer.4. Press the navigation key to change the setting.5. When the desired setting is reached, press [OK/Message] to save the setting.6. You can press [C] to return to the previous menu at any time.Power Up/downWhen the Power Up/down option is set to on, the phone sounds analert when the phone is powered up or powered down.To set the sound alert On or Off:1. Press [MENU] to display the menu.2. Press [5 JKL] for Sounds.3. Press [7 PQRS] for Power Up/down .4. Press the navigation key to change the setting between On or Off.5. When the desired setting is reached, press [OK/Message] to save the setting.6. You can press [C] to return to the previous menu at any time.](https://usermanual.wiki/Samsung-Electronics-Co/SCHN150/User-Guide-145102-Page-50.png)
![SCH-N150 User Guide Draft Rev 1.2 3/16/01 50DisplayThese settings determine what is displayed on the phone screen.Display optionsYour phone has several display options. They allow you to:.Display your own phone number..Control when and how long your backlight is active..Define a personal greeting up to 30 characters..Set the language (English or Spanish) used on your screen..View hardware and software versions of your phone.BacklightThere are several options for setting the backlight features.When the phone flip is closed, the backlight remains off conservingbattery power. When the flip is open, the length of time that thebacklight remains active can be set to 7, 15, or 30 seconds.To select backlight options:1. Press [MENU] to display the menu.2. Press [6 MNO] for Display.3. Press [1 .-’] for Backlight.4. Scroll through the menu options. Your choices are ‘Flip Open’ (Always On when flip is open), ‘7 seconds’, ‘15 seconds’, ‘30 Seconds’, and ‘Always Off’.5. When the desired option is displayed, press [OK/Message] to save.BannerThe Banner option allows you to edit the personal greeting displayed on thestandby screen.Enter the banner desired using the alphanumeric keys.To select banner options:1. Press [MENU] to display the menu.2. Press [6 MNO] for Display.3. Press [2 ABC] for Banner.4. Press [MENU] to select from Input Mode options, ‘Word’, ‘ABC’, ‘Sy mbol’, and ‘123’.5. Scroll through the options. When the desired option is displayed, press [OK/Message] to select.6. Enter your banner up to 12 characters in length.7. Press [OK/Message] to save it. The standb mode display will be updated with your new banner.Idle ScreenThe Idle screen option allows you to select the graphic still images foryour phone. These images display on the screen when your phone is in standby mode.To select idle screen image options:1. Press [MENU] to display the menu.2. Press [6 MNO] for Display.3. Press [3 DEF] for Idle Screen. The options appearing on the display screen are:‘Large Clock’ and ‘Banner’.4. When the desired option is displayed, press [OK/Message] to save.5. Pressing [C] returns you to the Idle Screen options menu.My phone #The My Phone Number option displays the telephone number of the phone.](https://usermanual.wiki/Samsung-Electronics-Co/SCHN150/User-Guide-145102-Page-51.png)
![SCH-N150 User Guide Draft Rev 1.2 3/16/01 51To display your phone number:1. Press [MENU] to display the menu.2. Press [6 MNO] for the Display.3. Press [4 GHI] for My Phone#. Your phone number will display.4. Press [C] to return to standby mode.To view your phone number during a conversation:1. Press [MENU] to display the In-Use Menu.2. Press [6 MNO] for My Phone #. Your phone number will display.3. Press [C] to return to the previous menu.LanguageThe Language option changes the language on the phone to English or Spanish.To change languages:1. Press [MENU] to display the menu.2. Press [6 MNO] for Display.3. Press [5 JKL] for Language.4. Scroll between English or Spanish.5. When the desired option is displayed, press [OK/Message] to save.Set TimeYour phone is equipped with a standard clock. Although your phone will automaticallydisplay date and time when in digital mode, this information will not be available onthe screen when your phone is out of service or in analog mode when powered up.To set the clock manually :1. Press [MENU] to display the menu.2. Press [6 MNO] for Display.3. Press [6 MNO] for Set Time.4. Enter the desired date, and time in 12-hour display format. Press [2 ABC] for ‘AM’ and [7 PQRS] for ‘PM’ at the end of time digit entry.5. Press [OK/Message] to save the setting. The entered date and time displays on the standby mode screen.6. Or, p ress [C] to return to the previous menu.Auto HyphenWith the Auto Hyphen option set to on, your phone can automaticallyhyphenate numbers. For example: 972-761-0000.Here’s how it is configured:1. Press [MENU] to display the menu.2. Press [6 MNO] for Display.3. Press [7 PQRS] for Auto Hyphen.4. Select between ‘Yes’ and ‘No’ using the navigation key. Press [OK/Message] to save.5. Pressing [C] returns you to the previous menu.VersionThe Version menu displays the current hardware/software versionthat is installed in your phone. This feature is helpful if you needto call customer care.To view the version:1. Press [MENU] to display the menu.2. Press [6 MNO] for Display.3. Press [8 TUV] to view the Version information.4. Press [END] to quit and return to standby mode.5. Or, p ress [C] to return to the previous screen.](https://usermanual.wiki/Samsung-Electronics-Co/SCHN150/User-Guide-145102-Page-52.png)
![SCH-N150 User Guide Draft Rev 1.2 3/16/01 52Voice DialVoice dialingYour phone features voice dialing. Whether on a digital or an analog network, you cancall up to 10 stored names simply by speaking the name into themicrophone. Using the voice dialing option requires that you firstprogram the phone to recognize the name of the person you are calling.Note: You cannot connect voice dialing entries to your phone book. If you wish toSet voice dialing for frequently used numbers in your phone book, you need torecord names and re-enter the same phone numbers to the voice dial memory locations, separately.Tips on recording names− Avoid recording similar names phonetically. If you record a similar name to one that is already stored in voice-dial memory, the phone requests another name.− Avoid recording in a noisy place.− Speak clearly and naturally.− Avoid very long or very short names. Names with two to five syllables are recommended.− If the voice dial entry does not connect properly, you may need to record the name and number again.RecordThe phone provides voice prompts and screen displays to guide youthrough the recording process.To program the phone for voice dialing:1. Press [MENU] to display the menu.2. Press [7 PQRS] for Voice Dial.3. Press [1 .-’] for Record. The phone prompts you to record a name.4. Wait for a beep and then say the name. The phone stores the name and then prompts you to speak the name again.5. Respond to the prompt by repeating the name after the beep exactly as you did the first time. If the name is accepted, the phone requests the phone number.6. Enter the phone number using the keypad.7. To store the phone number, press [OK/Message]. The number you entered displays, along with the notification ‘Recorded’. If the number you entered matches a number already stored in your Phone Book, then the name also displays, together with the notification ‘Recorded’.8. The phone returns to previous Voice Dial menu.ReviewThe Review option is used to review and/or erase dialing entries.To play or erase voice dialing entries:1. Press [MENU] to display the menu.2. Press [7 PQRS] for Voice Dial.3. Press [2 ABC] for Review. A list of stored voice dial numbers displays. (The names also display if already stored in the Phone Book).4. Press the digit key to select the desired entry or scroll to the desired entry and press [OK/Message]. The recorded name is vocalized. You can quicklyscroll through entries using the navigation key without having to listen toeach one, or you can listen to them all as they play in order if you wait forthe voice prompt “Next entry”.](https://usermanual.wiki/Samsung-Electronics-Co/SCHN150/User-Guide-145102-Page-53.png)
![SCH-N150 User Guide Draft Rev 1.2 3/16/01 535. Press [OK/Message] while reviewing a voice dial entry to erase that entry.6. Press [C] to return to the previous screen.7. When the last entry is played, the phone returns to standby mode.To erase all voice dialing entries:1. Press [MENU] to display the menu.2. Press [7 PQRS] for Voice Dial.3. Press [3 DEF] for Erase All.4. At the voice prompt, p ress [OK/Message] to confirm Erase of All the entries. The display screen will inform you when all entries are successfully erased.5. If you wish to exit without erasing any voice dialing entries press [C] and you will return to the previous menu.Set ActiveVoice dialing is always on once you have programmed the phone toaccept voice dialing entries and associated the phone numbers. Toplace voice dialing calls, press and hold [* Shift]. Then say the nameinto the phone after you hear the voice prompt and the beep.You can also initiate a voice dialing call by simply opening the phone’sflip cover ( this option is selected through the menu).To change voice dialing activation options:1. Press [MENU] to display the menu.2. Press [7 PQRS] for Voice Dial.3. Press [4 GHI] for Set Active.4. Scroll between the following options:. [*] only: Enables voice dialing only by pressing and holding [* Shift].. [*]/Flip : Enables voice dialing either when pressing and holding [* Shift] or when the flip cover of the phone is opened.5. Press [OK/Message] when the desired option displays.](https://usermanual.wiki/Samsung-Electronics-Co/SCHN150/User-Guide-145102-Page-54.png)
![SCH-N150 User Guide Draft Rev 1.2 3/16/01 54GamesGame menuUsing your phone, you have the ability to play the following games:1. Flying Tight2. Money or DieFlying TightTo play Flying Tight:1. Press [MENU] to display the menu.2. Press [8 TUV] for the Games menu.3. Press [1 .-’] for the Flying Tight game.4. When the ‘start screen’ of the game is displayed, press any key to go to the help screenwhich describes how to play the game.5. Press [OK/Message] to start the game.ObjectThe object of the game is to fly the plane inside a cave through a maze of obstacleslongest time possible. To control the path of the plane, use the navigation keys.Sustain the flight path of the plane in balance to avoid the wall. Keep pressingthe navigation key upwards as the gravity pulls the plane down towards the ground.Timer on the display shows you how long you have stayed alive. If you are hitby the asteroids or creatures three times, or bang against the walls too many times,the game is over. Pick up “E” (Energy) along the way to extend an extra life and“B” (Bomb) to detonate all the asteroids and creatures that appear on the screen.The longer you stay alive the higher your score. A high score is recorded each time you play.Key CommandsThe following options are displayed prior to the start of the game :- Press navigation key upwards: Fly the plane upwards.- Press navigation key downwards: Fly the plane downwards.- Press [OK/Message] to start the game.- Press [C] or [End] to exit the game.Money or DieTo play Money or Die :1. Press [MENU] to display the menu.2. Press [8 TUV] for the Games menu.3. Press [2 ABC] for the Money or Die game.4. When the ‘start screen’ of the game is displayed, press any key to go to the help screenwhich describes how to play the game.5. Press [OK/Message] to start the game.ObjectThe object of the game is to control the character on a skate board to pick upas many pouches of money as possible within limited length of Stage and avoidingcollision with the motorcycles. Picking up a pouch increases the ‘Money’ count.But, every time you are hit by a motorcycle, your ‘Money’ count resets itself to zero.You must earn ten or more pouches (more than 10 ‘Money’ count) within each Stageto advance to the next stage. If you reach an end of a Stage with less than ten ‘Money’count, the game is over. A high score is recorded each time you play.Key CommandsThe following options are displayed prior to the start of the game :](https://usermanual.wiki/Samsung-Electronics-Co/SCHN150/User-Guide-145102-Page-55.png)
![SCH-N150 User Guide Draft Rev 1.2 3/16/01 55- Press navigation key upwards: Move the character upwards.- Press navigation key downwards: Move the character downwards.- Press [OK/Message] to start the game.- Press [C] or [End] to exit the game.](https://usermanual.wiki/Samsung-Electronics-Co/SCHN150/User-Guide-145102-Page-56.png)
![SCH-N150 User Guide Draft Rev 1.2 3/16/01 56SetupAuto retryWhen the Auto retry option is activated, your phone automaticallyretries the last call up to ten times when a connection fails.How to enable Auto Retry:1. Press [MENU] to display the menu.2. Press [9 WXYZ] for Setup.3. Press [1 .-’] for Auto Retry. The Auto Retry screen displays.4. Press the navigation key to toggle between Off, every 10 seconds, every 30 secondsand every 60 seconds. Press [OK/Message] to save your option.5. Pressing [C] returns you to the previous screen.Auto AnswerWhen the Auto answer option is activated, your phone automaticallyanswers calls after a specified number of rings. This option is usefulwhen driving or you are unable to answer the phone.If Auto Answer is set to ‘Off’, the phone does not answer the incomingcall. If you do not answer the call it is automatically stored in theMissed Call log.How to enable Auto answer:1. Press [MENU] to display the menu.2. Press [9 WXYZ] for Setup.3. Press [2 ABC] for Auto Answer. The Auto Answer screen displays.4. Press the navigation key to scroll between Off, after 1 ring, after 3 rings, and after 5 rings. Press [OK/Message] to save your option.5. Pressing [C] returns you to the previous screen.Answer ModeWhen the Answer Mode option is activated, your phone allows you toselect a specific answer mode when receiving an incoming call. Yourphone can be preset to answer when you do any of the following:− by send key: You can answer the call by pressing [SEND]− by flip open: You can answer the call by opening the flip cover of the phone.− by any key: You can answer the call by pressing any key on the phone.To set the Answer Mode:1. Press [MENU] to display the menu.2. Press [9 WXYZ] for Setup.3. Press [3 DEF] for Answer Mode.5. Press the navigation key to scroll between ‘by flip open’, ‘by send key’, and ‘by any key’. Press [OK/Message] to save.5. Pressing [C] returns you to the previous screen.Tone LengthSome older phones only recognize longer tones. Therefore you mayhave to change the tone length for some calls. When calling a pagingsystem or a credit card company, remember that your phone should be set in the normal mode.To change the Tone length:1. Press [MENU] to display the menu.2. Press [9 WXYZ] for Setup.3. Press [4 GHI] for Tone Length. The Tone Length screen displays.4. Press the navigation key to scroll between ‘normal’, and ‘long’. Press [OK/Message] to save.5. Pressing [C] returns you to the previous screen.](https://usermanual.wiki/Samsung-Electronics-Co/SCHN150/User-Guide-145102-Page-57.png)
![SCH-N150 User Guide Draft Rev 1.2 3/16/01 57Set NAMYour Samsung phone can store two NAMs (Numerical AssignmentModule, and is essentially your phone number). This allows you tohave two phone numbers on one phone. You can switch your serviceback and forth between the two numbers using the NAM menu.Note: Each NAM has an associated set of System roaming settings. See “Set System” onpage 135 for information on these settings.To select a different NAM:1. Press [MENU] to display the menu.2. Press [9 WXYZ] for Setup.3. Press [5 JKL] for Set NAM.4. Scroll between NAM-1 or NAM-2.5. When the desired option is displayed, press [OK/Message] to save.6. Press [C] to exit without saving.Note: If you change your NAM, then the phone automatically reboots andacquires service using the new NAM.Set SystemYour Samsung phone allows you to set the preferred system. Changing this settingwill affect your charges, so contact your service provider to determine the best roamingmethods for you.To change the preferred system setting:1. Press [MENU] to display the menu.2. Press [9 WXYZ] for Setup.3. Press [6 MNO] for Set System. The Set System screen displays.4. Scroll between ‘Home only’, ‘Automatic-A’ or ‘Automatic-B’.5. When the desired option is displayed, press [OK/Message] to save.6. Press [C] to exit without saving.Note:- ‘Automatic-A’: With this setting, your phone will always try your calls using the Preferred Roaming List loaded into your phone first, but if your phone cannot find any pre-ferred systems, then it will attempt to acquire any digital or analog “A” system. In a wireless service area, there are usually at least two service providers which are referred to as “A” and “B” systems. Your service provider will provide you information about this when you sign up for service.- ‘Automatic-B’: With this setting, your phone will always try your calls using the Preferred Roaming List loaded into your phone first, but if your phone cannot find any pre-ferred systems, then it will attempt to acquire any digital or analog “B” system.- ‘Home only’ : W ith this setting, you cannot roam. If your home system is not available then your call will not be connected and the No Service indicator ( ) is displayed. In some service areas, an operator may come on line asking you how you would like to pay for the call.Data/FaxYour Samsung phone is capable of sending and receiving digital dataand fax calls when connected to a computing device (laptop, desktop,hand held, palmtop, etc.) running Windows 95, Windows 98, Windows2000, Windows ME, or Windows NT. Your Samsung phone functions](https://usermanual.wiki/Samsung-Electronics-Co/SCHN150/User-Guide-145102-Page-58.png)
![SCH-N150 User Guide Draft Rev 1.2 3/16/01 58similar to a typical modem on your PC, enabling you to use wirelessdata with a variety of Windows software applications.To use digital data or fax services with your Samsung phone, you willneed to obtain a digital data/fax cable kit from your service provider.This kit contains the necessary cables, software, and documentationrequired for you to connect and use your Samsung phone with yourcomputing device.Note: The phone must be on a digital network to receive or send faxes anddata. When you are in a digital network, the icon is displayed.To setup Data/Fax calls :1. Press [MENU] to display the menu.2. Press [9 WXYZ] for Setup.3. Press [7 PQRS] for Data/Fax. The Data Mode screen displays.4. Use the scroll keys to toggle between: − Data/Fax Off: (No incoming Data/Fax calls can be received.) − Fax for Next Call: (Waiting for Fax Call. No Voice Calls can be received for next 10 minutes.) − Fax until Powered Off: (No Voice Calls can be received.) − Data for Next Call: (Waiting for data call. No voice calls can be received for next 10 minutes.) − Data until Powered Off: (No voice calls can be received.)5. When the desired option is displayed, press [OK/Message] to save.6. Press [C] to exit without saving.Receiving a faxTo receive a fax:1. Ensure that your phone is connected to your PC and is powered on.2. Press [MENU] to display the menu.3. Press [9 WXYZ] for Setup.4. Press [7 PQRS] for Data / Fax.5. Scroll and select “Fax for Next Call”.6. Press [OK/Message] to save. The screen displays “Waiting for Fax call (no voice) for 10 min.”Note: No incoming Voice Calls can be received for 10 minutes. Your phonethen returns to the standby mode.7. In the Fax program on your PC, setup the Answer mode. Click on“Receive” and select one of the following: − Automatic Receive (recommended) − Manual ReceiveNote: Once you have set your phone’s mode to “ Fax for Next Call” , you cannotreceive regular voice calls until you change back to “Data/fax Off” or a fax is received.Changing your phone back to voice call1. Press [MENU] to display the menu.2. Press [9 WXYZ] for Setup.3. Press [7 PQRS] for Data/Fax.4. Scroll and select “Data/Fax Off” .5. Press [OK/Message] to save. The screen displays “No incoming Data/Fax calls can be received” .Ending a fax or data callSome regular ways of ending a call, like closing the phone, do not enda fax or data call. Close the connection through the application onyour computer.](https://usermanual.wiki/Samsung-Electronics-Co/SCHN150/User-Guide-145102-Page-59.png)
![SCH-N150 User Guide Draft Rev 1.2 3/16/01 59Note: Disconnecting the data cable or turning off your phone will also end adata or fax call, but may disrupt your computer.Sending a fax or data fileWhen connected to a computing device, your phone allows wireless faxand data transmissions. Your computing device software initiates thecall to the destination phone number. Your Samsung phone functionsas a wireless modem to send the fax or data file to the numberdesignated by your PC software.Set ForceWhen your phone is in weak signal coverage area,but if you wish to place a call in a better known coverage systemuse this menu. Your phone allows you to search for other system foreciblyfor the next call.To Set Force call:1. Press [MENU] to display the menu.2. Press [9 WXYZ] for Setup.3. Press [8 TUV] for Set Force.4. Press [1 .-’] for Force Analog. This will revert the phone to analog service andremain in analog mode for up to 10 minutes and until a call is made.5. Or, p ress [2 ABC] for Force Mode and select from the following options by pressing[OK/Message]. Again, if selected, the phone will revert to and remain in that mode for up to10 minutes and until a call is made.− CDMA only: Service is limited to CDMA cellular and PCS services, and analog roaming are not allowed.− PCS only: Service is limited to CDMA PCS service, and CDMA cellular and analog roaming are not allowed.− Cell Only - Service is limited to CDMA cellular and analog services, and PCS roaming is not allowed.− Automatic - Automatically looks for any available preferred service.6. After a call is made and terminated, the phone scans for normal preferred system.Whisper ModeWhisper Mode automatically increases the microphone gain to allow the other party to hear your voiceloud enough even if you speak silently. This feature is useful in quite environments such as during ameeting.To set Whisper Mode:1. Press [MENU] to display the menu.2. Press [9 WXYZ] for Setup.3. Press [9 WXYZ] for Whisper Mode.4. Press the navigation key to toggle between On and Off5. Press [OK/Message] to save.Note: However, in normal ambient noise environments, setting this featureactive may cause your voice to sound too loud for the other party to listen to.](https://usermanual.wiki/Samsung-Electronics-Co/SCHN150/User-Guide-145102-Page-60.png)
![SCH-N150 User Guide Draft Rev 1.2 3/16/01 60Mail kitThe Mail Kit allows you to create, send, read, and save your messages.Your phone receives four kinds of messages: voicemail, text and e-mail, numericpages, and browser messages. To access the Mail kit, press [OK/Message].Note: Contact your service provider about activating the sending andreceiving short messages. This feature will only be available if yourservice provider supports it in the network.The Mail kit contains the following six menus:− New Messages− Voice− Txt Inbox− TxtOutbox− Filed Msg− Message SetupNew messagesYou can simply create text, numeric page, or e-mail messages to send to another party.Each message can be sent to up to 10 mobile numbers or e-mail addresses at a time.Message options allow you to set priority, validity period, or send message after aspecified time. You can also file yet to be sent draft messages into the filed messagesfolder to send them later on, or save the sent messages to the Text Outbox to reviewdelivery status.Note: Sending message is only supported in the digital networks and only if yourservice provider supports this feature in its network.1. Press [OK/Message] for the Mail Kit menu.2. Press [1 .-’] for New Messages.3. Press [1 .-’] for Send To. This is a required field for entry. Once this field isentered, you can send the message at any time by pressing [SEND].4. Press [MENU] to select from Address options Phone Number, E-mail, and Phonebook.- Phone Number: Enter the destination mobile phone or pager number of up to 32 digits using the keypad.- E-mail: Enter the destination e-mail address using the keypad. You can enter only up to 48 characters. (See “Add E-mail” on page ?? for entry method.)- Phonebook: Access the phone book to retrieve a number or an e-mail address you wish to send the message to.Note: For e-mail addresses, at the bottom right corner of the display is acharacter counter showing how many characters allowable remain for entry.5. After entering the Send To number or e-mail address, press [OK/Message] toreturn to the New Message menu. Notice that the Send To area is updatedwith the first few digits or characters of the number or e-mail address entered.6. If you wish to send the same message to multiple recipients:- Press [OK/Message] again or press [1 .-’] to go to the multiple addresses menu.- Entry ‘0’ is the first destination entered from above. Press [OK/Message] or [1 .-’] for entry number ‘1’.- Select from the three Address options by scrolling and pressing [OK/Message].- Enter the additional mobile number or e-mail address and press [OK/Message].- Notice that the Send To field is updated with ‘Multi’ marking notifying you that the message is addressed to multiple recipients.- To add more recipient addresses, repeat the above 6. steps. The multiple destinations entered will be updated on the Send To list.](https://usermanual.wiki/Samsung-Electronics-Co/SCHN150/User-Guide-145102-Page-61.png)
![SCH-N150 User Guide Draft Rev 1.2 3/16/01 617. Press [2 ABC] for Message. This is an optional field for entry. If you skip thisoption (or leave this field blank), messaging will be the same as sending a numeric page.8. Type in the message you wish to send. You can change the Input Modeby pressing [MENU], which allows you to select from Word , ABC, Symbol,and 123 modes. (See “Entering text, numbers, or symbols on page 14? for details.)9. Press [OK/Message] to select Input Mode and begin entering the message. You canenter only up to 180 characters in length for messages. At the bottom right corner of thedisplay is a character counter showing how many characters allowable remain for entry.Note: If the Send To destination is an e-mail address, this character counter starts from180 minus the length of the e-mail address.10. Once entered, press [OK/Message] to save the message. Notice that the Message area (Msg) is updated with the header of the message entered.11. Press [3 DEF] for Call Back number. This is an optional field for entry.12. Edit the Call Back number if desired. The default setting is your own phone number. If no need for change, press [OK/Message] without change. Notice that the Call Back area (CB#) is updated with the new number entered.13. Press [4 GHI] for Options. This is an optional field for entry. You can scroll or toggle between the following options using the navigation key:- Priority: Normal, Urgent- Validity Period: None, 30 Min., 1 Hour, 2 Hours, 12 Hours, 1 Day, 2 Days, 3 Days- Send Later: None, 30 Min., 1 Hour, 2 Hours, 12 Hours, 1 Day, 2 Days, 3 Days- Delivery Ack : On, Off- Save Message: Auto Save, Prompt Save, Do Not Save14. Press [OK/Message] to confirm setting and return to the New Message menu.15. Press [5 JKL] for Action. This is an optional field for entry.16. The following four options will display:- Press [SEND] to transmit the message.- Press [OK/Message] to file the message to the “Filed Msg” folder without sending it.- Press [C] to cancel and return to the previous menu.- Press [END] to terminate message and return to standby mode.17.When [SEND] is pressed, the animation is displayed showing that the message is being sent. If the message was sent successfully, “Message Sent!” message displays, but if it failed, “Messaging Failed!” displays.18. If transmission fails, the phone will automatically prompt to resend the message once more, depending on the error conditions. Select Yes to resend message. If message is successfully sent, the message sent will be stored in the Outbox based on the “Save Message” option setting described previously.- Auto Save: The message will be stored to the Outbox message list automatically after transmission is complete.- Prompt Save: The phone will prompt if you wish to save the message to the Outbox. You can select from Yes or No.- Do Not Save: The phone will not store the sent message to the Outbox.19. You can view the status of the transmitted message through the Outbox message list. (See “Outbox” on page ?? for details).Voicemail and Text InboxYour phone receives incoming messages in both Standby and In-Usemodes. When you are on a call and a message is received, your phoneautomatically mutes the ringer and provides the call waiting tone (thisis to avoid ringing in your ear while you are trying to speak).Receiving a message in standby modeWhen your phone receives a message in standby mode, the ringersounds (unless turned off), and the screen displays (“New Voicemail” ,](https://usermanual.wiki/Samsung-Electronics-Co/SCHN150/User-Guide-145102-Page-62.png)
![SCH-N150 User Guide Draft Rev 1.2 3/16/01 62“New Text ”, “New Page” or “New BrowserMsg” ). The messageindicator is displayed and remains on the screen until you listen to thenew voicemail message, read the new Browser message, text messageor numeric page.Receiving a message while on a callIf you receive a new text message or numeric page while on a voicecall, the Call Waiting tone sounds and a message header displays. Youcan easily review the new message while on the call by just pressing[OK/Message]. Your call is not disconnected, and you can ask the other partyto wait while you review the message.Reviewing voicemails, numeric pages, and text messagesWhen a message arrives, you can directly dial the sender’scall back number, if available, by pressing [SEND], or you can review themessage by pressing [OK/Message]. The Inbox Messages list provides options forreviewing the sender’s name, phone number, time / date stamp and the message.To review a stored (or old) voice mail notification or text message (includingnumeric page from standby mode:1. Press [OK/Message] to display the Mail Kit menu. The number of new (unreviewed) or sent messages displays next to the associated message type in the menu.2. Press [2 ABC] for Voice. The date / time stamp for the last voice mail receiveddisplays along with a notification of the number of new voicemail messages.You can press [SEND] to dial your mailbox directly to review voicemails.3. Or, press [3 DEF] for Text Inbox. A list of messages displays.- An exclamation point next to an entry number indicates an urgent message. A check mark next to an entry number indicates that the message has already been read.- Scroll to the message you wish to review and press [OK/Message].- While reviewing the message, you can press the navigation key up and down to scroll through the time / date stamp, sender’s call back number, origination number / e-mail address, and message body. But if you wait, the phone automatically scrolls through the display.- To review other messages, press the navigation key left or right to move to the next or previous message received.4. Press [C] to return to the previous screen.Note: While reviewing a message, you can press [MENU] for more options. See“ Message options” on page 140.Message optionsWhen reviewing Text Inbox, the Messages menu provides a numberof options. You can return a call or text message to the phone numberor the e-mail address in the message, and forward the message to another party..1. While reviewing a message, press [SEND] to dial the Call Back number.2. Or, scroll through the menu with the navigation key. Press [MENU] for Options.The following options are available: - Reply - Forward - Delete- Save Address- Save Call Back #](https://usermanual.wiki/Samsung-Electronics-Co/SCHN150/User-Guide-145102-Page-63.png)
![SCH-N150 User Guide Draft Rev 1.2 3/16/01 633. Select ‘Reply’ to reply to the sender. The phone accesses “New Message” menuand copies the sender’s originating address to the Send To field. (See “New Message” on page ?? for descriptions on sending a message.)4. Select ‘Forward’ to forward the message to another party. The phone accesses “New Message” menu, and copies the sender’s message body to the Message field.5. Select ‘Delete’ to delete the message from the Inbox.6. Select ‘Save addr’ to save the sender’s origination number or e-mail addressto the phone book. The number or address gets automatically copied into theAdd Entry or E-mail entry field. (See “Add Entry” on page ?? and “Add E-mail” onpage ?? for descriptions on saving phone numbers or e-mail addresses to the phone book.)7. Select ‘Save cb#’ to save the call back number to the phone book. The number gets automatically copied into the Add Entry field.8. Press [C] to return to the previous Text Inbox messages list screen.Message ringingYour phone allows you to set unique ring types for different types ofincoming messages . (see “ Ringer type” on page 96).Messages and lock modeIncoming messages are received even when your phone is in LockMode. The screen displays the time and date of the message, but youcannot access the message. To access the message, unlock the phone.Text OutboxYour phone stores messages into theText Outbox of the phone regardless of whether the message wassuccessfully transmitted or not, and if not set to ‘Do Not Save’in the Save Message setting under Msg Setup. You can review, resend,or delete any message stored in the outbox, if desired. You can alsoverify if the message or e-mail transmitted is successfullydelivered to the other party and at what date and time, throughthe Delivery Acknowledgement feature.Reviewing OutboxTo review the outgoing messages:1. Press [OK/Message] to display the Mail kit menu.2. Press [4 GHI] for Text Outbox. A list of messages displays. The indicator next to the entry number represents the transmission status. - A check mark means that the message was successfully transmittedand delivery was acknowledged. (Delivery Ack)- A colon (‘:’) means that the message is transmitted but is not delivered yet.- An ‘X’ mark means that the message transmission has failed.3. Scroll through the outgoing messages using the navigation key, and select a message to be viewed by pressing [OK/Message].4. The display showing the message status will be presented with ‘Text Msg xx’ or ‘E-mail Msg xx’ (xx; message number) notification on top line of the display. The display will include information on transmitted date / time stamp, Send To number or e-mail address, call back number, the message body, and the delivery status.5. Press [MENU] for more options.. A ‘Sent Msg’ pop-up menu will display.](https://usermanual.wiki/Samsung-Electronics-Co/SCHN150/User-Guide-145102-Page-64.png)
![SCH-N150 User Guide Draft Rev 1.2 3/16/01 64u Select ‘Re-send’ to resend the message. Press [SEND] to resend withthe same message settings. Or, follow steps under “New messages”on page ?? to edit and resend message.u Select ‘Delete’ to delete the message from the Outbox. ‘Erased’ notification will display.Delivery AcknowledgementIf turned on in the Message Setup or New Message options menu, thisfeature provides an alert message with the delivery status some timeafter a message is successfully delivered. The delivery acknowledgementmessage will be displayed on your phone screen until you press any key,and will include delivered date / time stamp, and a text notification of‘Message to [Send To number or e-mail address] delivered.’However, the Delivery Ack message will not be stored in memory,but will be a one-time display only. Also, if multiple messages weretransmitted consecutively in short time, triggering multiple Delivery Ack’sto be delivered to your phone, then only the last received Delivery Ackwill be displayed. The Text Outbox message display will be updated withthe delivered date / time stamp information.Note: Delivery Ack is a type of message sent from the systemto indicate that a message arrived at its destination without error.To review the delivery status of an outgoing message:1. Press [OK/Message] to display the Mail kit menu.2. Press [4 GHI] for Text Outbox. You can review the delivery status through the indicators next to the message entry number.3. Scroll and select an Outbox entry to review.4. Scroll down to view the delivered date / time stamp for the transmitted message updated at the bottom of the display.Mail kit memory capacityYour phone can store up to 20 messages for Text Inbox and up to20 messages for Text Outbox and Filed Messages combined. Thestorage capacity includes all received, sent, and filed messagetypes; numeric page, VMN (voicemail notification), and text message.The number of messages stored depends on the length of the messages.When message memory reaches over 75% capacity, the screen displays“Memory is xx% full. Erase old messages”, where xx is between 75 to 100.At 100% capacity, the screen displays a text notification and rejectsadditional incoming messages until you erase the stored messages fromText Inbox, Text Outbox, or the Filed Messages .Filed MessagesYour phone can store yet to be sent draft messages into the Filed Msgfolder. You can access this folder later to continue editing and to sendthe message.Note: The memory capacity available for the Filed Messages folder isrelative to the Text Outbox memory capacity.To store unsent messages to the Filed Messages folder:1. Press [MENU] to display the Mail Kit menu.2. After “New Message” creation, press [5 JKL] for Action.3. Press [OK/Message] for File Msg.](https://usermanual.wiki/Samsung-Electronics-Co/SCHN150/User-Guide-145102-Page-65.png)
![SCH-N150 User Guide Draft Rev 1.2 3/16/01 65To access unsent messages and continue editing:1. Press [MENU] to display the Mail Kit menu.2. Press [5 JKL] for Filed Msg. The number of pending messages displaynext to the Filed Msg text.3. The filed messages will display in order. Scroll and select message tocontinue editing by pressing [OK/Message].4. Follow steps under “New Messages” on page ?? to edit and send the message.Message SetupYou can preset several options for general settings or new messagetransmissions, and delete all messages from the Inbox or Outbox.1. Press [OK/Message] to display the Mail Kit menu.2. Press [6 MNO] for Msg Setup.3. Press [1 .-’] for General.- Press [1 .-’] for Scroll Timer. Your options are Off, 1, 2, 3, 4, or 5 seconds.- Or, press [2 ABC] for Msg. Reminder. Your options are Off, Once, or Every 2 min.4. Press [2 ABC] for New Messages.u Press [1 .-’] to set the default Callback number. The default setting isyour own phone number. Enter a new callback number via the keypadand press [OK/Message].u Press [2 ABC] to set the Save Message options. You can toggle between‘AutoSave’, ’Prompt Save’, or ‘Do Not Save’ for the default setting.Press [OK/Message] to save the setting. When set to ‘Prompt Save’,the phone will display “Store Msg?” prompt asking if the created message should be saved to the outbox after a message is transmitted.u Press [3 DEF] for message Entry Method. You can toggle between ‘Alphabet’ and ‘Word’ (predictive keypad) for the default setting using the navigation keys. Press [OK/Message] to save the setting.u Press [4 GHI] to set the Delivery ACK. You can toggle between ‘On’ and ‘Off’ for the default setting using the navigation keys. Press [OK/Message] to save the setting.u Press [5 JKL] for Canned Messages. There are a total of 10 frequently usedcanned messages preprogrammed to your phone. You can select the numberassociated with each canned message and press [OK/Message] to edit it.If you completed editing of a canned message, press [OK/Message] to save.5. Press [3 DEF] for Erase.u Press [1 .-’] for Entire Inbox.u Press [2 ABC] for Entire Outbox.u Press [3 DEF] for Erase All Msg. When prompt displays, press [OK/Message] to accept or [C] to cancel. If accepted, all messages from the inbox and/or the outbox will be deleted.](https://usermanual.wiki/Samsung-Electronics-Co/SCHN150/User-Guide-145102-Page-66.png)
![SCH-N150 User Guide Draft Rev 1.2 3/16/01 66SecurityYour phone’s security featuresYour phone provides security options, including a user-programmablelock code and special phone number features. To access the Securitymenu in standby mode, press [Menu], [0 Next], and enter the 4-digit lockcode. (normally the lock code is the last 4 digits of your phonenumber). Press the associated numeric key to access one of thefollowing Security options:.Lock Mode.Restrict.Lock code.Emergency #.Send PIN.Clear MEM.Reset Phone.Voice PrivacyLock modeLocking the phone limits all outgoing calls except calls to hard-codedemergency numbers (911, *911 and #911).You can lock the phone manually during use, or set the phone to lockautomatically when it is turned on. When the phone is in Lock Mode,you can answer incoming calls, but you must unlock the phone toplace outgoing calls.Locking the phoneTo lock the phone:1. Press [MENU] to display the menu.2. Press [0 Next] for Security and enter your lock code.3. Press [1 .-’] for Lock Phone.4. Scroll through the options:. never: The phone remains unlocked.. now: The phone locks immediately and stays locked until the lockcode is entered.. on power up: The phone locks automatically the next time yourphone is powered on and stays locked until the lock code is entered.5. Press [OK/Message]to save the setting.Unlocking the phoneWhen the phone is locked, pressing the navigation key, [MENU], or [OK/Message] displays “ UserLock” . Enter the phone’s lock code, and the phone will immediately unlock itself.Dialing in lock modeYou can place calls to emergency (911, *911, #911) and three special numbers yousaved under emergency# in the lock mode. After entering the number press [SEND] to dial.To place normal outgoing calls in lock mode, enter the lock code to unlock the phone,and then dial the phone number.RestrictThis feature allows you to restrict the use of your phone.To restrict the phone:1. Press [MENU] to display the menu.](https://usermanual.wiki/Samsung-Electronics-Co/SCHN150/User-Guide-145102-Page-67.png)
![SCH-N150 User Guide Draft Rev 1.2 3/16/01 672. Press [0 Next] for Security. Enter the 4-digit lock code.3. Press [2 ABC] for Restrict.4. Press the navigation key to scroll between ‘Yes’ or ‘No’. Press [OK/Message] to confirmthe restriction.5. Or, p ress [C] to exit and return to previous menu.Lock CodeThe default lock code for your phone is the last fourdigits of your phone number. You can enter a personal lock code orchange the lock code as often as you like.To enter a new lock code:1. Press [MENU] to display the menu.2. Press [0 Next] for Security.3. Enter your current 4-digit lock code.4. Press [3DEF] for Lockcode.5. When prompted with “ENTER NEW CODE”, enter a new 4-digit lock code by pressing the numeric keys.6. You will be prompted again with “RE-ENTER NEW CODE”. Enter the same 4-digit lock code to confirm.7. Or, p ress [C] to exit and return to the Security menu.Note: Your phone does not allow viewing of the lock code unless you know thelock code (this is for obvious security reasons). So, if you change the lockcode, be sure to write down or memorize the new code.Emergency #Your phone provides the option of storing three emergency or specialnumbers. Each special number can be up to ten digits long.All special numbers can be manually dialed at any time, even whenyour phone is locked or restricted. This feature is useful for controlling whatnumbers can be dialed from your phone.Note: Emergency numbers 911, *911, and #911 are hard-coded to yourphone. You can dial these numbers by pressing [SEND] after number entry at any time, even whenthe phone is locked or restricted. If you dial 911, *911, or #911, an audible tone is heardand an “Emergency” prompt displays during the duration of the call to alert you that a 911 call is in progress.IMPORTANT NOTICE! PLEASE READ!Because of various transmission methods, network parameters, anduser settings used to complete a call from your wireless phone, aconnection cannot always be guaranteed.Therefore, emergency calling may not be available on all wirelessnetworks at all times.DO NOT depend on this phone as a primary method of dialing 911 orfor any other essential or emergency communications.Remember to always turn your phone on and check for adequatesignal strength before placing a call.Storing numbersTo store special numbers that allow you to dial even when phone is locked or restricted:1. Press [MENU] to display the menu.2. Press [0 Next] for Security and enter your current lock code.3. Press [4 GHI] for Emergency #.4. Press [1 .-’], [2 ABC], or [3 DEF] to select from three entries.5. Enter the special number. You can enter up to 10 digits for each number.6. Press [OK/Message] to save the number entered.7. Press [C] to exit and return to the Security menu.](https://usermanual.wiki/Samsung-Electronics-Co/SCHN150/User-Guide-145102-Page-68.png)
![SCH-N150 User Guide Draft Rev 1.2 3/16/01 68Send PINThe PIN (Personal Identification Number) feature prevents your phone from beingUsed by unauthorized persons. Contact your service provider for complete informationon this feature.To set your phone to prompt for your PIN to be sent to the systemwhenever a call is placed:1. Press [MENU] to display the menu.2. Press [0 Next] for Security and enter your current lock code.3. Press [5 JKL] for Send PIN.4. Choose between never or prompt.5. Press [OK/Message] to save the choice.Note: Your service provider must enable this feature andassign you a PIN in order for this feature to work.Clear MEMClear M EM erases your Phone Book and Voice Dial recordings. Personal settings(Call Logs, Mail Kit Messages, Schedules, or other phone feature settings) arenot affected by clearing memory on your phone. This feature is useful if you wantto give your phone to a friend or family member, or if you want to erase all of yourphone numbers.To clear memory on your phone:1. Press [MENU] to display the menu.2. Press [0 Next] for Security and enter your current lock code.3. Press [6 MNO] for Clear MEM . A confirmation prompt “Clear All? ” displays alertingyou that phone memory will be cleared.4. Press [C] to cancel the operation.5. Or, press [OK/Message] to clear the phone memory. After a few seconds, “Erased” message displays and the phone returns to standby mode.Reset PhoneReset Phone reboots the phone and returns all feature and memory settings to the factorydefault settings. This also erases all your Phone Book, Voice Dial recordings,Call Logs, Mail Kit Messages, and Game Scores.To reset your phone:1. Press to [MENU] display the menu.2. Press [0 Next] for Security and enter your current lock code.3. Press [7 PQRS] for Reset Phone. A confirmation prompt displays asking ifyou want to ‘Proceed?’.4. Press [C] to cancel the operation.5. Or, p ress [OK/Message] to reset your phone. This may take up to 20 seconds to complete. Once complete, the phone will automatically power cycle itself and return to standby mode.Voice PrivacyAlthough your conversation is securely encrypted to prevent eavesdropping whenused in digital mode, this feature extends the encryption when set to enhance mode.To activate voice privacy:1. Press [MENU] to display the menu.2. Press [0 Next] for Security and enter your current lock code.3. Press [8 TUV] for Voice Privacy. Select ‘enhanced’ to activate or ‘standard’ to deactivateVoice Privacy.4. Press [C] to cancel the operation.5. Or, p ress [OK/Message] to save the setting.](https://usermanual.wiki/Samsung-Electronics-Co/SCHN150/User-Guide-145102-Page-69.png)

![SCH-N150 User Guide Draft Rev 1.2 3/16/01 70In-Use MenuYour phone includes both a Standby menu and an In-Use menu. The In-Usemenu is displayed by pressing [MENU] during a call in progress.The In-Use menu options are:1. Mute/Quit - Mutes or unmutes your voice so that the calling party cannot hear you.2. Calls - Checks your call log for outgoing, incoming, and missed calls. You can also erase the logs from this menu.3. PhoneBook - Accesses the Phone Book menu options.6. Silent/Quit – Activates or deactivates silent keypad feature. When set to silent mode,your keypad tone is not sent out to the calling party. However, this should not be usedwhen you access automated services that requires you to select options or press numbersthrough the keypad.5. Send Tel # - Send your phone number to the calling party or automated services.6. My Phone # - Displays your own phone number used with the phone.7. Version - Displays the version of the software and hardware that is being used on the phone.8. Voice Privacy - Allows you to select between a privacy level of standard or enhanced.](https://usermanual.wiki/Samsung-Electronics-Co/SCHN150/User-Guide-145102-Page-71.png)