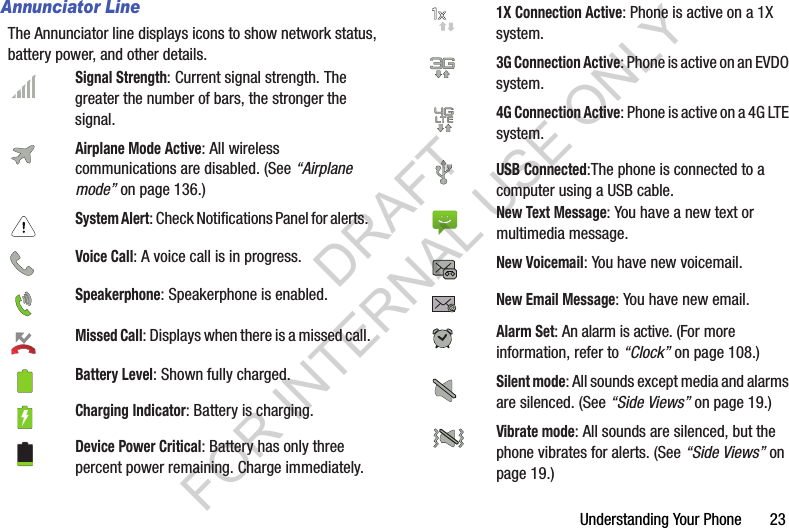
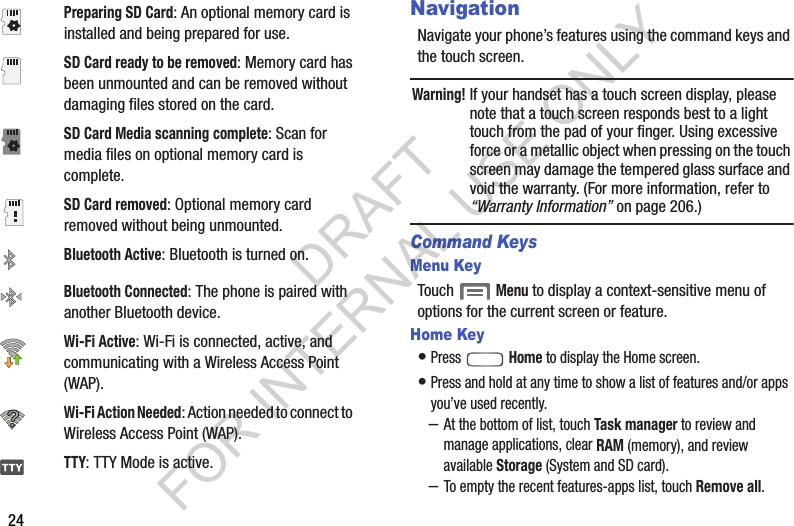
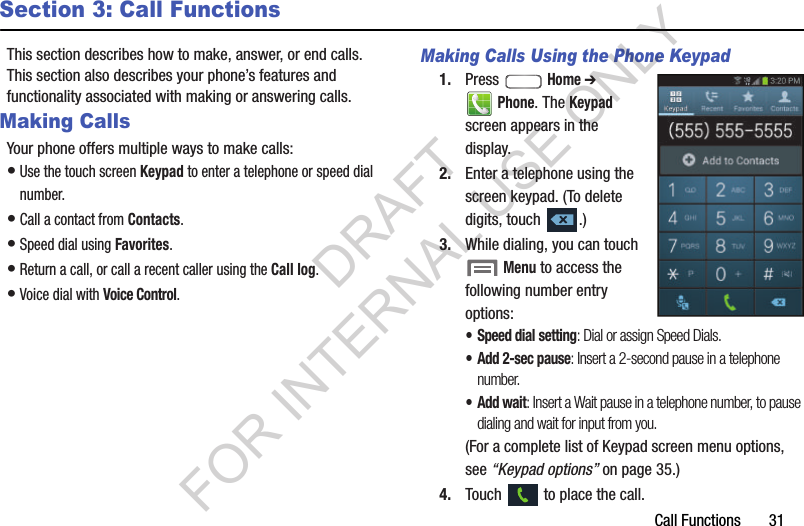
Samsung Electronics Co SCHR830C Multi-band CDMA/LTE Phone with WLAN, Bluetooth and RFID User Manual r830
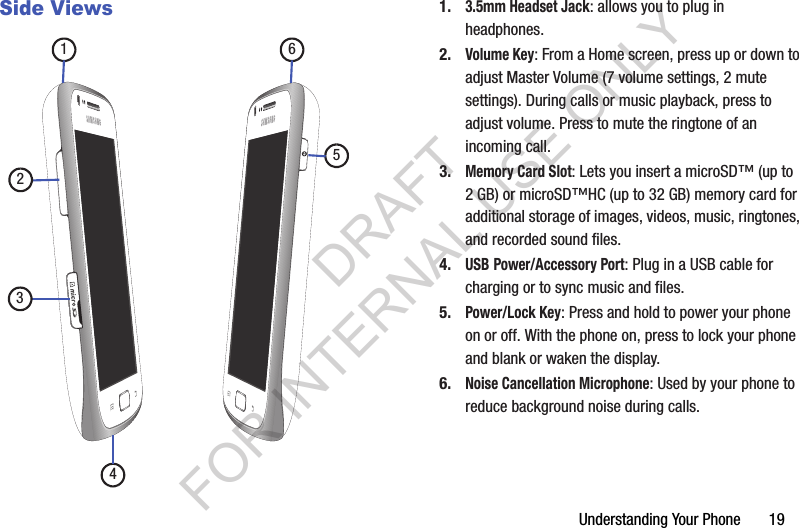
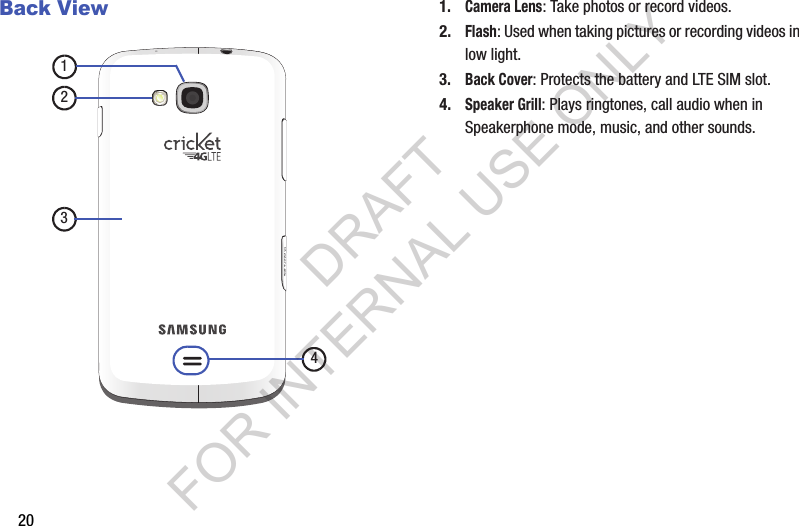
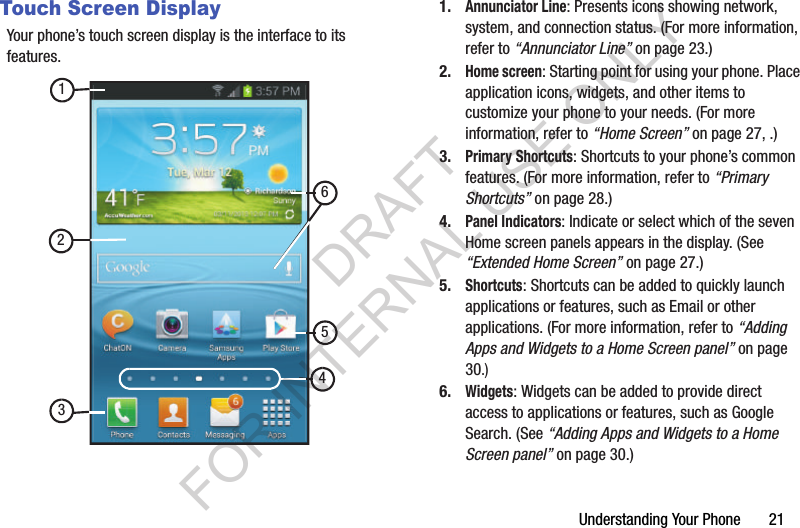
Samsung Electronics Co Ltd Multi-band CDMA/LTE Phone with WLAN, Bluetooth and RFID r830
UserManual.wiki
>
Samsung Electronics Co
>
SCHR830C User Manual
>
Users Manual
Contents
1.
Users Manual
2.
User Manual
Users Manual
Navigation menu
Upload a User Manual
Namespaces
Wiki Guide
HTML
PDF
Info
Views
User Manual
Discussion / Help
Navigation

![INTEROPERABILITY OR NON-INFRINGEMENT, WITH RESPECT TO INFORMATION TECHNOLOGY SECURITY PROTECTION, SAFE™ DEVICES AND APPLICATIONS TESTED WITH SAFE™ DEVICES. IN NO EVENT SHALL THE SAMSUNG ENTITIES BE LIABLE FOR ANY DIRECT, INDIRECT, INCIDENTAL, PUNITIVE, OR CONSEQUENTIAL DAMAGES OF ANY KIND WHATSOEVER WITH RESPECT TO INFORMATION TECHNOLOGY SECURITY PROTECTION, SAFE™ DEVICES OR APPLICATIONS TESTED WITH SAFE™ DEVICES. In addition, information technology security protection will be affected by features or functionality associated with, among other things the e-mail platform, master data management, and virtual private network solutions selected by the software provider, solution provider or user. Choice of an e-mail, master data management, and virtual private network solution is at the sole discretion of the software provider, solution provider or user and any associated effect on information technology security protection is solely the responsibility of the software provider, solution provider or user. For complete statement of limited warranty, please refer to www.samsung.com/us/safe, available on the web and where Samsung smartphone and Galaxy Tab™ devices are sold. [101212] Samsung Telecommunications America (STA), LLCHeadquarters:1301 E. Lookout DriveRichardson, TX 75082Customer Care Center:1000 Klein Rd.Plano, TX 75074Toll Free Tel: 1.888.987.HELP (4357)DRAFT FOR INTERNAL USE ONLY](https://usermanual.wiki/Samsung-Electronics-Co/SCHR830C.Users-Manual/User-Guide-1931628-Page-4.png)


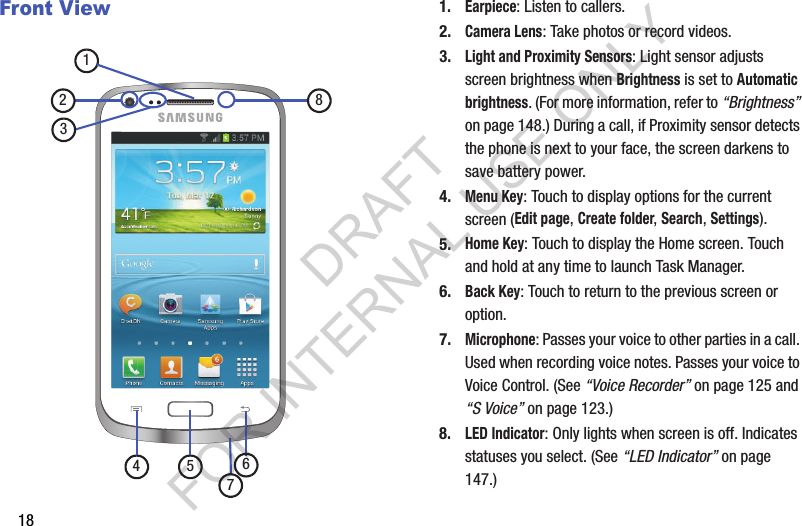
![Understanding Your Phone 17Section 2: Understanding Your PhoneThis section outlines key features of your phone, including keys, displays, and icons. Features•4.0-inch (800x480 pixel) WVGA full-screen touch screen •1.2 Gigahertz Dual-Core Processor•High Speed Data [4G Long Term Evolution (LTE) Technology, EVDO Rev A Capable Technology, and Wi-Fi Technology] •Android OS •Motion and position sensitivity •Full integration with Google® applications, including Play Store®, plus pre-loaded applications •Connections –USB 2.0 HS –Wi-Fi 802.11 a/b/g/n –Portable Wi-Fi Hotspot –USB Tethering –Bluetooth 4.0 (For more information, refer to “Bluetooth profiles” on page 132.) •Messaging Services (with on-screen QWERTY Keypads) –Text, Picture, and Video Messaging –Voice Messaging –Email –Mobile Instant Messenger (IM) –Chat •Full-HTML Browser •Global Positioning (GPS) Technology •5 Megapixel CMOS Camera-Camcorder, rear-facing •1.3 Megapixel CMOS Camera-Camcorder, front-facing •Picture Gallery, supporting JPG, PNG, GIF, and BMP formats •Music Player, supporting MP3 format •Video Player, supporting MP4, M4V, 3GP, DIVX, H.263, and H.264 formats •Speakerphone •Ringtone and Alert tone support for MP3, AAC, WMA, OGG, QCP, EVRC, MIDI, WAV, and AMR formats •Support for microSD™ and microSDHC™ Memory Cards (up to 64 GB capacity) DRAFT FOR INTERNAL USE ONLY](https://usermanual.wiki/Samsung-Electronics-Co/SCHR830C.Users-Manual/User-Guide-1931628-Page-23.png)


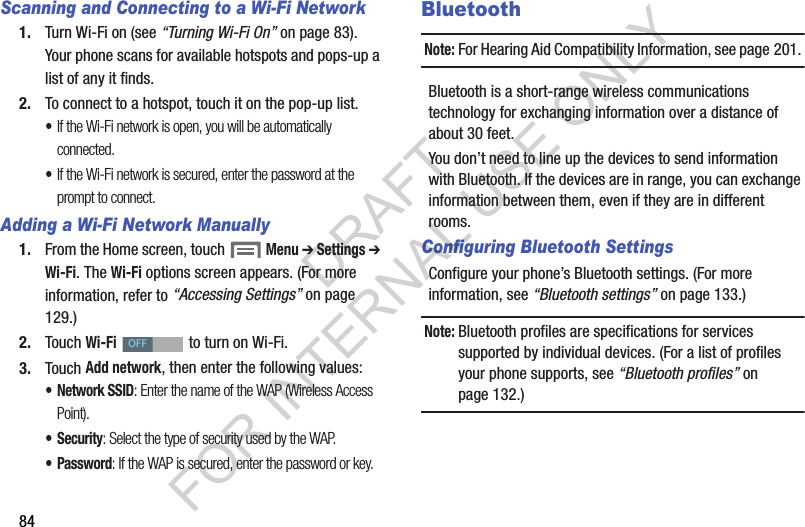
![Connections 83Section 7: ConnectionsWi-FiWi-Fi is a wireless networking technology that provides access to local area networks.Wi-Fi communication requires access to an existing Wi-Fi network. Wi-Fi networks can be Open (unsecured), or Secured (requiring you to provide login credentials). Your phone supports the 802.11 a/b/g/n Wi-Fi protocols.Configuring Wi-Fi SettingsConfigure your phone’s Wi-Fi settings. (For more information, see “Wi-Fi Settings” on page 130.) Turning Wi-Fi On or OffWhen you turn Wi-Fi service on, your phone automatically searches for available, in-range “hotspots” [also termed WAPs (Wireless Access Points)]. Turning Wi-Fi On1. From the top of the Home screen, sweep your finger downward to display the Notifications screen. 2. At the top of the Notifications screen, touch Wi-Fi to turn Wi-Fi On. Turning Wi-Fi Off1. From the top of the Home screen, sweep your finger downward to display Notifications. 2. At the top of the Notifications screen, touch Wi-Fi to turn Wi-Fi Off. DRAFT FOR INTERNAL USE ONLY](https://usermanual.wiki/Samsung-Electronics-Co/SCHR830C.Users-Manual/User-Guide-1931628-Page-89.png)


![136More Wireless and Network SettingsAirplane modeWhen airplane mode is enabled, all your phone’s wireless connections are disabled, and you cannot make or receive calls [except for Emergency (E911) calls] or messages. You can, however, make Wi-Fi and Bluetooth connections. While in airplane mode, you can use other features of your phone, such as playing music, watching videos, or using other applications. 1. From the Settings screen, under Wireless and network, touch More settings. The Wireless and network menu appears. 2. Touch Airplane mode to enable or disable airplane mode. When enabled, a check mark appears in the check box.Mobile networksSet options for network selection, data service, and roaming behavior.1. From the Settings screen, under Wireless and network, touch More settings ➔ Mobile networks. The Mobile network screen appears. 2. Set these options:•Mobile data: Enable or disable your phone’s connection to the mobile data network. You can also control this setting at Notifications with the Mobile data toggle. • Data roaming: Enable or disable connection to data services when your device is roaming on another network. (For more information about roaming, see “Roaming” on page 12.) •Network mode: Configure roaming for CDMA, LTE, and EV-DO networks.–LTE/CDMA: Lets your phone automatically access LTE, CDMA, and/or EV-DO mobile networks when available. –CDMA: Restricts your phone to CDMA mobile networks. • System select: Configure CDMA roaming mode. –Home only: Restricts your phone to your Wireless Provider’s network. –Automatic: Permits your phone to automatically roam to networks other than that provided by your Wireless Provider. DRAFT FOR INTERNAL USE ONLY](https://usermanual.wiki/Samsung-Electronics-Co/SCHR830C.Users-Manual/User-Guide-1931628-Page-142.png)


![166AccountsSet up and manage accounts, including your Samsung, Email, Google, and social networking accounts. 䡲 From the Settings screen, under Accounts, touch the desired account type. The related account type screen displays. Samsung account1. From the Settings screen, under Accounts, touch Add account ➔ Samsung account. The Samsung account screen displays. 2. Under General settings, touch Account settings. The following options are available: • Account information: –Profile (password protected): Change password and view Email address, Date pf birth, Name prefix, First name, Lastname, Zip code, Nickname, and Receive newsletter status for your account. –Terms and conditions: Review Country or region, Terms and conditions, and Privacy policy information. –Help: Find your email address or password, Contact us with a text message, or review Customer support information [My questions, FAQ (Frequently Asked Questions), or Contact us]. • Device backup: –Auto backup: When set to On for at least an hour and connected to a Wi-Fi network and with the screen off and the device charging, your data is backed up automatically. –Backup options: Select the data to back up [Logs, Messages (SMS), Messages (MMS), and/or Wallpaper]. –Back up now: Immediately backup your data. Also shows when your data was Last backed up. –Restore: Immediately restore your backed up data to your device. ChatON1. From the Settings screen, under Accounts, touch Add account ➔ ChatON. The ChatON screen displays. 2. Follow the prompts to set up a ChatON profile. DRAFT FOR INTERNAL USE ONLY](https://usermanual.wiki/Samsung-Electronics-Co/SCHR830C.Users-Manual/User-Guide-1931628-Page-172.png)


![188The FCC SAR limit incorporates a substantial margin of safety to give additional protection to the public and to account for any variations in measurements.SAR tests are conducted using standard operating positions accepted by the FCC with the phone transmitting at its highest certified power level in all tested frequency bands. Although the SAR is determined at the highest certified power level, the actual SAR level of the phone while operating can be well below the maximum reported value. This is because the phone is designed to operate at multiple power levels so as to use only the power required to reach the network. In general, the closer you are to a wireless base station antenna, the lower the power output of the phone.**************Before a new model phone is available for sale to the public, it must be tested and certified to the FCC that it does not exceed the SAR limit established by the FCC. Tests for each model phone are performed in positions and locations (e.g. at the ear and worn on the body) as required by the FCC. For body-worn operation, this phone has been tested and meets FCC RF exposure guidelines when used with an accessory that contains no metal and that positions the mobile device a minimum of X.X? cm from the body.Use of other accessories may not ensure compliance with FCC RF exposure guidelines. The FCC has granted an Equipment Authorization for this mobile device with all reported SAR levels evaluated as in compliance with the FCC RF exposure guidelines. This [mobile phone/tablet/device] has a FCC ID number: A3LXXXXXX [Model Number: XXX-XXX] and the specific SAR levels for this [mobile phone/tablet/device] can be found at the following FCC website:http://www.fcc.gov/oet/ea/.The SAR information for this device can also be found on Samsung’s website: http://www.samsung.com/sar. ****************SAR information on this and other model phones can be accessed online on the FCC's website through http://transition.fcc.gov/oet/rfsafety/sar.html. To find information that pertains to a particular model phone, this site uses the phone FCC ID number which is usually printed somewhere on the case of the phone. Sometimes it may be necessary to remove the battery pack to find the number. Once you have the FCC ID number for a particular phone, follow the instructions on the website and it should provide values for typical or maximum SAR for a particular phone. Additional DRAFT FOR INTERNAL USE ONLY](https://usermanual.wiki/Samsung-Electronics-Co/SCHR830C.Users-Manual/User-Guide-1931628-Page-194.png)


![Health and Safety Information 205• Reduce risk of repetitive motion injuries. When you repetitively perform actions, such as pressing keys, drawing characters on a touch screen with your fingers, or playing games, you may experience occasional discomfort in your hands, neck, shoulders, or other parts of your body. When using your device for extended periods, hold the device with a relaxed grip, press the keys lightly, and take frequent breaks. If you continue to have discomfort during or after such use, stop use and see a physician.• If your device has a camera flash or light, do not use the flash or light close to the eyes of people or pets. [122011]DRAFT FOR INTERNAL USE ONLY](https://usermanual.wiki/Samsung-Electronics-Co/SCHR830C.Users-Manual/User-Guide-1931628-Page-211.png)

![Warranty Information 211Samsung Telecommunications America, LLC1301 E. Lookout DriveRichardson, Texas 75082Phone: 1-800-SAMSUNGPhone: 1-888-987-HELP (4357)©2012 Samsung Telecommunications America, LLC. All rights reserved.No reproduction in whole or in part allowed without prior written approval. Specifications and availability subject to change without notice. [111611]End User License Agreement for SoftwareIMPORTANT. READ CAREFULLY: This End User License Agreement ("EULA") is a legal agreement between you (either an individual or a single entity) and Samsung Electronics Co., Ltd. ("Samsung Electronics Co.") for software, owned by Samsung Electronics Co. and its affiliated companies and its third party suppliers and licensors, that accompanies this EULA, which includes computer software and may include associated media, printed materials, "online" or electronic documentation ("Software"). Samsung Electronics Co. is a separate company from the company that provides the limited warranty for this mobile device, Samsung Telecommunications America, LLC.This device requires the use of preloaded software in its normal operation. BY USING THE DEVICE OR ITS PRELOADED SOFTWARE, YOU ACCEPT THE TERMS OF THIS EULA. IF YOU DO NOT ACCEPT THESE TERMS, DO NOT USE THE DEVICE OR THE SOFTWARE. INSTEAD, RETURN THE DEVICE TO THE RETAILER FOR A REFUND OR CREDIT. 1. GRANT OF LICENSE. Samsung Electronics Co. grants you the following rights provided that you comply with all terms and conditions of this EULA: You may install, use, access, display and run one copy of the Software on the local hard disk(s) or other permanent storage media of one computer and use the Software on a single computer or a mobile device at a time, and you may not make the Software available over a network where it could be used by multiple computers at the same time. You may make one copy of the Software in machine readable form for backup purposes only; provided that the backup copy must include all copyright or other proprietary notices contained on the original.DRAFT FOR INTERNAL USE ONLY](https://usermanual.wiki/Samsung-Electronics-Co/SCHR830C.Users-Manual/User-Guide-1931628-Page-217.png)
![218date of the first consumer purchaser's purchase of the device and providing the same information. These are the only two forms of notice that will be effective to opt out of this dispute resolution procedure. Opting out of this dispute resolution procedure will not affect your use of the device or its preloaded Software, and you will continue to enjoy the benefits of this license.16. ENTIRE AGREEMENT; SEVERABILITY. This EULA is the entire agreement between you and Samsung Electronics Co. relating to the Software and supersedes all prior or contemporaneous oral or written communications, proposals and representations with respect to the Software or any other subject matter covered by this EULA. If any provision of this EULA is held to be void, invalid, unenforceable or illegal, the other provisions shall continue in full force and effect. [101212]DRAFT FOR INTERNAL USE ONLY](https://usermanual.wiki/Samsung-Electronics-Co/SCHR830C.Users-Manual/User-Guide-1931628-Page-224.png)