Samsung Electronics Co SCHS735C PCS CDMA Phone with WLAN and Bluetooth User Manual
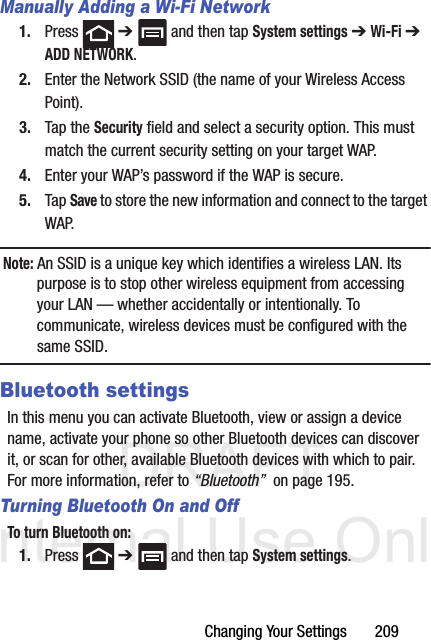
Samsung Electronics Co Ltd PCS CDMA Phone with WLAN and Bluetooth Users Manual
UserManual.wiki
>
Samsung Electronics Co
>
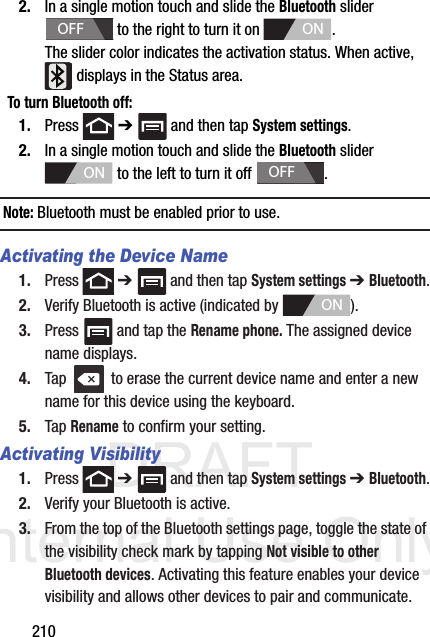
SCHS735C User Manual
Users Manual
Navigation menu
Upload a User Manual
Namespaces
Wiki Guide
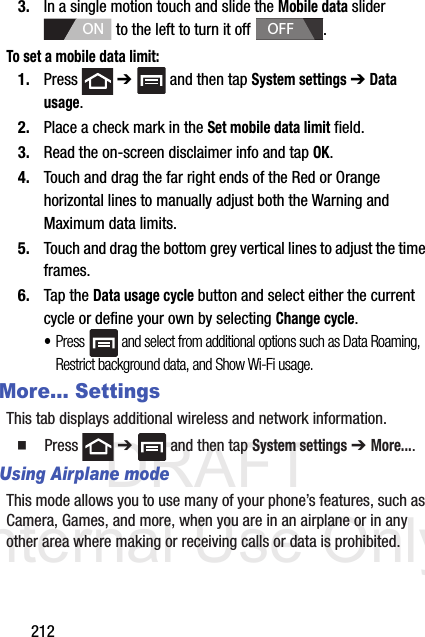
HTML
PDF
Info
Views
User Manual
Discussion / Help
Navigation


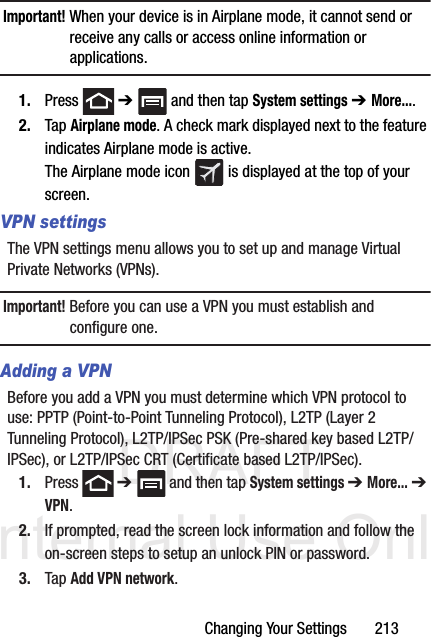
![DRAFT Internal Use Only80To enter symbols:1. Tap to configure the keyboard for Symbol mode.2. Tap the appropriate symbol key.– or –Tap button to cycle through additional pages.•The first number on this key indicates which page (1, 2, or 3) of additional characters is active.Using XT9 Predictive TextXT9 is a predictive text system that has next-letter prediction and regional error correction.Note: XT9 is only available when ABC mode is selected. XT9 advanced settings are available only if the XT9 field has been selected.1. Press ➔ and then tap System settings ➔ Language & input ➔ (adjacent to the Samsung keyboard field).– or –From within an active text entry screen, tap from the bottom of the screen to reveal the Samsung keyboard settings screen.2. Set any of the following options:• Portrait keyboard types allows you to choose a keyboard configuration (Qwerty keyboard [default] or 3x4 keyboard).• Input languages sets the input language. Tap a language from the available list. The keyboard is updated to the selected language.123Sym1/3](https://usermanual.wiki/Samsung-Electronics-Co/SCHS735C/User-Guide-1813584-Page-84.png)


![DRAFT Internal Use OnlyMessages 119Deleting an Internet Email Account1. From the Home screen, tap (Applications) ➔ (Email). 2. Press and then tap Settings ➔ [email account].3. Scroll to the bottom of the settings page and select Remove account ➔ OK.Opening an Email1. From the Home screen, tap ➔ (Email).2. Tap the account name field (upper-left) to open the complete email account list page. •Selecting Combined view allows you to view all the emails for your current accounts, managed by the application, to be listed on a single screen.3. Select an email account and tap an email message.Refreshing Email messages1. From the Home screen, tap ➔ (Email).2. Select an email account.•If you are already in an email account, tap the account name field (upper-right) to open the complete email account list page.•Select an available email account.3. Tap (Refresh) from the bottom of the screen.](https://usermanual.wiki/Samsung-Electronics-Co/SCHS735C/User-Guide-1813584-Page-123.png)
![DRAFT Internal Use OnlyMessages 1234. Tap Next. Consult your Network or IT Administrator for further details and support.5. Tap Exchange (from the add new email account screen).Note: If prompted with an on-screen notification that the connection that the “Setup could not finish”, tap Edit details to continue with a manual update of necessary information.6. When prompted to provide additional detailed information within the Exchange server settings screen, enter an updated Domain, and confirm your user name and Password information.Important! Remember to manually place the cursor in the correct spot and enter a Domain name before the “[Domain]\[user name]” entry. Most servers only provide a username.7. Update or re-enter your Exchange server information within the appropriate field. This field can often be populated with incorrect or out of date information provided by your server.• Exchange Server: your exchange server remote email address. Typically starts with mail.XXX.com. Obtain this information from your company network administrator. Important! Do not accept the default entry as this is a guess based on returned information.](https://usermanual.wiki/Samsung-Electronics-Co/SCHS735C/User-Guide-1813584-Page-127.png)

![DRAFT Internal Use Only1363. Locate the Storage field and Tap the < > icons current to change the desired default storage location (Phone or MMC [Multi Media Card]) for newly taken pictures or videos. Choose from: Phone or MMC.Note: It is recommended that you set the option to MMC which corresponds to a microSD card.4. Press to return to the Home screen.Using the CameraTaking PhotosTaking pictures with your device’s built-in camera is as simple as choosing a subject, pointing the camera, then tapping (Camera key).Note: When taking a photo in direct sunlight or in bright conditions, shadows may appear on the photo.1. From the Home screen, tap (Camera).2. Using the device’s main display screen as a viewfinder, adjust the image by aiming the camera at the subject.Note: Use the on-screen slider to zoom in or out.3. If desired, before taking the photo, tap (Settings) to access various camera options and settings.](https://usermanual.wiki/Samsung-Electronics-Co/SCHS735C/User-Guide-1813584-Page-140.png)


![DRAFT Internal Use OnlyApplications and Development 169LocalLocal (formerly known as Google Places) displays company logos on a layer of Google Maps. When viewing an area you can quickly locate a business or person, find out more information about the business, see coupons, public responses, and more.1. From the Home screen, tap (Applications) ➔ (Local).2. Tap (Search) and then use the Search Maps field to manually enter a desired place or choose from among the various categories. Matches are filtered by those closest to your current location.3. Locate and tap one of the listed places (Restaurants, Cafes, Bars, Attractions, [user added searches], or IN THIS AREA) A list of places within this category displays.4. Tap the Maps icon to launch the related maps feature.5. Press and then tap Add a search. The functions adds additional search shortcuts to the places screen.•The menu also provides access to the app’s Settings and Help information.](https://usermanual.wiki/Samsung-Electronics-Co/SCHS735C/User-Guide-1813584-Page-173.png)
![DRAFT Internal Use OnlyApplications and Development 1712. Tap Google’s location services allows apps to use data from sources such as Wi-Fi and mobile networks to provide a better approximation of your current location.3. Tap GPS satellites to enable the GPS satellite.Tip: When using Google Maps you can turn on Location & Google search. Enabling this feature allows you to locate places of interest at the street-level. However, this also requires a clear view of the sky and uses more battery power.Opening Maps1. From the Home screen, tap (Applications) ➔ (Maps).2. Tap the upper-right My location button to find your location on the map with a blinking blue dot.3. Locate the bottom row of the buttons to access additional options:•Search: allows you to search for a place of interest.•Directions: displays navigation directions to a location from a starting point.•Local: provides access to the places menu where you can quickly locate a business or person, find out more information about a business, see coupons, public responses, and more (page 169). Locate and tap one of the listed places (Restaurants, Cafes, Bars, Attractions, [user added searches], and IN THIS AREA.) A list of places within each category displays.](https://usermanual.wiki/Samsung-Electronics-Co/SCHS735C/User-Guide-1813584-Page-175.png)


![DRAFT Internal Use OnlyChanging Your Settings 2372. Set any of the following options:• Portrait keyboard types allows you to choose a keyboard configuration (Qwerty keyboard [default] or 3x4 keyboard).• Input languages sets the input language. Tap a language from the available list. The keyboard is updated to the selected language.•Predictive text enables predictive text entry mode. This must be enabled to gain access to the advanced settings. For more information, refer to “Using XT9 Predictive Text” on page 82.• Continuous input allows you to enter text by sliding your finger across the keyboard.•Keyboard swipe allows changing between the input modes without having to use the Input Mode key. You can "sweep" the displayed keyboard aside, in a similar manner to scrolling through the Home screens.• Voice input activates the Voice input feature. This is an experimental feature that uses Google’s networked speech recognition application. • Auto-capitalization automatically capitalizes the first letter of the first word in each sentence (standard English style). • Auto-punctuate automatically inserts a full stop of text by tapping the space bar twice when using the on-screen QWERTY keyboard.• Character preview provides an automatic preview of the current character selection within the text string. This is helpful when multiple characters are available within one key.•Key-tap sound activates an audible sound that plays as you tap on-screen keys.](https://usermanual.wiki/Samsung-Electronics-Co/SCHS735C/User-Guide-1813584-Page-241.png)


![DRAFT Internal Use Only282• For vehicles equipped with an air bag, remember that an air bag inflates with great force. Do not place objects, including installed or portable wireless equipment near or in the area over the air bag or in the air bag deployment area. If wireless equipment is improperly installed and the air bag inflates, serious injury could result.• Switch your mobile device off before boarding an aircraft. The use of wireless mobile devices in aircraft is illegal and may be dangerous to the aircraft's operation. Check with appropriate authorities before using any function of a mobile device while on an aircraft.• Failure to observe these instructions may lead to the suspension or denial of cell phone services to the offender, or legal action, or both.• While using your device, leave some lights on in the room and do not hold the screen too close to your eyes.• Seizures or blackouts can occur when you are exposed to flashing lights while watching videos or playing games for extended periods. If you feel any discomfort, stop using the device immediately.• Reduce risk of repetitive motion injuries. When you repetitively perform actions, such as pressing keys, drawing characters on a touch screen with your fingers, or playing games, you may experience occasional discomfort in your hands, neck, shoulders, or other parts of your body. When using your device for extended periods, hold the device with a relaxed grip, press the keys lightly, and take frequent breaks. If you continue to have discomfort during or after such use, stop use and see a physician.• If your device has a camera flash or light, do not use the flash or light close to the eyes of people or pets. [122011]](https://usermanual.wiki/Samsung-Electronics-Co/SCHS735C/User-Guide-1813584-Page-286.png)
![DRAFT Internal Use Only290Important! Please provide warranty information (proof of purchase) to Samsung’s Customer Care Center in order to provide this service at no charge. If the warranty has expired on the device, charges may apply.Samsung Telecommunications America, LLC1301 E. Lookout DriveRichardson, Texas 75082Phone: 1-800-SAMSUNGPhone: 1-888-987-HELP (4357)©2012 Samsung Telecommunications America, LLC. All rights reserved.No reproduction in whole or in part allowed without prior written approval. Specifications and availability subject to change without notice. [111611]End User License Agreement for SoftwareIMPORTANT. READ CAREFULLY: This End User License Agreement (“EULA”) is a legal agreement between you (either an individual or a single entity) and Samsung Electronics Co., Ltd. for software owned by Samsung Electronics Co., Ltd. and its affiliated companies and its third party suppliers and licensors that accompanies this EULA, which includes computer software and may include associated media, printed materials, “online” or electronic documentation (“Software”). BY CLICKING THE “I ACCEPT” BUTTON (OR IF YOU BYPASS OR OTHERWISE DISABLE THE “I ACCEPT”, AND STILL INSTALL, COPY, DOWNLOAD, ACCESS OR OTHERWISE USE THE SOFTWARE), YOU](https://usermanual.wiki/Samsung-Electronics-Co/SCHS735C/User-Guide-1813584-Page-294.png)