Samsung Electronics Co SCX4623FW Laser Printer User Manual scx 4623 guide english
Samsung Electronics Co Ltd Laser Printer scx 4623 guide english
UserManual.wiki
>
Samsung Electronics Co
>
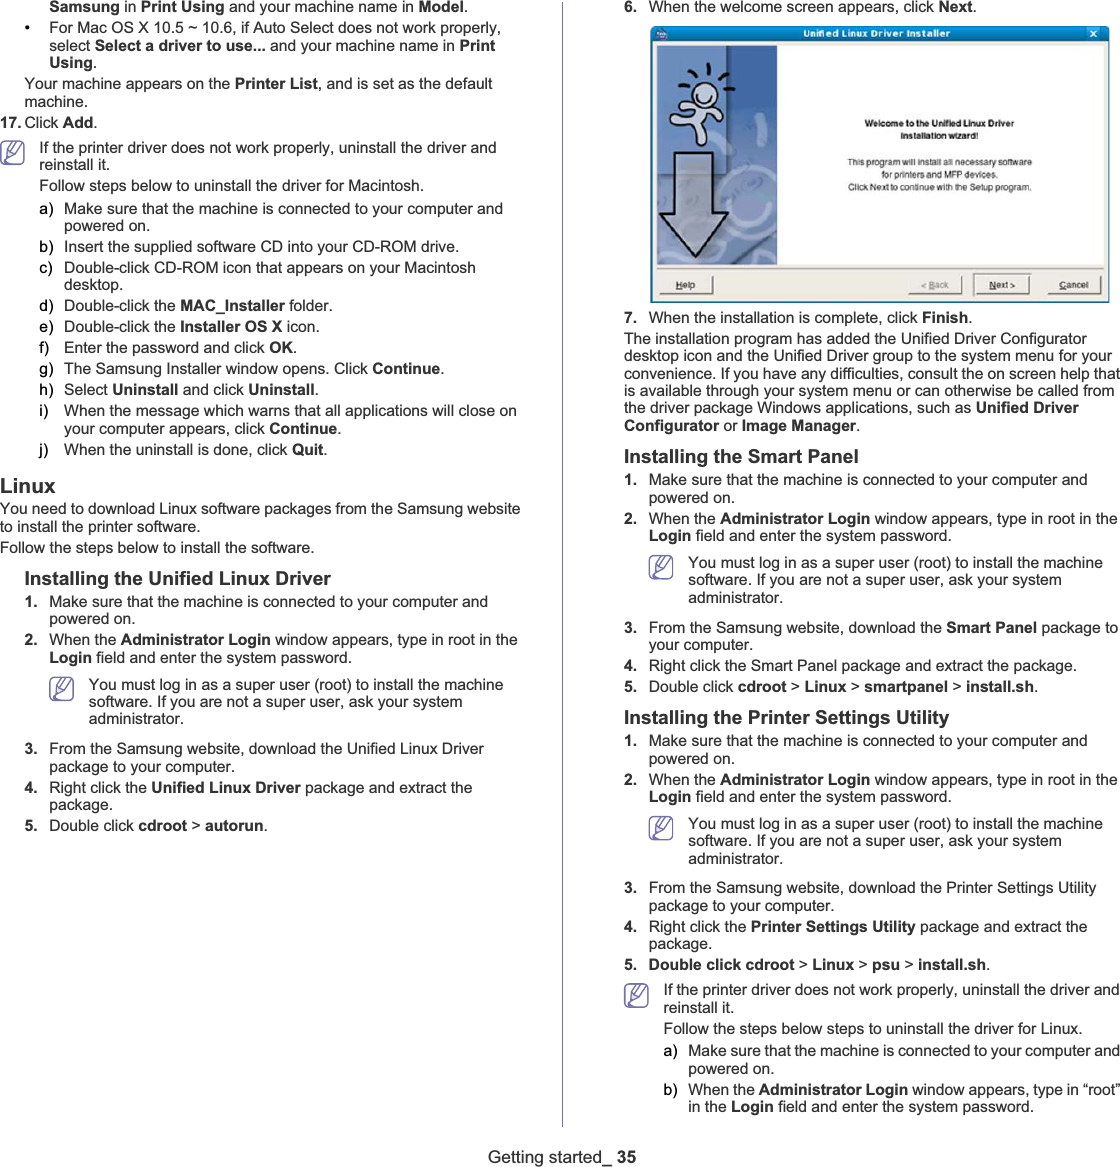
SCX4623FW User Manual
Users Manual
Navigation menu
Upload a User Manual
Namespaces
Wiki Guide
HTML
PDF
Info
Views
User Manual
Discussion / Help
Navigation
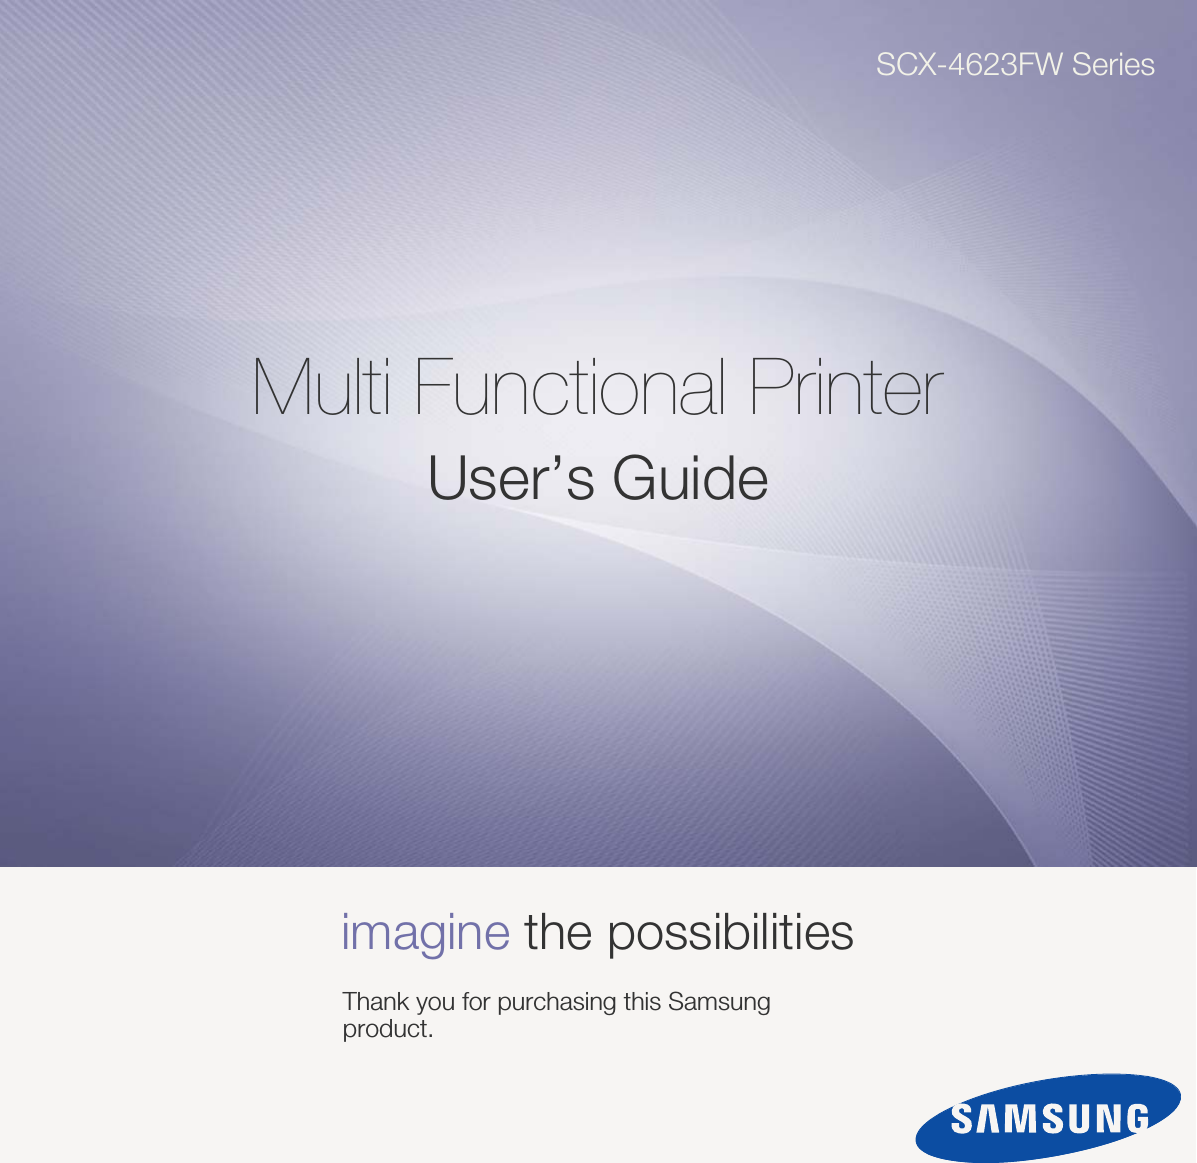

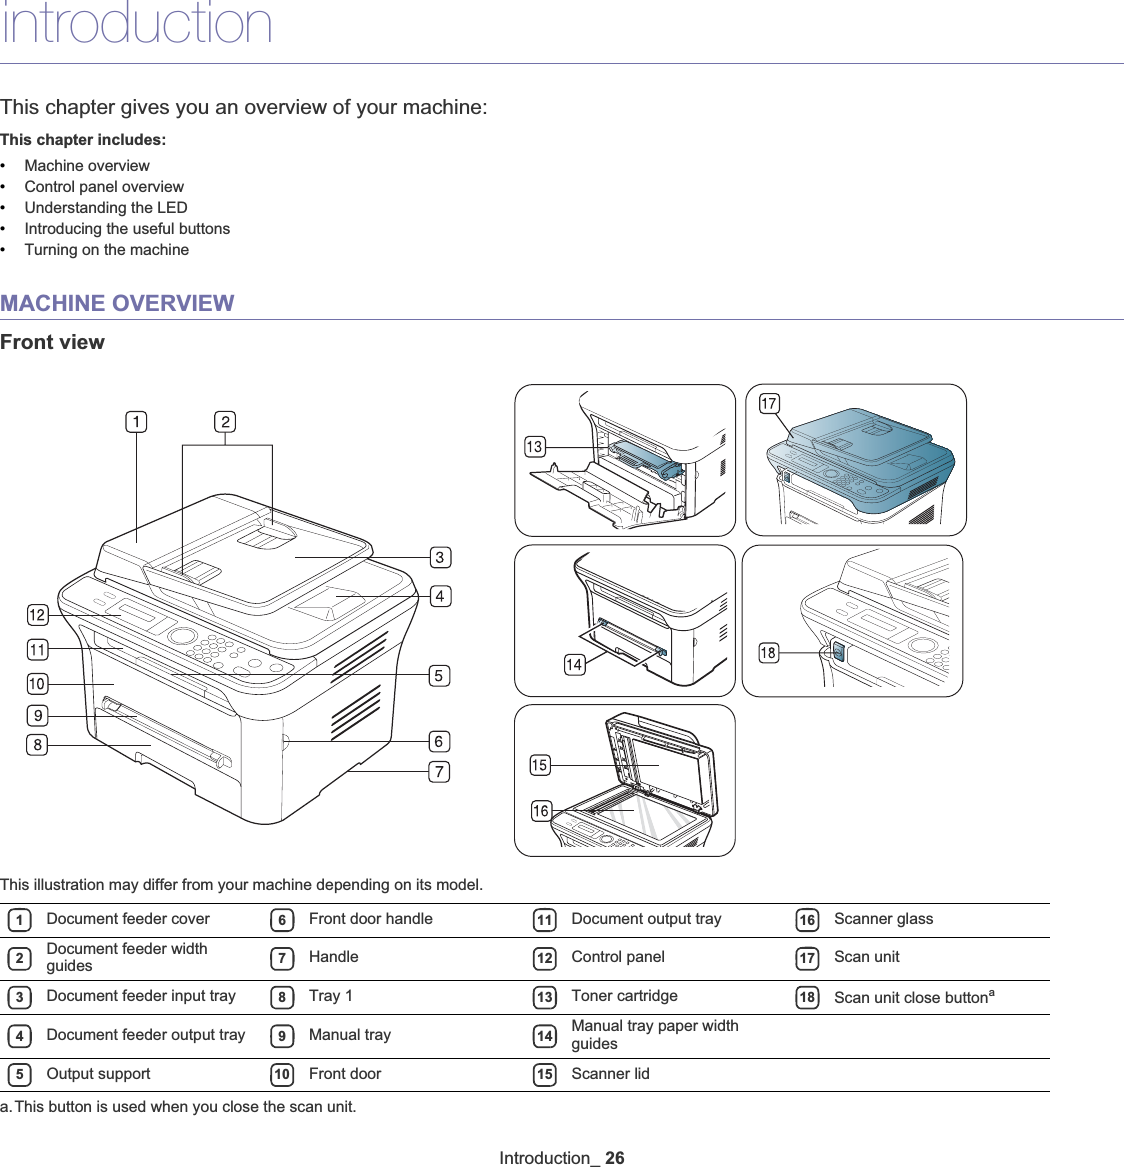

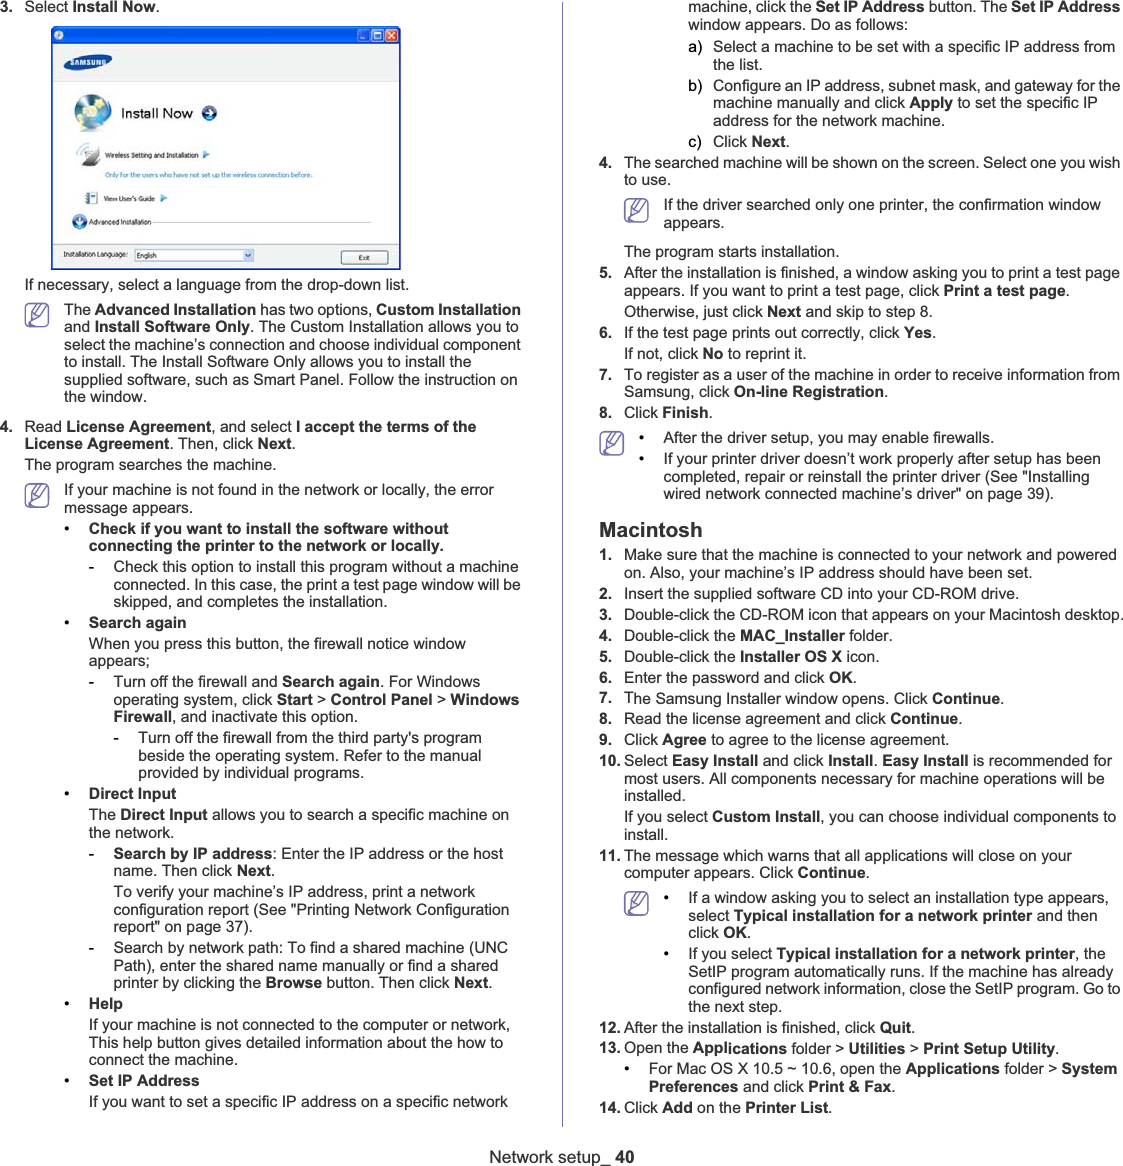
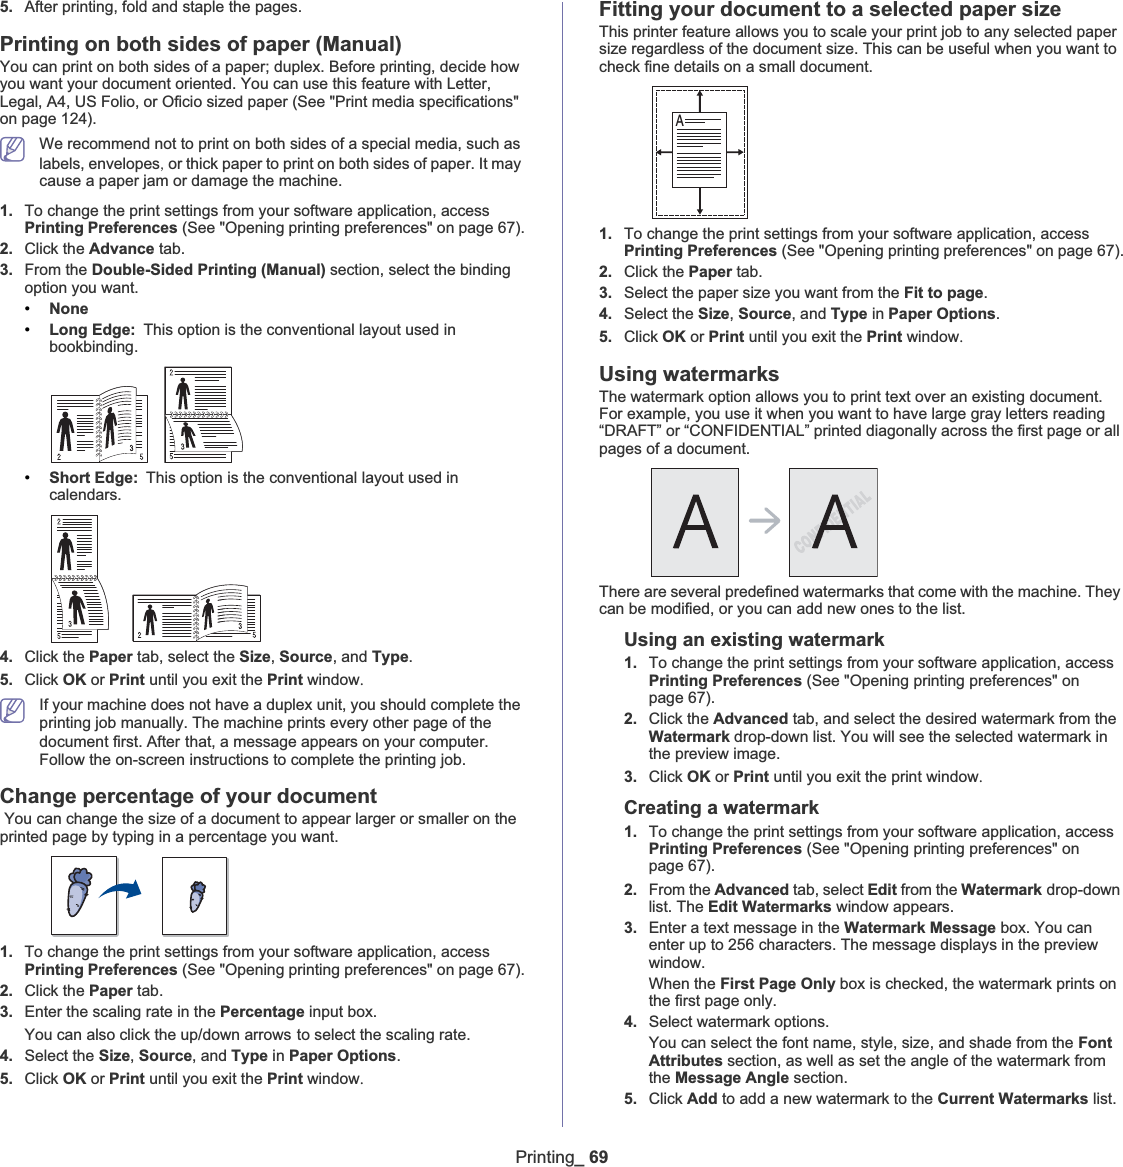
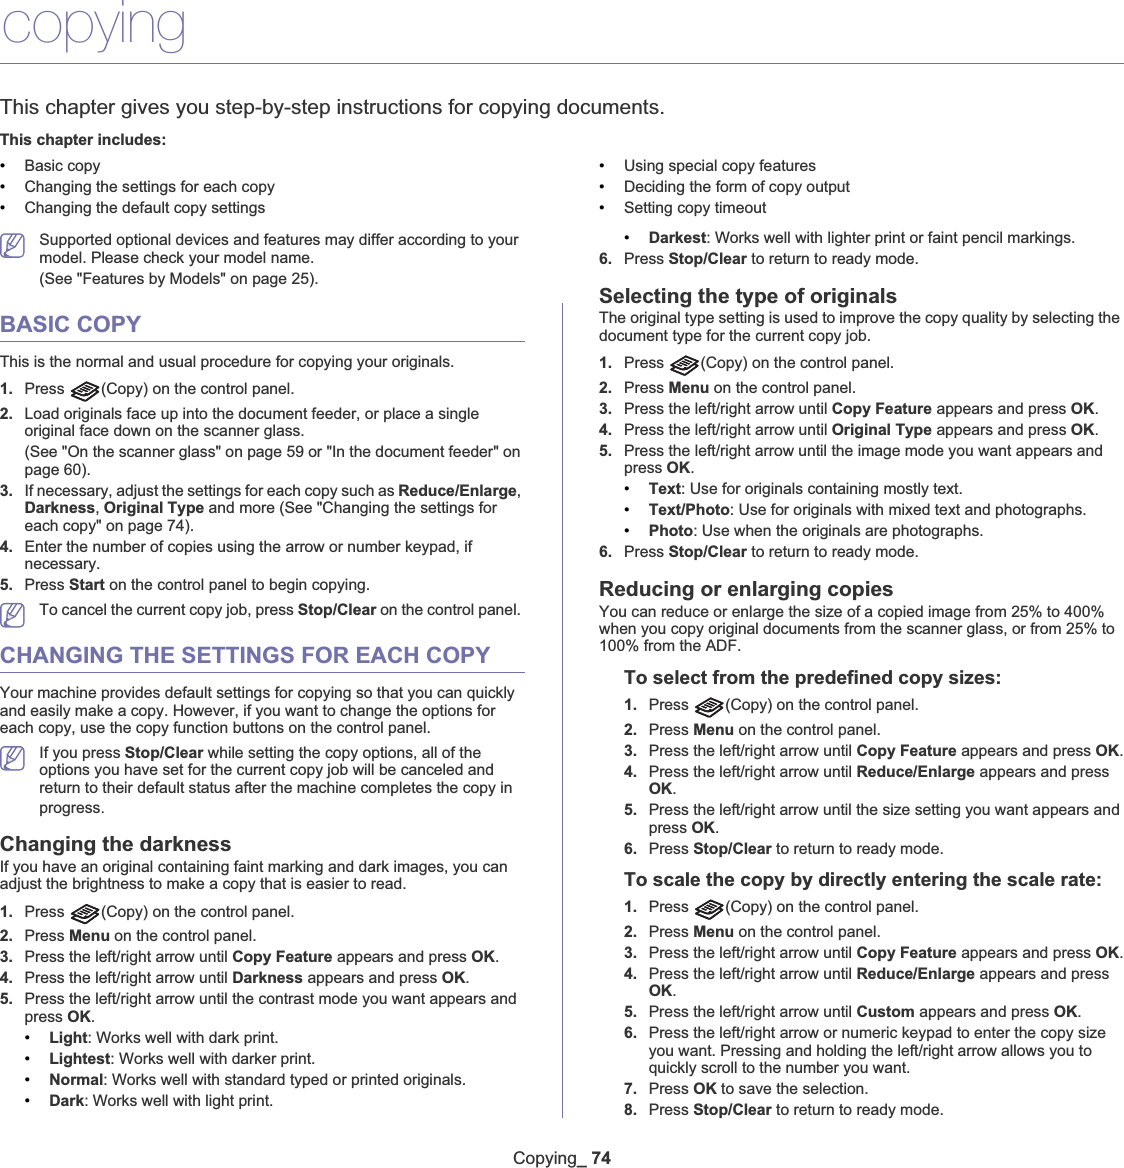
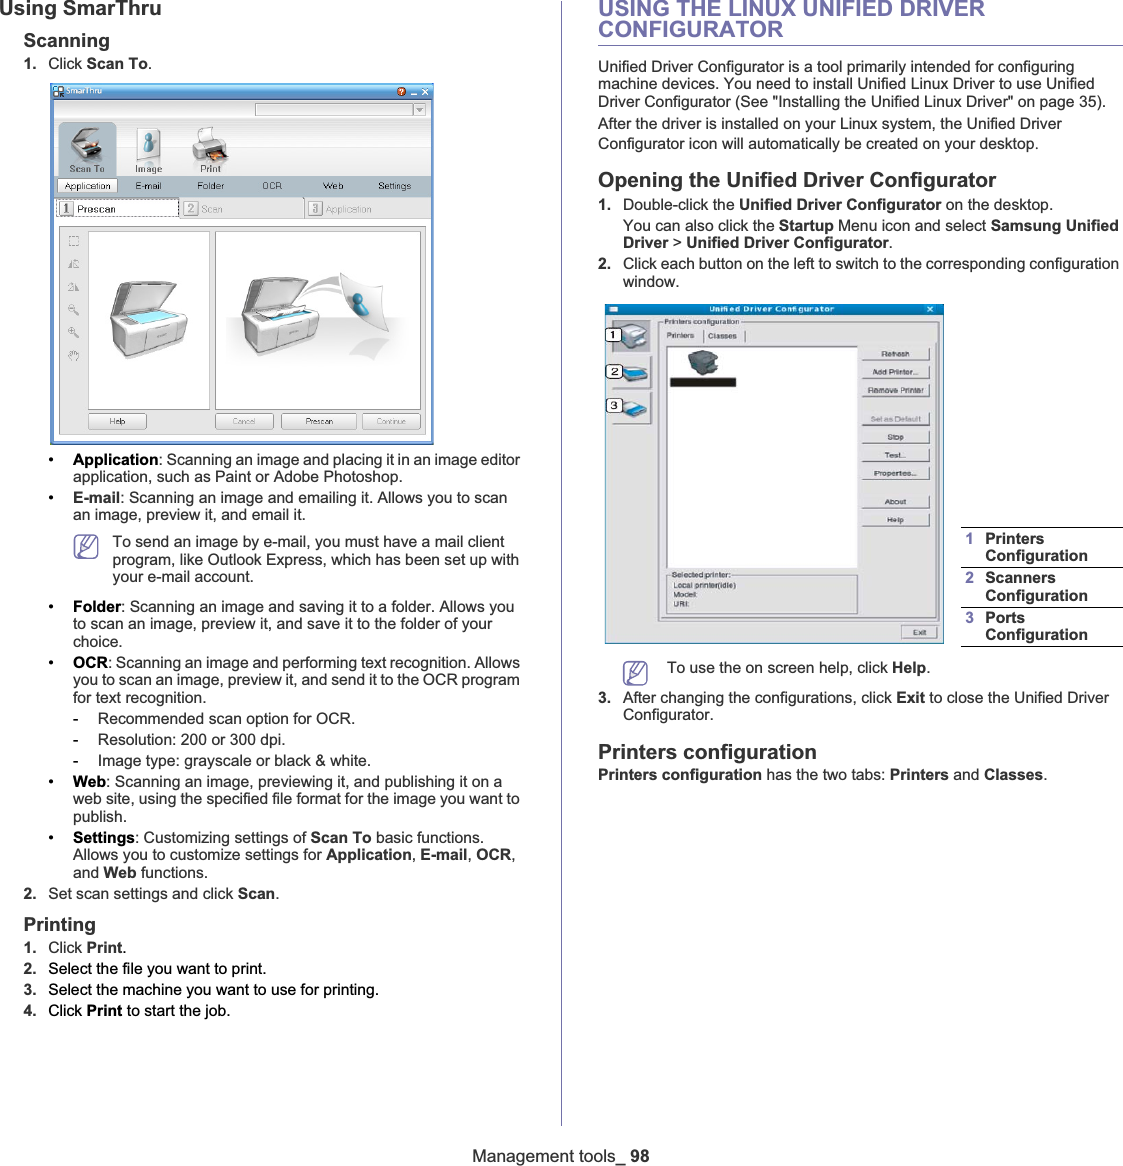
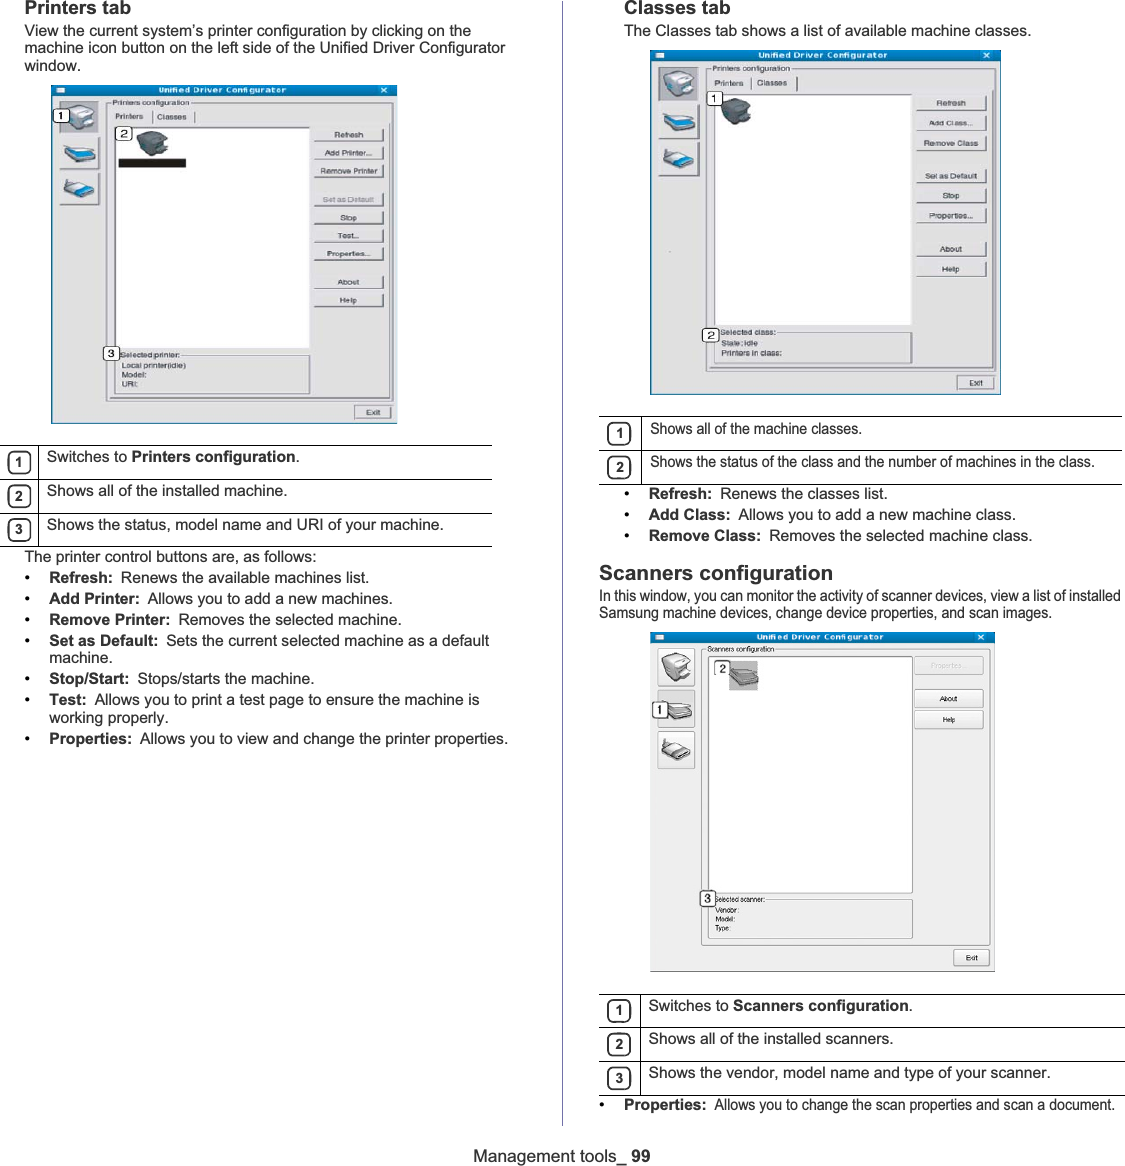
![Getting started_ 36You must log in as a super user (root) to uninstall the printer driver. If you are not a super user, ask your system administrator.c) Click the icon at the bottom of the desktop. When the Terminal screen appears, type in:[root@localhost root]#cd /opt/Samsung/mfp/uninstall/[root@localhost uninstall]#./uninstall.shd) Click Uninstall.e) Click Next.f) Click Finish.SHARING YOUR MACHINE LOCALLY12Follow the steps below to set up the computers to share your machine locally.If the Host computer is directly connected to the machine with a USB cable and is also connected to the local network environment, the client computer connected to the local network can use the shared machine through the host computer to print. WindowsSetting up a host computer1. Install your printer driver (See "Installing USB connected machine’s driver" on page 33).2. Click the Windows Start menu. 3. For Windows 2000, select Settings >Printers.•For Windows XP/2003, select Printers and Faxes.•For Windows 2008/Vista, select Control Panel > Hardware and Sound >Printers.•For Windows 7, select Control Panel > Hardware and Sound >Devices and Printers.•For Windows Server 2008 R2, select Control Panel > Hardware >Devices and Printers.4. Right click your printer icon. 5. For Windows XP/2003/2008/Vista, press Properties.For Windows 7 and Windows Server 2008 R2, from context menus, select the Printer properties.If Printer properties item has Ź mark, you can select other printer drivers connected with selected printer.6. Select the Sharing tab.7. Check the Change Sharing Options.8. Check the Share this printer.9. Fill in the Share Name field. Click OK.Setting up a client computer1. Install your printer driver (See "Installing USB connected machine’s driver" on page 33).2. Click the Windows Start menu. 3. Select All programs > Accessories >Windows Explorer.4. Enter in IP address of the host computer and press Enter in your keyboard. In case host computer requires User name and Password, fill in User ID and password of the host computer account.5. Right click the printer icon you want to share and select Connect.6. If a set up complete message appears, click OK.7. Open the file you want to print and start printing. MacintoshThe following steps are for Mac OS X 10.5 ~ 10.6. Refer to Mac Help for other OS versions. Setting up a host computer1. Install your printer driver (See "Macintosh" on page 34).2. Open the Applications folder > System Preferences and click Print & Fax.3. Select the printer to share in the Printers list.4. Select Share this printer.Setting up a client computer1. Install your printer driver (See "Macintosh" on page 34).2. Open the Applications folder > System Preferences and click Print & Fax.3. Press the “+” icon. A display window showing the name of your shared printer appears.4. Select your machine and click Add.Host computer A computer which is directly connected to the machine by USB cable.Client computers Computers which use the machine shared through the host computer.](https://usermanual.wiki/Samsung-Electronics-Co/SCX4623FW/User-Guide-1247086-Page-36.png)
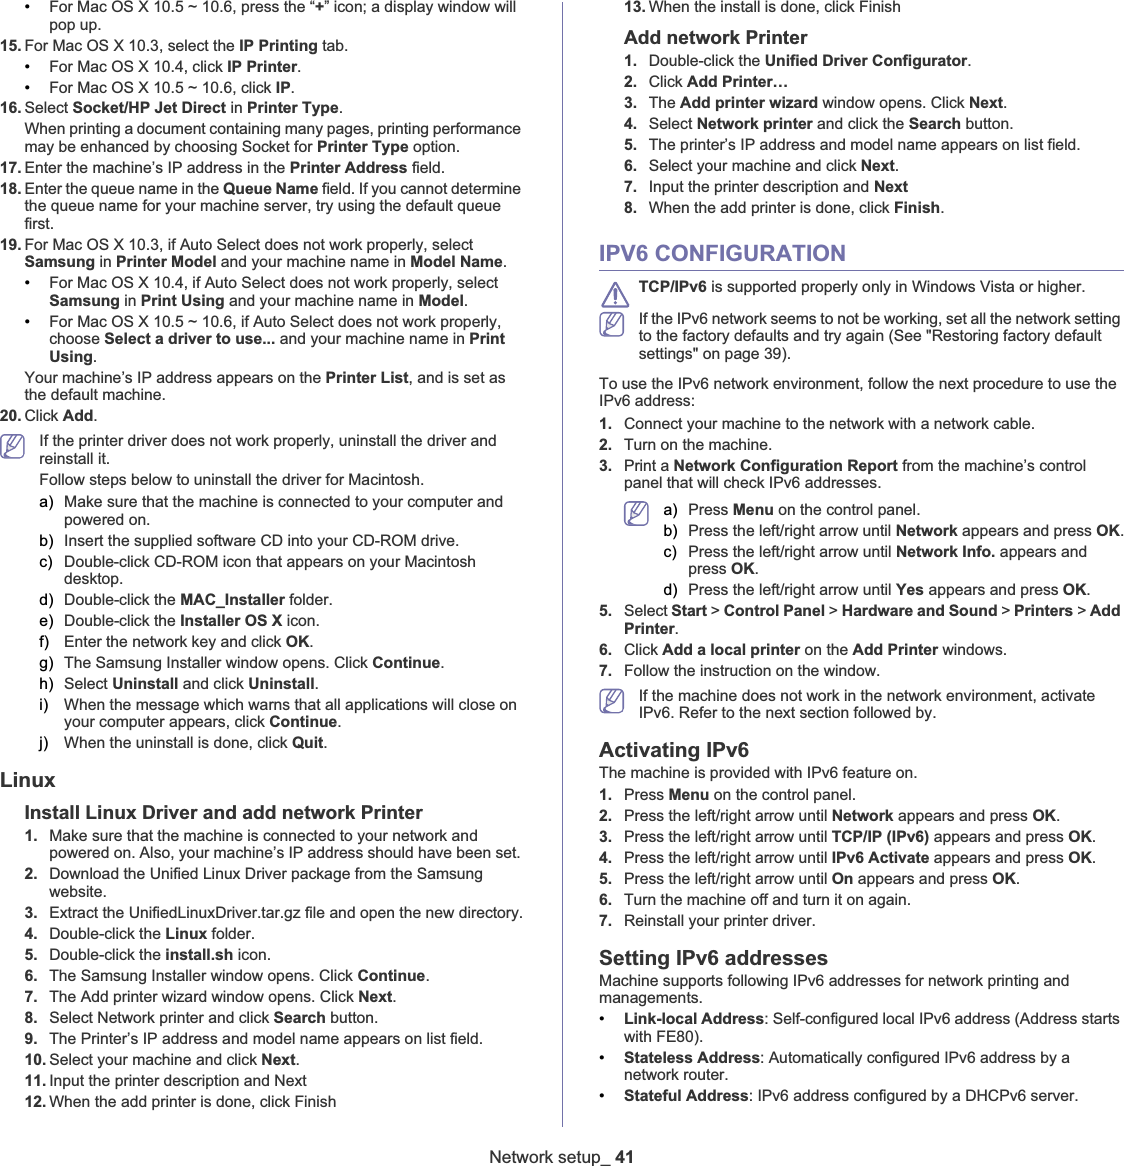
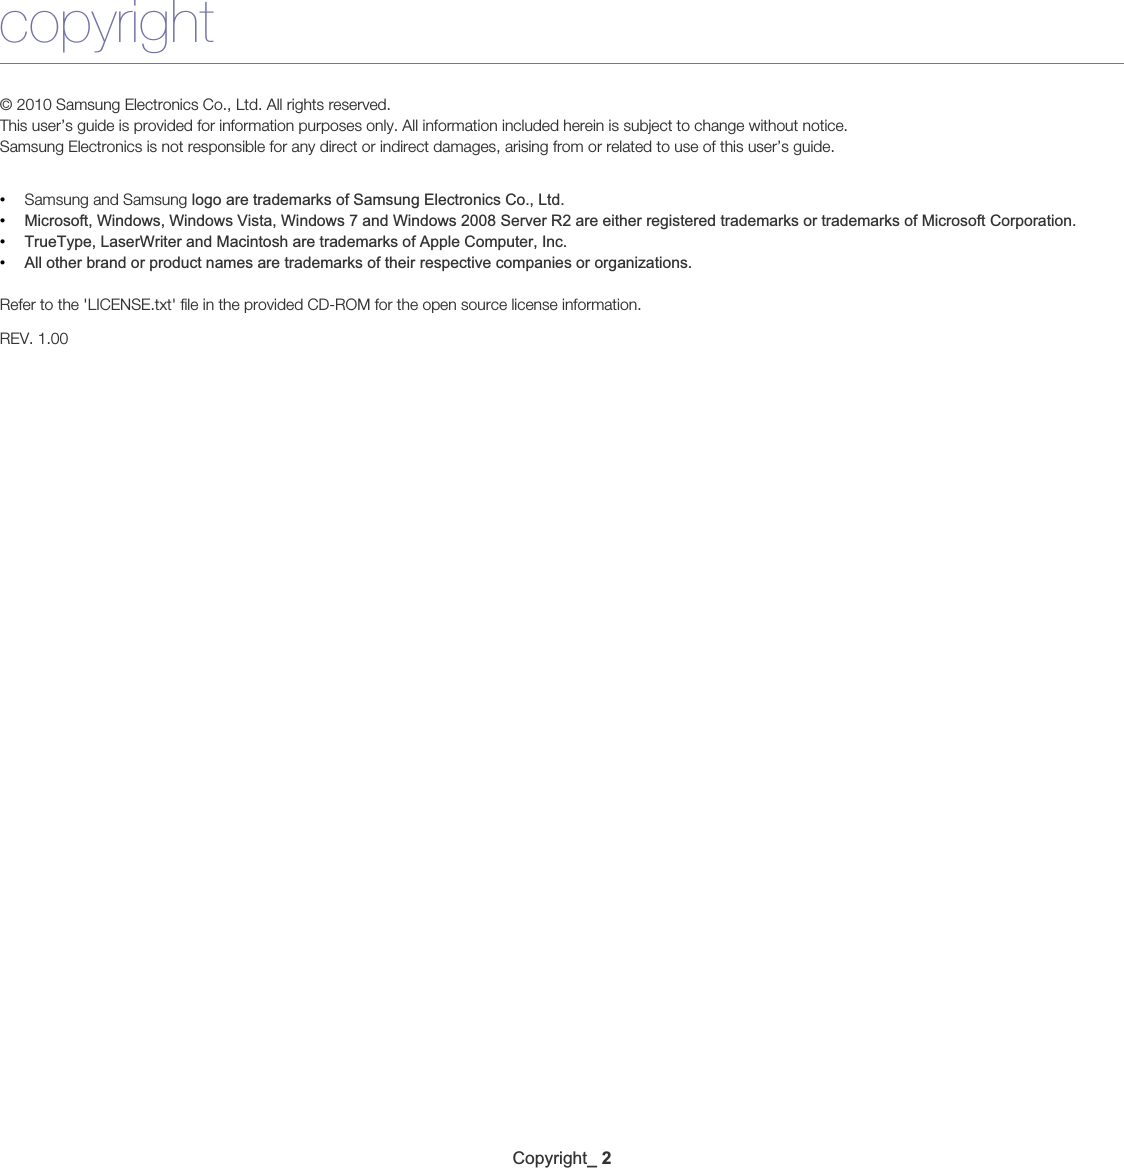
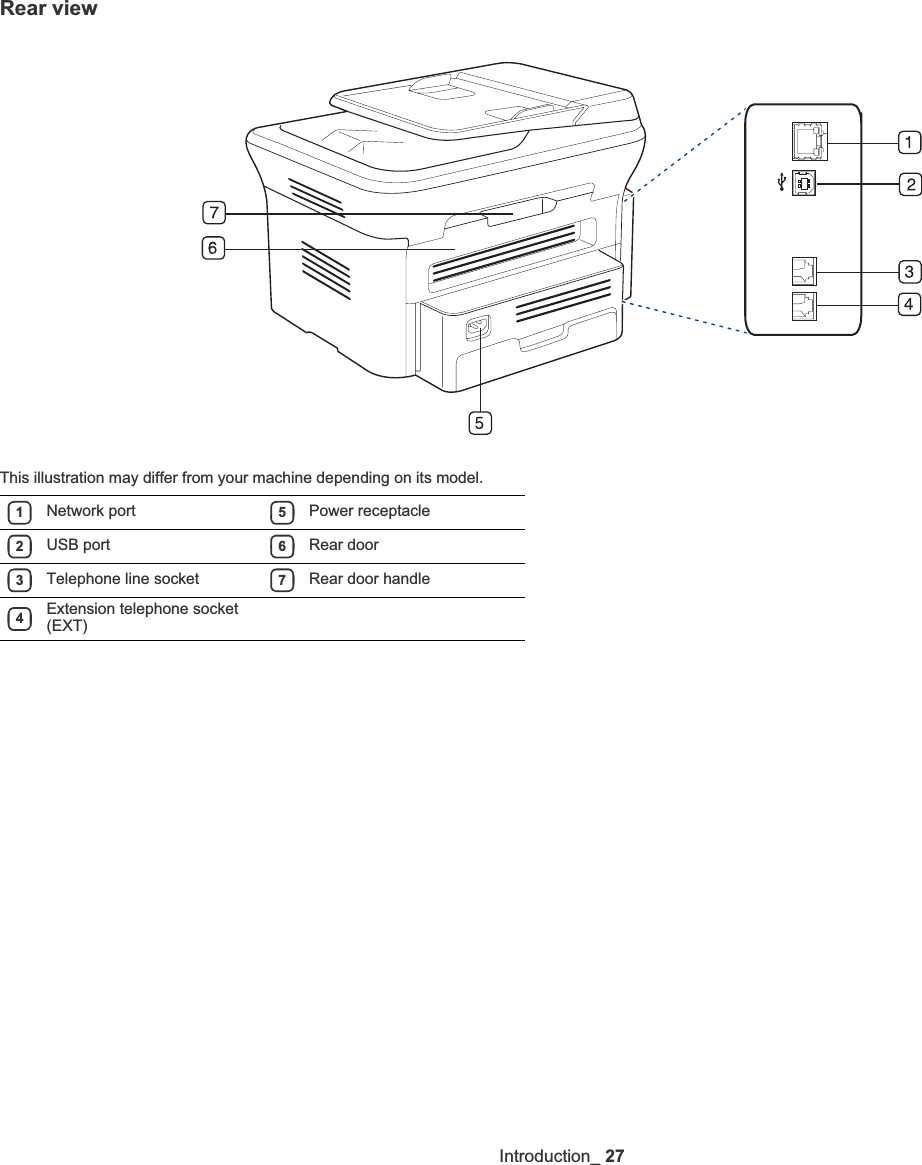
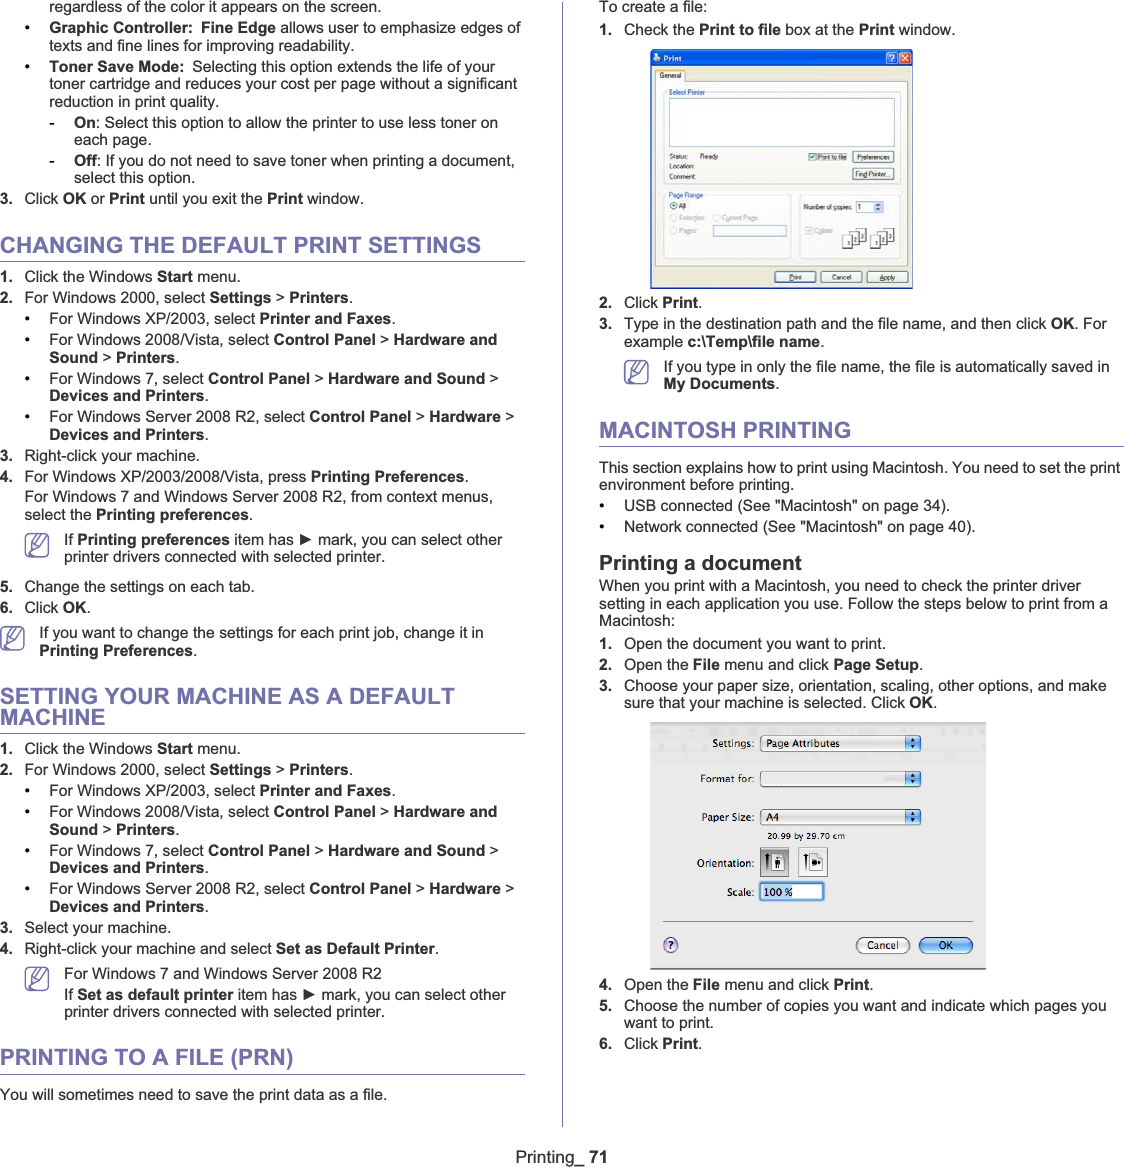
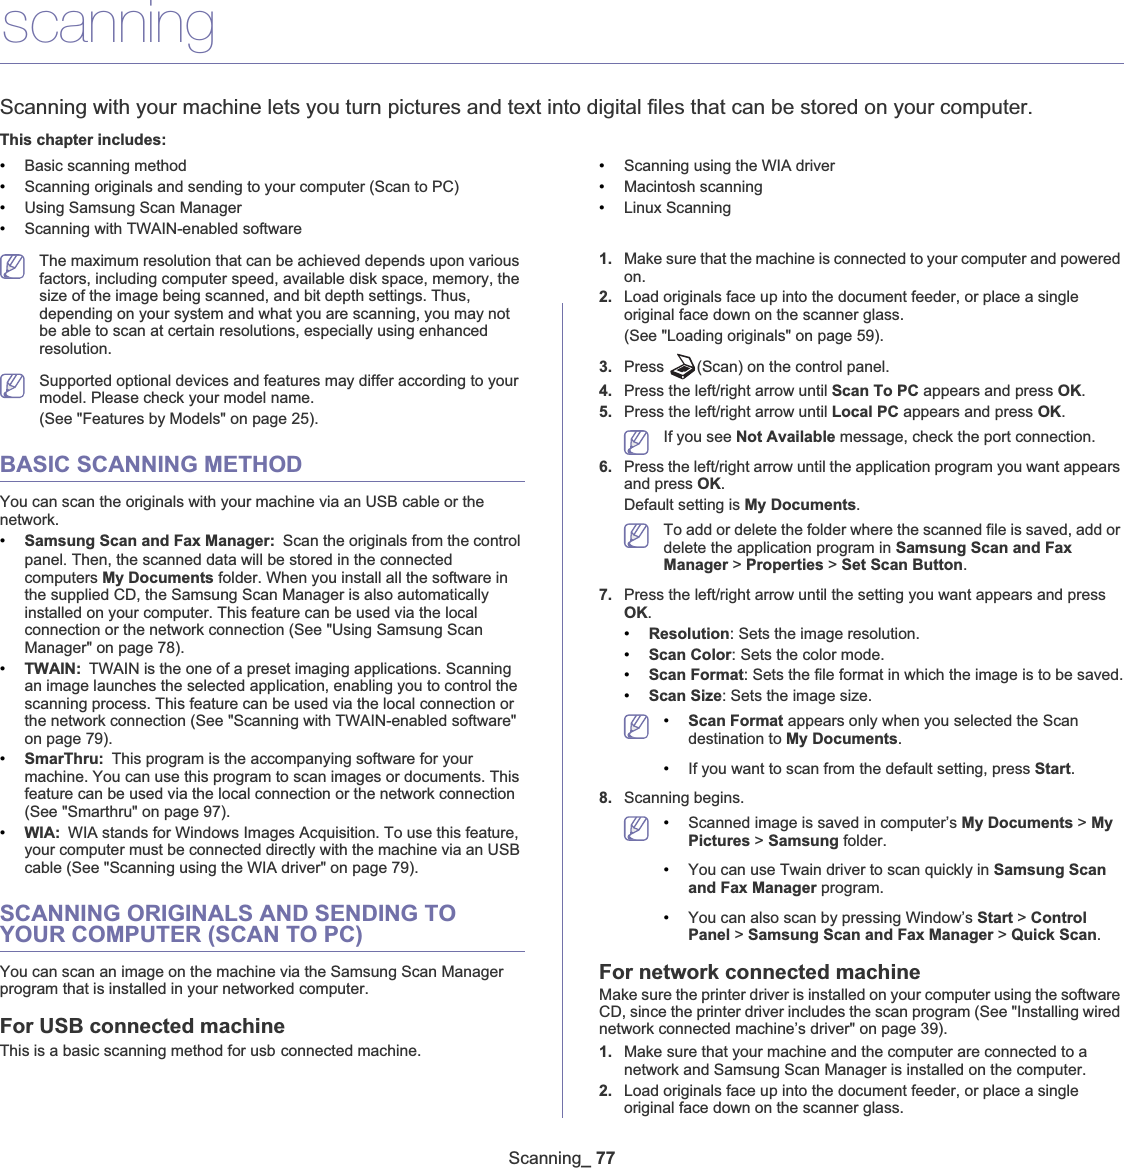
![Network setup_ 42•Manual Address: Manually configured IPv6 address by a user.DHCPv6 address configuration (Stateful)If you have a DHCPv6 server on your network, you can set one of the following option for default dynamic host configuration:1. Press Menu on the control panel.2. Press the left/right arrow until Network appears and press OK.3. Press the left/right arrow until TCP/IP (IPv6) appears and press OK.4. Press the left/right arrow until DHCPv6 Config appears and press OK.5. Press the left/right arrow to access the required value.•Router: Use DHCPv6 only when requested by a router.•DHCPv6 Addr.: Always use DHCPv6 regardless of router request.•DHCPv6 Off: Never use DHCPv6 regardless of router request.6. Press OK.Manual address configuration1. Start a web browser such as Internet Explorer that supports IPv6 addressing as a URL (See "Connecting SyncThru™ Web Service" on page 42).For IPv4, enter the IPv4 address (http://xxx.xxx.xxx.xxx) in the address field and press the Enter key or click Go.2. When the SyncThru™ Web Service window opens, click Network Settings.3. Click TCP/IP.4. Enable the Manual Address In the TCP/IPv6 section.5. Select the Router Prefix and click the Add button, then the router prefix will automatically be entered into the address field. Enter the rest of address (ex:3FFE:10:88:194::AAAA. “A” is the hexadecimal 0 through 9, A through F).6. Click the Apply button.Connecting SyncThru™ Web Service1. Start a web browser such as Internet Explorer that supports IPv6 addressing as a URL.2. Select one of the IPv6 addresses (Link-local Address,Stateless Address,Stateful Address,Manual Address) from Network Configuration Report.3. Enter the IPv6 addresses (ex: http://[FE80::215:99FF:FE66:7701]).Address must be enclosed in '[ ]' brackets.](https://usermanual.wiki/Samsung-Electronics-Co/SCX4623FW/User-Guide-1247086-Page-42.png)
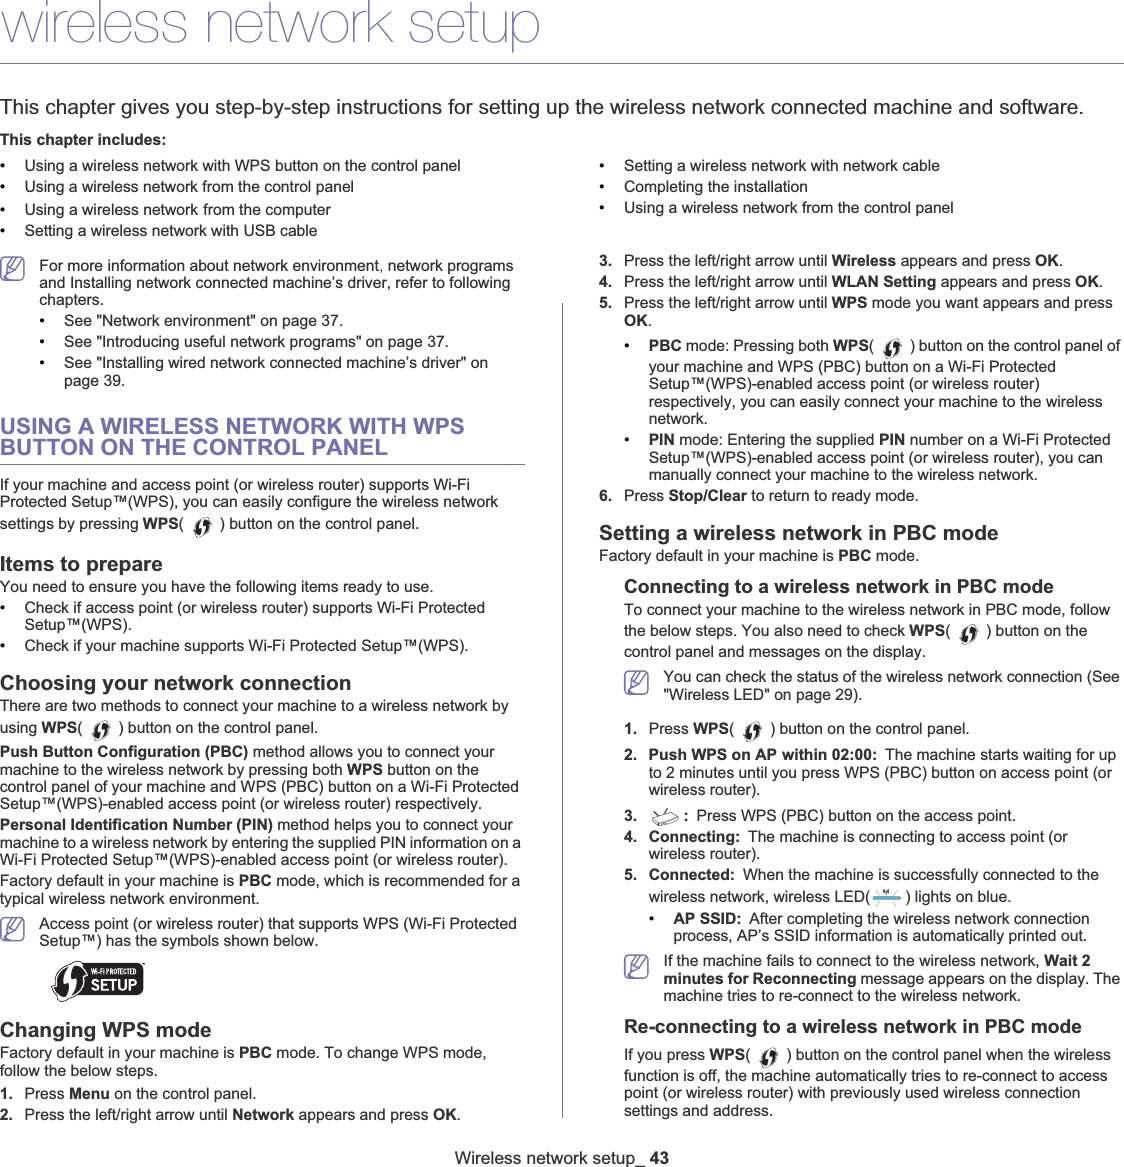


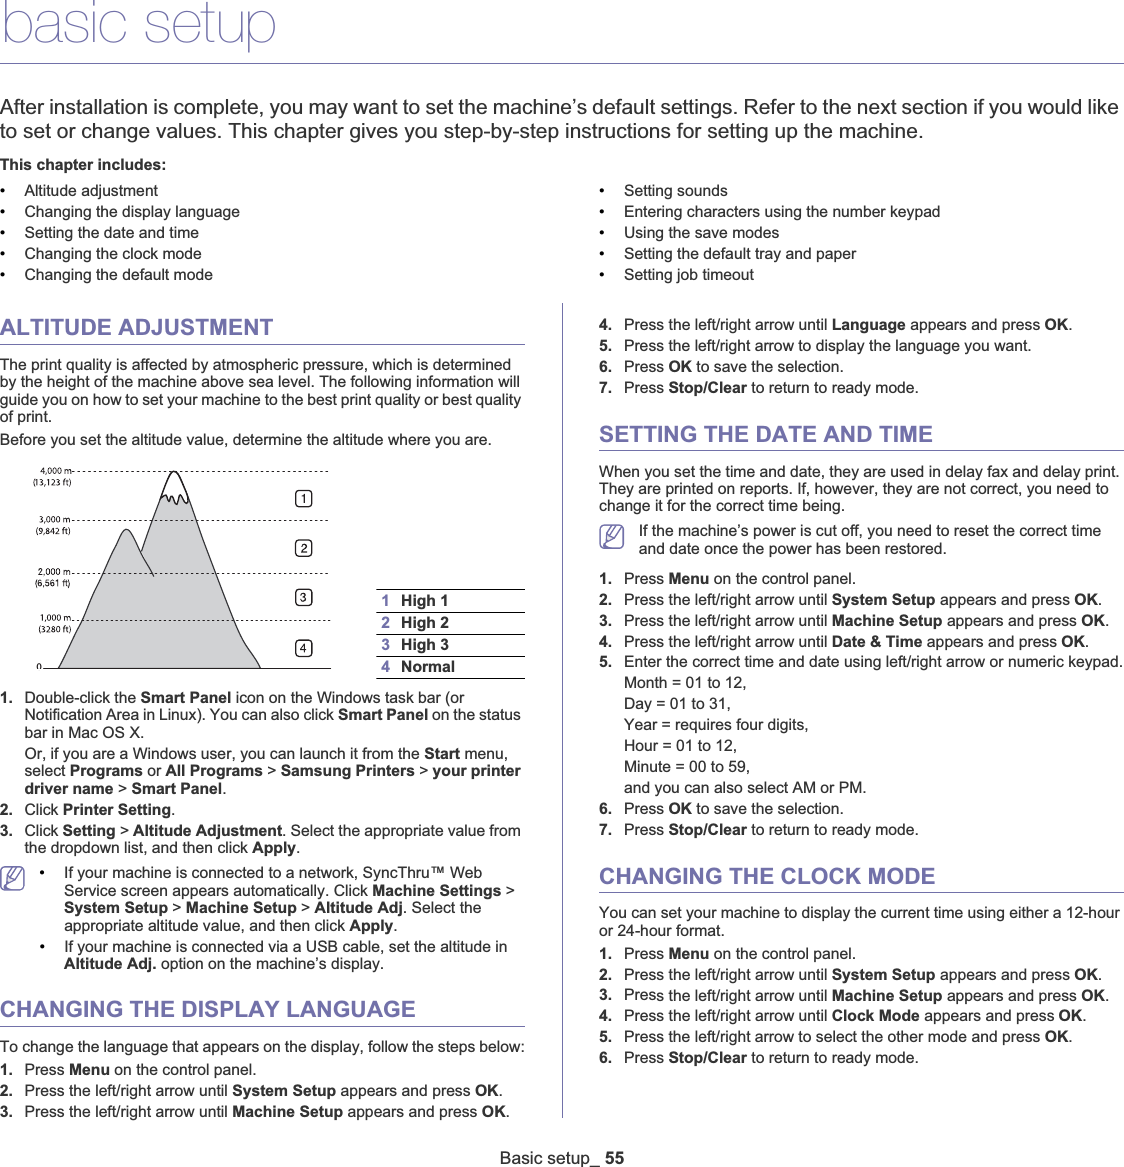
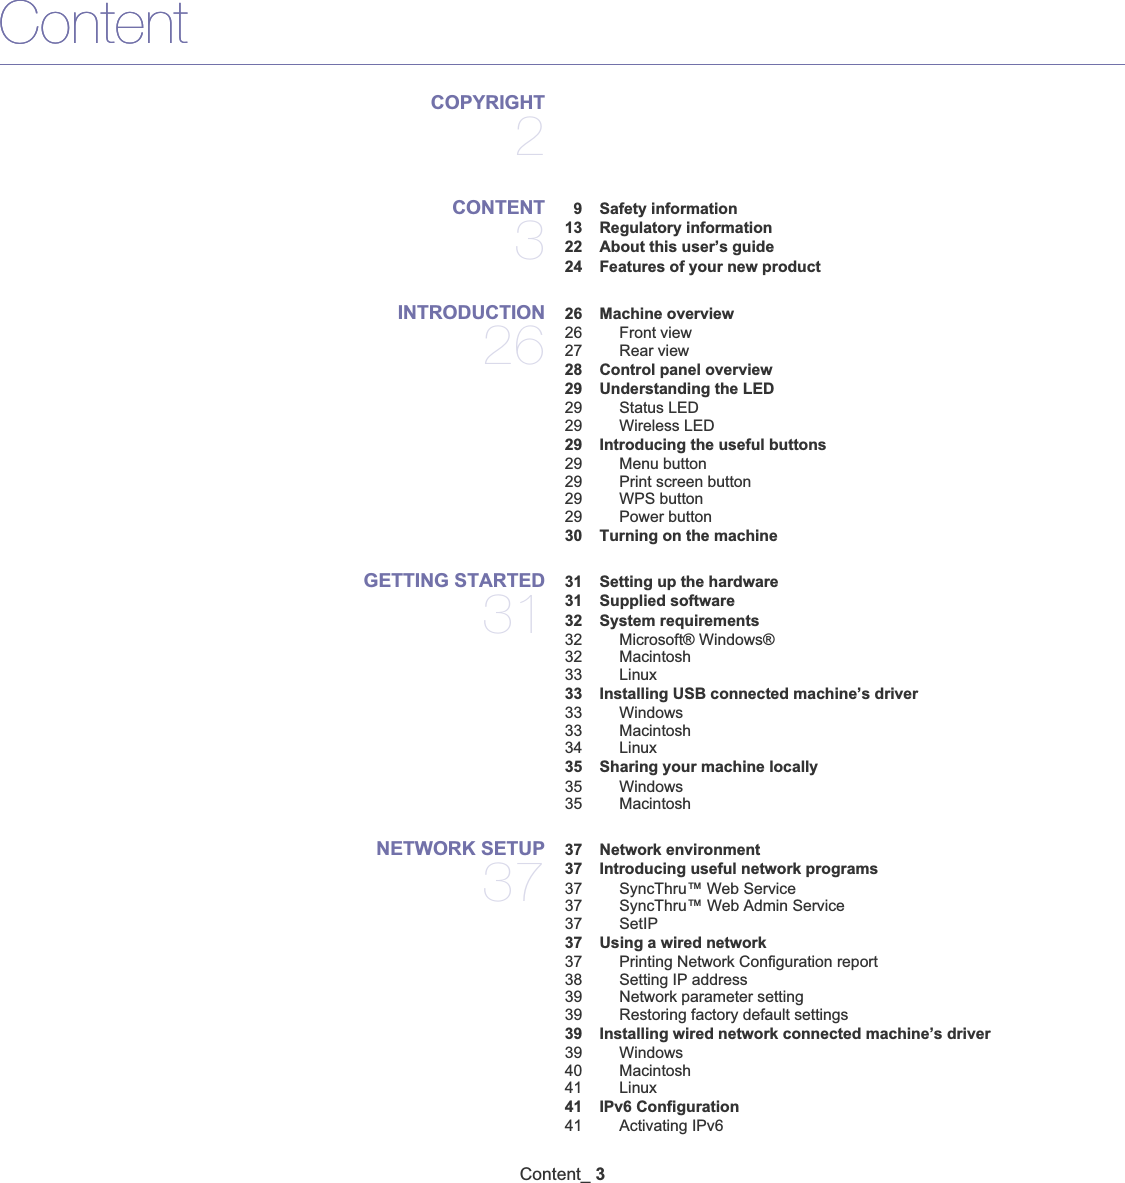
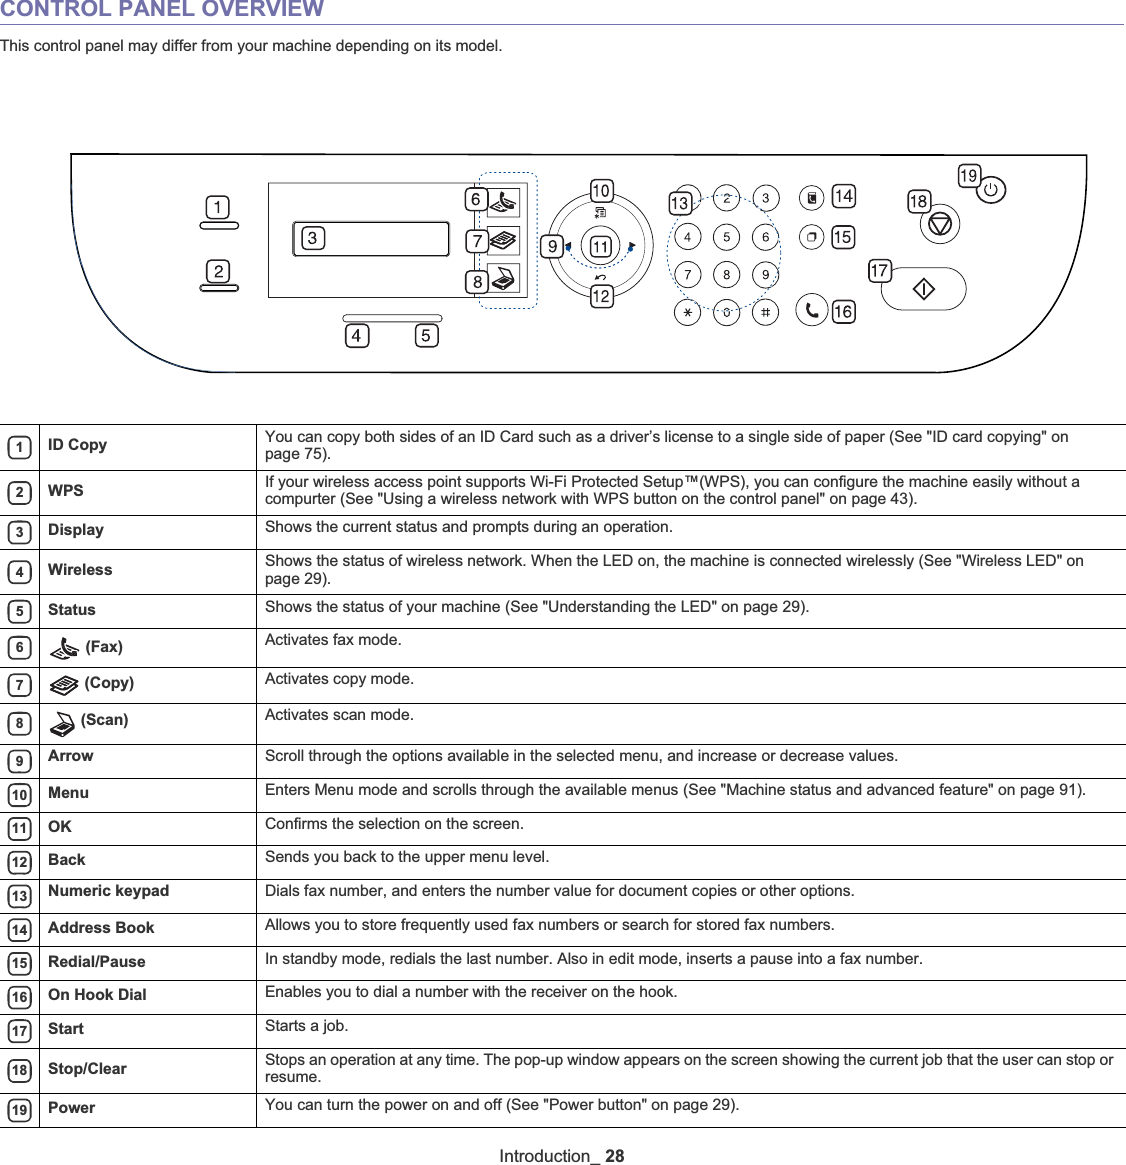
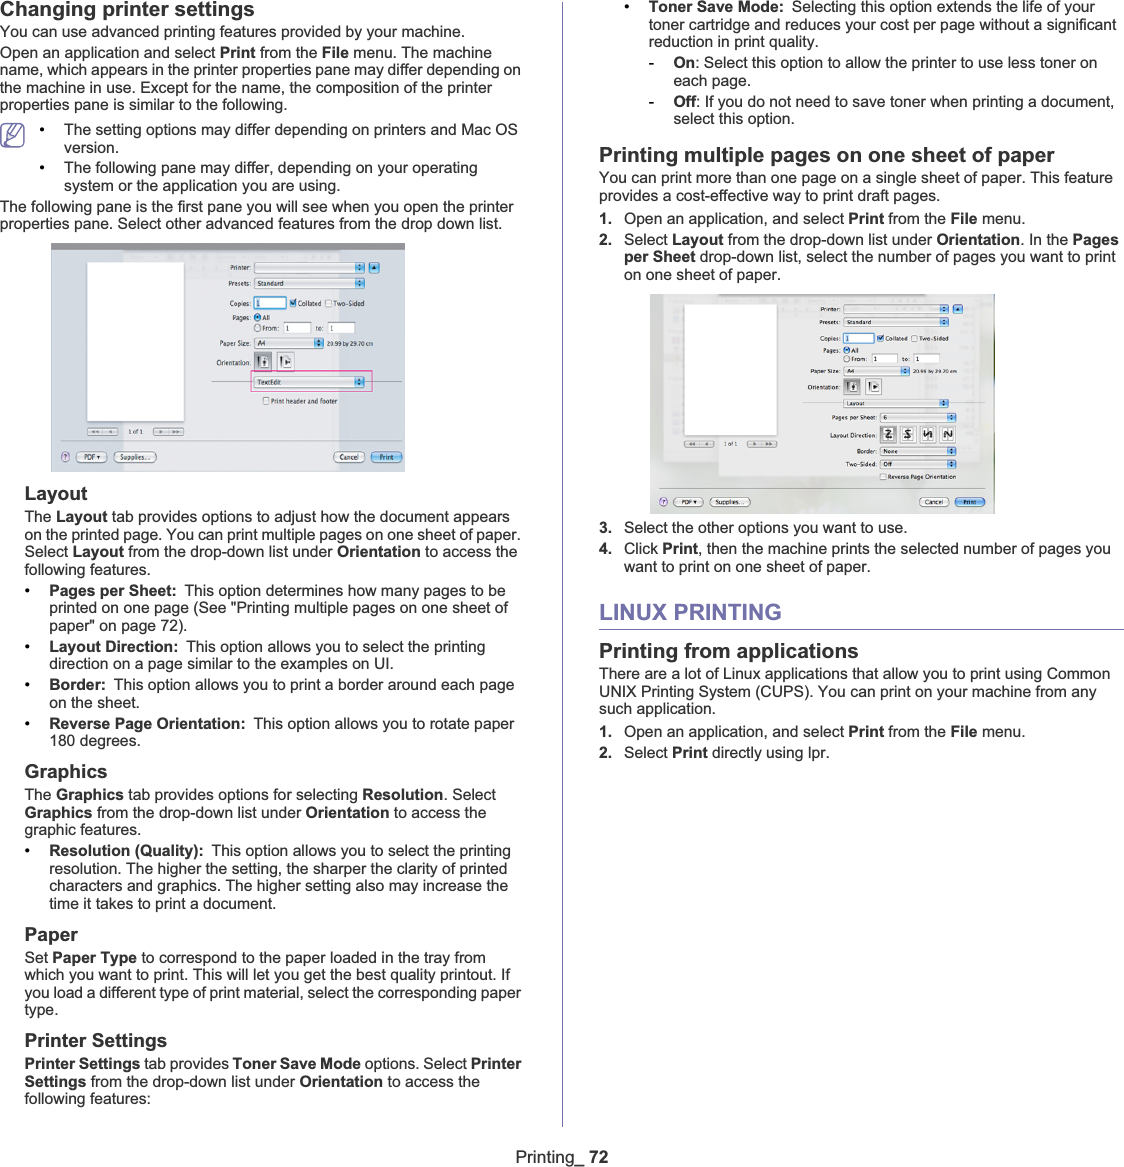
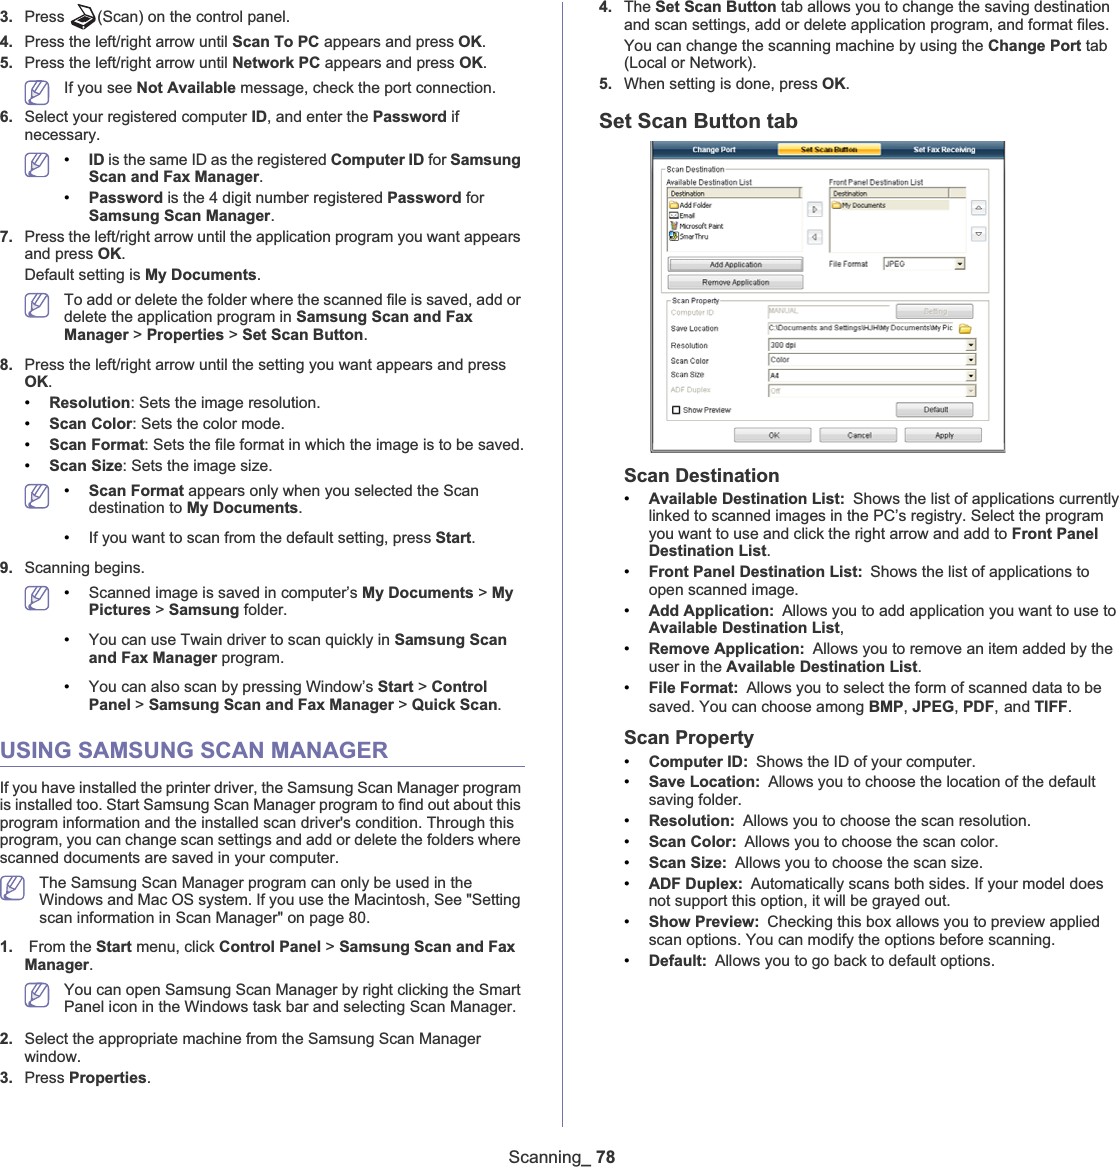
![Basic setup_ 57USING THE SAVE MODESUsing the toner saving featureToner save mode allows your machine to use less toner on each page. Activating this mode extends the life of the toner cartridge beyond what one would experience in the normal mode, but it reduces print quality.1. Press Menu on the control panel.2. Press the left/right arrow until System Setup appears and press OK.3. Press the left/right arrow until Machine Setup appears and press OK.4. Press the left/right arrow until Toner Save appears and press OK.5. Press the left/right arrow until On appears and press OK.6. Press Stop/Clear to return to ready mode.When PC-printing, you can also turn on or off toner save mode in the printer properties.Using the power saving featureWhen you are not using the machine for a while, use this feature to save power. 1. Press Menu on the control panel.2. Press the left/right arrow until System Setup appears and press OK.3. Press the left/right arrow until Machine Setup appears and press OK.4. Press the left/right arrow until Power Save appears and press OK.5. Press the left/right arrow to select the time you want.6. Press OK to save the selection.7. Press Stop/Clear to return to ready mode.SETTING THE DEFAULT TRAY AND PAPERYou can select the tray and paper you would like to keep using for printing job.In the control panelSetting the paper size1. Press Menu on the control panel.2. Press the left/right arrow until System Setup appears and press OK.3. Press the left/right arrow until Paper Setup appears and press OK.4. Press the left/right arrow until Paper Size appears and press OK.5. Press the left/right arrow to select the paper tray you want and press OK.6. Press the left/right arrow to select the paper size you want.7. Press OK to save the selection.8. Press Stop/Clear to return to ready mode.Setting the paper type1. Press Menu on the control panel.2. Press the left/right arrow until System Setup appears and press OK.3. Press the left/right arrow until Paper Setup appears and press OK.4. Press the left/right arrow until Paper Type appears and press OK.5. Press the left/right arrow to select the paper tray you want and press OK.6. Press the left/right arrow to select the paper type you want.7. Press OK to save the selection.8. Press Stop/Clear to return to ready mode.Setting the paper source1. Press Menu on the control panel.2. Press the left/right arrow until System Setup appears and press OK.3. Press the left/right arrow until Paper Setup appears and press OK.4. Press the left/right arrow until Paper Source appears and press OK.5. Press the left/right arrow until Copy Tray or Fax Tray appears and press OK.6. Press the left/right arrow to select the paper tray you want.7. Press OK to save the selection.8. Press Stop/Clear to return to ready mode.In the computerWindows1. Click the Windows Start menu. 2. For Windows 2000, select Settings >Printers.•For Windows XP/2003, select Printers and Faxes.•For Windows 2008/Vista, select Control Panel > Hardware and Sound >Printers.•For Windows 7, select Control Panel > Hardware and Sound >Devices and Printers.•For Windows Server 2008 R2, select Control Panel > Hardware >Devices and Printers.3. Right-click your machine.4. For Windows XP/2003/2008/Vista, press Printing Preferences.For Windows 7 and Windows Server 2008 R2, from context menus, select the Printing Preferences.If Printing Preferences item has Ź mark, you can select other printer drivers connected with selected printer.5. Click Paper tab. 6. Select tray and its options, such as paper size and type.7. Press OK.If you want to use special-sized paper such as a billing paper, select Paper tab > Size >Edit... in the Printing Preferences (See "Opening printing preferences" on page 67).MacintoshMacintosh users need to change the default setting manually each time they want to print using other settings. 1. Open a Macintosh application and select the file you want to print.2. Open the File menu and click Print.3. Go to Paper Feed pane.4. Open the File menu and click Print.5. Go to Paper Feed.6. Set appropriate tray from which you want to print.7. Go to Paper pane.8. Set paper type to correspond to the paper loaded in the tray from which you want to print.9. Click Print to print. Linux1. Open Terminal Program2. When the Terminal screen appears, type in the following: [root@localhost root]# lpr <FileName>3. Select Printer and click Properties…](https://usermanual.wiki/Samsung-Electronics-Co/SCX4623FW/User-Guide-1247086-Page-57.png)


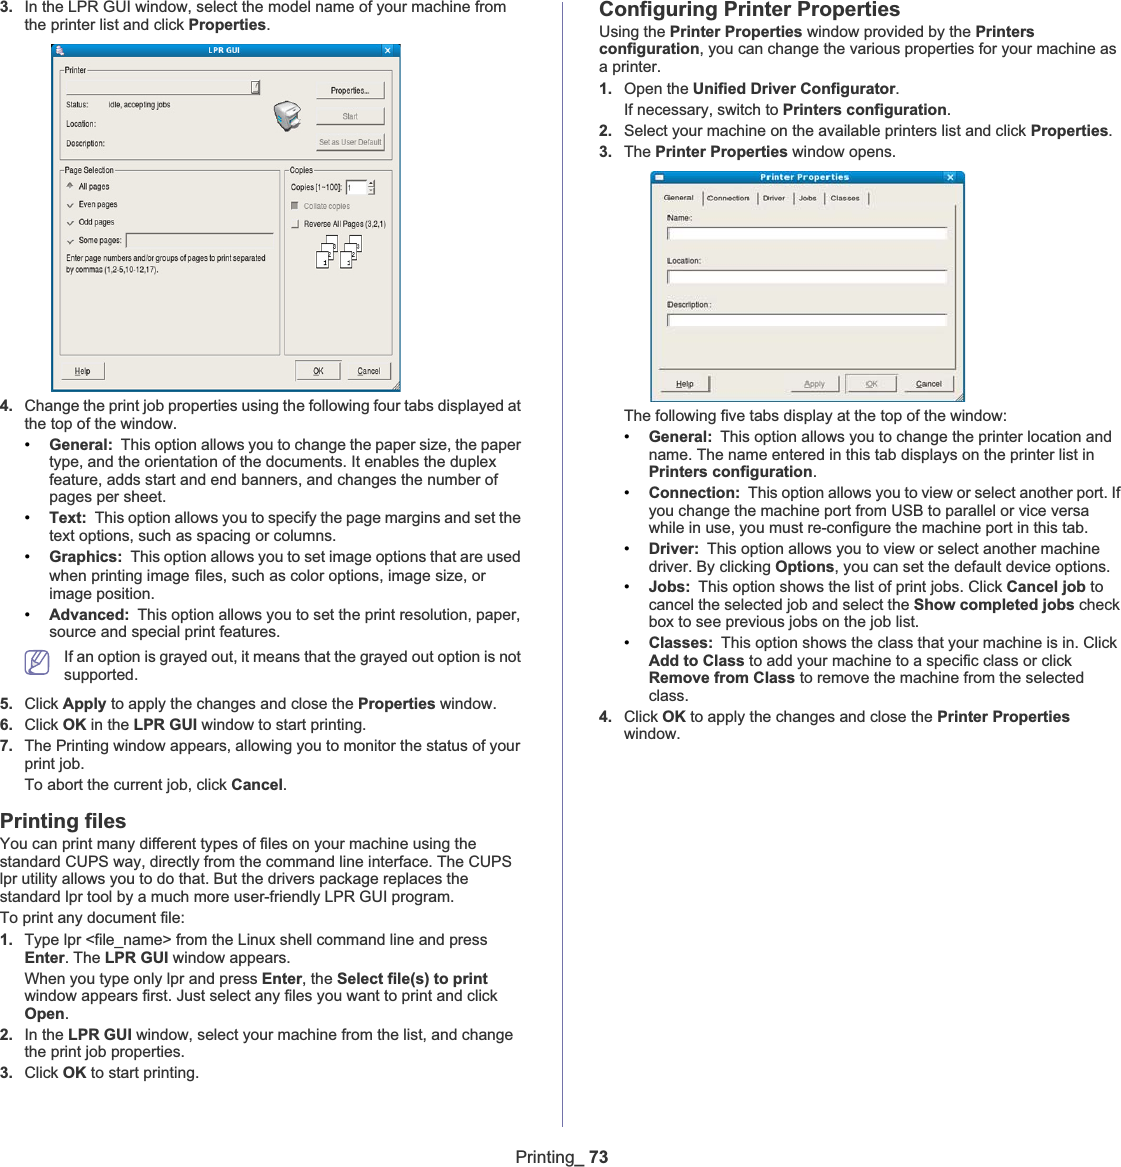
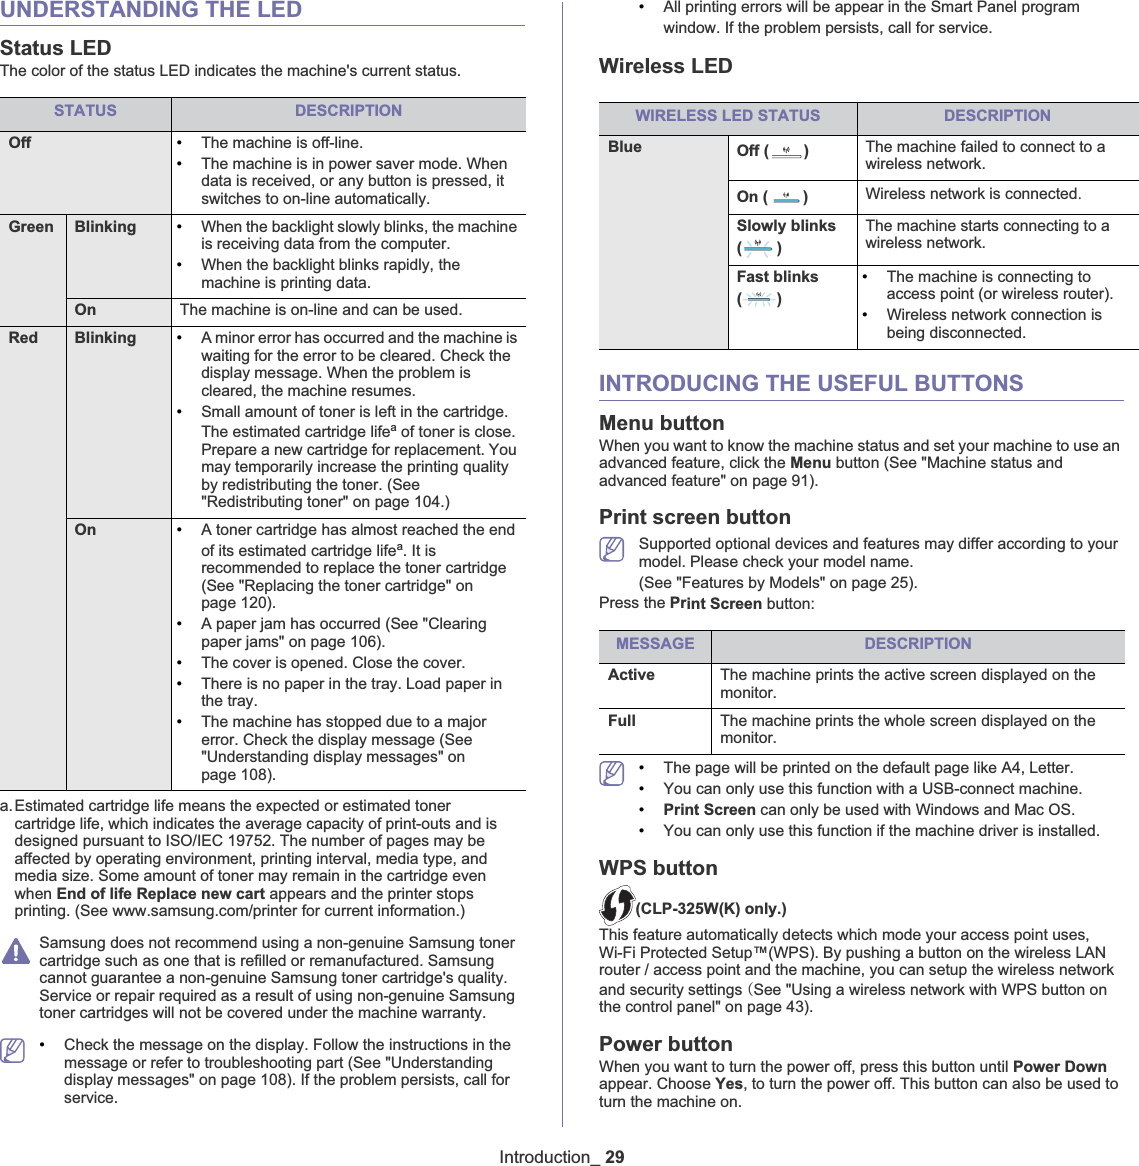
![Copying_ 75When you make a reduced copy, black lines may appear at the bottom of your copy.CHANGING THE DEFAULT COPY SETTINGSThe copy options, including darkness, original type, copy size, collation and number of copies, can be set to those most frequently used. When you copy a document, the default settings are used unless they have been changed by using the corresponding buttons on the control panel.1. Press (Copy) on the control panel. 2. Press Menu on the control panel.3. Press the left/right arrow until Copy Setup appears and press OK.4. Press the left/right arrow until Change Default appears and press OK.5. Press the left/right arrow until the setup option you want appears and press OK.6. Press the left/right arrow until the setting you want appears and press OK.7. Repeat steps 5 through 6, as needed.8. Press Stop/Clear to return to ready mode.While you are setting copy options, pressing Stop/Clear cancels the changed settings and restores the defaults.USING SPECIAL COPY FEATURESYou can use the following copy features:ID card copyingYour machine can print 2-sided originals on one sheet of A4-, Letter-, Legal-, Folio-, Executive-, B5, A5, or A6-sized paper.The machine prints one side of the original on the upper half of the paper and the other side on the lower half without reducing the size of the original. This feature is helpful for copying a small-sized item, such as a business card.•This copy feature is available only when you place originals on the scanner glass.•The size of the 2-sided originals should be smaller than A5, if not, some of it won’t be copied. 1. Press ID Copy on the control panel. 2. Place Front Side and Press [Start] appears on the display.3. Place the front side of an original facing down on the scanner glass where arrows indicate as shown, and close the scanner lid. 4. Press OK on the control panel.Your machine begins scanning the front side and shows Place Back Side and Press [Start].5. Turn the original over and place it on the scanner glass, where arrows indicate as shown then, close the scanner lid.6. Press OK on the control panel to begin copying.•If the original is larger than the printable area, some portions may not be printed.•If you don’t press the OK button, only the front side will be copied.•If you press Stop/Clear, the machine cancles the copy job and returns to ready mode. 2-up or 4-up copying (N-up)The machine reduces the size of the original images and prints 2 or 4 pages onto one sheet of paper.1 21 23 41. Press (Copy) on the control panel. 2. Press Menu on the control panel.3. Press the left/right arrow until Copy Feature appears and press OK.4. Press the left/right arrow until Layout appears and press OK.5. Press the left/right arrow until 2-Up or 4-Up appears and press OK.6. When Yes appears, press OK.7. Press Start on the control panel to begin copying.You cannot adjust the copy size using Reduce/Enlarge for the N-Upfeature.Poster copyingYour original will be divided into 9 portions. You can paste the printed pages together to make one poster-sized document.This copy feature is available only when you place originals on the scanner glass.1. Press (Copy) on the control panel. 2. Press Menu on the control panel.3. Press the left/right arrow until Copy Feature appears and press OK.4. Press the left/right arrow until Layout appears and press OK.5. Press the left/right arrow until Poster Copy appears and press OK.6. Press Stop/Clear to return to ready mode.7. Press Start on the control panel to begin copying.Your original is divided into 9 portions. Each portion is scanned and](https://usermanual.wiki/Samsung-Electronics-Co/SCX4623FW/User-Guide-1247086-Page-75.png)


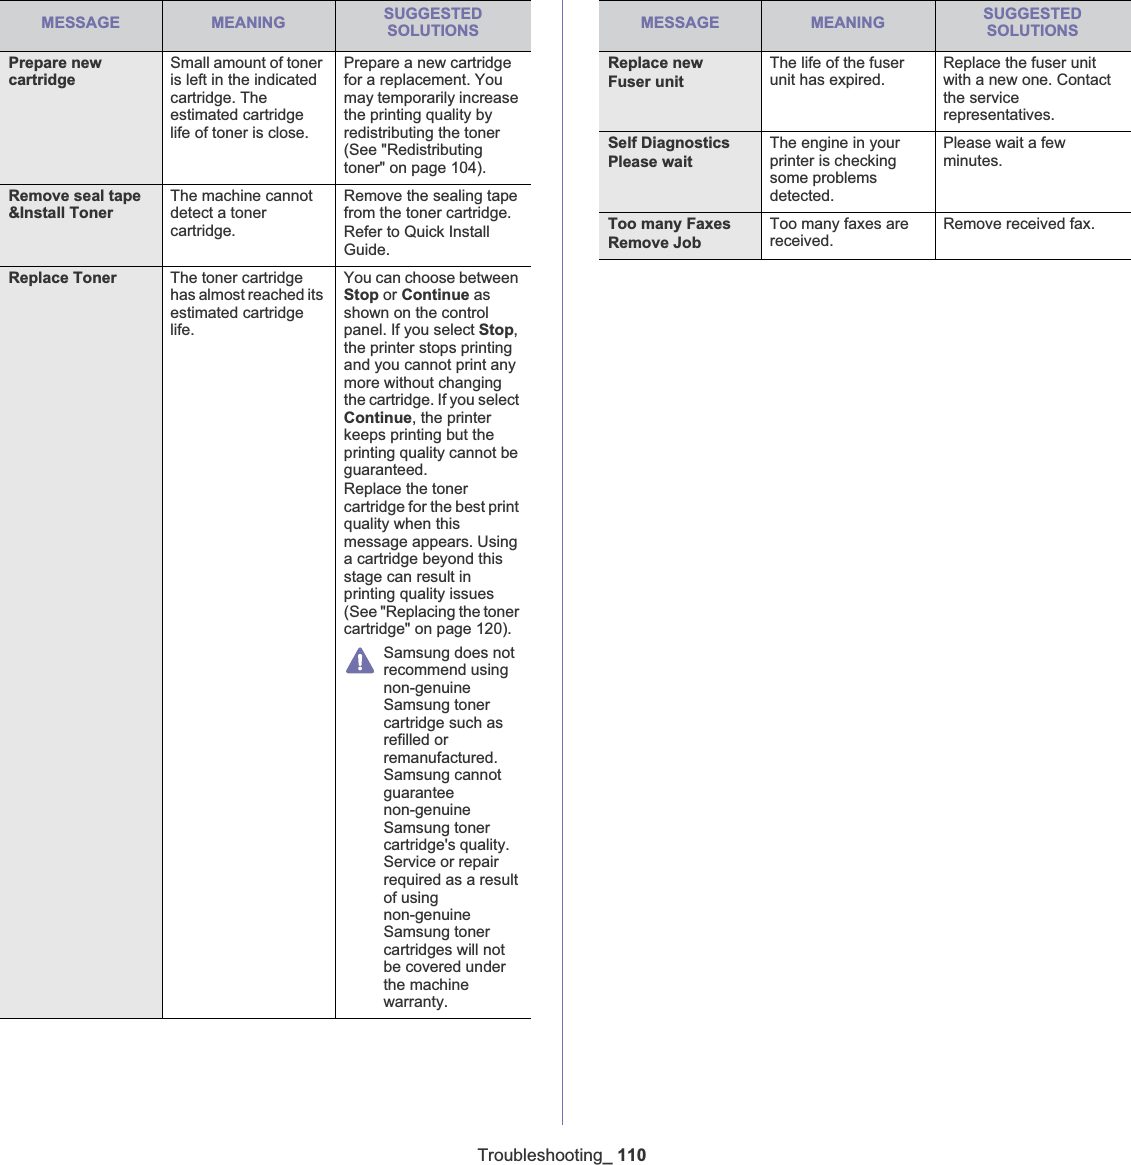
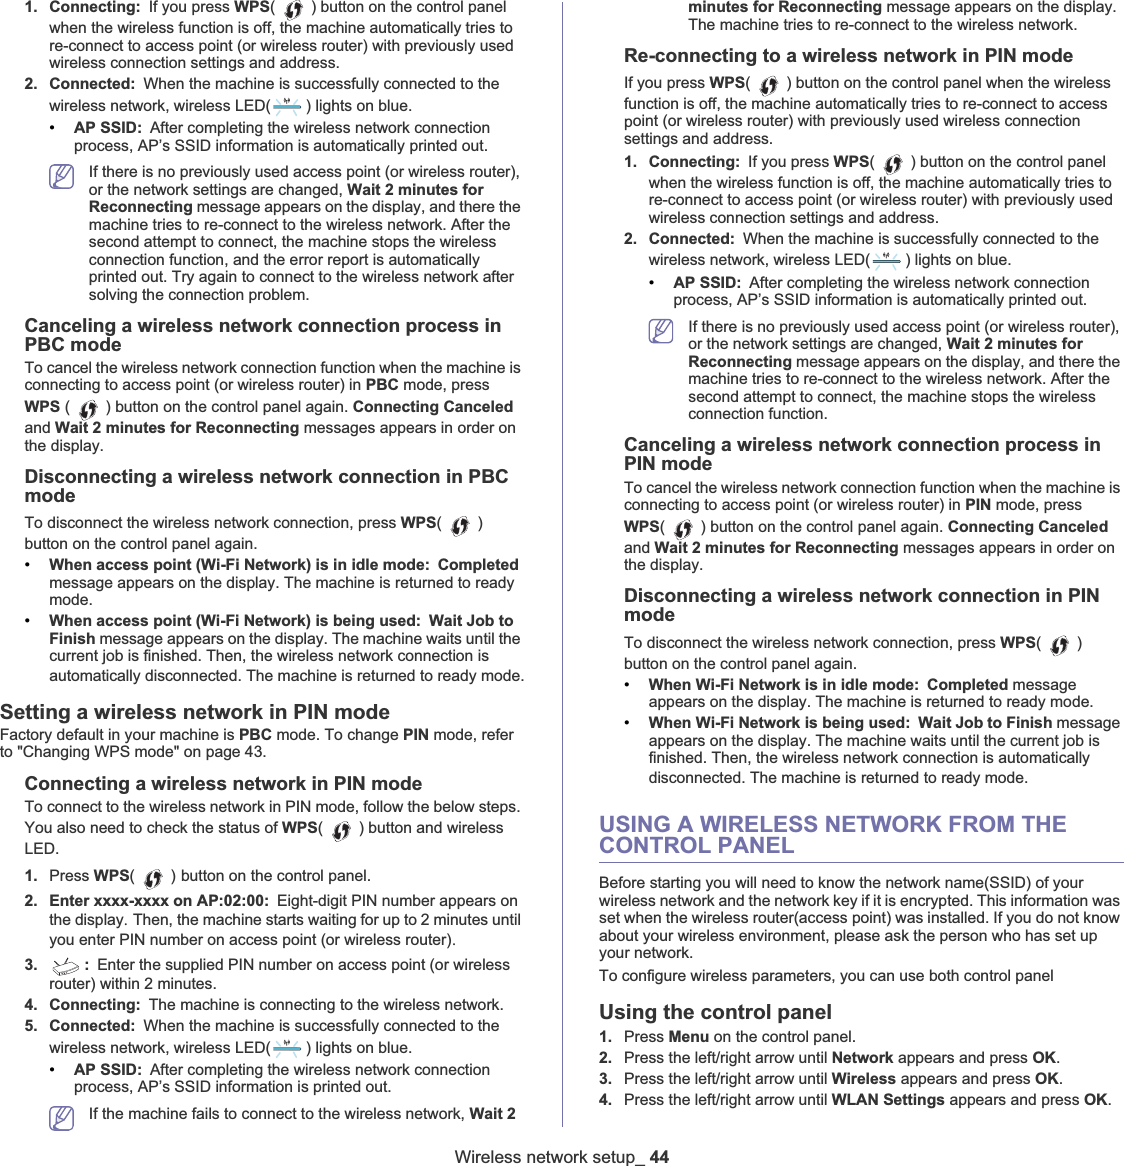
![Troubleshooting_ 108UNDERSTANDING DISPLAY MESSAGESMessages appear on the control panel display to indicate the machine’s status or errors. Refer to the tables below to understand the messages’ and their meaning, and correct the problem, if necessary.Checking display messages•If a message is not in the table, reboot the power and try the printing job again. If the problem persists, call for service.•When you call for service, provide the service representative with the contents of display message.•Some messages may not appear in the display depending on the options or models.•[error number] indicates the error number. •[tray type] indicates the tray number. •[media type] indicates the media type.•[media size] indicates the media size.•[color] indicates the color of toner or imaging unit.MESSAGE MEANING SUGGESTEDSOLUTIONS[COMM. Error] The machine has a communication problem.Ask the sender to try again.[Incompatible] The machine has received a fax from which is registered as a junk fax.The received fax data will be deleted. Reconfirm junk fax setup. See page 50[Line Busy] The receiving fax machine did not answer or the line is already engaged.Try again after a few minutes.[Line Error] Your machine cannot connect with the receiving fax machine or has lost contact because of a problem with the phone line.Try again. If the problem persists, wait an hour or so for the line to clear and try again. Or, turn the ECM mode on. See page 50.[Stop Pressed] Stop/Clear has been pressed during an operation.Try again.BOOTP problemAuto IP RunThe IP address assignment is failed. This happens, when Auto IP for BOOTP is set in SyncThru Web Service. Change the IP address assignment method to DHCP or Static. If you do not change this option, the BOOTP server continually asks to assign the IP Address.BOOTP problemReconfigure DHCPThe IP address assignment is failed. This happens, when Auto IP for BOOTP is not set in SyncThru Web Service.Change the IP address assignment method to DHCP or Static. If you do not change this option, the BOOTP server continually asks to assign the IP Address.DHCP problem: Auto IP RunThe IP address assignment is failed. This happens, when Auto IP for DHCP is set in SyncThru Web Service.Change the IP address assignment method to BOOTP or Static. If you do not change this option, the DHCP server continually asks to assign the IP Address.DHCP problemReconfigure BOOTPThe IP address assignment is failed. This happens, when Auto IP for DHCP is not set in SyncThru Web Service.Change the IP address assignment method to BOOTP or Static. If you do not change this option, the DHCP server continually asks to assign the IP Address.Document Jam.Remove JamThe loaded original has jammed in the ADF.Clear the jam (See "Clearing original document jams" on page 104).Door Open.Close itThe front cover is not securely latched.Close the cover until it locks into place.MESSAGE MEANING SUGGESTED SOLUTIONS](https://usermanual.wiki/Samsung-Electronics-Co/SCX4623FW/User-Guide-1247086-Page-108.png)
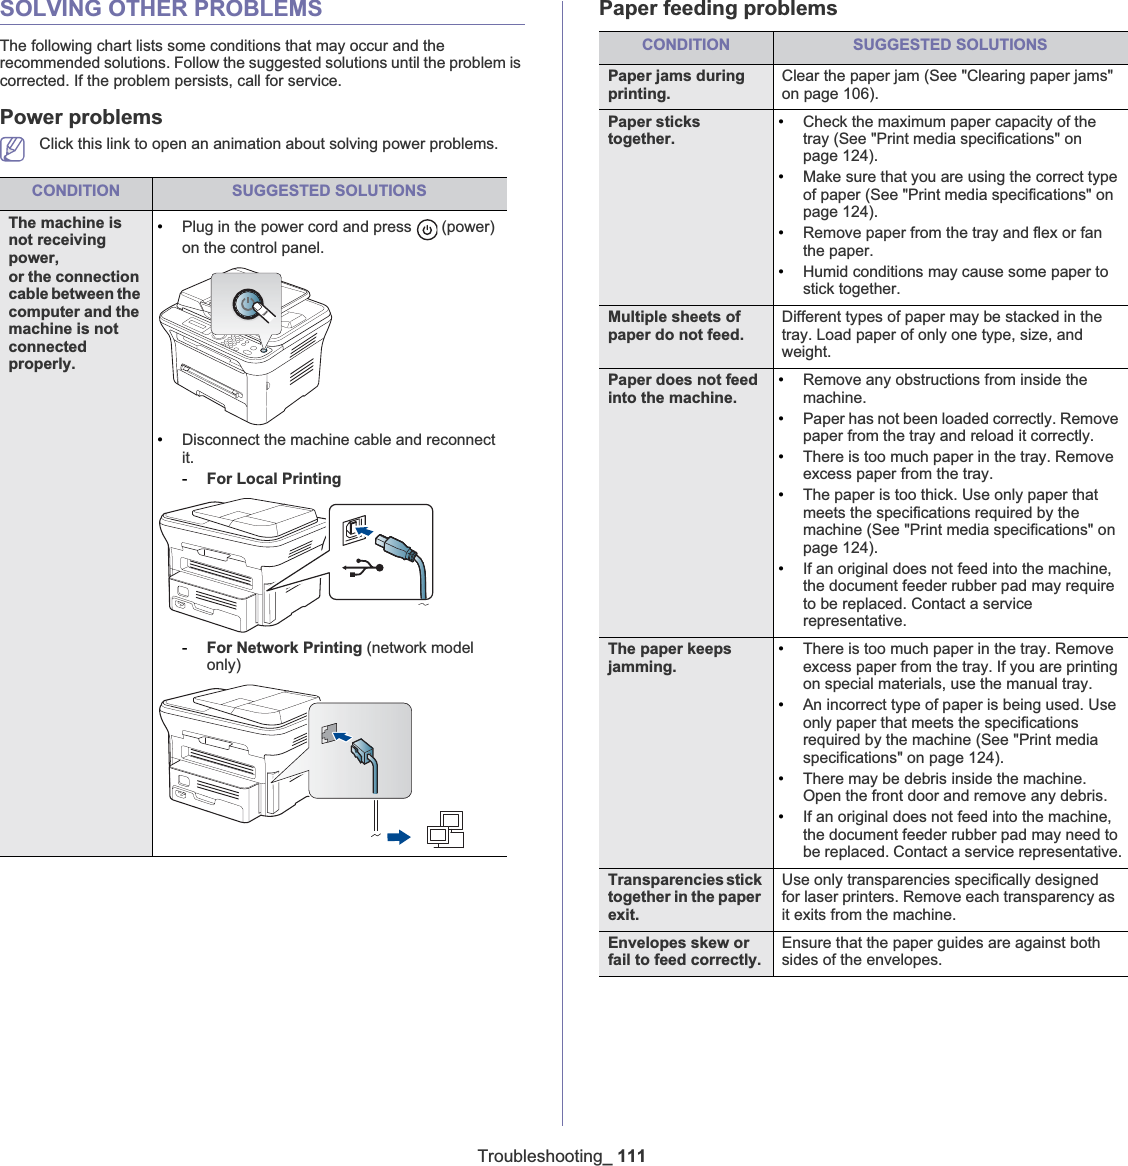
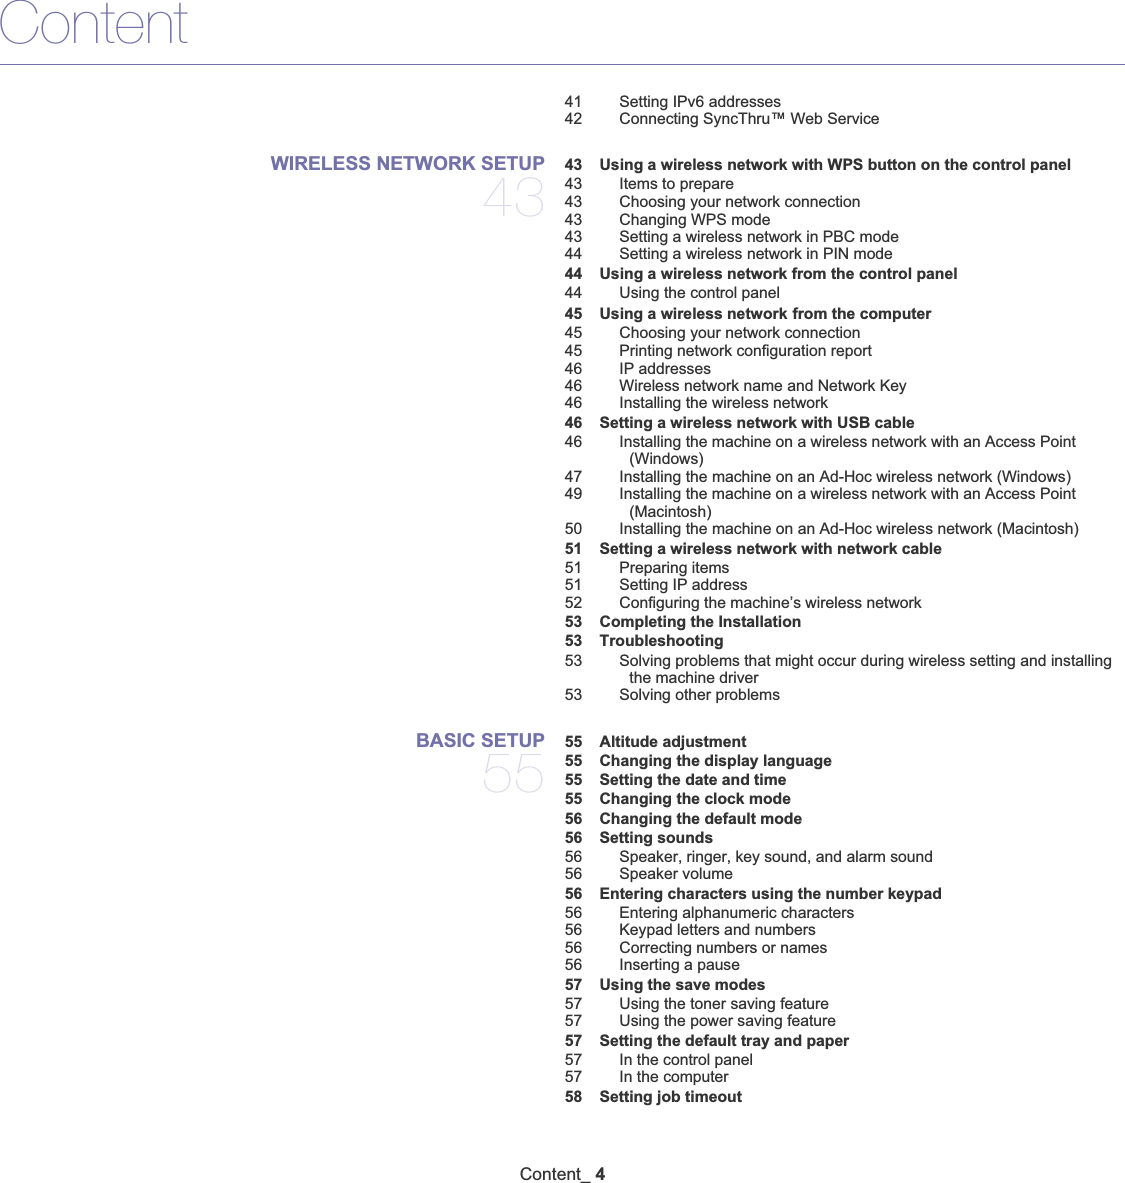
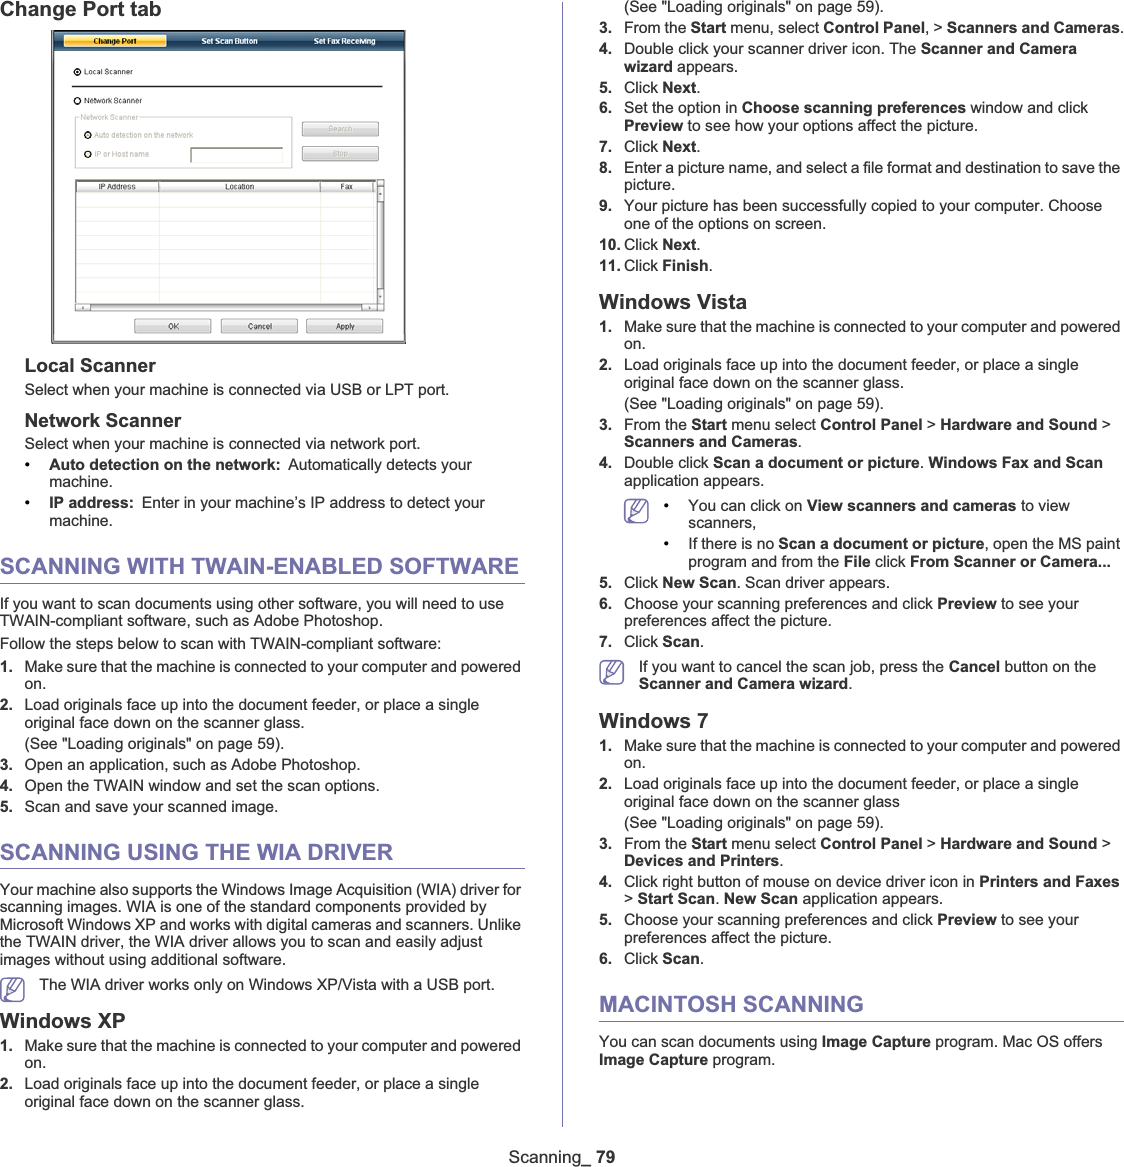
![Troubleshooting_ 109End of lifeReplace new cartThe indicated toner cartridge has reached its estimated cartridge life. The printer stops printing.Estimated cartridge life means the expected or estimated toner cartridge life, which indicates the average capacity of print-outs and is designed pursuant to ISO/IEC 19752 (See "Available supplies" on page 120).The number of pages may be affected by operating environment, printing interval, media type, and media size. Some amount of toner may remain in the cartridge even when End of life Replace new cart appears and the printer stops printing.Replace the toner cartridge (See "Replacing the toner cartridge" on page 120).Error [error number]Turn off then on A systematic error has occurredReboot the power and try the printing job again. If the problem persists, call for service.Install Toner The toner cartridge is installed improperly, or not installed.Reinstall the toner cartridge two or three times to confirm it is seated properly. If the problem persists, the toner cartridge is not being detected. Contact the service representatives.Load [media size] in[tray number]There is no corresponding paper in the corresponding tray.Load corresponding paper in the corresponding tray (See "Loading paper in the tray" on page 61).MESSAGE MEANING SUGGESTEDSOLUTIONSMemory FullRemove JobThe memory is full. Press the left/right arrow to highlight Cancel orStart, then press OK. If you select Cancel, the machine stops the fax job. If you select Start,the machine only sends scanned documents of the fax job. Network Problem:IP ConflictThe IP address is used elsewhere. Check the IP address or obtain a new IP address.No Answer The receiving fax machine has not answered after several redial attempts.Try again. Make sure that the receiving machine is operational.Not Compatibletoner cartridgeThe toner cartridge is not suitable for your machine.Install the corresponding toner cartridge with a Samsung-genuine cartridge (See "Replacing the toner cartridge" on page 120).Output bin FullRemove paperThe output tray is full. Or the sensor is not facing down.Remove papers from the output tray, the machine resumes printing. Or make sure the sensor is facing down. If the problem persists, call for service.Paper Emptyin [tray number] There is no paper in the indicated tray.Load paper in the tray (See "Loading paper in the tray" on page 61).Pulled Out[tray number] CassetteThe indicated tray cassette is not inserted, or not properly closed.To close the tray, lower the rear edge, align it with the slot, and slide it into the printer.Paper Jamin MP TrayPaper has jammed in the manual tray area.Clear the jam (See "In the manual tray" on page 106).Paper Jamin Tray 1Paper has jammed in the tray1 area.Clear the jam (See "In tray 1" on page 106).Paper Jaminside machinePaper has jammed inside the machine.Clear the jam (See "Inside the machine" on page 106).Paper Jamin exit areaSpecial print media has jammed in the paper exit area.Clear the jam.•See "In exit area" on page 107.•See "In the manual tray" on page 106)MESSAGE MEANING SUGGESTED SOLUTIONS](https://usermanual.wiki/Samsung-Electronics-Co/SCX4623FW/User-Guide-1247086-Page-109.png)