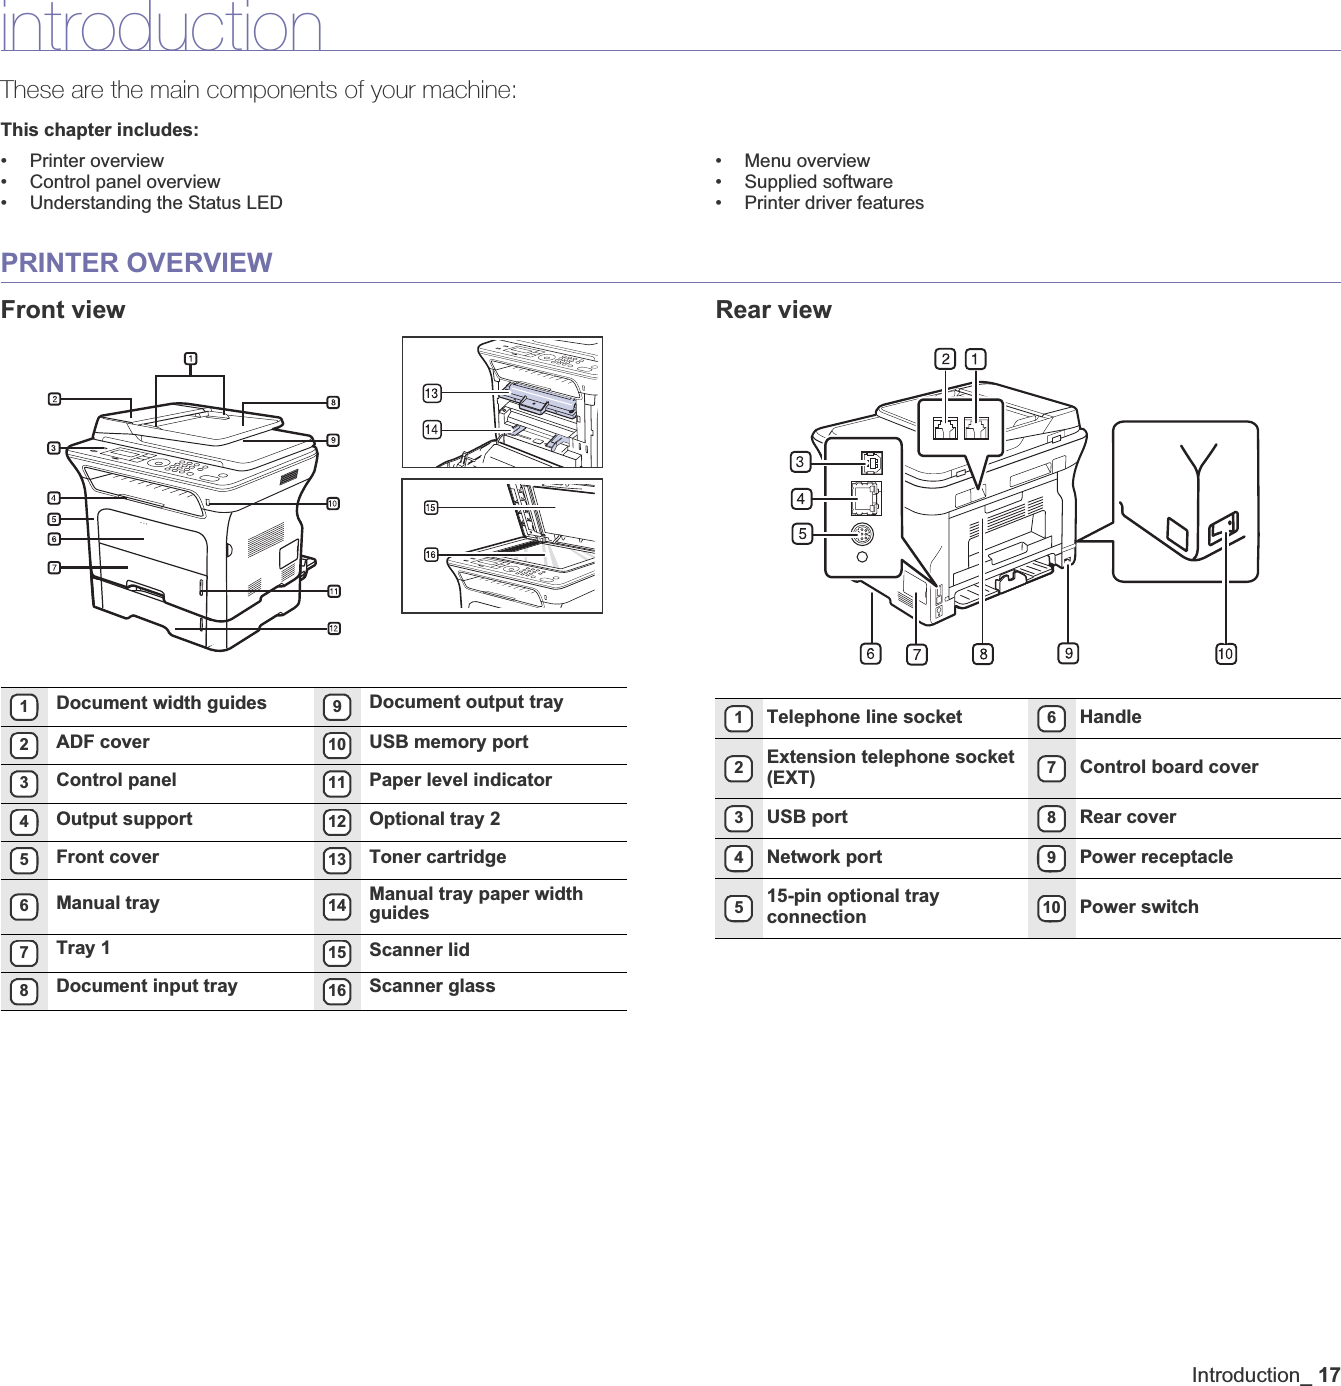
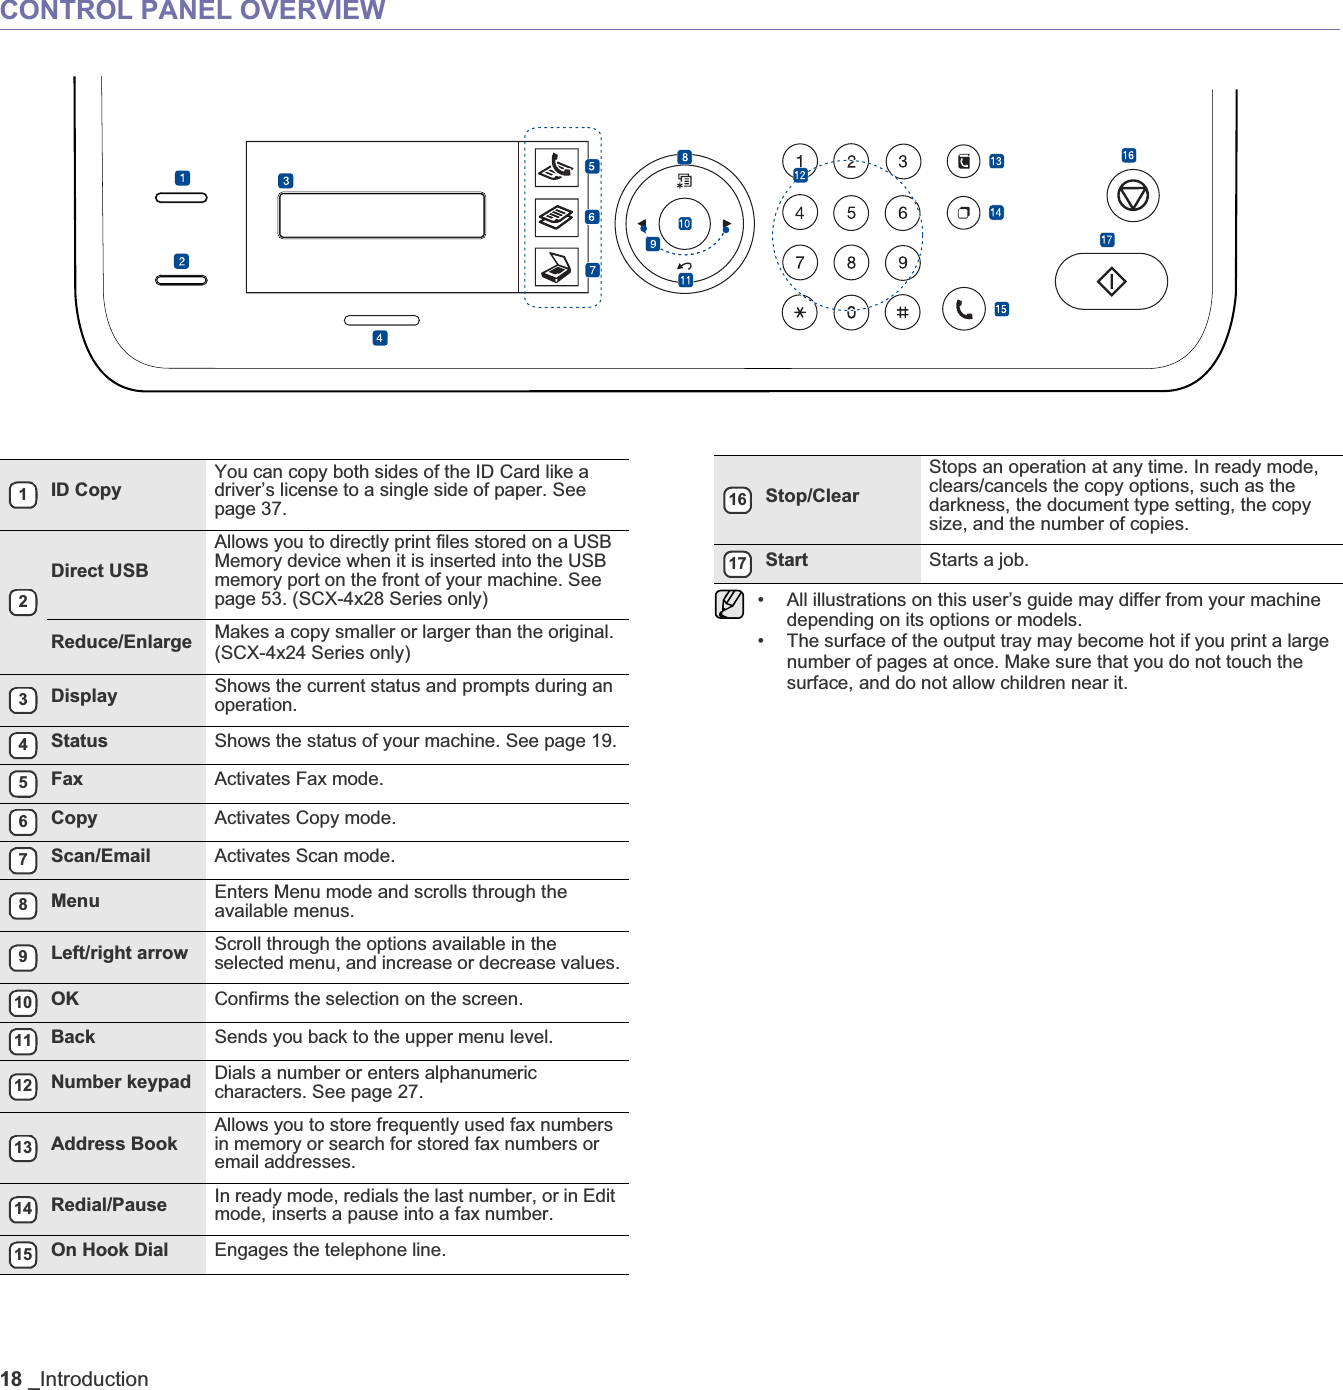
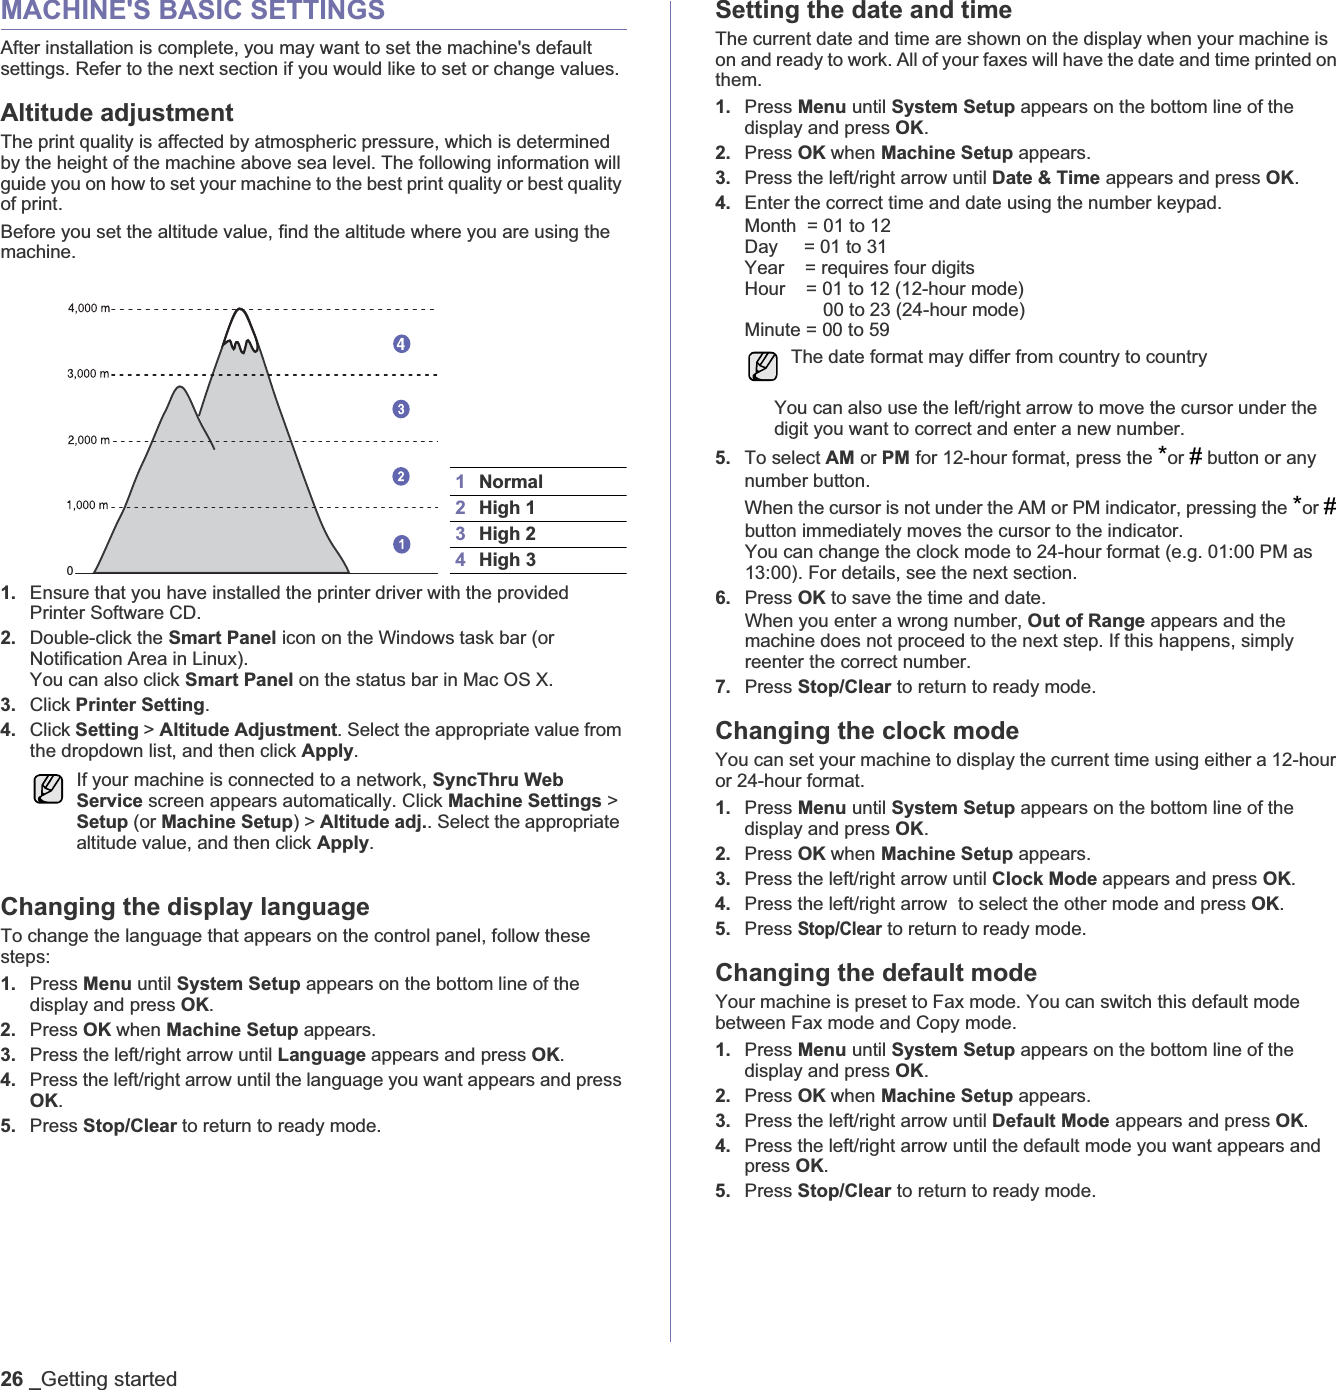
Samsung Electronics Co SCX4828FN Multi Function Printer User Manual SCX 482x Guide EN
Samsung Electronics Co Ltd Multi Function Printer SCX 482x Guide EN
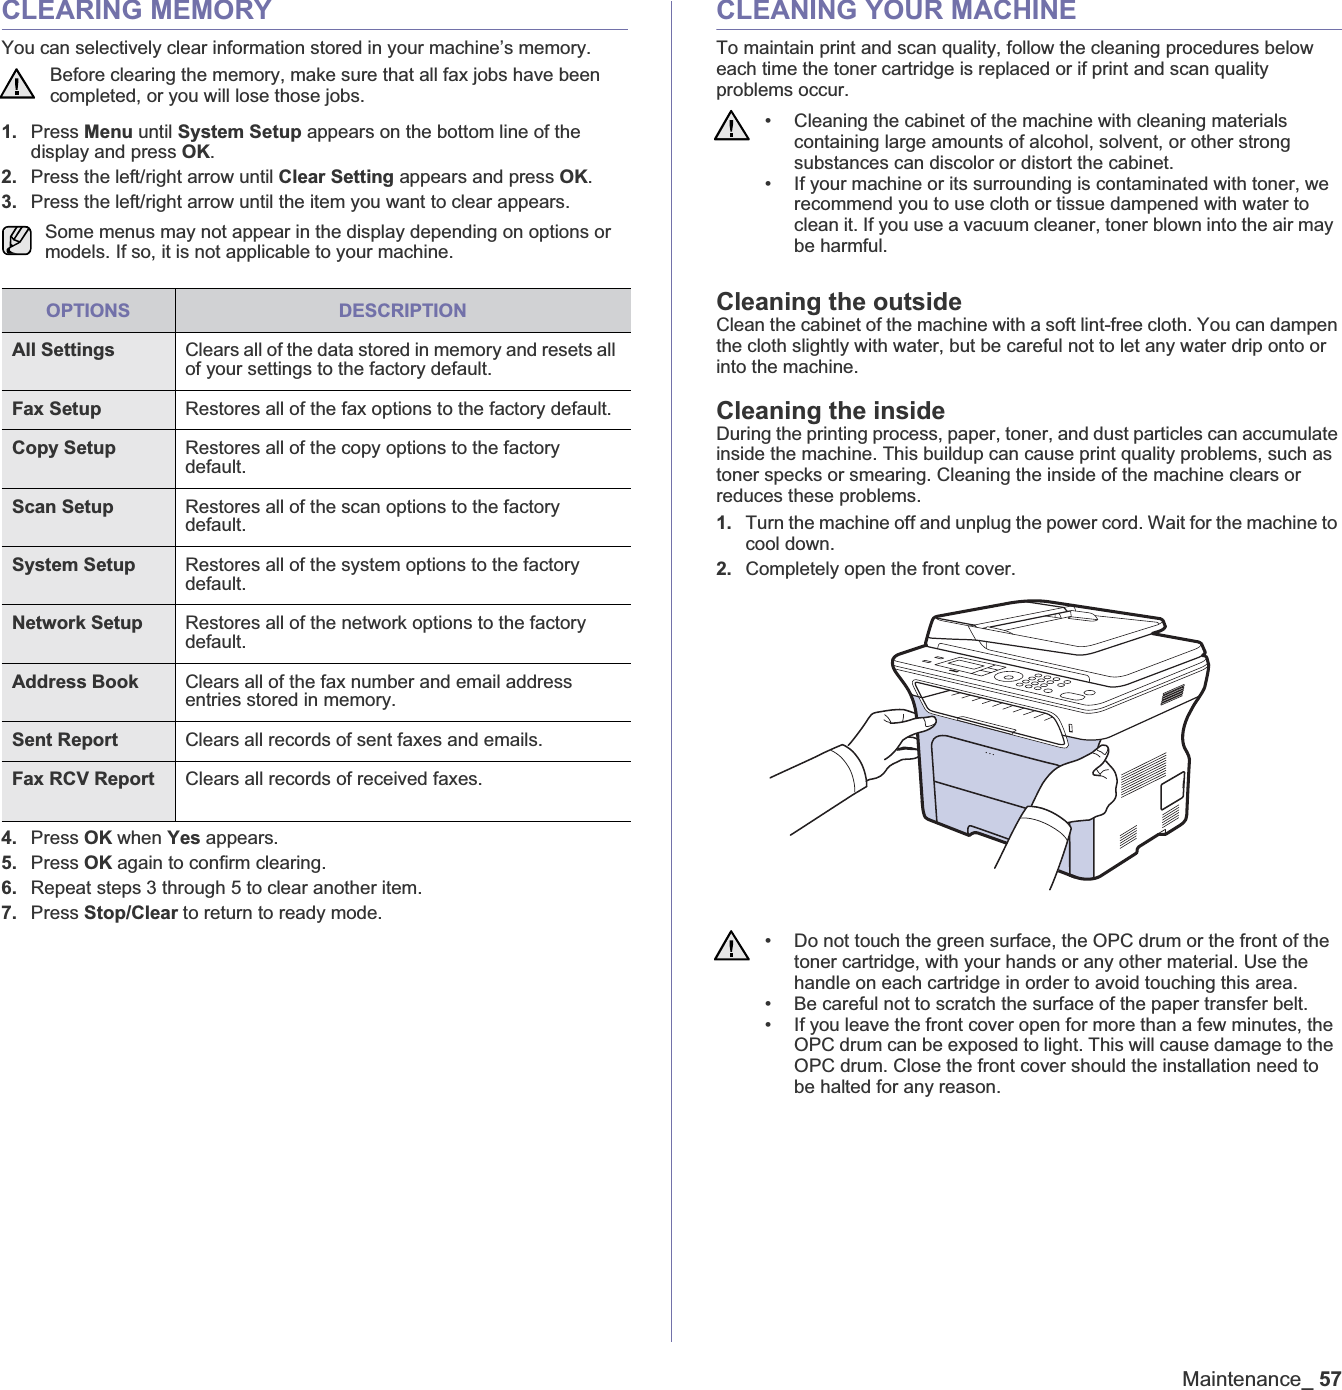
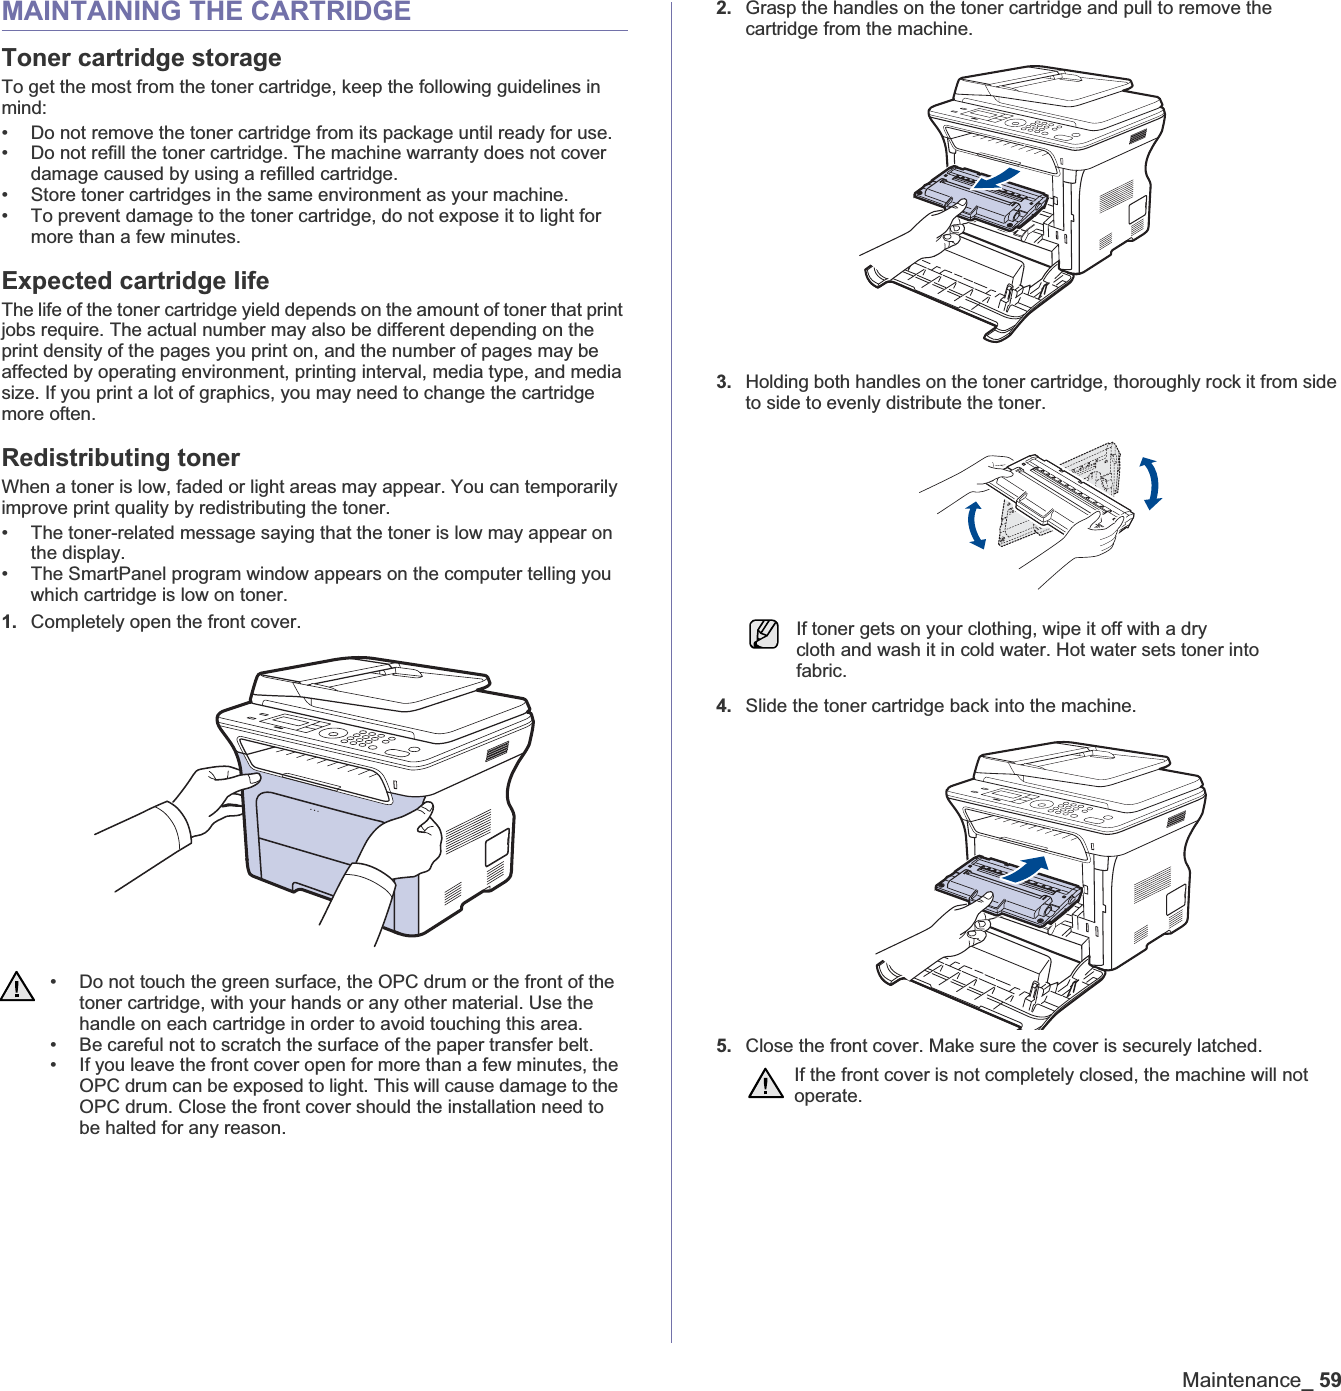
UserManual.wiki
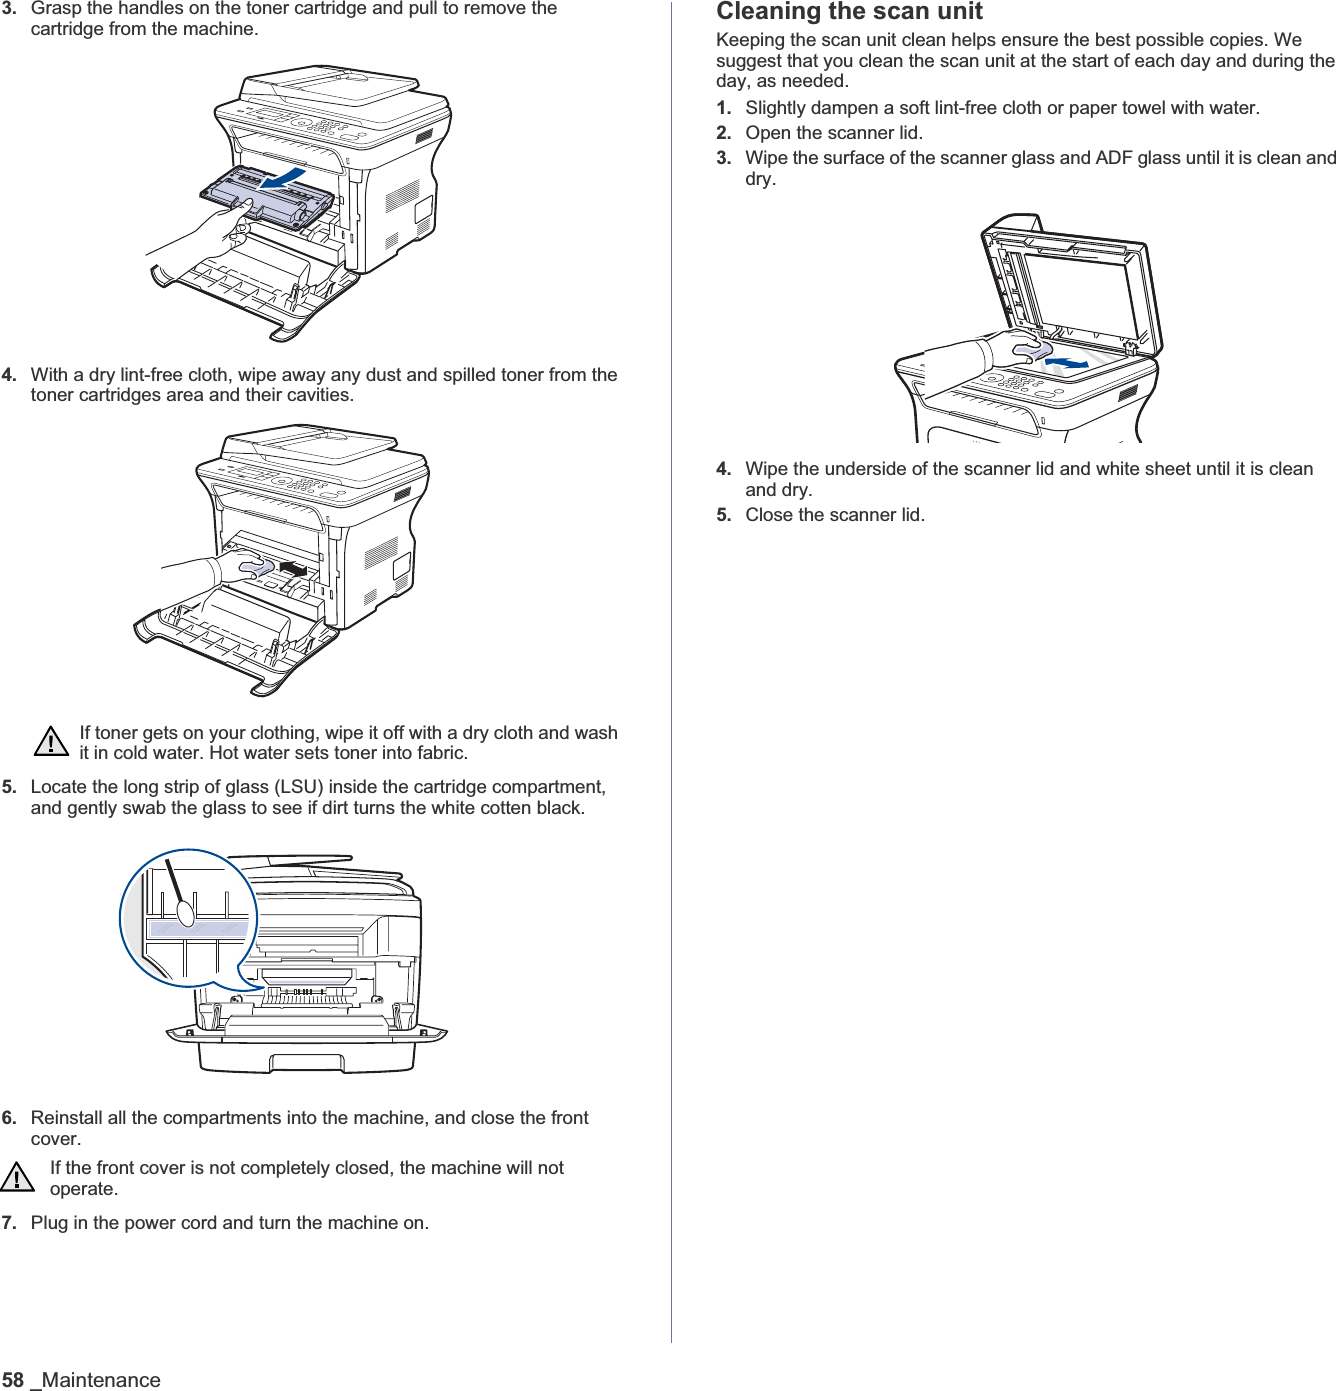
>
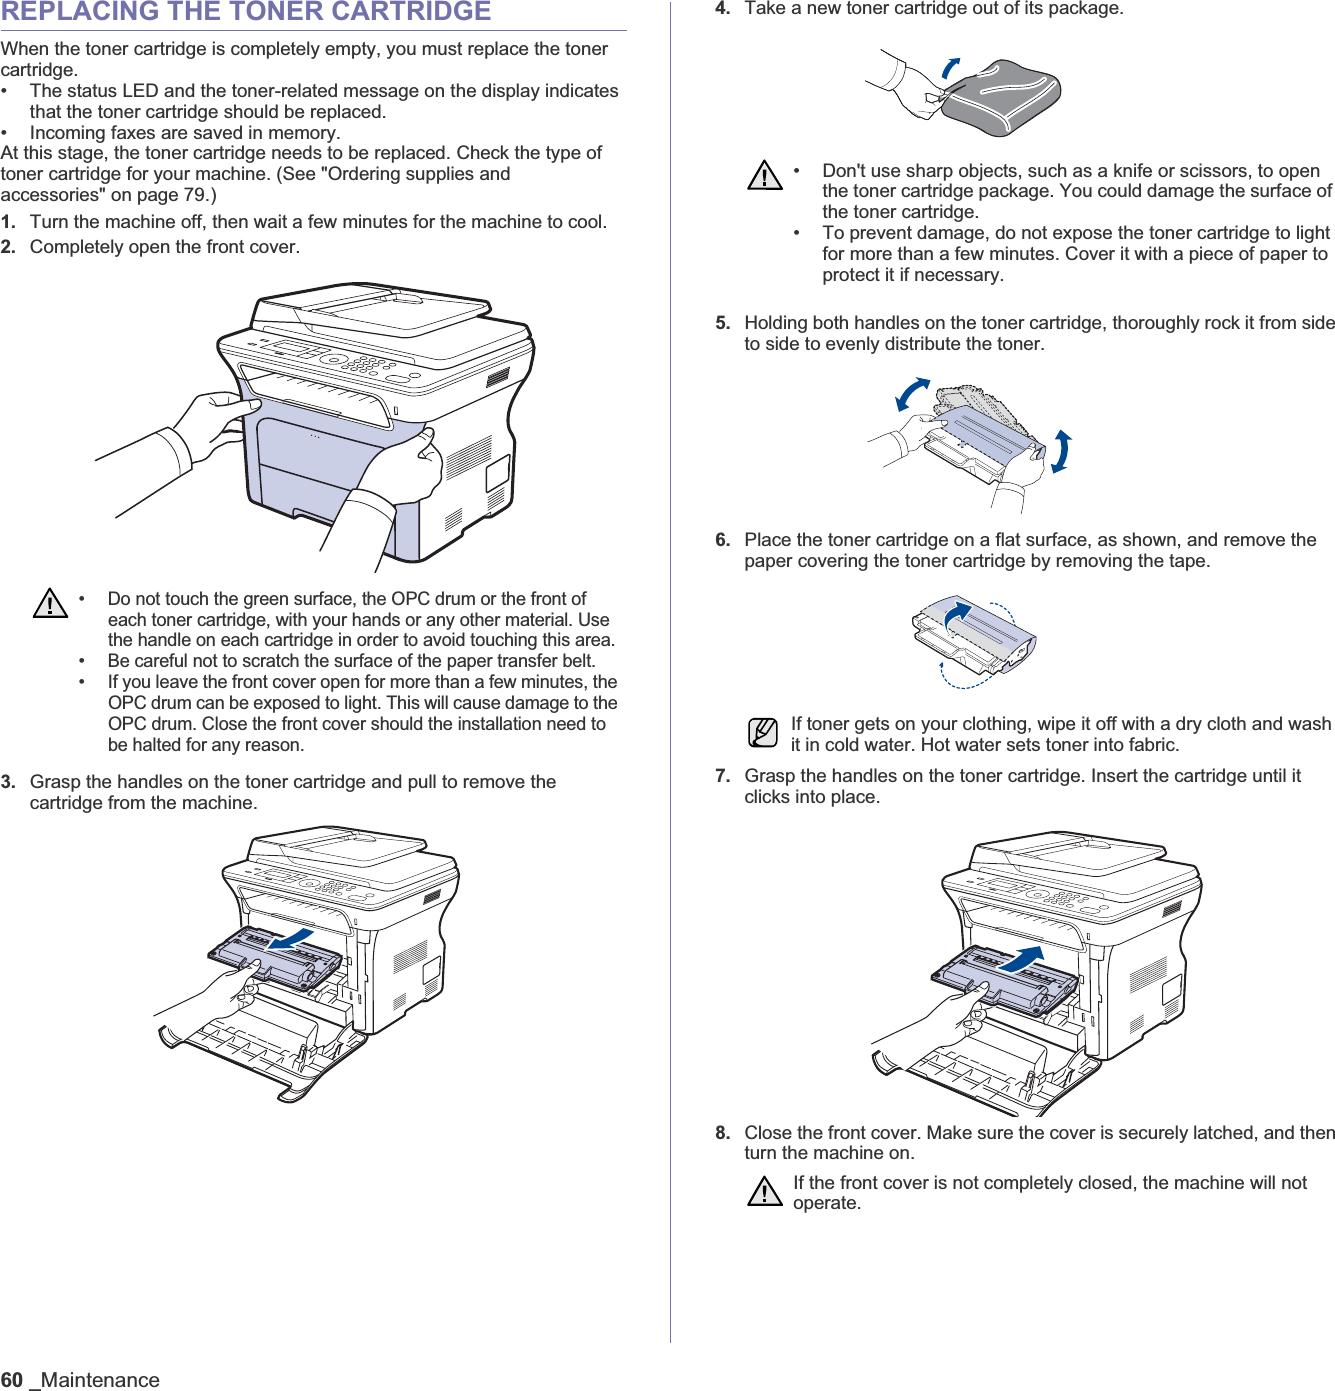
Samsung Electronics Co
>
SCX4828FN User Manual
Users Manual
Navigation menu
Upload a User Manual
Namespaces
Wiki Guide
HTML
PDF
Info
Views
User Manual
Discussion / Help
Navigation

![Safety information_11OPENSSL LICENSECopyright (c) 1998-2001 The OpenSSL Project. All rights reserved.Redistribution and use in source and binary forms, with or without modification, are permitted provided that the following conditions are met:1. Redistributions of source code must retain the above copyright notice, this list of conditions and the following disclaimer. 2. Redistributions in binary form must reproduce the above copyright notice, this list of conditions and the following disclaimer in the documentation and/or other materials provided with the distribution.3. All advertising materials mentioning features or use of this software must display the following acknowledgment: “This product includes software developed by the OpenSSL Project for use in the OpenSSL Toolkit. (http://www.openssl.org/)”4. The names “OpenSSL Toolkit“ and “OpenSSL Project” must not be used to endorse or promote products derived from this software without5. prior written permission. For written permission, please contact openssl-core@openssl.org.6. Products derived from this software may not be called “OpenSSL” nor may “OpenSSL” appear in their names without prior written permission of the OpenSSL Project.7. Redistributions of any form whatsoever must retain the following acknowledgment: “This product includes software developed by the OpenSSL Project for use in the OpenSSL Toolkit (http://www.openssl.org/)”THIS SOFTWARE IS PROVIDED BY THE OpenSSL PROJECT “AS IS”' AND ANY EXPRESSED OR IMPLIED WARRANTIES, INCLUDING, BUT NOT LIMITED TO, THE IMPLIED WARRANTIES OF MERCHANTABILITY AND FITNESS FOR A PARTICULAR PURPOSE ARE DISCLAIMED. IN NO EVENT SHALL THE OpenSSL PROJECT OR ITS CONTRIBUTORS BE LIABLE FOR ANY DIRECT, INDIRECT, INCIDENTAL, SPECIAL, EXEMPLARY, OR CONSEQUENTIAL DAMAGES (INCLUDING, BUT NOT LIMITED TO, PROCUREMENT OF SUBSTITUTE GOODS OR SERVICES; LOSS OF USE, DATA, OR PROFITS; OR BUSINESS INTERRUPTION) HOWEVER CAUSED AND ON ANY THEORY OF LIABILITY, WHETHER IN CONTRACT, STRICT LIABILITY, OR TORT (INCLUDING NEGLIGENCE OR OTHERWISE) ARISING IN ANY WAY OUT OF THE USE OF THIS SOFTWARE, EVEN IF ADVISED OF THE POSSIBILITY OF SUCH DAMAGE.This product includes cryptographic software written by Eric Young(eay@cryptsoft.com). This product includes software written by Tim Hudson (tjh@cryptsoft.com).ORIGINAL SSLEAY LICENSECopyright (C) 1995-1998 Eric Young (eay@cryptsoft.com) All rights reserved.This package is an SSL implementation written by Eric Young (eay@cryptsoft.com). The implementation was written so as to conform with Netscapes SSL.This library is free for commercial and non-commercial use as long as the following conditions are aheared to. The following conditions apply to all code found in this distribution, be it the RC4, RSA, lhash, DES, etc., code; not just the SSL code. The SSL documentation included with this distribution is covered by the same copyright terms except that the holder is Tim Hudson (tjh@cryptsoft.com). Copyright remains Eric Young's, and as such any Copyright notices in the code are not to be removed. If this package is used in a product, Eric Young should be given attribution as the author of the parts of the library used. This can be in the form of a textual message at program startup or in documentation (online or textual) provided with the package.Redistribution and use in source and binary forms, with or without modification, are permitted provided that the following conditions are met:1. Redistributions of source code must retain the copyright notice, this list of conditions and the following disclaimer.2. Redistributions in binary form must reproduce the above copyright notice, this list of conditions and the following disclaimer in the documentation and/or other materials provided with the distribution.3. All advertising materials mentioning features or use of this software must display the following acknowledgement: "This product includes cryptographic software written by Eric Young (eay@cryptsoft.com)" The word 'cryptographic' can be left out if the rouines from the library being used are not cryptographic related:-). 4. If you include any Windows specific code (or a derivative thereof) from the apps directory (application code) you must include an acknowledgement: "This product includes software written by Tim Hudson (tjh@cryptsoft.com)"THIS SOFTWARE IS PROVIDED BY ERIC YOUNG ``AS IS'' AND ANY EXPRESS OR IMPLIED WARRANTIES, INCLUDING, BUT NOT LIMITED TO, THE IMPLIED WARRANTIES OF MERCHANTABILITY AND FITNESS FOR A PARTICULAR PURPOSE ARE DISCLAIMED. IN NO EVENT SHALL THE AUTHOR OR CONTRIBUTORS BE LIABLE FOR ANY DIRECT, INDIRECT, INCIDENTAL, SPECIAL, EXEMPLARY, OR CONSEQUENTIAL DAMAGES (INCLUDING, BUT NOT LIMITED TO, PROCUREMENT OF SUBSTITUTE GOODS OR SERVICES; LOSS OF USE, DATA, OR PROFITS; OR BUSINESS INTERRUPTION) HOWEVER CAUSED AND ON ANY THEORY OF LIABILITY, WHETHER IN CONTRACT, STRICT LIABILITY, OR TORT (INCLUDING NEGLIGENCE OR OTHERWISE) ARISING IN ANY WAY OUT OF THE USE OF THIS SOFTWARE, EVEN IF ADVISED OF THE POSSIBILITY OF SUCH DAMAGE.The licence and distribution terms for any publically available version or derivative of this code cannot be changed. i.e. this code cannot simply be copied and put under another distribution licence [including the GNU Public Licence.]](https://usermanual.wiki/Samsung-Electronics-Co/SCX4828FN/User-Guide-912059-Page-11.png)
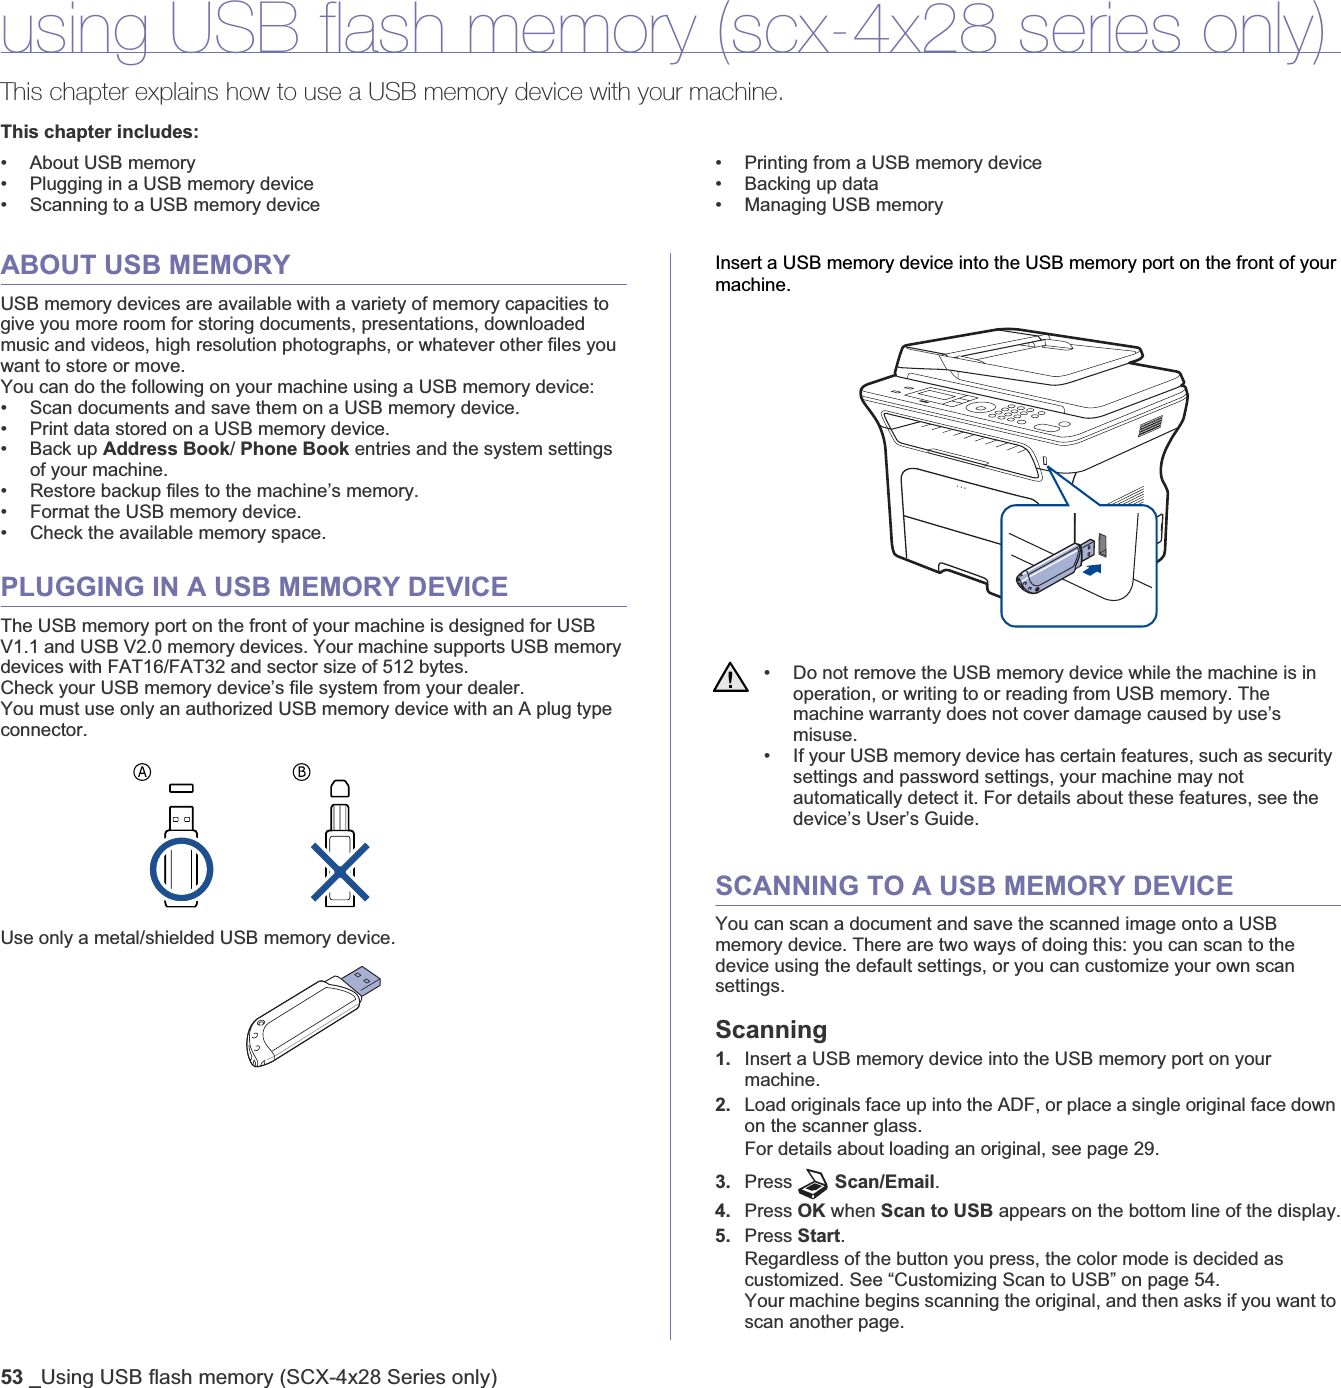
![Getting started_25INSTALLING THE SOFTWAREYou have to install the machine software for printing. The software includes drivers, applications, and other user friendly programs. 1. Make sure that the network setup for your machine is completed. (See "Setting up the network" on page 23.) All applications should be closed on your computer before beginning installation.2. Insert the Printer Software CD-ROM into your CD-ROM drive.The CD-ROM should automatically run, and an installation window appears. If the installation window does not appear, click Start > Run. Type X:\Setup.exe, replacing “X” with the letter which represents your drive and click OK.If you use Windows Vista, click Start > All Programs > Accessories > Run, and type X:\Setup.exe.If the AutoPlay window appears in Windows Vista, click Run Setup.exein Install or run program field, and click Continue in the User Account Control window.3. Click Next.• If necessary, select a language from the drop-down list.4. Select Typical installation for a network printer, and then click Next.5. The list of machines available on the network appears. Select the printer you want to install from the list and then click Next.• If you do not see your machine on the list, click Update to refresh the list, or select Add TCP/IP Port to add your machine to the network. To add the machine to the network, enter the port name and the IP address for the machine.To verify your machine’s IP address or the MAC address, print a Network Configuration page. (See "Printing reports" on page 56.)• To find a shared network printer (UNC Path), select Shared Printer [UNC] and enter the shared name manually or find a shared printer by clicking the Browse button.6. After the installation is finished, a window appears asking you to print a test page and to register yourself as a user of Samsung machines in order to receive information from Samsung. If you desire, select the corresponding checkbox(es) and click Finish.• The following procedure is for when the machine is being used as a network machine. If you want to connect a machine with a USB cable, refer to Software section.• The following procedure is based on the Windows XP operating system. The procedure and popup window which appear during the installation may differ depending on the operating system, the printer feature, or the interface in use.If you are not sure of the IP address, contact your network administrator or print network information. (See "Printing reports" on page 56.)• If your machine does not work properly after the installation, try to reinstall the printer driver. See Software section.• During the printer driver installation process, the driver installer detects the location information for your operating system and sets the default paper size for your machine. If you use a different Windows location, you must change the paper size to match the paper you usually use. Go to printer properties to change the paper size after installation is complete.](https://usermanual.wiki/Samsung-Electronics-Co/SCX4828FN/User-Guide-912059-Page-24.png)

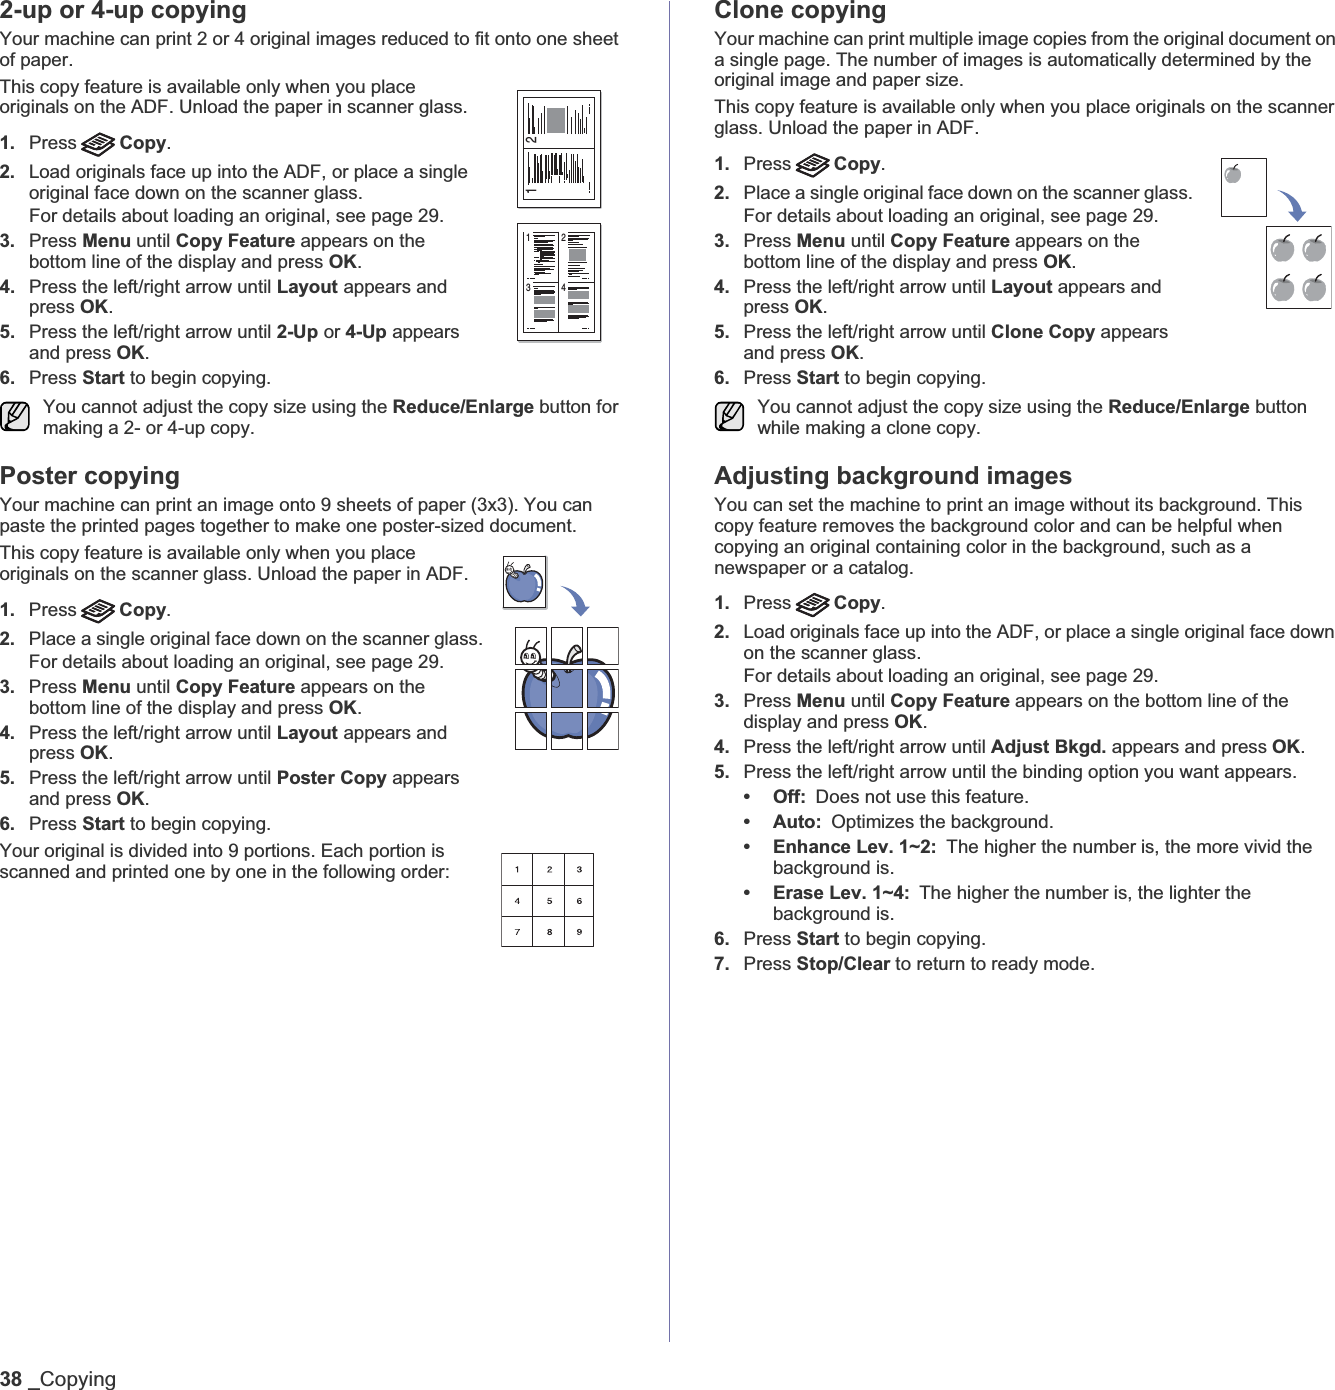
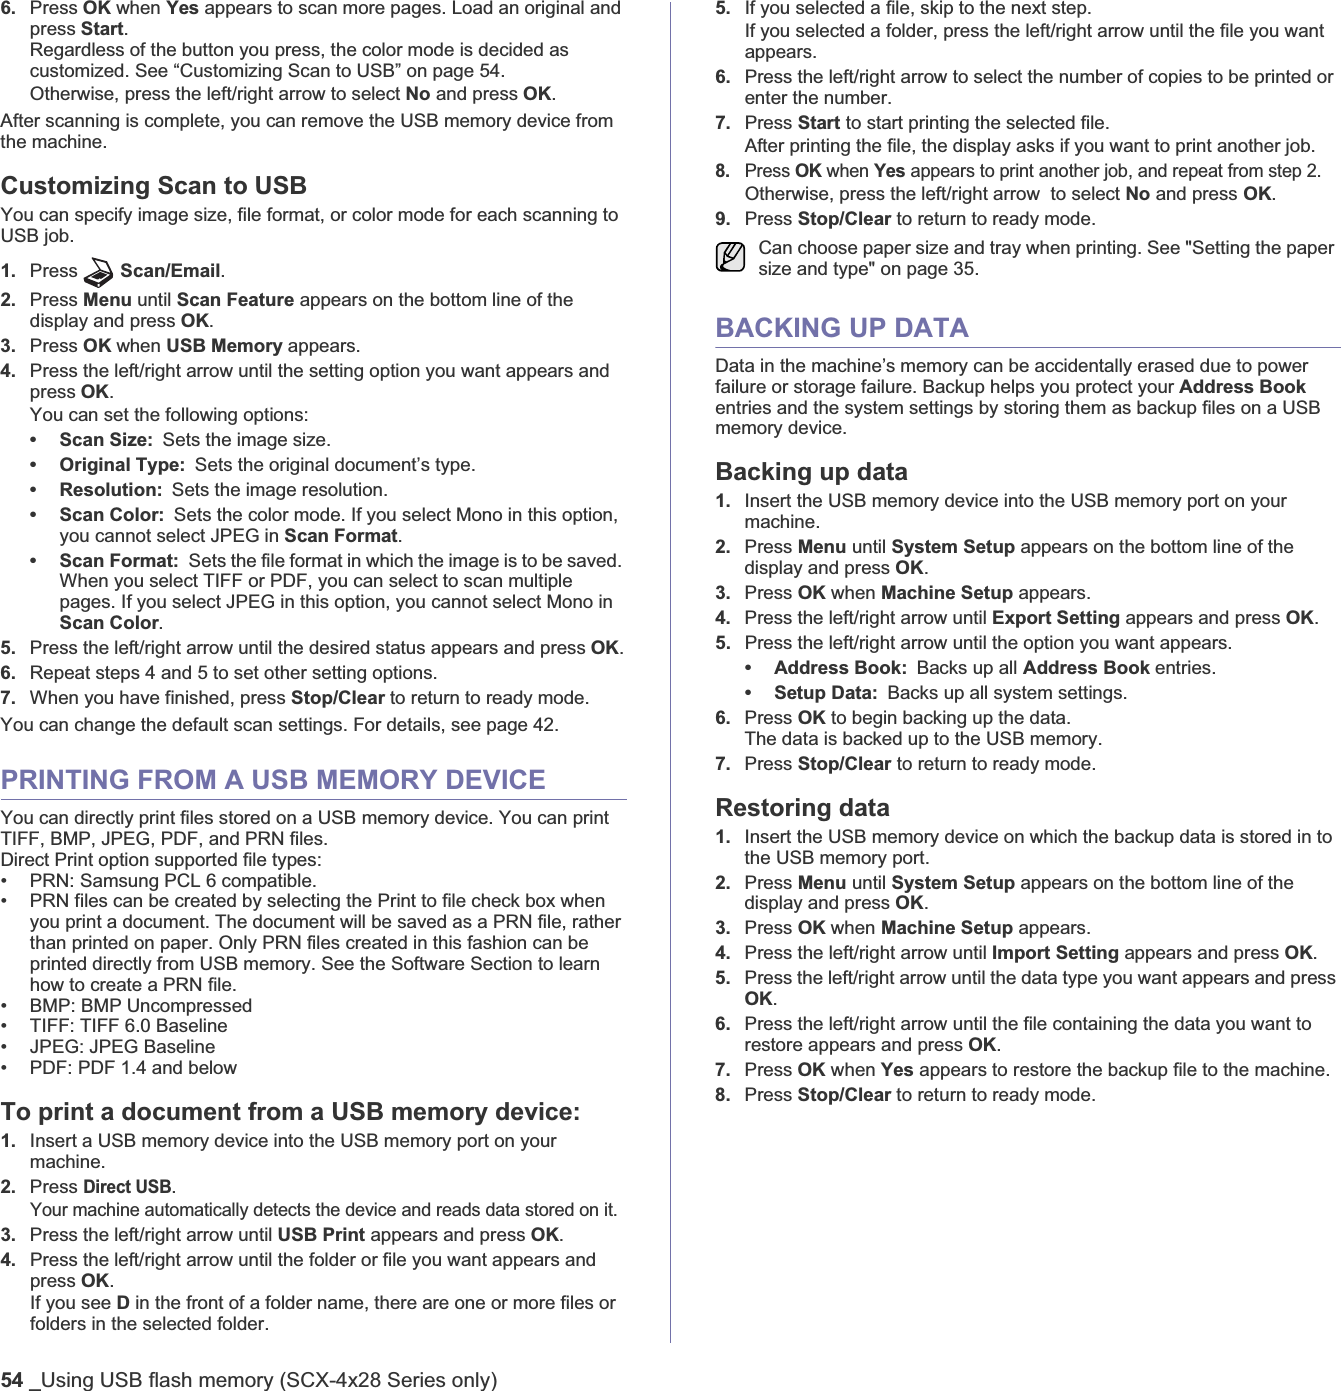
![Copying_37CHANGING THE DEFAULT COPY SETTINGSThe copy options, including darkness, original type, copy size, and number of copies, can be set to those most frequently used. When you copy a document, the default settings are used unless they have been changed by using the corresponding buttons on the control panel.1. Press Copy.2. Press Menu until Copy Setup appears on the bottom line of the display and press OK.3. Press OK when Change Default appears.4. Press the left/right arrow until the setup option you want appears and press OK.5. Press the left/right arrow until the setting you want appears and press OK.6. Repeat steps 4 through 5, as needed.7. Press Stop/Clear to return to ready mode.ID CARD COPYINGYour machine can print 2-sided originals on one sheet of A4-, Letter-, Legal-, Folio-, Oficio-, Executive-, B5-, A5-, or A6-sized paper. When you copy using this feature, the machine prints one side of the original on the upper half of the paper and the other side on the lower half without reducing the size of the original. This feature is helpful for copying a small-sized item, such as a name card. This copy feature is available only when you place originals on the scanner glass. Unload the paper in ADF.1. Press ID Copy.2. Place the front side of an original facing down on the scanner glass where arrows indicate as shown, and close the scanner lid.3. Place Front Side and Press[Start] appears on the display.4. Press Start.Your machine begins scanning the front side and shows Place Back Side and Press[Start]5. Turn the original over and place it on the scanner glass, where arrows indicate as shown. Then, close the scanner lid.6. Press Start to begin copying. USING SPECIAL COPY FEATURESYou can use the following copy features:CollationYou can set the machine to sort the copy job. For example, if you make 2 copies of a 3 page original, one complete 3 page document will print followed by a second complete document.1. Press Copy.2. Load originals face up into the ADF, or place a single original face down on the scanner glass.For details about loading an original, see page 29.3. Enter the number of copies using the number keypad.4. Press Menu until Copy Setup appears on the bottom line of the display and press OK.5. Press OK when Change Default appears.6. Press the left/right arrow until Copy Collation appears and press OK.7. Press the left/right arrow to select On.8. Press Start to begin copying.One complete document will print followed by the second complete document.While you are setting copy options, pressing Stop/Clear cancels the changed settings and restores the defaults. If you press Stop/Clear or if no buttons are pressed for approximately 30 seconds, the machine cancels the copy job and returns to ready mode.If the original is larger than the printable area, some portions may not be printed.If you press Stop/Clear or if no buttons are pressed for approximately 30 seconds, the machine cancels the copy job and returns to ready mode.123](https://usermanual.wiki/Samsung-Electronics-Co/SCX4828FN/User-Guide-912059-Page-36.png)

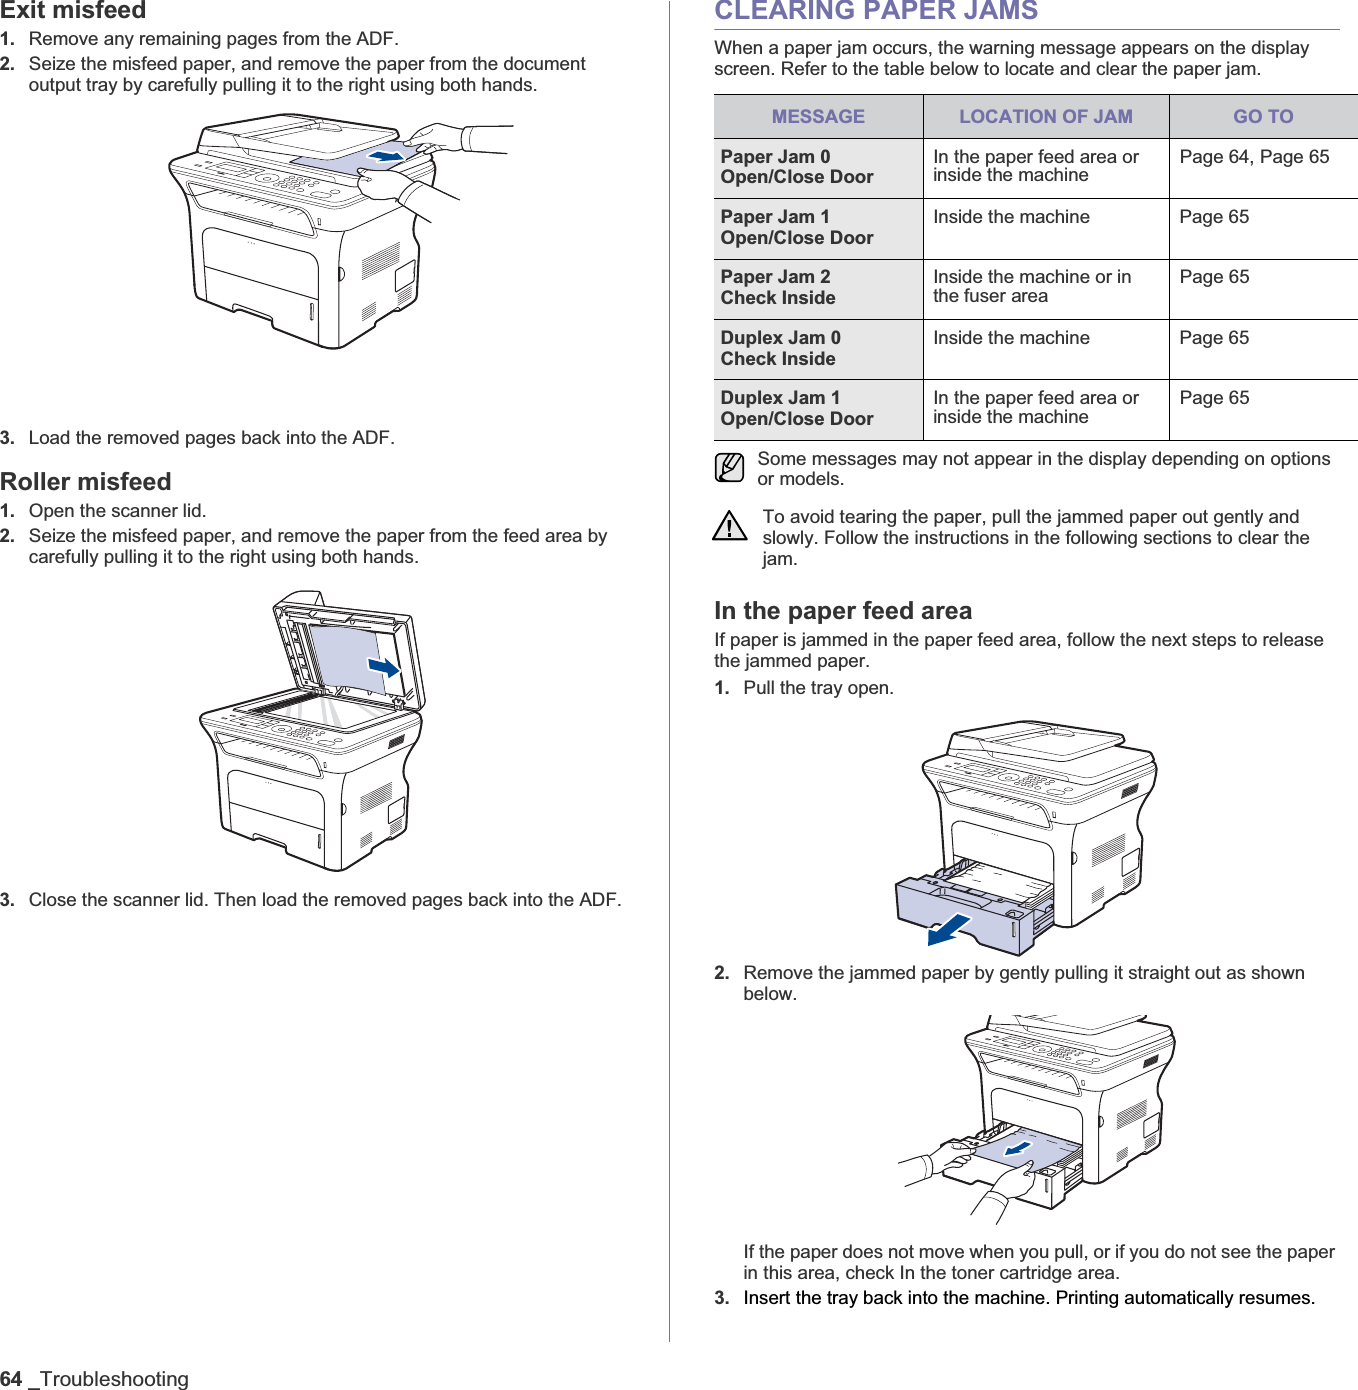

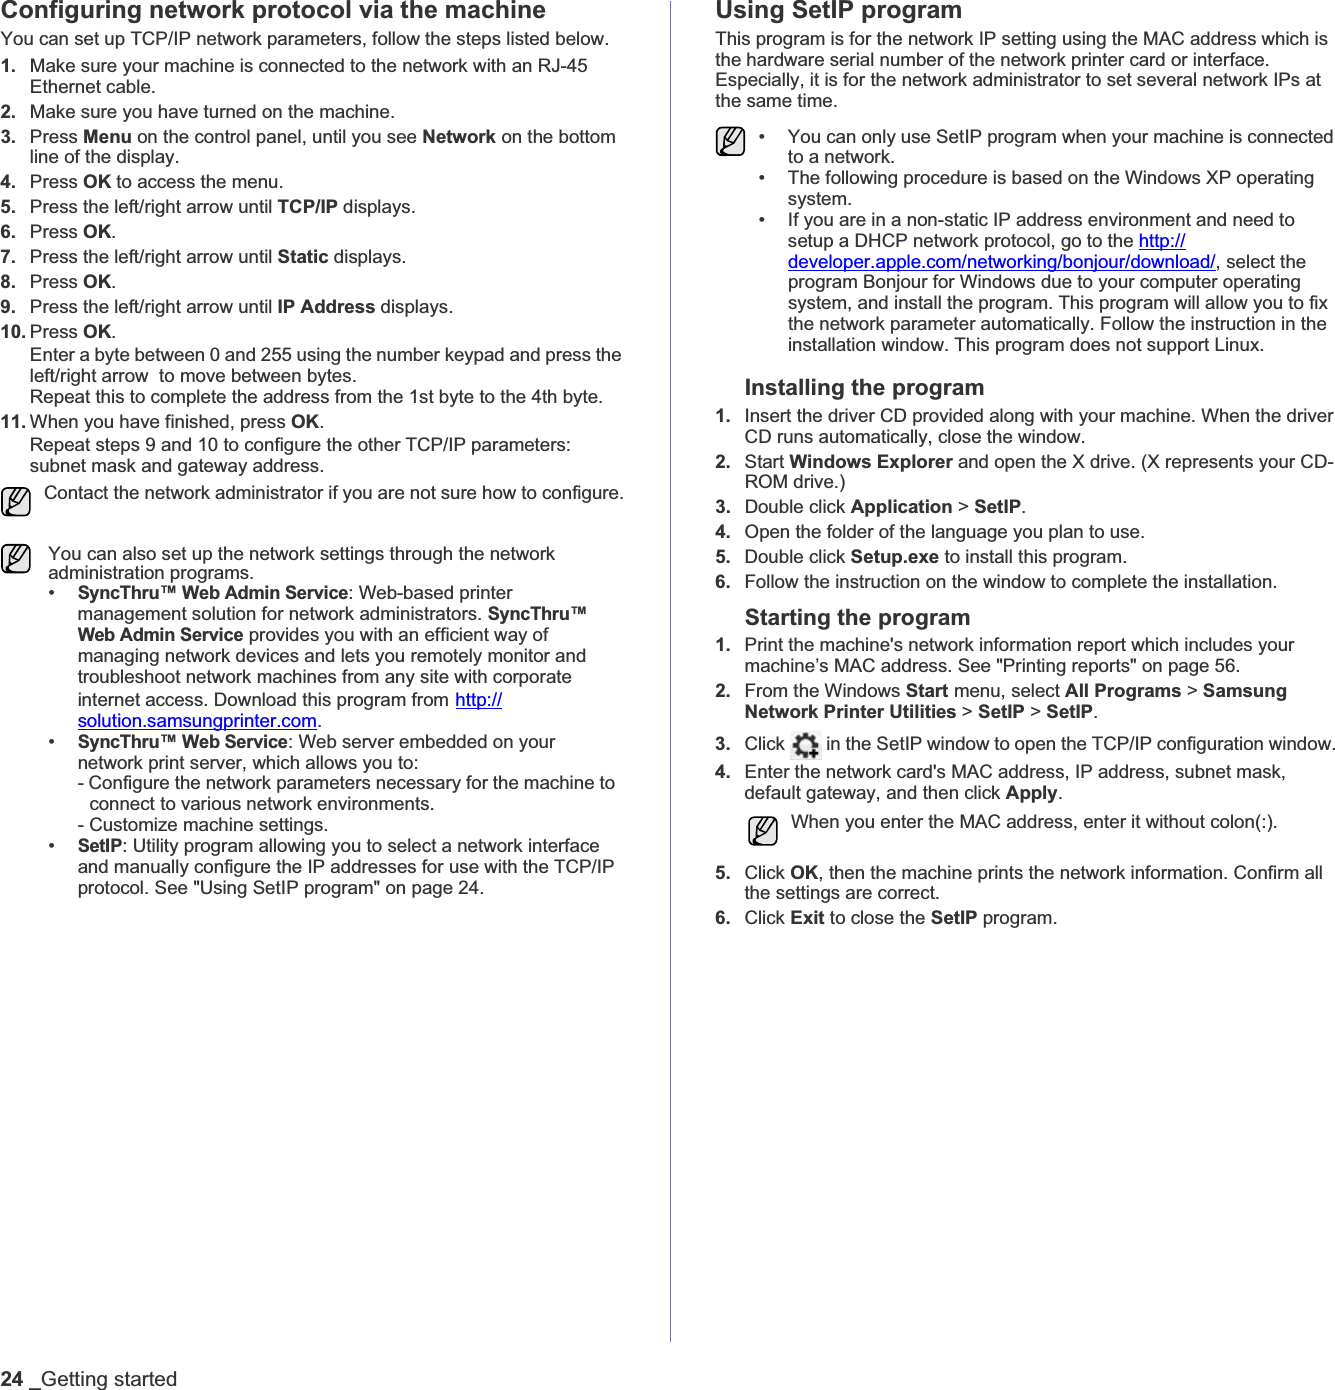
![Troubleshooting_67UNDERSTANDING DISPLAY MESSAGESMessages appear on the control panel display to indicate the machine’s status or errors. Refer to the tables below to understand the messages’ meaning and correct the problem if necessary. Messages and their meanings are listed in alphabetical order. • xxx indicates the media type.• yyy indicates the tray.• If the message is not in the table, cycle the power and try the printing job again. If the problem persists, call for service.• Some messages may not appear in the display depending on options or models. MESSAGE MEANING SUGGESTEDSOLUTIONS[COMM. Error] The machine has a communication problem.Ask the sender to try again.[Incompatible] The machine has received a fax from which is registered as a junk fax.The received fax data will be deleted.Reconfirm junk fax setup. See page 50[Line Error] Your machine cannot connect with the receiving fax machine or has lost contact because of a problem with the phone line.Try again. If the problem persists, wait an hour or so for the line to clear and try again.Or, turn the ECM mode on. See page 50.[No Answer] The receiving fax machine has not answered after several redial attempts.Try again. Make sure that the receiving machine is operational.[Stop Pressed] Stop/Clear has been pressed during an operation.Try again.[yyy]Paper EmptyThere is no paper in the tray.Load paper in the tray.[yyy] Paper MismatchThe paper size specified in the printer properties does not match the paper you are loading.Load the correct paper in the tray.Cancel? W Yes XYour machine’s memory has become full while trying to store an original into memory.To cancel the fax job, press the OK button to accept Yes.If you want to send those pages that have been successfully stored, press the OK button to accept No. You should send the remaining pages later, when memory is available.Connection Error Connection with the SMTP server failed.Check the server settings and the network cable.Data Read Fail Check USB Mem.Time expired while reading data.Try again.Data Write Fail Check USB Mem.Storing to the USB memory failed.Check the available USB memory space.Document Jam The loaded original has jammed in the ADF.Clear the jam. See page 63.Door Open The front cover is not securely latched.Close the cover until it locks into place.Duplex Jam 0Check InsidePaper has jammed during duplex printing. This is applicable only to machines with this feature. Clear the jam. See page 65.Duplex Jam 1Open/Close DoorPaper has jammed during duplex printing. This is applicable only to machines with this feature. Clear the jam. See page 65.Enter Again You entered an unavailable item.Enter the correct item again.File Format Not SupportedThe selected file format is not supported.Use the correct file format.Group NotAvailable You have tried to select a group location number where only a single location number can be used, such as when adding locations for a Multiple Send operation.Use a speed dial number or dial a number manually using the number keypad.Install TonerTThe toner cartridge is not installed.Install the toner cartridge.Invalid TonerTThe toner cartridge you have installed is not for your machine.Install the a Samsung-genuine toner cartridge designed for your machine.Line Busy The receiving fax machine did not answer or the line is already engaged.Try again after a few minutes.Mail ExceedsServer SupportThe mail size is larger than the supported size by SMTP server.Divide your mail or reduce the resolution.Main MotorLockedThere is a problem in the main motor.Open and then close the front cover.MESSAGE MEANING SUGGESTED SOLUTIONS](https://usermanual.wiki/Samsung-Electronics-Co/SCX4828FN/User-Guide-912059-Page-66.png)
![68 _TroubleshootingMemory Full The memory is full. Delete unnecessary fax jobs and retransmit after more memory becomes available. Alternatively, split the transmission into more than one operation.Not Assigned The speed button or speed dial number you tried to use has no number assigned to it.Enter the number manually using the number keypad or store the number or address.NonSAMSUNG TonerTThe toner cartridge is not a Samsung-genuine cartridge.Press OK to toggle the message to Stopor Continue.WStop XYou can select either Stopor Continue with the left/right arrow.If you select Stop by pressing OK on the control panel, the machine stops printing. If you select Continue, the machine keeps printing, but the quality cannot be guaranteed. If you do not select any, the machine will work as Stop is selected. Replace the corresponding toner cartridge with a Samsung-genuine cartridge. See page 60.One Page is Too LargeSingle page data exceeds the configured mail size.Reduce the resolution and try again.Operation NotAssigned You are in the Add Page/Cancel Joboperation, but there are no jobs stored.Check the display to see if there are any scheduled jobs.Out-Bin Full|Open/Close DoorThe output tray of the machine is full of paper.Remove paper. Open the front cover and than close it.Paper Jam 0Open/Close DoorPaper has jammed in the feeding area of the tray.Clear the jam. See page 64.Paper Jam 1Open/Close DoorPaper has jammed inside the machine.Clear the jam. See page 65.Paper Jam 2Check InsideSpecial print media has jammed in the paper exit area.Clear the jam. See page 65.Refilled TonerTThe toner cartridge you have installed is not genuine or refilled.The print quality may get poor if the refilled toner cartridge is installed, since its characteristics may significantly differ from the genuine. We recommend Samsung-genuine toner cartridge.MESSAGE MEANING SUGGESTEDSOLUTIONSReplace TonerTThis message appears between Toner Empty and Toner Low status.Replace the toner cartridge with a new one. See page 60.Replace [xxx] SoonThe life of the part expires soon.See page 61 and call for service.Retry Redial? The machine is waiting for a specified time interval to redial a previously busy station.You can press OK to immediately redial, or Stop/Clear to cancel the redial operation.Scanner locked The scanner module is lockedUnlock the scanner and press Stop/Clear.Send Error(AUTH)There is a problem in SMTP authentication.Configure the authentication setting.Send Error(DNS)There is a problem in DNS.Configure the DNS setting.Send Error(POP3)There is a problem in POP3.Configure the POP3 setting.Send Error(SMTP)There is a problem in SMTP.Change to the available server.Send Error(Wrong Config)There is a problem on the network interface card.Configure your network interface card correctly.Toner EmptyTThe toner cartridge has run out. The machine stops printing.Press OK to toggle the message to Stopor Continue.WStop XYou can select the option among Stop or Continuewith the left/right arrow. If you select Stop by pressing OK on the control panel, the machine stops printing. If you select Continue, the machine keeps printing, but the quality cannot be guaranteed. If you do not select any, the machine will work as Stop is selected.Replace the toner cartridge with a new one. See page 60. MESSAGE MEANING SUGGESTED SOLUTIONS](https://usermanual.wiki/Samsung-Electronics-Co/SCX4828FN/User-Guide-912059-Page-67.png)