Samsung Electronics Co SCX5635FN Multi Function Printer User Manual scx 5635 guide english
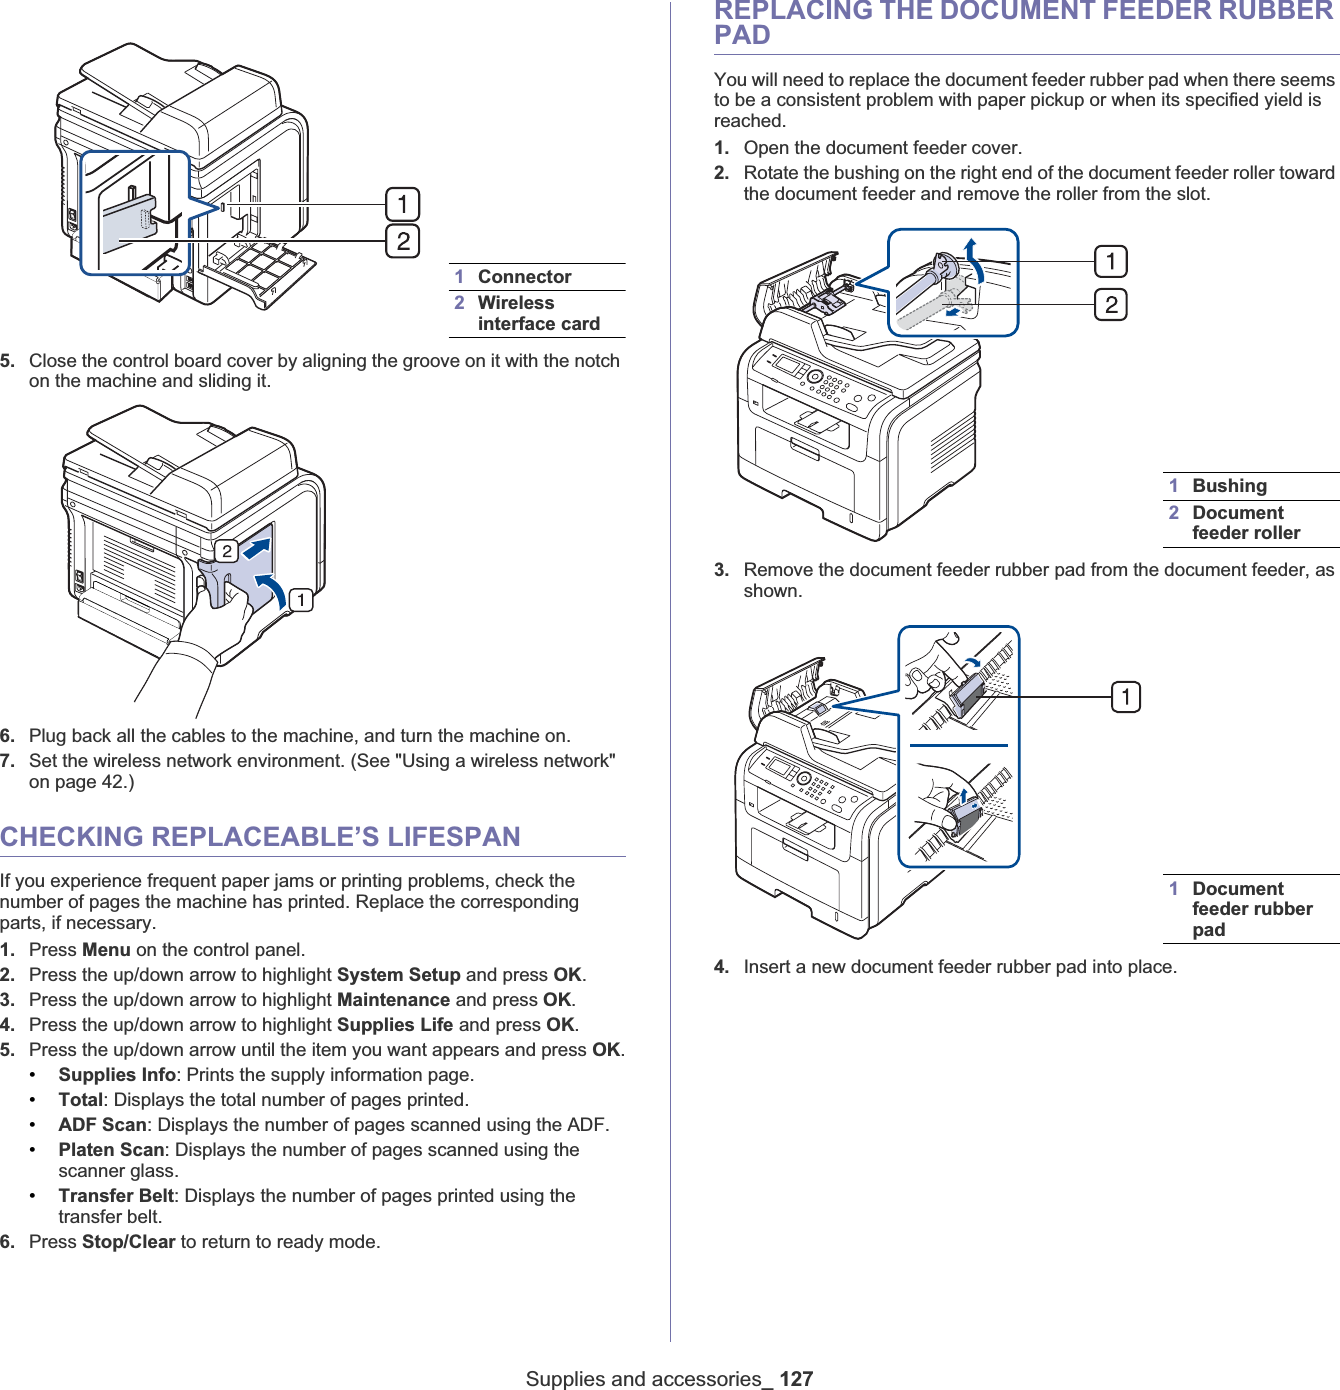
Samsung Electronics Co Ltd Multi Function Printer scx 5635 guide english
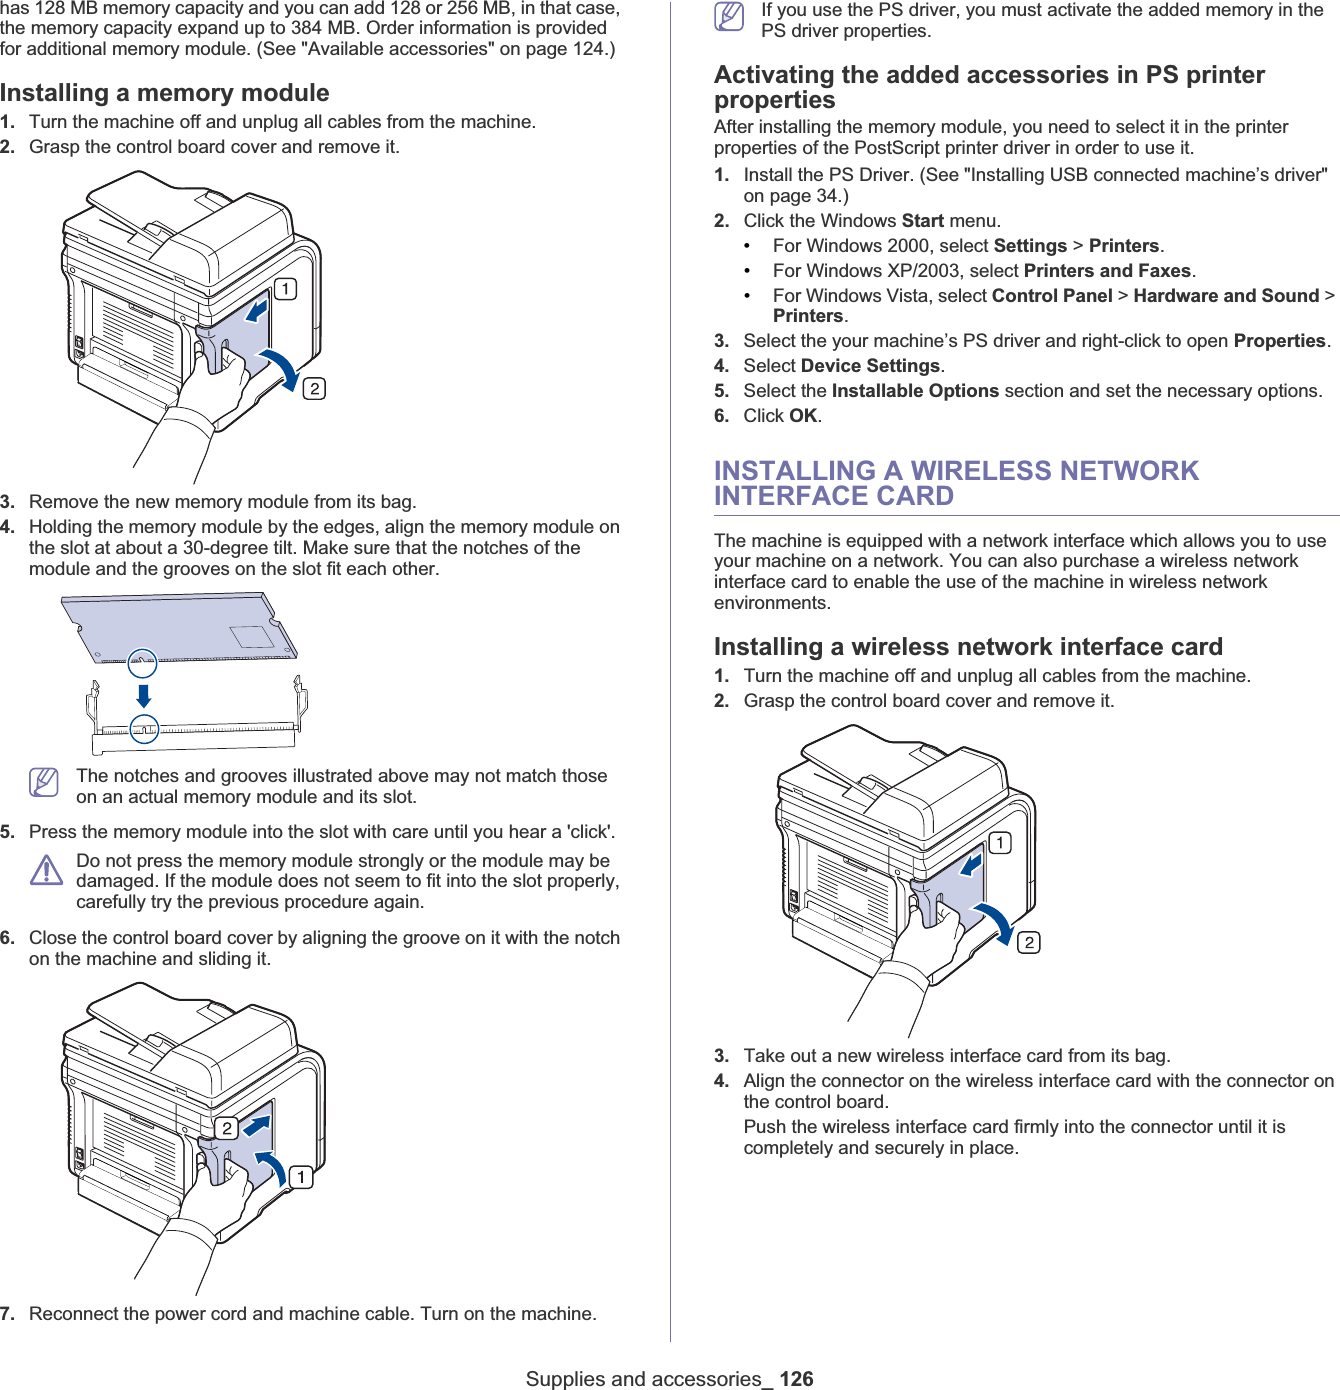
UserManual.wiki
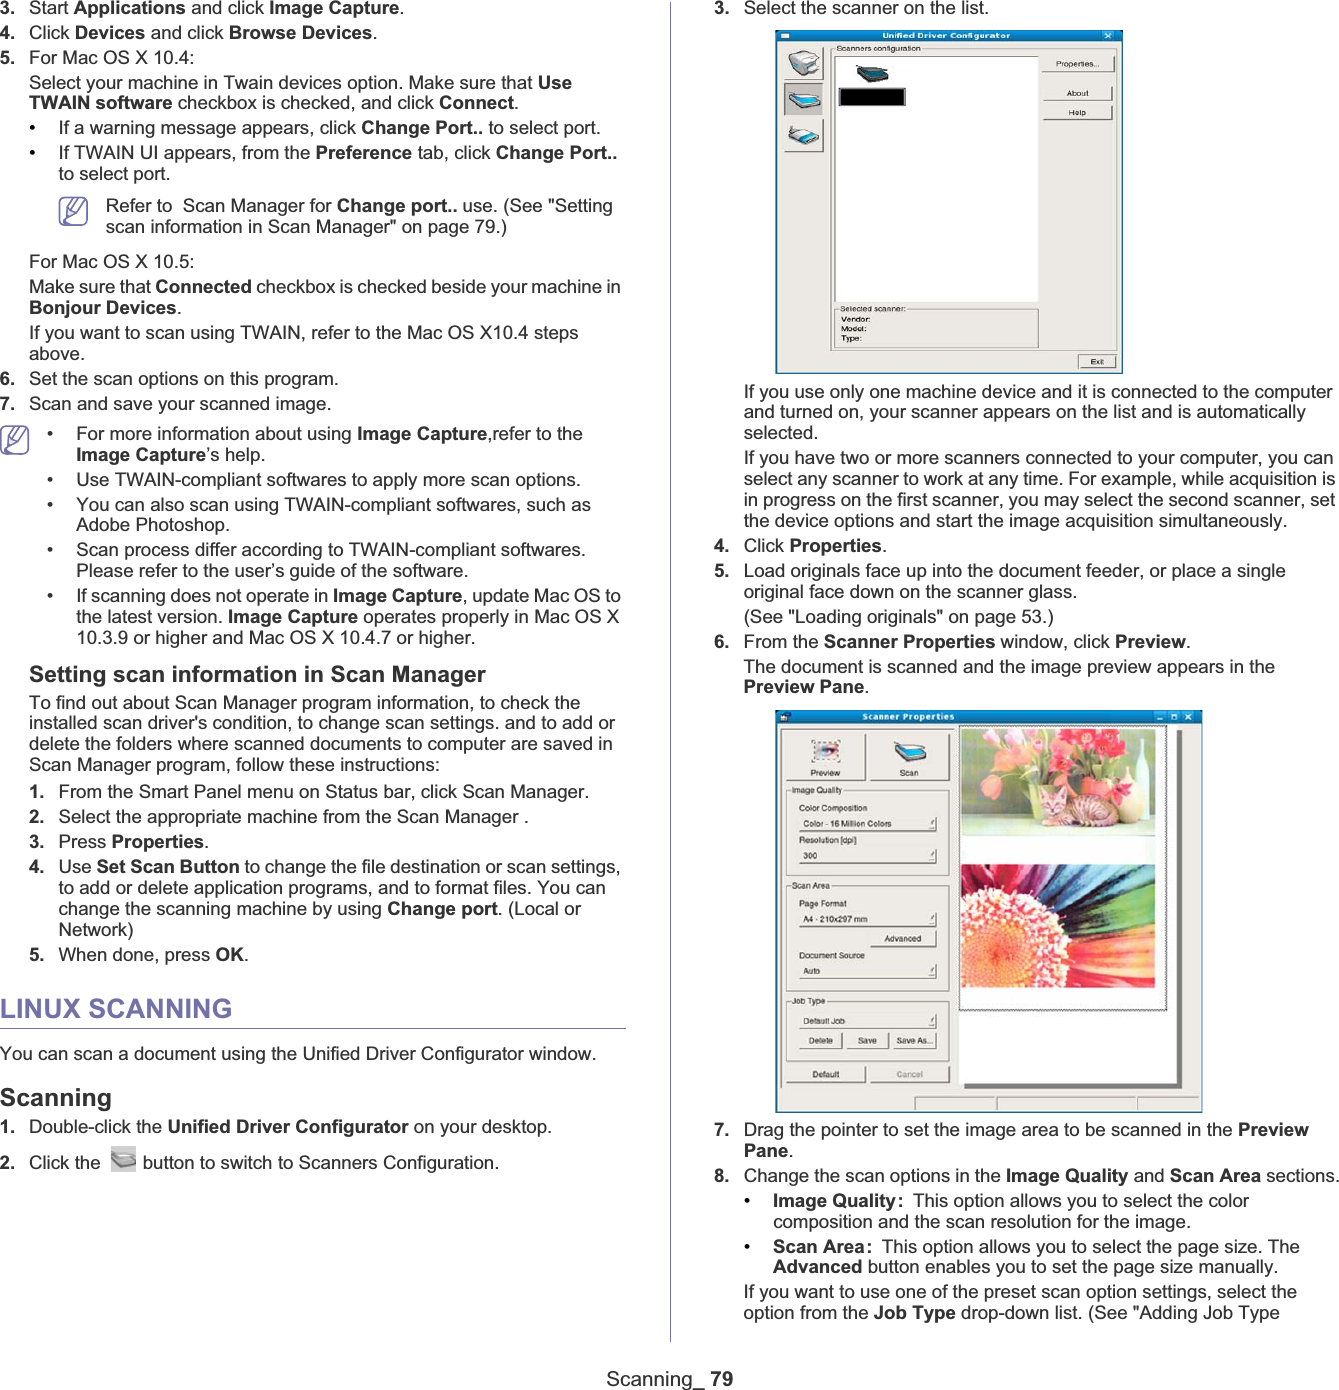
>
Samsung Electronics Co
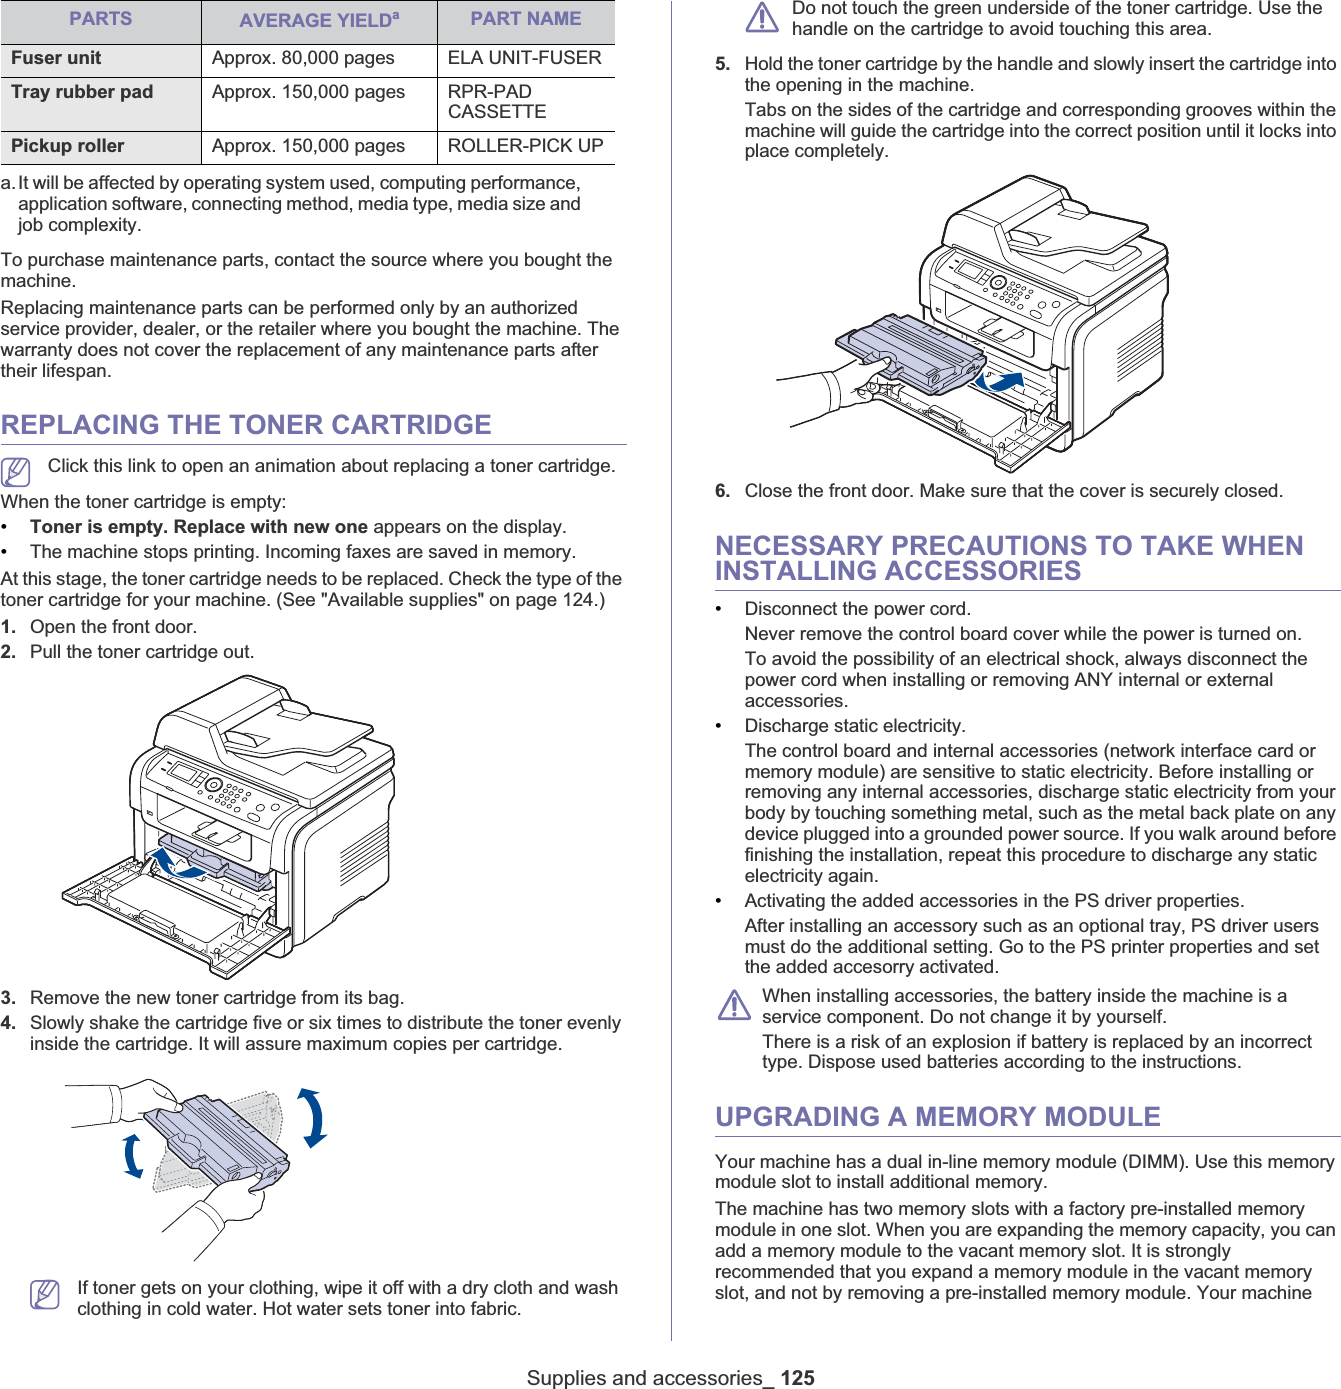
>
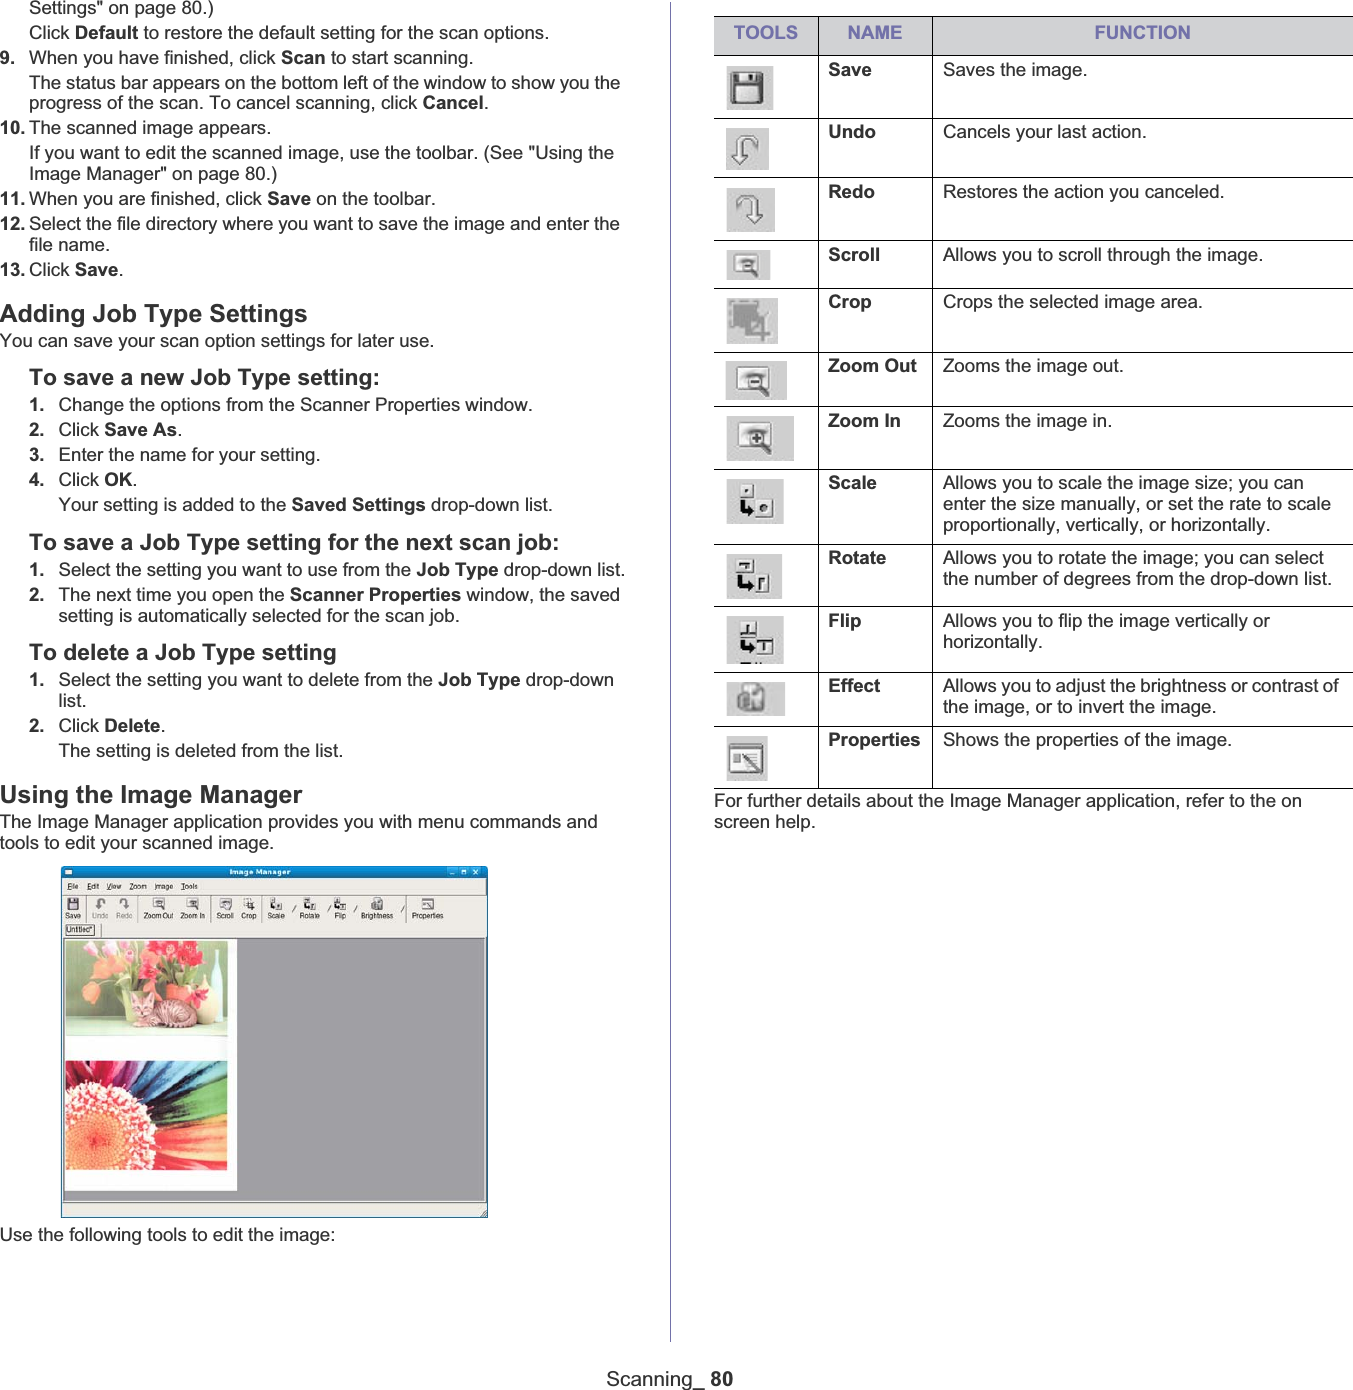
SCX5635FN User Manual
Users Manual
Navigation menu
Upload a User Manual
Namespaces
Wiki Guide
HTML
PDF
Info
Views
User Manual
Discussion / Help
Navigation


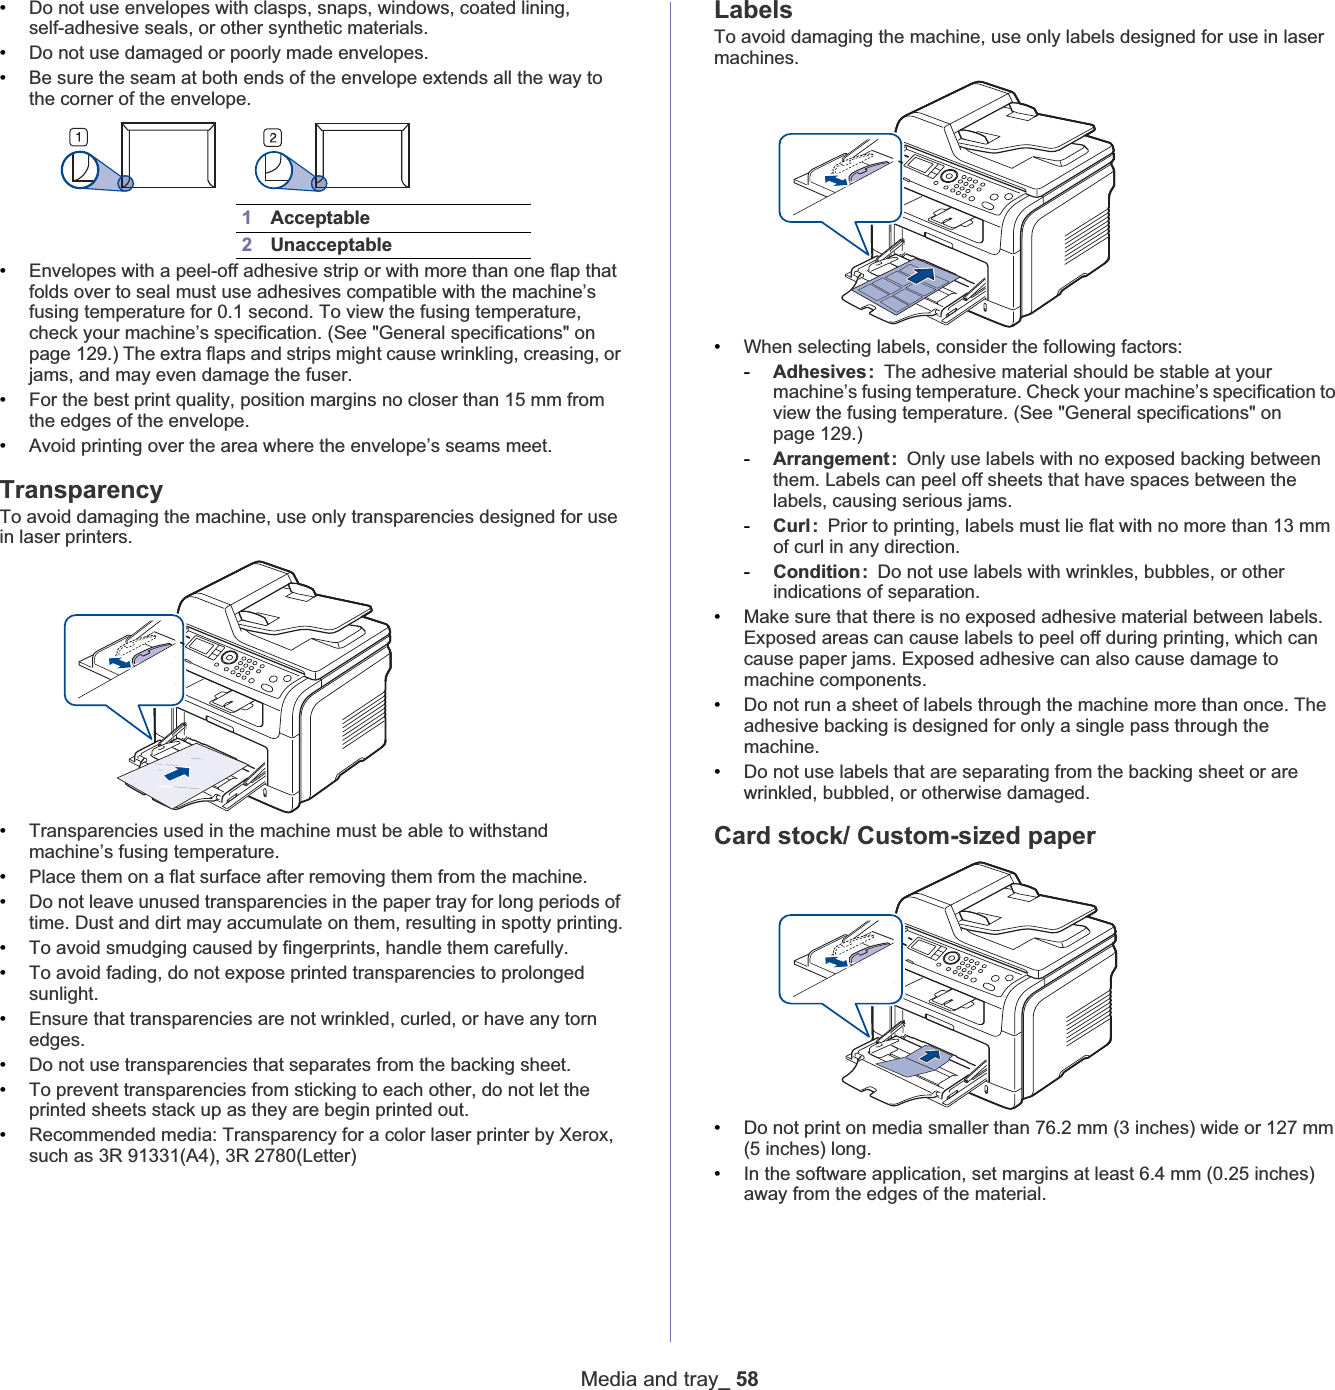
![Getting started_ 36The software CD will run automatically.If the software CD does not run automatically, click the icon at the bottom of the desktop. When the Terminal screen appears, type inGthefollowing:If the software CD is secondary master and the location to mount is /mnt/cdrom,[root@localhost root]#mount -t iso9660 /dev/hdc /mnt/cdrom[root@localhost root]#cd /mnt/cdrom/Linux[root@localhost Linux]#./install.shIf you still failed to run the software CD , type the followings in sequence:[root@localhost root]#umount /dev/hdc[root@localhost root]#mount -t iso9660 /dev/hdc /mnt/cdromThe installation program runs automatically if you have an autorun software package installed and configured.4. When the welcome screen appears, click Next.5. When the installation is complete, click Finish.The installation program has added the Unified Driver Configurator desktop icon and the Unified Driver group to the system menu for your convenience. If you have any difficulties, consult the on screen help that is available through your system menu or can otherwise be called from the driver package Windows applications, such as Unified Driver Configurator or Image Manager.Installing the driver in the text mode:• If you do not use the graphical interface or have been unable to install the driver, you have to use the driver in the text mode.• Follow the steps 1 to 3, then type [root@localhost Linux]# ./install.sh. Follow the instructions on the terminal screen. The installation is completed.• When you want to uninstall the driver, follow the installation instructions above, but type [root@localhost Linux]# ./uninstall.sh on the terminal screen.If the printer driver does not work properly, uninstall the driver and reinstall it. Follow the steps below steps to uninstall the driver for Linux.a) Make sure that the machine is connected to your computer and powered on.b) When the Administrator Login window appears, type in “root” in the Login field and enter the system password.You must log in as a super user (root) to uninstall the printer driver. If you are not a super user, ask your system administrator.c) Insert the supplied software CD into your CD-ROM drive.The software CD will run automatically.If the software CD does not run automatically, click the icon at the bottom of the desktop. When the Terminal screen appears, type in:If the software CD is secondary master and the location to mount is /mnt/cdrom,[root@localhost root]#mount -t iso9660 /dev/hdc /mnt/cdrom[root@localhost root]#cd /mnt/cdrom/Linux[root@localhost Linux]#./uninstall.shThe installation program runs automatically if you have an autorun software package installed and configured.d) Click Uninstall.e) Click Next.f) Click Finish.SHARING YOUR MACHINE LOCALLYFollow the steps below to set up the computers to share your machine locally.If the Host computer is directly connected to the machine with USB cable and is also connected to the local network environment, the client computer connected to the local network can use the shared machine through the host computer to print. WindowsSetting up a host computer1. Install your printer driver. (See "Installing USB connected machine’s driver" on page 34.)2. Click the Windows Start menu. 3. For Windows 2000, select Settings >Printers.•For Windows XP/2003 select Printer and Faxes.•For Windows Vista select Control Panel > Hardware and Sound >Printers.4. Double-click your printer driver icon. 5. From the Printer menu, select Sharing....6. Check the Share this printer.7. Fill in the Shared Name field. Click OK.Setting up a client computer1. Install your printer driver. (See "Installing USB connected machine’s driver" on page 34.)2. Click the Windows Start menu. 3. Select All programs > Accessories >Window Explorer.1Host computer A computer which is directly connected to the machine by USB cable.2Client computers Computers which use the machine shared through the host computer.](https://usermanual.wiki/Samsung-Electronics-Co/SCX5635FN/User-Guide-1024544-Page-36.png)
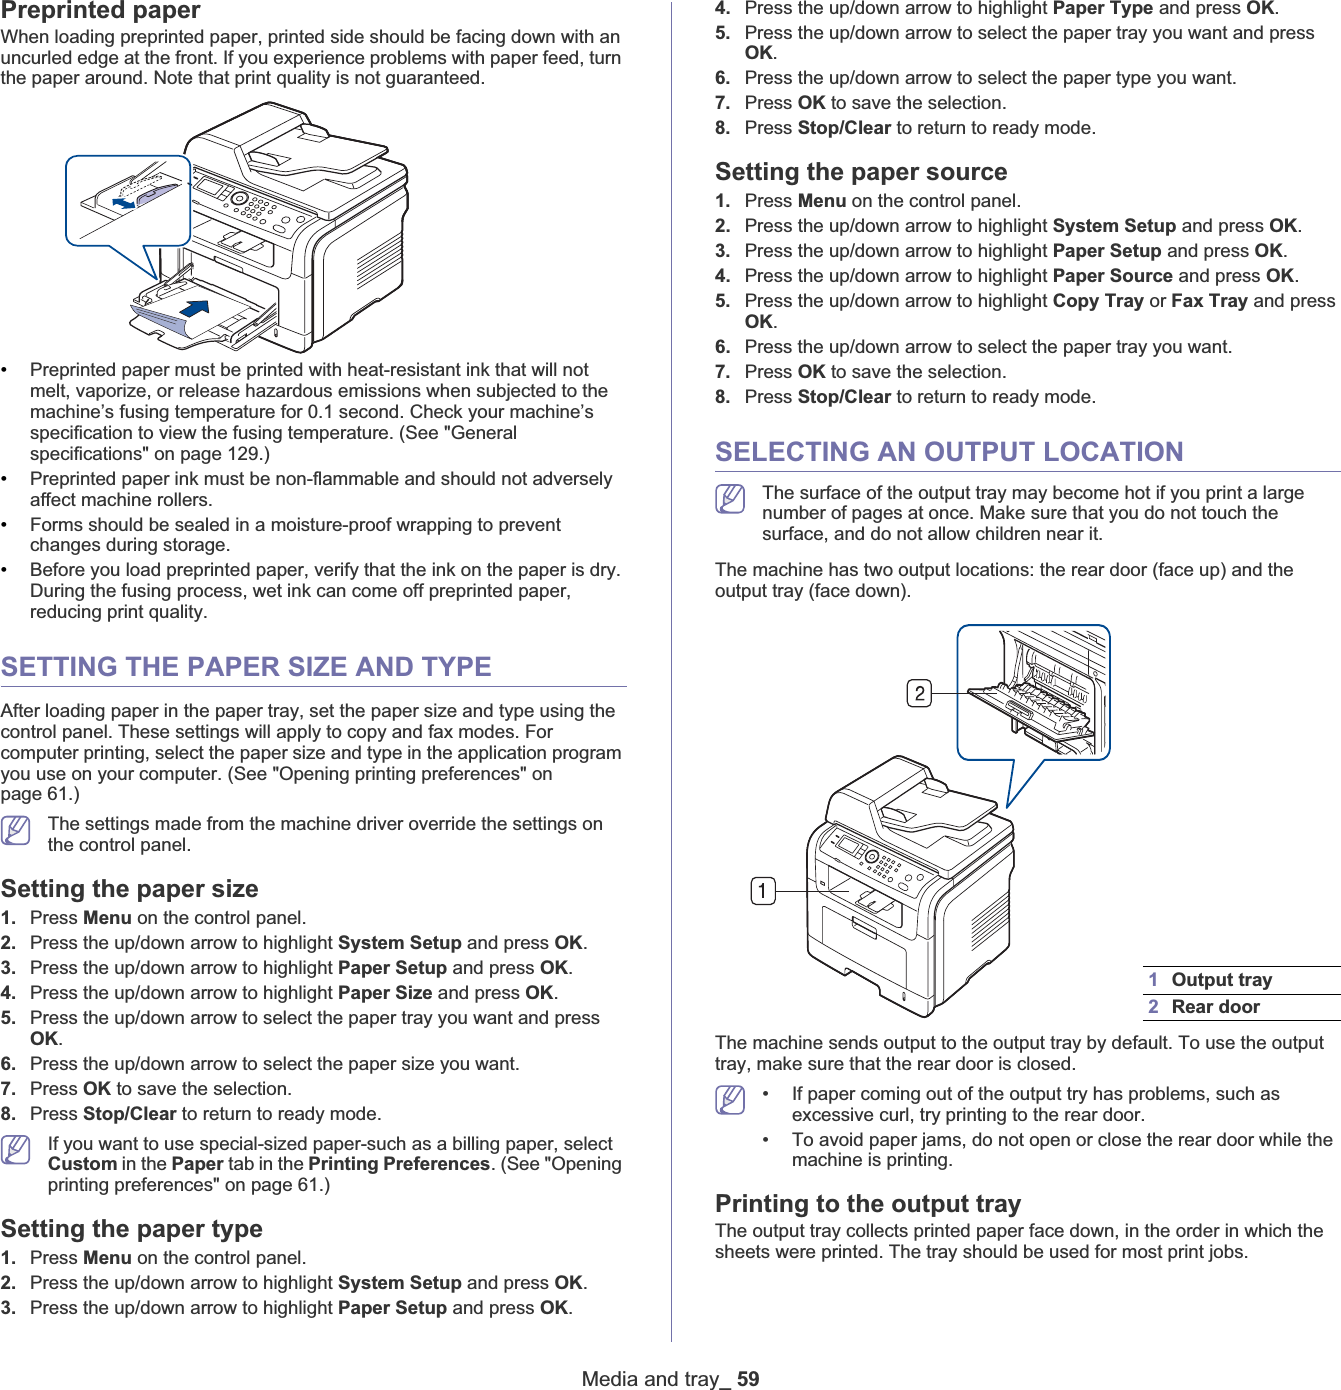
![Network setup_ 415. The list of machines available on the network appears. Select the machine you want to install from the list and then click Next.• If you do not see your machine on the list, click Update to refresh the list, or select Add TCP/IP Port to add your machine to the network. To add the machine to the network, enter the port name and the IP address for the machine. To verify your machine’s IP address or the MAC address, print a Network Configuration page.• To find a shared machine (UNC Path), select Shared Printer [UNC] and enter the shared name manually or find a shared printer by clicking the Browse button.• If you cannot find your machine in network,turn off the firewall and click Update. For Windows operating system, click Start > Control Panel > Windows Firewall, and inactivate this option. For other operating system, refer to its on-line guide.6. After the installation is finished, a window asking you to print a test page appears. If you choose to print a test page, select the checkbox and click Next. Otherwise, just click Next and skip. 7. If the test page prints out correctly, click Yes.If not, click No to reprint it.8. To register as a user of the machine in order to receive information from Samsung, select the checkbox and click Finish. You are now registered to the Samsung web site.9. Otherwise, just click Finish.If the printer driver does not work properly, uninstall the driver and reinstall it. For windows follow the steps below to uninstall the driver.a) Make sure that the machine is connected to your computer and powered on.b) From the Start menu, select Programs or All Programs > your printer driver name > Maintenance.c) Select Remove and click Next.You will see a component list so that you can remove any item individually.d) Select the components you want to remove and then click Next.e) When your computer asks you to confirm your selection, click Yes.The selected driver and all of its components are removed from your computer.f) After the software is removed, click Finish.Macintosh1. Make sure that the machine is connected to your network and powered on. Also, your machine’s IP address should have been set. 2. Insert the supplied software CD into your CD-ROM drive.3. Double-click the CD-ROM icon that appears on your Macintosh desktop.4. Double-click the MAC_Installer folder.5. Double-click the Installer icon.6. Enter the password and click OK.7. The Samsung Installer window opens. Click Continue.8. Select Easy Install and click Install.Easy Install is recommended for most users. All components necessary for machine operations will be installed. If you select Custom Install, you can choose individual components to install.9. When the message which warns that all applications will close on your computer appears, click Continue.10. Select Typical installation for a network print and click OK.The certification window appears, click Trust. See "IP setting using SetIP Program (Macintosh)" on page 39.11. After the installation is finished, click Quit.If you have installed scan driver, click Restart.12. Open the Applications folder > Utilities > Print Setup Utility.•For Mac OS X 10.5, open the Applications folder > System Preferences and click Print & Fax.13. Click Add on the Printer List.•For Mac OS X 10.5, press the “+” icon; a display window will pop up.14. For Mac OS X 10.3, select the IP Printing tab.•For Mac OS X 10.4, click IP Printer.•For Mac OS X 10.5, click IP.15. Select Socket/HP Jet Direct in Printer Type.When printing a document containing many pages, printing performance may be enhanced by choosing Socket for Printer Typeoption.16. Enter the machine’s IP address in the Printer Address field.17. Enter the queue name in the Queue Name field. If you cannot determine the queue name for your machine server, try using the default queue first.18. For Mac OS X 10.3, if Auto Select does not work properly, select Samsung in Printer Model and your machine name in ModelName.•For Mac OS X 10.4, if Auto Select does not work properly, select Samsung in Print Using and your machine name in Model.•For Mac OS X 10.5, if Auto Select does not work properly, choose Select a driver to use... and your machine name in Print Using.Your machine’s IP address appears on the Printer List, and is set as the default machine.19. Click Add.If the printer driver does not work properly, uninstall the driver and reinstall it. Follow steps below to uninstall the driver for Macintosh.](https://usermanual.wiki/Samsung-Electronics-Co/SCX5635FN/User-Guide-1024544-Page-41.png)
![Network setup_ 474. The list of machines available on the network appears. Select the machine you want to install from the list and then click Next.• If you do not see your machine on the list, click Update to refresh the list, or select Add TCP/IP Port to add your machine to the network. To add the machine to the network, enter the port name and the IP address for the machine. To verify your machine’s IP address or the MAC address, print a Network Configuration page.• To find a shared machine (UNC Path), select Shared Printer [UNC] and enter the shared name manually or find a shared printer by clicking the Browse button.• If you cannot find your machine in network,turn off the firewall and clickUpdate. For Windows operating system, click Start > Control Panel eWindows Firewall, and inactivate this option. For other operating system, refer to its on-line guide.5. After the installation is finished, a window asking you to print a test page appears. If you choose to print a test page, select the checkbox and click Next. Otherwise, just click Next and skip. 6. If the test page prints out correctly, click Yes.If not, click No to reprint it.7. To register as a user of the machine in order to receive information from Samsung, select the checkbox and click Finish. You are now registered to the Samsung web site.8. Otherwise, just click Finish.If the printer driver does not work properly, uninstall the driver and reinstall it. For windows follow the steps below to uninstall the driver.a) Make sure that the machine is connected to your computer and powered on.b) From the Start menu, select Programs or All Programs > your printer driver name > Maintenance.c) Select Remove and click Next.You will see a component list so that you can remove any item individually.d) Select the components you want to remove and then click Next.e) When your computer asks you to confirm your selection, click Yes.The selected driver and all of its components are removed from your computer.f) After the software is removed, click Finish.Macintosh1. Make sure that the machine is connected to your network and powered on. Also, your machine’s IP address should have been set. 2. Insert the supplied software CD into your CD-ROM drive.3. Double-click the CD-ROM icon that appears on your Macintosh desktop.4. Double-click the MAC_Installer folder.5. Double-click the Installer icon.6. Enter the password and click OK.7. The Samsung Installer window opens. Click Continue.8. Select Easy Install and click Install.Easy Install is recommended for most users. All components necessary for machine operations will be installed. If you select Custom Install, you can choose individual components to install.9. When the message which warns that all applications will close on your computer appears, click Continue.10. Select Typical installation for a network print and click OK.The certification window appears, click Trust. See "IP setting using SetIP Program (Macintosh)" on page 43.11. After the installation is finished, click Quit.If you have installed scan driver, click Restart.12. Open the Applications folder > Utilities > Print Setup Utility.•For Mac OS X 10.5, open the Applications folder > System Preferences and click Print & Fax.13. Click Add on the Printer List.•For Mac OS X 10.5, press the “+” icon; a display window will pop up. 14. For Mac OS X 10.3, select the IP Printing tab.•For Mac OS X 10.4, click IP Printer.•For Mac OS X 10.5, click IP.15. Select Socket/HP Jet Direct in Printer Type.When printing a document containing many pages, printing performance may be enhanced by choosing Socket for Printer Type option.16. Enter the machine’s IP address in the Printer Address field.17. Enter the queue name in the Queue Name field. If you cannot determine the queue name for your machine server, try using the default queue first.18. For Mac OS X 10.3, if Auto Select does not work properly, select Samsung in Printer Model and your machine name in Model Name.•For Mac OS X 10.4, if Auto Select does not work properly, select Samsung in Print Using and your machine name in Model.•For Mac OS X 10.5, if Auto Select does not work properly, choose Select a driver to use... and your machine name in Print Using.Your machine’s IP address appears on the Printer List, and is set as the default machine.19. Click Add.If the printer driver does not work properly, uninstall the driver and reinstall it. Follow steps below to uninstall the driver for Macintosh.a) Make sure that the machine is connected to your computer and powered on.b) Insert the supplied software CD into your CD-ROM drive.c) Double-click CD-ROM icon that appears on your Macintosh desktop.d) Double-click the MAC_Installer folder.](https://usermanual.wiki/Samsung-Electronics-Co/SCX5635FN/User-Guide-1024544-Page-47.png)

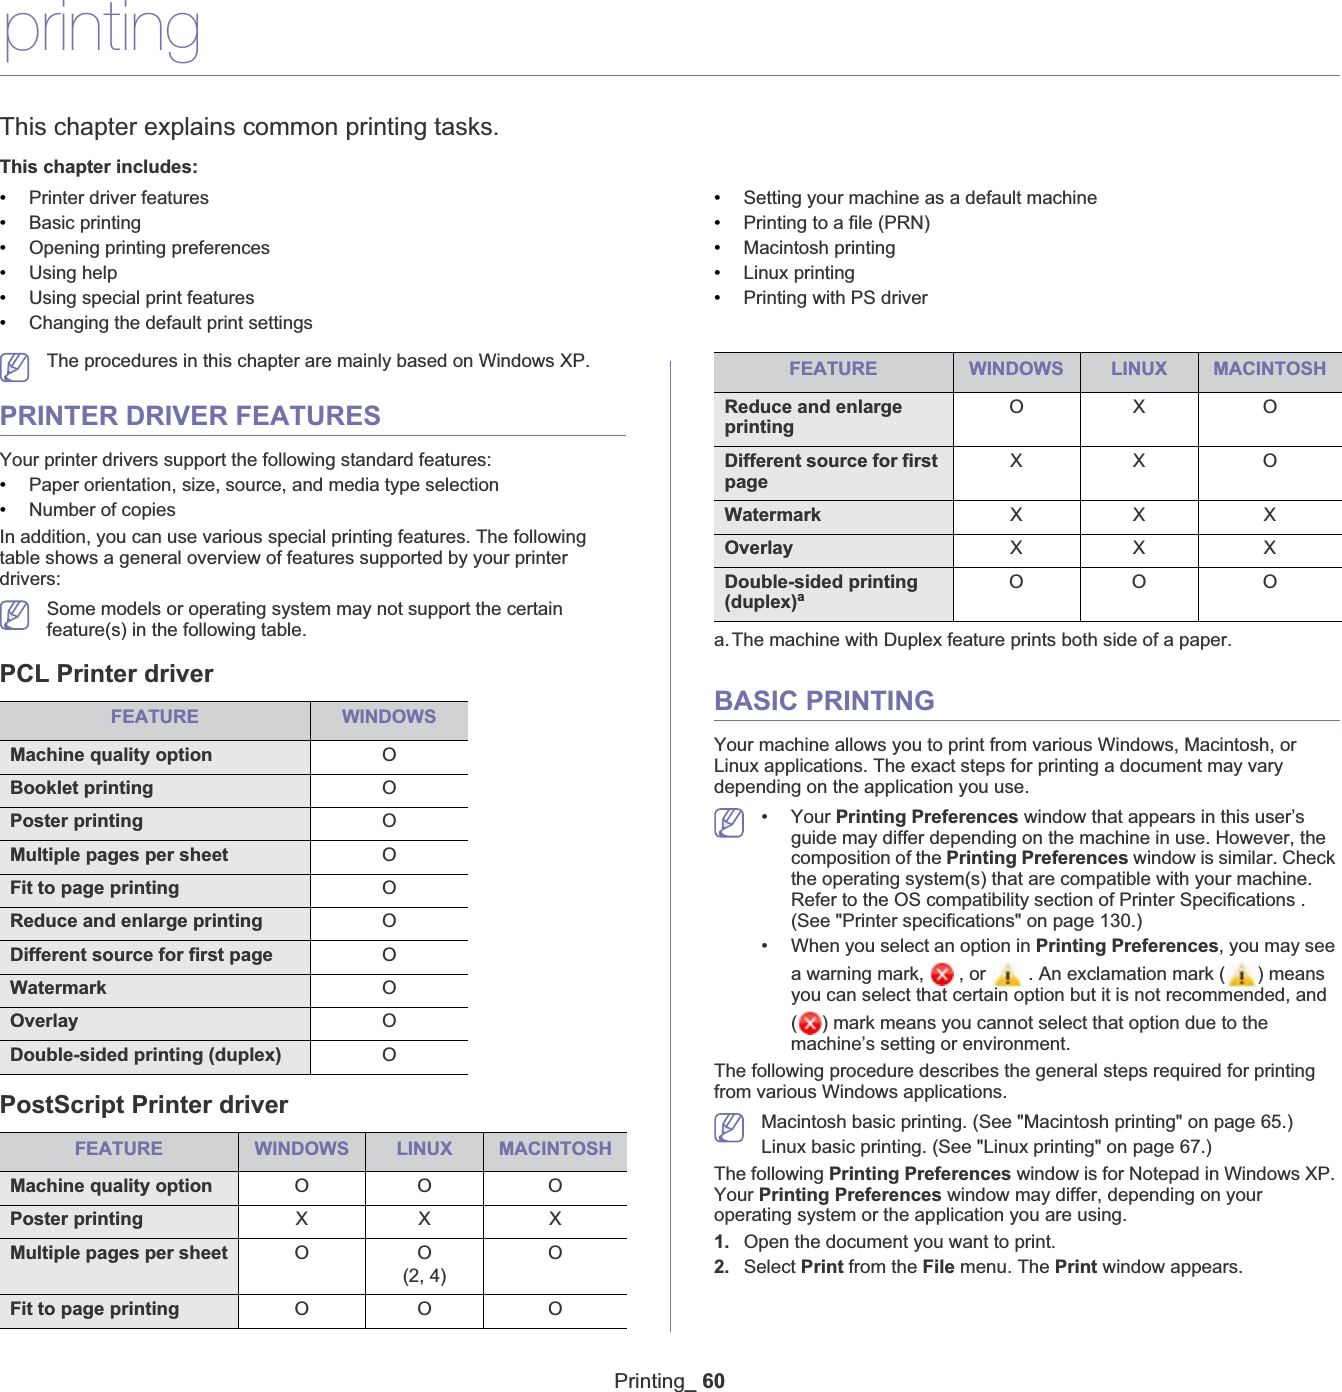
![Scanning_ 7612. Enter the Login Name and Login Password.13. Enter the Scan File Folder for saving the scanned image.14. Click Apply.Setting up an SMB serverTo use an SMB server, you need to set up parameters for access to SMB servers using SyncThru™ Web Service.1. Turn your networked computer on and open the web browser. 2. Enter your machine's IP address as the URL in a browser.3. Click Go to access the SyncThru™ Web Service.4. Click Machine Settings > SMB Setup > Server List.5. Click Add.6. Select the Index number, from 1 to 20.7. Enter a name in Alias for the Setup. This name will be displayed on your machine.8. Select IP Address or Host Name.9. Enter the server address in dotted decimal notation or a host name.10. Enter the server port number, from 1 to 65535.The default port number is 139.11. Enter the Share name of the server.12. Check the box next to Anonymous if you want to permit unauthorized persons to access the SMB server. This box is unchecked by default.13. Enter the User Name and User Password.14. Enter the User Domain.15. Enter the Scan File Folder for storing the scanned image.16. Click Apply.Scanning and sending to SMB/FTP server1. Make sure that your machine is connected to a network.2. Load originals face up into the document feeder, or place a single original face down on the scanner glass..3. Press Scan/Email on the control panel.4. Press the up/down arrow to highlight Scan To SMB or Scan To FTP,and press OK.5. Press the up/down arrow until the server you want highlights and press OK.6. Press the up/down arrow until the scan format you want highlights and press OK.The machine begins scanning and then sends the scanned image to the specified server.SETTING AUTHENTICATION FOR AUTHORIZED USERIf you have connected your machine to a network and set up the network parameters correctly, you can scan and send images over the network.To send a scanned image through email or via network server safely, you must register account information of authorized users to your local machine using SyncThru™ Web Service.•If user authentication has been activated, only authorized local users can send scanned data to the network (email, FTP, SMB).•For network scanning using the authentication feature, you must register the network or local authentication configuration using the SyncThru™ Web Service.•User authentication has 2 options: No Authentication (Default) and Require Local Authentication.Registering local authorized users1. Turn your networked computer on and open the web browser. 2. Enter your machine's IP address as the URL in a browser.3. Click Go to access the SyncThru™ Web Service.4. Click Machine SettingsGeGUser Authentication.5. Select Require Local Authentication in the Setup section.If you have not set Default[From:] Address in SMTP Client Setup, the notifying pop-up window appears. Click OK to browse the Web page where you can set the default email address.6. Click Apply.7. Click OK in the modifying confirmation pop-up window.8. Select Local Authentication in the left pane.9. Click Add.10. Select an index number corresponding to the location for storing the entry, from 1 to 50.11. Enter User Name,Auth ID,Password,E-mail Address and Phonenumber.You need to enter the registered user ID and password in the machine when you start scanning to email from the control panel.12. Click Apply.USING SAMSUNG SCAN MANAGERIf you have installed the printer driver, Samsung Scan Manager program has installed too. Start Samsung Scan Manager program to find out about this program information and the installed scan driver's condition. Through this program, you can change scan settings and add or delete the folders where scanned documents are saved in your computer. The Samsung Scan Manager program can only be used in the Window and Macintosh system. If you use the Macintosh, See "Setting scan information in Scan Manager" on page 79.1. From the Start menu, click Control Panel > Samsung Scan Manager.You can open Samsung Scan Manager by right clicking the Smart Panel icon in the Windows task bar and seleting Scan Manager.2. Select the appropriate machine from the Samsung Scan ManagerGwindow.3. Press Properties.4. The Set Scan Button tab allows you to change the saving destination and scan settings, add or delete application program, and format files.You can change the scanning machine by using the Change Port tab. (Local or Network)5. When setting is done, press OK.](https://usermanual.wiki/Samsung-Electronics-Co/SCX5635FN/User-Guide-1024544-Page-76.png)


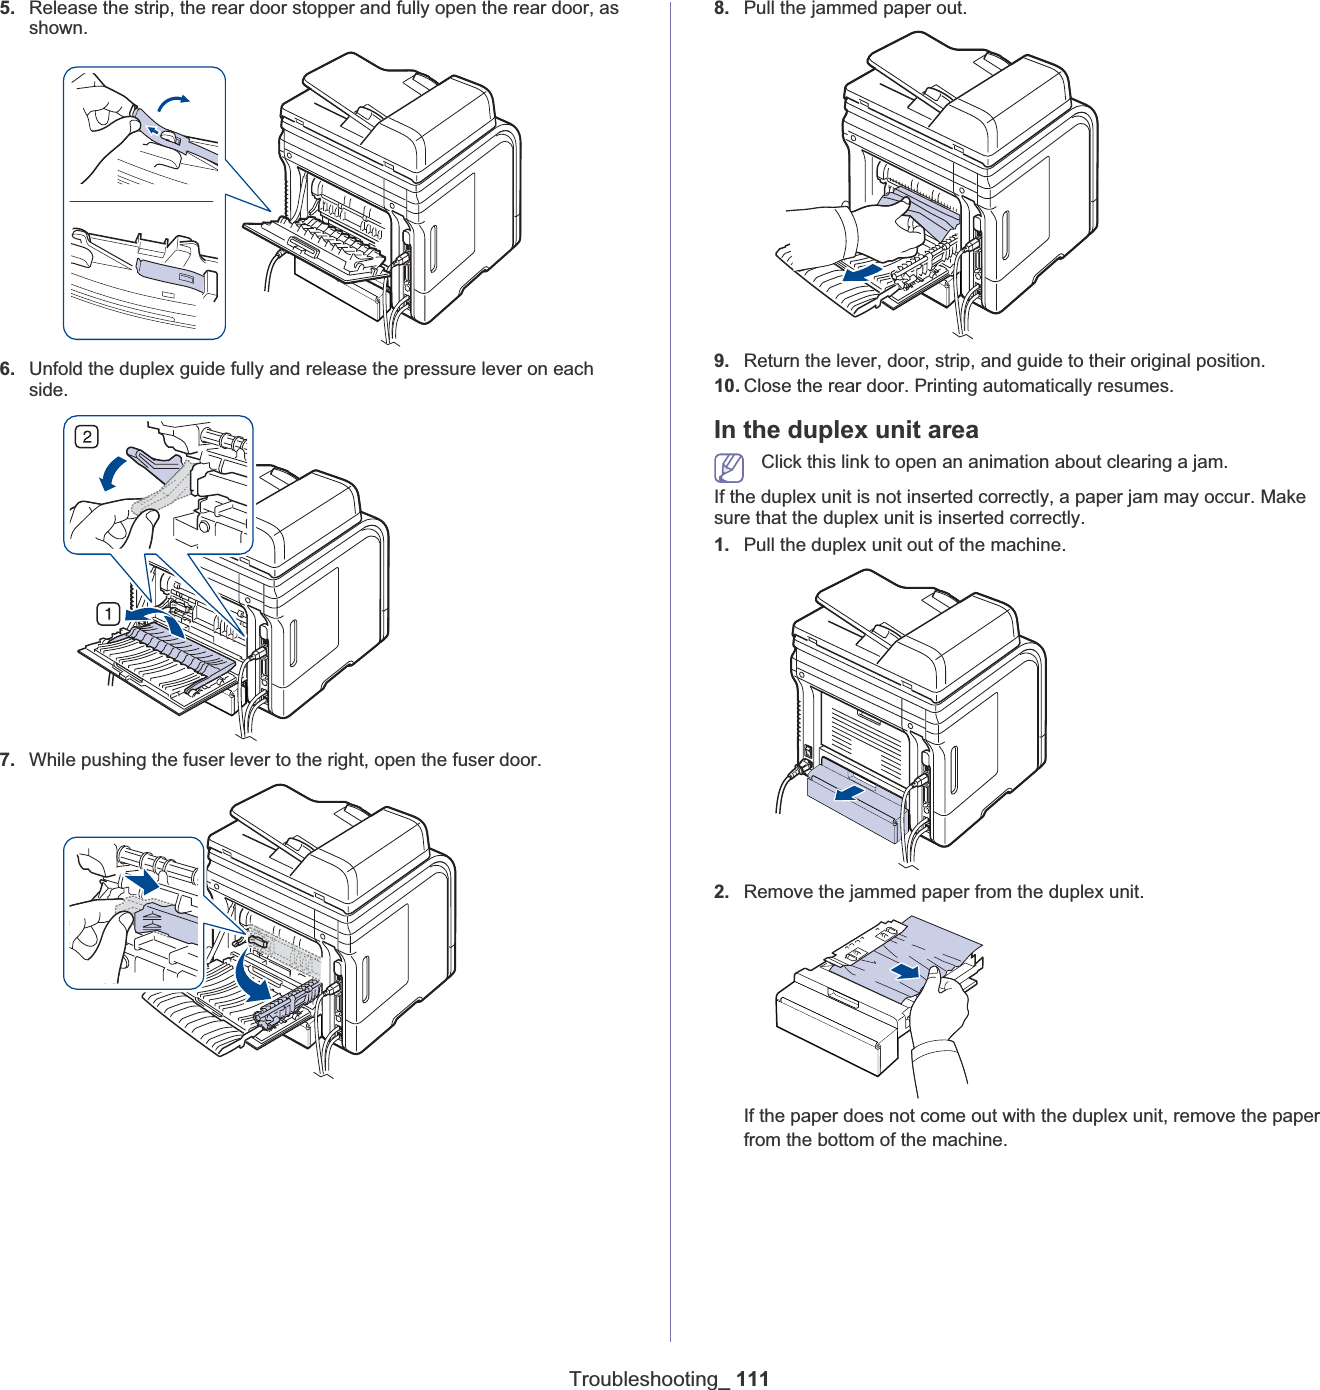
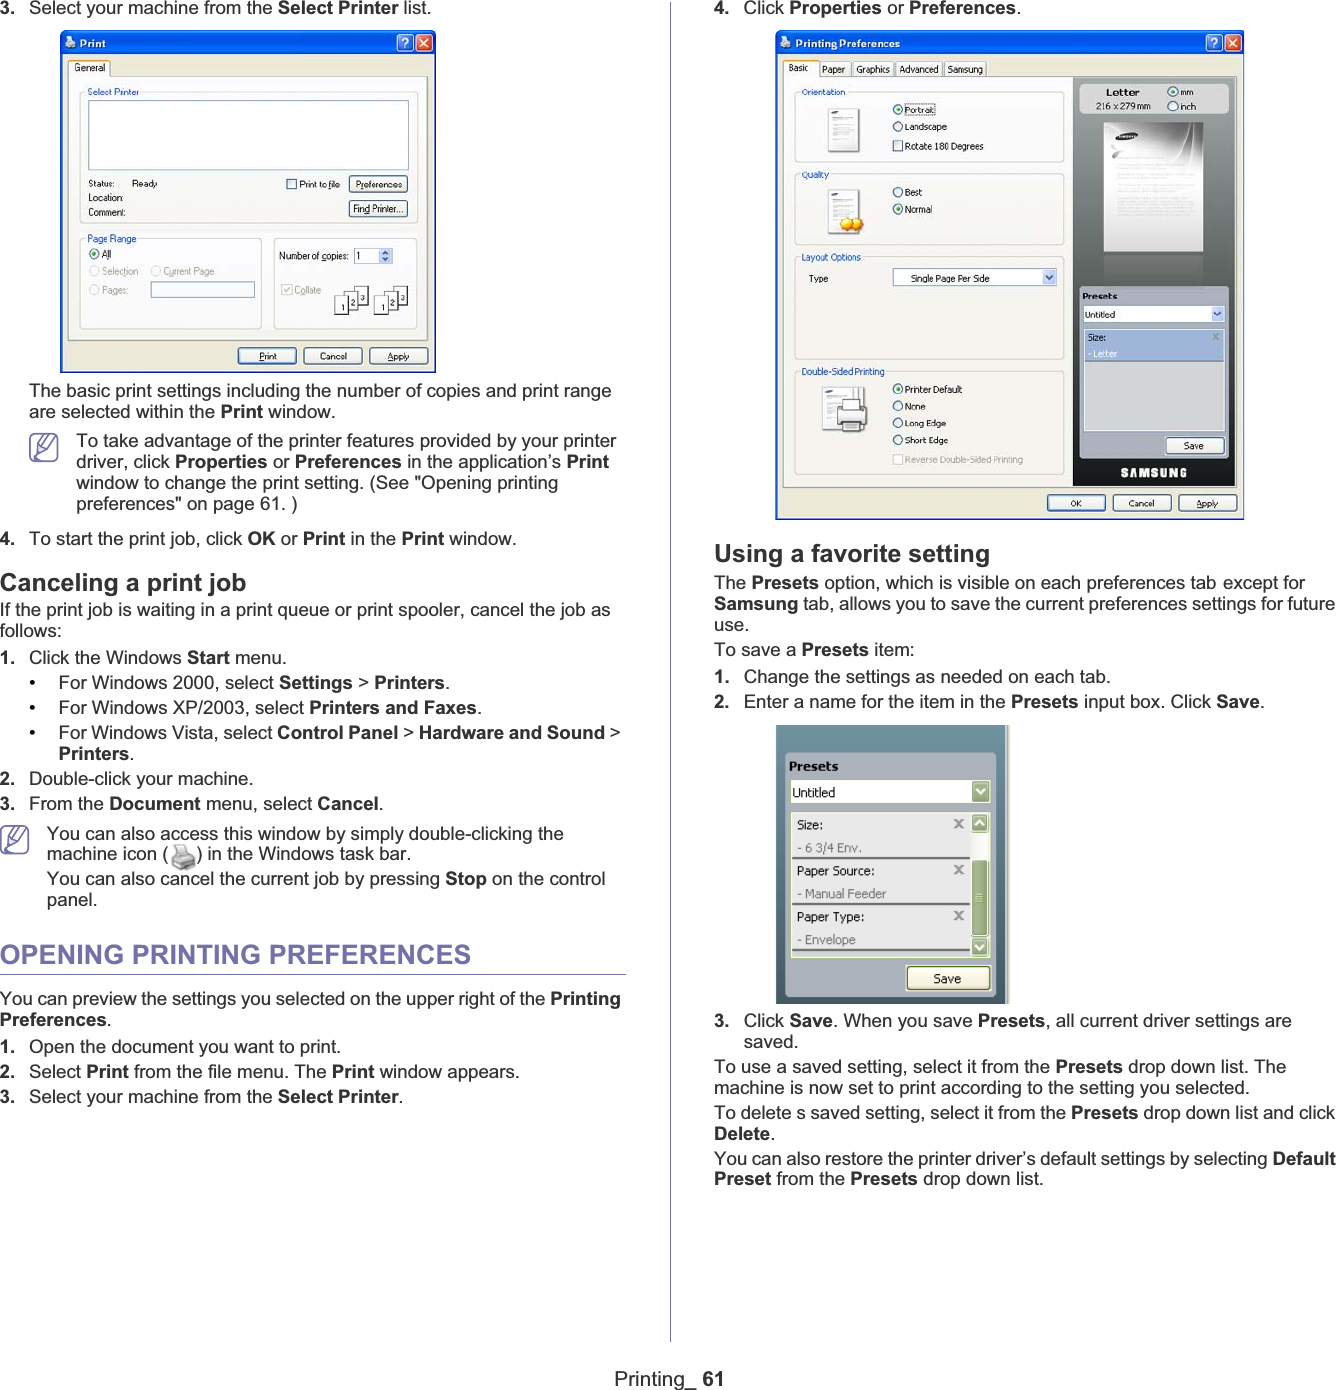
![Troubleshooting_ 112Insert the duplex unit into the machine.If you still do not see the paper, go to the next step.3. Open the rear door.4. Unfold the duplex guide fully.5. Pull the jammed paper out.6. Fold the duplex guide and close the rear door.UNDERSTANDING DISPLAY MESSAGESMessages appear on the control panel display to indicate the machine’s status or errors. Some error messages are shown with graphics to help you troubleshoot problem.Checking display messages1. When errors occur, Check Status appears on the display and press OK.2. Check the display message to see what kind of error has occured. If several messages appear, press the up/down arrow to highlight the message you want solve.3. Press OK on the control panel.Refer to the tables below to understand the messages’ and their meaning, and solve the problem, if necessary.• If Check Status still appears, repeat above steps.• If a message is not in the table, reboot the power and try the printing job again. If the problem persists, call for service.• When you call for service, provide the service representative with the contents of display message.• Some messages may not appear in the display depending on options or models.• [xxx] indicates the media type.• [zzz] indicates the paper size.• [yyy] indicates the tray.MESSAGE MEANING SUGGESTEDSOLUTIONSBOOTP problemBOOTP has aproblem. Reconfigure DHCP/static IPThere is a problem with the network.Check your network environment, or contact your network administrator.BOOTP problemBOOTP has aproblem. Switching to Auto IPThere is a problem with the network.Check your network environment, or contact your network administrator.Connection Error Connection with the SMTP server failed.Check the server settings and the network cable.Data Read FailCheck USB keyTime expired while reading date.Try again.Data Write FailCheck USB keyStoring to the USB memory failed.Check the available USB memory space.DHCP problemDHCP has aproblem. Reconfigure BOOTP/static IPThere is a problem with the network.Check your network environment, or contact your network administrator.DHCP problemDHCP has aproblem. Switching to Auto IPThere is a problem with the network.Check your network environment, or contact your network administrator.](https://usermanual.wiki/Samsung-Electronics-Co/SCX5635FN/User-Guide-1024544-Page-112.png)

![Troubleshooting_ 114Paper Empty in [yyy]Paper is empty in [yyy].Load paperThere is no paper in the tray.Load paper in the tray. (See "Loading paper in the tray" on page 55.)Paper Jam in MP trayPaper has jammed in the multi-purpose tray area.Clear the jam. (See "In the multi-purpose tray" on page 109.)Paper Jam in tray 1 Paper has jammed in the tray1 area.Clear the jam. (See "In tray 1" on page 109.)Paper Jam in tray 2 Paper has jammed in the tray2 area.Clear the jam. (See "In optional tray 2" on page 109.)Paper mismatch [yyy]Load [zzz][xxx] Continue Cancel The paper sizespecified in the printerproperties does notmatch the paper youare loading.You can select the option between Continue or Cancel. If you select Cancel , the printing job will stop. Load the correct paper in the tray. If you select Continue, printing job will continue.Pickup roller is worn[yyy] pickup roller is worn.Replace with new oneThe pickup roller has reached the end of its lifespan.This message appears when the pickup roller is worn. Replace the pickup roller with a new one. Call for service.Rear Door is open.Close itThe rear door is not securely latched.Close the rear door until it locks into place.Retry Redial? The machine iswaiting for a specifiedtime interval to rediala previously busystation.You can press OK toimmediately redial, orStop/Clear to cancel the redial operation.Replace New Toner Replace with New TonerThe toner cartridge has reached the end of its lifespan.Replace the toner cartridge with a Samsung-genuine toner cartridge. (See "Replacing the toner cartridge" on page 125.)Scanner locked The scanner module is locked.Unlock the CCD lock. (See "Front view" on page 28. ) Or turn off the machine and on again. If the problem persists, call for service.Self Diagnostics...Please waitThe engine in your printer is checking some problems detected.Please wait a few minutes.MESSAGE MEANING SUGGESTED SOLUTIONSSend ErrorThere is a problem in DNSThere is a problem in DNS.Configure the DNS setting.Send ErrorThere is a problem in POP3There is a problem in POP3.Configure the POP3 setting.Send ErrorThere is a problem in SMTPThere is a problem in SMTP.Change to the available server.Send ErrorThere is a problem in SMTP authenticationThere is a problem in SMTP authentication.Configure the authentication setting.Send ErrorThere is a problem on the NIC CardThere is a problem on network interface card.Turn the power switch off and on. If the problem persists, call for service.Toner is emptyToner is empty. Replace with new oneThe toner cartridge has reached the end of its lifespan.You can select the option among Stop or Continue. If you select Stop, the machine stops printing. If you select Continue, the machine keeps printing, but the quality cannot be guaranteed. (See "Replacing the toner cartridge" on page 125.)Toner is wornToner is worn. Replace with new oneThe toner cartridge is near the end of its lifespan.You can select the option among Stop or Continue. If you select Stop, the machine stops printing. If you select Continue, the machine keeps printing, but the quality cannot be guaranteed. (See "Replacing the toner cartridge" on page 125.)Toner is LowToner is Low.Order new oneThe toner cartridge is getting empty.Take out the toner cartridge and thoroughly shake it. By doing this, you can temporarily reestablish printing operations. (See "Redistributing toner" on page 107.)Toner Not CompatibleToner cartridge is not compatible.Check guideThe toner cartridge you have installed is not for your machine.Install a Samsung-genuine toner cartridge designed for your machine.MESSAGE MEANING SUGGESTEDSOLUTIONS](https://usermanual.wiki/Samsung-Electronics-Co/SCX5635FN/User-Guide-1024544-Page-114.png)
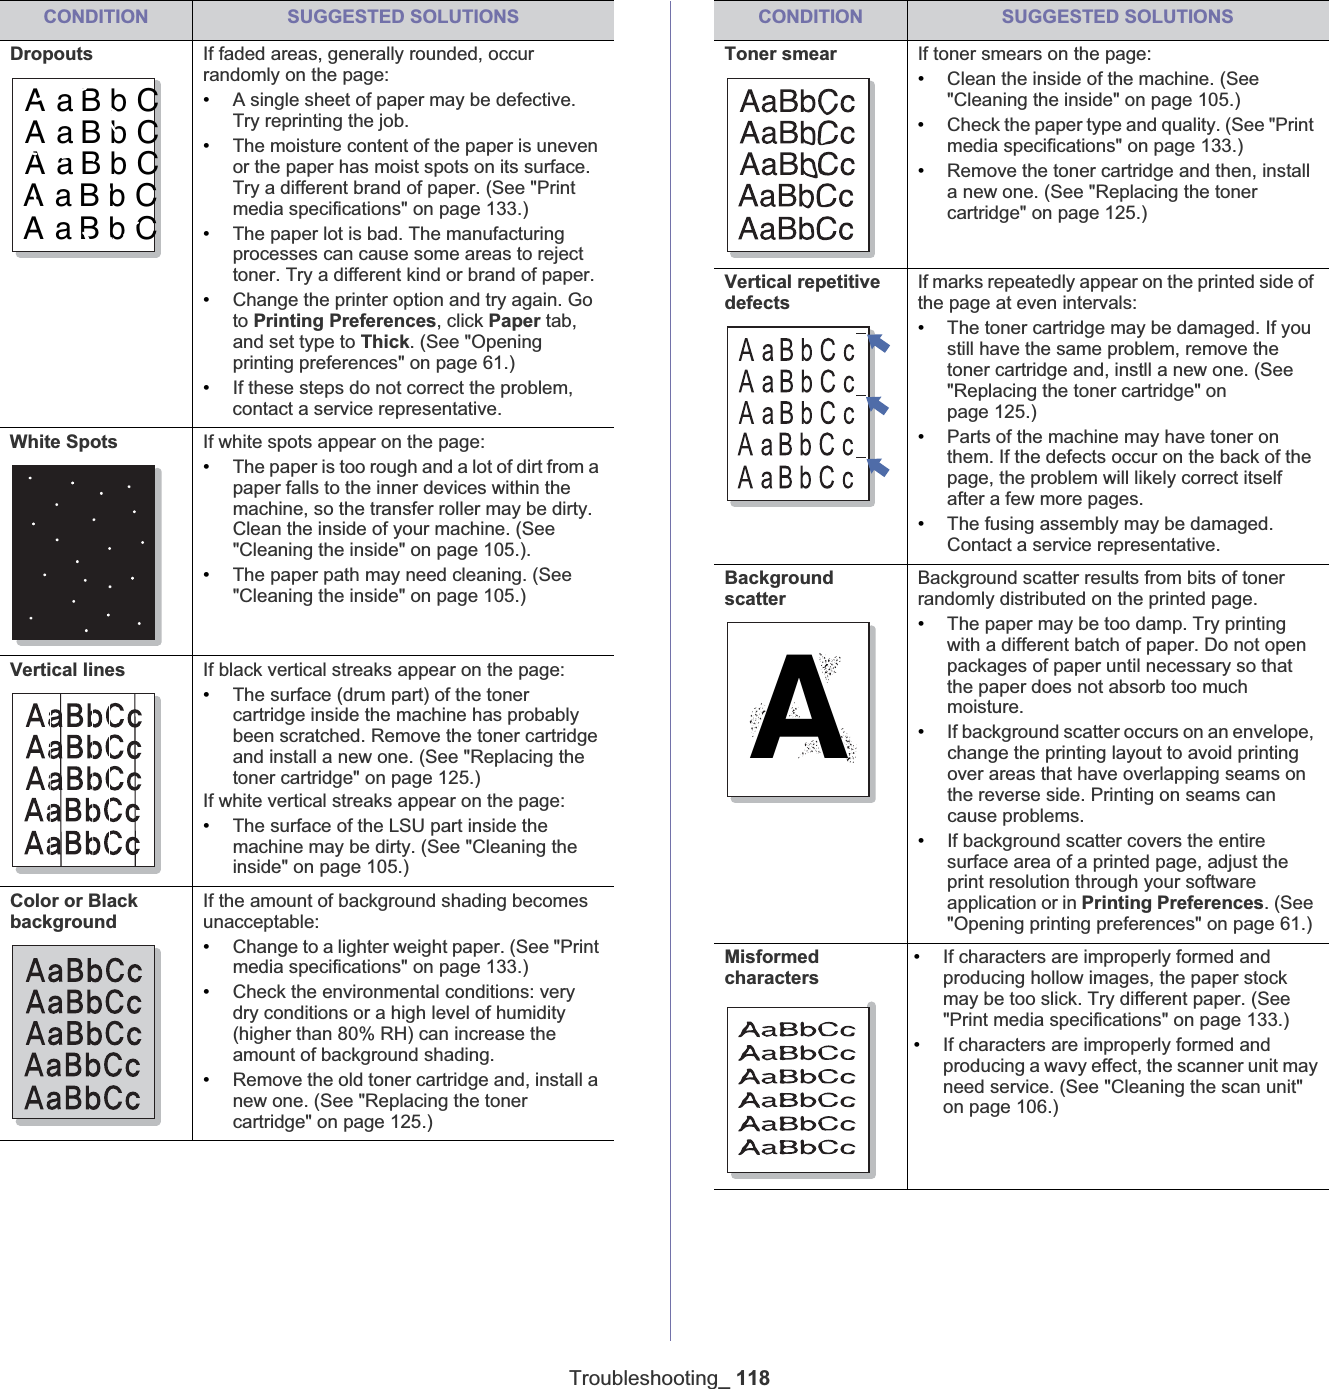
![Troubleshooting_ 115SOLVING OTHER PROBLEMSThe following chart lists some conditions that may occur and the recommended solutions. Follow the suggested solutions until the problem is corrected. If the problem persists, call for service.Paper feeding problemsToner Not InstalledToner cartridge is not Installed.Install itThe toner cartridge is not installed.Install the toner cartridge.Too many FaxesToo may faxes are received.Print or remove job.Too many faxes are received.Print or remove received fax.Too many FaxesToo may faxes are queued.Wait or remove job.Too many faxes are queued to be sent.Cancel reserved fax in priority fax feature.[yyy] emptyLoad [zzz][xxx]There is no paper inthe tray.Load paper in the tray. (See "Loading paper in the tray" on page 55.)Tray2 Not InstalledTray2 is not installedThe optional tray2 is not installed.Install the optional tray 2. If the optional tray 2 is installed, check the cable connecting the machine and the optional tray 2. If the problem persists, call for service. Tray2 has a problemCommunication problem occurred with Tray2The machine cannot communicate the optional tray 2.Check the cable connecting the machine and the optional tray 2. If the problem persists, call for service.MESSAGE MEANING SUGGESTED SOLUTIONSCONDITION SUGGESTED SOLUTIONSPaper jams during printing.Clear the paper jam. (See "Clearing paper jams" on page 109.)Paper sticks together.•Check the maximum paper capacity of the tray. (See "Print media specifications" on page 133.)•Make sure that you are using the correct type of paper. (See "Print media specifications" on page 133.)•Remove paper from the tray and flex or fan the paper.•Humid conditions may cause some paper to stick together.Multiple sheets of paper do not feed.Different types of paper may be stacked in the tray. Load paper of only one type, size, and weight.Paper does not feed into the machine.•Remove any obstructions from inside the machine.•Paper has not been loaded correctly. Remove paper from the tray and reload it correctly.•There is too much paper in the tray. Remove excess paper from the tray.•The paper is too thick. Use only paper that meets the specifications required by the machine. (See "Print media specifications" on page 133.)•If an original does not feed into the machine, the document feeder rubber pad may require to be replaced. Contact a service representative.The paper keeps jamming.•There is too much paper in the tray. Remove excess paper from the tray. If you are printing on special materials, use the multi-purpose tray.•An incorrect type of paper is being used. Use only paper that meets the specifications required by the machine. (See "Print media specifications" on page 133.)•There may be debris inside the machine. Open the front door and remove any debris.•If an original does not feed into the machine, the document feeder rubber pad may need to be replaced. Contact a service representative.Transparencies stick together in the paper exit.Use only transparencies specifically designed for laser printers. Remove each transparency as it exits from the machine.Envelopes skew or fail to feed correctly.Ensure that the paper guides are against both sides of the envelopes.](https://usermanual.wiki/Samsung-Electronics-Co/SCX5635FN/User-Guide-1024544-Page-115.png)