Samsung Electronics Co SGHE780 Single-Band PCS GSM/ EDGE Phone with Bluetooth User Manual
Samsung Electronics Co Ltd Single-Band PCS GSM/ EDGE Phone with Bluetooth Users Manual
UserManual.wiki
>
Samsung Electronics Co
>
SGHE780 User Manual
Users Manual
Navigation menu
Upload a User Manual
Namespaces
Wiki Guide
HTML
PDF
Info
Views
User Manual
Discussion / Help
Navigation

![2About this GuideThis User’s Guide provides you with condensed information about how to use your phone. To quickly learn the basics for your phone, please refer to “Get started” and “Step outside the phone.”In this guide, the following instruction icons appear:Indicates that you need to pay careful attention to the subsequent information regarding safety or phone features.Indicates that you can get more information on the referenced page. →Indicates that you need to press the Navigation keys to scroll to the specified option and then select it.[ ]Indicates a key on the phone. For example, [OK]< >Indicates a soft key, whose function is displayed on the phone screen. For example, <Menu>• Camera and camcorderUse the camera module on your phone to take a photo or record a video.Special features of your phone•Music playerPlay MP3 music files using your phone as a music player.• Image editorCrop, resize, rotate, and decorate your photos.• Voice recognitionJust say a command to dial a phone number or access a menu function.](https://usermanual.wiki/Samsung-Electronics-Co/SGHE780/User-Guide-632784-Page-6.png)
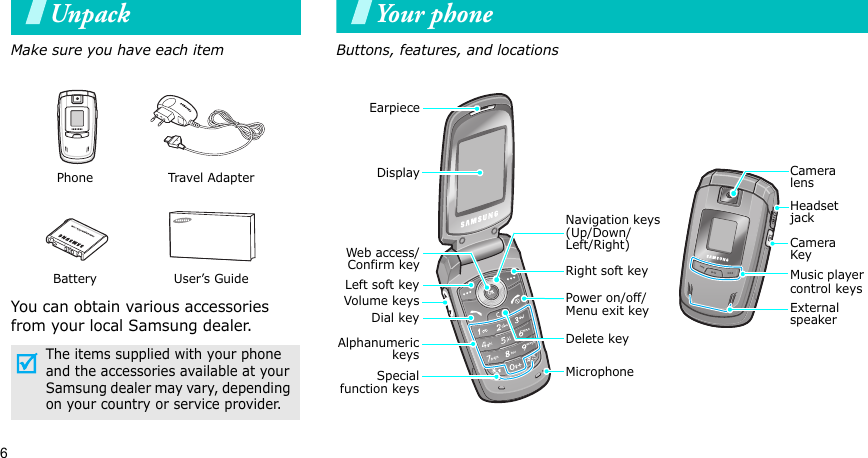
![7Get startedFirst steps to operating your phoneSIM card informationWhen you subscribe to a cellular network, you receive a plug-in SIM (Subscriber Identity Module) card loaded with your subscription details, such as your PIN, and available optional services.Install and charge the phone Remove the battery cover.If the phone is already on, first turn it off by holding [ ]. Insert the SIM card.Make sure that the gold-coloured contacts on the card face down into the phone. Install the battery. Replace the cover. Plug the travel adapter into the phone. Plug the adapter into a standard AC wall outlet.](https://usermanual.wiki/Samsung-Electronics-Co/SGHE780/User-Guide-632784-Page-11.png)
![8Get startedLow battery indicatorWhen the battery is low:• a warning tone sounds,• the battery low message displays, and• the empty battery icon blinks.If the battery level becomes too low, the phone automatically turns off. Recharge your battery. Power on or off When the phone is completely charged (the battery icon becomes still), unplug the adapter from the power outlet. Remove the adapter from the phone.Power onDo not turn on the phone when mobile phone use is prohibited.1. Open the phone.2. Press and hold [] to turn on the phone.3. If necessary, enter the PIN and press <OK>.Power off1. Open the phone.2. Press and hold [].](https://usermanual.wiki/Samsung-Electronics-Co/SGHE780/User-Guide-632784-Page-12.png)
![9Get startedKeys and displayKeysPerform the function indicated on the bottom line of the display.In Idle mode, access your favourite menus directly.p. 82In Menu mode, scroll through menu options.In Idle mode, launch the web browser.In Menu mode, select the highlighted menu option or confirm input.Send or answer a call.In Idle mode, retrieve numbers recently dialled, missed, or received.Delete characters from the display and selected item in an application.End a call. Press and hold to switch the phone on or off. In Menu mode, cancel input and return the phone to Idle mode.Enter numbers, letters, and some special characters.In Idle mode, press and hold [1] to access your voicemail. Press and hold [0] to enter an international call prefix.Enter special characters.In Idle mode, press and hold [] to activate or deactivate Quiet mode. Press and hold [] to enter a pause between numbers.Adjust the phone volume.In Idle mode, with the phone open, adjust the keypad tone volume. With the phone closed, press and hold to turn on the external display.In Idle mode, access the Camera menu: press and hold to turn on the camera.In Camera mode, take a photo or record a video.](https://usermanual.wiki/Samsung-Electronics-Co/SGHE780/User-Guide-632784-Page-13.png)
![11Get startedAccess menu functionsUse the soft keysThe roles of the soft keys vary depending on the function you are using. The bottom line of the display indicates their current role.Press the left soft key to select the highlighted option.Press the right soft key to return to the previous menu level.Select BackSelect an option1. Press the appropriate soft key.2. Press the Navigation keys to move to the next or previous option.3. Press <Select> or [OK] to confirm the function displayed or option highlighted.4. To exit, choose either of the following methods:•Press <Back> to move up one level.• Press [ ] to return to Idle mode.Use shortcutsPress the number key corresponding to the option you want.](https://usermanual.wiki/Samsung-Electronics-Co/SGHE780/User-Guide-632784-Page-15.png)
![13Get started3. For Clock, scroll to a clock type and press <Save>.For Cover title, enter a greeting and press [OK].For Wallpaper images, select an image category and then an image. Press <Save>.You can change the colour for the display components, such as title bars and highlight bars.1. In Idle mode, press <Menu> and select Settings → Display settings → Skin.2. Select a colour pattern.Menu mode skin colourYou can set the Navigation keys to function as shortcuts to access your favourite menus.1. In Idle mode, press <Menu> and select Settings → Phone settings → Short cut.2. Select a key.3. Select a menu to be assigned to the key.You can switch the phone to Silent mode to avoid disturbing other people.Press and hold [] in Idle mode.Menu shortcuts Silent mode](https://usermanual.wiki/Samsung-Electronics-Co/SGHE780/User-Guide-632784-Page-17.png)
![14Get startedMake/Answer callsYou can protect the phone against unauthorised use with a phone password. The phone will require the password on power-up.1. In Idle mode, press <Menu> and select Settings → Security → Change password.2. Enter the default password, 00000000, and press <OK>.3. Enter a new 4- to 8-digit password and press <OK>.4. Enter the new password again and press <OK>.5. Select Phone lock.6. Select Enable.7. Enter the password and press <OK>.Phone lock1. Enter an area code and phone number.2. Press [ ].3. To end the call, press [ ].1. When the phone is ringing, press [ ].2. To end the call, press [ ].Press [ / ].Make a callAnswer a callAdjust the volume during a call](https://usermanual.wiki/Samsung-Electronics-Co/SGHE780/User-Guide-632784-Page-18.png)
![15Step outside the phoneBegin with your camera, the music player, and other special featuresUse the camera1. In Idle mode, press and hold [ ] to turn on the camera.2. Aim the lens at the subject and make any desired adjustments.3. Press [] to take a photo. The photo is saved automatically.4. Press <Back> to take another photo.1. In Idle mode, press <Menu> and select My files → Images → Photos.2. Select the photo you want.Take a photoView a photo1. In Idle mode, press [ ] and select Record video.2. Press [] to start recording.3. Press [] or <> to stop recording. The video is saved automatically.4. Press the right soft key to record another video.1. In Idle mode, press <Menu> and select My files → Videos → Videos.2. Select the video clip you want.Record a videoPlay a video](https://usermanual.wiki/Samsung-Electronics-Co/SGHE780/User-Guide-632784-Page-19.png)
![16Step outside the phonePlay music filesUse these methods:• Download from the wireless webp. 46• Download from a computer using the optional Samsung PC StudioSamsung PC Studio User’s Guide• Receive via Bluetoothp. 431. In Idle mode, press <Menu> and select Applications → Music player.2. Press <Options> and select Add music.3. Press [OK] to select the files you want and press <Add>.Copy music files to the phoneCreate a play list1. From the music player screen, press [OK].2. During playback, use the following keys:•OK: pauses or resumes playback.• Up: accesses the current play list.• Left: moves back to the previous file. Moves backward in a file when held down.• Right: skips to the next file. Skips forward in a file when held down.• / : adjusts the volume.• Down: stops playback.Play music files](https://usermanual.wiki/Samsung-Electronics-Co/SGHE780/User-Guide-632784-Page-20.png)
![17Step outside the phoneBrowse the webUsing a built-in web browser, you can easily access the wireless web to get a variety of up-to-date services and information and to download web content.Use PhonebookIn Idle mode, press [OK].• To scroll through browser items, press [Up] or [Down]. • To select an item, press < > or [OK].• To return to the previous page, press <Back> or [C].• To return to the homepage, press and hold [C].• To use browser menu options, select or press [].• To use web page options, press [].Launch the web browserNavigate the webTo the phone’s memory:1. In Idle mode, enter a phone number and press [OK].2. Select Phone → New → a number type.3. Specify contact information: First name, Last name, Mobile, Home, Office, Fax, Other, Email, Graphic ID, Alert, Group, and Notes.4. Press <Options> and select Save to save the contact.To the SIM c ar d:1. In Idle mode, enter a phone number and press [OK].2. Select SIM.3. Enter a name.4. Press <Options> and select Save to save the contact.Add a contact](https://usermanual.wiki/Samsung-Electronics-Co/SGHE780/User-Guide-632784-Page-21.png)
![18Step outside the phoneSend messages1. In Idle mode, press <Contacts>.2. Enter the first few letters of the name you want.3. Select a contact.4. Scroll to a number and press [] to dial, or press [OK] to edit contact information.1. In Idle mode, press <Menu> and select Phonebook → My name card.2. Specify your contact information.3. Press <Options> and select Save to save the name card.4. To send the name card, press <Options> and select Send via → a sending method.Find a contactCreate and send a name card1. In Idle mode, press <Menu> and select Messages → Create new message → Text message.2. Enter the message text and press [OK].3. Enter destination numbers.4. Press [OK] to send the message.1. In Idle mode, press <Menu> and select Messages → Create new message → Multimedia message.2. Select Subject.3. Enter the message subject and press [OK].Send a text message (SMS)Send a multimedia message (MMS)](https://usermanual.wiki/Samsung-Electronics-Co/SGHE780/User-Guide-632784-Page-22.png)
![19Step outside the phone4. Select Picture & Video or Sound.5. For Picture & Video, select Add image or Add video and add an image or video clip.For Sound, select Add sound and add a sound clip.6. Select Message.7. Enter the message text and press [OK].8. Press <Options> and select Send.9. Enter destination numbers or addresses.10. Press [OK] to send the message.1. In Idle mode, press <Menu> and select Messages → Create new message → Email.2. Select Subject.3. Enter the e-mail subject and press [OK].4. Select Message.5. Enter the e-mail text and press [OK].6. Select File attach.7. Add image, video, sound, music files, or document files.8. Press <Options> and select Send.9. Enter e-mail addresses.10. Press [OK] to send the e-mail.Send an e-mail](https://usermanual.wiki/Samsung-Electronics-Co/SGHE780/User-Guide-632784-Page-23.png)
![23Enter textABC, T9, Number, and Symbol modesYou can enter text in some features such as Messages, Phonebook, or Calendar, using ABC mode, T9 mode, Number mode, and Symbol mode.Changing the text input modeThe text input mode indicator displays when the cursor is in a text field.•Press and hold [] to switch between T9 ( ) and ABC ( ) modes.•Press [] to change case or to switch to Number mode ( ).•Press and hold [] to switch to Symbol mode ().Using ABC modePress the appropriate key until the character you want appears on the screen.(creating an SMS message with GSM-alphabet encoding)Characters in order displayedKey Upper case Lower case](https://usermanual.wiki/Samsung-Electronics-Co/SGHE780/User-Guide-632784-Page-27.png)
![24Enter textOther ABC mode operations• To enter the same letter twice or to enter a different letter on the same key, wait for the cursor to move to the right automatically or press [Right]. Then, enter the next letter.•Press [] to insert a space.• Press the Navigation keys to move the cursor. •Press [C] to delete characters one by one. Press and hold [C] to clear the display.Using T9 modeT9 is a predictive text input mode that allows you to key in any character using single keystrokes.Entering a word in T9 mode1. Press [2] to [9] to start entering a word. Press each key once for each letter. For example, press [4], [3], [5], [5], and [6] to enter Hello in T9 mode. T9 predicts the word that you are typing, and it may change with each key that you press.2. Enter the whole word before editing or deleting characters.3. When the word displays correctly, go to step 4. Otherwise, press [0] to display alternative word choices for the keys that you have pressed. For example, Of and Me use [6] and [3].4. Press [] to insert a space and enter the next word.Other T9 mode operations• Press [1] to enter periods or apostrophes automatically.• Press the Navigation keys to move the cursor. • Press [C] to delete characters one by one. Press and hold [C] to clear the display.Adding a new word to the T9 dictionaryThis feature may not be available for some languages.1. Enter the word that you want to add.2. Press [0] to display alternative words for your key presses. When there are no more alternative words, Spell displays on the bottom line.](https://usermanual.wiki/Samsung-Electronics-Co/SGHE780/User-Guide-632784-Page-28.png)
![253. Press <Spell>.4. Enter the word you want using ABC mode and press <Add>.Using Number modeNumber mode enables you to enter numbers. Press the keys corresponding to the digits you want.Using Symbol modeSymbol mode enables you to insert symbols.Call functionsAdvanced calling featuresMaking a call1. In Idle mode, enter the area code and phone number.2. Press [ ].Making an international call1. In Idle mode, press and hold [0]. The + character appears.2. Enter the country code, area code, and phone number, then press [ ].Redialling recent numbers1. In Idle mode, press [ ] to display the list of recent numbers.2. Scroll to the number you want and press [ ].To Pressdisplay more symbols [Up] or [Down]. select a symbol the corresponding number key.clear the symbols [C]. insert the symbols <OK>.• Press [C] to clear the last digit or press and hold [C] to clear the whole display.• Press and hold [] to enter a pause between numbers.](https://usermanual.wiki/Samsung-Electronics-Co/SGHE780/User-Guide-632784-Page-29.png)
![26Call functionsMaking a call from PhonebookOnce you have stored a number in Phonebook, you can dial the number by selecting it from Phonebook.p. 32You can also use the speed dial feature to assign your most frequently called numbers to specific number keys.p. 34You can quickly dial a number from the SIM card using the location number assigned when stored.1. In Idle mode, enter the location number for the phone number you want and press [].2. Scroll through other numbers, if necessary.3. Press <Dial> or [ ] to dial the number you want.Voice diallingYou can dial a number stored in Phonebook by speaking the associated name or number into the microphone.p. 44Ending a callClose the phone or press [ ].Answering a callWhen you receive an incoming call, the phone rings and displays the incoming call image. Press <Accept> or [ ] to answer the call.Tips for answering a call• When Anykey answer is active, you can press any key to answer a call, except for <Reject> and [].p. 83• When Active folder is active, you can simply open the phone.p. 83• Press <Reject> or [ ] to reject a call.• Press and hold [ / ] to reject a call or mute the ringer, depending on the Volume key setting.p. 82Viewing missed callsIf you have missed calls, the screen displays how many calls you have missed.1. Press <View>.2. If necessary, scroll through the missed calls.](https://usermanual.wiki/Samsung-Electronics-Co/SGHE780/User-Guide-632784-Page-30.png)
![Call functions 273. Press [ ] to dial the number you want.Using the headsetUse the headset to make or answer calls without holding the phone. Connect the headset to the jack on the right side of the phone. The button on the headset works as follows:Options during a callYou can access a number of functions during a call.Adjusting the volume during a callUse [ / ] to adjust the earpiece volume during a call.Press [ ] to increase the volume level and [ ] to decrease the volume level.Placing a call on hold/RetrievingPress <Hold> or <Retrieve> to place the call on hold or retrieve the call.Making a second callYou can make another call if your network supports this function.1. Press <Hold> to put the call on hold.2. Make the second call in the normal way.3. Press <Swap> to switch between the calls.4. Press <Options> and select End held call to end the call on hold.5. To end the current call, press [ ].Answering a second callYou can answer an incoming call while already on the phone, if your network supports this function and you have activated the call waiting feature.p. 87 To Pressredial the last call the button and then press and hold it again.answer a call the button and hold.end a call the button and hold.](https://usermanual.wiki/Samsung-Electronics-Co/SGHE780/User-Guide-632784-Page-31.png)
![28Call functions1. Press [ ] to answer the call. The first call is automatically put on hold.2. Press <Swap> to switch between the calls.Using the speakerphone featureUse the speakerphone feature to talk and listen with the phone a short distance away.Press [OK] and then <Yes> to activate the speakerphone feature. Press [OK] again to switch back to the earpiece.Using In-call optionsPress <Options> to access the following options during a call:•Voice clarity on/Voice clarity off: remove extraneous noise and increase call quality so that the person with whom you are speaking can hear you clearly even if you are in a noise place.•Mute/Unmute: switch off the phone's microphone so that the other person on the phone cannot hear you, or switch it back on.•Mute keys/Send keys: switch the key tones on or off.•Phonebook: access the contact list.•Send DTMF: send the DTMF (Dual tone multi-frequency) tones as a group. The DTMF tones are the tones used in phones for tone dialling, sounding when you press the number keys. This option is helpful for entering a password or an account number when you call an automated system, like a banking service.•Message: read an incoming message and send a new message.p. 49•Join: set up a multi-party call by adding a caller on hold to a currently active call. You can include up to five people on a multi-party call.To communicate with answering machines or computerised telephone systems, Send keys must be selected.](https://usermanual.wiki/Samsung-Electronics-Co/SGHE780/User-Guide-632784-Page-32.png)
![29•Split: have a private conversation with one multi-party call participant. The other participants can converse with each other. After the private conversation, select Join to return both all private participants to the multi-party call.•Transfer: transfer the currently active call to a caller on hold. The two callers can talk to each other, but you are disconnected from the call.•Remove: disconnect one multi-party call participant.•End held call: disconnect the call currently on hold.•SIM service: access special services, such as news, weather forecasts, entertainment, and location services, provided by your SIM card. This option is available when you use a SIM card supporting SIM AT menus.•Switch to headset/Switch to phone: switch the call to a Bluetooth headset or hands-free car kit or back to the phone.Menu functionsAll menu options listedCall log(Menu 1) Use this menu to view the calls you have dialled, received, or missed, and the length of the calls. You can also check the cost of your calls, if the SIM card supports this function.To access this menu, press <Menu> in Idle mode and select Call log.Recent contacts(Menu 1.1)This menu displays the most recent calls dialled, received, or missed. Accessing a call record1. Press [Left] or [Right] to move to another call type.2. Press [Up] or [Down] to scroll through the call list.](https://usermanual.wiki/Samsung-Electronics-Co/SGHE780/User-Guide-632784-Page-33.png)
![30Menu functions3. Press [ ] to dial a number, or [OK] to view the details of a call.Using call record optionsFrom the call list, press <Options> to access the following options:•Details: access the call details.•Call: make a call to the number.•Add to phonebook: save the number in Phonebook.•View contact details: access contact information, if the caller is saved in Phonebook.•Send message: send an SMS or MMS message.•Delete: delete the selected call record or all records.•Reject list: specify numbers from which you do not want to accept calls.•Add to reject list: add the number to the Reject list.Missed calls(Menu 1.2)This menu displays the most recent received calls that you did not answer.Dialled calls(Menu 1.3)This menu displays the most recent calls you have dialled.Received calls(Menu 1.4) This menu displays the most recent calls you have received.Delete all(Menu 1.5) Use this menu to delete all of the records in each call type.1. Press [OK] to select the call types to be cleared. 2. Press <Delete>. 3. Press <Yes> to confirm the deletion.](https://usermanual.wiki/Samsung-Electronics-Co/SGHE780/User-Guide-632784-Page-34.png)
![32Menu functionsContact list (Menu 2.1)Use this menu to search for numbers in Phonebook.Finding an entry1. Enter the first few letters of the name that you want to find.2. Select the name you want from the list.3. Scroll to a number and press [ ] to dial, or press [OK] to edit contact information.Using Phonebook optionsWhile viewing contact details, press <Options> to access the following options:•Edit: edit contact information.•Send message: send an SMS or MMS message to the selected number, or send an MMS message or e-mail to the selected e-mail address.•Copy: copy the number to the phone’s memory, to the SIM card, or to the FDN list.•Copy to phone: copy the e-mail address with the name to a new contact.•Send via: send the contact via SMS, MMS, e-mail, or Bluetooth. •Delete: delete the selected entry.•Print via Bluetooth: print the contact by connecting the phone to a printer via Bluetooth. Some printers may not be compatible with the phone.•Mark default number: set the selected number as the default for the contact.FDN list (Menu 2.2)Use this menu to create a list of contacts to be used in FDN (Fixed Dialling Number) mode, in which the phone allows outgoing calls only to the specified phone numbers, if your SIM card supports this feature. You can activate FDN mode in the FDN mode menu.p. 89You can quickly access this menu by pressing <Contacts> in Idle mode.](https://usermanual.wiki/Samsung-Electronics-Co/SGHE780/User-Guide-632784-Page-36.png)
![Menu functions Phonebook(Menu 2)33Adding a contact1. From the FDN list, press <Options> and select Add.2. Enter your PIN2 and press <OK>.3. Enter information about the contact:•Name: assign a name.•Phone number: add a number.•Location: assign a location number.4. Press <Save> to save the contact.Using contact optionsYou can access contact options by pressing <Options> in the FDN list.Add new contact (Menu 2.3)Use this menu to add a new contact to Phonebook.Storing a number in the phone’s memory1. Select Phone.2. Change the settings or enter information about the contact:•First name/Last name: assign a name.•Mobile/Home/Office/Fax/Other: add a number in any category.•Email: assign an e-mail address.•Graphic ID: assign a caller ID image to alert you to a call from the person.•Alert: assign a ringtone to alert you to a call from the person.•Group: assign the number to a caller group.•Notes: add a memo about the person.3. Press <Options> and select Save to save the contact.Storing a number on the SIM card1. Select SIM and enter a name.2. Press [Down] and enter a phone number.3. Press [Down] and change the location number, if necessary.The settings specified in Graphic ID and Alert are given priority over group settings.To assign a caller ID image, ringtone, or group, the contact must be saved to the phone’s memory.](https://usermanual.wiki/Samsung-Electronics-Co/SGHE780/User-Guide-632784-Page-37.png)
![34Menu functions4. Press <Save> to save the contact.Group (Menu 2.4)Use this menu to organise your contacts in caller groups.Adding members to a caller group1. Select a group.2. Press <Add>.3. Press [OK] to select the contacts you want.4. Press <Add>.Managing caller groupsWhile viewing the group list, press <Options> to access the following options:•View: display the members of the selected group.•Add: add a new group.•Edit: change the properties of the selected group.•Send message: send an SMS, MMS, or e-mail to the members you want.•Delete: delete the selected group. Group members, however, will not be deleted from Phonebook.Speed dial (Menu 2.5)Use this menu to assign speed dial numbers (2 to 9) for 8 of your most frequently called numbers.Assigning speed dial numbers1. Select a key location from 2 to 9. Key 1 is reserved for your voicemail server.2. Select a contact from the contact list.3. Select a number, if it has more than one number.Managing speed dial entriesFrom the Speed dial screen, press <Options> to access the following options:•Add: assign a number to an unassigned key. You can select a contact from Phonebook or the FDN list.•View: check the name and number assigned to the key.](https://usermanual.wiki/Samsung-Electronics-Co/SGHE780/User-Guide-632784-Page-38.png)
![36Menu functions•Delete all: delete all of the contacts from your phone’s memory, your SIM card, or the FDN list.•Memory status: display the number of contacts you have stored in Phonebook.Service number (Menu 2.9)Use this menu to view the list of Service Dialling Numbers (SDN) assigned by your service provider, including emergency numbers and numbers for directory enquiries. This menu is available if your SIM card supports SDN. 1. Scroll to the number you want.2. Press <Dial> or [ ].Applications(Menu 3)Use this menu to play Java applications, play music files, or edit photos.To access this menu, press <Menu> in Idle mode and select Applications.Music player (Menu 3.1)Use this menu to enjoy music. First, you need to save music files in your phone’s memory. To enjoy high quality music, you can use an optional Bluetooth stereo headset.Downloading or receiving music filesUse the following methods to save music files to your phone:• Download from the wireless webp. 46• Download from a computer using the optional Samsung PC Studio programmeSamsung PC Studio User’s Guide• Receive via Bluetoothp. 43Creating a play listAdd the music files to the play list so you can play them.1. From the music player screen, press <Options> and select Add music.Normal headsets are not compatible with the music player.](https://usermanual.wiki/Samsung-Electronics-Co/SGHE780/User-Guide-632784-Page-40.png)
![Menu functions Applications(Menu 3)372. Press [OK] to select the files you want and press <Add>.Playing music files1. From the music player screen, press <Options> and select Play via.2. Select Phone to use the phone speaker. Select Bluetooth stereo headset to use a Bluetooth stereo headset and then search for and connect to the headset.During playback, use the following keys:Using music player optionsWhile playing a music file, press <Options> to access the following options:•Play/Pause: begin or pause playback.•Transfer to A/V headset/Transfer to phone: switch the sound output to a Bluetooth headset or the phone speaker.•Open: access the current play list or all play lists.•Remove from play list: remove the selected file from the play list.Key FunctionOKPauses or resumes playback.Left Moves back to the previous file. Moves backward in a file when held down.Right Skips to the next file. Skips forward in a file when held down.Up Accesses the current play list.Down Stops playback./ Adjusts the volume.2Changes the playback animation.3Changes the repeat mode.5Changes the skin image.6Sets the music player to play tracks in random order.Key Function](https://usermanual.wiki/Samsung-Electronics-Co/SGHE780/User-Guide-632784-Page-41.png)
![38Menu functions•Settings: change the default settings for playing music files. Repeat: select a repeat mode.Shuffle: set the music player to play tracks in random order.Equalize: change the equaliser setting.3D sound: turn 3D sound on or offVisualization: change the playback animation.Music skin: select a skin type.Volume: select a volume level.•Details: access the file properties.•Music short cuts: view the functions of the keys you can use during playback.Accessing the play listFrom the music player screen, press [Up].Press <Options> to access the following options:•Play via: select a sound output mode, Phone or Bluetooth stereo headset. If you selected Bluetooth stereo headset, you can use a Bluetooth stereo headset and then search for and connect to the headset. •Add music: add files to the play list.•Go to Album list: access the album list.•Move to: move the selected file to another play list.•Copy to: copy the selected file to another play list.•Change order: move the selected file to the position you want within the play list.•Remove: remove the selected file or all files from the play list.•Details: access the file properties.Voice recorder(Menu 3.2)Use this menu to record voice memos. A voice memo can be up to one hour long.Recording a voice memo1. Press [OK] to start recording. 2. Speak into the microphone.Press [OK] to pause or resume the recording.3. When you have finished, press <Save> or [Down]. The voice memo is automatically saved.](https://usermanual.wiki/Samsung-Electronics-Co/SGHE780/User-Guide-632784-Page-42.png)
![Menu functions Applications(Menu 3)394. Press [OK] to review the voice memo, or [Up] to record additional memos.Playing a voice memo1. From the Voice recorder screen, press <Options> and select Go to voice list.2. Select a voice memo. The memo plays.During playback, use the following keys:Using voice recorder optionsFrom the Voice recorder screen, press <Options> to access the following options:•Record: record a new voice memo.•Go to voice list: access the voice memo list.•Settings: customise the default settings for the voice recorder:Recording time: select a recording time.- Limit for multimedia messages: record a voice memo for adding to an MMS message.- Limit for emails: record a voice memo for adding to an e-mail- 1 hour: record a voice memo of up to one hour.Volume: select a volume level.Default name: change the default prefix of file names.Visualization: select an equalizer image.Image editor(Menu 3.3)Use this menu to edit your photos using an assortment of editing tools.Applying an effect1. Press <Options> and select New image → Open or Take a photo.Key FunctionOKPauses or resumes playback.Left Moves backward in a file.Right Skips forward in a file.Down Stops playback./ Adjusts the volume.](https://usermanual.wiki/Samsung-Electronics-Co/SGHE780/User-Guide-632784-Page-43.png)
![40Menu functions2. Select a photo or take a new photo.3. Press <Load>, or press <Options> and select Load.4. Press <Options> and select Effects → an effect option.5. Press <Done>.6. Press <Options> and select Save as.7. Press <Yes>.8. Enter a new file name and press [OK]. Adding visual featuresYou can decorate photos by adding a frame, an image, or a note.1. Select a photo or take a new photo.2. Press <Load>, or press <Options> and select Load.3. Press <Options> and select Insert → a feature type.•Frames: add a decorative frame.•Emoticons: add an emoticon.•Clip art: add an image.4. Select an item.5. Adjust the position of the inserted item and press <Done>.6. Press <Options> and select Save as.7. Press <Yes>.8. Enter a new file name and press [OK].Decision maker (Menu 3.4)This menu helps you make decisions when you are not sure what to do in given situations.Adding a decision category1. Press <Create> to create a new category.2. Enter the title for the category and press [Down].3. Select the number of the alternatives you want.4. Enter content for each alternative and press [OK].Making a decision1. From the Decision maker screen, scroll to a decision category.](https://usermanual.wiki/Samsung-Electronics-Co/SGHE780/User-Guide-632784-Page-44.png)
![46Menu functionsNames: turn on or off audio playback for name dialling.Name settings: adjust settings for the speed and volume for name dialling.•About: display information about the voice command programme.Viewing help informationYou can view onscreen help information for using the voice recognition feature. From the Voice commands menu, press <Help>.SIM-AT(Menu 3.8) This menu is available if you use a SIM-AT card that supports SIM Application Toolkit menus and provides additional services, such as news, weather, sports, entertainment, and location services. Available services may vary, depending on your service provider’s plans. For details, see your SIM card instructions or contact your service provider.Browser(Menu 4)The Wireless Application Protocol (WAP) on your phone allows you to access the wireless web. Using the web browser, you can access up-to-date information and a wide variety of media content, such as wallpapers, ringtones, and music files.To access this menu, press <Menu> in Idle mode and select Browser.Home(Menu 4.1)Use this menu to connect your phone to the network and load the homepage of the wireless web service provider. You can also press [OK] in Idle mode.Navigating the web browserTo Pressscroll through browser items [Up] or [Down]. select a browser item < > or [OK].return to the previous page <Back> or [C].return to the homepage and hold [C].](https://usermanual.wiki/Samsung-Electronics-Co/SGHE780/User-Guide-632784-Page-50.png)
![Menu functions Browser(Menu 4)47Using browser menu options1. Select or press [].2. Select one of the following browser options:•Back: go back to the previous page.•Home: go back to the homepage.•Exit: exit the web browser.•Reload: reload the current page.•Show URL: display the URL address of the current web page.•About ...: access version and copyright information about the browser.Using web page optionsFrom any web page, press [] to access the following options:•Enter URL: enter a URL address manually.•Bookmarks: switch to the Bookmarks menu.•Messages: check the messages stored in the My messages folder. You can also create and send a new SMS message.•My files: switch to the My files menu.Exiting the browserPress [ ] to end the network connection and exit the browser.Bookmarks(Menu 4.2)Use this menu to save URL addresses in order to quickly access web pages, or access the preset bookmarks.Adding a bookmark1. Select an empty location.2. Enter a title for the bookmark and press [Down].3. Enter a URL address and press [OK].Accessing a bookmarked pageSelecting a bookmark item launches the web browser and accesses the associated web page.Using bookmark optionsFrom the bookmark list, press <Options> to access the following options:•Open: access the website.](https://usermanual.wiki/Samsung-Electronics-Co/SGHE780/User-Guide-632784-Page-51.png)
![50Menu functions2. Press <Options> to access the following options:•Send only: just send the message.•Save and send: save the message in Outbox and then send it.•Preview by vivid message: display the message text in 3D graphics.•Insert: add a template, Phonebook entry, or bookmark.•Add picture/Add animation/Add melody: attach a simple image, an animated image, or a melody.•Attach: add a name card or calendar data as a data format attachment.•Save in: save the message in another folder.•Language select: change the language to be used in T9 input mode.•Text style: change the text attributes.3. When you have finished, press <Options> and select Send only or Save and send.4. Enter a destination number.To send the message to more than one recipient, fill in the destination fields.5. Press [OK] to send the message.Multimedia message (Menu 5.1.2)Multimedia Message Service (MMS) delivers messages containing a combination of text, image, video, and audio, from phone to phone or from phone to e-mail. 1. Select the Subject line.2. Enter the subject and press [OK]. 3. Select the Picture & Video or Sound line and add an image, a video, or a sound file. 4. Select the Message line.5. Enter the message text.• The maximum size allowed for a message can differ, depending on your service provider.• Depending on the file type or DRM (Digital Rights Management) system, some files may not be able to be forwarded.](https://usermanual.wiki/Samsung-Electronics-Co/SGHE780/User-Guide-632784-Page-54.png)
![Menu functions Messages(Menu 5)516. Press <Options> to access the following options:•Save: save the message in the Draft box.•Insert: add a template, Phonebook entry, or bookmark.•Save to: save the message in another folder.•Text style: change the text attributes.•Language select: change the language used in T9 input mode.7. When you have finished, press [OK].8. After adding items, press <Options> to access the following options:•Edit: edit the subject or text of your message.•Change image/Change video/Change sound: replace an added item.•Preview: view the message as it will be shown on the recipient’s phone.•Send: send the message.•Save to: save the message to another folder.•Add page: add pages. Move to each page by pressing [Left] or [Right].•Delete page: delete the added page.•Edit page: set the page duration or move the current page to the next or previous page.•Attach: attach name cards or calender data as data format attachments, or document files stored in the Other files folder.•Remove subject/Remove media/Remove sound/Remove message/Remove: remove an added item.9. When you have finished, press <Options> and select Send.10. Enter a phone number or an e-mail address.To send the message to more than one recipient, fill in additional destination fields.11. Press [OK] to send the message.Email (Menu 5.1.3)You can send and receive e-mails that include text, audio, and images. To use this feature, you need to subscribe to an e-mail service and set up your e-mail account and profile.p. 62, p. 64](https://usermanual.wiki/Samsung-Electronics-Co/SGHE780/User-Guide-632784-Page-55.png)
![52Menu functions1. Select the Subject line.2. Enter the subject of your e-mail and press [OK].3. Select the Message line.4. Enter the e-mail text.Press <Options> to access the following options:•Save: save the message in the Draft box.•Insert: add a template, Phonebook entry, or bookmark.•Save to: save the e-mail in another folder.•Language select: change the language used in T9 input mode.5. When you have finished, press [OK].6. Select the File attach line and select one of the following options:•Add image/Add videos/Add sounds/Add music/Add other files: add items stored in the phone’s memory.•Send: send the e-mail.•Save to: save the e-mail in another folder.•Attach: attach name cards or calender data as data format attachments.7. After adding items, press <Options> to access the following options for editing the e-mail:•Edit: edit the subject or text.•View: open the selected file.•Remove subject/Remove message: clear the subject or text.•Remove: delete the selected attachment or all attachments.•Remove all attachments: delete all attachments.8. When you have finished, press <Options> and select Send.9. Enter an e-mail address.To send the e-mail to more than one recipient, fill in additional destination fields. 10. Press [OK] to send the e-mail.Depending on the file type or DRM (Digital Rights Management) system, some files may not be able to be forwarded.](https://usermanual.wiki/Samsung-Electronics-Co/SGHE780/User-Guide-632784-Page-56.png)
![56Menu functionsEmail box (Menu 5.2.5)This folder stores e-mails that you have received.Viewing an e-mail1. Press <Select> when Check new mail displays, or press <Options> and select Retrieve. The phone checks the e-mail server and downloads new e-mails. The following icons may appear on the list to show the e-mail status:• Retrieved from the server• Being retrieved• Failed to retrieve2. Select an e-mail or a header.3. Press [ / ] to view other pages in the e-mail. Press and hold [ / ] to move to the first or last page in the e-mail.4. Press [] or [] to view the next or previous e-mail.Using e-mail optionsWhile viewing the e-mail or header, press <Options> to access the following options:•Retrieve: retrieve the body of the e-mail from the e-mail server.•Open file: open the selected file.•Save file: save the selected file.•Reply to: send a reply to the sender or all recipients.•Forward: forward the e-mail to other people.•Delete: delete the e-mail from the phone’s memory or from both the phone’s memory and the e-mail server.•Add to block list: add the sender’s e-mail address or subject to the Block list to reject e-mails from that address or containing that subject.A ! icon next to a message means that the e-mail is of high priority. A grey-coloured e-mail icon indicates low priority.](https://usermanual.wiki/Samsung-Electronics-Co/SGHE780/User-Guide-632784-Page-60.png)
![Menu functions Messages(Menu 5)57•Cut address: extract URLs, e-mail addresses, and phone numbers.•Cut attachment: save the selected attachment or all attachments from the e-mail to your phone’s memory.•Print via Bluetooth: print the e-mail via a Bluetooth-compatible printer. Some printers may not be compatible with the phone.•Protection: protect the e-mail from being deleted. •Details: access the e-mail properties.My folder (Menu 5.2.6)Use this menu to view the messages you have moved to this folder using the Move to my folder option while viewing a message list.Templates (Menu 5.3)Use this menu to make and use templates of frequently used messages.Text template (Menu 5.3.1)You can create SMS templates with the sentences you use frequently so that you can retrieve and insert them when composing an SMS message.Creating a template1. Select an empty location.2. Enter a message and press [OK].Using template optionsFrom the template list, press <Options> to access the following options:•Edit: edit the template.•Send: create and send a new message via SMS, MMS, or e-mail.•Delete: delete the selected template.Multimedia message template (Menu 5.3.2)You can access embedded MMS templates or ones you have saved so that you can use them in composing an MMS message.](https://usermanual.wiki/Samsung-Electronics-Co/SGHE780/User-Guide-632784-Page-61.png)
![58Menu functionsCreating a template1. Press <Options> and select Add new.2. Create a template as you would when creating an MMS message.3. Press <Options> and select Save to → Templates.Using template optionsFrom the template list, press <Options> to access the following options:•View: open the selected template.•Send message: create and send a new message via MMS.•Edit: edit the selected template.•Add new: add a new template.•Delete: delete the selected template or all templates. You cannot delete the embedded templates.Delete all (Menu 5.4)Use this menu to delete all messages in each message type at once.1. Press [OK] to select the message folders to be cleared.2. Press <Delete>.3. Press <Yes> to confirm the deletion.Settings (Menu 5.5)Use this menu to set up various options for using the messaging service.Text messages (Menu 5.5.1)You can configure SMS settings.•Sending options: set up the options for sending SMS messages:Send read receipt: send a read-reply request along with your messages.Send delivery receipt: set the network to inform you when messages have been delivered.](https://usermanual.wiki/Samsung-Electronics-Co/SGHE780/User-Guide-632784-Page-62.png)
![Menu functions Planner(Menu 7)69Alarm(Menu 7.1) Use this menu to set alarms. The alert type for a normal alarm corresponds to the call alert type settings. A wake up alarm is not affected by your sound settings.Setting an alarm1. Select the type of alarm.2. Set each alarm option.•Alarm: activate the alarm.•Alarm time: enter the time for the alarm to ring.•AM/PM: select AM or PM in 12-hour format.•Alarm day: select days of the week to ring the alarm.•Alarm tone: select an alarm tone.3. Press <Save>.Stopping an alarm• For a non-wake-up alarm, press any key.• For a wake-up alarm, press <OK> or [OK]. Press any key, except <OK> and [OK], to cause it to sound again after 5 minutes. You can do this a maximum of 5 times.Deactivating an alarm1. Select the alarm you want to deactivate.2. Select Off on the Alarm line and press <Save>.Setting the alarm to sound even if the phone is offFrom the Alarm screen, select Auto power-up → On.If the phone is off when it is time for the alarm to sound, the phone switches on and sounds the alarm.Calendar (Menu 7.2)Use this menu to keep track of your monthly schedule.Consulting the calendarWhen you access the Calendar menu, the calendar in Month view appears with today’s date indicated by a blue box.](https://usermanual.wiki/Samsung-Electronics-Co/SGHE780/User-Guide-632784-Page-73.png)
![70Menu functionsSelecting a day• Press [Left] or [Right] to move by day.• Press [Up] or [Down] to move by week.• Press [ / ] to move by month.Using calendar optionsPress <Options> to access the following options:•View by: change the view mode of the calendar.•Create: add a new item.next section•Go to: select today’s date or enter a specific date.•Event list: sort items by type of item.•Delete: delete items stored on the calendar by using various deleting options.•Settings: change the default settings for the calendar.Default view by: select the default calendar view mode.Week starts on: select which day of the week the calendar starts with.•Missed alarm events: access items whose alarms you have missed.•Memory status: access memory information for the items stored on the calendar.Creating an itemYou can store appointments, anniversaries, miscellaneous items, and tasks on the calendar. More than one item per day can be stored.Entering a new appointment or miscellaneous item1. Select a date on the calendar.2. Press <Options> and select Create → Appointments or Miscellaneous.3. Enter information or change the settings:•Subject: enter a title for the item.•Details: enter item details.•Start date and Start time: enter the starting date and time for the item.•AM/PM: select AM or PM in 12-hour time format.•End date and End time: enter the ending date and time for the item.](https://usermanual.wiki/Samsung-Electronics-Co/SGHE780/User-Guide-632784-Page-74.png)
![72Menu functions•before: set how long before the task the alarm is to alert you.•Alarm time: enter the time for the alarm to ring.•AM/PM: select AM or PM in 12-hour time format.•Alarm tone: select an alarm tone.4. Press <Save> to save the task.Viewing an itemOnce you have scheduled things, the item icons and the number of items for a specific day appears at the bottom of the calendar.Accessing an item1. Select a date on the calendar to display the items for that day. 2. Select an item to view its details.3. Press [Left] or [Right] to access the other items scheduled for the selected day.Using optionsWhile viewing an item, press <Options> to access the following options:•Edit: edit the item.•Create: add a new item.•Send via: send the item via SMS, MMS, e-mail, or Bluetooth.•View by: change the view mode of the calendar.•Done/Undone: change the status of the task item.•Delete: delete the item.•Print via Bluetooth: print the item by connecting the phone to a printer via Bluetooth. Some printers may not be compatible with the phone.Viewing an item in a different modeYou can change the calendar display to Day view or Week view. Press <Options> and select View by → a view mode. • Appointments • Anniversaries• Tasks • Miscellaneous items](https://usermanual.wiki/Samsung-Electronics-Co/SGHE780/User-Guide-632784-Page-76.png)
![74Menu functionsSetting the local time zone1. From the world map, press [Left] or [Right] to scroll to the city you want on the upper line ( ). As the time line moves, the time and date of the given zone displays.2. Press [OK] to save the time zone.Viewing world time1. From the world map, move to the lower line ( ).2. Press [Left] or [Right] to scroll to the city you want.3. Press [OK] to save the time zone.Applying Daylight Savings Time1. From the world map, press <Options> and select Set daylight saving time.2. Press [OK] to select the time zones you want. 3. Press <Save>.Calculator(Menu 7.5) Use this menu to perform basic arithmetic functions, such as addition, subtraction, multiplication, and division.1. Enter the first number. • Press [ ] to insert a decimal point.• Press [ ] to insert a bracket.•Press <Options> to use additional arithmetic functions.2. Press one of the Navigation keys to access the math function you want.3. Enter the second number.4. Press [OK] to view the result.5. If necessary, repeat from step 2 to continue the calculation.Converter(Menu 7.6)Use this menu for common conversions, such as currency and temperature.](https://usermanual.wiki/Samsung-Electronics-Co/SGHE780/User-Guide-632784-Page-78.png)
![Menu functions Planner(Menu 7)75Performing a conversion1. Select a converter.2. Press [Left] or [Right] to select the original unit and press [Down].3. Enter the value to be converted and press [Down].•Press [] to insert a decimal point.•Press [] to change the temperature to above zero (+) or below zero (-).4. Press [Left] or [Right] to select the unit to which you want to convert.The equivalent value for the amount you entered displays.Using converter optionsPress <Options> to access the following options:•Clear: clear the current values.•Reverse: reverse the conversion.•Currency rates: edit the currency rate list.Timer(Menu 7.7)Use this menu to set a period of time for the phone to count down. The phone will sound an alarm when the specified period of time has expired.Starting the timer1. Press <Set>.2. Enter the length of time you want to count down and press <OK>.3. Press [OK] to start counting down.Stopping the timer• Press any key when the timer rings.• Press [OK] on the Timer screen to stop the timer before it rings.Stopwatch(Menu 7.8)Use this menu to measure elapsed time. The maximum time is 10 hours.1. Press [OK] to start the stopwatch.2. Press [OK] to check an interval. You can repeat this step for a total of 4 intervals.](https://usermanual.wiki/Samsung-Electronics-Co/SGHE780/User-Guide-632784-Page-79.png)
![76Menu functionsCamera(Menu 8) You can use the camera module embedded in your phone to take photos and record videos.To access this menu, press <Menu> in Idle mode and select Camera.Take a photo (Menu 8.1)The camera produces JPEG photos. Taking a photo1. Access the Take a photo menu or press and hold [ ] to turn on the camera.2. Make any desired adjustments.• Press < > to access camera options. next section• Use the keypad to change the camera settings or switch to other modes.p. 783. Press [] to take a photo. The photo is saved in the Photos folder.Using camera options in Capture modeIn Capture mode, press < > to access the following options:•Record video: switch to Record mode.•Shooting mode: take a photo in the following modes:Single shot: take a photo in normal mode. You can select whether or not the camera automatically saves a photo.• Do not take photos of people without their permission.• Do not take photos in a place where cameras are not allowed.• Do not take photos in a place where you may interfere with another person’s privacy.When you take a photo in direct sunlight or in bright conditions, shadows may appear on the photo.4.To Pressaccess photo options <Options>.p. 78delete the photo [C] and then <Yes>.return to Capture mode <Back> or [OK].](https://usermanual.wiki/Samsung-Electronics-Co/SGHE780/User-Guide-632784-Page-80.png)
![Menu functions Camera(Menu 8)79•Go to photos: access the Photos folder.•Bluetooth visibility: share the selected file with other Bluetooth devices.•Print via: print the file by connecting the phone to a printer via USB or Bluetooth. Some printers may not be compatible with the phone.•Protection: protect the file from being deleted.•Details: access the file properties.Record video (Menu 8.2)You can record a video of what is displayed on the camera screen and save it.Recording a video1. Access the Record video menu.2. Make any desired adjustments. • Press < > to access camera options. next section• Use the keypad to change the camera settings or switch to other modes.p. 803. Press [] to start recording.4. Press [] or < > to stop recording. The video is automatically saved in the Videos folder.Using camera options in Record modeIn Record mode, press < > to access the following options:•Take a photo: switch to Capture mode.•Effects: change the colour tone or apply a special effect.•Timer: set a time delay before the camera starts recording a video.•Go to videos: access the Videos folder.5.To Pressplay back the video clip[OK].access video options the left soft key.p. 81delete the video [C] and then <Yes>.return to Record mode the right soft key.](https://usermanual.wiki/Samsung-Electronics-Co/SGHE780/User-Guide-632784-Page-83.png)

![Menu functions Settings(Menu 9)83Volume key(Menu 9.2.4)Use this menu to set whether the phone mutes the call ringer or rejects a call if you press and hold [ / ] when a call comes in.Extra settings (Menu 9.2.5)You can turn the automatic redialing or answering features on or off, and lock the external keys.•Auto redial: set the phone to make up to ten attempts to redial a phone number after an unsuccessful call.•Anykey answer: answer an incoming call by pressing any key, except <Reject> and [ ]. •Voice clarity: remove extraneous noise and increase call quality so that the person with whom you are speaking can hear you clearly even if you are in a noisy place.•Active folder: answer an incoming call by opening.•Cover keylock: lock the exposed keys to keep accidental presses from affecting your phone’s operation when the phone is closed.Offline mode (Menu 9.2.6)Use this menu to turn on or off the network features such as call functions, so that you can use the phone in a flight.Display settings(Menu 9.3)Use this menu to change settings for the display and light.Wallpaper(Menu 9.3.1)You can change the background image that is displayed on each display:•Main display: select a background image. •Cover display: select an image or text to be displayed on the external display.Clock: select a clock type.Cover title: enter the text you want.Wallpaper images: select an image.Text display(Menu 9.3.2) You can change the display settings for the text displayed on the idle screen.](https://usermanual.wiki/Samsung-Electronics-Co/SGHE780/User-Guide-632784-Page-87.png)
![Menu functions Settings(Menu 9)85Incoming call(Menu 9.4.1)Use this menu to select a volume level and alert type for incoming calls.•Alert type: specify how you are to be informed of incoming calls.•Ring tone: select a ringtone for the call ringer.•Volume: select a ringtone volume.Keypad tone(Menu 9.4.2)Use this menu to select the tone that the phone sounds when you press a key.Message tone(Menu 9.4.3) Use this menu to set up the ringtone for incoming messages and e-mails. •Tone: select one of several message tones. •Alert type: specify how you are informed when a message comes in. •Repetition: specify how often the phone informs you of a new message.Power on/off(Menu 9.4.4)Use this menu to select the melody that the phone sounds when it is switched on or off. Folder tone(Menu 9.4.5)Use this menu to select the tone that the phone sounds when you open or close the phone. Silent mode(Menu 9.4.6)Use this menu to set how the phone acts to alert you to a specific event in Silent mode. Extra tones(Menu 9.4.7) Use this menu to customise additional tones for the phone. •Minute minder: set the phone to beep every minute during an outgoing call to keep you informed of the length of your call.•Connection tone: set the phone to beep when an outgoing call is connected to the system.•Alerts on call: set the phone to beep when you receive a new message or when the time for an alarm comes during a call.You can adjust the keypad tone volume using [ / ] in Idle mode.](https://usermanual.wiki/Samsung-Electronics-Co/SGHE780/User-Guide-632784-Page-89.png)
![Menu functions Settings(Menu 9)89Change password(Menu 9.6.4)Use this menu to change your phone password.Privacy(Menu 9.6.5)Use this menu to lock access to messages, files, or all menu functions on the phone, except for call functions. When a privacy options enabled, you must enter the phone password to access the locked items or functions. SIM lock(Menu 9.6.6)The SIM lock feature allows your phone to work only with the current SIM by assigning a SIM lock code. You must enter the SIM lock code to use a different SIM card.FDN mode(Menu 9.6.7) If supported by your SIM card, Fixed Dialling Number (FDN) mode restricts your outgoing calls to a limited set of phone numbers. When this feature is enabled, you can make calls only to phone numbers stored on the SIM card.Change PIN2(Menu 9.6.8)If supported by your SIM card, the Change PIN2 feature changes your current PIN2. Memory status(Menu 9.7) Use this menu to check the amount of memory being used for storing data in Messages, My files, Calendar, Phonebook, JAVA world, and Memo. You can also view the amount of shared memory.Reset settings(Menu 9.8) Use this menu to reset the phone’s settings you have changed.1. Press [OK] to select the setting categories to be reset. 2. Press <Reset>.3. Press <Yes> to confirm the reset.4. Enter the phone password and press <OK>.The password is preset to 00000000. You can change this password.p. 88](https://usermanual.wiki/Samsung-Electronics-Co/SGHE780/User-Guide-632784-Page-93.png)
![90Solve problemsHelp and personal needsTo save the time and expense of an unnecessary service call, perform the simple checks in this section before contacting a service professional.When you switch on your phone, the following messages may appear:“Insert SIM”• Be sure that the SIM card is correctly installed.“Phone lock”• The automatic locking function has been enabled. You must enter the phone’s password before you can use the phone.“Enter PIN”• You are using your phone for the first time. You must enter the PIN supplied with the SIM card.• The PIN check feature is enabled. Every time the phone is switched on, the PIN has to be entered. To disable this feature, use the PIN check menu.“Enter PUK”• The PIN code has been entered incorrectly three times in succession, and the SIM card is now blocked. Enter the PUK supplied by your service provider.“No Service,” “Network Failure,” or “Not Done” displays• The network connection has been lost. You may be in a weak signal area. Move and try again.• You are trying to access an option for which you have no subscription with your service provider. Contact the service provider for further details.You have entered a number but it was not dialled• Be sure that you have pressed [ ].• Be sure that you have accessed the right cellular network.• Be sure that you have not set an outgoing call barring option.](https://usermanual.wiki/Samsung-Electronics-Co/SGHE780/User-Guide-632784-Page-94.png)
![91Solve problemsYour correspondent cannot reach you• Be sure that your phone is switched on. ([ ] pressed for more than one second.)• Be sure that you are accessing the correct cellular network.• Be sure that you have not set an incoming call barring option.Your correspondent cannot hear you speaking• Be sure that you have switched off the microphone.• Be sure that you are holding the phone close enough to your mouth. The microphone is located at the bottom of the phone.The phone starts beeping and “Battery low” flashes on the display• Your battery is insufficiently charged. Recharge the battery.The audio quality of the call is poor• Check the signal strength indicator on the display ( ). The number of bars indicates the signal strength from strong ( ) to weak ( ).• Try moving the phone slightly or moving closer to a window if you are in a building.No number is dialled when you re-call a Phonebook entry•Use the Contact list menu to ensure the number has been stored correctly.• Re-store the number, if necessary.The battery doesn’t charge properly or the phone sometimes turns itself off• Wipe the charging contacts both on the phone and on the battery with a clean soft cloth.If the above guidelines do not help you to solve the problem, take note of:• The model and serial numbers of your phone•Your warranty details• A clear description of the problemThen contact your local dealer or Samsung after-sales service.](https://usermanual.wiki/Samsung-Electronics-Co/SGHE780/User-Guide-632784-Page-95.png)