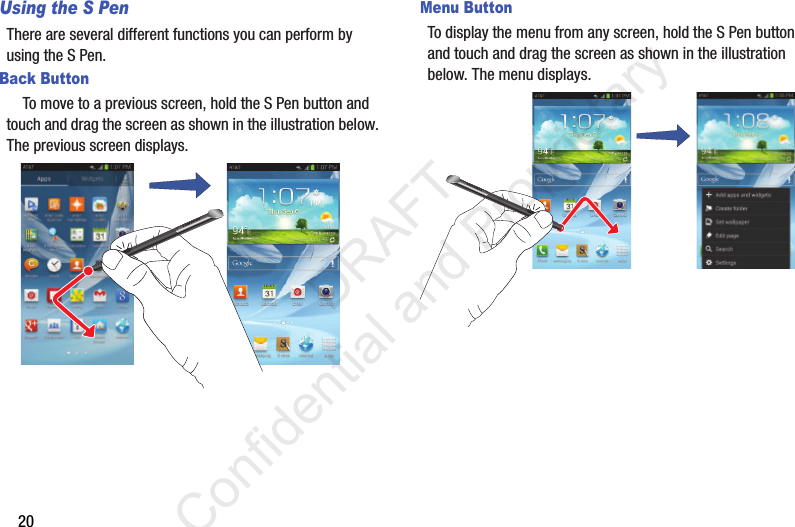
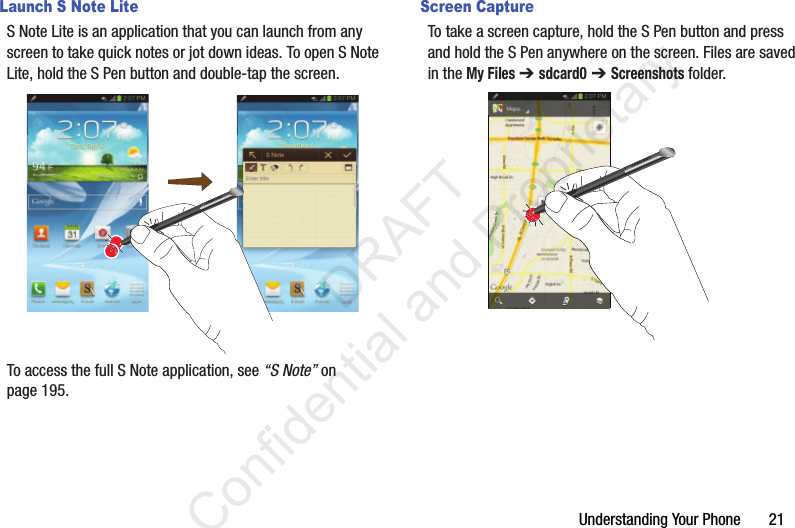
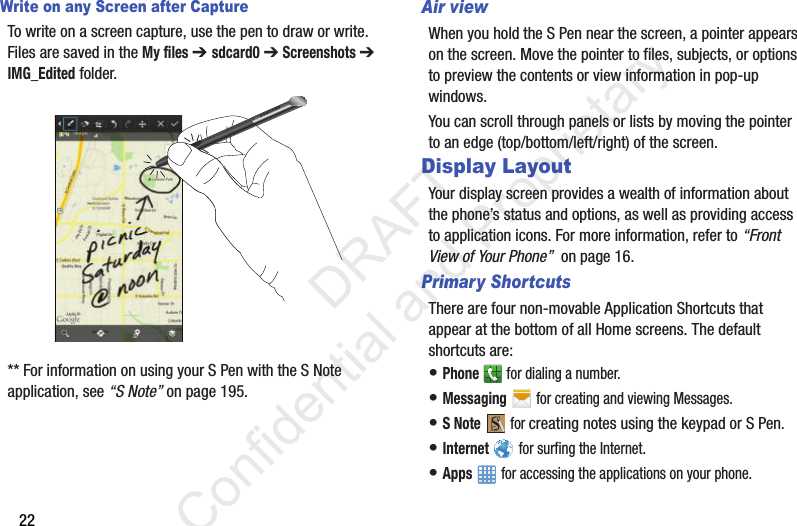
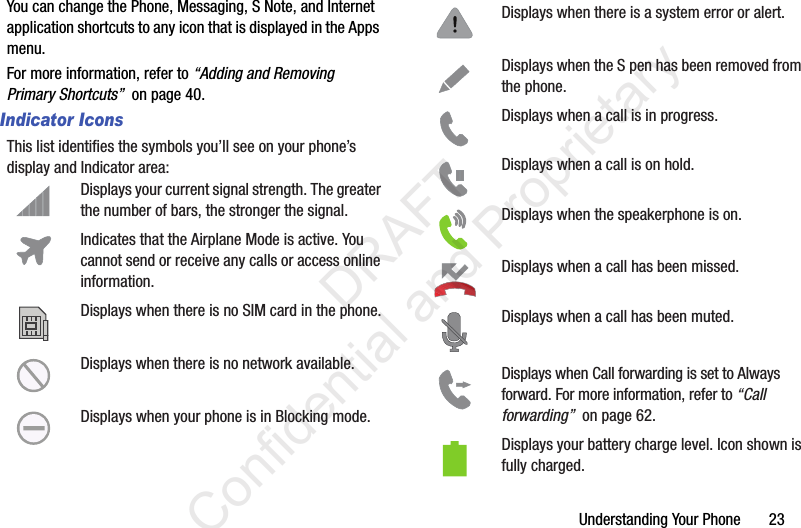
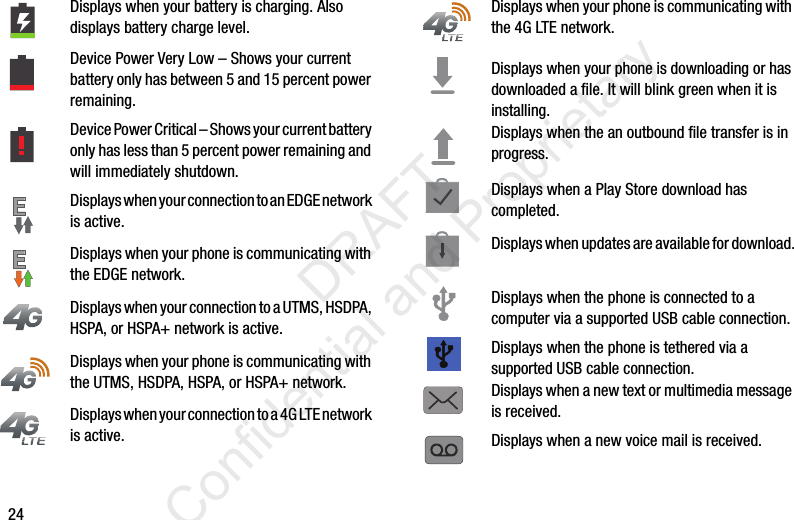
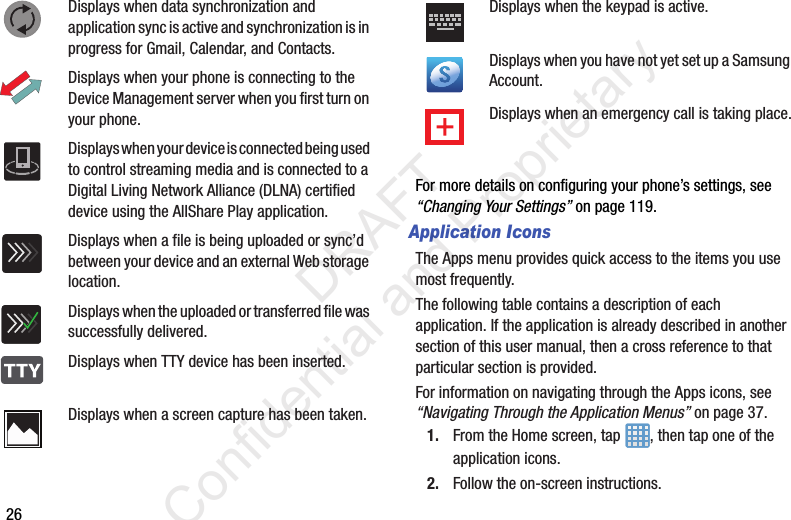
Samsung Electronics Co SGHI317 Cellular/PCS GSM/EDGE/WCDMA Phone with LTE, WLAN, RFID and Bluetooth User Manual i317 Galaxy Note II
Samsung Electronics Co Ltd Cellular/PCS GSM/EDGE/WCDMA Phone with LTE, WLAN, RFID and Bluetooth i317 Galaxy Note II
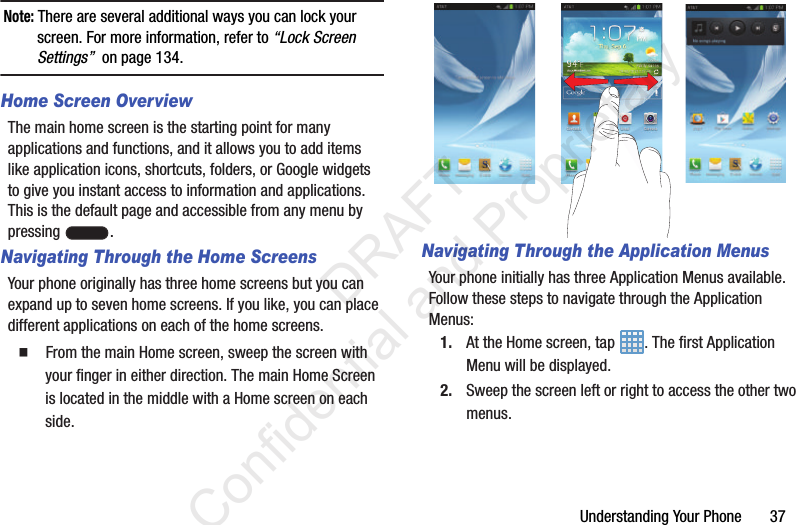
Contents
- 1. User Manual
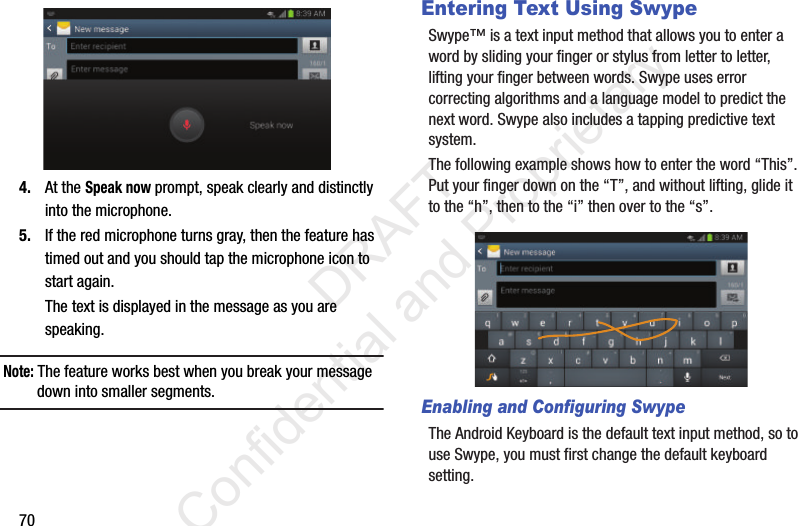
- 2. Users Manual
User Manual


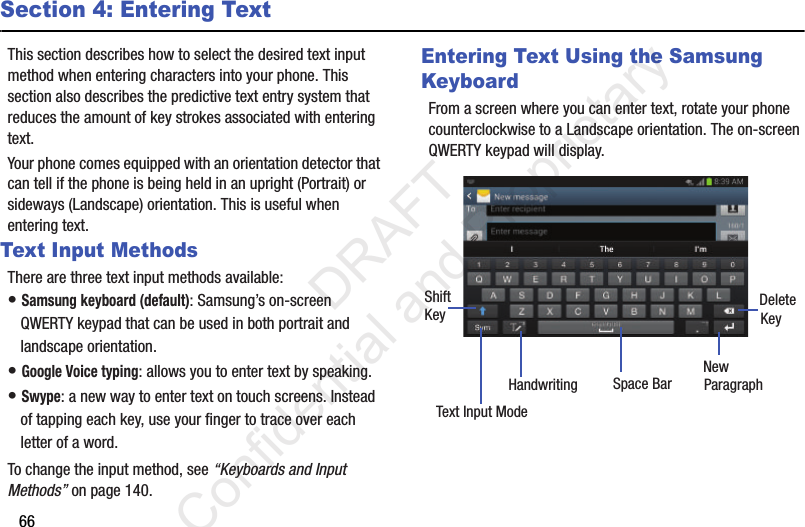


![1245. Tap Show password and Show advanced options to see them displayed.6. Tap Save.7. Press for the following options:• Timeout settings: allows you to set the time your device will be available as a portable Wi-Fi hotspot.•Help: provides additional information.Connecting to Portable Wi-Fi hotspot from other devices1. Activate Wi-Fi on the device that wants to connect to your phone.2. Find [SGHI317_xxxx] in the Wi-Fi network list and connect to it. XXXX are four randomly generated digits that will appear when you set up a Portable Wi-Fi hotspot on your device.The connected device can now use internet through your Portable Wi-Fi hotspot. Note: Activating Wi-Fi and connecting to your phone will be different depending on the type of the other device.Help䡲 From the Tethering and portable hotspot menu, tap Help for additional informationVPN settingsThe VPN settings menu allows you to set up and manage Virtual Private Networks (VPNs).Important! Before you can use a VPN you must establish and configure one.Adding a Basic VPNBefore you add a VPN you must determine which VPN protocol to use: PPTP (Point-to-Point Tunneling Protocol), L2TP (Layer 2 Tunneling Protocol), L2TP/IPSec PSK (Pre-shared key based L2TP/IPSec), or L2TP/IPSec CRT (Certificate based L2TP/IPSec).1. Before using VPN, you must first set up a screen unlock PIN or password. For more information, refer to “Lock Screen Settings” on page 134.2. From the Home screen, tap ➔ Settings ➔ More settings ➔ VPN.3. Tap Basic VPN. DRAFT Confidential and Proprietary](https://usermanual.wiki/Samsung-Electronics-Co/SGHI317.User-Manual/User-Guide-1795082-Page-130.png)
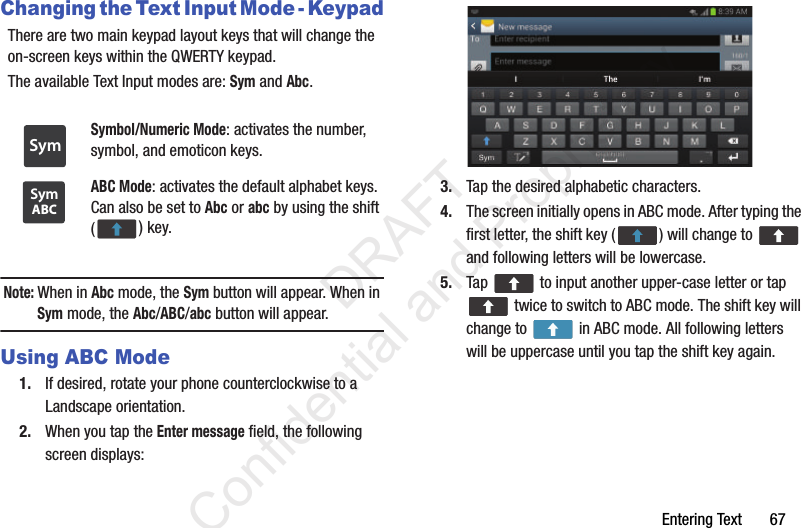
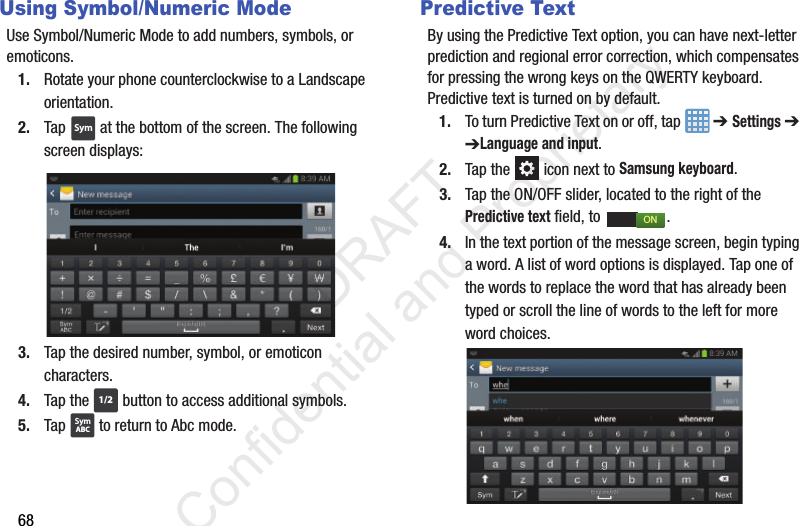
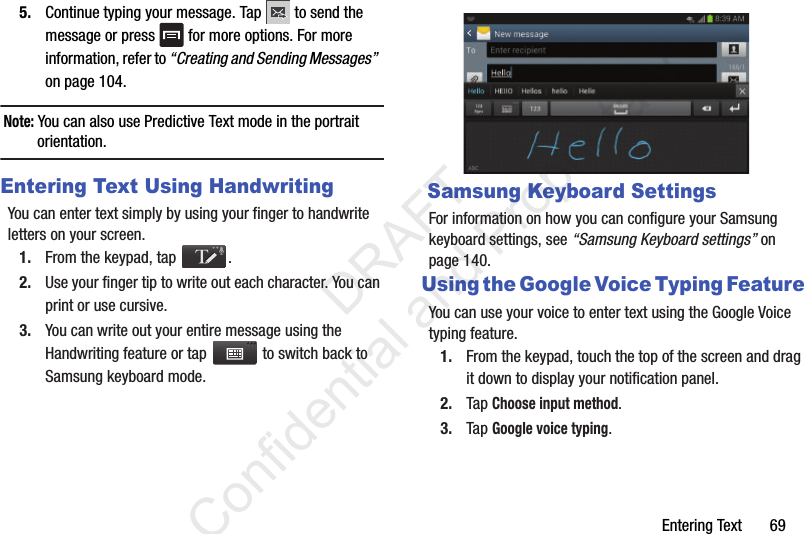
![140Keyboards and Input MethodsYou can change the keyboard used by your device by following these steps:1. From the Home screen, tap ➔ Settings ➔ Language and input.2. Tap Default and select a keyboard.Select Samsung keyboard or Swype.3. Tap Set up input methods.4. Tap the icon next to the input method that you would like to configure the settings for.5. Based on your selection of input method, the appropriate settings will appear and are explained below.Google voice typing settingsFrom this menu you can set Samsung keyboard options.1. From the Home screen, tap ➔ Settings ➔ Language and input.2. Tap the icon next to Google voice typing. 3. The following options are available:• Choose input languages: tap on a language that you want to input. Select Automatic to use the local language or select a language from the list.• Block offensive words: tap to create a checkmark and enable the blocking of recognized offensive words from the results of your voice-input Google typing.• Download offline speech recognition: Enables voice input while offline.Samsung Keyboard settingsFrom this menu you can set Samsung keyboard options.1. From the Home screen, tap ➔ Settings ➔ Language and input.2. Tap the icon next to Samsung keyboard.• Portrait keypad types allows you to choose a keypad configuration (Qwerty [default] or 3x4 Keyboard).• Input languages sets the input language. Tap a language from the available list. The keyboard is updated to the selected language.• Predictive text enables predictive text entry mode. This must be enabled to gain access to the advanced settings. Touch and hold to access the advanced settings. DRAFT Confidential and Proprietary](https://usermanual.wiki/Samsung-Electronics-Co/SGHI317.User-Manual/User-Guide-1795082-Page-146.png)


![222• Reduce risk of repetitive motion injuries. When you repetitively perform actions, such as pressing keys, drawing characters on a touch screen with your fingers, or playing games, you may experience occasional discomfort in your hands, neck, shoulders, or other parts of your body. When using your device for extended periods, hold the device with a relaxed grip, press the keys lightly, and take frequent breaks. If you continue to have discomfort during or after such use, stop use and see a physician.• If your device has a camera flash or light, do not use the flash or light close to the eyes of people or pets. [122011] DRAFT Confidential and Proprietary](https://usermanual.wiki/Samsung-Electronics-Co/SGHI317.User-Manual/User-Guide-1795082-Page-228.png)
![228Samsung Telecommunications America, LLC1301 E. Lookout DriveRichardson, Texas 75082Phone: 1-800-SAMSUNGPhone: 1-888-987-HELP (4357)©2012 Samsung Telecommunications America, LLC. All rights reserved.No reproduction in whole or in part allowed without prior written approval. Specifications and availability subject to change without notice. [111611]End User License Agreement for SoftwareIMPORTANT. READ CAREFULLY: This End User License Agreement (“EULA”) is a legal agreement between you (either an individual or a single entity) and Samsung Electronics Co., Ltd. for software owned by Samsung Electronics Co., Ltd. and its affiliated companies and its third party suppliers and licensors that accompanies this EULA, which includes computer software and may include associated media, printed materials, “online” or electronic documentation (“Software”). BY CLICKING THE “I ACCEPT” BUTTON (OR IF YOU BYPASS OR OTHERWISE DISABLE THE “I ACCEPT”, AND STILL INSTALL, COPY, DOWNLOAD, ACCESS OR OTHERWISE USE THE SOFTWARE), YOU AGREE TO BE BOUND BY THE TERMS OF THIS EULA. IF YOU DO NOT ACCEPT THE TERMS IN THIS EULA, YOU MUST CLICK THE “DECLINE” BUTTON, AND DISCONTINUE USE OF THE SOFTWARE.1. GRANT OF LICENSE. Samsung grants you the following rights provided that you comply with all terms and conditions of this EULA: You may install, use, access, display and run one copy of the Software on the local hard disk(s) or other permanent storage media of one computer and use the Software on a single computer or a mobile device at a time, and you may not make the Software available over a network where it could be used by multiple computers at the same time. You may make one copy of the Software in machine-readable form for backup purposes only; provided that the backup copy must include all copyright or other proprietary notices contained on the original.2. RESERVATION OF RIGHTS AND OWNERSHIP. Samsung reserves all rights not expressly granted to you in this EULA. The Software is protected by copyright and other intellectual DRAFT Confidential and Proprietary](https://usermanual.wiki/Samsung-Electronics-Co/SGHI317.User-Manual/User-Guide-1795082-Page-234.png)