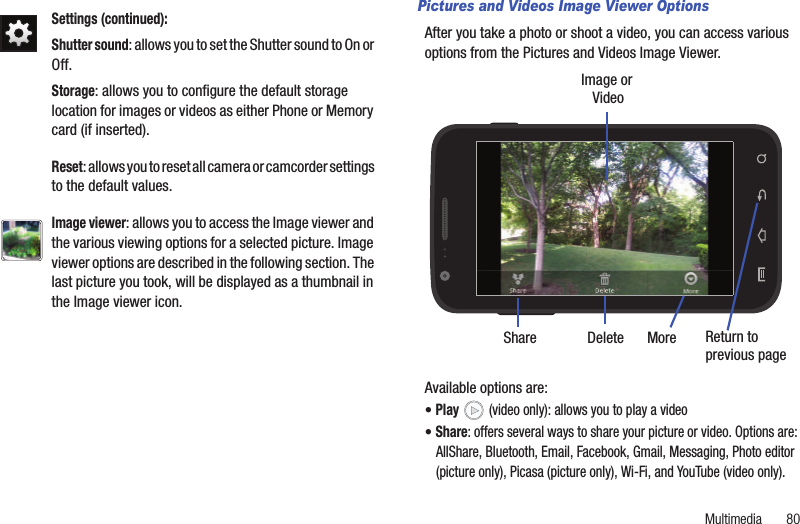
Samsung Electronics Co SGHI747 Portable Handset with Multi-Band GSM/EDGE/WCDMA/LTE, WLAN, Bluetooth and RFID User Manual i727 Galaxy S II Skyrocket
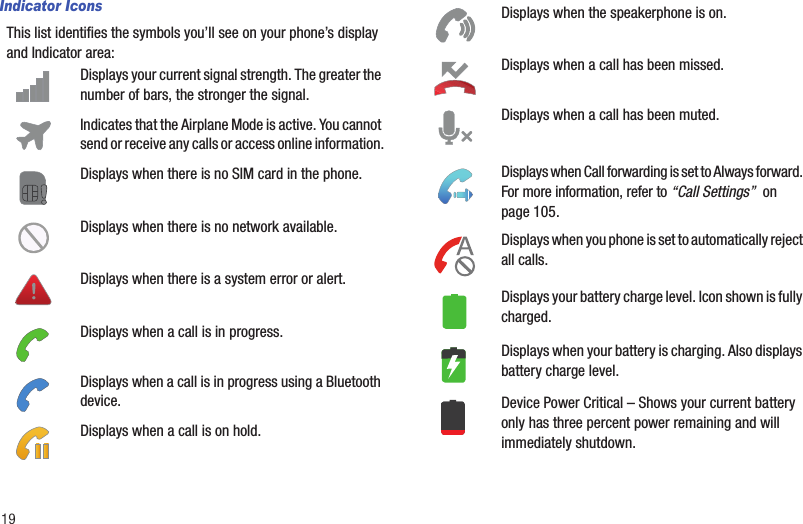
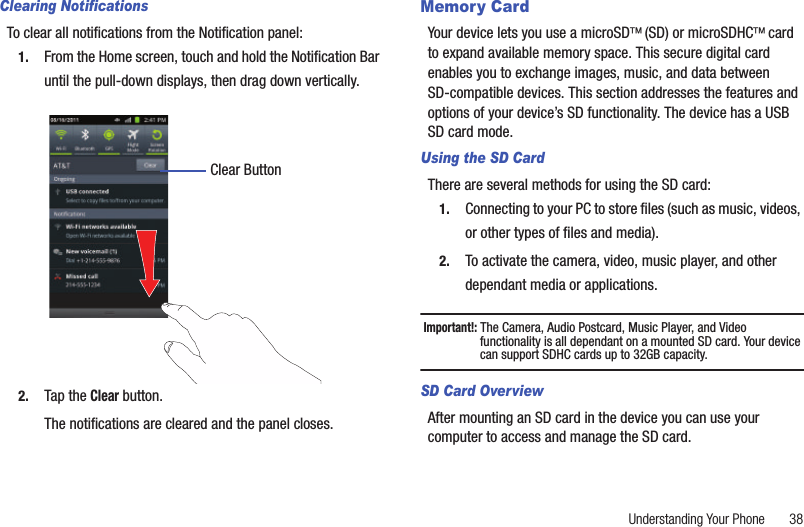
Samsung Electronics Co Ltd Portable Handset with Multi-Band GSM/EDGE/WCDMA/LTE, WLAN, Bluetooth and RFID i727 Galaxy S II Skyrocket
Users Manual


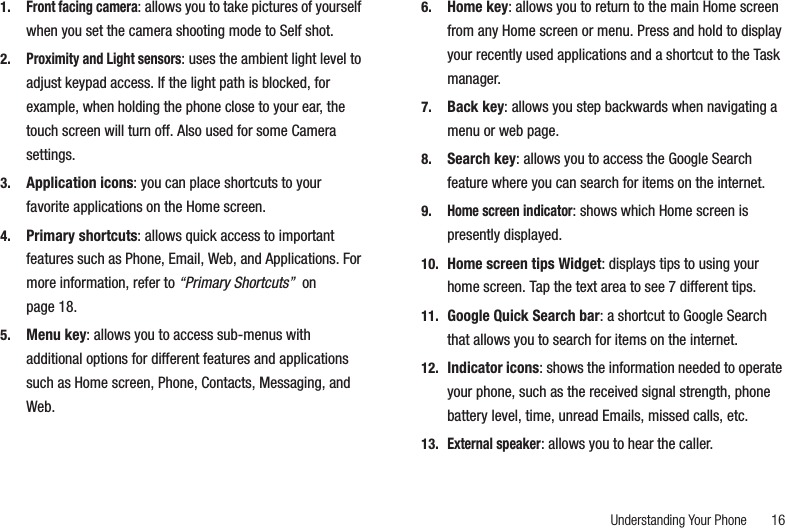
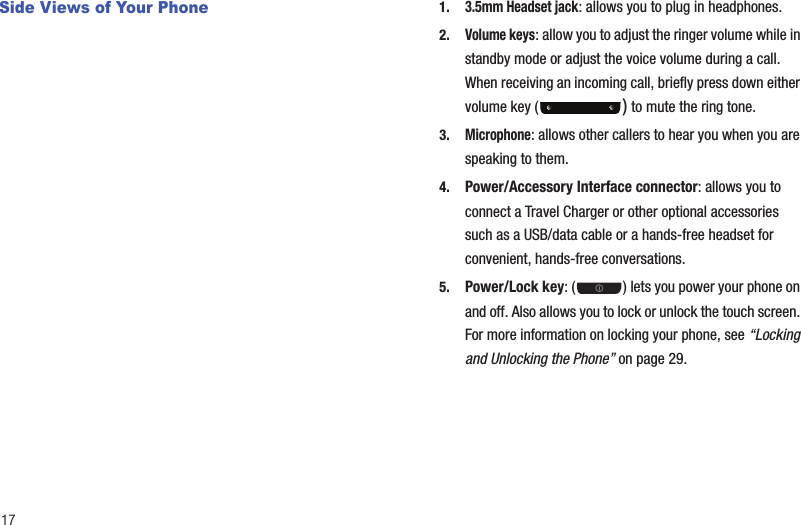
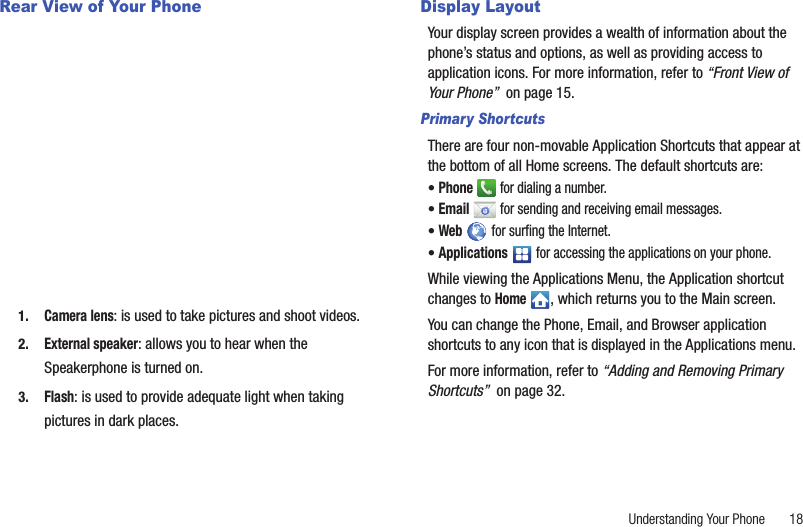


![Changing Your Settings 102Connecting to Portable Wi-Fi hotspot from other devices1. Activate Wi-Fi on the device that wants to connect to your phone.2. Find [AndroidHotspotxxxx] in the Wi-Fi network list and connect to it (xxxx are the last four digits of the phone number that is offering the Portable Wi-Fi hotspot).The connected device can now use internet through your Portable Wi-Fi hotspot. Note: Activating Wi-Fi and connecting to your phone will be different depending on the type of device.VPN settingsThe VPN settings menu allows you to set up and manage Virtual Private Networks (VPNs).Important!: Before you can use a VPN you must establish and configure one.Adding a VPNBefore you add a VPN you must determine which VPN protocol to use: PPTP (Point-to-Point Tunneling Protocol), L2TP (Layer 2 Tunneling Protocol), L2TP/IPSec PSK (Pre-shared key based L2TP/IPSec), or L2TP/IPSec CRT (Certificate based L2TP/IPSec).1. From the Home screen, tap ➔ Settings ➔ Wireless and network ➔ VPN settings.2. Tap Add VPN.To establish a PPTP (Point-to-Point Tunneling Protocol):1. Tap Add PPTP VPN. 2. Tap VPN name, add a name for this connection using the keypad, then tap OK.3. Tap Set VPN server, add a name using the keypad, then tap OK.4. Tap Enable Encryption to make a checkmark (if desired).5. Tap DNS search domains, add a name for DNS search using the keypad, then tap OK.To establish a L2TP (Layer 2 Tunneling Protocol):1. Tap Add L2TP VPN. 2. Tap VPN name, add a name for this connection using the keypad, then tap OK.3. Tap Set VPN server, add a name using the keypad, then tap OK.4. Tap Enable L2TP Secret to make a checkmark (if desired).](https://usermanual.wiki/Samsung-Electronics-Co/SGHI747/User-Guide-1690708-Page-107.png)


![Connections 1342. Tap the Bluetooth field to deactivate the feature. The green checkmark will be removed.Bluetooth Status IndicatorsThe following icons show your Bluetooth connection status at a glance:Displays when Bluetooth is active.Displays when Bluetooth is connected (paired) and communicating.Displays when Bluetooth is on but is not connected to a Bluetooth device.Displays when Bluetooth is disabled (default status).Bluetooth SettingsThe Bluetooth settings menu allows you to set up many of the characteristics of your device’s Bluetooth service, including:• Entering or changing the name your device uses for Bluetooth communication and description• Setting your device’s visibility (or “discoverability”) for other Bluetooth devices• Displaying your device’s Bluetooth addressTo access the Bluetooth Settings menu:1. From the Home screen, tap ➔ Settings ➔ Wireless and network ➔ Bluetooth settings.2. Verify your Bluetooth is active.3. Tap the Device name, Visible, Visible time-out, and Search for devices fields to set the options.To change your Bluetooth name:1. Verify your Bluetooth is active.2. From the Bluetooth settings page, tap Device name.3. Enter a new name.4. Tap OK to complete the rename process.To make your device visible:1. Verify your Bluetooth is active.2. From the Bluetooth settings page, tap Visible.•Making your device visible allows it to be detected by other devices for pairing and communication.3. Tap Visible-time-out to set how long your device will remain invisible.To scan for Bluetooth devices:1. Verify your Bluetooth is active.[no icon]](https://usermanual.wiki/Samsung-Electronics-Co/SGHI747/User-Guide-1690708-Page-139.png)


![191No reproduction in whole or in part allowed without prior written approval. Specifications and availability subject to change without notice. [050611]End User License Agreement for SoftwareIMPORTANT. READ CAREFULLY: This End User License Agreement ("EULA") is a legal agreement between you (either an individual or a single entity) and Samsung Electronics Co., Ltd. for software owned by Samsung Electronics Co., Ltd. and its affiliated companies and its third party suppliers and licensors that accompanies this EULA, which includes computer software and may include associated media, printed materials, "online" or electronic documentation ("Software"). BY CLICKING THE "I ACCEPT" BUTTON (OR IF YOU BYPASS OR OTHERWISE DISABLE THE "I ACCEPT", AND STILL INSTALL, COPY, DOWNLOAD, ACCESS OR OTHERWISE USE THE SOFTWARE), YOU AGREE TO BE BOUND BY THE TERMS OF THIS EULA. IF YOU DO NOT ACCEPT THE TERMS IN THIS EULA, YOU MUST CLICK THE "DECLINE" BUTTON, AND DISCONTINUE USE OF THE SOFTWARE.1. GRANT OF LICENSE. Samsung grants you the following rights provided that you comply with all terms and conditions of this EULA: You may install, use, access, display and run one copy of the Software on the local hard disk(s) or other permanent storage media of one computer and use the Software on a single computer or a mobile device at a time, and you may not make the Software available over a network where it could be used by multiple computers at the same time. You may make one copy of the Software in machine-readable form for backup purposes only; provided that the backup copy must include all copyright or other proprietary notices contained on the original. 2. RESERVATION OF RIGHTS AND OWNERSHIP. Samsung reserves all rights not expressly granted to you in this EULA. The Software is protected by copyright and other intellectual property laws and treaties. Samsung or its suppliers own the title, copyright and other intellectual property rights in the Software. The Software is licensed, not sold.3. LIMITATIONS ON END USER RIGHTS. You may not reverse engineer, decompile, disassemble, or otherwise attempt to discover the source code or algorithms of, the Software (except and only to the extent that such activity is expressly permitted by applicable law notwithstanding this limitation), or modify, or disable any features of, the Software, or create derivative works based on the Software. You may not rent, lease, lend, sublicense or provide commercial hosting services with the Software.4. CONSENT TO USE OF DATA. You agree that Samsung and its affiliates may collect and use technical information gathered as part of the product support services related to the Software provided to you, if any, related to the Software. Samsung may use this information solely to improve its products or to provide](https://usermanual.wiki/Samsung-Electronics-Co/SGHI747/User-Guide-1690708-Page-197.png)