Samsung Electronics Co SGHS100 Single-Mode PCS GSM Phone User Manual

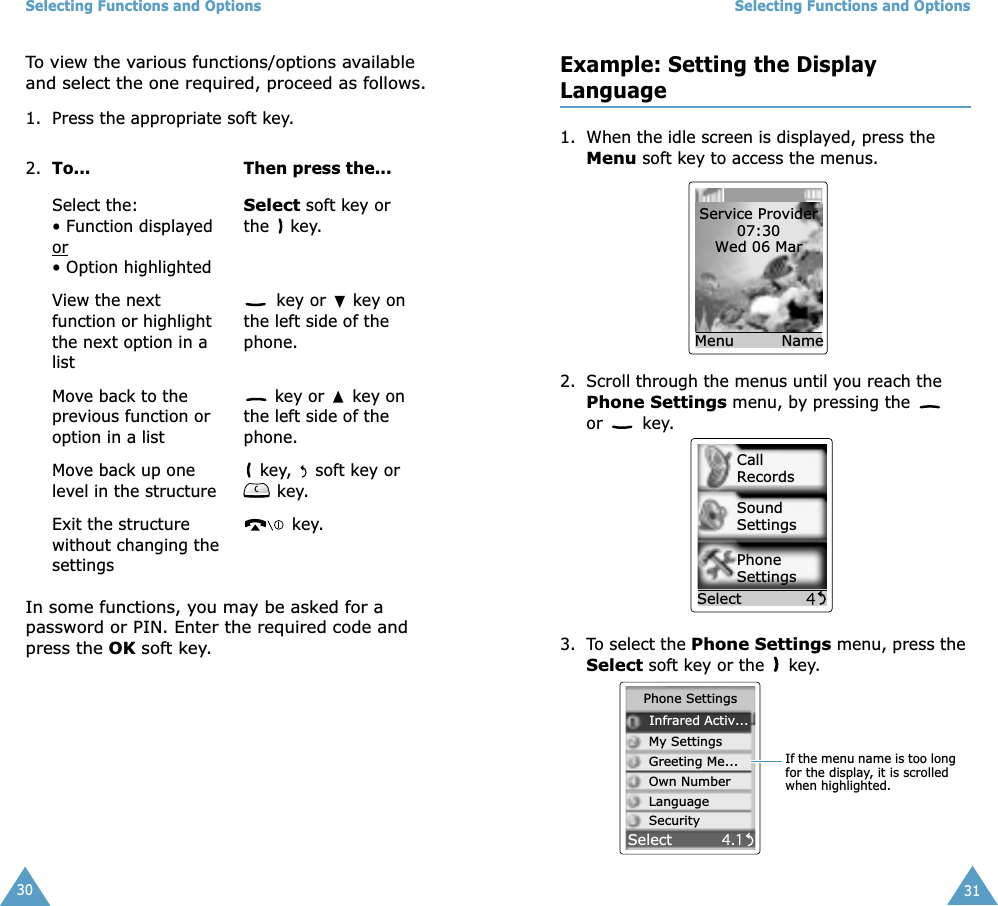
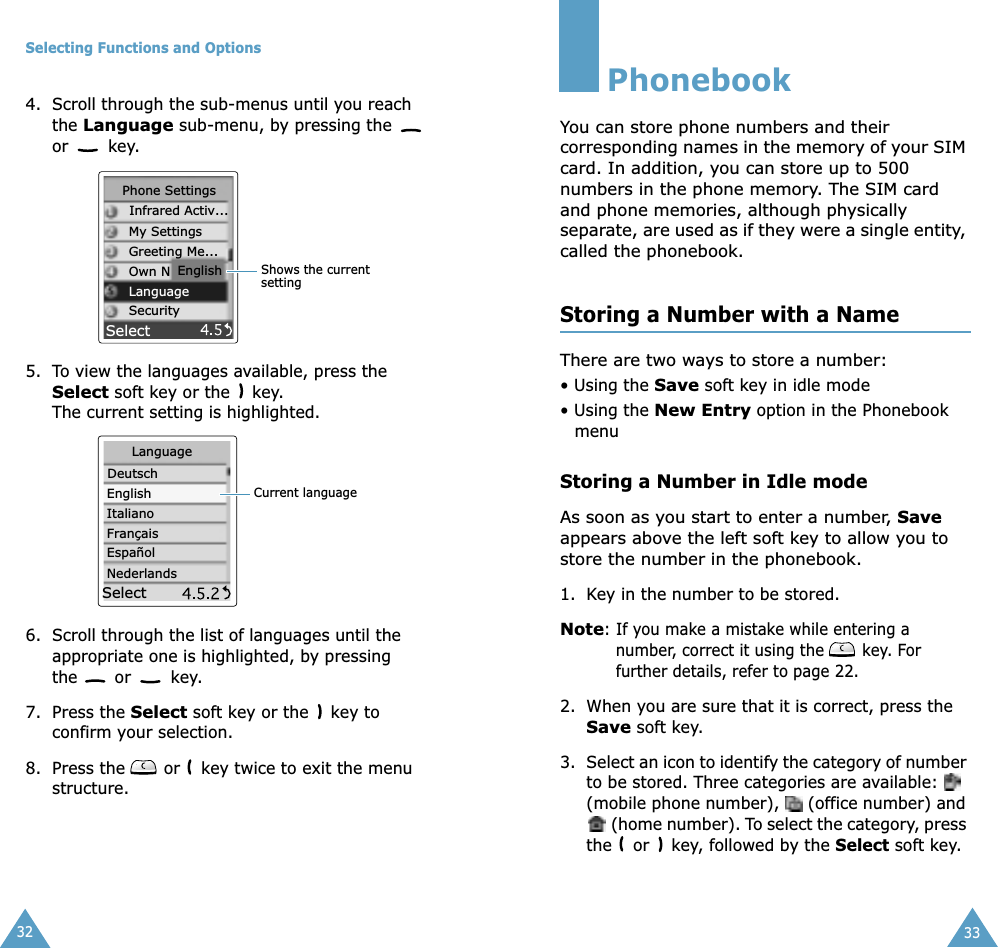
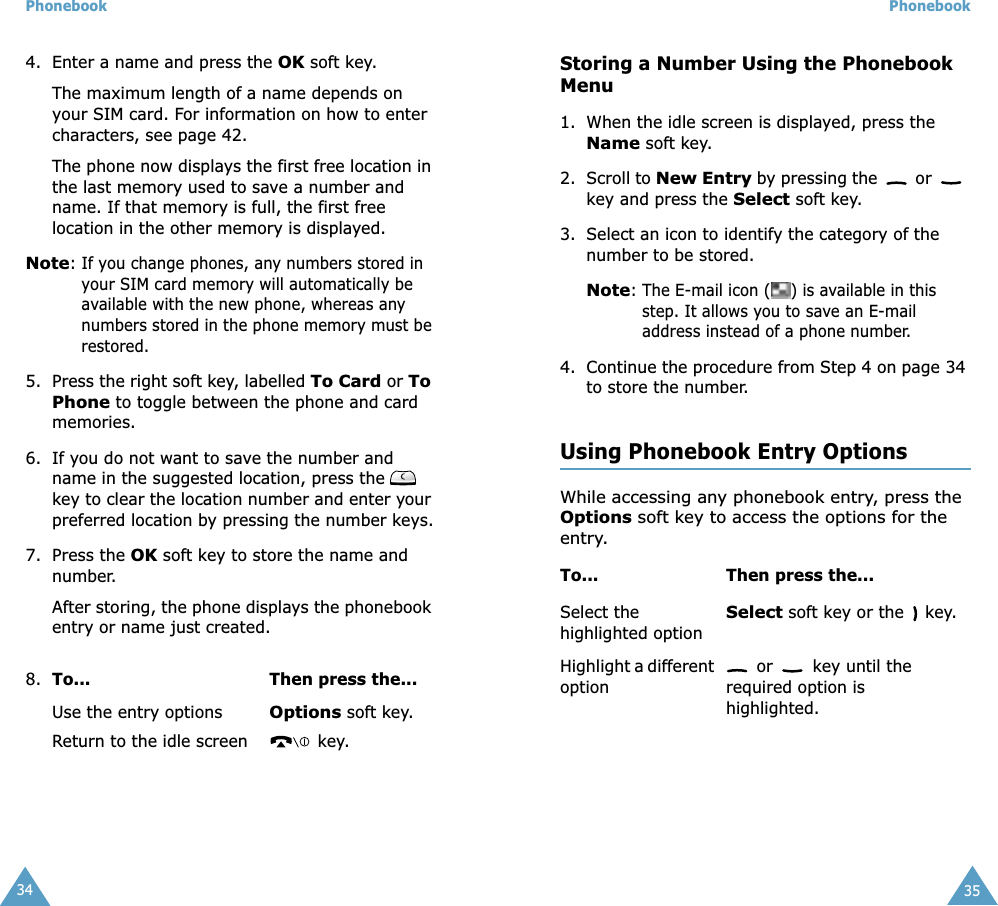
Samsung Electronics Co Ltd Single-Mode PCS GSM Phone Users Manual

Users Manual

TRI BANDGPRS TELEPHONESGH-S100ELECTRONICS* Some of the contents in this manual may differ from your phone,depending on the software installed or your service provider.Printed in KoreaCode No.: GH68-02936AEnglish. 06/2002. Rev. 1.1World Wide Webhttp://www.samsungmobile.com
 2 3 Contents Important Safety Precautions ...................... 7Unpacking .................................................... 9Your Phone ................................................ 10 Phone Layout................................................  10Display ........................................................  13Service Light ................................................  16 Getting Started .......................................... 17 Installing the SIM Card ..................................  17Charging a Battery ........................................  19Switching the Phone On/Off............................  21 Call Functions ............................................ 22 Making a Call................................................  22Adjusting the Volume ....................................  24Answering a Call ...........................................  25Viewing Missed Calls......................................  26Switching Quickly to the Silent Mode................  28 Selecting Functions and Options ................ 29 Example: Setting the Display Language............  31 Phonebook ................................................. 33 Storing a Number with a Name .......................  33Using Phonebook Entry Options.......................  35Searching for and Dialling a Number in the Phone-book............................................................  37Editing a Caller Group ....................................  39Speed-Dialling ..............................................  40Checking Memory Status................................  41
 Contents 4 Entering Text ............................................. 42 Changing the Text Input Mode ........................  43Using the T9 Mode ........................................  44Using the Upper/Lower-CaseCharacter Mode ............................................  45Using the Symbol Mode..................................  47Using the Number Mode .................................  47 In-Call Options........................................... 48 Putting a Call on Hold ....................................  48Switching the Microphone Off (Mute) ...............  49Muting/Sending Key Tones .............................  50Searching for a Number in the Phonebook ........  50Using the SMS Service ...................................  51Answering a Second Call ................................  51Making a Multiparty Call .................................  52 Using the Menus......................................... 54 Accessing Menu Functions by Scrolling .............  54Accessing Menu Functions by Using Shortcuts ...  55List of Menu Functions ...................................  55 Messages ................................................... 60 Read Messages   (Menu 1.1)..................................  60 Write Messages   (Menu 1.2) .................................  62 Templates   (Menu 1.3) .........................................  64 Setup   (Menu 1.4) ................................................  64 Broadcast   (Menu 1.5) ..........................................  66 Voice Mail   (Menu 1.6) ..........................................  67 My Contents   (Menu 1.7) ......................................  68 Memory Status   (Menu 1.8) ..................................  68 Call Records ............................................... 69 Missed Calls   (Menu 2.1).......................................  69 Received Calls   (Menu 2.2) ...................................  69 Dialled Calls   (Menu 2.3) ......................................  70 Call Time   (Menu 2.4) ...........................................  70 Call Cost   (Menu 2.5)............................................  71 Contents 5 Sound Settings........................................... 72 Ring Tone   (Menu 3.1) ..........................................  72 Ring Volume   (Menu 3.2)......................................  72 Alert Type   (Menu 3.3) .........................................  73 Keypad Tone   (Menu 3.4) .....................................  73 Message Tone   (Menu 3.5) ...................................  74 Extra Tones   (Menu 3.6) .......................................  75 Phone Settings........................................... 76 Infrared Activate   (Menu 4.1) ...............................  76 My Settings   (Menu 4.2) .......................................  77 Greeting Message   (Menu 4.3)..............................  78 Own Number   (Menu 4.4) .....................................  78 Language   (Menu 4.5) ..........................................  79 Security   (Menu 4.6).............................................  79 Display Settings    (Menu 4.7)................................  82 Extra Settings   (Menu 4.8) ...................................  84 ShortCut   (Menu 4.9)............................................  85 Reset Settings   (Menu 4.10) .................................  85 Organiser ................................................... 86 Calendar   (Menu 5.1)............................................  86 To Do List   (Menu 5.2)..........................................  88 Time & Date   (Menu 5.3) ......................................  91 Alarm   (Menu 5.4) ................................................  92 Calculator   (Menu 5.5) ..........................................  93 Currency Exchange   (Menu 5.6) ...........................  94 Network Services ....................................... 95 Call Diverting   (Menu 6.1) ....................................  95 Call Barring   (Menu 6.2) .......................................  97 Call Waiting   (Menu 6.3) .......................................  99 Network Selection   (Menu 6.4) ............................ 100 Caller ID   (Menu 6.5)........................................... 101 Closed User Group (CUG)   (Menu 6.6)................. 101 Band Selection   (Menu 6.7) ................................. 103
 Contents 6 Funbox..................................................... 104 Games   (Menu 7.1).............................................. 104 WAP Browser   (Menu 7.2).................................... 104 Downloads   (Menu 7.3)........................................ 104 Solving Problems ..................................... 107Access Codes ........................................... 110 Phone Password..........................................  110PIN ...........................................................  111PUK...........................................................  111PIN2..........................................................  112PUK2 .........................................................  112Barring Password ........................................  113 Health and Safety Information................. 115 Exposure to Radio-FrequencyEnergy (SAR Information)............................ 118Precautions When Using Batteries.................. 120Road Safety............................................... 122Operating Environment................................ 124Potentially Explosive Atmospheres................. 126Emergency Calls......................................... 127Other Important Safety Information.............. 128Care and Maintenance................................. 129 Glossary................................................... 131Index....................................................... 136
 7 Important Safety Precautions Read these guidelines before using your wireless phone. Failure to comply with them may be dangerous or illegal. For more detailed safety information, see “Health and Safety Information” on page 114. Road Safety at All Times Do not use a hand-held phone while driving; park the vehicle first.  Switching Off When Refuelling Do not use the phone at a refuelling point (service station) or near fuels or chemicals. Switching Off in Aircraft Wireless phones can cause interference. Using them in aircraft is both illegal and dangerous. Switching Off in Hospitals Switch off your phone near medical equipment.Follow any regulations or rules in force. Interference All wireless phones may be subject to interference, which could affect their performance. Special Regulations Meet any special regulations in force in any area and always switch off your phone whenever it is forbidden to use it, or when it may cause interference or danger (in a hospital for example).
 Important Safety Precautions 8 Radio Frequency Exposure The design of this phone complies with European Union (EU) requirements relating to radio frequency (RF) exposure. To maintain compliance with these requirements, use only Samsung-supplied or approved accessories. Use of non-approved accessories may violate the requirements. Sensible Use Use only in the normal position (held to the ear). Avoid unnecessary contact with the antenna when the phone is switched on. Accessories and Batteries Use only Samsung-approved accessories and batteries.  Qualified service Only qualified service personnel may install or repair your phone. 9 Unpacking Your package contains the following items.In addition, you can obtain the following accessories for your phone from your local Samsung dealer:• Desktop charger  • Earphone• Simple hands-free kit • Car holder• Standard/slim batteries• Cigarette lighter adapterHandset Travel AdapterBatteryUser’s ManualsEar-MicrophoneSoftware CD-ROMData Cable
 10 Your Phone Phone Layout The following illustrations show the main elements of your phone.EarpieceDisplaySoft key (right)WAP Browser keyPower on/off / menu exit keyAlphanumeric keysSpecial function keysNavigationkeysVolume/menubrowse keysSoft key (left)Dial/menuconfirmation keyIrDA portMicrophoneCancel/correction keyEar-microphonejackAntennaService lightExternal display Your Phone 11 Key Description   In the menu facility , scroll through the menu options and phonebook memory. In idle mode,  allow you to access your favourite menu options directly (for more information on shortcuts, see page 85). In the menu facility , return to the previous menu level and select the current menu respectively.  When entering text , move the cursor left and right respectively.   In idle mode , allow you to access your favourite menu options directly (for more information on shortcuts, see page 85). (soft keys)Perform the functions indicated by the text above them (on the bottom line of the display).In idle mode, launches the WAP Browser directly.Deletes characters from the display.In the menu facility, returns to the previous menu level.
Your Phone12Makes or answers a call.When held down in idle mode, recalls the last number dialled or received.In the menu facility, selects a menu function or stores information that you have entered (such as a name) in the phone or SIM memory.Ends a call. Also switches the phone on and off when held down. In the menu facility, returns to the idle mode and cancels your input.When held down in idle mode, accesses your voice mail.Enter numbers, letters and some special characters.Enter special characters.Perform the various functions.(on the side of the phone) During a call, adjust the earpiece volume.In idle mode, adjust the key volume.In the menu facility, scroll through the menu options and phonebook memory.Key Description (continued)Your Phone13DisplayDisplay LayoutThe display comprises three areas.Area DescriptionFirst line Displays various icons (see page 14).Middle lines Display messages, instructions and any information that you enter (number to be dialled, for example).Last line Shows the functions currently assigned to the two soft keys.IconsText and graphic areaSoft keysMenu Name
Your Phone14IconsIcon DescriptionShows the received signal strength. The greater the number of bars, the better the signal strength.Appears when a call is in progress.Appears when you are connected to the GPRS network.Appears when the Silent mode is active or you set the Alert Type menu option (Menu 3.3), so that the phone vibrates when you receive a call; for further details, see page 73. Appears when a new text message has been received.Appears when a new voice mail message has been received.Appears when you are entering text to indicate the current text input mode.Appears when you set the alarm.Shows the level of your battery. The more bars you see, the more power you have left.Appears when the IrDA port is active. For details, see page 76.Your Phone15BacklightThe display is illuminated by a backlight. When you press any key, the backlight illuminates. It turns off if no key is pressed within a given period of time, depending on the Back Light menu option (Menu 4.7.2).To specify the length of time for which the backlight is active, set the Back Light menu option (Menu 4.7.2); see page 82 for further details.You can also set the phone to use the backlight only during a specified period time, via the Auto Light menu option (Menu 4.7.3); see page 83 for further details.External DisplayYour phone has an external display on the cover. It indicates that you have an incoming call or a message, and notifies you at the specified time when you set an alarm.Appears when you are out of your home area and have registered with a different network, when travelling in other countries, for example.Appears when the Mute mode is active.Icon Description
Your Phone16Service LightThe service light is in the top right-hand corner of the phone. It flashes when services are available on the phone.To activate or deactivate use of the service light, set the Service Light menu option (Menu 4.7.4); see page 83 for further details.Service light17Getting StartedInstalling the SIM CardWhen you subscribe to a cellular network, you are provided with a plug-in SIM card loaded with your subscription details, such as your PIN, any optional services available and so on.Important! The plug-in SIM card and its contacts can be easily damaged by scratches or bending, so be careful when handling, inserting or removing the card.Keep all SIM cards out of the reach of small children.1. If necessary, switch off the phone by holding down the   key until the power-off image is displayed.2. Remove the battery. To do so:➀ Press down the catch above the battery and hold it in this position.➁ Slide the battery and lift it away, as shown.
Getting Started183. Slide the SIM card into the SIM card holder so that the holder locks the card in position. Make sure that the cut corner is top right and the gold contacts of the card face into the phone.Note: When you need to remove the SIM card, slide it, as shown, and take it out of the holder.4. Place the battery back, taking care to match the tabs on the battery with the grooves on the phone. Getting Started195. Slide the battery towards the top of the phone until it clicks into place. Make sure that the battery is properly installed before switching on the power.Charging a BatteryYour phone is powered by a rechargeable Li-ion battery. A travel adapter is provided with your phone. Use only approved batteries and chargers. Ask your local Samsung dealer for further details.The phone can be used while the battery is charging, but this will cause the phone to charge more slowly. Note: You must fully charge the battery before using your phone for the first time. A discharged battery is fully recharged in approximately 200 minutes.1. With the battery in position on the phone, connect the lead from the travel adapter to the bottom of the phone.
Getting Started202. Connect the adapter to a standard AC wall outlet.3. When charging is finished, disconnect the adapter from the power outlet and from the phone by pressing the grey tabs on both sides of the connector and pulling the connector out. Low Battery IndicatorWhen the battery is weak and only a few minutes of talk time remain, you will hear a warning tone and a message will be repeated at regular intervals on the display:When the battery becomes too weak for the phone to operate, it switches off automatically.**Warning**Low BatteryMenu NameGetting Started21Switching the Phone On/Off1. Open the folder.2. Hold down the   key until the phone switches on.3. If the phone asks for a password, key in the password and press the OK soft key. The phone password is factory set to 00000000. For further details, see page 110.4. If the phone asks for a PIN, key in the PIN and press the OK soft key. For further details, see page 111.The phone searches for your network and when it finds it, the idle screen, illustrated below, appears on each display. Now, you can make or receive a call.Note: The display language is factory set to English. To change the language, use the Language menu option (Menu 4.5); for further details, refer to page 79.5. When you wish to switch the phone off, hold down the   key until the power-off image is displayed.Service Provider07:30Wed 06 MarMenu Name07:30Wed/06
22Call FunctionsMaking a CallWhen the idle screen is displayed, key in the area code and phone number, and press the   key.Note: If you have checked the Auto Redial option in the Extra Settings menu (Menu 4.8), the number is redialled automatically up to ten times when the person does not answer the call or is already on the phone; see page 84 for further details.Making a International Call1. Press and hold down the   key. The + character appears.2. Key in the country code, area code and phone number and press the   key.Correcting the NumberTo clear... Then...The last digit displayedPress the   key. Any other digit in the numberPress the   or   key until the cursor is immediately to the right of the digit to be cleared. Press the   key. You can also insert a missing digit simply by pressing the appropriate key.The whole displayHold down the   key for more than one second.Call Functions23Ending a CallWhen you have finished your call, briefly press the   key.Redialling the Last NumberThe phone stores the numbers you dialled, received or missed if the caller is identified; see “Call Records” on page 69 for further details. To recall any of these numbers, proceed as follows.1. If you have typed any characters on the display, clear the display by holding down the   key for more than one second.2. Press the   key to display a list of the last numbers in the order in which the calls were made.3. Use the   and   keys to scroll through the numbers until the required number is highlighted.4. To... Then...Dial the number highlightedPress the   key.Edit the number highlighted• Press the Edit soft key.• Change the number as required, referring to “Correcting the Number” on page 22 for further details.
Call Functions24Making a Call from the PhonebookYou can store frequently-dialled phone numbers with a name in the SIM card or the phone memory, using the phonebook. You then simply select the required name to recall the associated number. For further details on the Phonebook features, refer to page 33.Adjusting the VolumeDuring a call, if you want to adjust the earpiece volume, use the   and   keys on the left side of the phone. Press the   key to increase and the   key to decrease the volume.In idle mode with the folder open, you can adjust the key volume using the   and   keys.Call Functions25Answering a CallWhen somebody calls you, the phone rings and the following screen appears on each display.If the caller can be identified, the caller’s phone number or name, if stored in your phonebook, is displayed.1. If necessary, open the folder. Press the   key or the Accept soft key to answer the incoming call.If the Anykey Answer option in the Extra Settings menu (Menu 4.8) is checked, you can press any key to answer a call except for the   key and the Reject soft key (see page 84).If the Active Flip option in the Extra Settings menu (Menu 4.8) is checked, you can answer the call simply by opening the folder (see page 84).Note: To reject an incoming call, press and hold the volume keys on the left side of the phone without opening the folder. 2. End the call by closing the folder or pressing the   key.Note: You can answer a call while using the phonebook or menu features.Accept Reject
Call Functions26Viewing Missed CallsIf you are unable to answer a call for any reason, you can find out who was calling you, provided that this service is available. In this way, you can call the person back, if necessary. The number of missed calls is displayed on the idle screen immediately after a call was missed.To view the missed call immediately, proceed as follows.1. If the phone is closed, open the folder.2. Press the View soft key.The number corresponding to the most recent missed call is displayed, if available.3. To.... Then press the...Scroll through the missed calls or   key.Call the number displayed key.Edit or delete a missed call numberSelect soft key (see next page).Call Functions27Editing a Missed Call NumberNote: If the number corresponding to the missed call is not available, the Edit Number option is not displayed.1. Press the Options soft key.2. Press the   or   key to highlight the Edit Number option.3. Press the Select soft key.4. Change the number as required. Deleting a Missed Call1. Press the Options soft key.2. If necessary, press the   or   key to highlight the Delete option.3. Press the Select soft key.You can press the   key at any time to exit the Missed Call feature.Note: You can access the Missed Call feature at any time by selecting the Missed Calls menu option (Menu 2.1); for further details, see page 69.5. To... Then press the...Call the number  key.Store the numberSave soft key and enter the name and location required (for further details, refer to page 33).
Call Functions28Switching Quickly to the Silent ModeThe Silent Mode is convenient when discretion is required and you a wish to stop the phone from making any noise, in a theatre for example.In idle mode, to switch your phone quickly to the silent mode, simply press and hold down the   key until the “Silent Mode” message and vibration icon ( ) are displayed.In the silent mode, your phone changes the sound settings as follows.To exit the silent mode and reactivate the previous Sound Settings, press and hold the   key again until “Exit Silent Mode” appears. The vibration icon ( ) is no longer displayed.Option New SettingAlert Type (Menu 3.3) VibrationKeypad Tone (Menu 3.4)OFFSMS Tone (Menu 3.5.1) Light OnlyError Tone (Menu 3.6.1)OFF29Selecting Functions and OptionsYour phone offers a set of functions that allow you to customise your phone. These functions are arranged in menus and sub-menus, accessed via the two soft keys marked   and  . Each menu and sub-menu allows you to view and alter the settings of a particular function.The roles of the soft keys vary according to the current context; the label on the bottom line of the display just above each key indicates its current role.Example:OptionsPress the left soft key to access the available options.Press the right soft key to change the text input mode.
Selecting Functions and Options30To view the various functions/options available and select the one required, proceed as follows.1. Press the appropriate soft key.In some functions, you may be asked for a password or PIN. Enter the required code and press the OK soft key.2. To... Then press the...Select the:• Function displayed or• Option highlightedSelect soft key or the   key.View the next function or highlight the next option in a list key or   key on the left side of the phone. Move back to the previous function or option in a list key or   key on the left side of the phone. Move back up one level in the structure key,   soft key or  key.Exit the structure without changing the settings key.Selecting Functions and Options31Example: Setting the Display Language1. When the idle screen is displayed, press the Menu soft key to access the menus.2. Scroll through the menus until you reach the Phone Settings menu, by pressing the   or   key.3. To select the Phone Settings menu, press the Select soft key or the   key.Service Provider07:30Wed 06 MarMenu NameCall RecordsSound SettingsPhone SettingsSelectSelectPhone SettingsInfrared Activ...My SettingsGreeting Me...Own NumberLanguageSecurityIf the menu name is too long for the display, it is scrolled when highlighted.
Selecting Functions and Options324. Scroll through the sub-menus until you reach the Language sub-menu, by pressing the   or   key.5. To view the languages available, press the Select soft key or the   key. The current setting is highlighted.6. Scroll through the list of languages until the appropriate one is highlighted, by pressing the   or   key.7. Press the Select soft key or the   key to confirm your selection.8. Press the   or   key twice to exit the menu structure.Phone SettingsInfrared Activ...My SettingsGreeting Me...Own NLanguageSecurityShows the current settingSelectEnglishLanguageDeutschEnglishItalianoFrançaisEspañolNederlandsCurrent languageSelect33PhonebookYou can store phone numbers and their corresponding names in the memory of your SIM card. In addition, you can store up to 500 numbers in the phone memory. The SIM card and phone memories, although physically separate, are used as if they were a single entity, called the phonebook.Storing a Number with a NameThere are two ways to store a number: • Using the Save soft key in idle mode • Using the New Entry option in the Phonebook menuStoring a Number in Idle modeAs soon as you start to enter a number, Save appears above the left soft key to allow you to store the number in the phonebook.1. Key in the number to be stored.Note: If you make a mistake while entering a number, correct it using the   key. For further details, refer to page 22.2. When you are sure that it is correct, press the Save soft key.3. Select an icon to identify the category of number to be stored. Three categories are available:   (mobile phone number),   (office number) and  (home number). To select the category, press the   or   key, followed by the Select soft key.
Phonebook344. Enter a name and press the OK soft key. The maximum length of a name depends on your SIM card. For information on how to enter characters, see page 42.The phone now displays the first free location in the last memory used to save a number and name. If that memory is full, the first free location in the other memory is displayed.Note: If you change phones, any numbers stored in your SIM card memory will automatically be available with the new phone, whereas any numbers stored in the phone memory must be restored.5. Press the right soft key, labelled To Card or To Phone to toggle between the phone and card memories.6. If you do not want to save the number and name in the suggested location, press the   key to clear the location number and enter your preferred location by pressing the number keys.7. Press the OK soft key to store the name and number.After storing, the phone displays the phonebook entry or name just created.8. To... Then press the...Use the entry optionsOptions soft key.Return to the idle screen  key.Phonebook35Storing a Number Using the Phonebook Menu1. When the idle screen is displayed, press the Name soft key. 2. Scroll to New Entry by pressing the   or   key and press the Select soft key.3. Select an icon to identify the category of the number to be stored.Note: The E-mail icon ( ) is available in this step. It allows you to save an E-mail address instead of a phone number.4. Continue the procedure from Step 4 on page 34 to store the number.Using Phonebook Entry OptionsWhile accessing any phonebook entry, press the Options soft key to access the options for the entry.To... Then press the...Select the highlighted optionSelect soft key or the   key.Highlight a different option or   key until the required option is highlighted.
Phonebook36The following options are available.Paste: allows you to paste the selected number into the normal dialling mode. Use this option to dial a number similar to one in the phonebook, a different extension in the same office, for example.Use the   key to change the number as required; refer to page 22 for further details. When you are ready to dial, press the   key.Edit: allows you to edit the selected name and number.Erase: allows you to erase the selected name and number from the phonebook. You are asked to confirm that you wish to erase the name and number by pressing the Yes soft key.Copy: allows you to copy the selected number to another location. Use this option to store a number similar to one already in memory; once copied, edit the number and store it in the phonebook.Caller Group: allows you to assign the entry to a caller group so that the phone alerts you in a particular way when the corresponding person calls you. Select one of the ten groups available. To remove an entry from a group, select the No Group option.For more information on how to change caller group properties, see page 39.Add Entry: allows you to add a new number in a different category (mobile, office, home or E-mail) to the currently selected name. A phonebook entry or name can contain up to four number, one in each catogory.Phonebook37Searching for and Dialling a Number in the PhonebookAfter storing numbers in the phonebook, you can search for them in two ways: by name and by caller group.Searching for a Number by Name1. When the idle screen is displayed, press the Name soft key. 2. Press the Select soft key when Search is highlighted. You are asked to enter a name.3. Enter the start of the name that you wish to find.The phonebook entries are listed, starting with the first entry matching your input. This entry is also highlighted.5. Once you have found the required entry, press the   key to dial the number, or press the Options soft key to access the phonebook entry options; for further details, see page 35.4. To... Then press the...View the highlighted entryView soft key.Select a different entry or   key until the required entry is highlighted.Look for a name starting with a different letterKey labelled with the required letter.
Phonebook38Searching for a Number by Caller Group1. When the idle screen is displayed, press the Name soft key. 2. Scroll to Group Search by pressing the   or   key and press the Select soft key. You are asked to enter a group name.3. Enter the start of the group name that you wish to find.The caller groups are listed, starting with the first group matching your input. The group is also highlighted. 4. Scroll to the required group by pressing the   or   key and press the View soft key.The phonebook entries in the selected caller group are listed.6. Once you have found the required entry, press the   key to dial the number, or press the Options soft key to access the phonebook entry options; for further details, see page 35.5. To... Then press the...View the highlighted entryView soft key.Select a different entry or   key until the required entry is highlighted.Phonebook39Editing a Caller Group1. When the idle screen is displayed, press the Name soft key.2. Scroll to Group Edit by pressing the   or   key and press the Select soft key.3. Enter the start of the required group name or scroll through the group list by pressing the   or   key.4. When the required group is highlighted, press the Options soft key.5. Select each option and change the settings, as required. The following options are available.Call ring tone: allows you to select the ring tone to be used when you receive a voice call from a person in the group.SMS tone: allows you to select the ring tone to be used when you receive a text message from a person in the group.Graphic: allows you to select the graphic icon to be displayed when you receive a voice call from a person in the group.Group Name: allows you to assign a name to the group; for further details on how to enter characters, see page 42.6. When you have finished, press the   or  key.
Phonebook40Speed-DiallingOnce you have stored phone numbers in the SIM card, you can set up to eight speed-dial entries and then dial them easily whenever you want, simply by pressing the associated number key.Setting Up Speed-Dial Entries1. When the idle screen is displayed, press the Name soft key.2. Scroll to Speed Dial by pressing the   or   key and press the Select soft key.3. Select the key to which you wish to assign the speed-dialling feature (keys   to  ) and press the OK soft key.Note: If you have already assigned a number to the key, the Options soft key replaces the OK soft key. Go to Step 6.4. Select the required phonebook entry from the list and press the View soft key.5. Select the required number if the entry has more than one number, by pressing the   or   key and press the Select soft key.6. Once you have assigned a number to the selected key, four options are available:Change: allows you to assign a different number to the key.Erase: allows you to clear the setting so that no number is assigned to the key.Phonebook41Erase All: allows you to clear the settings for all keys so that no numbers are assigned to any of the keys.Number: allows you to view the number assigned to the key.7. When you have finished, press the   or   key.Speed-Dialling from the PhonebookTo speed-dial the numbers assigned to keys  to , press and hold down the appropriate key.Note: Memory location 1 is reserved for your Voice Mail server number. Checking Memory StatusYou can check how many names and numbers are stored in the phonebook (card and phone memories) or how many free locations remain. 1. When the idle screen is displayed, press the Name soft key.2. Select the Memory Status option.3. Press the   or   keys to view the number of existing and remaining entries in the card and phone memories.
42Entering TextWhen using your phone, you will often need to enter text. For example, when storing a name in the phonebook, creating your personal greeting or scheduling events in your calendar. You can enter alphanumeric characters by using your phone’s keypad.You are provided with the following text input modes.• T9 modeThis mode allows you to enter words with only one keystroke per letter. Each key on the keypad has more than one letter – when you press the   key once, J, K or L may be displayed. The T9 mode automatically compares your keystrokes with an internal linguistic dictionary to determine the correct word, thus requiring far fewer keystrokes than the traditional upper/lower-case character modes.• Upper/lower-case character modesThese modes allow you to enter letters by pressing the key labelled with the required letter once, twice, three or four times until the letter is displayed.• Number modeThis mode allows you to enter numbers.Entering Text43Changing the Text Input ModeWhen you are in a field that allows characters to be entered, you will notice the text input mode indicator in the display.To select the... Then press the   soft key until...T9 mode  is displayed. See page 44.Upper-case character modeA is displayed. See page 45.Lower-case character modea is displayed. See page 45.Number mode1 is displayed. See page 47.Symbol mode is displayed. See page 47.OptionsHIText input mode indicator
Entering Text44Using the T9 ModeThe T9 predictive text input mode allows you to key in any character using single keystrokes. This text input mode is based on a built-in dictionary.1. When you are in the T9 predictive text input mode, start entering a word by pressing keys  to  . Press each key only once for one letter. Example: to enter HELLO in the T9 mode, press  ,  ,  ,   and  .The word that you are typing appears in the display. It may change with each key that you press.2. Enter the whole word before editing or deleting the keystrokes.3. If the word is correct, start entering the next word. Otherwise, press the  ,   or   key repeatedly to display alternate word choices for the keys that you have pressed. Example: both OF and ME have the sequence ,  . The phone displays the most commonly used choice first.4. Complete each word with a space by pressing the   key.• To type words not found in the T9 mode, change the text input mode to the upper/lower-case character input mode. Entering Text45• To enter full stops, hyphens or apostrophes, press the   key. The T9 mode applies grammar rules to ensure that the correct punctuation is used. Example:   is used twice to display two punctuation marks: • To change the case in the T9 mode, use the   key. • You can move the cursor by using the   and   keys. To delete letters, press the   key. Press and hold down the   key to clear the display.Using the Upper/Lower-CaseCharacter ModeUse the   to   keys to enter your text. 1. Press the key labelled with the required letter:- Once for the first letter- Twice for the second letter- And so on2. Select the other letters in the same way.Note: The cursor moves to the right when you press a different key. When entering the same letter twice or a different letter on the same key, just wait for a few seconds for the cursor to move right automatically, and then select the next letter.         LE T ’S E A T .
Entering Text46Refer to the table below for more information about the characters available.• To insert a space, press the   key. • You can move the cursor by using the   and   keys. To delete letters, press the  key. Press and hold down the   key to clear the display. Characters in the Order DisplayedKeySpaceUpper CaseUpper Case Lower CaseEntering Text47Using the Symbol ModeThe symbol mode enables you to insert symbols in a text message. Use the navigation keys to scroll to the desired symbol and then press OK soft key to insert the highlighted symbol into your message. Using the Number ModeThe Number mode enables you to enter numbers in a text message (a telephone number for example). Press the keys corresponding to the required digits before manually switching back to the appropriate text input mode.OK
48In-Call OptionsYour phone provides a number of control functions that you can use during a call. Putting a Call on HoldYou can place the current call on hold whenever you want. You can make another call while you have a call in progress if this service is supported by the network. Of these two calls, one is active and the other is on hold and you can switch between the calls.To place a call on hold, simply press the Hold soft key. You can reactivate the call whenever you want, by pressing the Unhold soft key.To make a call while you have a call in progress, proceed as follows.1. Key in the phone number that you wish to dial or look it up in the phonebook.2. Press the   key to dial the second call. The first call is automatically put on hold.Or alternatively, proceed as follows.1. Put the current call on hold by pressing the Hold soft key.2. Make the second call in the normal way.To swap between the two calls, simply press the Swap soft key.The current call is placed on hold and the call on hold is reactivated so that you can continue conversing with the other party.When you have finished, end each call normally by pressing the   key.In-Call Options49Switching the Microphone Off (Mute)You can temporarily switch your phone’s microphone off, so that the other party cannot hear you.Example: You wish to say something to another person in the room but do not want the other party to hear you.To switch the microphone off temporarily, proceed as follows.1. Press the Options soft key.2. If necessary, press the   key to highlight the Mute option.3. Press the OK soft key. The other party can no longer hear you.To switch the microphone back on, proceed as follows.1. Press the Options soft key.2. If necessary, press the   key to highlight the Unmute option.3. Press the OK soft key. The other party can hear you again.
In-Call Options50Muting/Sending Key TonesThese options allow you to turn the key tones off or on. If the Mute keys option is selected, your phone does not transmit the key tones. It allows you to press keys without hearing annoying key tones during a call.Note: To communicate with answering machines or computerised telephony systems, the Send keys option must be selected.Searching for a Number in the PhonebookYou can search for a number in the phonebook during a call.1. Press the Options soft key.2. Press the   key to highlight the Phonebook option.3. Press the OK soft key.The phonebook entries are listed.4. Enter the name that you wish to find.If you enter the start of the name, the phonebook entries are listed, starting with the first entry matching your input. The entry is also highlighted.5. To view the highlighted entry, press the View soft key.For a more detailed description of the Phonebook feature, refer to page 33.In-Call Options51Using the SMS ServiceIf you receive an SMS (Short Message Service) message during a call, the message icon ( ) flashes in the display. The SMS Service option enables you to use this feature.Read Messages: allows you to read the messages that you have received.Write Messages: allows you to write a message.For further details on the SMS service, refer to page 60.Answering a Second CallYou can answer an incoming call while you have a call in progress, if this service is supported by the network and you have set the Call Waiting menu option (Menu 6.3) to Activate (see page 99). You will be notified of an incoming call by a call waiting tone.To answer a call while you have a call in progress, proceed as follows.1. Press the   key to answer the incoming call. The first call is automatically put on hold.2. To switch between the two calls, press the Swap soft key.To end a held call, press the Options soft key and select the End Held Call option.3. To end the current call, press the   key.
In-Call Options52Making a Multiparty CallA multiparty call is a network service that allows up to six people to take part simultaneously in a multiparty or conference call. For more information, contact your service provider.Setting up the Multiparty Call1. Call the first participant in the normal way.2. Call the second participant in the normal way. The first call is automatically put on hold.3. To join the first participant to the multiparty call, press the Options soft key and select the Join option.4. To add a new person to the multiparty call, call the person in the normal way, then press the Options soft key and select the Join option.You can add incoming callers by answering the call and pressing Options, followed by Join. Repeat as required.Having a Private Conversation With One Participant1. Press the Options soft key and choose the Select one option. The list of call participants appears.2. Highlight the required person, by pressing the   or   key, followed by the Select soft key or the   key.In-Call Options533. Select the Private option.Now you can talk privately with that person. The other participants can continue to converse with each other.4. To return to the multiparty call, press the Options soft key and select Join.All the multiparty call participants can now hear each other.Dropping One Participant1. Press the Options soft key and choose the Select one option. The list of call participants appears.2. Highlight the required person, by pressing the   or   key, followed by the Select soft key or the   key.3. Select Remove. The call is ended with that participant, but you can continue to talk with the other participants.4. End the multiparty call by closing the phone or pressing the   key.
54Using the MenusThe phone offers a range of functions that allow you to tailor the phone to your needs. These functions are arranged in menus and sub-menus.The menus and sub-menus can be accessed by scrolling with the navigation keys or by using the shortcuts.Accessing Menu Functions by Scrolling1. In idle mode, press the Menu soft key to access the menu facility. 2. Scroll with the   or   key to reach the required main menu, Phone Settings for example. Press the Select soft key or the   key to enter the menu.3. If the menu contains any sub-menus, Language for example, you can access them by scrolling with the   or   key and pressing the Select soft key.If the menu that you have selected contains further options, repeat the same procedure.4. To... Then press the...Scroll through the menus or   key or use the   and   keys on the left side of the phone.Confirm the chosen settingSelect soft key or the   key.Return to the previous menu level soft key or the   key.Exit the menu without changing the settings key.Using the Menus55Accessing Menu Functions by Using ShortcutsThe menu items (menu, sub-menus and options) are numbered and can be accessed quickly by using their shortcut number. The shortcut number is shown in the bottom right next to the   soft key on the display. Simply press the Menu soft key and key in the required number.Example: Accessing the Language option.1. Press the Menu soft key.2. Press   for Phone Settings.3. Press   for Language.The languages available are displayed directly. Note: The numbers assigned to each menu option are indicated in the list on page 55. They may not match the menu number on the phone. It depends on the services supported by the SIM card.List of Menu FunctionsThe following illustration shows the menu structure available and indicates the:• Number assigned to each option• Page on which you can find a description of each featureNote: If you use a SIM AT card that provides additional services, the SIM AT menu (8) is displayed first when you press the Menu soft key to enter the menu facility. For further details, refer to your SIM card documentation.
Using the Menus561.  Messages (see page 60)1.1  Read Messages1.1.1  Inbox1.1.2  Outbox1.2  Write Messages1.3  Templates1.4  Setup1.4.1  Setting 1*1.4.2  Setting 2*1.4.3  Setting 3*1.4.4  Common Setting1.5  Broadcast1.5.1  Read1.5.2  Receive1.5.3  Channel List1.5.4  Language1.6  Voice Mail1.6.1  Connect to Voice Server1.6.2  Voice Server Number1.7  My Contents1.7.1  My EMS Melody1.7.2  My EMS Picture1.7.3  My EMS Animation1.8  Memory Status1.8.1  SIM memory1.8.2  PHONE memory1.8.3  CB memory2.  Call Records (see page 69)2.1  Missed Calls2.2  Received Calls2.3  Dialled Calls2.4  Call Time2.4.1  Last Call Time2.4.2  Total Sent2.4.3  Total Received2.4.4  Reset Timers* Shown only if supported by your SIM card.Using the Menus572.  Call Records (continued)2.5  Call Cost*2.5.1  Last Call Cost2.5.2  Total Cost2.5.3  Max Cost2.5.4  Reset Counters2.5.5  Set Max Cost2.5.6  Price/Unit3.  Sound Settings (see page 72)3.1  Ring Tone3.2  Ring Volume3.3  Alert Type3.4  Keypad Tone3.5  Message Tone3.5.1  SMS Tone3.5.2  SMS-CB Tone3.6  Extra Tones 3.6.1  Error Tone3.6.2  Minute Minder3.6.3  Connect Tone4.  Phone Settings (see page 76)4.1  Infrared Activate4.2  My Settings4.2.1  Wallpaper4.2.2  Colour Theme4.2.3  Menu Style4.3  Greeting Message4.4  Own Number4.5  Language4.6  Security4.6.1  PIN Check4.6.2  Change PIN4.6.3  Phone Lock4.6.4  Change Password4.6.5  SIM Lock4.6.6  FDN Mode*4.6.7  Change PIN2** Shown only if supported by your SIM card.
Using the Menus584.  Phone Settings (continued)4.7  Display Settings4.7.1  Contrast4.7.2  Back Light4.7.3  Auto Light4.7.4  Service Light4.7.5  Graphic Logo4.8  Extra Settings4.8.1  Auto Redial4.8.2  Active Flip4.8.3  Anykey Answer4.9  Short Cut4.10  Reset Settings5.  Organiser (see page 86)5.1  Calendar5.2  To Do List5.3  Time & Date5.3.1  Set Time5.3.2  Set Date5.3.3  World Time5.3.4  Time Format5.4  Alarm5.5  Calculator5.6  Currency Exchange6.  Network Services (see page 95)6.1  Call Diverting6.1.1  Divert Always6.1.2  Busy6.1.3  No Reply6.1.4  Unreachable6.1.5  Cancel All6.2  Call Barring 6.2.1  All Outgoing6.2.2  International6.2.3  International Except to Home6.2.4  All Incoming6.2.5  Incoming While Abroad6.2.6  Cancel All6.2.7  Change Barring PasswordUsing the Menus596.  Network Services (continued)6.3  Call Waiting6.3.1  Voice Calls6.3.2  Data Calls6.3.3  Cancel All6.4  Network Selection6.4.1  Automatic6.4.2  Manual6.5  Caller ID6.5.1  Default6.5.2  Hide Number6.5.3  Send Number6.6  Closed User Group6.6.1  Index List6.6.2  Outside Access6.6.3  Default Group6.6.4  Deactivate*6.7  Band Selection7.  Funbox (see page 104)7.1  Games7.2  WAP Browser7.3  Downloads7.3.1  Games & More7.3.2  Sounds7.3.3  Pictures7.3.4  DNS Setting*Shown only if the Closed User Group Feature is active.
60MessagesThe SMS (Short Message Service) function is a network service and may not be supported by your network. Messages can be sent by text, fax, Email and paging messaging systems, provided that these services are supported by your network. To send text messages by phone, you must obtain the number of the SMS centre from your service provider.When the message icon ( ) appears, you have received new text messages. If the message memory is full, an error message is displayed and you cannot receive any new messages. Use the Delete option in the Read Messages menu (Menu 1.1) to delete obsolete messages.Read Messages  (Menu 1.1)Two message boxes are available.Inbox: used to store the messages that you have received.Outbox: used to store the messages that you have already sent or will send.Reading a Message1. Select the required box and press the Select soft key. The list of messages in the box is displayed with the sender or recipient’s phone number or name, if it is available in your phonebook.2. Select the required message and press the View soft key to view the message contents.Messages613. To scroll through the message, press the   or   key.While reading a message, you can choose the following options by pressing the Options soft key.Delete: allows you to delete obsolete messages.Text Reply (inbox only): allows you to reply to the sender by sending a text message. You can also change the SMS centre number, if required.Call Back (inbox only): allows you to call the sender back.Cut Number: allows you to extract a number from the message text, so that you can call the number or save it in the phonebook.Send: allows you to send a message that you have received or saved. For further information on how to send a message, see page 62.Edit Message: allows you to edit a message.Select Objects: allows you to save the objects, such as sounds or images, from the message into your phone. You can then use the objects when writing a message; for details, see page 63. Note: The options available vary, depending on the message status (new/old, not sent or sent for example).
Messages62Write Messages  (Menu 1.2)Via this menu, you can write and send a text message.Note: You can enter up to 918 alphanumeric characters for your message. If you add objects to the message, the number of characters you can enter will be decreased.Creating a Simple Text Message1. Create your message as required.Note: For more information about entering characters, refer to page 42.2. When you have completed your message, press the Options soft key. The following options are available.Send Only: allows you to send the message. The message will be deleted after sending.Save and Send: allows you to save a copy of the message and then send the message to the required destination. You can read the message in your outbox using the Read Messages option. Save Only: allows you to save the message so that it can be sent later. You can read the message in your outbox using the Read Messages option.For information about the Text Formatting, Add Objects, Add Templates, and Language options, see page 63.3. Select Send Only or Save and Send, and press the Select soft key.If you want just to save the message, select Save Only. After saving the message, the phone returns to the Messages menu.Messages634. Enter a destination number and press the OK soft key. The message is sent.Creating a Message using the Options1. Create your message as required.2. Press the Options soft key.3. Select one of the following options as required by using the   and   keys and pressing the Select soft key.Text Formatting: allows you to format the style of the text. For the Size attribute, the Normal, Large and Small sizes are available. For the Underline and Strikethrough attributes, select On or Off. The attributes can be combined.Add Objects: allows you to add the required sound, melody picture or animation to the message. Select the category of the object to be added: Sound, Melody, Picture and Animation are available. In each category, you can select the various factory-set items or choose an item received from other sources, such as the Internet or other phones.Add Templates: allows you to apply one of the preset message templates to the text. Select one of the five messages predefined via the Templates menu option (Menu 1.3); for further details, see page 64.Language: allows you to change the language to be used in the T9 input mode. Select the language to be used. 4. Complete the message, and send or save it by following the procedure from Step 2 on page 62.
Messages64Templates  (Menu 1.3)Using this menu, you can preset up to five messages that you use most frequently. Scroll through the template list using the   and   keys. When the required message template is highlighted, press the Options soft key.Edit: allows you to write a new message or edit the selected message.Note: For further information on how to enter characters, refer to page 42.Send Message: allows you to recall the selected message. Once you have completed the message, you can send, save and send, or simply save it. For details on how to send a message, see page 62.Delete: allows you to delete the selected message. You are asked to confirm the deletion by pressing the Yes soft key.Setup  (Menu 1.4)Via this menu, you can set up default SMS information. A setting group is a collection of settings required to send messages. The number of setting groups available depends on the capacity of your SIM card. Setting x (where x is the setting group number): each group has its own sub-menu.Service Centre: allows you to store or change the number of your SMS centre required when sending messages. You must obtain this number from your service provider.Messages65Default Type: allows you to set the default message type (Text, Fax, Email and Paging). The network can convert the messages into the selected format.Default Validity: allows you to set the length of time for which your text messages will be stored at the message centre while attempts are made to deliver them.Setting Name: allows you to give a name to the setting group currently being defined.Common Setting: four options are available.Reply Path: allows the recipient of your SMS message to send you a reply message via your message centre, if the service is provided by the network.Delivery Reports: allows you to activate or deactivate the report function. When this function is activated, the network informs you whether your message has been delivered or not.Bearer Selection: allows you to choose between GSM and GPRS.Wap Push: allows you to select whether you receive Web messages from the server or not. Select Never if you do not want to receive any messages, Always to receive all messages, and SMS-C Specific to receive messages from a specific SMS centre.
Messages66Broadcast  (Menu 1.5)This network service allows you to receive text messages on various topics, such as the weather or traffic. Messages are displayed immediately they are received, provided that: • The phone is in idle mode • The Receive option is set to Enable • The message channel is currently active in the channel listThe following options are available.Read: lets you view the message. Volatile displays the messages from the network, but loses its contents as soon as the phone is switched off. Scroll through the message by using the   and   keys. While reading a message, press the Save soft key to store the message in the Archive box for later retrieval.Receive: allows you to enable or disable the reception of broadcast messages.Channel List: allows you to indicate the channels from which you wish to receive broadcast messages. The following options are available.Select: used to enable or disable channels in the list by marking or unmarking them respectively (a check mark is displayed in front of each channel selected).Add Channel: used to declare the ID and title for a new channel.Delete: used to remove a channel from the list.Edit: used to change the ID and title of an existing channel.Messages67Language: allows you to select your preferred language to be used when displaying cell broadcast messages.Please contact your service provider for more information.Voice Mail  (Menu 1.6)This menu provides you with a way of accessing your voice mailbox (if provided by your network). The following options are available.Connect to Voice Server: before using this feature, you must enter the voice server number obtained from your service provider (see menu option 1.6.2). You can then select this option and simply press the OK soft key to listen to your messages. To quickly connect to the voice server, press and hold down the   key in idle mode.Voice Server Number: allows you to change the voice mail server number, if necessary.Note: Voice Mail is a network feature. Please contact your service provider for more information.To... Then press the...Enter the server numberCorresponding numeric keys.Correct a digit  key.Move the cursor to the left/right without clearing the digit or   key.
Messages68My Contents  (Menu 1.7)After saving any objects received in messages into your phone memory, using the Select Object option (see page 61), you can see the objects in this menu.To delete the objects in this menu, press the Delete soft key. You can forward the objects to other people by including message and/or use them for your ring tone or background them in a image.Three categories of objects are available: • My EMS Melody• My EMS Picture• My EMS AnimationMemory Status  (Menu 1.8)This menu shows how many messages are currently stored in the SIM, phone and CB memories.69Call RecordsVia this menu, you can view the phone calls:• Missed• Received• DialledNote: You can access all numbers in the three types of call records by pressing the  key in idle mode.Missed Calls  (Menu 2.1)This option lets you view the last 20 unanswered calls. The number and name, if available, are displayed, together with the date and time at which the call was received. By pressing the Options soft key, you can:• Edit the number if available and dial it or save it in the phonebook• Delete the call from the listReceived Calls  (Menu 2.2)This option lets you view the last 20 phone calls answered. The number and name, if available, are displayed, together with the date and time at which the call was received. By pressing the Options soft key, you can:• Edit the number if available and dial it or save it in the phonebook• Delete the call from the list
Call Records70Dialled Calls  (Menu 2.3)This option lets you view the last 20 numbers dialled. The number and name, if available, are displayed, together with the date and time at which the call was made. By pressing the Options soft key, you can:• Delete the number • Edit the number and save it in the phonebookCall Time  (Menu 2.4)This option lets you view the timers for calls made and received. The following timers are available.Last Call Time: length of the last call.Total Sent: total length of all calls made since the timer was last reset.Total Received: total length of all calls received since the timer was last reset.Reset Timers: option used to reset the call timers; you must first enter the phone password (see page 110) and then press the OK soft key.Note: The actual time invoiced for calls by your service provider may vary, depending on network features, rounding-off for billing purposes and so forth.Call Records71Call Cost*  (Menu 2.5)This network feature lets you view the cost of calls. The following options are available.Last Call Cost: cost of the last call made.Total Cost: total cost of all calls made since the cost counter was last reset. If the total cost exceeds the maximum cost set via the Set Max Cost option, you can no longer make any calls until you reset the counter.Max Cost: maximum cost set via the Set Max Cost option (see below).Reset Counters: option used to reset the cost counter; you must first enter your PIN2 (see page 112) and then press the OK soft key.Set Max Cost: option used to enter the maximum cost that you authorise for your calls.Price/Unit: option used to set the cost of one unit; this price per unit is applied when calculating the cost of your calls. * Shown only if supported by your SIM card.
72Sound SettingsYou can use the Sound Settings feature to customise various settings, such as the:• Ring melody, volume and type• Sounds made when you press a key, make an error or receive a messageNote: When the phone is in the Silent mode (see page 28), you cannot change the sound settings.Ring Tone  (Menu 3.1)This option allows you to select the required ring melody. You can choose between many different melodies. Each time you select a melody, it is played for a few seconds. If you have downloaded any sounds from the Internet or EasyGPRS programme or received any ring tone messages, you can view the list in this menu. Ring Volume  (Menu 3.2)This option allows you to adjust the ring volume to one of five levels. Use the   and   keys or the   and   keys on the left side of the phone. Sound Settings73Alert Type  (Menu 3.3)This option allows you to specify how you are to be informed of any incoming calls. The following options are available. Light only: only the backlight is switched on; the phone neither rings nor vibrates.Melody: the phone rings using the ring melody selected via the Ring Tone menu option (Menu 3.1); see page 72.Vibration: the phone vibrates but does not ring. Vibra+Melody: the phone first vibrates three times and then starts ringing.Keypad Tone  (Menu 3.4)This option allows you to select the tone that the keypad generates when you press a key. The following options are available.OFF: the keys do not make any sound.Tone: each key, when pressed, makes a different sound.Beep: each key, when pressed, makes the same sound.
Sound Settings74Message Tone  (Menu 3.5)This option allows you to select how the phone informs you that a new message has been received.SMS ToneThis option allows you to select how the phone informs you that a new SMS message has been received.The following options are available.OFF: the phone does not use the SMS tone.Light Only: the service light at the top of the phone flashes.Vibration: the phone vibrates.Single Beep: the phone beeps once. SMS Tone1~10: the phone uses an SMS tone. You are provided with ten SMS tones.SMS CB ToneThis option allows you to select how the phone informs you that a new cell broadcast (CB) message has been received.The following options are available.OFF: the phone does not use the CB tone.Light Only: the service light at the top of the phone flashes.Vibration: the phone vibrates.Single Beep: the phone beeps once. SMS CB Tone1~10: the phone uses a CB tone. You are provided with ten CB tones.Sound Settings75Extra Tones  (Menu 3.6)You can customise various other tones used by the phone. The following options are available.Error Tone: sets whether the phone informs you that you have made a mistake or not. Minute Minder: sets whether the phone must beep every minute during an outgoing call to keep you informed of the length of your call.Connect Tone: sets your phone to beep when the person you are calling answers the phone.To turn a given tone...Then press the...OnOK soft key.A check mark is displayed in front of the option.OffOK soft key again.The check mark is no longer displayed.
76Phone SettingsMany different features of your phone can be customised to suit your preferences. All of these features are accessed via the Phone Settings menu.Infrared Activate  (Menu 4.1)This feature allows you to send or receive data/fax through the infrared port. To use an infrared connection, you must:• Configure and activate an IrDA-compliant infrared port on your PC• Activate the infrared feature on the phone; the IrDA icon ( ) appears on the top line of the display• Align the IrDA port on the phone with the IrDA port on your computerThe connection is ready for data transmission.If there is no communication between your phone and the IrDA-compliant device within 30 seconds of activating the feature, it is automatically deactivated.Note: For best performance, it is highly recommended that you use the data link cable supplied in your SGH-S100 kit.15IrDA portIrDA portPhone Settings77My Settings  (Menu 4.2)You can change the background image and the colour of the components in the display according to your preference.WallpaperThis option allows you to change the background image (wallpaper) to be displayed in idle mode.To change the background image, proceed as follows.1. Scroll through the list by pressing the   or   key.You have various preset images available. You can also select the blank background and any images downloaded from the Internet or the EasyGPRS programme. 2. Press the Select soft key when the required image is highlighted.The selected image is displayed.3. After viewing the image, press the Select soft key to display it on the idle screen.Colour ThemeYou can change the colour setting of the display components, such as text, soft key display area or the menu names and icons. Nine different colour settings are available.Select the required setting and press the Select soft key, followed by OK to confirm the highlight colour and colour theme.
Phone Settings78Menu StyleThis option allows you to select the menu display style. You can choose between Folder Style and Nature Style. Greeting Message  (Menu 4.3)This option allows you to set a greeting message to be displayed briefly when the phone is switched on. The current message is displayed.For further details on how to enter characters, refer to page 42. Own Number  (Menu 4.4)This feature allows you to:• Assign a name to each of your own phone numbers registered on your SIM card• Edit the names and numbersThis function is a memory aid, which you can use to check your own phone numbers if you need to do so.Any changes made here do not in any way affect the actual subscriber numbers on your SIM card.To... Then press the...Clear the existing message key and hold it down until the message is cleared.Enter a new messageAppropriate alphanumeric keys.Change the text input mode soft key.Phone Settings79Language  (Menu 4.5)You can select a display language. When the language option is set to Automatic, the language is automatically selected according to the language of the SIM card used.Security  (Menu 4.6)The Security feature enables you to restrict the use of your phone to:• The people of your choice• The types of calls of your choiceVarious codes and passwords are used to protect the features of your phone. They are described in the following sections (see also pages 110-113).PIN CheckWhen the PIN Check feature is enabled, you must enter your PIN each time you switch the phone on. Consequently, any person who does not have your PIN cannot use your phone without your approval.Note: Before disabling the PIN Check feature, you must enter your PIN.To change your PIN, refer to the Change PIN menu option (Menu 4.6.2).The following options are available.Disable: the phone connects directly to the network when you switch it on.Enable: you must enter the PIN each time the phone is switched on.
Phone Settings80Change PINThis feature allows you to change your current PIN to a new one, provided that the PIN Check feature is enabled. You must enter the current PIN before you can specify a new one.Once you have entered a new PIN, you are asked to confirm it by entering it again.Phone LockWhen the Phone Lock feature is enabled, the phone is locked and you must enter the 8-digit phone password each time the phone is switched on.The password is factory set to “00000000”. To change the phone password, refer to the Change Password menu option (Menu 4.6.4) below.Once the correct password has been entered, you can use the phone until you switch it off.The following options are available.Disable: you are not asked to enter the phone password when you switch the phone on.Enable: you are required to enter the phone password when you switch the phone on.Change PasswordThe Change Password feature allows you to change your current phone password to a new one. You must enter the current password before you can specify a new one.The password is factory set to “00000000”. Once you have entered a new password, you are asked to confirm it by entering it again.Phone Settings81SIM LockWhen the SIM Lock feature is enabled, your phone only works with the current SIM. You must enter the SIM lock code.Once you have entered the lock code, you are asked to confirm it by entering it again.To unlock the SIM, you must enter the SIM lock code.FDN ModeThe FDN (Fixed Dial Number) mode, if supported by your SIM card, allows you to restrict your outgoing calls to a limited set of phone numbers.The following options are available.Disable: you can phone any number.Enable: you can only call phone numbers stored in the phonebook. You must enter your PIN2.Note: Not all SIM cards have a PIN2. If your SIM card does not, this menu option is not displayed.To change your PIN2, refer to the Change PIN2 menu option (Menu 4.6.7) below.Change PIN2The Change PIN2 feature allows you to change your current PIN2 to a new one. You must enter the current PIN2 before you can specify a new one.Once you have entered a new PIN2, you are asked to confirm it by entering it again.Note: Not all SIM cards have a PIN2. If your SIM card does not, this menu option is not displayed.
Phone Settings82Display Settings   (Menu 4.7)ContrastThis option allows you to adjust the contrast of the display screens to make them lighter or darker.To adjust the display contrast, proceed as follows.1. Select the required display (Main LCD or Front LCD) and press the Select soft key.2. Adjust the contrast by using the   and   keys or the   and   keys on the left side of the phone.3. When you are satisfied, press the OK soft key to save the selection.Back LightYou can select whether or not the phone uses the backlight. A marginal increase in standby/talk time can be achieved by turning the backlight off.The following options are available.OFF: the backlight is not used.Short: the backlight comes on when you press a key or receive a call and switches off 10 seconds after the last key is pressed.Long: the backlight comes on when you press a key or receive a call and switches off 20 seconds after the last key is pressed.Phone Settings83Auto LightUsing this feature, you can specify the time for which the backlight is to be used. This feature helps conserve your battery power.The following options are available.Disable: the backlight is used according to the setting in the Back Light menu option (Menu 4.7.2); see page 82.Enable: the backlight is used only during the specified period of time. Set the required length of time in hours and minutes, using the appropriate number keys.Service LightThis option allows you to select whether or not the service light on the top of the phone is used or in which colour it flashes. Select the required colour from red, green, blue, yellow, cyan, violet and light purple. When the phone is ready for use, the service light will flash in the appropriate colour.If you do not wish to use the service light, select Off.Graphic LogoThis option allows you to display your operator’s logo instead of its name.On: the operator logo stored in your phone is displayed in idle mode; if no logo has been stored, the operator name is displayed.Off: the operator name is displayed in idle mode.
Phone Settings84Extra Settings  (Menu 4.8)You can turn the automatic redialling or answering features on or off. The following options are available.Auto Redial: when this option is checked, the phone makes up to ten attempts to redial a phone number after an unsuccessful call.Note: The interval between two call attempts varies.Active Flip: when this option is checked, you can simply open the folder to answer a call.When it is unchecked, you must open the folder and press a key, depending on the setting of the Anykey Answer option (see below).Anykey Answer: when this option is checked, you can answer an incoming call by pressing any key, except the   key and the Reject soft key. To reject the call, press the   key or the Reject soft key. When this option is unchecked, you can only press the   key or Accept soft key.To turn a feature...Then press the...OnON soft key.A check mark is displayed in front of the option.OffOFF soft key.The check mark is no longer displayed.Phone Settings85ShortCut  (Menu 4.9)The navigation keys can be used as shortcut keys. When held down in idle mode, they allow you to access specific menu options directly.To assign a shortcut to a key, proceed as follows.1. Select the key to be used as a shortcut key by pressing the   or   key, followed by the Select soft key.Key up ( )Key down ( )Key right ( )Key left ( ) 2. Select the menu option to be assigned to the key by pressing the   or   key.Note: To deactivate a shortcut key, select the None option.3. Press the Select soft key to save the selection.Reset Settings  (Menu 4.10)You can easily reset your phone to its default configuration. To do so, proceed as follows.1. Select the Reset Settings menu option.2. Enter the 8-digit phone password and press the OK soft key.Note: The password is preset to “00000000”. To change this password, refer to page 80.
86OrganiserThe Organiser feature enables you to:• View the calendar and organise your schedule• Define a list of things to do• Set the current date and time• Set the alarm so that the phone rings at a specific time (to remind you of an appointment for example)• Use the phone as a calculator for basic mathematical equations or currency exchange operations Calendar  (Menu 5.1)With the Calendar feature, you can:• Consult the calendar• Write memos to keep track of your schedule and trigger an alarm if necessaryConsulting the CalendarWhen you select the Calendar menu option (Menu 5.1), the calendar is displayed. The following options are available when you press the Options soft key.Search all: displays all memos set, regardless of the day and starting with the oldest. To scroll through the memos, press the   or   key.Delete all: allows you to delete all memos. You are asked to confirm your action.Go to date: allows you to jump to a specific date.Exit: exits the Calendar feature and returns to the idle mode.Organiser87Writing a MemoTo write or edit a memo on a specific date, proceed as follows.1. Select the required date in the calendar, using the navigation keys.Note: To skip to the previous or next month, press the   and   keys on the left side of the phone.2. Press the Select soft key. An empty memo screen is displayed to allow you to enter your memo.3. Enter your memo and then press the OK soft key.     Note: For further details on how to enter characters, refer to page 42.You are asked if you wish to set the alarm.4. If you want the alarm to ring on the chosen day, press the Yes soft key. Otherwise, press the No soft key.5. If you pressed the Yes soft key, set the time for the alarm and press the OK soft key.The colour of the date is changed to green to indicate that a memo exists.Editing a MemoIf you select a day for which a memo already exists, you can press the Edit soft key to edit the memo displayed.Note: For further details about how to enter characters, refer to page 42.
Organiser88Once you have finished editing the memo, press the OK soft key. The following options are then available when you press the Options soft key.Alarm: allows you to set the alarm to ring on the chosen day.Erase: allows you to delete the memo.Copy to: allows you to copy the memo to another date and/or time.Move to: allows you to change the date and/or time of the memo.To Do List  (Menu 5.2)This feature allows you to:• Draw up a list of tasks to be done• Assign a priority and deadline to each task• Sort the tasks by priority and status markCreating the To Do List1. Press the New soft key.2. Enter the first task.Note: You can enter up to 40 characters. For further details on how to enter characters, see page 42.3. Press the OK soft key.4. Select high, normal or low priority using the   or   key and press the Select soft key.5. Enter your deadline. If you do not want to set a deadline, press the Skip soft key.Organiser896. Press the OK soft key.Editing the To Do ListIf tasks are already defined in the To Do List when you select the To Do List menu option (Menu 5.2), the current contents are displayed with the status mark and priority (three stars for high, two for normal and one for low). The following options are available.To... Then...View the details for a specific task• Highlight the task.• Press the View soft key.Change the status of a specific task• Highlight the task.• Press the   key to mark the task as completed as of the current date and time.or• Highlight the task. • Press the Options soft key.• Select the Mark option.• Select the appropriate status (Done or Undo).Create a new task • Press the Options soft key.• Select the New option.• Enter the text, priority and deadline for the task. Edit an existing task• Highlight the task.• Press the Options soft key.• Select the Edit option.• Change the text, priority and deadline for the task.
Organiser90Sort the existing tasks by priority or status• Press the Options soft key.• Select the Sort option.• Select the sort criterion (High, Low, Done or Undo).Copy a task • Highlight the task.• Press the Options soft key.• Select the Copy option.• Change the text, priority and deadline for the task as required.Copy a task to the calendar• Highlight the task.• Press the Options soft key.• Select the Copy to calendar option.• Change the text and deadline for the task and set the alarm as required.Delete a task • Highlight the task.• Press the Options soft key.• Select the Delete option.Delete all tasks • Press the Options soft key.• Select the Delete all option.• Confirm the deletion by pressing OK.Exit the To Do list • Press the Options soft key.• Select the Exit option.To... Then...Organiser91Time & Date  (Menu 5.3)This option allows you to change the current time and date displayed. You can also check the current time for Greenwich Mean Time (GMT) and 21 major cities around the world.The following options are available.Set Time: allows you to enter the current time. You can choose the time format via the Time Format menu option (Menu 5.3.4).Note: Before setting the time, you must specify your time zone, via the World Time menu option (Menu 5.3.3).Set Date: allows you to enter the day, month and year. World Time: allows you to check the current time for Greenwich Mean Time (GMT) and 21 major cities around the world, using the   and   keys.The screen shows the:• City name• Current date and time• Time difference between the selected city and your city if you have set the local time (see below for further details) or GMT (by default)To select the time zone in which you are located, proceed as follows.1. Select the city corresponding to your time zone by pressing the   or   key one or more times.The local date and time are displayed.2. Press the Set soft key.Time Format: allows you to change the time format to 24 Hours or 12 Hours.
Organiser92Alarm  (Menu 5.4)This feature allows you to:• Set the alarm to ring at a specific time• Set the phone to switch on automatically and ring the alarm even if the phone is switched off (Autopower menu option set to Enable)The following options are available.Once Alarm: the alarm rings only once and is then deactivated.Daily Alarm: the alarm rings every day at the same time.Morning Call: the alarm rings to wake you up in the morning.To set the alarm, proceed as follows.1. Choose the type of alarm to be set.2. Enter the required time and day of the week, if applicable.3. Press the OK soft key.4. If you select Morning Call in Step 1, select the repeat option: Monday to Friday or Monday to Saturday.Remove Alarm: deactivates all alarm settings.Autopower: if this option is set to Enable, the alarm will ring at the specified time, even when the phone is switched off. If the menu option is set to Disable and the phone is switched off at the specified time, the alarm will not ring.Organiser93To stop the alarm when it rings, open the phone and press the Exit soft key.When setting or viewing an alarm, the following options are available when you press the Options soft key.Remove Alarm: deactivates the current alarm. Alarm Sound Set: allows you to select the alarm melody. Calculator  (Menu 5.5)With this feature, you can use the phone as a calculator. The calculator provides the basic arithmetic functions: addition, subtraction, multiplication and division.Using the Calculator1. Enter the first number using the numeric keys.2. Press the right soft key until the required arithmetic symbol appears: + (add), - (subtract), x (multiply), / (divide).3. Enter the second number.4. Repeat Steps 1 to 3 as many times as required.Notes: • To erase any mistakes and clear the display, press the  key.• To include a decimal point or a bracket, press the left soft key until the required symbol is displayed.5. To calculate the result, press the   key.
Organiser94Currency Exchange  (Menu 5.6)Using this menu option, you can make currency conversions.1. Enter the current exchange rate of your source currency and press the OK soft key.You can insert a decimal point by pressing the   key.2. Enter the amount for which you wish to conduct the currency conversion and press the OK soft key.The exchange rate amount you entered and equivalent value are displayed.3. Press the Exit soft key to exit the currency convertor.
95Network ServicesThese menu functions are network services. Please contact your service provider to check their availability and subscribe to them, if you so wish.Call Diverting  (Menu 6.1)This network service enables incoming calls to be rerouted to the number that you specify.Example: You may wish to divert your business calls to a colleague while you are on holiday.Call diverting can be set up in the following ways.Divert Always: all calls are diverted.Busy: calls are diverted if you are already making another call.No Reply: calls are diverted if you do not answer the phone.Unreachable: calls are diverted if you are not in an area covered by your service provider.Cancel All: all call diverting options are cancelled.You can specify individual diverting options for each of the following call types:• Voice calls only• Data calls onlyExample: You can divert voice calls to your colleague if you are already using the phone.
Network Services96To set your call diverting options, proceed as follows.1. Select the type of call diverting required by pressing the   or   key until the appropriate option is highlighted, and then press Select.2. Select the type of calls to be diverted by pressing the   or   key until the appropriate option is highlighted and then press Select.The current status is displayed. If the option has already been set, the number to which the calls are diverted is displayed.4. Enter the number to which the calls are to be diverted and press OK.To enter the international code, press the   key until the + sign is displayed.The phone sends your settings to the network and the network’s acknowledgement is displayed.You can deactivate all call diverting settings by selecting the Cancel All option.3. To... Then...Activate call divertingPress the Activate soft key.Go to Step 4.Change the call numberPress the Change soft key.Go to Step 4. Deactivate call divertingPress the Remove soft key.Network Services97Call Barring  (Menu 6.2)The call barring network service allows you to restrict your calls.Call barring can be set up in the following ways.All Outgoing: calls cannot be made.International: international calls cannot be made.International Except to Home: when abroad, calls can be made only to numbers within the current country and to your home country, that is the country where your home network provider is located.All Incoming: calls cannot be received.Incoming While Abroad: calls cannot be received when you are using your phone outside your home service area.Cancel All: all call barring settings are deactivated; calls can be made and received normally.You can specify individual barring options for each of the following call types.• Voice calls only• Data calls only
Network Services98To set your call barring options, proceed as follows.1. Select the type of call barring required by pressing the   or   key until the appropriate option is highlighted and then press the Select soft key.2. Select the type of calls to be barred by pressing the   or   key until the appropriate option is highlighted and then press Select.3. Press the Activate soft key to confirm your settings.4. Enter your call barring password supplied by your service provider.The phone sends your settings to the network and the network’s acknowledgement is displayed.To deactivate specific call barring settings, proceed as follows.1. Select the call barring option to be deactivated.2. Select the type of call to which this option applies.3. Press the Deactivate soft key.4. Enter your call barring password supplied by your service provider.The phone sends your settings to the network and the network’s acknowledgement is displayed.You can also deactivate all call barring settings by selecting the Cancel All option.Network Services99Change Barring Password: you can set and change the call barring password obtained from your service provider using this option. You must enter the current password before you can specify a new one.Once you have entered a new password, you are asked to confirm it by entering it again.Call Waiting  (Menu 6.3)This network service enables you to be informed when someone is trying to reach you during another call.You can specify individual call waiting options for each of the following call types:• Voice calls only• Data calls onlyTo set your call waiting options, proceed as follows.1. Select the type of calls to which the call waiting option is to be applied by pressing the   or   key until the appropriate option is highlighted and then press the Select soft key.The screen informs you whether call waiting is activated or deactivated. 2. You can activate or deactivate the call waiting feature as necessary by using the Activate or Deactivate soft key respectively. To return to the previous screen, press the Exit soft key.You can also deactivate all call waiting settings by selecting the Cancel All option.
Network Services100Network Selection  (Menu 6.4)The Network Selection feature enables you to indicate whether the network used when roaming (outside your home area) is selected automatically or manually.Note: You can select a network other than your home network only if it has a valid roaming agree-ment with your home network.To indicate whether the network is to be selected automatically or manually when roaming, proceed as follows.1. When Network Selection is displayed, press the Select soft key.2. Press the   or   key until the appropriate option is highlighted and then press the OK soft key.If you select Automatic, you are connected to the first available network when roaming.If you select Manual, the phone scans for the available networks. Go to Step 3.3. Press the   or   key until the preferred network is highlighted and then press the OK soft key.You are connected to that network.Network Services101Caller ID  (Menu 6.5)You can prevent your phone number from being displayed on the phone of the person being called.Note: Some networks do not allow the user to change this setting.The following options are available.Default: the default setting provided by the network is used.Hide Number: your number is not displayed on the other person’s phone.Send Number: your number is sent each time you make a call.Closed User Group (CUG)  (Menu 6.6)This network service allows incoming and outgoing calls to be restricted to a selected user group. You may be a member of up to ten user groups.For details on how to create, activate and use a closed user group, contact your service provider.Example: A company lends SIM cards to its employees and wants to restrict outgoing calls to members of the same team.Activating a Closed User GroupIf you select the Closed User Group menu, you can enter the CUG function. You can now access the following options after pressing the Select soft key.Index List: lets you list, add or delete CUG index numbers. The list of current CUG indexes appears.
Network Services102Add a new CUG index as advised by your service provider or delete a selected group.Outside Access: lets you enable or disable calls to numbers other than those nominated for the Closed User Group. This feature depends on the nature of your CUG subscription. Please check with your service provider.Default Group: you may communicate a default CUG to your service provider. If you have done so, you can enable the Default Group option on your phone. When making a call, you will be given the option of using your default CUG, instead of selecting one from the list.Deactivate: deactivates the CUG function. This menu appears only when the default group is enabled or a CUG index is selected.To... Then press the...Scroll the through the existing CUG indexes or   key.Add a new CUG indexOptions soft key, select the Add option and enter the index.Delete a CUG indexOptions soft key and select the Delete option.Activate a CUG indexOptions soft key and select the Activate option.Network Services103Band Selection  (Menu 6.7)For the phone to make and receive phone calls, it must register with one of the available networks. Your phone can handle any of the following types of network: • GSM 900• GSM 1800• Combined GSM 900/1800• GSM 1900The country where you purchased your phone determines the default band that it uses. When you travel abroad, you must remember to change to an appropriate band. Proceed as follows.1. When Band Selection is displayed, press the Select soft key.2. Press the   or   key until the appropriate option (GSM 900/1800 or GSM 1900) is highlighted and press the OK soft key.When you select a new band, your phone displays a confirmation message and then automatically searches for all the available networks. Your phone then registers with a preferred network within the selected band.
104FunboxThe Funbox menu contains several fun options.Games  (Menu 7.1)You can enjoy three games with your phone. Scroll to the required game, using the   and   keys and press the Select soft key. For further details on the game, refer to the on-screen help.WAP Browser  (Menu 7.2)Your phone is equipped with a WAP Browser to allow you to access and navigate the Wireless Web via your phone.For further details on the WAP Browser menu, refer to the WAP Browser User’s Manual supplied with your phone.Downloads  (Menu 7.3)You can download MIDlets (Java applications running on mobile phones) from various sources using the WAP Browser and store them in your phone. You can then view the list of MIDlets stored on the Games & More screen.Note: Java  services may be unabailable depending upon the service provider.Games & MoreThis menu option allows you to launch a MIDlet and access various menu options.For more details on how to download MIDlets via the WAP Browser, refer to the WAP Browser User’s Manual supplied with your phone.Funbox105Launching a MIDletTo launch a MIDlet, proceed as follows.1. From the Downloads screen, select the Games & More option.2. Scroll to the desired MIDlet and press the Launch soft key.Using the MenusFrom the Main Screen press the Menu soft key to access the following options.Info*: displays information about the selected MIDlet, such as the file size, application version, vendor, and the location of the jad file, which is the MIDlet description file.Remove*: removes the selected MIDlet. When the confirmation message appears, press the Remove soft key. To cancel your selection, press the Cancel soft key.Update*: accesses the server and updates the selected MIDlet. Entering TextWhen entering URL addresses, the following five input modes are available.ABC: allows you to enter upper-case English characters.abc: allows you to enter lower-case English characters.123: allows you to enter numbers.Sym: allows you to enter symbols. After highlighting the required symbol by pressing the navigation keys, press the   key to insert it.* Shown only when a MIDlet has been downloaded.
Funbox106: allows you to enter English characters using the T9 mode. For details about this mode, see page 44. Note: To change case, press the   key.To change the text input mode, press the   key until the appropriate indicator appears on the soft key area of the display.SoundsIn this menu, you can view the list of sounds downloaded from the server. You can set the downloaded sounds as the current ring tone, but cannot send the sounds to other phones. When the memory is full, a warning message is displayed and the phone rejects additional sounds until you erase obsolete ones. PicturesIn this menu, you can view the list of pictures downloaded from the server. You can set the downloaded pictures as the current background image, but cannot send them to other phones. When the memory is full, a warning message is displayed and the phone rejects additional pictures until you erase obsolete ones.DNS SettingThe DNS (Domain Name Server) address of the Java server is preset at the factory, but sometimes you may need to change it. In this menu, you can determine whether or not the address will be automatically updated when needed.Automatic: the server will automatically trasmit the address to the phone if it is changed.Manual: you can manually change the address.107Solving ProblemsBefore contacting the after-sales service, perform the following simple checks. They may save you the time and expense of an unnecessary service call.When you switch your phone on, the following messages may appearInsert SIM Card• Check that the SIM card is correctly installed.Phone Locked Enter Password• The automatic locking function has been enabled. You must enter the phone’s password before you can use the phone.Enter PIN• You are using your phone for the first time. You must enter the Personal Identification Number supplied with the SIM card.• The option requiring that the PIN be entered each time the phone is switched on was enabled. You must enter your PIN and then disable this option if so required.Enter PUK• The PIN code was entered wrongly three times in succession and the phone is now blocked. Enter the PUK supplied by your network operator.
Solving Problems108“No service,” “Network failure” or “Not done” is displayed• The network connection was lost. You may be in a weak signal area (in a tunnel or surrounded by buildings). Move and try again.• You are trying to access an option for which you have not taken out a subscription with your service provider. Contact the service provider for further details.You have entered a number but it was not dialled• Have you pressed the   key?• Are you accessing the right cellular network?• You may have set an outgoing call barring option.Your correspondent cannot reach you• Is your phone switched on (the   key pressed for more than one second)?• Are you accessing the right cellular network?• You may have set an incoming call barring option.Your correspondent cannot hear you speaking• Have you switched off the microphone?• Are you holding the phone close enough to your mouth? The microphone is located at the bottom of the phone.Solving Problems109The phone starts beeping and “**Warning** Low Battery” flashes in the display• The battery is insufficiently charged. Replace the battery and recharge it.The audio quality of the call is poor• Check the signal strength indicator in the display ( ); the number of bars indicates the signal strength from strong ( ) to weak ( ).• Try moving the phone slightly or moving closer to a window if you are in a building.No number is dialled when you recall a phonebook entry• Check that the numbers have been stored correctly, by using the Phonebook Search feature.• Re-store the number, if necessary.If the above guidelines do not enable you to solve the problem, take a note of:• The model and serial numbers of your phone• Your warranty details• A clear description of the problemThen contact your local dealer or Samsung after-sales service.
110Access CodesThere are several access codes that are used by your phone and its SIM card. These codes help you protect the phone against unauthorised use.When requested for any of the codes explained below, key in the appropriate code (displayed as asterisks) and press the OK soft key. If you make a mistake, press the   key one or more times until the incorrect digit is cleared and then continue entering the correct code.The access codes, except for the PUK and PUK2 codes can be changed using Security menu options (Menu 4.6). See page 79 for further details.Important! Avoid using access codes resembling emergency numbers, such as 112, so that you do not dial an emergency number accidentally.Phone PasswordThe Phone Lock feature uses the phone password to protect your phone against unauthorised use. The phone password is supplied with the phone and is factory set to 00000000.To... Refer to...Activate/deactivate the Phone Lock featurePage 80(Menu 4.6.3).Change the phone passwordPage 80(Menu 4.6.4).Access Codes111PINThe Personal Identification Number or PIN (4 to 8 digits) protects your SIM card against unauthorised use. It is usually supplied with the SIM card.If you enter an incorrect PIN three times in succession, the code is disabled and cannot be used until you re-enable it by entering the PUK (see below).PUKThe 8-digit PUK (Personal Unblocking Key) is required to change a disabled PIN. The PUK may be supplied with the SIM card. If not, or you have lost it, contact your service provider.To re-enable your PIN, proceed as follows.1. Key in the PUK and press the OK soft key.2. Enter a new PIN of your choice and press the OK soft key.3. When the Confirm New PIN message is displayed, key in the same code again and press the OK soft key.If you enter an incorrect PUK ten times in succession, the SIM card becomes invalid. Contact your service provider for a new card.To... Refer to...Activate/deactivate the PIN Check featurePage 79 (Menu 4.6.1).Change the PIN Page 80(Menu 4.6.2).
Access Codes112PIN2The PIN2 (4 to 8 digits), supplied with some SIM cards, is required to access specific functions, such as setting the maximum cost of a call. These functions are available if supported by your SIM card.If you enter an incorrect PIN2 three times in succession, the code is disabled and you cannot access the functions until you re-enable it by entering the PUK2.To change the PIN2, refer to page 81 (Menu 4.6.7).PUK2The 8-digit PUK2 (Personal Unblocking Key 2), supplied with some SIM cards, is required to change a disabled PIN2. If you lose the code, contact your service provider.To re-enable your PIN2, proceed as follows.1. Key in the PUK2 and press the OK soft key.2. Enter a new PIN2 of your choice and press the OK soft key.3. When the Confirm PIN2 message is displayed, key in the same code again and press the OK soft key.If you enter an incorrect PUK2 ten times in succession, you will not be able to access the functions requiring the PIN2. Contact your service provider for a new card.Access Codes113Barring PasswordThe 4-digit barring password is required when you use the Call Barring function. You obtain the password from your service provider when you subscribe to this function. See page 99 for further details.
115Health and Safety InformationExposure to Radio Frequency (RF) SignalsYour mobile phone is a radio transmitter and receiver. It is designed and manufactured, so as to exceed the limits for exposure to radio-frequency (RF) energy, as recommended by the Federal Communications Commission of the U.S. Government. These limits are part of comprehensive guidelines and establish permitted levels of RF energy for the general population. The guidelines are based on the safety standards previously set by both U.S. and international standards bodies:• American National Standards Institute (ANSI) IEEE. C95.1-1992• National Council on Radiation Protection and Measurement (NCRP). Report 86. 1986• International Commission on Non-Ionizing Radiation Protection (ICNIRP) 1996• Ministry of Health (Canada), Safety Code 6.The standards include a substantial safety margind designed to assure the safety of all persons, regardless of age and health.The exposure standard for mobile phones employs a unit of measurement known as the SAR (Specific Absorption Rate). The SAR limit recommended by the FCC is 1.6W/kg.** In the U.S. and Canada, the SAR limit for mobile phones used by the public is 1.6 watts/kg (W/kg) averaged over one gram of tissue. The standard incorporates a substantial margin of safety to give additional protection for the public and to account for any variations in measurements.
Health and Safety Information116SAR tests are conducted using standard operating positions specified by the FCC with the phone transmitting at its highest certified power level in all tested frequency bands. Although the SAR is determined at the highest certified power level, the actual SAR level of the phone while operation can be well below the maximum value. This is because the phone is designed to operate at multiple power levels so as to use only the power required to reach the network. In general, the closer you are to a base station, the lower the power output of the phone. Before a new phone model is available for sale to the public, it must be tested and certified to the FCC that it does not exceed the limit established by the government-adopted requirement for safe exposure. The tests are performed in positions and locations (e.g., at the ear and worn on the body) as required by the FCC for each model. (Body-worn measurements may differ among phone models, depending upon available accessories and FCC requirements). While there may be differences between the SAR levels of various phones and at various positions, they all meet the government requirement for safe exposure.This device was tested for typical body-worn operations              with the back of the phone kept 1.5 cm. from the body.To maintain compliance with FCC RF exposure require- ments, use only belt-clips, holsters or similar accessoriesthat maintain a 1.5 cm. separation distance between the user's body and the back of the phone, includingthe antenna. The use of belt-clips, holsters and similar accessories should not contain metallic components in its assembly. The use of accessories that do not satisfy Health and Safety Information117For additional information concerning exposure to radio frequency signals, see the following websites:Federal Communications Commission (FCC) RF Safety program (select “Information on Human Exposure to RF Fields from Cellular and PCS Radio Transmitters”): http://www.fcc.gov/oet/rfsafetyCellular Telecommunications Industry Association (CTIA): http://www.wow-com.comWorld Health Organization (WHO) International Commission on Non-ionizing Radiation Protection (select Qs & As): http://www.who.int/emfUnited Kingdom, National Radiological Protection Board: http://www.nrpb.org.ukU.S.Food and Drug Administration (FDA) Center for Devices and Radiological Health:http://www.fda.gov/cdrh/consumer/120FCC Compliance lnformationThis device complies with part 15 of the FCC Rules.Operation and is subject to the condition that thisdevice does not cause harmful interference.these requirements may not comply with FCC RF exposure requirements, and should be avoided.
118Exposure to Radio-FrequencyEnergy (SAR Information)This phone meets European Union (EU) requirements concerning exposure to radio waves.Your mobile phone is a radio transmitter and receiver. It is designed and manufactured, so as not to exceed the limits for exposure to radio-frequency (RF) energy, as recommended by the EU Council. These limits are part of comprehensive guidelines and establish permitted levels of RF energy for the general population. The guidelines were developed by independent scientific organisations through periodic and thorough evaluation of scientific studies. The limits include a substantial safety margin designed to ensure the safety of all persons, regardless of age and health.The exposure standard for mobile phones employs a unit of measurement known as SAR (Specific Absorption Rate). The SAR limit recommended by the EU Council is 2.0W/kg.** The SAR limit for mobile phones used by the public is 2.0 watts/kilogram (W/kg) averaged over one gram of body tissue. The limit incorporates a substantial margin of safety to give additional protection for the public and to account for any variations in measurements. The SAR values may vary depending on national reporting requirements and the network band.Health and Safety Information119SAR tests are conducted using standard operating positions with the phone transmitting at its highest certified power level in all tested frequency bands. Although the SAR is determined at the highest certified power level, the actual SAR level of the phone while operating can be well below the maximum value. This is because the phone is designed to operate at multiple power levels so as to use only the power required to reach the network. In general, the closer you are to a base station, the lower the power output of the phone. Before a new model phone is available for sale to the public, compliance with the European R&TTE Directive must be shown. This directive includes as one of its essential requirements the protection of the health and safety of the user and any other person.
Health and Safety Information120Precautions When Using BatteriesYour phone is powered by a rechargeable Li-ion standard battery. • Never use any charger or battery that is damaged in any way.• Use the battery only for its intended purpose.• If you use the phone near the network’s base station, it uses less power; talk and standby time are greatly affected by the signal strength on the cellular network and the parameters set by the network operator.• Battery charging time depends on the remaining battery charge and the type of battery and charger used. The battery can be charged and discharged hundreds of times, but it will gradually wear out. When the operation time (talk time and standby time) is noticeably shorter than normal, it is time to buy a new battery.• If left unused, a fully charged battery will discharge itself over time.• Use only Samsung-approved batteries and recharge your battery only with Samsung-approved chargers. When a charger is not in use, disconnect it from the power source. Do not leave the battery connected to a charger for more than a week, since overcharging may shorten its life.• Extreme temperatures will affect the charging capacity of your battery: it may require cooling or warming first.Health and Safety Information121• Do not leave the battery in hot or cold places, such as in a car in summer or winter conditions, as you will reduce the capacity and life-time of the battery. Always try to keep the battery at room temperature. A phone with a hot or cold battery may temporarily not work, even when the battery is fully charged. Li-ion batteries are particularly affected by temperatures below 0 °C (32 °F).• Do not short-circuit the battery. Accidental short circuiting can occur when a metallic object (coin, clip or pen) causes a direct connection between the + and – terminals of the battery (metal strips on the battery), for example when you carry a spare battery in a pocket or bag. Short-circuiting the terminals may damage the battery or the object causing the short-circuit.• Dispose of used batteries in accordance with local regulations. Always recycle. Do not dispose of batteries in a fire.
Health and Safety Information122Road SafetyYour wireless phone gives you the powerful ability to communicate by voice, almost anywhere, anytime. But an important responsibility accompanies the benefits of wireless phones, one that every user must uphold.When driving a car, driving is your first responsibility. When using your wireless phone behind the wheel of a car, practice good common sense and remember the following tips.1. Get to know your wireless phone and its features, such as speed dial and redial. If available, these features help you to place your call without taking your attention off the road.2. When available, use a hands-free device. If possible, add an extra layer of convenience and safety to your wireless phone with one of the many hands-free accessories available today.3. Position your wireless phone within easy reach. Be able to access your wireless phone without removing your eyes from the road. If you get an incoming call at an inconvenient time, let your voice mail answer it for you.4. Let the person you are speaking with know you are driving; if necessary, suspend the call in heavy traffic or hazardous weather conditions. Rain, sleet, snow, ice and even heavy traffic can be hazardous.5. Do not take notes or look up phone numbers while driving. Jotting down a To Do list or flipping through your phonebook takes your attention away from your primary responsibility, driving safely.Health and Safety Information1236. Dial sensibly and assess the traffic; if possible, place calls when you are not moving or before pulling into traffic. Try to plan calls when your car will be stationary. If you need to make a call while moving, dial only a few numbers, check the road and your mirrors, then continue.7. Do not engage in stressful or emotional conversations that may be distracting. Make the people with whom you are talking aware that you are driving and suspend conversations that have the potential to divert your attention from the road.8. Use your wireless phone to call for help. Dial the emergency number in the case of fire, traffic accident or medical emergencies. Remember, it is a free call on your wireless phone! 9. Use your wireless phone to help others in emergencies. If you see a car accident, crime in progress or other serious emergency where lives are in danger, call the emergency number, as you would want others to do for you.10. Call roadside assistance or a special non-emergency wireless assistance number when necessary. If you see a broken-down vehicle posing no serious hazard, a broken traffic signal, a minor traffic accident where no one appears injured, or a vehicle you know to be stolen, call roadside assistance or any other special non-emergency wireless number.
Health and Safety Information124Operating EnvironmentRemember to follow any special regulations in force in any area and always switch off your phone whenever it is forbidden to use it, or when it may cause interference or danger.When connecting the phone or any accessory to another device, read its user’s guide for detailed safety instructions. Do not connect incompatible products.As with other mobile radio transmitting equipment, users are advised that for the satisfactory operation of the equipment and for the safety of personnel, it is recommended that the equipment should only be used in the normal operating position (held to your ear with the antenna pointing over your shoulder).Electronic DevicesMost modern electronic equipment is shielded from radio frequency (RF) signals. However, certain electronic equipment may not be shielded against the RF signals from your wireless phone. Consult the manufacturer to discuss alternatives.PacemakersPacemaker manufacturers recommend that a minimum distance of 15 cm (6 inches) be maintained between a wireless phone and a pacemaker to avoid potential interference with the pacemaker. These recommendations are consistent with the independent research and recommen-dations of Wireless Technology Research.Health and Safety Information125Persons with pacemakers:• Should always keep the phone more than 15 cm (6 inches) from their pacemaker when the phone is switched on• Should not carry the phone in a breast pocket• Should use the ear opposite the pacemaker to minimise potential interferenceIf you have any reason to suspect that interference is taking place, switch off your phone immediately.Hearing AidsSome digital wireless phones may interfere with some hearing aids. In the event of such inter-ference, you may wish to consult your hearing aid manufacturer to discuss alternatives.Other Medical DevicesIf you use any other personal medical devices, consult the manufacturer of your device to determine if it is adequately shielded from external RF energy. Your physician may be able to assist you in obtaining this information. Switch off your phone in health care facilities when any regulations posted in these areas instruct you to do so. Hospitals or health care facilities may be using equipment that could be sensitive to external RF energy.
Health and Safety Information126VehiclesRF signals may affect improperly installed or inadequately shielded electronic systems in motor vehicles. Check with the manufacturer or its representative regarding your vehicle.You should also consult the manufacturer of any equipment that has been added to your vehicle.Posted FacilitiesSwitch off your phone in any facility where posted notices require you to do so.Potentially Explosive AtmospheresSwitch off your phone when in any area with a potentially explosive atmosphere and obey all signs and instructions. Sparks in such areas could cause an explosion or fire resulting in bodily injury or even death.Users are advised to switch off the phone while at a refuelling point (service station). Users are reminded of the need to observe restrictions on the use of radio equipment in fuel depots (fuel storage and distribution areas), chemical plants or where blasting operations are in progress.Areas with a potentially explosive atmosphere are often but not always clearly marked. They include below deck on boats, chemical transfer or storage facilities, vehicles using liquefied petroleum gas (such as propane or butane), areas where the air contains chemicals or particles, such as grain, dust or metal powders, and any other area where you would normally be advised to turn off your vehicle engine.Health and Safety Information127Emergency CallsThis phone, like any wireless phone, operates using radio signals, wireless and landline networks as well as user-programmed functions, which cannot guarantee connection in all conditions. Therefore, you should never rely solely on any wireless phone for essential communications (medical emergencies, for example).Remember, to make or receive any calls the phone must be switched on and in a service area with adequate signal strength. Emergency calls may not be possible on all wireless phone networks or when certain network services and/or phone features are in use. Check with local service providers.To make an emergency call, proceed as follows.1. If the phone is not on, switch it on.2. Key in the emergency number for your present location (for example, 112 or any other official emergency number). Emergency numbers vary by location.3. Press the   key.If certain features are in use (call barring, for example), you may first need to deactivate those features before you can make an emergency call. Consult this document and your local cellular service provider.When making an emergency call, remember to give all the necessary information as accurately as possible. Remember that your phone may be the only means of communication at the scene of an accident; do not cut off the call until given permission to do so.
 Health and Safety Information 128 Other Important Safety Information • Only qualified personnel should service the phone or install the phone in a vehicle. Faulty installation or service may be dangerous and may invalidate any warranty applicable to the device.• Check regularly that all wireless phone equipment in your vehicle is mounted and operating properly.• Do not store or carry flammable liquids, gases or explosive materials in the same compartment as the phone, its parts or accessories.• For vehicles equipped with an air bag, remember that an air bag inflates with great force. Do not place objects, including both installed or portable wireless equipment in the area over the air bag or in the air bag deployment area. If wireless equipment is improperly installed and the air bag inflates, serious injury could result.• Switch off your phone before boarding an aircraft. The use of wireless phones in aircraft may be dangerous to the operation of the aircraft, and is illegal.• Failure to observe these instructions may lead to the suspension or denial of telephone services to the offender, or legal action, or both. Health and Safety Information 129 Care and Maintenance Your phone is a product of superior design and craftsmanship and should be treated with care. The suggestions below will help you fulfill any warranty obligations and allow you to enjoy this product for many years. • Keep the phone and all its parts and accessories out of the reach of small children’s.• Keep the phone dry. Precipitation, humidity and liquids contain minerals that will corrode electronic circuits.•Do not touch the phone with a wet hand while it is charging. Doing so may cause an electric shock to you or damage to the phone. • Do not use or store the phone in dusty, dirty areas, as its moving parts may be damaged.• Do not store the phone in hot areas. High temperatures can shorten the life of electronic devices, damage batteries, and warp or melt certain plastics.• Do not store the phone in cold areas. When the phone warms up to its normal operating temperature, moisture can form inside the phone, which may damage the phone’s electronic circuit boards.• Do not drop, knock or shake the phone. Rough handling can break internal circuit boards.• Do not use harsh chemicals, cleaning solvents or strong detergents to clean the phone. Wipe it with a soft cloth slightly dampened in a mild soap-and-water solution.
 Health and Safety Information 130 • Do not paint it. Paint can clog the device’s moving parts and prevent proper operation.• Use only the supplied or an approved replacement antenna. Unauthorised antennas or modified accessories may damage the phone and violate regulations governing radio devices.• If the phone, battery, charger or any accessory is not working properly, take it to your nearest qualified service facility. The personnel there will assist you, and if necessary, arrange for service. 131 Glossary To help you understand the main technical terms and abbreviations used in this booklet and take full advantage of the features on your mobile phone, here are a few definitions. Active Flip Ability to answer a call simply by opening the phone. Call Barring Ability to restrict outgoing and incoming calls. Call Diverting Ability to reroute calls to another number. Call Holding Ability to put one call on standby while answering or making another call; you can then switch between the two calls, as required. Call Waiting Ability to inform users that they have an incoming call when engaged on another call.
Glossary132GPRS (General Packet Radio Service)New non-voice value-added service that allows information to be sent and received across a mobile telephone network. GPRS guaranties continuous connection to the Internet for mobile phone and computer users. It is based on the Global System for Mobile Communication (GSM) circuit-switched cellular phone connections and the Short Message Service (SMS).GSM (Global System for Mobile Communication)International standard for cellular communication, guaranteeing compatibility between the various network operators. GSM covers most European countries and many other parts of the world.JavaProgramming language generating applications that can run on all hardware platforms, whether small, medium or large, without modification. It has been promoted for and geared heavily to the Web, both for public Web sites and Intranets. When a Java program runs from a Web page, it is called a Java applet. When it is run on a mobile phone or pager, it is called a MIDlet. Line Identification Services (Caller ID)Services allowing subscribers to view or block the telephone numbers of callers.Glossary133Multiparty CallingAbility to establish a conference call involving up to five additional parties.Phone PasswordSecurity code used to unlock the phone when you have selected the option to lock it automatically each time it switches on.PIN (Personal Identification Number)Security code that protects the phone against unauthorised use. The PIN is supplied by the service provider with the SIM card. It may be a four to eight-digit number and can be changed, as required.PUK (PIN Unblocking Key)Security code used to unlock the phone when an incorrect PIN has been entered three times in succession. The eight-digit number is supplied by the service provider with the SIM card.RoamingUse of your phone when you are outside your home area (when travelling for example).
Glossary134SDN (Service Dialling Numbers)Telephone numbers supplied by your network provider and giving access to special services, such as voice mail, directory inquiries, customer support and emergency services.SIM (Subscriber Identification Module)Card containing a chip with all the information required to operate the phone (network and memory information, as well as the subscriber’s personal data). The SIM card fits into a small slot on the back of the phone and is protected by the battery.SMS (Short Message Service)Network service sending and receiving messages to and from another subscriber without having to speak to the correspondent. The message created or received can be displayed, received, edited or sent.Soft KeysTwo keys marked   and  on the phone, the purpose of which:• Varies according to the function that you are currently using• Is indicated on the bottom line of the display just above the corresponding keyGlossary135Tri BandAbility to handle any of the following types of network: GSM 900, GSM 1800, combined GSM 900/ 1800 and GSM 1900 MHz bands, for greater call success and wider roaming.Your phone automatically searches for the last network used. If, for any reason, this network is unavailable, your phone will attempt to register with a different network. Voice MailComputerised answering service that automatically answers your calls when you are not available, plays a greeting (optionally in your own voice) and records a message.
136IndexAAccess codes • 110Accessories • 9Active Flip • 84Alarm (5.4) • 92Alert Type (3.3) • 73Animations • 63, 68Answeringa call • 25a second call • 51Anykey Answer • 25, 84Auto Light • 83Auto Redial • 84Autopower • 92BBackground image • 77Backlight • 15, 82auto light • 83contrast • 82Band Selection (6.7) • 103Barringcalls (6.2) • 97password • 99, 113Batterycharging • 19low battery indicator • 20precautions • 116Broadcast (1.5) • 66BrowserWAP (7.2) • 104CCalculator (5.5) • 93Calendar (5.1) • 86Callergroups • 36, 38, 39ID (6.5) • 101Callsansweringa call • 25a second call • 51barring (6.2) • 97cost (2.5) • 71dialled (2.3) • 70C (continued)Calls (continued)diverting (6.1) • 95emergency • 123ending • 23holding • 48international • 22making • 22missed • 26, 69multiparty • 52received (2.2) • 69records (2) • 69redialling • 23automatically • 84speed-dialling • 40time (2.4) • 70via phonebook • 37waiting (6.3) • 51, 99Cardinstalling the SIM • 17Care • 125Changingbarring password • 99password • 80PIN • 80PIN2 • 81text entry modes • 43Characterschanging mode • 43entering • 42Charging batteries • 19Closed User Group (6.6) • 101Color Theme • 77Conference call • 52Connectto voice server • 67tone • 75Contrast • 82Copyingmemos • 88phonebook numbers • 36task • 90Correcting numbers • 22Cost of calls • 71CUG • 101Currency Exchange (5.6) • 94Index137DDatesetting • 91Deletingmemos • 88messages • 61missed calls • 27, 69phonebook numbers • 36tasks • 90Dialled Calls (2.3) • 70Displaycontrast • 82external • 15icons • 14language • 31, 79layout • 13settings (4.7) • 82Diverting calls (6.1) • 95Downloads (7.3) • 104EEarpiece volume • 24Editingcaller groups • 39memos • 87messages • 61missed calls • 27, 69phonebook numbers • 36tasks • 89Electronic devices • 120Emergency calls • 123Error tone • 75Explosive atmospheres • 122External display • 15Extra Settings (4.8) • 84Extra Tones (3.6) • 75FFDN mode • 81Fixed Dial Number mode • 81Funbox (7) • 104Functionsselecting • 29GGames (7.1) • 104Graphic logo • 83Greeting Message (4.3) • 78Groupscaller • 36, 38, 39user • 101HHealth information • 114Hearing aids • 121Holding calls • 48IIconsdescription • 14Identifying a caller • 25, 101Imagesbackground • 77downloaded • 106messages • 61, 63, 68Infrared Activate (4.1) • 76Internet • 104IrDA port • 76KKey tonesadjusting volume • 24muting • 50selecting (3.4) • 73sending • 50Keypad Tone (3.4) • 73Keysdescription • 11location • 10shortcut • 85soft • 29LLanguage (4.5) • 31, 79Last number redial • 23
Index138L (continued)Length of calls • 70, 75Letterschanging mode • 43entering • 42Lightbacklight • 15, 82service • 16, 83Lockingphone • 80SIM card • 81Logographic • 83Low battery indicator • 20Lower-case charactersentering • 45MMaintenance • 125Medical devices • 121Melodies • 63, 68Memory statusmessage (1.8) • 68phonebook • 41Memoscopying • 88deleting • 88editing • 87writing • 87Menuscolours • 77list • 55scrolling • 54shortcuts • 55style • 78Message Tone (3.5) • 74Messagesanimations • 63, 68broadcast (1.5) • 66contents (1.7) • 68formatting • 63greeting • 78images • 61, 63, 68language • 63M (continued)Messages (continued)memory status (1.8) • 68reading (1.1) • 51, 60setup (1.4) • 64sounds • 61, 63, 68templates (1.3) • 63, 64voice mail (1.6) • 67writing (1.2) • 51, 62Microphone mute • 49Minute minder • 75Missed Calls (1.1) • 26, 69Morning Call • 92Multiparty callsdropping • 53making • 52private conversation • 52Mutingkey tones • 50microphone • 49My Contents (1.7) • 68My Settings (4.2) • 77NNamesentering • 42searching/dialling • 37storing • 33Network Selection (6.4) • 100Network Services (6) • 95Numbersadding phonebook • 36copying phonebook • 36correcting • 22editing phonebook • 36erasing • 36fixed dial • 81mode • 47own • 78pasting phonebook • 36redialling • 23searching/dialling • 37storing • 33Index139OObjectsmessage • 61, 68Operator logo • 83Optionsselecting • 29Organiser (5) • 86Own Number (4.4) • 78PPacemakers • 120Passwordbarringchanging • 99code • 113phonechanging • 80code • 110Pasting phonebook numbers • 36Phonelock • 80password • 110settings (4) • 76Phonebookadding entries • 36caller groups • 36, 38, 39copying • 36editing • 36erasing • 36memory status • 41options • 35pasting • 36searching/dialling • 37, 50speed-dialling • 40storing numbers/names • 33Picturesbackground • 77messages • 61, 63, 68PINchanging • 80checking • 79code • 111PIN2changing • 81code • 112P (continued)Problem solving • 107PUK • 111PUK2 • 112RRadio-frequencies • 114Read Messages (1.1) • 60Received Calls (2.2) • 69Rediallingautomatically • 84last number • 23Rejecting calls • 25Reset Settings (4.10) • 85Ringtone (3.1) • 72type (3.3) • 73volume (3.2) • 72Road safety • 118Roaming • 100SSafetybatteries • 116explosive atmospheres • 122information • 114, 124operating environment • 120precautions • 7road • 118Schedule • 86Searching in phonebook • 37, 50Security (4.6) • 79Selecting functions/options • 29Sendingkey tones • 50messages • 62Service light • 16, 83Settingsalarm (5.4) • 92colours • 77date • 91display (4.7) • 82
Index140S (continued)Settings (continued)extra (4.8) • 84language (4.5) • 79phone (4) • 76reset (4.10) • 85security (4.6) • 79sound (3) • 72time • 91Setup (1.4) • 64Shortcut (4.9) • 85Silent mode • 28SIM cardinstalling • 17locking • 81SMSmessage icon • 60setup • 64using • 51, 60Soft keys • 29Solving problems • 107Sound Settings (3) • 72Soundsdownloaded • 106messages • 61, 63, 68Speed-dialling • 40Switching on/offmicrophone • 49phone • 21silent mode • 28Symbol mode • 47TT9 mode • 44Tasksdefining • 88editing • 89Templates (1.3) • 63, 64Textchanging mode • 43entering • 42Timecall • 70format • 91setting • 91world • 91T (continued)To Do List (5.2) • 88Toneconnect • 75error • 75extra • 75keypad • 73message • 74ring • 72Travel adapter • 19UUpper-case charactersentering • 45User groups • 101VVibration • 73, 74Voice Mail (1.6) • 67Voice server • 67Volumeadjusting • 24selecting the ring • 72WWaitingcalls • 51, 99Wallpaper • 77WAP Browser (7.2) • 104World Time • 91Write Messages (1.2) • 62Writing memos • 87
Access the Menu Functions➀Press the Menu soft key.➁Scroll with the   and   keys through the list of the menus until you reach the required menu.➂Press the Select soft key.➃Scroll with the   and   keys through the list of the options until the required one is selected.➄Press the Select soft key.• Each of the two soft keys (  and  ) perform the function indicated by the text above it (bottom line in the display).Switch On/Off Press and hold the   key.Make a Call ➀Key in the number.➁Press the   key.End a Call Briefly press the   key.View Missed Calls Immediately After Missing Them➀Open the phone and press the View soft key.➁Scroll with the   and   keys through the missed calls.➂To return the call, press the   key.Tri Band SGH-S100 GPRS TelephoneQuick Reference Card
Answer a CallOpen the phoneorPress the   key.Adjust the VolumePress the   or   key on the left side of the phone.Choose the Alert Type➀Select the Alert Type menu option (3.3).➁Select an option: •Light only•Melody•Vibration•Vibra+Melody➂Press the Select soft key.Store Numbers in the Phonebook➀Key in the number.➁Press the Save soft key.➂Select an icon for label.➃Press the Select soft key.➄Enter the name.➅Press the OK soft key.➆If necessary, change the location.➇Press the OK soft key.➈Press   to return to idle mode.Search for a Number in the Phonebook➀Press the Name soft key.➁Select the Search option.➂Enter the start of the name.➃To scroll through the names, press the   and   keys.➄Press the View soft key.➅To scroll through the numbers, press the   and   keys.➆Press the   key to dial.Declaration of Conformity (R&TTE) For the following product:TRI BAND GPRS TELEPHONE SGH-S100(Product Name)SGH-S100(Model Number)Manufactured at:- Samsung Electronics,  94-1 Imsu-Dong, Gumi City, Kyung Buk, Korea, 730-350- Samsung Electronics Iberia, S.A., Pol. Ind. Riera de Caldes, Via Augusta, n-10 08184 Palau de Plegamans, Barcelona, Spain(Factory Name, Address)We hereby declare that [all essential radio test suites have been carried out and that] the above named product is in conformity with all the essential requirements of Directive 1999/5/EC.The conformity essessment procedure referred to in Article 10 and detailled in annex [IV] of Directive 1999/5/EC has been followed with the involvement of the following Notified Body(ies):BABT, Claremont House, 34 Molesey Road, Walton-on-Thames, KT12 4RQ, UK - Identification mark: 168The technical documentation kept at:Samsung Electronics Euro QA Lab.which will be made available upon request.(Manufacturer)Samsung Electronics Co., Ltd.Suwon P.O.Box 105Kyungki-Do, Korea 440-60005/20/2002JUNGKWAN CHOI / S. Manager(place and date of issue) (name and signature of authorised person)(Representative in the EU)Samsung Electronics Euro QA Lab., Blackbush Business Park, Saxony Way, Yateley, Hampshire, GU46 6GG, UK05/20/2002IN-SEOP LEE / Manager(place and date of issue) (name and signature of authorised person)

Navigation menu