Samsung Electronics Co SGHT459 Cellular/PCS GSM/EDGE Phone with Bluetooth User Manual t459
Samsung Electronics Co Ltd Cellular/PCS GSM/EDGE Phone with Bluetooth t459
UserManual.wiki
>
Samsung Electronics Co
>
SGHT459 User Manual
Users Manual
Navigation menu
Upload a User Manual
Namespaces
Wiki Guide
HTML
PDF
Info
Views
User Manual
Discussion / Help
Navigation

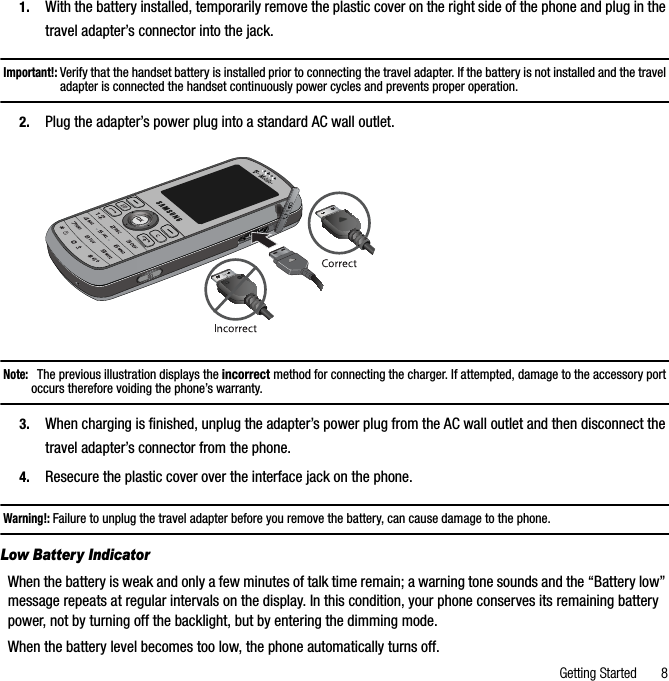


![694. Fill in the desired fields.5. Press Save to save your information.Block listTheBlock list menu allows you to add or remove contacts from the blocked list of callers.Creating a Block list6. In Idle mode, press Menu➔ Phonebook ➔ Block list and press the Select soft key or the key.7. Highlight [Add to block list] and press the OK soft key.8. Select one of the following options:• Number: allows you to block the number you enter.•Contacts: allows you to select contacts from the Contact list to block.• Recent contacts: allows you to select a recent contact from the Recent contacts list to block.• Unknown numbers: adds all unrecognized numbers (numbers not in the Phonebook or on the FDN list) to the block list.•FDN contacts: allows you to identify FDN contacts to block.The selected contact(s) display and are added to the Block list.Removing contacts from the Block list1. In Idle mode, press Menu➔ Phonebook ➔ Block list and press the Select soft key or the key.2. Highlight the number to remove and press Remove .3. At the Remove from block list? prompt, press Yes to delete the selected contact, or press No to cancel.The selected contact(s) are removed from the Block list.ManagementTo access the Management menu:ᮣIn Idle mode, press Menu➔ Phonebook ➔ Management and press the Select soft key or the key.](https://usermanual.wiki/Samsung-Electronics-Co/SGHT459/User-Guide-1004702-Page-72.png)


![Health and safety information30Emergency callsThis phone, like any wireless phone, operates using radio signals, wireless, and landline networks as well as user-programmed functions, which cannot guarantee connection in all conditions. Therefore, you should never rely solely on any wireless phone for essential communications like medical emergencies.To make or receive calls, the phone must be switched on and in a service area with adequate signal strength. Emergency calls may not be possible on all wireless phone networks or when certain network services and/or phone features are in use. Check with local service providers.To make an emergency call:1. Switch on the phone.2. Key in the emergency number for your present location. Emergency numbers vary by location.3. Press [ ].Certain features like Call Barring may need to be deactivated before you can make an emergency call. Consult this document and your local cellular service provider.Other important safety information• Only qualified personnel should service the phone or install the phone in a vehicle. Faulty installation or service may be dangerous and may invalidate any warranty applicable to the device.• Check regularly that all wireless phone equipment in your vehicle is mounted and operating properly.• Do not store or carry flammable liquids, gases, or explosive materials in the same compartment as the phone, its parts, or accessories.• For vehicles equipped with an air bag, remember that an air bag inflates with great force. Do not place objects, including installed or portable wireless equipment, in the area over the air bag or in the air bag deployment area. Improperly installed wireless equipment could result in serious injury if the air bag inflates.• Switch off your phone before boarding an aircraft. It is dangerous and illegal to use wireless phones in an aircraft because they can interfere with the operation of the aircraft.](https://usermanual.wiki/Samsung-Electronics-Co/SGHT459/User-Guide-1004702-Page-162.png)