Samsung Electronics Co SGHZ610 Single-Band PCS GSM/ EDGE Phone with Bluetooth User Manual 1
Samsung Electronics Co Ltd Single-Band PCS GSM/ EDGE Phone with Bluetooth 1
UserManual.wiki
>
Samsung Electronics Co
>
SGHZ610 User Manual
Users Manual
Navigation menu
Upload a User Manual
Namespaces
Wiki Guide
HTML
PDF
Info
Views
User Manual
Discussion / Help
Navigation
![2About this GuideThis User’s Guide provides you with condensed information about how to use your phone. To quickly learn the basics for your phone, please refer to “Get started” and “Step outside the phone.”In this guide, the following instruction icons appear:Indicates that you need to pay careful attention to the subsequent information regarding safety or phone features.Indicates that you can get more information on the referenced page. →Indicates that you need to drag your finger to scroll to the specified option and then select it.[ ] Indicates a key on the phone. For example, []< > Indicates a soft key, whose function is displayed on the phone screen. For example, <Menu>•3GYour phone is capable of operating in a 3G environment, allowing much greater data transfer speed, video streaming, and video conferencing. Special features of your phone• Camera and camcorderUse the camera module on your phone to take a photo or record a video.• Media playerPlay media files on your phone. You can enjoy high quality videos and music.• Photo printingPrint your photos to preserve your best moments forever.Z610.book Page 2 Monday, June 26, 2006 11:10 AM](https://usermanual.wiki/Samsung-Electronics-Co/SGHZ610/User-Guide-680086-Page-5.png)
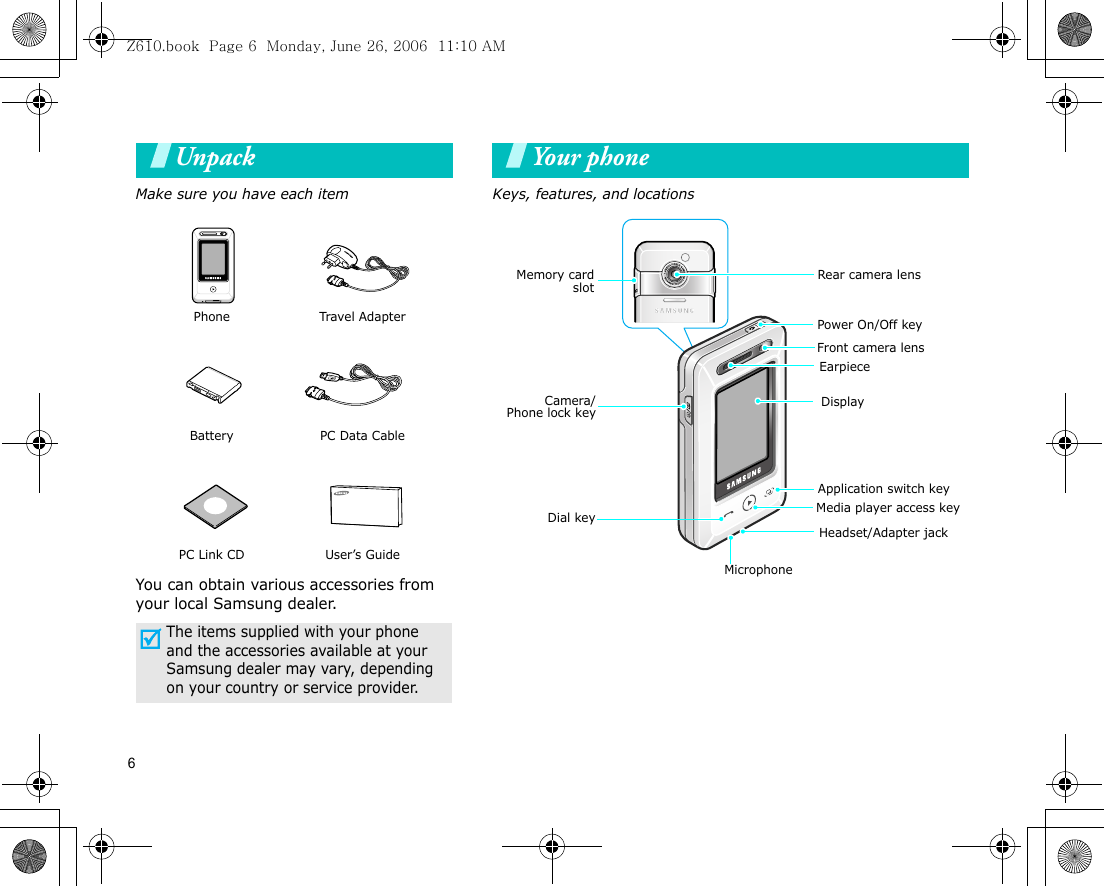
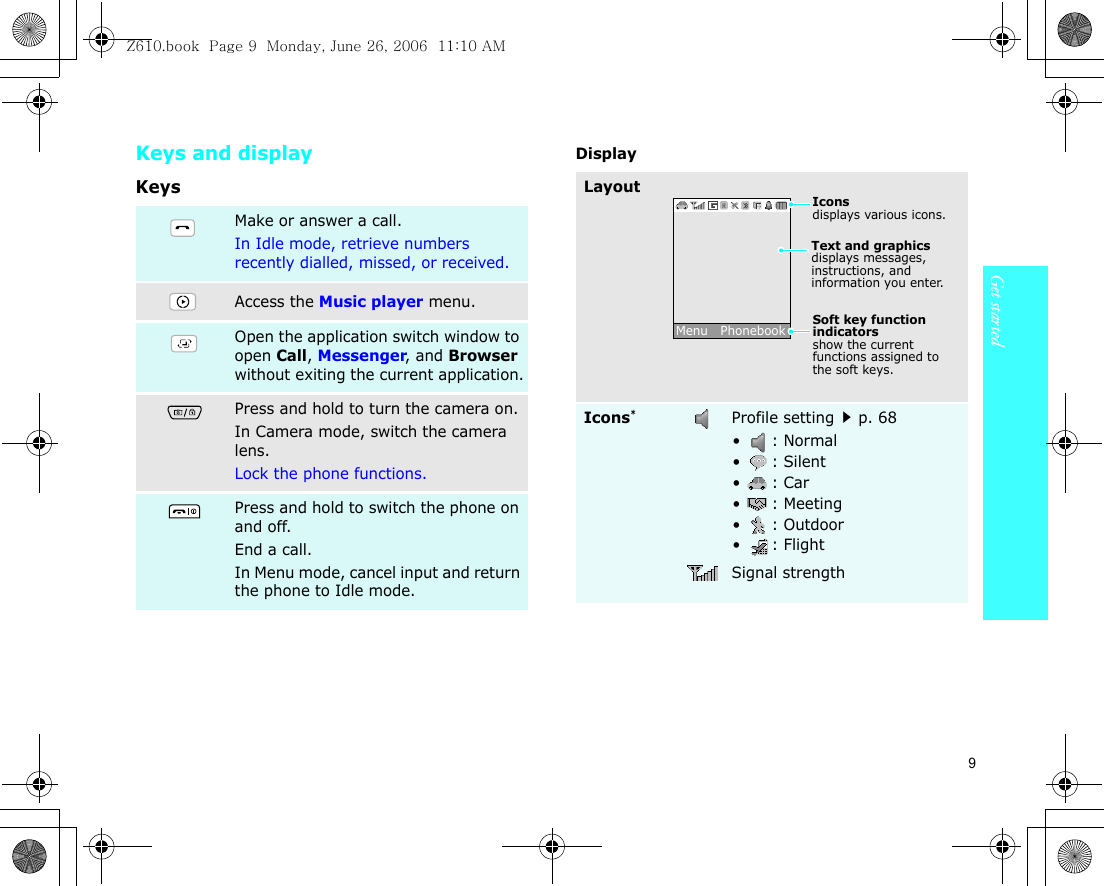
![7Get startedFirst steps to operating your phoneUSIM/SIM card informationWhen you subscribe to a cellular network, you receive a plug-in SIM (Subscriber Identity Module) card loaded with your subscription details, such as your PIN and available optional services. For 3G services, you can purchase an USIM (Universal Subscriber Identity Module) card.Install and charge the phone Remove the battery cover.If the phone is already on, first turn it off by pressing and holding []. Insert the USIM/SIM card.Make sure that the gold-coloured contacts on the card are face down. Install the battery. Reattach the cover. Plug the travel adapter into the phone. Plug the adapter into a standard AC wall outlet. When the phone is completely charged (the battery icon comes still), unplug the adapter from the wall outlet.Z610.book Page 7 Monday, June 26, 2006 11:10 AM](https://usermanual.wiki/Samsung-Electronics-Co/SGHZ610/User-Guide-680086-Page-10.png)
![Get started8Low battery indicatorWhen the battery is low:• a warning tone sounds,• the battery low message displays, and• the empty battery icon blinks.If the battery level becomes too low, the phone automatically turns off. Recharge your battery. Power on or offPhone Lock modeYou can lock the phone to prevent accidental presses from affecting phone operations. Press [ ] on the left side of the phone and select <Yes>. To unlock the phone functions, press [ ] and select <Yes>. Remove the adapter from the phone.Switch onDo not switch on the phone when mobile phone use is prohibited.1. Press and hold [ ] on the top of the phone.2. If necessary, enter the PIN and press <OK>.Switch offPress and hold [ ].Z610.book Page 8 Monday, June 26, 2006 11:10 AM](https://usermanual.wiki/Samsung-Electronics-Co/SGHZ610/User-Guide-680086-Page-11.png)
![15Make/Answer calls8. Enter the new password again and select <OK> → <Confirm>.9. Select Phone lock.10. Select On.11. Enter the password and select <Confirm>.To ma ke a voic e c all:1. Open the dialling screen.2. Enter an area code and phone number.3. Press [ ].4. To end the call, press [ ].To make a video call:1. Open the dialling screen.2. Enter an area code and phone number.3. Select <Options> → Video call.If their phone is compatible, the other person appears on the screen.Phone lockMake a call1. When the phone rings, press [].2. For a video call, when a “Allow own image to be shown?” message appears, select Yes to allow the other person to see you.3. To end the call, press [ ].Answer a callZ610.book Page 15 Monday, June 26, 2006 11:10 AM](https://usermanual.wiki/Samsung-Electronics-Co/SGHZ610/User-Guide-680086-Page-18.png)
![16Step outside the phoneBegin with your camera, the media player, the web browser, and other special featuresUse camera1. In Idle mode, press and hold [ ] to turn on the camera.2. Select to switch between the front camera lens and rear camera lens.3. Aim the lens at the subject and make any desired adjustments.4. Tap the screen or press [] to take a photo. The photo is saved automatically.5. Select <Back> or < > to take another photo.1. In Idle mode, select <Menu> and move to Menu2.2. Select My files → Pictures → My photos.3. Select the photo you want.Take a photoView a photo1. In Idle mode, press and hold [ ] to turn on the camera.2. Select to switch to Record mode.3. Select to switch between the front camera lens and rear camera lens.4. Tap the screen or press [] to start recording.5. Tap the screen to stop recording. The video is automatically saved.6. Select <Back> to record another video.1. In Idle mode, select <Menu> and move to Menu2.2. Select My files → Videos → My video clips.3. Select the video you want.Record a videoPlay a videoZ610.book Page 16 Monday, June 26, 2006 11:10 AM](https://usermanual.wiki/Samsung-Electronics-Co/SGHZ610/User-Guide-680086-Page-19.png)
![19Step outside the phoneSend messages4. Specify contact information: Name, Phone number, Email (for USIM), Group (for USIM), and Location number.5. Select <Save>, or <Options> → Save to save the contact.1. In Idle mode, select <Phonebook>.2. Enter the first few letters of the name you want.3. Select a contact from the Phonebook list.4. Scroll to a number, and press [ ] to dial or select <Options> → Edit to edit contact information.1. In Idle mode, select <Phonebook> → the Contacts tab.2. Select <Options> → My namecard.3. Specify your contact information.Find a contactCreate and send a name card4. Select <Options> → Save to save the name card.5. To send the name card, select <Options> → Send namecard via → a sending method.1. In Idle mode, select <Menu> → Messages → Create message.2. Move to the text input field.3. Open the text input screen.4. Enter your message and select <OK>.5. Move to the Recipient field.6. Open the Recipients screen.7. Open the text input screen.8. Enter a destination number and select <OK>.9. Select <Options> → Send to send the message.Send a text message (SMS)Z610.book Page 19 Monday, June 26, 2006 11:10 AM](https://usermanual.wiki/Samsung-Electronics-Co/SGHZ610/User-Guide-680086-Page-22.png)

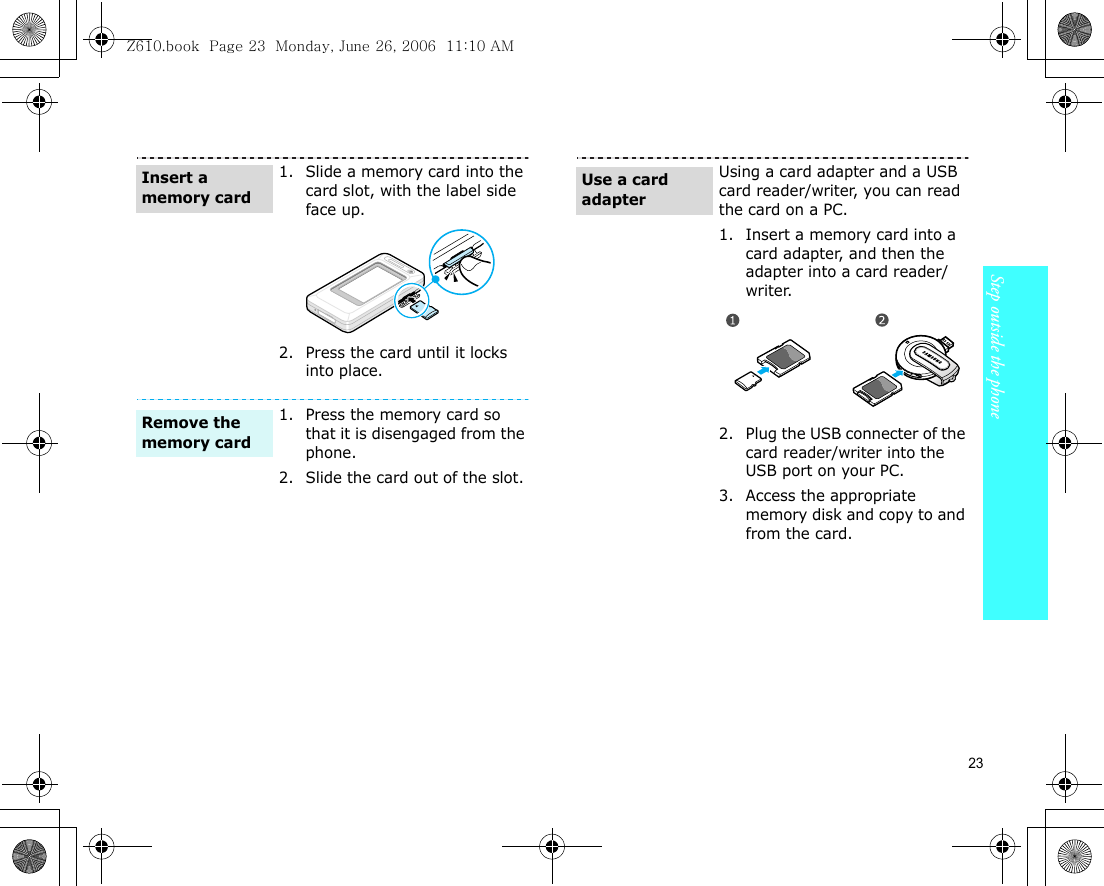
![Step outside the phone22Switch applicationsYou can switch to other applications from a menu, without closing the menu screen you were using.Use a memory cardYou can use a memory card to increase your phone’s memory capacity. 1. While using a menu, press [].2. Select an application.•Call: open the dialling screen.•Messenger: access the Messages menu.•Browser: launch the web browser.1. Press [].2. Scroll to End all?.3. Select <Yes>. Switch to an applicationAvailable applicationsClose all running applications• Frequent erasing and writing will shorten a card’s lifespan.• Do not remove a card from the phone or turn off the phone while data is being accessed or transferred. This could result in loss of data and/or damage to the card or phone.• Do not subject cards to strong shocks.• Do not touch card terminals with your fingers or metal objects. If dirty, wipe the card with a soft cloth.• Keep cards away from small children or pets.• Do not expose cards in a place subject to electro-static discharge and/or electrical noise.Important memory card informationZ610.book Page 22 Monday, June 26, 2006 11:10 AM](https://usermanual.wiki/Samsung-Electronics-Co/SGHZ610/User-Guide-680086-Page-25.png)
![27Call functionsAdvanced calling featuresMaking a call1. In Idle mode, open the dialling screen.2. Enter the area code and phone number.3. Press [ ].4. When you want to end the call, press [ ].Making an international call1. In Idle mode, open the dialling screen. 2. Tap and hold 0. The + character appears.3. Enter the country code, area code, and phone number, then press [ ].Redialling recent numbers1. In Idle mode, press [ ] to display the list of recent numbers.2. Scroll to the number you want and press [ ].Making a call from PhonebookOnce you have stored a number in Phonebook, you can dial the number by selecting it from Phonebook.p. 50You can also use the speed dial feature to assign your most frequently dialled numbers to specific number keys.p. 72You can quickly dial a number from the USIM/SIM card using its location number assigned when stored.1. In Idle mode, open the dialling screen. 2. Enter the location number for the phone number you want and select .3. Scroll to the number you want4. Select <Call> or press [ ] to make a voice call, or select <V-Call> to make a video call.Answering a callWhen you receive an incoming call, the phone rings and displays the incoming call image. To answer the call, select <Accept> or press [ ].To reject a call, select <Reject> or press [ ].Top and hold to enter a pause between numbers.Z610.book Page 27 Monday, June 26, 2006 11:10 AM](https://usermanual.wiki/Samsung-Electronics-Co/SGHZ610/User-Guide-680086-Page-30.png)
![Call functions28Viewing missed callsIf you have missed calls, the screen displays how many calls you have missed.1. Select <View>.2. If necessary, scroll through the missed calls.3. Press [ ] to dial the number you want.Using the headsetUse the headset to make or answer calls without holding the phone. Connect the headset to the jack on the bottom of the phone. The button on the headset works as follows: Options during a callYou can access a number of functions during a call.Adjusting the volume during a callScroll through the screen to adjust the earpiece volume during a call.Placing a call on hold/RetrievingSelect <Hold> to place the call on hold, or select <Retrieve> to retrieve the call.Making a second callYou can make another call if your network supports this function.1. Select <Hold> to put the call on hold.2. Make the second call in the normal way.3. Select <Swap> to switch between the calls.4. Select <Options> → End call to end the call on hold.5. To end the current call, press [ ].To Pressredial the last call and hold the button.answer a call the button.mute/unmute the microphone during a callthe button.end a call and hold the button.Z610.book Page 28 Monday, June 26, 2006 11:10 AM](https://usermanual.wiki/Samsung-Electronics-Co/SGHZ610/User-Guide-680086-Page-31.png)
![Call functions 29Answering a second callYou can answer an incoming call while already on the phone, if your network supports this function and you have activated the call waiting feature.p. 711. Select [ ] to answer the call. The first call is automatically put on hold.2. Select <Swap> to switch between the calls.3. Select <Options> → End call to end the call on hold.4. To end the current call, press [ ].Using In-call optionsSelect <Options> to access the following options during a call:•Speaker on/Normal: turn on the speakerphone feature or switch back to Normal mode.•Switch to headset/Switch to phone: switch the call to a Bluetooth headset or hands-free car kit or back to the phone.p. 73•Join: set up a multi-party call by adding a caller on hold to a currently active call. You can include up to 5 people on a multi-party call.•Split: have a private conversation with the selected participant. The other participants can converse with each other. After the private conversation, select Join to return both private participants to the multi-party call.•Swap: switch between calls, if a call is on hold.•Transfer: transfer the currently active call to a caller on hold. The two callers can talk to each other, but you are disconnected from the call.•Hold/Retrieve: place a call on hold or retrieve the call.•Mute: access the following muting options:Voice: switch off the phone's microphone so that the other person on the phone cannot hear you, or switch it back on.Key tone: turn the key tones off or on.•New call: make a new voice call.•Phonebook: locate or store contacts in Phonebook.•Add to Phonebook: add the sender’s number to Phonebook.•Create message: create a new SMS message.•View contact details: access the contact information, if saved.•Send DTMF: send DTMF (Dual tone multi-frequency) tones as a group. The DTMF tones are the tones used in phones for tone dialling, sounding when you press the number keys. This option is helpful for entering a password or an To communicate with answering machines or computerised telephone systems, Key tone must be deactivated.Z610.book Page 29 Monday, June 26, 2006 11:10 AM](https://usermanual.wiki/Samsung-Electronics-Co/SGHZ610/User-Guide-680086-Page-32.png)
![Call functions 31Send DTMF: send Dual tone multi-frequency (DTMF) tones as a group after entering the entire number you need to send or retrieving a number from Phonebook.Calendar: access the calendar to check your schedule or enter new appointments.Memo: create a memo.•Switch to voice call/Switch to video call: switch between the voice call and video call.•Settings: change the default settings for the video call feature.p. 71Managing call recordsYou can view the calls you have dialled, received, or missed, and the length of the calls. You can also check the cost of your calls, if your USIM/SIM card supports this function.Accessing recent call recordsYou can access the most recent calls you have dialled, received, or missed.1. In Idle mode, press [ ].2. Scroll through the screen to move to another call type.3. Scroll through the call list. 4. Select <Options> → Details to view the details of a call, or press [ ] to dial a number.Using call log optionsFrom the call list, press <Options> to access the following options:•Details: access the call details.•Voice call: make a voice call to the number.•Video call: make a video call to the number, if the 3G service is available.•Add to Phonebook: save the selected number in Phonebook.•Create message: send an SMS or MMS message.•Delete: delete the selected call record or all records.•Add to reject list: add the selected number to the list of phone numbers from which calls are rejected.•View contact details: access contact information, if the caller is saved in Phonebook.•Call manager: check the total amount of data you have sent or received, and the length of calls. You can also check the cost of calls, if supported by your USIM/SIM card.Z610.book Page 31 Monday, June 26, 2006 11:10 AM](https://usermanual.wiki/Samsung-Electronics-Co/SGHZ610/User-Guide-680086-Page-34.png)
![Menu functions38Call voicemailUse this menu to access the voicemail server.TemplatesUse this menu to make and use templates of frequently used messages or passages.MMS templates You can access embedded MMS templates or ones you have saved so that you can use them in composing an MMS message.Creating a template1. Select <Add new>, or select <Options> → Add new, if one has been already stored.2. Create a template as you would create an MMS message.p. 343. When you have finished, select <Options> → Save as template.Using template optionsFrom the MMS template list, select <Options> to access the following options:•View: open the selected template.•Edit and send: send the template via MMS.•Add new: add a new template.•Delete: delete the selected template or all templates, except for the embedded ones.Text templatesYou can create SMS templates with the sentences you use frequently so that you can retrieve and insert them when composing an SMS message.Creating a template1. Select <Add new>, or select <Options> → Add new, if one has been already stored.2. Create a template as you would create an SMS message.p. 333. When you have finished, select [Centre].Using template optionsFrom the text template list, select <Options> to access the following options:•Edit and send: edit and send the template via SMS or MMS.•Add new: add a new template.•Delete: delete the selected template or all templates, except for the embedded ones.Delete allUse this menu to delete all of the messages in each message folder one by one. You can also delete all of the messages in all folders at one time.1. Select the message folders you want.2. Select <Delete> → <Yes> to confirm the deleting.Z610.book Page 38 Monday, June 26, 2006 11:10 AM](https://usermanual.wiki/Samsung-Electronics-Co/SGHZ610/User-Guide-680086-Page-41.png)


![Menu functions46CameraYou can use the camera module embedded on your phone to take photos and record videos.To access this menu, select <Menu> in Idle mode → Camera, or press and hold [ ]. Taking a photoYou can take photos in various modes. The camera will produce JPEG photos.1. Access the Camera menu to turn on the camera and switch the display to Capture mode. You can also press and hold [ ] to turn on the camera.2. Select to switch between the front camera lens and rear camera lens on the back of the phone.3. Make any desired adjustments.• Zoom in or out by scrolling through the screen.• Adjust the image brightness by scrolling through the screen.• Select < > to use the camera options. next section4. Tap the screen to take a photo. The photo is saved in the My photos folder.• Do not take photos of people without their permission.• Do not take photos in a place where cameras are not allowed.• Do not take photos in a place where you may interfere with another person’s privacy.When you take a photo in direct sunlight or in bright conditions, shadows may appear on the photo.5.To Selectuse photo options < > or <Options>.p. 47send the photo.return to Capture mode <Back> or < >.Z610.book Page 46 Monday, June 26, 2006 11:10 AM](https://usermanual.wiki/Samsung-Electronics-Co/SGHZ610/User-Guide-680086-Page-49.png)

![Menu functions48•Details: access the file properties.Recording a videoYou can record a video of what is displayed on the camera screen and save it.1. Access the Camera menu to turn on the camera and switch the display to Capture mode. You can also press and hold [ ] to turn on the camera.2. Select to switch to Record mode.3. Select to switch between the front camera lens and rear camera lens on the back of the phone.4. Make any desired adjustments.• Zoom in or out by scrolling through the screen.• Adjust the image brightness by scrolling through the screen.• Select < > to use the camera options. next section5. Tap the screen to start recording.6. Tap the screen to stop recording. The video is saved in the My video clips folder.Using camera options in Record modeIn Record mode, select < > to access the following options:•Camera: switch to Capture mode.•Album: access the My video clips folder.Size: select a frame size.Effects: change the colour tone.Timer: set a time delay before the camera takes a photo.White balance: adjust the colour balance of the video. You can make your video appear warmer or cooler.•Settings: change the following settings for recording a video.Quality: select an image quality. Recording time: select a video recording mode. If you select Limit for MMS, you can record a video suitable for an MMS message.7.To Selectplay back the video clip .use video options <Options>.p. 49return to Record mode <Back>.Z610.book Page 48 Monday, June 26, 2006 11:10 AM](https://usermanual.wiki/Samsung-Electronics-Co/SGHZ610/User-Guide-680086-Page-51.png)
![Menu functions50•Message tone: assign a ringtone to alert you to a message from the person.•Address-private: assign a postal address.•Birthday: enter the person’s birthday.•Note: enter the additional note of the person.4. If necessary, select <Options> to access the following options:•Change type: change the selected number type.•Add item: add an additional category to the contact.•Delete item: remove the selected category from the contact.5. Select <Options> → Save to save the contact.Storing a contact on the USIM/SIM card1. Scroll to the Contacts tab.2. Select <Options> → Create contact → SIM.3. Change the settings or enter information about the contact.•Name: assign a name.•Phone number: enter a phone number.•Email: (for USIM) assign an e-mail address.•Group: (for USIM) assign a caller group.•Location number: assign a location number.4. If you are using a USIM card, select <Options> to add additional information:•Add item: add an additional category to the contact.•Delete item: remove the selected category from the contact.5. Select <Save>, or <Options> → Save to save the contact.Finding a contact You can search for numbers in Phonebook.1. Scroll to the Contacts tab.2. Open the text input screen.3. Enter the first few letters of the name that you want to find and select <OK>.4. Select the contact you want from the Phonebook list.5. Scroll to a number and press [ ] to dial and select <Options> → Edit to edit the contact details.Using contact optionsFrom the contact list, select <Options> to access the following options:•View: access contact information.•Create contact: add a new contact in Phonebook.•Voice call: make a voice call.•Video call: make a video call.•Send message: send an SMS or MMS.Z610.book Page 50 Monday, June 26, 2006 11:10 AM](https://usermanual.wiki/Samsung-Electronics-Co/SGHZ610/User-Guide-680086-Page-53.png)
![Menu functions Browser63• To return to the previous page, select <Back>, or select <Options> → Go → Backward. • To move to the next page, select <Options> → Go → Forward.• To close the browser, press [ ].Using browser menu optionsFrom any web page, select <Options> to access the following browser options:•Open: go to the currently linked web page.•Go: move backward or forward through pages in history.•Reload: reload the current page with updated information.•Desktop view/Smart-Fit view: change the display mode of the browser.•Go to homepage: return to the homepage.•Add to Bookmarks: add the current page to your bookmark list.•View Bookmarks: access the bookmark list.•Enter URL: manually enter the URL address of the web page you want to access.•Copy URL to message: send the URL address of the web page by adding it to the message text via SMS or MMS.•Save: save the images of the current page or the current page.•Saved pages: access the web pages you have saved.•History: access the list of web pages you have accessed.•Browser settings: change the various settings for the browser:Clear cache: clear the cache. The cache is a temporary memory site that stores recently accessed web pages.Empty cookies: delete cookies. Cookies are pieces of personal information sent to a web server while navigating the web.Cookie options: set whether or not cookies are stored. If you select Prompt, the phone will ask you to save the cookies of the current page.Preferences: change the settings for the web browser to suit your preference.Certificates: access the root certificates for the operator and trusted third parties.About browser: access version and copyright information about the browser.•Page details: access the properties of the browser.Z610.book Page 63 Monday, June 26, 2006 11:10 AM](https://usermanual.wiki/Samsung-Electronics-Co/SGHZ610/User-Guide-680086-Page-66.png)

![79Solve problemsHelp and personal needsTo save the time and expense of an unnecessary service call, perform the simple checks in this section before contacting a service professional.When you switch on your phone, the following messages may appear:“Please insert SIM card”• Be sure that the USIM/SIM card is correctly installed.“Password”• The automatic locking function has been enabled. You must enter the phone’s password before you can use the phone.“PIN lock”• You are using your phone for the first time. You must enter the PIN supplied with the USIM/SIM card.• The PIN lock feature is enabled. Every time the phone is switched on, the PIN has to be entered. To disable this feature, use the PIN lock menu.“PUK lock”• The PIN was entered incorrectly three times, and the USIM/SIM card is now blocked. Enter the PUK supplied by your service provider.“No service,” “Network error,” or “Not done” displays• The network connection has been lost. You may be in a weak signal area. Move and try again.• You are trying to access an option for which you have no subscription with your service provider. Contact the service provider for further details.You have entered a number but it was not dialled• Be sure that you have pressed [ ].• Be sure that you have accessed the right cellular network.• Be sure that you have not set an outgoing call barring option.Your correspondent cannot reach you• Be sure that your phone is switched on. ([ ] pressed for more than one second.) • Be sure that you are accessing the correct cellular network.• Be sure that you have not set an incoming call barring option.Your correspondent cannot hear you speaking• Be sure that you have switched on the microphone.• Be sure that you are holding the phone close enough to your mouth. The microphone is located at the bottom of the phone.Z610.book Page 79 Monday, June 26, 2006 11:10 AM](https://usermanual.wiki/Samsung-Electronics-Co/SGHZ610/User-Guide-680086-Page-82.png)