Samsung Electronics Co SH100 Digital Camera User Manual 2 of 2
Samsung Electronics Co Ltd Digital Camera 2 of 2
UserManual.wiki
>
Samsung Electronics Co
>
SH100 User Manual
>
User manual 2 of 2
Contents
1.
User manual 1 of 2
2.
User manual 2 of 2
User manual 2 of 2
Navigation menu
Upload a User Manual
Namespaces
Wiki Guide
HTML
PDF
Info
Views
User Manual
Discussion / Help
Navigation
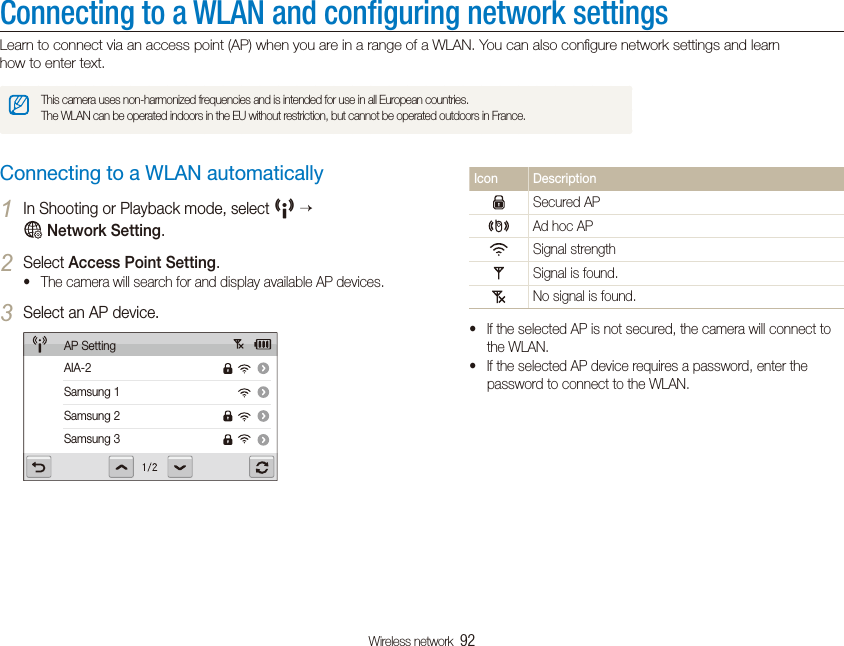
![Shooting options 51Using face detectionTaking a smile shotThe camera automatically releases the shutter when it detects a smiling face. In Shooting mode, select f . When your subject smiles broadly, your camera can detect the smile more easily.Taking a self portrait shotTake photos of yourself. The focus distance will be set to close-up and your camera will emit a beep.In Shooting mode, select 1f .When you hear a quick beep, press [2Shutter].To turn the beep on or off, select t Self-Portrait in the sound settings. (p. 108)If you turn volume off in settings, the camera will not emit a beep.t](https://usermanual.wiki/Samsung-Electronics-Co/SH100.User-manual-2-of-2/User-Guide-1362408-Page-1.png)
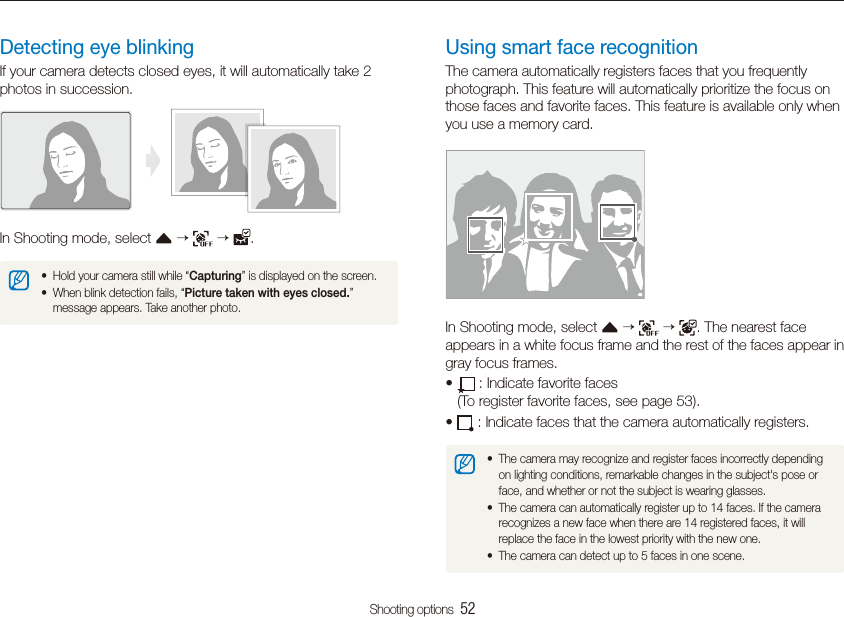
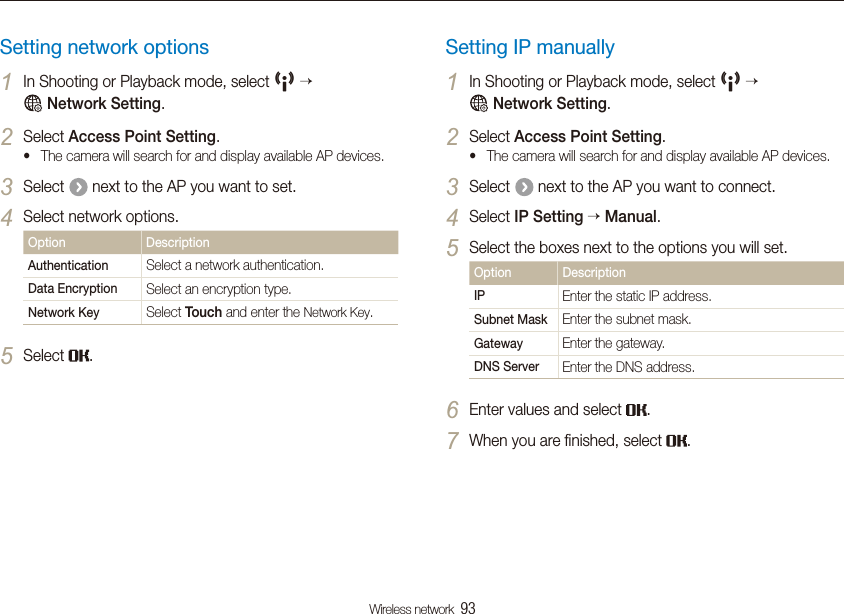
![Shooting options 53Using face detectionSelect 3 when the face list appears.Your favorite faces are indicated with a t on the face list.You can register up to 6 favorite faces.tThe flash option will be set to t Off.If you register the same face twice, you can delete one of the faces tin the face list. Viewing your favorite faces In Shooting mode, select 1f .Select 2 to view your favorite faces.To change the ranking of your favorite faces, select t . (p. 68)To cancel your favorite faces, select t .Registering faces as your favorites (My Star)You can register your favorite faces to prioritize the focus and exposure on those faces. This feature is available only when you use a memory card.In Shooting mode, select 1f .Align your subject’s face with the oval guideline and 2press [Shutter] to register the face.If the subject’s face is not aligned with the oval guideline, the twhite frame will not appear.You will take 5 photos of the subject’s face: one each from the tfront, left, right, above, and below.Take photos of one person at a time when registering faces.t](https://usermanual.wiki/Samsung-Electronics-Co/SH100.User-manual-2-of-2/User-Guide-1362408-Page-3.png)
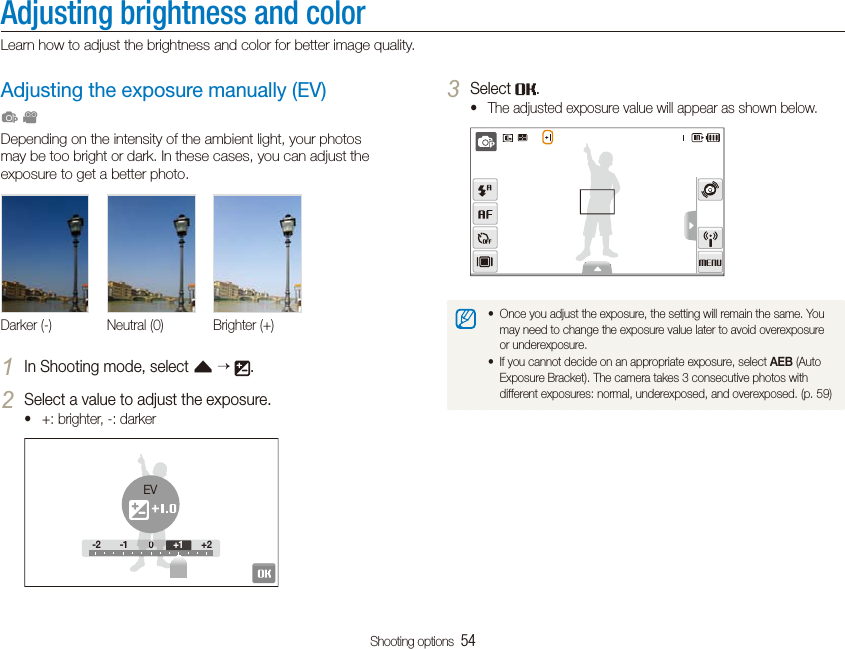
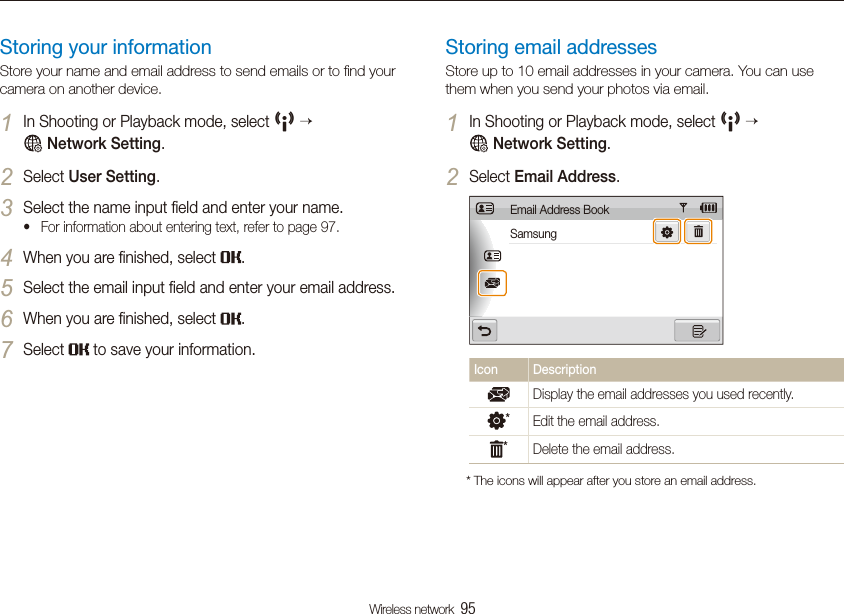
![Shooting options 58Adjusting brightness and color Defining your own white balance You can customize the white balance by taking photos of a white surface, such as a piece of paper. This will help you to match the colors in your photo with the actual scene according to your lighting condition.In Shooting mode, select 1f .Aim the lens at a piece of white paper.2Press [3Shutter].](https://usermanual.wiki/Samsung-Electronics-Co/SH100.User-manual-2-of-2/User-Guide-1362408-Page-8.png)
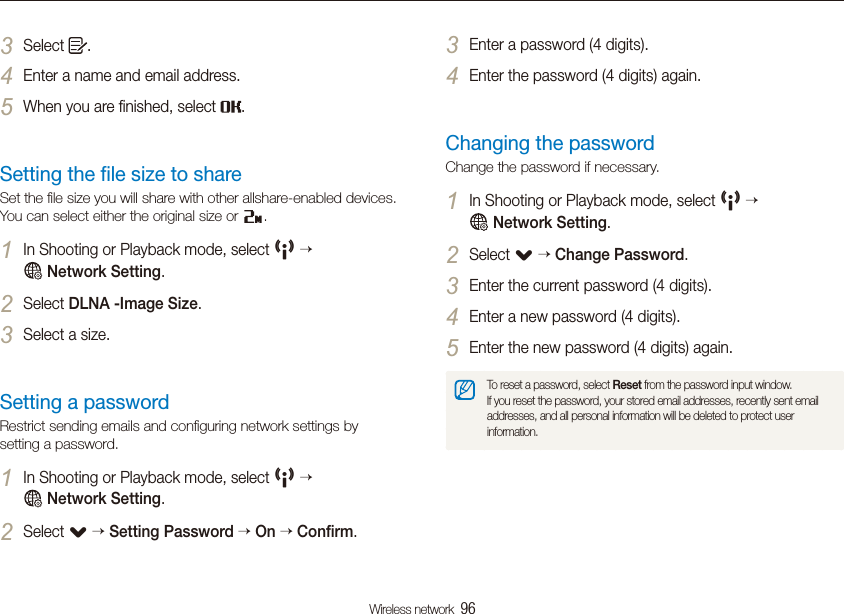
![Shooting options 59Using burst modesIt can be difficult to take photos of fast-moving subjects or capture natural facial expressions and gestures of your subjects in photos. In these cases, select one of the burst modes. pOption DescriptionSingle: Take a single photo.Continuous:While you are pressing [t Shutter], the camera takes photos continuously.The maximum number of photos depends on the tcapacity of your memory card.Motion Capture: While you are pressing [Shutter], the camera takes VGA photos (6 photos per second; maximum of 30 photos).AEB:Take 3 consecutive photos with different exposures: tnormal, underexposed, and overexposed.Use a tripod to prevent blurry photos.tThe options may differ depending on the shooting mode.You can use the flash, timer, and ACB only when you select tSingle.When you select t Motion Capture, the resolution will be set to VGA and the ISO speed will be set to Auto.Depending on the selected face detection option, some burst toptions are not available.You can capture continuous photos if you selectt Children mode in Scene mode.In Shooting mode, select 1f > .Select an option.2Single](https://usermanual.wiki/Samsung-Electronics-Co/SH100.User-manual-2-of-2/User-Guide-1362408-Page-9.png)
![Playback/Editing 65Playing backLearn actions to play back photos, videos, or voice memos, and managing files.If you want to view files stored in the internal memory, remove your tmemory card.The camera will not properly play back files that are too large or those ttaken with cameras from other manufacturers.Starting Playback modeView photos or play videos and voice memos stored in your camera.Press [1Playback].The most recent file you have taken or recorded will be tdisplayed.If the camera is off, it will turn on.tDrag files left or right to scroll through files.2Select t< to view the previous file. Hold to view files quickly.Select t> to view the next file. Hold to view files quickly.](https://usermanual.wiki/Samsung-Electronics-Co/SH100.User-manual-2-of-2/User-Guide-1362408-Page-15.png)
![Playback/Editing 69Playing backIt may take some time for the camera to open Smart Album or to change the category and reorganize files.Select a date, file type, weekday, color, or face.3You can also touch and hold t< or > to scroll through dates, file types, weekdays, colors, or faces.29 617Select 4< or > to scroll through files.Select 5 to return to the normal view.Once you select a category and a menu that displays thumbnails (such as deleting multiple files or protecting selected files), the camera will display all files sorted by category or only those that match the category option. Viewing files by category in Smart Album View and manage files by categories, such as date, file type, or week.In Playback mode, select 1.You can also access Smart Album by rotating [t Zoom] left.Select 2 a category.Option DescriptionType View files by the file type.Date View files by the date they were saved.Color View files by the dominant color of the image.Week View files by the weekday they were saved.Favorite View your favorite files.Face View files by recognized faces and favorite faces. (Up to 20 people)29 61720TypeDateColorWeekFavorite Face](https://usermanual.wiki/Samsung-Electronics-Co/SH100.User-manual-2-of-2/User-Guide-1362408-Page-19.png)
![Playback/Editing 70Playing back Viewing files as thumbnails Scan thumbnails of files.In Playback mode, rotate [Zoom] left to display 9 or 16 thumbnails (rotate [Zoom] right to return to the previous mode).29 61720To Do thisScroll through files Select < or > or slide your finger on the screen left or right to scroll through files.View a file Select a thumbnail.Delete files Select . (p. 71)View in 3D Select .Select a category Select .When you drag files in thumbnail mode, indication icons may appear after thumbnail have loaded. To view files in 3D view In Playback mode, select 1 .Drag files left or right to scroll through files.2Drag files left or right to move them more quickly. The farther tyou drag an icon across the screen, the more files you will scroll through at a time. Select t to view files in Smart Album.1/5Select a file in the middle of the screen to view in the full 3screen.Select the file to return to 3D view.tYou cannot play movies or voice memos in 3D view.tThe 3D feature is not available while the camera is connected to a TV.t](https://usermanual.wiki/Samsung-Electronics-Co/SH100.User-manual-2-of-2/User-Guide-1362408-Page-20.png)
![Playback/Editing 72Playing backIcon DescriptionDelete the file.Crop the enlarged photo (it will be saved as a new file).Go back to the original view.X2.0 Zoom ratio Starting a slide show You can apply effects and audio to your slide show. This function does not work for videos or voice memos.In Playback mode, select 1.Set a slide show effect.2Option DescriptionImages: Select photos (up to 2.000) for your slide show. Copying files to the memory card You can copy files from the internal memory to a memory card.In Playback mode, select 1M.Select 2. Copy to Card.Select 3Yes to copy files. Enlarging a photo In Playback mode, rotate [Zoom] right to enlarge a photo (rotate [Zoom] left to reduce a photo).The enlarged area is indicated on the top of the screen. The maximum zoom ratio may vary depending on the resolution. Scroll toward the direction you want to move.](https://usermanual.wiki/Samsung-Electronics-Co/SH100.User-manual-2-of-2/User-Guide-1362408-Page-22.png)

![Playback/Editing 75Playing back Playing a voice memo added to a photo In Playback mode, select a photo that includes a voice 1memo .Use the following icons to control playback.2Icon Description / Pause or resume playback.Stop playback.Adjust volume or mute sound. Adding a voice memo to a photo In Playback mode, select a photo 1 M.Select 2Voice Memo On.Press [3Shutter] to record a short voice memo (10 seconds maximum).Press [t Shutter] to stop recording a voice memo.](https://usermanual.wiki/Samsung-Electronics-Co/SH100.User-manual-2-of-2/User-Guide-1362408-Page-25.png)
![Playback/Editing 82Viewing files on a TVPlay back photos or videos by connecting your camera to a TV using the A/V cable.View photos or play videos using the touch screen on 8your camera.The touch screen will function as the controller for the TV tscreen. Locate the option you want on the TV screen and touch where the option is located on the camera screen. When a pointer appears on the option on the TV screen, select on the camera screen.On some TVs, digital noise may occur or part of an image may not tappear.Images may not appear centered on the TV screen depending on tyour TV settings.You can capture photos or videos while the camera is connected tto a TV.In Shooting or Playback mode, select 1M .Select2.(twice)Video Out.Select a video signal output according to your country or 3region. (p. 111)Turn off your camera and TV.4Connect your camera to your TV using the A/V cable.5Video AudioTurn on your TV and select the video output mode using 6the TV remote control.Turn on your camera and press [7Playback].](https://usermanual.wiki/Samsung-Electronics-Co/SH100.User-manual-2-of-2/User-Guide-1362408-Page-32.png)


![Appendixes 127Correct Disposal of This Product (Waste Electrical & Electronic Equipment)(Applicable in the European Union and other European countries with separate collection systems) This marking on the product, accessories or literature indicates that the product and its electronic accessories (e.g. charger, headset, USB cable) should not be disposed of with other household waste at the end of their working life. To prevent possible harm to the environment or human health from uncontrolled waste disposal, please separate these items from other types of waste and recycle them responsibly to promote the sustainable reuse of material resources. Household users should contact either the retailer where they purchased this product, or their local government office, for details of where and how they can take these items for environmentally safe recycling. Business users should contact their supplier and check the terms and conditions of the purchase contract. This product and its electronic accessories should not be mixed with other commercial wastes for disposal.Correct disposal of batteries in this product(Applicable in the European Union and other European countries with separate battery return systems)This marking on the battery, manual or packaging indicates that the batteries in this product should not be disposed of with other household waste at the end of their working life. Where marked, the chemical symbols Hg, Cd or Pb indicate that the battery contains mercury, cadmium or lead above the reference levels in EC Directive 2006/66. If batteries are not properly disposed of, these substances can cause harm to human health or the environment. To protect natural resources and to promote material reuse, please separate batteries from other types of waste and recycle them through your local, free battery return system.This Class [B] digital apparatus complies with Canadian ICES-003.PlanetFirst represents Samsung Electronics' commitment to the sustainable development and social responsibility through eco-driven business and management activities.](https://usermanual.wiki/Samsung-Electronics-Co/SH100.User-manual-2-of-2/User-Guide-1362408-Page-77.png)