Samsung Electronics Co SLC2670FW Printer User Manual
Samsung Electronics Co Ltd Printer
UserManual.wiki
>
Samsung Electronics Co
>
SLC2670FW User Manual
>
Users Manual 4
Contents
1.
Users Manual 1
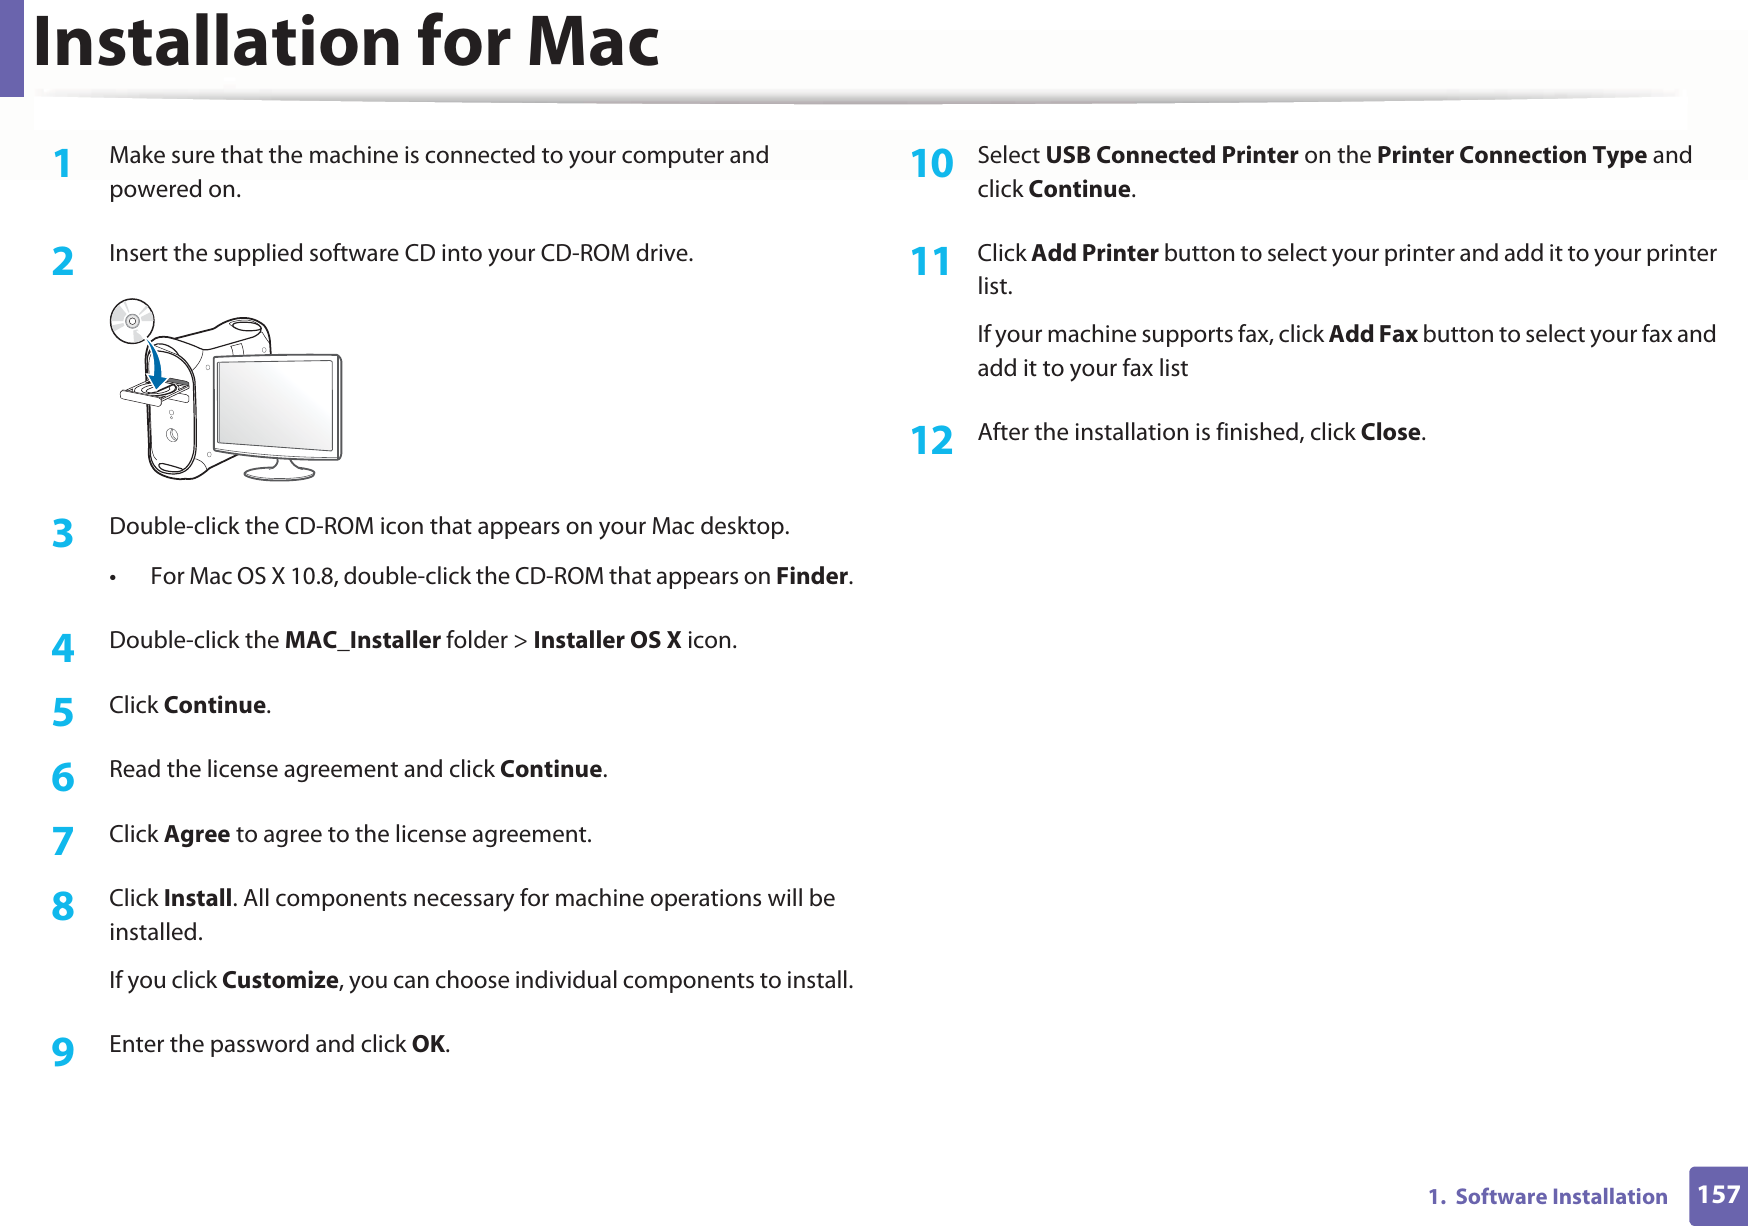
2.
Users Manual 2
3.
Users Manual 3
4.
Users Manual 4
Users Manual 4
Navigation menu
Upload a User Manual
Namespaces
Wiki Guide
HTML
PDF
Info
Views
User Manual
Discussion / Help
Navigation


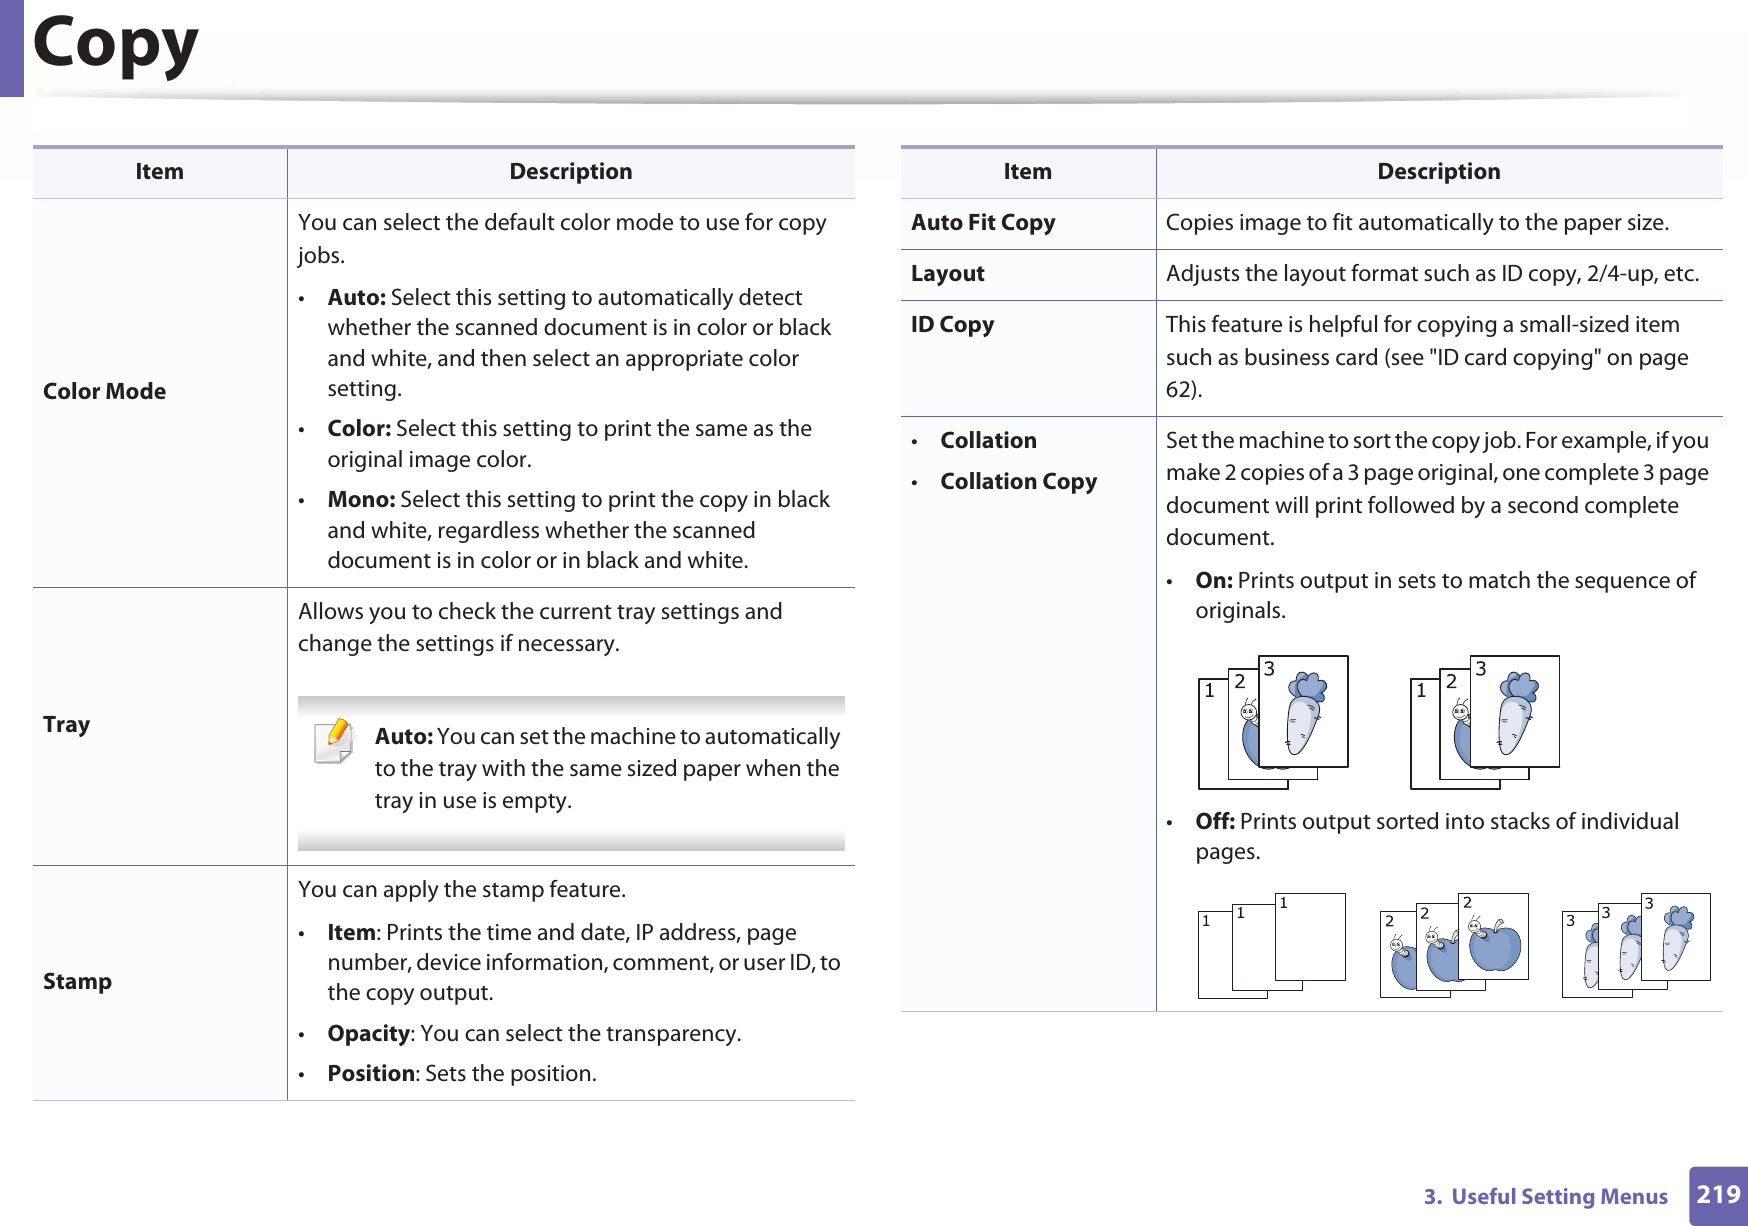
![IPv6 configuration1762. Using a Network-Connected Machine • You can also set the DHCPv6.• To manually set the IPv6 address:Check the Manual Address check box. Then, the Address/Prefix text box is activated. Enter the rest of the address (e.g.,:3FFE:10:88:194::AAAA. “A” is the hexadecimal 0 through 9, A through F). IPv6 address configuration1Start a web browser, such as Internet Explorer, that supports IPv6 addressing as a URL.2 Select one of the IPv6 addresses (Link-local Address, Stateless Address, Stateful Address, Manual Address) from Network Configuration Report (see "Printing a network configuration report" on page 163).•Link-local Address: Self-configured local IPv6 address (Address starts with FE80).•Stateless Address: Automatically configured IPv6 address by a network router.•Stateful Address: IPv6 address configured by a DHCPv6 server.•Manual Address: Manually configured IPv6 address by a user.3 Enter the IPv6 addresses (e.g.,: http://[FE80::215:99FF:FE66:7701]). Address must be enclosed in '[ ]' brackets.](https://usermanual.wiki/Samsung-Electronics-Co/SLC2670FW.Users-Manual-4/User-Guide-2300327-Page-26.png)


# # = | ? " : { } < > ;(These symbols are available when you type for network authentication.)](https://usermanual.wiki/Samsung-Electronics-Co/SLC2670FW.Users-Manual-4/User-Guide-2300327-Page-103.png)


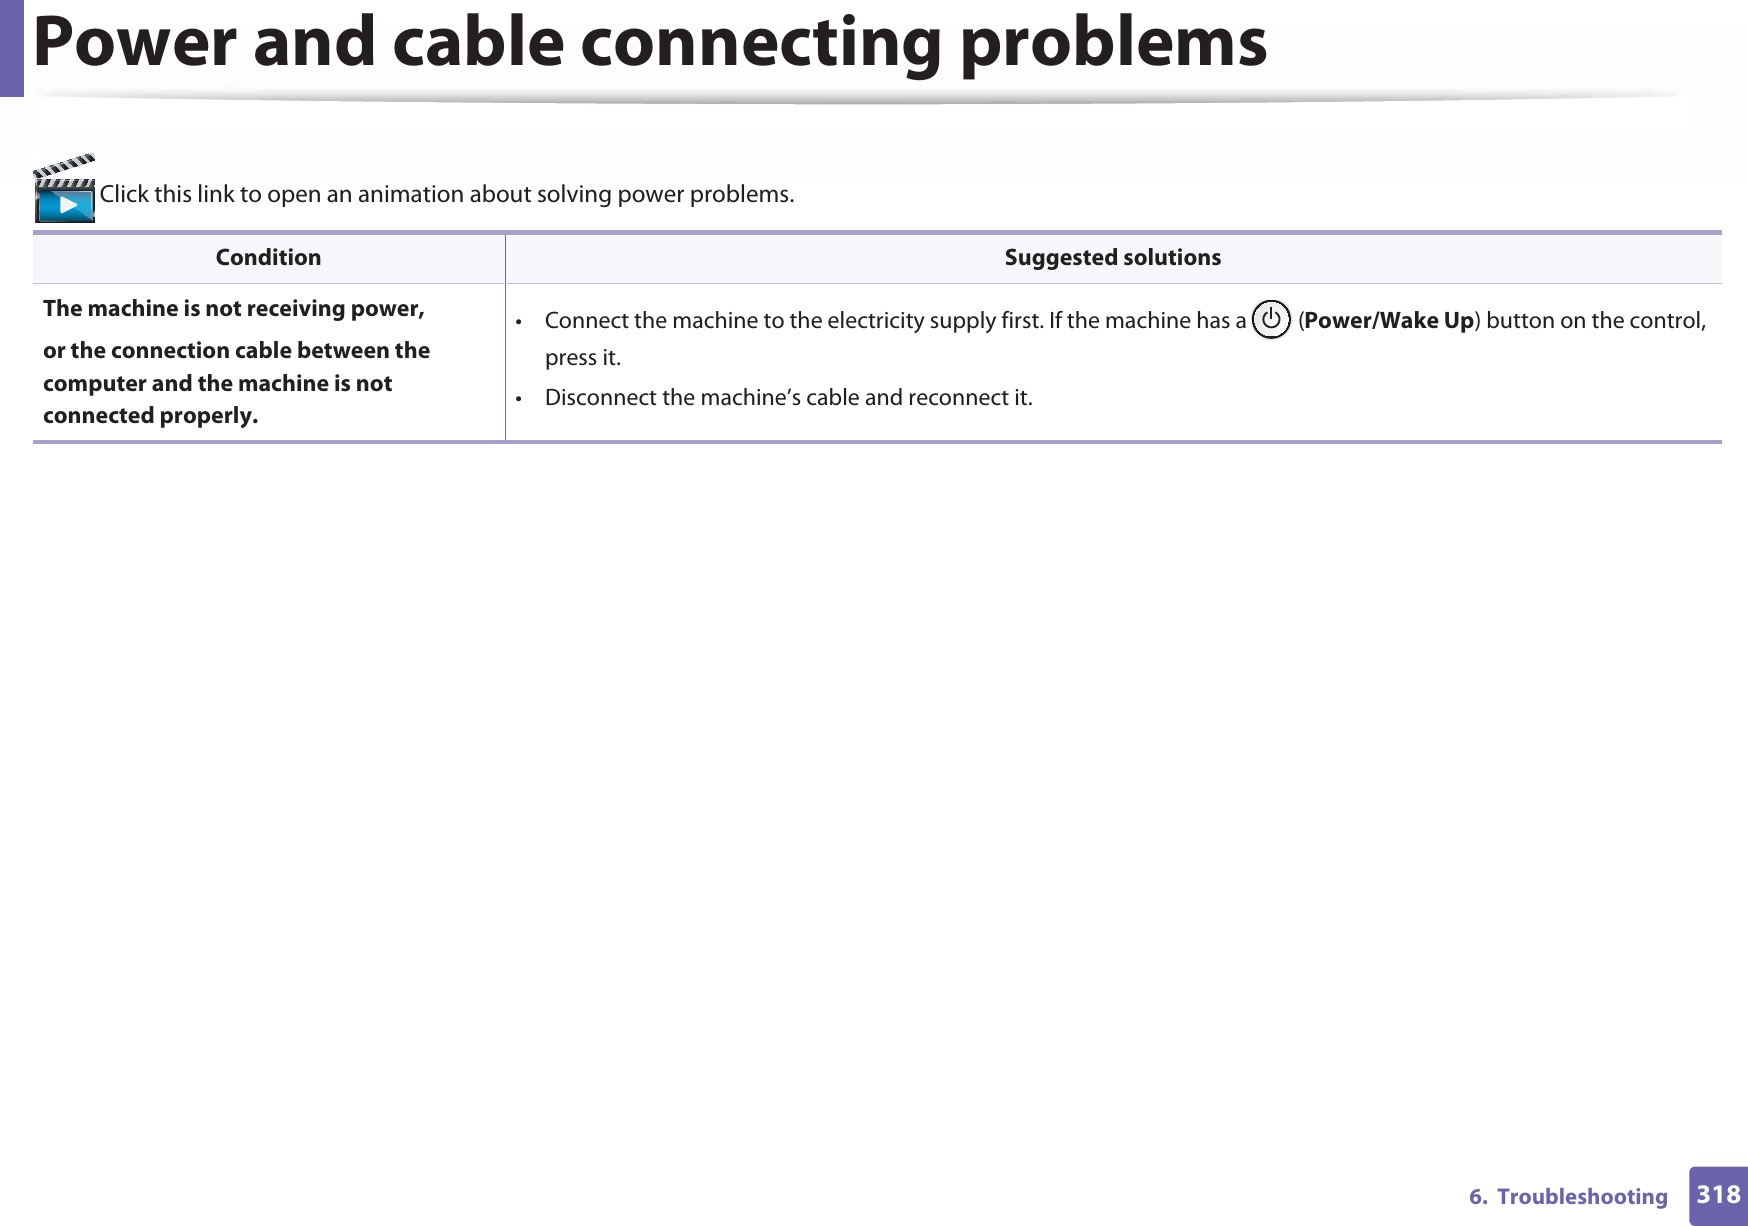
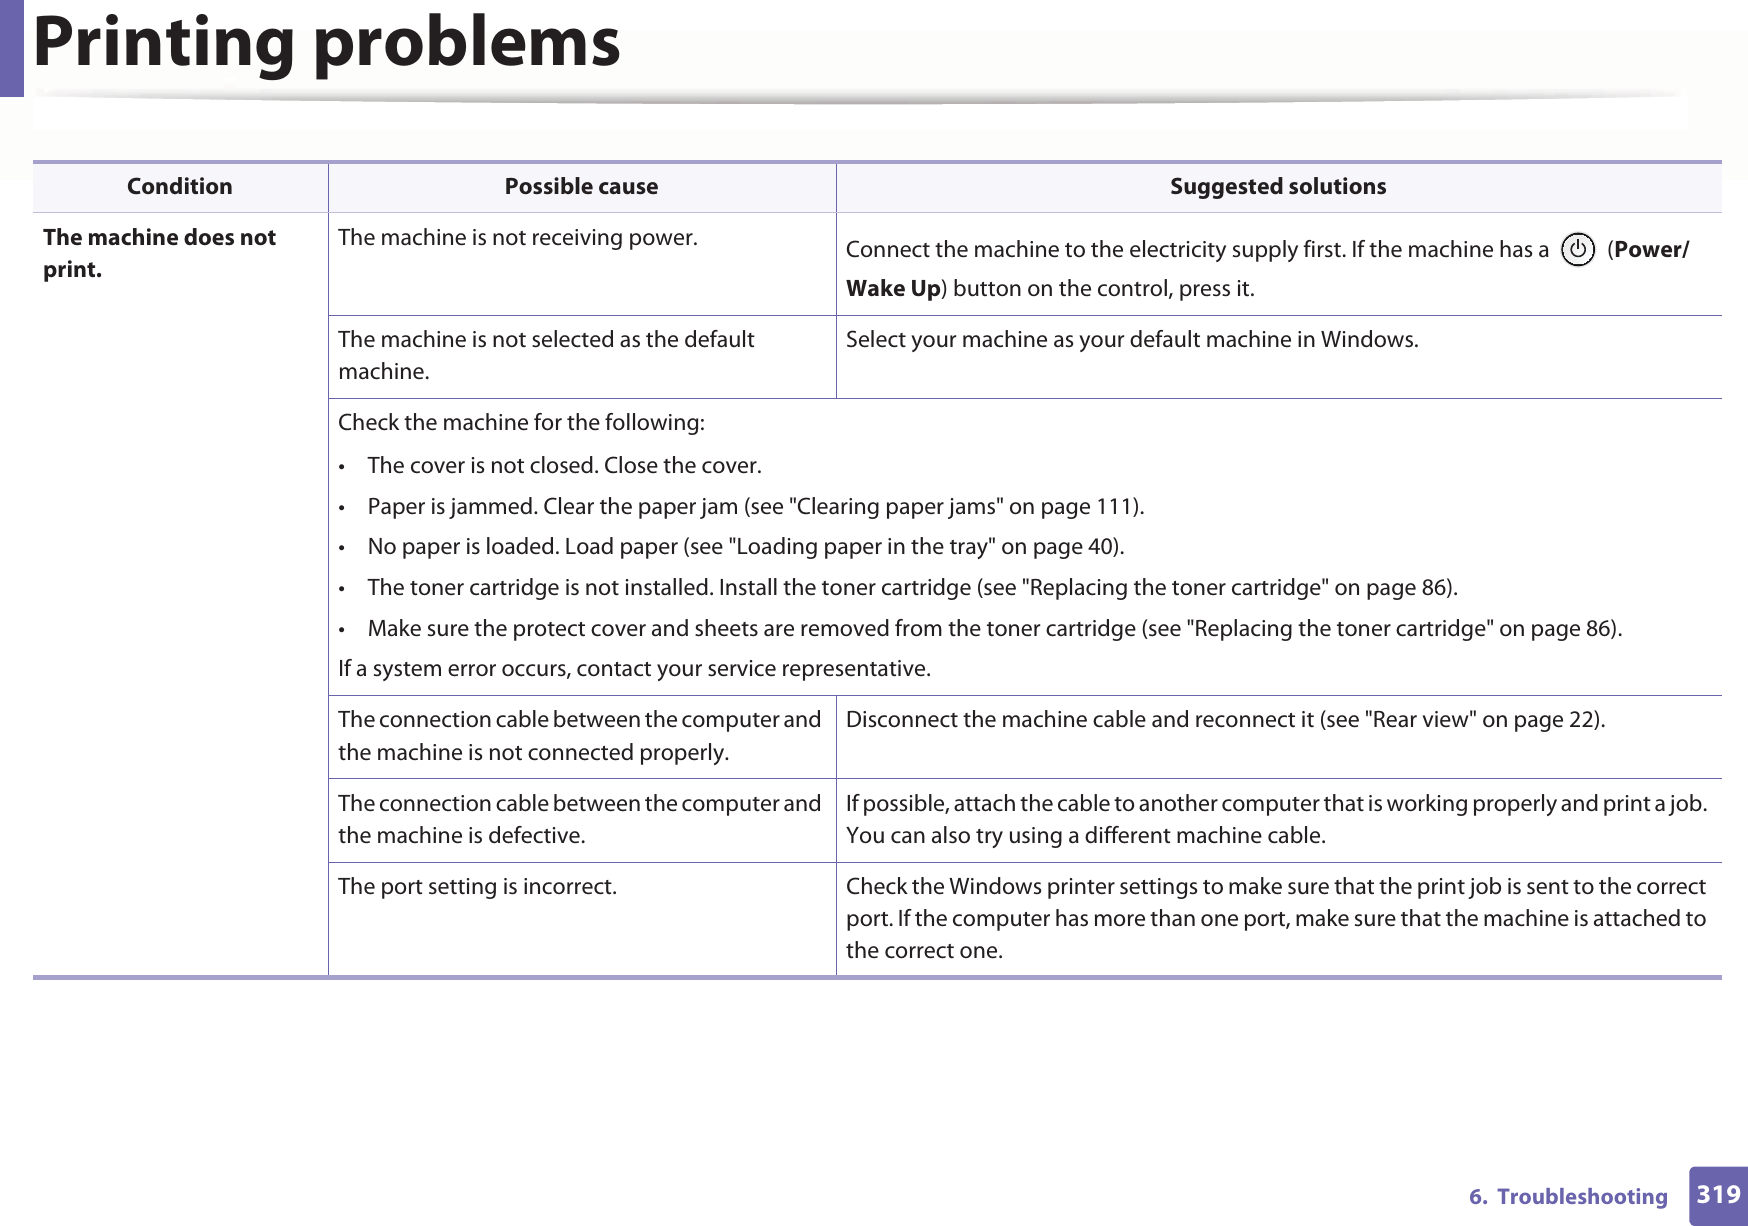
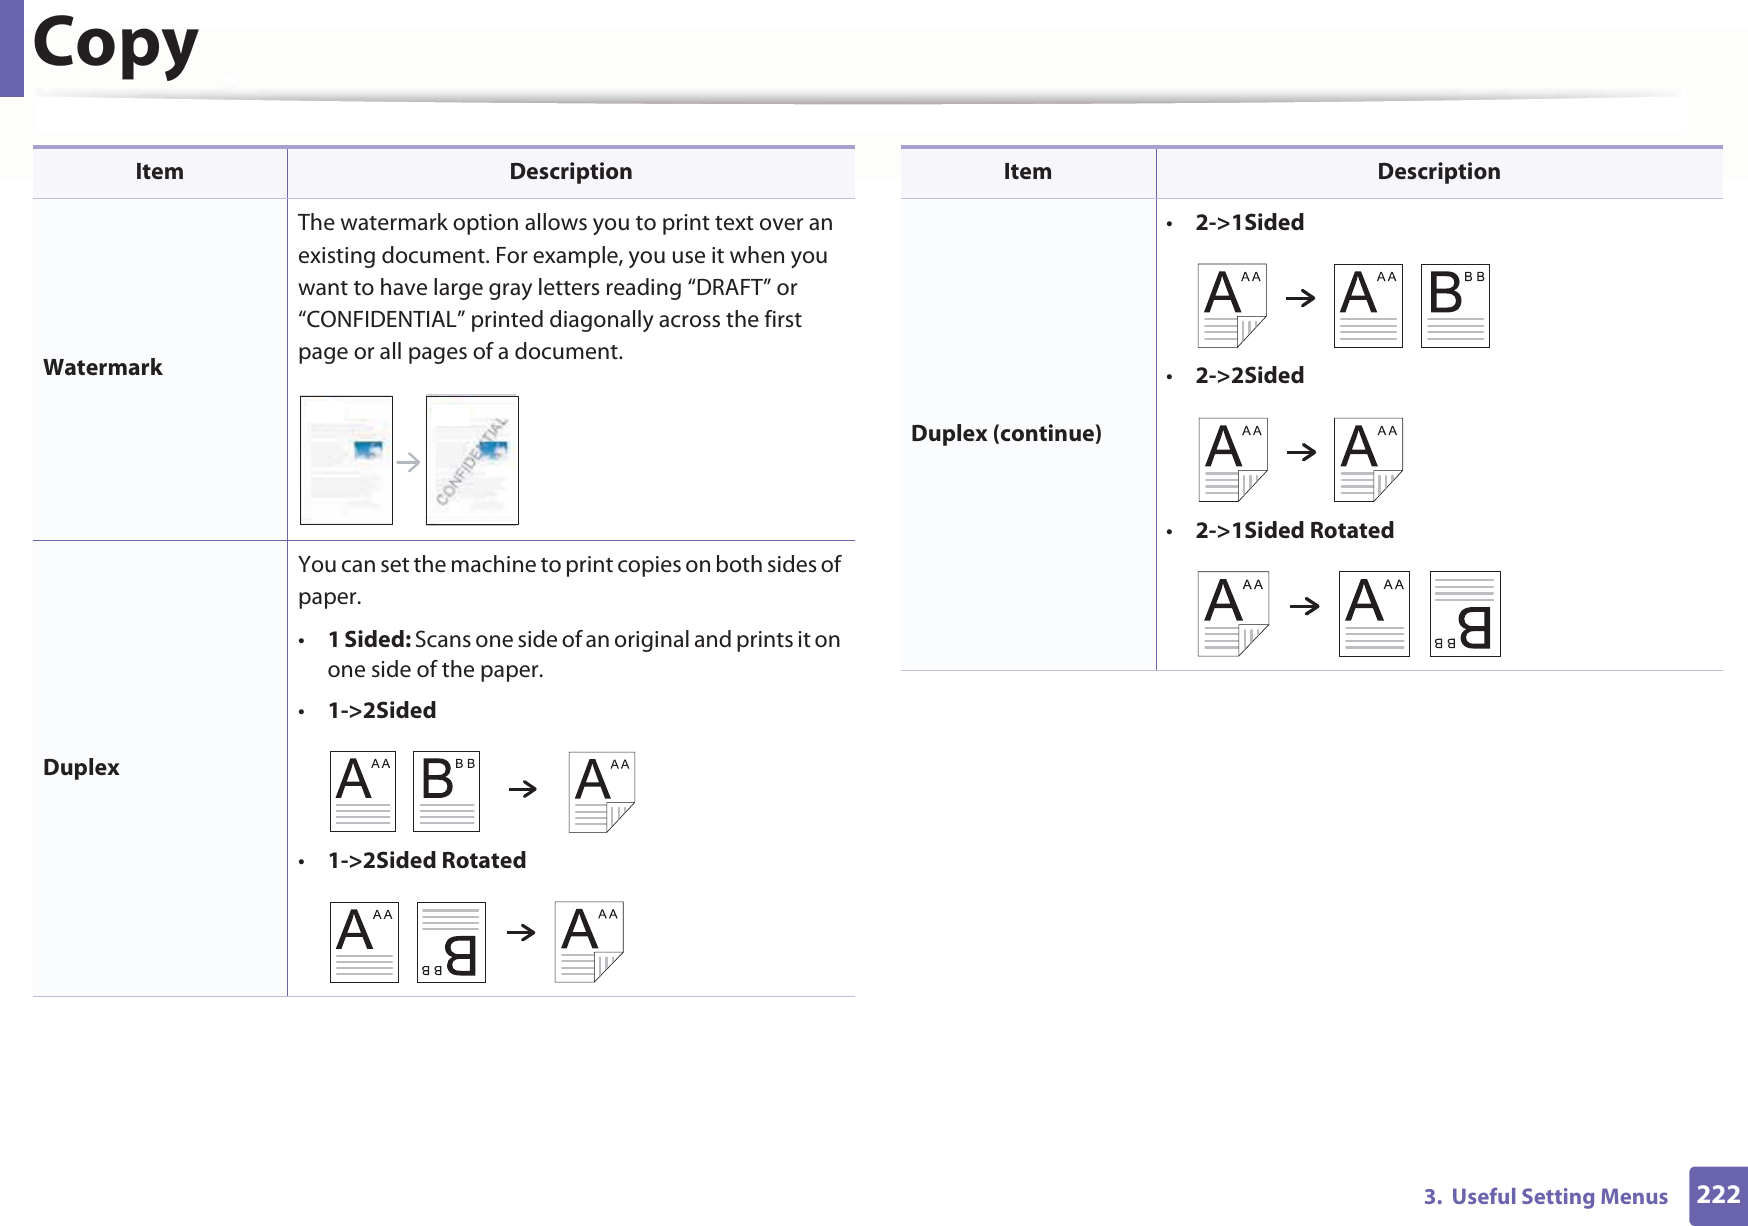
![Printing problems3216. TroubleshootingThe wrong printer driver was selected. Check the application’s printer selection menu to ensure that your machine is selected.The software application is malfunctioning. Try printing a job from another application.The operating system is malfunctioning. Exit Windows and reboot the computer. Turn the machine off and back on again.Pages print, but they are blank.The toner cartridge is defective or out of toner. Redistribute the toner, if necessary. If necessary, replace the toner cartridge.• See "Redistributing toner" on page 84.• See "Replacing the toner cartridge" on page 86.The file may have blank pages. Check the file to ensure that it does not contain blank pages.Some parts, such as the controller or the board, may be defective.Contact a service representative.The machine does not print PDF files correctly. Some parts of graphics, text, or illustrations are missing.Incompatibility between the PDF file and the Acrobat products.Printing the PDF file as an image may enable the file to print. Turn on Print As Image from the Acrobat printing options. It will take longer to print when you print a PDF file as an image. The print quality of photos is not good. Images are not clear.The resolution of the photo is very low. Reduce the photo size. If you increase the photo size in the software application, the resolution will be reduced. Before printing, the machine emits vapor near the output tray.Using damp/wet paper can cause vapor [white smoke] during printing.This is not a problem, just keep printing. If you are bothered by the smoke [vapor], then replace the paper with fresh paper from an unopened ream.Condition Possible cause Suggested solutions](https://usermanual.wiki/Samsung-Electronics-Co/SLC2670FW.Users-Manual-4/User-Guide-2300327-Page-171.png)

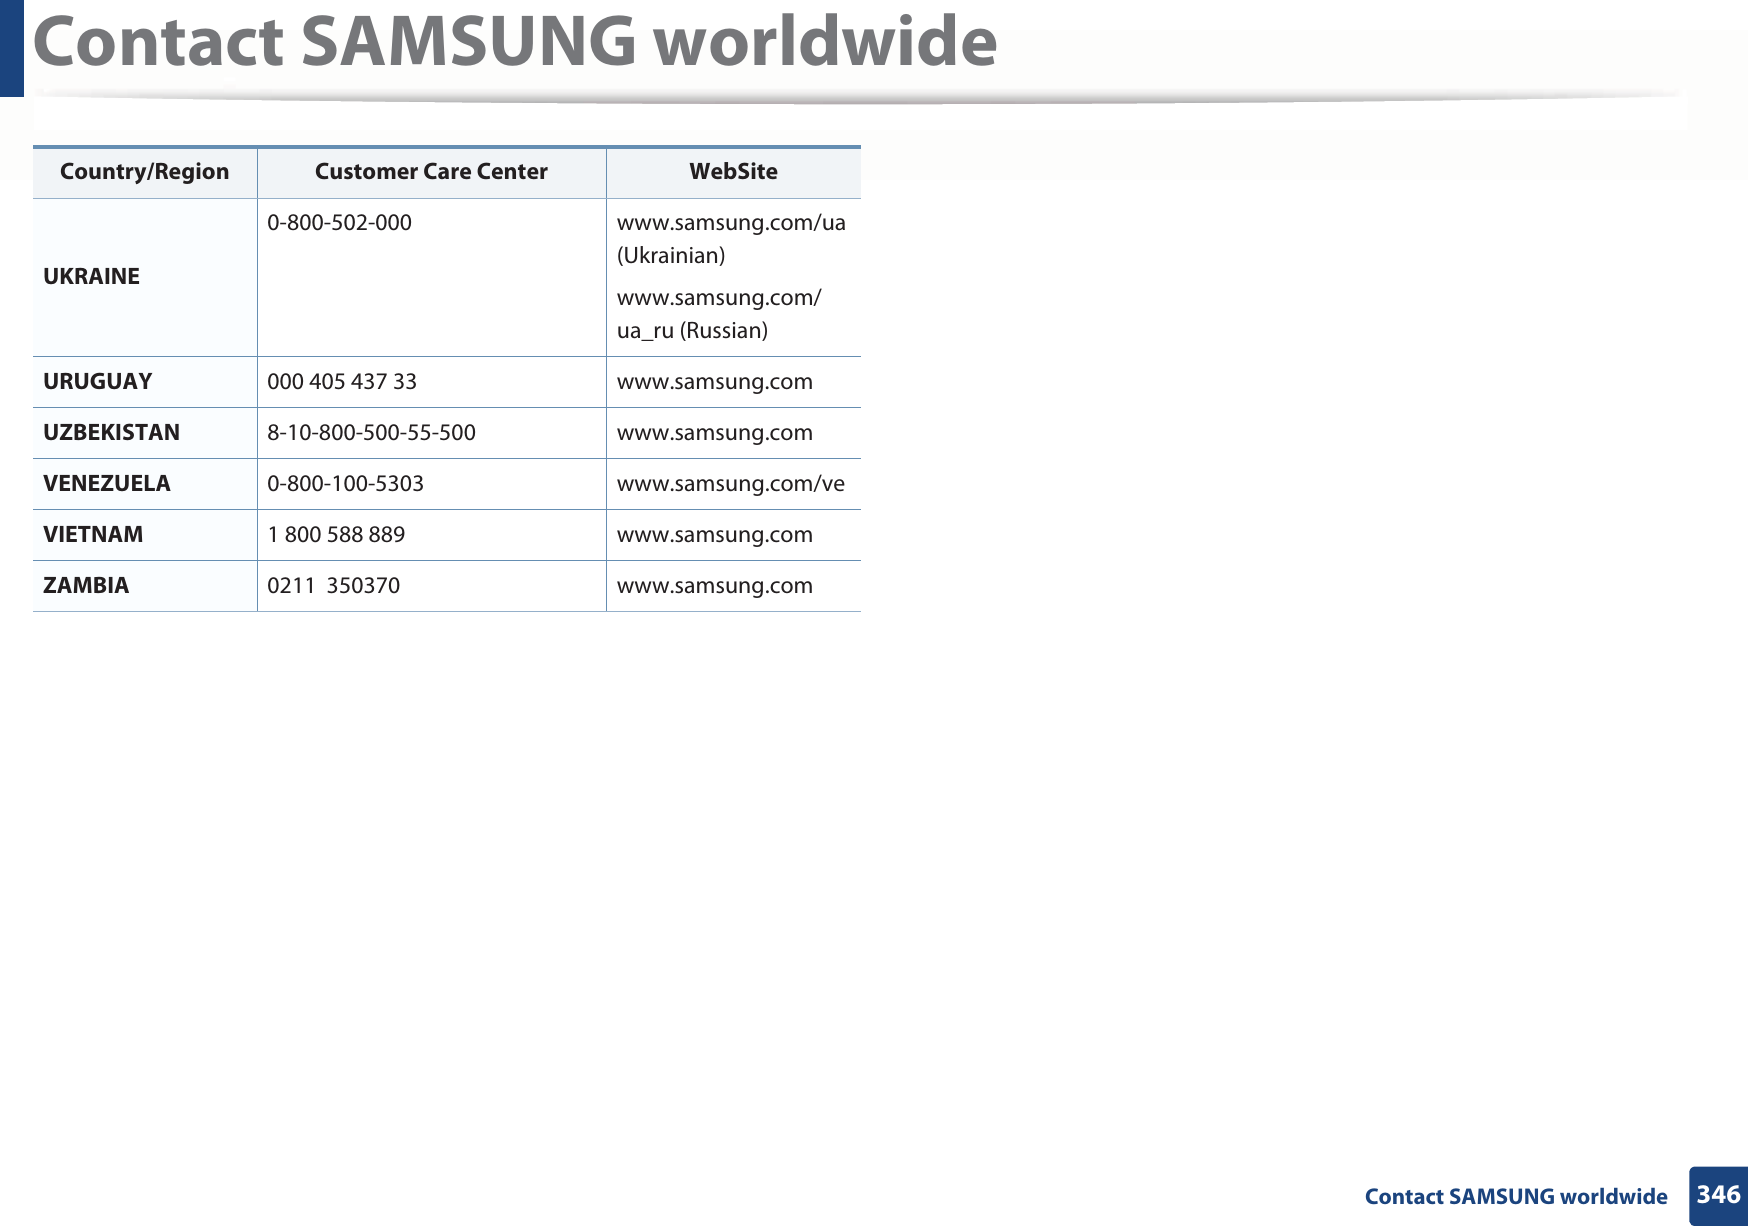
![341 Contact SAMSUNG worldwideContact SAMSUNG worldwideIf you have any comments or questions regarding Samsung products, contact the Samsung customer care center.Country/Region Customer Care Center WebSiteALGERIA 0800 100 100 www.samsung.com/n_africaANGOLA 91-726-7864 www.samsung.comARGENTINA 0800-333-3733 www.samsung.com.arARMENIA 0-800-05-555 www.samsung.comAUSTRALIA 1300 362 603 www.samsung.com/auAUSTRIA 0810-SAMSUNG (7267864, € 0.07/min)www.samsung.comAZERBAIJAN 088-55-55-555 www.samsung.comBAHRAIN8000-4726 www.samsung.com/ae (English)www.samsung.com/ae_ar (Arabic)BELARUS 810-800-500-55-500 www.samsung.comBELGIUM02-201-24-18 www.samsung.com/be (Dutch)www.samsung.com/be_fr (French)BOLIVIA 800-10-7260 www.samsung.comBOSNIA 051 133 1999 www.samsung.comBOTSWANA 8007260000 www.samsung.comBRAZIL0800-124-421 (Demais cidades e regiões)4004-0000 (Capitais e grandes centros)www.samsung.com.brBULGARIA 07001 33 11 , share cost tariff www.samsung.com/bgBURUNDI 200 www.samsung.comCAMEROON 7095- 0077 www.samsung.com/africa_fr/CANADA1-800-SAMSUNG (726-7864) www.samsung.com/ca (English)www.samsung.com/ca_fr (French)CHILE 800-SAMSUNG (726-7864)[HHP] 02-24828200www.samsung.com/clCHINA 400-810-5858 www.samsung.comCOLOMBIA 01-8000112112Bogotá: 6001272www.samsung.com/coCountry/Region Customer Care Center WebSite](https://usermanual.wiki/Samsung-Electronics-Co/SLC2670FW.Users-Manual-4/User-Guide-2300327-Page-191.png)
![Contact SAMSUNG worldwide342 Contact SAMSUNG worldwideCOSTA RICA0-800-507-7267 www.samsung.com/latin (Spanish)www.samsung.com/latin_en (English)CROATIA 062 SAMSUNG (062 726 786) www.samsung.com/hrCote D’ Ivoire 8000 0077 www.samsung.com/africa_fr/CYPRUS 8009 4000 only from landline www.samsung.com/grCZECH 800-SAMSUNG (800-726786) www.samsung.comDENMARK 70 70 19 70 www.samsung.comDOMINICA1-800-751-2676 www.samsung.com/latin (Spanish)www.samsung.com/latin_en (English)DRC 499999 www.samsung.comECUADOR1-800-10-7267 www.samsung.com/latin (Spanish)www.samsung.com/latin_en (English)EGYPT 08000-726786 www.samsung.comEIRE 0818 717100 www.samsung.comCountry/Region Customer Care Center WebSiteEL SALVADOR800-6225 www.samsung.com/latin (Spanish)www.samsung.com/latin_en (English)ESTONIA 800-7267 www.samsung.com/eeFINLAND 030-6227 515 www.samsung.comFRANCE 01 48 63 00 00 www.samsung.com/frGERMANY0180 6 SAMSUNG bzw. 0180 6 7267864* [HHP] 0180 6 M SAMSUNG bzw.0180 6 67267864* (*0,20 €/Anruf aus dem dt. Festnetz, aus dem Mobilfunk max. 0,60 €/Anruf)www.samsung.comGEORGIA 8-800-555-555 www.samsung.comGHANA 0800-100770302-200077www.samsung.com/africa_en/GREECE80111-SAMSUNG (80111 726 7864) only from land line(+30) 210 6897691 from mobile and land linewww.samsung.com/grCountry/Region Customer Care Center WebSite](https://usermanual.wiki/Samsung-Electronics-Co/SLC2670FW.Users-Manual-4/User-Guide-2300327-Page-192.png)
![Contact SAMSUNG worldwide343 Contact SAMSUNG worldwideGUATEMALA1-800-299-0013 www.samsung.com/latin (Spanish)www.samsung.com/latin_en (English)HONDURAS800-27919267 www.samsung.com/latin (Spanish)www.samsung.com/latin_en (English)HONG KONG(852) 3698-4698 www.samsung.com/hk (Chinese)www.samsung.com/hk_en (English)HUNGARY 06-80-SAMSUNG (726-7864) www.samsung.com/huINDIA 1800 3000 82821800 266 8282www.samsung.com/inINDONESIA 0800-112-8888 (Toll Free) 021-5699-7777www.samsung.com/idIRAN 021-8255 www.samsung.comITALIA800-SAMSUNG (726-7864)[HHP] 800.Msamsung (800.67267864)www.samsung.comJAMAICA 1-800-234-7267 www.samsung.comCountry/Region Customer Care Center WebSiteJAPAN 0120-327-527 www.samsung.comJORDAN 800-22273065777444www.samsung.com/Levant (English)KAZAKHSTAN 8-10-800-500-55-500 (GSM:7799) www.samsung.comKENYA 0800 545 545 www.samsung.comKUWAIT183-2255 (183-CALL) www.samsung.com/ae (English)www.samsung.com/ae_ar (Arabic)KYRGYZSTAN 00-800-500-55-500 www.samsung.comLATVIA 8000-7267 www.samsung.com/lvLITHUANIA 8-800-77777 www.samsung.com/ltLUXEMBURG 261 03 710 www.samsung.comMALAYSIA 1800-88-9999 www.samsung.com/myMEXICO 01-800-SAMSUNG (726-7864) www.samsung.comMOLDOVA 0-800-614-40 www.samsung.comMONGOLIA +7-800-555-55-55 www.samsung.comMONTENEGRO 020 405 888 www.samsung.comMOROCCO 080 100 2255 www.samsung.comCountry/Region Customer Care Center WebSite](https://usermanual.wiki/Samsung-Electronics-Co/SLC2670FW.Users-Manual-4/User-Guide-2300327-Page-193.png)
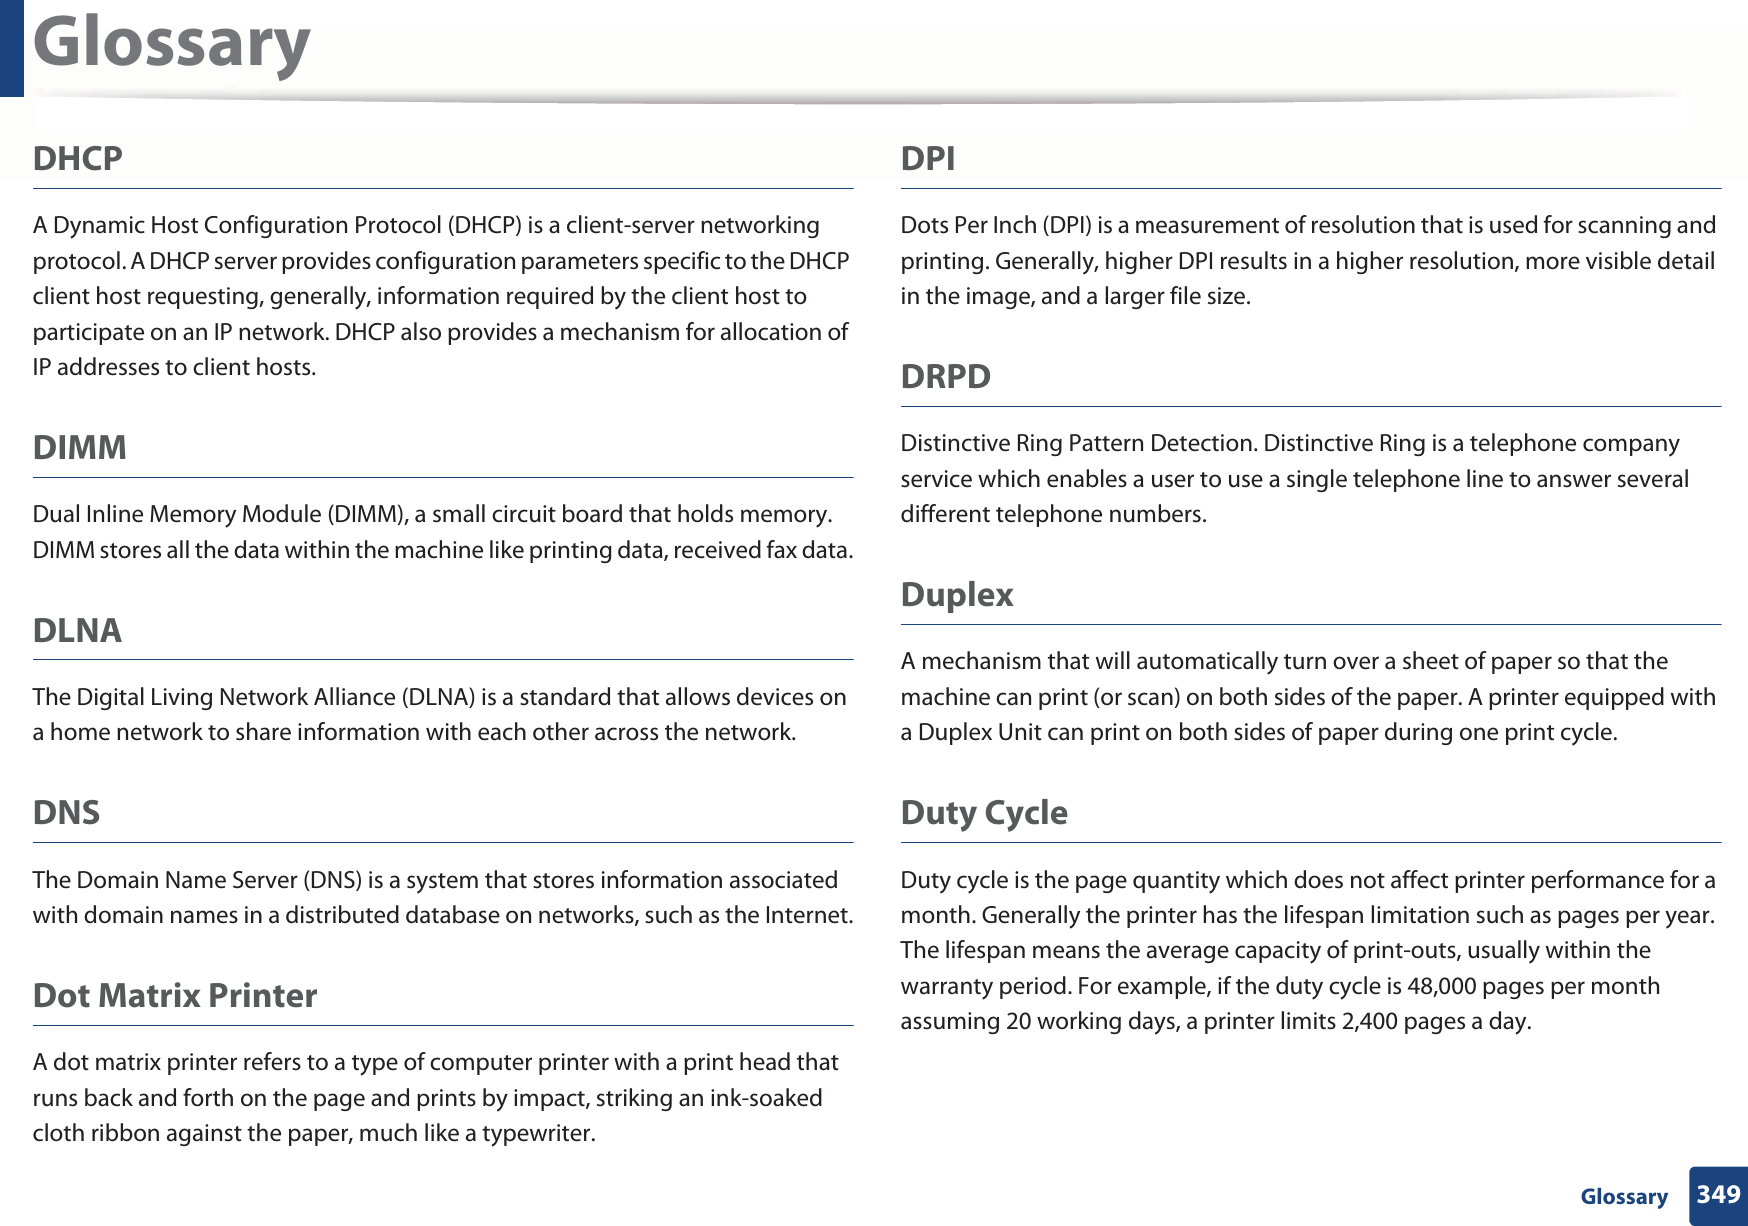
![Contact SAMSUNG worldwide344 Contact SAMSUNG worldwideMOZAMBIQUE 847267864 / 827267864 www.samsung.comNAMIBIA 08 197 267864 www.samsung.comNIGERIA 0800-726-7864 www.samsung.com/africa_en/NETHERLANDS 0900-SAMSUNG (0900-7267864) (€ 0,10/min)www.samsung.comNEW ZEALAND 0800 SAMSUNG (0800 726 786) www.samsung.com/nzNICARAGUA00-1800-5077267 www.samsung.com/latin (Spanish)www.samsung.com/latin_en (English)NORWAY 815-56 480 www.samsung.comOMAN800-SAMSUNG (726-7864) www.samsung.com/ae (English)www.samsung.com/ae_ar (Arabic)PAKISTAN 0800-Samsung (72678) www.samsung.com/pk/PANAMA800-7267 www.samsung.com/latin (Spanish)www.samsung.com/latin_en (English)Country/Region Customer Care Center WebSitePARAGUAY 009 800 542 0001 www.samsung.com.pyPERU0-800-777-08Desde celulares por favor llamar al número 336 8686www.samsung.com/pePHILIPPINES1-800-10-7267864 [PLDT]1-800-8-7267864 [Globe landline and Mobile]02-4222111 [Other landline]www.samsung.com/phPOLAND0 801-1SAMSUNG(172-678) * lub +48 22 607-93-33 **[HHP] 0 801-672-678* lub +48 22 607-93-33*** (całkowity koszt połączenia jak za 1 impuls według taryfy operatora)** (koszt połączenia według taryfy operatora)www.samsung.com/plPORTUGAL 808 20-SAMSUNG (808 20 7267) www.samsung.comPUERTO RICO 1-800-682-3180 www.samsung.comCountry/Region Customer Care Center WebSite](https://usermanual.wiki/Samsung-Electronics-Co/SLC2670FW.Users-Manual-4/User-Guide-2300327-Page-194.png)
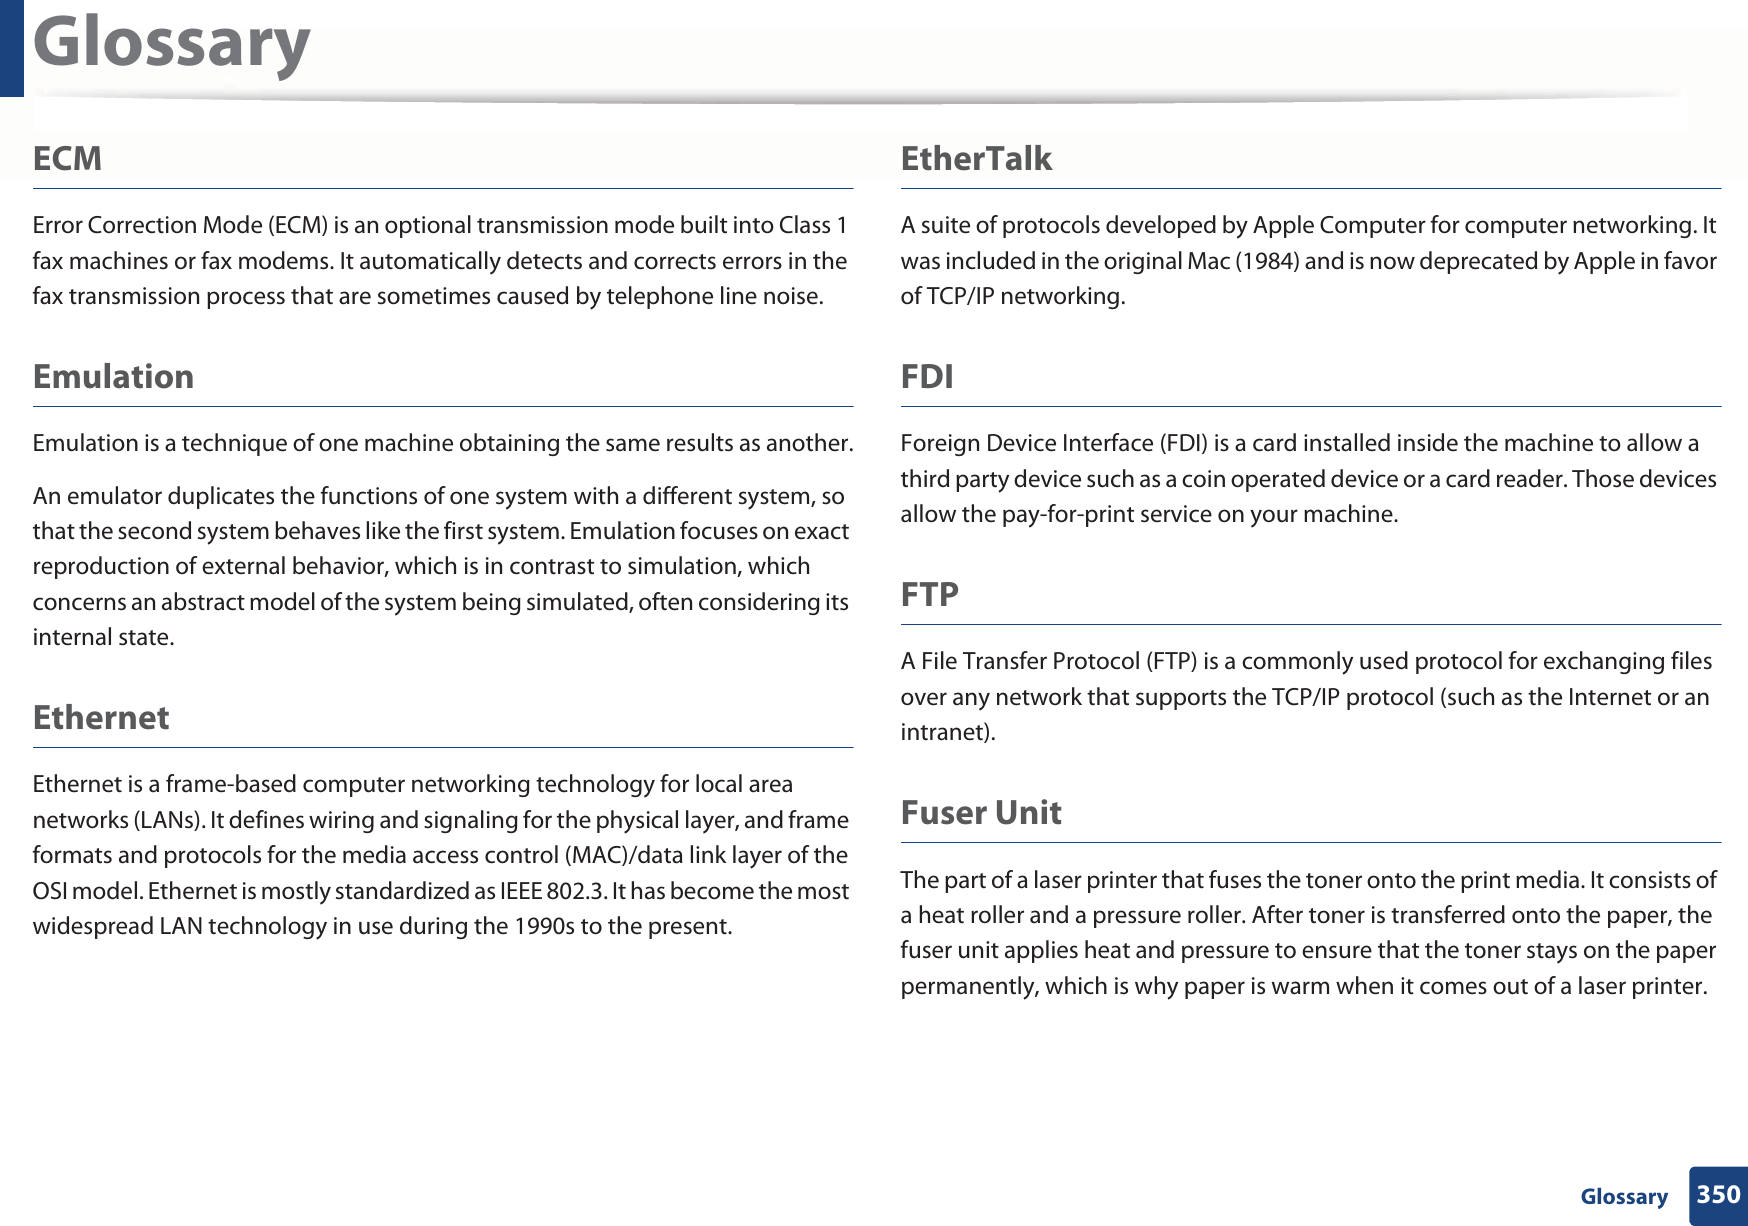
![Contact SAMSUNG worldwide345 Contact SAMSUNG worldwideQATAR800-2255 (800-CALL) www.samsung.com/ae (English)www.samsung.com/ae_ar (Arabic)RWANDA 9999 www.samsung.comROMANIA08008 SAMSUNG (08008 726 7864)TOLL FREE No.www.samsung.com/roRUSSIA 800-00-0077 www.samsung.comSAUDI ARABIA 9200-21230 www.samsung.com/sa (Arabic)SENEGAL 8-800-555-55-55 www.samsung.com/africa_fr/SERBIA 011 321 6899 www.samsung.com/rsSINGAPORE 1800-SAMSUNG (726-7864) www.samsung.com/sgSLOVAKIA 0800 - SAMSUNG(0800-726 786) www.samsung.comSOUTH AFRICA 0860 SAMSUNG (726-7864) www.samsung.comSPAIN 902-1-SAMSUNG(902 172 678) www.samsung.comSUDAN 1969 www.samsung.comSWEDEN 0771 726 7864 (SAMSUNG) www.samsung.comCountry/Region Customer Care Center WebSiteSWITZERLAND0848-SAMSUNG (7267864, CHF 0.08/min)www.samsung.com/chwww.samsung.com/ch_fr/SYRIA 18252273 www.samsung.com/Levant (English)TADJIKISTAN 8-10-800-500-55-500 www.samsung.comTAIWAN 0800-329-999 www.samsung.com/twTANZANIA 0685 88 99 00 www.samsung.comTHAILAND 1800-29-323202-689-3232www.samsung.com/thTRINIDAD & TOBAGO1-800-SAMSUNG (726-7864) www.samsung.comTURKEY 444 77 11 www.samsung.comU.A.E 800-SAMSUNG (726-7864) www.samsung.comU.K 0330 SAMSUNG (726-7864) www.samsung.comU.S.A 1-800-SAMSUNG (726-7864) www.samsung.com/usU.S.A(Mobile Phones)[HHP] 1-888-987-HELP(4357) www.samsung.comUGANDA 0800 300 300 www.samsung.comCountry/Region Customer Care Center WebSite](https://usermanual.wiki/Samsung-Electronics-Co/SLC2670FW.Users-Manual-4/User-Guide-2300327-Page-195.png)