Samsung Electronics Co SLM2020W Printer User Manual Bluejay english NEW
Samsung Electronics Co Ltd Printer Bluejay english NEW
Contents
- 1. Users Manual 1
- 2. Users Manaul 2
- 3. Users Manual 3
Users Manaul 2
Installing driver over the network
96
2. Using a network-connected machine
10 Click Install. All components necessary for machine operations will be
installed.
If you click Customize, you can choose individual components to install.
11 Enter the password and click OK.
12 Installing software requires you to restart your computer. Click Continue
Installation.
13 After the installation is finished, click Close.
14 Open the Applications folder > Utilities > Print Setup Utility.
• For Mac OS X 10.5-10.7, open the Applications folder > System
Preferences and click Print & Fax.
15 Click Add on the Printer List.
• For Mac OS X 10.5-10.7, click the “+” icon. A display window will pop
up.
16 For Mac OS X 10.4, click IP Printer.
• For Mac OS X 10.5-10.7, click IP.
17 Select HP Jetdirect - Socket in Protocol.
When printing a document containing many pages, printing performance
may be enhanced by choosing Socket for Printer Type option.
18 Enter the machine’s IP address in the Address input field.
19 Enter the queue name in the Queue input field. If you cannot determine
the queue name for your machine server, try using the default queue
first.
20 For Mac OS X 10.4, if Auto Select does not work properly, select Samsung
in Print Using and your machine name in Model.
• For Mac OS X 10.5-10.7, if Auto Select does not work properly, choose
Select Printer Software and your machine name in Print Using.
21 Click Add.
Your machine appears in the Printer List, and is set as the default
machine.
8
Linux
You need to download Linux software packages from the Samsung website to
install the printer software (www.samsung.com > find your product > Support
or Downloads).
To install other software:
• See "Installing the Smart Panel" on page 4.
• See "Installing the Printer Settings Utility" on page 5.
Installing driver over the network
97
2. Using a network-connected machine
Install the Linux driver and add network printer
1Make sure that the machine is connected to your network and powered
on. Also, your machine’s IP address should have been set.
2 Download the Unified Linux Driver package from the Samsung website.
3 Extract the UnifiedLinuxDriver.tar.gz file and open the new directory.
4 Double-click the Linux folder > install.sh icon.
5 The Samsung installer window opens. Click Continue.
6 The add printer wizard window opens. Click Next.
7 Select network printer and click Search button.
8 The machine’s IP address and model name appears on list field.
9 Select your machine and click Next.
10 Input the printer description and Next.
11 After the machine is added, click Finish.
12 When installation is done, click Finish.
Add a network printer
1Double-click the Unified Driver Configurator.
2 Click Add Printer.
3 The Add printer wizard window opens. Click Next.
4 Select Network printer and click the Search button.
5 The printer’s IP address and model name appears on list field.
6 Select your machine and click Next.
7 Enter the printer description and click Next.
8 After the machine is added, click Finish.
9
UNIX
• Make sure your machine supports the UNIX operating system before
installing the UNIX printer driver (see "Features by models" on page 4)
• The commands are marked with “”, when typing the commands, do not
type “”.
Installing driver over the network
98
2. Using a network-connected machine
To use the UNIX printer driver, you have to install the UNIX printer driver
package first, then setup the printer. You can download the UNIX printer driver
package from the Samsung website (www.samsung.com > find your product >
Support or Downloads).
Installing the UNIX printer driver package
The installation procedure is common for all variants of UNIX OS mentioned.
1From the Samsung website, download and unpack the UNIX Printer
Driver package to your computer.
2 Acquire root privileges.
“su -”
3 Copy the appropriate driver archive to the target UNIX computer.
See administration guide of your UNIX OS for details.
4 Unpack the UNIX printer driver package.
For example, on IBM AIX, use the following commands.
“gzip -d < enter the package name | tar xf -”
5 Go to the unpacked directory.
6 Run the install script.
“./install”
install is the installer script file which is used to install or uninstall the
UNIX Printer Driver package.
Use “chmod 755 install” command to give the permission to the
installer script.
7 Execute the “. /install –c” command to verify installation results.
8 Run “installprinter” from the command line. This will bring up the Add
Printer Wizard window. Setup the printer in this window referring to
the following procedures.
On some UNIX OS, for example on Solaris 10, just added printers may not be
enabled and/or may not accept jobs. In this case run the following two
commands on the root terminal:
“accept <printer_name>”
“enable <printer_name>”

Installing driver over the network
99
2. Using a network-connected machine
Uninstalling the printer driver package
The utility should be used to delete the printer installed in the system.
a Run “uninstallprinter” command from the terminal.
It will open the Uninstall Printer Wizard.
The installed printers are listed in the drop-down list.
b Select the printer to be deleted.
c Click Delete to delete the printer from the system.
d Execute the “. /install –d” command to uninstall the whole package.
e To verify removal results, execute the “. /install –c” command.
To re-install it, use the command “. /install” to reinstall the binaries.
Setting up the printer
To add the printer to your UNIX system, run ‘installprinter’ from the command
line. This will bring up the Add Printer Wizard window. Setup the printer in this
window according to the following steps:
1Type the name of the printer.
2 Select the appropriate printer model from the model list.
3 Enter any description corresponding to the type of the printer in the
Type field. This is optional.
4 Specify any printer description in the Description field. This is optional.
5 Specify the printer location in the Location field.
6 Type the IP address or DNS name of the printer in the Device textbox for
network-connected printers. On IBM AIX with jetdirect Queue type,
only the DNS name is possible-numeric IP address is not allowed.
7 Queue type shows the connection as lpd or jetdirect in the
corresponding list box. Additionally, usb type is available on Sun Solaris
OS.
8 Select Copies to set the number of copies.
9 Check the Collate option to receive copies already sorted.
10 Check the Reverse Order option to receive copies in the reverse order.
11 Check the Make Default option to set this printer as default.
12 Click OK to add the printer.
100
2. Using a network-connected machine
IPv6 configuration
IPv6 is supported properly only in Windows Vista or higher.
If the IPv6 network seems to not be working, set all the network setting to
the factory defaults and try again using Clear Setting.
In the IPv6 network environment, follow the next procedure to use the IPv6
address.
10
From the control panel
1Connect your machine to the network with a network cable.
2 Turn on the machine.
3 Print a Network Configuration Report that will check IPv6 addresses
(see "Printing a network configuration report" on page 3).
4 Select Start > Control Panel > Printers and Faxes.
5 Click Add a printer in the left pane of the Printers and Faxes windows.
6 Click Add a local printer in the Add Printer windows.
7 The Add Printer Wizard window appears. Follow the instructions in the
window.
If the machine does not work in the network environment, activate IPv6.
Refer to the next section followed by.
Activating IPv6
1Press the (Menu) button on the control panel.
2 Press Network > TCP/IP (IPv6) > IPv6 Activate.
3 Select On and press OK.
4 Turn the machine off and turn it on again.
5 Reinstall your printer driver.
IPv6 configuration
101
2. Using a network-connected machine
Setting IPv6 addresses
The machine supports the following IPv6 addresses for network printing and
managements.
•Link-local Address: Self-configured local IPv6 address (Address starts with
FE80).
•Stateless Address: Automatically configured IPv6 address by a network
router.
•Stateful Address: IPv6 address configured by a DHCPv6 server.
•Manual Address: Manually configured IPv6 address by a user.
DHCPv6 address configuration (Stateful)
If you have a DHCPv6 server on your network, you can set one of the following
options for default dynamic host configuration.
1Press the (Menu) button on the control panel.
2 Press Network > TCP/IP (IPv6) > DHCPv6 Config.
3 Press OK to select the required value you want.
•DHCPv6 Addr.: Always use DHCPv6 regardless of router request.
•DHCPv6 Off: Never use DHCPv6 regardless of router request.
•Router: Use DHCPv6 only when requested by a router.
11
From the SyncThru™ Web Service
For models that do not have the display screen on the control panel, you
need to access SyncThru™ Web Service first using the IPv4 address and
follow the below procedure to use IPv6.
1Access a web browser, such as Internet Explorer, from Windows. Enter
the machine IP address (http://xxx.xxx.xxx.xxx) in the address field and
press the Enter key or click Go.
2 If it’s your first time logging into SyncThru™ Web Service you need to
log-in as an administrator. Type in the below default ID and password.
•ID: admin
•Password: sec00000
3 When the SyncThru™ Web Service window opens, move the mouse
cursor over the Settings of the top menu bar and then click Network
Settings.
4 Click TCP/IPv6 on the left pane of the website.
5 Check the IPv6 Protocol check box to activate IPv6.
6 Check the Manual Address check box. Then, the Address/Prefix text
box is activated.
IPv6 configuration
102
2. Using a network-connected machine
7 Enter the rest of the address (e.g.,:3FFE:10:88:194::AAAA. “A” is the
hexadecimal 0 through 9, A through F).
8 Choose the DHCPv6 configuration.
9 Click the Apply button.
Using SyncThru™ Web Service
1Start a web browser, such as Internet Explorer, that supports IPv6
addressing as a URL.
2 Select one of the IPv6 addresses (Link-local Address, Stateless
Address, Stateful Address, Manual Address) from Network
Configuration Report (see "Printing a network configuration report" on
page 3).
3 Enter the IPv6 addresses (e.g.,: http://[FE80::215:99FF:FE66:7701]).
Address must be enclosed in '[ ]' brackets.
103
2. Using a network-connected machine
Wireless network setup
• Make sure your machine supports wireless networking. Wireless
networking may not be available depending on the model (see "Features
by models" on page 4).
• If the IPv6 network seems to not be working, set all the network settings
to the factory defaults and try again using Clear Setting.
12
Getting started
Understanding your network type
Typically, you can only have one connection between your computer and the
machine at a time.
Wireless network name and network key
Wireless networks require higher security, so when an access point is first set up,
a network name (SSID), the type of security used, and a Network Key are created
for the network. Ask your network administrator about this information before
proceeding with the machine installation.
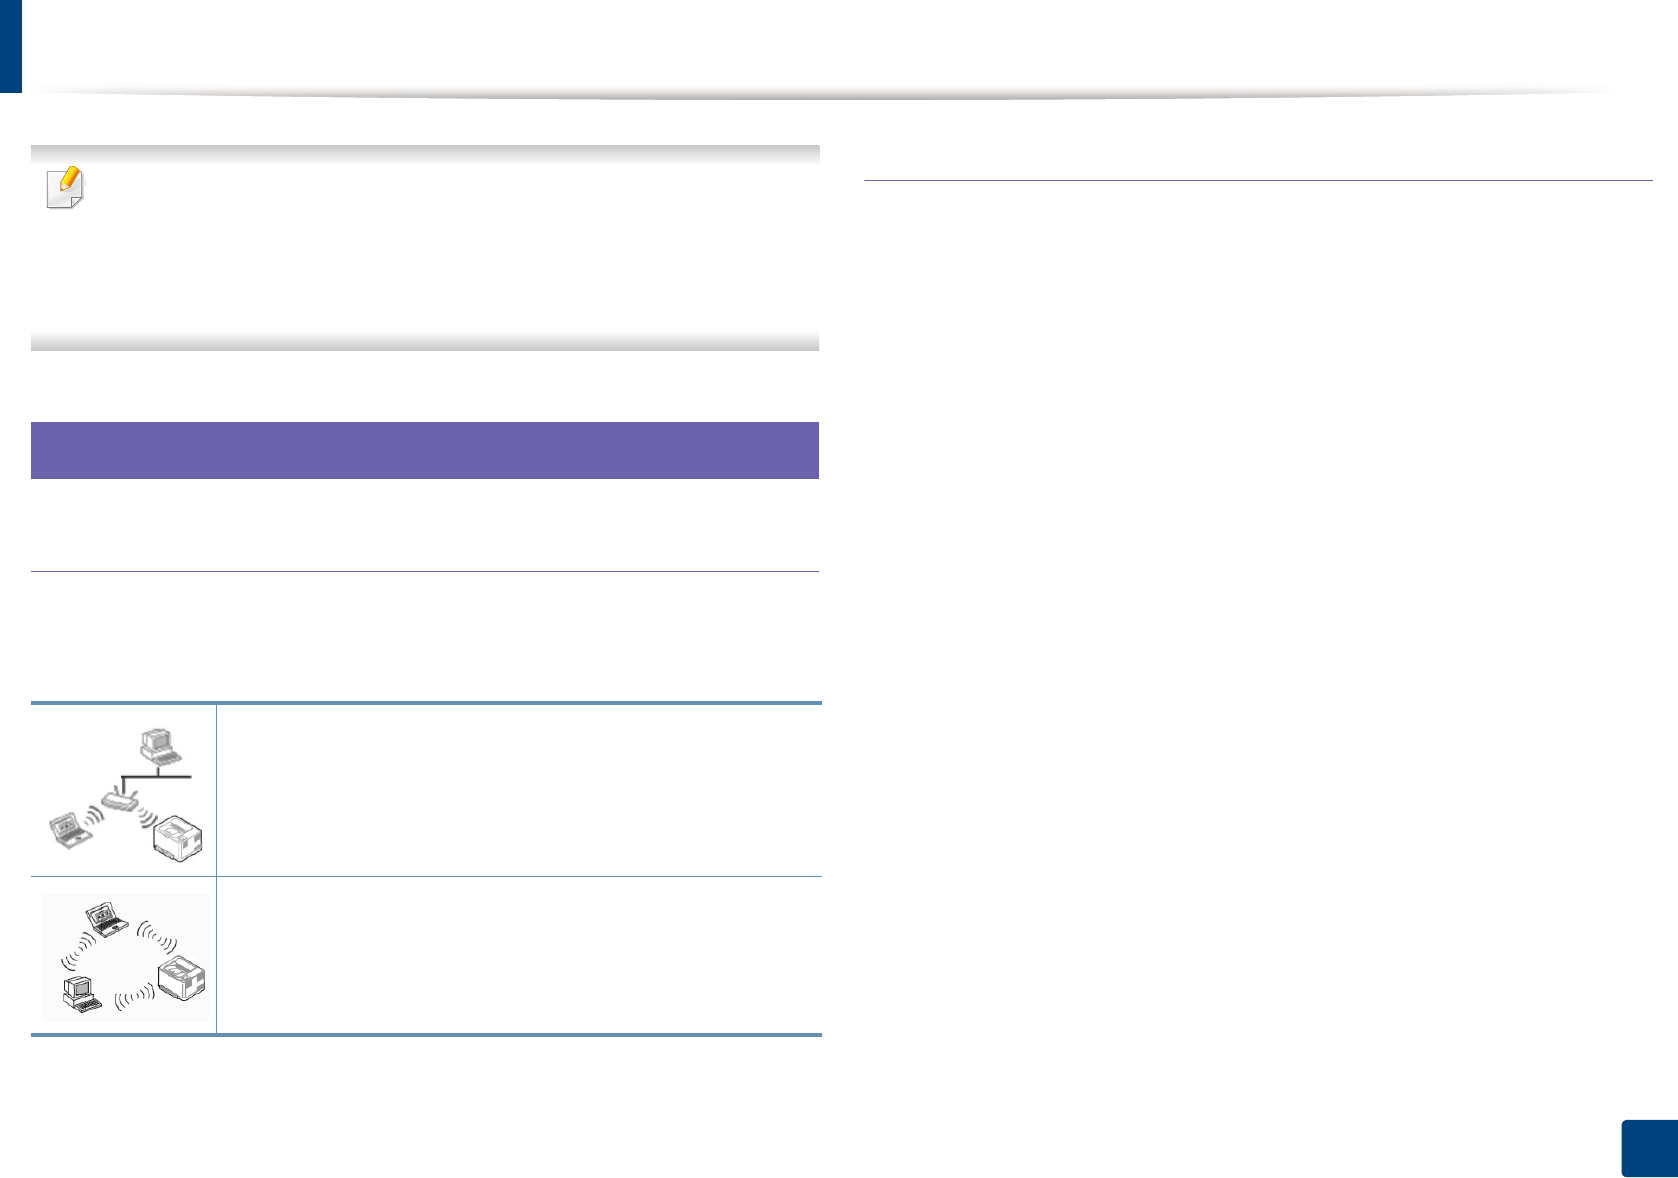
Infrastructure mode
This is an environment generally used for homes and SOHOs
(Small Office/ Home Office). This mode uses an access point to
communicate with the wireless machine.
Ad hoc mode
This mode does not use an access point. The wireless
computer and wireless machine communicate directly.
Wireless network setup
104
2. Using a network-connected machine
13
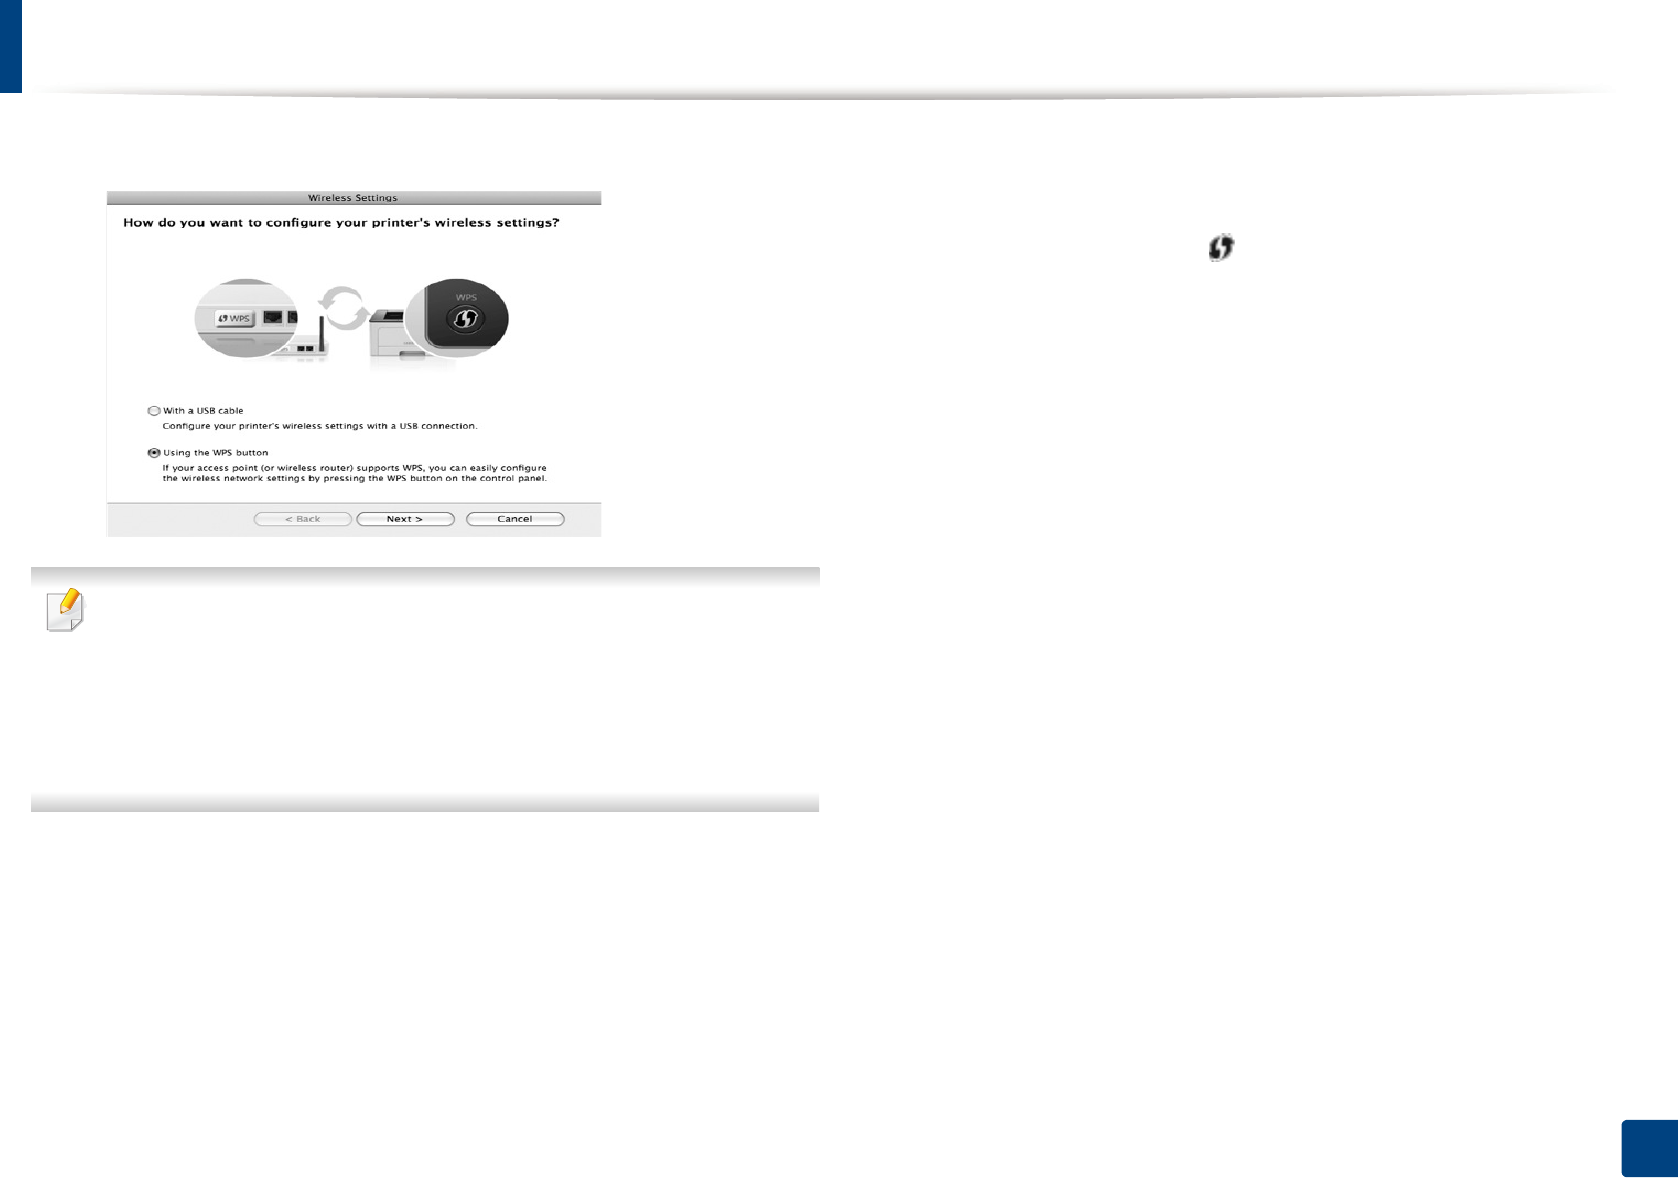
Introducing wireless set up methods
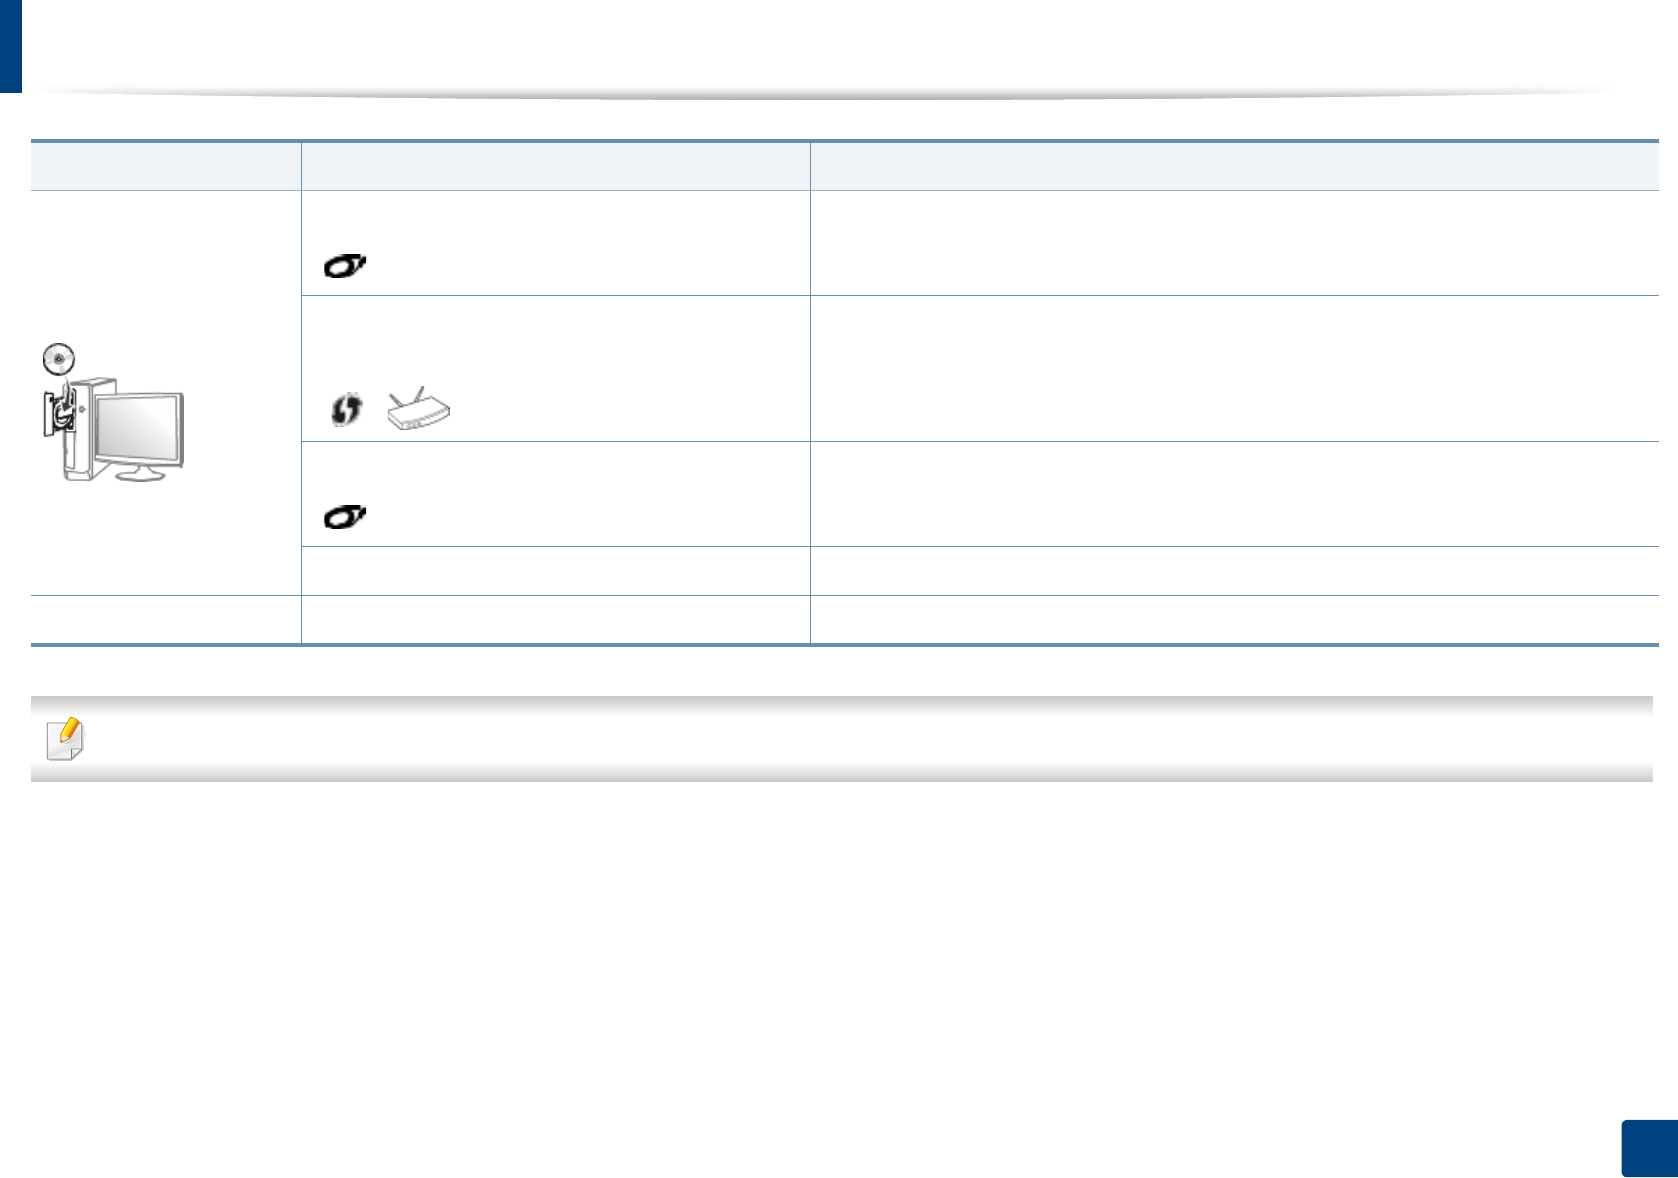
You can set wireless settings either from the machine or the computer. Choose the setting method from the below table.
Some wireless network installation types may not be available depending on the model or country.
Set up method Connecting method Description & Reference
From the machine’s
control panel
Using the WPS (recommended)
()
• See "Machines with a display screen" on page 21.
• See "Machines without a display screen" on page 22.
Using the menu button
()
• See "Using the menu button" on page 23.
Wireless network setup
105
2. Using a network-connected machine
If problems occur during wireless set up or driver installation, refer to the troubleshooting chapter (see "Troubleshooting" on page 46).
From the computer
Access point via USB cable (recommended)
()
• Windows user, see "Access point via USB cable" on page 24.
• Macintosh user, see "Access point via USB cable" on page 33.
Access point via WPS button (without a USB cable
connection)
( , )
• Windows user, see "Access point via WPS button (without a USB cable connection)"
on page 28.
• Macintosh user, see "Setting the access point using the WPS button" on page 37.
Ad hoc via USB cable
()
• Windows user, see "Ad hoc via USB cable" on page 30.
• Macintosh user, see "Ad hoc via USB cable" on page 39.
Using a network cable • See "Using a network cable" on page 41.
Other set up methods Setting the Wi-Fi Direct for mobile printing • See "Setting up Wi-Fi Direct" on page 44.
Set up method Connecting method Description & Reference

Wireless network setup
106
2. Using a network-connected machine
14
Using the WPS button
If your machine and an access point (or wireless router) support Wi-Fi Protected
Setup™ (WPS), you can easily configure the wireless network settings by
pressing the (WPS) button on the control panel without a computer.
• If you want to use the wireless network using the infrastructure mode,
make sure that the network cable is disconnected from the machine.
Using the WPS (PBC) button or entering the PIN from the computer to
connect to the access point (or wireless router) varies depending on the
access point (or wireless router) you are using. Refer to the user's guide
of the access point (or wireless router) you are using.
• When using the WPS button to set the wireless network, security settings
may change. To prevent this, lock the WPS option for the current wireless
security settings. The option name may differ depending on the access
point (or wireless router) you are using.
Items to prepare
• Check if the access point (or wireless router) supports Wi-Fi Protected
Setup™ (WPS).
• Check if your machine supports Wi-Fi Protected Setup™ (WPS).
• Networked computer (PIN mode only)
Choosing your type
There are two methods available to connect your machine to a wireless network
using the (WPS) button on the control panel.
The Push Button Configuration (PBC) method allows you to connect your
machine to a wireless network by pressing both the (WPS) button on the
control panel of your machine and the WPS (PBC) button on a Wi-Fi Protected
Setup™ WPS-enabled access point (or wireless router) respectively.
The Personal Identification Number (PIN) method helps you connect your
machine to a wireless network by entering the supplied PIN information on a Wi-
Fi Protected Setup™ WPS-enabled access point (or wireless router).
Factory default in your machine is PBC mode, which is recommended for a
typical wireless network environment.
You can change the WPS mode in control panel ( (Menu) > Network >
Wireless > OK > WPS Setting).

Wireless network setup
107
2. Using a network-connected machine
Machines with a display screen
Connecting in PBC mode
1Press and hold the (WPS) button on the control panel for more than
2 seconds.
The machine starts waiting for up to two minutes until you press the WPS
(PBC) button on the access point (or wireless router).
2 Press the WPS (PBC) button on the access point (or wireless router).
The messages are displayed on the display screen in the order below:
a Connecting: The machine is connecting to the access point (or
wireless router).
b Connected: When the machine is successfully connected to the
wireless network, the WPS LED light stays on.
c AP SSID: After completing the wireless network connection process,
the AP’s SSID information appears on the display.
Connecting in PIN mode
1Press and hold the (WPS) button on the control panel for more than
2 seconds.
2 The eight-digit PIN appears on the display.
You need to enter the eight-digit PIN within two minutes on the
computer that is connected to the access point (or wireless router).
The messages are displayed on the display screen in the order below:
a Connecting: The machine is connecting to the wireless network.
b Connected: When the machine is successfully connected to the
wireless network, the WPS LED light stays on.
c SSID Type: After completing the wireless network connection
process, the AP’s SSID information is displayed on the LCD display.

Wireless network setup
108
2. Using a network-connected machine
Machines without a display screen
Connecting in PBC mode
1Press and hold the (WPS) button on the control panel for about 2 - 4
seconds until the status LED blinks quickly.
The machine starts connecting to the wireless network. The LED blinks
slowly for up to two minutes until you press the PBC button on the
access point (or wireless router).
2 Press the WPS (PBC) button on the access point (or wireless router).
a The light blinks fast on the WPS LED. The machine is connecting to
the access point (or wireless router).
b When the machine is successfully connected to the wireless
network, the WPS LED light stays on.
Connecting in PIN mode
1The network configuration report, including PIN, must be printed (see
"Printing a network configuration report" on page 3).
In ready mode, Press the (Cancel or Stop/Clear) button for more than
five seconds on the control panel.
The machine without the (Cancel or Stop/Clear) button: Press the
(WPS) button formore than ten seconds on the control panel.
You can find your machine’s PIN.
2 Press and hold the (WPS) button on the control panel for more than
4 seconds until the status LED stays on.
The machine starts connecting to the access point (or wireless router).
3 You need to enter the eight-digit PIN within two minutes on the
computer that is connected to the access point (or wireless router).
The LED blinks slowly for up to two minutes until you enter the eight-
digit PIN.
The WPS LED blinks in the order below:
a The light blinks fast on the WPS LED. The machine is connecting to
the access point (or wireless router).
b When the machine is successfully connected to the wireless
network, the WPS LED light stays on.
Wireless network setup
109
2. Using a network-connected machine
Re-connecting to a network
When the wireless function is off, the machine automatically tries to re-connect
to the access point (or wireless router) with the previously used wireless
connection settings and address.
In the following cases, the machine automatically re-connects to the
wireless network:
• The machine is turned off and on again.
• The access point (or wireless router) is turned off and on again.
Canceling the connection process
To cancel the wireless network connection when the machine is connecting to
the wireless network, press and release the (Cancel or Stop/Clear) or
(Power)button on the control panel. You need to wait 2 minutes to re-
connect to the wireless network.
Disconnecting from a network
To disconnect the wireless network connection, press the (WPS) button on
the control panel for more than two seconds.
•When the Wi-Fi network is in idle mode: The machine is immediately
disconnected from the wireless network and the WPS LED turns off.
•When the Wi-Fi network is being used: While the machine waits until the
current job is finished, the light blinks fast on the WPS LED. Then, the
wireless network connection is automatically disconnected and the WPS
LED turns off.
15
Using the menu button
Some menus may not appear in the display depending on options or
models. If so, it is not applicable to your machine
Before starting, you will need to know the network name (SSID) of your wireless
network and the network key if it is encrypted. This information was set when
the access point (or wireless router) was installed. If you do not know about your
wireless environment, please ask the person who set up your network.
Wireless network setup
110
2. Using a network-connected machine
After completing the wireless network connection, you need to install a
machine driver to print from an application (see "Installing driver over the
network" on page 6).
1Press the (Menu) button on the control panel.
2 Press Network > Wireless > WLAN Settings.
3 Press the OK to select the setup method you want.
•Wizard (recommended): In this mode, the setup is automatic. The
machine will display a list of available networks from which to
choose. After a network is chosen then printer will prompt for the
corresponding security key.
•Custom: In this mode, users can give or edit manually their own SSID
, or choose the security option in detail.
16
Setup using Windows
Shortcut to the Wireless Setting program without the CD: If you have
installed the printer driver once, you can access the Wireless Setting
program without the CD. From the Start menu, select Programs or All
Programs > Samsung Printers > your printer driver name > Wireless
Setting Program.
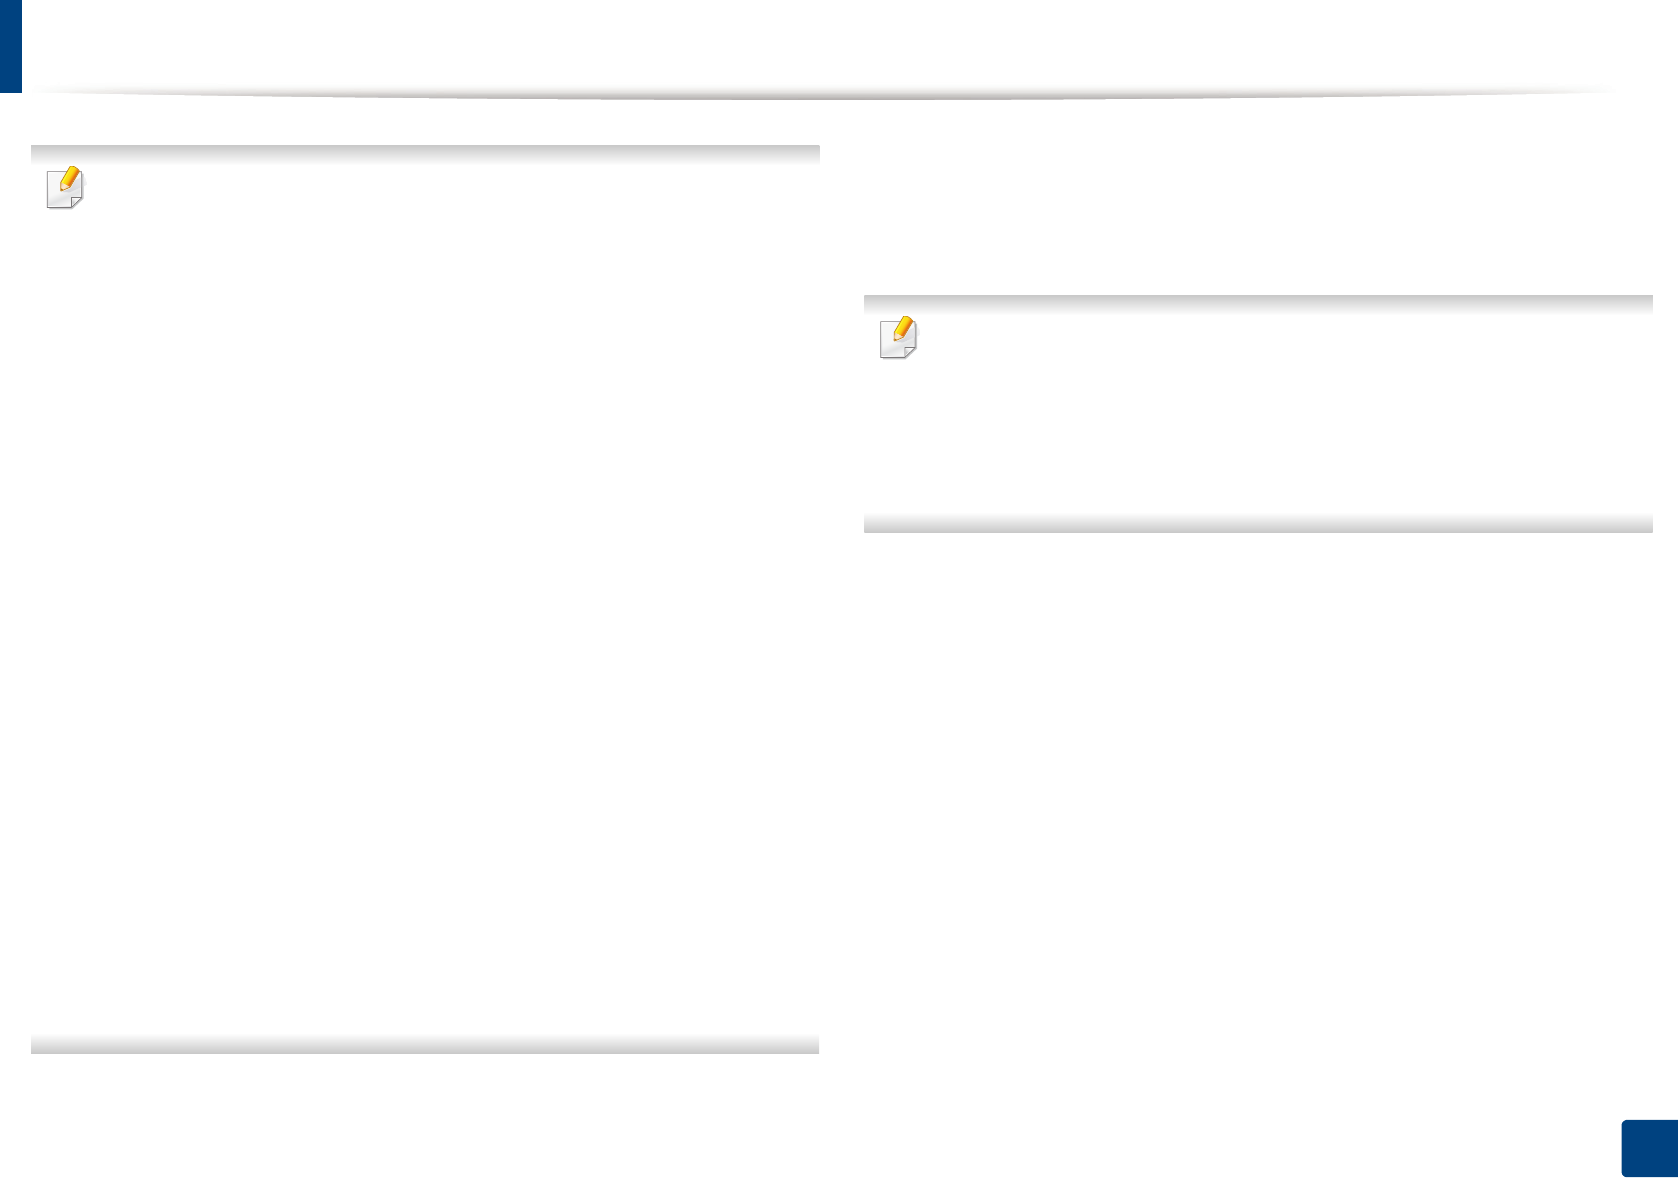
Access point via USB cable
Items to prepare
• Access point
• Network-connected computer
• Software CD that was provided with your machine
• A machine installed with a wireless network interface
• USB cable
Creating the infrastructure network
1Check whether the USB cable is connected to the machine.
2 Turn on your computer, access point, and machine.
3 Insert the supplied software CD into your CD-ROM drive.
4 Select the Wireless Setting and Installation option.
5 Read the License Agreement, and select I accept the terms of the
License Agreement. Then, click Next.
6 The software searches the wireless network.
If the software has failed to search the network, check if the USB cable is
connected properly between the computer and machine, and follow the
instructions in the window.
Wireless network setup
111
2. Using a network-connected machine
• If wireless network set up has been set before, the Wireless Network
Setting Information window appears.
If you want to reset the wireless settings, check the check box and click
Next.
• For models that support the WPS button (without a USB cable
connection), the window shown below will appear.
-With a USB Cable: Connect the USB cable and click Next, then go to
step 7.
-Using the WPS Button: See "Access point via WPS button (without a
USB cable connection)" on page 28.
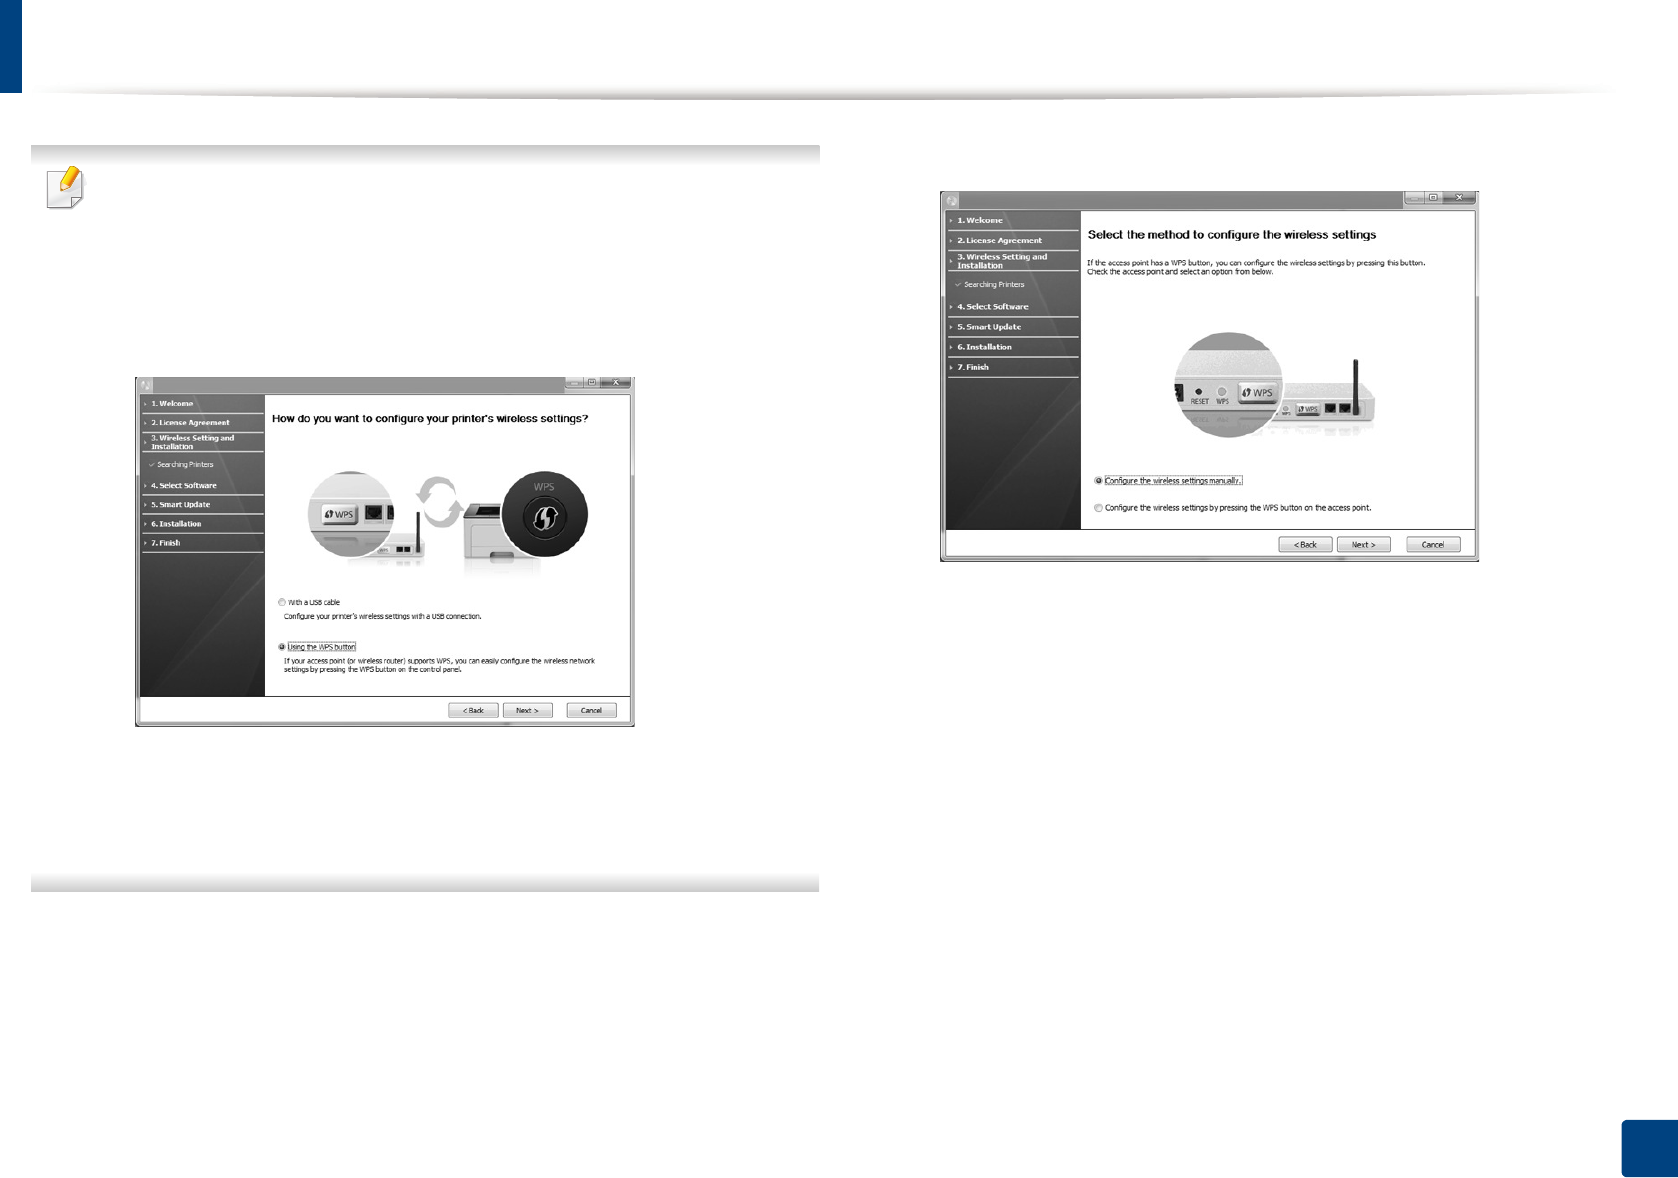
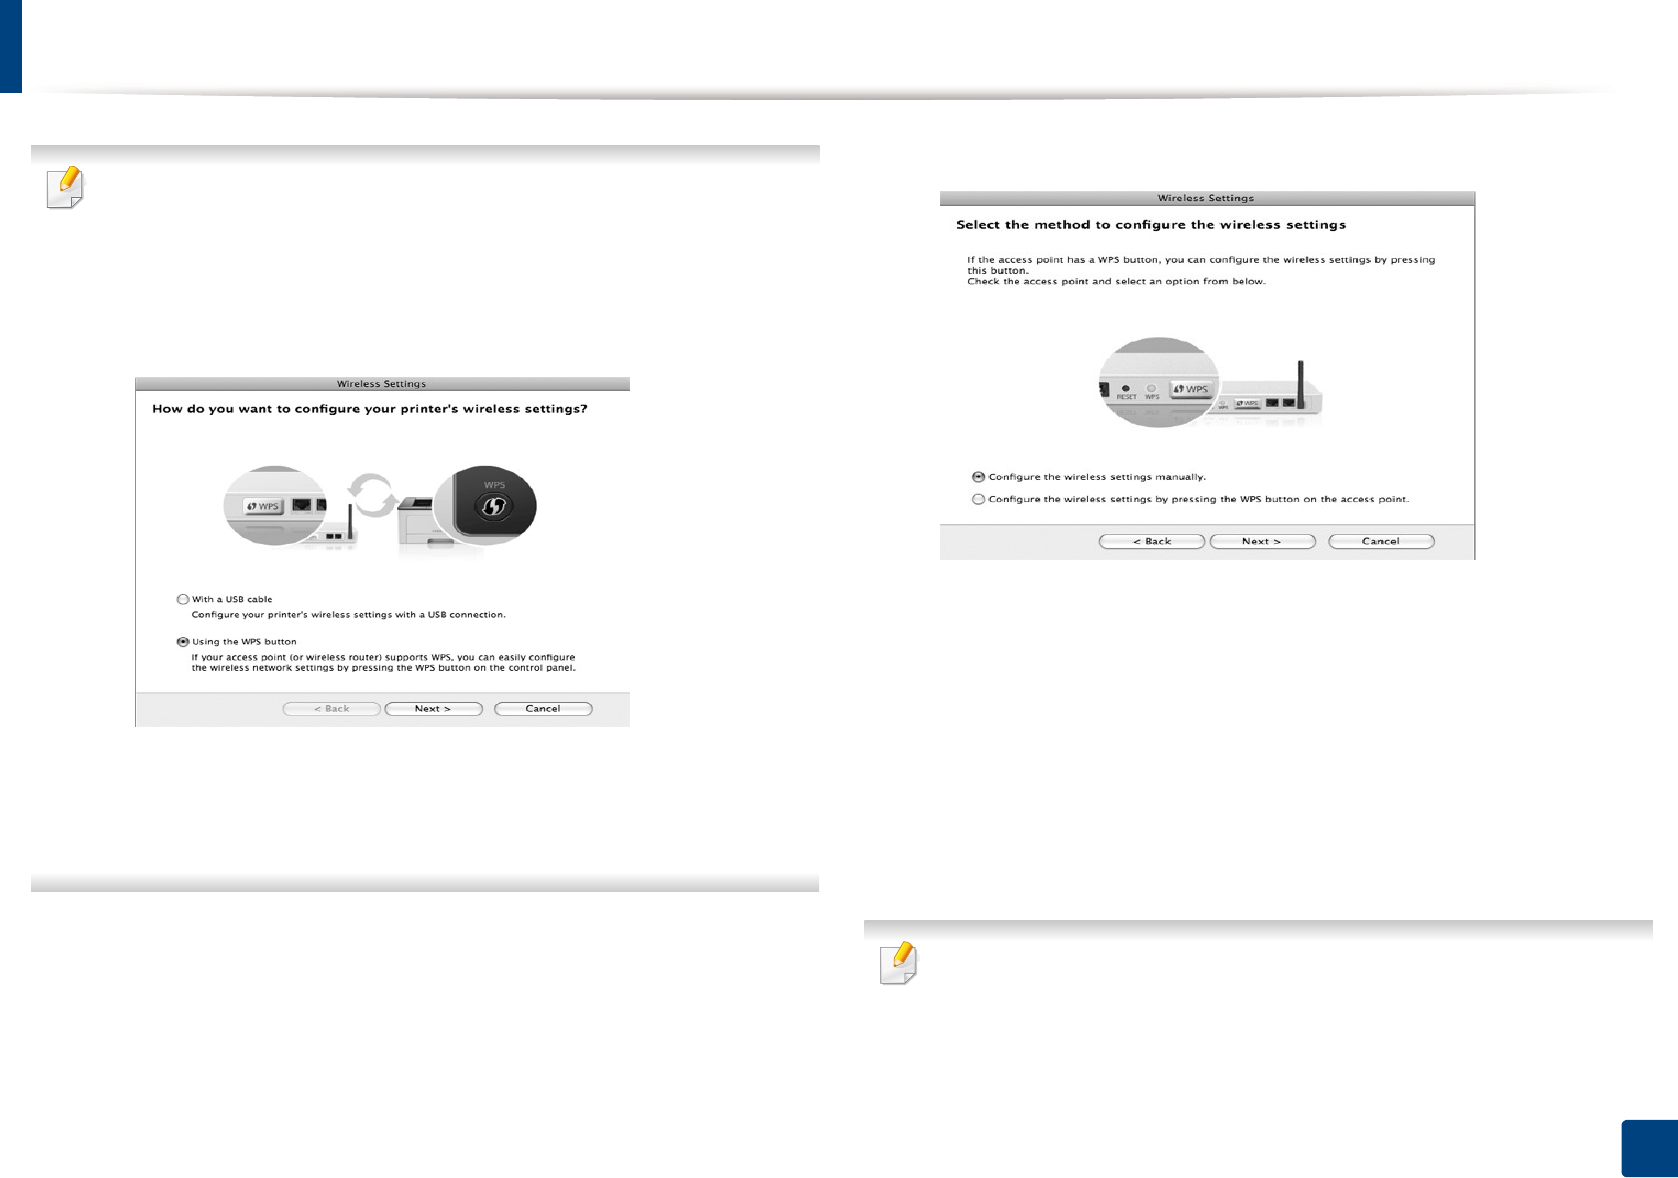
7 Select the method to use from the wireless set up method window.
•Configure the wireless settings manually.: Go to step 8.
•Configure the wireless settings by pressing the WPS button on
the access point.: Connect to the wireless network by press the WPS
button on the access point (or wireless router).
- Follow the instructions in the window. When you are done
configuring the wireless network settings, go to step 11.
8 After searching, the window shows the wireless network devices. Select
the name (SSID) of the access point you are using and click Next.
Wireless network setup
112
2. Using a network-connected machine
If you cannot find the network name you want to choose, or if you want to
set the wireless configuration manually, click Advanced Setting.
•Enter the wireless Network Name: Enter the SSID of the access point
(SSID is case-sensitive).
•Operation Mode: Select Infrastructure.
•Authentication: Select an authentication type.
Open System: Authentication is not used, and encryption may or may
not be used, depending on the need for data security.
Shared Key: Authentication is used. A device that has a proper WEP key
can access the network.
WPA Personal or WPA2 Personal: Select this option to authenticate the
print server based on a WPA Pre-Shared Key. This uses a shared secret key
(generally called Pre Shared Key pass phrase), which is manually
configured on the access point and each of its clients.
•Encryption: Select the encryption (None, WEP64, WEP128, TKIP, AES,
TKIP AES).
•Network Key: Enter the encryption network key value.
•Confirm Network Key: Confirm the encryption network key value.
•WEP Key Index: If you are using WEP Encryption, select the appropriate
WEP Key Index.
The wireless network security window appears when the access point has
security settings.
The wireless network security window appears. The window may differ
according to its security mode: WEP or WPA.
•WEP
Select Open System or Shared Key for authentication and enter the
WEP security key. Click Next.
WEP (Wired Equivalent Privacy) is a security protocol preventing
unauthorized access to your wireless network. WEP encrypts the data
portion of each packet exchanged on a wireless network using a 64-bit
or 128-bit WEP encryption key.
•WPA
Enter the WPA shared key and click Next.
WPA authorizes and identifies users based on a secret key that changes
automatically at regular intervals. WPA also uses TKIP (Temporal Key
Integrity Protocol) and AES (Advanced Encryption Standard) for data
encryption.
Wireless network setup
113
2. Using a network-connected machine
9 The window shows the wireless network settings and checks if the
settings are correct. Click Next.
• For the DHCP method
If the IP address assignment method is DHCP, check if DHCP is shown
in the window. If it shows Static, click Change TCP/IP to change the
assignment method to DHCP.
• For the Static method
If the IP address assignment method is Static, check if Static is shown
in the window. If it shows DHCP, click Change TCP/IP to enter the IP
address and other network configuration values for the machine.
Before entering the IP address for the machine, you must know the
computer’s network configuration information. If the computer is
set to DHCP, you must contact the network administrator to get the
static IP address.
For example,
If the computer’s network information is as shown below,
- IP address: 169.254.133.42
- Subnet Mask: 255.255.0.0
Then, the machine’s network information should be as follows:
- IP address: 169.254.133.43
- Subnet Mask: 255.255.0.0 (Use the computer’s subnet mask.)
- Gateway: 169.254.133.1
10 When the window that tells you that the network cable connection is
confirmed appears, disconnect the network cable and click Next.
If the network cable is connected, it may have trouble finding the
machine when configuring the wireless network.
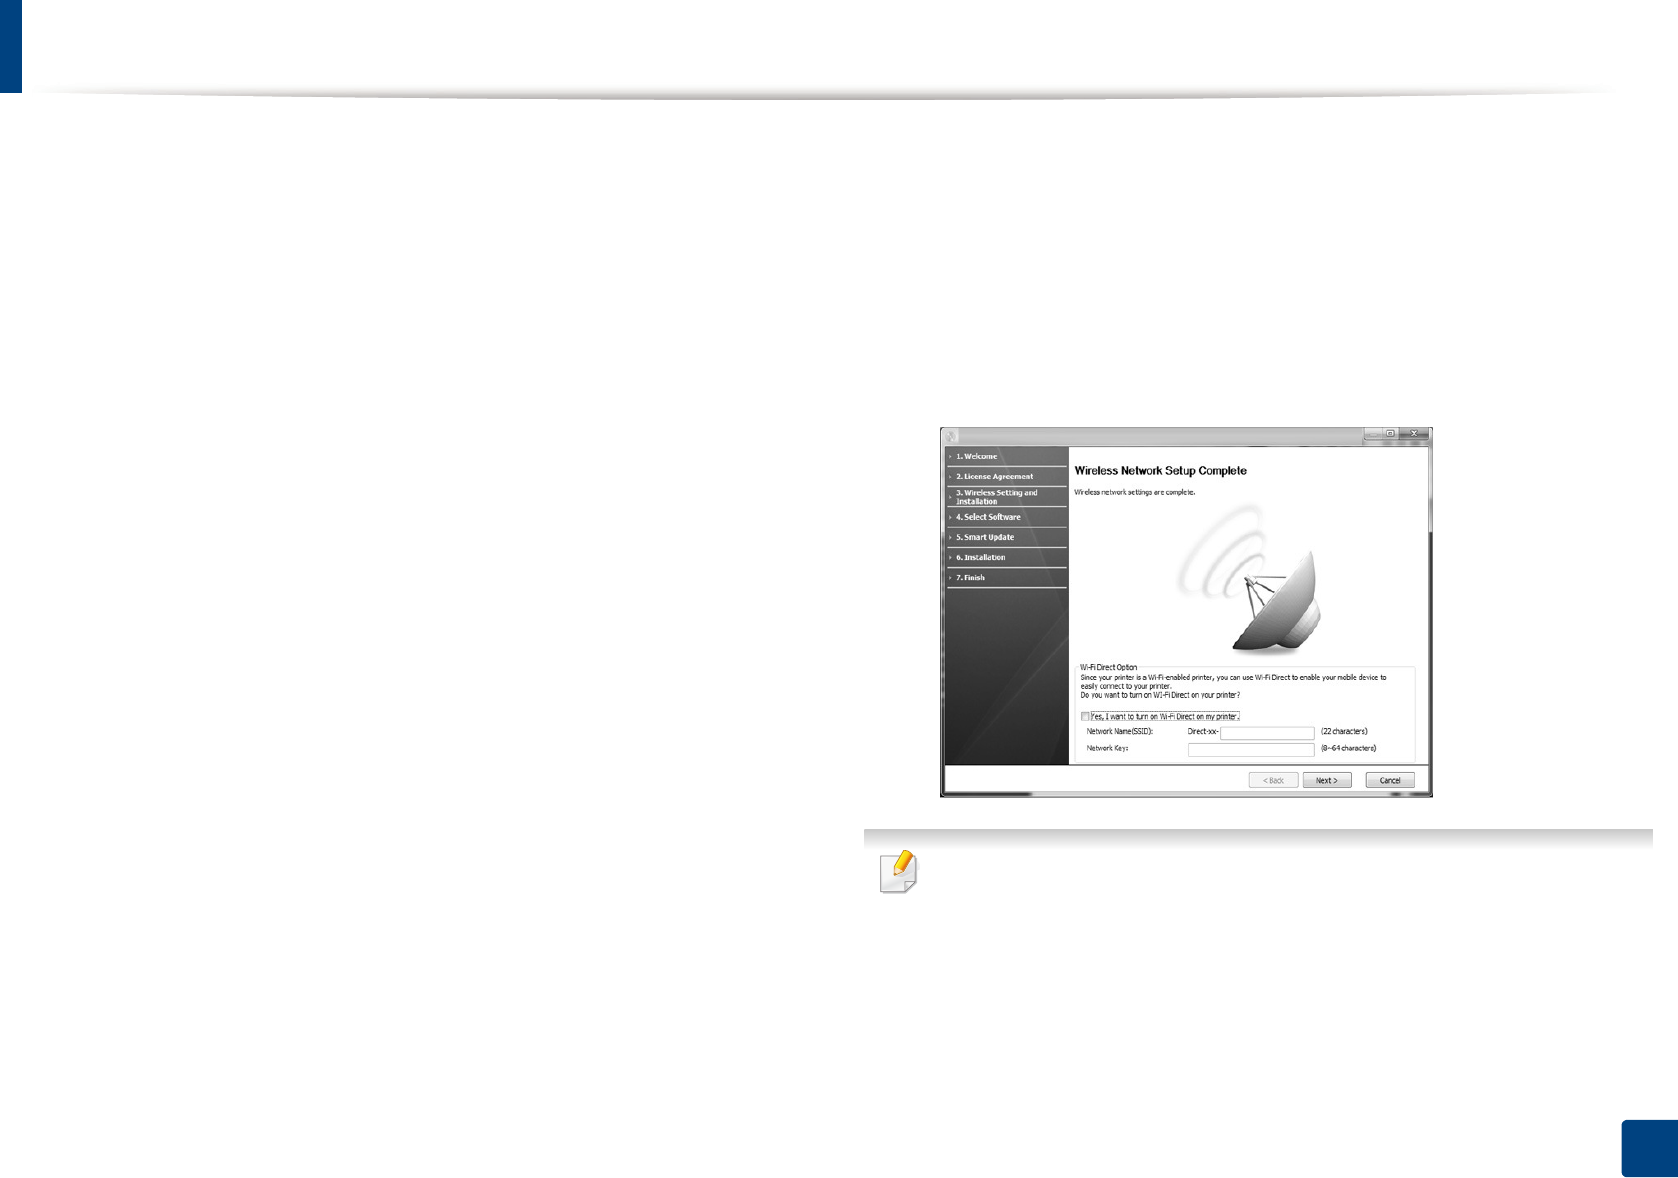
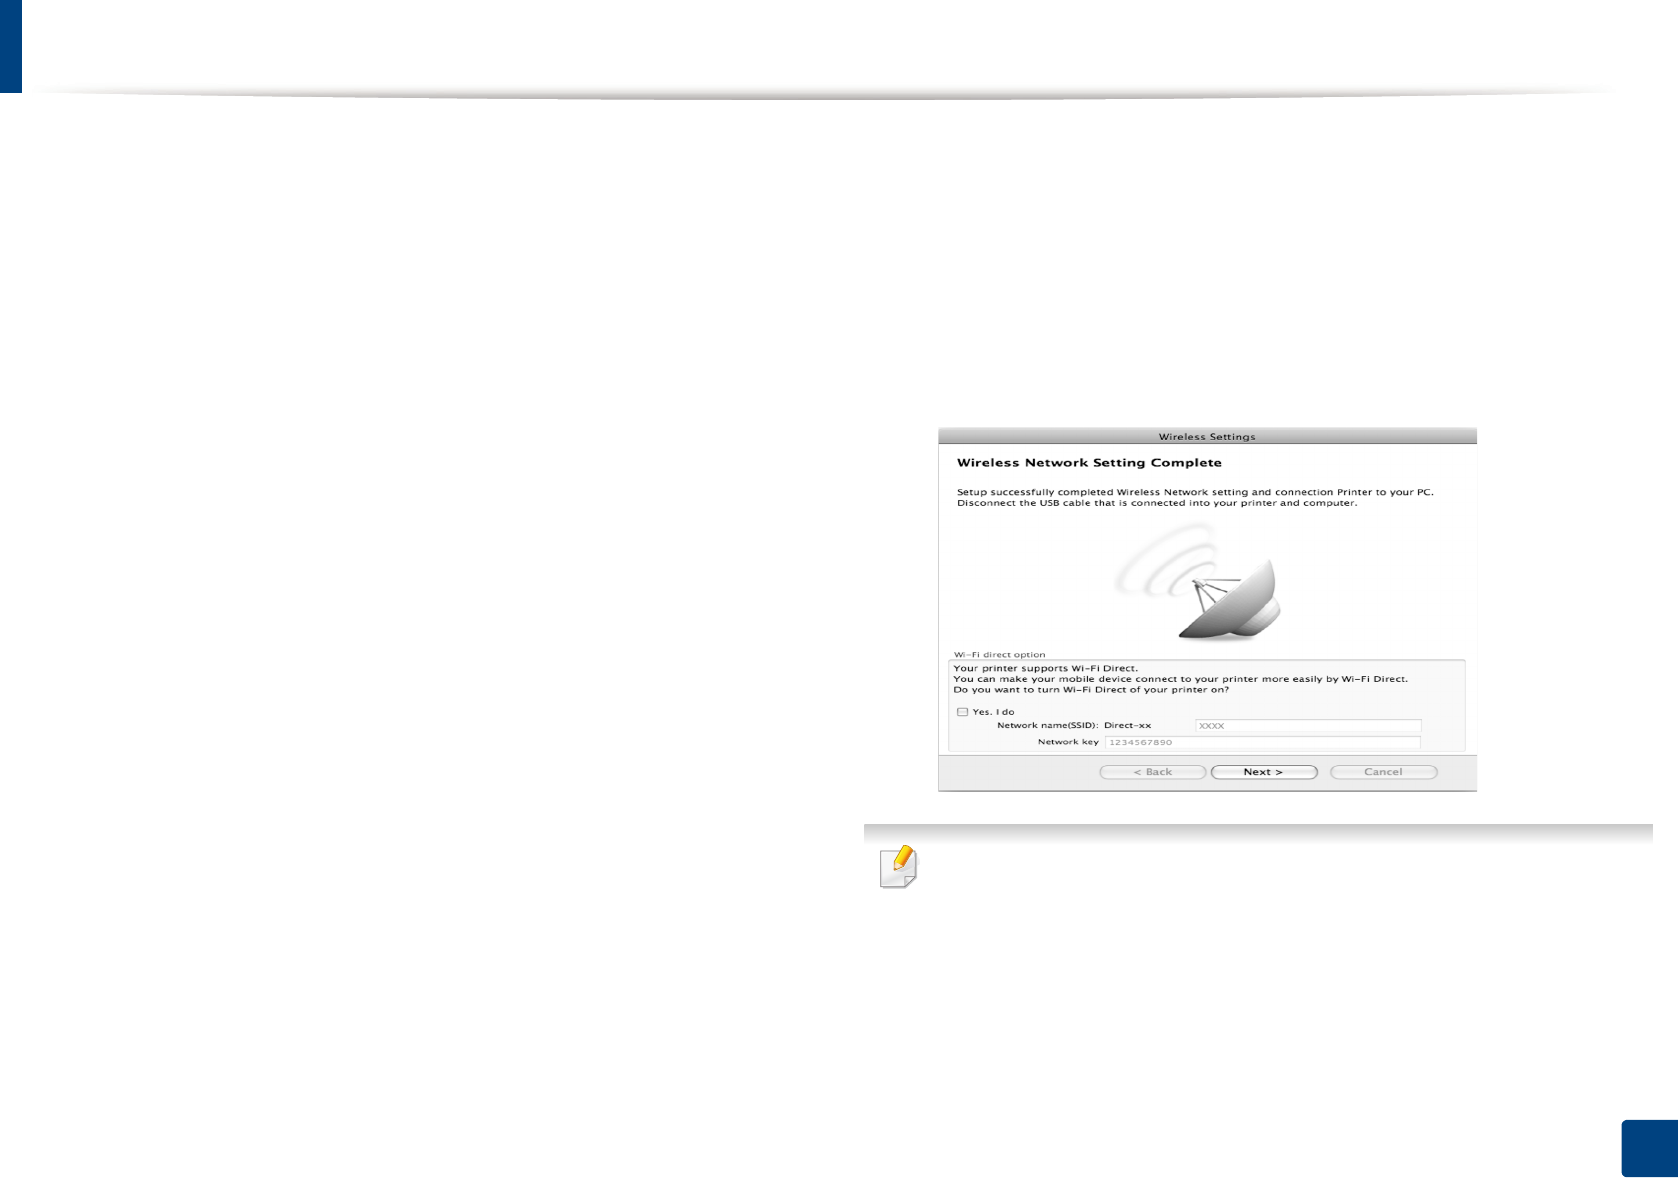
11 Wireless network setting is completed. To print from a Wi-Fi Direct
supported mobile device, set the Wi-Fi Direct Option (see "Setting up Wi-
Fi Direct" on page 44).
Wi-Fi Direct Option:
• Wi-Fi Direct option appears on the screen only if your printer supports
this feature.
• Can start to build Wi-Fi Direct by using Samsung Easy Printer Manager
(see "Setting up Wi-Fi Direct" on page 44).

Wireless network setup
114
2. Using a network-connected machine
•Network Name(SSID): The default Network Name is the model name
and the maximum length is 22 characters (not including "Direct-xx-").
•Network Key is the numeric string, and the size is 8 ~ 64 characters.
12 When the wireless network set up is completed, disconnect the USB
cable between the computer and machine. Click Next.
13 Click Next when the Confirm Printer Connection window appears.
14 Select the components to be installed. Click Next.
15 After selecting the components, you can also change the machine name,
set the machine to be shared on the network, set the machine as the
default machine, and change the port name of each machine. Click Next.
16 After installation is finished, a window asking you to print a test page
appears. If you want to print a test page, click Print a test page.
Otherwise, just click Next and go to step 18.
17 If the test page prints out correctly, click Yes.
If not, click No to reprint it.
18 If you want to register your machine with the Samusng web site and
receive useful information, click On-line Registration. If not, click
Finish.
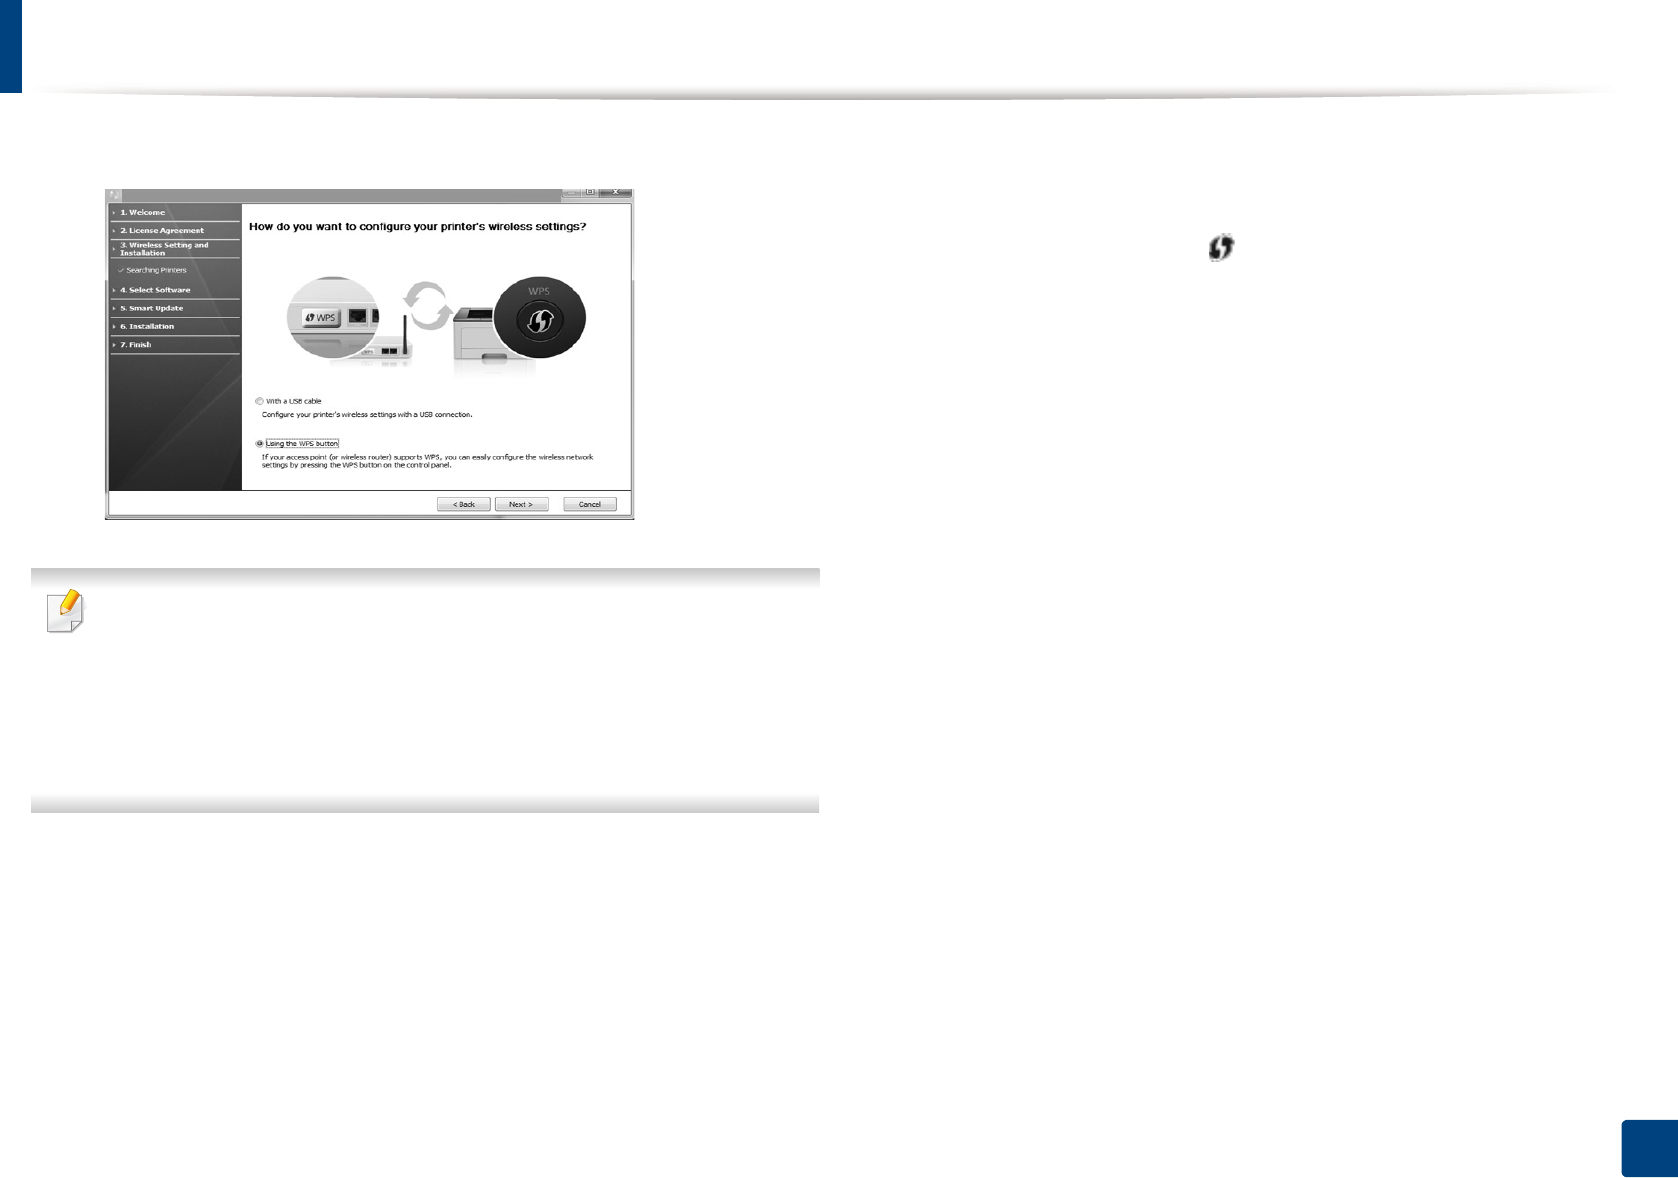
Access point via WPS button (without a USB cable
connection)
For models that have a WPS button, you can set the wireless network using the
WPS button (without a USB connection) and access point (or a router) WPS
button.
Items to prepare
• Access point (or wireless router)
• Network-connected computer
• Software CD that was provided with your machine
• The machine installed with a wireless network interface
Creating the infrastructure network
1Turn on your computer, access point, and machine.
2 Insert the supplied software CD into your CD-ROM drive.
3 Select the Wireless Setting and Installation option.
4 Read the License Agreement, and select I accept the terms of the
License Agreement. Then, click Next.
Wireless network setup
115
2. Using a network-connected machine
5 Select Using the WPS button and click Next.
• For models that support WPS button, the above window appears.
• If your machine is connected with a USB cable, the above window does
not appear. Disconnect the USB cable if you want to set up the wireless
network using the WPS button.
• If you want to set up the wireless network using the USB cable, refer to
"Access point via USB cable" on page 24.
6 The next window asks you to check if your access point (or wireless
router) supports WPS or not.
If the access point (or wireless router) has a WPS button, select Yes and
click Next.
7 Follow the instructions on the window to set up the wireless network.
• For models with a display screen, follow the steps below.
a Press and hold the (WPS) button on the control panel for
about 2-4 seconds.
The machine waits up to 2 minutes for the WPS button on the
access point (or a router) to be pressed.
b Press the WPS (PBC) button on the access point (or wireless
router).
The messages are displayed on the display screen in the order
below:
-Connecting: The machine is connecting to the access point
(or wireless router).
-Connected: When the machine is successfully connected to
the wireless network, the WPS LED light stays on.

Wireless network setup
116
2. Using a network-connected machine
-SSID Type: After completing the wireless network
connection process, the AP’s SSID information appears on
the display.
• For models without a display screen, follow the steps below.
a Press and hold the (WPS) button on the control panel for
about 2 - 4 seconds until the status LED blinks quickly.
The machine starts connecting to the wireless network. The LED
blinks slowly for up to two minutes until you press the PBC
button on the access point (or wireless router).
b Press the WPS (PBC) button on the access point (or wireless
router).
- The light blinks fast on the WPS LED while it is connecting to
the access point (or wireless router).
- When the machine is successfully connected to the wireless
network, the WPS LED light stays on.
8 The Wireless Network Setting Complete window appears. Click Next.
9 Click Next when the Confirm Printer Connection window appears.
10 Select the components to be installed. Click Next.
11 After selecting the components, you can also change the machine name,
set the machine to be shared on the network, set the machine as the
default machine, and change the port name of each machine. Click Next.
12 After the installation is finished, a window asking you to print a test page
appears. If you want to print a test page, click Print a test page.
Otherwise, just click Next and go to step 14.
13 If the test page prints out correctly, click Yes.
If not, click No to reprint it.
14 If you want to register your machine with the Samusng web site and
receive useful information, click On-line Registration. If not, click
Finish.
Ad hoc via USB cable
If you do not have an access point (AP), you may still connect the machine
wirelessly to your computer by setting up an ad-hoc wireless network by
following the simple steps below.
Items to prepare
• Network-connected computer
• Software CD that was provided with your machine
• A machine installed with a wireless network interface
• USB cable
Wireless network setup
117
2. Using a network-connected machine
Creating the ad hoc network in Windows
1Check whether the USB cable is connected to the machine.
2 Turn on your computer and the wireless network machine.
3 Insert the supplied software CD into your CD-ROM drive.
4 Select the Wireless Setting and Installation option.
5 Read the License Agreement, and select I accept the terms of the
License Agreement. Then, click Next.
6 The software searches the wireless network.
If the software has failed to search the network, check if the USB cable is
connected properly between the computer and machine, and follow the
instructions in the window.
7 After searching the wireless networks, a list of wireless networks your
machine has searched appears.
If you want to use the Samsung default ad hoc setting, select the last
wireless network on the list, Network Name(SSID) is Portthru and
Signal is Printer Self Network.
Then, click Next.
If you want to use other ad hoc settings, select another wireless network
from the list.
If you want to change the ad hoc settings, click the Advanced Setting
button.
•Enter the wireless Network Name: Enter the SSID name you want (SSID
is case-sensitive).
•Operation Mode: Select ad hoc.
•Channel: Select the channel. (Auto Setting or 2412 MHz to 2467 MHz).
•Authentication: Select an authentication type.
Open System: Authentication is not used, and encryption may or may
not be used, depending on the need for data security.
Shared Key: Authentication is used. A device that has a proper WEP key
can access the network.
•Encryption: Select the encryption (None, WEP64, WEP128).
•Network Key: Enter the encryption network key value.
•Confirm Network Key: Confirm the encryption network key value.
•WEP Key Index: If you are using WEP Encryption, select the appropriate
WEP Key Index.
The wireless network security window appears when the ad hoc network
has security enabled.
Select Open System or Shared Key for the authentication and click Next.
• WEP (Wired Equivalent Privacy) is a security protocol preventing
unauthorized access to your wireless network. WEP encrypts the data
portion of each packet exchanged on a wireless network using a 64-bit
or 128-bit WEP encryption key.
8 The window showing the wireless network setting appears. Check the
settings and click Next.
Wireless network setup
118
2. Using a network-connected machine
Before entering the IP address for the machine, you must know the
computer’s network configuration information. If the computer’s network
configuration is set to DHCP, the wireless network setting should also be
DHCP. Likewise, if the computer’s network configuration is set to Static, the
wireless network setting should also be Static.
If your computer is set to DHCP and you want to use the Static wireless
network setting, you must contact the network administrator to get the
static IP address.
•For the DHCP method
If the IP address assignment method is DHCP, check if DHCP is shown in
the Wireless Network Setting Confirm window. If it shows Static, click
Change TCP/IP to change the assignment method to Receive IP
address automatically (DHCP).
•For the Static method
If the IP address assignment method is Static, check if Static is shown in
the Wireless Network Setting Confirm window. If it shows DHCP, click
Change TCP/IP to enter the IP address and other network configuration
values for the machine.
For example,
If the computer’s network information is as shown follows:
- IP address: 169.254.133.42
- Subnet Mask: 255.255.0.0
Then, the machine’s network information should be as below:
- IP address: 169.254.133.43
- Subnet Mask: 255.255.0.0 (Use the computer’s subnet mask.)
- Gateway: 169.254.133.1
9 The Wireless Network Setting Complete window appears. Click Next.
10 When the wireless network settings are completed, disconnect the USB
cable between the computer and machine. Click Next.
If the Change PC Network Setting window appears, follow the steps in the
window.
Click Next if you are finished with the computer’s wireless network settings.
If you set the computer’s wireless network to DHCP, it will take several
minutes to receive the IP address.
11 Click Next when the Confirm Printer Connection window appears.
12 Select the components to be installed. Click Next.
13 After selecting the components, you can also change the machine name,
set the machine to be shared on the network, set the machine as the
default machine, and change the port name of each machine. Click Next.
14 After the installation is finished, a window asking you to print a test page
appears. If you want to print a test page, click Print a test page.
Otherwise, just click Next and go to step 16.
15 If the test page prints out correctly, click Yes.
If not, click No to reprint it.

Wireless network setup
119
2. Using a network-connected machine
16 If you want to register your machine with the Samusng web site and
receive useful information, click On-line Registration. If not, click
Finish.
17
Setup using Macintosh
Items to prepare
• Access point
• Network-connected computer
• Software CD that was provided with your machine
• A machine installed with a wireless network interface
• USB cable
Access point via USB cable
1Check whether the USB cable is connected to the machine.
2 Turn on your computer, access point, and machine.
3 Insert the supplied software CD into your CD-ROM drive.
4 Double-click the CD-ROM icon that appears on your Macintosh desktop.
5 Double-click the MAC_Installer folder > Installer OS X icon.
6 Click Continue.
7 Read the license agreement and click Continue.
8 Click Agree to agree to the license agreement.
9 When the message that warns that all applications will close on your
computer appears, click Continue.
10 Click Wireless Network Setting button on the User Options Pane.
11 The software searches the wireless network.
If the software has failed to search the network, check if the USB cable is
connected properly between the computer and machine, and follow the
instructions in the window.
Wireless network setup
120
2. Using a network-connected machine
• If wireless network setting has been set before, Wireless Network
Setting Information window appears.
If you want to reset the wireless settings, check the check box and click
Next.
• For models that support the WPS button (without a USB cable
connection), the window shown below will appear.
-With a USB Cable: Connect the USB cable and click Next, then go to
step 7.
-Using the WPS Button: See "Access point via WPS button (without a
USB cable connection)" on page 28.
12 Select the method to use from the wireless set up method window.
•Configure the wireless settings manually.: Go to step 13.
•Configure the wireless settings by pressing the WPS button on
the access point.: Connect to the wireless network by press the WPS
button on the access point (or a wireless router).
- Follow the instructions in the window. When you are done
setting the wireless network settings, go to step 16.
13 After searching, the window shows the wireless network devices. Select
the name (SSID) of the access point you are using and click Next.
When you set the wireless configuration manually, click Advanced Setting.
•Enter the wireless Network Name: Enter the SSID of the access point
(SSID is case-sensitive).
•Operation Mode: Select Infrastructure.

Wireless network setup
121
2. Using a network-connected machine
•Authentication: Select an authentication type.
Open System: Authentication is not used, and encryption may or may
not be used, depending on the need for data security.
Shared Key: Authentication is used. A device that has a proper WEP key
can access the network.
WPA Personal or WPA2 Personal: Select this option to authenticate the
print server based on the WPA Pre-Shared Key. This uses a shared secret
key (generally called Pre Shared Key pass phrase) that is manually
configured on the access point and each of its clients.
•Encryption: Select the encryption. (None, WEP64, WEP128, TKIP, AES,
TKIP, AES)
•Network Key: Enter the encryption network key value.
•Confirm Network Key: Confirm the encryption network key value.
•WEP Key Index: If you are using WEP Encryption, select the appropriate
WEP Key Index.
The wireless network security window appears when the access point has
security enabled.
The wireless network security window appears. The window may differ
according to its security mode: WEP or WPA.
•WEP
Select Open System or Shared Key for the authentication and enter the
WEP security key. Click Next.
WEP (Wired Equivalent Privacy) is a security protocol preventing
unauthorized access to your wireless network. WEP encrypts the data
portion of each packet exchanged on a wireless network using a 64-bit
or 128-bit WEP encryption key.
•WPA
Enter the WPA shared key and click Next.
WPA authorizes and identifies users based on a secret key that changes
automatically at regular intervals. WPA also uses TKIP (Temporal Key
Integrity Protocol) and AES (Advanced Encryption Standard) for data
encryption.
Wireless network setup
122
2. Using a network-connected machine
14 The window shows the wireless network settings and check if settings
are right. Click Next.
•For the DHCP method
If the IP address assignment method is DHCP, check if DHCP is shown
in the window. If it shows Static, click Change TCP/IP to change the
assignment method to DHCP.
•For the Static method
If the IP address assignment method is Static, check if Static is shown
in the window. If it shows DHCP, click Change TCP/IP to enter the IP
address and other network configuration values for the machine.
Before entering the IP address for the machine, you must know the
computer’s network configuration information. If the computer is
set to DHCP, you must contact the network administrator to get the
static IP address.
For example:
If the computer’s network information is shown as follows:
- IP address: 169.254.133.42
- Subnet Mask: 255.255.0.0
Then, the machine’s network information should be as shown
below:
- IP address: 169.254.133.43
- Subnet Mask: 255.255.0.0 (Use the computer’s subnet mask.)
- Gateway: 169.254.133.1
15 When the window that tells you that the network cable connection is
confirmed appears, disconnect the network cable and click Next.
If the network cable is connected, it may have trouble finding the
machine when configuring the wireless network.
16 Wireless network setting is completed. To print from a Wi-Fi Direct
supported mobile device, set the Wi-Fi Direct Option (see "Setting up Wi-
Fi Direct" on page 44).
Wi-Fi Direct Option:
• Wi-Fi Direct Option appears on the screen only if your printer supports
this feature.
• Can start to build Wi-Fi Direct by using Samsung Easy Printer Manager
(see "Setting up Wi-Fi Direct" on page 44).
Wireless network setup
123
2. Using a network-connected machine
•Network Name(SSID): The default Network Name is the model name
and the maximum length is 22 characters (not including "Direct-xx-").
•Network Key is the numeric string, and the size is 8 ~ 64 characters.
17 When the wireless network settings are completed, disconnect the USB
cable between the computer and machine.
18 Wireless network set up is completed. After the installation is finished,
click Quit.
After completing the wireless network connection, you need to install a
machine driver to print from an application (see "Installation for Macintosh"
on page 2).
Setting the access point using the WPS button
For models that have a WPS button, you can set the wireless network using the
WPS button (without a USB connection) and access point (or a router) WPS
button.
Items to prepare
• Access point (or wireless router)
• Network-connected computer
• Software CD that was provided with your machine
• A machine installed with a wireless network interface
Creating the infrastructure network
1Turn on your computer, access point, and machine.
2 Insert the supplied software CD into your CD-ROM drive.
3 Double-click the CD-ROM icon that appears on your Macintosh desktop.
4 Double-click the MAC_Installer folder > Installer OS X icon.
5 Click Continue.
6 Read the license agreement and click Continue.
7 Click Agree to agree to the license agreement.
8 When the message that warns that all applications will close on your
computer appears, click Continue.
9 Click the Wireless Network Setting button on the User Options Pane.
Wireless network setup
124
2. Using a network-connected machine
10 Select Using the WPS button and click Next.
• For models that support the WPS button, the above window appears.
• If your machine is connected with a USB cable, the above window does
not appear. Disconnect the USB cable if you want to set up the wireless
network using the WPS button.
• If you want to set up the wireless network using the USB cable, refer to
"Access point via USB cable" on page 33.
11 The next window asks you to check if your access point (or wireless
router) supports WPS or not.
If the access point (or wireless router) has a WPS button, select Yes and
click Next.
12 Follow the instructions in the window to set up the wireless network.
• For models with a display screen, follow the steps below:
a Press and hold the (WPS) button on the control panel for
about 2-4 seconds.
The machine waits up to 2 minutes for the WPS button on the
access point (or a router) to be pressed.
b Press the WPS (PBC) button on the access point (or wireless
router).
The messages are displayed on the display screen in the order
below:
-Connecting: The machine is connecting to the access point
(or wireless router).
-Connected: When the machine is successfully connected to
the wireless network, the WPS LED light stays on.
Wireless network setup
125
2. Using a network-connected machine
-SSID Type: After completing the wireless network
connection process, the AP’s SSID information appears on
the display.
• For models without a display screen, follow the steps below:
a Press and hold the (WPS) button on the control panel for
about 2 - 4 seconds until the status LED blinks quickly.
The machine starts connecting to the wireless network. The LED
blinks slowly for up to two minutes until you press the PBC
button on the access point (or wireless router).
b Press the WPS (PBC) button on the access point (or wireless
router).
- The light blinks fast on the WPS LED. The machine is
connecting to the access point (or wireless router).
- When the machine is successfully connected to the wireless
network, the WPS LED light stays on.
13 Wireless network set up is completed. After installation is finished, click
Quit.
After completing the wireless network connection, you need to install a
machine driver to print from an application (see "Setup using Macintosh" on
page 33).
Ad hoc via USB cable
If you do not have an access point (AP), you may still connect the machine
wirelessly to your computer by setting up an ad hoc wireless network by
following these simple directions.
Items to prepare
• Network-connected computer
• Software CD that was provided with your machine
• A machine installed with a wireless network interface
• USB cable
Creating the ad hoc network in Macintosh
1Check whether the USB cable is connected to the machine.
2 Turn on your computer and the wireless network machine.
3 Insert the supplied software CD into your CD-ROM drive.
4 Double-click the CD-ROM icon that appears on your Macintosh desktop.
5 Double-click the MAC_Installer folder > Installer OS X icon.
6 Click Continue.
7 Read the license agreement and click Continue.
Wireless network setup
126
2. Using a network-connected machine
8 Click Agree to agree to the license agreement.
9 When the message that warns that all applications will close on your
computer appears, click Continue.
10 Click Wireless Network Setting button on the User Options Pane.
11 The software searches for wireless network devices.
If the search has failed, check if the USB cable is connected between the
computer and machine properly, and follow the instructions in the window.
12 After searching the wireless networks, a list of wireless networks your
machine has searched appears.
If you want to use the Samsung default ad hoc setting, select the last
wireless network on the list, which Network Name(SSID) is Portthru
and Signal is Printer Self Network.
Then, click Next.
If you want to use other ad hoc settings, select another wireless network
from the list.
If you want to change ad hoc settings, click the Advanced Setting button.
•Enter the wireless Network Name: Enter the SSID name (SSID is case-
sensitive).
•Operation Mode: Select ad hoc.
•Channel: Select the channel (Auto Setting or 2412 MHz to 2467 MHz).
•Authentication: Select an authentication type.
Open System: Authentication is not used, and encryption may or may
not be used, depending on the need for data security.
Shared Key: Authentication is used. A device that has a proper WEP key
can access the network.
•Encryption: Select the encryption (None, WEP64, WEP128).
•Network Key: Enter the encryption network key value.
•Confirm Network Key: Confirm the encryption network key value.
•WEP Key Index: If you are using WEP Encryption, select the appropriate
WEP Key Index.
The wireless network security window appears when the ad hoc network
has security setting.
Select Open System or Shared Key for the authentication and click Next.
• WEP (Wired Equivalent Privacy) is a security protocol preventing
unauthorized access to your wireless network. WEP encrypts the data
portion of each packet exchanged on a wireless network using a 64-bit
or 128-bit WEP encryption key.
13 The window showing the wireless network settings appears. Check the
settings and click Next.
Wireless network setup
127
2. Using a network-connected machine
Before entering the IP address for the machine, you must know the
computer’s network configuration information. If the computer’s network
configuration is set to DHCP, the wireless network setting should also be
DHCP. Likewise, if the computer’s network configuration is set to Static, the
wireless network setting should also be Static.
If your computer is set to DHCP and you want to use Static wireless network
setting, you must contact the network administrator to get the static IP
address.
•For the DHCP method
If the IP address assignment method is DHCP, check if DHCP is shown in
the Wireless Network Setting Confirm window. If it shows Static, click
Change TCP/IP to change the assignment method to Receive IP
address automatically (DHCP).
•For the Static method
If the IP address assignment method is Static, check if Static is shown in
the Wireless Network Setting Confirm window. If it shows DHCP, click
Change TCP/IP to enter the IP address and other network configuration
values for the machine.
For example,
If the computer’s network information is shown as follows:
- IP address: 169.254.133.42
- Subnet Mask: 255.255.0.0
Then, the machine’s network information should be as shown below:
- IP address: 169.254.133.43
- Subnet Mask: 255.255.0.0 (Use the computer’s subnet mask.)
- Gateway: 169.254.133.1
14 When the window that tells you that the network cable connection is
confirmed appears, disconnect the network cable and click Next.
If the network cable is connected, it may have trouble finding the
machine when configuring the wireless network.
15 The wireless network connects according to the network configuration.
16 Wireless network set up is completed. After installation is finished, click
Quit.
After completing the wireless network connection, you need to install a
machine driver to print from an application (see "Installation for Macintosh"
on page 2).
18
Using a network cable
Machines that do not support the network interface will not be able to use
this feature (see "Rear view" on page 15).
Your machine is a network compatible machine. To enable your machine to
work with your network, you will need to perform some configuration
procedures.
Wireless network setup
128
2. Using a network-connected machine
• After completing the wireless network connection, you need to install a
machine driver to print from an application (see "Installing driver over
the network" on page 6).
• See your network administrator, or the person that set up your wireless
network, for information about your network configuration.
Items to prepare
• Access point
• Network-connected computer
• Software CD that was provided with your machine
• A machine installed with a wireless network interface
• Network cable
Printing a network configuration report
You can identify the network settings of your machine by printing a network
configuration report.
See "Printing a network configuration report" on page 3.
IP setting using SetIP Program (Windows)
This program is used to manually set the network IP address of your machine
using its MAC address to communicate with the machine. The MAC address is
the hardware serial number of the network interface and can be found in the
Network Configuration Report.
See "Setting IP address" on page 3.
Configuring the machine’s wireless network
Before starting you will need to know the network name (SSID) of your wireless
network and the network key if it is encrypted. This information was set when
the access point (or wireless router) was installed. If you do not know about your
wireless environment, please ask the person who set up your network.
To configure wireless parameters, you can use SyncThru™ Web Service.
Using SyncThru™ Web Service
Before starting wireless parameter configuration, check the cable connection
status.
Wireless network setup
129
2. Using a network-connected machine
1Check whether or not the network cable is connected to the machine. If
not, connect the machine with a standard network cable.
2 Start a web browser such as Internet Explorer, Safari, or Firefox and enter
your machine’s new IP address in the browser window.
For example,
3 Click Login on the upper right of the SyncThru™ Web Service website.
4 Type in the ID and Password then click Login.
•ID: admin
•Password: sec00000
5 When the SyncThru™ Web Service window opens, click Network
Settings.
6 Click Wireless > Wizard.
Wizard will help you setup the wireless network configuration. However, if
you want to set the wireless network directly, select Custom.
7 Select the one Network Name(SSID) in the list.
•SSID: SSID (Service Set Identifier) is a name that identifies a wireless
network, access points, and wireless devices attempting to connect
to a specific wireless network must use the same SSID. The SSID is
case sensitive.
•Operation Mode: Operation Mode refers to the type of wireless
connections (see "Wireless network name and network key" on page
17).
-Ad-hoc: Allows wireless devices to communicate directly with
each other in a peer-to-peer environment.
-Infrastructure: Allows wireless devices to communicate with
each other through an access point.
If your network’s Operation Mode is Infrastructure, select the SSID of the
access point. If the Operation Mode is Ad-hoc, select the machine’s SSID.
Note that “portthru” is the default SSID of your machine.
8 Click Next.
If the wireless security setting window appears, enter the registered
password (network key) and click Next.
9 The confirmation window appears, please check your wireless setup. If
the setup is right, click Apply.
Wireless network setup
130
2. Using a network-connected machine
Disconnect the network cable (standard or network). Your machine should
then start communicating wirelessly with the network. In case of Ad-hoc
mode, you can use a wireless LAN and wired LAN simultaneously.
19
Turning the Wi-Fi network on/off
If your machine has a display, you can also turn on/off the Wi-Fi from the
machine’s control panel using the Network menu.
1Check whether the network cable is connected to the machine. If not,
connect the machine with a standard network cable.
2 Start a web browser such as Internet Explorer, Safari, or Firefox and enter
your machine’s new IP address in the browser window.
For example,
3 Click Login on the upper right of the SyncThru™ Web Service website.
4 Type in the ID and Password, then click Login.
•ID: admin
•Password: sec00000
5 When the SyncThru™ Web Service window opens, click Network
Settings.
6 Click Wireless > Custom.
You can also turn the Wi-Fi network on/off.
20
Setting the Wi-Fi Direct for mobile printing
Wi-Fi Direct is an easy-to-setup peer-to-peer connecting between method for
your printer and a mobile device that provides a secure connection and better
throughput than ad hoc mode.
With Wi-Fi Direct, you can connect your printer to a Wi-Fi Direct network while
concurrently connecting to an access point, You can also use a wired network
and a Wi-Fi Direct network simultaneously so multiple users can access and print
documents both from Wi-Fi Direct and from a wired network.
• You cannot connect to the internet through the printer’s Wi-Fi Direct.
• The supported protocol list may differ from your model, Wi-Fi Direct
networks do NOT support IPv6, network filtering, IPSec, WINS, and SLP
services.
Setting up Wi-Fi Direct
You can enable Wi-Fi Direct feature by one of the following methods.
Wireless network setup
131
2. Using a network-connected machine
From the USB cable-connected computer(recommended)
• When setting from the supplied software CD, see the access point via USB
cable.
- Windows user, see "Access point via USB cable" on page 24.
- Macintosh user, see "Access point via USB cable" on page 33.
• After the driver installation is complete, Samsung Easy Printer Manager can
be set and changes in the Wi-Fi Direct can be made.
Samsung Easy Printer Manager is Available for Windowsand Macintosh OS
users only.
- From the Start menu, select Programs or All Programs > Samsung
Printers > Samsung Easy Printer Manager > Device Settings >
Network.
▪Wi-Fi Direct On/Off: Select On to enable.
▪Device Name: Enter the printer’s name for searching for your
printer on a wireless network. By default, the device name is the
model name.
▪IP Address: Enter the IP address of the printer. This IP address is
used only for the local network and not for the infrastructure wired
or wireless network. We recommend using the default local IP
address (the default local IP address of the printer for Wi-Fi Direct is
192.168.3.1 )
▪Group Owner: Activate this option to assign the printer the Wi-Fi
Direct group’s owner. The Group Owner acts similar to a wireless
access point. We recommend activating this option.
▪Network Key: If your printer is a Group Owner, a Network Key is
required for other mobile devices to connect to your printer. You
can configure a network key yourself, or can remember the given
Network Key that is randomly generated by default.
From the machine (Machines with a display screen)
• Select Network > Wireless > Wi-Fi Direct from the control panel.
•Enable Wi-Fi Direct.
From the network-connected computer
If your printer is using a network cable or a wireless access point, you can enable
and configure Wi-Fi Direct from SyncThru™ Web Service.
• Access SyncThru™ Web Service, select Settings > Network Settings >
Wireless > Wi-Fi Direct.
• Enable or disable Wi-Fi Direct and set other options.
•For Linux OS users,
- Print an IP network configuration report to check the output (see
"Printing a network configuration report" on page 3).
Wireless network setup
132
2. Using a network-connected machine
- Access SyncThru Web Service, select Settings > Network Settings
> Wireless > Wi-Fi Direct.
- Enable or disable Wi-Fi Direct.
Setting up the mobile device
• After setting up Wi-Fi Direct from the printer, refer to the user manual of the
mobile device you are using to set its Wi-Fi Direct.
• After setting up Wi-Fi Direct, you need to download the mobile printing
application (For example: Samsung Mobile printer) to print from your
smartphone.
• When you have found the printer you want to connect to from your
mobile device, select the printer and the printer's LED will blink. Press the
WPS button on the printer and it will be connected to your mobile
device.
• If your mobile device does not support WPS, you need to enter the
"Network Key" of a printer instead of pushing the WPS button.
21
Troubleshooting
Problems during setup or driver installation
Printers Not Found
• Your machine may not be turned on. Turn on your computer and the
machine.
• USB cable is not connected between your computer and machine. Connect
the machine to your computer using the USB cable.
• The machine does not support wireless networking. Check the machine's
user's guide included on the software CD supplied with your machine and
prepare a wireless network machine.
Connecting Failure - SSID Not Found
• The machine is unable to find the network name (SSID) you have selected or
entered. Check the network name (SSID) on your access point and try
connecting again.
• Your access point is not turned on. Turn on your access point.

Wireless network setup
133
2. Using a network-connected machine
Connecting Failure - Invalid Security
• Security is not configured correctly. Check the configured security on your
access point and machine.
Connecting Failure - General Connection Error
• Your computer is not receiving a signal from your machine. Check the USB
cable and your machine’s power.
Connecting Failure - Connected Wired Network
• Your machine is connected with a wired network cable. Remove the wired
network cable from your machine.
PC Connection Error
• The configured network address is unable to connect between your
computer and machine.
- For a DHCP network environment
The receives the IP address automatically (DHCP) when computer is
configured to DHCP.
- For a Static network environment
The machine uses the static address when the computer is configured
to static address.
For example,
If the computer’s network information is as shown below:
▪IP address: 169.254.133.42
▪Subnet Mask: 255.255.0.0
Then the machine’s network information should be as below:
▪IP address: 169.254.133.43
▪Subnet Mask: 255.255.0.0 (Use the computer’s subnet mask.)
▪Gateway: 169.254.133.1
Other problems
If problems occur while using the machine on a network, check the following:
For information on the access point (or wireless router), refer to its own
user's guide.
• Your computer, access point (or wireless router), or machine may not be
turned on.
• Check the wireless reception around the machine. If the router is far from
the machine or there is an obstacle, you might have difficulty receiving the
signal.
• Cycle the power for the access point (or wireless router), machine, and
computer. Sometimes cycling the power can recover network
communication.

Wireless network setup
134
2. Using a network-connected machine
• Check whether firewall software (V3 or Norton) is blocking the
communication.
If the computer and the machine are connected on the same network and it
cannot be found when searching, firewall software might be blocking the
communication. Refer to the user's guide for the software to turn it off and
try searching for the machine again.
• Check whether the machine's IP address is allocated correctly. You can
check the IP address by printing the network configuration report.
• Check whether the access point (or wireless router) has a configured
security (password). If it has a password, refer to the access point (or wireless
router) administrator.
• Check the machine's IP address. Reinstall the machine driver and change the
settings to connect to the machine on the network. Due to the
characteristics of DHCP, the allocated IP address could change if the
machine is not used for a long time or if the access point has been reset.
Register the product's MAC address when you confogure the DHCP server
on the access point (or wireless router). Then you can always use the IP
address that is set with the MAC address. You can identify the Mac address
of your machine by printing a network configuration report (see "Printing a
network configuration report" on page 3).
• Check the wireless environment. You might not be able to connect to the
network in the infrastructure environment where you need to type in a
user's information before connecting to the access point (or wireless router).
• This machine only supports IEEE 802.11 b/g/n and Wi-Fi. Other wireless
communication types (e.g., Bluetooth) are not supported.
• When using the ad hoc mode, in operating systems such as Windows Vista,
you might need to set the wireless connection setting every time you use
the wireless machine.
• You cannot use infrastructure mode and ad hoc mode at the same time for
Samsung wireless network machines.
• The machine is within the range of the wireless network.
• The machine is located away from obstacles that could block the wireless
signal.
Remove any large metal objects between the access point (or wireless
router) and the machine.
Make sure the machine and wireless access point (or wireless router) are not
separated by poles, walls, or support columns containing metal or concrete.
• The machine is located away from other electronic devices that may
interfere with the wireless signal.
Many devices can interfere with the wireless signal, including a microwave
oven and some Bluetooth devices.
• Whenever the configuration of your access point (or wireless router)
changes, you must do the product's wireless network setup again.
135
2. Using a network-connected machine
Samsung MobilePrint
22
What is Samsung MobilePrint?
Samsung MobilePrint is a free application that enables users to print photos,
documents, and web pages directly from your smartphone or tablet. Samsung
MobilePrint is not only compatible with your Android, Windows and iOS smart
phones but also with your iPod Touch and tablet PC. It connects your mobile
device to a network connected Samsung printer or to a wireless printer through
a Wi-Fi access point. Installing a new driver or configuring network settings isn’t
necessary – just simply install the Samsung MobilePrint application, and it will
automatically detect compatible Samsung printers. Besides printing photos,
web pages, and PDFs, scanning is also supported. If you have Samsung
multfunction printer, scan any document into a JPG, PDF, or PNG format for
quick and easy viewing on your mobile device.
23
Downloading Samsung MobilePrint
To download Samsung MobilePrint, go to the application store (Samsung
Apps, Android Market, App Store, Marketplace) on your mobile device, and just
search for “Samsung MobilePrint.” You can also visit iTunes for Apple devices
or Marketplace for Windows devices on your computer.
24
Supported Mobile OS
• Android OS 2.1 or higher
• iOS 4.0 or higher
• Windows Phone 7 or higher
25
Supported devices
•iOS 4.0 or higher: iPod Touch, iPhone, iPad
•Android 2.1 or higher: Galxy S, Galaxy S2, Galaxy Tab, and Android mobile
devices
•Windows Phone 7 or higher: Samsung Focus, Omnia7, and OminaW, and
Windows mobile devices
3. Special features
This chapter explains special printing features.
• Altitude adjustment 2
• Changing the default print settings 3
• Setting your machine as a default machine 4
• Using advanced print features 5
• Using Direct Printing Utility (Windows only) 13
• Using memory/hard drive features 14
• Macintosh printing 15
• Linux printing 17
• Unix printing 19
The procedures in this chapter are mainly based on Windows 7.
137
3. Special features
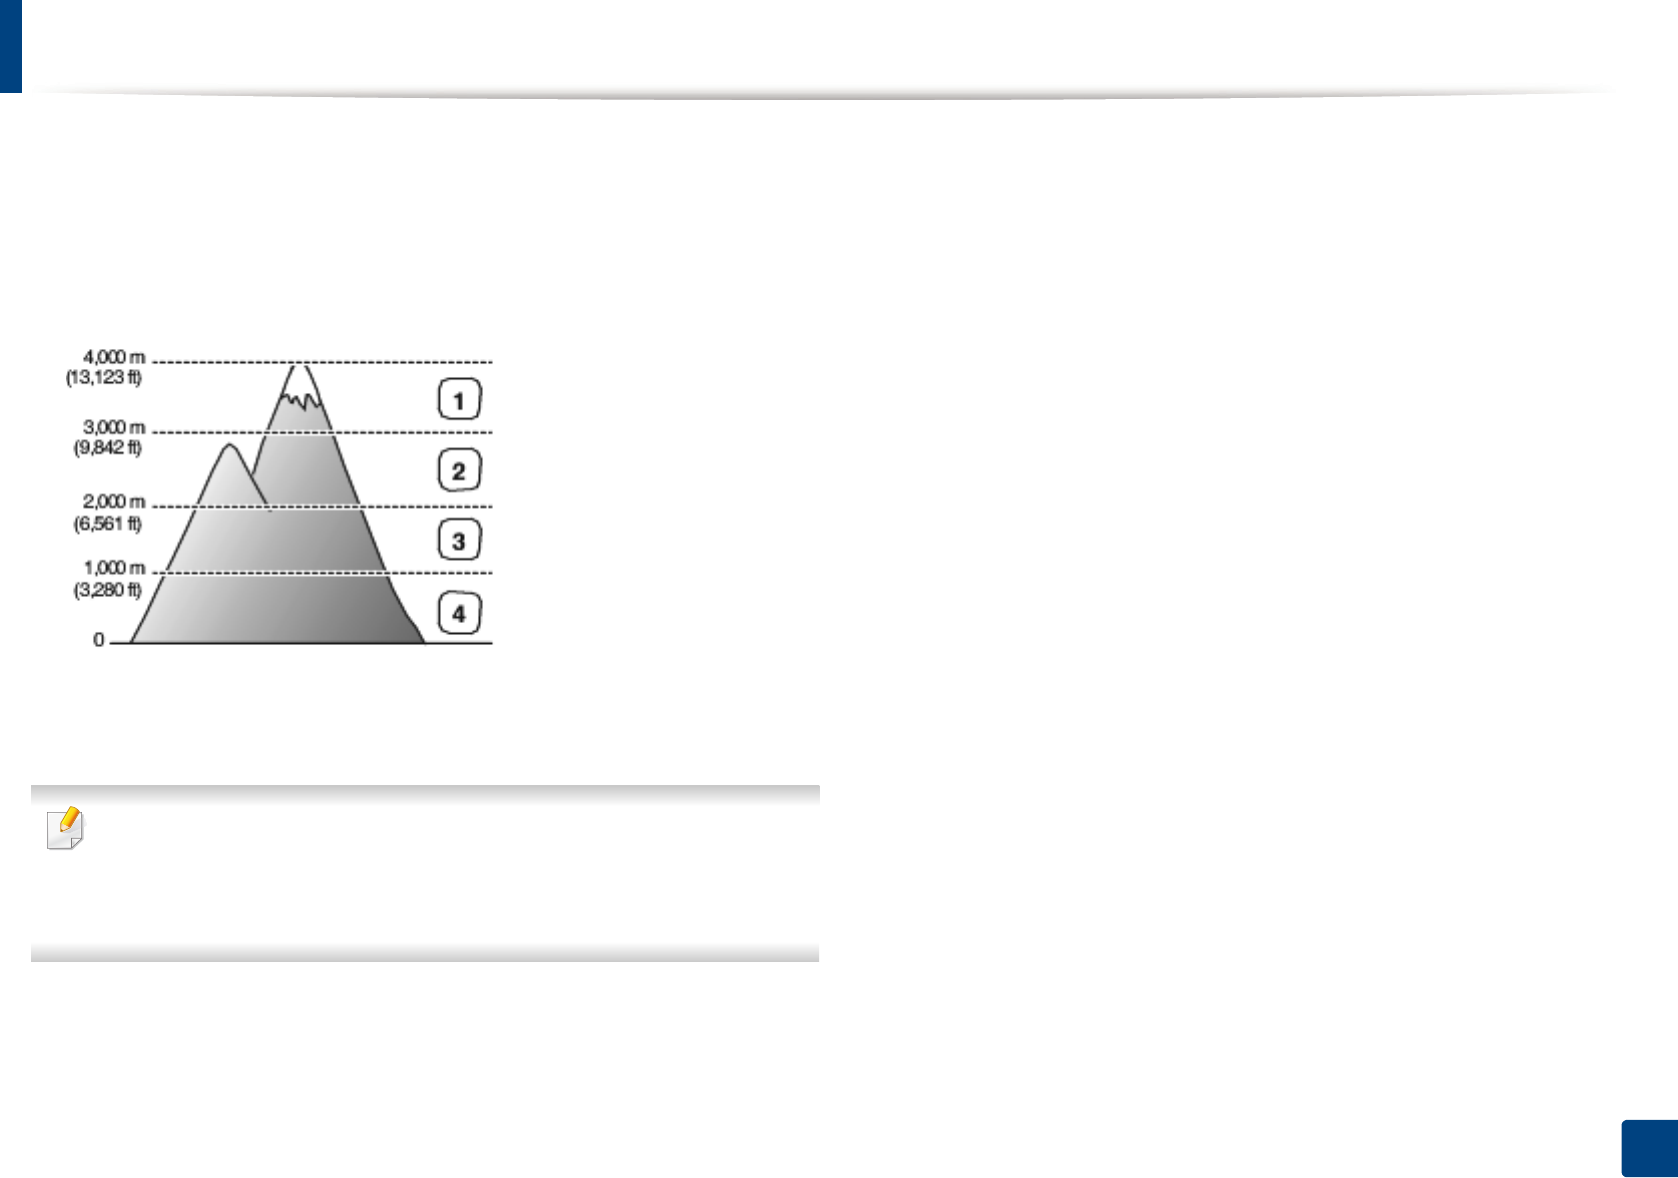
Altitude adjustment
Print quality is affected by atmospheric pressure, which is determined by the
height of the machine above sea level. The following information will guide you
on how to set your machine for the best print quality.
Before you set the altitude value, determine the altitude where you are.
• For Windows and Macintosh users, see "Device Settings" on page 9.
• For Linux users, see "Using Smart Panel" on page 13.
• If your machine is connected to the network, you can set the altitude via
SyncThru™ Web Service.
• You can also set the altitude in System Setup option on the machine’s
display.
1High 3
2High 2
3High 1
4Normal
138
3. Special features
Changing the default print settings
1Click the Windows Start menu.
2 For Windows Server 2000, select Settings > Printers.
• For Windows XP/Server 2003, select Printer and Faxes.
• For Windows Server 2008/Vista, select Control Panel > Hardware
and Sound > Printers.
• For Windows 7, select Control Panel > Devices and Printers.
• For Windows Server 2008 R2, select Control Panel > Hardware >
Devices and Printers.
3 Right-click on your machine.
4 For Windows XP/Server 2003/Server 2008/Vista, select Printing
Preferences.
For Windows 7 or Windows Server 2008 R2, from context menus, select
Printing preferences.
If Printing preferences has a ?, you can select other printer drivers
connected to the selected printer.
5 Change the settings on each tab.
6 Click OK.
If you want to change the settings for each print job, change it in Printing
Preferences.
139
3. Special features
Setting your machine as a default machine
1Click the Windows Start menu.
2 For Windows Server 2000, select Settings > Printers.
• For Windows XP/Server 2003, select Printer and Faxes.
• For Windows Server 2008/Vista, select Control Panel > Hardware
and Sound > Printers.
• For Windows 7, select Control Panel > Devices and Printers.
• For Windows Server 2008 R2, select Control Panel > Hardware >
Devices and Printers.
3 Select your machine.
4 Right-click your machine and select Set as Default Printer.
For Windows 7 or Windows Server 2008 R2, if Set as default printer has a ?,
you can select other printer drivers connected to the selected printer.
140
3. Special features
Using advanced print features
XPS printer driver: used to print XPS file format.
• See "Features by models" on page 4.
• The XPS printer driver can be installed only on Windows Vista OS or
higher.
• Install optional memory when an XPS job does not print because the
printer is out of memory.
• For models that provide XPS driver from the Samsung website,
www.samsung.com > find your product > Support or Downloads.
1
Printing to a file (PRN)
You will sometimes need to save the print data as a file.
1Check the Print to file box in the Print window.
2 Click Print.
3 Type in the destination path and the file name, and then click OK.
For example, c:\Temp\file name.
If you type in only the file name, the file is automatically saved in My
Documents, Documents and Settings, or Users. The saved folder may
differ, depending on your operating system or the application you are
using.

Using advanced print features
141
3. Special features
2
Understanding special printer features
You can use advanced printing features when using your machine.
To take advantage of the printer features provided by your printer driver, click Properties or Preferences in the application’s Print window to change the print
settings. The machine name, that appears in the printer properties window may differ depending on the machine in use.
• Some menus may not appear on the display depending on options or models. If so, it is not applicable to your machine.
• Select the Help or click the button from the window or press F1 on your keyboard and click on any option you want to know about (see "Using help" on page
14).
Item Description
Multiple Pages per Side Selects the number of pages to print on a single sheet of paper. To print more than one page per sheet, the pages will be reduced in size
and arranged in the order you specify. You can print up to 16 pages on one sheet.
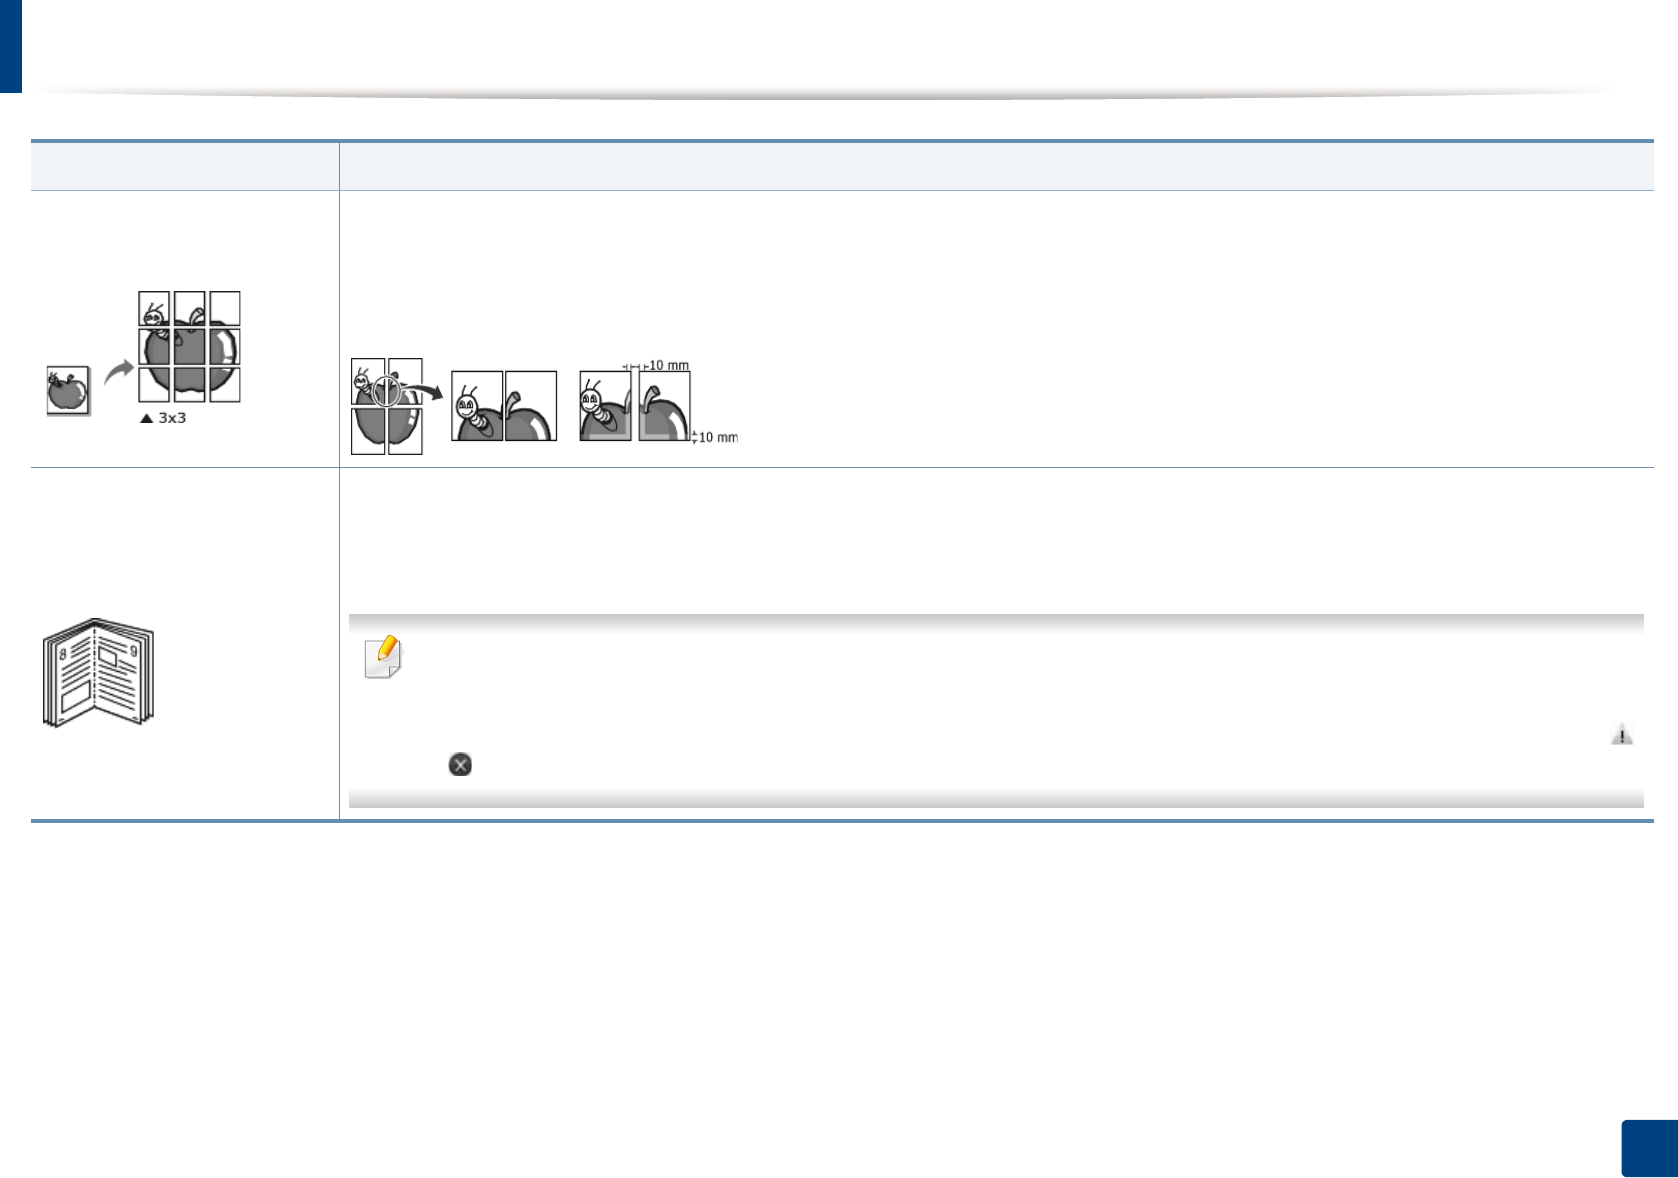
Using advanced print features
142
3. Special features
Poster Printing
Prints a single-page document onto 4 (Poster 2x2), 9 (Poster 3x3), or 16 (Poster 4x4) sheets of paper, for the purpose of pasting the sheets
together to form one poster-size document.
Select the Poster Overlap value. Specify Poster Overlap in millimeters or inches by selecting the radio button on the upper right of Basic
tab to make it easier to paste the sheets together.
Booklet Printing1
Prints your document on both sides of a sheet of paper and arranges the pages so that the paper can be folded in half after printing to
produce a booklet.
If you want to make a booklet, you need to print on Letter, Legal, A4, US Folio, or Oficio sized print media.
The Booklet Printing option is not available for all paper sizes. Select the available paper Size option under the Paper tab to see
what paper sizes are available.
If you select an unavailable paper size, this option can be automatically canceled. Select only available paper (paper without
or mark).
Item Description
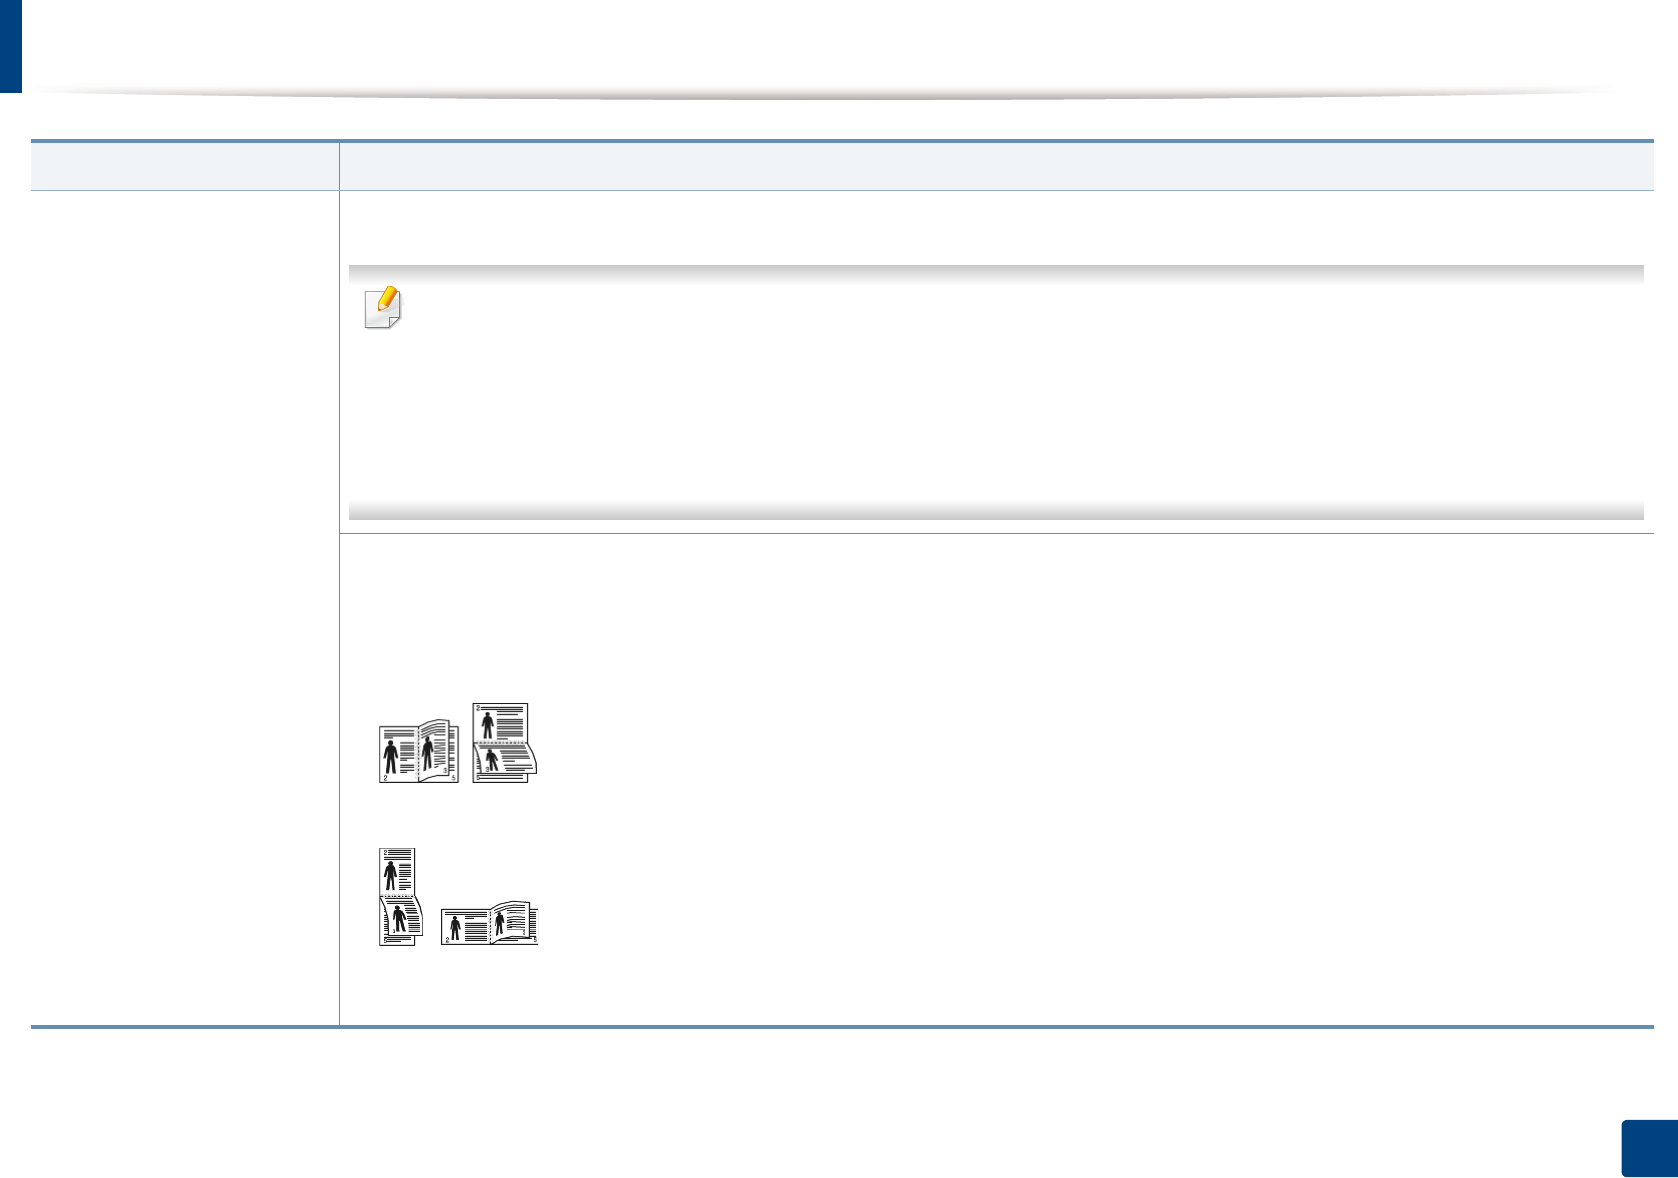
Using advanced print features
143
3. Special features
•Double-sided Printing1
•Double-sided Printing
(Manual)1
Print on both sides of a sheet of paper (duplex). Before printing, decide how you want your document oriented.
• You can use this feature with Letter, Legal, A4, US Folio or Oficio sized paper
• If your machine does not have a duplex unit, you should complete the printing job manually. The machine prints every other
page of the document first. After that, a message appears on your computer.
•Skip Blank Pages feature does not work when you select the duplex option.
• We recommend not to print on both sides of the special media, such as labels, envelopes, or thick paper. It may cause a paper
jam or damage the machine.
•Printer Default: If you select this option, this feature is determined by the settings you have selected on the control panel of the
machine. This option is available only when you use the PCL / XPS printer driver (see "Features by models" on page 4).
•None: Disables this feature.
•Long Edge: This option is the conventional layout used in bookbinding.
•Short Edge: This option is the conventional layout used in calendars.
•Reverse Double-Sided Printing: Check this option to reverse the print order when duplex printing. This option isnot available when
you use the Reverse Double-Sided Printing (Manual).
Item Description
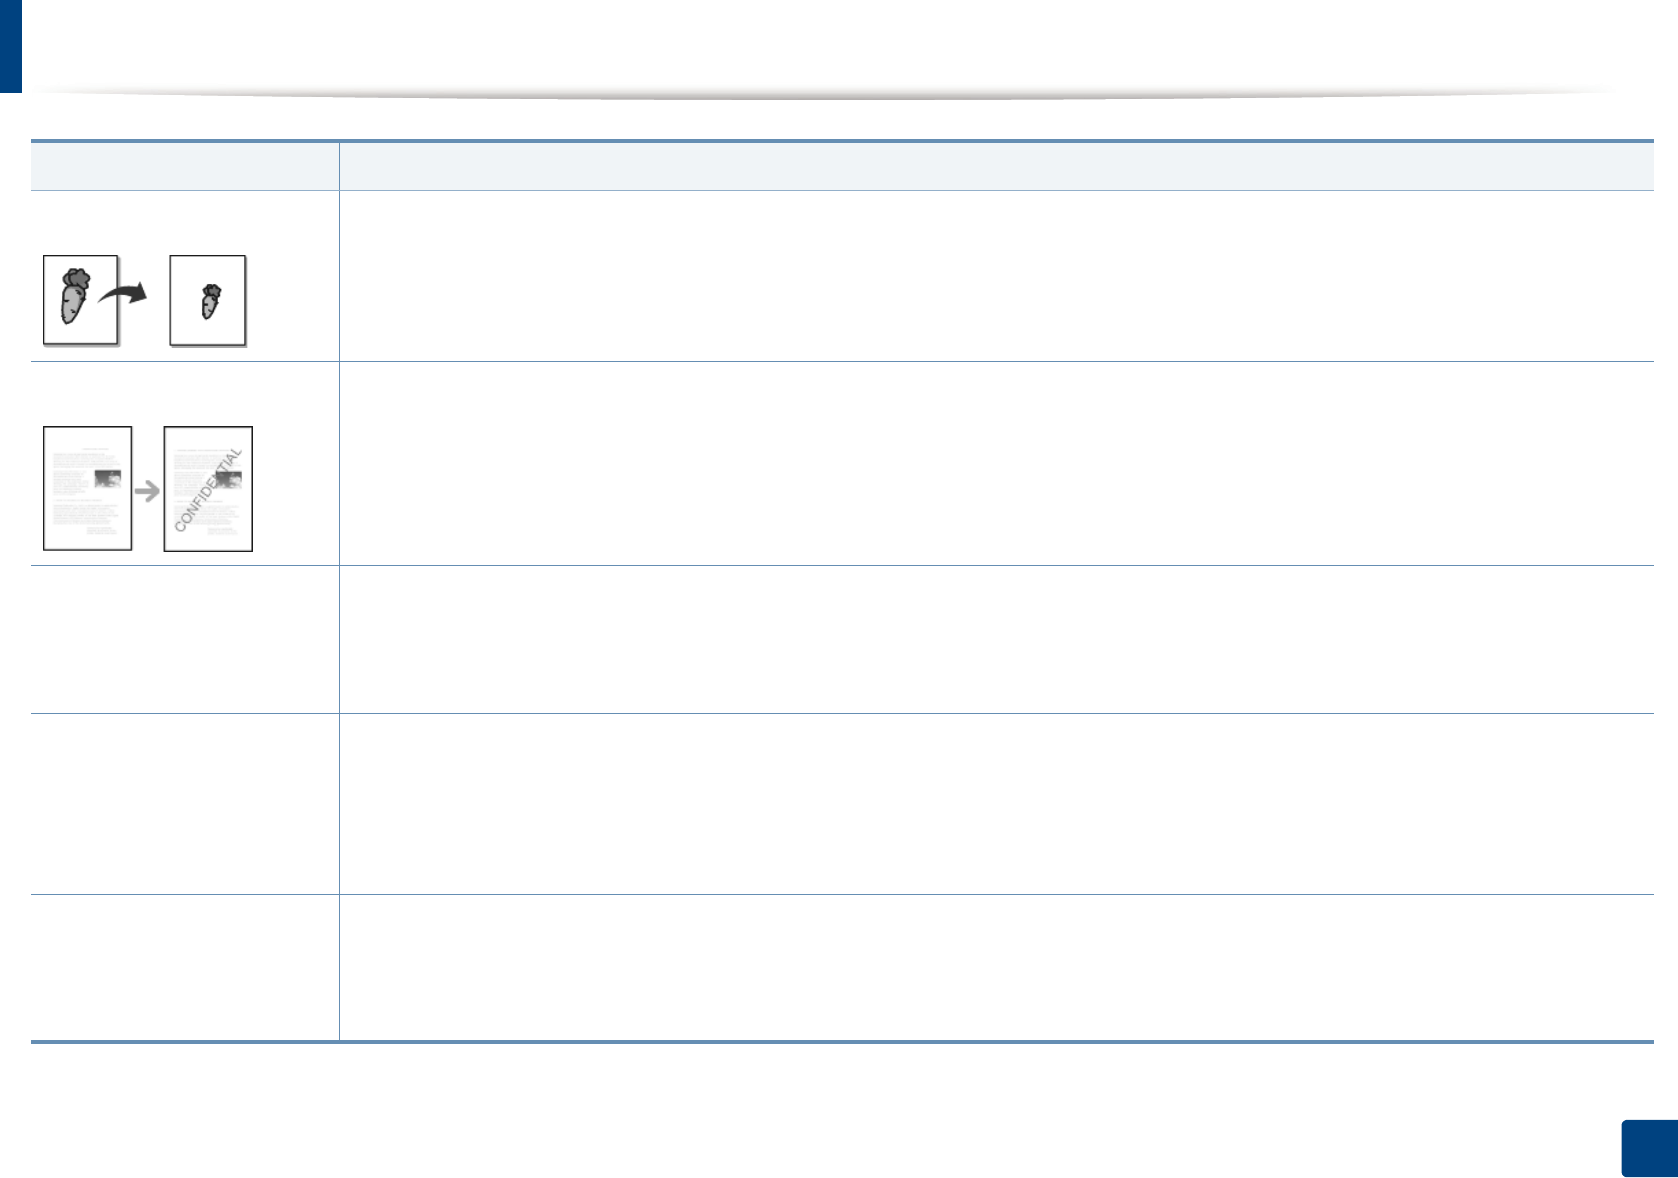
Using advanced print features
144
3. Special features
Paper Options Changes the size of a document to appear larger or smaller on the printed page by entering in a percentage by which to enlarge or
decrease the document.
Watermark The watermark option allows you to print text over an existing document. For example, you use it when you want to have large gray letters
reading “DRAFT” or “CONFIDENTIAL” printed diagonally across the first page or all pages of a document.
Watermark
(Creating a watermark)
a To change the print settings from your software application, access Printing Preferences.
b Click the Advanced tab, select Edit from the Watermark drop-down list. The Edit Watermarks window appears.
c Enter a text message in the Watermark Message box.
You can enter up to 256 characters. The message displays in the preview window.
Watermark
(Editing a watermark)
a To change the print settings from your software application, access Printing Preferences.
b Click the Advanced tab, select Edit from the Watermark drop-down list. The Edit Watermarks window appears.
c Select the watermark you want to edit from the Current Watermarks list and change the watermark message and options.
d Click Update to save the changes.
e Click OK or Print until you exit the Print window.
Watermark
(Deleting a watermark)
a To change the print settings from your software application, access Printing Preferences.
b Click the Advanced tab, select Edit from the Watermark drop-down list. The Edit Watermarks window appears.
c Select the watermark you want to delete from the Current Watermarks list and click Delete.
d Click OK or Print until you exit the Print window.
Item Description
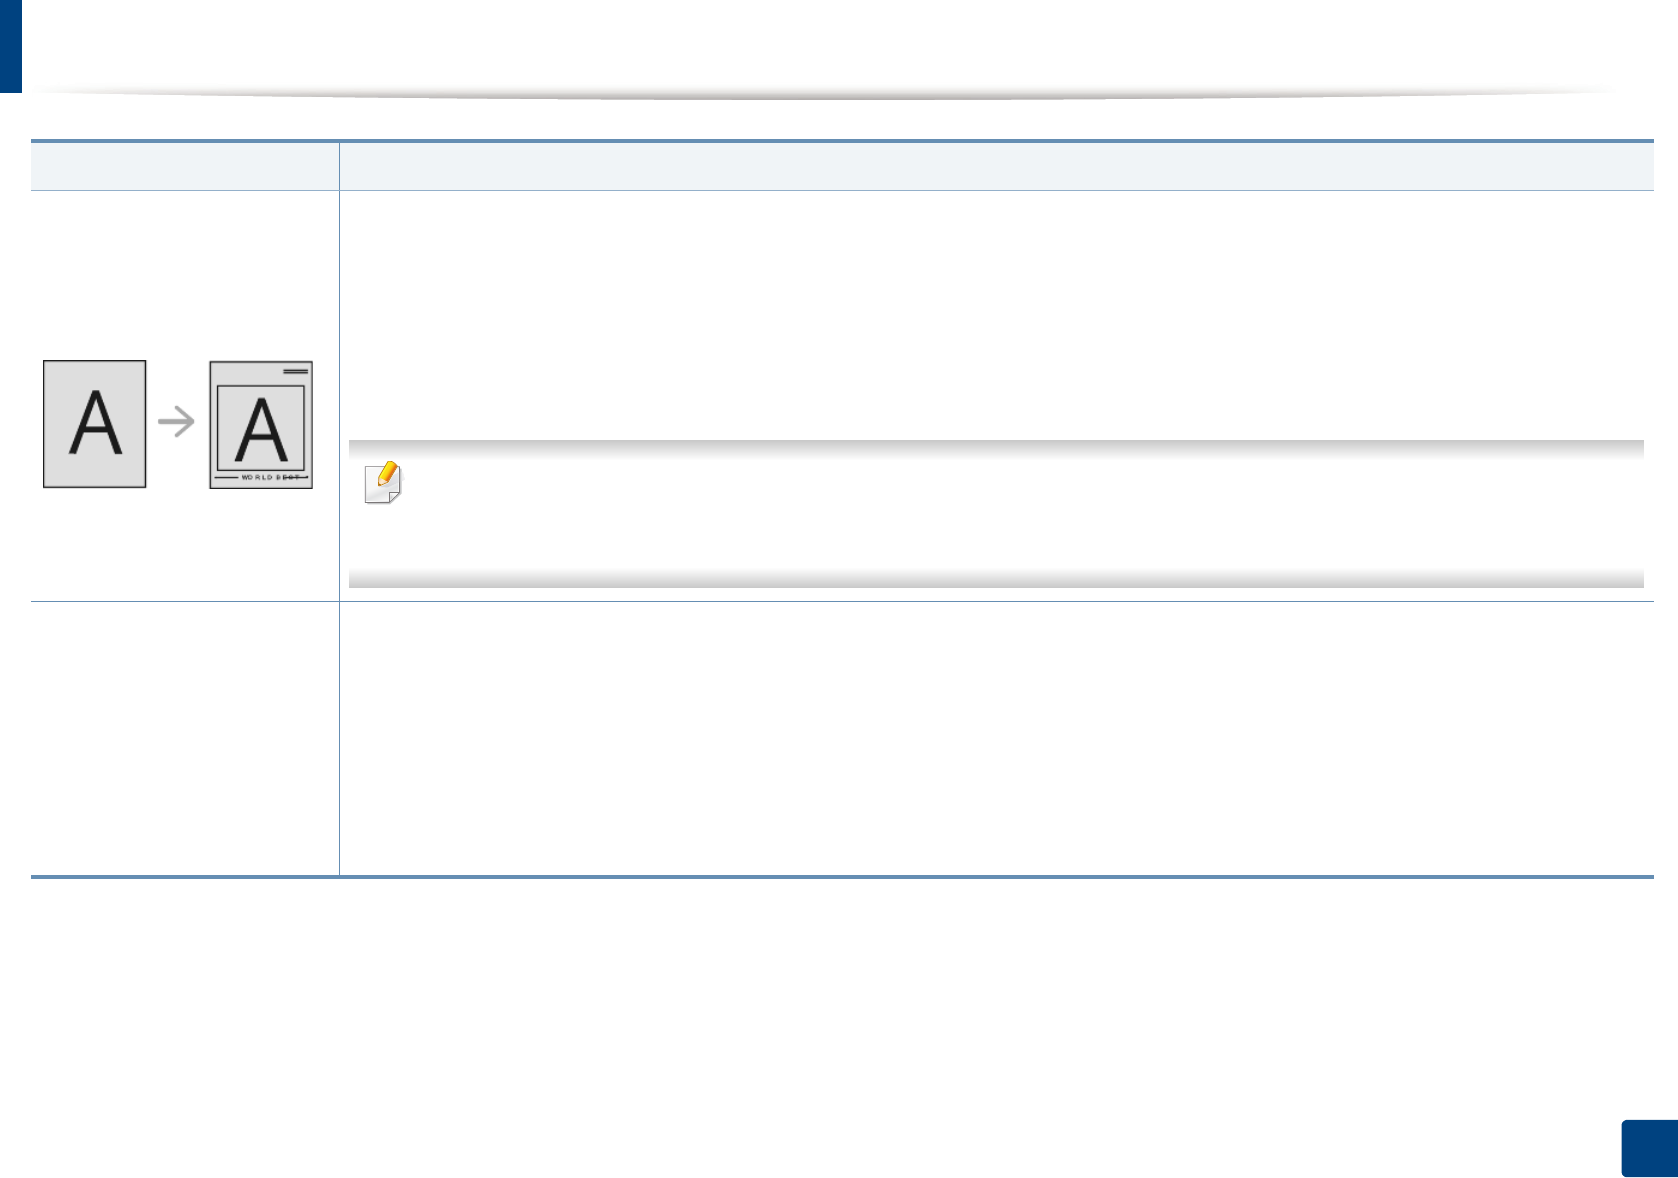
Using advanced print features
145
3. Special features
Overlay1
This option is available only when you use the PCL/SPL printer driver (see "Software" on page 4).
An overlay is text and/or images stored in the computer hard disk drive (HDD) as a special file format that can be printed on any document.
Overlays are often used to take the place of letterhead paper. Rather than using preprinted letterhead, you can create an overlay
containing exactly the same information that is currently on your letterhead. To print a letter with your company’s letterhead, you do not
need to load preprinted letterhead paper in the machine: just print the letterhead overlay on your document.
To use a page overlay, you must create a new page overlay containing your logo or image.
• The overlay document size must be the same as the document you print with the overlay. Do not create an overlay with a
watermark.
• The resolution of the overlay document must be the same as that of the document you will print with the overlay.
Overlay
(Creating a new page
overlay)
a To save the document as an overlay, access Printing Preferences.
b Click the Advanced tab, and select Edit from the Text drop-down list. Edit Overlay window appears.
c In the Edit Overlay window, click Create.
d In the Save As window, type a name up to eight characters in the File name box. Select the destination path, if necessary (The default
is C:\Formover).
e Click Save. The name appears on the Overlay List.
f Click OK or Print until you exit the Print window.
The file is not printed. Instead, it is stored on your computer hard disk drive.
Item Description
Using advanced print features
146
3. Special features
Overlay
(Using a page overlay)
a Click the Advanced tab.
b Select the desired overlay from the Text drop-down list.
c If the overlay file you want does not appear in the Text drop-down list, select Edit... from the list and click Load. Select the overlay file
you want to use.
If you have stored the overlay file you want to use in an external source, you can also load the file when you access the Open window.
After you select the file, click Open. The file appears in the Overlay List box and is available for printing. Select the overlay from the
Overlay List box.
d If necessary, check Confirm Page Overlay When Printing box. If this box is checked, a message window appears each time you submit
a document for printing, asking you to confirm printing an overlay on your document.
If this box is not checked and an overlay has been selected, the overlay automatically prints with your document.
e Click OK or Print until you exit the Print window.
Overlay
(Deleting a page overlay)
a In the Printing Preferences window, click the Advanced tab.
b Select Edit in the Text drop down list.
c Select the overlay you want to delete from the Overlay List box.
d Click Delete.
e When a confirming message window appears, click Yes.
f Click OK or Print until you exit the Print window. You can delete page overlays that you no longer use.
Item Description
Using advanced print features
147
3. Special features
Print Mode
• This feature is available only if you have installed the optional memory or mass storage device (HDD).
• Some menus may not appear on the display depending on options or models. If so, it is not applicable to your machine.
•Print Mode: The default Print Mode is Normal, which is for printing without saving the printing file in the memory.
-Normal: This mode prints without storing your document in the optional memory.
-Proof: This mode is useful when you print more than one copy. You can print one copy first to check, then print the rest of the copies
later.
-Confidential: This mode is used for printing confidential documents. You need to enter a password to print.
-Store: Select this setting to save a document in the hard disk without printing.
-Store and Print: This mode is used when printing and storing document at the same time.
-Spool: This option can be useful when handling large amounts of data. If you select this setting, the printer spools the document
into the hard disk and then prints it from the hard disk queue, decreasing the computer’s work load.
-Print Schedule: Select this setting to print the document at a specified time.
•User ID: This option is used when you need to find a saved file using the control panel.
•Job Name: This option is used when you need to find a saved file using the control panel.
1. This option is not available when you use XPS driver.
Item Description
148
3. Special features
Using Direct Printing Utility (Windows only)
3
What is Direct Printing Utility?
Direct Printing Utility is a program that sends PDF files directly to your machine
to print without having to opening the file.
To install this program, select Advanced Installation > Custom Installation
and put a check mark in this program when you install the printer driver.
• Mass storage device (HDD) should be installed on yourmachine, to print
files using this program.
• You cannot print PDF files that are restricted. Deactivate the printing
restriction feature and retry printing.
• You cannot print PDF files that are restricted by a password. Deactivate
the password feature, and retry printing.
• Whether or not a PDF file can be printed using the Direct Printing Utility
program depends on how the PDF file was created.?
• The Direct Printing Utility program supports PDF version 1.7 and below.
For higher versions, you must open the file to print it.
4
Printing
There are several ways you can print using the Direct Printing Utility.
1From the Start menu select Programs or All Programs > Samsung
Printers > Direct Printing Utility > Direct Printing Utility.
The Direct Printing Utility window appears.
2 Select your machine from the Select Printer drop-down list and click
Browse.
3 Select the file you wish to print and click Open.
The file is added in the Select Files section.
4 Customize the machine settings for your needs.
5 Click Print. The selected PDF file is sent to the machine.
5
Using the right-click menu
1Right-click on the PDF file to print and select Direct Printing.
The Direct Printing Utility window appears with the PDF file is added.
2 Select the machine to use.
3 Customize the machine settings.
4 Click Print. The selected PDF file is sent to the machine.
149
3. Special features
Using memory/hard drive features
Some menus may not appear on the display depending on options or
models. If so, it is not applicable to your machine.
6
From the printer driver
After installing the optional memory, you can use advanced printing features,
such as proofing a job and specifying of printing a private job in the Print
window. Select Properties or Preference, and configure the printing mode.
7
From the control panel
If your machine has optional memory or an optional hard drive, you can use
these features from the Job Management menu.
•Active Job: All of the print jobs waiting to be printed are listed in the active
job queue in the order you sent them to the printer. You can delete a job
from the queue before printing, or promote a job to print sooner.
•File Policy: You can choose the file policy for generating file name before
you proceed with the job through optional memory. If the optional memory
already has the same name when you entered a new file name, you can
rename or overwrite it.
•Stored Job: You can print or delete a stored job.
•Held Job Timeout: The machine can automatically delete a stored job after
a certain period of time. You can set the time the machine will wait before
deleting the stored job.
•Image Overwrite: Image Overwrite is a security measure for customers who
are concerned about unauthorized access and duplication of classified or
private document.
After installing the hard drive, you can also print the predefined document
templates from the Form Menu.
150
3. Special features
Macintosh printing
Some features may not be available depending on models or options. It
means that the features are not supported.
8
Printing a document
When you print with a Macintosh, you need to check the printer driver settings
in each application you use. Follow the steps below to print from a Macintosh:
1Open the document to print.
2 Open the File menu and click Page Setup (Document Setup in some
applications).
3 Choose your paper size, orientation, scaling, other options, and make
sure that your machine is selected. Click OK.
4 Open the File menu and click Print.
5 Choose the number of copies and indicate which pages to print.
6 Click Print.
9
Changing printer settings
You can use advanced printing features when using your machine.
Open an application and select Print from the File menu. The machine name,
which appears in the printer properties window, may differ depending on the
machine in use. Except for the name, the composition of the printer properties
window is similar to the following.
10
Printing multiple pages on one sheet
You can print more than one page on a single sheet of paper. This feature
provides a cost-effective way to print draft copies.
1Open an application, and select Print from the File menu.
2 Select Layout from the drop-down list under Orientation. In the Pages
per Sheet drop-down list, select the number of pages you want to print
on one sheet of paper.
3 Select the other options to use.
4 Click Print.
The machine prints the selected number of pages to print on one sheet
of paper.

Macintosh printing
151
3. Special features
11
Printing on both sides of the paper
Some features may not be available depending on models or options. It
means that the features are not supported.
Before printing in the duplex mode, decide on which edge you will be binding
your finished document. The binding options are, as follows:
•Long-Edge Binding: This option is the conventional layout used in book
binding.
•Short-Edge Binding: This option is the type often used with calendars.
1From your Macintosh application, select Print from the File menu.
2 Select Layout from the drop-down list under Orientation.
3 Select a binding orientation from the Two-Sided option.
4 Select the other options to use.
5 Click Print and the machine prints on both sides of the paper.
If you print more than 2 copies, the first copy and the second copy might
print on the same sheet of paper. Avoid printing on both sides of paper
when you are printing more than 1 copy.
12
Using help
Click the question mark on the bottom-left corner of the window and click on
the topic you want to know about. A pop-up window appears with information
about that option's feature, which is provided from the driver.
152
3. Special features
Linux printing
Some features may not be available depending on models or options. It
means that the features are not supported.
13
Printing from applications
There are a lot of Linux applications that allow you to print using Common UNIX
Printing System (CUPS). You can print on your machine from any such
application.
1Open an application, and select Print from the File menu
2 Select Print directly using lpr.
3 In the LPR GUI window, select the model name of your machine from the
printer list and click Properties.
4 Change the print job properties using the following four tabs displayed
at the top of the window.
•General: Changes the paper size, the paper type, and the
orientation of the documents. It enables the duplex feature, adds
start and end banners, and changes the number of pages per sheet.
Automatic/manual duplex printing may not be available depending on
models. You can alternatively use the lpr printing system or other
applications for odd-even printing.
•Text: Specifies the page margins and set the text options, such as
spacing or columns.
•Graphics: Sets image options that are used when printing image
files, such as color options, image size, or image position.
•Advanced: Sets the print resolution, paper source, and destination.
5 Click Apply to apply the changes and close the Properties window.
6 Click OK in the LPR GUI window to start printing.
7 The Printing window appears, allowing you to monitor the status of your
print job.
To abort the current job, click Cancel.

Linux printing
153
3. Special features
14
Printing files
You can print many different types of files on your machine using the standard
CUPS, directly from the command line interface. The CUPS lpr utility allows you
to do that, but the driver’s package replaces the standard lpr tool by a much
more user-friendly LPR GUI program.
To print any document file:
1Enter lpr <file_name> from the Linux shell command line and press
Enter. The LPR GUI window appears.
When you type only lpr and press Enter, the Select file(s) to print
window appears first. Just select any files you want to print and click
Open.
2 In the LPR GUI window, select your machine from the list, and change
the print job properties.
3 Click OK to start printing.
15
Configuring Printer Properties
Using the Printer Properties window provided by the Printers configuration,
you can change the various properties for your machine as a printer.
1Open the Unified Driver Configurator.
If necessary, switch to Printers configuration.
2 Select your machine on the available printers list and click Properties.
3 The Printer Properties window appears.
The following five tabs display at the top of the window:
•General: Allows you to change the printer location and name. The
name entered in this tab displays on the printer list in Printers
configuration.
•Connection: Allows you to view or select another port. If you change
the machine port from USB to parallel or vice versa while in use, you
must re-configure the machine port in this tab.
•Driver: Allows you to view or select another machine driver. By
clicking Options, you can set the default device options.
•Jobs: Shows the list of print jobs. Click Cancel job to cancel the
selected job and select the Show completed jobs check box to see
previous jobs on the job list.
•Classes: Shows the class that your machine is in. Click Add to Class
to add your machine to a specific class or click Remove from Class
to remove the machine from the selected class.
4 Click OK to apply the changes and close the Printer Properties window.
154
3. Special features
Unix printing
Some features may not be available depending on models or options. It
means that the features are not supported.
16
Proceeding the print job
After installing the printer, choose any of the image, text, PS or HPGL files to
print.
1Execute “printui <file_name_to_print>” command.
For example, if you are printing “document1”
printui document1
This will open the UNIX Printer Driver Print Job Manager in which the
user can select various print options.
2 Select a printer that has been already added.
3 Select the printing options from the window such as Page Selection.
4 Select how many copies are needed in Number of Copies.
To take advantage of the printer features provided by your printer driver,
press Properties (see "Changing printer settings" on page 15).
5 Press OK to start the print job.
17
Changing the machine settings
The UNIX printer driver Print Job Manager in which the user can select various
print options in printer Properties.
The following hot keys may also be used: “H” for Help, “O” for OK, “A” for Apply,
and “C” for Cancel.
General tab
•Paper Size: Set the paper size as A4, Letter, or other paper sizes, according
to your requirements.
•Paper Type: Choose the type of the paper. Options available in the list box
are Printer Default, Plain, and Thick.
•Paper Source: Select from which tray the paper is used. By default, it is Auto
Selection.
•Orientation: Select the direction in which information is printed on a page.
•Duplex: Print on both sides of paper to save paper.

Unix printing
155
3. Special features
Automatic/manual duplex printing may not be available depending on
models. You can alternatively use the lpr printing system or other
applications for odd-even printing.
•Multiple pages: Print several pages on one side of the paper.
•Page Border: Choose any of the border styles (e.g., Single-line hairline,
Double-line hairline)
Image tab
In this tab, you can change the brightness, resolution, or image position of your
document.
Text tab
Set the character margin, line space, or the columns of the actual print output.
HPGL/2 tab
•Use only black pen: To print all graphics in black.
•Fit plot to page: Fit the entire graphic into a single page.
Margins tab
•Use Margins: Set the margins for the document. By default, margins are not
enabled. The user can change the margin settings by changing the values in
the respective fields. Set by default, these values depend on the page size
selected.
•Unit: Change the units to points, inches, or centimeters.
Printer-Specific Settings tab
Select various options in the JCL and General frames to customize various
settings. These options are specific to the printer and depend on the PPD file.

4. Useful management
tools
This chapter introduces management tools provided to help you make full use of your machine.
• Samsung AnyWeb Print 2
• Easy Eco Driver 3
• Using SyncThru™ Web Service 5
• Using Samsung Easy Printer Manager 8
• Using Samsung Printer Status 11
• Using Smart Panel 13
• Using the Linux Unified Driver Configurator 15
157
4. Useful management tools
Samsung AnyWeb Print
Available for Windows and Macintosh OS users only.
This tool helps you screen-capture, preview, scrap, and print pages more easily,
than when you use an ordinary program.
To open the Program:
•For Windows: Select Start > All Programs > Samsung Printers >
Samsung AnyWeb Print > Download the latest version.
•For Macintosh: Open the Applications folder > Samsung folder >
Samsung AnyWeb Print.
158
4. Useful management tools
Easy Eco Driver
With the Easy Eco Driver, you can apply Eco features to save paper and toner
before printing. To use this application, Start Easy Eco Driver before printing
job checkbox in the printer properties should be checked.
Easy Eco Driver also allows you simple editing such as removing images and
texts, changing fonts, and more. You can save frequently used settings as a
preset.
Available for Windows OS users only.
How to use:
1 Open a document to print.
2 Print the document.
A preview window appears.
3 Select the options you want to apply to the document.
You can see the preview of the applied features.
4 Click Print.

159
4. Useful management tools
Understanding Easy Capture Manager
Capture your screen and launch Easy Capture Manager by simply pressing the
Print Screen key on the keyboard. Now you can easily print your captured screen
as captured or edited.
160
4. Useful management tools
Using SyncThru™ Web Service
• Internet Explorer 6.0 or higher is the minimum requirement for
SyncThru™ Web Service.
•SyncThru™ Web Service explanation in this user’s guide may differ from
your machine depending on its options or models.
• Network model only.
1
Accessing SyncThru™ Web Service
1Access a web browser, such as Internet Explorer, from Windows.
Enter the machine IP address of your printer (http://xxx.xxx.xxx.xxx) in
the address field and press the Enter key or click Go.
2 Your machine’s embedded website opens.
Logging into SyncThru™ Web Service
Before configuring options in SyncThru™ Web Service, you need to log-in as an
administrator. You can still use SyncThru™ Web Service without logging in but
you won’t have access to Settings tab and Security tab.
1Click Login on the upper right of the SyncThru™ Web Service website.
2 Type in the ID and Password then click Login.
•ID: admin
•Password: sec00000
2
SyncThru™ Web Service overview
Some tabs may not appear depending on your model.
Information tab
This tab gives you general information about your machine. You can check
things, such as remaining amount of toner. You can also print reports, such as an
error report.
•Active Alerts: Shows the alerts that have occurred in the machine and their
severity.
•Supplies: Shows how many pages are printed and amount of toner left in
the cartridge.

Using SyncThru™ Web Service
161
4. Useful management tools
•Usage Counters: Shows the usage count by print types: simplex and
duplex.
•Current Settings: Shows the machine’s and network’s information.
•Print information: Prints reports such as system related reports and font
reports.
Settings tab
This tab allows you to set configurations provided by your machine and
network. You need to log-in as an administrator to view this tab.
•Machine Settings tab: Sets options provided by your machine.
•Network Settings tab: Shows options for the network environment. Sets
options such as TCP/IP and network protocols.
Security tab
This tab allows you to set system and network security information. You need to
log-in as an administrator to view this tab.
•System Security: Sets the system administrator’s information and also
enables or disables machine features.
•Network Security: Sets settings for HTTPs, IPSec, IPv4/IPv6 filtering, and
802.1x.
Maintenance tab
This tab allows you to maintain your machine by upgrading firmware and
setting contact information for sending emails. You can also connect to
Samsung website or download drivers by selecting the Link menu.
•Firmware Upgrade: Upgrade your machine’s firmware.
•Contact Information: Shows the contact information.
•Link: Shows links to useful sites where you can download or check
information.
3
E-mail notification setup
You can receive emails about your machine’s status by setting this option. By
setting information such as IP address, host name, e-mail address and SMTP
server information, the machine status (toner cartridge shortage or machine
error) will be sent to a certain person's e-mail automatically. This option may be
used more frequently by a machine administrator.
1Start a web browser, such as Internet Explorer, from Windows.
Enter the machine IP address (http://xxx.xxx.xxx.xxx) in the address field
and press the Enter key or click Go.
2 Your machine’s embedded website opens.
3 From the Settings tab, select Machine Settings > E-mail Notification.
Using SyncThru™ Web Service
162
4. Useful management tools
If you have not configured outgoing server environment, go to Settings >
Network Settings > Outgoing Mail Server(SMTP) to configure network
environment before setting e-mail notification.
4 Select Enable check box to use the E-mail Notification.
5 Click Add button to add e-mail notification user.
Set the recipient name and e-mail address(es) with notification items
you want to receive an alert for.
6 Click Apply.
If the firewall is activated, the e-mail may not be sent successfully. In that
case, contact the a network administrator.
4
Setting the system administrator’s information
This setting is necessary for using the e-mail notification option.
1Start a web browser, such as Internet Explorer, from Windows.
Enter the machine IP address (http://xxx.xxx.xxx.xxx) in the address field
and press the Enter key or click Go.
2 Your machine’s embedded website opens.
3 From the Security tab, select System Security > System Administrator
4 Enter the name of the administrator, phone number, location, and email
address.
5 Click Apply.
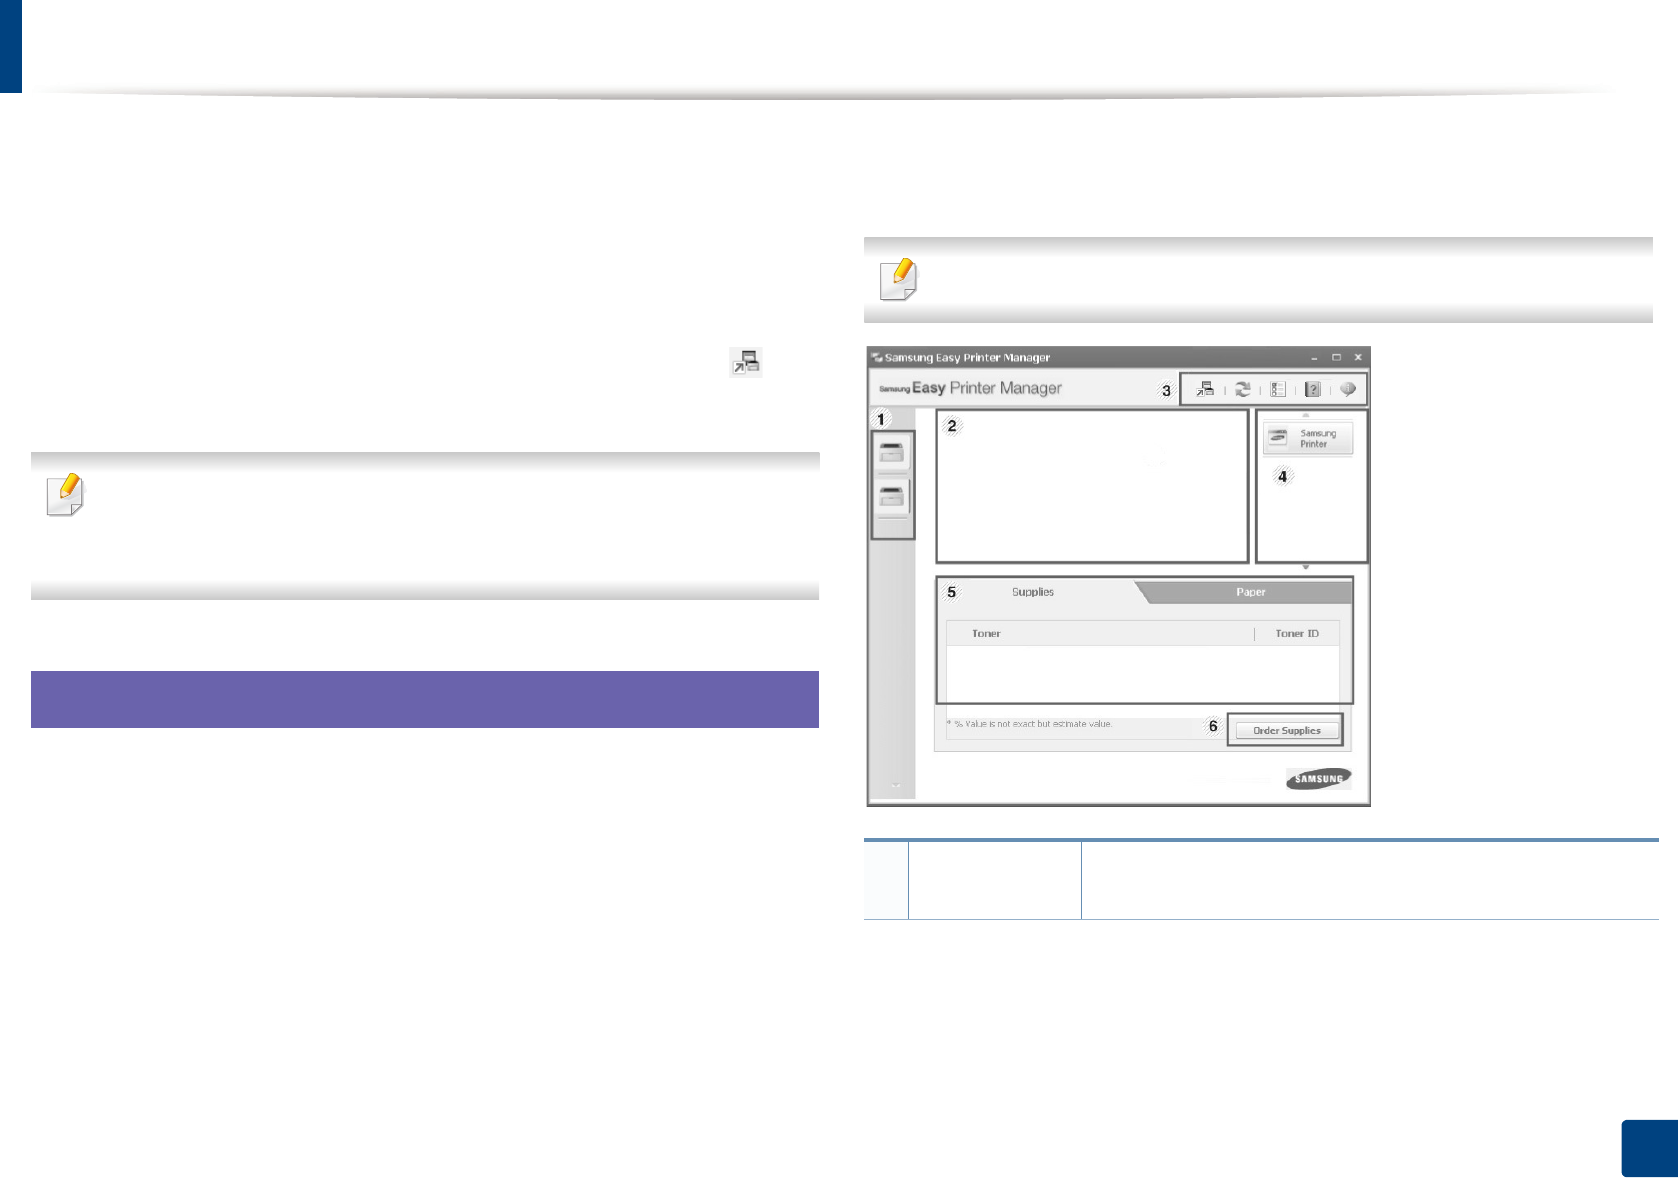
163
4. Useful management tools
Using Samsung Easy Printer Manager
Samsung Easy Printer Manager is an application that combines Samsung
machine settings into one location. Samsung Easy Printer Manager combines
device settings as well as printing environments, settings/actions and
launching. All of these features provide a gateway to conveniently use your
Samsung machine. Samsung Easy Printer Manager provides two different user
interfaces for the user to choose from: the basic user interface and the advanced
user interface. Switching between the two interfaces is easy: just click
button.
• Availabe for Windows or Macintosh OS users only.
• For Windows, Internet Explorer 6.0 or higher is the minimum
requirement for Samsung Easy Printer Manager.
5
Understanding Samsung Easy Printer Manager
To open the program:
For Windows,
Select Start > Programs or All Programs > Samsung Printers > Samsung
Easy Printer Manager > Samsung Easy Printer Manager.
For Macintosh,
Open the Applications folder > Samsung folder > Samsung Easy Printer
Manager.
The Samsung Easy Printer Manager interface is comprised of various basic
sections as described in the table that follows:
The screenshot may differ depending on operating system you are using.
1Printer List The printer list displays the installed printer icons on your
computer.
Using Samsung Easy Printer Manager
164
4. Useful management tools
Click the Help ( ) button from the upper-right corner of the window and
click on any option you want to know about.
6
Advanced settings user interface overview
The advanced user interface is intended to be used by the person responsible
for managing the network and machines.
Device Settings
You can configure various machine settings such as machine setup, paper,
layout, emulation, network, and print information.
2
Printer
Information
This area gives you general information about your
machine. You can check information, such as the machine’s
model name, IP address (or Port name), and machine
status.
User’s Guide button: This button opens
Troubleshooting Guide when an error occurs.
You can directly open the necessary section in the
user’s guide.
3
Application
information
Includes links for changing to the advanced settings,
preference, help, and about.
The button is used to change the user
interface to the advanced settings user interface.
4
Quick links Displays Quick links to machine specific functions. This
section also includes links to applications in the advanced
settings.
If you connect your machine to a networt, the
SyncThru™ Web Service icon is enabled.
5
Contents Area Displays information about the selected machine,
remaining toner level, and paper. The information will vary
based on the machine selected. Some machines do not
have this feature.
6
Order Supplies Click on the Order button from the supply ordering
window. You can order replacement toner cartridge(s)
from online.

Using Samsung Easy Printer Manager
165
4. Useful management tools
Alert Settings (Windows only)
This is menu includes settings related to error alerting.
•Printer Alert: Provides settings related to when alerts will be received.
•Email Alert: Povides options relating to receiving alerts via email.
•History Alert: Provides a history of device and toner related alerts.
Job Accounting
Provides querying of quota information of the specified job accounting user.
This quota information can be created and applied to devices by job accounting
software such as SyncThru™ or CounThru™ admin software.
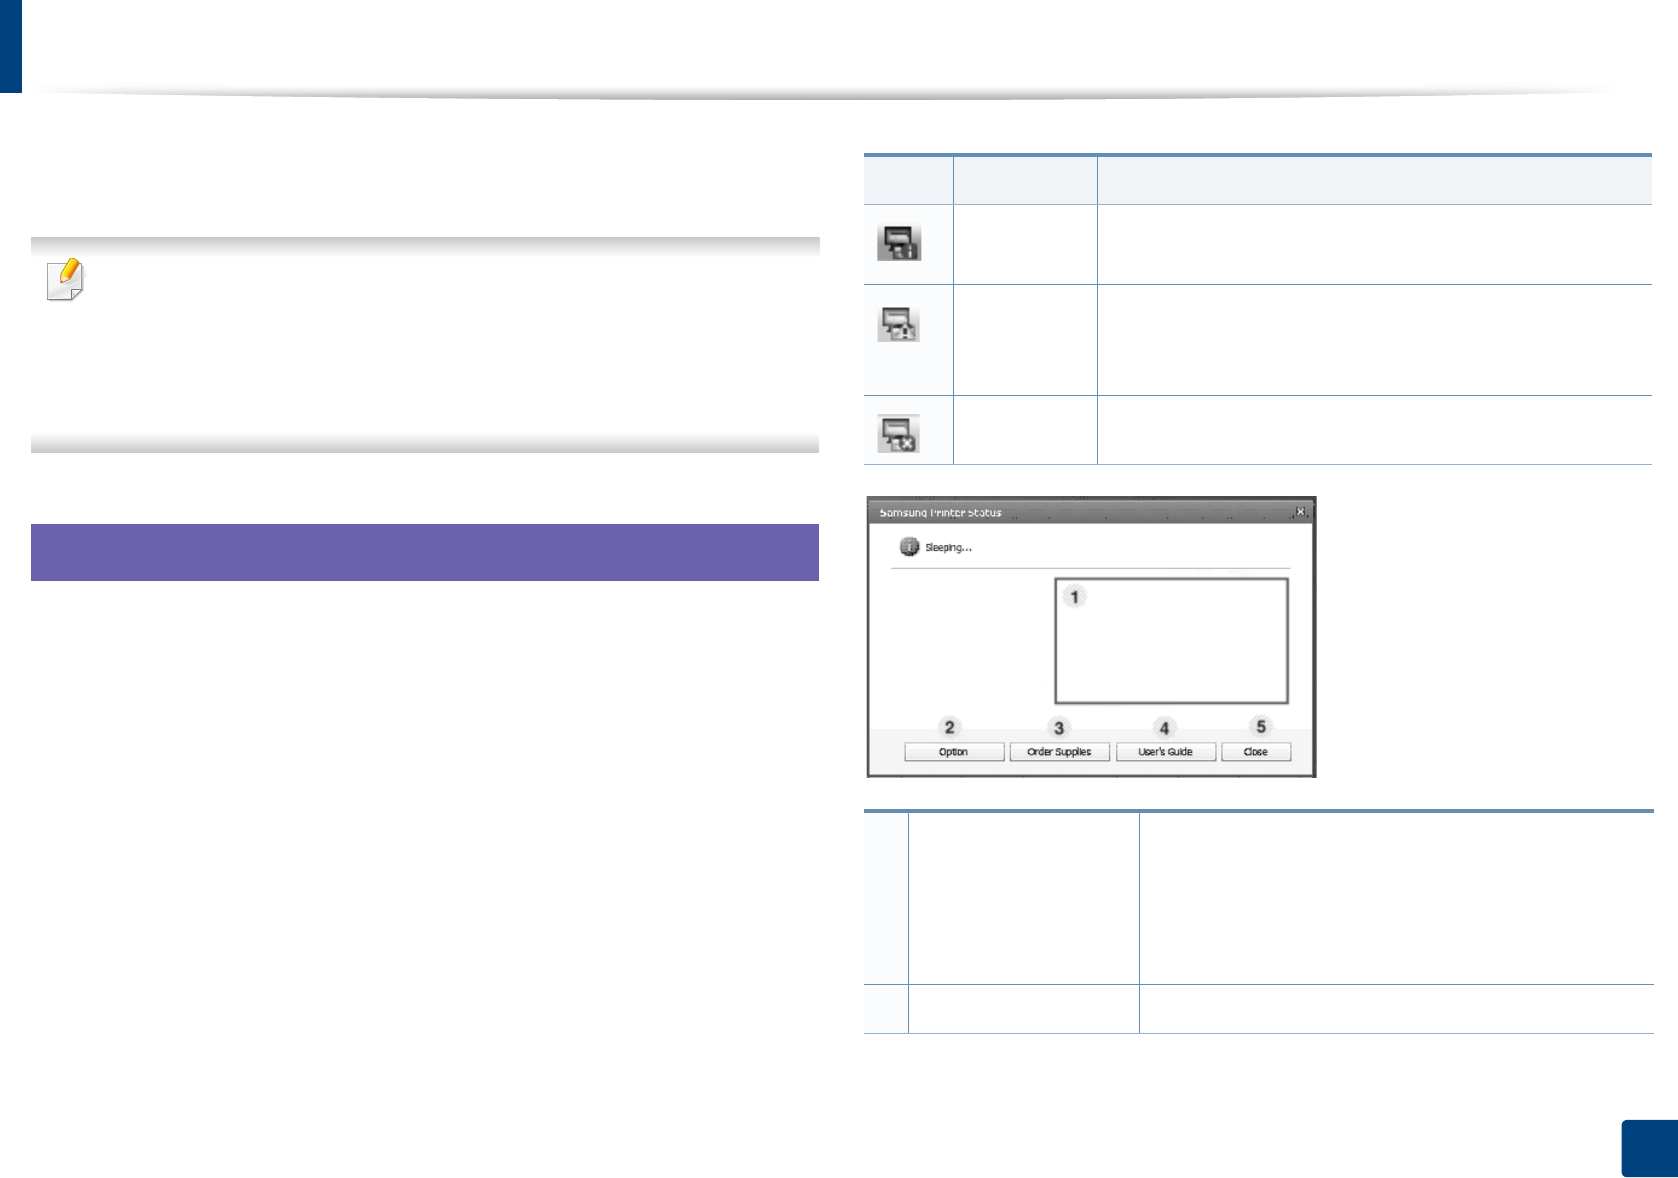
166
4. Useful management tools
Using Samsung Printer Status
The Samsung Printer Status is a program that monitors and informs you of the
machine status.
• Available for Windows users.
• The Samsung Printer Status window and its contents shown in this user’s
guide may differ depending on the machine or operating system in use.
• Check the operating system(s) that are compatible with your machine
(see "System requirements" on page 7).
7
Samsung Printer Status overview
If an error occurs while operating, you can check the error from the Samsung
Printer Status. Samsung Printer Status is installed automatically when you install
the machine software.
You can also launch Samsung Printer Status manually. Go to the Printing
Preferences , click the Basic tab > Printer Status button.
These icons appear on the Windows task bar:
Icon Mean Description
Normal The machine is in ready mode and experiencing no
errors or warnings.
Warning The machine is in a state where an error might occur in
the future. For example, it might be in toner low status,
which may lead to toner empty status.
Error The machine has at least one error.
1
Toner Level You can view the level of toner remaining in each
toner cartridge. The machine and the number of
toner cartridge(s) shown in the above window may
differ depending on the machine in use. Some
machines do not have this feature.
2Option You can set Printing Job Alert related settings.
Using Samsung Printer Status
167
4. Useful management tools
3Order Supplies You can order replacement toner cartridge(s) from
online.
4Troubleshooting You can directly open the troubleshooting section in
the user’s guide.
5Close Close the window.
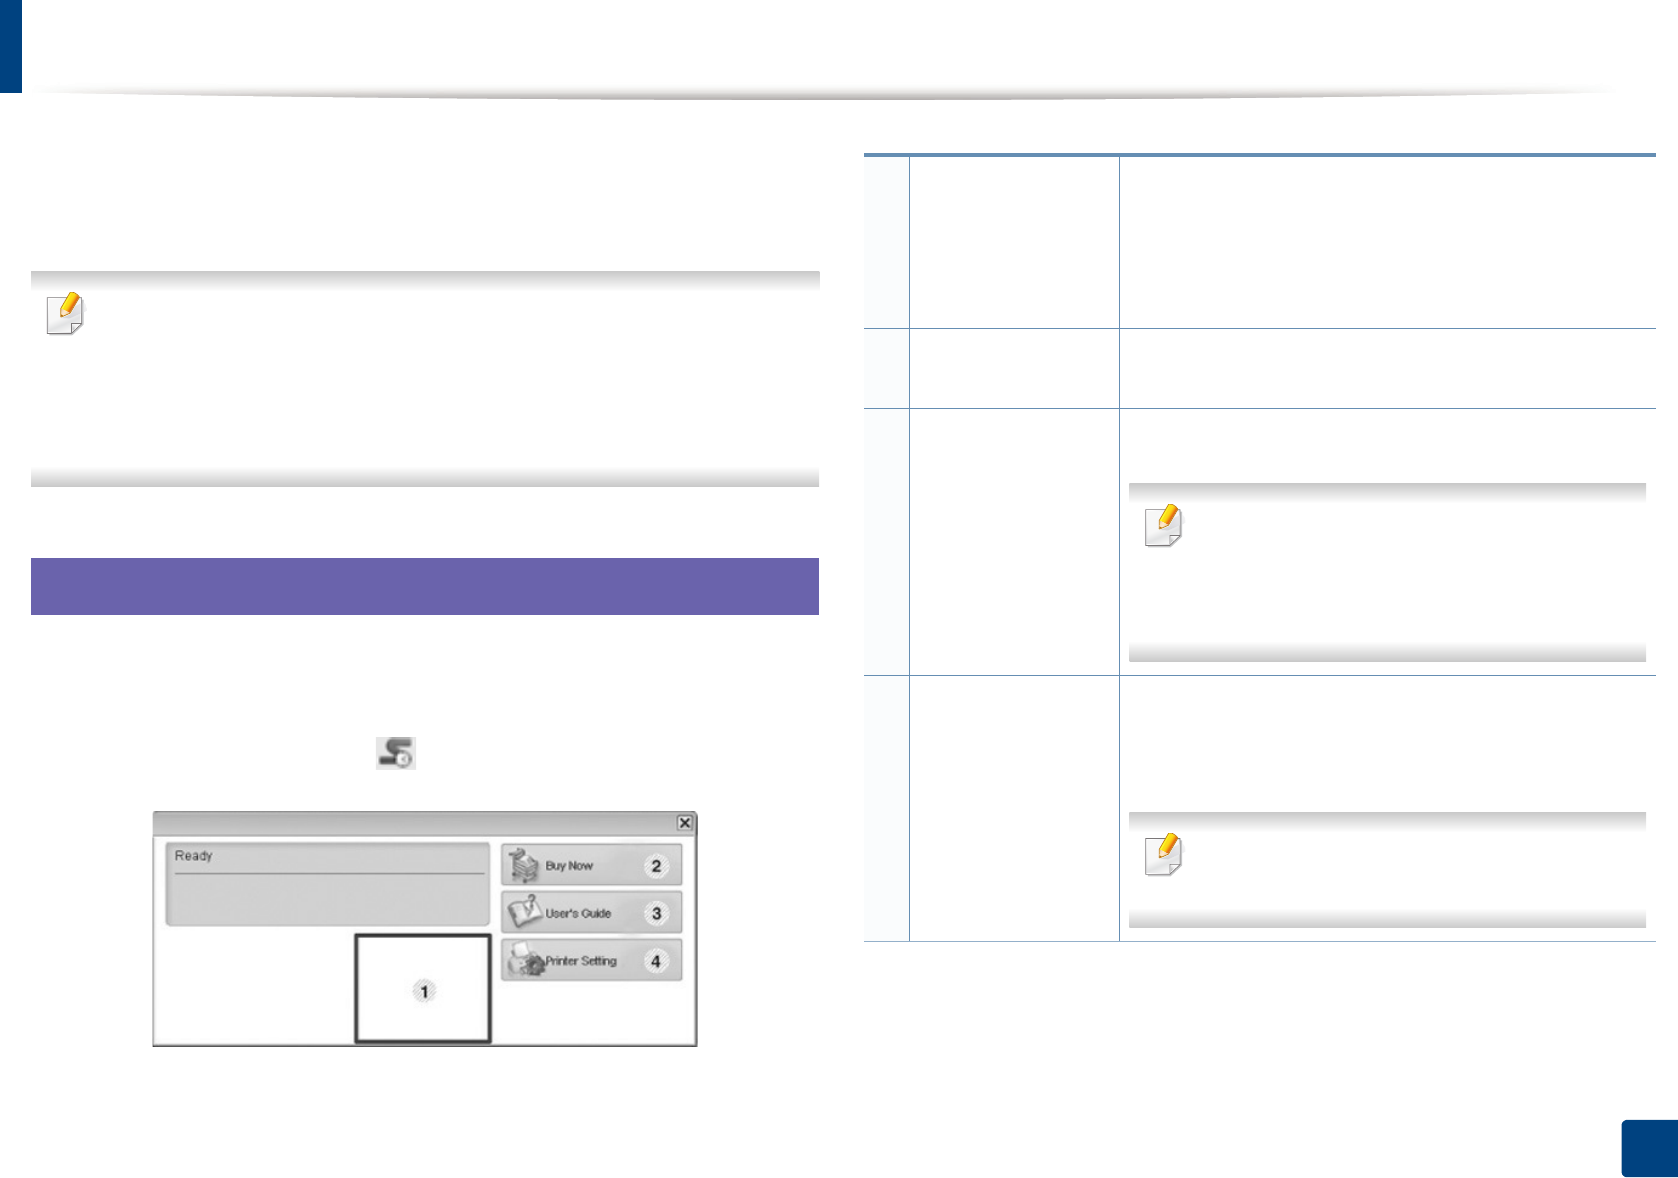
168
4. Useful management tools
Using Smart Panel
Smart Panel is a program that monitors and informs you of the machine’s status,
and allows you to customize the machine’s settings. You can download Smart
Panel from the Samsung website (see "Installing the Smart Panel" on page 4).
• Available for Linux OS users only.
• The Smart Panel window and its contents shown in this user’s guide may
differ depending on the machine or operating system in use.
• Check the operating system(s) that are compatible with your machine
(see "Installing the driver locally" on page 19).
8
Smart Panel overview
If an error occurs while operating, you can check the error from the Smart Panel.
You can also launch Smart Panel manually.
Double-click the Smart Panel icon( ) in the Notification Area.
1
Toner Level You can view the level of toner remaining in each toner
cartridge. The machine and the number of toner
cartridge(s) shown in the above window may differ
depending on the machine in use. If you cannot see
this feature, it is not applicable to your machine.
2Buy Now You can order replacement toner cartridge(s) from
online.
3
User’s Guide You can view the online User’s Guide.
This button opens the Troubleshooting
Guide when an error occurs. You can directly
open the troubleshooting section in the user’s
guide.
4
Printer Setting You can configure various machine settings in the
Printer Settings Utility window. Some machines do not
have this feature.
If you connect your machine to a networt, the
SyncThru™ Web Service icon is enabled.

Using Smart Panel
169
4. Useful management tools
9
Changing Smart Panel ‘s settings
Right-click on the Smart Panel icon and select Configure Smart Panel. Select
the settings you want from the Configure Smart Panel window.
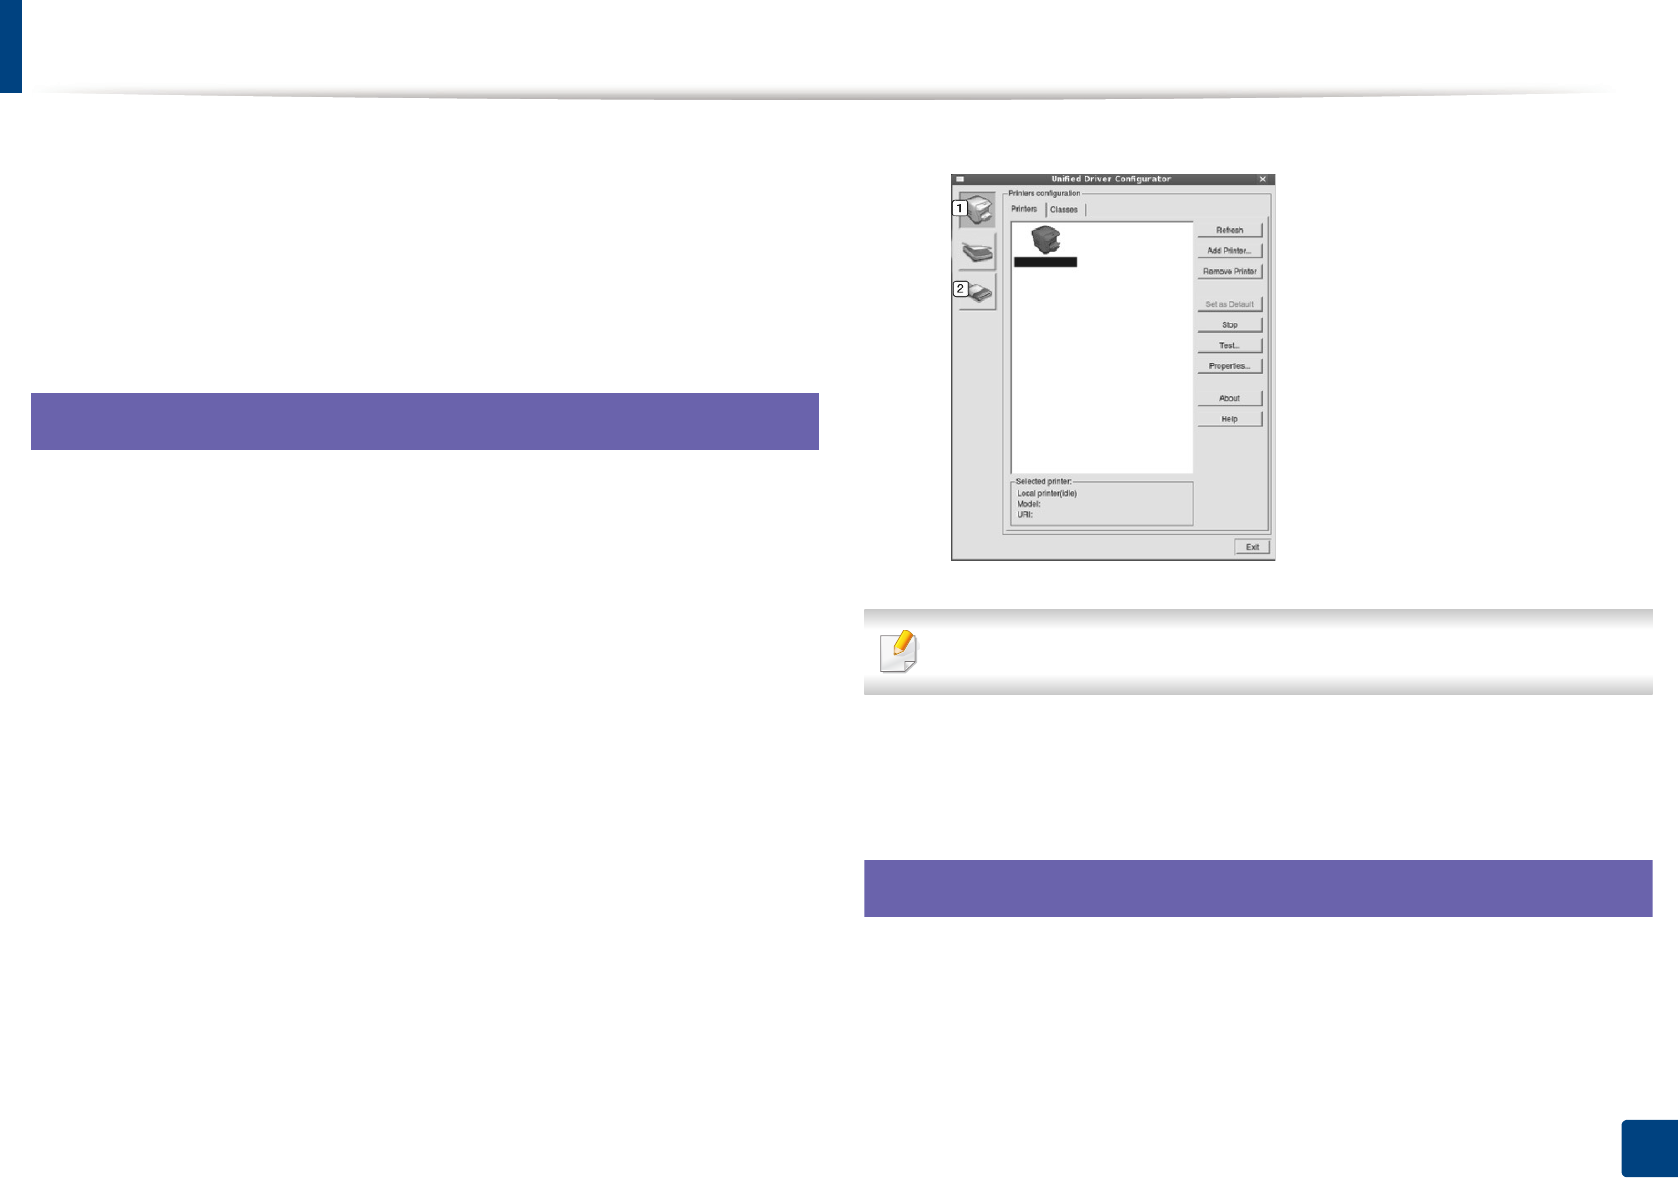
170
4. Useful management tools
Using the Linux Unified Driver Configurator
The Unified Driver Configurator is a tool primarily intended for configuring
machine devices. You need to install Unified Linux Driver to use Unified Driver
Configurator (see "Installation for Linux" on page 4).
After the driver is installed on your Linux system, the Unified Driver Configurator
icon will automatically be created on your desktop.
10
Opening Unified Driver Configurator
1Double-click the Unified Driver Configurator on the desktop.
You can also click the Startup Menu icon and select Samsung Unified
Driver > Unified Driver Configurator.
2 Click each button on the left to switch to the corresponding
configuration window.
To use the on screen help, click Help.
3 After changing the configurations, click Exit to close the Unified Driver
Configurator.
11
Printers configuration
Printers configuration has the two tabs: Printers and Classes.
1Printer Configuration
2Port Configuration
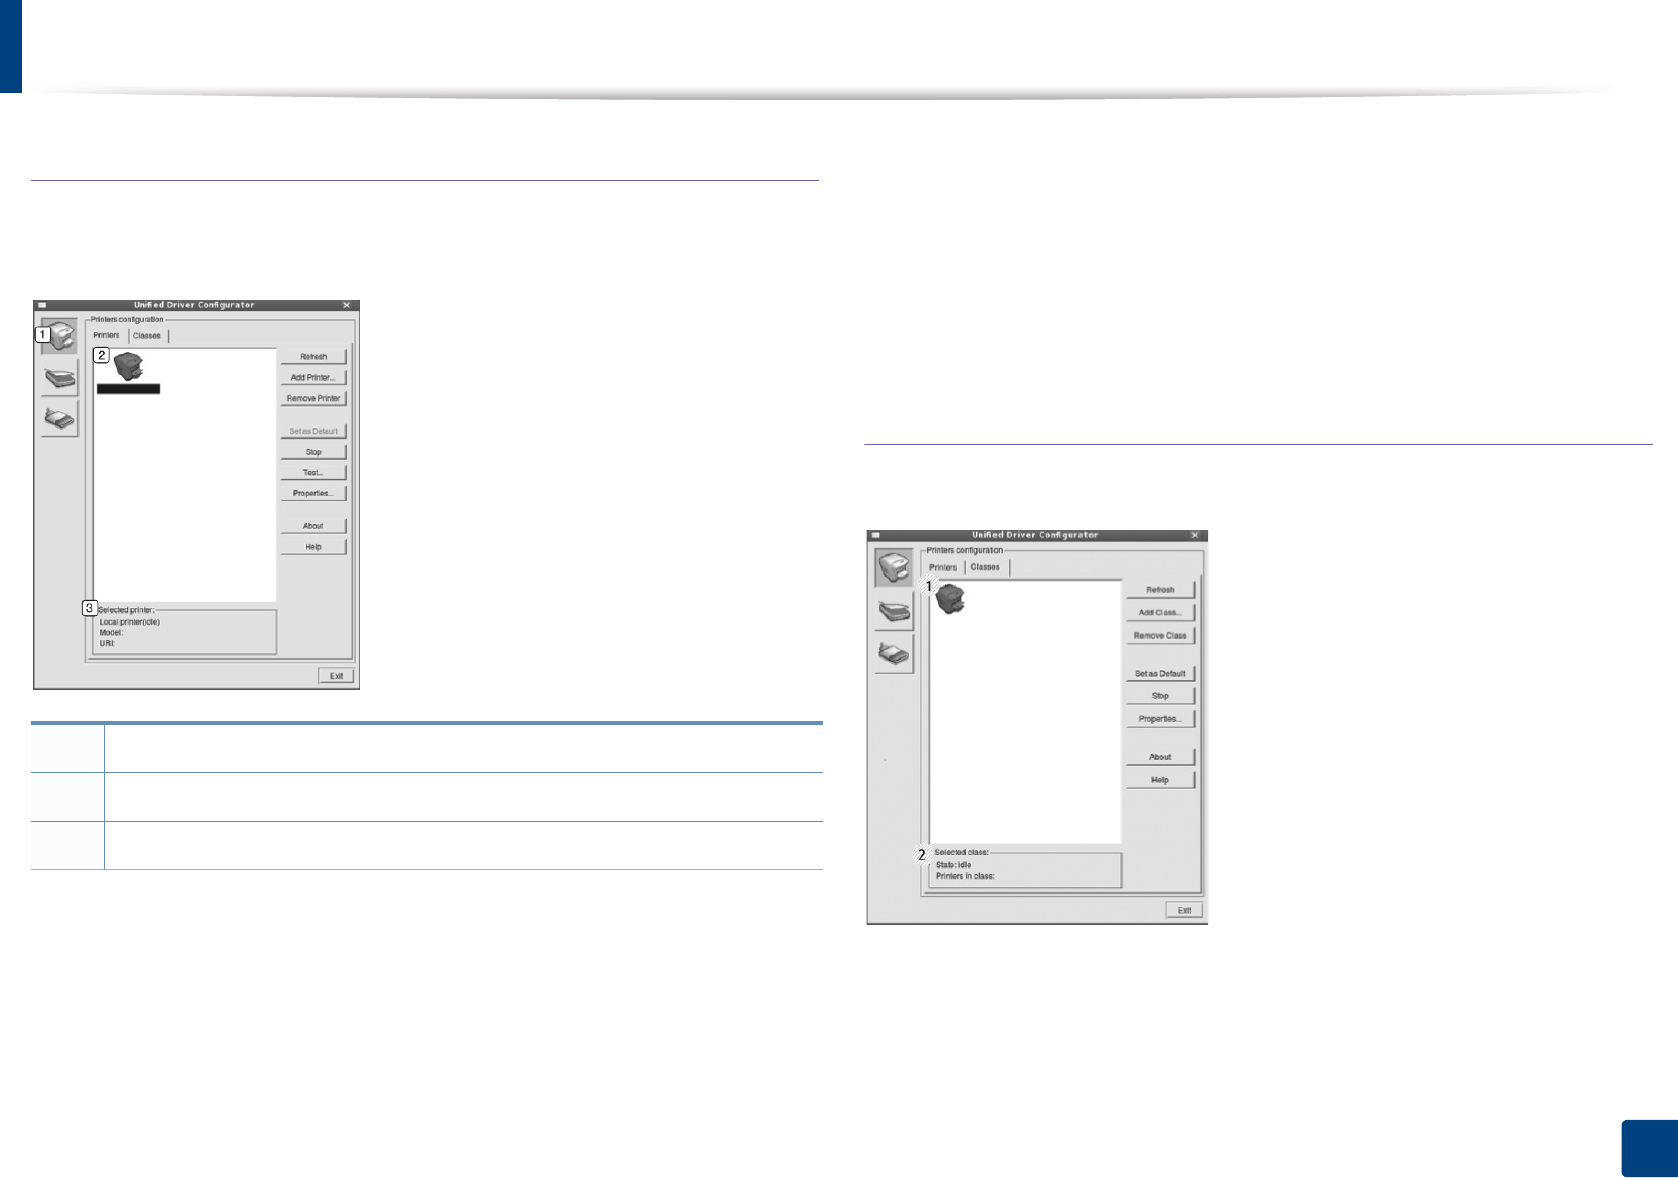
Using the Linux Unified Driver Configurator
171
4. Useful management tools
Printers tab
View the current system’s printer configuration by clicking on the machine icon
button on the left side of the Unified Driver Configurator window.
The printer control buttons are, as follows:
•Refresh: Renews the available machines list.
•Add Printer: Allows you to add a new machines.
•Remove Printer: Removes the selected machine.
•Set as Default: Sets the current selected machine as a default machine.
•Stop/Start: Stops/starts the machine.
•Test: Allows you to print a test page to ensure the machine is working
properly.
•Properties: Allows you to view and change the printer’s properties.
Classes tab
The Classes tab shows a list of available machine classes.
1Switches to Printers configuration.
2Shows all of the installed machines.
3Shows the status, model name, and URI of your machine.
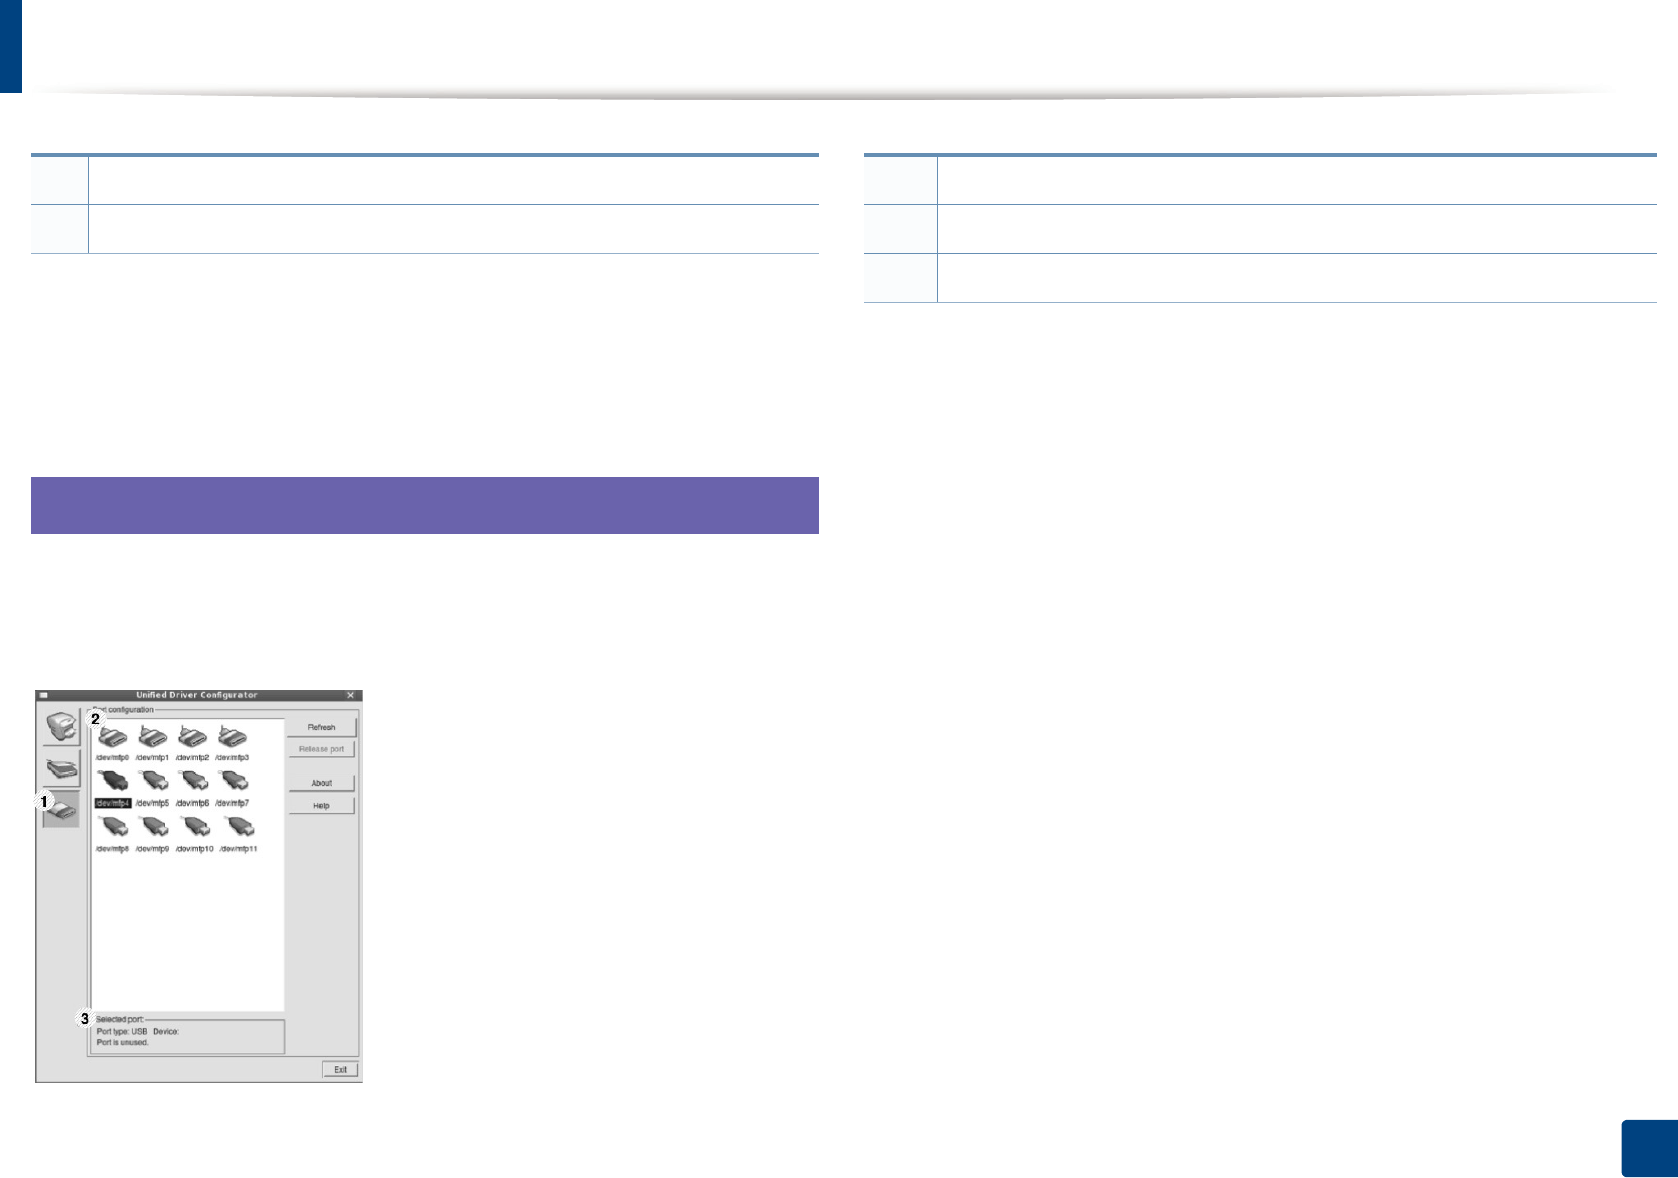
Using the Linux Unified Driver Configurator
172
4. Useful management tools
•Refresh: Renews the classes list.
•Add Class: Allows you to add a new machine class.
•Remove Class: Removes the selected machine class.
12
Ports configuration
In this window, you can view the list of available ports, check the status of each
port and release a port that is stalled in a busy state when its owner has
terminated the job for any reason.
•Refresh: Renews the available ports list.
•Release port: Releases the selected port.
1Shows all of the machine classes.
2Shows the status of the class and the number of machines in the class.
1Switches to Ports configuration.
2Shows all of the available ports.
3Shows the port type, device connected to the port, and status.

5. Troubleshooting
This chapter gives helpful information for what to do if you encounter an error.
• Paper feeding problems 2
• Power and cable connecting problems 3
•Printing problems 4
• Printing quality problems 8
• Operating system problems 16
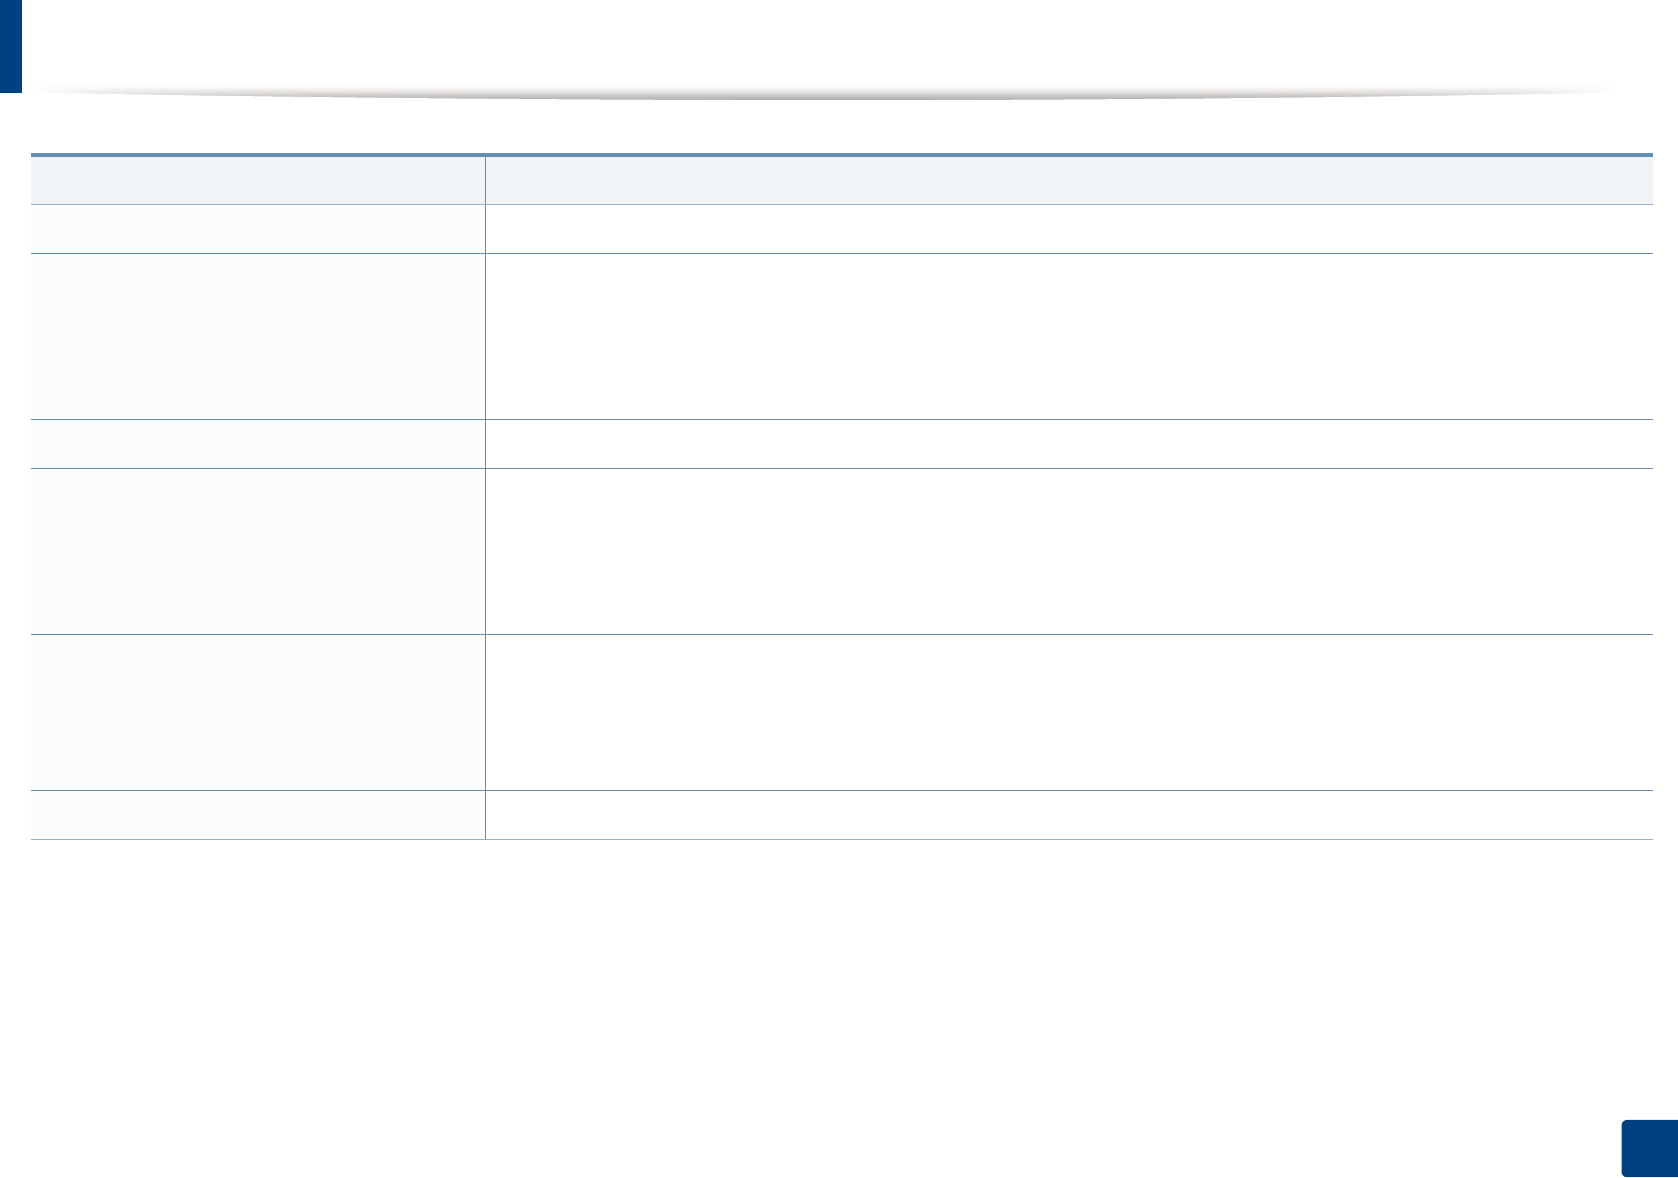
174
5. Troubleshooting
Paper feeding problems
Condition Suggested solutions
Paper jams during printing. Clear the paper jam.
Paper sticks together. • Check the maximum paper capacity of the tray .
• Make sure that you are using the correct type of paper.
• Remove paper from the tray and flex or fan the paper.
• Humid conditions may cause some paper to stick together.
Multiple sheets of paper do not feed. Different types of paper may be stacked in the tray. Load paper of only one type, size, and weight.
Paper does not feed into the machine. • Remove any obstructions from inside the machine.
• Paper has not been loaded correctly. Remove paper from the tray and reload it correctly.
• There is too much paper in the tray. Remove excess paper from the tray.
• The paper is too thick. Use only paper that meets the specifications required by the machine.
The paper keeps jamming. • There is too much paper in the tray. Remove excess paper from the tray. If you are printing on special materials, feed
manually in the tray.
• An incorrect type of paper is being used. Use only paper that meets the specifications required by the machine.
• There may be debris inside the machine. Open the top cover and remove any debris.
Envelopes skew or fail to feed correctly. Ensure that the paper guides are against both sides of the envelopes.
175
5. Troubleshooting
Power and cable connecting problems
Click this link to open an animation about solving power problems.
Condition Suggested solutions
The machine is not receiving power,
or the connection cable between the
computer and the machine is not
connected properly.
• Connect the machine to the electricity supply first and press the (Power) button on the control panel.
• Disconnect the machine’s cable and reconnect it.
176
5. Troubleshooting
Printing problems
Condition Possible cause Suggested solutions
The machine does not
print.
The machine is not receiving power. Check the power cord connections. Check the power switch and the power source.
The machine is not selected as the default
machine.
Select your machine as your default machine in Windows.
Check the machine for the following:
• The top cover is not closed. Close the top cover.
• Paper is jammed. Clear the paper jam (see "Clearing paper jams" on page 3).
• No paper is loaded. Load paper (see"Loading paper in the tray" on page 4).
• The toner cartridge is not installed. Install the toner cartridge (see "Replacing the toner cartridge" on page 8).
• Make sure the protect cover and sheets are removed from the toner cartridge (see "Replacing the toner cartridge" on page 8).
If a system error occurs, contact your service representative.
The connection cable between the computer and
the machine is not connected properly.
Disconnect the machine cable and reconnect it (see "Rear view" on page 15).
The connection cable between the computer and
the machine is defective.
If possible, attach the cable to another computer that is working properly and print a job.
You can also try using a different machine cable.
The port setting is incorrect. Check the Windows printer settings to make sure that the print job is sent to the correct
port. If the computer has more than one port, make sure that the machine is attached to
the correct one.
The machine may be configured incorrectly. Check the Printing Preferences to ensure that all of the print settings are correct.
Printing problems
177
5. Troubleshooting
The machine does not
print.
The printer driver may be incorrectly installed. Uninstall and reinstall the machine’s driver.
The machine is malfunctioning. Check the display message on the control panel to see if the machine is indicating a
system error. Contact a service representative.
The document size is so big that the hard disk
space of the computer is insufficient to access the
print job.
Get more hard disk space and print the document again.
The output tray is full. Once the paper is removed from the output tray, the machine resumes printing.
The machine selects print
materials from the wrong
paper source.
The paper option that was selected in the
Printing Preferences may be incorrect.
For many software applications, the paper source selection is found under the Paper tab
within the Printing Preferences (see "Opening printing preferences" on page 13).
Select the correct paper source. See the printer driver help screen (see "Using help" on
page 14).
A print job is extremely
slow.
The job may be very complex. Reduce the complexity of the page or try adjusting the print quality settings.
Half the page is blank. The page orientation setting may be incorrect. Change the page orientation in your application (see "Opening printing preferences" on
page 13). See the printer driver help screen (see "Using help" on page 14).
The paper size and the paper size settings do not
match.
Ensure that the paper size in the printer driver settings matches the paper in the tray.Or,
ensure that the paper size in the printer driver settings matches the paper selection in
the software application settings you use (see "Opening printing preferences" on page
13).
Condition Possible cause Suggested solutions
Printing problems
178
5. Troubleshooting
The machine prints, but
the text is wrong,
garbled, or incomplete.
The machine cable is loose or defective. Disconnect the machine cable and reconnect. Try a print job that you have already
printed successfully. If possible, attach the cable and the machine to another computer
that you know works and try a print job. Finally, try a new machine cable.
The wrong printer driver was selected. Check the applicatinon’s printer selection menu to ensure that your machine is selected.
The software application is malfunctioning. Try printing a job from another application.
The operating system is malfunctioning. Exit Windows and reboot the computer. Turn the machine off and back on again.
Pages print, but they are
blank.
The toner cartridge is defective or out of toner. Redistribute the toner, if necessary. If necessary, replace the toner cartridge.
• See "Redistributing toner" on page 7.
• See "Replacing the toner cartridge" on page 8.
The file may have blank pages. Check the file to ensure that it does not contain blank pages.
Some parts, such as the controller or the board,
may be defective.
Contact a service representative.
The machine does not
print PDF files correctly.
Some parts of graphics,
text, or illustrations are
missing.
Incompatibility between the PDF file and the
Acrobat products.
Printing the PDF file as an image may enable the file to print. Turn on Print As Image
from the Acrobat printing options.
It will take longer to print when you print a PDF file as an image.
The print quality of
photos is not good.
Images are not clear.
The resolution of the photo is very low. Reduce the photo size. If you increase the photo size in the software application, the
resolution will be reduced.
Condition Possible cause Suggested solutions
Printing problems
179
5. Troubleshooting
Before printing, the
machine emits vapor near
the output tray.
Using damp paper can cause vapor during
printing.
This is not a problem. Just keep printing.
The machine does not
print special-sized paper,
such as billing paper.
Paper size and paper size setting do not match. Set the correct paper size in the Custom in Paper tab in Printing Preferences (see
"Opening printing preferences" on page 13).
The printed billing paper
is curled.
The paper type setting does not match. Change the printer option and try again. Go to Printing Preferences , click Paper tab,
and set type to Thick (see "Opening printing preferences" on page 13).
Condition Possible cause Suggested solutions
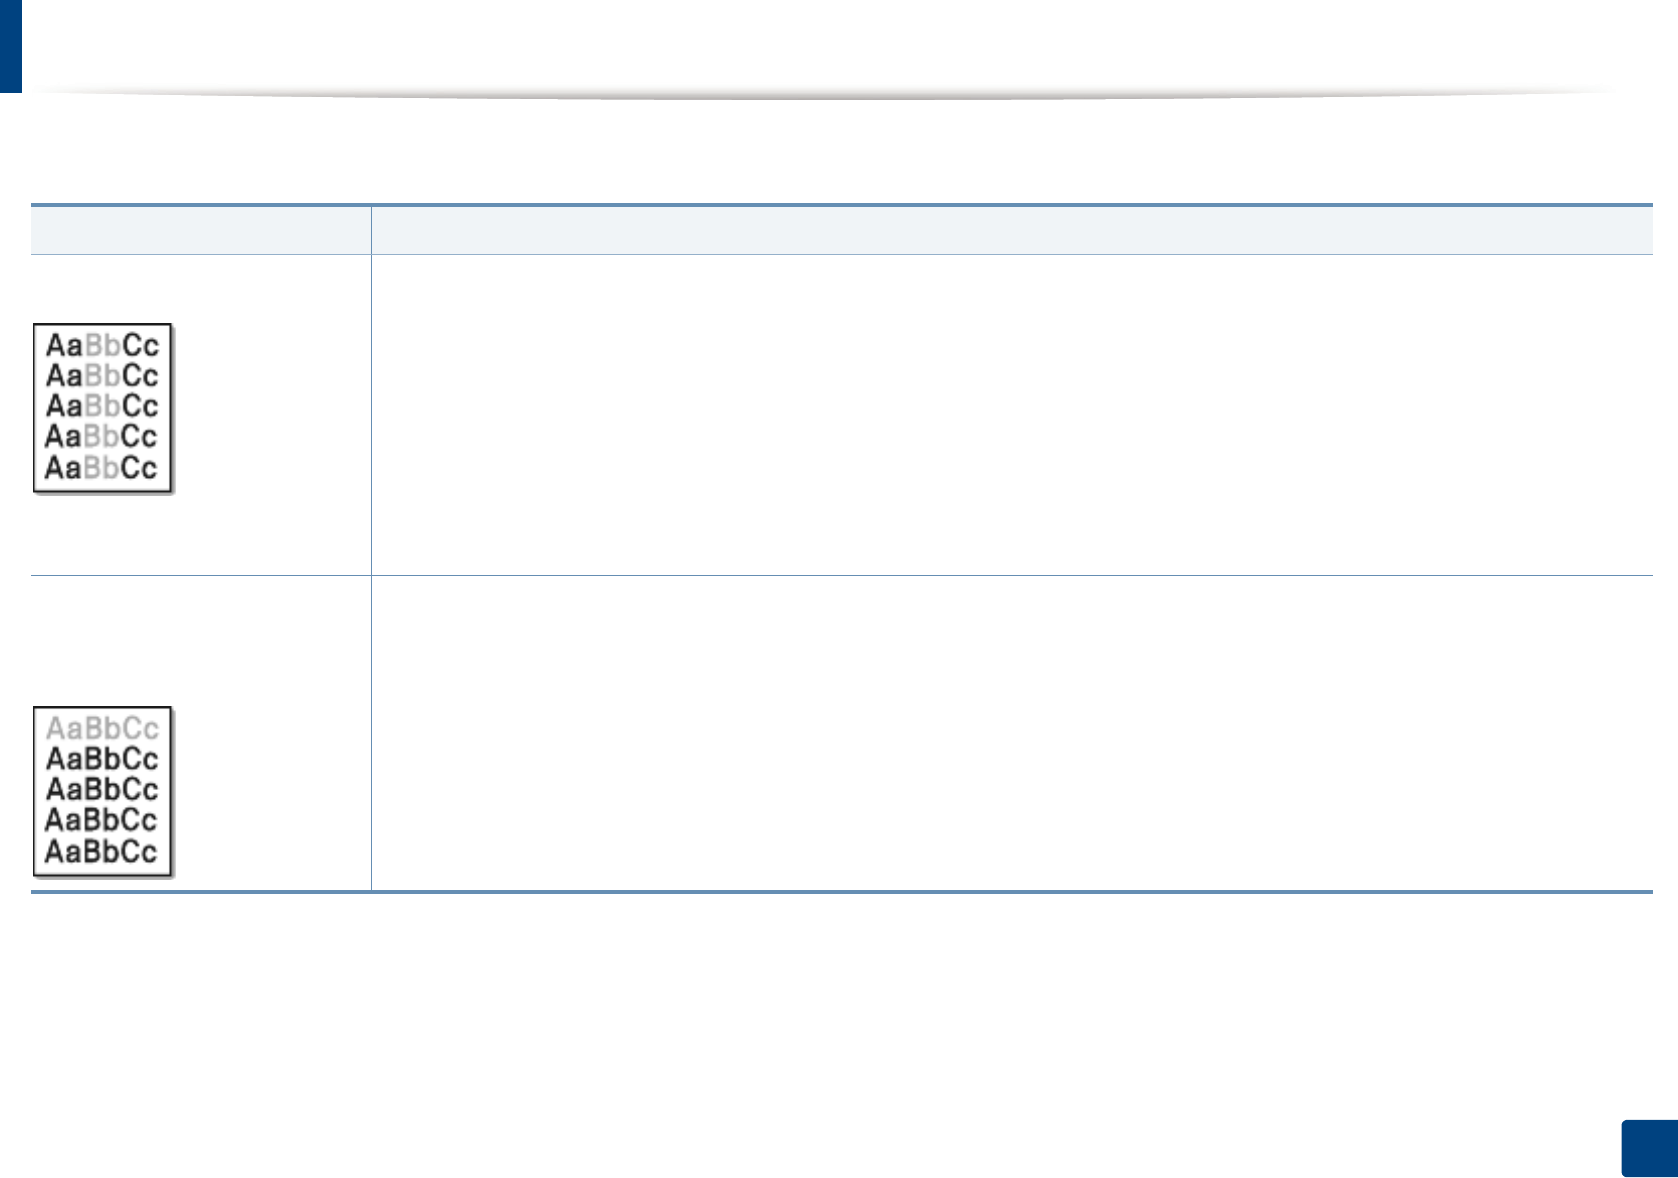
180
5. Troubleshooting
Printing quality problems
If the inside of the machine is dirty or paper has been loaded improperly, there might be a reduction in print quality. See the table below to clear the problem.
Condition Suggested Solutions
Light or faded print • If a vertical white streak or faded area appears on the page, the toner supply is low. Install a new toner cartridge (see "Replacing the
toner cartridge" on page 8).
• The paper may not meet paper specifications; for example, the paper may be too moist or rough.
• If the entire page is light, the print resolution setting is too low or the toner save mode is on. Adjust the print resolution and turn
the toner save mode off. See the help screen of the printer driver.
• A combination of faded or smeared defects may indicate that the toner cartridge needs cleaning. Clean the inside of your machine
(see "Cleaning the machine" on page 11).
• The surface of the LSU part inside the machine may be dirty. Clean the inside of your machine (see "Cleaning the machine" on page
11). If these steps do not correct the problem, contact a service representative.
The top half of the paper is
printed lighter than the rest of
the paper
The toner might not adhere properly to this type of paper.
• Change the printer option and try again. Go to Printing Preferences , click the Paper tab, and set the paper type to Recycled (see
"Opening printing preferences" on page 13).