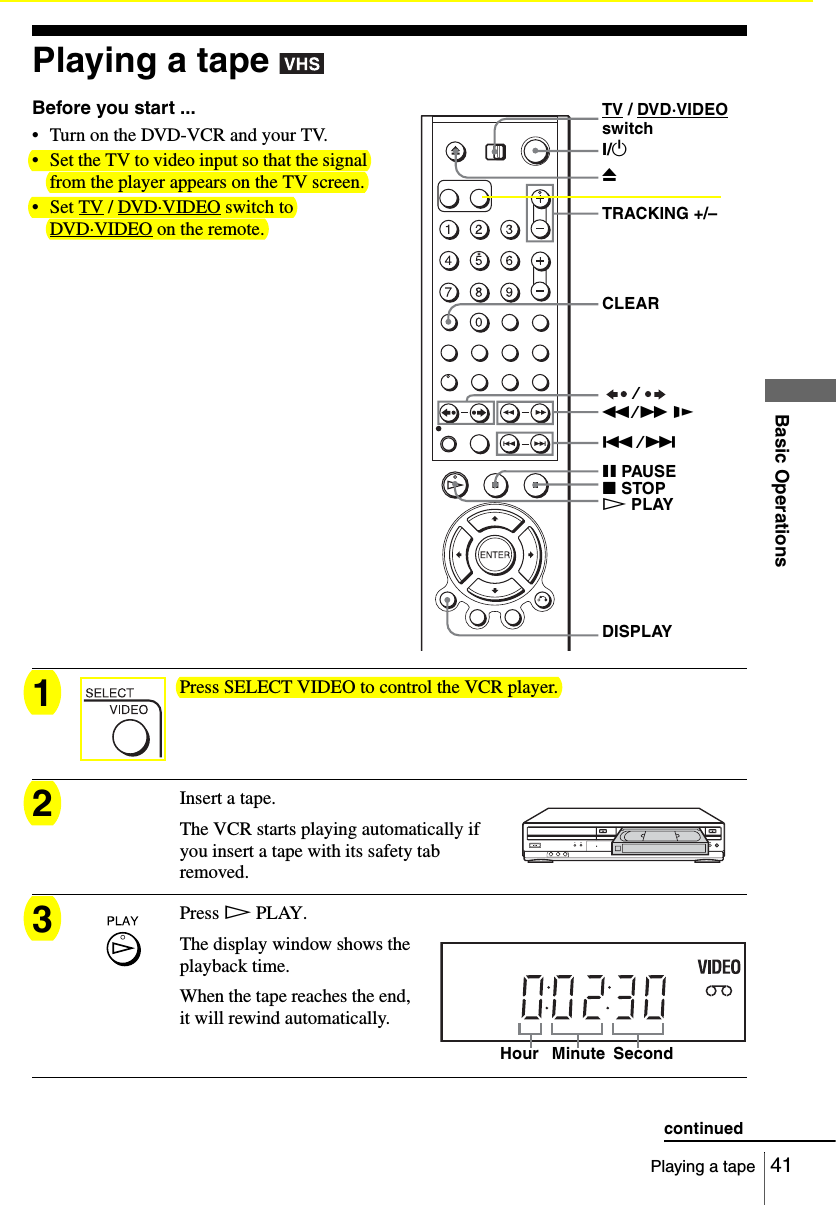
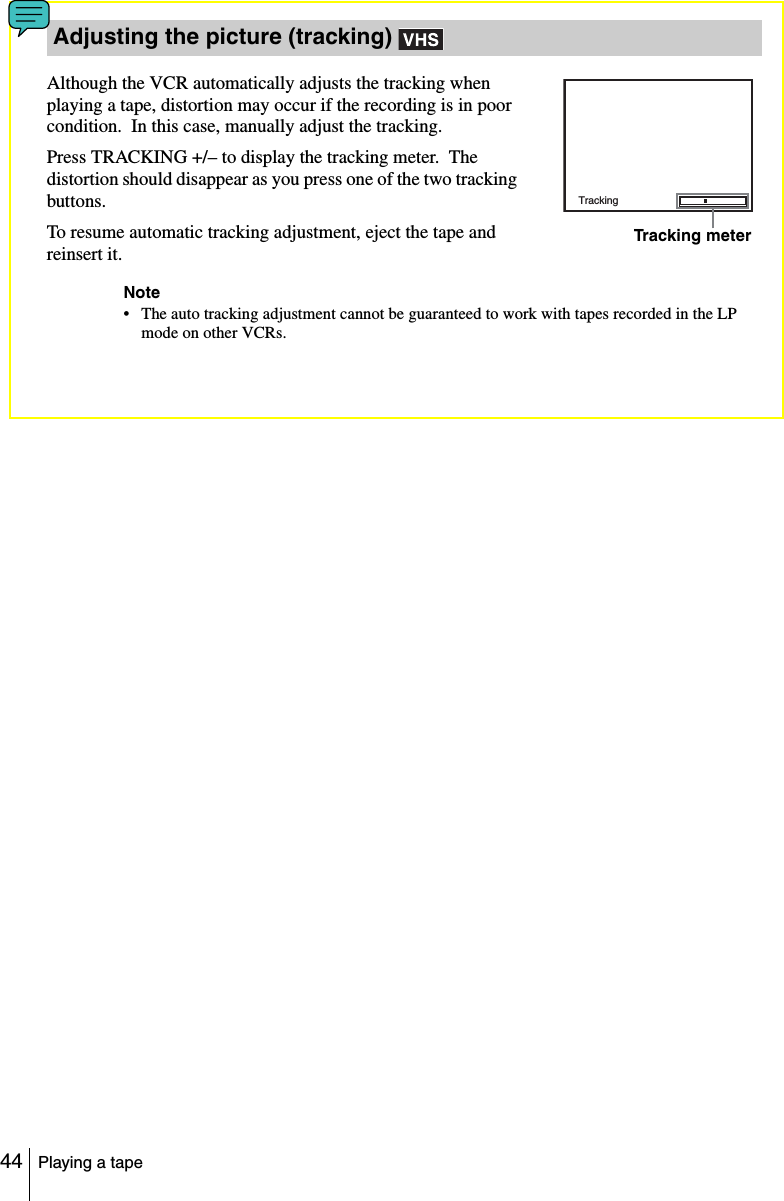
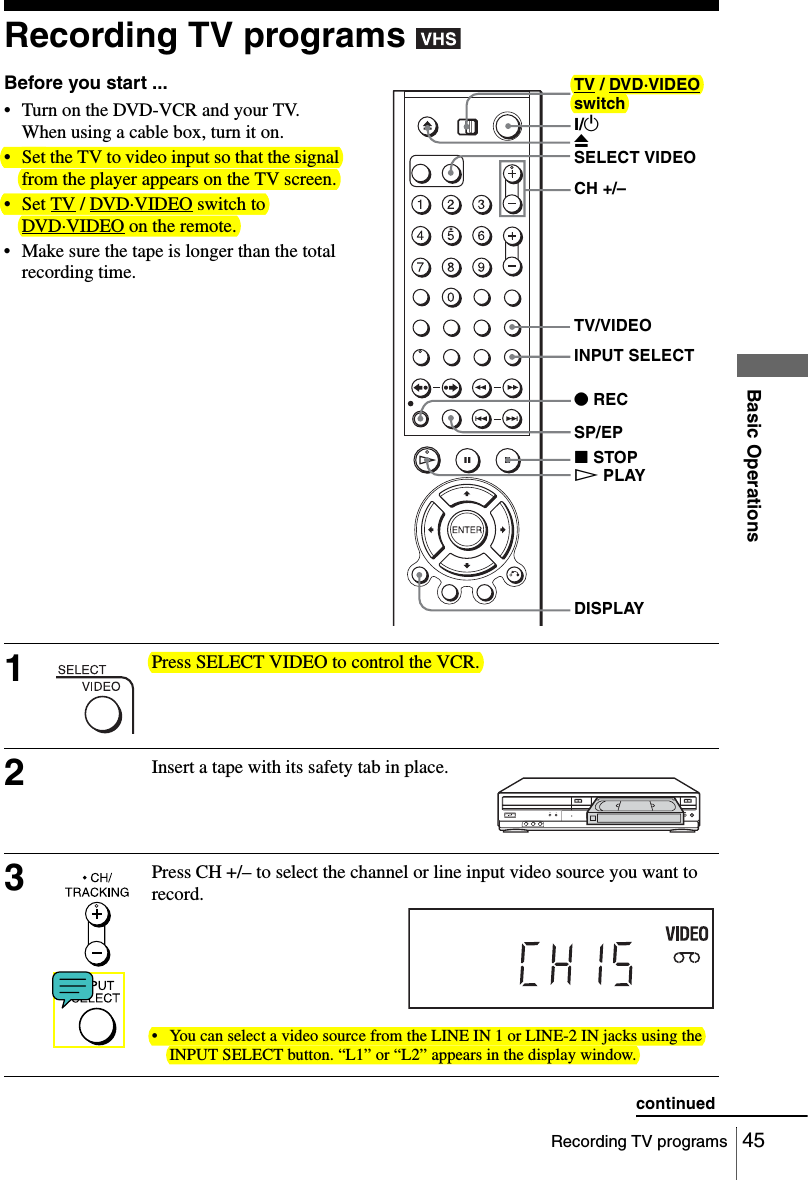
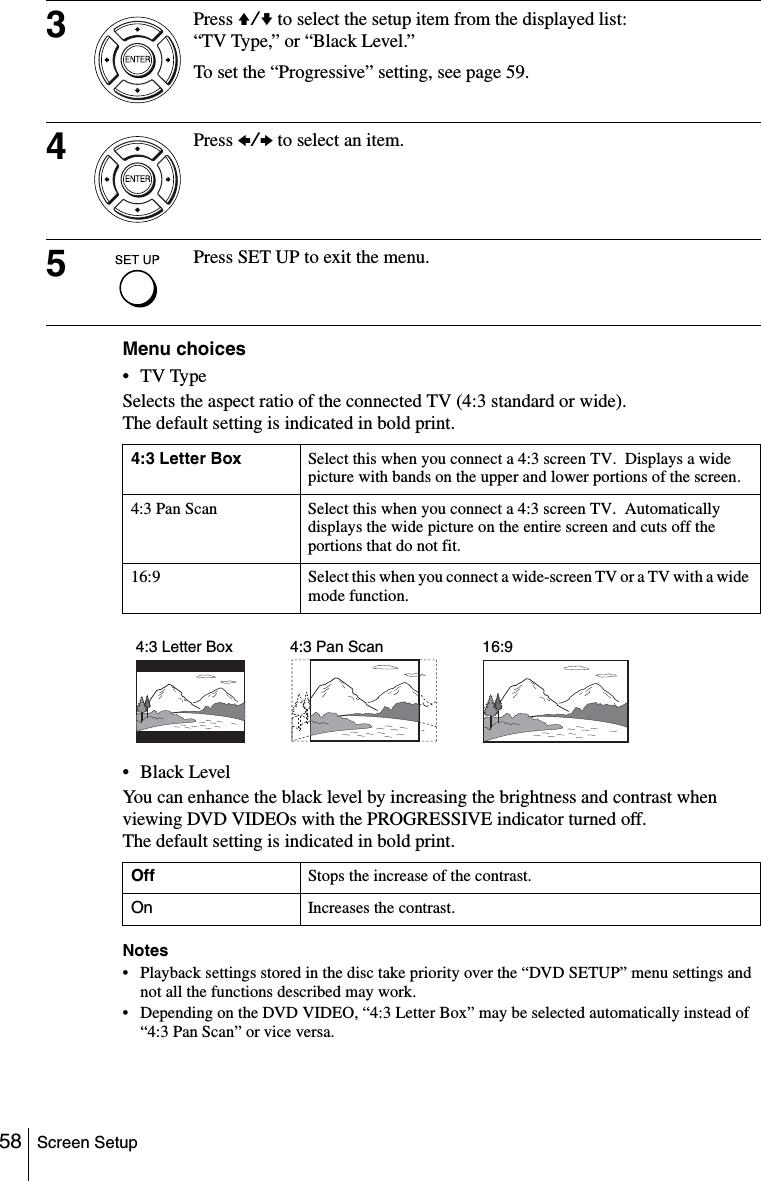
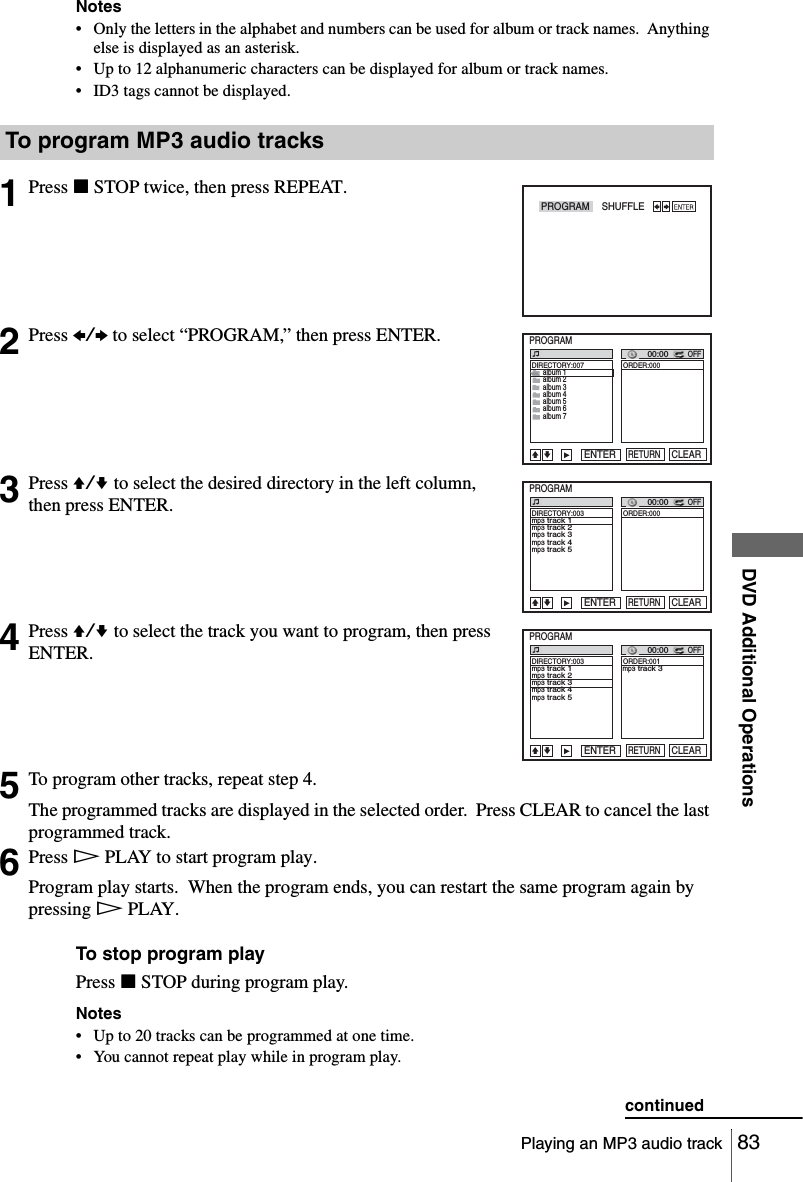
Samsung Electronics Co SLVD370P DVD Player / Video Cassette Recorder User Manual SLV D370P
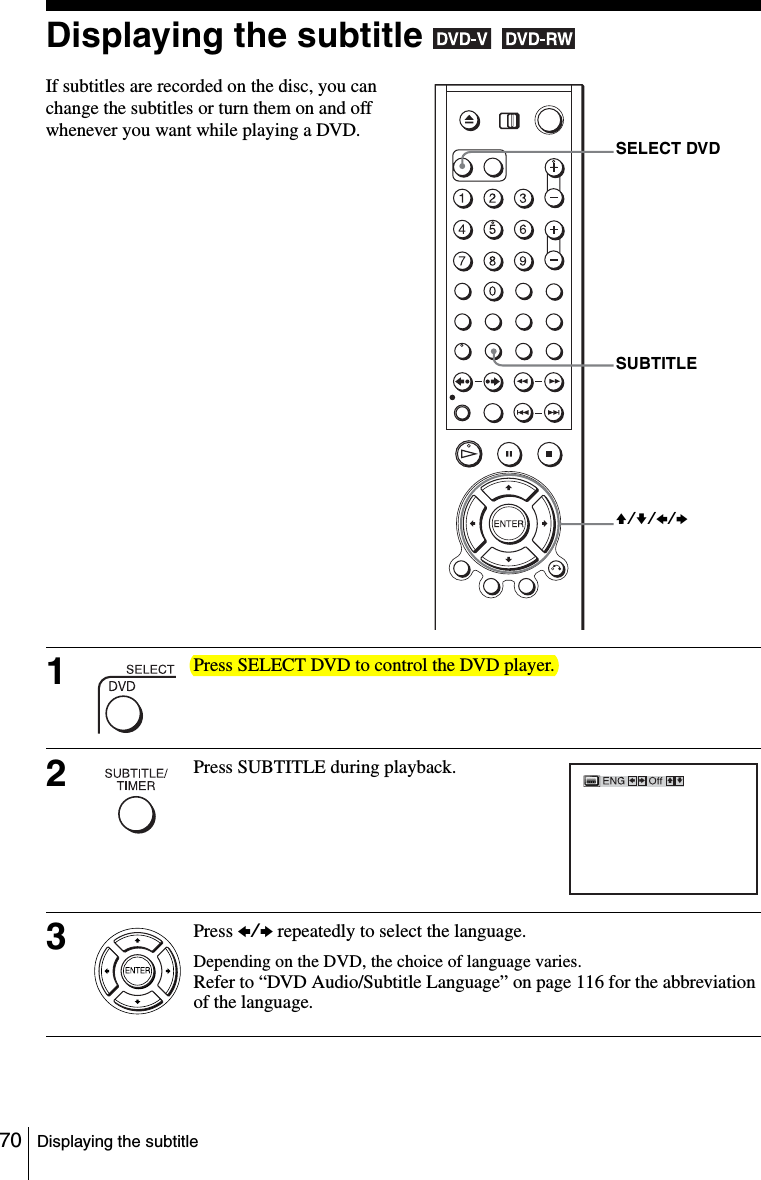
Samsung Electronics Co Ltd DVD Player / Video Cassette Recorder SLV D370P
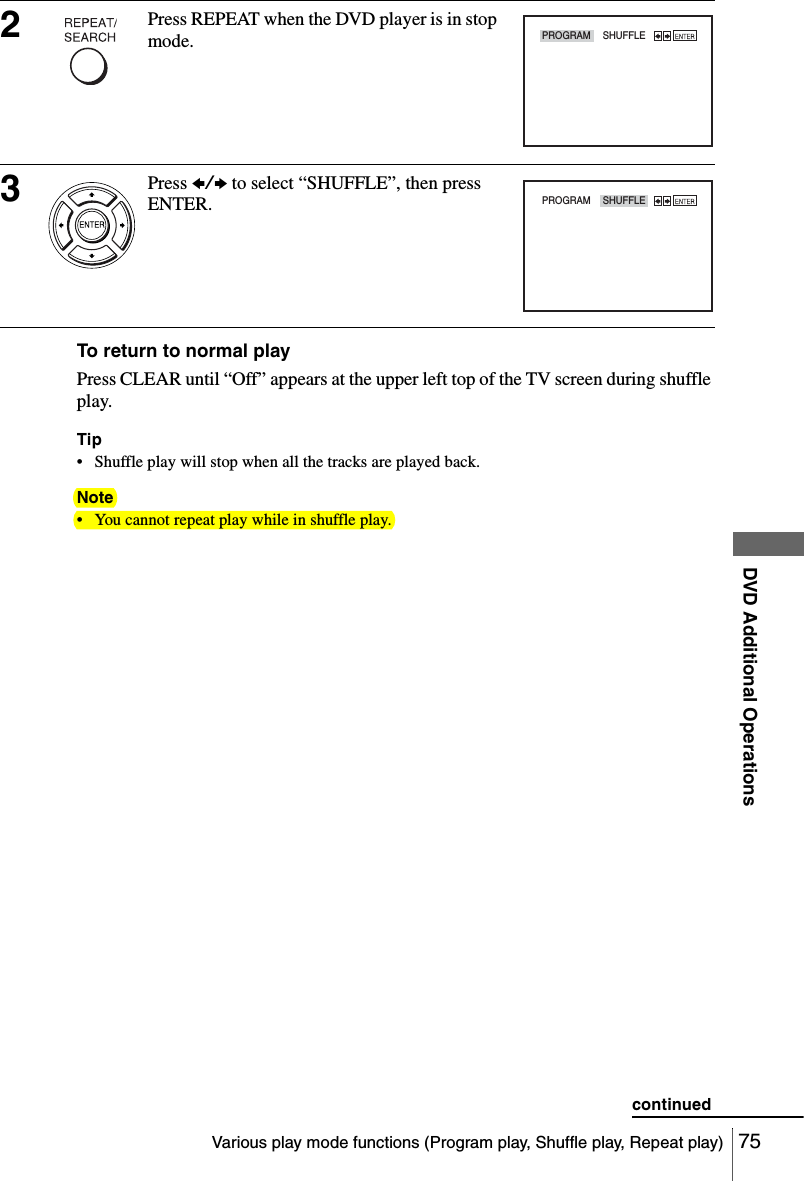
UserManual.wiki
>
Samsung Electronics Co
>
SLVD370P User Manual
Users Manual
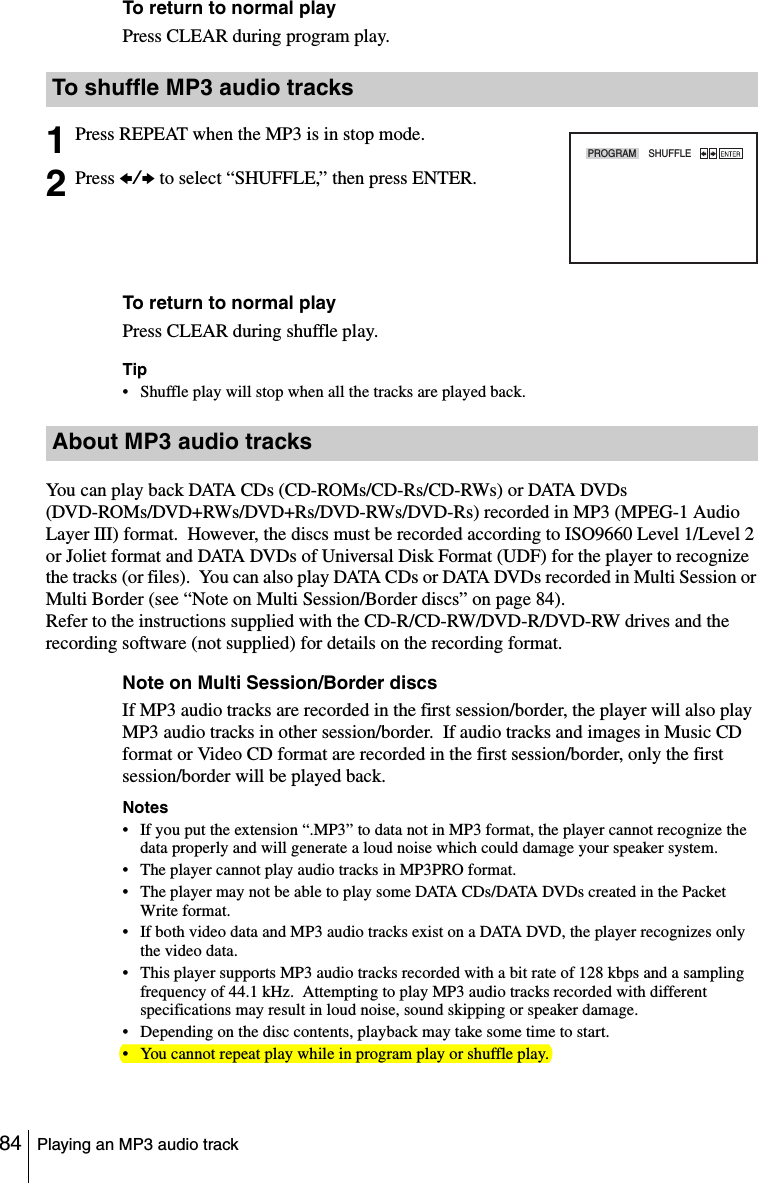
Navigation menu
Upload a User Manual
Namespaces
Wiki Guide
HTML
PDF
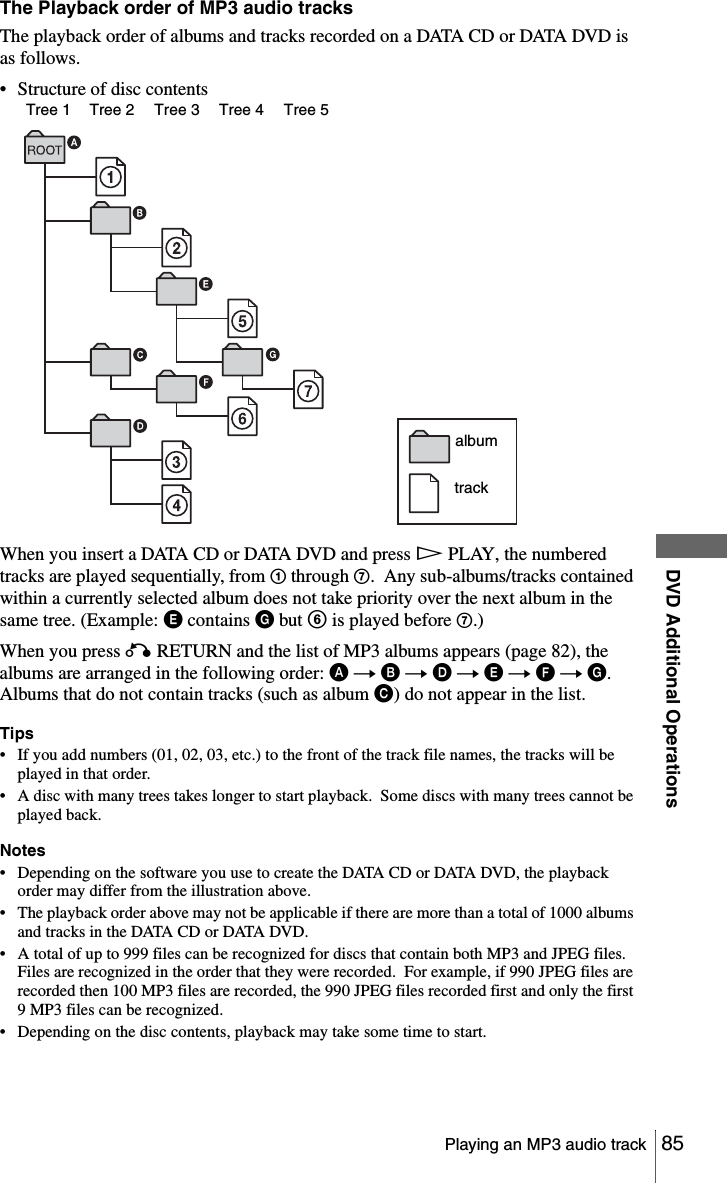
Info
Views
User Manual
Discussion / Help
Navigation

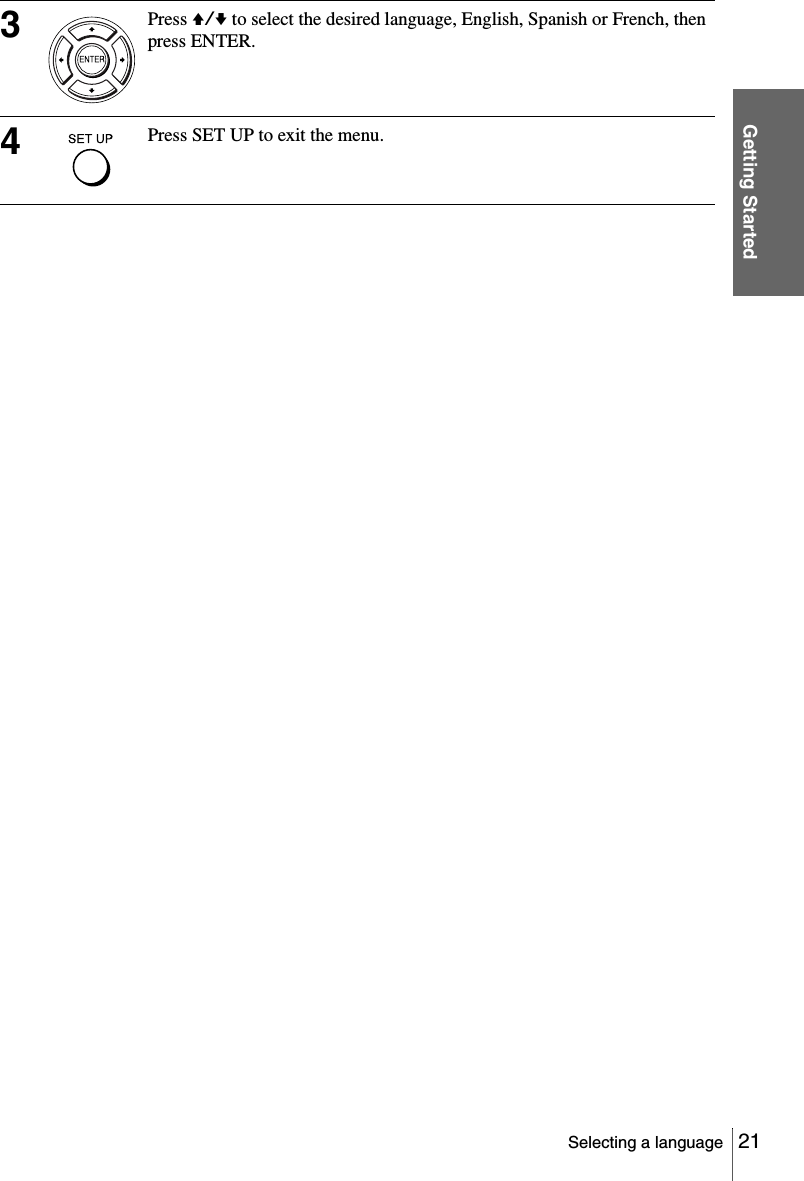
![20 Selecting a languageStep 4 : Selecting a languageYou can change the on-screen display language.Before you start…• Turn on the DVD-VCR and your TV.• Set the TV to video input so that the signal from the player appears on the TV screen.•Set TV / DVD·VIDEO switch to DVD·VIDEO on the remote.• If the DVD player is in play mode, you cannot display the setup menu. Stop the DVD playback.1Press SET UP, then press V/v to select (OPTION) and press ENTER.2Press V/v to select “Language”, then press ENTER.The “LANGUAGE/IDIOMA/LANGUE” menu appears.V/vENTERTV / DVD·VIDEO switchSET UPLanguageChannel SetupAuto Power OffRF Output ChannelClock Set/Adjust :English[ Off ][ 3CH ]RETURNOPTION SETUPSET UPENTERvVRETURNLANGUAGE/IDIOMA/LANGUESET UPENTERvVEnglishFrançaisBEspañol](https://usermanual.wiki/Samsung-Electronics-Co/SLVD370P/User-Guide-612404-Page-20.png)
![22 Setting the clockStep 5 : Setting the clockYou must set the clock on the DVD-VCR to use the timer features properly.Using the Auto Clock Set featureSome TV and cable channels transmit time signals with their broadcasts. Your DVD-VCR can pick up this time signal to automatically set the clock.The Auto Clock Set feature works only if a channel in your area is broadcasting a time signal. If broadcasters in your area are not yet sending time signals, set the time manually (page 24).Before you start…• Turn on the DVD-VCR and your TV. When using a cable box, turn it on.• Set the TV to video input so that the signal from the player appears on the TV screen.•Set TV / DVD·VIDEO switch to DVD·VIDEO on the remote.• If the DVD player is in play mode, you cannot display the setup menu. Stop the DVD playback.1Press SET UP, then press V/v to select (OPTION) and press ENTER.V/v/B/bENTERSET UPO RETURNTV / DVD·VIDEO switchLanguageChannel SetupAuto Power OffRF Output ChannelClock Set/Adjust :English[ Off ][ 3CH ]RETURNOPTION SETUPSET UPENTERvV](https://usermanual.wiki/Samsung-Electronics-Co/SLVD370P/User-Guide-612404-Page-22.png)
![Getting Started23Setting the clock2Press V/v to select “Clock Set/Adjust”, then press ENTER.The “CLOCK SET/ADJUST” menu appears.3Press V/v to select “Auto”, then press ENTER.4Press V/v to select the item you want, then press B/b to make the setting.• For “Clock data CH”Leave the setting to “Auto” to have the DVD-VCR automatically search for a channel that carries a time signal. Press B/b to select a channel that carries a time signal. Use this option if you know of a channel that carries a time signal. Most PBS member stations broadcast a time signal. For the fastest response, select your local PBS station.• For “Time zone”Select the time zone of your area, or select “Auto” to have the DVD-VCR automatically set your time zone.The options are:Auto y Atl. (Atlantic) y East (Eastern) y Cen. (Central) y Mtn. (Mountain) y Pac. (Pacific) y Alas (Alaska) y Haw. (Hawaii) y Auto• For “Daylight saving”Select “Yes” or “No” (standard time), or “Auto” to have the DVD-VCR automatically set the daylight saving time.RETURNCLOCK SET/ADJUSTSET UPENTERAutoManualvVRETURNCLOCK SET/ADJUSTSET UPClock data CH [ Auto ]Time zone [ Auto ]Daylight saving [ Auto ]vVbBRETURNCLOCK SET/ADJUSTSET UPClock data CH [ 123 ]Time zone [ Auto ]Daylight saving [ Auto ]vVbBRETURNCLOCK SET/ADJUSTSET UPClock data CH [ Auto ]Time zone [ Pac. ]Daylight saving [ Auto ]vVbBRETURNCLOCK SET/ADJUSTSET UPClock data CH [ Auto ]Time zone [ Auto ]Daylight saving [ No ]vVbBcontinued](https://usermanual.wiki/Samsung-Electronics-Co/SLVD370P/User-Guide-612404-Page-23.png)
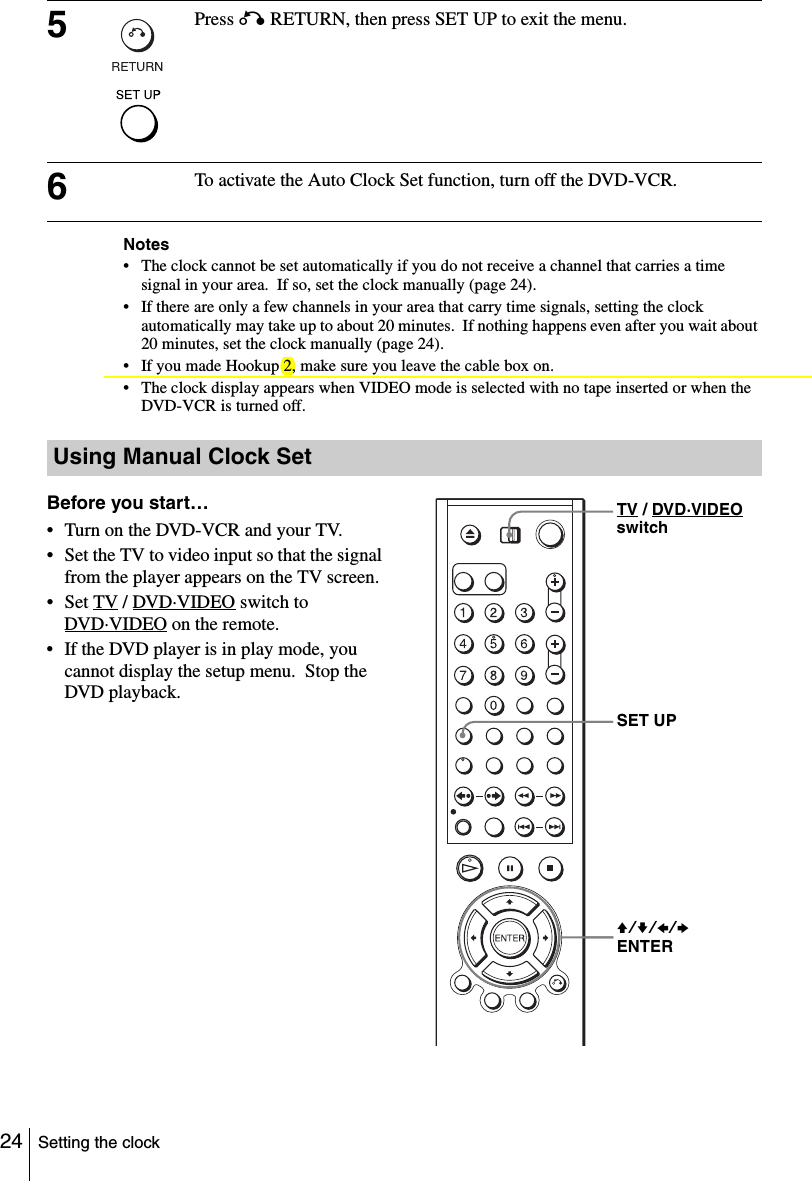
![Getting Started25Setting the clockNote• The clock display appears when VIDEO mode is selected with no tape inserted or when the DVD-VCR is turned off.1Press SET UP, then press V/v to select (OPTION) and press ENTER.2Press V/v to select “Clock Set/Adjust”, then press ENTER.The “CLOCK SET/ADJUST” menu appears.3Press V/v to select “Manual”, then press ENTER.4Set the hour, minutes, month, day and year in sequence by pressing B/b to select the item to be set, and press V/v to select the digits. The day of the week is set automatically.5Press ENTER to confirm the setting.6Press SET UP to exit the menu.LanguageChannel SetupAuto Power OffRF Output ChannelClock Set/Adjust :English[ Off ][ 3CH ]RETURNOPTION SETUPSET UPENTERvVRETURNCLOCK SET/ADJUSTSET UPENTERAutoManualvV12:00AM 1/01 2005 SatTime DateRETURNCLOCK SET/ADJUSTSET UPENTERvVbBYear12:00AM 1/01 2005 SatTime DateRETURNCLOCK SET/ADJUSTSET UPENTERvVbBYear](https://usermanual.wiki/Samsung-Electronics-Co/SLVD370P/User-Guide-612404-Page-25.png)
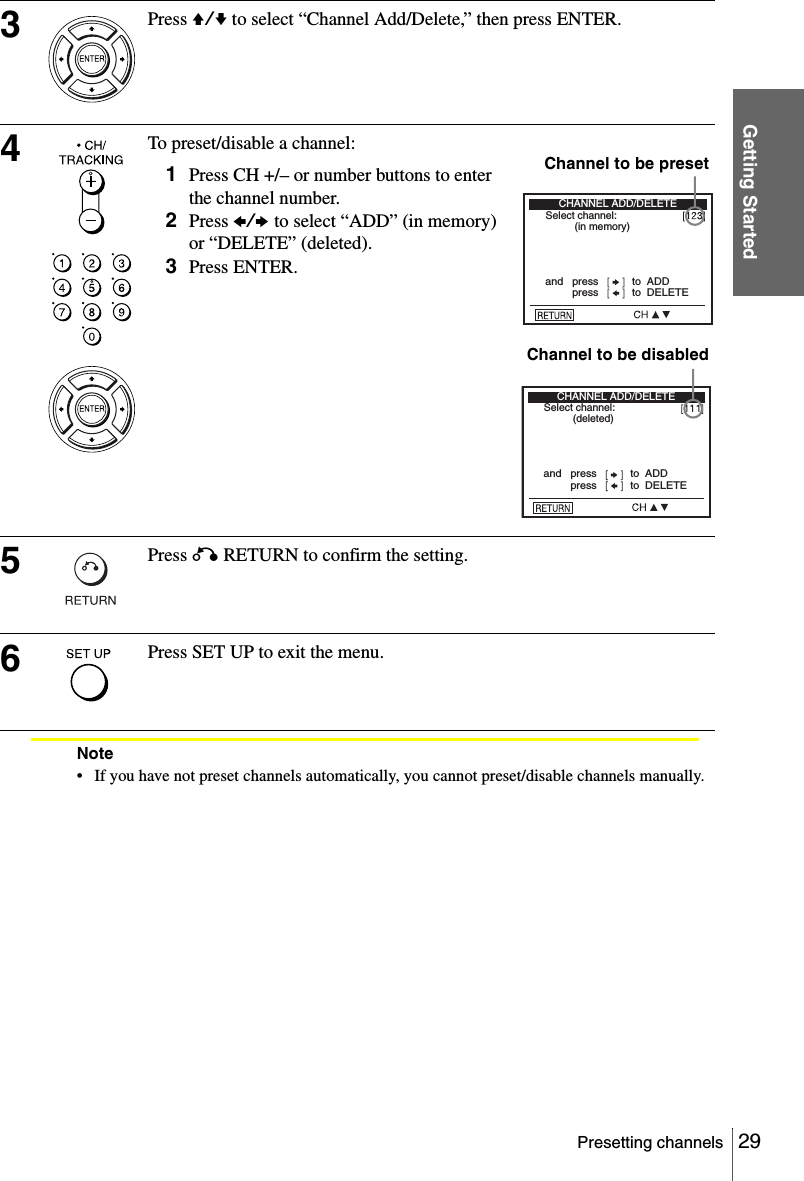
![26 Presetting channelsStep 6 : Presetting channelsThis DVD-VCR is capable of receiving VHF channels 2 to 13, UHF channels 14 to 69 and unscrambled CATV channels 1 to 125. First, we recommend that you preset the receivable channels in your area using automatic presetting methods. Then, if there are any unwanted channels, disable them manually. If you have already decided which channels you wish to preset, set them directly using manual presetting methods (page 28).Presetting all receivable channels automaticallyBefore you start…• Turn on the DVD-VCR and your TV. When using a cable box, turn it on.• Set the TV to video input so that the signal from the player appears on the TV screen.•Set TV / DVD·VIDEO switch to DVD·VIDEO on the remote.• If the DVD player is in play mode, you cannot display the setup menu. Stop the DVD playback.1Press SET UP, then press V/v to select (OPTION) and press ENTER.V/v/B/bENTERSET UPTV / DVD·VIDEO switchLanguageChannel SetupAuto Power OffRF Output ChannelClock Set/Adjust :English[ Off ][ 3CH ]RETURNOPTION SETUPSET UPENTERvV](https://usermanual.wiki/Samsung-Electronics-Co/SLVD370P/User-Guide-612404-Page-26.png)
![Getting Started27Presetting channels2Press V/v to select “Channel Setup”, then press ENTER.The “CHANNEL SETUP” menu appears.3Press V/v to select “Ant/Cable.”4• To preset cable TV channels:Press B/b to select “Cable TV.”• To preset VHF and UHF channels:Press B/b to select “Antenna.”5Press V/v to select “Auto Channel Memory,” then press ENTER.All receivable channels are preset in numerical sequence. When no more receivable channels can be found, presetting stops and the picture from the lowest numbered channel is displayed on the TV screen.RETURNCHANNEL SETUPSET UPAnt/Cable [ Cable TV ]Auto Channel MemoryChannel Add/DeleteGuide Channel SetupvVbBRETURNCHANNEL SETUPSET UPAnt/Cable [ Cable TV ]Auto Channel MemoryChannel Add/DeleteGuide Channel SetupvVbBRETURNCHANNEL SETUPSET UPAnt/Cable [ Antenna ]Auto Channel MemoryChannel Add/DeleteGuide Channel SetupvVbBMemorizingPlease WaitAUTO CH MEMORYRETURNSET UPcontinued](https://usermanual.wiki/Samsung-Electronics-Co/SLVD370P/User-Guide-612404-Page-27.png)
![28 Presetting channelsPresetting/disabling channels manuallyBefore you start…• Turn on the DVD-VCR and your TV. When using a cable box, turn it on.• Set the TV to video input so that the signal from the player appears on the TV screen.•Set TV / DVD·VIDEO switch to DVD·VIDEO on the remote.• If the DVD player is in play mode, you cannot display the setup menu. Stop the DVD playback.1Press SET UP, then press V/v to select (OPTION) and press ENTER.2Press V/v to select “Channel Setup”, then press ENTER.The “CHANNEL SETUP” menu appears.SET UPCH +/–Number buttonsV/v/B/bENTERO RETURNTV / DVD·VIDEO switchLanguageChannel SetupAuto Power OffRF Output ChannelClock Set/Adjust :English[ Off ][ 3CH ]RETURNOPTION SETUPSET UPENTERvVRETURNCHANNEL SETUPSET UPAnt/Cable [ Cable TV ]Auto Channel MemoryChannel Add/DeleteGuide Channel SetupvVbB](https://usermanual.wiki/Samsung-Electronics-Co/SLVD370P/User-Guide-612404-Page-28.png)
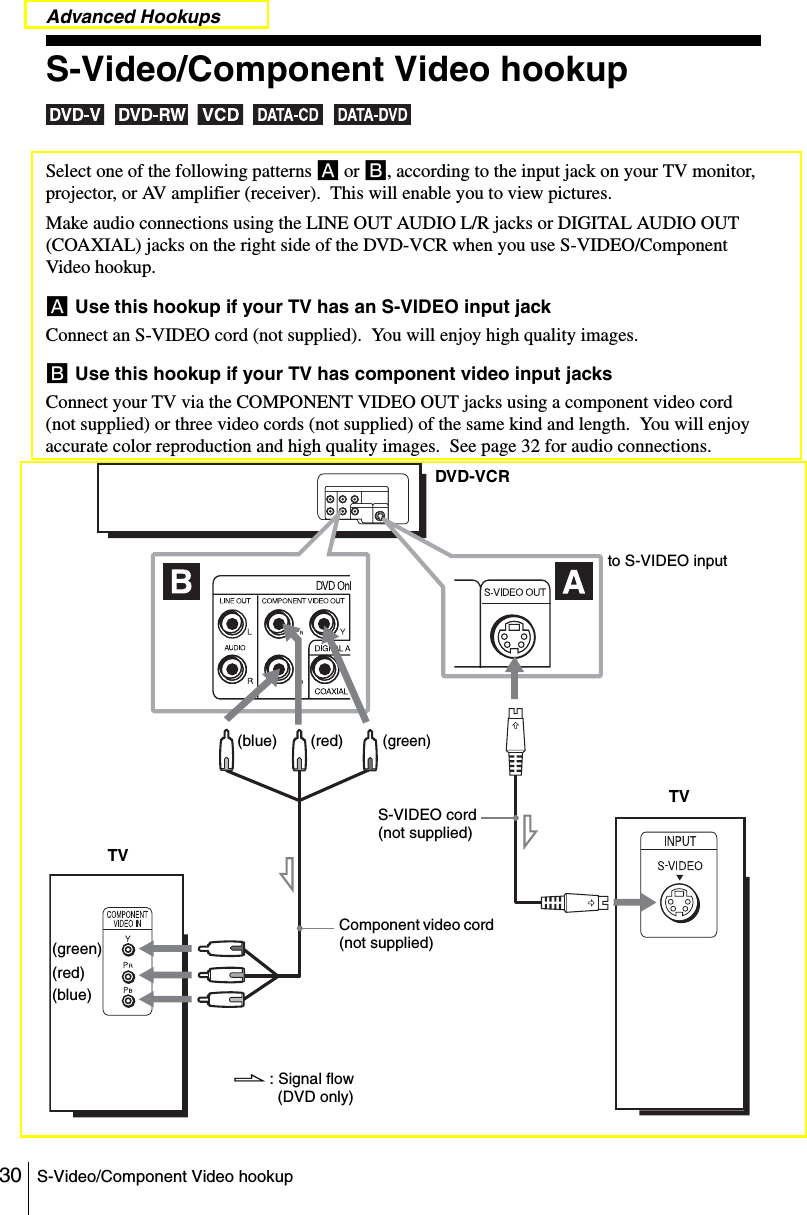
(white)[Speakers]to audio input(white)(red)to LINE OUT L/R (AUDIO)to coaxial digital inputCoaxial digital cord (not supplied)to DIGITAL AUDIO OUT (COAXIAL)or](https://usermanual.wiki/Samsung-Electronics-Co/SLVD370P/User-Guide-612404-Page-33.png)

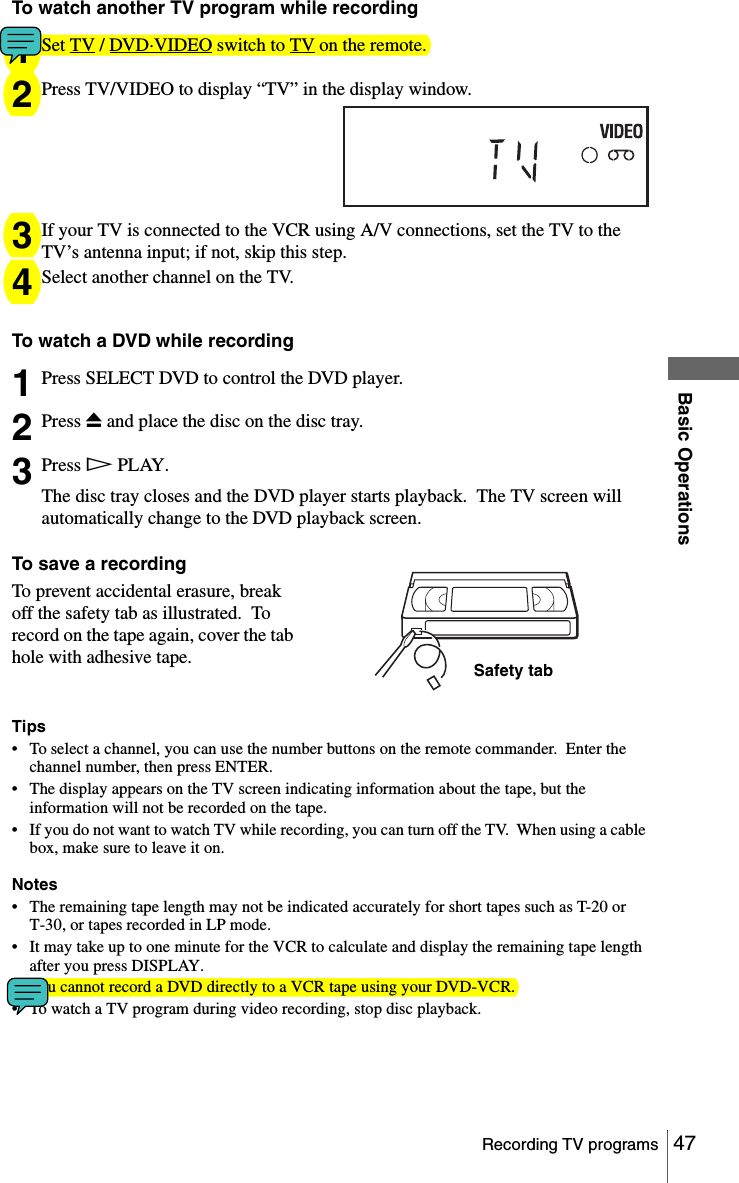
![43Playing a tapeBasic OperationsTo use the time counterPress CLEAR at the point on the tape that you want to find later. The counter in the display window resets to “0:00:00.” To search for the counter 0:00:00 point automatically, see “Go to [0:00:00] (To search for the counter 0:00:00 point):” on page 95.To display the counter on the TV screen, press DISPLAY during normal playback.Tip• Adjust the picture using the TRACKING +/– buttons if:– Streaks appear while playing in slow motion.– Bands appear at the top or bottom while pausing.– The picture shakes during pause.Notes• Tapes recorded in LP mode on other VCRs can be played back on this VCR but the picture quality cannot be guaranteed.• The counter resets to “0:00:00” whenever a tape is reinserted.• The counter stops counting when it comes to a portion with no recording.• When 10 hours have passed, the counter in the display window returns to “0:00:00” and the count starts over again.• No sound is output during playback at various speeds.• The picture may show noise when playing at high speed in reverse.• While playing a tape, you can display the setup menu, but the remote commander’s function switches to DVD automatically. Press O RETURN repeatedly to exit the menu.• When playback does not start even if you insert a tape with its safety tab removed, set “Auto Play” to “On” in the “VIDEO FUNCTION SETUP” menu (page 96).• Stop disc playback while playing back a video.• The VCR can also play S-VHS tapes recorded by S-VHS mode. The VCR will automatically identify the type of tape inserted in the VCR (either VHS or S-VHS). When S-VHS tapes are played in the VCR, the enhanced resolution will not be visible on screen; there may also be picture distortion while playing the S-VHS tape in slow motion or while utilizing other special playback modes. The VCR will not record in S-VHS mode on an S-VHS tape.• The playback of S-VHS tapes recorded in EP/LP mode cannot be guaranteed.continued](https://usermanual.wiki/Samsung-Electronics-Co/SLVD370P/User-Guide-612404-Page-43.png)

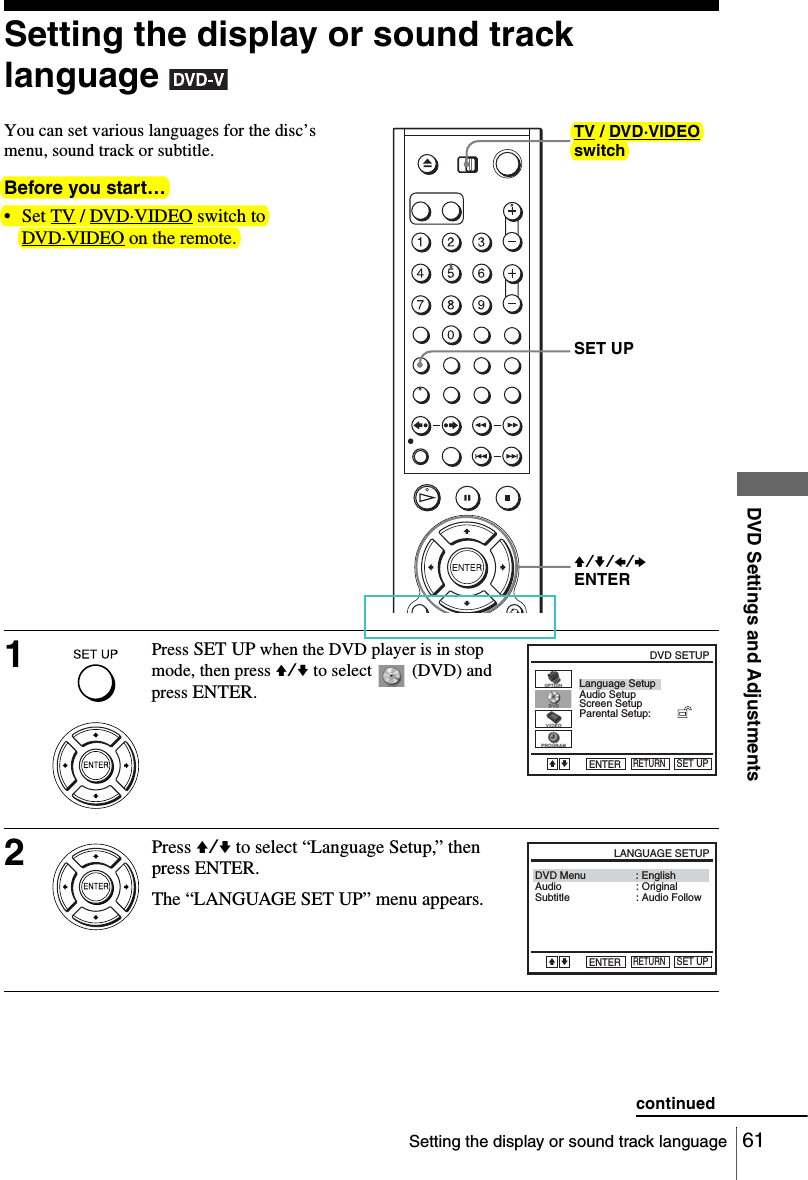
![54 Audio SetupDVD Settings and AdjustmentsAudio Setup “Audio Setup” allows you to set the sound according to the playback and connection conditions.Before you start…•Set TV / DVD·VIDEO switch to DVD·VIDEO on the remote.1Press SET UP when the DVD player is in stop mode, then press V/v to select (DVD), then press ENTER.2Press V/v to select “Audio Setup,” then press ENTER.V/v/B/b ENTERSET UPTV / DVD·VIDEO switchLanguage SetupScreen SetupParental Setup:Audio SetupRETURNDVD SETUPSET UPENTERVvDolby DigitalDTSAudio DRCRETURNAUDIO SETUPSET UPvVbB[ Off ][ Standard ][ D-PCM ]](https://usermanual.wiki/Samsung-Electronics-Co/SLVD370P/User-Guide-612404-Page-54.png)
![57Screen SetupDVD Settings and AdjustmentsScreen Setup “Screen Setup” allows you to set the screen according to the playback and connection conditions.Before you start…•Set TV / DVD·VIDEO switch to DVD·VIDEO on the remote.1Press SET UP when the DVD player is in stop mode, then press V/v to select (DVD), then press ENTER.2Press V/v to select “Screen Setup,” then press ENTER.V/v/B/bENTERSET UPO RETURNTV / DVD·VIDEO switchLanguage SetupScreen SetupParental Setup:Audio SetupRETURNDVD SETUPSET UPENTERVvBlack LevelTV TypeProgressiveRETURNSCREEN SETUPSET UPvVbB[ Off ][ Off ] [ 4:3 Letter Box ]continued](https://usermanual.wiki/Samsung-Electronics-Co/SLVD370P/User-Guide-612404-Page-57.png)
![59Screen SetupDVD Settings and AdjustmentsIf your TV accepts progressive (480p) format signals, you will enjoy accurate color reproduction and high quality image.To set the “Progressive” setting1Follow step 1 and 2 on page 57, then press V/v to select “Progressive.”2Press B/b to select “On,” then press ENTER.3Follow the instructions appearing on the screen.1Ensure your TV is (480p) Progressive Scan capable.2Connect with Component Video Output jacks (red/green/blue connections).See “B Use this hookup if your TV has component video input jacks” on page 30.3Press B/b to select [OK] to test your video signal.4If video signal appears OK, video connection is complete. Press ENTER.The PROGRESSIVE indicator on the unit lights up in orange.If picture is distorted, press O RETURN. Check the connection (page 30).Black LevelTV TypeProgressiveRETURNSCREEN SETUPSET UPvVbB[ Off ][ Off ] [ 4:3 Letter Box ]Black LevelTV TypeProgressiveRETURNSCREEN SETUPENTERSET UPvVbB[ On ][ Off ] [ 4:3 Letter Box ]Progressive Scan Output1) Ensure your TV is (480P) Progressive Scan capable. 2) Connect with Component Video Output jacks. (red/green/blue connections)3) Select [OK] to test your video signal.4) If video signal appears OK, video connection is complete.RETURNSCREEN SETUPENTERSET UPbBOK CANCELTEST SCREENSCREEN SETUPIf picture is OK, press [ENTER] key.If picture is distorted, press [RETURN] key.To DeactivatePress [PAUSE] on the unit for 5 seconds.RETURNSCREEN SETUPENTERPROGRESSIVE indicatorcontinued](https://usermanual.wiki/Samsung-Electronics-Co/SLVD370P/User-Guide-612404-Page-59.png)
![60 Screen SetupTip• To cancel the “Progressive” setting, press X on the unit continuously for 5 seconds or more, or selecting “Off” in step 2.Note• If you select progressive signal when you connect the DVD player to a TV that cannot accept the signal in progressive format, the image quality will deteriorate. In this case, set “Progressive” to “Off”.5Press SET UP to exit the menu.Black LevelTV TypeProgressiveRETURNSCREEN SETUPSET UPvVbB[ On ][ Off ] [ 4:3 Letter Box ]](https://usermanual.wiki/Samsung-Electronics-Co/SLVD370P/User-Guide-612404-Page-60.png)
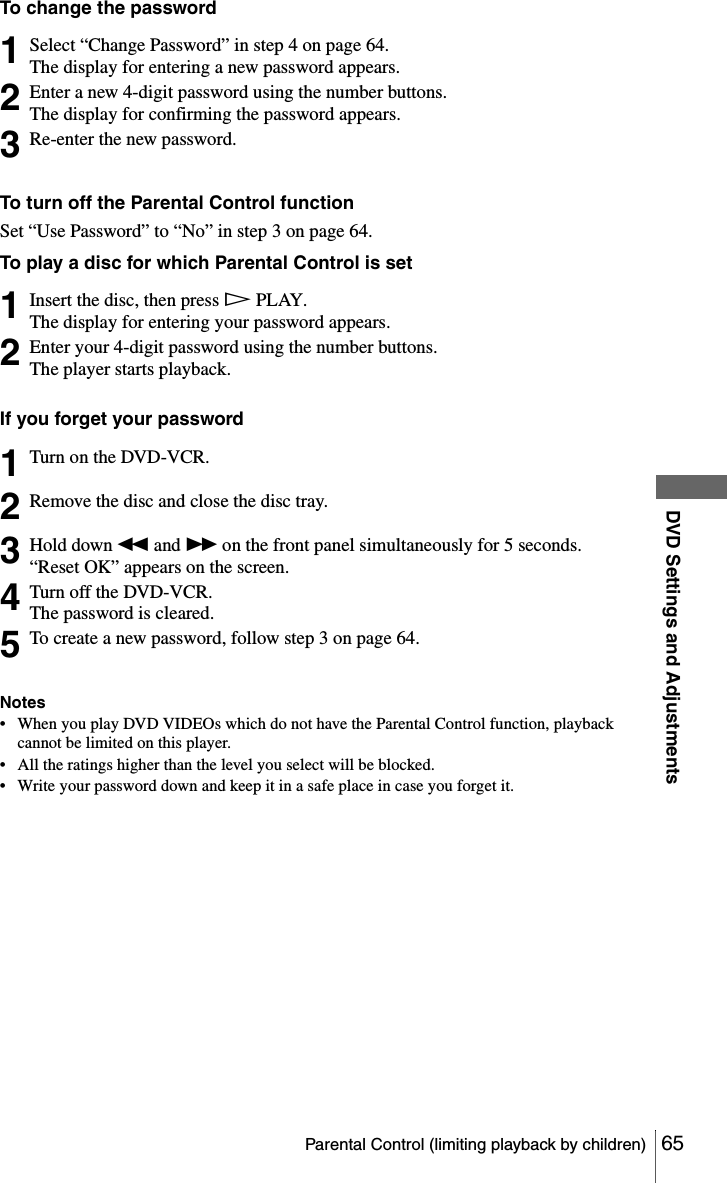
![63Parental Control (limiting playback by children)DVD Settings and AdjustmentsParental Control (limiting playback by children) Playback of some DVD VIDEOs can be limited according to a predetermined level such as the age of the users. The “Parental Control” function allows you to set a playback limitation level.Before you start…•Set TV / DVD·VIDEO switch to DVD·VIDEO on the remote.1Press SET UP when the DVD player is in stop mode, then press V/v to select (DVD) and press ENTER.2Press V/v to select “Parental Setup,” then press ENTER.Number buttonsSET UPHPLAYTV / DVD·VIDEO switchV/v/B/bENTERLanguage SetupScreen SetupParental Setup:Audio SetupRETURNDVD SETUPSET UPENTERVvUse PasswordRETURNPARENTAL SETUPSET UP[ No ]Bbcontinued](https://usermanual.wiki/Samsung-Electronics-Co/SLVD370P/User-Guide-612404-Page-63.png)
![64 Parental Control (limiting playback by children)3Press b to set the parental control.• If you have not entered a passwordThe display for registering a new password appears.Enter a 4-digit password using the number buttons.The display for confirming the password appears.Re-enter the password.• When you have already registered a passwordThe display for entering the password appears.Enter a 4-digit password using the number buttons.After registering a password, if you set “Use Password” to “No,” “PASSWORD CHECK” screen will not appear.4Press V/v to select “Rating Level,” then press ENTER.5Press V/v to select the level you want, then press ENTER.The options are as follows.Level 8 (Adult) y Level 7 y Level 6 y Level 5 y Level 4 y Level 3 y Level 2 y Level 1 (Kids Safe)The lower the value, the stricter the limitation.6Press SET UP to exit the menu.Enter Password––––CREATE PASSWORD-~9RETURNCREATE PASSWORD-~9RETURNRe-enter Password––––PASSWORD CHECK-~9RETURNEnter Password––––Use PasswordRETURNPARENTAL SETUPSET UP[ Yes ]vVbBRating LevelChange Password:1RETURNRATING LEVELSET UPENTERVLevel 8 AdultLevel 7Level 6Level 5Level 4Level 3Level 2Level 1 Kids SafevRETURNRATING LEVELSET UPENTERLevel 8 AdultLevel 7Level 6Level 5Level 4Level 3Level 2Level 1 Kids SafeVv](https://usermanual.wiki/Samsung-Electronics-Co/SLVD370P/User-Guide-612404-Page-64.png)

![95Searching using various functionsVCR Additional OperationsNote• Once in recording mode, if the VCR is put in pause and then released to start the recording, no index mark will be inserted. An index mark will be inserted if the channel is changed while VCR is put in pause.4• Scan and Play (To search using the index function):1Press b to scan ahead, or B to scan backwards.The VCR searches and then plays back for about five seconds.2Press HPLAY to view that program.If you do not press HPLAY, the VCR automatically searches for the next index mark, or until it reaches the end of the tape.• Go to [0:00:00] (To search for the counter 0:00:00 point):Press V.The VCR starts searching and automatically stops at the 0:00:00 point.To mark a point on the tape that you want to find later, press CLEAR to reset the tape counter to “0:00:00.”• End search (To search for a blank portion of the tape)Press v.The VCR starts searching and automatically stops at the beginning of a blank space. If no blank space is found, the VCR reaches the end.Scan and playGo toEnd search](https://usermanual.wiki/Samsung-Electronics-Co/SLVD370P/User-Guide-612404-Page-95.png)
![96 Changing menu optionsChanging menu options You can change the tape length, auto play and auto repeat settings. Normally the default settings are used. Change these settings if necessary. 1Press SET UP when the DVD player is in stop mode. 2Press V/v to select (VIDEO) and press ENTER.3Press V/v to select the option to change.SET UPV/v/B/bENTERHPLAYLanguageChannel SetupAuto Power OffRF Output ChannelClock Set/Adjust :English[ Off ][ 3CH ]RETURNOPTION SETUPSET UPENTERvVTape LengthAuto PlayRETURNVIDEO FUNCTION SETUPSET UPvVbB[ T120 ][ On ]Auto Repeat [ Off ]Tape LengthAuto PlayRETURNVIDEO FUNCTION SETUPSET UPvVbB[ T120 ][ On ]Auto Repeat [ Off ]](https://usermanual.wiki/Samsung-Electronics-Co/SLVD370P/User-Guide-612404-Page-96.png)
![100 General setup informationAdditional InformationGeneral setup informationBefore you start…•Set TV / DVD·VIDEO switch to DVD·VIDEO on the remote.1Press SET UP when the DVD player is in stop mode, then press V/v to select (OPTION), then press ENTER.2Press V/v to select the option to change.SET UPV/v/B/bENTERTV / DVD·VIDEO switchLanguageChannel SetupAuto Power OffRF Output ChannelClock Set/Adjust :English[ Off ][ 3CH ]RETURNOPTION SETUPSET UPENTERvVLanguageChannel SetupAuto Power OffRF Output ChannelClock Set/Adjust :English[ Off ][ 3CH ]RETURNOPTION SETUPSET UPvVbB](https://usermanual.wiki/Samsung-Electronics-Co/SLVD370P/User-Guide-612404-Page-100.png)


![Getting Started9ESSelecting a languageSelecting a languageYou can change the on-screen display language.Before you start…• Turn on the DVD-VCR and your TV.• Set the TV to video input so that the signal from the player appears on the TV screen.• If the DVD player is in play mode, you cannot display the setup menu. Stop the DVD playback.• Use the remote commander to operate the following functions.1Press SET UP, then press V/v to select (OPTION) and press ENTER.2Press V/v to select “Language”, then press ENTER.The “LANGUAGE/IDIOMA/LANGUE” menu appears.3Press V/v to select the desired language, English, Spanish or French, then press ENTER.4Press SET UP to exit the menu.LanguageChannel SetupAuto Power OffRF Output ChannelClock Set/Adjust :English[ Off ][ 3CH ]RETURNOPTION SETUPSET UPENTERvVRETURNLANGUAGE/IDIOMA/LANGUESET UPENTERvVEnglishFrançaisBEspañol](https://usermanual.wiki/Samsung-Electronics-Co/SLVD370P/User-Guide-612404-Page-126.png)
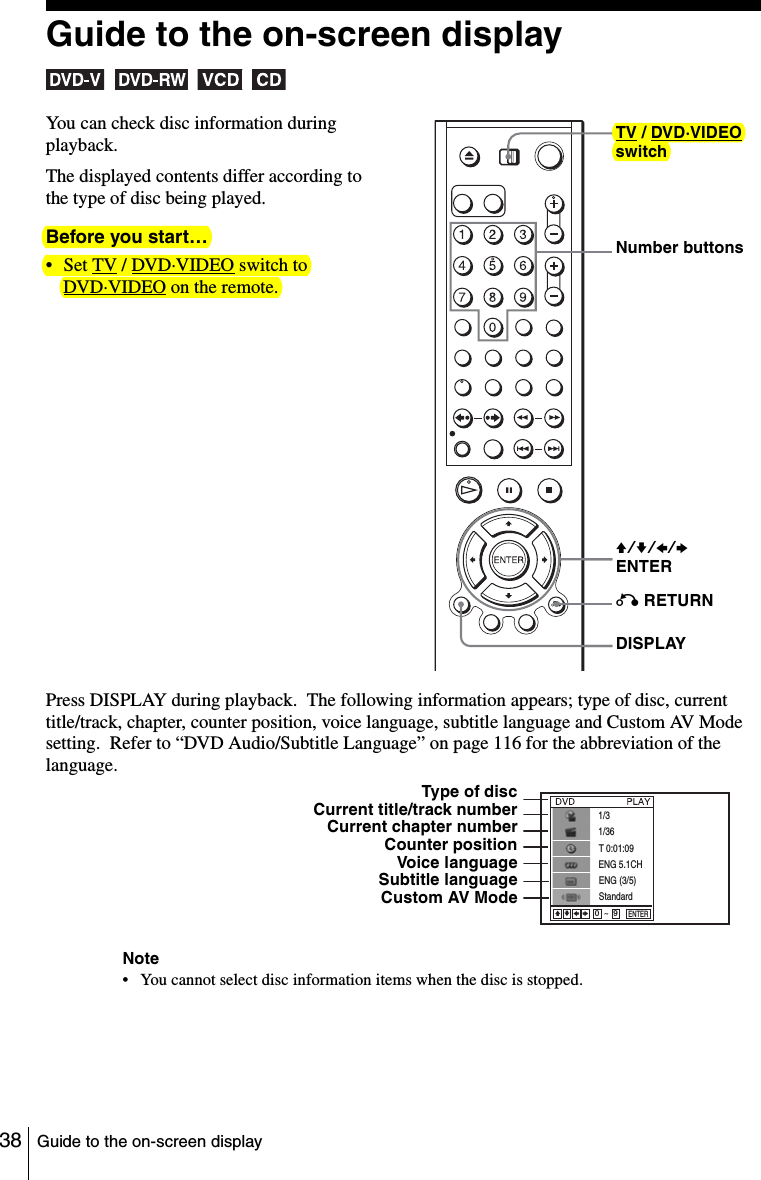
![10ES Setting the clockSetting the clockBefore you start…• Turn on the DVD-VCR and your TV.• Set the TV to video input so that the signal from the player appears on the TV screen.• If the DVD player is in play mode, you cannot display the setup menu. Stop the DVD playback.• Use the remote commander to operate the following functions.Notes• To record TV programs using the timer, you must set the clock accurately.• The clock display appears when VIDEO mode is selected with no tape inserted or when the DVD-VCR is turned off.1Press SET UP, then press V/v to select (OPTION) and press ENTER.2Press V/v to select “Clock Set/Adjust”, then press ENTER.The “CLOCK SET/ADJUST” menu appears.3Press V/v to select “Manual”, then press ENTER.4Set the hour, minutes, month, day and year in sequence by pressing B/b to select the item to be set, and press V/v to select the digits.The day of the week is set automatically.5Press ENTER to confirm the setting.6Press SET UP to exit the menu.LanguageChannel SetupAuto Power OffRF Output ChannelClock Set/Adjust :English[ Off ][ 3CH ]RETURNOPTION SETUPSET UPENTERvVRETURNCLOCK SET/ADJUSTSET UPENTERAutoManualvV12:00AM 1/01 2005 SatTime DateRETURNCLOCK SET/ADJUSTSET UPENTERvVbBYear](https://usermanual.wiki/Samsung-Electronics-Co/SLVD370P/User-Guide-612404-Page-127.png)
![Getting Started11ESPresetting channelsPresetting channelsThis DVD-VCR is capable of receiving VHF channels 2 to 13, UHF channels 14 to 69 and unscrambled CATV channels 1 to 125. First, we recommend that you preset the receivable channels in your area using automatic presetting methods. Before you start…• Turn on the DVD-VCR and your TV. When using a cable box, turn it on.• Set the TV to video input so that the signal from the player appears on the TV screen.• If the DVD player is in play mode, you cannot display the setup menu. Stop the DVD playback.• Use the remote commander to operate the following functions.1Press SET UP, then press V/v to select (OPTION) and press ENTER.2Press V/v to select “Channel Setup”, then press ENTER.The “CHANNEL SETUP” menu appears.3Press V/v to select “Ant/Cable.”4• To preset cable TV channels:Press B/b to select “Cable TV.”• To preset VHF and UHF channels:Press B/b to select “Antenna.”5Press V/v to select “Auto Channel Memory,” then press ENTER.All receivable channels are preset in numerical sequence. When no more receivable channels can be found, presetting stops and the picture from the lowest numbered channel is displayed on the TV screen.LanguageChannel SetupAuto Power OffRF Output ChannelClock Set/Adjust :English[ Off ][ 3CH ]RETURNOPTION SETUPSET UPENTERvVRETURNCHANNEL SETUPSET UPAnt/Cable [ Cable TV ]Auto Channel MemoryChannel Add/DeleteGuide Channel SetupvVbBRETURNCHANNEL SETUPSET UPAnt/Cable [ Cable TV ]Auto Channel MemoryChannel Add/DeleteGuide Channel SetupvVbBMemorizingPlease WaitAUTO CH MEMORYRETURNSET UP](https://usermanual.wiki/Samsung-Electronics-Co/SLVD370P/User-Guide-612404-Page-128.png)