Samsung Electronics Co SMA730F Multi-band GSM/EDGE/UMTS/LTE Phone with Bluetooth, WLAN, RFID and ANT+ User Manual
Samsung Electronics Co Ltd Multi-band GSM/EDGE/UMTS/LTE Phone with Bluetooth, WLAN, RFID and ANT+ Users Manual
UserManual.wiki
>
Samsung Electronics Co
>
SMA730F User Manual
Users Manual
Navigation menu
Upload a User Manual
Namespaces
Wiki Guide
HTML
PDF
Info
Views
User Manual
Discussion / Help
Navigation
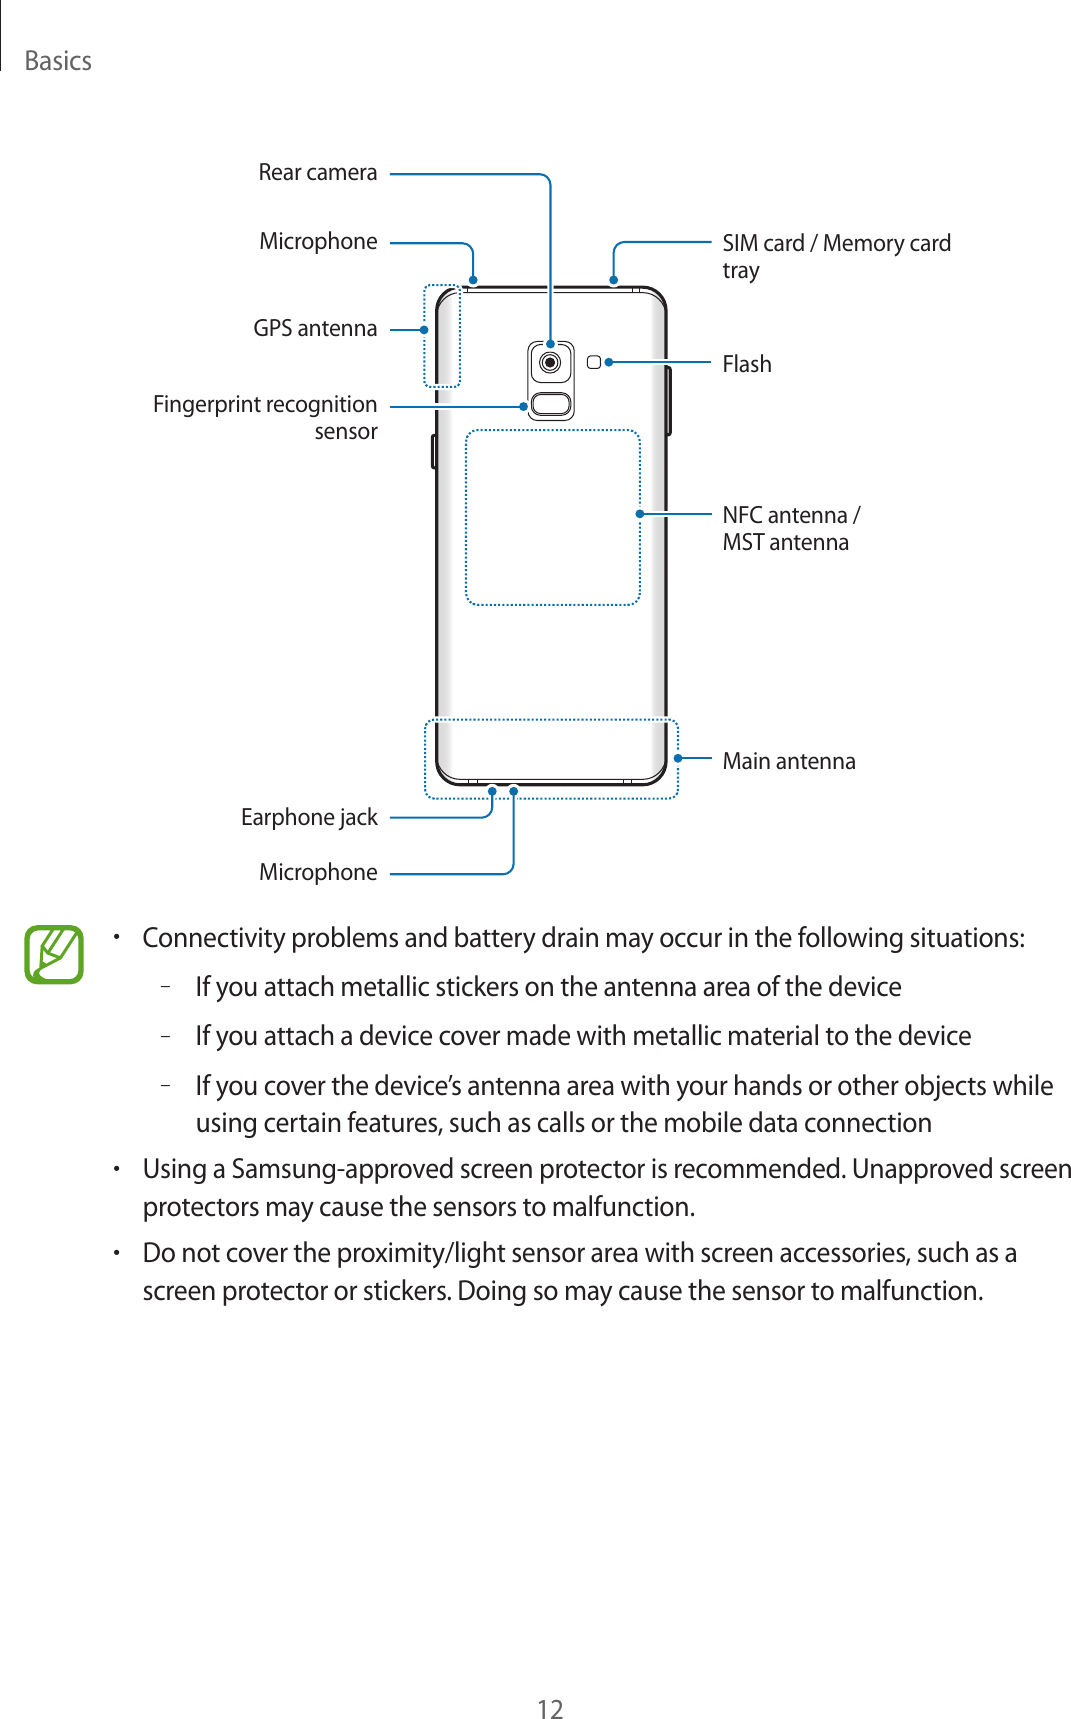
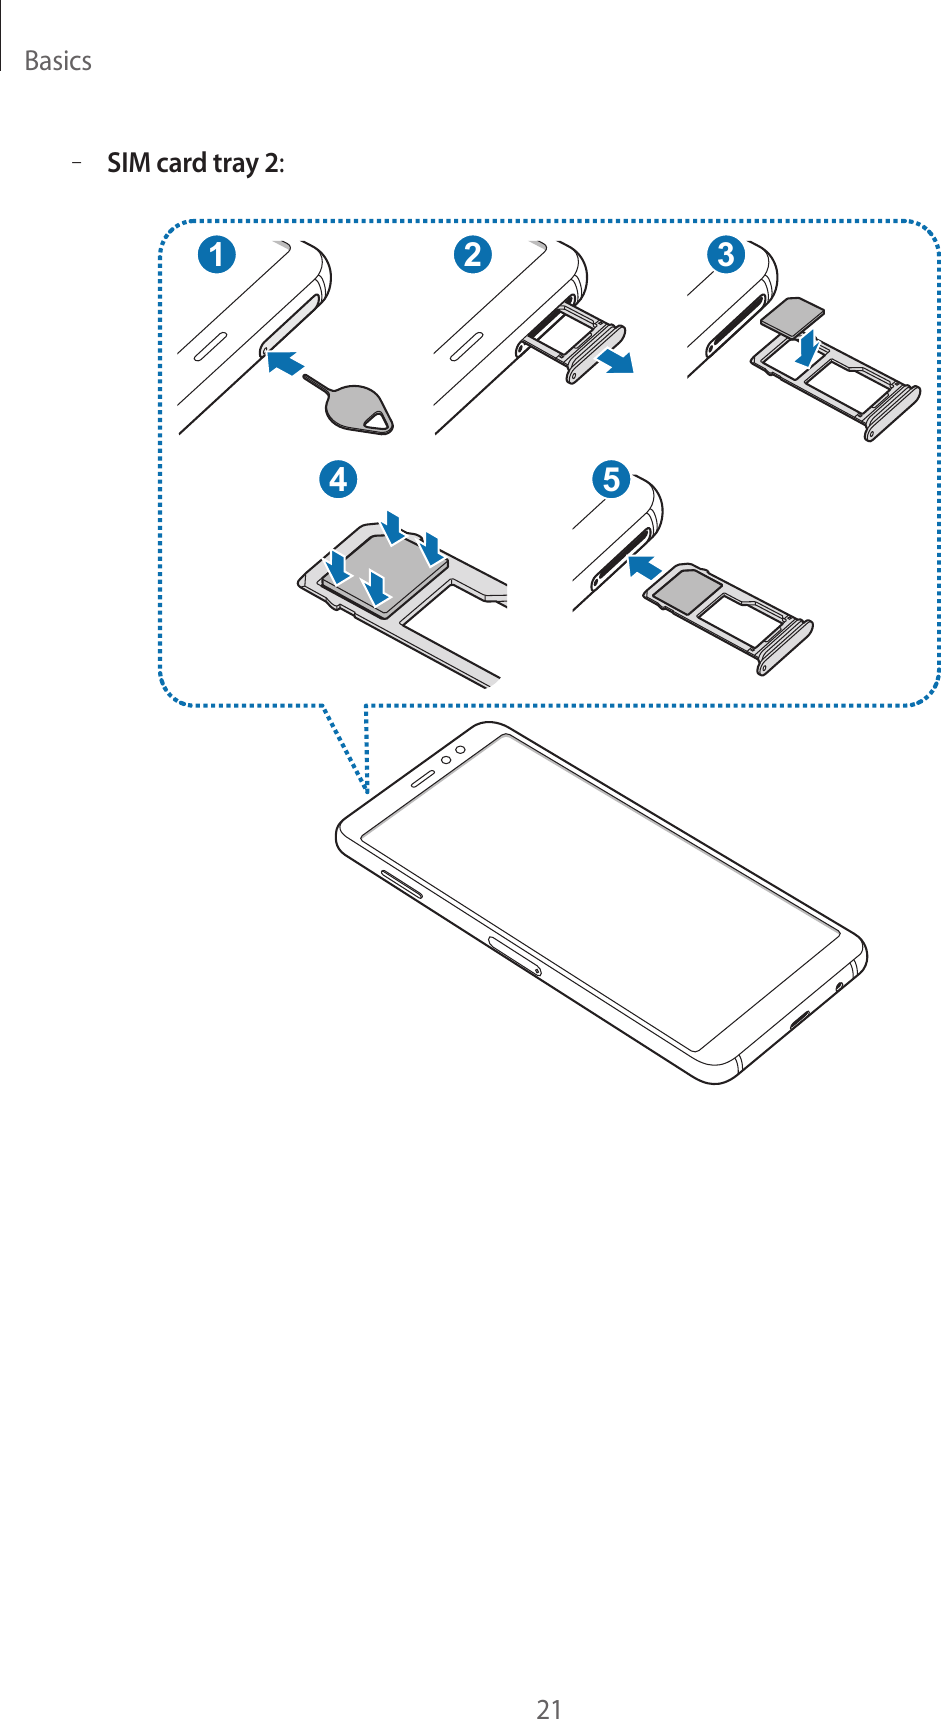
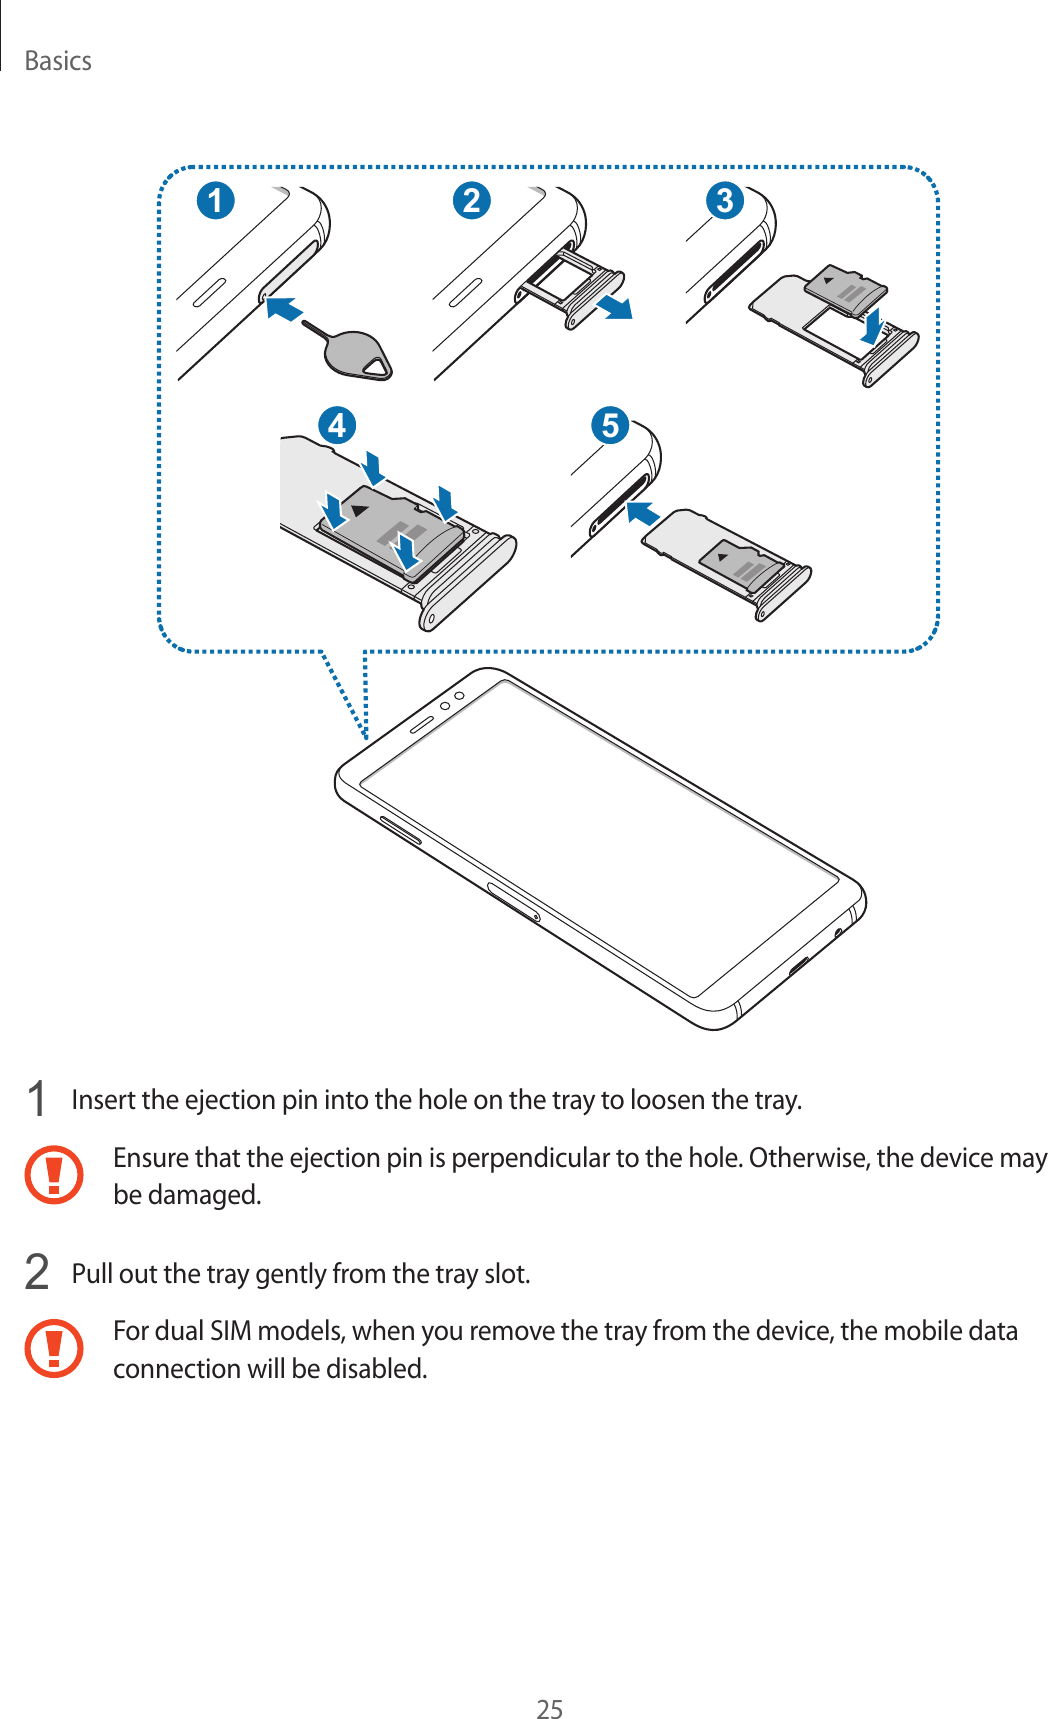
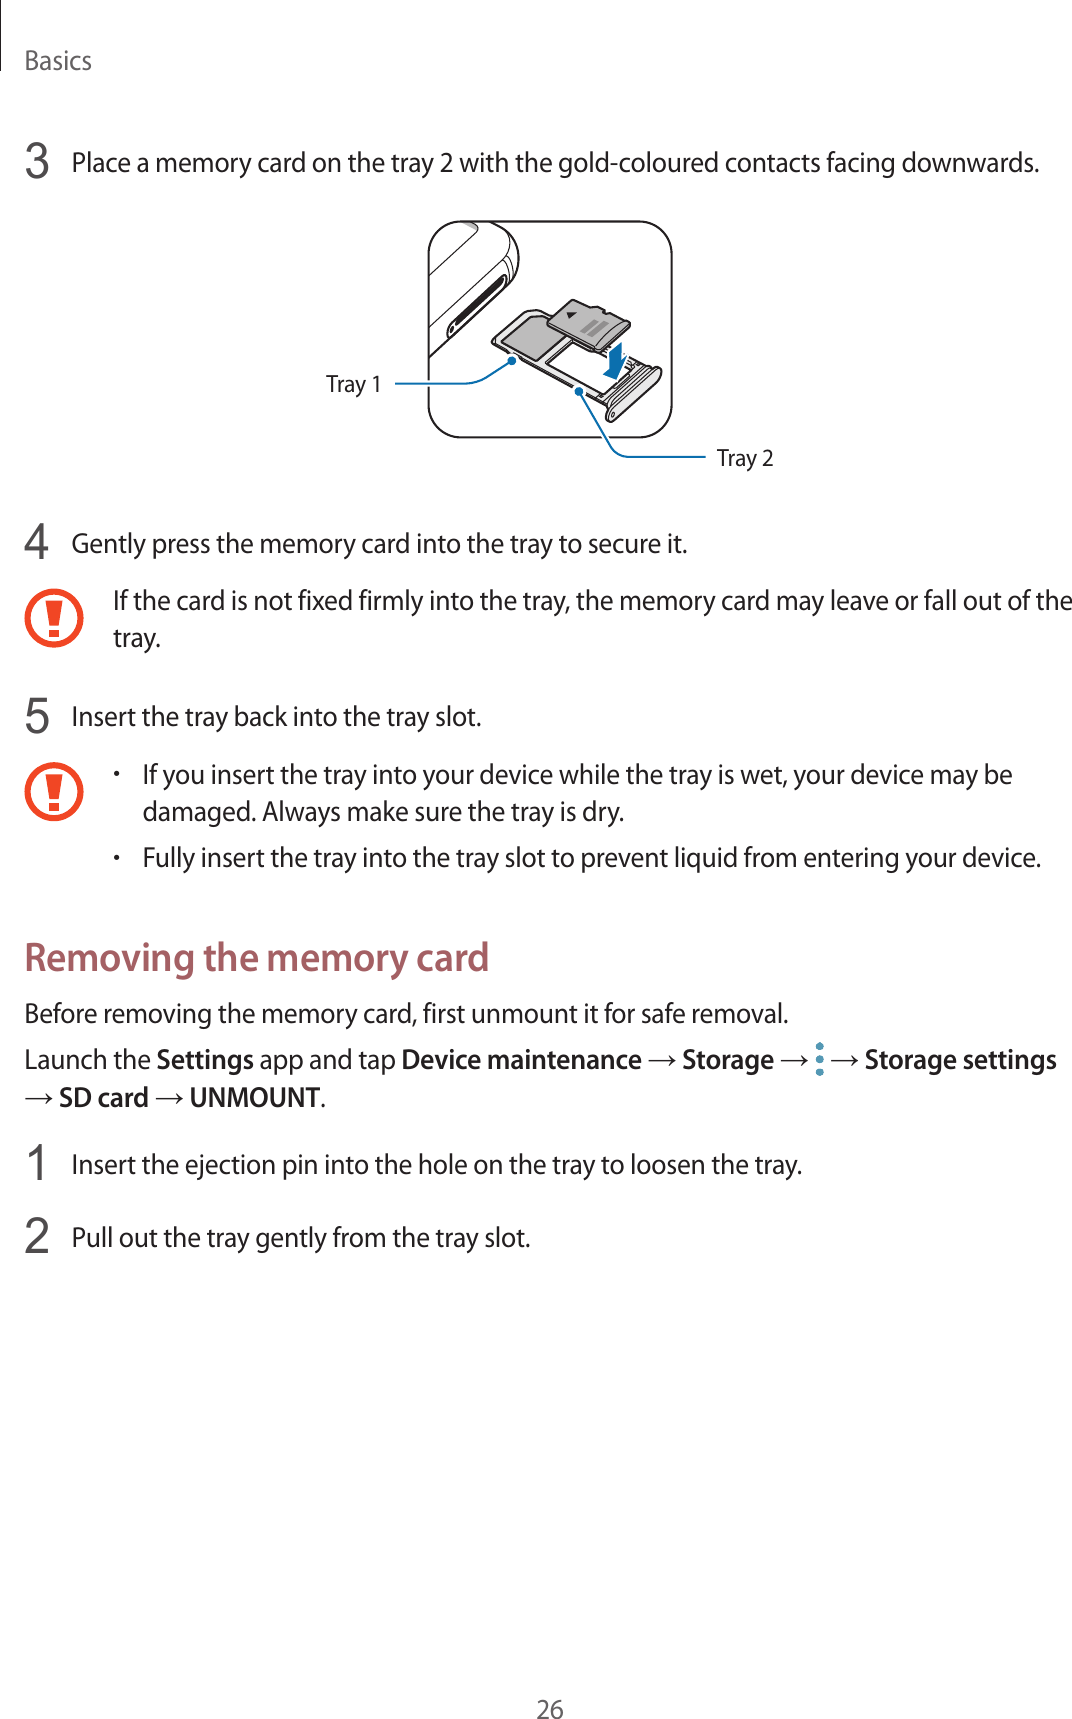
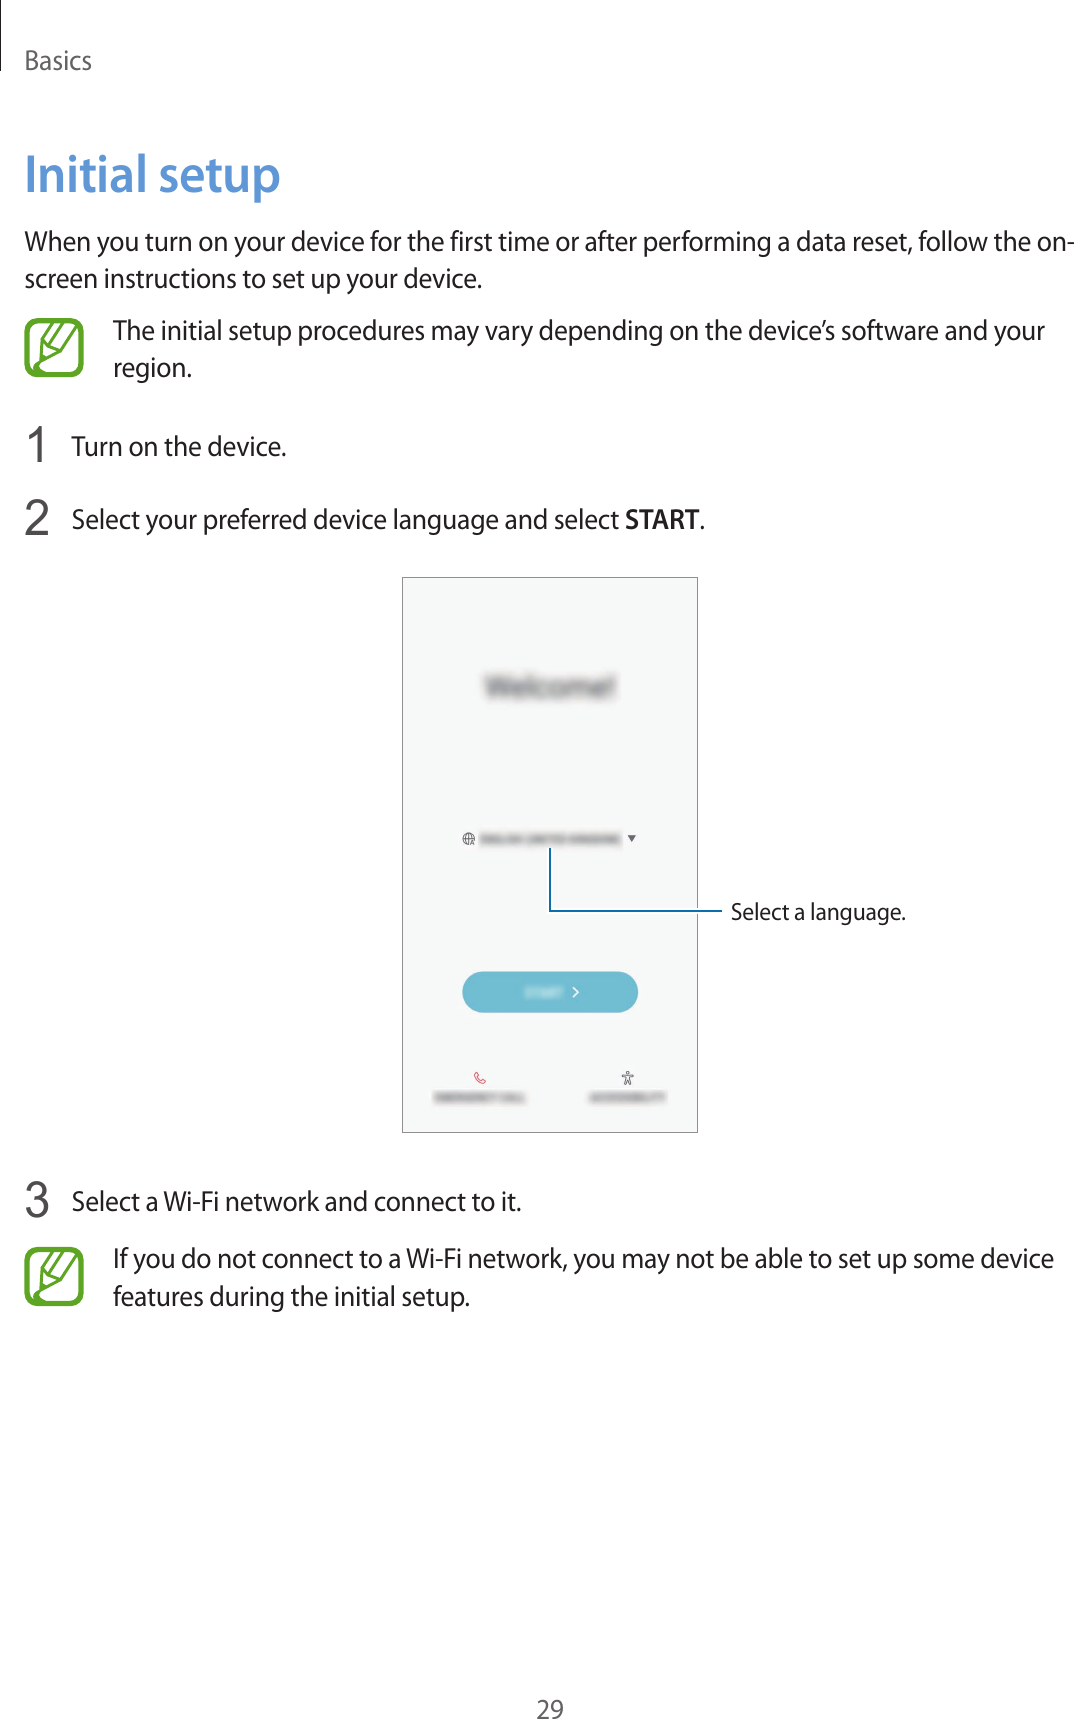
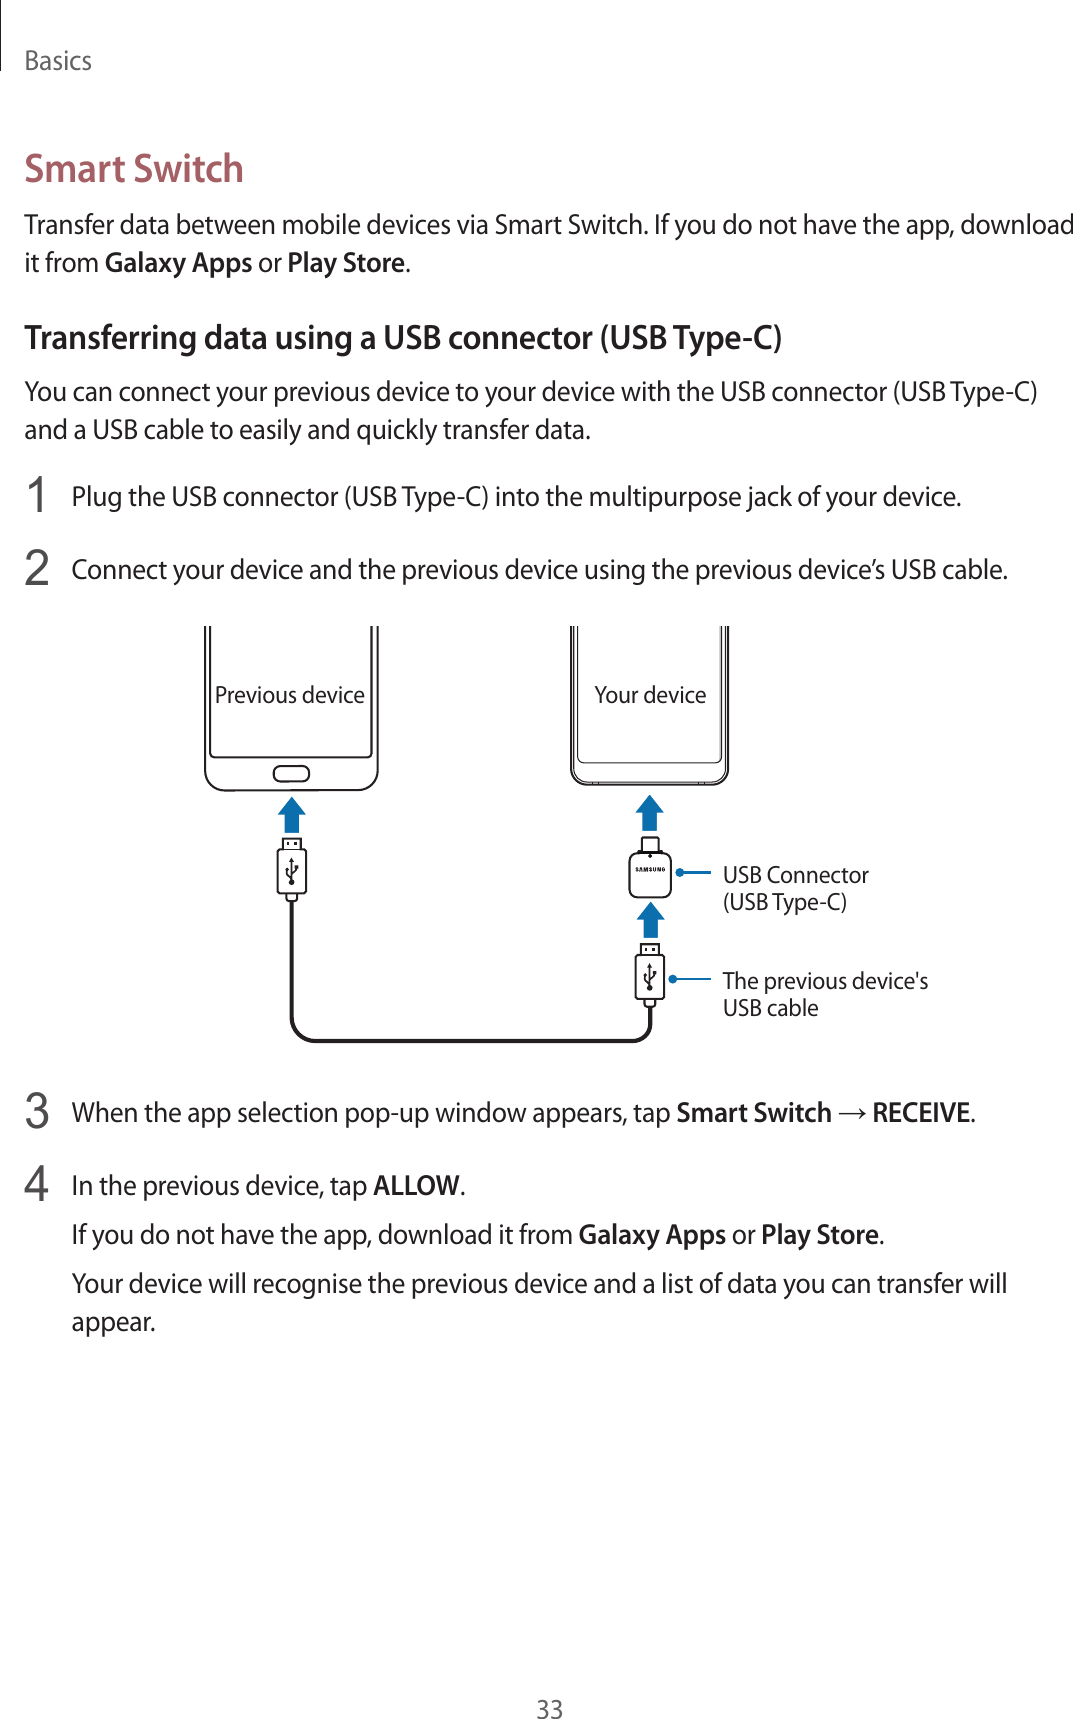
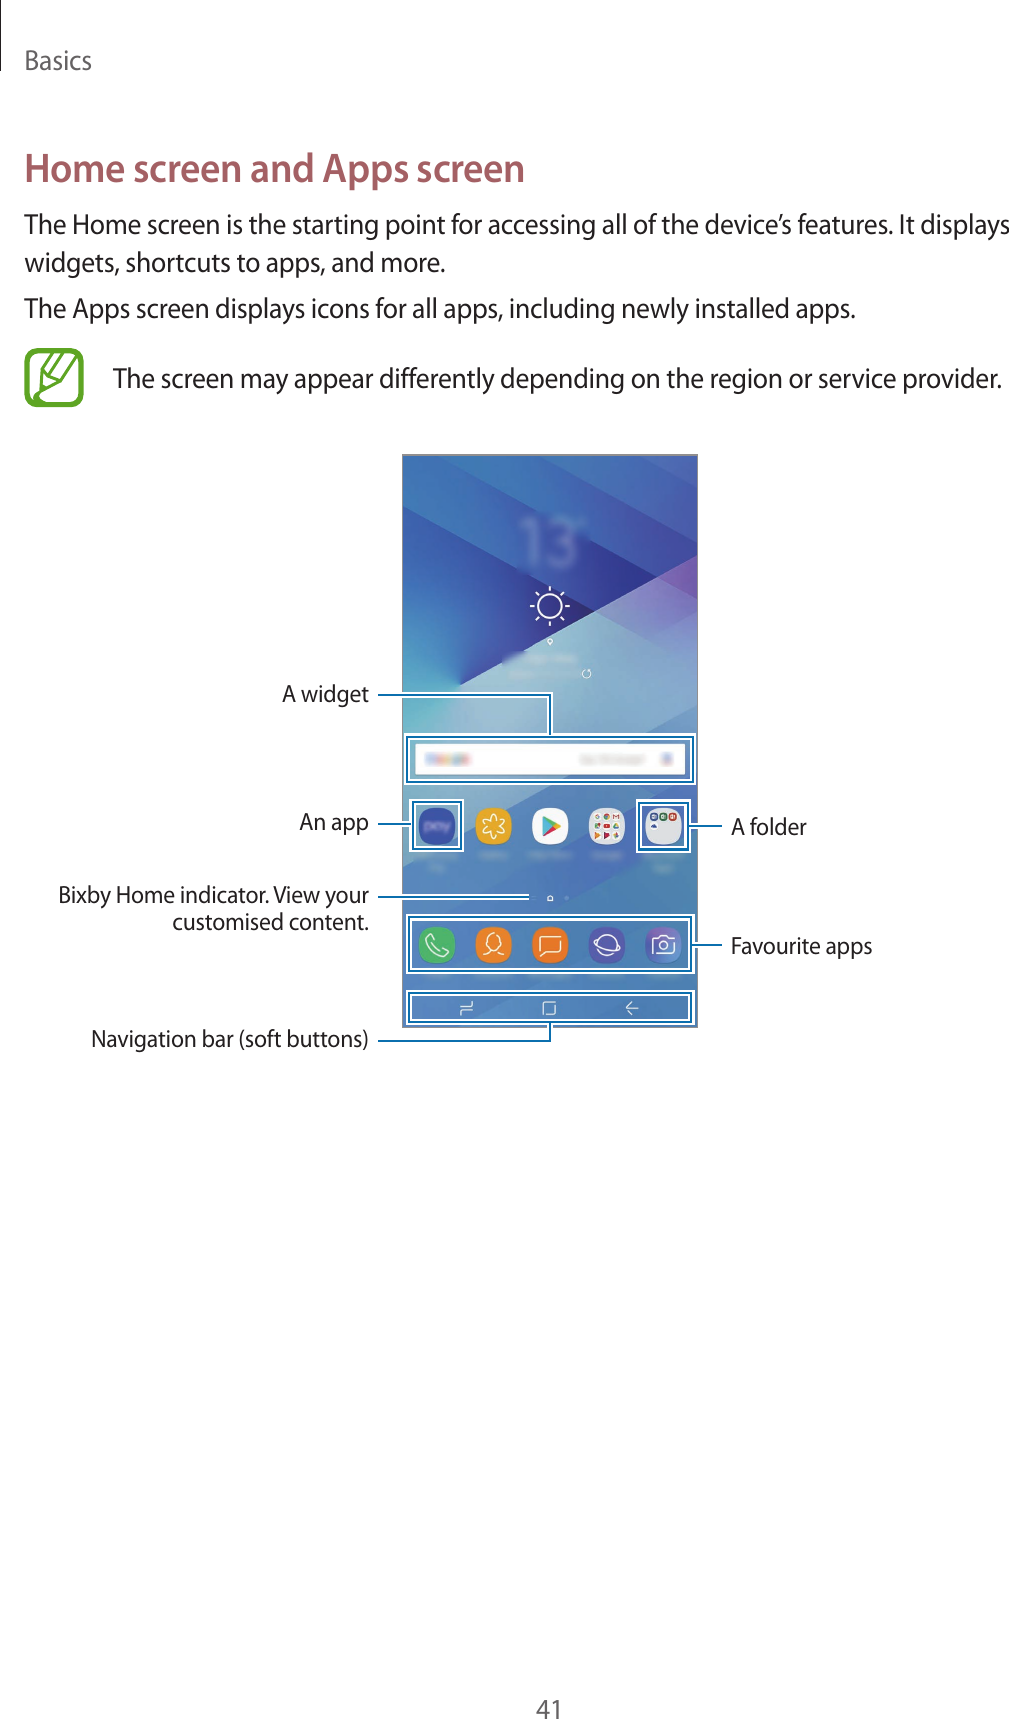
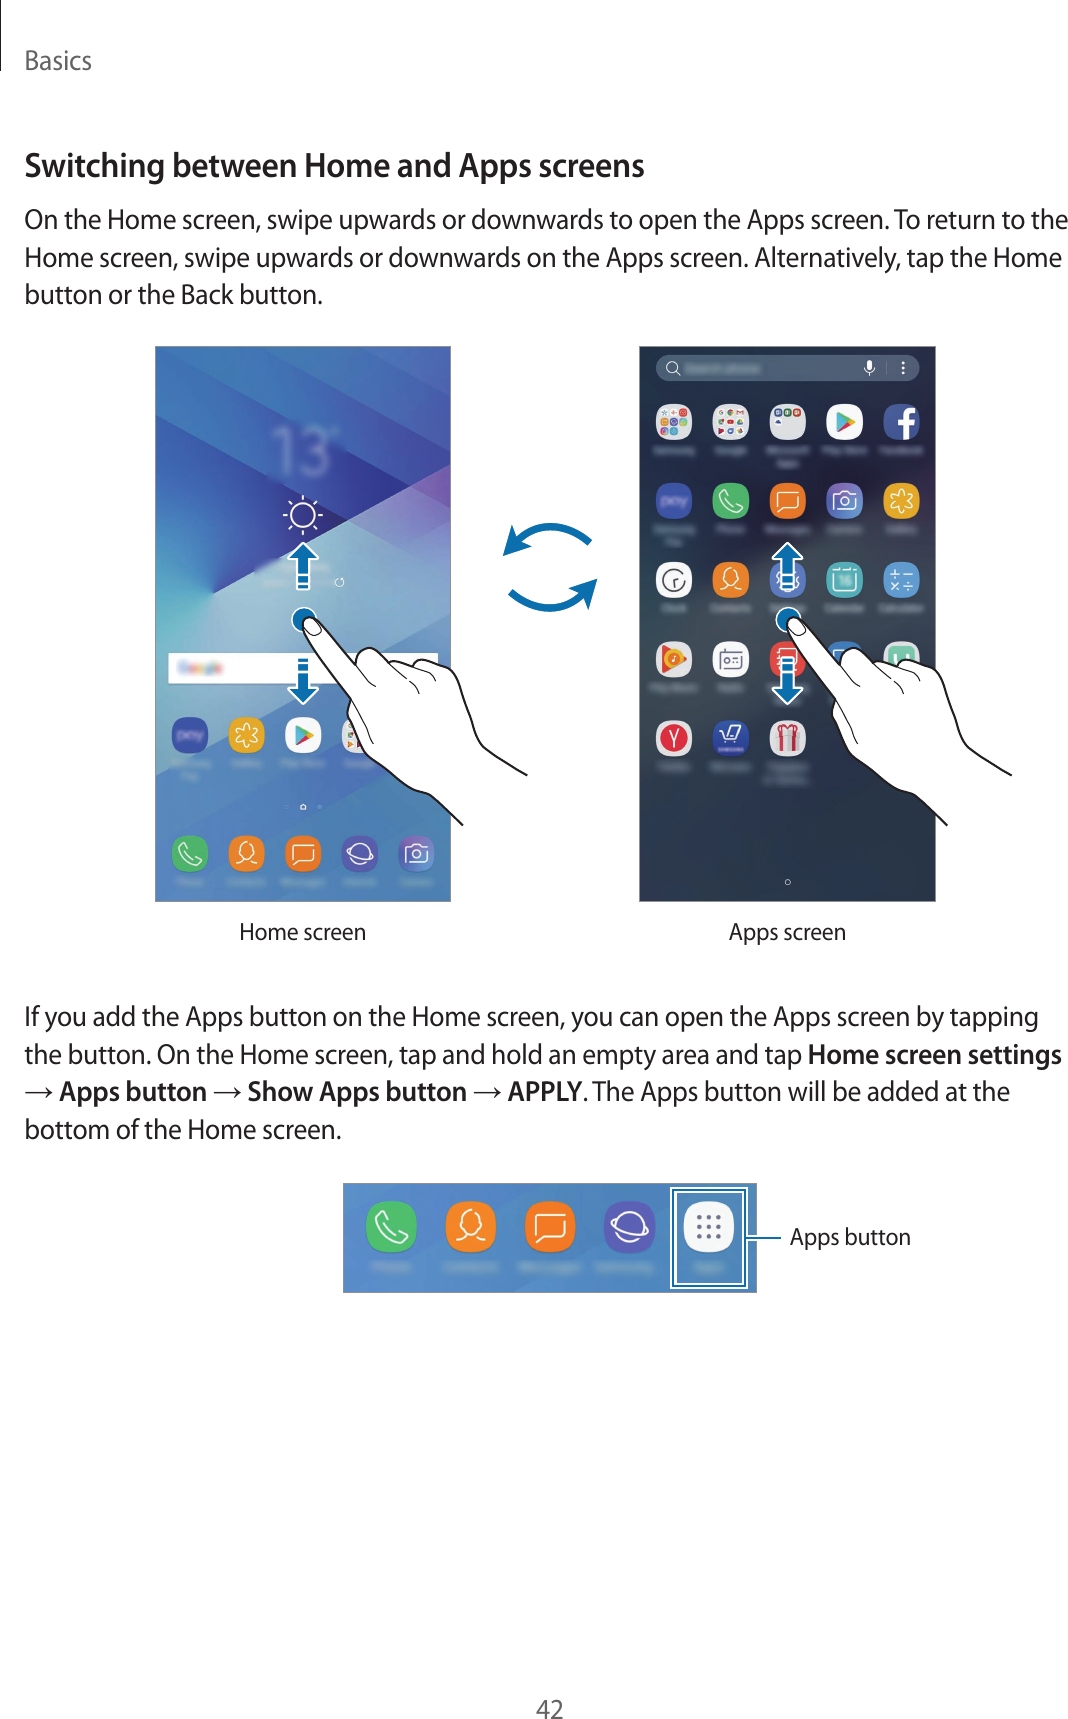
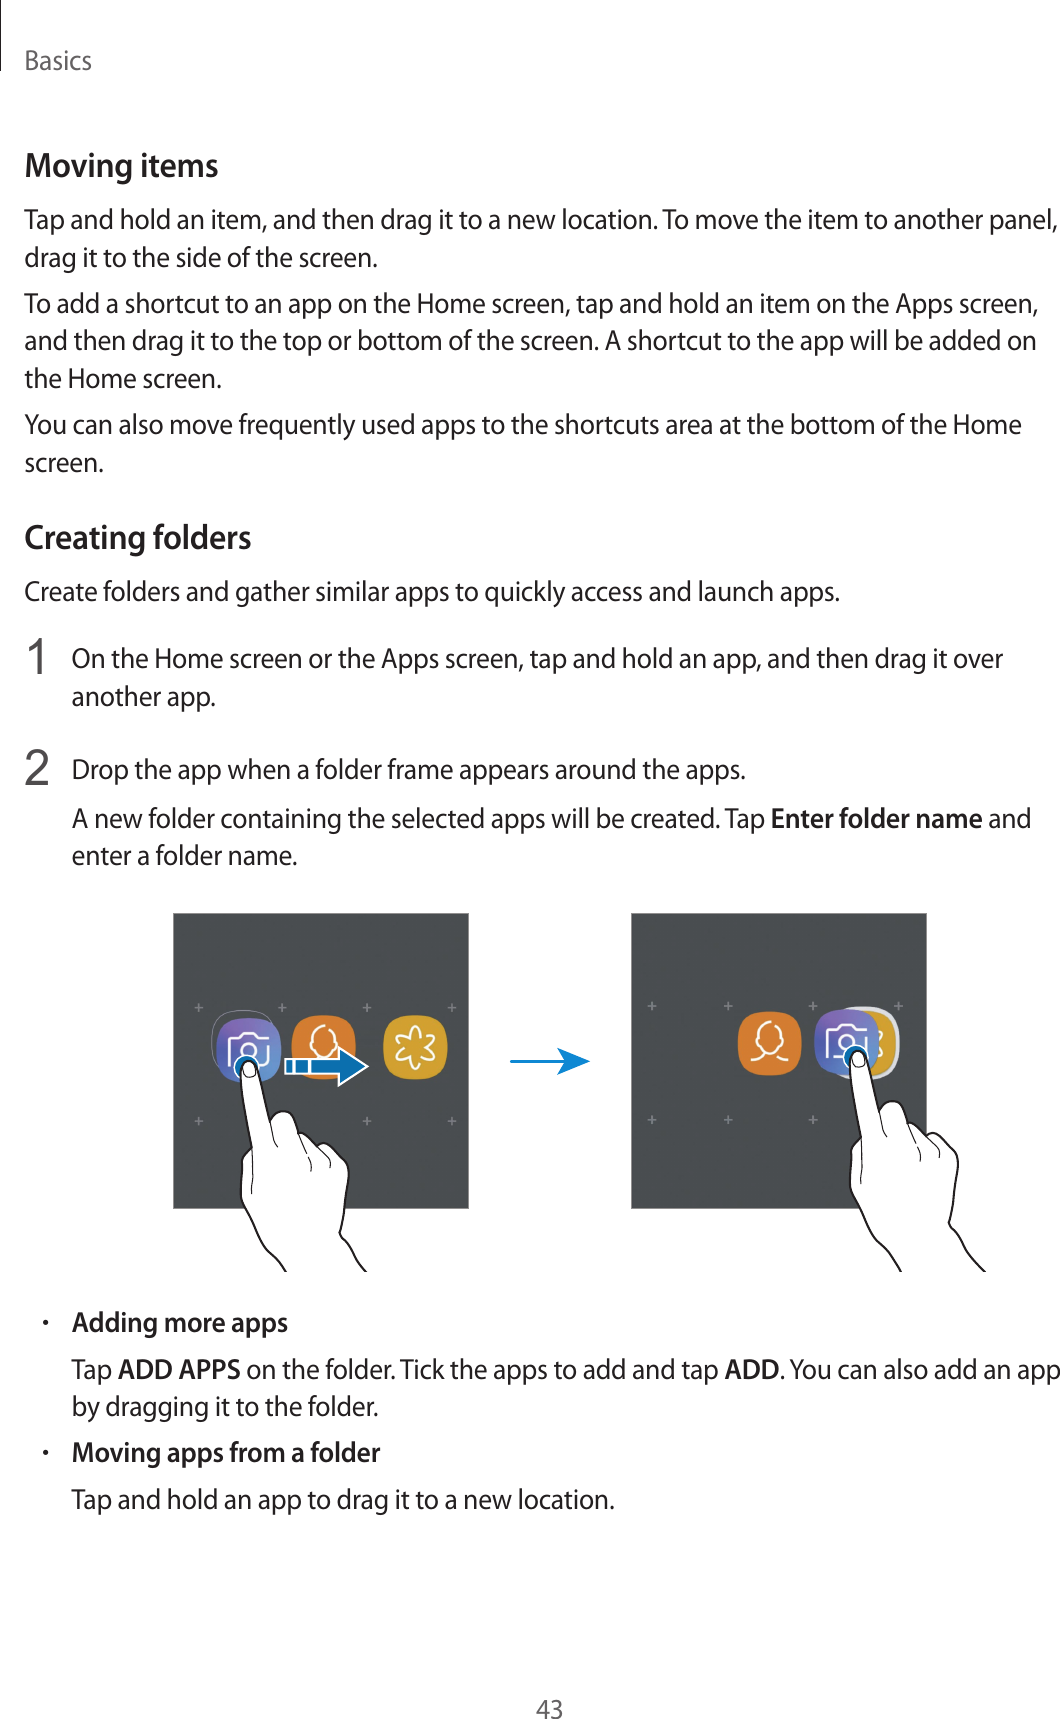
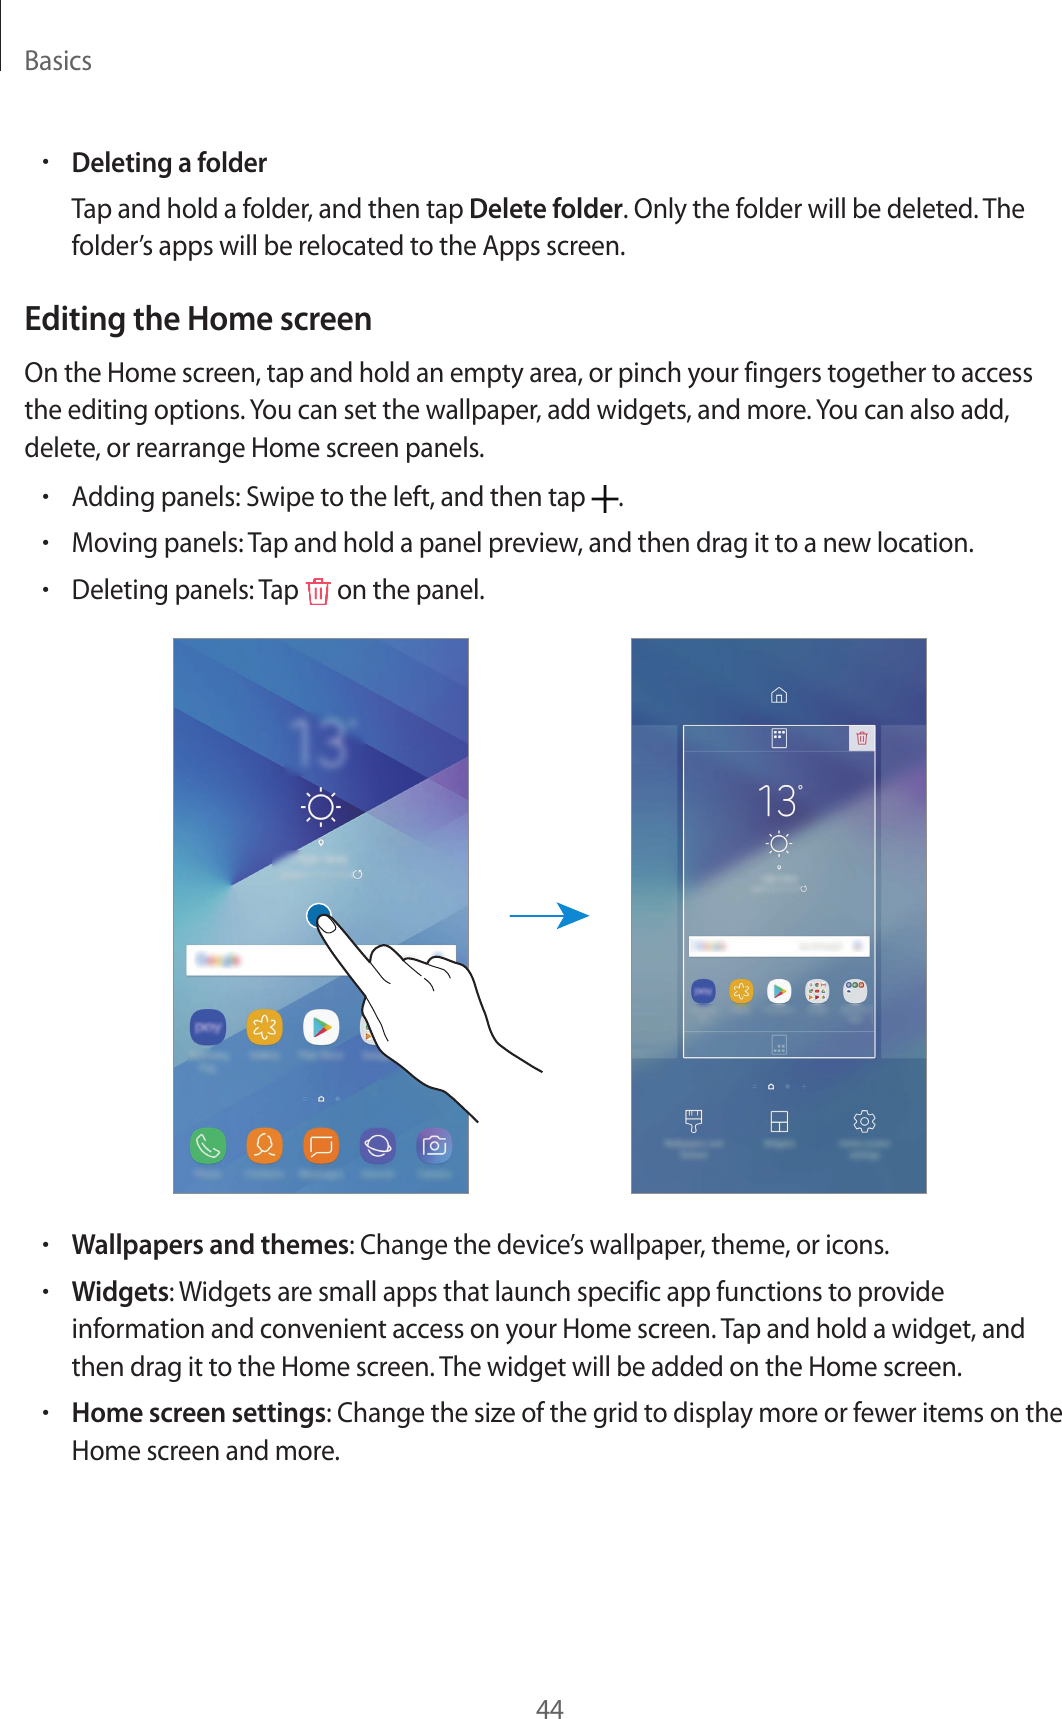
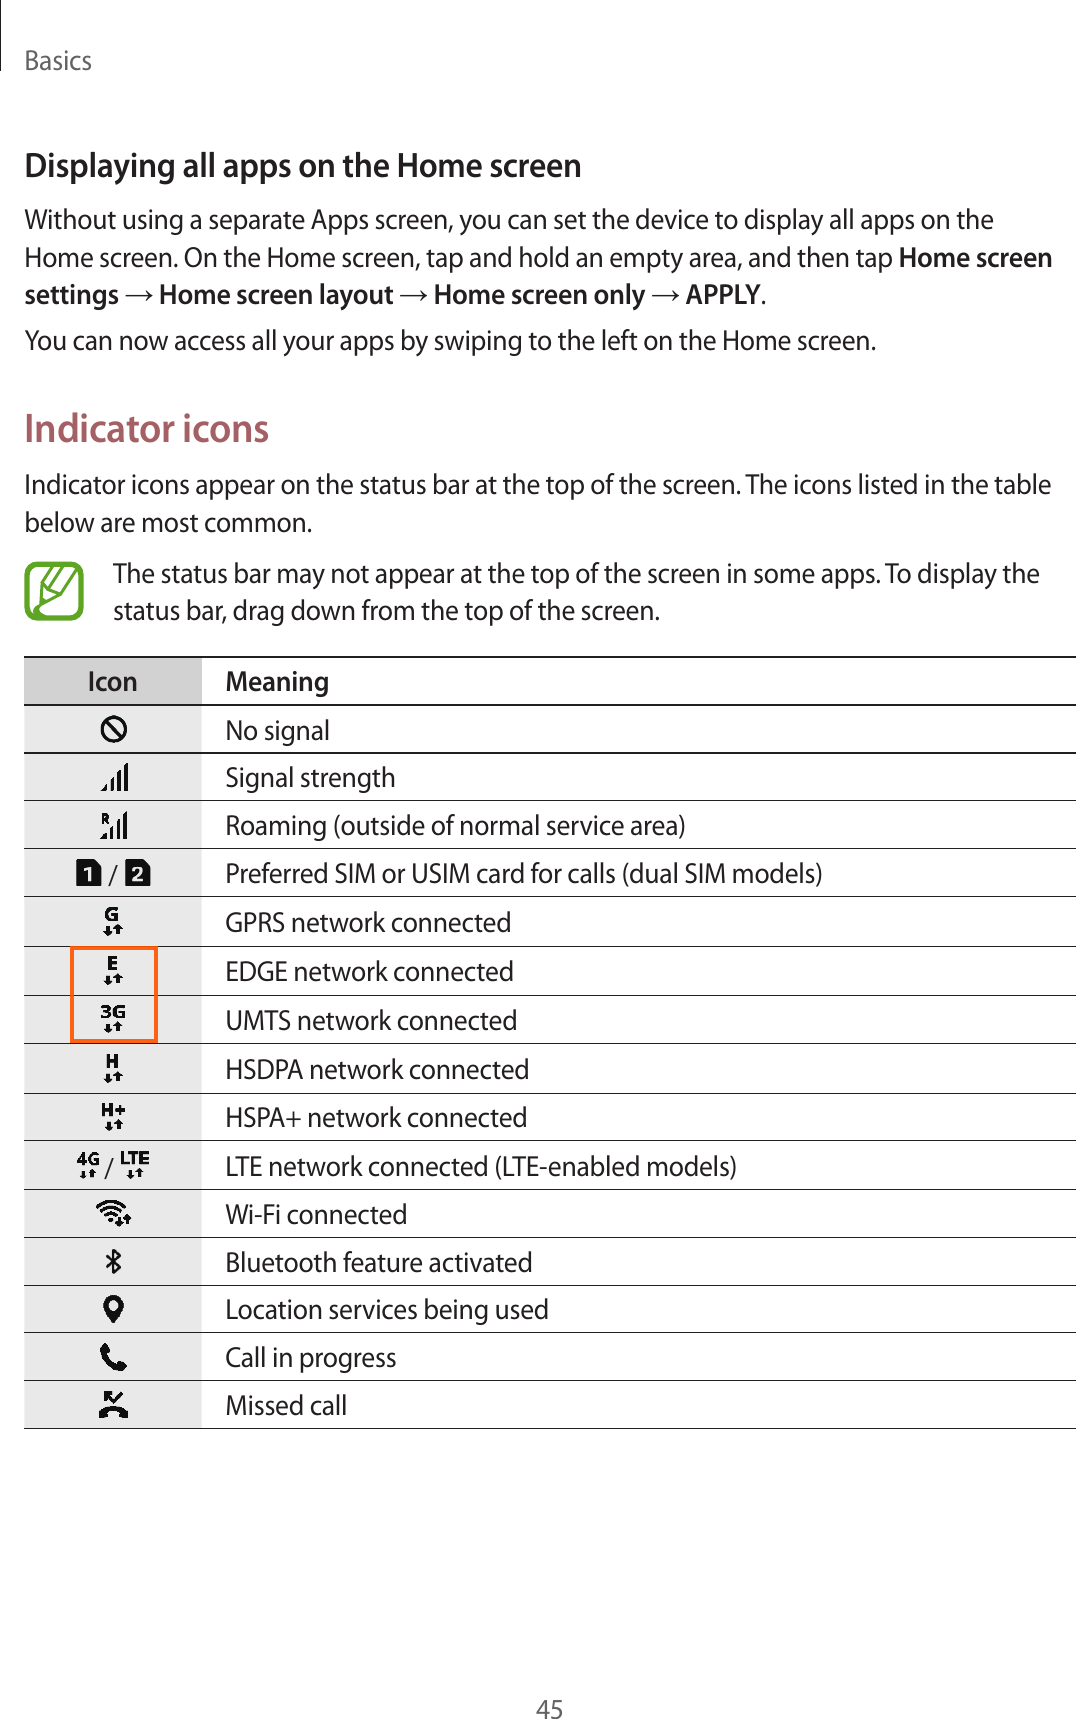
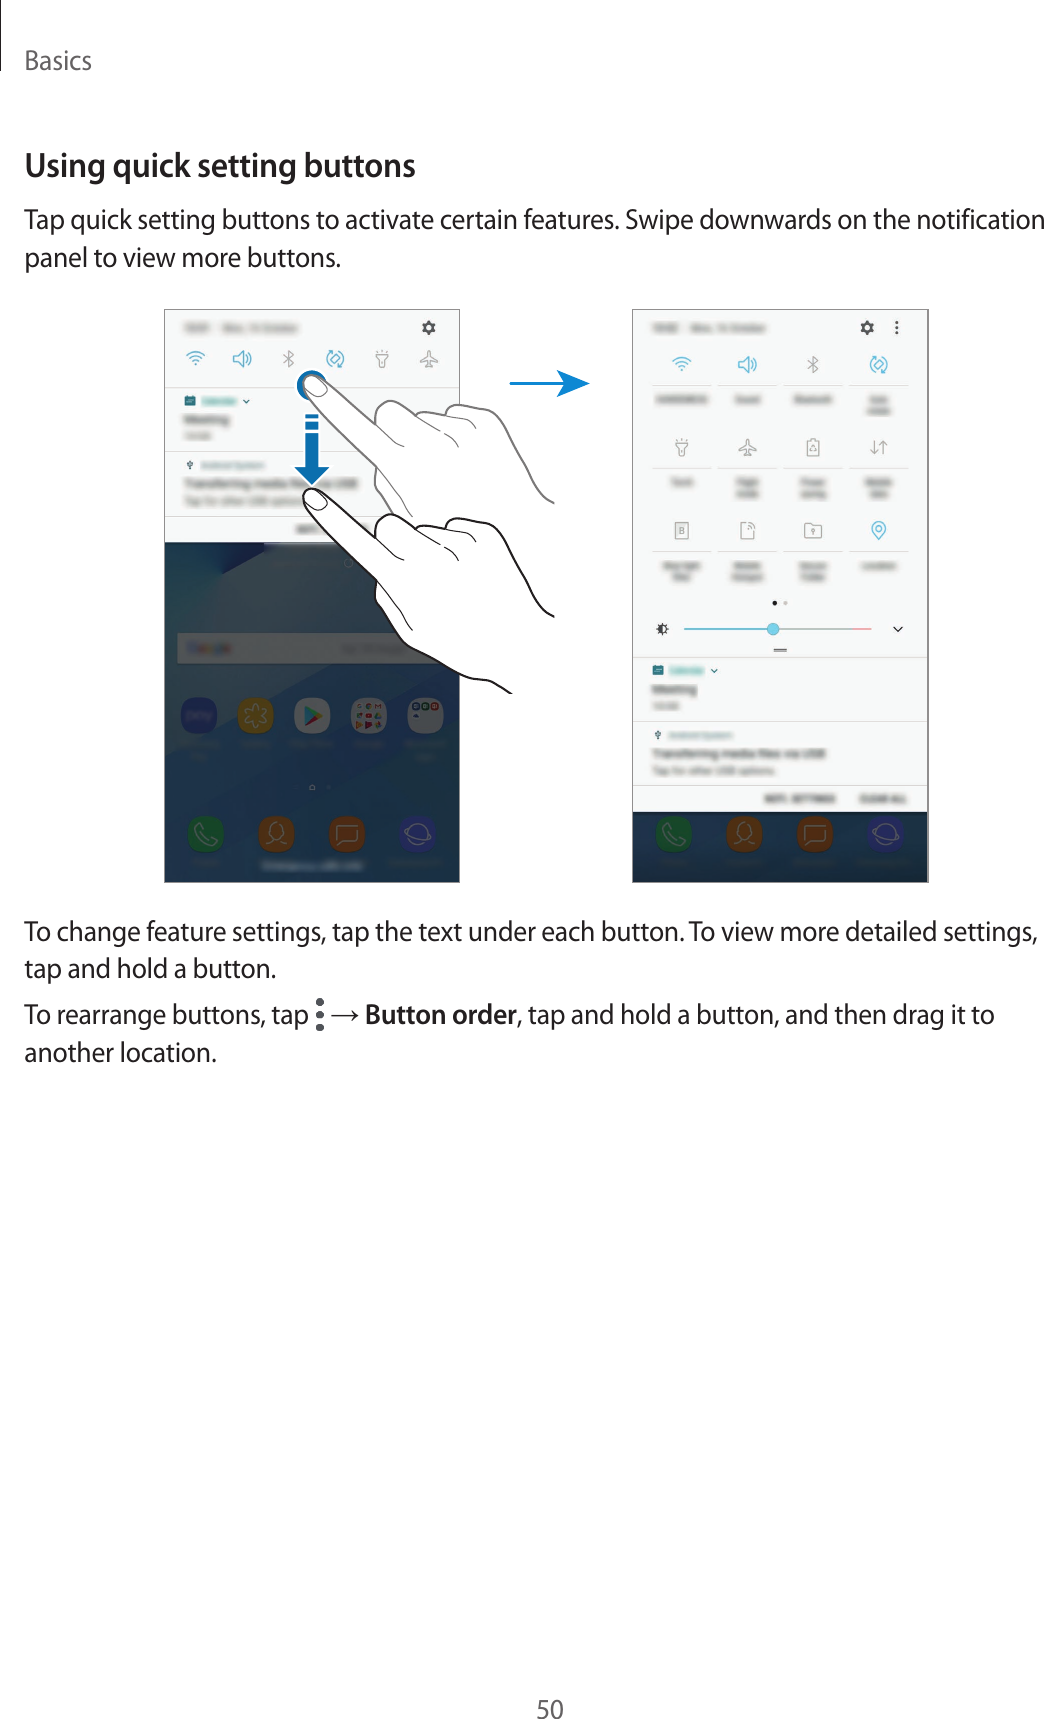
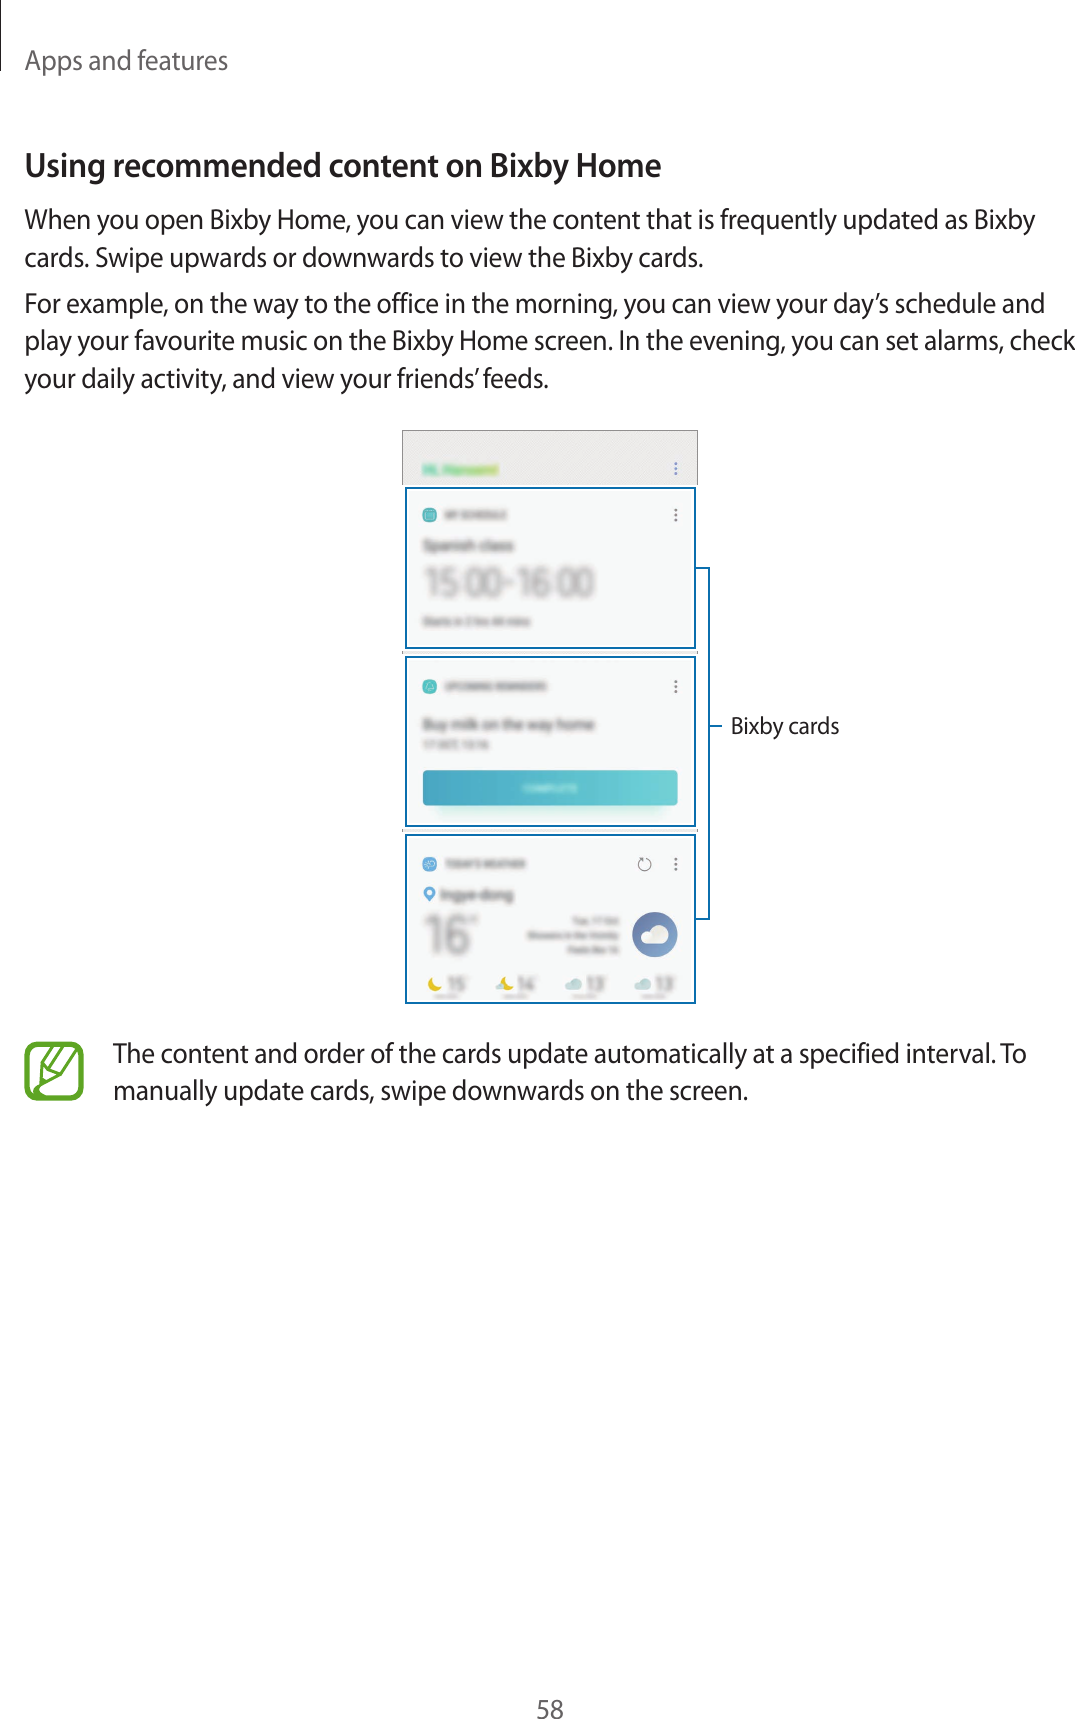
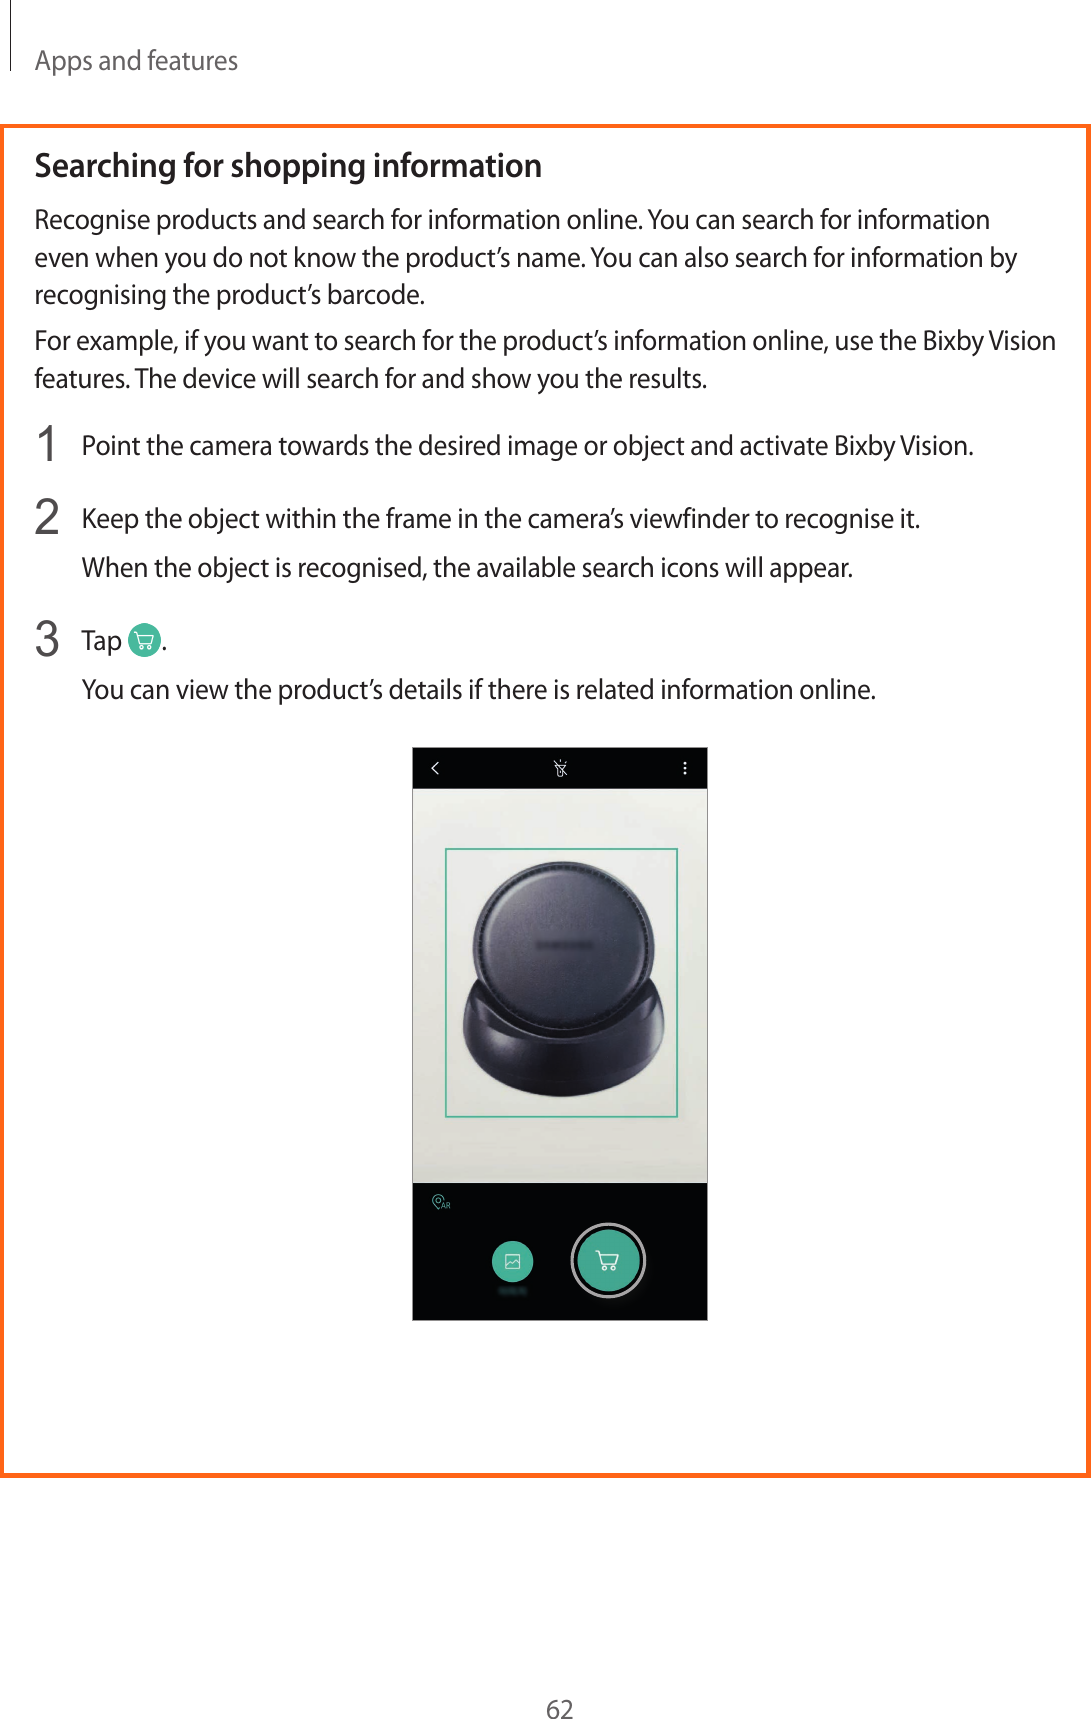
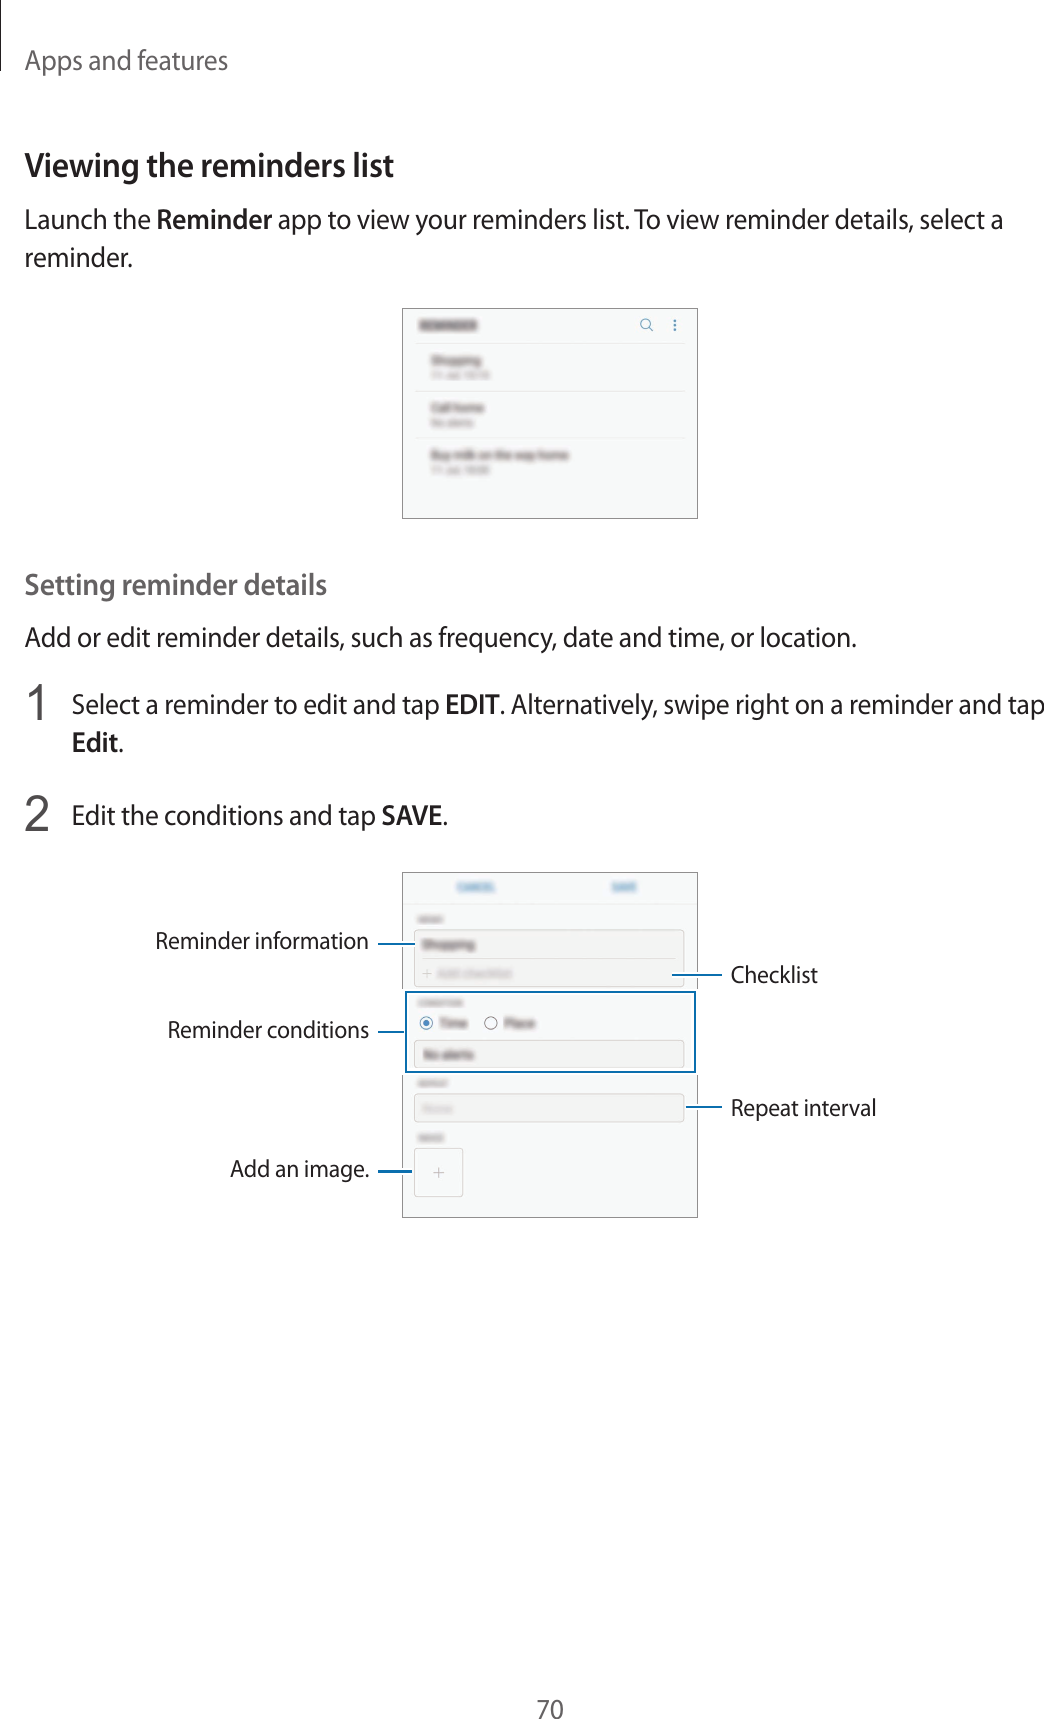
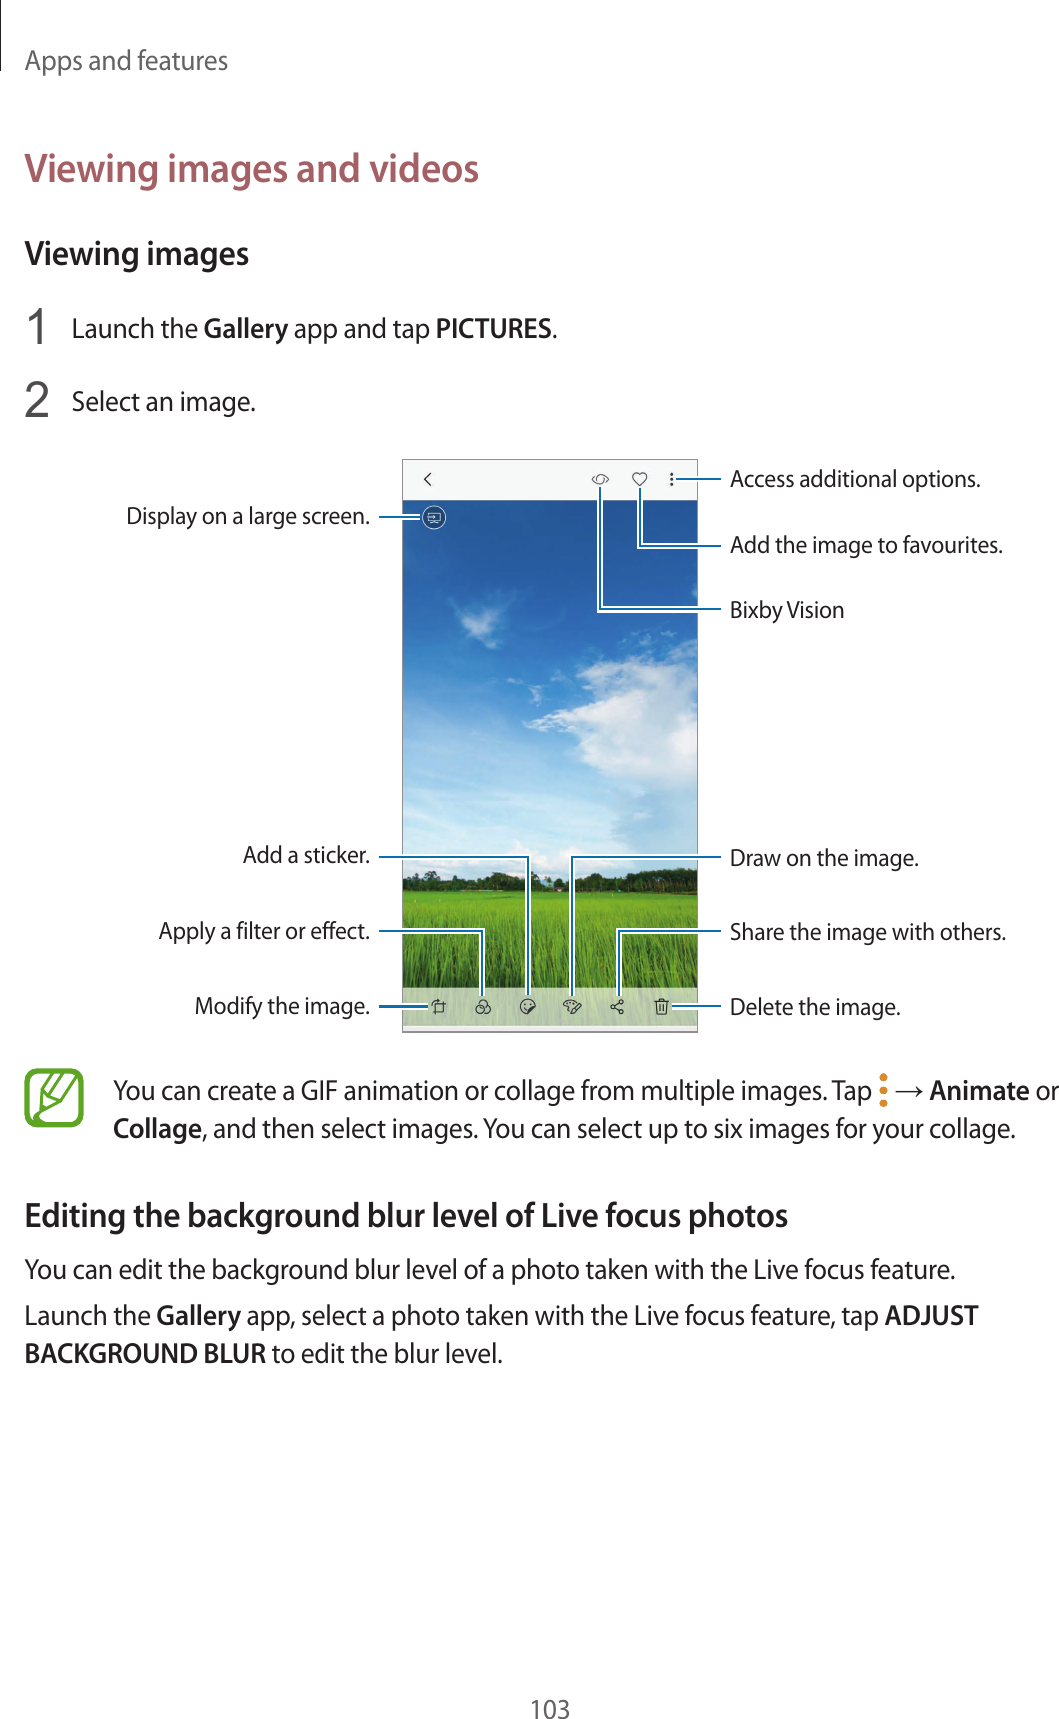
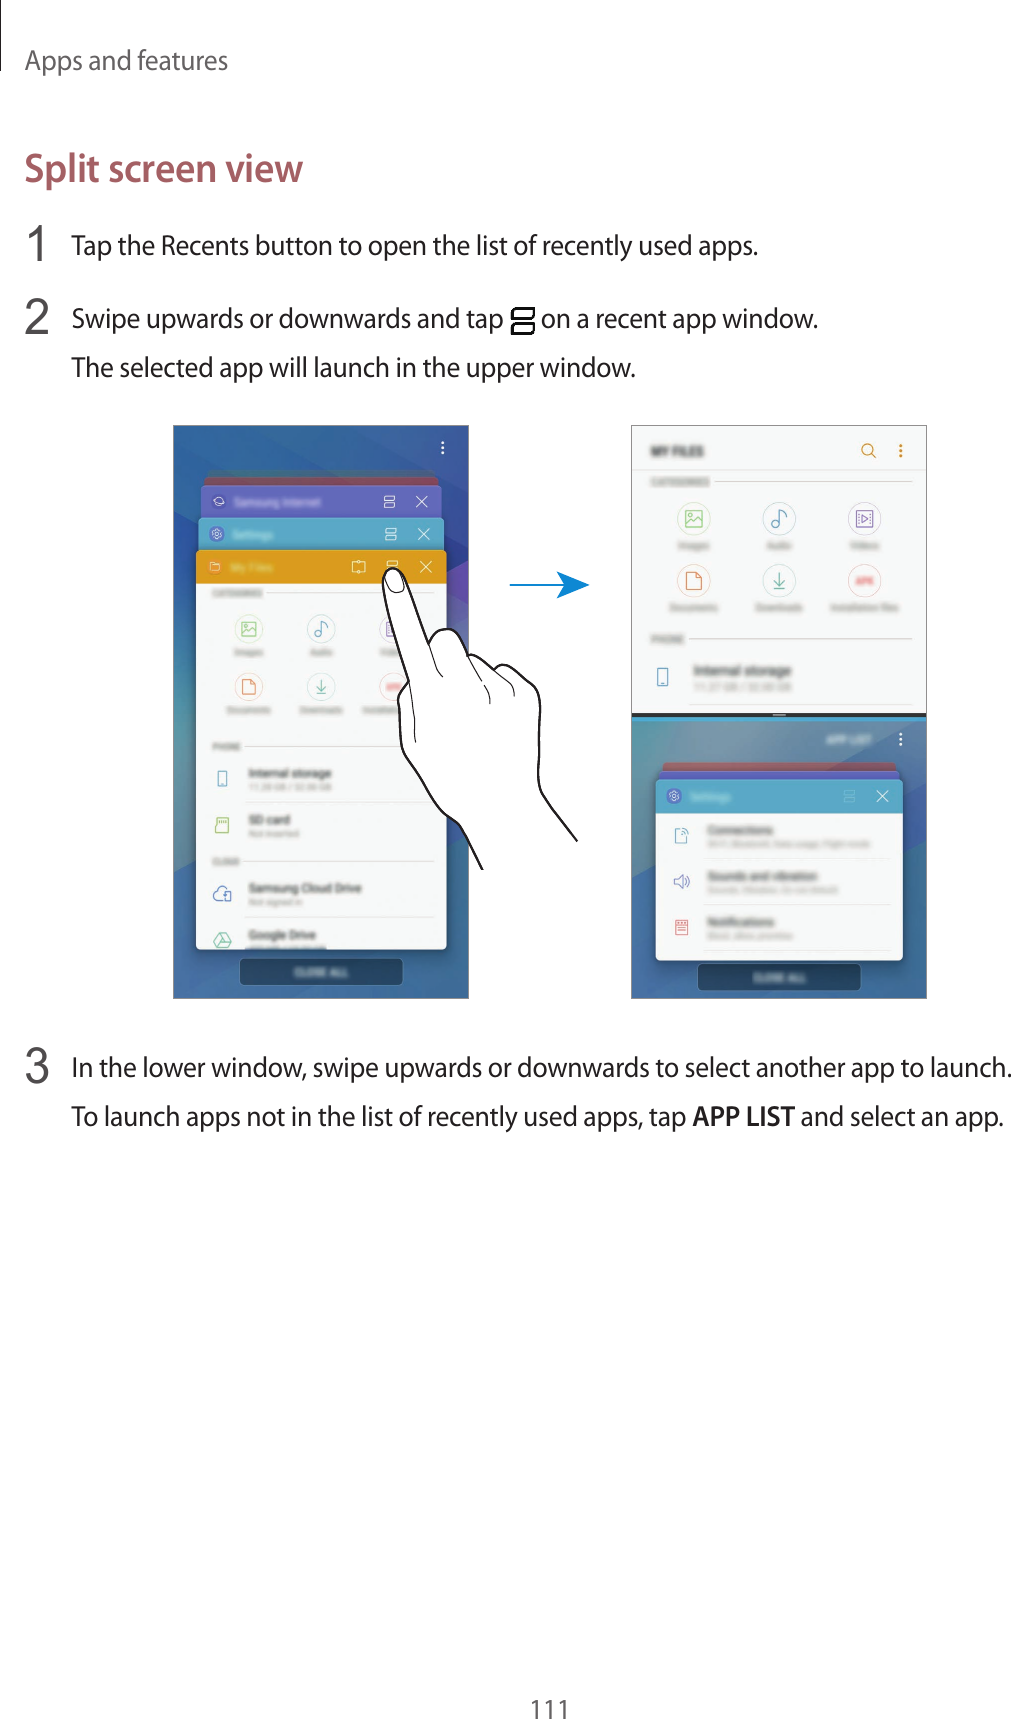
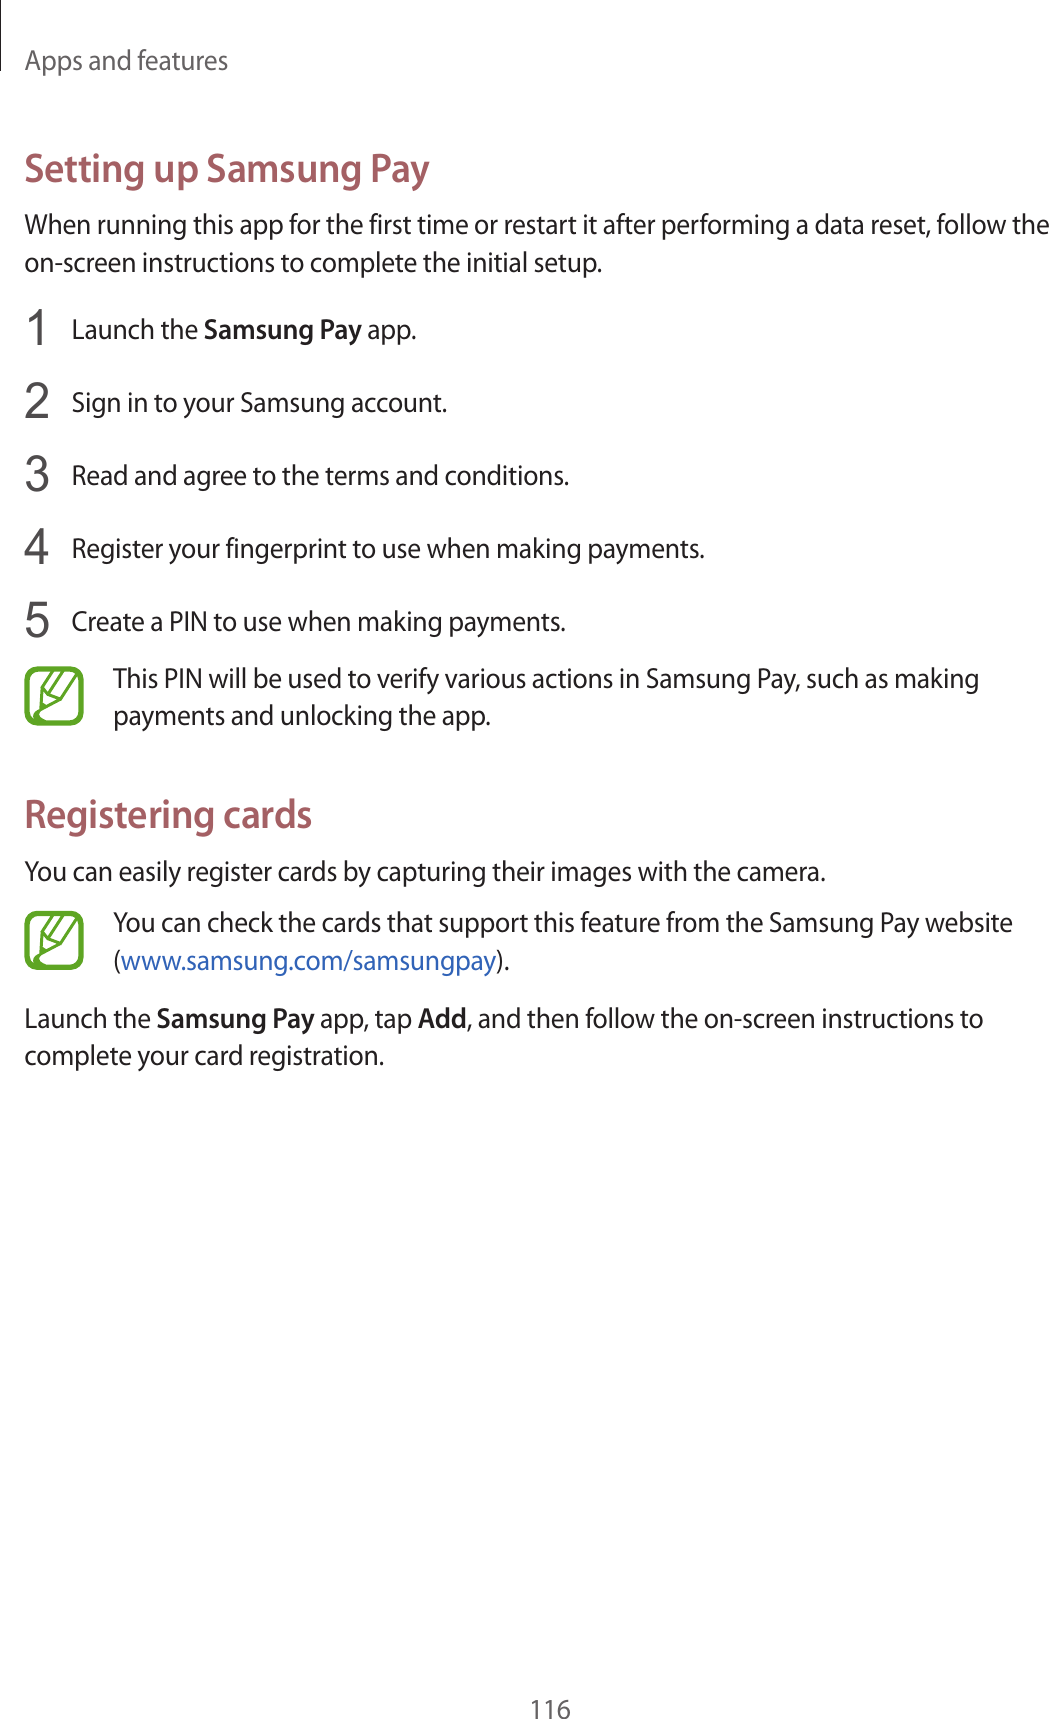
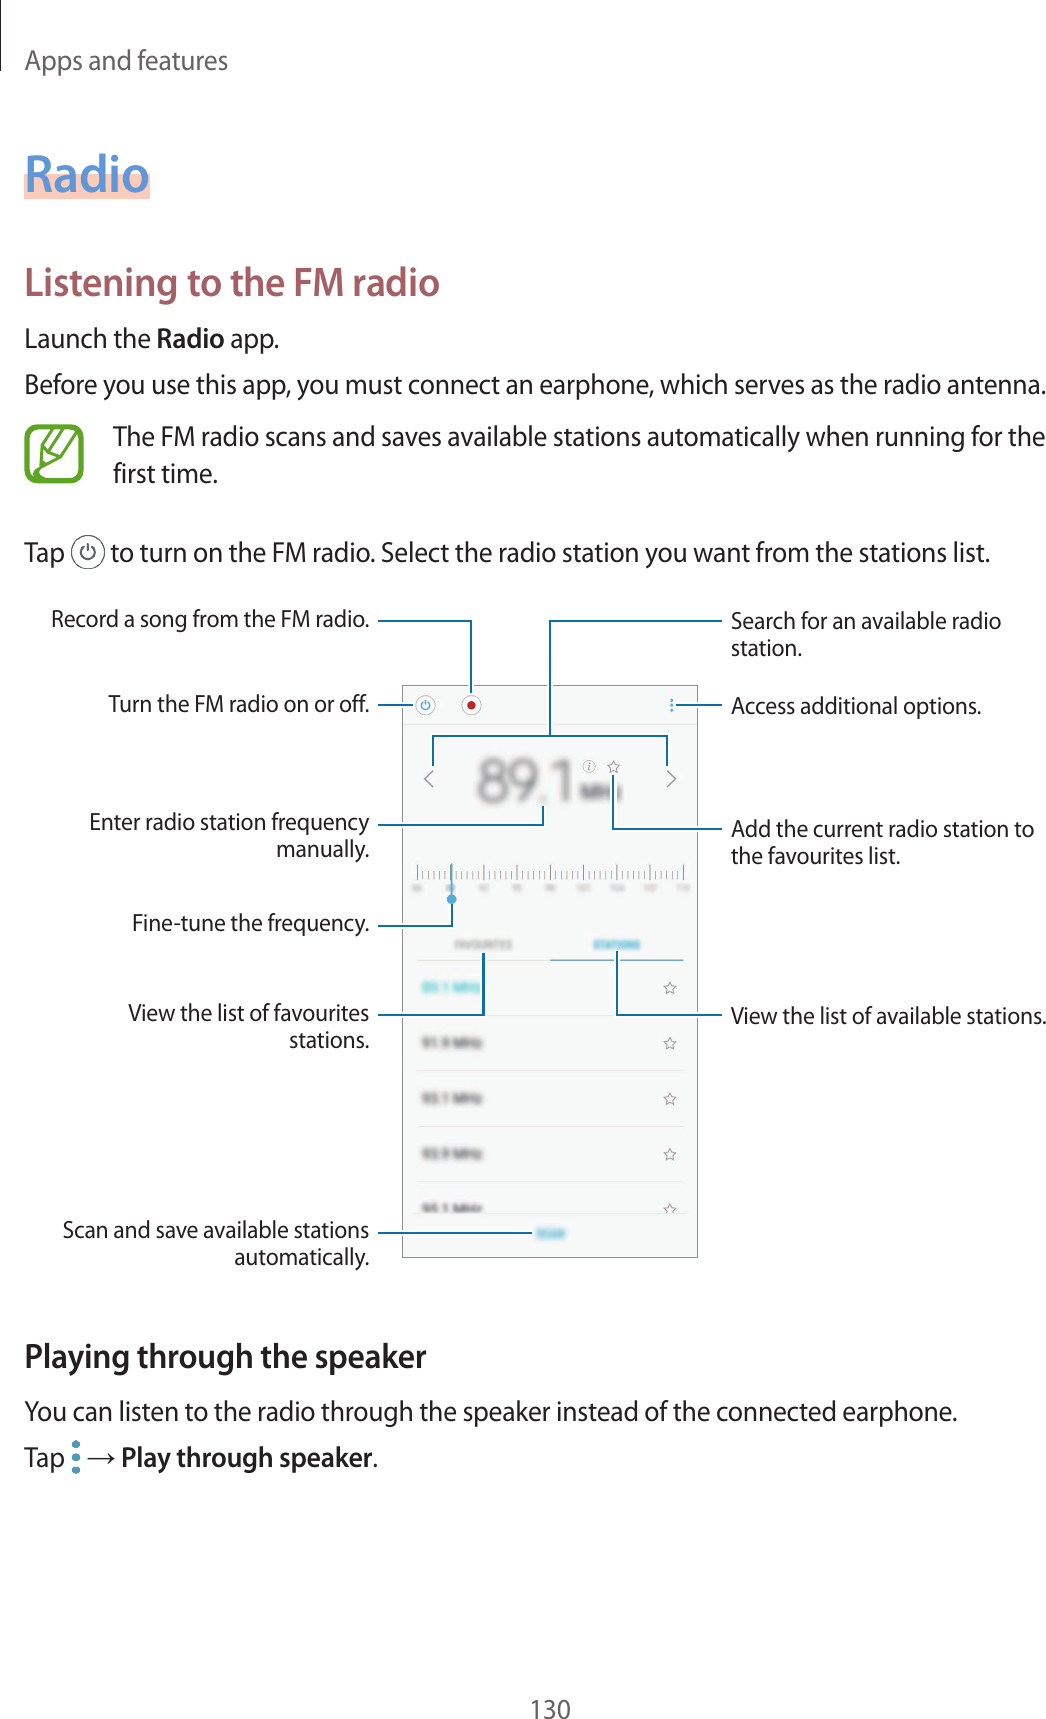
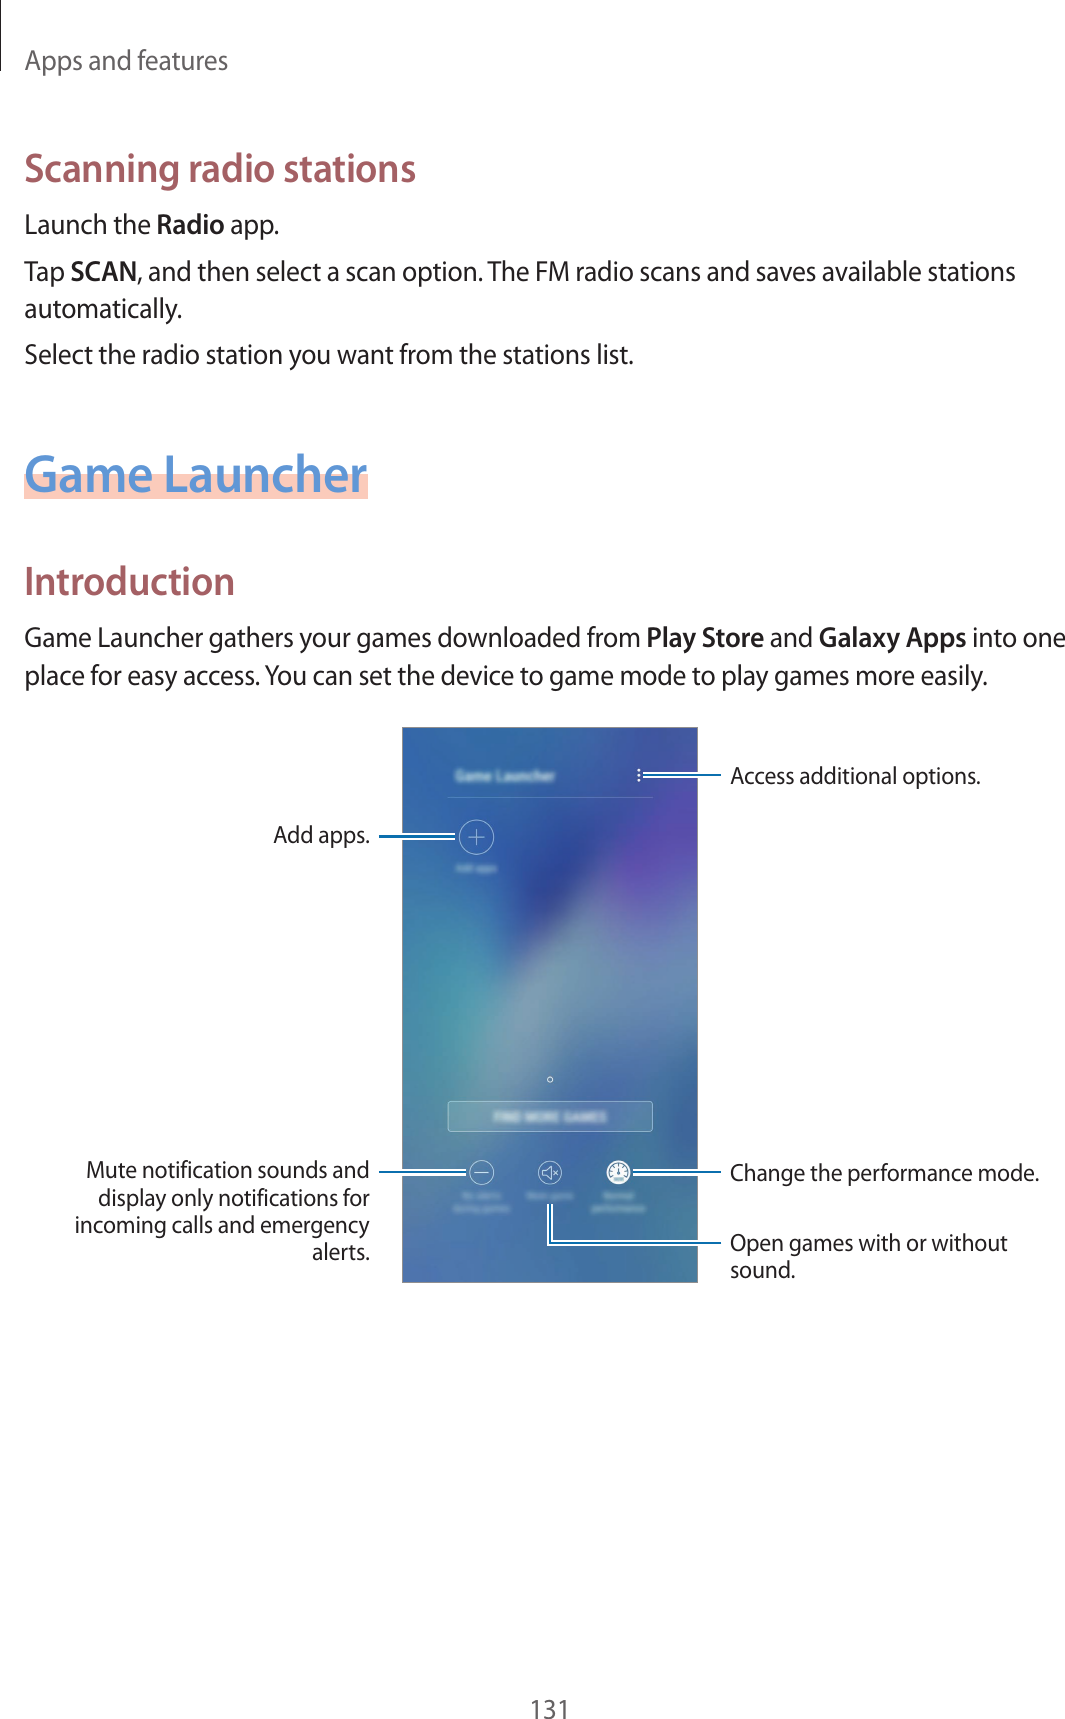
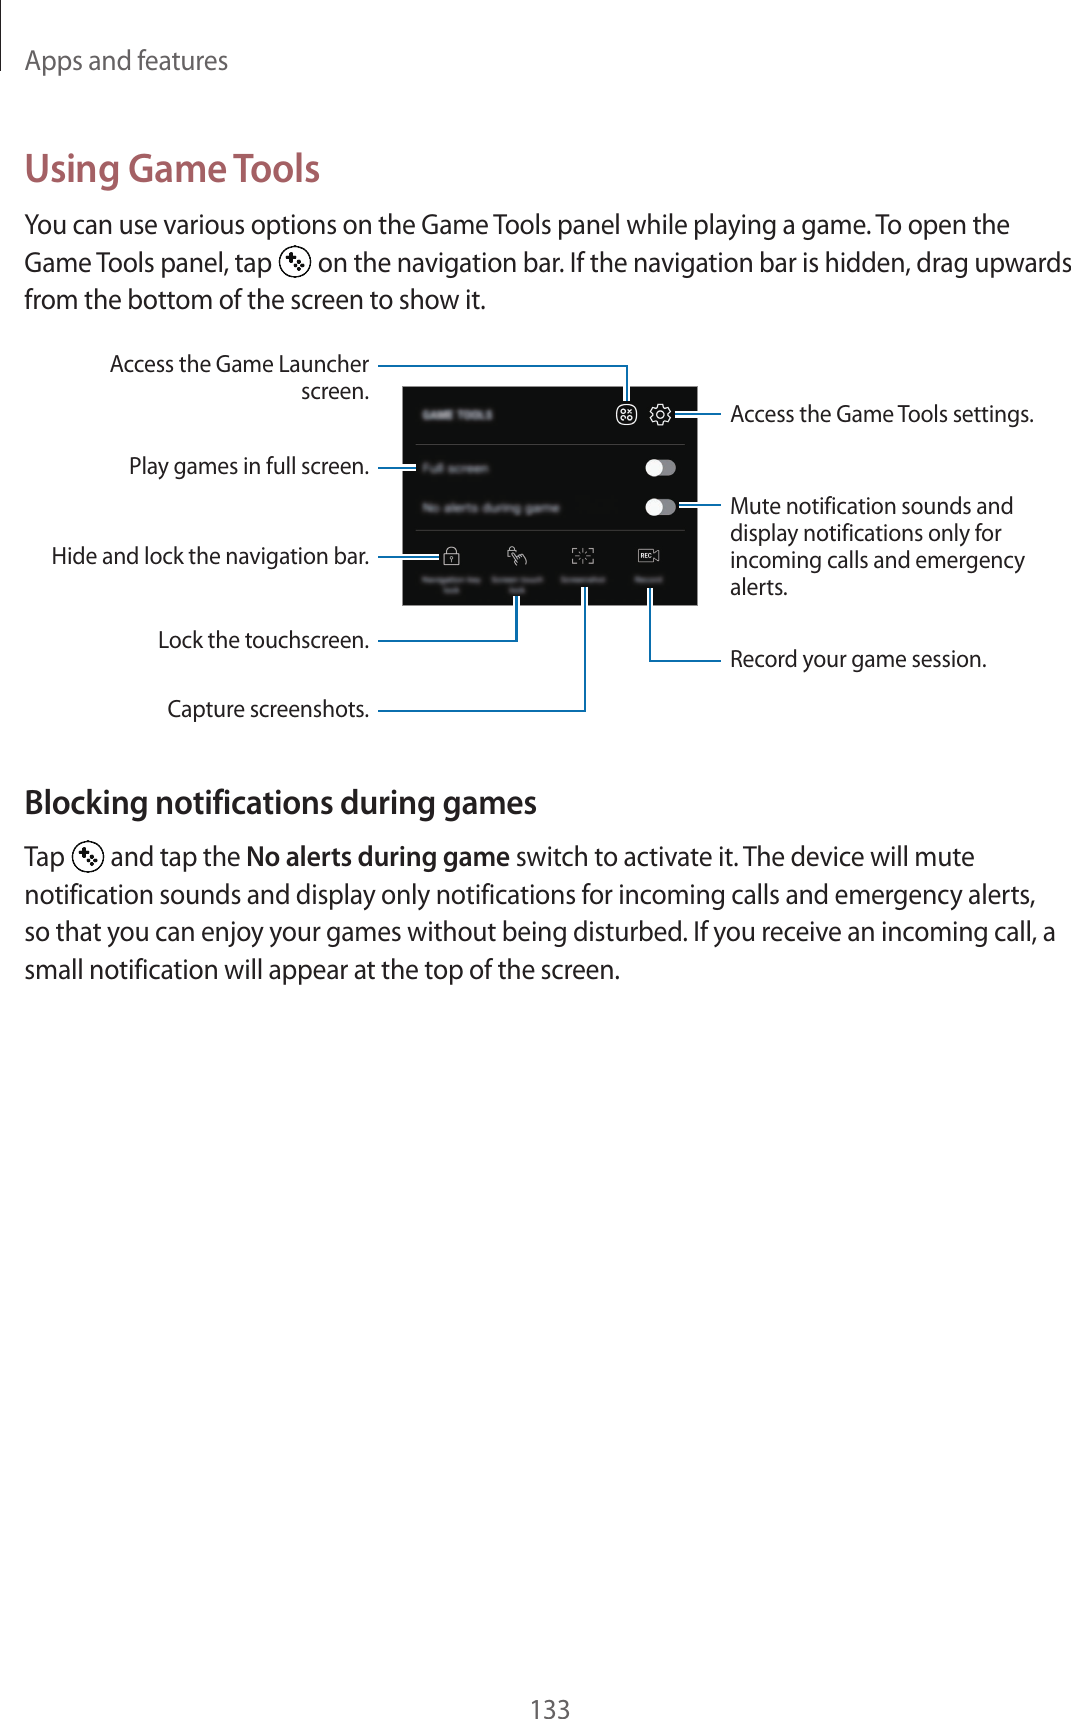
![Basics5•Modifying the device’s operating system or installing softwares from unofficial sources may result in device malfunctions and data corruption or loss. These actions are violations of your Samsung licence agreement and will void your warranty.•Depending on the region or model, some devices are required to receive approval from the Federal Communications Commission (FCC). If your device is approved by the FCC, you can view the FCC ID of the device. To view the FCC ID, launch the Settings app and tap About phone → Battery information.•Depending on the region, you can view the regulatory information on the device. To view the information, launch the Settings app and tap About phone → Regulatory information.Maintaining water and dust resistanceYour device supports water- and dust-resistance. Follow these tips carefully to maintain the water- and dust-resistance of your device. Failure to do so may result in damage to your device.•Do not immerse the device in fresh water deeper than 1.5 m or keep it submerged for more than 30 minutes. If you immerse the device in any liquid other than fresh water, such as salt water, ionised water, or alcoholic beverage, liquid will enter the device faster.•Do not expose the device to water moving with force.•If the device is exposed to fresh water, dry it thoroughly with a clean, soft cloth. If the device is exposed to other liquids, such as salt water, ionised water, or alcoholic beverage, rinse it with fresh water and dry it thoroughly with a clean, soft cloth. If you do not follow these instructions, the device’s performance and appearance may be affected.•If the device has been immersed in water or the microphone or speaker is wet, sound may not be heard clearly during a call. After wiping the device with a dry cloth, dry it thoroughly before using it.•The touchscreen and other features may not work properly if the device is used in water.•If the device is dropped or receives an impact, the water- and dust-resistant features of the device may be damaged.•Your device has been tested in a controlled environment and certified to be water- and dust-resistant in specific situations (meets requirements of classification IP68 as described by the international standard IEC 60529-Degrees of Protection provided by Enclosures [IP Code]; test conditions: 15-35 °C, 86-106 kPa, fresh water, 1.5 metre, 30 minutes). Despite this classification, it is still possible for your device to be damaged in certain situations.](https://usermanual.wiki/Samsung-Electronics-Co/SMA730F/User-Guide-3633985-Page-5.png)


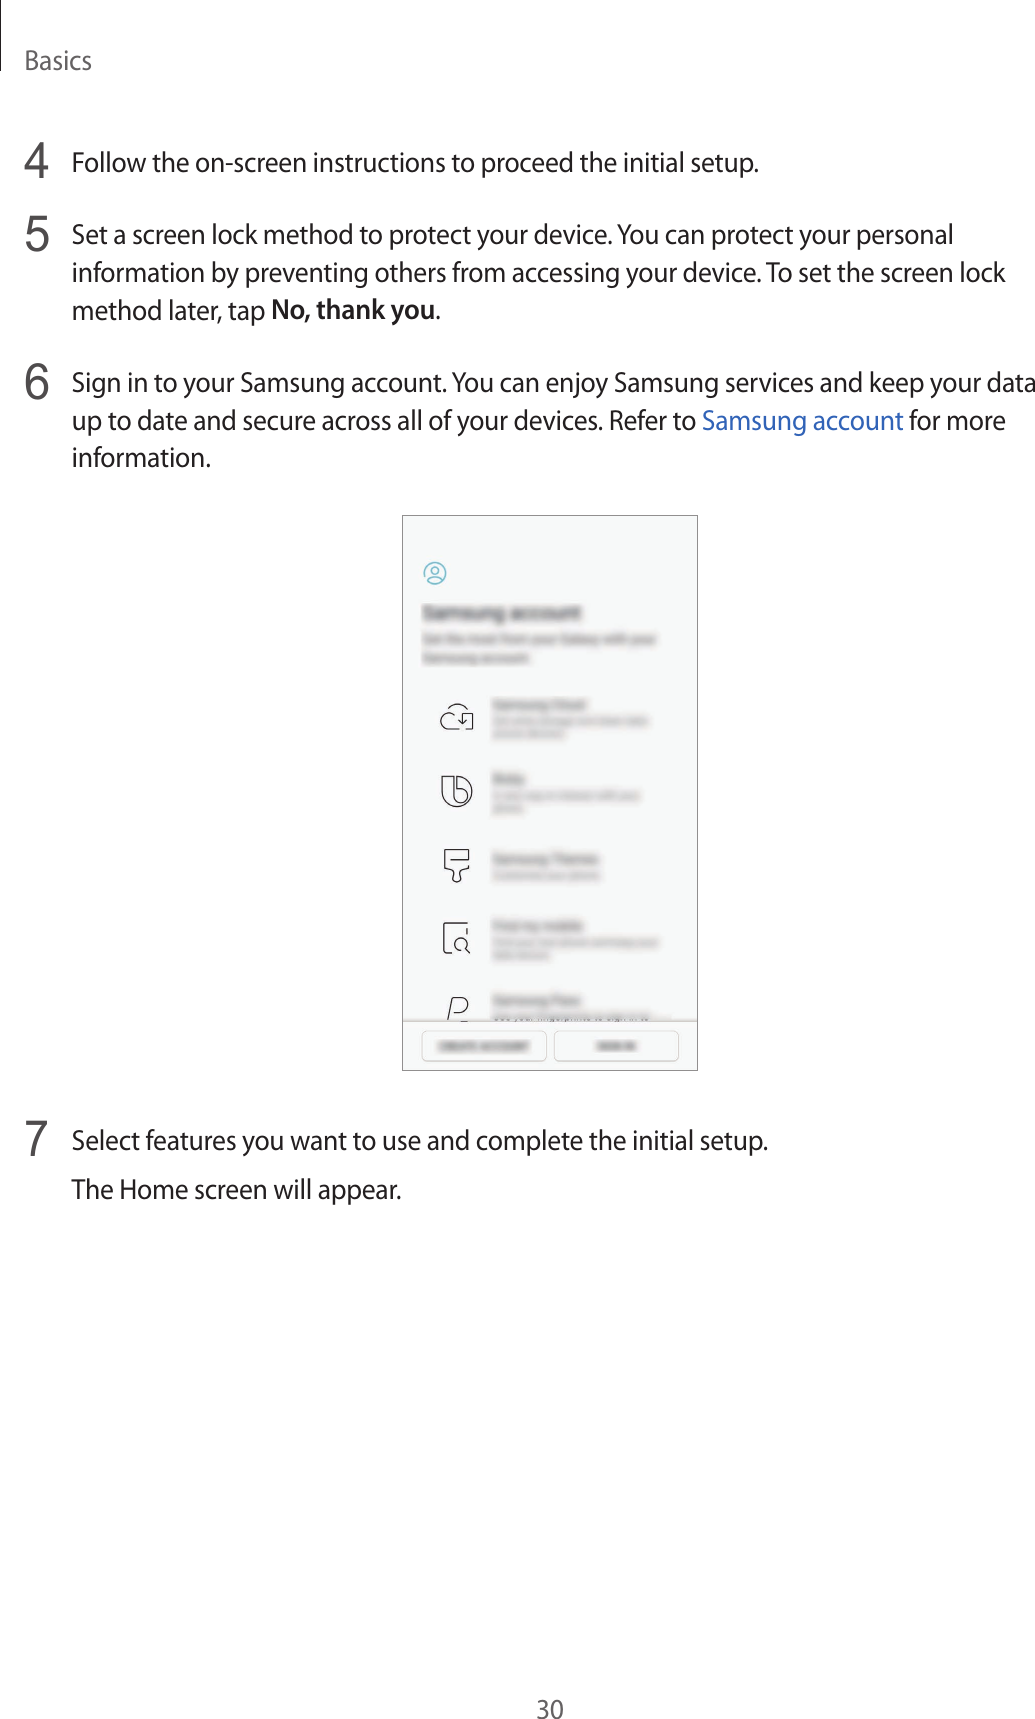
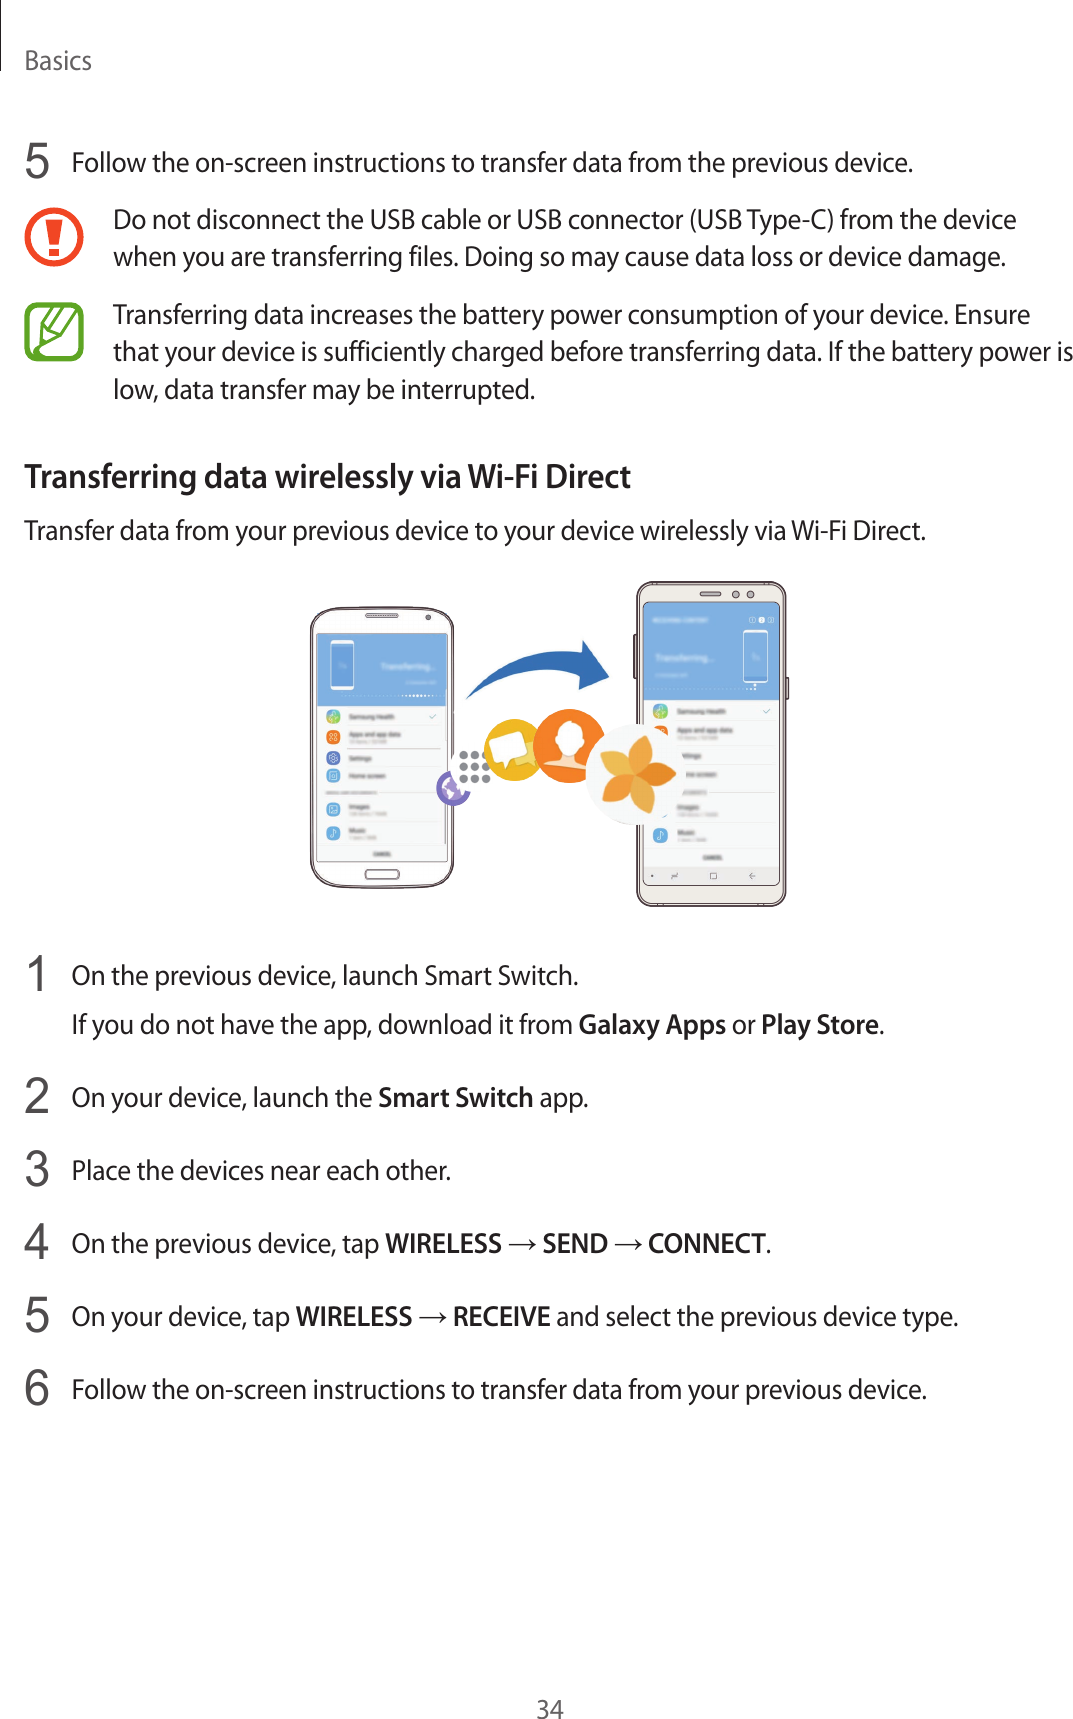
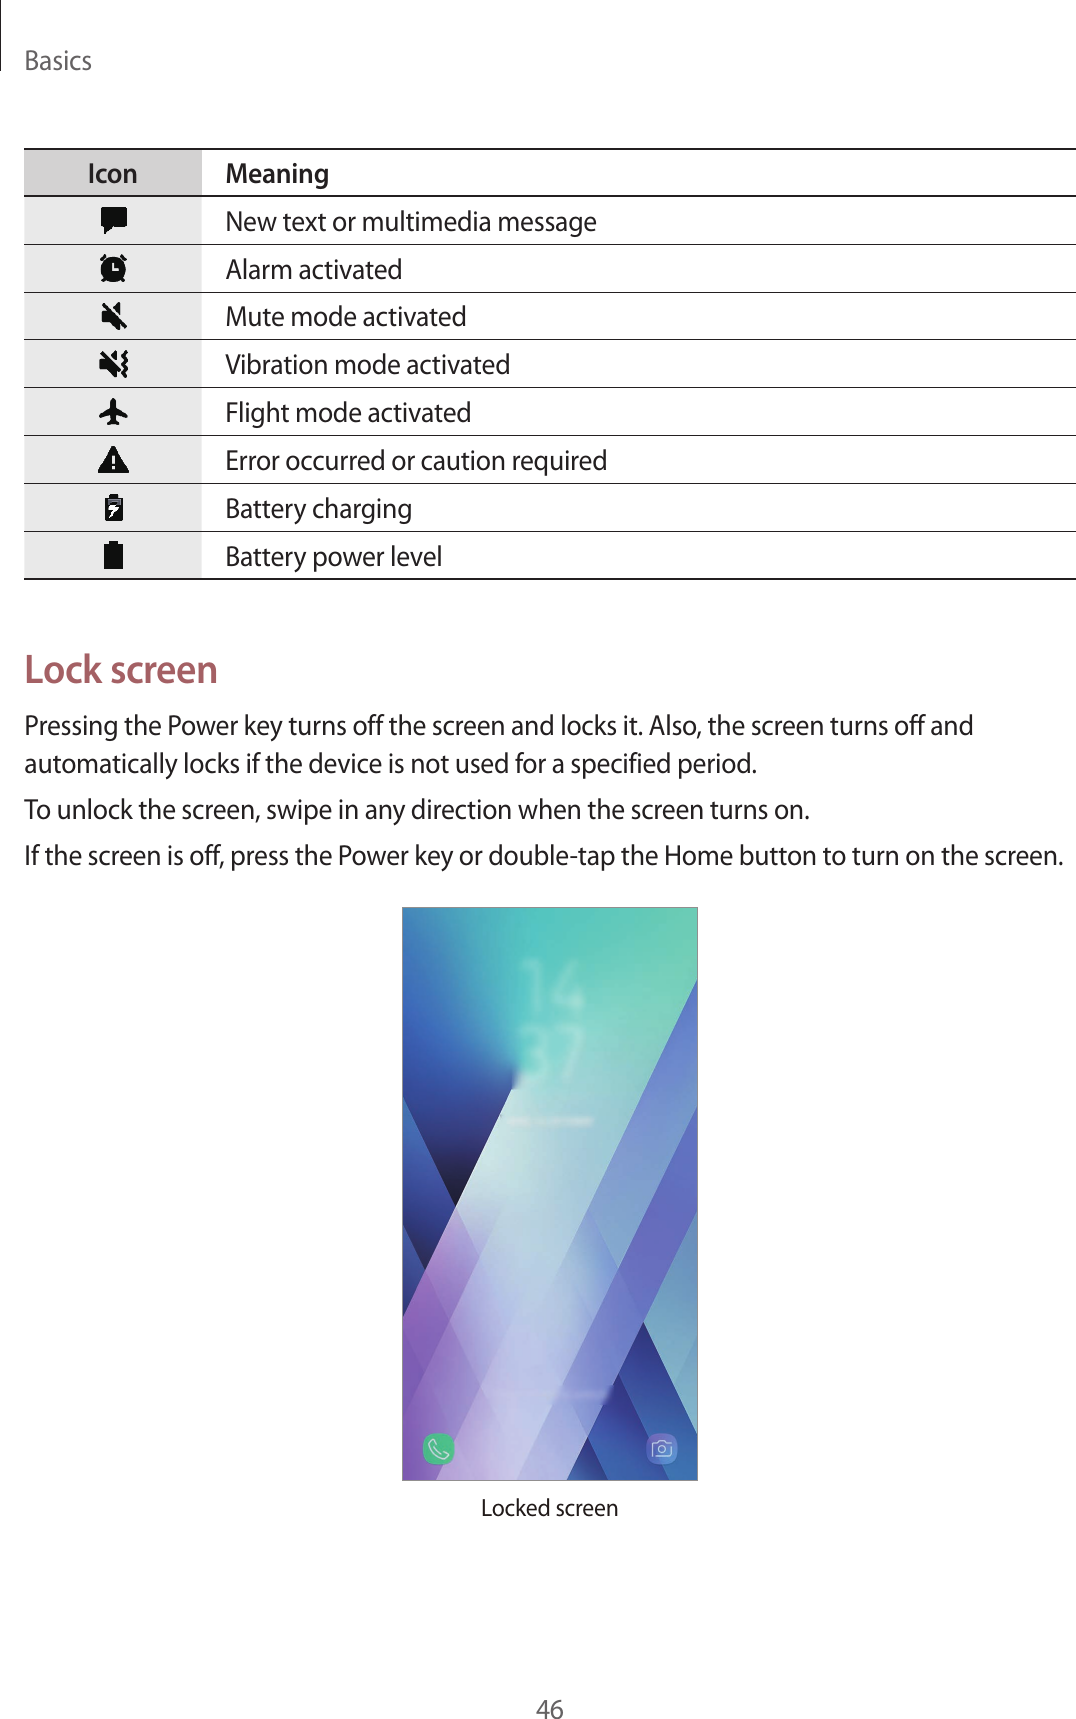

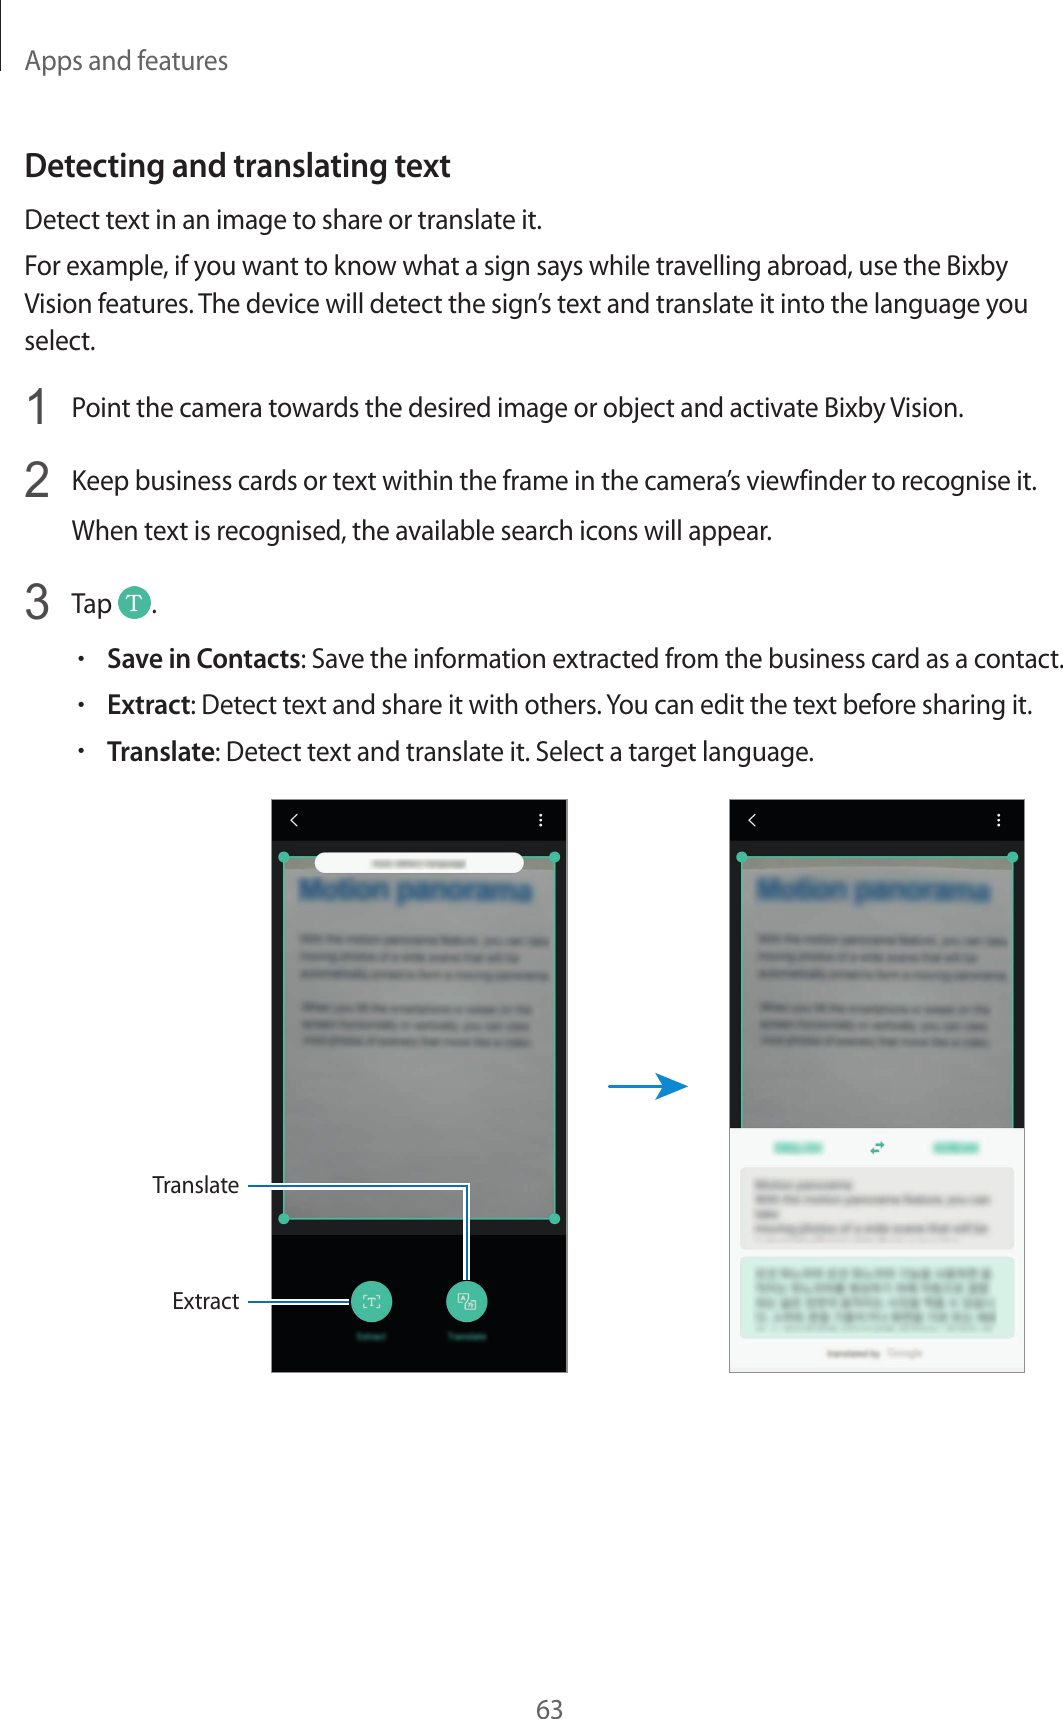
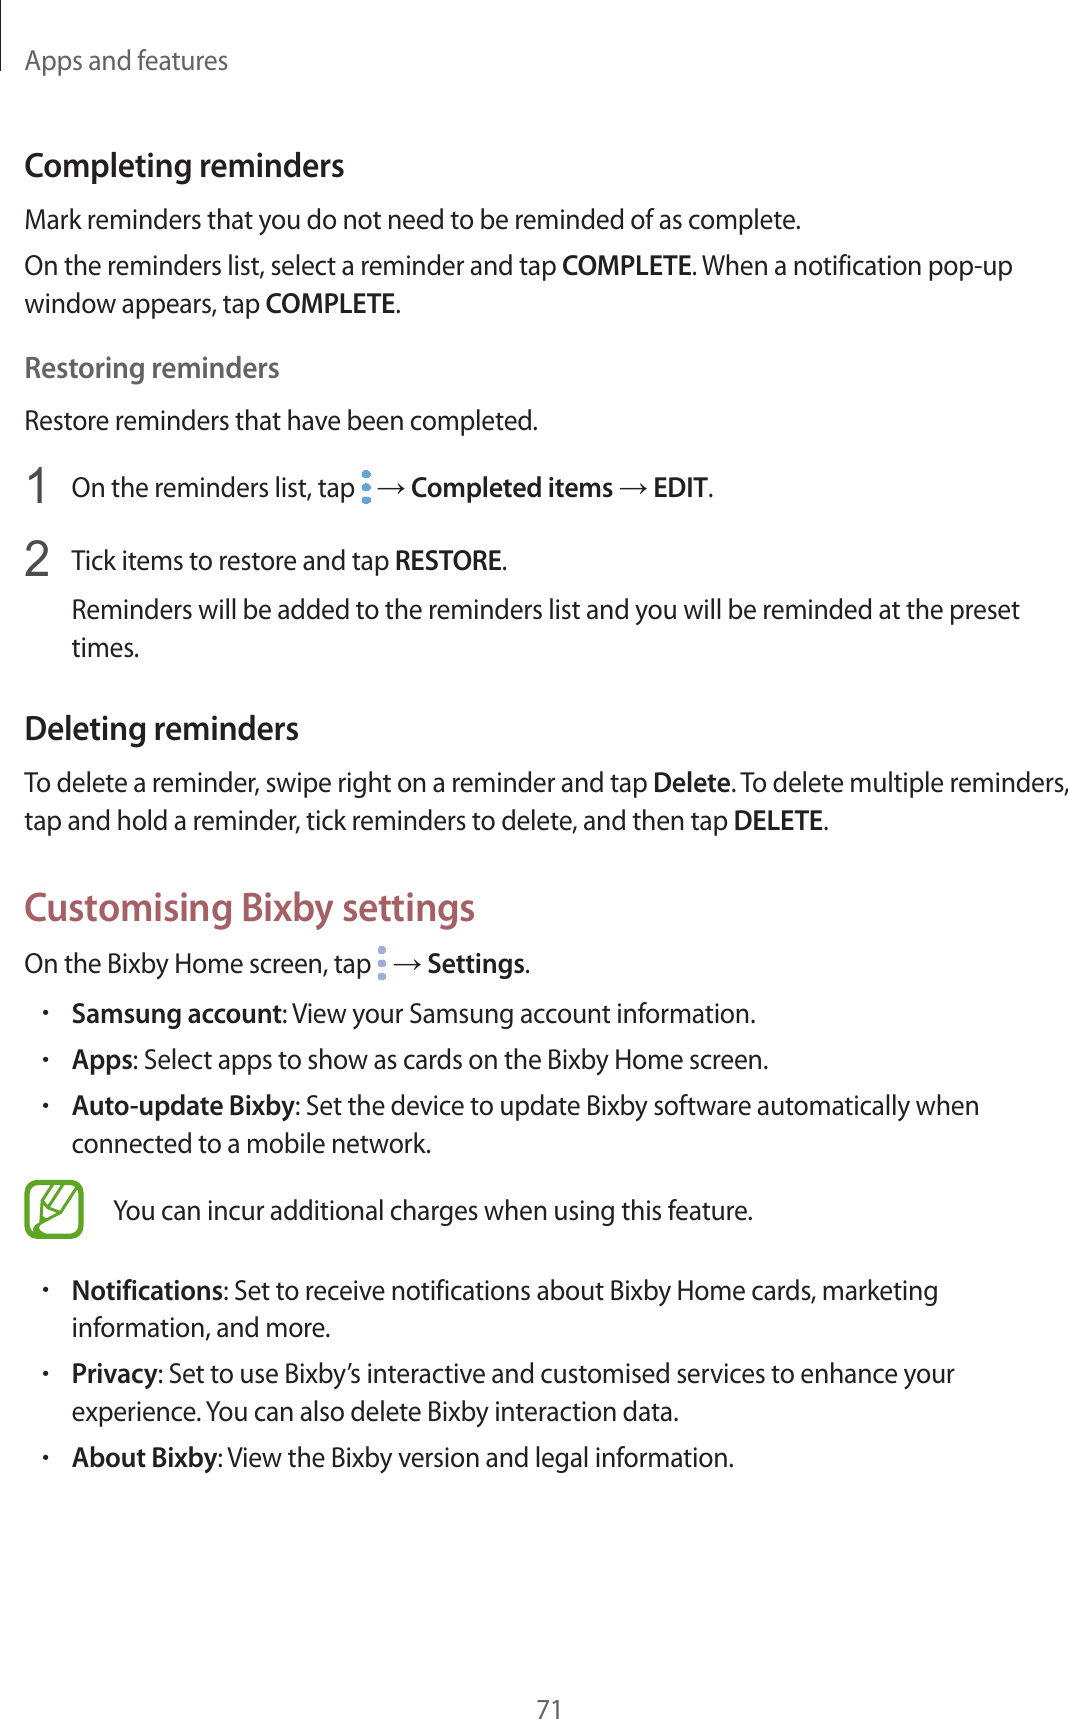


![+HDOWKDQGVDIHW\LQIRUPDWLRQ([SRVXUHWR5DGLR)UHTXHQF\5)6LJQDOV&HUWLILFDWLRQ,QIRUPDWLRQ6$5 <RXUZLUHOHVVSKRQHLVDUDGLRWUDQVPLWWHUDQGUHFHLYHU,WLVGHVLJQHGDQG PDQXIDFWXUHGQRWWRH[FHHGWKHH[SRVXUHOLPLWVIRUUDGLRIUHTXHQF\5)HQHUJ\VHW E\WKH)HGHUDO&RPPXQLFDWLRQV&RPPLVVLRQ)&&RIWKH86JRYHUQPHQW7KHVH )&&H[SRVXUHOLPLWVDUHGHULYHGIURPWKHUHFRPPHQGDWLRQVRIWZRH[SHUW RUJDQL]DWLRQVWKH1DWLRQDO&RXQVHORQ5DGLDWLRQ3URWHFWLRQDQG0HDVXUHPHQW 1&53DQGWKH,QVWLWXWHRI(OHFWULFDODQG(OHFWURQLFV(QJLQHHUV,(((,QERWK FDVHVWKHUHFRPPHQGDWLRQVZHUHGHYHORSHGE\VFLHQWLILFDQGHQJLQHHULQJH[SHUWV GUDZQIURPLQGXVWU\JRYHUQPHQWDQGDFDGHPLDDIWHUH[WHQVLYHUHYLHZVRIWKH VFLHQWLILFOLWHUDWXUHUHODWHGWRWKHELRORJLFDOHIIHFWVRI5)HQHUJ\ 7KHH[SRVXUHOLPLWVHWE\WKH)&&IRUZLUHOHVVPRELOHSKRQHVHPSOR\VDXQLWRI PHDVXUHPHQWNQRZQDVWKH6SHFLILF$EVRUSWLRQ5DWH6$57KH6$5LVDPHDVXUH RIWKHUDWHRIDEVRUSWLRQRI5)HQHUJ\E\WKHKXPDQERG\H[SUHVVHGLQXQLWVRIZDWWV SHUNLORJUDP:NJ7KH)&&UHTXLUHVZLUHOHVVSKRQHVWRFRPSO\ZLWKDVDIHW\OLPLW RIZDWWVSHUNLORJUDP:NJ7KH)&&H[SRVXUHOLPLWLQFRUSRUDWHVD VXEVWDQWLDOPDUJLQRIVDIHW\WRJLYHDGGLWLRQDOSURWHFWLRQWRWKHSXEOLFDQGWRDFFRXQW IRUDQ\YDULDWLRQVLQPHDVXUHPHQWV 6$5WHVWVDUHFRQGXFWHGXVLQJVWDQGDUGRSHUDWLQJSRVLWLRQVDFFHSWHGE\WKH)&& ZLWKWKHSKRQHWUDQVPLWWLQJDWLWVKLJKHVWFHUWLILHGSRZHUOHYHOLQDOOWHVWHGIUHTXHQF\ EDQGV$OWKRXJKWKH6$5LVGHWHUPLQHGDWWKHKLJKHVWFHUWLILHGSRZHUOHYHOWKH DFWXDO6$5OHYHORIWKHSKRQHZKLOHRSHUDWLQJFDQEHZHOOEHORZWKHPD[LPXPYDOXH 7KLVLVEHFDXVHWKHSKRQHLVGHVLJQHGWRRSHUDWHDWPXOWLSOHSRZHUOHYHOVVRDVWR XVHRQO\WKHSRZHUUHTXLUHGWRUHDFKWKHQHWZRUN,QJHQHUDOWKHFORVHU\RXDUHWRD ZLUHOHVVEDVHVWDWLRQDQWHQQDWKHORZHUWKHSRZHURXWSXW %HIRUHDQHZPRGHOSKRQHLVDYDLODEOHIRUVDOHWRWKHSXEOLFLWPXVWEHWHVWHGDQG FHUWLILHGWRWKH)&&WKDWLWGRHVQRWH[FHHGWKHH[SRVXUHOLPLWHVWDEOLVKHGE\WKH )&&7HVWVIRUHDFKPRGHOSKRQHDUHSHUIRUPHGLQSRVLWLRQVDQGORFDWLRQVHJDW WKHHDUDQGZRUQRQWKHERG\DVUHTXLUHGE\WKH)&& )RUERG\ZRUQRSHUDWLRQWKLVPRGHOSKRQHKDVEHHQWHVWHGDQGPHHWVWKH)&&5) H[SRVXUHJXLGHOLQHVZKHQXVHGZLWKD6DPVXQJDFFHVVRU\GHVLJQDWHGIRUWKLV SURGXFWRUZKHQXVHGZLWKDQDFFHVVRU\WKDWFRQWDLQVQRPHWDODQGWKDWSRVLWLRQV WKHKDQGVHWDPLQLPXPRIFPIURPWKHERG\ 1RQFRPSOLDQFHZLWKWKHDERYHUHVWULFWLRQVPD\UHVXOWLQYLRODWLRQRI)&&5) H[SRVXUHJXLGHOLQHV 6$5LQIRUPDWLRQRQWKLVDQGRWKHUPRGHOSKRQHVFDQEHYLHZHGRQOLQHDW KWWSZZZIFFJRYRHWHDIFFLG3OHDVHXVHWKHSKRQH)&&,'QXPEHUIRUVHDUFK $/60A730F6RPHWLPHVLWPD\EHQHFHVVDU\WRUHPRYHWKHEDWWHU\SDFNWRILQG WKHQXPEHU2QFH\RXKDYHWKH)&&,'QXPEHUIRUDSDUWLFXODUSKRQHIROORZWKH LQVWUXFWLRQVRQWKHZHEVLWHDQGLWVKRXOGSURYLGHYDOXHVIRUW\SLFDORUPD[LPXP6$5 IRUDSDUWLFXODUSKRQH$GGLWLRQDOSURGXFWVSHFLILF6$5LQIRUPDWLRQFDQDOVREH REWDLQHGDWJVVRYYYHEEIQXGPE[ENQRGFKCURGEKHKECDUQTRVKQPTCVGUCTEGNNWNCTVGNGRJQPGU&RQVXPHU,QIRUPDWLRQRQ:LUHOHVV3KRQHV](https://usermanual.wiki/Samsung-Electronics-Co/SMA730F/User-Guide-3633985-Page-194.png)
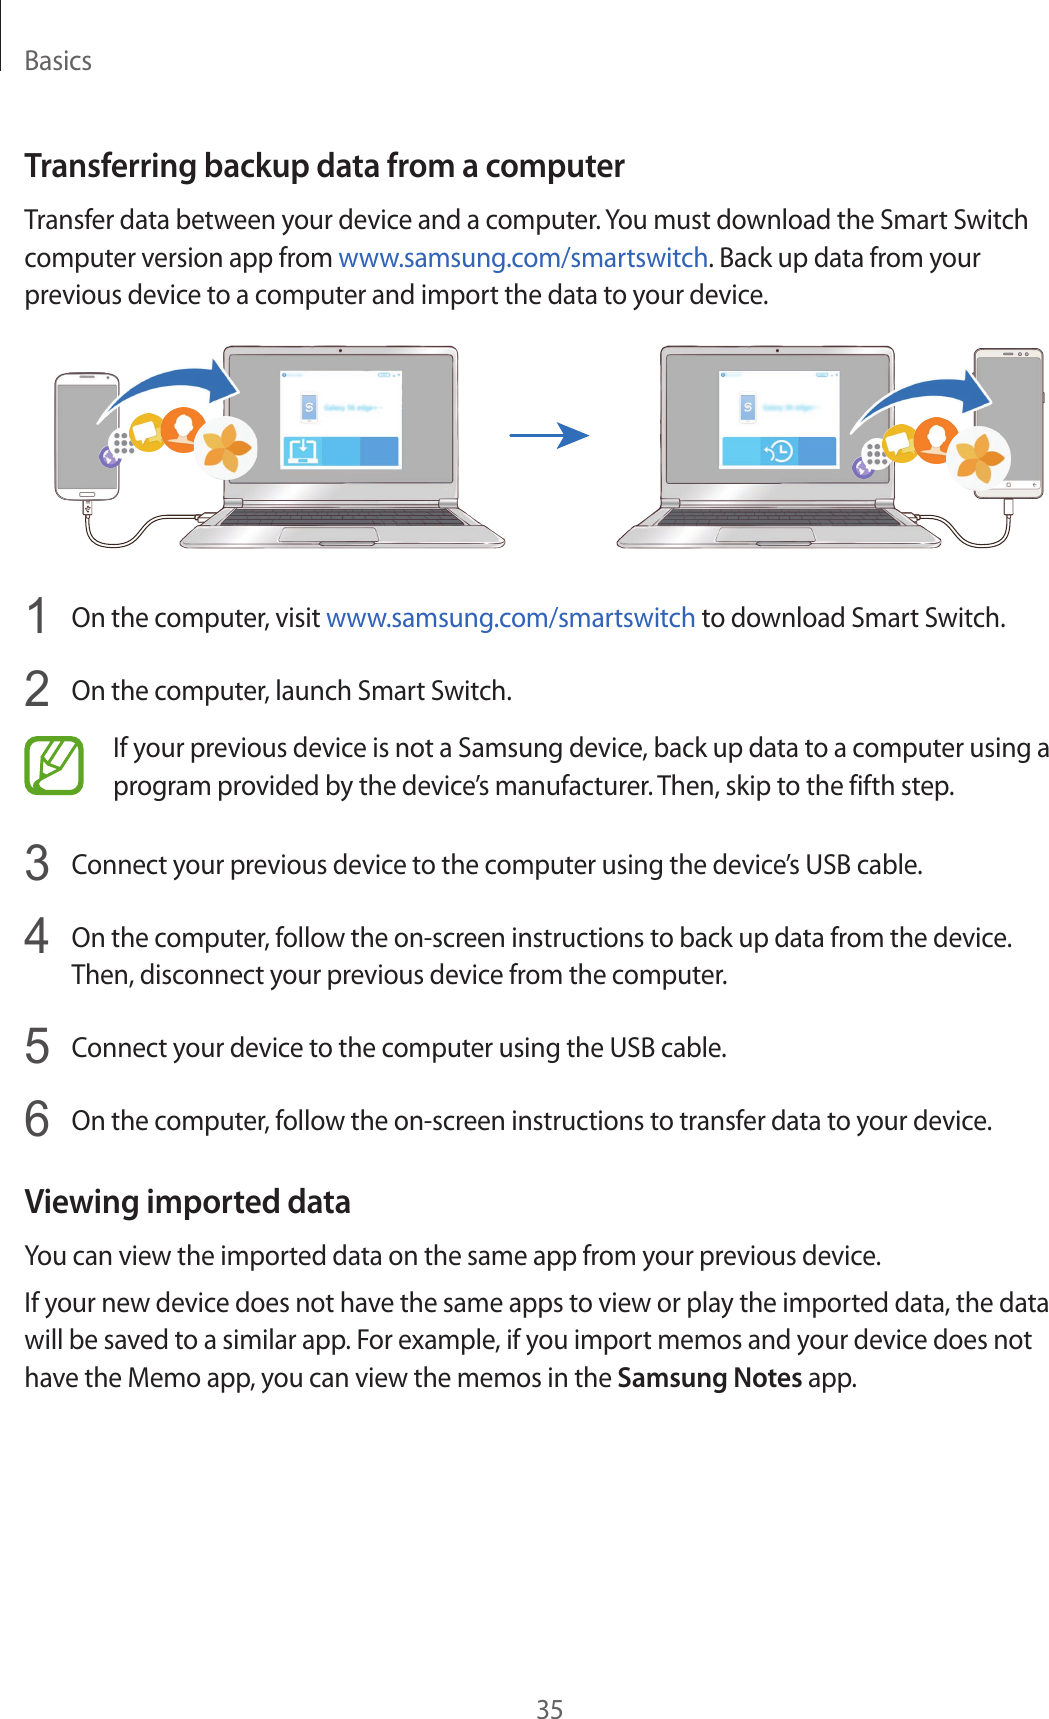
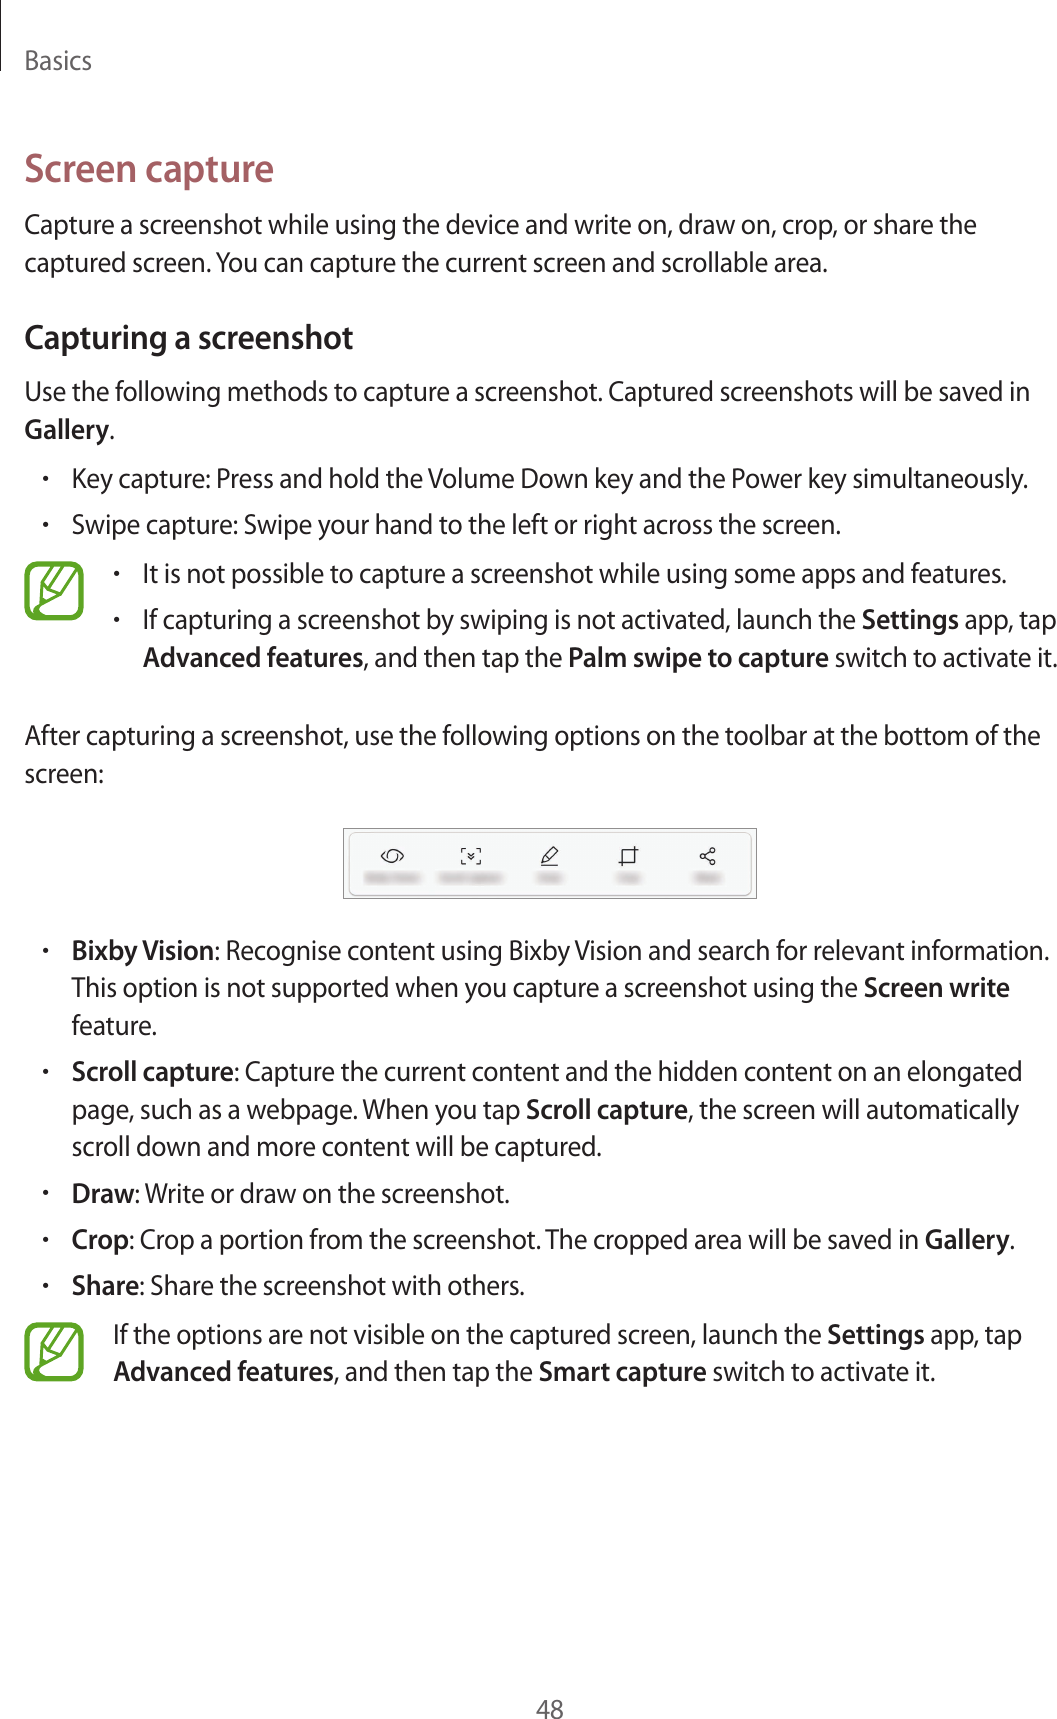
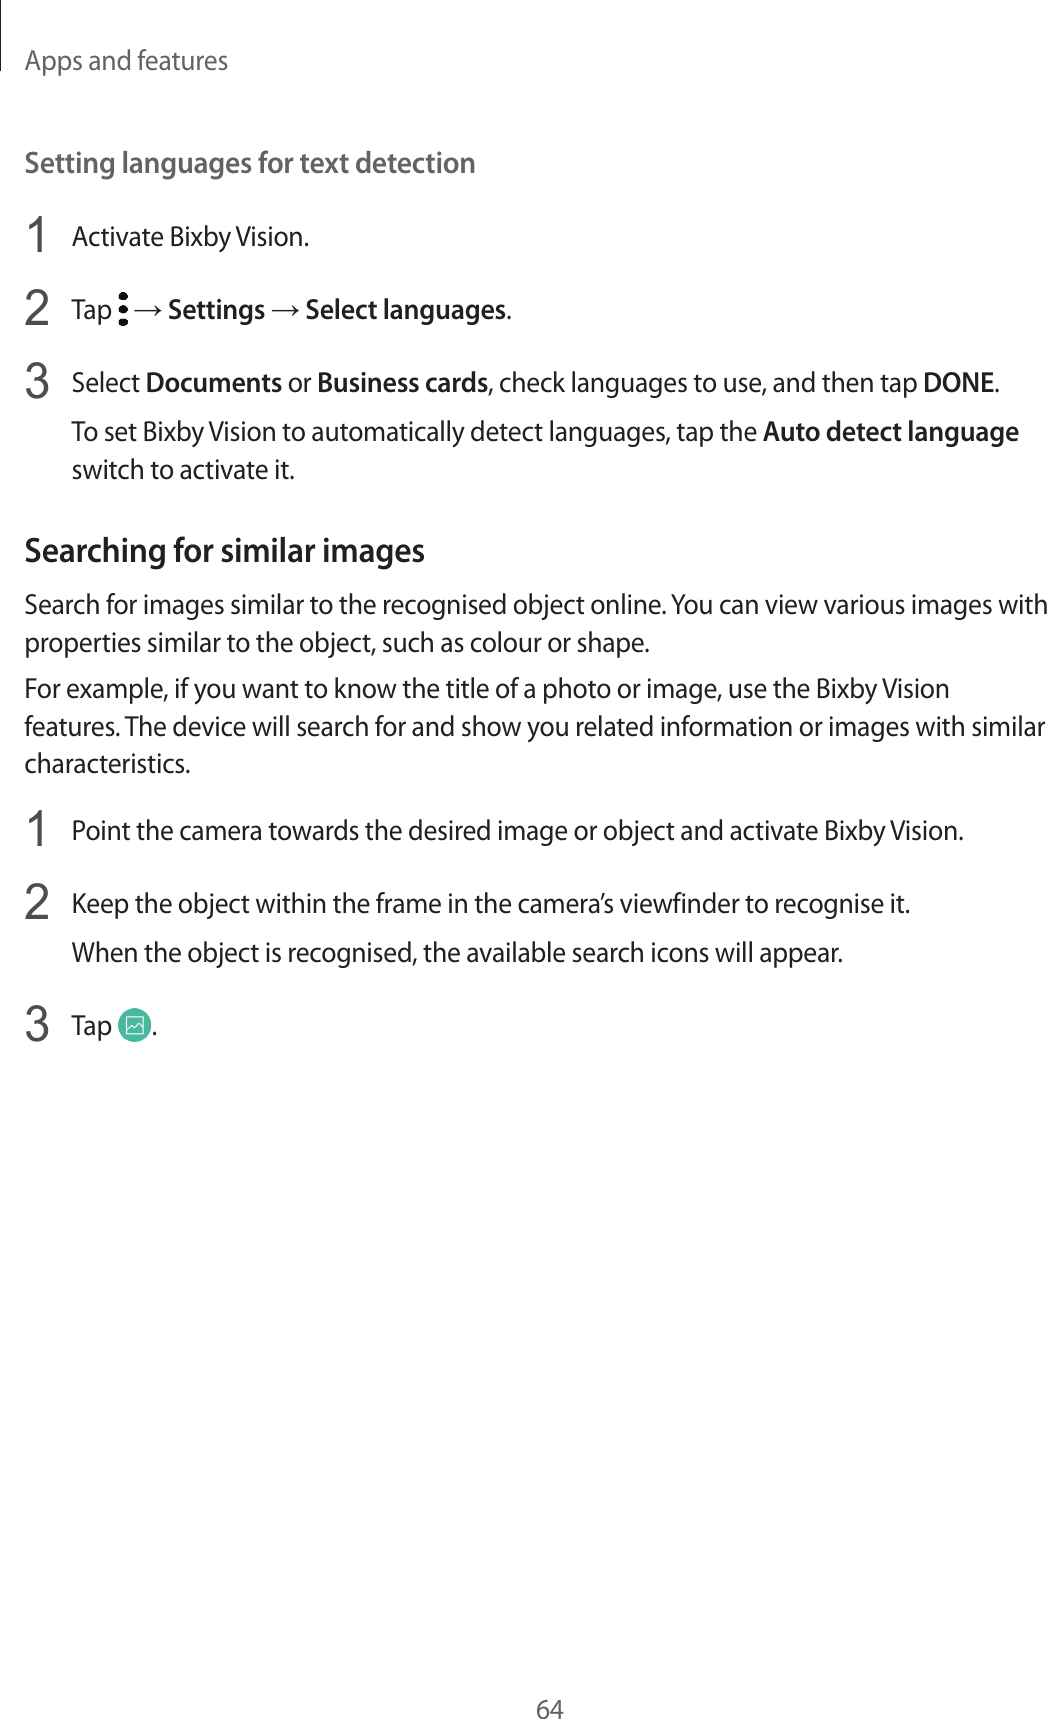
![z³6XSSRUWQHHGHGUHVHDUFKLQWRSRVVLEOHELRORJLFDOHIIHFWVRI5)RIWKHW\SHHPLWWHGE\ZLUHOHVVSKRQHVz³'HVLJQZLUHOHVVSKRQHVLQDZD\WKDWPLQLPL]HVDQ\5)H[SRVXUHWRWKHXVHUWKDWLVQRWQHFHVVDU\IRUGHYLFHIXQFWLRQDQGz³&RRSHUDWHLQSURYLGLQJXVHUVRIZLUHOHVVSKRQHVZLWKWKHEHVWSRVVLEOHLQIRUPDWLRQRQSRVVLEOHHIIHFWVRIZLUHOHVVSKRQHXVHRQKXPDQKHDOWK)'$EHORQJVWRDQLQWHUDJHQF\ZRUNLQJJURXSRIWKHIHGHUDODJHQFLHVWKDWKDYHUHVSRQVLELOLW\IRUGLIIHUHQWDVSHFWVRI5)VDIHW\WRHQVXUHFRRUGLQDWHGHIIRUWVDWWKHIHGHUDOOHYHO7KHIROORZLQJDJHQFLHVEHORQJWRWKLVZRUNLQJJURXSz³1DWLRQDO,QVWLWXWHIRU2FFXSDWLRQDO6DIHW\DQG+HDOWK7KH86)RRGDQG'UXJ$GPLQLVWUDWLRQ)'$KDVSXEOLVKHGDVHULHVRI4XHVWLRQV DQG$QVZHUVIRUFRQVXPHUVUHODWLQJWRUDGLRIUHTXHQF\5)H[SRVXUHIURPZLUHOHVV SKRQHV7KH)'$SXEOLFDWLRQLQFOXGHVWKHIROORZLQJLQIRUPDWLRQ:KDWNLQGVRISKRQHVDUHWKHVXEMHFWRIWKLVXSGDWH" 7KHWHUPZLUHOHVVSKRQHUHIHUVKHUHWRKDQGKHOGZLUHOHVVSKRQHVZLWKEXLOWLQ DQWHQQDVRIWHQFDOOHG³FHOO´³PRELOH´RU³3&6´SKRQHV7KHVHW\SHVRIZLUHOHVV SKRQHVFDQH[SRVHWKHXVHUWRPHDVXUDEOHUDGLRIUHTXHQF\HQHUJ\5)EHFDXVHRI WKHVKRUWGLVWDQFHEHWZHHQWKHSKRQHDQGWKHXVHUVKHDG7KHVH5)H[SRVXUHVDUH OLPLWHGE\)HGHUDO&RPPXQLFDWLRQV&RPPLVVLRQVDIHW\JXLGHOLQHVWKDWZHUH GHYHORSHGZLWKWKHDGYLFHRI)'$DQGRWKHUIHGHUDOKHDOWKDQGVDIHW\DJHQFLHV :KHQWKHSKRQHLVORFDWHGDWJUHDWHUGLVWDQFHVIURPWKHXVHUWKHH[SRVXUHWR5)LV GUDVWLFDOO\ORZHUEHFDXVHDSHUVRQV5)H[SRVXUHGHFUHDVHVUDSLGO\ZLWKLQFUHDVLQJ GLVWDQFHIURPWKHVRXUFH7KHVRFDOOHG³FRUGOHVVSKRQHV´ZKLFKKDYHDEDVHXQLW FRQQHFWHGWRWKHWHOHSKRQHZLULQJLQDKRXVHW\SLFDOO\RSHUDWHDWIDUORZHUSRZHU OHYHOVDQGWKXVSURGXFH5)H[SRVXUHVZHOOZLWKLQWKH)&&VFRPSOLDQFHOLPLWV'RZLUHOHVVSKRQHVSRVHDKHDOWKKD]DUG" 7KHDYDLODEOHVFLHQWLILFHYLGHQFHGRHVQRWVKRZWKDWDQ\KHDOWKSUREOHPVDUH DVVRFLDWHGZLWKXVLQJZLUHOHVVSKRQHV7KHUHLVQRSURRIKRZHYHUWKDWZLUHOHVV SKRQHVDUHDEVROXWHO\VDIH:LUHOHVVSKRQHVHPLWORZOHYHOVRIUDGLRIUHTXHQF\ HQHUJ\5)LQWKHPLFURZDYHUDQJHZKLOHEHLQJXVHG7KH\DOVRHPLWYHU\ORZOHYHOV RI5)ZKHQLQWKHVWDQGE\PRGH:KHUHDVKLJKOHYHOVRI5)FDQSURGXFHKHDOWK HIIHFWVE\KHDWLQJWLVVXHH[SRVXUHWRORZOHYHO5)WKDWGRHVQRWSURGXFHKHDWLQJ HIIHFWVFDXVHVQRNQRZQDGYHUVHKHDOWKHIIHFWV0DQ\VWXGLHVRIORZOHYHO5) H[SRVXUHVKDYHQRWIRXQGDQ\ELRORJLFDOHIIHFWV6RPHVWXGLHVKDYHVXJJHVWHGWKDW VRPHELRORJLFDOHIIHFWVPD\RFFXUEXWVXFKILQGLQJVKDYHQRWEHHQFRQILUPHGE\ DGGLWLRQDOUHVHDUFK,QVRPHFDVHVRWKHUUHVHDUFKHUVKDYHKDGGLIILFXOW\LQ UHSURGXFLQJWKRVHVWXGLHVRULQGHWHUPLQLQJWKHUHDVRQVIRULQFRQVLVWHQWUHVXOWV:KDWLV)'$VUROHFRQFHUQLQJWKHVDIHW\RIZLUHOHVVSKRQHV" 8QGHUWKHODZ)'$GRHVQRWUHYLHZWKHVDIHW\RIUDGLDWLRQHPLWWLQJFRQVXPHU SURGXFWVVXFKDVZLUHOHVVSKRQHVEHIRUHWKH\FDQEHVROGDVLWGRHVZLWKQHZGUXJV RUPHGLFDOGHYLFHV+RZHYHUWKHDJHQF\KDVDXWKRULW\WRWDNHDFWLRQLIZLUHOHVV SKRQHVDUHVKRZQWRHPLWUDGLRIUHTXHQF\HQHUJ\5)DWDOHYHOWKDWLVKD]DUGRXVWR WKHXVHU,QVXFKDFDVH)'$FRXOGUHTXLUHWKHPDQXIDFWXUHUVRIZLUHOHVVSKRQHVWR QRWLI\XVHUVRIWKHKHDOWKKD]DUGDQGWRUHSDLUUHSODFHRUUHFDOOWKHSKRQHVVRWKDW WKHKD]DUGQRORQJHUH[LVWV $OWKRXJKWKHH[LVWLQJVFLHQWLILFGDWDGRQRWMXVWLI\)'$UHJXODWRU\DFWLRQV)'$KDV XUJHGWKHZLUHOHVVSKRQHLQGXVWU\WRWDNHDQXPEHURIVWHSVLQFOXGLQJWKHIROORZLQJ](https://usermanual.wiki/Samsung-Electronics-Co/SMA730F/User-Guide-3633985-Page-195.png)
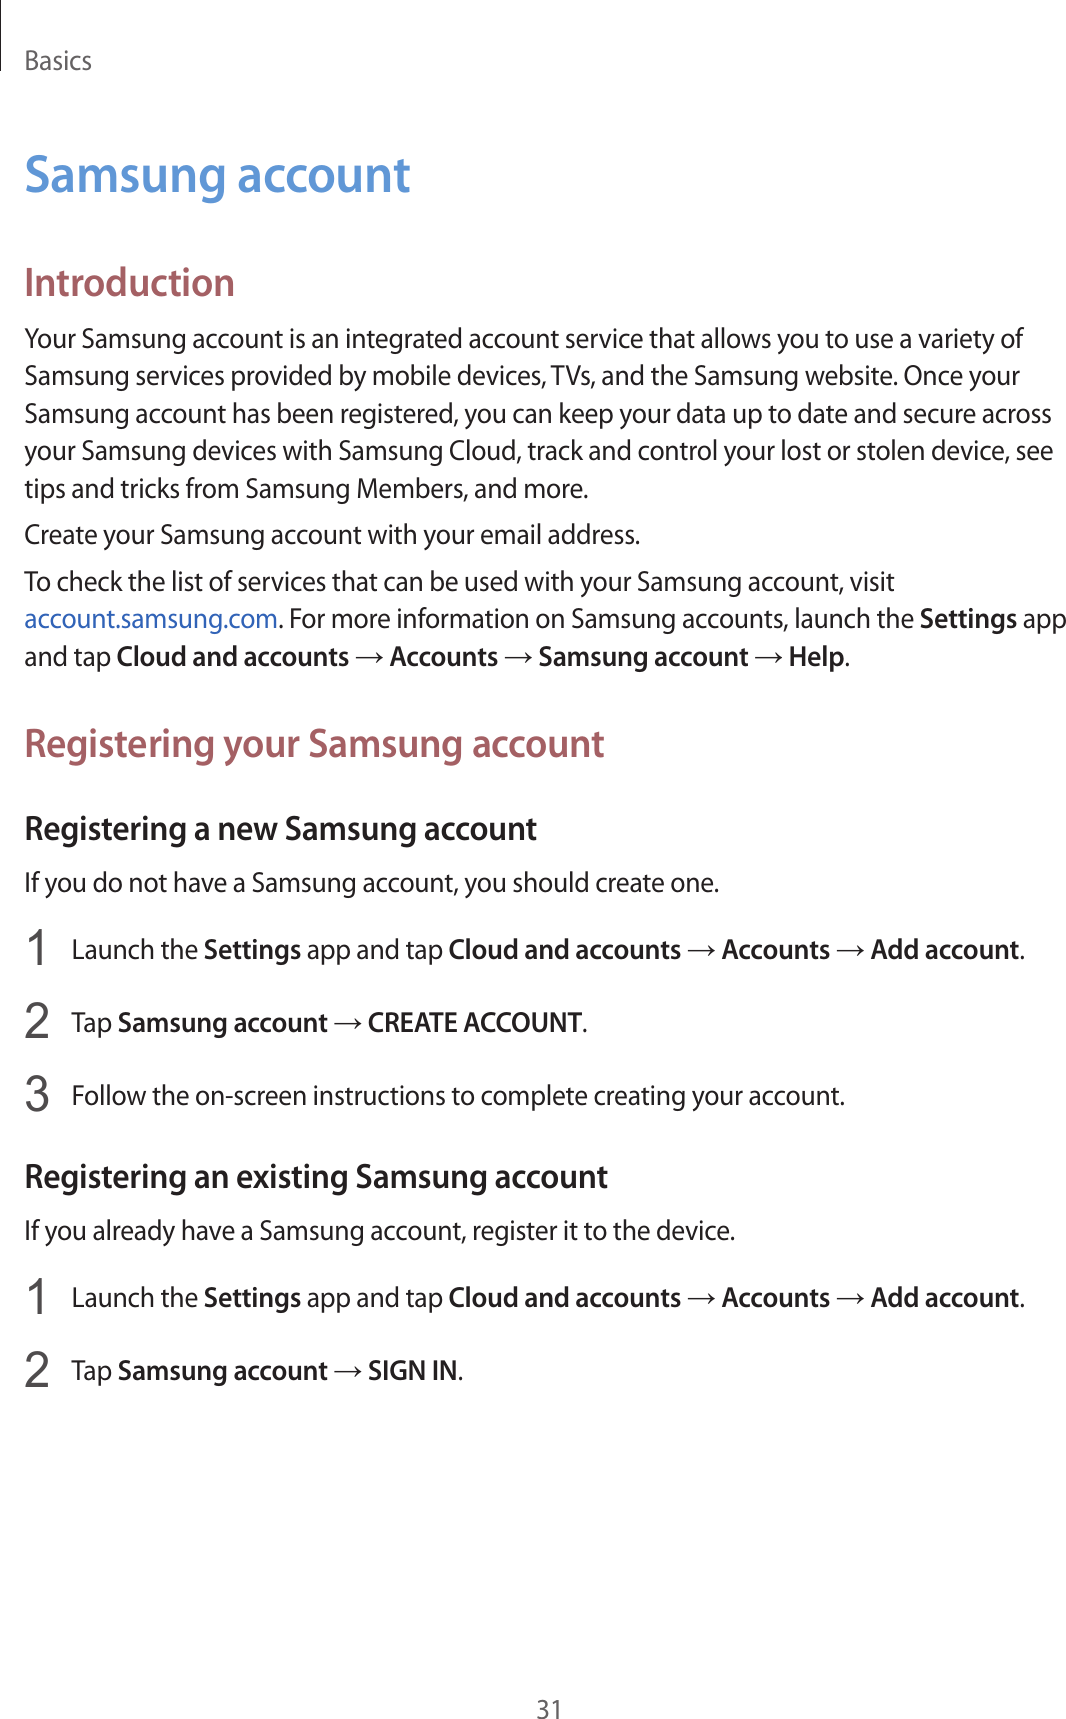
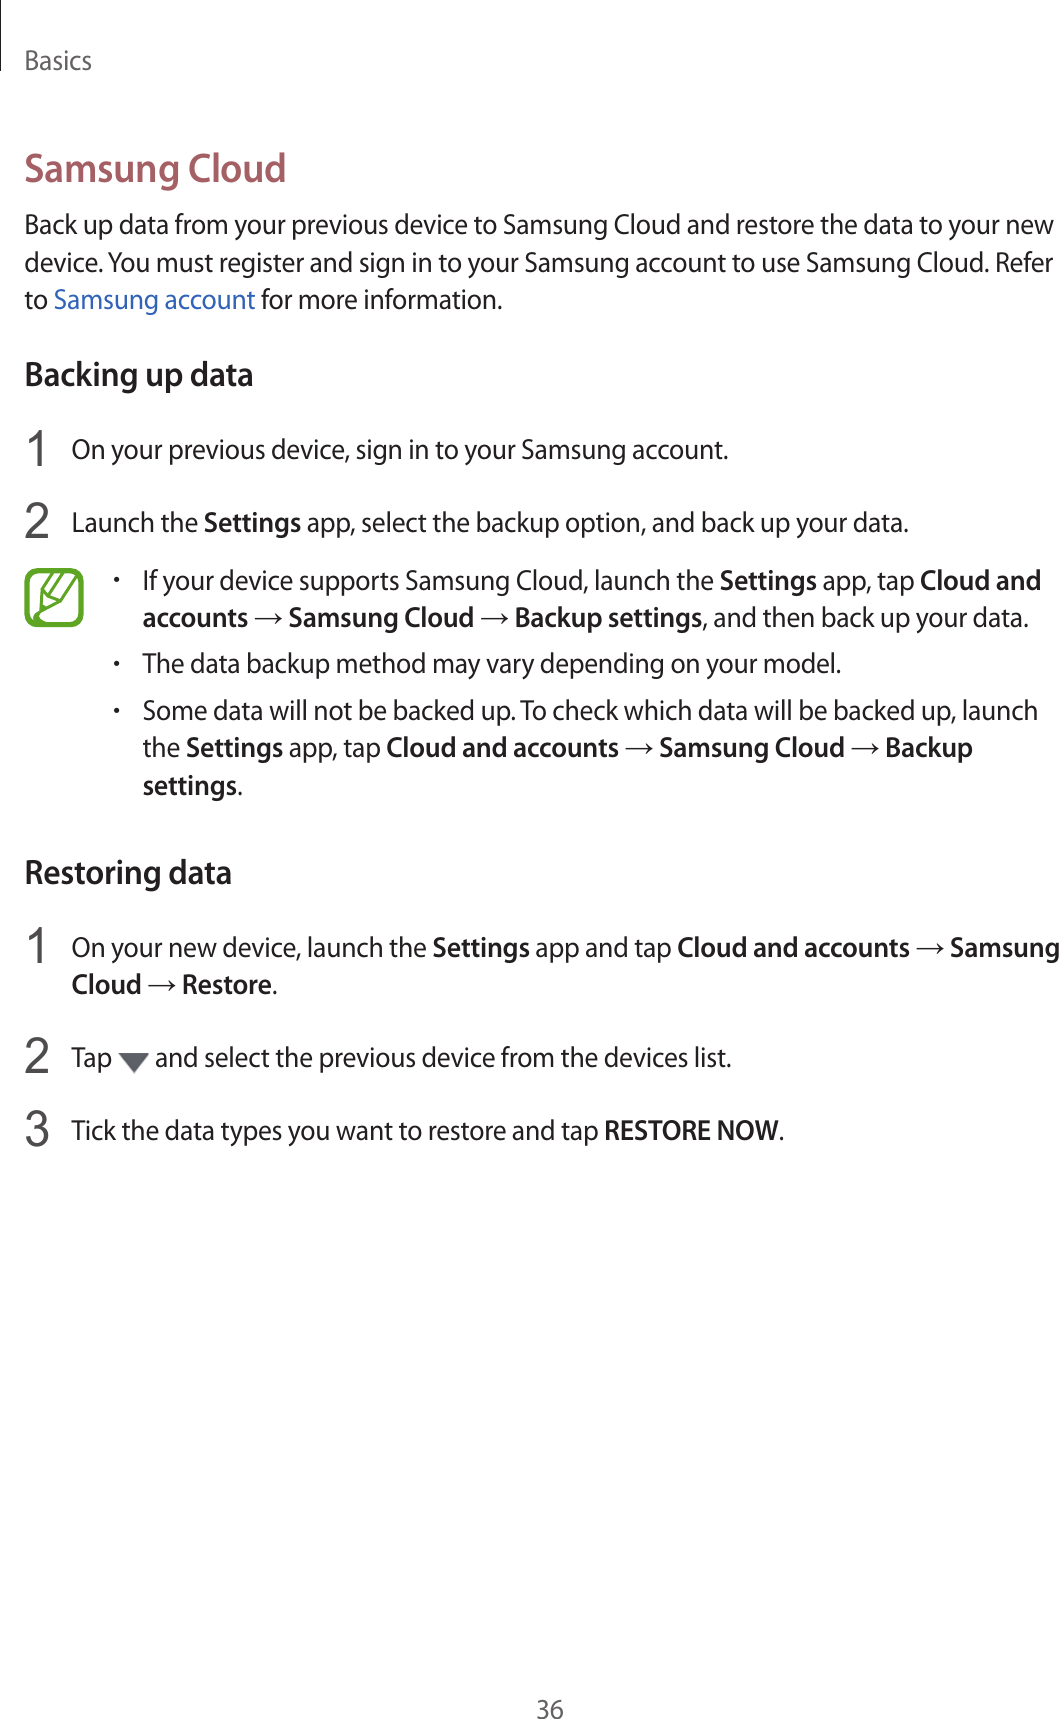
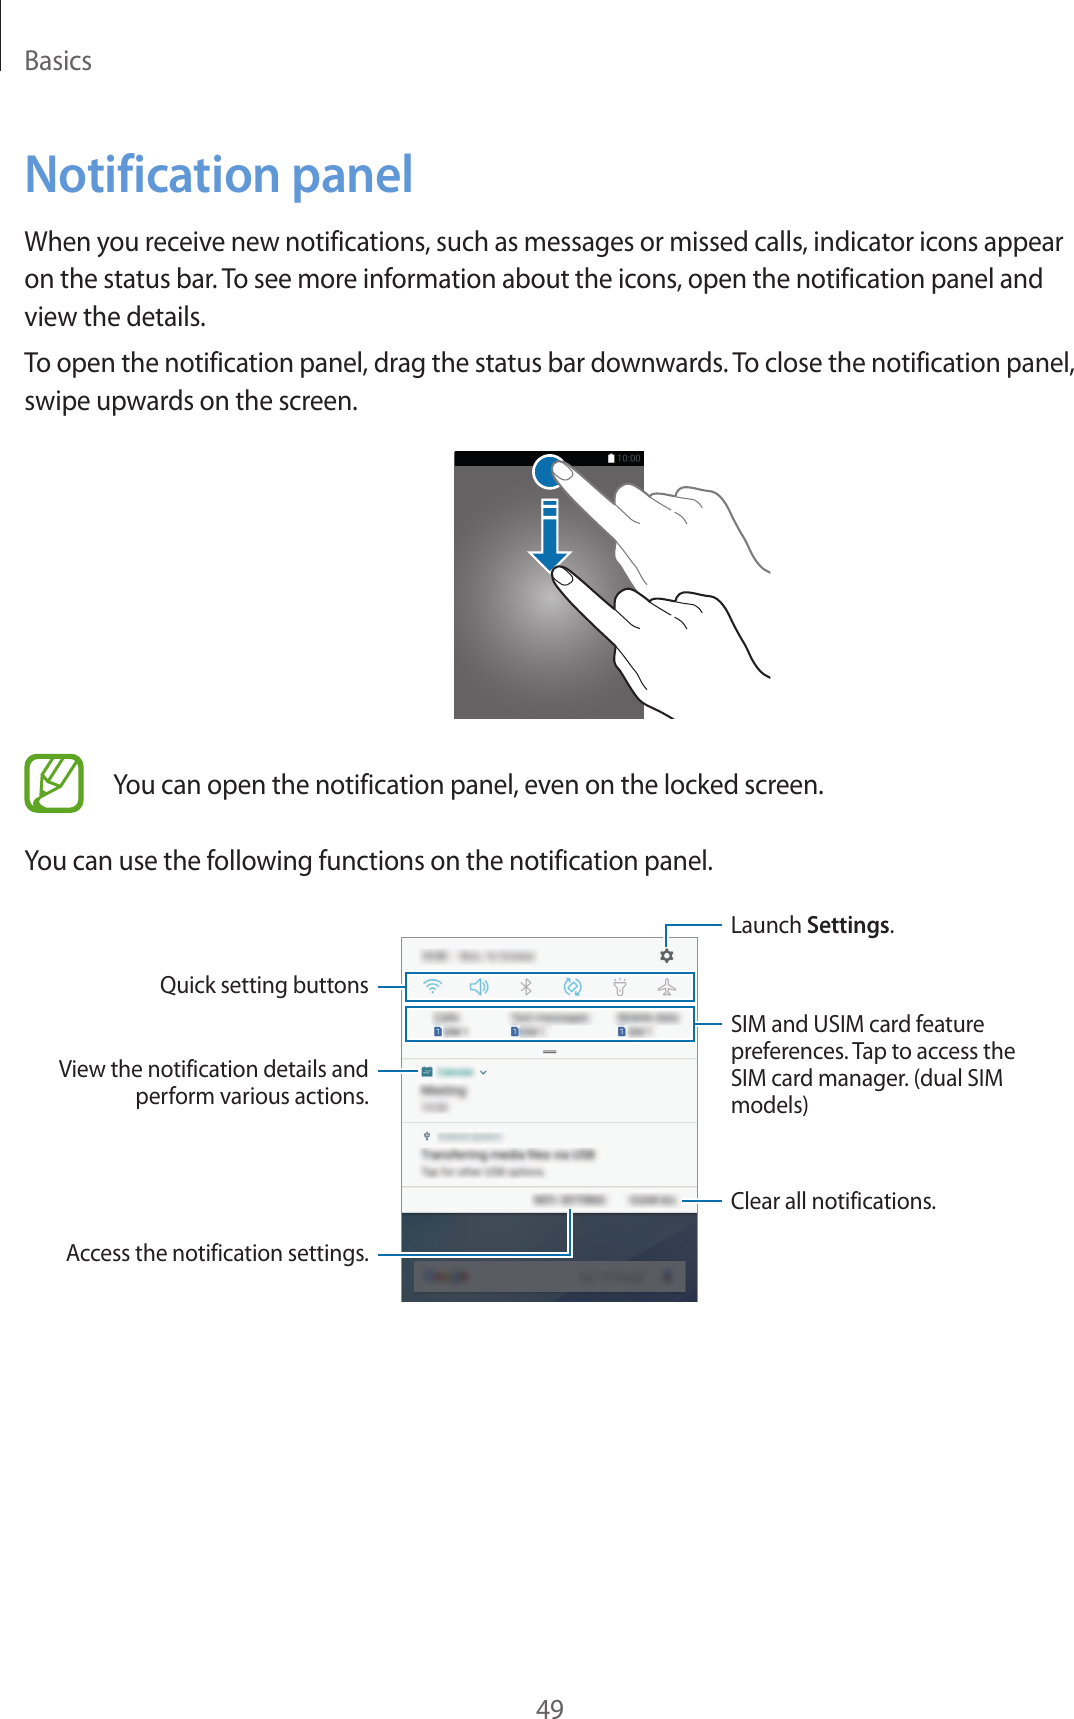
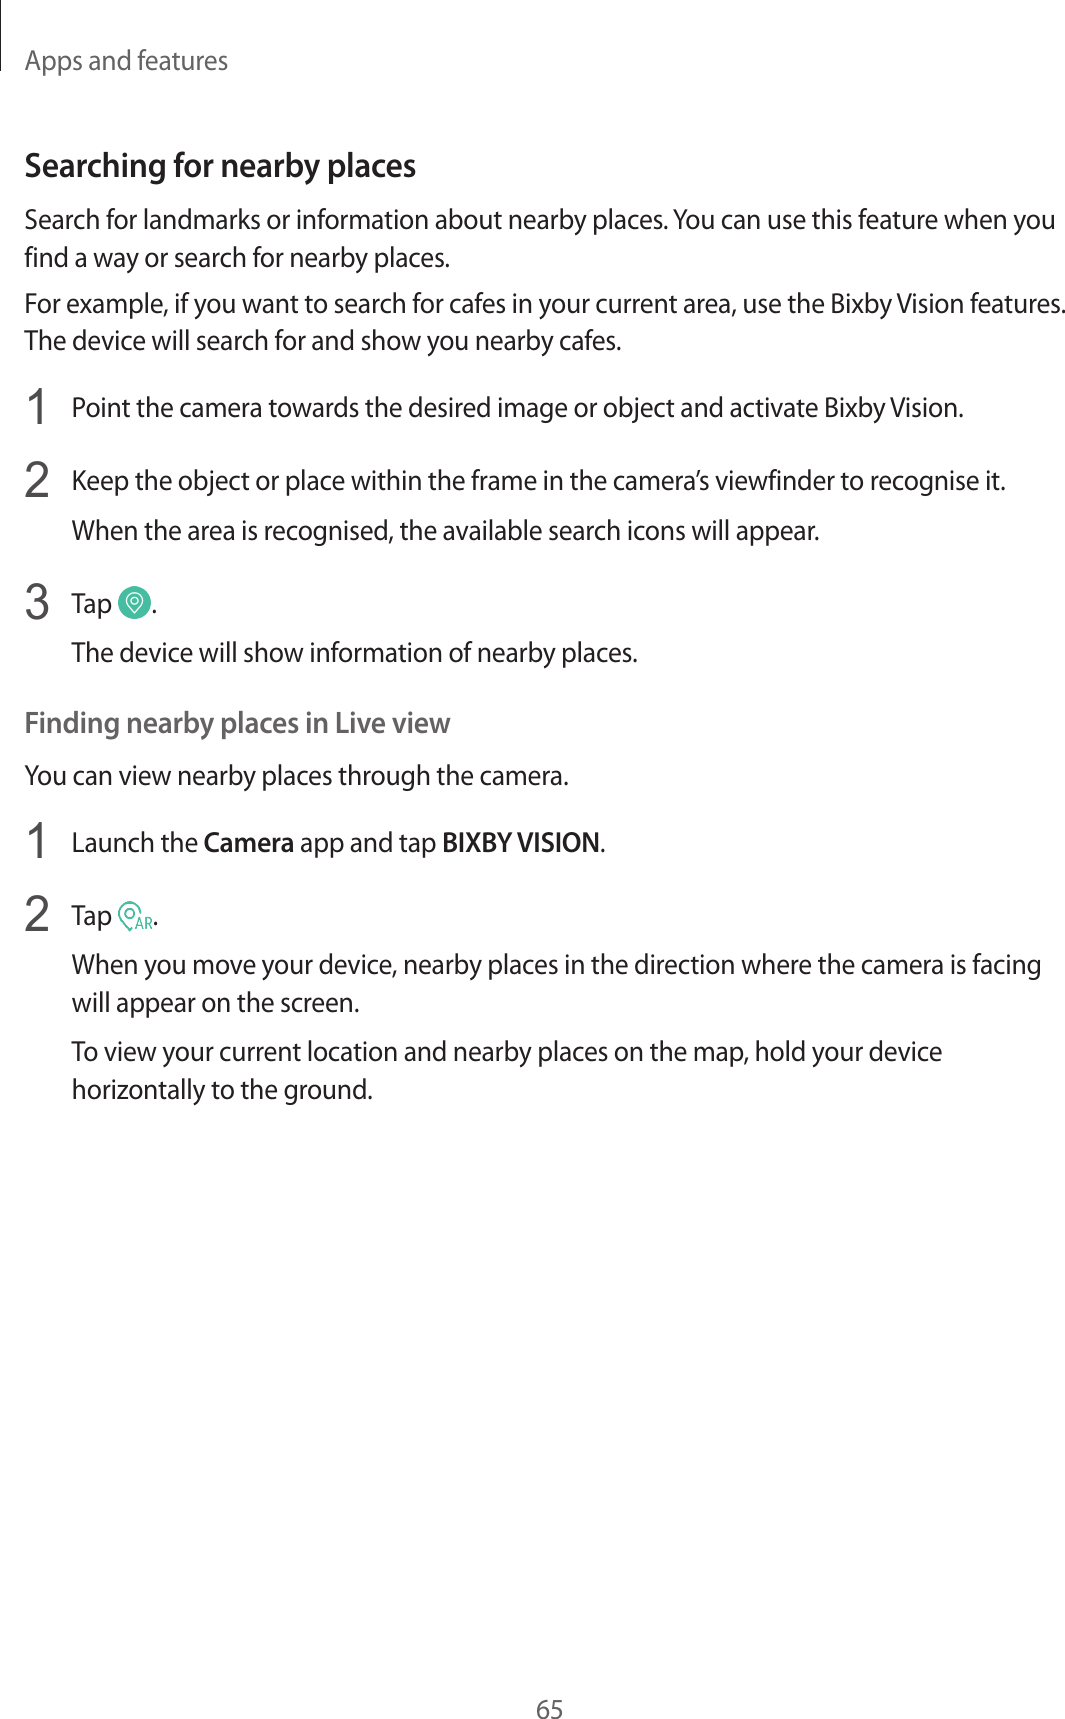
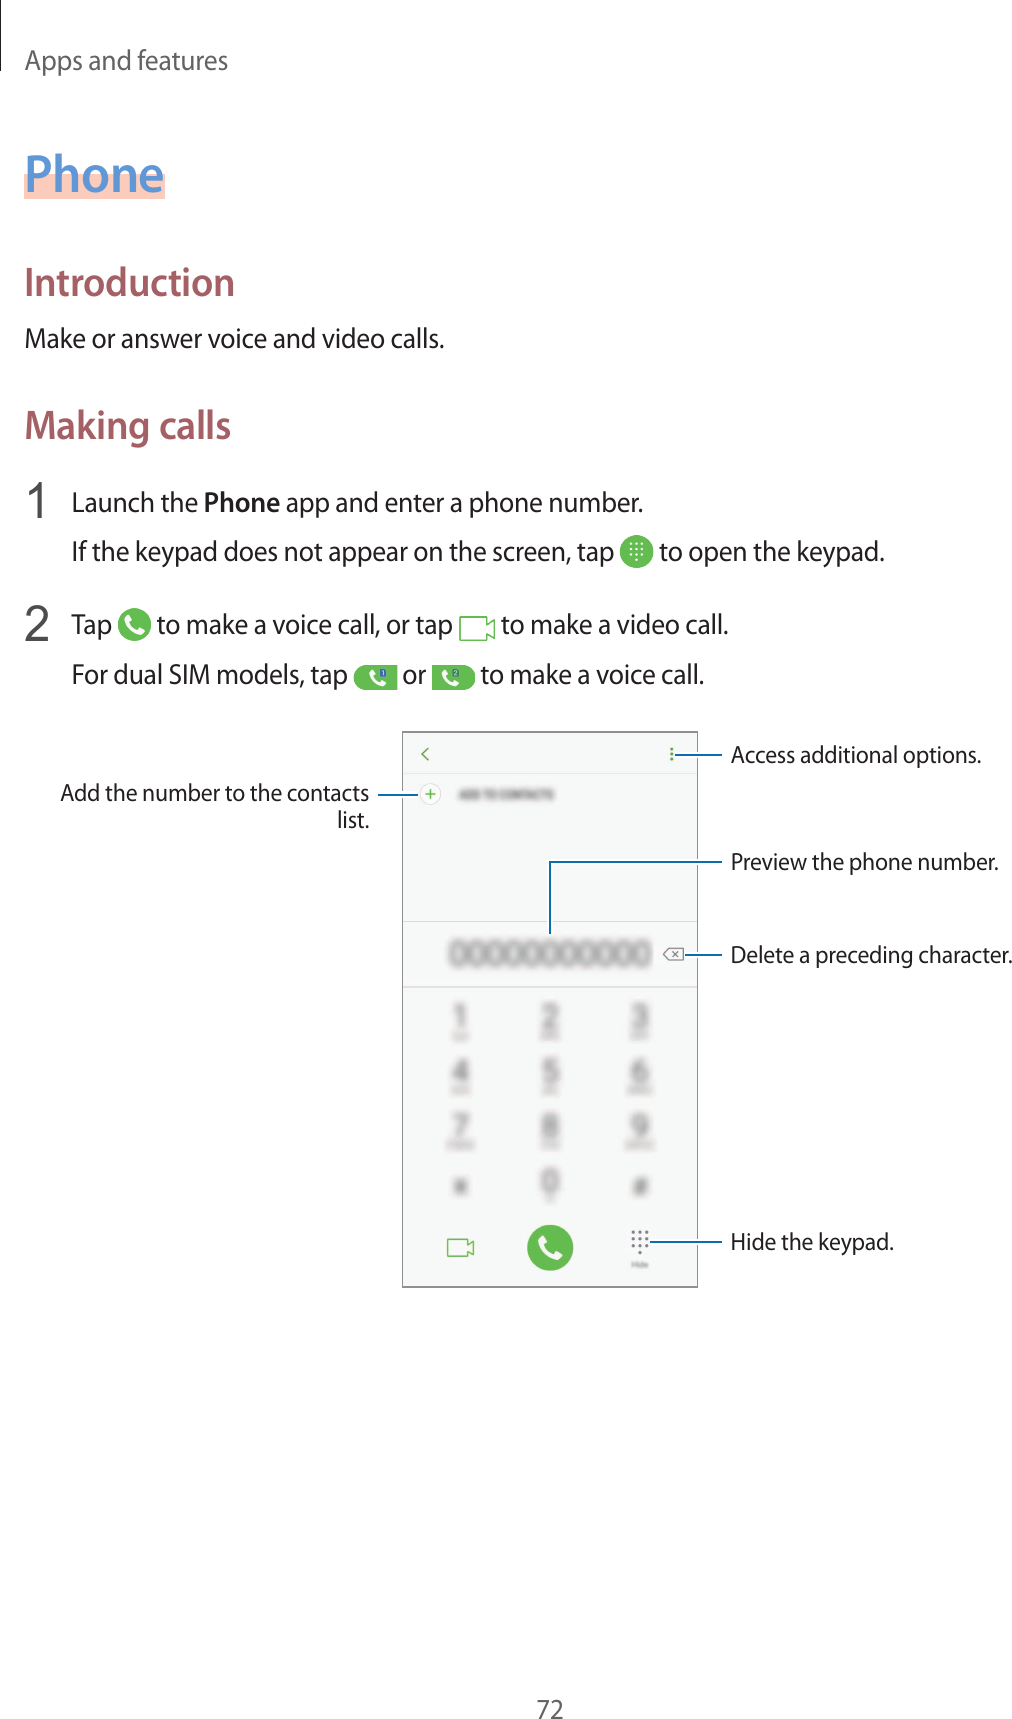
![z³,I\RXPXVWFRQGXFWH[WHQGHGFRQYHUVDWLRQVE\ZLUHOHVVSKRQHHYHU\GD\\RXFRXOGSODFHPRUHGLVWDQFHEHWZHHQ\RXUERG\DQGWKHVRXUFHRIWKH5)VLQFHWKHH[SRVXUHOHYHOGURSVRIIGUDPDWLFDOO\ZLWKGLVWDQFH)RUH[DPSOH\RXFRXOGXVHDKHDGVHWDQGFDUU\WKHZLUHOHVVSKRQHDZD\IURP\RXUERG\$JDLQWKHVFLHQWLILFGDWDGRQRWGHPRQVWUDWHWKDWZLUHOHVVSKRQHVDUHKDUPIXO%XWLI\RXDUHFRQFHUQHGDERXWWKH5)H[SRVXUHIURPWKHVHSURGXFWV\RXFDQXVHPHDVXUHVOLNHWKRVHGHVFULEHGDERYHWRUHGXFH\RXU5)H[SRVXUHIURPZLUHOHVVSKRQHXVH:KDWDERXWFKLOGUHQXVLQJZLUHOHVVSKRQHV"7KHVFLHQWLILFHYLGHQFHGRHVQRWVKRZDGDQJHUWRXVHUVRIZLUHOHVVSKRQHVLQFOXGLQJFKLOGUHQDQGWHHQDJHUV,I\RXZDQWWRWDNHVWHSVWRORZHUH[SRVXUHWRUDGLRIUHTXHQF\HQHUJ\5)WKHPHDVXUHVGHVFULEHGDERYHZRXOGDSSO\WRFKLOGUHQDQGWHHQDJHUVXVLQJZLUHOHVVSKRQHV5HGXFLQJWKHWLPHRIZLUHOHVVSKRQHXVHDQGLQFUHDVLQJWKHGLVWDQFHEHWZHHQWKHXVHUDQGWKH5)VRXUFHZLOOUHGXFH5)H[SRVXUH6RPHJURXSVVSRQVRUHGE\RWKHUQDWLRQDOJRYHUQPHQWVKDYHDGYLVHGWKDWFKLOGUHQEHGLVFRXUDJHGIURPXVLQJZLUHOHVVSKRQHVDWDOO)RUH[DPSOHWKHJRYHUQPHQWLQHSLGHPLRORJLFDOVWXGLHVLVKDPSHUHGE\GLIILFXOWLHVLQPHDVXULQJDFWXDO5)H[SRVXUH GXULQJGD\WRGD\XVHRIZLUHOHVVSKRQHV0DQ\IDFWRUVDIIHFWWKLVPHDVXUHPHQW VXFKDVWKHDQJOHDWZKLFKWKHSKRQHLVKHOGRUZKLFKPRGHORISKRQHLVXVHG:KDWLV)'$GRLQJWRILQGRXWPRUHDERXWWKHSRVVLEOHKHDOWKHIIHFWVRI ZLUHOHVVSKRQH5)" )'$LVZRUNLQJZLWKWKH861DWLRQDO7R[LFRORJ\3URJUDPDQGZLWKJURXSVRI LQYHVWLJDWRUVDURXQGWKHZRUOGWRHQVXUHWKDWKLJKSULRULW\DQLPDOVWXGLHVDUH FRQGXFWHGWRDGGUHVVLPSRUWDQWTXHVWLRQVDERXWWKHHIIHFWVRIH[SRVXUHWRUDGLR IUHTXHQF\HQHUJ\5) )'$KDVEHHQDOHDGLQJSDUWLFLSDQWLQWKH:RUOG+HDOWK2UJDQL]DWLRQLQWHUQDWLRQDO (OHFWURPDJQHWLF)LHOGV(0)3URMHFWVLQFHLWVLQFHSWLRQLQ$QLQIOXHQWLDOUHVXOW RIWKLVZRUNKDVEHHQWKHGHYHORSPHQWRIDGHWDLOHGDJHQGDRIUHVHDUFKQHHGVWKDW KDVGULYHQWKHHVWDEOLVKPHQWRIQHZUHVHDUFKSURJUDPVDURXQGWKHZRUOG7KH 3URMHFWKDVDOVRKHOSHGGHYHORSDVHULHVRISXEOLFLQIRUPDWLRQGRFXPHQWVRQ(0) LVVXHV)'$DQG&HOOXODU7HOHFRPPXQLFDWLRQV,QWHUQHW$VVRFLDWLRQ&7,$KDYHDIRUPDO &RRSHUDWLYH5HVHDUFKDQG'HYHORSPHQW$JUHHPHQW&5$'$WRGRUHVHDUFKRQ ZLUHOHVVSKRQHVDIHW\)'$SURYLGHVWKHVFLHQWLILFRYHUVLJKWREWDLQLQJLQSXWIURP H[SHUWVLQJRYHUQPHQWLQGXVWU\DQGDFDGHPLFRUJDQL]DWLRQV&7,$IXQGHGUHVHDUFK LVFRQGXFWHGWKURXJKFRQWUDFWVWRLQGHSHQGHQWLQYHVWLJDWRUV7KHLQLWLDOUHVHDUFKZLOO LQFOXGHERWKODERUDWRU\VWXGLHVDQGVWXGLHVRIZLUHOHVVSKRQHXVHUV7KH&5$'$ZLOO DOVRLQFOXGHDEURDGDVVHVVPHQWRIDGGLWLRQDOUHVHDUFKQHHGVLQWKHFRQWH[WRIWKH ODWHVWUHVHDUFKGHYHORSPHQWVDURXQGWKHZRUOG:KDWVWHSVFDQ,WDNHWRUHGXFHP\H[SRVXUHWRUDGLRIUHTXHQF\HQHUJ\IURP P\ZLUHOHVVSKRQH",IWKHUHLVDULVNIURPWKHVHSURGXFWVDQGDWWKLVSRLQWZHGRQRWNQRZWKDWWKHUHLV LWLVSUREDEO\YHU\VPDOO%XWLI\RXDUHFRQFHUQHGDERXWDYRLGLQJHYHQSRWHQWLDOULVNV \RXFDQWDNHDIHZVLPSOHVWHSVWRPLQLPL]H\RXUH[SRVXUHWRUDGLRIUHTXHQF\ HQHUJ\5)6LQFHWLPHLVDNH\IDFWRULQKRZPXFKH[SRVXUHDSHUVRQUHFHLYHV UHGXFLQJWKHDPRXQWRIWLPHVSHQWXVLQJDZLUHOHVVSKRQHZLOOUHGXFH5)H[SRVXUH](https://usermanual.wiki/Samsung-Electronics-Co/SMA730F/User-Guide-3633985-Page-197.png)
![WKH8QLWHG.LQJGRPGLVWULEXWHGOHDIOHWVFRQWDLQLQJVXFKDUHFRPPHQGDWLRQLQ 'HFHPEHU7KH\QRWHGWKDWQRHYLGHQFHH[LVWVWKDWXVLQJDZLUHOHVVSKRQH FDXVHVEUDLQWXPRUVRURWKHULOOHIIHFWV7KHLUUHFRPPHQGDWLRQWROLPLWZLUHOHVVSKRQH XVHE\FKLOGUHQZDVVWULFWO\SUHFDXWLRQDU\LWZDVQRWEDVHGRQVFLHQWLILFHYLGHQFH WKDWDQ\KHDOWKKD]DUGH[LVWV 'RKDQGVIUHHNLWVIRUZLUHOHVVSKRQHVUHGXFHULVNVIURPH[SRVXUHWR5) HPLVVLRQV"6LQFHWKHUHDUHQRNQRZQULVNVIURPH[SRVXUHWR5)HPLVVLRQVIURPZLUHOHVVSKRQHV WKHUHLVQRUHDVRQWREHOLHYHWKDWKDQGVIUHHNLWVUHGXFHULVNV+DQGVIUHHNLWVFDQEH XVHGZLWKZLUHOHVVSKRQHVIRUFRQYHQLHQFHDQGFRPIRUW7KHVHV\VWHPVUHGXFHWKH DEVRUSWLRQRI5)HQHUJ\LQWKHKHDGEHFDXVHWKHSKRQHZKLFKLVWKHVRXUFHRIWKH 5)HPLVVLRQVZLOOQRWEHSODFHGDJDLQVWWKHKHDG2QWKHRWKHUKDQGLIWKHSKRQHLV PRXQWHGDJDLQVWWKHZDLVWRURWKHUSDUWRIWKHERG\GXULQJXVHWKHQWKDWSDUWRIWKH ERG\ZLOODEVRUEPRUH5)HQHUJ\:LUHOHVVSKRQHVPDUNHWHGLQWKH86DUH UHTXLUHGWRPHHWVDIHW\UHTXLUHPHQWVUHJDUGOHVVRIZKHWKHUWKH\DUHXVHGDJDLQVW WKHKHDGRUDJDLQVWWKHERG\(LWKHUFRQILJXUDWLRQVKRXOGUHVXOWLQFRPSOLDQFHZLWK WKHVDIHW\OLPLW'RZLUHOHVVSKRQHDFFHVVRULHVWKDWFODLPWRVKLHOGWKHKHDGIURP5)UDGLDWLRQ ZRUN"6LQFHWKHUHDUHQRNQRZQULVNVIURPH[SRVXUHWR5)HPLVVLRQVIURPZLUHOHVVSKRQHV WKHUHLVQRUHDVRQWREHOLHYHWKDWDFFHVVRULHVWKDWFODLPWRVKLHOGWKHKHDGIURP WKRVHHPLVVLRQVUHGXFHULVNV6RPHSURGXFWVWKDWFODLPWRVKLHOGWKHXVHUIURP5) DEVRUSWLRQXVHVSHFLDOSKRQHFDVHVZKLOHRWKHUVLQYROYHQRWKLQJPRUHWKDQD PHWDOOLFDFFHVVRU\DWWDFKHGWRWKHSKRQH6WXGLHVKDYHVKRZQWKDWWKHVHSURGXFWV JHQHUDOO\GRQRWZRUNDVDGYHUWLVHG8QOLNH³KDQGIUHH´NLWVWKHVHVRFDOOHG³VKLHOGV´ PD\LQWHUIHUHZLWKSURSHURSHUDWLRQRIWKHSKRQH7KHSKRQHPD\EHIRUFHGWRERRVW LWVSRZHUWRFRPSHQVDWHOHDGLQJWRDQLQFUHDVHLQ5)DEVRUSWLRQ,Q)HEUXDU\ WKH)HGHUDOWUDGH&RPPLVVLRQ)7&FKDUJHGWZRFRPSDQLHVWKDWVROGGHYLFHVWKDW FODLPHGWRSURWHFWZLUHOHVVSKRQHXVHUVIURPUDGLDWLRQZLWKPDNLQJIDOVHDQG XQVXEVWDQWLDWHGFODLPV$FFRUGLQJWR)7&WKHVHGHIHQGDQWVODFNHGDUHDVRQDEOH EDVLVWRVXEVWDQWLDWHWKHLUFODLP:KDWDERXWZLUHOHVVSKRQHLQWHUIHUHQFHZLWKPHGLFDOHTXLSPHQW" 5DGLRIUHTXHQF\HQHUJ\5)IURPZLUHOHVVSKRQHVFDQLQWHUDFWZLWKVRPHHOHFWURQLF GHYLFHV)RUWKLVUHDVRQ)'$KHOSHGGHYHORSDGHWDLOHGWHVWPHWKRGWRPHDVXUH HOHFWURPDJQHWLFLQWHUIHUHQFH(0,RILPSODQWHGFDUGLDFSDFHPDNHUVDQG GHILEULOODWRUVIURPZLUHOHVVWHOHSKRQHV7KLVWHVWPHWKRGLVQRZSDUWRIDVWDQGDUG VSRQVRUHGE\WKH$VVRFLDWLRQIRUWKH$GYDQFHPHQWRI0HGLFDOLQVWUXPHQWDWLRQ $$0,7KHILQDOGUDIWDMRLQWHIIRUWE\)'$PHGLFDOGHYLFHPDQXIDFWXUHUVDQG PDQ\RWKHUJURXSVZDVFRPSOHWHGLQODWH7KLVVWDQGDUGZLOODOORZ PDQXIDFWXUHUVWRHQVXUHWKDWFDUGLDFSDFHPDNHUVDQGGHILEULOODWRUVDUHVDIHIURP ZLUHOHVVSKRQH(0,)'$KDVWHVWHGZLUHOHVVSKRQHVDQGKHOSHGGHYHORSD YROXQWDU\VWDQGDUGVSRQVRUHGE\WKH,QVWLWXWHRI(OHFWULFDODQG(OHFWURQLF(QJLQHHUV ,(((7KLVVWDQGDUGVSHFLILHVWHVWPHWKRGVDQGSHUIRUPDQFHUHTXLUHPHQWVIRU KHDULQJDLGVDQGZLUHOHVVSKRQHVVRWKDWQRLQWHUIHUHQFHRFFXUVZKHQDSHUVRQXVHV DFRPSDWLEOHSKRQHDQGDFRPSDWLEOHKHDULQJDLGDWWKHVDPHWLPH7KLVVWDQGDUG ZDVDSSURYHGE\WKH,(((LQ )'$FRQWLQXHVWRPRQLWRUWKHXVHRIZLUHOHVVSKRQHVIRUSRVVLEOHLQWHUDFWLRQVZLWK RWKHUPHGLFDOGHYLFHV6KRXOGKDUPIXOLQWHUIHUHQFHEHIRXQGWRRFFXU)'$ZLOO](https://usermanual.wiki/Samsung-Electronics-Co/SMA730F/User-Guide-3633985-Page-198.png)
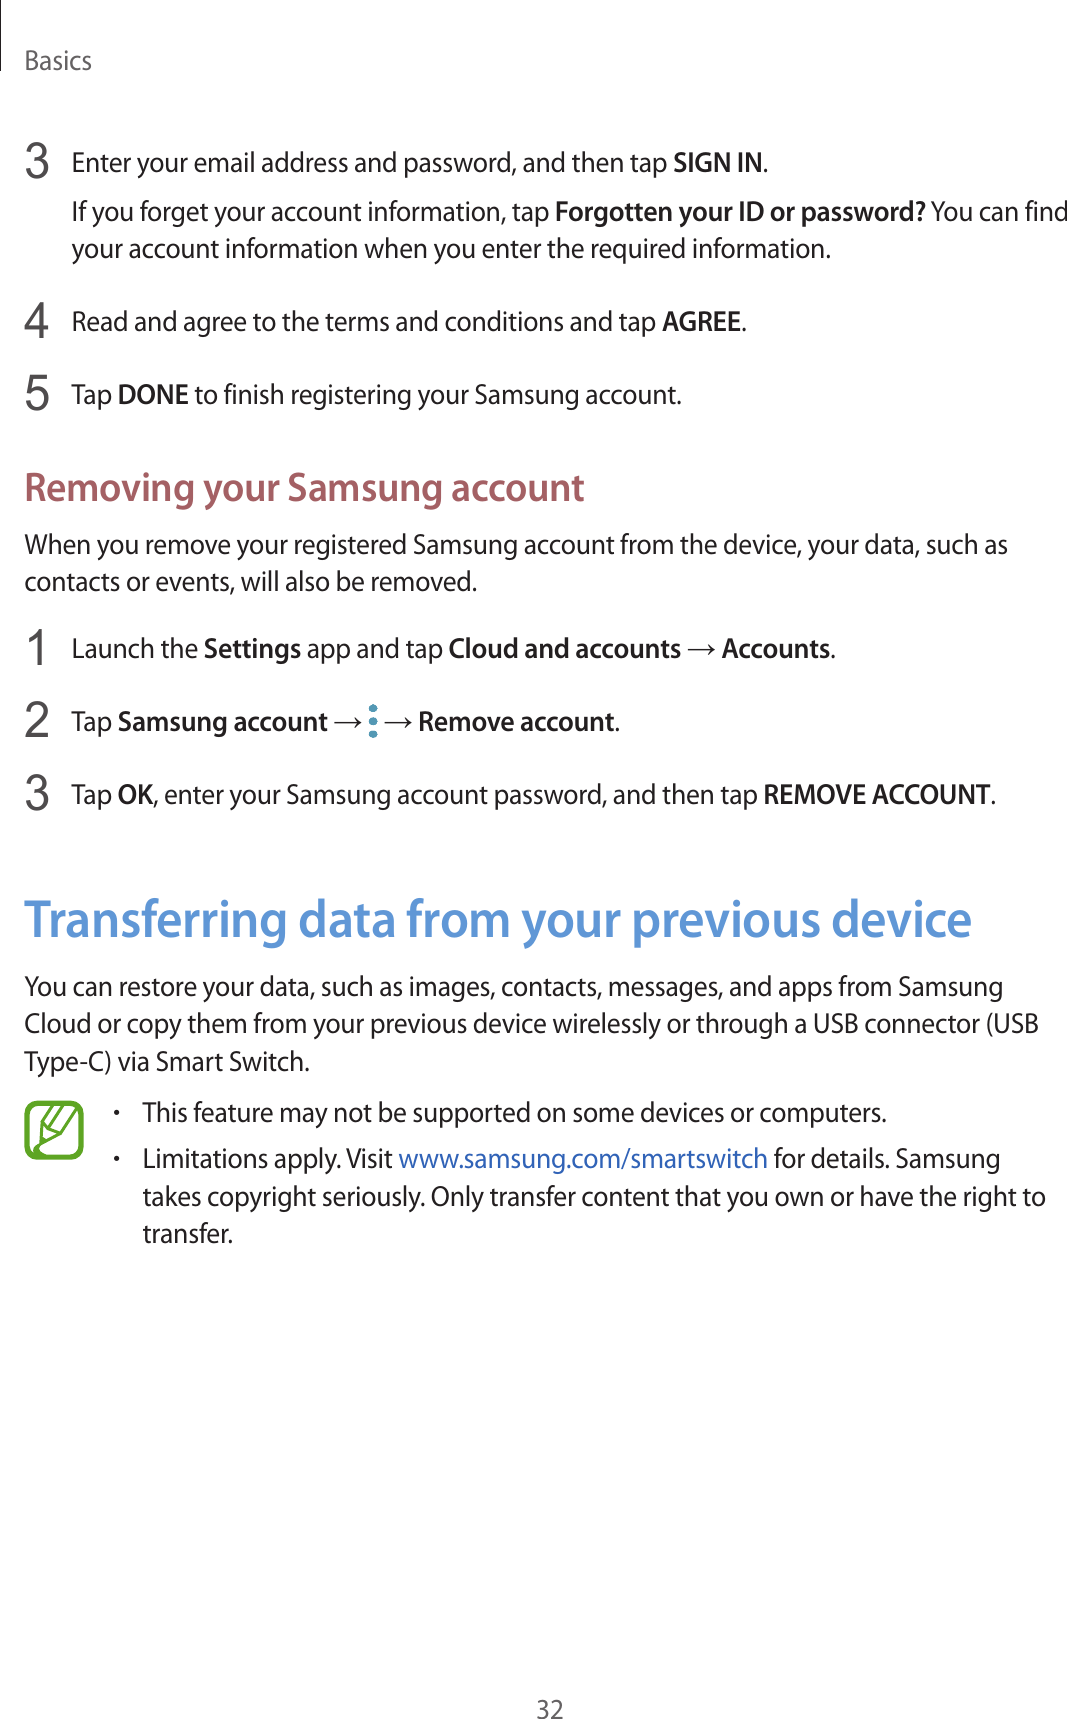
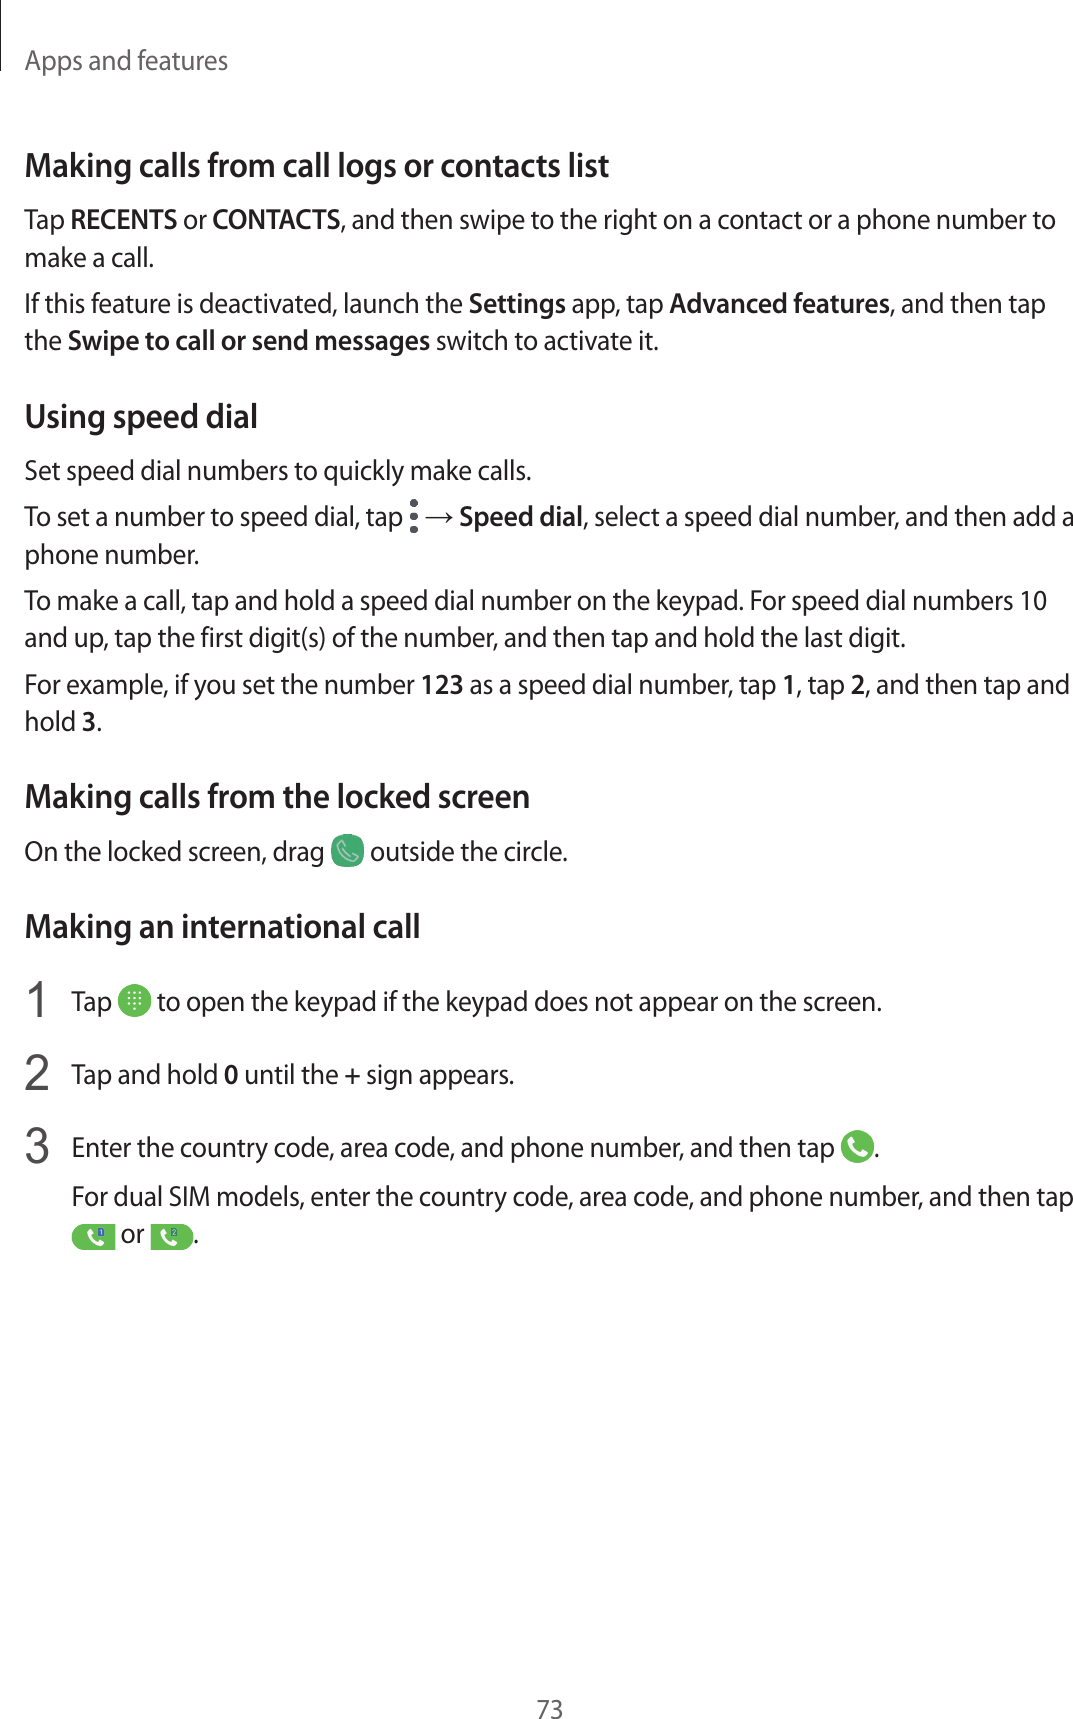
![FRQGXFWWHVWLQJWRDVVHVVWKHLQWHUIHUHQFHDQGZRUNWRUHVROYHWKHSUREOHP$GGLWLRQDOLQIRUPDWLRQRQWKHVDIHW\RI5)H[SRVXUHVIURPYDULRXVVRXUFHVFDQEHREWDLQHGIURPWKHIROORZLQJRUJDQL]DWLRQVz)&&5)6DIHW\3URJUDPKWWSZZZIFFJRYRHWUIVDIHW\z(QYLURQPHQWDO3URWHFWLRQ$JHQF\(3$KWWSZZZHSDJRYUDGLDWLRQz2FFXSDWLRQDO6DIHW\DQG+HDOWK$GPLQLVWUDWLRQV26+$KWWSZZZRVKDJRY6/7&UDGLRIUHTXHQF\UDGLDWLRQLQGH[KWPOz1DWLRQDOLQVWLWXWHIRU2FFXSDWLRQDO6DIHW\DQG+HDOWK1,26+KWWSZZZFGFJRYQLRVKz:RUOGKHDOWK2UJDQL]DWLRQ:+2KWWSZZZZKRLQWSHKHPIz,QWHUQDWLRQDO&RPPLVVLRQRQ1RQ,RQL]LQJ5DGLDWLRQ3URWHFWLRQKWWSZZZLFQLUSGHz1DWLRQDO5DGLDWLRQ3URWHFWLRQ%RDUG8.KWWSZZZKSDUDGLDWLRQVHUYLFHVRUJXNUSDz8SGDWHG86IRRGDQG'UXJ$GPLQLVWUDWLRQKWWSZZZIGDJRY5DGLDWLRQ(PLWWLQJ3URGXFWV5DGLDWLRQ(PLWWLQJ3URGXFWVDQG3URFHGXUHV+RPH%XVLQHVVDQG(QWHUWDLQPHQW&HOO3KRQHVGHIDXOWKWP5RDG6DIHW\<RXUZLUHOHVVSKRQHJLYHV\RXWKHSRZHUIXODELOLW\WRFRPPXQLFDWHE\YRLFHDOPRVWDQ\ZKHUHDQ\WLPH%XWDQLPSRUWDQWUHVSRQVLELOLW\DFFRPSDQLHVWKHEHQHILWVRIZLUHOHVVSKRQHVRQHWKDWHYHU\XVHUPXVWXSKROG:KHQGULYLQJDFDUGULYLQJLV\RXUILUVWUHVSRQVLELOLW\:KHQXVLQJ\RXUZLUHOHVVSKRQHEHKLQGWKHZKHHORIDFDUSUDFWLFHJRRGFRPPRQVHQVHDQGUHPHPEHUWKHIROORZLQJWLSV *HWWRNQRZ\RXUZLUHOHVVSKRQHDQGLWVIHDWXUHVVXFKDVVSHHGGLDODQGUHGLDO,IDYDLODEOHWKHVHIHDWXUHVKHOS\RXWRSODFH\RXUFDOOZLWKRXWWDNLQJ\RXUDWWHQWLRQRIIWKHURDG :KHQDYDLODEOHXVHDKDQGVIUHHGHYLFH,ISRVVLEOHDGGDQDGGLWLRQDOOD\HURIFRQYHQLHQFHDQGVDIHW\WR\RXUZLUHOHVVSKRQHZLWKRQHRIWKHPDQ\KDQGVIUHHDFFHVVRULHVDYDLODEOHWRGD\ 3RVLWLRQ\RXUZLUHOHVVSKRQHZLWKLQHDV\UHDFK%HDEOHWRDFFHVV\RXUZLUHOHVVSKRQHZLWKRXWUHPRYLQJ\RXUH\HVIURPWKHURDG,I\RXJHWDQLQFRPLQJFDOODWDQLQFRQYHQLHQWWLPHOHW\RXUYRLFHPDLODQVZHULWIRU\RX /HWWKHSHUVRQ\RXDUHVSHDNLQJZLWKNQRZ\RXDUHGULYLQJLIQHFHVVDU\VXVSHQGWKHFDOOLQKHDY\WUDIILFRUKD]DUGRXVZHDWKHUFRQGLWLRQV5DLQVOHHWVQRZLFHDQGHYHQKHDY\WUDIILFFDQEHKD]DUGRXV 'RQRWWDNHQRWHVRUORRNXSSKRQHQXPEHUVZKLOHGULYLQJ-RWWLQJGRZQD³WRGR´OLVWRUIOLSSLQJWKURXJK\RXUDGGUHVVERRNWDNHVDWWHQWLRQDZD\IURP\RXUSULPDU\UHVSRQVLELOLW\GULYLQJVDIHO\ 'LDOVHQVLEO\DQGDVVHVVWKHWUDIILFLISRVVLEOHSODFHFDOOVZKHQ\RXDUHQRWPRYLQJRUEHIRUHSXOOLQJLQWRWUDIILF7U\WRSODQFDOOVZKHQ\RXUFDUZLOOEHVWDWLRQDU\,I\RXQHHGWRPDNHDFDOOZKLOHPRYLQJGLDORQO\DIHZQXPEHUVFKHFNWKHURDGDQG\RXUPLUURUVWKHQFRQWLQXH](https://usermanual.wiki/Samsung-Electronics-Co/SMA730F/User-Guide-3633985-Page-199.png)
![ 'RQRWHQJDJHLQVWUHVVIXORUHPRWLRQDOFRQYHUVDWLRQVWKDWPD\EHGLVWUDFWLQJ0DNHSHRSOH\RXDUHWDONLQJZLWKDZDUH\RXDUHGULYLQJDQGVXVSHQGFRQYHUVDWLRQVWKDWKDYHWKHSRWHQWLDOWRGLYHUW\RXUDWWHQWLRQIURPWKHURDG 8VH\RXUZLUHOHVVSKRQHWRFDOOIRUKHOS'LDORURWKHUORFDOHPHUJHQF\QXPEHULQWKHFDVHRIILUHWUDIILFDFFLGHQWRUPHGLFDOHPHUJHQFLHV5HPHPEHULWLVDIUHHFDOORQ\RXUZLUHOHVVSKRQH 8VH\RXUZLUHOHVVSKRQHWRKHOSRWKHUVLQHPHUJHQFLHV,I\RXVHHDQDXWRDFFLGHQWFULPHLQSURJUHVVRURWKHUVHULRXVHPHUJHQF\ZKHUHOLYHVDUHLQGDQJHUFDOORURWKHUORFDOHPHUJHQF\QXPEHUDV\RXZRXOGZDQWRWKHUVWRGRIRU\RX &DOOURDGVLGHDVVLVWDQFHRUDVSHFLDOQRQHPHUJHQF\ZLUHOHVVDVVLVWDQFHQXPEHUZKHQQHFHVVDU\,I\RXVHHDEURNHQGRZQYHKLFOHSRVLQJQRVHULRXVKD]DUGDEURNHQWUDIILFVLJQDODPLQRUWUDIILFDFFLGHQWZKHUHQRRQHDSSHDUVLQMXUHGRUDYHKLFOH\RXNQRZWREHVWROHQFDOOURDGVLGHDVVLVWDQFHRURWKHUVSHFLDOQRQHPHUJHQF\QXPEHU³7KHZLUHOHVVLQGXVWU\UHPLQGV\RXWRXVH\RXUSKRQHVDIHO\ZKHQGULYLQJ´)RUPRUHLQIRUPDWLRQSOHDVHFDOO6$)(RUYLVLWRXUZHEVLWHZZZZRZFRPFRP3URYLGHGE\WKH&HOOXODU7HOHFRPPXQLFDWLRQV,QWHUQHW$VVRFLDWLRQ2SHUDWLQJ(QYLURQPHQW5HPHPEHUWRIROORZDQ\VSHFLDOUHJXODWLRQVLQIRUFHLQDQ\DUHDDQGDOZD\VVZLWFK\RXUSKRQHRIIZKHQHYHULWLVIRUELGGHQWRXVHLWRUZKHQLWPD\FDXVHLQWHUIHUHQFHRUGDQJHU:KHQFRQQHFWLQJWKHSKRQHRUDQ\DFFHVVRU\WRDQRWKHUGHYLFHUHDGLWVXVHUVJXLGHIRUGHWDLOHGVDIHW\LQVWUXFWLRQV'RQRWFRQQHFWLQFRPSDWLEOHSURGXFWV$VZLWKRWKHUPRELOHUDGLRWUDQVPLWWLQJHTXLSPHQWXVHUVDUHDGYLVHGWKDWIRUWKHVDWLVIDFWRU\RSHUDWLRQRIWKHHTXLSPHQWDQGIRUWKHVDIHW\RISHUVRQQHOLWLVUHFRPPHQGHGWKDWWKHHTXLSPHQWVKRXOGRQO\EHXVHGLQWKHQRUPDORSHUDWLQJSRVLWLRQ8VLQJ<RXU3KRQH1HDU2WKHU(OHFWURQLF'HYLFHV0RVWPRGHUQHOHFWURQLFHTXLSPHQWLVVKLHOGHGIURPUDGLRIUHTXHQF\5)VLJQDOV+RZHYHUFHUWDLQHOHFWURQLFHTXLSPHQWPD\QRWEHVKLHOGHGDJDLQVWWKH5)VLJQDOVIURP\RXUZLUHOHVVSKRQH&RQVXOWWKHPDQXIDFWXUHUWRGLVFXVVDOWHUQDWLYHV3DFHPDNHUV3DFHPDNHUPDQXIDFWXUHUVUHFRPPHQGWKDWDPLQLPXPGLVWDQFHRIFPLQFKHVEHPDLQWDLQHGEHWZHHQDZLUHOHVVSKRQHDQGDSDFHPDNHUWRDYRLGSRWHQWLDOLQWHUIHUHQFHZLWKWKHSDFHPDNHU7KHVHUHFRPPHQGDWLRQVDUHFRQVLVWHQWZLWKWKHLQGHSHQGHQWUHVHDUFKDQGUHFRPPHQGDWLRQVRI:LUHOHVV7HFKQRORJ\5HVHDUFK3HUVRQVZLWKSDFHPDNHUVzVKRXOGDOZD\VNHHSWKHSKRQHPRUHWKDQFPLQFKHVIURPWKHLUSDFHPDNHUZKHQWKHSKRQHLVVZLWFKHGRQzVKRXOGQRWFDUU\WKHSKRQHLQDEUHDVWSRFNHWzVKRXOGXVHWKHHDURSSRVLWHWKHSDFHPDNHUWRPLQLPL]HSRWHQWLDOLQWHUIHUHQFH,I\RXKDYHDQ\UHDVRQWRVXVSHFWWKDWLQWHUIHUHQFHLVWDNLQJSODFHVZLWFK\RXUSKRQHRIILPPHGLDWHO\+HDULQJ$LGV](https://usermanual.wiki/Samsung-Electronics-Co/SMA730F/User-Guide-3633985-Page-200.png)

![)&&1RWLFHDQG&DXWLRQV)&&1RWLFH7KLVGHYLFHFRPSOLHVZLWK3DUWRIWKH)&&5XOHV2SHUDWLRQLV VXEMHFWWRWKHIROORZLQJWZRFRQGLWLRQVWKLVGHYLFHPD\QRWFDXVHKDUPIXOLQWHUIHUHQFHDQGWKLVGHYLFHPXVWDFFHSWDQ\LQWHUIHUHQFHUHFHLYHGLQFOXGLQJLQWHUIHUHQFHWKDWPD\FDXVHXQGHVLUHGRSHUDWLRQz7KLVHTXLSPHQWKDVEHHQWHVWHGDQGIRXQGWRFRPSO\ZLWKWKHOLPLWVIRUD&ODVV%GLJLWDOGHYLFHSXUVXDQWWRSDUWRIWKH)&&5XOHV7KHVHOLPLWVDUHGHVLJQHGWRSURYLGHUHDVRQDEOHSURWHFWLRQDJDLQVWKDUPIXOLQWHUIHUHQFHLQDUHVLGHQWLDOLQVWDOODWLRQ7KLVHTXLSPHQWJHQHUDWHVXVHVDQGFDQUDGLDWHUDGLRIUHTXHQF\HQHUJ\DQGLIQRWLQVWDOOHGDQGXVHGLQDFFRUGDQFHZLWKWKHLQVWUXFWLRQVPD\FDXVHKDUPIXOLQWHUIHUHQFHWRUDGLRFRPPXQLFDWLRQV+RZHYHUWKHUHLVQRJXDUDQWHHWKDWLQWHUIHUHQFHZLOOQRWRFFXULQDSDUWLFXODULQVWDOODWLRQ,IWKLVHTXLSPHQWGRHVFDXVHKDUPIXOLQWHUIHUHQFHWRUDGLRRUWHOHYLVLRQUHFHSWLRQZKLFKFDQEHGHWHUPLQHGE\WXUQLQJWKHHTXLSPHQWRIIDQGRQWKHXVHULVHQFRXUDJHGWRWU\WRFRUUHFWWKHLQWHUIHUHQFHE\RQHRUPRUHRIWKHIROORZLQJPHDVXUHV5HRULHQWRUUHORFDWHWKHUHFHLYLQJDQWHQQD ,QFUHDVHWKHVHSDUDWLRQEHWZHHQWKHHTXLSPHQWDQGUHFHLYHU &RQQHFWWKHHTXLSPHQWLQWRDQRXWOHWRQDFLUFXLWGLIIHUHQWIURPWKDWWRZKLFKWKHUHFHLYHULVFRQQHFWHG &RQVXOWWKHGHDOHURUDQH[SHULHQFHGUDGLR79WHFKQLFLDQIRUKHOS7KHSKRQHPD\FDXVH79RUUDGLRLQWHUIHUHQFHLIXVHGLQFORVHSUR[LPLW\WRUHFHLYLQJHTXLSPHQW7KH)&&FDQUHTXLUH\RXWRVWRSXVLQJWKHSKRQHLIVXFKLQWHUIHUHQFHFDQQRWEHHOLPLQDWHG9HKLFOHVXVLQJOLTXHILHGSHWUROHXPJDVVXFKDVSURSDQHRUEXWDQHPXVWFRPSO\ZLWKWKH1DWLRQDO)LUH3URWHFWLRQ6WDQGDUG1)3$)RUDFRS\RIWKLVVWDQGDUGFRQWDFWWKH1DWLRQDO)LUH3URWHFWLRQ$VVRFLDWLRQ2QH%DWWHU\PDUFK3DUN4XLQF\0$$WWQ3XEOLFDWLRQ6DOHV'LYLVLRQ&DXWLRQV&KDQJHVRUPRGLILFDWLRQVPDGHLQWKHUDGLRSKRQHQRWH[SUHVVO\DSSURYHGE\6DPVXQJZLOOYRLGWKHXVHU¶VDXWKRULW\WRRSHUDWHWKHHTXLSPHQW7KHXVHRIDQ\XQDXWKRUL]HGDFFHVVRULHVPD\EHGDQJHURXVDQGYRLGWKHSKRQHZDUUDQW\LIVDLGDFFHVVRULHVFDXVHGDPDJHRUDGHIHFWWRWKHSKRQH$OWKRXJK\RXUSKRQHLVTXLWHVWXUG\LWLVDFRPSOH[SLHFHRIHTXLSPHQWDQGFDQEHEURNHQ$YRLGGURSSLQJKLWWLQJEHQGLQJRUVLWWLQJRQLW](https://usermanual.wiki/Samsung-Electronics-Co/SMA730F/User-Guide-3633985-Page-203.png)
![2WKHU,PSRUWDQW6DIHW\,QIRUPDWLRQz2QO\TXDOLILHGSHUVRQQHOVKRXOGVHUYLFHWKHSKRQHRULQVWDOOWKHSKRQHLQDYHKLFOH)DXOW\LQVWDOODWLRQRUVHUYLFHPD\EHGDQJHURXVDQGPD\LQYDOLGDWHDQ\ZDUUDQW\DSSOLFDEOHWRWKHGHYLFHz&KHFNUHJXODUO\WKDWDOOZLUHOHVVSKRQHHTXLSPHQWLQ\RXUYHKLFOHLVPRXQWHGDQGRSHUDWLQJSURSHUO\z'RQRWVWRUHRUFDUU\IODPPDEOHOLTXLGVJDVHVRUH[SORVLYHPDWHULDOVLQWKHVDPHFRPSDUWPHQWDVWKHSKRQHLWVSDUWVRUDFFHVVRULHVz)RUYHKLFOHVHTXLSSHGZLWKDQDLUEDJUHPHPEHUWKDWDQDLUEDJLQIODWHVZLWKJUHDWIRUFH'RQRWSODFHREMHFWVLQFOXGLQJERWKLQVWDOOHGRUSRUWDEOHZLUHOHVVHTXLSPHQWLQWKHDUHDRYHUWKHDLUEDJRULQWKHDLUEDJGHSOR\PHQWDUHD,IZLUHOHVVHTXLSPHQWLVLPSURSHUO\LQVWDOOHGDQGWKHDLUEDJLQIODWHVVHULRXVLQMXU\FRXOGUHVXOWz6ZLWFK\RXUSKRQHRIIEHIRUHERDUGLQJDQDLUFUDIW7KHXVHRIZLUHOHVVSKRQHLQDLUFUDIWLVLOOHJDODQGPD\EHGDQJHURXVWRWKHDLUFUDIWVRSHUDWLRQz)DLOXUHWRREVHUYHWKHVHLQVWUXFWLRQVPD\OHDGWRWKHVXVSHQVLRQRUGHQLDORIWHOHSKRQHVHUYLFHVWRWKHRIIHQGHURUOHJDODFWLRQRUERWK3URGXFW3HUIRUPDQFH*HWWLQJWKH0RVW2XWRI<RXU6LJQDO5HFHSWLRQ7KHTXDOLW\RIHDFKFDOO\RXPDNHRUUHFHLYHGHSHQGVRQWKHVLJQDOVWUHQJWKLQ\RXUDUHD<RXUSKRQHLQIRUPV\RXRIWKHFXUUHQWVLJQDOVWUHQJWKE\GLVSOD\LQJDQXPEHURIEDUVQH[WWRWKHVLJQDOVWUHQJWKLFRQ7KHPRUHEDUVGLVSOD\HGWKHVWURQJHUWKHVLJQDO,I\RXUHLQVLGHDEXLOGLQJEHLQJQHDUDZLQGRZPD\JLYH\RXEHWWHUUHFHSWLRQ8QGHUVWDQGLQJWKH3RZHU6DYH)HDWXUH,I\RXUSKRQHLVXQDEOHWRILQGDVLJQDODIWHUPLQXWHVRIVHDUFKLQJD3RZHU6DYHIHDWXUHLVDXWRPDWLFDOO\DFWLYDWHG,I\RXUSKRQHLVDFWLYHLWSHULRGLFDOO\UHFKHFNVVHUYLFHDYDLODELOLW\RU\RXFDQFKHFNLW\RXUVHOIE\SUHVVLQJDQ\NH\$Q\WLPHWKH3RZHU6DYHIHDWXUHLVDFWLYDWHGDPHVVDJHGLVSOD\VRQWKHVFUHHQ:KHQDVLJQDOLVIRXQG\RXUSKRQHUHWXUQVWRVWDQGE\PRGH0DLQWDLQLQJ<RXU3KRQHV3HDN3HUIRUPDQFH)RUWKHEHVWFDUHRI\RXUSKRQHRQO\DXWKRUL]HGSHUVRQQHOVKRXOGVHUYLFH\RXUSKRQHDQGDFFHVVRULHV)DXOW\VHUYLFHPD\YRLGWKHZDUUDQW\7KHUHDUHVHYHUDOVLPSOHJXLGHOLQHVWRRSHUDWLQJ\RXUSKRQHSURSHUO\DQGPDLQWDLQLQJVDIHVDWLVIDFWRU\VHUYLFHz3ODFHWKHPRELOHSKRQHVDFRXVWLFRXWSXWQH[WWR\RXUHDUIRUSURSHURULHQWDWLRQz'RQRWWDPSHURUDOWHUWKHSKRQHVDQWHQQDz'RQWXVHWKHSKRQHLIWKHDQWHQQDLVGDPDJHGz6SHDNGLUHFWO\LQWRWKHSKRQHVUHFHLYHUz$YRLGH[SRVLQJ\RXUSKRQHDQGDFFHVVRULHVWRUDLQRUOLTXLGVSLOOV,I\RXUSKRQHGRHVJHWZHWLPPHGLDWHO\WXUQWKHSRZHURIIDQGUHPRYHWKHEDWWHU\,ILWLVLQRSHUDEOHFDOO&XVWRPHU&DUHIRUVHUYLFH$YDLODELOLW\RI9DULRXV)HDWXUHV5LQJ7RQHV](https://usermanual.wiki/Samsung-Electronics-Co/SMA730F/User-Guide-3633985-Page-204.png)
![%DWWHU\3UHFDXWLRQVz1HYHUXVHDQ\FKDUJHURUEDWWHU\WKDWLVGDPDJHGLQDQ\ZD\z8VHWKHEDWWHU\RQO\IRULWVLQWHQGHGSXUSRVHz,I\RXXVHWKHSKRQHQHDUWKHQHWZRUNVEDVHVWDWLRQLWXVHVOHVVSRZHUWDONDQGVWDQGE\WLPHDUHJUHDWO\DIIHFWHGE\WKHVLJQDOVWUHQJWKRQWKHFHOOXODUQHWZRUNDQGWKHSDUDPHWHUVVHWE\WKHQHWZRUNRSHUDWRUz%DWWHU\FKDUJLQJWLPHGHSHQGVRQWKHUHPDLQLQJEDWWHU\FKDUJHDQGWKHW\SHRIEDWWHU\DQGFKDUJHUXVHG7KHEDWWHU\FDQEHFKDUJHGDQGGLVFKDUJHGKXQGUHGVRIWLPHVEXWLWZLOOJUDGXDOO\ZHDURXW:KHQWKHRSHUDWLRQWLPHWDONWLPHDQGVWDQGE\WLPHLVQRWLFHDEO\VKRUWHUWKDQQRUPDOLWLVWLPHWREX\DQHZEDWWHU\z,IOHIWXQXVHGDIXOO\FKDUJHGEDWWHU\ZLOOGLVFKDUJHLWVHOIRYHUWLPHz8VHRQO\6DPVXQJDSSURYHGEDWWHULHVDQGUHFKDUJH\RXUEDWWHU\RQO\ZLWK6DPVXQJDSSURYHGFKDUJHUV:KHQDFKDUJHULVQRWLQXVHGLVFRQQHFWLWIURPWKHSRZHUVRXUFH'RQRWOHDYHWKHEDWWHU\FRQQHFWHGWRDFKDUJHUIRUPRUHWKDQDZHHNVLQFHRYHUFKDUJLQJPD\VKRUWHQLWVOLIHz([WUHPHWHPSHUDWXUHVZLOODIIHFWWKHFKDUJLQJFDSDFLW\RI\RXUEDWWHU\LWPD\UHTXLUHFRROLQJRUZDUPLQJILUVWz'RQRWOHDYHWKHEDWWHU\LQKRWRUFROGSODFHVVXFKDVLQDFDULQVXPPHURUZLQWHUFRQGLWLRQVDV\RXZLOOUHGXFHWKHFDSDFLW\DQGOLIHWLPHRIWKHEDWWHU\$OZD\VWU\WRNHHSWKHEDWWHU\DWURRPWHPSHUDWXUH$SKRQHZLWKDKRWRUFROGEDWWHU\PD\WHPSRUDULO\QRWZRUNHYHQZKHQWKHEDWWHU\LVIXOO\FKDUJHG/LLRQEDWWHULHVDUHSDUWLFXODUO\DIIHFWHGE\WHPSHUDWXUHVEHORZ&)z'RQRWVKRUWFLUFXLWWKHEDWWHU\$FFLGHQWDOVKRUWFLUFXLWLQJFDQRFFXUZKHQDPHWDOOLFREMHFWFRLQFOLSRUSHQFDXVHVDGLUHFWFRQQHFWLRQEHWZHHQWKHDQGWHUPLQDOVRIWKHEDWWHU\PHWDOVWULSVRQWKHEDWWHU\IRUH[DPSOHZKHQ\RXFDUU\DVSDUHEDWWHU\LQDSRFNHWRUEDJ6KRUWFLUFXLWLQJWKHWHUPLQDOVPD\GDPDJHWKHEDWWHU\RUWKHREMHFWFDXVLQJWKHVKRUWFLUFXLWLQJz'LVSRVHRIXVHGEDWWHULHVLQDFFRUGDQFHZLWKORFDOUHJXODWLRQV,QVRPHDUHDVWKHGLVSRVDORIEDWWHULHVLQKRXVHKROGRUEXVLQHVVWUDVKPD\EHSURKLELWHG)RUVDIHGLVSRVDORSWLRQVIRU/L,RQEDWWHULHVFRQWDFW\RXUQHDUHVW6DPVXQJDXWKRUL]HGVHUYLFHFHQWHU$OZD\VUHF\FOH'RQRWGLVSRVHRIEDWWHULHVLQDILUH&DUHDQG0DLQWHQDQFH<RXUSKRQHLVDSURGXFWRIVXSHULRUGHVLJQDQGFUDIWVPDQVKLSDQGVKRXOGEHWUHDWHGZLWKFDUH7KHVXJJHVWLRQVEHORZZLOOKHOS\RXIXOILOODQ\ZDUUDQW\REOLJDWLRQVDQG0DQ\VHUYLFHVDQGIHDWXUHVDUHQHWZRUNGHSHQGHQWDQGPD\UHTXLUHDGGLWLRQDO VXEVFULSWLRQDQGRUXVDJHFKDUJHV1RWDOOIHDWXUHVDUHDYDLODEOHIRUSXUFKDVHRUXVH LQDOODUHDV'RZQORDGDEOH5LQJ7RQHVPD\EHDYDLODEOHDWDQDGGLWLRQDOFRVW2WKHU FRQGLWLRQVDQGUHVWULFWLRQVPD\DSSO\6HH\RXUVHUYLFHSURYLGHUIRUDGGLWLRQDO LQIRUPDWLRQ%DWWHU\6WDQGE\DQG7DON7LPH 6WDQGE\DQGWDONWLPHVZLOOYDU\GHSHQGLQJRQSKRQHXVDJHSDWWHUQVDQGFRQGLWLRQV %DWWHU\SRZHUFRQVXPSWLRQGHSHQGVRQIDFWRUVVXFKDVQHWZRUNFRQILJXUDWLRQVLJQDO VWUHQJWKRSHUDWLQJWHPSHUDWXUHIHDWXUHVVHOHFWHGIUHTXHQF\RIFDOOVDQGYRLFH GDWDDQGRWKHUDSSOLFDWLRQXVDJHSDWWHUQV ](https://usermanual.wiki/Samsung-Electronics-Co/SMA730F/User-Guide-3633985-Page-205.png)
![DOORZ\RXWRHQMR\WKLVSURGXFWIRUPDQ\\HDUVz.HHSWKHSKRQHDQGDOOLWVSDUWVDQGDFFHVVRULHVRXWRIWKHUHDFKRIVPDOOFKLOGUHQz.HHSWKHSKRQHGU\3UHFLSLWDWLRQKXPLGLW\DQGOLTXLGVFRQWDLQPLQHUDOVWKDWZLOOFRUURGHHOHFWURQLFFLUFXLWVz'RQRWXVHWKHSKRQHZLWKDZHWKDQG'RLQJVRPD\FDXVHDQHOHFWULFVKRFNWR\RXRUGDPDJHWRWKHSKRQHz'RQRWXVHRUVWRUHWKHSKRQHLQGXVW\GLUW\DUHDVDVLWVPRYLQJSDUWVPD\EHGDPDJHGz'RQRWVWRUHWKHSKRQHLQKRWDUHDV+LJKWHPSHUDWXUHVFDQVKRUWHQWKHOLIHRIHOHFWURQLFGHYLFHVGDPDJHEDWWHULHVDQGZDUSRUPHOWFHUWDLQSODVWLFVz'RQRWVWRUHWKHSKRQHLQFROGDUHDV:KHQWKHSKRQHZDUPVXSWRLWVQRUPDORSHUDWLQJWHPSHUDWXUHPRLVWXUHFDQIRUPLQVLGHWKHSKRQHZKLFKPD\GDPDJHWKHSKRQHVHOHFWURQLFFLUFXLWERDUGVz'RQRWGURSNQRFNRUVKDNHWKHSKRQH5RXJKKDQGOLQJFDQEUHDNLQWHUQDOFLUFXLWERDUGVz'RQRWXVHKDUVKFKHPLFDOVFOHDQLQJVROYHQWVRUVWURQJGHWHUJHQWVWRFOHDQWKHSKRQH:LSHLWZLWKDVRIWFORWKVOLJKWO\GDPSHQHGLQDPLOGVRDSDQGZDWHUVROXWLRQz'RQRWSDLQWWKHSKRQH3DLQWFDQFORJWKHGHYLFHVPRYLQJSDUWVDQGSUHYHQWSURSHURSHUDWLRQz'RQRWSXWWKHSKRQHLQRURQKHDWLQJGHYLFHVVXFKDVDPLFURZDYHRYHQDVWRYHRUDUDGLDWRU7KHSKRQHPD\H[SORGHZKHQRYHUKHDWHGz:KHQWKHSKRQHRUEDWWHU\JHWVZHWWKHODEHOLQGLFDWLQJZDWHUGDPDJHLQVLGHWKHSKRQHFKDQJHVFRORU,QWKLVFDVHSKRQHUHSDLUVDUHQRORQJHUJXDUDQWHHGE\WKHPDQXIDFWXUHUVZDUUDQW\HYHQLIWKHZDUUDQW\IRU\RXUSKRQHKDVQRWH[SLUHGz,I\RXUSKRQHKDVDIODVKRUOLJKWGRQRWXVHLWWRRFORVHWRWKHH\HVRISHRSOHRUDQLPDOV7KLVPD\FDXVHGDPDJHWRWKHLUH\HVz8VHRQO\WKHVXSSOLHGRUDQDSSURYHGUHSODFHPHQWDQWHQQD8QDXWKRUL]HGDQWHQQDVRUPRGLILHGDFFHVVRULHVPD\GDPDJHWKHSKRQHDQGYLRODWHUHJXODWLRQVJRYHUQLQJUDGLRGHYLFHVz,IWKHSKRQHEDWWHU\FKDUJHURUDQ\DFFHVVRU\LVQRWZRUNLQJSURSHUO\WDNHLWWR\RXUQHDUHVWTXDOLILHGVHUYLFHIDFLOLW\7KHSHUVRQQHOWKHUHZLOODVVLVW\RXDQGLIQHFHVVDU\DUUDQJHIRUVHUYLFH&RUUHFWGLVSRVDORIWKLVSURGXFW:DVWH(OHFWULFDO(OHFWURQLF(TXLSPHQW$SSOLFDEOHLQWKH(XURSHDQ8QLRQDQGRWKHU(XURSHDQFRXQWULHVZLWKVHSDUDWHFROOHFWLRQV\VWHPV7KLVPDUNLQJVKRZQRQWKHSURGXFWRULWVOLWHUDWXUHLQGLFDWHVWKDWLWVKRXOGQRWEH](https://usermanual.wiki/Samsung-Electronics-Co/SMA730F/User-Guide-3633985-Page-206.png)